Transcripts
1. Welcome to Wilderness Survival and Awareness: Hi, my name is Jeremy white and this has wilderness survival and awareness. Want to thank you for checking this course out. This course is designed to show you some key things and how to survive and wilderness environments. And using your mind, your knowledge, and your skill set to accomplish your goal of survival. If you are a beginner, this is a great course to start off with. If you already have some experience in wilderness survival. There are some great things in here that can to help you along the way. Some key things that you will learn in this course are the rule of three. Involving minutes without air, three days without water, three weeks without food, and there's some modifications to it as well. We'll go over that, how to secure those? How do you find drinkable water? For example, if you're on a desert island surrounded by salt water, drinkable water, how do you find water? So things like that, as well as how to make a fire in various scenarios using various materials, and also how to make traps. Some first aid course. Also we'll go over navigation and how to use a map and compass using your surroundings to navigate and much more. This course is taught by pictures, slides, video demonstrations. You'll see myself talking and some of them as well. You might be wondering what this is here and this going on. Really brief. I came down with heart failure a few years ago and I'm waiting for a heart transplant. And I've been really busy on the Goldman whole life. I'm very involved in search and rescue and with the sheriff's department working with them and a lot of outdoors backpacking and things of that nature. And I got hit with heart failure. And I'm grateful to be alive still on when he for a heart transplant. But until that comes, I've decided to put what I know and I've experienced in my life into this course for others. And I do enjoy love, love teaching it. And all the proceeds from these really, really helped me sell. Want to thank you for checking this course out and hopefully you enjoy it. By the end of this course, you will be ready to survive a wilderness survival the scenario. Go through all the materials, go over, go over them again. If you have to sum, if I go to quick on some things but free to rewind the first kickback or pause the slides are free to leave me a comment or review. I will get back to you on any comments. Just let me know and I look forward to you joining my course. Thanks.
2. Intro for me after my stroke:heart tranplant: Hi, I'm Jamie. Wait, I like outdoor service or rebel skills. And I teach that survival skills in school. Also online to this the bills. And I shall I share my experience with you. The Zemin. Now, I can't speak, but I've got a stroke to naff years ago but also have a heart transplant to but I'm I'm so live and i'm I'm I'm still a backpacking now and use HE me. See me speaking in my other videos. It's me. But before my stroke. And when you take that course, you you try to grow your knowledge with outdoors skills and then teach you every, every thing I know. And Cadmus and final water, shelter and and all of the gear for the class. I started in college and I retired with a backpack. And how you moose. And that's it. So pretty easy, but I'll show you what you do and also other things do you buy? Okay, I'll show you in the class to find shelter, firewater, direction, food, and also show it to you. I'll show you to make traps to catch food. All right, I'll see you next class. Bye.
3. Clothing: Clothing, your first-line of defense from the elements. Put the proper clothing and gear. One can be out in cold temperatures and become trouble and survive for long periods of time. As a rule, you should always have one layer more uploading than you think you'll need for your trip. Also, when you're about to start your hike, dress cool because when you start hiking, you heat up quickly. Remember to have appropriate clothing whenever venturing outdoors. It does not need to be freezing temperatures to become hyperthermic. Most cases happened in tempts over 40 degrees Fahrenheit. Materials. There are a variety of materials used for clothing. However, if given the choice, choose clothing that has features such as waterproof, breathable, insulates, durable, and as comfortable. Of course. Three main types of materials used are will synthetic, nylon. These, even when wet, can insulate better than cotton off for these materials. The saying goes cotton kills. This refers to the fact that when cotton gets wet, it ceases to insulate your body that keep you warm and thus can cause hypothermia and even death. Layering. By layering your clothing, you to utilize the best features of each piece. This method is most effective for providing warmth and protection for wind, rain and snow melt the different layers and their purpose in this picture. See the picture. The base layer consists of thin, light and comfortable materials against your skin that preferably a wicks away sweat and moisture. The mid layer provide mainly insulation and protection for wind. The outer layers are waterproof, protecting against spring and snow. Waterproof breathable gear, usually stated on the tag of a garment. If it is waterproof and breathable, cortex and event are a couple of popular brands. This material is able to hold in heat and repel water while allowing your body to breathe. If you sweat. Head cover, approximately 40 percent of heat is lost to the head. So isn't very important to keep your head covered when cold. A beanie or even a hood can prevent valuable heat from escaping.
4. Could you Survive? Rev 2: To make it out of a survival situation. By the end of this course, you can. Wilderness survival and awareness. This class will teach many topics require building shelters, surviving animal attacks and much more. This gives you a layer will help you in the wilderness, but also in urban settings. The skills taught here will help you survive various situations and encourage you and ingenuity to achieve your objectives. Survival and awareness skills taught in this class will allow students to be better prepared for difficult situations. Utilize and tools around them, and never give up on their goals. As well as appreciate the beauty of the outdoors. Survival. But what do you do in this particular survival situation, such as well out on the back roads in the country. Your vehicle race down here miles from the nearest town. Does anyone know to come look for you? Can you survive long enough to be rescued and or make it out yourself? This course will prepare you to answer these questions. Also, we'll look at why do some people survive and others die in S arrival scenario. Often answer boils down to survivors have the will to survive. Basic survival rules to live by awareness. Be observant and aware of yourself, your surroundings, and others. What does your situation? What are your strengths and weaknesses? What is your environment? What are others? Strengths is this is applicable not only to wilderness, but also urban work and home settings. Your most powerful survival tool is here. Mind. Remain calm and use your mind to be creative. Make decisions, the resourceful, and to help you survive and get out alive. Always maintain situational awareness to what is around you and available to you. Okay? Moving on. If you're in a survival situation is important to remember this general rule. That rule up. Basically a person who got Kingo if needed, three minutes without air, three hours without shelter, three days without water, and three weeks without food. This helps you determine what things are a priority and what are not. Next, we look at the five Cs. And other means to help you prioritize your tasks to survive are the five C's of survival. First, a cutting tool, such as a pocket knife. Heavy mad can be extremely helpful in surviving is allowable scenario. Combustion. A lighter matches or something else that can get a spark. Accorded, such as the 550 pericardium. This is a good option. Quarters can be used to create shelters, signaling devices, clothes, etc. Next is a container such as a metal pot for boiling water. This is a necessity since boiling water purifies it and then you'd bacteria so you can drink it and cover such as clothing and or a tarp for shelter. Okay. Let's look and see if you could survive this scenario. One, do you and one of your friends are driving the logging roads in the wilderness during early October. When suddenly your vehicle dies. You are a good 20 miles from the nearest town and daytime temperatures and the fifties, no snow yet. However, nighttime temperatures get as low as 30 degrees. Items you have with you are the following. For granola bars, the lighter, one, blanket and bottled water newspaper, bungee cord knife, 20 by 20 tarp area map, compass to chocolate bars, small acts, 50 Peter Rowe, metal pot, first aid kit to garbage bags, flashlight, sunglasses, bug spray, batteries, ball of steel, wool, and gloves. If you can only select ten things here, select the top 10 things you would take for your quotes level kid, if you had to leave your location and find help, you may want to pause this video and write down what items you think through it. Great. Okay, the ten essentials. Ten essentials are what survival atoms are best survival scenario if you're going to bring or have things in a survival situation. Note these 10, the essentials. See the list on the right. Here shows one, navigation, some protection, insulation. It has extra clothing, illumination, parts of a flashlight, and you have that first aid supplies. Fire, such as matches, our starter, flint and steel, et cetera. A repair kit and tools including a knife. Nutrition excerpt, good hydration, extra water or means to get extra water, and even emergency shelter. Also some form of cover. How did the items you select it in the survival of scenario compared to the 10 essentials. Did your items meet ten essentials? Did you cover the five C's of survival? Do you think you could survive in the woods for a few days or more until you are rescued. If you had trouble on the scenario, don't worry. Your skills and knowledge will increase through this course. And by the end, you will feel confident in yourself to survive. If variety of survival situations have fun.
5. Fire Building: The Art of fire building. First, we'll look at the location of your fire is important to make sure you pick a good location for your fire. Building, fire it close enough to your shelter, but not too close that he could catch your shelter on fire. If building a signifier, make sure it is in an open area with lots of visibility. If in a windy environment, to see a place with shelter from the wind or create a barrier such as rocks or sticks. If an area is very dry, make sure to protect against sparks, sketch nearby wood on fire. You can do this by surrounding your fire with rocks, as well as clearing the area around your fire of any flammable materials. Fire building. After selecting the area to build your fire, make you barriers such as rocks around it to prevent it from spreading from unwanted areas. Like we discussed in the previous slide. Materials for building your fire are categorized in three basic forms. The first being Tinder. Tinder is very small, fine fibers that catch fire very easily from a spark or flame. Next we have kindling. Kindling is a little bit bigger than tinder, such as small sticks. It catches fire very easily. But because it is small, r does not burn for a long period of time. Final piece fuel fuel our larger logs or piece of wood that are designed to burn for a long period of time. Now let's look at some examples are the three main types of materials used to build a fire. We'll start off with tinder, dry Ireland by wood shavings, cotton balls that are soaked in Vaseline, dry leaves, pine needles, et cetera. I'll poems a great Tinder. Kindling, Small sticks for twigs, small to medium-sized branches that burn easily. After tenders LET fuel larger logs for long burning time. Once the fires started with Tinder and kindling. There are many types of ways to build a fire. Whoever the three most common are the following. The log cabin or a pyramid where the TP and the lean to. All three have a tinder nest and the bottom with kindling around the tender than larger logs added when the fires going. Making your fire. Step 1, making nest out of the Tinder and place it in the bottom center. Step 2, add kindling around the Tinder. Smallest first and gradually larger. Step three. Add fuel logs to the fire after the fires lighted and going from Tinder. And can we see that fire building demo video for more information? Next, we have extinguishing your fire. To not pour water over fire and thickness out. Clothes on the bottom often can still remain hot and able to ignite for hours, even days later. Use the sprinkle instrument. Sprinkle water, snow, or even dirt over a smoldering fire, and stir it with a stick. Repeat process as needed. Make sure all coals are out. And finally, the signifier. If you are needing to signal rescuers a signifier, it can be quite affected. First, build a well burning fire. Once fire is burning well had green vegetation such as green leaves, green grass, or fresh pine needles. To create large amounts of smoke. Continue to add dry wood to keep the fire burning. Then add additional green vegetation. Repeat this process as needed until you are rescued.
6. Fire Building Demo: I'm Jeremy white and we're going to build a fire today. You can see I've got some of this stuff already. Here. I've kind of separated, separated my file, larger, kind of medium, smaller ones, and then start Tinder pile, some pine cone shavings. And I've got some dryer lint here too. And then also I've got some of these would cure in your brown pine needles worked really well for Tinder, tinder kindling. And then this is starting to get into some bigger stuff. And the larger logs are referred to them as fuel log's doesn't keep the fire going for awhile. So start off, I'm going to make my fire on this piece of bark. You don't have to, but I just had it. So we're going to make a pyramid style and log cabin style of fire. And I make the outside frame of it with the larger pieces here. And it's going to break this one actually make the outside frame of it with some larger ones actually in salary. And this will kind of hold a frame around it. And then I'll put this in here. So I can, I'm going to light it from underneath here. I'm going to this on top. It's good to begin. Make like a little nest. Say you got a bunch of dried grass or these kind of pine needles, make like a little nest of them. And then you put that in here with the dip of the nest facing this way and you can put your light right into it, works really well. So I've got a kind of a basic frame gone. And then I'm going to take actually a few more of these. Put it in here, is for Ireland should catch pretty well. So make sure they've got enough room to breathe in there. And I'm going to take these little ones are going to go on top. So as Tinder in their Burns, who catch these little ones on top going. And keep video. Right? Is a triangle really small and try and build them bigger and bigger. And I'm teaching a class on survival. I'll tell my students that. Yet one match. When you have your one match, you light it really close to where you're going to put it, plant it and go right in there and just hold it. And they're usually able to get it started just with the one match. I'm using a ladder today. And I'll see you on it. Certainly kitchen stuff on top. As it goes. Just keep adding some more little stuff. Do it is to keep repeating it until it really gets going and you don't want to smother those. So make sure you have plenty of airspace. And in-between pieces of Tinder. Certain go a little bit bigger here. There we go. And so as I start to go and you start to burn more, you can add some larger ones, larger ones. As you can see, it's not too hard.
7. Demo: All right, so we got our gum wrapper here. And there we're going to go on each end of this battery, the ends will get pretty hot. And you're going to have your Byron's Burke there. So you want to be pretty close to your tinder bundle. And I've got some trial interior that hopefully it will work well. And there we go. There we go. And there we go. And sometimes in the middle, the middle sexual actually burn and come apart. However, you can still get your fire going and behold the two ends on here. And then take the tin foil and touch two ends together. Like that. A lot of times you can still make a spark and fire that way. And that's how you make a fire using a battery and gum wrapper.
8. Knots to know Rev 2: Knots to know is important to know some basic nods and they can prove useful not only survival situations, but everyday uses. A very common type of rope quarters use is a 550 bear record. The top picture, it consists of several types of cordage spun together to give it strength. However, each thread can be unwound to reach a longer or thinner line. This can be used to the fishing line or a shoe lace. But remember, cordage can also be made out of a number of materials. Shoe laces, strips of fabric, vines, grass leaves, even animal parts, such as skin and tendons. Here we will cover some of the basic and most useful knots to know. The overhand knot. Basic not encourage very simple. Bolen, a knot or loop that will not slip and it's fairly easy to undo the halfedge. Easy way to secure an end of the line. It's also self tightening. Figure eight, a larger, not encourage, useful FOR loop at the end of the line. The square not commonly used to Type two ends together. Let's look at some uses. You'll see the overhand knot, simple, basic, not figure-eight or double figure eight. In this picture, it's commonly used at backpacking and other types of scenarios. The halfedge a useful not for tying around a pole or branch. The square not again, used to tie two ends of a rope together. And then we look at the Bolen bottom right here, they're using it, your tire around a post. Make sure to check out the video demonstrations following this lecture on how to tie these knots. And remember, practice makes perfect.
9. Knots 1: All right, so today we're going to go over some knots. And the first one we're gonna do is a Bolen. Bolen is a common not used in many scenarios. And so what you wanna do, I'm using this stroke, the larger one because it should be easier to see. You want to do is give yourself enough room. And you want to, there's an analogy, say make a hole. Okay? And this part up here is the tree. And this is then rabbit down into this hole. So either way it or convert to remember this rabbit comes up whose whole around the tree. And then back down as whole. When you get to here, you don't want to grab both of these and grab this and type like that. It should look like this, isn't quite super tight. And then this is the loop right here. And by making this not, this is, this will not come apart. And it's also fairly easy to undo the need to reshoring and do homework time here. This one can confuse a lot of people. Will go and make a loop and over. And then we'll take this part. And remember, this part is your loop you're trying to make. So a lot of people make the mistake of going up here around and then just pull it all the way through. And that's not actually what you wanna do. You wanna make this slew, give yourself enough room up to the hole around the back of the tree and back down the hole. When you're in here, you've got these two kind of this just like that. And there you go. And then it's fairly easy to undo and do it like that. Okay, so the next one we're going to do is a square naught. Square knot is a great app for tion two ends together. Let's now be at the ends. Easy way is right over left, my right, your left, like this. Like that. Then you get these and then left over. Right? So I'm going to go like this, all these together like that. And that's it right there. Plus it's pretty easy. So over one, you can go the opposite way. Only other good, easy way to tie it to you in here. And then a very basic if you just need a knot in the middle of rope for grip or whenever, is just the overhead. Not anyone can do this or don't even know. It was called the overhand, not slight that beat that one. That's a very easy, simple one. Stephen, and not the middle of the row for a nod towards the end just to tie it off. That's just a very simple, easy one.
10. Navigation Rev 2: Navigation using a map, compass and your surroundings. Here we'll go over some basic navigation skills to help you find your bearings. Some may ask, why do I have to note north, east, south and west, isn't it? Because if you can find Norse and you can find the direction you need to go. Learning to navigate without your smartphone may seem daunting, however, you will find it easier than you might think. There are many ways to navigate. We will review some intersection compass. Most common way to find northeast, west by using a compass. Compass use with a map and provide detailed information on your direction to go. Begin with orienting your compass. See that video following this presentation on how to do this. Maps. Maps give you a layout of the land. And whenever heading out into the woods, make sure to bring one of the area. Maps provide a detailed picture of your area and some, such as topo maps, provide information on terrain and elevations. See demonstration of a yield following is permutation or how to use maps. Other forms of navigating, improvising, and using your surroundings. Find your direction. If you do not have a compass to find North. And here are some other ways you can use this Stars. Find the Big Dipper is pretty easy to spot and follow the end of the cup up to the North Star or handle it the little deeper. The North Star is the only star that never moves in the sky. Tree mus in the Northern Hemisphere, the majority of moss growing on tree bark, we'll be on the northern side of the trees. If in the Southern Hemisphere, MOSFET generally grow on the southern side of the trees. Sunset and sunrise. And easy way to navigate is simply remembering the sun rises in the east and sets in the West. Although it may not be an exact heading, it will give you a general direction of where you're going. Magnetizing a needle, using a needle or paperclip, rubbing magnet against one end of it. And then place it on a leaf floating in still water and magnetize end. It will point to NORC, a watch. For the Northern Hemisphere. Using an analog watch, point, the hour hand to the sun. And the halfway distance between the hour hand and 12 are Fock is the north south line. And halfway mark point south. For the Southern Hemisphere. Point to 12 o'clock number to the sun. And the halfway distance between the 12 o'clock and the hour hand is a north-south line. In the Southern Hemisphere. The halfway mark points north. For best results, use this method at mid day when the sun is at its highest point. The shadow stick. This method is fairly simple. First-place is stick upright in the dirt. Mark the end of the shadow with a rock. Wait, 15 or 30 minutes. And then again mark the end of the shadow. The first mark points west and the second mark points east. From here you can figure out the north-south line. The moon. The moon rise in the east and sets in the West, just like the sun. Shadows tick method can be used with the Moon. Same as what the set. If there's a crescent moon, make a line for each point and the crescent moon down to the horizon, where the line meets the horizon is pointing in the southern direction. See the button picture. Conclusion. The key and navigation is to find the correct direction, northeast, southwest. Once you find that, you can then determine which direction to head for the nearest source of rescue.
11. Situational Awareness Rev 2: Situational awareness. Knowing what's going on around you. Situational awareness is about identifying and processing the elements of your surroundings and ultimately being able to utilize elements of your surroundings to meet your objective. Often, those who do not possess situational awareness are the first ones to die in a survival situation. Popular movie is display this trait. Like in the movies of JSON born. He is always analyzing his surroundings. His mission objectives. Situational awareness allows you to respond faster and appropriately to a given event. Being aware will aid you in many situations. Survival. Buyer, that accidents, et cetera. Situational awareness can help prevent you from being in a emergency situation as well. An example would be, if you're in a restaurant, it is a good practice to know the exits. In case of a fire, for example. And do not hang your purse on the back of your chair where it can be easily taken. Tips to developing good situational learns for yourself in the mind of your wrestlers or your enemy and ask, what would they do? Then respond accordingly. Notice any irregularities. Such had one-person moving quickly amongst the slow moving crowd. He polarized moving and observing. They'll lay your eyes, they glued to your phone. Be aware of what's going on around you. Notice escape routes and other safety gear when entering a building which has a firing distinguisher, flashlight, et cetera. If hiking in the woods, always watch very good shelter for the night just in case. Okay. And next, watch your six. Make sure to look behind you every so often. But are hiking in the woods or walking down the street, if I can, is important at times you look behind you and see what the course looks like for when you return to your vehicle. They're walking on the street, but behind you every so often. So you can make yourself aware of any shady characters that may sneak up on you. Keep a bubble of free space between you and other people. There's less the chance of death. And this also allows you to assess others around you. Stand tall, walked competence. This is a preventative measure toward off would-be attackers. Sit with your back to the wall. Therefore, you can see the rest of the room with nothing behind you. Take note of the items and tools around you and determine how they can help you achieve your goal. To supplies to wilderness survival and accomplish really, really any other goal for you.
12. Survival Kit Rev 2: How to make your own survival tickets. The essentials of survival. Ten essentials. When it comes to things you need to survive. There are what's called the quote, ten essentials. These items are recommended by experts that are key in a survival situation. First, let's review the list. On the left. You'll see ten essential items in a systems approach. And the classic approach. Certain left. Navigation, mapping, compass, some protection, sunglasses, sunscreen, insolation, extra clothing, illumination, headlamp or fleshly. First aid supplies. Fire, such as a fire starter matches. Repair kit. Tools including a knife. Knife being the most important. Nutrition, will be extra food, hydration, extra water, and an emergency shelter. Some items are obvious over others may bring up questions. So that's why they're here and needed. A common question. Is that why is some protection on the list? When hiking, you're exposed to the sun, especially hiking a high elevation and around snow. The sun can be most intense because serious sunburn, even snow blindness. I myself, I key in a mountain an elevation of over 10000 feet. There is enlarge amounts of snow. I felt bernie on my face and at the end of the day, I woke up the next morning not able to see. I got so blackness. He was not very fun. Okay, when choosing a survival kit, you can make sure to have your own. Or you can buy a pre-made kit. They might have items could vary over. Make sure to include the ten essentials of survival in your survival kit. As even the picture on the right. Once or allocate is very compact, such as an output can, and the other is larger with more items. Here are some examples of different types of survival kits. For some things like water filters and extra clothes from group ten essentials and not fit in your quote survival kit. However, things like water purification tablets and emergency blanket may work depending on the size of your survival kit. Additional items. Besides the ten essentials. Here's some items you may want to include in your saliva kits and are bringing with you and your next trip. Efficient line, hook, duck tape. I 50 Paris Accord, plastic tubing, Tinder, something that easily burns the candle. Iodine or water purification tablets. Classic poncho or garbage big snare wire. Chocolate bar, which provides quick energy. A tarp for emergency shelter. Team fills needed sewing kit, tin foil, double a batteries for AAA, wherever your flashlight has, a whistle. And $20. Other uses. Survival kits are enough only for your back that key measures that can be very useful, vehicle, boat, plane, or other mutagenic rotation. Depending on your situation, you can tailor your survival kit to meet your needs. The basic idea of a certificate is to have a select number of items available to make it a survival situation. If you are caught at 1.5 of making your survival kit. And always remember to be creative. Think about where you might need something.
13. Survival Shelters: Shelters, your protection from the elements. How do you shelters help you? Referring to the rule of threes, it is set you can go three hours without shelter. This basically means that shelter is a priority to survival. The main purpose of a shelter is to quote, shelter you from exposure to the elements of Mother Nature. Shelters provide protective of wind, rain, snow, the cold, and some types keep you off the ground. Also shelters provided barrier protection for myelin. Types of shelters. Shelter can be made from a variety of things. Look at the type of shelters here and what is used to make them. First, we have natural shelters to be a natural rock formation or tree of some sort. There's a jungle shelter and dispersion. We see it's lifted off the ground. The lead to shelter, very common serverless shelter used by many people. The snow shelter and the brush out there, which is a basic frame along with brush pile onto to add insulation. Alright, so get the lean-to shelter somewhere. Shelters, the most common survival shelter is a lean-to shelter. They are fairly easy to build and can be set up in a timely manner. To build a lean-to. First is larger logs, sticks to build the frame, then fill it in with smaller sticks and leaves, everything branches and brush to the walls and floor for bedding and insulation from the cold. Or you can use a tarp for a quick thing to shelter. Snow gave shelter. In winter environments, the best option for shelter, maybe a snow cave sign is no gave shelter is an area dug out and amount of smell for value shelter from the weather and elements. Keep in mind your area and possible Schumpeter location under a tree around rocks, et cetera. See that tree pit shelter on the right. Use your location to your advantage. When making your snow shelter, Be sure to note the amount of snow on top and do not let it collapse. Ventilation holes may be made by poking sticks through the snow. Now, move on to the brush up the brush out there. And, and uses the surrounding brush to provide insulation and protection from the elements. To make a brush shelter. Construct a basic frame was sticks, which has a lean to design. Fill in any large holes in the walls with additional sticks, then gather large amounts of brush, can be leaves, pine needles, et cetera, and place them on top. Also add brush to the insight for betting. Either some common shelters used in a survival situation. But be sure to check out other survival ideas. Remember to always use your surroundings.
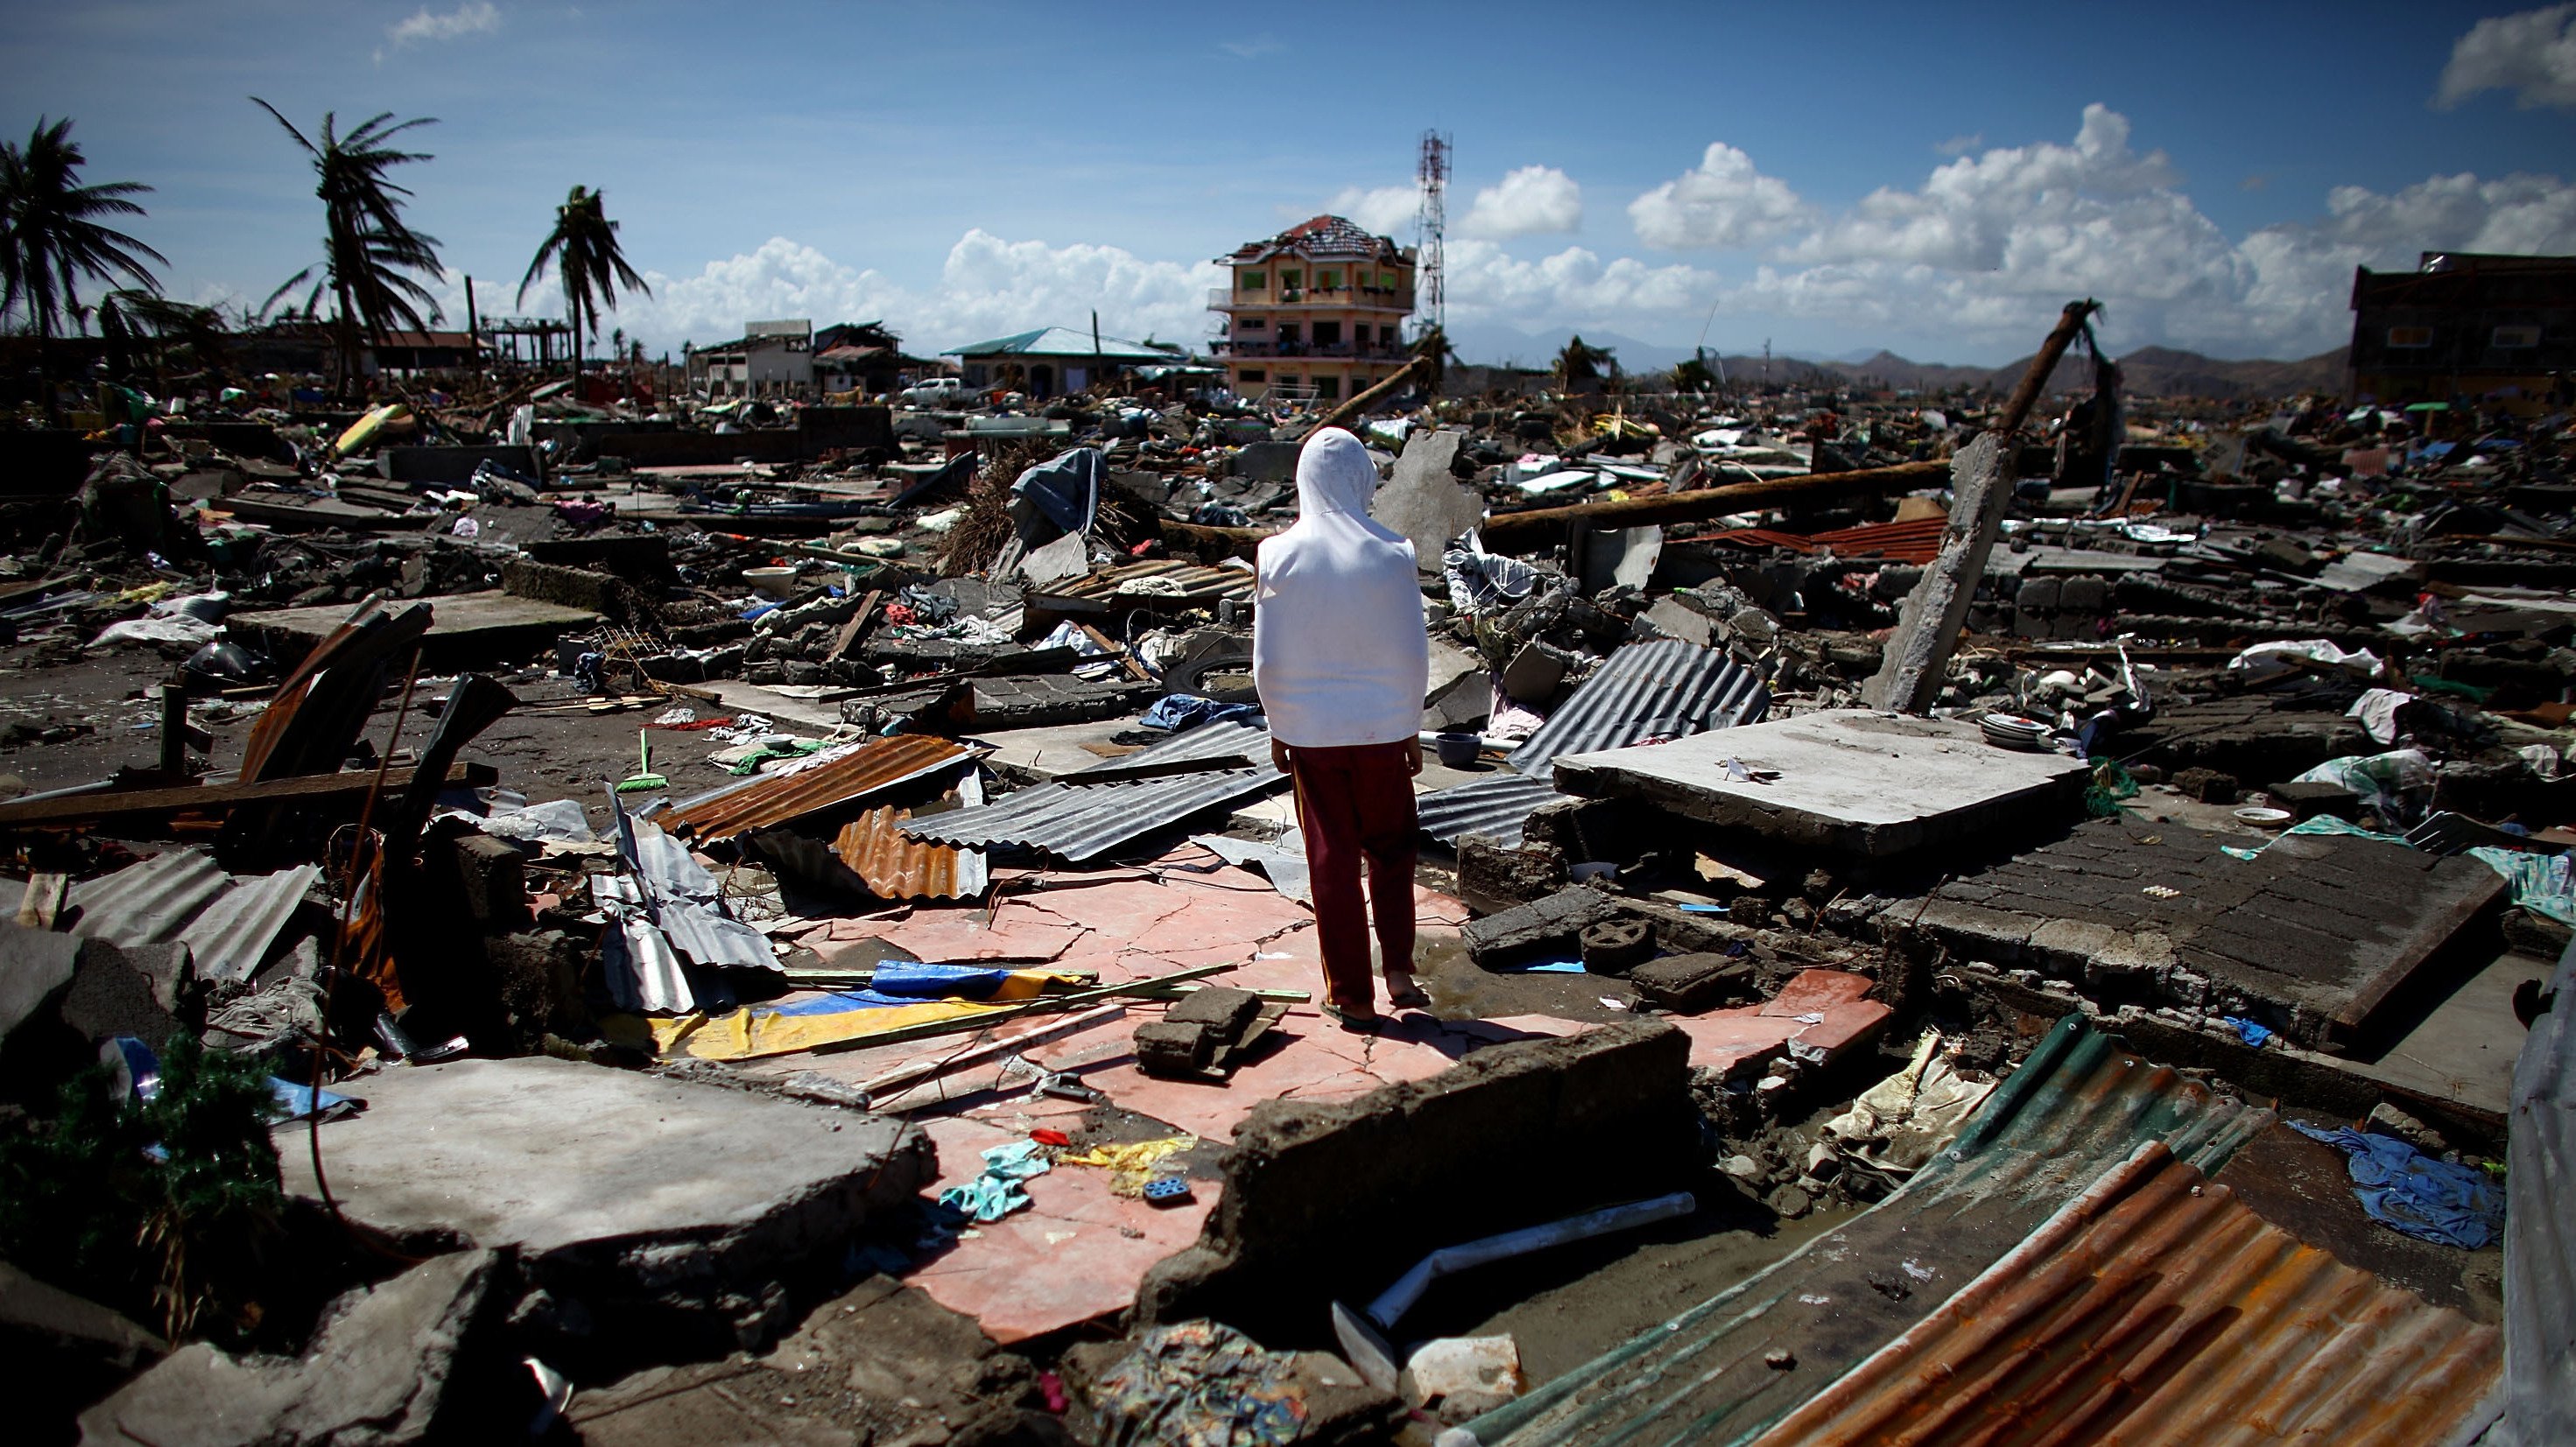
14. Surviving a Natural Disaster: Surviving a natural disaster is about being prepared and knowing the proper way to respond to the given disaster. Natural disasters. There are many types of disasters that can happen out of nowhere. Disaster scenarios such as earthquakes, floods, storms, power outages, fires, droughts, tsunamis, snow and avalanches. The following are some checklist items to help prepare and react to a disaster situation. Tips for survival. Earthquakes. Stay away from anything that could fall on you. And see cover under a table or desk. One shaking has stopped, exit the building and move away from buildings are trees that could ball and you, aftershocks often fall. Earthquakes. Determine if all members of your party or present seek emergency help. We carefully inspect to your residence for damage. Plus, if time evacuated there to turn off all electrical units in the house. Do not attempt to cross rapid movie Water and get swept away. Seek higher ground, which has hillsides, trees, roof of the house, as signal for rescue. Easy things like reflective material, radio, phone, et cetera. Storms. Stay indoors and in your shelter during historic have backup heat, such as plenty of firewood, propane heater, etc. The case electricity is knocked out. Electro water bottles, bathtubs or other containers on put water, or drinking, cooking and toilets. The other candles, matches, flashlights. Moved to basement is needed. Listen to the radio and TV for storm updates. Okay. Power outages. Have candles to flashlights accessible and ready. Have a working generator with extra fuel. Learn how to cook over a fire if you need to. Place any frozen water bottles in February here to help prolong refrigerated foods. He's a landline phone for information updates. As cell phone towers may be out of service. Break out extra blankets and use the extra clothes for war. Buyers. Get out of bed and onto the floor. Check for smoke and fire. If saved to the cover your mouth and nose with a cloth, moist if possible, and prevent smoke inhalation. If in a house, close the doors where if Irish president and go outside another door or window, caution door handles may be hot if the fires on either side. If you have caught fire, you use this method, stop, drop and roll to be extinguished, your buyer moved to a safe location and wait for rescue. Droughts. Fill and store water if drought was forecasted. Milk jugs are really handy for this. Don't let water run. If you're doing dishes, brushing your teeth, or showering, et cetera. Reuse water whenever possible. Example would be to wash vegetables in a bowl of water, then use the water for plants in your garden or flushing a toilet. If drought as extreme rationing water may be necessary. Tsunami earthquakes usually prelude tsunamis. So if by water, move to a higher ground immediately after the quake, remain a high ground up to two to four days as aftershocks are commonly present. Tune into the news and seek tsunami updates her when to safely return. If gotten the water during a tsunami, swim to something solid higher than the water. So there's a tree or building, snowstorm or avalanches. First look at the weather report. Per any snow and avalanche danger. They've gotten an avalanche. Not much one can do. So avoid avalanche areas is the main course of action. If outside, find shelter immediately, stay hydrated, and start a fire, can maintain heat. If the storm hits well in your vehicle, remain in it. The other extra blankets and close for warmed. Use each other's body heat, stay close to each other.
15. Surviving Animal Attacks: Surviving an animal attack. First, we'll look at practices to prevent an animal attack. Your chances of getting attacked by a wild animal are very small. But when they do happen is usually because people don't proper precautions to prevent them. These checklists will help you prevent an animal wanted to attack you. First, keep your campsite cleaning of extra food, garbage, toothpaste, clothes with food spill on them, et cetera. Hanging these items up in a tree away from your tend to not take food with you into your dent or keep it in your pockets. This may make a smell and thus attract animals. And the items have a scent can attract unwanted. Guess. So remove these items from your tent and sleeping areas. And most importantly, don't feed the animals. Okay, let's look at types of animals. First, bears. When dealing with bears, the most important thing to do is to not surprise that this can easily be achieved by making noise while you're in the woods. Some precautions are carry bear spray or a gun. Don't run as they will chase you. And we'll get to move slowly, backing away if you do come across one, don't make that their pill, that key is cornered. Always given some space. Attack. Hey dad, while covering your head and neck to protect them, try to remain on your stomach and tell the bear lose interest in you and moves on. Next, we'll look at cougars, mountain lions, and also other because if you are confronted by a cougar in the woods, stop, standstill and you don't run. Try and make yourself look bigger than you actually are. Don't turn your back to the animal. That is their time to pounds. If the animal is aggressive, make noisy, try and scare them off and back away slowly. If attacked, try and remain on your feet, not on the ground. And use whatever you can to fight back, such as sticks, fingers to the eyes, and night, et cetera. Now, we'll look at Moose. First. Don't approach and get lots of space to any moose and the area back away from the moose and go around him. If it is a cat and cow, Louis, be very careful and back away. If the move stops. Hair raises, years go down as a signal that has getting ready to attack. Unlike bears or cougars, it loose. We do run. They often don't chase you for very long. If charged by a moose. Define the tree and our climate tree to create a barrier between you and the moocs. If you are being attacked on the ground and curl up into a ball, protecting your head and neck. Made for the moves to leave, for getting up and out of their. Next wolves and coyotes. First, don't run. This will trigger an attack. Make noise. Yell, bang pots together. Have a firewall right? To scare them off. Stand tall and they prepare to fight that if attack. These animals often travel in packs, so prepared to ward off many is whatever items can toward them off sticks, rocks, and guns, beer, fire, etc. Try and have your bag against a wall or water to prevent any attacked from the rear. Shark attacks, although very uncommon, shark attacks to happen, first step is to don't pan. Frantic movements only attract sharks. If you see sharks approaching or certainly try and maintain a visual on them at all times. As you swim out of the water. It's shark seem to be moving through, curl up into a ball and let him pass. If a shark is not moving along to make yourself appear large. If attacked by backed by poking the shark in the eyes and guilds with your fingers. Tried to not let this chart get behind and back away slowly and out of the water. Next, alligators and crocodiles. First avoidance is best to stay out of known areas that are known to have alligators and crocodiles present. It being teased on Land, Run. Humans and outrun alligators and crocodiles on land. If attack, fight back, but anything you can poke the eyes and tell them how about an alligator or a crocodile lets go. If grabbed by a gator, try and secure it from spinning with your arm in its mouth. This quote, Death Row can tear up body parts. Also make noise and try to scare the animal law.
16. Trapping and Fishing Rev 2: Trapping and fishing skills to acquire protein-rich foods. Food for survival. In general, it is recommended that I mentioned at 1800 calories per day and women while a 100 calories per day. However, during his Serrano scenario, and if you were having to be active, like building a shelter, hiking out, etc, more calories are required. Remember the rule of 33 minutes without air, three hours without shelter, three days without water, and three weeks without food. Although food is top priority is much easier to survive for long periods of time when you can obtain your own food. And the following slides we will go over some ways to Claire food using hunting, trapping and fishing techniques. Hunting and trapping. There are many things that can be used to hunt and trap food. Most commonly in a survival scenario. Snares are used. Snares and Bob using cordage. Make a loop with a not that easily times when pulled. Then hang a loop open at a desired location, preferably on a game trail or outside a rabbit. An example, dashed the other end of the cordage to a branch, which when triggered, will spring and keep dilute tighten on the animal. There are many types of trigger systems out there. Let's check out a few common ones. Figure for a popular career method. This takes a little time to make this very effective in triggering a variety of snares and treppe methods. First notice these pictures showing how to make the figure for triggers system. Now let's look at a variety of uses for it. For carrier system. Here we see what's known as a dead fault trap. This trap is used with wood, rocks, or other heavy objects. The figure for us that up. And then when it was touched, it triggers the trap x via the bird case trap. This cage is made of using sticks and cordage and a trigger mechanism, although different in this case, operates the same as a figure for when triggered. The trap collapses and encloses the animal. Coupled to add a heavy rock or something that is quite heavy to prevent the animal from escaping. We also have the toggled trigger. This involves cordage and a small stick that is then held in place by another stick and once triggered, it will spring. Here you can see it's wrapped around a solid stake held by another stick. Also in this case, it's made for a ground smear. And heresy that loop before the snare, ready and waiting to spring. Now we'll look at how it is used in a figure four type of trap. And the bottom, you'll notice the rope are recorded as wrapped around and a little sticky. By a longer step. A little different trigger method for a bird cage trapped. And this is also a little different. Our simpler and works to save. Next we have fishing spears and hooks. Fishing spears are easy to make and can be a very effective means of catching fish for food. To make a phishing spear, first select a sapling size tree that is fairly flexible. Then sharpen the one and now split the end into four sections or prompts. Insert a small twig between each prom to keep them spaced apart. Then use cordage to tie and secure fishing with a line. And if you have line but no hook, see the picture below for hook ideas. There's different types of hooks using wood, wire, thorns, etc. Be creative. If you have larger cordage, remember you can unwind certain parts of it to make a small line for fishing. Been going spear phishing. Remember that light refracts pop of water. Therefore, object will actually be closer than it appears. So when Amy her spear, him a little lower than your target, and you should add your mark. And practice makes perfect. Now the fish trap at the edge of the water, you sticks rocks or other materials to build a encircled area with one section, a V-shape for fish to enter. See the pictures. It can be helpful to add some leaves or some type covered in the top of that trap for fish to hide it. But the trip sit for a period of time, then retrieve any fish caught in the trap. Fish basket. Fish basket is used mainly for fish, crabs, lobster, and other see dwelling creatures. Use sticks, leaves, binds cordage to make a fish basket. Build an exterior frame with medium-sized sticks, then filling in the larger holes with additional material. To the pictures from our detail. As you can see, when finished, it should appear such that as a funnel shape. Ideally, you want a smaller funnel. We've placed a top so the fish swim in through and then cannot get out. Places submerged in water for a period of time. And check the basket, retrieve any pitch and the button.
17. Universal Plant Edibility Test: The universal plant, a stability test. He used by the surrounding community, including by the United States airports at their survival schools. Okay, survival priorities. Although food is not a priority survival item. If you are faced with starvation and eating food, take note and put to memory this system of tests, a glance to see if they are editable. Selecting plants do test. First, saw it. Plants that are in abundance want to avoid plants that have been sprayed. Her herbicides or insecticides. If selecting a plant that grows in water, boil or cooked to kill off waterborne parasites, such as Giardia. Okay. Tests guidelines have been established to assist the survivor to avoid plants. They're in small portions to cause severe discomfort and extreme internal disorder and even death. The cork testing of plant makes sure that they are present in abundance. Remember, eating large portions of plant food and an empty stomach can cause diarrhea, nausea, or cramps. Example would be green apples and onions. Avoid potentially poisonous plants that are milky or discolored SAT, such as beans, bolds, or seeds inside a pod. Also bidder or soapy taste, such as soap, berries and spines, fine hairs or thorns. Jazz a stinging nettles. Also deal. Carrot. Car snips or partially foliage. Example would be water hemlock. Avoid an omen sent in woody parts and leaves. Example would be an apricot. Green heads with pink, purplish or blacks Berg. Three leave growth patterns also avoid. Now, when you have eliminated those potentially places plants. And you can perform the universal and ability tests. First, make sure to test only one part of a plant at a time. Certain parts may be edible and other parts not separate the plant and do basic components. Leaves, stems, roots, buds, and flowers. Next, smell the food per strong or acidic odor. Remember, smell alone is not indicated plan is edible and inedible. Do not eat for eight hours before starting this test. During the eight hour, to abstain from eating. Tests for contact poisoning by placing a piece of the plant part on the inside of the elbow or wrist for 15 minutes. During the test period. Take nothing by mouth except you're up by water. In the plant part you are testing. Select a small portion of a single-part and prepare it the way you plan to eat it. Before placing that prepare plant part in your mouth. Touch a small portion such as a pinch to the outer surface of your lip for burning or itching sensation. If after three minutes there's no reaction on your lips, place a plant on your top. Hold it there for 15 minutes. If there is no reaction to early chew a pinch and hold it in your mouth for 15 minutes, but do not swallow it after 15 minutes and still no reaction. And it is safe to swallow. Wait eight hours. If any ill effects occurred during this period, induce vomiting and drink a lot of water. If no ill effects occur. Eat a quarter of a cup of the same plant part, prepared the same way. Wait another eight hours. If still no effects occur. The plant part as repaired is safe to eat. Caution, however, test all parts of the plant hereditability. As some plants have both edible and inedible parks, do not assume that a part of a proved edible plant, when Cook is also edible raw, test the parts were off to ensure edible before ED rock. The same part of the plant may produce varying reactions in different individuals.
18. Water purification Rev 2: Water, heavy drinking water is a key component to surviving Israeli situation. The rule is, you can go three days without water. If Anna Serrano situation and need drinking water is important to purify it before drinking. Often bacteria will live in the water. And after drinking this water, serious side effects can occur, such as stomach aches, vomiting, weakness, and in some cases, can be fatal. Several types of water purification options to use in the backcountry. However, during a survival situation, the most common is boiling water. Boiling water, the most common way to purify drinking water and the outdoors. Boiling water for my preference, seven minutes kills any bacteria that may be harmful to a person. Either survival resources may say five minutes or ten minutes, but it depends on the type of water where you're drawing it from and what type of environment you're in. Water has particles in it. First string the water through a fabric. So it says a shirt or a sock. Then boil the water. If possible, select water that is moving from a river or stream over standing water in a lake or puddle. Ways to purify water. So what do you do if you don't have any means to boil water? Here are some ways to get and make water drinkable in a survival situation. First, we have the solar still. This is common way to make water drinkable using moisture in the air. Also, heated rocks can be used to boil water per period of time, heat rocks in a fire, and then place them into the water and allow it to boil. Pump filters are a variety of filters out there on the market today. Many can be purchased as survival or outdoor retailer locations. We also have tablets, such as iodine or other water purification tablets available at many stores. Extra moisture. Here a plastic bag is used over green branches and moisture collected on the inside of the bag is actually drinkable. Then we have ultraviolet light filters. These use the ultraviolet light to purify water of harmful bacteria. These are relatively new in the water purification market. Okay. Now let's look in detail at a few of these methods. First off, the solar still. This method uses the sun and collection of moisture to make a solar still dig out a hole in the ground, place the container and the bottom. Green vegetation and or salt water. And the bottom of the hole. Laid plastic over top with a weight in the middle. Water will condensate on the plastic and drip into the container at the bottom. This method is especially useful in a desert survival situation. Or if one is marooned on an island surrounded by salt water, which is not drinkable. Okay, so let's look at some ways now. T's vegetation trap and make drinkable water. First, you can either plastic bag over leaves to trap moisture. Pick an area that is exposed to sun. And on the inside of the bag moisture will collect. Also, collect water from leaves or using a plastic or tart when it's raining. Collect water from leaves during early morning. Do is another method. Also we have using her as a filter. First, dig a hole in the sand or at least a few feet away from the water source. Water will collect in the hole and, and as filtered by the surrounding dirt and sand. Alright, now let's look at some water-filter options. There are a variety of types of water filters available, mainly designed for backpacking. However, obviously useful and it's around the situation. Take a look at the pictures below. If interested in purchasing one, speak with the customer service rep at your local outdoor sporting goods store. All right, Now let's look at tablets and iodine. There are many types of water purification tablets available for use. And make sure to follow the manufacturer's instructions for use. To purify water with iodine. Use a table on the right. Make sure to use 2% tincture of iodine. You'll note on the left of the graphic, household iodine, five drops to one clear coat of water, or 10 drops to one quart of cloudy or murky water. But this water stamp that 30 minutes before a consumption.
 Jeremy White