Transcripts
1. Welcome - Checking your Website Speed: Hey guys, Welcome
to this section, to this model and
happy to see you here. Here we will talk about
how you can speed up your website with simple tools, without programming, without changing anything
on your website, just with two specific tools
that I will share with you. We will do at a real life tests. We will get my website.com
and we will test the speed of the website right now
before we implement the tools, We will go ahead together. Uri will implement the tools and we will see the results
if it's improved. This is not why and how you
can achieve the same results. You may be asking, Okay, Diego, that's cool, but why
we need to do that? What is this really necessary? If we are talking about SEO and if we want to rank your website higher on Google and any
other search engine platform, we need to make sure you, one of the main ingredients that they look at is the
speed of your website. So if your website is fast, if the loading speed is fast, the Google and assert engines, they will see that as a potential ranking
increase factors. So they will see that
your website is fast, the performance is good
on mobile and desktop, your website will
start ranking higher. Also, forgetting about
Google will talk about boil, think about your clients, the people that go
to your website, people that your
client, your fans, your followers, they go to your website if they didn't
have a good experience. If the website doesn't load
fast with good-quality, They usually you will
lose some visitors. That's normal. People don't want to wait
today for the website too low. If he's taken a few seconds, you already lost that client. We will go ahead right now, test the speed of the website. I hope you do this right
now with your website too, and we will start implementing
these in the next video in this section here guys
is a technical session. You will see me
going to a computer, you know about applying these
strategies are installing plugins and you can
do exactly the same. I'll show you step-by-step
what you need to do exactly. Here we are in Google. The first step is to test
the speed of your website. How do we do that? We come to Google
and we search for website speed test, for example. Here we are website
speed, speed test. And I recommend
to use two tools. You can use more if you want, but these are the main
ones that I like. The first one is tools
dot pin down.com. This one is one of the most
popular one for speed test, and I already have it
open here for you. We will do the test
here together. The next one is from Google. So if you, let's see if
we can find it here. Let's see if this one works. This is not actually the one. You can go right
now to page speed dot web dot depth,
or even better, you can come back to Google
and you can just search for google developer
speed tests. See Google Developers
speed test, and this is the one
that we want to use. So basically, how do we test? We come here and we
enter here your website. Let me enter my website here. You click on Analyze. Google will start
analyzing your website for two specific platforms,
mobile and desktop. It will test the speed
of your website, the performance for people
that are connecting, that are using your website
through a mobile device. And also for people that are using on the computer,
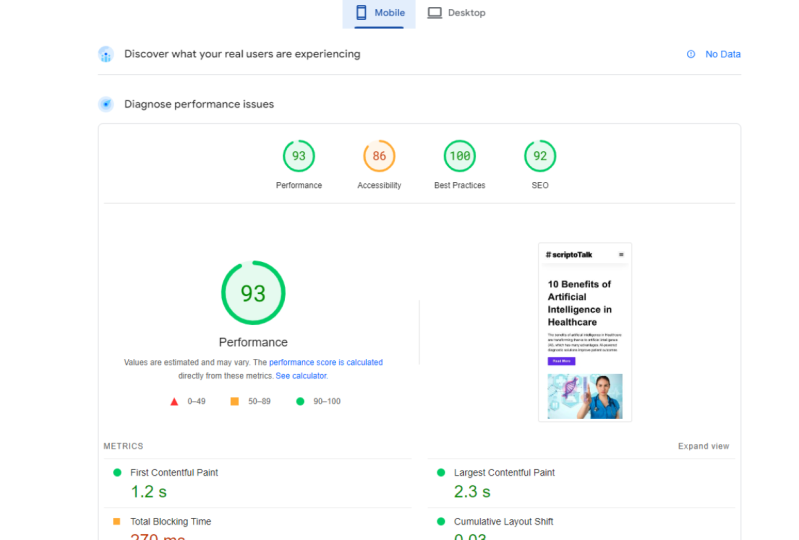
on the desktop. Let's go to the desktop. Let's see. Here we have some results. And the one that I want to check right now is the performance. So I scroll down to
the performance. I see here we have
the website URL. We have the performance
of my website, which is not great as you see, it's 81 is the number
that they give me. You see we have here from 0
to 49, the next category. Then the next step
is from 50 to 89. And the top one which
is the recommended, the green one is 90 to 100. So the goal that we have
here in this section, I'm not sure if we will
accomplish this with this website is to
get to a green light, 90 to a 100. This is what we have
on Google also, we have other information. You see the matrix here, we see the view of the TreeMap, the website loading over time. You see the images showing up here and some suggestions from Google opportunities about how to improve this qualification. This number to 90 to a
100, which is the goal. Let's go to the next one. Let's use pink Dong
website test, speed test. Let's go to diego.com. You can choose here where, where you will perform
the test from. So in this case, I'll
pick here Washington DC. You can choose any
servers you can choose. You can test on
different servers. Servers is if you want, I just click on Analyze and you see that
it's analyzing here. There is running the
tests, we're almost done. This usually takes
a few seconds, sometimes up to one
or two minutes, depending on your website. And we see the results coming
on the screen right now. See, look at that. Here we are. We see the website image here. On this website. In this tool, we have the
performance grade of 73. On Google tool we have 81, which is a little bit
better in this one is still the yellow, sorry, the orange
one which is C, It's not good enough, is 73. You see the page size
is 2.1.1 megabytes. The low time, the
time that takes your website to low
completely is 4.3 seconds, which is a lot. I mean, if people
go to my website, they wait four seconds to see what's going on.
That's a lot, right? So we need to optimize this. You have several
ways to optimize. One way is to hire a developer, pay them thousands of dollars, and hope that they will figure
it out how to optimize. Or you can just use the tools
that we recommend in here. And you will have it right away. And of course, if you
have time and money, you can do both, which will
be the ideal scenario. This is the speed that we have
right now, 7381 on Google. Right now in the next video, we are going and we'll, we'll start working with
the first tool that we have here on this
system. See you there.
2. Installing NitroPack on your Website: The first tool we're
going to start on your website is called
a nitrile pack. Here is the link you
can use to go to their website and
create a free account. Here we are on their website. This is a service
that we can see and you can start with
the service for free. You can test it and see
how your website performs. If we go to the pricing area, you see all the
prices. They have. These prices changes frequently, but they have a free
plan that you can use on one website, up to 5 thousand pageviews, and up to one gig of bad. If you don't have huge
traffic every day, every month, your
website, you can always leave with a free option, but it's recommended to upgrade because when
we're upgrading, that means that we're having more and more visitors
and your website, your business is growing, which is what we want here. So before we sign, I recommend to come
here and do a test. Before you go and install these, do a test on your website. We are doing this same
test on the old Avila.com. I come here and you see the
button which is saying here, test my website
with nitrile pack. With this, I will
enter my website here. Nitroprusside, we'll
do a simulation of how this my website will
perform with their service. They will show me a
comparative between now and after we
install the service. So let's wait for this, this take a few
seconds to perform. And while that, we will see
that they have a few mode. So nitro pack you can
install on your website. You can use different modes. You can use a regular
mode and normal mode, a strong mode, or
a ludicrous mode. Each mode is faster
than the R1 and you can see which one you can test on your website
so you how to do that? Which one performs
better on these tests? They just finished a
test that is finished. Let's see the results. We see here that we have desktop and mobile and we
have before and after. Look at this, before. Great is 74. Let's see what this one, this was the great
also on pink bone 73. They calculated a grade of 74. And they are saying here, and this is Greg guys. They are saying
that if we install this degree will go up, up to 94, will be
on the green area. Remember when we were here
on Google page insights, you'll see the numbers
here, the grades. We have, the red,
orange, and green. And the green starts on
night for 90 to a 100. So they are saying
here that we are going to 90 for my website. That's fantastic if I just
do this without applying the next tool that I'll show you will have a huge increase. We will, we are ready, great on Google's eyes,
which is what we want. We will have a faster
website for our visitors. So you see here the
estimated loss of visitors 10% right now, after that will be 0. You see other details. The page, the speed index. You see the difference
from 3.8 seconds to 071, which is a huge difference
when you are talking about users waiting for your content
to load in front of them. On mobile, we are
with a score of 39, which is super low. And they are saying
that we then we are going to 68, which is great. So let's test this. I hope you do these tests with your website and
see your numbers analyze to see if you want to go ahead and use a nitro pack. If you don't want to, you if you do the test and you said, Hey, I don't want to do it. Wait for the, you can jump to
the next video where we are doing the next tool
with Cloudflare. I'll show you that
in the next video, but stay with me here
because this is great. Why are we doing here? We are going to sign
up or get started, or if you have an account,
you can just sign in. Let's go sign out. I will I will start with
a free option here. One thing that we
need to mention is that they are saying here, if you use the free
option, the free plan, they will add a batch about nitrile pack on the
footer of your website, which is not a big deal
depending on your business. But of course, you
can always upgrade to the paid plans and you will remove that branding for sure. Let's click on getting started. I will now enter my
information here. I'd be back in 1 second. Excellent, I just
completed my information. Hit submit, and here
we are checkout successful when it up to a minute to apply for
your subscription. So I go to my dashboard now, we will start applying and installing these
on your website. The next step is to connect
these tool nitro pack with your WordPress website or if you have other website
that is not wordpress. Same process. We connect that using a plug-in or they call
it a connector. Let's see at the top, on the top menu we have
here, the dashboard. The second one is
connect your website. Let's click on that. Here we have my website
name, the website URL, the site ID that is
unique for each one, and the side secret key that
is also unique for this one. And I recommended to
don't share that you don't share these key
with anyone because it, because it can
compromise the data. To connect the website
with the tool nitro pack, we use a connector. You see here download
a connector. They are saying that
they have a few options. We have naturopathic
for WordPress, for WooCommerce and all
these options here, the one that we are using is this one the nitrile pack for WordPress because I have a WordPress website
on this case. We go to the website. I hope you go right now to
your WordPress website. If you don't have a
WordPress website, I recommend you to go to Contact nitrile PAC
support and they can give you the right tool to connect your non WordPress
website with nitro panic. In here. Here we
are in WordPress, we click on plugins and we click on add new to
add a new plugin, which is the nitro pack plug-in. So I'll type here. Nitro pack. Excellent. We see the results here. The first result is the nitrile pack official
plugging, which is this one. You see nitro pack
by naturopathic LLC. I'll install this is
installing right now. Excellent. Once this style
we will activate. So click on Activate. Now, let's see. Now is active and installed. So we look for that
on the tool here. Let's see here. Naturopathic here we are. We go to Settings. Here in Settings we say
that we're reading here. Welcome to naturopathic
for WordPress, we are connecting nitrile back with your
WordPress website. We click here on
connector nitro back, or you can enter the details
manually if you want. You can enter the site
ID and the secret, the side secret which are
here on your a dashboard. If you want to
connect your website, you just copy this information. Let's do that right now. Copy this side. Let's copy also the secret. That's all I need to do. You see we are in the
dashboard now is optimizing its processing the pages right now we see the
plan that we have, the limits, the number of
page views, the bandwidth, and we see the
optimization mode right now is under diluted crows mode. And you can change
these if you want. I recommend it to
just lift the default 11 important message that we have here that
you could also have. This message is here
at the top is seen. They are saying that I have active WP Super Cache,
a nitrile pack. With that plugin, I have
overlapping functionality, so they are recommending
me to disable the WP Super Cache because
that's a cash app, a Cash plugin, and it's irrelevant once we have
the nitro nitrobenzene. That's what I am
doing right now. I'm going back here to plumes. Let's disable the
WP Super Cache. Let's see WP Super Cache. The activate. Working on that. Excellent. So now you see that that
one is deactivated. I can activate it
again if I want, I just leave it there for now. Let's go back to settings and nitro pack to take a
look on the dashboard. Now we need to do the test. We need to make sure that we
just style four minutes ago. And that is working
on over or not. Sometimes take a
few minutes up to an hour to build the
cache of your website. You have a large
website especially. But let's test right now to see if we have optimize results, are ready to do that. Let's go right now to make sure that the website is
connected. Let's see. Yes, it's connected, Wonderful. We see the optimization
that we can do. I click on optimization that are sorted, some suggestions here. We have the settings that
you can change if you want. So all your tools
are here right now. Let's do the test. I'm not sure if this
will work right away because we just
installed the tool. Remember we have,
let me open here. We have a node, a
performance grades. Here you see on
the screen of 73, we have a c node, an orange warning
note saying, Hey, the website is slow, is taken 4.32 seconds too low, and we give you a
C Node, a C grade. Let's test again on
the same website. To take a look.
Let's go to Pingdom. Let me type here,
Diego, the VLR.com. I choose the server and
I click on Start test. Let's see how it goes. Hopefully we have great
results right now. Let's see, let's see,
let's see testing. We are waiting hopefully,
hopefully, hopefully. Let's see, 73 was the
node before the grade. Now, we have looked
at these guys, 93, we have an a plus grade
right now with 93, we are loading the
page in 2.75 seconds, 50 around 50% faster
than the last time. And with just this
wonderful tool, which is naturopathic,
we are growing. We are super-fast right now. Guys, this is how
you can upgrade the speed of your website
right away with nitro. Back in the next video, we will apply a second
tool called Cloudflare. I hope to see you there. Let's start with that right now.
3. Enabling CloudFlare Advance for WordPress: Our next tool is Cloudflare. Cloudflare is a platform that
is used by many website, many companies all over the world that helps the
website to be more secure, protects them for attacks, and thus also the DNS
translation for the website. Given the website the
advantage of being faster to load
everywhere in the world. See if you have a
WordPress website, probably you have Cloudflare. And if you do, if you use
the service of Cloudflare, you can use these
tools that I will recommend to you right now. If you have never heard
about Cloudflare, you can ask the developer of your website if you
are using that, and if not, don't worry, you can use just nitro pack that we use in the last video. And that will already, as you saw in the test we did, we jumped from B a C category
to a C grade to an a grade. So we are right now
loading way, way faster. If you are in Cloudflare, what do you need to do is just login here on your account. I have all these websites
here on Cloudflare. Dow.com is the one
that we're using. I click on that. And in the left menu we
see the option of speed. So if I click Speed, I see that just by
using Cloudflare and already 11%
faster that if not, you see with Cloudflare. Without Cloudflare, you
see the comparison of how fast is charging here
is loading the website. You see the difference
here on the images. And this is fantastic. And the service that they
are recommending here, you see a recommended
optimization is called automatic
platform optimization, and this is the one
that we are signing up today to test how it performs. They are promising here that this website
specifically changed from website to website, but they know this
website because they are doing the DNS translation
for this website. Are saying here that we
will experience 21.8% faster loading on desktop,
which is amazing. Twenty-five percent,
one percent is great. Let's sign for that. All we need to do is
click on Purchase. This is a paid service. The price for the service
changes depending on location. I think on my location
is around $6 a month, which is not expensive for a service and for
something that will speed up the website
up to 21% of my case. What I will do now
is I will fill my credit card
information and I'll be back in one minute. Excellent. I just completed my credit
card information on you see that on my area here
is $5 per month. Probably that's the same
amount you are paying. This is a good service, so let's see, right now, we are ready with this. I will confirm payment here. Let's see confirming. Excellent. Now, automatic
platform optimization for WordPress is ready for me. All I need to do is to, is to connect this
service with my website. So I need to go there and
install the WordPress website. If I click here on install WordPress website,
sorry, WordPress plugin. Here we have the plugin. So let's go right
now to your website. This is the same
process we did in the last video
with nitrile pack, we will install Cloudflare plugin first to make sure we
connect these two services. I click on add new plugin. Wordpress. Excellent is load in here. Now we will start
for Cloud flare. The first result
is the first node. The second result in my case, is the one that we
are installing. You see the low here
from Cloudflare. Cloudflare, I will
install these and I will click also on Activate
once x is tall, Let's see, he's installing
is downloading the files, installing all that on the system or my website
is already installed. Let's click on Activate. Excellent, is activated now. Wonderful. Let's go to settings
right now on Cloudflare. And see if we can
connect these two. We see speed up and I will
I already have an account, so I will sign up here. I enter my e-mail and
my global API key. Excellent guys, now that I already logged in here we are in the plug-in homepage and
all we need to do here is activate the automatic
platform optimization. So I activate that. Wonderful, that's what
we are assigning here. This is the main goal. And if you want,
you can also apply the recommended Cloudflare
settings for WordPress. On these case. This is active now is
building the cash. We will wait a few minutes, maybe an hour, maybe two hours. I recommended to
wait a little bit. And after that, you
can test the speed of your website again to see
if it's improved or not. And why we don't
test that right now. Let's go back to pink.com
to test the speed. Remember the last
bit we test was 93 grade the number was 93, which is fantastic
because we were on 8073, we weren't 73 on this website. We start nitro pack. We jumped up to 93 and now let's see where we are
Diego to villa.com. Now that when you
style the Cloudflare, so we were at 93, hopefully is higher and
higher now is testing for us. Wonderful. Let's see. Wow, look at this. Now we are at 97, almost a 100. This is fantastic. The page side reduced to 1.9. The low time, it was
almost five seconds. Initially, we are right
now on 1.9 seconds. This is amazing. Everything is green now, which is what we want. And this we
accomplish these just by using these two tools, nitro back and Cloudflare. I hope you try this. Let me know in the comments. If you are having these results, please take a screenshot
of your before and you're after to compare and share with me and
with the community. See you in the next video.
4. Final Project: Hey guys, Welcome
to this assignment at the end of this section and excited to see you here because you will have
amazing results to, with these two tools. To get your website faster, to speed up your website, to have better
ranking on Google, and to improve
significantly the SEO of your website and everything
you create inside of it. So in this assignment,
what you need to do is you need to apply two of these, these two tools that we
discussed on this section, you can use a nitrile
pack and also cloudflare, or you can choose
one or the other. I recommended to use both to have the best
result possible. And you will see, what
are you need to do is actually just follow
the steps that we follow in this section. You need to first number one, measure the speed
of your website. You can choose pink.com or any website that we use
during the lessons. Take a screenshot, take a
photo with your cell phone of that result of the grade
that you are getting. And after that, you are ready to go it simple with a few clicks, you can have your
website right away. Jump from a C grade two
or a plus grade and half. Amazing results on
ranking on Google. Share the results with me. Take a picture of before and
after and shared here in the resources area
so I can see it and other students in the
community can see two, I am excited and
looking forward to see how much you are
improving your grade. And I see you after
that in the next video.
 Diego Davila, Entrepreneur and Social Media Innovator