Transcripts
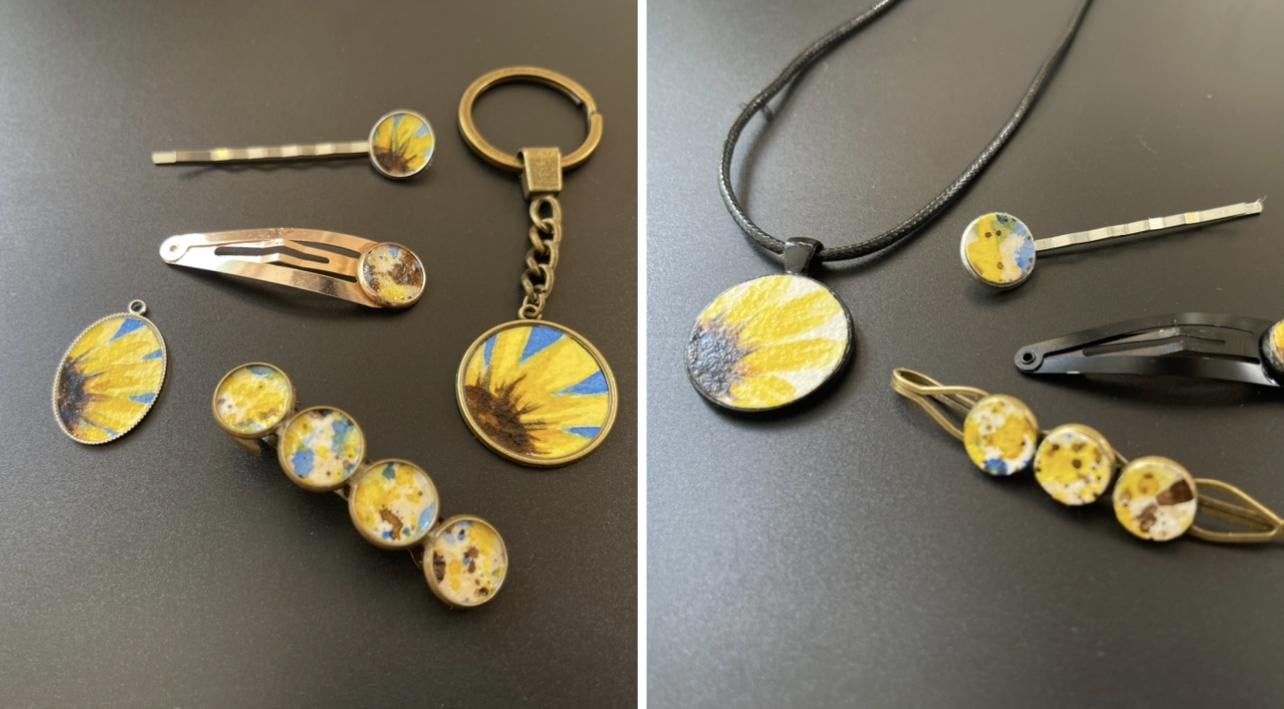
1. Watercolor Accessories: What could you do with hand painted watercolor
art accessories? You can wear them. You can make them
into hair clips. You can accessorize with them. You can gift them. You could make them as a
souvenir for a special event. You could hang them on
a purse or a suitcase. You can sell them. Your dog can wear them! And so much more. I'm Deborah Diaz with
Water Strokes Art. I'm a watercolor artist and an American sign
language interpreter. You can find me on Instagram @Waterstrokes.Boutique
and @Waterstrokes.Studio Or you can follow
my art journey by emailing me subject
line "newsletter" to DDiaz@Waterstrokes.com.
I love painting watercolors, but I enjoy even more
finding ways that I can wear my watercolor art
or use them in some way. Watercolors aren't just
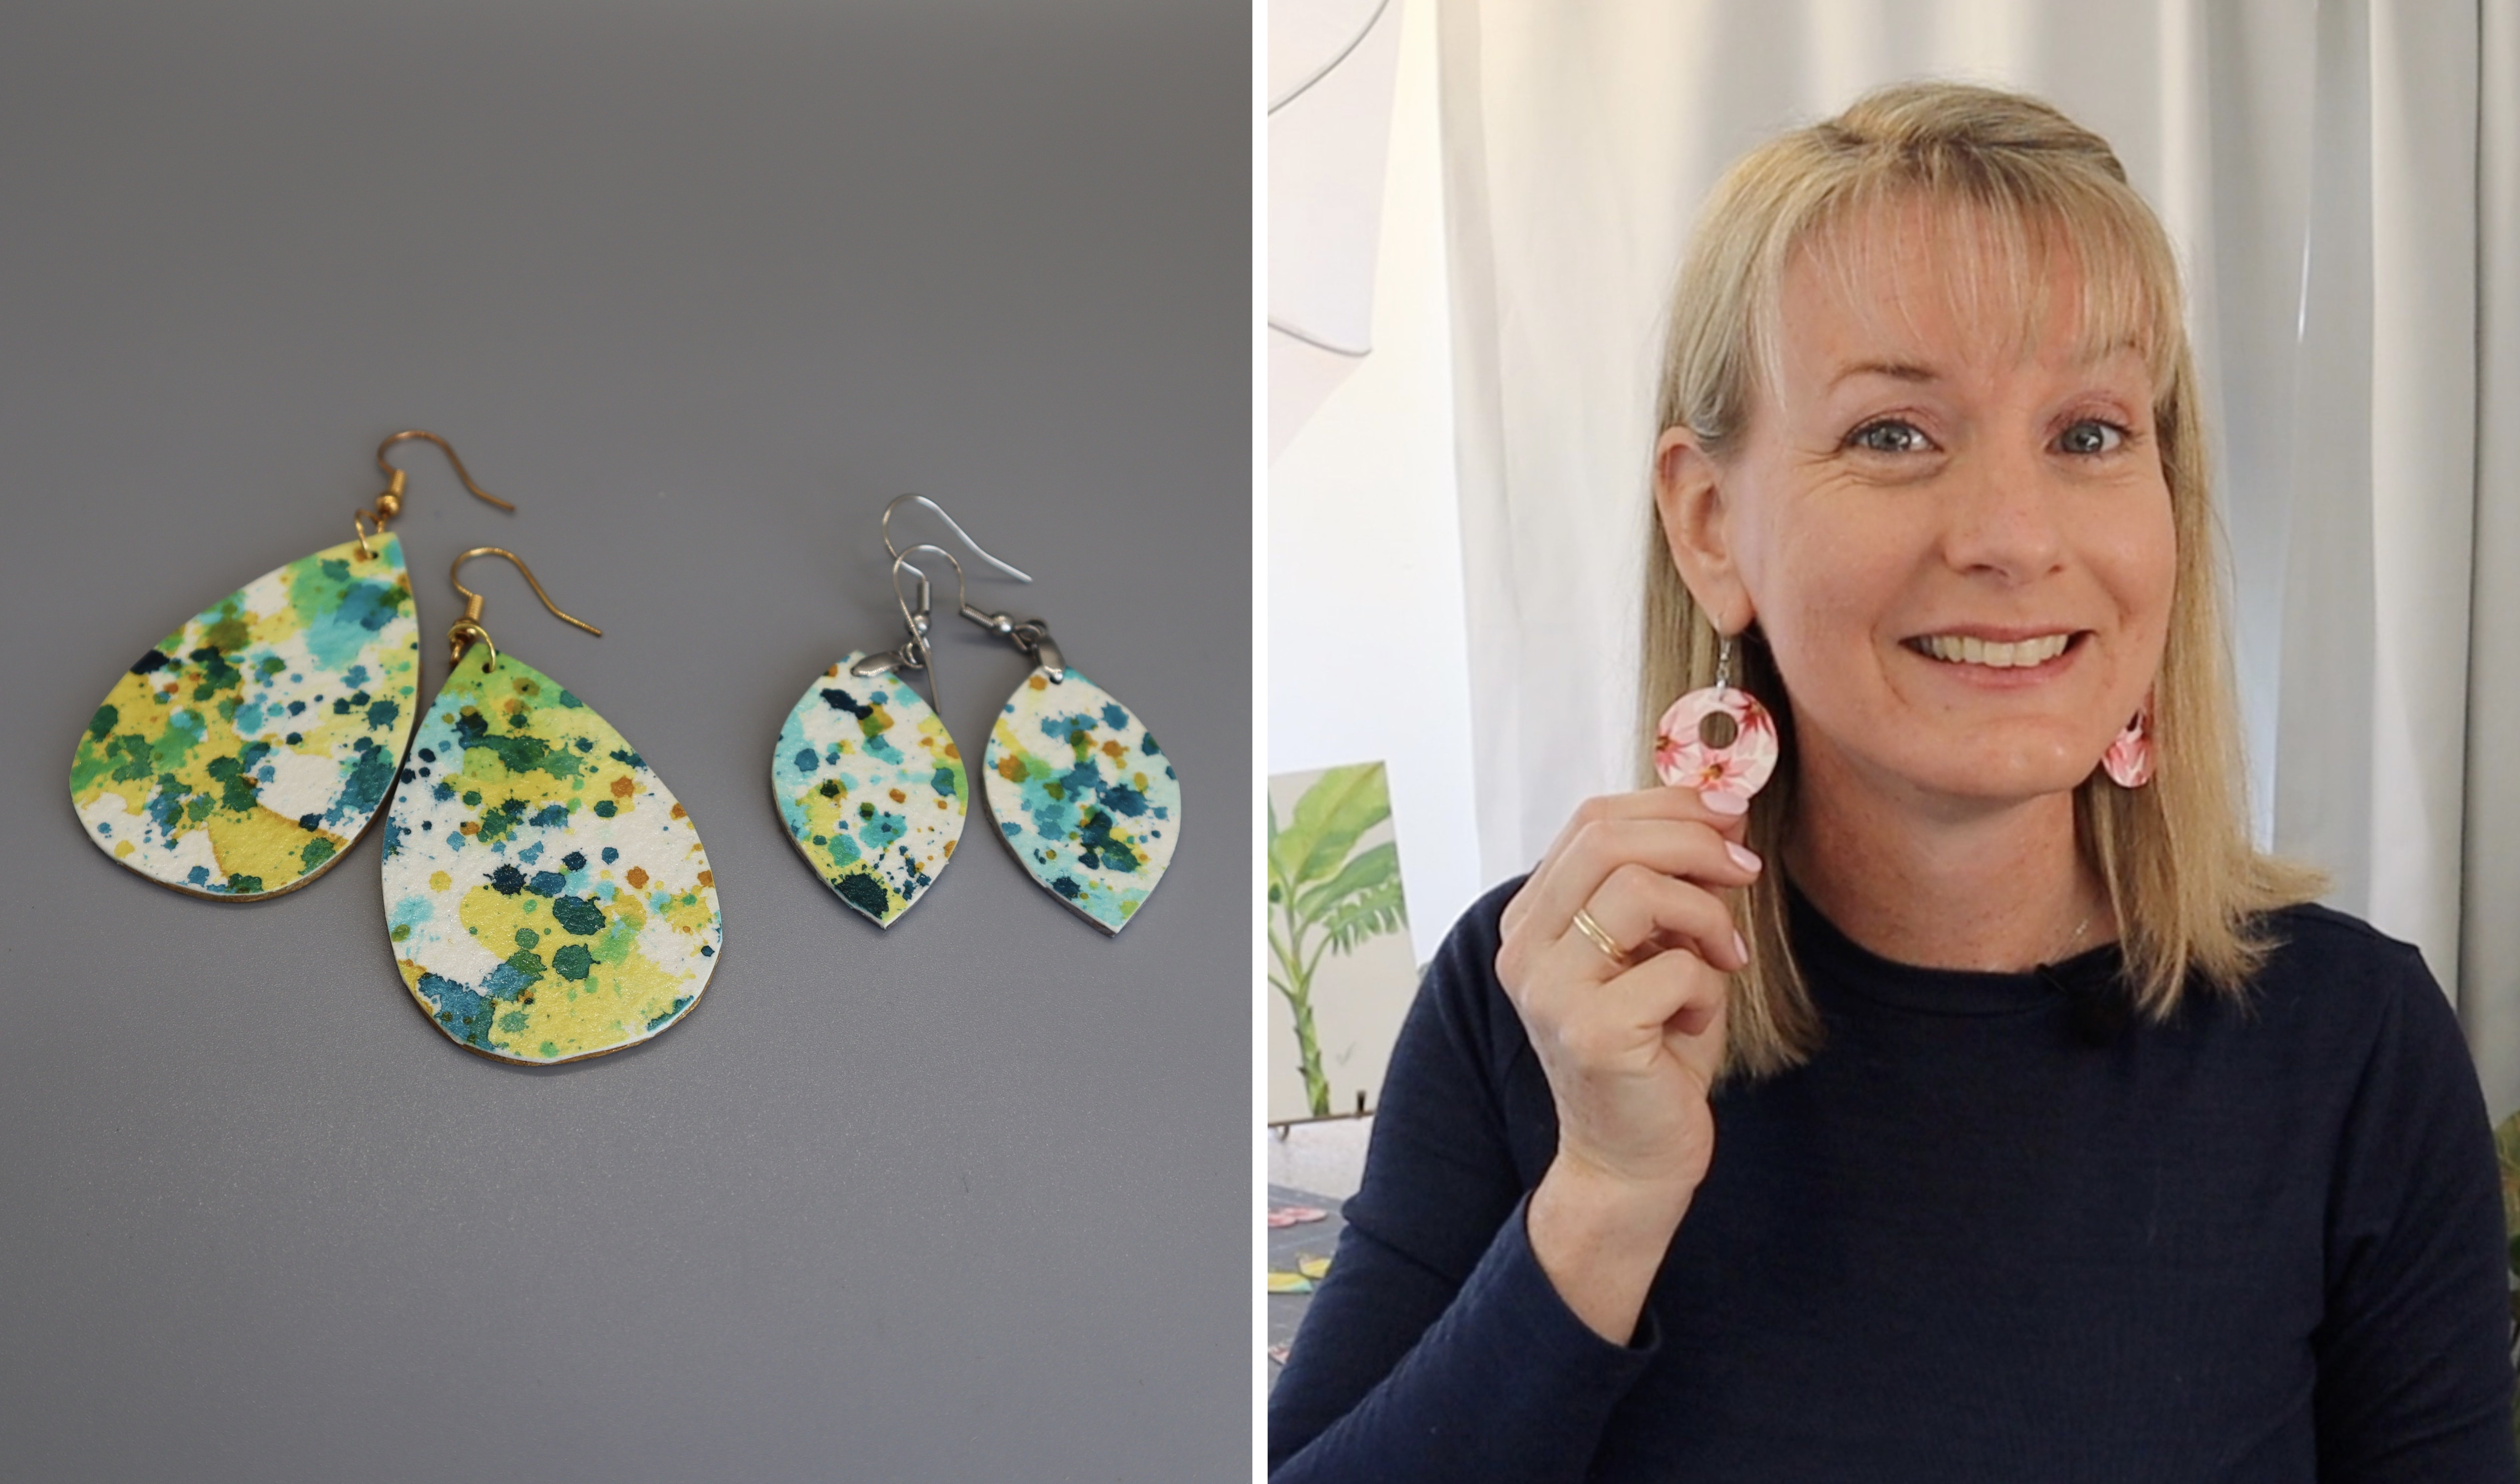
for hanging on a wall. You can see an example of that in my class called "Wearable Art: Transforming Watercolors
into Beautiful Earrings. Today I will teach you a
simple watercolor painting of a sunflower and a
matching abstract that you can use for
these accessories. Then I will teach you several
different methods on how to create these accessories
for your class project. Feel free to paint along with me with my sunflower or any
painting of your choice. You can create
your abstract with the colors I use or your
own favorite colors. So that your
watercolor accessories will be completely
one of a kind. I'm so looking forward to
seeing what you create. Let's start painting
and creating.
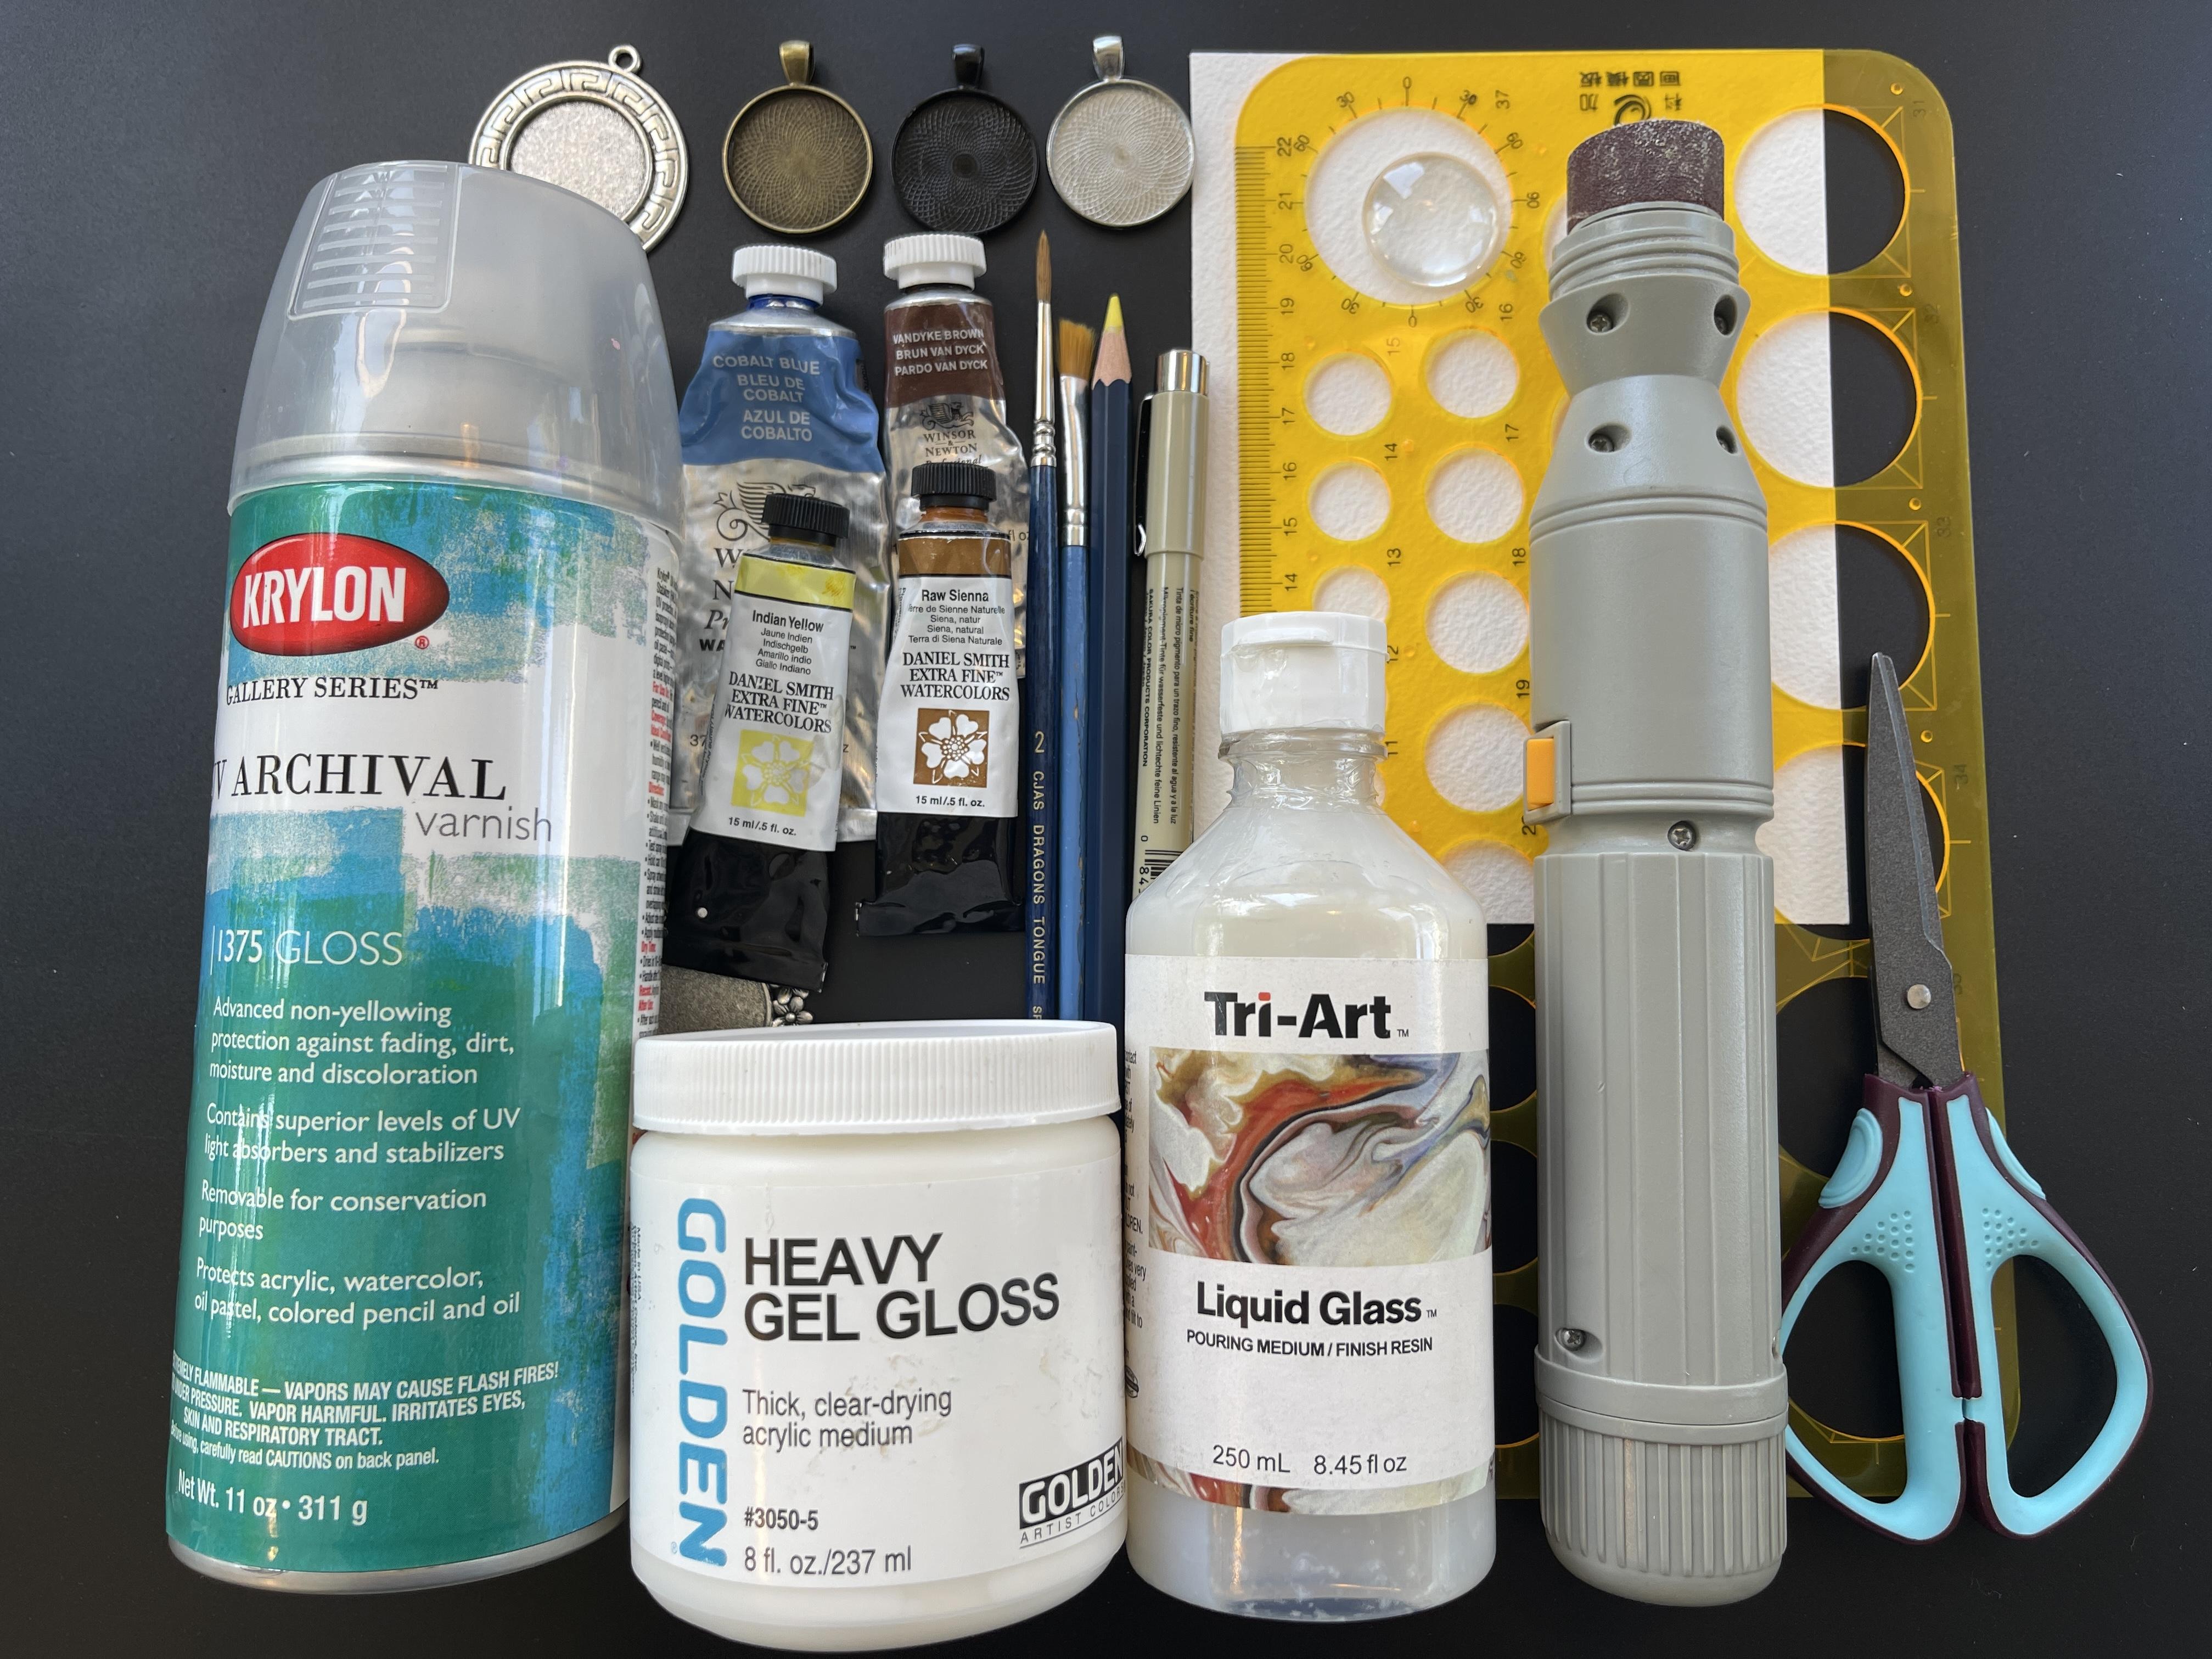
2. Supplies: Look at all the fun things
that we can put our art into. Now if you search
on Amazon or Etsy, you can find lots
and lots of bezel options. For example, we have key chains, different colors,
almost everything you can find in
different color metals. I like these and also a
different bobby pin, like hair pin just
slides in there. These are also for your hair. With a little clip,
you can put your art into all of the hair barrettes. They've got different color
metals for the barrettes. We also have cuff links, which I think are super cool, that you can make
cuff links also with your art. Of course, pendants. Now probably you're more
familiar with the pendants. There's lots of different
color metals for the pendants. Most of them come with
these glass domes. I will show you how to use the glass domes and I will also show if you don't have the
glass domes, what you can do. For example, like this one. It didn't come with glass. Maybe I could find
it. I don't know. But if you run into something
like that where you buy the bezel but it doesn't
have the glass. That's okay. Some of them have the glass, like these little tiny ones, but they didn't come with it. The glass things don't
fit. They're too small. You can make as pendants or you can also make
them as key chains. I really like this
one of the key chain, lots and lots of options. Very fun stuff here. Some of the pendants
are more decorative, some of them are more plane. Let's see what supplies we need. Also now for the products that
we need to create our art. We start off with
watercolor paper. I use 140 lbs. This is 140lbs Arches
watercolor paper. And we're just going to use
a tiny little part of it. We can cut a corner
out of it and just use a small
watercolor paper. I like it because it's a
very good quality paper. It's very good for
absorbing the water. It'll make your painting
just that much nicer. You start with good
quality paper, then you'll have a good
water color painting also. Balsa wood. This is lightweight. I just got this on Amazon. You can use scissors
to cut it out, and I'll show you
what we're going to do with it later on. This tool comes in handy
because you don't always know the size of the piece
that you're working with. You can use this to be
able to draw your shape. If you can get this
tool, it's very useful. Some of these are optional,
some of them I will use. This is my least favorite, but you can
use it if you want. If you have it, it's pretty common if you have
it sitting around, that's fine, you can use this. I also like to use this as my first coat to protect my
watercolor from smudging. It just makes it
easier to work with after I spray this
on because it keeps the watercolor painting
pretty waterproof. This is the glue
that I like to use. I prefer this over this. This one has more grip. It's just heavier
duty, it's more thick. This one is a little
bit more watery. This is the one that
I recommend using. But whatever glue you have
is fine for your top coat. You can either just put
two or three layers of this or you can put
a top coat of this. This is very nice. It's
called liquid glass. Whatever you have of
these products is great. I use a very fine tip
pen to draw on my paper. You'll need a small brush, fine tipped, water color brush. Any is fine as long as it's got a nice sharp tip
and a brush that you don't care about because
we're going to be using some of these products and you don't want that on your good brush. A nice pair of scissors. And colors I will be using
will be Indian yellow, Cobalt blue, Van Dyke
brown, and Raw Sienna. These four colors. If you don't have these
brands, that's fine. Don't go out and buy them.
All we need is a yellow, blue, dark brown, and a
light brown or a tan, a brown, a blue and a yellow. I really like this
yellow for sunflowers, it's just such a
nice bright yellow. I use this blue for a
lot of other things. If you have these
colors, that's great. Or if you have them in other
brands, that's fine too. But these are the
ones I'm using. I just have a palette
here for my paint. That's all. Let's
start creating.
3. Time to Paint!: Now we are ready to paint. I want to show you how you
can make this sunflower. We can make it into
some key chains, some pendants like this, and some pendants
like that, possibly. This one's real
nice and delicate. I really like this one. And some hair clips. The
size of the pendants, they're all pretty standard. They use the glass domes. What we can do is we can
use that as our way to measure, To economize our time, We can paint several
at the same time. When you're painting
something this small, a lot of the time spent is
waiting for each layer to dry before you go on
to the next layer by painting more than one. At the same time,
you're giving yourself time for the first one to dry while you're working
on the last one. Now, these didn't come with
the little glass domes. Remember I told you
about this tool here to find out
what size they are. I usually go a
little bit bigger, maybe even this one. Because when I draw
the circle it'll be smaller because of the inside of the pen will be inside
of the template here. Then on this side we're
going to do an abstract. We're going to make
the sunflower here on this side in these circles. Then using the same colors, we're going to use abstract to do the little tiny
things like this, like the hair pins and the other accessories
that we have. It'll be a set because
it'll be the same colors. It'll be the same
colors that you'll use for the sunflower
and the abstract. I have my brush. I have a thing of water
here on the side. I have a paper towel
to dab my brush with. And we're just going to start. Dab your brush into the water
and into the paint. And we'll make the center of the sunflower coming
off to the side here. We'll do them all the same. Again, while this one's drying, we'll be working
on the other ones. Maybe one of them
you'll end up not liking or several of them you won't like, for whatever reason. Then you'll at least have
some other ones to pick from some more paint, these little tiny ones
here with the same colors. I'm going to do my abstract. I'm just going to
bounce my brush around with this first color. It won't look like
much, but when it's onto your accessory, it will look quite nice because it'll just be the colors
that you're seeing. My next color will be
this Indian yellow. Now remember, this
is a very bright, bright color if you
keep it diluted. If you put on the
paint really thick, it'll almost be a tan color. We're diluting it really well. Then we're going in and
putting the petals in. Just bring them out
from the center here, it can bleed into the
center of the flower. That's fine too, but you do want to remember to
leave a little bit of space so that you'll see the
definition of the petals. It doesn't have to be perfect. You can take your time. If you're experienced
with watercolor, feel free to paint
your own design, your own flowers,
your own landscape. Anything you like. If you
want to follow along but paint a different color
flower, that's okay too. I've painted the same flower in multiple colors already and
they all look very nice. It's nice because I still have the same paint on my brush. I'm not having to
change back and forth. I'm just doing all of these with the same pattern and it
makes it go quite fast. If you're new to water color and you're worried
that you don't like the looks of your flower, It's okay because water color
goes through many stages. Many of the stages
are pretty ugly. The middle stage, there's
at least one or two stages, your process that you won't like the looks of it because
it gets pretty ugly. But in the very end, with the details and
the definition on it, it will look very nice. You'll be happy with it
if you stick with it. Now let's go into our abstract with
the same color. I'm just going to tap in. See, I'm just tapping
my brush like this, tap, tap, tap, and splashing
some paint on here. It gives it some interest, Dab it here and there maybe
doesn't have to be a lot. We'll go in and put another
couple layers in later. We can start with that and
then see what happens. Okay. Let's see what next
layer will be. Let's go into our dark brown. See that's pretty wet still
See how it's bleeding. This one is dryer. The paint is more
staying in one spot. You're just going to tap around. If it's too wet, you can just wait a little
bit for it to dry. We'll end up putting
another layer on here too. It doesn't have to be as dark as it needs to be with
the first layer. It's a great thing
about water color because it's just
layers upon layers might give this a little
bit more time to dry. Because some of this, if I get it into the wet part,
it's just going to bleed. But I want that I want to wait for this to
dry a little bit first. If you have handy a hair
dryer, I use that a lot. I let that dry, but you can see how the part where it was wet, where the brown went
into the wet paint, it just got dull.
It bled together. Sometimes I like when the
paint bleed together, but I want this
brown to be nice and strong, real bold there. You can't get that when
it's on wet paint. I'm just tap my brush
around a couple places, get some of this nice. Maybe just a couple
more spatters. Okay, I forgot to put the
middle part darker on these little ones now that it's dry and I've still got this brown on my paint brush. I'm going to use that to
darken this up a little bit. I'm just going to tap a little bit darker up here. All right, let's go in
with another layer of the make sure I
get all that brown off my brush because I
want to keep that yellow. I'm just dabbing it onto
my paper towel to make sure that all the brown paint comes off before I
go into that yellow. Because I don't want to make the yellow darker than it is. I like it real bright and nice. I'm just going to highlight
a little bit of each petal with layer of the yellow and if your first
layer was pretty light, you'll be able to
see this definition. I'm not painting
the whole pedal, I'm just going in and
giving it a bit of shape, a bit of lines here and there. This one was pretty dark, you can't see that second
layer as much on this one. You see see the difference
between how it shows up real nice on this one then
that one, which is okay. It's just different. They're
a little bit different. That one got some definition. This one go a little
bit too wet, I think. Okay, Since I have
this on my brush, I might want to splash a few more layers of
yellow onto here. Now, this yellow is on this layer of yellow is on
top of the other layer. So it'll show up a
little bit better even. We are going to with
just a little bit of this tan still too wet. Some of them will be
drier than others. You can work with what you have. Or maybe we need to let this dry again, again, with water color. You can see when it's, the colors won't
stand out as much. But when it's dry, the colors
have more definition. I'm just bringing up
just a little bit of the base into the petals
to show the definition. To show the petals
to show a shadow in between the petals and
the seed pod here. I want to one more layer of the dark just because
when it dries, when watercolor paint dries, it's always lighter than
you think it's going to be. When it's wet, it looks real dark and then it dries lighter. So we want to make sure that
it's got enough paint on it. I'm going to, again, just pull out from the
middle just a little bit, lines here and there
to connect the petals. It just grounds it
somehow defines. It, gives it a little
bit of shadow. Makes those petals stand
out. You see how that works. It's a nice effect. This is just with the very tip of my brush that got a little bit too heavy
there, but it's okay. And the little tiny guys here. Another splash of this in here. It looks like it's filled, looks like there's
paint everywhere. But when you get
something in this tiny, it ends up not being
too much interest. You want lots of
by little details, As small as you
can get in there. Okay. Our last
color is our blue, so we don't have to do each one, for example, have the
blue in the background and this one just has
the white background whichever way you prefer it. I do like the blue. I'll use it here to show you how it just makes
the petals pop out. And it's a nice blue color too. We'll do these three
white up here. We'll do with the
blue background. Just with the very
tip of your brush. This little area here
behind the petals, we're going to make blue. We want a nice
little pointy spot where the petals come
together, right? They're pointy. See how
pretty that looks on? The thicker your paint is, the darker your color will be. And if you water it
down, it'll be lighter. So if you want it to
be a lighter blue, you just put a little
bit more water in your mix. And I said
this one, right? You want to keep your
lines pretty straight because that will look like
your petal is crooked. If your blue line is crooked, then it'll turn into your petal being crooked, like right there. Straighten that up if I can. Okay? And these
little bitty guys, if there's a spot
in there or not. Okay? Last one, okay? Three with the blue
background and three with the white background or you could put whatever
colors you like. I like to also use this blue to give it a
little bit of a shadow here. It just darken it up when it dries and got a little bit
too much water on there. Just a tiny bit. I'm also going to pull up with
this blue into the petals. And that's again, just
the shadow color here. And it connects it together.
And I did this one. Yeah. I'm not adding any
more blue to my brush. I'm just pulling up
what I've got already a little bit too much. Let
me wipe some of that off. Let me straighten up this
line a little bit there. If we want to add the
blue to this abstract, I'm going to just aim for the white spots and just around. And then I'm going to splash, of course, that
extra little touch, a little bit more water,
a little bit more paint. And see that just gives it
a little bit extra little. I think I might put
another layer of yellow, yellow that I like to be really bright has faded a little bit. So make sure I get all the blue out of my
brush because I don't want my yellow to be
green. Go into the yellow. I did notice this one is little bit too light. Maybe I'm putting another
layer of yellow onto this one. I think the other ones are good. I'm just going to
aim for where there already is yellow and just
brighten it up a little bit. Oops, that one turned green because I already
had blue there. There's no science to this.
Again, this is abstract. I just want to make sure that
all my little spaces are filled up because the
more detailed it is, the more interesting pieces you can get when you cut
out the little tiny holes. Okay, I think that is done. I'll let this dry
just a little bit more and then we can cut it out.
4. Spray Seal & Cut: So an easy step now is to spray your watercolor painting with
this UV archival varnish. It's by Krylon. It's
called archival varnish, gloss, and there's
a matt and a gloss. Either one is fine to show you real quick
why we did that spray. For example, when you don't
have the spray water color, when it dries, it's good. But then it can be reactivated
as soon as it gets wet. You see if you get the glue on it or you
get it wet by accident, your painting, it
will get ruined. But if you spray that archival varnish on
it and do the same thing, you can see that it's protected. That paint didn't run because
I have that spray on it. Let's start cutting
out our shapes. I'll just cut around. And again, all these other ones here we're going to
make from our abstract. This one actually has
these little glass domes. I can use that as my shape when I draw around and cut out. Some of them don't
have glass domes. Again, I'll use this, I
want to aim a little big, not that big, Probably
about that size. I will draw my circles. One thing about these, I've noticed the lip bends in. If you can see it bends in. If you cut your watercolor paper to the size of the
top part of the rim, when you push it
down to the bottom, it'll be small because the
bottom of the rim is bigger. But since watercolor
paper is flexible, cut it a little bit bigger
than the rim and just stuff it in there and then
it'll be the right size. Again, we're going to
aim big for our circles. I'm just going to measure out my sizes and count how many
circles I'm going to make. Put them all here.
For the other ones, I'm going to cut out these
for this shape here. I'm still using the circles. One of them we're
going to demonstrate with the glass dome. And one of them without, just so you can see
the difference, I will use this to cut out my shape and to test out
how I wanted to look. Which one I want to
use for this shape? Probably this one for sure. I'll cut that out like that, it'll be that direction. The rest of them, I'll
just make circles because that's the shape
that they already are. One tip I want to mention, especially when you
have several like this, I suggest cutting one
and then testing it out. Because sometimes you'll want
to cut exactly on the line. Sometimes that will just be too big and you'll want to
cut inside the line. Or if you cut inside the line, it ends up being too small. You don't want to end up having
all of them be too small. Just test out one, make
sure it's the right size, and then go on from there. The same thing with the
little tiny circles you want to test out one. And then make sure you're good, then you can proceed
with the rest of them.
5. Glue: Now I have all my pieces
cut and ready to go. I want to show you
three different methods on how to assemble these. Remember I mentioned that
you might need balsa wood. One of the things
that we're going to do is to use these glass domes. But another way is to use
this balsa wood to bring your art, to the level of the lip. Again, some of them don't
come with the glass dome, and some of them have
a pretty deep lip. What I like to do is cut
some of this balsa wood as a filler to put inside
to bring your art. even with the top. I will
do that with one of each of the little hair clips and probably one of
the hair pins to, and one of the pendants. What I'll do is I'll use my tool here and I'll find the size. I will draw the circles on here. I've gone ahead and
draw out the shapes of the ones that I'm going to use my balsa wood filler in. Again, it's very lightweight, very easy to cut with scissors. We'll just, these don't have to be perfect because they're
going to be under your art. Nobody will see them. If the shape isn't exactly
round, that's not a problem. But you want to cover
most of the circle too. You don't want to have big gaps in it.
That's good enough. Okay, I'll go ahead and cut the rest out for
the next step is gluing the balsa wood circles
that I cut out to the right shape
into the Bezels. I use this Golden,
Heavy Gel Gloss. Again, this is just glueing in any type of glue
that you have. I particularly like this because it's thick and
it's not so runny. And I feel like it has, it grips really good because sometimes
if you're glueing it, it'll bend a little bit
because of the glue is wet. And then you have a hard
time sticking it down this medium because it's thick and it has a good
grip, it'll hold it down. This is the one I use. Feel free to use whatever glue
you have on hand. I just put some in, make sure I get all the edges. My first layer will be
that balsa wood filler. Now, if you've got a
paper towel on hand, you can just squeeze
it so that make sure that it sticks all the way and just
wipe off the excess. We can do that with the
rest of these little ones. Same idea. Stick it in, make sure it's all
the way in there. That one's not a perfect circle, but that's okay because it'll
hold the painting in place. Then these little guys, be sure to use a brush
that's not your favorite, just because this is glue and we want to protect
our good brushes. Okay, we'll just let these
dry for just a little bit, then we will go on
to our next step. For the next step, I can include the ones that we
just did with the filler. With the next kind that
we're going to do, these will be with no filler
and with no glass dome, this will just be flat, like this one doesn't
have as much of a lip. I feel like we can, we don't need a filler
and I wanted to show how it looks
without the glass dome. These, we're just going to
try again with no glass domes because they
didn't come with it and with no filler either. It's just the same glue
that I'm going to use. I'll put on just a
tiny little bit, press it on, definitely. We'll need the paper towel for this part because that glue will come out and we want to just wipe it
off the sides there. You see this one is
right up to the lip. It makes the art more
visible that way. I'll show it to you on this one. Since it's a little bit bigger, it's easier to see, get
this medium on here. If you get it on the side, you can just wipe it
off, not a problem. I'm going to squeeze
it with my paper towel to make sure that it's
stuck all the way. Even though it has a nice grip, sometimes I like to put it underneath something heavy just to make sure that all those
edges stick down real nice. You see how the filler makes the art come all
the way to the top, it makes it more visible. I'm going to set this
underneath something heavy, just while it dries. The rest of them are similar. We just put the glue on them. Make sure you have enough
to cover all the edges. You put your art in it. face the art whichever
direction you want, Squeeze it down with
the paper towel and then wipe away the excess. Now this one, because it
has a little bit of a lip, it won't help if I put
something heavy on top. But again, because this
glue has such a nice grip, it's probably not
necessary anyway. If you find that you're
using something that doesn't have a grip and
your paper is bending up, what you can do is you can use one of the glass
domes and press it, don't glue it, press it down. And then put that on
something heavy that will be able to keep the edges down because it's a
little bit of a lip. If you put something on there, it's not going to push it down. But you need, it's
the right size. Like I said, for these
I wanted to show you because the edges go that way. The lip on the inside is
smaller than the base of it. Let me just show you real quick, what ends up happening is I cut the watercolor paper just a little bit bigger
than it needs to be, and then I take it inside. I guess I should have done this one of them first before I
got all the glue everywhere. Okay. And it looks like
it's not going to fit, but it goes right in there. Some of the glue
comes out. It's okay. You can just wipe it
off there you have it. You stick one end in and then you push the
rest of the edges in. I mean, it is possible
that you cut it too big and you will have to
adjust it a little bit, but it usually fits. I thought that one was
going to be too big. Take one side in, then push the other corners in that way
it covers the whole inside. If it's cut to the
size of the rim, then you've got
this blank circle around the inside of it. You see how much glue
is getting on the tops. And I'm pressing it and
moving it all around. If I didn't have that
archival spray on it, that paint would be
smearing quite a lot. That just helps me not
have to worry about me messing up my paint
by doing all this, working the paper
this much. Perfect. All four of those fit
in there. Just right. This one we're
going to leave with no filler and no glass domes because it didn't
come with a glass dome. But I think that looks
pretty, just the way it is. I'll go ahead and finish
the rest of these. For the next step, I'd like to show you a different product. This is called liquid glass. For the glass domes
for the big ones, what we're going to do is
we're going to put this on first and then glue
it to the pendent. Where is it? This step first, we won't be able
to, because again, this lip is a little bit funny. I wanted these to be full. I'm going to put
this glue in first. Smoosh them in there,
get them all tight, and then I'll put this on
top. Let's do this first. You can use this for the glue, You can use the mode
all of those glues dry or make sure that your
glue is a clear drying glue. This one I find is
particularly clear. But either way,
what we're going to do is we're going do this first, then put it underneath
something hard, and let it dry real good. Because it's like putting on a glass screen on
your cell phone. If there's a little
bubble in there, you'll be able to see it
if you put this in first. If you glue this in first and
then you put this on top, there's a possibility
that this won't be laying flat and then you'll
get more air bubbles. If you glue this first, make sure it's flat underneath
something hard like that to wait for it to dry, then you'll have less
chance of air bubbles. We'll do that with these
two, This liquid glass, I'm just going to
put a little bit. It'll run out, run off the
sides, but that's okay. I'll wipe it off. And
then I'm going to put it on under something
hard so it can dry. I can put it straight on
the paper too, either way. Okay. You see that's got
a nice coat to it. I'll do the same
thing with this one. I'll put it on the paper first. Either way is fine. Make
sure there's no air bubbles, and then I'll go
set it underneath something, let it
dry for a while. While I wait on those to dry, I'm just going to go in and do the same method that I showed
you before with these. I'm just going to
put the, the heavy gel gloss and then I'm going to put the watercolor
paintings inside this. Again, this is cut
bigger than the lip. It's going to take some
smooshing to get it in and hopefully it will fit. Sometimes I use something
to poke the edges in there. I think that's in now
it's in all the way. You always think it's too big. And then it ends
up going, it wipe off all that extra glue. I'll do the same thing
with the rest of them. I'm going to use
this liquid glass now for putting these in here. We're still waiting
on these to dry. In the meantime, we can do
these super, super simple. Just one little drop
of the liquid glass. You put that in there,
make sure it all the way. You might have to wipe
off a little around the edges if you got too
much on, if it overflows. Perfect, beautiful.
Same thing with these. Again, any clear
drying glue will work. But this I find is real nice and fluid, real nice cufflinks. And this is a nice
set because it's the tie bar and the
cufflinks and they match. That one spilled out a lot. Itty bitty little ones
don't need a lot. You can decide if you
like to use these or not. I find that these
little tiny ones, it's real hard to see
the art because they have such a dome to them. But they came with it.
So let's give it a try. Okay, and let's go get these. Remember to glue this
part of it together. I like to use the
golden gel gloss. I'm going to put that
into these two and then I'm going to add the dome that already has
the painting on it. Set that right in there, make sure it's
attached all the way. I'm actually going to put a little bit on the back
of this one just to make sure it's got a good grip and make sure your art is
facing the right direction, because you might
not get a chance to move it after you
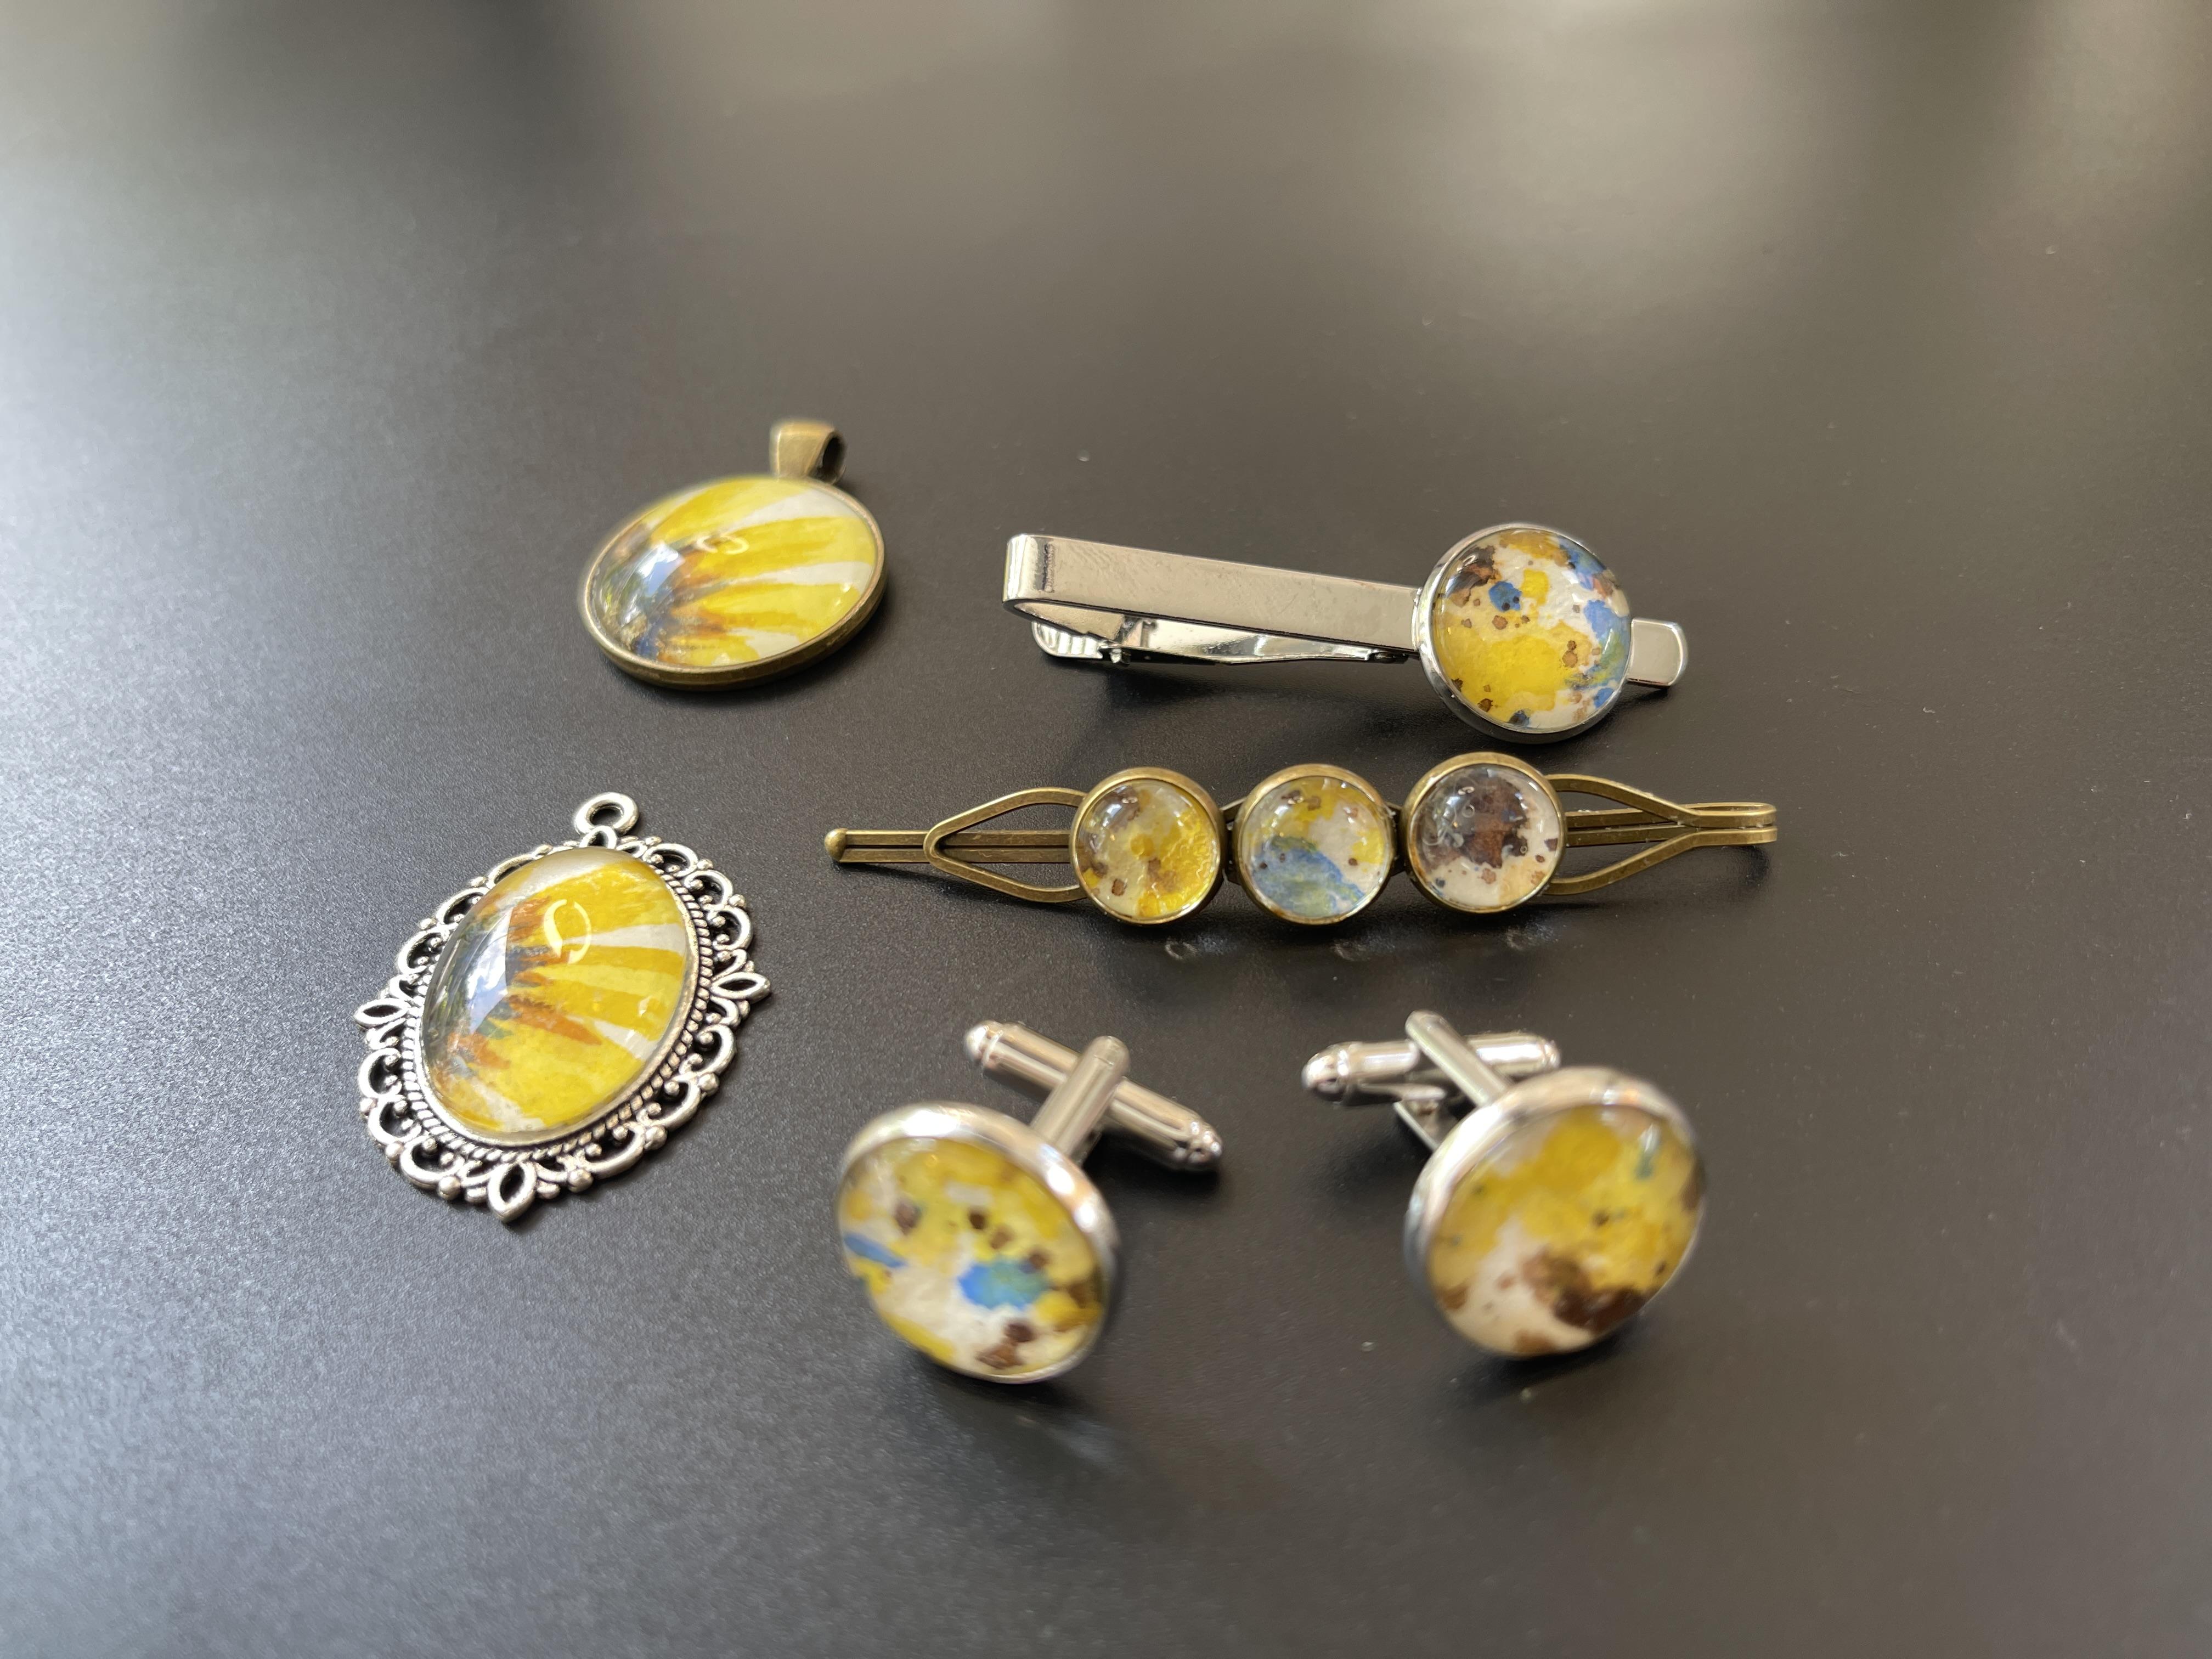
get it in there. Okay, here's a look at our
beautiful finished product, our watercolor art accessories. These are the ones with
the balsa wood that raises up the art to the level
of the lip of the bezel. These are the ones that have no balsa wood filler and they
don't have the glass dome. And these are the ones with
the glass dome on them.
6. Conclusion: Thank you so much for joining me today to learn how to make your own watercolor art into
these cool accessories. You learned how to paint
a simple water color of a sunflower and an
abstract to match it. Tips on the products
that work best for me, along with how to
cut the water colors to fit your accessories. As you learned three
methods on how to do this. One, we used a filler
with balsa wood so that your art could be raised to the level of the
lip of the bezel. The second method, we didn't use a filler and we didn't
use the glass dome. Third, we use the glass dome because some of the
bezels come with it. And if you prefer that way,
that's always an option you can use whichever method
your art looks best in, with that particular bezel. I'm looking forward to
seeing the ones you create. To seeing what you do with them. To seeing what
paintings you made and what colors you
decided to use. If you decide to post
pictures of your creations, don't forget to tag me
@Waterstrokes.boutique so that I can see
and like your pictures. Also remember to check out my other class
called Wearable Art: Transforming Watercolors
into Beautiful Earrings. Thanks again for watching, and I'll see in my next class.
 Deborah Diaz, Watercolor artist