Transcripts
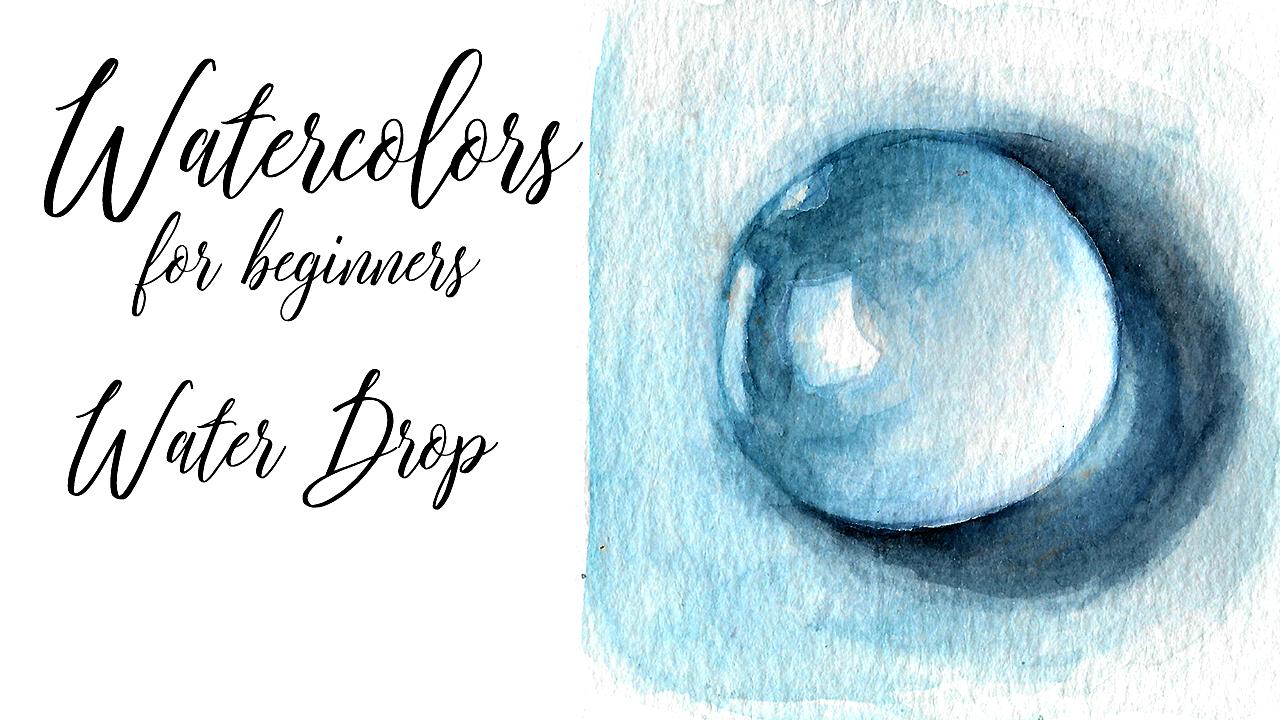
1. Intro to watercolor water drops: Hey, near I'm Kate. And thank you so much for checking out my still share clubs in this short glass, I will be showing you how you drawn paint. Realistic watercolor drop like blue you will be needing is a pencil and Jew color space. And of course, so my main medium off choice, Thea's watercolor and proud of it. I've been practicing for over a year now, and I usually do colorful watercolor orchards and just illustrations. I have illustrations and working in this class, you will learn how to use glazing technique and how to achieve that realistic watercolor water droplet look, said Elsie in the next lesson.
2. Art Supplies: so I wanted to show you the art supplies that we will be using to create our beautiful water droplet. First, it's the paper I'm using. The sacharow that is watercolor paper by Johnson and most importantly, is that it's a least 100 £40 of weight or 300 grams per square meter. It's the weight of paper, so it's sick, and it's not gonna work as you paint and you can choose any watercolor paper. It doesn't matter if you have different brand with glazing. I found that papers with glazing they don't pay that much of a difference. The only difference that I know just is when you use wet on wet techniques. And then, yes, you can see a huge difference between different brands of paper. For example, I love arches for glazing, but using arches second, I'll show you. This is the arches paper that I paint on, usually Andi, as I'm using a lot of glazing techniques. It's perfect, and it's suitable for glazing, but it's horrible with adding wet on wet. So this is what happens with all wet. These were two colors, but they think it's not good for what on what I will show you. I will do another class on watercolor techniques, and we're gonna look at the papers and how they behave differently with different techniques. So the paper I'm using the cancel cans on paper. It's not expensive, it's quite affordable. And it's great to work for sketches for anything, really. So after that, I will be using a mechanical pencil. It's, um 0.3 mechanical pencil. It's a three h lent. It has a three age lead in this one, and you can use any pencil. Actually, it doesn't matter. You can use to h by any other company. I have Farber Castell here, but as long as it's quite light and it doesn't leave that dark mark, just don't use the self blood pencils beat pencils go onto the H. That's what I'm using. Always. Then I'm gonna be using a bit of when. Gosh, this is gonna be for highlights, and I neither eraser. So I needed a racer. It's something very useful. When you're working in watercolor, you can lift up the pencil lines and not destroyed the tooth of the paper because watercolor paper is quite textured. I love working with cold pressed paper and neither racers are amazing because it just it just lift up the pencil lines. If you'd like to see how I use my needed a racer more, you can check up my biscuits and cookies, watercolor biscuits and cookies. Class. Um, so I use it there on I will show you how I use it there as well. And then I will be using my similiar watercolors. This is a set of 24 watercolors. As I've said in my previous class, I would strongly suggest for anyone, even if you're just a beginner, to invest into artists, great paints because, um and we have one would wash with my blue cerulean blue because that result that you get with professional paints and with students great paints is very, very different. You can see that this is my power. Sometimes clean it up. But usually I use, um, blues and greys. And for this class, I will be using my cerulean blue and pains. Great. You can use any colors you like. Depending on the background that you choose. Look on Google or Pinterest or on pics of as a great Web site, we can find also images that are free and not cooperated. And just look for inspiration on water droplets that you would like to paint and then decide which, um, colors You're gonna be using betel leaf or maybe, ah, flower. So, yes, it's a always a great idea to have a reference or multiple references for any thinking that you're doing so. These are all our art supplies that we will be needing for this class and also the bank brushes. I'm using my nylon brushes. This is a number eight and number four and yes, let's get started. Let's get sketching. So the first lesson is gonna be on how? Just catch out our water droplet. It might seem so. It seems simple, but, um, just pay attention where the highlights are and where the shadows are, and I will see you in the next lesson. See you soon.
3. Water Drop Sketch: Okay, So the first thing we will need to do for our water droplet is sketching the border water droplet itself. So I'm going to just draw around ST in here. This is going to be the water drop with itself. I hope you can see it. Um, I'm afraid that if I use it, if I put the pencil too hard on the paper that we will see the contour lines through the water color, but it's OK just for the sake of you seeing it, I sketched it in a bit darker than usually. And now let's decide where the light source is going to be. So I say my lead source is going to be here. So the light is coming from this side, and depending on the light source that you have your water droplet in, it's going to greet the shape of a highlight on the water droplets. So I see on my reference photo, I see the highlight here a bit here. And then there's a window that's square, like almost square in here, so it's not squared. If you know just how I drew my square. It's not square. It's kind of going around like the lines on our water droplet. So it kind of creates the illusion of being rounded. So I'm happy with my highlights. And now I need to sketch in where I want my shadow to be his watercolor. Um, sorry is drops of water. They are transparent and they act like kind of a prison. Then we see the like, passing through the water droplet, and we will actually see it come out the other end. So if it were a solid object, we would just have a shadow here on this side. And then some reflected light on the object itself. But as the water droplet is transparent and actually what's the light like passed through? We will see a reflected light he alike to coming out of it from here. And then the shadow is going to be kind of go around it and like, dissipate here. It's not gonna be a strong. So this is my general shape of the water droplet. Now let's paint it
4. Water Drop 1: So now let's paint it. I'm going to be using my number eight for the background and I will be using a mix of cerulean blue. This one was light blue and pains. Great. So I have them premixed here. This is my usual watercolor palette I love believes on, but the greens in them. So I'm gonna be just picking up the paint off of this. But basically, it's a mix of the two. It depends on what background you want your droplet to be on. For example, let's say if you want to get to be a leaf Sorry, if you wanted to be a leaf than the background, obviously is going to be green. And the droplet itself is going to be green as well. So it really depends on what you're painting. So always is, the best thing to do when you're learning is to look a reference photos. So that way you will know what color's actually used. So I'm picking up my blue that's surly and blue with diluted with water very, very much so I'm just gonna toe lived it even more so. I'm happy with this, I think, and I'm going to just gonna dab a bit with my kneaded eraser to tinker with the heart console lines Just so they're not so obvious. Okay, so the first thing I'm gonna do is I'm going to faint in the background. So this way we will give our water droplets shape What I mean by that is that where the highlights are We need something to contrast the highlights. So I'm gonna make justice. Let's say this is a square and I'm gonna go all the way around my water droplet that pickups, more paint and water and I'm going all the way around. I'm trying to make this layer is even. It's possible because it doesn't have any changes in the color of out or value. It's just a flat surface. So to do that, you just use a wash of water color. What I mean is that you delivered to your paint to make it a sin as you want. And so, basically, this is the amount that I have for my wash. And to make a flat wash, I'll show you here. You just used the same paint, the same diluted paint over and over the same area that like as far as you go. So let's say if this was the square that I wanted to paint this enough enough off paint that I diluted. But I still have paint. If I wanted to go ahead, I can still continue with the same value with the same color. And I don't have this difference between the two squares that I just painted. So they are the same color, and it's a flat wash. So it's one of the basic watercolor techniques. When you delivered to your paint, you don't take it straight from the pan, or if you squeeze it out onto your palate, you don't take it straight from the paint itself. You need to dilute it as much as you need it, and then you just paint. Let's say that this is another wash. This is a more saturated wash. I will create another, more saturated wash over here, and let's say that again. I wanted to make another square to continue to make it the longer rectangle, so you see that by using the same diluted paint I get the same color on the wash stays flat . Also, another thing to pay attention to is the amount of water that you're using. If you have a too watery, then when it dries in, my might change. Um, it might not be is even so here. As you saw, this is a perfect amount of water for glazing because it's already drive, by the way, because it doesn't allow the paint to move too much because paint flows where the water is . And this way you have this even wash with the same diluted bank that you're using. But anyway, let's get back to our water droplet.
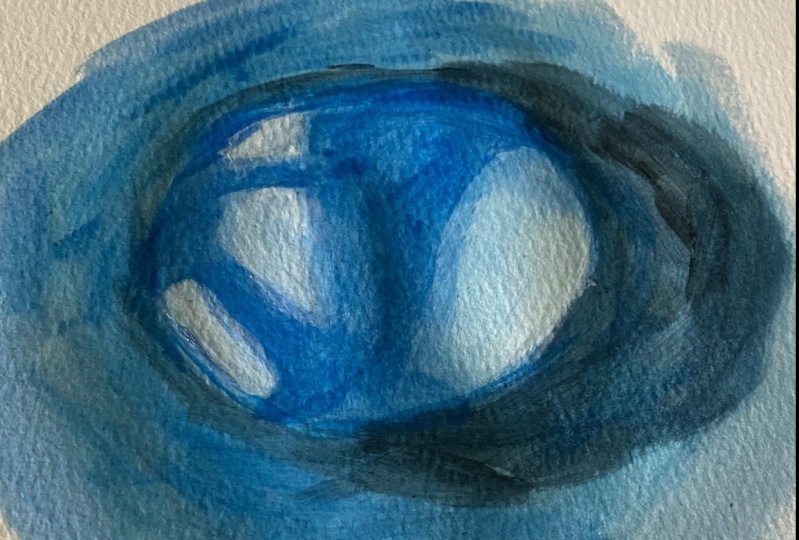
5. Water Drop 2: So now that this is dry, I'm quite happy with it. I'm going to have some more beings. Great to my blue. So this is my pains. Great. I'm gonna add it to my blue, but I'm going to make it quite watering again. So every time that I'm using my paint, I always try to lead the excess water like just brushing it against the room of my pilot or dabbing it against the tissue softly. So now I need to add some shading Teoh the droplet itself. So, as I said, here are our highlights. So I'm gonna leave those completely alone for now. And I'm gonna add the color. I think I need more pains. Grave. I want to make it a bit different from the background just slightly. And I'm gonna go around here around my highlights, and here I go, just a bit to the edge and the same thing I do here just a bit towards the edge. Here it's quite enough. So now I wash out completely my brush, it's not clean, so and I dab it against my tissue, so to see that it's clean stone up to you. And now, with my water, Just clean water. I'm gonna drag out the pigment to give it the kind of a softer transition into the rest of the droplet. So this part is going to be in the the latest part of the droplet itself, just going to move a bit. The paint here so doesn't create any hard edges. Go but further than I wanted there. But it's fine. So now again, I'm cleaning up my brush and I'm going to add just a layer of water on this late side off the droplet, just a layer of water because it's going to be the latest part of our water droplet. So I'm gonna pick up very, very few paint. Then I'm gonna add a bit those kind of a rounded motion here, So it kind of gives us the effect of roundness so you can see where there's water. The water color kind of creates a soft edge. And where there is no water, this part is already dry. It's gonna create a very card line, and this is precisely what I wanted to do for now, because it's going to be the border of our water droplet. We got a bit over the line here. It's not going to create that hard edge, but anyway, we're gonna add it in the subsequent washers. I think I'm gonna add a bit more Payne's gray here, but no painting it on, just dropping it in a bit. This is gonna be enough for now. So already we here have a kind of a shape coming out of the water droplet. So for now, I'm gonna let it dry, and I'm going to start with my shadow as soon as it's dry.
6. Water Drop 3: So now that my water droplet is dry, I've gone a bit over this site and I kind of drag the Paynes Grey into the blue where it shouldn't be. I'm just going to soft in it out with my brush just to take away that judge there just gonna soft in it out. And it's not such a big mistake, because here there's gonna be the shadow. Then I'm just dragging it out into the rest of my blue, making sure that I take away that excess paint there. Waas. I'm not even touching this part because this is gonna be shadow anyway. So this is the way you correct your watercolor mistakes or you use whitewash. So it's two ways. So now, before I dry the painting again, I'm gonna have just a bit off water clean water over my highlights. I'm just gonna go and soft on this edge as well as I do it again. I'm taking clean water constantly. I'm softening out these edges because I don't want them to be so card. And if it's too white the highlight, it's not gonna look natural. So I'm gonna pass over this one as well. Okay, So here we go For now, I'm gonna let it dry again. Now we can intensify the color on the droplet again. But I see that there is kind of a this thing going on on my like, it's not all one color. There's a reflection of what's happening from the light source. So kind of goes like this comes into the highlight a bit So I'm using my cerulean blue. Now there is just a bit of a mix of pains grain here, Onda again, I'm dragging the color out. I'm going into the highlight a bit just to take away that flat look. And I'm dragging the bank out here a bit This well, fixing it it too much in my highlight. I don't want that much there, So I'm gonna think this technique as I'm going with my washes over and over, it's called Glazing Now for the shadow. I'm gonna leave the drop alone and I'm using that pains Great. And the strongest shadow is going to be on this side and on the opposite side here as well . So I'm gonna add some great here and I can see that there's kind of a line that gives the droplet with sheep. So I have it here and on the other side as well. Hear what I said that we had better. I had a bit of a mistake there. So this is going to give the water droplet and even more sense of round this sense of shape . So again I'm washing my brush, dabbing it in the water. I'm gonna drag out the shadow here and soft India. John, decide too much. Clean that up. So I'm gonna take it through here, and we have the shadow kind off the sold ing here behind the water droplet. Clean this up. I don't want the pain to be there. It's just gonna be there, like, just deport. So this is my first wash for the shadow. Soft on it a bit more even. Here we go. Something in something out the edge here? No, We created a very sharp line here on this side and on the side. Which kind of gives me Oh,
7. Water Drop 4: Now that it's dry, I'm gonna have more pains. Great. Again on the same places here on the search on to get on the such here. I'm gonna give it shape. Sorry, I'm with my camera there, so yeah, dragging it out, which is clean water, diving my playing brush against the tissue on with just clean water and pulling it all the way here. So to create it of even darker shadow, I'm gonna just drop in a bit off Payne's gray over here. I went over the images of my water drop, but it's OK, because what, you're drops come in all shapes and sizes. So no need to worry if I went a bit over it and here again, this thing already started drying while I was fixing the other side. But watercolor paints are great because they reactivate very, very fast with water. So this is my shadow. And again, I'm gonna fix it here a bit. I just grew up it off a bit. Gone too far. Here's okay. So I got into the white off the water droplet, but it's okay. I'm gonna just pick it up. So now we have the water droplet there and just something soft thinning out the edge again , I'm gonna write again and again I'm gonna add I think I'm gonna add a bit more color to the water droplet itself Here. I wanted to be more. I want to add more contrast here. I'm going, but also into the highlight just to give it some interest. So it's not just a flat corner, so it's gonna go. And you here like that. A bit of a match here and the here gonna self then it out. There we go is gonna be quite like here. This is the darkest part. So now I'm gonna dry it again. I think now that is dry. I think I'm gonna switch to smaller brush. This is a number four to get into synthetic brush, and I'm going to intensify the shadows, especially on this side. This'll 10 my goodness. Okay, Things like that happened not to panic. It's fine. Just don't wash off my brush on. Here we go. It's fun. Almost saved it. Almost. There you go. Okay. Nothing bad happened, so I'm gonna soft in at the edge again. And I always so often it out. Not towards the water droplet. But on the outside, here, pick up a bit more Payne's gray and I'm gonna give it to shape here because the shadow goes here on this side and what's so often it out again? I see that there's not enough pain it here. I'm gonna just a bit more here like that, dropping in a bit more pains. Great. And on this side, I'm gonna do the same thing on the other side as well. Gonna intensify the shadow here, and then I'm gonna just drag it out speeded before. So basically pleasing is putting layer after layer after layer faint. And that's why you need good watercolor paper so it can accept a lot, a lot of water. And I'm gonna just soft enough decision as well. So we kind of have it just be, Oh,
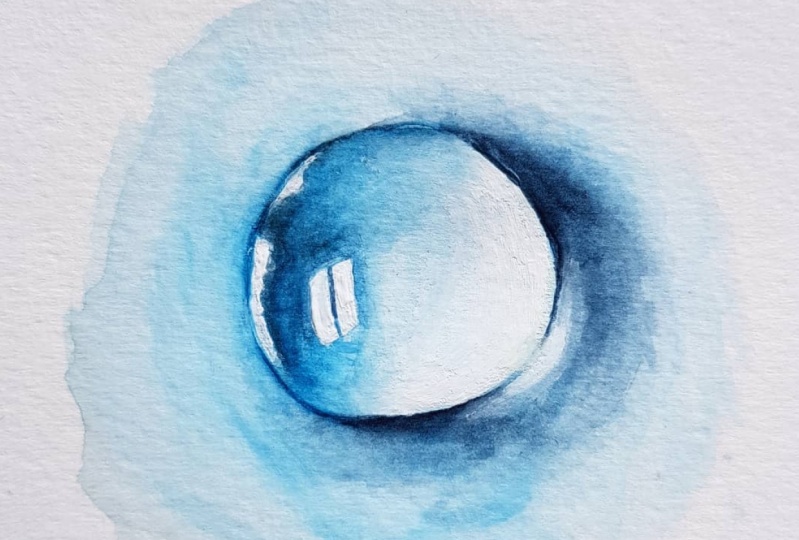
8. Water Drop 5: Still, I'm not happy with shadow here, So I'm gonna do the same thing. I'll continue adding layers until I'm happy with it. So I'm gonna add, but more great here. Also, it's intensified. This one is a very at it. The thing with watercolor is that you need to know when to stop and not overwork the painting. So this one, that's okay. And because you can go with your layers on and on and on, and Okay, I'm gonna try this one now on. And I see one more thing that my shadow kind of curls around here and I'm gonna make a very , very weak, washed off things. Great just to give it the most that's gonna dab it off against the tissue. And here it kind of girls tell a bit more or on the water droplet. And here it's darker as well. So here we go. It's gonna call like that. And when it dries, it's gonna be a lot like her. And the same thing happens on the other side. Just here. I'm like this hard edge. So I'm gonna so often it out blended into the background in this hard edges. Well, I'm gonna just soft in it out or scrub it a bit with my brush just to give it since softness and I want to hire the contrast here Still, So I'm gonna add a bit more color into the droplet inside here and again, I'm gonna soft on it out. Like that watcher on Boston it out here. But so our water droplet is almost finished. Just having a bit more three years, Just something out there. Highlight. I would add some more highlights, to be honest with my whitewash. So what I'm gonna do is I'm gonna put some weight on my water. Go. Appellate! This is whitewash by ones are new to and this is where I put it on my water. Go ballot. I'm just diluting it with water. And as it's kind of ah, sister with watercolor toe watercolor, It's the opaque version of watercolor and say I'm just gonna fix my highlight here, make it more white at the very edge. Just fixing my edge of it. Take a tick, the paint here. So I'm gonna create a deeper contrast here between the shadow and between the highlight, because it goes all the way around like this, so even going over my sharp edge that I like so much. But it's worth it because it's going to give us more contrast. That's gonna be more pleasing to the eye with more contrast. And again, I'm doing the same thing as I did with your color in the take some water clean water on just pull it into the water droplet created softer ridge. So this way we can correct all the mistakes with wet wash as well. So I'm just gonna pull it out like that and this way off, moving it around, it's gonna help us create this shape. So that's enough here. I'm just gonna because the water droplet is quite round. There we go. So we kind of created this realm nous to the shape even more. Take it away from here. But
9. Water Drop 6: I think I went over the shadow too much. I'm gonna pick it up, Likely. And then we're gonna bad. The things great again destroyed the border here, the one who wanted it. And I'm gonna delete my wife again a lot. And at this highlight that there was here. Here's the highlight. I think that's good enough. That's good enough. And now I'm also gonna fix it with my highlights with my white again. I'm gonna go on, give them too much more shape and Lindemann slightly so there's not a huge difference. Okay, so this is gonna be okay. You have more to decide. And with this one, we're gonna go like this here. Okay? I think this is great. Just gonna have a bit more weight on top here to create the highlight. From what? I dropped it and soft it out. Okay, ended right now, Theo on. And I've allowed a bit more Payne's gray because I want that contrast to be more intense here with shadows. So just again. Pull it out. I hope I have my water drop from here. Water drop on the water drop. So pulling it out again and splendid. This one in more. This one here blended out came but more paint here, there's not enough. Okay, So that'll like this jagged here line, we're gonna make it softer, this one we can soft in out of it because I don't want it to go down for May. I made it go too far of it. Mm. Dap obliquely to take a clean tissue again. I just couldn't like me dab it on. And we went too far here as well, just with clean water for hair. Self tough, tough. And I think one more thing that I'm going to do is just intensified. But the background here, just the very edge just to give it kind of more contrast. Okay, I use my bigger brush now again, the number eight good at the color to the background. So it stands up, but more because it was quite light during my flap wash over the previous wash. So let's and I say that there we have it may be a bit just of washed. Boyd, wash a bit more on here just a bit. A bit more. Just a bit. Here. Just take away this white you. So their way
10. Your Project: I hope you enjoyed the class. And if you did, I would really appreciate it if you could leave a thumbs up and leave you. And of course, I went to see your projects in the project section. That's the main thing about this class. So if you do decide to do your water drop but on the leaf for water with all the flower, that would be amazing as well. I would love to see those, and I will see you the next class.
 Katia Kot, Children's Illustrator