Transcripts
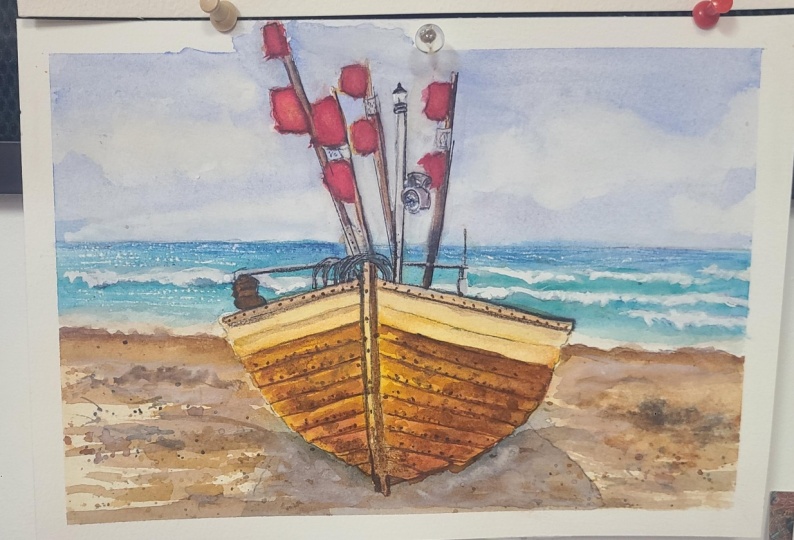
1. Introduction: Hello, and welcome to the tutorial in which
I'll show you how to paint a boat on a seashore with beautiful water
in the background. This painting combines a lot of loose elements with a bit
more detail in the boat area, so I think it's perfect
for those of you who enjoy a good balance between
looseness and detail. I would say this is
a great project for upper beginners
who would like to try something a bit
more challenging, as well as for
intermediate painters. In this painting, I simplified
the way I approached all the elements in order to achieve a more
painterly loose look, especially in the
water and sand. At the same time, I focused
a bit more on the details in the boat so that some
realism is preserved. Of course, this is not a
hyperrealistic painting. I've never really aimed
for hyperrealism. I always prefer to
simplify things and filter the reference
through a painter's eyes. I also think this painting has a really lovely color
palette and captures the peaceful mood of
a slow walk along the seashore on a sunny
slightly windy day. If you're ready to get started, let's move on to the next part where I will explain
the painting plan.
2. Project and Resources: I've prepared a selection
of helpful resources for your project available in the projects and
resources section. You'll find a PDF file with the supply list I used
for this painting, along with the reference
photo and an image of my finished
artwork for guidance. Line drawings in various sizes are also provided so
you can print and transfer them onto your
watercolor paper in the size that best
fits your needs. I painted it on a 12
by nine inch size. Additionally, there are working
progress photos to help you follow the process and
focus on specific areas. Feel free to explore
these materials and use them to create your own unique
and beautiful painting. Please share your final painting in the projects and
resources section. I also encourage you to
take the time to view each other's work in the
student project gallery. It's always inspiring to
see what others create and the support of your
fellow students can be incredibly comforting. Don't forget to like and
comment on each other's work. Lastly, I highly recommend watching each lesson
before you begin painting. This will give you a
clear understanding of what to expect at each
stage of the tutorial. If you find this class helpful, I would also greatly appreciate it if you could leave
an honest review. Your feedback will help me
improve my content and assist other students in
deciding whether to join this class.
Thank you in advance.
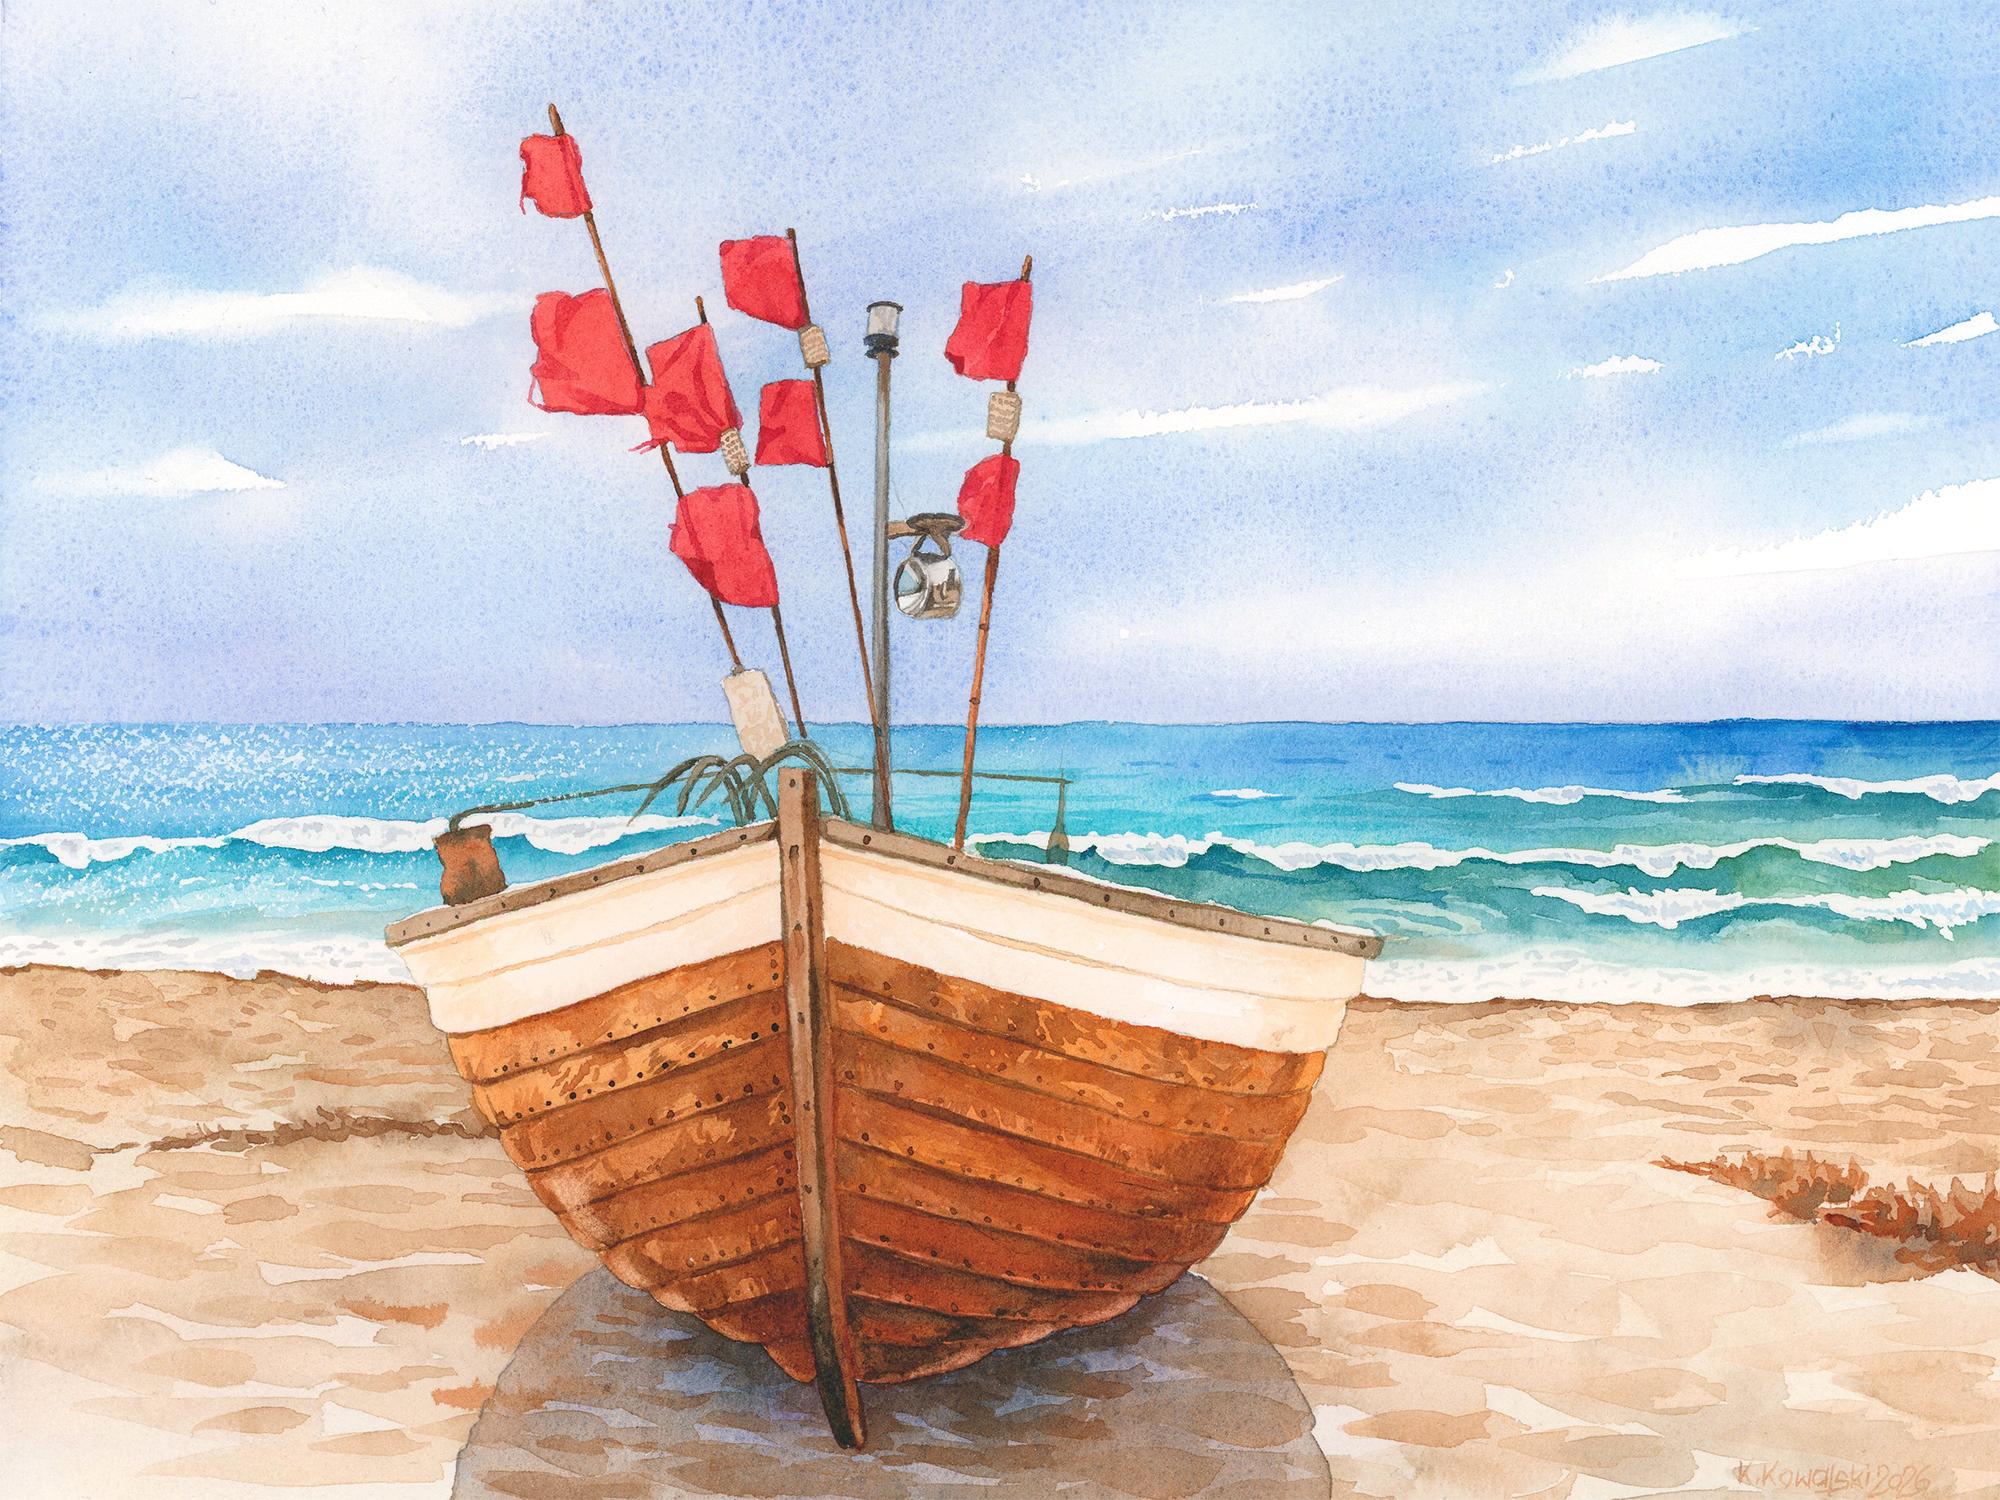
3. Painting Plan: Here you can see
the reference photo and my painting side by side, and you can already notice
how much I simplified. We could spend a lot of time on this painting and try to
recreate every tiny detail, but I believe that it's
not always necessary. Whenever possible, I try to
find ways to capture elements in a believable way without
overcomplicating things. Let's take the sand
as an example. Could paint it in
many different ways. For instance, we could
meticulously paint every shadow and dot to carefully
recreate the sandy textures. We could also use a
toothbrush and spatter thousands of tiny dots to
add more visual texture. And of course, those options
are completely valid. You can definitely experiment with them in your own painting. I decided to simplify
this whole area and use very simple brush strokes that suggest those irregular
shapes in the sand. The same goes for the water. For example, the shimmering
surface on the left side, instead of spending
hours painting lots of tiny blue dots with
white gaps between them, we'll use a much simpler way
to capture that texture. There are always
many different ways and styles we can use
to paint something. So remember that
what I'm showing you here is just one
version and one idea. There's also a name of the boat written on the sides
in black letters. Included these in
the line drawing, but I decided not to add
them in the final painting. In fact, you could write a completely different
name on the boat. If you like, you could
even write your own name. Initially, I also thought about adding some
seagulls flying around or maybe sitting on the boat or perhaps some
objects on the sand, but in the end, I decided not to overcomplicate the composition
and kept it simple. Of course, feel free to add any extra elements if you like. With every painting, we
first need to think about whether there are any areas
that should be masked out. Even though masking is
an additional step, I find that in many instances, it's very useful and sometimes necessary because it makes the painting process
much easier. In this case, I decided it would be best to mask out the flags, the edges of the boat, and the white areas
of the water. Masking these elements will make it much easier
to paint the sky, water, and sand
without having to carefully paint around
all the boat details. The wooden part of the boat isn't too difficult
to paint around, but the flags would
definitely be a nightmare. So I think we can
make our work much easier by applying
masking fluid first. Then we will begin painting from the furthest plains and
gradually move closer. We'll start with the sky, then move on to the
water, and then the sand. After painting the sand, we will remove the masking
fluid and briefly return to the water to add some details to the
previously masked areas. Once these three main background
elements are finished, we'll focus on the
flags, and finally, we will complete the painting by working on the wooden
structure of the boat. As you can see, there
aren't too many steps. Some parts will require
more patience and precision while others will be much
looser and more relaxed. Overall, I think this will
be a very enjoyable process. So now let's move on to the first part where we will
mask out the main elements.
4. Masking: For masking, I'll be using Windsor and Newton masking
fluid with a yellow tint. It may look green, but that's just the
color of the bottle. Before using it, I gently
roll the battle to distribute the yellow
pigment evenly inside. In this little container, I have a small piece of soap. We'll use it to protect the
bristles of the brush from sticking together when
working with masking fluid. I also have a cap from an
old masking fluid bottle. I like to use it to hold a small amount of masking
fluid while I work. For applying the masking, I'll be using a cheap
synthetic brush that I dedicate only to masking
fluid, never for painting. And we also need
some clean water. First, I'll pour
a small amount of masking fluid into the old cup and quickly close the bottle. It's best to close it as soon as possible so that the oxygen doesn't start drying the fluid inside and forming
clumps in the bottle. Now, I'll dip the brush
in water and rub it on the bar of soap to create a protective layer
on the bristles. This helps prevent
them from sticking together when we dip the
brush into the masking fluid. And now we can start applying the masking carefully staying
within the pencil lines. In the class materials, I will attach an
illustration showing exactly where I applied
the masking fluid. Don't rush this process. Remember that the
edges of the masking will form the final
shapes of the objects, so try to make them
as neat as possible. For smaller elements
like the flags, I'll cover the entire shapes. Later when working on the boat, I will mask only the edges. From time to time, if you feel the masking fluid starting
to dry on the bristles, take a short break,
clean the brush, and apply soap again. You may notice that
I didn't apply masking fluid to the
dark poles and hooks. That's because they
are so dark that we can easily paint over them
later with darker colors. When we apply the
proper darker values, the blue background
won't affect them. Once you finish
applying the masking, clean your brush thoroughly and leave everything
to dry completely. In the next part, we'll
begin painting the sky.
5. Sky: The masking fluid is
now completely dry, so we can begin painting. We'll start with the sky, so let's prepare some
beautiful blues. My main color will
be cobbled blue. However, I can see
a slight shift toward a warmer blue
near the horizon. So in addition to cobbled blue, I will also use
ultramarine blue, which leans a bit more toward them, slightly purplish side. Later, I may also add
some Windsor blue, but for now, we'll
begin with these two. We're going to paint using the wet on wet technique because we want the blues to spread and blend
softly on the paper. At the same time,
I'd like to create some white gaps to
suggest clouds, and I'll show you
how to achieve that. First, we need to
apply clean water. For that, I will use
a 1 " flat brush, but feel free to use any
large brush you have. I'm applying water to
the entire sky area, but I'm intentionally
leaving some dry gaps. It's best to look at your
paper from an angle so you can clearly see where you've applied water and where the
dry areas remain. Clean water can
be harder to see, so tilting the
paper really helps. I'll try to show you
the surface from an angle so you can
notice those dry gaps. I'm keeping them slightly diagonal to suggest
movement in the clouds. Once the water is applied, I'll switch to a
large round brush. I'm using size 12 and begin
applying cobbled blue. I'm also using slightly
diagonal brush strokes and leaving small
gaps in some places. When the paint
touches a dry area, it creates a hard edge and the
paper remains white there, forming a narrow cloud shape. I'll create a few
of these shapes, but I'm not strictly following
the reference photo. The reference only gives
me a general idea. Now I'm adapting that
idea to my own painting. As I approached the horizon, I switched to ultramarine
blue to reflect that subtle color change I
noticed in the reference. H After applying ultramarine blue, I noticed a slightly
more greenish tone in the upper right
part of the sky. So I decided to add a bit of
windsor blue green shade. It's actually a
nice choice because I'll also use it
later in the water, creating a beautiful
color connection between the sky and the sea. I'm just dropping it in here and there to strengthen
and enrich the blue. Once the blues are on the paper, gently tilt and move
your board around. This encourages
the paint to flow naturally and helps create
smoother transitions. I keep doing this
until I see that the paint has settled
and is no longer moving. Before leaving it to dry, I clean the masking tape around the painting by removing
any excess water or paint. When the sky is completely dry, we can take an optional step and soften some of the edges
of those white gaps. For that, I will use
my scrubber brush. It's a galeria brush size
four from Windsor and Newton. I dip it in water, blood off the s on a paper
towel and gently wrap the upper edges of the white gaps to create
softer cloud shapes. I don't want to
soften all the edges. I think it looks
more interesting if some of them remain sharp. But if you prefer, you
can soften more of them. With this brush, you
can also lift paint in other areas to create
additional soft clouds. You can do this with a
regular round brush as well. The stiffer bristles just
make lifting a bit easier. Finally, I'd like to slightly
soften the horizon line. It's not absolutely necessary, but I feel it creates
a gentler transition. Once you're finished
with the sky, we can move on to
painting the water.
6. Water: Before we start
painting the water, I'd like to draw your
attention to the left side where we can see a
shimmering effect on the distant water. It's quite a textured effect
that includes lots of white. If this painting were larger, we could even use
masking fluid here. But since this is a
relatively small area, we'll use a simpler solution. Instead of painting
lots of tiny blue dots and carefully leaving
white gaps between them, we can use a
different technique. Let me show you what we can do. I'm going to
demonstrate two ways to achieve a similar
shimmering effect. I'll use my sketchbook
to show you. The first method
involves using a candle. Here I have a small
white birthday candle. If we rub it on the paper as
if we were drawing with it, the wax sits on top of the textured surface of
the watercolor paper. Wax acts as a resist. So when we apply paint over it, it pushes the paint away, similar to masking fluid. However, unlike masking
fluid, wax is permanent. We can't remove it and
we can't paint over it. So that's something
to keep in mind. When I apply paint
over the waxed area, the pigment settles around the wax in the tiny
grooves of the paper, leaving the waxed areas white with a characteristic
texture defect. So this is one way of
creating that shimmer. The second method is much more aggressive and starts by
applying watercolor first. Here I found a page
with blue paint. Let's imagine this
is our water area. For this technique, we can use medium grit sandpaper and gently scrape the surface to reveal the white
paper underneath. Because sandpaper
has its own texture, it removes paint unevenly, creating a similar
shimmering effect. Personally, I don't
like this method because it's quite harsh
on the paper surface, but the result can
be interesting, and I wanted to show you
that this option exists. It's always good to have different techniques in
your artistic toolkit. You never know when they
might come in handy. But for today's painting, I'll use the first
method with the candle. We have to apply the
wax before painting, which can be a bit tricky because we can't really
see it on the paper. I highly recommend trying this technique first on
a scrap piece of paper to understand how
much pressure and wax you need to achieve
a satisfying effect. I actually press quite
firmly and apply a generous amount of wax to
create enough white texture. I'll try to til the paper
to show you the surface, but as you can see, the wax is barely visible. Unlike masking fluid, we don't need to wait
for anything to dry, so we can start
painting right away. I'll be using a
size eight brush. For the colors, I'll mix Windsor blue green
shade with a touch of green gold to create
a darker turquoise. Windsor blue will be my
main color for the water, but I would also like
to add something extra. On my old palette, I still have some
cobalt turquoise light, which is a beautiful color
for quiet turquoise waters. So I would like to
use that as well. It's quite opaque, but if we
dilute it enough with water, it becomes nicely transparent. Just in case I will also
keep some pure windsor blue, a bit of green gold, and a mix of windsor blue with
cobalt blue on my palette. Let's begin applying the colors. I'm using the wet on
dry technique because this is a small manageable area. I'll start with cobalt
turquoise light and then switch between different blues to vary the color of the water. You can immediately see
how the wax resists the paint and how the shimmering effect
starts forming naturally. I'm adding more paint
over that waxed area because we want to clearly see the contrast between
the blue and the white, the blue shouldn't be too pale. Moving toward the right side, I switch to a mix of cobalt blue and Windsor
blue in the upper area. Near the horizon, the
water is darkest, so I'm using a more
concentrated mix there. I'll deepen this area a
bit more later as well. So In the middle section, I'm using more cobble
turquoise light, and on the right side, I'm also dropping in a bit of green gold. I noticed some green tones in the water and wanted
to include them. Green gold is very bright and mixes beautifully with blues,
creating lovely greens. We can always dull
down bright colors, but it's much harder
to brighten dull ones. So if I have the choice, I prefer to start with
something vibrant. The closer we get to the beach, the lighter the color
of the water becomes. After applying the main colors
to the entire water area, I pick up a darker
turquoise mix and drop it in under the white
caps to suggest shadows. I also add a bit more
blue on the left side. Now we'll leave this
first layer to dry, and once it's dry, we'll return to add
a few more details. The first layer is now dry and the shimmering effect
looks really nice. I'll switch to a size six brush to add a bit more
detail to the water. I'm mainly focusing on darkening the areas under the white
caps to deepen the shadows. For this, I'll use a darker mix of windsor blue with a
touch of green gold. I'm working wet on
dry because I want some hard edges and small
gaps between brush strokes. In those gaps, the colors from the first layer
will show through creating lighter
spots that suggest subtle highlights on
the water surface. I also add very subtle
horizontal lines, especially in the distance
to suggest tiny waves. As you can see, I'm simplifying
everything quite a lot. I'm not trying to replicate
every detail exactly. Instead, I'm aiming for a
similar overall impression, almost as if I'm looking at the reference photo
with squinted eyes, focusing only on
the general look rather than the tiny details. Near the bottom, I'm dropping
in a little burnt sienna to suggest shallow water where we can see the
sand underneath. At the end, I decided to slightly adjust the
depth of blue on the right side and added a bit more of the Windsor blue
and cobbled blue mix there. Now we can finish this part and let everything
dry completely. Later, after removing
the masking fluid, we'll come back
to the white caps and add a few final details.
7. Sand: Now we can move on to
painting the sand. We're going to paint
it in a few stages, but I promise they
will be very easy. We need to divide
the process into stages because within
the sand area, we have a combination
of soft and hard edges, and these are easiest to
achieve when working in layers. When I say soft areas, I'm thinking about the
general color of the sand, smooth gradients that create
the overall base color. We'll apply this layer first. Next, we'll paint the
shadow of the boat, which has a sharp edge. We'll do this at
this early stage, placing it between
the base layer and the later texture layers. After that, we'll start adding texture with larger
brush strokes, let everything dry, and finally add smaller details
to finish the sand. May wonder why we are not adding the shadow of the
boat at the very end. Let me explain my
thinking process. So to create the sand texture, we'll be adding many
horizontal brush strokes to suggest the smaller ridges
and valleys in the sand. I want these shapes to
keep their sharp edges. If we added the shadow later, we might accidentally
soften or blur those details and then have
to repaint them again. By painting the shadow earlier, we can add the texture over it and keep everything
crisp and intact. I'll clean a space on my
palette to prepare some browns, and I'll be using
a size 12 brush. The main color of the
sand will be a mix of burnt sienna and
Windsor yellow deep, which gives a warm brown. To mute it slightly, I will add a touch
of cobbled blue. I'm using cobbled blue rather than ultramarine
blue because it's softer and won't neutralize the brown too much
or turn it gray. Just a small touch is enough. This will be our base
light neutral brown. Keep it very watery and light. If you notice any color
variations in the sand, we can always introduce
additional colors later. Start applying this base color
from the left side using a large brush and the
wet on dry technique. Don't overthink this part. We just want to cover the entire sand area
with this basic tone. I noticed a slight reddish tone in some areas of the sand, so I will add a tiny touch of
quinacradon red to the mix. U Because this base color
is quite neutral, it's also easy to
adjust and make slightly more saturated
in certain areas. For example, closer
to the water, I'm adding a bit more of the vibrant burnt sienna and
Windsor yellow deep mix, creating a soft natural
transition from a richer brown to the
more neutral base. Now leave everything
to dry completely, and then we'll paint the shadow. The first layer is now dry so we can paint the
shadow of the boat. For that, I'll mix
ultramarine blue with a tiny bit of burnt CNM
and quinacrodon red. I'm aiming for a
delicate purple tone somewhere between
blue and violet. If we painted the shadow
with just one flat color, it would look a bit boring. So while the paint is still wet, we'll drop in additional colors. Add more burnt sienna
here and there, and then more ultramarine
blue with quinacra and red, especially near the boat
where the shadow is darkest. Tilt the painting
slightly to let the colors blend
naturally on the paper. As a final touch, drop in a bit of paints gray and even a touch of
permanent lizarin crimson, if you like, into the darkest area near the
boat to deepen the shadow. We can always adjust
it later if needed. Once the shadow is dry, you'll notice how beautifully varied and colorful it looks. Now I'll switch
to asisten brush, and we'll begin
building the texture. First, we apply the base color, and now we'll gradually
build the sandy texture. We'll use burned CNA
as our main color, but we will also need
a darker brown to create that almix burned
Sienna with ultramarine blue. Pick up burned CNM and
starting from the left side, begin applying many short
horizontal brush strokes to suggest the tiny ridges
and valleys in the sand. Let these shapes
overlap and mingle. Don't try to paint
separate individual marks. Together, they will form a natural visual texture with a mix of soft
and hard edges. On the left side of the boat and on the right side
of the painting, there are also
slightly darker areas, use the darker brown mix there. Keep in mind that
the closer we get to the viewer toward the
bottom of the painting, the larger the sandy
shapes should be. Use smaller strokes
in the distance and gradually increase the
size as you move downward. In the shadow area, you can use a darker mix with more ultramarine blue
and burnt sienna to deepen the shadow, especially right under the boat. Continue adding these brush
strokes on the right side and spend an extra moment shaping the triangular
area on the right. But don't overdo it. Keep everything loose
and try to capture just a general shape with
slightly jagged edges. When you finish this layer, leave it to dry completely. In the final step of
painting the sand, we will add the
finishing details. Keep using the
same larger brush. If you switch to a smaller one, you may be tempted to
add too many details. We want to keep the
effect light and loose. We'll repeat the same
process as before, but this time we can also add a slightly darker shadow just under the water's edge to enhance that subtle three
dimensional effect. Then start adding those
short brush strokes again. This time we can include more small strokes
in the distance. The second texture layer will blend nicely with
the previous one and the overlapping
shapes will create a beautiful, simplified
sand texture. We will still see
individual brush strokes with crisp edges, which gives the painting a
lovely watercolor character. We're building this
visual texture gradually, allowing it to emerge
layer by layer. Thanks to these
transparent layers, the sand retains a light, airy watercolor feel and doesn't look heavy
or overworked. When you finish this part, we'll remove the masking
fluid and then return to the water to add a few
details to the white cups.
8. Whitecaps: Everything is now completely dry so we can remove
the masking fluid. I have this handy little tool, a rubber masking pickup tool, and I really like using
it for this purpose. You can now remove the masking from the water and
from the entire boat. I like to gently run the back of my pinky finger
over the surface of the paper to make sure I haven't missed any small bits
of masking fluid. This next step is optional, but if you notice a
very strong contrast between the water and the
white foam along the edges, you can soften that transition slightly with a scrubber brush. I'd like to soften mine a bit and integrate the
white shapes more naturally with the water so that the separation between the white and blue isn't too harsh. Uh Now I'll switch to a smaller size four
brush and prepare a very, very light tone of cobbled blue, slightly neutralized with
a touch of burnt sienna. I want to keep this mixture
very pale to begin with. If needed, we can always
deepen the color later. Using the slight tone, I'll start adding
small organic shapes to the white areas
that were masked out. There are subtle shadows and textures in the foam
and white caps, and I'd like to
gently suggest them. I begin with a very light value because I don't want to
go too dark too quickly. But in a few places, I may drop in slightly
stronger blue. On the white caps, I'm also adding some random
organic marks. These areas are quite small, so there is no need to spend too much time on tiny details. I just want to add a few brush marks to
suggest soft shadows. I try to follow the
curvature of each white cap, painting short strokes that
echo their rounded shapes. And with that, we've finished
the entire background. Now we can finally
move on to the boat, starting with the flags.
9. Flags: I think the flags are probably the most fiddly and
detailed elements in this painting,
but don't worry. We'll take this step by step and it won't
be too difficult. The only slightly more
demanding element here is the small lamp. I included it because I like the look of its shiny surface, but it's tiny, so feel free to simplify it even
more if you prefer. Let's begin with the red flags. I'll use Sis six brush for this. Our main color will
be quinacrodon red, and I will add a touch of Windsor yellow deep
to warm it slightly. Keep the mixture fairly watery, not too thick with a
medium tunnel value. Apply the spread using the wet and dry technique
on all the flags. This part is very
straightforward. Simply apply the base
color evenly to each flag. Once that's done, we can quickly dry everything
with a hair dryer. When the flags are dry, switch to a smaller brush
size four to add details. We'll need a shadow color now, so I'm going to mix permanent lazarin crimson
with the red we already used. The slightly darker
red should be enough to create the
shadows on the flags. Now I'll work flag by flag
focusing on the folds in the fabric and small
details such as tiny threads along the edges or shadows cast by the poles. We don't have to follow the
reference photo exactly. It simply gives us clues about where darker
tones might appear. I lazarin crimson
feels too dark, especially for the
fabric shadows, you can also use the same red mixture as
before without lysarin. Each additional layer deepens and enriches the previous one. Adding a different pigment
like lysarin crimson is only necessary if you
need a deeper red than quinacrodon red
alone can achieve. After applying the second
layer with shadows, I dried everything
and noticed there was a bit too much contrast between the base red and the shadows. The red also wasn't as
saturated as I wanted. In situations like this, I like to use a unifying glaze, a thin, transparent
layer applied over the entire object to
harmonize the colors. For this glaze, I'll mix an orange red using Windsor yellow deep
with quinacradn red, keeping more red in the mix. Using a size eight brush, I'll quickly apply this
glaze over all the flags. Try to do this swiftly
and lightly without too much brushing so we don't disturb the
layers underneath. This glaze will
unify the colors and make the red warmer
and more saturated. For glazing, it's best to use a larger softer brush
and a gentle touch. After drying everything again, I want to add one
final tiny detail. Using a darker red, I'll paint the slightly
darker curved corners on two of the flags, and now they are
finished, I promise. Next, I'll switch back to a size four brush and use burnt sienna to
paint the poles. I rotate the painting slightly clockwise because
it's easier for me to paint straight lines from the lower left
toward the upper right. This angle gives my
hand more stability. Apply burnt sienna to
all the brown poles. Nothing complicated here. Just try to keep the
lines fairly straight. We could use here a
ruling pen and a ruler, but honestly, it's
just a few lines and perfection isn't necessary. Now mix burnt sienna
with ultramarine blue to create a darker brown and use it to add
shadows to the pols. This will bring them to life and create a stronger
contrast against the sky. I actually switched to a size zero liner brush
here for more precision. Don't cover the entire poles
with the darker brown. Focus on areas around the
flags and the lower sections, but allow some of that lighter burnt sienna from the first layer to
remain visible. This will suggest subtle
highlights on the poles. So switching back to a size four brush, I will mix a very light gray
using ultramarine blue and burnt sienna to paint the metal pole with the
small light on top. I start with a very light value, but I quickly realize
that against the sky, it's too pale and doesn't
stand out enough. So I add another layer of the same color to
deepen it slightly. Then use a light tone of burnt sienna to paint other
small elements around. For the lamp, apply touches of brown and blue in
strategic places, making sure to leave some
white paper visible. This preserved white will help create the illusion
of reflected light. Now dry everything
with a hair dryer. Once dry, we'll add the final
details with a liner brush, using a darker brown add shadows to those small
rectangular elements. There's also some texture there. So I'm adding tiny
dots arranged in gentle curved rows to
suggest the rounded form, almost like rows
of corn kernels. Repeat the on similar
elements and add a few random marks for
texture where needed. For the small lamp at the top, which ended up a bit
crooked in my painting, start with the
darkest shapes using a concentrated mix of burnt
sienna and ultramarine blue. Paint the top, the dark bottom, and a small shadow on the pole. Finally, let's spend a
moment on the main lamp. Begin with the darkest and
most prominent shapes. Choose the ones that
stand out most to you. Work slowly and
try to be precise. To suggest shiny metal, we need a combination
of smooth gradients and strong high contrast
shapes with crisp edges. All these abstract
shapes will come together to create a
convincing metallic surface. On such a small scale, it's not easy, but
we do our best. When you paint the darkest
shapes at touches of burnt sienna in the
upper and lower areas to warm them slightly. Then take some blue. I still have a mix of cobalt
blue and Windsor blue and paint the small triangular blue shape
inside the lamp. Finally return to the dark brown and add a few last
lines and accents. The white paper we preserved
suggests reflected sunlight, and the strong contrast between light and dark shapes creates
a believable metallic look. I think the result works nicely. We've now finished the flags and all the smaller elements, so we can move on to painting the main body of the boat
and complete the painting.
10. Boat: In this final part,
we're going to focus on the wooden boat and
all its details. As I mentioned earlier, I decided not to paint
the name of the boat, but I did include it
in the line drawing. Feel free to add it if you like, or even come up
with your own name. If you decide to add one, it's best to do this
at the very end since the letters sit
on a white background. Let's begin by applying the main colors starting
from the edges. For that, we'll
need a muted brown. I'll pick up burnt Sina
from my palette with a bit of leftover ultramarine blue to
neutralize it slightly. I'll use this color to paint
the outer edge of the boat. After applying this layer, I'll quickly mix a
slightly darker version of the same color and drop it in here and there to introduce
some variation in value. This will automatically suggest areas of light and shadow. Now, we'll skip the
white wooden planks for the moment and move
straight to the brown ones. For these, I'll mix
Windsor yellow deep with burnt sienna and a
touch of quinacuredon red. This creates a very
vibrant color, but that's intentional. It's our base layer and we'll
build texture on top of it. The texture will partially
cover the strong color, but some of it will
still show through giving us beautiful
lively pops of color. Apply this mixture with
a size eight brush. Start on the left side
using this vibrant mix, then gradually switch to more burnt sienna as
you move downward. The color may look
quite bright when wet, but it will dull
slightly as it dries. Don't worry about
any imperfections. When painting textured surfaces, perfectly smooth layers
aren't necessary. Those irregularities
will actually enhance the final effect. Repeat the same process on
the right side of the boat. Here I noticed slightly
more red toward the bottom, so I will introduce a bit more quinacrodon
red in that area. The main thing to
watch are the edges. Try to stay within
the pencil lines and keep the outline of the
boat neat and clean. While the paint is still wet, we can drop in additional
browns or warmer tones, so the surface isn't too uniform and has subtle
color variations. Now, leave everything
to dry completely. Once dry, apply a
neutral brown to the central vertical
wooden piece, the stem. At the bottom,
where it's darker, use a stronger mix of ultramarine
blue and burnt sienna. Then let this layer dry as well. Next, let's prepare a
very dark brown and near black by mixing burnt
sienna with pains gray. A mix with more pains gray
will act as our black, and with more burnt sienna, it becomes a rich dark brown. I'll start with a liner
brush initially size four, but I will quickly switch to a size zero for more precision. Using the dark brown, begin painting the shadows
beneath the wooden planks. Simple dark lines
will be enough. In some places, make
them slightly thicker to suggest deeper gaps or
irregularities in the wood. Keep this step simple and
don't overcomplicate it. Now switch to a
size six brush and burn CNA to begin building
the wood texture. This part is more intuitive and therefore a bit
harder to describe, but I will explain
my thinking process. The wooden planks aren't perfectly smooth or
uniform in color. Their texture is quite
complex in the reference, but in a small
painting like this, we need to simplify it. I'm not trying to
copy every detail. Instead, I'm focusing on the general look and using
a bit of common sense. I want to preserve the feeling
of separate wooden planks, so I will keep the dark
separating lines visible and sometimes deepen
the shadows under certain planks to enhance the
three dimensional effect. Suggest texture, I will use many short brush strokes
in different directions. These small marks
will eventually build up a convincing
wood texture. Short brush strokes are
always helpful when creating textures that
are difficult to define. At the same time, I will combine these textured areas with some smoother passages of
color to create balance. The right side especially near the bottom sits more in shadow, so I will also use slightly
darker tones there. Because the boat
has a round form, I will keep in mind the idea of reflected light and add subtle highlights
later along the edge. I'll also darken
the right side of the central stem since
it falls into shadow. After drying everything, we can move on to the
railing and hooks. I'm not entirely sure what these elements are called,
but let's go with that. I don't want to overcomplicate them or spend too
much time here, so I will simply use different shades of brown
to define their shapes. In the hooks, I will
vary the tones a bit more to suggest overlapping
forms and small shadows. I'll also darken the lower
part of the central stem slightly because I feel it
should be darker in value. Finally, we can add a subtle
tone to the white planks. They are white, but
leaving them as pure white paper
might look too dark. Use a very diluted burnt sienna and apply a pale wash
over these planks. Once dry, add a
slightly darker line between them to suggest gentle
shadows and separation. Then using a very dark mix of burnt sienna and paints
gray and a small brush, paint the tiny nails
along the planks, edges, and central stem. The small detail really
helps finish the boat. As a final touch, we can
lift a bit of paint from the edges of the boat to
suggest reflected light, which enhances the rounded form. I'll use a regular
round brush for this since the brown
paint lifts easily, simply dampen the brush, gently rub the edge, and left the paint with a paper towel to reveal
a soft highlight. And that completes the painting unless you would like to
add a name to the boat. If so, go ahead and include
some lettering now. Then we can sign the painting
and call it finished. I hope you're happy with
what you've created. In the final part,
we will briefly summarize what we've
learned in this tutorial. I.
11. Summary: Congratulations on completing
the seaside boat painting. This project combined loose
background techniques with more detailed elements, and I hope you enjoyed the
process as much as the result. Let's quickly recap
what we explored. We focused on capturing
the overall mood and main shapes instead of
copying every tiny detail. We worked in a clear order, masking first, then painting from background to foreground. We created airy clouds and smooth gradients
while controlling edges and preserving light. We used wax resist and
layered blues to build depth, movement, and
sparkle in the sea. We built realistic
sand step by step, starting with a soft base and
gradually adding texture. We combined
expressive background washes with more controlled
details in the boat. We as transparent
glazes to enrich color and unify
different elements, short brush strokes
and layered tones helped us create a wooden
grain and natural textures. Small details, deeper shadows and subtle highlights
brought the boat to life. Thank you so much for
painting along with me. I hope you enjoyed this relaxing seaside project
and discovered new ways to simplify complex
subjects while still creating a rich and engaging
watercolor painting. Happy painting and see
you next time by but
 Krzysztof Kowalski, Watercolor artist