Transcripts
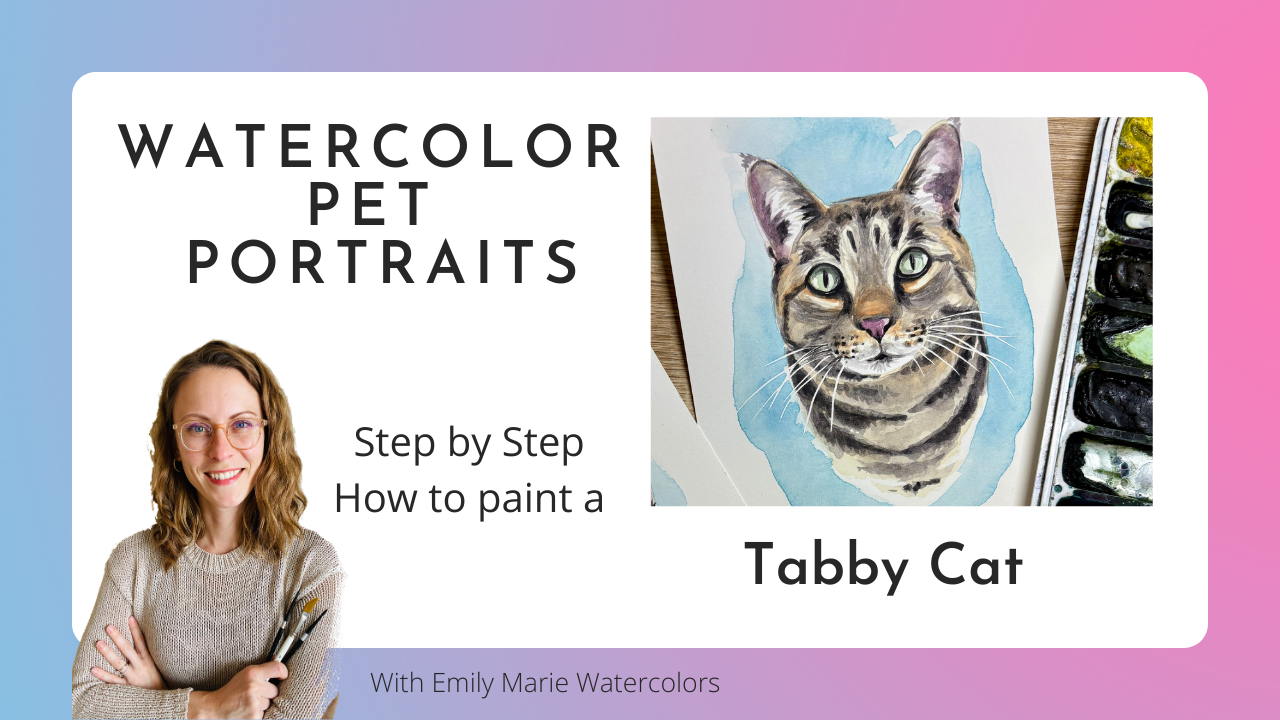
1. Intro Pet Portrait Tutorials: Hello, and welcome.
My name is Emily, and I am the artist behind
Emily Marie Watercolors. Welcome to my home studio
here in Madison, Wisconsin. In the tutorial, you'll
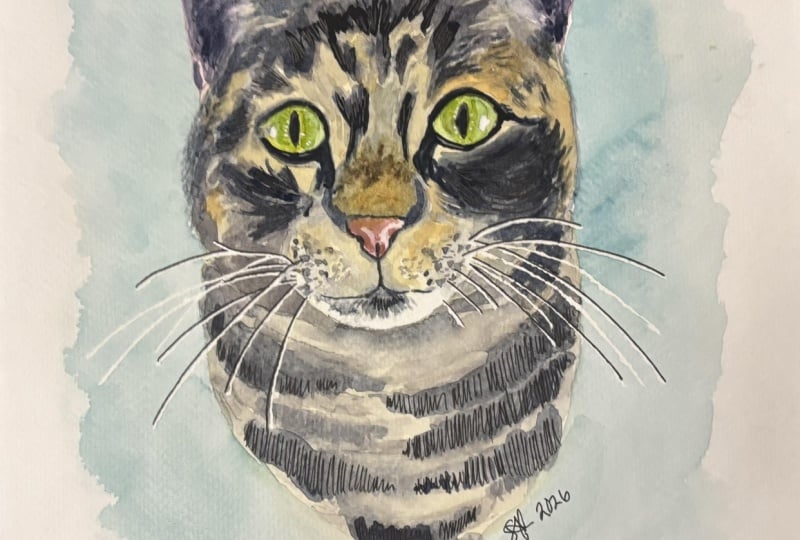
learn how to paint Tiger, the tabby cat, and watercolors. As a watercolor artist, I have found a passion for
painting pet portraits. If you already know the
basics of watercolor, painting pet portraits can
be a great way to turn your hobby into a part time
or even full time career. My style is characterized by adding details to
the mouth, nose, and eyes, but not
getting caught up in painting every
single hair or curl. Use the tracing template of Tiger included in this tutorial or use your own tabbycat as a reference for
this tutorial. You'll have access to full
color reference photos, as well as a color guide
and a supplies guide with all of the supplies and colors that I use
during this tutorial. I'll guide you through painting. Tiger the tabbycat
layer by layer. We'll pause to practice special brushstrokes that I find work well for
tabby markings. We'll then continue to
paint our tabby markings gradually until it comes together in one
cohesive painting. As an added bonus, I've even included a quick guide with step by step pictures so that you have
an easy way to see how all these layers
come together. So grab your supplies, and let's get ready to paint. Don't forget to upload any
questions that you have, and I'll try my best to answer them along the way.
Let's get started.
2. Supplies and Masking Fluid: Alright, so to paint
our Tabby Cat, I will be using arches hot
pressed, 140 pound paper. I like to get a ten
by 14 inch block. And then for my five by
seven custom portraits, I'll cut the ten
by 14 into fours. And so it's a little
bit more economical. Now, I use hot press paper for my pet portraits
so that I can use a calligraphy pen and also micron pen for some details
and for adding masking fluid. However, if you prefer to
work on cold pressed paper, you're more than welcome to try this tutorial out on cold press. I do suggest that you start
with a smaller version of a Tabby Cat just to
practice some of the markings before you
go to a larger size, such as an eight by
ten or nine by 12. For brushes, I'm
using a variety of round size brushes
of different sizes, sized zero through
size four and six. The majority of my painting is done with this
round size four. I also have a variety
of water colors. I'm using Daniel Smith colors. You can find in the resources a page with all of the swatches of the
colors that I'm using. Um, but mostly I'm using a quinacronon bned
orange, a shadow violet, a sap green for the eyes, a thalo blue for the
blue in the background, and a lunar black for my blacks. Lastly, you will
need, of course, water and paper
towel and optional, at the very end of the tutorial, you can add some final
details using a micron pen. You might need a needed eraser, another type of eraser to
take the masking fluid off and tape to tape
down your painting. So I like to use these plastic
corrugated boards that I get from Michael's in
a large poster size. And then I'll tape it onto
I'll tape my painting onto these boards so that
I have the ability to move them around and so
that they can dry flat. I'm using a tape
called Kiwi Hub. However, you can use any
painter's tape that you have, and it'll work just fine. Alright, let's get started. So I'm going to trace out my template for
Tiger the Tabby Cat, and then we'll look at
some masking fluid tips. Alright, so to
mask the highlight in the eyes and the whiskers, I like using two
different tools. One, I have a used brush that I always use for
my masking fluid. I'm using Windsor and Newton. However, there are other
brands that are also great to use, like Sinire. They also have a great brand, but I tend to prefer
Winsor and Newton. Then I'm also using
a calligraphy pen with just a basic nib
for the whiskers. So I'll start with the
highlights of the eye. And then I just use an old paper towel
to clean the brush, and I'll just pull
off the little clumps when they appear. Now, for the whiskers, it's a little bit
more complicated. So this nib that I bought, I originally bought in Mexico. However, I know there's a few different brands that
you can find in the States. You'll want to make
sure that it's a fairly small nib
in the top and that you can kind of press it open if you need a little bit
more of an opening. So I like to test out my pen with my masking fluid before I use it on
the final piece. So I'll mask it out
and see if it works. If it doesn't like this, I'll try it again. So it just seemed like it
needed a little bit more. I'll try it then on my piece. It looks like now it's working. This takes a little
bit of practice. I don't actually need to
be pressing very hard. As long as there's enough of
that masking fluid there. If I press too hard, of course, I'm gonna get too big of an
opening for the whisker here. So this is going to
be way too big versus a little tiny flick of the
wrist. We'll try it again. If you start and you notice that there is no masking
fluid that comes out, I like to take a paper towel. I'll clean it off really well. Sometimes I'll use
that same paper towel kind of push the two ends of the nib up just to create a little bit more of an opening,
and then I'll try again. If it still doesn't
work, sometimes I'll add just a little water, maybe, like, one squirt of a squirt bottle and then kind
of mix it up a little bit. You can add water to
maskine fluid to make it a little bit more water down. But it is really just kind of a learning
curve in the beginning. I might have to clean
this nib off a few times before I can actually
get that masking fluid out. But what you're left with after it dries and after
you add the paint, then after you take off
the masking fluids, you're left with these
really nice clean, bright white marks
on your paper. If you don't have
this masking fluid and your calligraphy pen, you can always use
some white paint, some white acrylic
paint afterwards, something like a PH
Martin's bleed proof white and a really, really fine tipped paint brush to then paint the
whiskers on afterwards. But I do find personally that that's a little
bit more challenging to paint these straight lines versus using a calligraphy pen.
3. First layer: Base Color: Alright, so our first
layer is going to be always the lightest
of our pet portraits, and so that's going
to be the eyes, nose, and then any other pinks. So I have two round
size brushes, around size four,
around size six. I'm going to start with
my round size four here for starting
with our iris color. So I'm going to make
sure to water this down. I'm using a sap green, and I'm turning it. I'm noticing Tigers eyes are just a little bit
blue hint to them. So I'm adding a little halo
blue to that sap green. I've made sure that
my masking fluid on the highlights of
the eyes is dry. And now, this first layer, I'm going to completely cover the pupil of the eye as well. Remember that with watercolors, we can obviously
paint darker on top. Now, to this first
layer of color, once I have this base layer, I can always drop in any
additional colors that I notice. So I am noticing
this kind of lighter yellow around the outside edge of the iris, so
I'll drop that in. I can also look and see if I notice any sort
of blues or greens, and I might drop those more
into the center of the iris. I'm making sure
to lift if any of this liquid goes someplace
I don't want it to go, so I'll just tap my brush on my paper towel and lift
any extra pigment. So for this portrait,
I am dropping in some deep sap green along
the top of my irises. I'm noticing quite a
bit of a shadow there. I will end up going back after the majority of
my portrait is done, and I will add a
second layer wet on dry of a little shadow
on the top of the iris. And so I don't have to worry all too much about adding that. To be honest, most
of my pet portraits, I don't add that drop cast shadow in the
eye just quite yet. Alright, so we are
going to move on to any of the pinks
in our pet portrait. So I'm looking at the nose. I'm looking at the ears,
around the mouth area. So right now, I'm going
to start with my nose. I am using quinacridone
magenta mixed with some water. You can always add in
a little bit of brown, especially for your tabbies. I do notice that most tabbies have more of a brown
leaning pink nose. I am lifting a slight highlight off of the top of
the nose there. And then I'm going to
use the same pink. I might water it down
just a little bit more, and I'm going to paint
the pinks of the ears. I'll start with a line along the outmost edge of each ear, and then I'll pull in
some paint strokes. And what that's going
to do is it's going to negatively paint those
white hairs coming out. So I'm kind of painting
the pink in between. I will do this step
for pretty much all of my cat portraits regardless of if you can see the pink
in the ears or not. I just might kind of lower and tone down the pink
that you see in the ears. So once again, the pink along the outside and then
whatever's left on my brush or whatever is left in that
little line of pink, I'll pull it inward. Now, depending on how dark your inside of your
tabby cats ears are, you can always go back well
that section is still wet and drop in a little bit more pink or a little bit more brown. Now, we will be doing another
layer of color in the ears, and so I'm just worried about getting that first
layer of color down. Alright, so I'm going to
switch out my brushes here. So I've switched out my
size four for my size six because I'm going to start looking at my first
layer of fur color. I'll start by adding
lots of water to my palette and
now I'm going to try to mix that lightest yellow or tan that you see underneath
your tabby stripes. So this first layer of color, we are not adding any stripes. We're not adding
any fur texture. All we are doing
is we're wanting to get that base layer of color, and that color is pretty much what you're going
to see under the eyes, and around the eyes there, that's going to be
your base color. This first layer,
I'm doing very wet. Now you'll notice
along the ears, I'll do the same exact technique here that I did on the pink, except for now instead of
on the outside of the ear, I'll do the inside of the ear. Now, because Tiger
the Tabby does not have any white except for a little tiny bit
around the mouth, the majority of the upper face is going to be this
base layer color. So I'm working quickly, and I'm using my big brush for this. I'm working fairly wet
so that I'm pushing this puddle of color
all over my paper. The other section
that I might leave a little bit of white is those little white
hairs coming out of the ears, if I can. If you can't keep that section white,
that's okay as well. Alright, so now, once I get
to this line here where I'm starting to notice the tan disseminating
into the white, I'm going to take
whatever's left on my brush of that yellow, and I'm going to kind of.it where I notice these
whiskers coming out. So I'm going to slowly
kind of blend that yellow into white so that the lower
lip there is solid white. And then I'll continue with this base layer under
the neck, as well. Now, obviously, when you
look at the reference photo, you don't notice quite
as bright of yellows. Now, this yellow will fade as it starts to
dry, and that's okay. We will have a layer of color that will
be color correcting. So we'll be adding more yellows, more oranges in the areas, particularly in the nose there, where you see more oranges. But for now, we just want
a base coat of color. This is going to kind of prep our paper so that we can
add more layers on top. And it's going to
allow us to slowly build color in a way
that makes sense.
4. Practicing Tabby Marking Brush Strokes: Alright, so let's practice
some fur techniques before we start with some of the
striped tabby patterns. So I'm going to start by
mixing my light gray. Now, you can use any gray, really, for this purpose, but we are going to start
with more of a lighter, more watered down gray, and then gradually increase
as we continue painting. So the first brush stroke that you'll see me
doing as I'm painting Tiger is using the edge
of my brush and moving it sideways to create a
thick, uneven stripe. So you can work either way. I like to work from
the outside to the inside instead of
inside to the outside. So we can imagine that
our cat's face is here. So we'll start on
the right side. I'm going to be pushing
my brush down so that the whole length of the
brush is hitting the paper, and then I'm going to
move my brush along. I might make these little
movements up and down. I might slightly pick my
brush up in certain spots. But I want the right end
to be a little thicker. And then as I come
to the center, I want the center to
be a little thinner. So you can imagine some of the stripes around the
face, around the neck area. I can kind of make them a little bit more
curved if I want. So I would have my
stripes instead of being straight across. I might have them a
little bit more curved. So I'm just going to
start to practice maybe different sizes using this technique where I'm using kind of the edge of the brush. I might, like I said, I might slightly lift
it up a little bit. I'm coming from the right
in and from the left in. And then I can always go
back before they dry, and I can kind of fix some of these edges with more
of the tip of my brush. But I do want to have
that uneven edge because that's going
to help create this look of that our tabbies
have of these markings. Okay, so that's one
brush technique. I use this technique
more for my underlayers, and then I would have a different technique for adding some details on top. So I'm going to add a
little bit more gray. You'll notice this in a
later part of the tutorial, but you can still
practice this now just because you might find
that this other technique, this other brushstrokes, might work a little bit
better for you. So instead of these thick
side angle on my brush, now I'm going to angle my brush a little bit
more so that the point of my brush is a little
bit more perpendicular. And so I'm going to use dashes to add a little
extra detail than on top. So I shouldn't say dashes,
I should say Talies. So these tally marks are
talis that are touching. But we want to make
sure that these talis are staying in the
shape of the fur. So you'll notice that if
I'm going around the eye, maybe my tally marks will
look a little bit different or if I'm going to the
side or the face, okay? So if you're imagining
this is the neck, I don't ever want my
tally marks to go with the curve of the neck
because then it's not going to look like
our tally markings. We want our tally
markings to be diagno. And I might want some
of them to be separate, but I would want some of them to be most of them to be joined. This whole time I'm using a
lot of liquid on my brush. And these tally marks, now, this is the dark this is
fairly dark in comparison. But you'll notice that
in the video tutorial, a lot of these tally marks, I'm going to keep until
the very last layer. So that's going to be
my darkest layer on top is going to be
these tally marks. Now I can also use
a combination of talies and then
swiping my brush. So I might tally
and then swipe in, tally and swipe in. This all kind of depends on what you feel comfortable
with as you're painting. The other thing that you'll
notice me doing quite often after you've
kind of figured out which of these techniques
works the best for you is you might notice
that I'll start with some of these markings, and then I'll grab a
little bit of water. And I'll use that water to
just blend out the edges. Maybe it's the
bottom edge or maybe it's blending out
towards the center. And so I'm constantly deciding depending on
where these curves are. So wherever my highlights are, I'm going to dilute it a
little bit with water. So I might come in from the side and then grab a
little water and kind of dilute my marking
so that it looks a little bit less
towards the inside. It's a combination of
diluting with water and then touching my paper towel so that I don't have as
much liquid on my brush. And then I get this
really nice gradiation from dark to light. So let's try that one more time. We'll load up our brush. Maybe
let's start left to right, or we'll start with
some of these markings. I'll kind of stop midway,
grab a little water. I might tap and grab a little bit more water
because it's not light enough. And then I'll tap when
I'm done and kind of lift some of those edges so that those edges aren't
quite as dark. These are different types
of brushstrokes and different techniques that
you'll see as I'm painting. It's okay to leave a lot
of these edges hard edges. In fact, we want a lot of these second and third
layers to be hard edges. But these first layers, the first layer of markings, you do want to have
nice and light and try to blend them as much as you can
into the background.
5. First layer of Gray Markings: All right, so now that we've
practiced a little bit, now we're ready to start with our layers of gray
with the markings. So first, I'm going
to use my size for round brush and grab some water along with
some shadow violet. So I'm starting with a gray. Obviously, we're going to
add a few layers of gray before we add our darkest
layers of black on top. So what we're looking for to cover is all of the
areas that we're noticing that has kind of this darker brown for our tabby, and we're trying to keep open for that
underlayer yellow to shine through all the areas of yellow that we notice
on our painting. So this is around the
transparency opacity that I have of this
shadow violet. So it is fairly transparent. I'm adding quite a
bit of water here. I want to make sure that
this first layer of color is kind of my way of blacking out where
these colors are going. So I'm not as concerned
yet about adding these individual tally marks
for the Tabby markings, but rather, I want
to make sure that that gray is where
it should go first. And in order to do
that, I need it just very light and transparent. Now, as I'm painting this gray, I am trying to paint my lines going around where I'm
noticing the fur pattern. So around the eyes, I'm painting my grays
going around the eyes, and I'm trying to block out those triangles that you see
on the inside of the eyes. I'm also trying to block out a little bit of yellow
around the eyes. So here I blocked out
that big triangle. Now I'm coming into the
center of the nose to kind of block out that
center gray section. Now, as I come under the eye, I'm going to make sure to
leave quite a large section under the eye there for that light highlight under the eye. And then you'll notice
that I am leaving a little bit of that underlayer to shine through in
certain sections. I'm keeping a really
light touch on my brush, and I'm using the
tip of my brush in the locations that
I want to kind of let some of that
yellow shine through. I know that I can always
add more color on top. And so, like I said,
I'm just trying to kind of place where
this gray is gonna go. When I get to the
center mouth here, I'm using quite a lot
of liquid on my brush. I know it's hard to
tell with videos, but there's quite a lot
of liquid on my brush. This helps me to control exactly
how much pigment I have. I can always lift if the
pigment gets too dark. But I can only lift if there's enough water there
to begin with. If I'm working with
a very dry brush, but still with
pigment on my brush, it's gonna be a
lot harder to lift that up if it gets too dark. So I am one of those Watercolor painters
where I think I tend to work a little bit wetter
than most Watercolor artists. And that's simply just because
I feel like I can kind of control my paint and pigment
a little bit better. So I've kind of gone a little off script here where I started working on the ear, and then I decided I was
gonna drop in a little bit of this darker shadow violet
in the center of the ear. Um, occasionally, I do
that where instead of, you know, I tell you, I'm just going to do that
first light layer. And then I see a section
that I have time to drop in. Now I'm not dropping in any other dark shadow
violet on the face, simply because my paper
being hot pressed, it's drying really fast. So when I'm doing
these fine markings, on the face, particularly, I don't have enough time to drop in some of that
darker pigment. And so instead of dropping
it in wet on wet, I'm going to wait and do that dark pigment
for a second layer. However, the ears being
a smaller section, I do have time to drop in
a little bit darker of pigment and kind of
avoid an extra step. Alright, so I'm
back to working on that first layer of the face with this watered
down shadow violet. I'm coming into
the left eye now. There's quite a large shadow
along that tear duct. And then there's
quite a large space of yellow under the eye. So I'm making sure
to leave that open. And then once again, using
the tip of my brush, leaving a little
bit of that yellow to shine through. That's okay. It's okay that it's
not a uniform layer. And then I'll use my
watered down brush and add some darker spots along
the whiskers, as well. And, of course,
here's where being that it's so wet, they
get a little dark, so I dry my brush off with
my paper towel and I just soak up some of those dots that got a
little bit too dark. Now, when we take a
peek at the mouth here with our tabby cats
with any cat, really, we are going to have the darkest of the shadows on the lower lip. So it's this little triangle
section of the lower lip. I know you might see some
shadow on the upper lips, but we're going to wait
to add that shadow until this lower lip fully dries and until we've
got a better sense of, do we really need
that shadow or not? Alright, I'll continue mixing a little bit more of
this shadow violet, and then I'm going to
take a peek at the neck. Now, the neck line, I
know is slightly covered by the little house that our
cat is in the little tunnel. And so I'm going to try my best to add these markings where
I'm thinking they might be. And I'm noticing these markings running darker along the edges and then lightning up as
you get to the center. So that's how I'm going
to add these markings. Just like how we practiced, I'm using a very thick
edge of my brush, and I'm kind of squiggling
it up and down, making these edges to be
uneven as I pull inward. And then, of course,
where to stop, especially since we're doing
just the bust of our cats. So I always like to make my cat's neck a little
bit more triangular. So the point of the triangle is kind of where
I'm going to stop, and this tends to mimic
the head really nicely, and it kind of rounds
off my painting. So I'm going to add
a little center marking here on the neck, and then that's going
to kind of give it this more triangular
shape on the neck line.
6. Darker gray details in eyes and nose: Alright, so at this
stage of my painting, I like to pause and add a few more dark gray details
to the eyes and nose, just so I can place where those darkest shadows
are gonna be, I'm still using shadow violet. I am using my size
round four brush. However, if you have a detail brush that you'd rather use, feel free to use
that brush instead. Alright, so I'm
going to start by outlining around Tiger's eyes. Now, most tabby cats, most fully tabby cats, not like white tabbies white and orange tabbies or white with a little
marking tabbies, but full tabbies are gonna have fairly dark rings
around their eyes. It's gonna be pretty
well outlined. Now, I still don't want to use my darkest of colors
for this step because, of course, if I make
a mistake at all, I want to make sure I can still lift it up with some water. So I start by painting around
each eye and into this, like tear duct that falls
in the center of the eye. And then I'm going to
add that first layer of the pupil still all with
this same shadow violet, just with slightly more
pigment than water, but still mixing it
with enough water, like I said, so that I
can lift if I need to. Alright, so I'm going
to move on to adding a little bit of dark
outline to my nose. Now, I'm going to
keep the darkest of my sections outlined
on this bottom V. So I've got my two nostrils. They're barely
indented in the nose. It's just a little
slight cut out, and then I'll use that shadow violet gray to
just outline along that bottom V. If you notice this little split in that bottom section of the nose, you can add that as well. And then we usually do have a little bit more
darkness coming out of the upper
corners of the nose. Now I'm adding a
little bit of water onto my brush so that
I can kind of blend that upper edge and somewhat connect it to those tear
ducts coming out of the eyes. Now I will add a little bit of shadow violet along
the top of the nose. However, it's not
going to be quite as dark as along the
bottom V there. And so you'll just want
to be careful that that upper line is
not darker than that lower V. I will dry
my brush off and use a dry brush to just lift
and blend that edge.
7. Second layer of Gray Markings: Alright, so now I'm
going to start on my second layer of the gray
markings of my Tabby Cat. And so to do this, I'm still using shadow violet. And the color that I'm
mixing is going to be a fairly similar consistency and transparency
as my first layer. I do have my little test strip where I have that
first layer down, and I'm going to test just how dark it is on top of
that first layer. A lot of beginner pet
portrait artists will have too stark of contrasts
between their layers. And so your second
layer, although, yes, it needs to be just
slightly more opaque, it shouldn't be
obscenely opaque. I'm still adding quite a bit of water to this shadow violet. And I'm noticing as I'm
painting the second layer, if it's looking a little too illustrative or if
it's just looking off, a lot of times I notice
that that's because my second layer is a
little bit too opaque, so I'll add a little bit more
water and then try again. Alright, so now for the
second layer of gray, you're gonna notice that
I'm using a lot more of these hash mark technique that I was talking about before. I am going in to where I'm noticing it's
the darkest first, and so that would be
the top of the head. And then I am using more of these tally dash
marks around the eye. You'll notice I'm going with
the same shape of the eye, so I'm arcing it
above the eye here. And then I'll continue
bringing it down and into the right corner here. Now, it's important
that we still leave this first layer of gray to shine through
in certain areas. So I do want to start looking, taking a peek at where are these more apparent
markings on the face? And then that's where I'm
adding my second layer of gray. Now, you'll also
notice that I'm not really blending out these
hash marks all too much. I am leaving these
edges quite hard edged. Now I can do this because
my second layer of gray isn't too dark and opaque. I can always go back and blend out some of
these hard edges if they end up getting too hard. But for now, I want to
make sure that I have hard edges so that it
reflects the individual fur. Now I'm gonna continue
showing you this video. I'm not going to
speed it up at all because I do think
that at this layer, it's really important for you to see kind of how quick
my brush is moving, but also kind of the way in which I'm moving my brush and the direction of
these brushstrokes. So I'm going to let you
watch where I'm making these markings and
where I'm adding this second layer in real time. Now, at this point, I'm
noticing that the yellow underneath the eyes
is quite bright, and so I am adding the
slightest of little markings on the upper and lower edge of this yellow with just whatever
grays left on my brush. All that is doing is it's just toning down that
yellow just slightly, and it's creating
a little bit more of a blended edge
without blending. Alright, so I'm
going to speed up the next video just slightly. We're going to continue on with the second layer of
gray on the neck. We're doing the same
exact brushstrokes that we did for the first layer. We're just making
sure that the darkest of these sections is
towards the edge. And I'm also going to leave a few individual
hairs out, as well. So you'll notice along
the lowest section here, I might leave out just
a few individual hairs just to add a little
extra detail. And then we'll also
add a second layer of gray to the inside of the ears. We already added a little bit of extra gray on the
outside of the ears, and so we're going to add just another shade on
that inside section.
8. Color Corrections, Glazing: Alright, so at this
stage of my painting, I'm going to take a peek
at color corrections. So before I continue with
my darkest layer of color, either dark gray,
dark brown or black, I'm going to go back to
the eyes, nose, mouth, and any of those
yellow fur tones, and I'm going to correct
some of the coloring. Now, these color corrections
are often done using glazes, so they're light,
transparent layers of color. I'm going to start by
taking a peek at the eyes. So for a lot of my cat eyes, we don't usually have very, very dark coloring in the eyes, but usually you can
notice multicolors. So we've already done
that first layer with a little bit
more yellow tones, and so I'm coming
in with a sap green and adding a little
bit of darker green. Now, you'll notice I am
leaving a little bit of that lighter coloring to shine through around the
outside edge of the eye. This is going to give
it just a little bit more depth instead of adding a complete
second layer to the eye. I'm still gonna allow that first layer to
shine through in spots. After the eyes, I'm going
to take a peek at the nose. Oftentimes the tabby cats, we do want a second layer
of quinocreomgenta, or quinocretomgenta mixed with some sort of brown on the nose. I'm keeping the
second layer just to the left side of the nose to keep that little
highlight on the right. Alright. And then after I'm
done with the eyes and nose, then I'll take a peek
at the yellow and orange coloring behind my tabby. So that first layer that
we did with yellow, we wanted to keep
that really nice and light and transparent
so that we could add our second and third
layers of gray for the markings without
discoloring those markings. But now that we have those
first few layers of markings, we can go back and we
can see where do I have some darker shades
of yellow and orange. So I'm noticing for Tiger, that there's a little bit
more orange tones around the nose and the lower
section of the face. So right here I'm using it's a color by art philosophy
called sassafras, but an equivalent would be
a burnt orange of any sort. So a quinocradon burnt orange would be a similar color here. And I'm still mixing
it with quite a bit of water so that it is transparent. I can always drop in more opaque pigment once
that section is wet, but I definitely don't
want to go too dark. Adding oranges to your tabies, it's very, very easy
to go too dark. And so I do definitely
suggest that you start off lighter with
these light glazes. You can always add a
second glaze or drop in a little bit more opaque as
you continue painting. All right. And then I
will add a little bit of orange then to the
outer edge of the neck, as well as around the ears.
9. Layer of Black: Alright, so we're finally ready for our black layer of color. So I have here mixed with
quite a bit of water. I have some lunar black, and I'm checking it on top of the first two layers of gray, make sure that
it's not too dark. Oftentimes, when we're
adding layers to tabby cats, we're adding layers that are too dark and the same is
true with our black. So I do want to make sure that my black is still
quite watered down. I'm still remembering, though, that my black is going to dry lighter than what it
looks like when it's wet. But I just want to
make sure that it's not too much of a contrast. Now, even as I'm painting this, I am realizing that it is
quite a dark contrast. However, I also know
that I can go back and lift up if any
sections get too dark. At this last layer of black, this is where I'm wanting to
add more individual hairs. You'll also notice
that I'm not extending my black layer all the way covering my first
few layers of gray. I do want to leave a
little edge and rim around the black that
is gray instead of covering all of the gray layers because
that's going to help to kind of assimilate that black into the fur instead of
having it stick out so much. Alright, so I'm going to speed up this layer just slightly. The most important thing to
remember as you're painting your black layer is that
most of our black layer, we will not blend. There's only certain areas
that I will blend the black, and that's where I'm noticing a slightly darker shade that
isn't quite as detailed. So in the center of the nose
and that bridge of the nose, that's one location where
I'll blend out my black. But most other locations, I'm going to keep
those edges hard. I know that I can always soften up those edges after it dries, but I want to give myself the chance to see what
this painting looks like while the edges are hard and after the
black layer is dried, because I do know that it will
lighten up significantly. So here around the
nose is where I'm going to add just a
little bit of water to my brush to whatever
black I have on my brush, and I'll just pull
that black upward into that center portion of the nose because I do want that
portion to be darker. However, I don't
want it to be as dark as the other
markings around the face. Now, as I add a little bit
of black under the eyes, I am going to leave, like I said, some of
that gray underneath. And so I'll add
my lines that are going running along with
the eye and that eye shape, but I'll leave some space
in between those lines. And then that is going to
help give that texture of our Tabby Cat fur without us doing individual
hairs for that. Now, when I get to the
nose and mouth area, I'm still going
to use some black around the nose and mouth, but I'm going to try
to keep that black into that middle triangle area. You Tabby Cat might
have more browns in that white area or it
might have more white fur. If you have more white
fur, like, tiger, you're going to want to blend
out some of those whites. So I'm using a little
water on my brush to just dull down some of the
white in that mouth area. Now when I paint my last layer of lunar black on the neck, I'm going to make
this last layer have the most details in it. So I'm still using my
watered down lunar black, but I'm using more
hash marks than I did in the first few layers. So you'll notice
a little bit more marking texture on the
neck in this last layer, but I'm still trying to keep the darkest of values around
the outside edge. Now, when I move on to outlining the eyes and the blackest
details in the eyes, I'm going to use my darkest of black values around the eyes
and in the pupil of the eye. So I'm using great caution here, but trying to have this be the darkest of values
in my painting. I'll also add some of the darkest values to the
underside of the nose, particularly around the nostrils and in this little line in
between the nose and mouth. The line on the top of the nose, I might not fully connect. And then that line in
the center of the nose, I can always blend
slightly using water. The last little thing that
I'm going to do before I add some extra colors
around the outside of my pet portrait is going
to be I know Tiger from a different photo has
these little hairs off the end of his ears, so I'm going to add
that with a little bit of lunar black as well. Last thing that I always like
to do with the eyes is add a little arc of shadow in
each eye using lunar black. This helps to give
it a lot of shape. Alright, so, lastly, I am going to take
another peak now that my black clayer has
dried and see if I need any more intense
black anywhere. So I am still using some
water with lunar black, and I'm just adding a little bit of extra in the
darkest sections. Most of the time I'm noticing my darkest sections
are going to be around the eyes, nose and mouth. And then if there are any
special markings that I really want to be prominent that are looking prominent
in the reference photo, like the very clearly defined
M on Tiger's forehead, I can also add a
little extra layer of lunar black there to just
highlight those extra markings.
10. Second layer of Color Corrections: And then I'm also going to do another layer of
color correction. So these are my layers of glaze. So I'm noticing
that the nose still quite isn't as dark as
the reference photos, so I'm going to
add another layer. I'm also going to add a little
bit more pink to the ears. So glazing can happen really at any stage
of your painting. However, it is nice to have multiple spots where you do glazes instead of just
multiple glazes all at once. So I did a layer of glaze
before I did the black, and I'm doing a layer of glaze afterwards if I still need
to correct any of my colors. The reason being is
we just don't want to have these colors
go too dark too fast. So I'll add another
little glaze of orange around the
nose and cheeks, and then I'll take a peek at
if I need to glaze any gray. So here in certain sections, I'm going to use a wet
brush and go over some of these gray areas where the
gray is slightly darker. I'm also mixing a
little bit more of shadow violet and just
adding a glaze of shadow violet in these areas of the face where I need it
to be a little darker. I do still need the
highlights around the eyes and on the
forehead to stand out. But everywhere
else, it seemed to me it was still a
little bit too light. And so I'm glazing that gray in those areas just to
tone down those areas a little bit so that
the highlighted areas can really stand out.
11. Colorful Background Splash: Alright, so now
that I'm done with my main painting of the cat, I want to add a little
colorful splash behind. So I'm adding water to
some palo blue here. I am checking the opacity
because I do want it to be similar
to the first cat that I painted for this client. She ordered 25 by sevens
of two different cats. So I'm adding just
a little bit of yellow there just to change up the blue and to slightly green it to a little
bit of a turquoise. And I'm checking it on
a test strip to see if it matches the original
color of the first portrait. Now for the colorful
splash behind my cat, I do want to make sure
that I'm covering that masking fluid from the
whiskers that I covered. I do want those
whiskers to stand out against that bright
blue background. So I will add water first to this section then I want
to add my colorful splash. Now this colorful splash, I'm painting wet on wet, so I'm wetting the
section that I want to add the color to. I'm doing it wet on
wet simply to have extra time before
my edge is dry. So that way I can kind
of correct my edges. I can extend them.
I can soften them, and having my first
layer of water will extend the amount of time that I get to correct those edges. I'm still gonna work in sections because hot press
paper dries quickly, so I'll work mainly
in three sections here as I'm adding my
colorful splash behind Tiger.
12. Final Details: Alright, so I usually
like to leave my pet portraits to dry overnight after I add
the colorful splash. And then the next
day, I'm gonna come back and add any of
the final details. The first thing
I'm going to do is erase the masking fluid, using either a needed
eraser or gum eraser. And for this step, obviously, you have to make sure
that your colorful splash is completely dry. Now, I usually like to
come in after and add just a little bit
of shadow around where these white whiskers
are attaching to the cheek. Sometimes that masking fluid is a little bit too hard edged, and so I might come in
and just add a little bit of that lunar black
or shadow violet along some of those dots. Now, you can also use
this shadow violet or lunar black to darken
any of those whiskers. So if there's a few whiskers that aren't quite bright white, you can also use a wet brush and kind of dull them
down just slightly. Now, in my reference
photo for Tiger, the top of the whiskers are
a little bit more black. And so I'm using a micron pen to just kind of trace over
some of those top whiskers, especially where they're
coming out of the cheeks, and that's gonna kind
of tone down that white and help add a few of those
darker black whiskers. So I have to apologize that
I completely forgot to record the taking off the highlights of the eyes
with the masking fluid. Usually what I will do for the
highlights of the eyes is, of course, I'll remove
the masking fluid first, and then I'll take a usually, I'll take a damp brush, and I might I might soften
up the edge just slightly. It all depends on
where my highlight is. I might have to use a
little black around the outer edge to just correct the shape
of the highlight, but it's very minimal. But I did forget to record
that step, so I apologize, but it is an important one. C.
 Emily Marie Watercolors, Watercolor Artist and Dog Lover