Transcripts
1. Intro: Siamese Cat: Mm Hello, and welcome. My name is Emily, and I am the artist behind Emily
Marie Watercolors. Welcome to my home studio
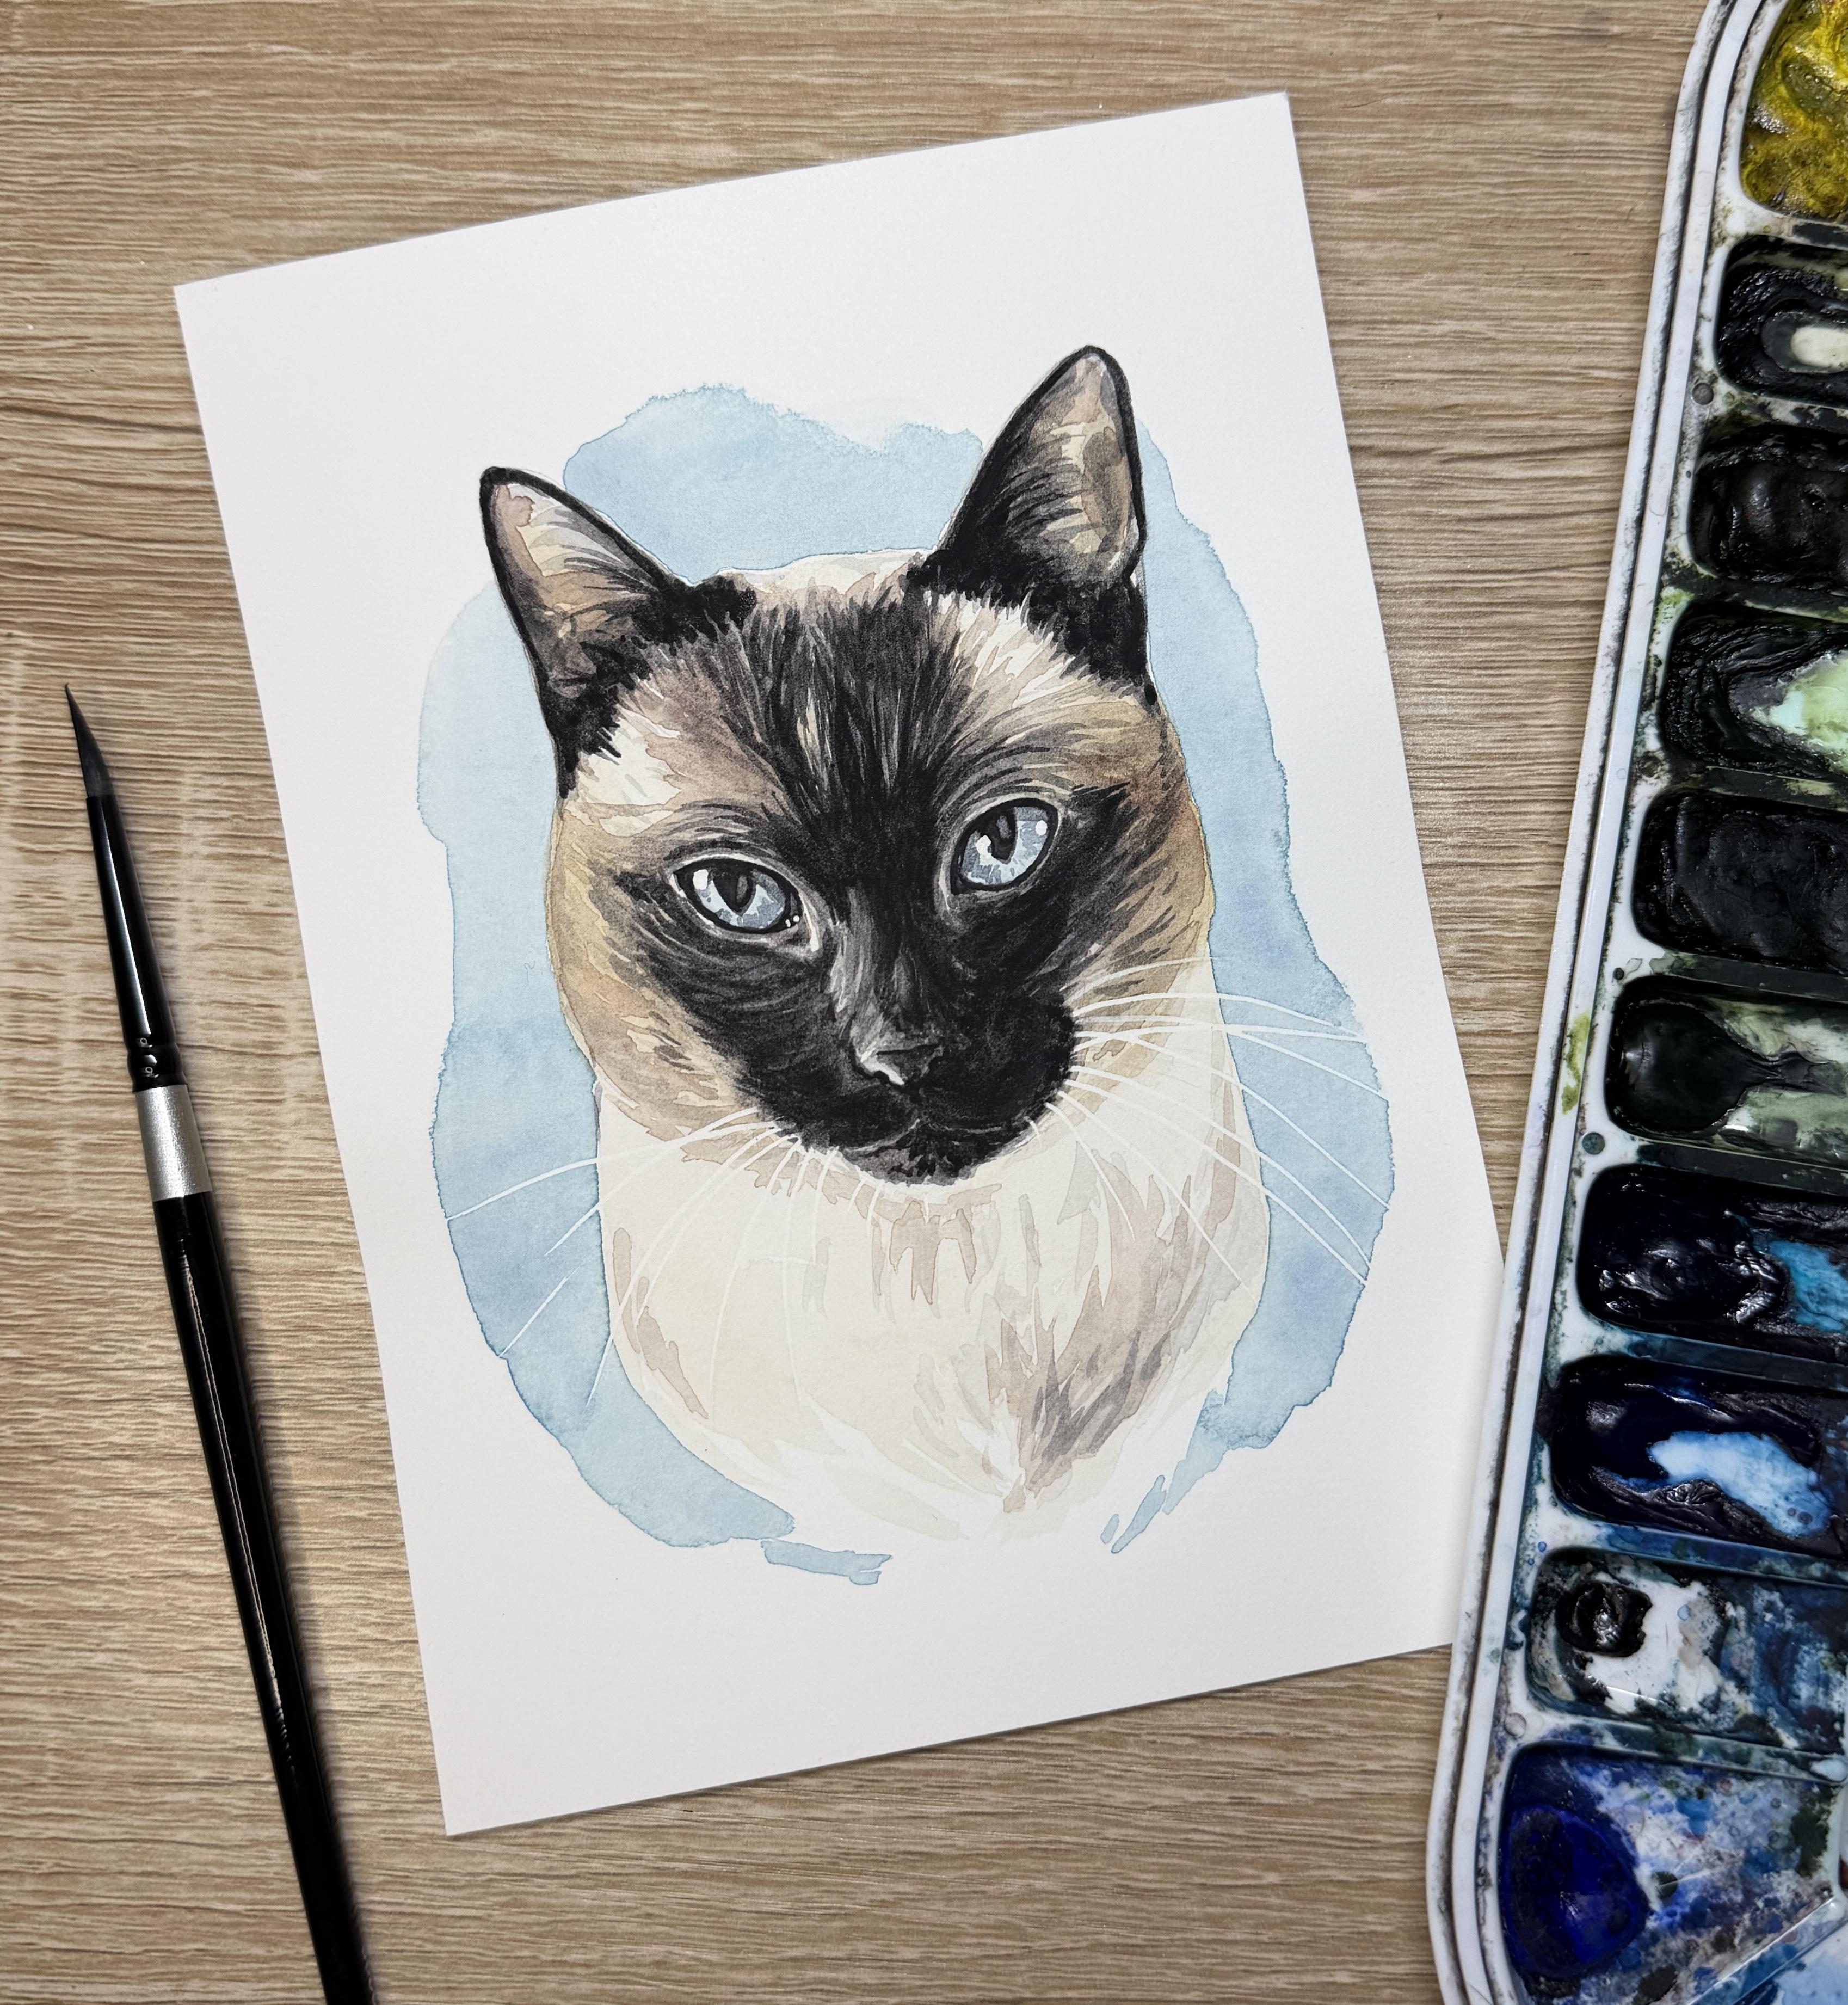
here in Madison, Wisconsin. In this Skillshare tutorial, you'll learn how to paint Champ, the Siamese cat
using watercolors. As a watercolor artist, I have found a passion for
painting pet portraits. If you already know the
basics of watercolor, painting pet portraits can
be a great way to turn your hobby into a part time
or even full time career. My style is characterized by adding details to
the mouth, nose, and eyes, but not
getting caught up in painting every
single hair or curl. In the resources tab, you'll find supplies guide as well as color guides
for this tutorial. Use the tracing template
and color reference photos included in this tutorial to trace out Champ
the Siamese cat, or use your own reference photos and sketch out your
own Siamese cat. In this tutorial,
we'll look at how to layer the tans and grays of a Siamese cat in a way
that doesn't create hard edges or nasty
white outlines. Then we'll talk about adding a final layer of black to
accentuate the facial features. We'll look at adding
details to the eyes, nose and mouth and
complete our painting with a colorful background
splash of color. As an added bonus, I've even included a quick guide with step by step pictures so that you have
an easy way to see how all these layers
come together. So grab your supplies, and let's get ready to paint. Don't forget to upload any
questions that you have, and I'll try my best to answer them along the way.
Let's get started.
2. Supplies and Applying Masking Fluid to Whiskers: Alright, so let's talk supplies
needed for this tutorial. So, first off, let's talk
about our paper choice. So I am using in
arches hot pressed. This is 140 pound paper. I enjoy painting on hot press
paper for my pet portraits, mainly because it's
nice and smooth. I can sketch things out. I can get really fine details in the eyes, nose and mouth. And then I can always
have the option of using a migranPen at the end to help with details
or some whiteqh. It also helps for me to mask my whiskers on hot press paper since it doesn't have any bump. You are more than welcome to use cold pressed paper if you
prefer hot pressed paper. It's a little bit more slippery, I would
say, to paint on. The cold pressed, and you
definitely don't have as much time to work
on hon press paper. So if you'd like to work on cold press,
that's okay as well. I like to buy mine in
ten by 18 inch pads, and then I will cut them
into four, five by seven. This tutorial, I'm
painting and chase a Siamese cat or Champ a Siamese cat on
five by seven inch paper. You are more than welcome
to do slightly larger. However, know that you might need to chunk your sections into slightly smaller
sections so that your paper doesn't dry before you can get that
whole section done. After I have my sketch out on my five by seven
inch sheet of paper, I will, um, tape it down onto a plastic
board to paint on. For brushes, you would need
a variety of round brushes. I like using silver limited
black velvet brushes. My kind of go to brush for most everything
is a round size four. You can find a larger
brush if you would like, for the first layer of color where we're just kind of getting color down
over everything. And then you might also
want a detail brush like around size zero
for some of the smaller, finer lines and areas. Now, I will make mention
and show you how to use masking fluid to
mask your whiskers. I'm using a calligraphy
brush with masking fluid. If you do not like using masking fluid or you
want a different option, you can also use PH Martin's
bleed proof white with a long rigor brush
or liner brush to paint on your whiskers, your white whiskers
at the very end. For paint choices, I am using a palette of Daniel mostly
Daniel Smith colors. You can find links to the exact colors
and the names of all the colors in
the resources tab. It's a color guide
and supplies guide. For the majority of my painting, I'm using a raw sienna light for the browns and, like, tans. And then I'm also using for
the majority of my painting, a color by Daniel Smith
called shadow violet. If you do not have
shadow violet, you can use a Paine's
gray or any other sort of warm gray that you
have in your palette. And then I'm also using black at the very end to add some
of the darkest details. I'm using lunar black so that you can see
through that color. It's a little bit
more transparent than a very dark black and opaque
black like a lamp black. You can always mix your own black if you do not have a black in your palette, and any other color
substitutions according to your cat or your palette
are definitely acceptable. You'll of course, need
water and a paper towel, and let's get started. Alright, now that
we have our sketch done of our Siamese cat, now we're going to add
the masking fluid. I like to use Windsor and
Newton masking fluid, and I also like to use
a calligraphy pen. It has a very simple
nib on the end. You can also use you can
try your hand at using a glass pen or a ruling pen. I do like using this
calligraphy pen, although it might be
a little challenging for you to find the
right size nib at first. Sometimes you have to push
them up and open a little bit. You definitely need to
practice ahead of time. For this, so I'm
going to practice it first on a scrap
sheet of paper. Got some scrap sheets here. Now, with my masking fluid, if I try this and
it's not thin enough, if it's too thick, I can
add a few drops of water, shake it up, and
then try it again. So the first time that I
do this, no, of course. I'm doing the video, so it's
gonna work the first time. If my first time starts and
I can't get anything out, sometimes it will work if I dip it in a second time
and then try again. Sometimes it gets
dried too quickly, and so then you'll want
to take your paper towel, clean it off completely. Kind of bend it upwards to make sure there's
no sticky pieces, and then try again. If you are trying it again, like I said, you might need
to add a little bit of water. Sometimes I keep two separate masking fluid
containers in my studio. One that's just normal, and then the other
one that's slightly watered down for whiskers. Okay, so now that I
have my masking fluid, I'll dip it one more
time in the nib. I like to turn my paper so that I'm pulling it really
nice and gently. Of course, as I'm talking, it starts to dry out. Now, I don't have to press
very hard when I'm doing this because I'm using
hot press paper and because it is a
little watered down. And then not too that
you don't have to follow these guidelines exactly the ones that you marked
with your pencil. We just kind of
want a rough guide. I like to turn my paper
now as I do my other side. I always find that
pulling down for me tends to create a
nicer, smoother line. And now, you might also
notice that I am not doing these whiskers
all concentrically. So I don't have them
nice and lined up. There's going I
like to try to make at least one of them
cross over the other, even if it doesn't show that
in the reference photos, right here, I
crossed one on top. Right here on the left
side, I crossed one on top. The reason I like doing
that is because it creates a little bit more diversity
than in the whiskers. It doesn't look as man made. And then I'm going to
use the same nib and calligraphy pen to add a little white
highlight to the eyes. Now, I do not usually do the
whiskers over the eyebrows, even if they are
quite prominent. I've just found that it's a personal preference
that I think it looks better when you
don't have it on top. The only exception to
that would be like a Tuxedo Cat where it's really dark black
and the white on top of the eyes is
really prominent. Otherwise, with most
other types of cats, I will not add it on top. Now, if you do not like using the calligraphy pen
and the masking fluid, you do have other options. So you would not mask
any of the whiskers. You would just mask
the white of the eyes, or you can still use this
for the white of the eyes. This is doctor PH Martin's
bleed proof white. You mix it with a little bit
of water from your brush, use it directly out
of the container. And then at the very end, after you finish painting, your whole cat, it's all done. Then you can take I
usually like to use a rigor brush or also known
as a script or a liner brush, and then I will wet it. I'll just kind of show
you what it looks like on a different sheet of
paper on a scratch sheet. So I would wet the rigor brush, get my doctor PH
Martin's bleed proof white, all nice and wet. Now, I'm using a rigor
brush because this will give me a nice long line. I just have to make sure that I'm using the gentlest of touch. But you notice I can
actually create a line that pretty much reaches
from one edge of the paper to the other. So it's really nice and um, it has a lot of capacity
in the brush to create these long
these long whiskers. And so this is also
another option if the masking fluid is not working out
that well for you. This would also be
a great option for adding any of the little
tiny eyebrows on top. So once again, pH Martin with a rigor or a liner brush
at the very very end. Alright, now that
we have this done, now we're going to attach
our paper to our board. So I like to buy these little
plastic corrugated boards. I get mine from Michael's
here in the US. You can tape it directly to your desk or whatever
surface you're working on. However, I do like to be able to move my painting
as I'm painting. Now, a few options
for taping it down. You can use green frog tape. This one my dog got to. Or you can also use there's
a brand called Kiwi Hub. You can find this on Amazon. I don't I haven't seen it
in art stores in the US, because it is, I believe,
an Australian brand, but this Kiwei hub
actually is a great tape, and it keeps it secure and in place without it
tearing your paper. So I'm going to
tape my paper down, even though I'm not going to be painting all the
way to the edges, mainly because I want
to keep it secure. I also don't want it to buckle
all too much because I'm not using a I'm not using
a block of paper here. I'm just using a
regular sheet of paper because I am painting
a five by seven inch. So I don't expect it to
buckle all too much, but taping it down
is going to help. Alright, now, I'll let it
dry just a little bit, and I'll be ready
to start painting.
3. Painting the Iris Color: Right now that it's
dry, I'm gonna start painting with my
lightest colors first. Now, as far as brushes
are concerned, I do have a size zero, four and six silver limited
black velvet brushes. These are round size brushes. I will mostly be using
this round size four. However, I will switch to
my round size six when I'm doing larger
areas of the furs. I'm going to keep
these all close. I'm gonna start,
though with my size four. I'll get it wet. I made sure to switch out
water so I don't have the white pH martins
in my waters. I've got clean water.
I'm going to start by mixing my color for
the iris of the eye. So I'm grabbing some water on
a new section of my plate. And now, Champ, the Siamese
cat has more of a blue, a very light blue,
almost teal like eye. It's a little bit gray as well when I look at
their reference photo. So I'm going to start
with this thalo blue. Add just a little bit
might even be too much. Just a tiny bit of
deep sap green. I had to add a little
bit more blue. I just want the little bit of a leaning towards
teal, but still blue. White water down,
and I'm going to use this for my base
layer of the iris. So I made sure that the
masking fluid is dry. I'm going to paint this
whole area of the eye here over the top of the pupil. I'll paint the second eye. I'm leaving it really
nice and watery. If it's too watery and I
can't get a nice point, I'll dab my paper towel to kind of get a finer
point as I'm working. Trying my best to make
both eyes a similar shape. Alright. Now that both eyes
have this base color, now I can always go
in and I can add drop in a little
bit of color if I need to so I can color correct, or I can add a little bit of darker color around the edge. I think I'm going
to try a little bit darker of color around the edge. So I'm gonna pull
just a little bit of indigo directly from my
pan onto a damp brush. Now, my brush isn't crazy wet. I don't want it really wet
because if it's too wet, that indigo is going
to completely fill up. That tan or that teal
color that I just painted. So it has to be a damp brush
but not completely dry. And now I'm just adding this indigo around
the edge of the eye. If you're noticing
that your teal is infiltrating into
the center of the eye, dry off your brush and
then use your brush like a like a sponge and
just soak that in. This is definitely
an optional step if you start doing this
and it doesn't work. Kind of just stop it. You can always do this as
a second layer, cleaning my brush, drying it, soaking up where that
went a little too unruly, because, remember, I
want this first layer of eye to be really
nice and light. It's okay if I have some of these coming in a little
bit more. That's okay. Alright, now, usually,
at this point, I would suggest doing any of the pinks of the
ears or the nose. Now with our Siamese cat, we do not have any pink in the nose because
it is all black, and there's not too
much pink in the ears.
4. First Layer of Tan: So instead, we're actually
going to switch brushes. We're going to do the
layer of tan first. So I'm using my larger size six, and I'll get a clean section of my my palette add some water. Now, this tan color, we're going to paint over the
entire section of our cat, even the sections that we
will paint black on top of. And we're looking for the
lightest tone of tan. So here I'm actually going to be choosing and
I can't see it. I'll move it over. I'm choosing a raw sienna light for this tan. I don't want something
that's too yellow. Um, so I'm not looking
for a gamboge, I'm not looking for
a burnt orange. I want something like
sienna or raw umber, something that really
is not too bright. I can always test this on a test strip before I
paint it on my painting. Now, I do want this first
layer to basically just stain my color because I'm noticing that Champ
is not fully white. I can always drop in
a little bit more of this raw sienna into sections where I'm noticing that it's a little bit darker. I can drop that wet-on-wet. But I still need to preserve
the lightest color first. So most likely I'm going to have to mix
more color than this. I'm, you know, if
you were mixing two colors together
for this base color, I would suggest mixing
enough to start, but I don't really
need to do that. Now, if you are like me, you're working on
hot press paper. This step goes pretty quickly. I'm going to start in
one section of my paper, and I will just cover the
entire section of the face. If you are doing your
own Siamese cat at home, and there's a section that
is pure white at all, I would leave this tan
away from the white. So you would paint around
that white section. But because Champ here
really doesn't have any section that
is that is white, I'm going to paint the whole
face using this tan first. No, I did come down
into the neck. I actually don't
want to come into the neck because I know
that this will dry quickly. So I'm actually going to do
just the face part first, and then I'll come back and
I'll do the neck afterwards. I'm already noticing that parts of this are
starting to dry. I want to be careful
coming too close to those eyes so I don't
pull any of the teal in. Got a little fuzz there. And even though this first
layer is going quickly, I'm still kind of looking
at where can I segment it? And this is where I chose to
segment it here on the face. Now, this is where I'm
saying if you had wanted to drop in any of this raw sienna, grab just a little bit
directly from your palette. And then I'm noticing
that there's quite a darker raciena
here on the edge. I can always drop a
little bit in here. There's a little bit raw sienna, a little darker
down at the base, a little darker by the ears. Now, I can only do
this step like such if my color is still wet. So I'm noticing
over in this area, it's already starting to dry. So at this point, I just want to get it mirred I'm not gonna worry about really
bringing it up into, maybe I can add a
little bit here. You're really gonna have to kind of judge when you're painting. Do you have time for
this or do you not? If you don't have time
for this, that's okay. This step you can always do
after the first layer is dry. Kind of working on my
edges a little bit. And now I'm going to take a
peek and make sure that I did not get that raw sienna in these sections where it's supposed to be a
little bit lighter. It looks like I did a
fairly good job with that. Alright, now I'll grab
my lighter color again. And now I'm going to
look at the chest area. So the chest is a little
bit lighter in color, but there are lots of
tufts here in the center. I do want my color to come
up against the chin here. I do not want it to be
like a line of white, and I do also want
it along the edge. However, I'm going
to kind of make up what the center of
the chest looks like. A lot of times, if I have a cat that's looking
straight on like this, I'm going to try to angle the hair so that it's triangular
towards the center. So to do that, I like to grab some color from the edge
and kind of pull inwards. And then once I get
to the center here, now I'm going to kind of pull
a little bit of a triangle, some on this side,
some on this side. And I'm going to start to let some of the white of the
paper shine through. You do want to kind of start at this point to blend it into
the white of your paper. So I know that's a little hard to see since it's
so light in color, but I'm happy with kind of how it's blended at this point. I've got some brush strokes
coming in from this edge, some from this edge, with some
white shining in between. Any variation of color
here in the neck, I'm going to do
with a second layer just because it's
drying so quickly. Alright, we'll let that
dry and then we'll get going on our first
layer of black.
5. First Layer of Gray, Part 1: Alright, so at this point,
we have two options. Option one for you is to
mix a slightly darker of this tan brown and add a second layer right now to the areas
around the cheek, around the ears, around the eyebrows to make that
your second layer of color. Or your other option is to
start with your first layer of that black area in the face using a gray and your
lightest shade of gray. Um, I think I'm actually
going to choose that option. The reason being is I want
to kind of place that gray before I place
the darker browns. So either option
could work for you. It's just for me in my head, that's the way that makes sense. I want to see where the
black is going to go before I put down
another layer of brown. So my thinking is first
layer of light brown, first layer of light gray, then second layer of slightly darker brown
and second layer of darker gray, and then black. That's kind of my thought process when I'm
going through this. I'm going to switch to
my size four brush here. And I'll clean off this section down below so that I have a
little bit more space. Add some water. Now, the
gray that I'm going to use, I always like to use gray
before I use any black. And for some reason, I always come back to this
shadow violet for my gray. It's a warmer gray. You can always use
Pains gray and just add a little bit of purple to it Pains gray tends to look a little cooler since it has
a little bit more blue tone. I like this shadow violet because it's a
little warmer to me. I resembles I think it goes a little bit
better with browns. And so this is the gray that
I'm going to start with. I do want to start with this
lightest shade of gray. I don't want it. I want
it nice and water down. I don't want it to be too dark. For a few different reasons. The first reason is if I paint in a section
I don't want it, I can lift it up really
fast with my paper towel. And just keeping
it a light shade and then somewhat
darker and then black tends to help my brain
to not overwork the piece. Otherwise, I feel
like I try to add too many layers and then
it gets too complicated. So I usually try to
stick to three layers of dark color for any of
my sections of black, there's lightest gray, a
medium gray, and then a black. Alright, so this shadow violet
is a granulating color, so you will need to continue
to mix it before you start. I'm going to start on the ears only because that
is the best place, I think, to make a mistake. If you're noticing that
your shade is a little bit too dark for your cat, then it's a good place to start. Now, here's where
I'm going to start right away with
negative painting. So some of this gray Oh, see, right here,
already made a mistake. Take my paper towel, lift it up. I'm going to be
negative painting up to the edge here where it's
really nice and white. So I'm pulling that gray into the cracks and crevices of where that white
hair would come out. And then I switch to positive painting here
at the top of the ear where now I'm pulling out my black hairs that
are covering on top. So this whole
process of painting, we are going to be
using a combination of this negative painting
and positive painting. Alright, and that's where
I'm going to pause. I want to just kind of fix
any line here on the edge. I'll do the same
thing on this ear. Now, you can imagine
if I started really dark in these ears, one, it's gonna be a lot more
intense for me as the artist, where I might be really nervous
about making a mistake. So this helps me to
kind of ease into it. Just Alright. Now, this side here, it looks like the gray is coming down just a little bit
more into the face. And so, once again, negative painting along
that kind of line that I drew between
the dark and light. And then filling in the rest. Keeping it really
nice and wet here. And when you keep it nice and wet, it's also going to help. One, it'll give you more time, but then also it will make
for really nice clean edges. And then coming in here and adding some
positive painting, the actual, like, little
hairs that are coming out. Adding a little bit more
water to my brush to get a little bit of the shadow
here on the inside of the ear. I might dry off my brush just
to kind of blend the edge. So it's not a very
hard edge there. Now, you might notice kind of some blue tones here
in the gray section. I'm okay with that.
I don't mind it. I actually like giving a little bit more color to these areas where
it's gray and black. Alright, now that
my ears are done, now I can work on the face. I'm going to work on kind of
around the eye area first, the left eye, and then
work into the right eye. Once again, I'm using
a combination of kind of filling in a
little pool of color here. And then from that
pool of color, then I can pull some strands
into that lighter area. Same thing. Another
little pool section, and then pulling some strands into that lighter
section on top. Trying to keep a little bit of a highlight in that
corner of the eye here. Now, at this point, you can either work on this
section of the eye. I'm going to work here so that
I don't have a hard edge. This is kind of something where as you paint
more portraits, you're going to learn a little bit more about how
your papers drying, what sections of your
painting you can do before it dries. Oh. I'll come around this edge here. Looks like there's a pretty
light section around the eye, so I'm gonna try to kind of keep that a little bit lighter. I can always darken it
up if it gets too light. And now here I'll start
working on the nose section. Now, the nose is
I'm going to do it one solid layer except for there's gonna be this
big highlight here. Gonna try to leave a little
bit of a highlight here by the nose. And you know what? Actually, I'm gonna
go around the nose. I just want to make
sure I don't lose it. Um, underneath my color here. And then I'm going to
do this section of the lip and kind of come
around to the cheek. I'm gonna fill that all in. And then I'll come
over to the side. And this is where now I still have a lot of this gray
tone on the edge here. And so I'm going to pull
this gray up into the cheek. And I'm using some brush strokes to kind of mimic the hair here.
6. First Layer of Gray, Part 2: On the cheek. I'm not going
to do this lower section yet. I want to get this
left hand section figured out first
before it dries. So coming up to that edge, kind of re wetting it, and then taking a peek as
to how far out it goes. Once again, I'm going to
leave that nose open for now, and I'll come to
the bottom cheek, bottom edge of the cheek and
then the tops of the lips. Fill that all in. And now I'll work on the section
coming out of the cheek. Looks like it's kind
of stopping more or less in this area here around
the corner of the eye. In this circumstance, it's
always easier to add more. Later, it's a little bit more
challenging to take away. So I do want to kind of
keep that edge here from getting too dark from
going down too far. Alright. Now I'm going to take a peek at these little sections here now that I kind
of outlined my area. When it comes to these sections
of these highlights here, I want to be very sparse with the extra kind of details
that I'm adding in. So I might add in one
or two little hairs. But overall, I want
to keep it clean. If I add too many
little hairs here, it's going to dirty
up the color. So I'm not really following
too much my reference photo. Like I said, I do want to
keep it nice and clean. When I come to the
forehead up here, it looks like I'm going to
add just a little bit of a shadow up on this edge, just a little bit
coming in on this edge. And then on this cheek, I can I'm noticing that there's
some little hairs kind of coming along the edge of the cheek here where
it's a little bit darker. This is something that I
am using my paper towel to adjust to make sure that it's
not getting too dark here. Kind of following the curve of the cheek here
coming underneath. This is also where I might add a little bit of extra brown, and if I need it after I'm
done with my dark layer, I actually added quite a bit over here, so I
think I'm good there. And now I'll add just a little bit to
the front area here, but I do want to lighten
it up a little bit. I don't want it quite as dark
as what I did on the face, so I'm adding a little bit of
water to a corner section. And now it seems like this section down here is going to be where
it's the darkest. And so that's where
I'm going to start. And I'm still going
to follow kind of the curves here of the body, at least the curves
that I designated. The curves in the reference
photo is actually kind of moving the opposite way since the body is
kind of tilted. So I don't necessarily
want to be using my reference photo for
the angles of the body here. I do want some little
tufts coming down, but I don't want that many, so I kind of have one
or two tuhs here, one or two toughs
there, but keeping the majority of the darkness in this kind of lower
right quadrant, I do want the lightest section of the cat to be down here. If it gets too dark
down on the body, then you lose how the
Siamese cat looks. So if it gets too dark, dry
your brush and pull off. Pull some of that pigment
so it's not too dark. Alright, it seems
like this mouth biit is starting to dry, so I'll add a little bit
of color to the mouth. Now, it is important that you are doing this mouth section separate and letting the top
dry because as you can see, I've got now this hard
edge by the cheeks, and it comes into that
nice kind of W shape. And we do want that. If we paint it at all
at the same time, we wouldn't have that
nice edge there. All right. And then same with the nose. It seems like the nose here is now dry or this area
around the nose. Now, if you are working
on cold press paper, it might not dry as
quickly as mine does. Now, the thing about Siamese
cats is that their noses are actually lighter than
around the edge. So I'm actually drying off, and along the base
here of that V, I'm going to just lift
a little bit of color. Alright, so this
is our base layer of this first layer of gray. Now we'll work on adding our second layer and adding some darker colors to the eyes.
7. Darkening the Eyes: Alright, at this stage, I kind of like to
go into the eyes, a little bit and add then
some darker shadow violet. This will be the first layer of the eyes around the
eyes and in the pupils. I'm still using my
size four brush. However, if you need one that's
a little bit finer point, use a smaller brush for this. I'm going to start by
outlining the eyes here and then filling
in the pupil. I want to make sure
that I'm keeping to the outer edge of the iris, not the outer edge of this lighter color
that's around the eye. I still want to try to preserve this lighter edge
around the eye. I just want my darkest
section here on the eye. And then I can
fill in the pupil. The first layer, at
least, of the pupil. Same thing to the other eye? No, painting these pupils so that they are the
same size and look correct is probably one of the most challenging
parts of painting a cat. I tend to constantly come
in and correct them. Ever so slightly making it just a little bit
bigger here or there. It's much, much easier to
make them smaller at first. And then push the pigment to the edge and make
them slightly larger. If you need them larger, it's much more
challenging if you get too big and then
need to take some away. Now, it's going to look a little awkward before we add another
layer of color there, so please don't
worry about that.
8. Second Layer of Gray, Part 1: Now that we've got around
the edge of the eyes, now we can do our second
layer of the shadow violet, which is going to be
just slightly darker. So I'm adding a little bit more of the shadow
violet to my water. So if I were to check
this second layer, it is going to be a little bit darker, of course,
than the first. Not a lot darker, though. I mean, remember that
we are painting on top of this first layer, and so it's automatically going to be a little bit darker. Same thing. I'm going to
start in the ears first and where my darkest
section is going to be. Around the edge of these ears. And then where I'm seeing the darkest sections
of this black fur. Now, this is where
on this layer, instead of filling it
all in on the inside, now we're going to be
using our brush and making some brush strokes
for all these little hairs. So this is where we get
into keeping a very, very light brush stroke
as we're doing this. We still can fill in some areas. So in the corner of this ear, I can fill in that area. But remember that we do want to add a little bit more of the
hair details in this layer. Now, adding these hair details, if this is getting
challenging for you, definitely practice it on
a scratch sheet of paper. I like to keep my brush
fairly vertical here. So here's how I'm
holding it with my hand and the tip of my brush, I'm barely touching to my paper. Now, this is why I like using a size four
because it still holds quite a bit of water versus if I'm using a size zero, Um, yes, I can get
really fine lines, but I actually have
to I have to stop painting fairly soon because it can't hold all that much liquid. So I'm I'm used to
painting with a size four. However, I can see how size
two would also be nice here. Alright, so we're
going to continue on into the forehead area. This forehead area is going to be the most
challenging to paint, simply because you've got some variation of color
here from dark to light. But there are some
sections that are lighter, so I'm noticing there's a
tuft of light or hair here, so I'm going to
start along the top. And I'm making these
little hash marks, so I'm constantly making
these little lines. These little hash
marks to two, 222. And that's what is
making my hair. And so I left this
little section open. And now coming
over to this side, I'm noticing that there's also another little section that's kind of left open a little bit. Now, it is the darkest
in the center here. And so I can kind
of connect some of these hairs and kind of just paint the darkest swatch
in the center here. And now, once I get
towards the eyes, now I'm going to
be doing this kind of fountain technique. Where here at the
bridge of the nose, it's going to start to
get a little bit lighter in color. There's a section. There's a highlight here
on the left hand side. So I'm going to start doing instead of working
down to the nose, I'm going to do these
eyebrows on top. I like to turn my paper a little bit so that I'm using
the natural arch here. Now, it tends to be
darker along the top. There's a little, like, dark edge here that kind of
almost looks like eyeliner. And then it gets a little
bit lighter on the edge. I'm going to pause. I'll do this other arch
first before it dries, and then I'll go underneath. So it looks like my dark values are quite
close to the nose here, although there's some lighter closest to the eye that I
want to try to preserve. It's pretty similar in this
right hand eye where we've got that little line
here on top of the eye. And then we kind of fountain
outward from that line. Now, to blend these edges, you can also tap your
brush on your paper towel, release some of that liquid, and then you've got a little bit less pigment
on your brush to kind of blend some of these edges here where it gets a
little bit too dark. Alright, I'll mix a
little bit more color. Like I said, this is kind of the most challenging of the steps. This layer this in between layer because this
is really setting the stage for where the hairs and kind of
the shape of the hairs, where where those are going. All right now in the center
here is really quite dark. However, you've got a little
bit of a highlight here, we've got the dark
coming along the center of the nose kind comes inwards. There's a little bit of
a triangle highlight, and then it's just darkness on this right hand side
until we get to the eye. I'll come under the eye. It's quite dark under the eye. However, there is
this little kind of lighter ring around the eye, then I'm going to
try to preserve my best, the best that I can. And then this whole section
here is just quite dark. And so I'm not going to
worry about any sort of fur strokes here
until I get to the edge. And then once I get to
the edge is where then I can start to add some of these individual I just want
to be careful to not go too far out to still kind of keep
it close to this edge here. And now this cheek is
really quite dark. Around the nose, we do want
to be careful because, remember, the nose
is actually lighter. I am going to come around
this nose, this edge. There is a slight kind of cut
out from the nostril here, and then it comes down
to a little bit of a point and a little
bit of a point. Now we're in the center
of the nose here. This whole section
is going to be dark. No, this whole section
on the inside here, I'm obviously going to
be having to adjust. That's also kind of the
nice thing about using granulating colors here is that they actually
lift really well. So if you needed to re
wet an area and lift it, it's actually fairly
easy to do so. So even here, if I need
to blend the edges, I can just use a wet
brush and kind of help blend that edge
out a little bit. Same here. I can kind of
blend this edge a little bit. Now, noses of our Siamese cats are going to be tricky as well. I do notice, though, at the top of this
nose that there is a bit of a hard edge. So I do see a line across
the end of the nose. Just kind of butt
up against there. I'm going to leave this for now. I can always come back and add that medium tone that I see. I just want to let
it dry really well. I don't want to kind of ruin that beautiful edge
that I just created. So I'll come around this side. I'll kind of cut it in just slightly for the nostril here. And then down this V shape
to the bottom of the nose. So a little edge, little cutout. There's a cutout on each side, and then a little
V to the center.
9. Second Layer of Gray, Part 2: Even if you don't notice that
in your reference photo, I would suggest painting that
in your painting because our eyes are going to
automatically want to see that or otherwise we might
not see it as a cats. Now, on this left hand side, now we're going to be following the curve of this cheek here. We have it quite dark. However, we do have a little bit of that highlight
around the eye here. Coming around. Can always fill that in later. It seems to me when I look
at the reference photo, it's kind of a slight U
shape under the eye here. And so that's kind of the
curve that I'm following. And then, same thing. It gets really nice and
dark here in the center. So I want to make sure that I've got my edge where I want it. And then everything on the
inside kind of gets filled in. And it's nice and
dark up to the nose. And same thing really nice
and dark, up to the cheek. Once again, we're not going to
do this bottom lip until this top has
dried a little bit. So here already, we can see that we've got that highlight
here on this left hand side, which we can always
adjust if we need to. But at least we've got some of this coloring around the eye. It seems like I kind of got a little too dark in the top here. So I wetted my brush, and I'm just going to lift
a little bit of that. Same thing. Some of
these edges are a little bit too dark of an edge, so I'm using a damp brush. It's not soaking wet. Actually, I think it kind of comes out a little
bit further than what I originally had here. Like I said, this layer is
kind of that layer that we're wanting all of
our all of our tones, our medium tones to be
in the correct spot. And I forgot the ear here, so I'm gonna go back
and do the ear. Alright. Now, before we move on, I've given a little bit
of time for this to dry, so I'm going to go back in, add just a little bit of shadow to the right
hand side of the nose. I'm going to start
at the top here. And I want to leave a little
bit of a V at the base. So I dabbed my paper towel
to get some of that off. And I'm going to
kind of blend that. If you notice, I
still left some of that highlight here
at the bottom, and I left kind of a larger highlight on this
left hand side. And now I'll add a little
bit to that lower lip. Now, this lower lip section, I'm going to start at
the kind of center here, and I'm going to pull my strands out from the center to
this right hand side, and then out to the
left hand side. And what that is going
to do is it's going to give me this really
nice mouth shape. You might not notice that
on your reference photo, it's something that I think just makes the cat mouse look nice, is that from this center, it kind of soars out. It's like an upside
down fountain. Similar to here, then it
comes out along the base. If you need to add any sort of darker shades
here to the base, I can just add a few
darker to the base here. Not a lot, 'cause remember, I want the focus of the
darkness to be up top. And then we'll take a
peek at the eyes here and add some of the shadows in
the centers of the eyes. So we've left this really nice lightness in
the center here, but it's actually not
that light in real life. So I kind of have that triangle
coming down a little bit. This one, actually, it's
this one looks pretty good. It was just this one. I was needing to kind
of adjust a little bit.
10. Second Layer of Color in the Irises: Let's take a peek a little
bit at the eyes here. So my eyes on the inside, I'm missing some of the kind of colored lines and
stripes of the iris. And so I'm going
to use an indigo with a little bit of
my shadow violet here. I do want it quite watered down. I don't want quite that
much liquid on my brush. And then I do want
to add some of these lines here where
it's the darkest. So in the center, I'm
going to add kind of some hash marks that are kind of going around the eye here. It's really dark in the center. There's some darkness
on the edge, as well. It's a little too dark. Pull some of that up. We'll do the same omni eye. Same thing. These kind of hash marks coming out of the
center of the eye. Looks like there's some
darker blue on the bottom. And it's a little lighter
towards the center of the eye. So I'm going to try to preserve that lightness
towards the center. This is a step that you
definitely do not want to soften your edges here. If you soften the edges
in the iris here, then basically
you're just losing all those really nice highlights that you had from
your first layer. So do not soften those edges.
11. Color Corrections: Browns: Alright, so this would
be the stage where I would suggest if your
browns are not dark enough, I would suggest that you
do another layer of brown here before we add
our black details. You still want to mix your
brown with color or I'm sorry, you still want to mix
your brown with water. Now, I'm using this tan, this raw sana light, but I might mix like a piaminite genuine,
which is a brown. Along with it just to get it a little bit more
of a brown color. And here, we're going
to use this mainly to glaze on top of areas. So over where it
is darker brown, we can kind of come in. I still want to leave
some of the highlights, but we can kind of
glaze on top of these sections where it should be a little
bit darker of brown. I'm keeping it really
nice and watered down. I'm coming into this cheek
area along the edge here. Especially on the cheek area. I'm noticing that it's quite
darker on the cheek here. Kind of comes into
the neck area. This brown also could be
good to use in the neck, so I'll come back and
I'll use it there. Kind of along these
edges where the where this really nice light
color is blending into the black is where you're going to find
these darker browns. So I'm going to come in and add some of those
darker browns there. Once again, leaving
those highlights. If I'm not getting
it brown enough, I can always when it's wet, come back and drop in brown if certain sections
need to be darker. Now, the reason why
we're doing this in between and before
the black is because any of these edges where the
brown is meeting this gray, we want the black to kind
of cover those edges. We don't want them we don't want to have
a dark edge there. And so the black
is going to help to kind of cover
those edges for us. I'm also going to take a peek the top of the
head if it needs to be any darker or I should say, any more brown tones. The center of the face
really isn't that brown. Maybe down here by the mouth, it's a little bit more brown, but this is all pretty black. There's a little bit of
brown kind of in the eyes. But most of this is black. And then up in the ears, I do notice a little
bit more brown. Especially on this ear. Noticing a little
bit more brown. And I will grab this brown
and we'll add a little bit of brown to the chest here. Once again, it's nice
and light colored, meaning there's a lot
of water in this brown. Same thing I don't
want. Too many details. I want to keep some of these sections
without fur details, or otherwise it might get a
little bit too busy there. Alright, I'm happy with
how that brown turned out. Now I will let it
dry and I'll get started on my last layer, which is going to be my black.
12. Layer of Black, Part 1: Alright, so our last layer of this painting is going to
be with our black color. Now, I am using lunar
black from Daniel Smith. This color is a
granulating color, so it is very easy to lift, but it also doesn't get you
as deep and dark of black as, say, a lamp black does, you are more than welcome to use whatever black
that you would like. I still find that I like and
continue to go back to use lunar black for all of my pet portraits simply for the fact that it
is so easy to lift, and so it blends in a little bit nicer with my background colors, and it allows those lower
layers to still shine through. So I have my fairly
dark black color. I'm going to kind of go the
darkest that it can go, and I like to start
with the eyes and the nose and then work on the
rest of the face features. You don't have to do this
same way of doing it as I do, but I like to make sure
that the areas that I want the darkest are going
to be the darkest. So the areas that I
want the darkest. For my pet portraits are those that I want my
attention at first, which is going to be the eyes
and the nose in the mouth. So I'm going to outline my eyes, my nose in my mouth
with this black. So I'm outlining around the
outside edge of the eye. And then I'm coloring
in the pupil. You might notice that I'm
not necessarily following the same highlights as you
see in the reference photo. I'm just filling in the pupil. If you are wanting
to try to add all of those shadows and highlights that you see, you're
more than welcome. For me, I think it's sometimes a little too much for
me to add all of those. For the nose section, I do want to be cautious that I am not overly outlining my nose. So I like to start with just
the lower V of the nose. And then perhaps I might add just a little bit
of line on the top, but not connecting
the whole nose. I have just a little
bit on the bridge. And it might come
down just slightly. And then this is where
I'm going to stop. I don't want to outline
anything more than that, simply because I don't want
it to be that prominent. Alright, these are
the only two things that I'm going to
outline and now I'm going to add a little bit
of water to that black. So it's not so dark. And I'm going to start with
my ears and work on the face, adding some black detail. Now, I do want to be a little
bit sparse with my black. I don't want to cover up
those really nice gradients. So I'm looking at where
are my darkest areas. So my darkest areas here in the ears going to be around
the edge of the ear. And then I have some dark
area here at the top. Okay. And it's coming into the center
of the ear here as well. So I'm going to add a little bit of that dark along
the center here. It's quite dark around the edge. Now, because like I said, because it's this
granulating color and because I'm
adding water to it, I still get a little
see through aspect. It's a little transparent. And now I'm going to pause there and add
black to the other ear. I do want to mix a little
bit more water on my brush. And then from here,
I'm just going to add a little bit of shadow
in the ear section, very watered down
where I'm noticing it. So I'm noticing it's a
little bit darker here. Alright. I think that's all. I can kind of use then
that watered down brush to kind of soften some
of those edges if some of those edges got
a little bit too dark. Now I'm going to use this dark black for the
center of the face. Now, this is also going to be a somewhat challenging step. However, I do want to keep the darkest section where
I'm noticing the darkest. So when I look at
my reference photo, it's going to be this
section here and between the eyes and then on this right hand side of the cheek and under the left
hand side of the cheek. I'm going to start there
where it's the darkest. And then I can at least
adjust accordingly. I don't want to start with
my lighter tones up here. I want to start where
it's the darkest. And then with whatever I
have left on my brush, I'm going to start pulling it up into these other sections here. So I'm not grabbing any
additional onto my brush. I'm just kind of using
what's on the brush. This black layer, like
I said, is the hardest. And so if you are nervous
at all about this layer, you can always do two
layers of black as well. Just have that first layer a little bit more watered down. This, as you can see, this black here is quite watered down. It's the darkest
here over the eye. I've got that nice
crease in the eye. It's my little
fountain coming out. And then I'm gonna do the
other side of this eye. This other side also
has that dark on top, but it's not coming out. So much the edge. It's a
little bit darker underneath. I'm gonna keep that
darker black for under the eye here. Same thing. I'm doing the same shape that
I did for this other layer. For the layer of gray
that's underneath, so I'm kind of doing
that U shape underneath. Once I come close
to the nose here, this is where it's the darkest. So in the center of the nose, I can kind of fill in
here in the center. And then bring it
up as I need it. In the center here of the nose, I've kind of got
this coming down, a line coming down the center, and then I've got my
shadow on this edge here.
13. Layer of Black, Part 2: Gonna mix a little bit more
of that black with water. It is quite dark
here under the eye. And on this right
side of the nose. So here I'm just
gonna fill it all in I'm using kind of the thicker edge of my
brush to kind of fill in. And now I'll come
to the eye and see where this darkest section
is coming under the eye. You know, with this black
whatever's left on my brush, I can always add a few
extra little strands of hair where I'm noticing them. So I added a few
over on this cheek. Maybe I'll add just
a few over here. But I really want the
majority of this darkness to be in this face area here. Because, of course, that's why we see this as a Siamese cat. When I come into the nose, I'm gonna come into this
inner triangle of the nose, still keeping the
highlight here. I can always soften
up those edges after I paint this
layer of black, but I don't want to soften it
up until it's nice and dry. Then from here, I'm going
to go to the mouth area. I'm just going to
keep a little tuft of that dark towards
that top there. It is darker on this
right hand side. And then it seems like it kind of lightens as it
comes to this left. So I'm going to keep
it a little lighter on this left hand side and keep
it darker on this right. I can go over any of these sections if they
need to be darker. By the cheeks here or a little bit darker
by the forehead. Just make sure that it
is nice and dry because, of course, this
granulating color will lift pretty easily
if it's not dry. Be careful about
overworking a section. If it is too wet
or too wet still. Now, up here in the forehead, I do want this to be
a little bit darker. It's looking a
little bit too light compared to my reference photo. So I'm going to darken
it up just a little bit. I still want to leave at least
this one highlight here. I'm noticing that this
is a little bit darker in the center here and comes up a little
darker on the edges. Sometimes as you're
doing this stage, it does help to kind of lift this up and put it right next to your reference photo to
kind of make sure that you have these darkest spots, dark. But also remember that
sometimes with watercolors, we don't need to get it quite as dark as the
reference photo. Sometimes it's almost impossible to get it just as dark
as a reference photo. So I think this is as
dark as I'm wanting it. The only thing that
I would change here is I'm noticing this section of the nose
is a little too light. So I washed my brush and, um, I'm just going to grab a little bit
more of that black. I just want to go over this side of the nose just a little bit. I still want to
keep the highlight on this left side of the nose. And if this highlight is looking
a little bit too bright, I can always tone it
down just a little bit, either using water on my brush, just to kind of tone it down
or just the slightest bit of pigment because I don't want
it to completely go away. I just want to I just want
to dim it a little bit, but I still want that
highlight there. The same with around the eyes. So if any of these
highlights around the eyes got a little
bit too light, I can use that wet brush to just kind of soften
up those highlights, make them so that they're
not quite as bright. All right. And now, the last kind of
step before I do my colorful wash is I'm
going to use same thing. I'm going to water down a
little bit of this black. I do want to add a little
bit of a shadow on the eye. This is the same
thing. You might not notice it in your
reference photo. I like to do this on most
of my cat portraits, but I'm going to paint
on top of the iris, and it's going to be
a one solid kind of shadow on top of the iris on
the top or on the top here. So all it does is it creates
this little bit of a shadow, and it kind of sets the eye back into the head a little bit. I like how it looks. If you don't like how
that looks on yours, you definitely don't
have to add that.
14. Quick Tip: Lifting highlights from Black: Alright, so the last
little tip that I have for you when painting
the black fur is, remember that you
can always lift up areas that get too dark. So when you've noticed that
your black section is dried, sometimes you'll notice that there's a section
that got too dark or that you maybe want
to fix the edge for. Remember that, especially
with this granulating color, you can fix that very easily
by wetting your brush. Sometimes I like
to dab it just a little bit on a paper towel
so it's not soaking wet. And then from
there, I'm going to re wet the section that
I want to lighten. And you might have to kind
of rub it a few times. You can either wet
it and then use a paper towel if you
really need to lighten it or you can just kind of use your brush
to soften edges. So here, if I use my damp brush, I can soften some
of these edges up. You might have to
kind of go over it a little bit to re wet
that area, like I said, so it might take a few passes to kind of
lift up that pigment. But part of the reason
why I love using granulating pigments
like this is that it does make it
really easy to lift up. If this brush isn't working and there's a
section where it's really, really dark and you really
need to lighten it up, you can use a scrubber brush. This is a kind of more
coarse brush, more blunt. Just know that using
this scrubber brush, when you have to get it wet and to use it sparingly because
it can rip your paper. So because it is
coarser bristles, and so I like to use
a scrubber brush in combination with my paper towel to lighten up little sections. With a scrubber brush, it might be challenging
to go back in and paint on top if you
rip your paper. So just use caution with that.
15. Optional Colorful Splash in the Background: Alright, now that I'm
done with the face, now I'm going to move on to the colorful splash
behind my cat. I'm going to use my slightly
larger brush, my size six. Now, normally, I will ask my clients I do ask my clients if they have
a preference for color, and this client did
not have a preference, and so I'm going to
choose a color that will work well with my cat. Usually, those colors tend to be the colors of their
eyes work really well. If there's a green eye, you don't want that
green in the back. Blues or any sort of combination
of teal also works well. Purples work well. Um, so right now, what I'm doing is I'm
mixing my color with water. I still don't want
my color to be all that opaque of a
color in the background. I'm trying to get it kind of
that right color of teal. I don't want it to teal, but I also don't
want it bright blue. Just want it kind of
leaning towards teal. Alright, so now with
this background, we're going to use a
wet-on-wet technique. So if you need to switch water, you can move these
brushes out of the way. So I am going to wet the area that I want the
pigment to go first. And so I definitely want
my pigment to go on top of my whiskers that
have the masking fluid. And so I will kind of
go along the edge here. I don't need to make this water go all
the way around the edge, and I don't need to bring it all the way to the
edge of the paper. So I might stop it here and not go all the
way to the tip top. Once I have my water
where I want it, then I'll grab some pigment. I'll add my pigment
closest to the body. And if I want to blend
out these edges at all, I'll just dry my brush and blend out the edges
with a dry brush. It's a little bit
more challenging to figure out where to
stop at the base here. Usually, though, if
you're going to have a portrait where it's coming down towards the
center V like this, you can kind of have
your blob stop part way. You can kind of pull
some little strands of fur like this towards the
center that also looks nice. And now we'll rotate and
we'll do the top section.
16. Final Details: So we've left this
to dry overnight. And so now today, we're going to take
off the masking fluid on the whiskers and
the highlights of the eyes and adjust the tone or the brightness
of the masking fluid, sorry, adjust the
brightness of the whiskers and adjust the highlights and whatever other little
things that we notice. I'm using a kneaded eraser to
take the masking fluid off. This is why you also
have to make sure that your painting is completely dry because we don't want
to be ripping up any or smudging any paint. So when we look at the whiskers, now that they're taken away and we look back at the
reference photo, you can see that the point of entry where the
whiskers are coming out of the cheeks isn't quite as bright and vibrant as you're
noticing on the painting. And so I'm going to use a wet brush and I'll
grab a newpaper towel. And using a clean wet brush, I'm going to reactivate
that black around that cheek area and blend in the ends of these
whiskers into the cheek. If it pulls up any
of that black paint, I might need to go back
and add a little bit more. So it looks like it kind of
pulled back the paint here. Gonna add in a little bit
more over on this side. Like I said, this lunar
block is really nice. It will lift really easily, but sometimes it lifts easier than what you
want it to lift. Might have to look back at that area after it dries
just to make sure. Now, with some of that
black that I just pulled, I'm adding a little
bit more water, and I'm taking a peek at
the whiskers themselves. I'm gonna actually take
some of that black down. If I go over any of the
whiskers on top of this tan, I definitely don't want any
black in this tan area. And, you know, as I take a
peek at the reference photo, I'm actually happy
with how this looks. The white whiskers here
actually aren't coming out. They're not as evident. And so I like how that looks. Now I'm just going to take
a peek at the highlights of the eyes and make whatever
corrections I need. I can also use a wet
brush and try to lift up a little bit more of a highlight in the pupil here on the side
on this right hand side, I'm noticing a little bit of
a highlight in the pupil. We'll see. I'll try pulling that highlight,
see if that helps. Sometimes when I pull
highlights from pupils, sometimes it looks funny, and then I need to
cover it back up again. So having this lunar black, it's a great way to
make these edits. And then if I don't like
how the edit looks, then I just cover
it back up again. I'm gonna do the same
thing with some of these highlights in the
corner of the eye here. I'm gonna come in with paint. Now you can also come in
with my gran pen here. However, remember, if
you're coming in with MigranPen and you
make a mistake, you won't be able to
lift that micron pen. That Migranpen will be,
of course, permanent. Alright, so I'm liking how
those highlights are looking. And now I'll take off the tape. And my last step is I'll always check it with
my reference photo, so I'll hold it up next
to my reference photo. And then I'll check and see. Are all my values correct? Does any spot need
to look darker? Alright. So I'm noticing that
this cheek area over here, I actually want to try to
make this angle here by the cheek where it kind of comes from the bottom
of the cheek up. I kind of I want to
make that a little bit more intense of an angle. And my reference photo, it definitely looks more
intense of an angle. And so I'm using a damp brush to lift up some of that black. No, because it lifts it
up pretty, pretty well. I might also have to go back and add a little bit of black
along this edge just to, um, make it a little bit
more similar to this edge. This one is blended out. It's a very soft edge, and I want it a
little bit harder. If I were tried to add
my black now, though, what would happen is
that it would start to blend out because
it's still damp.
 Emily Marie Watercolors, Watercolor Artist and Dog Lover