Transcripts
1. Intro for Skillshare videos: Hello, and welcome.
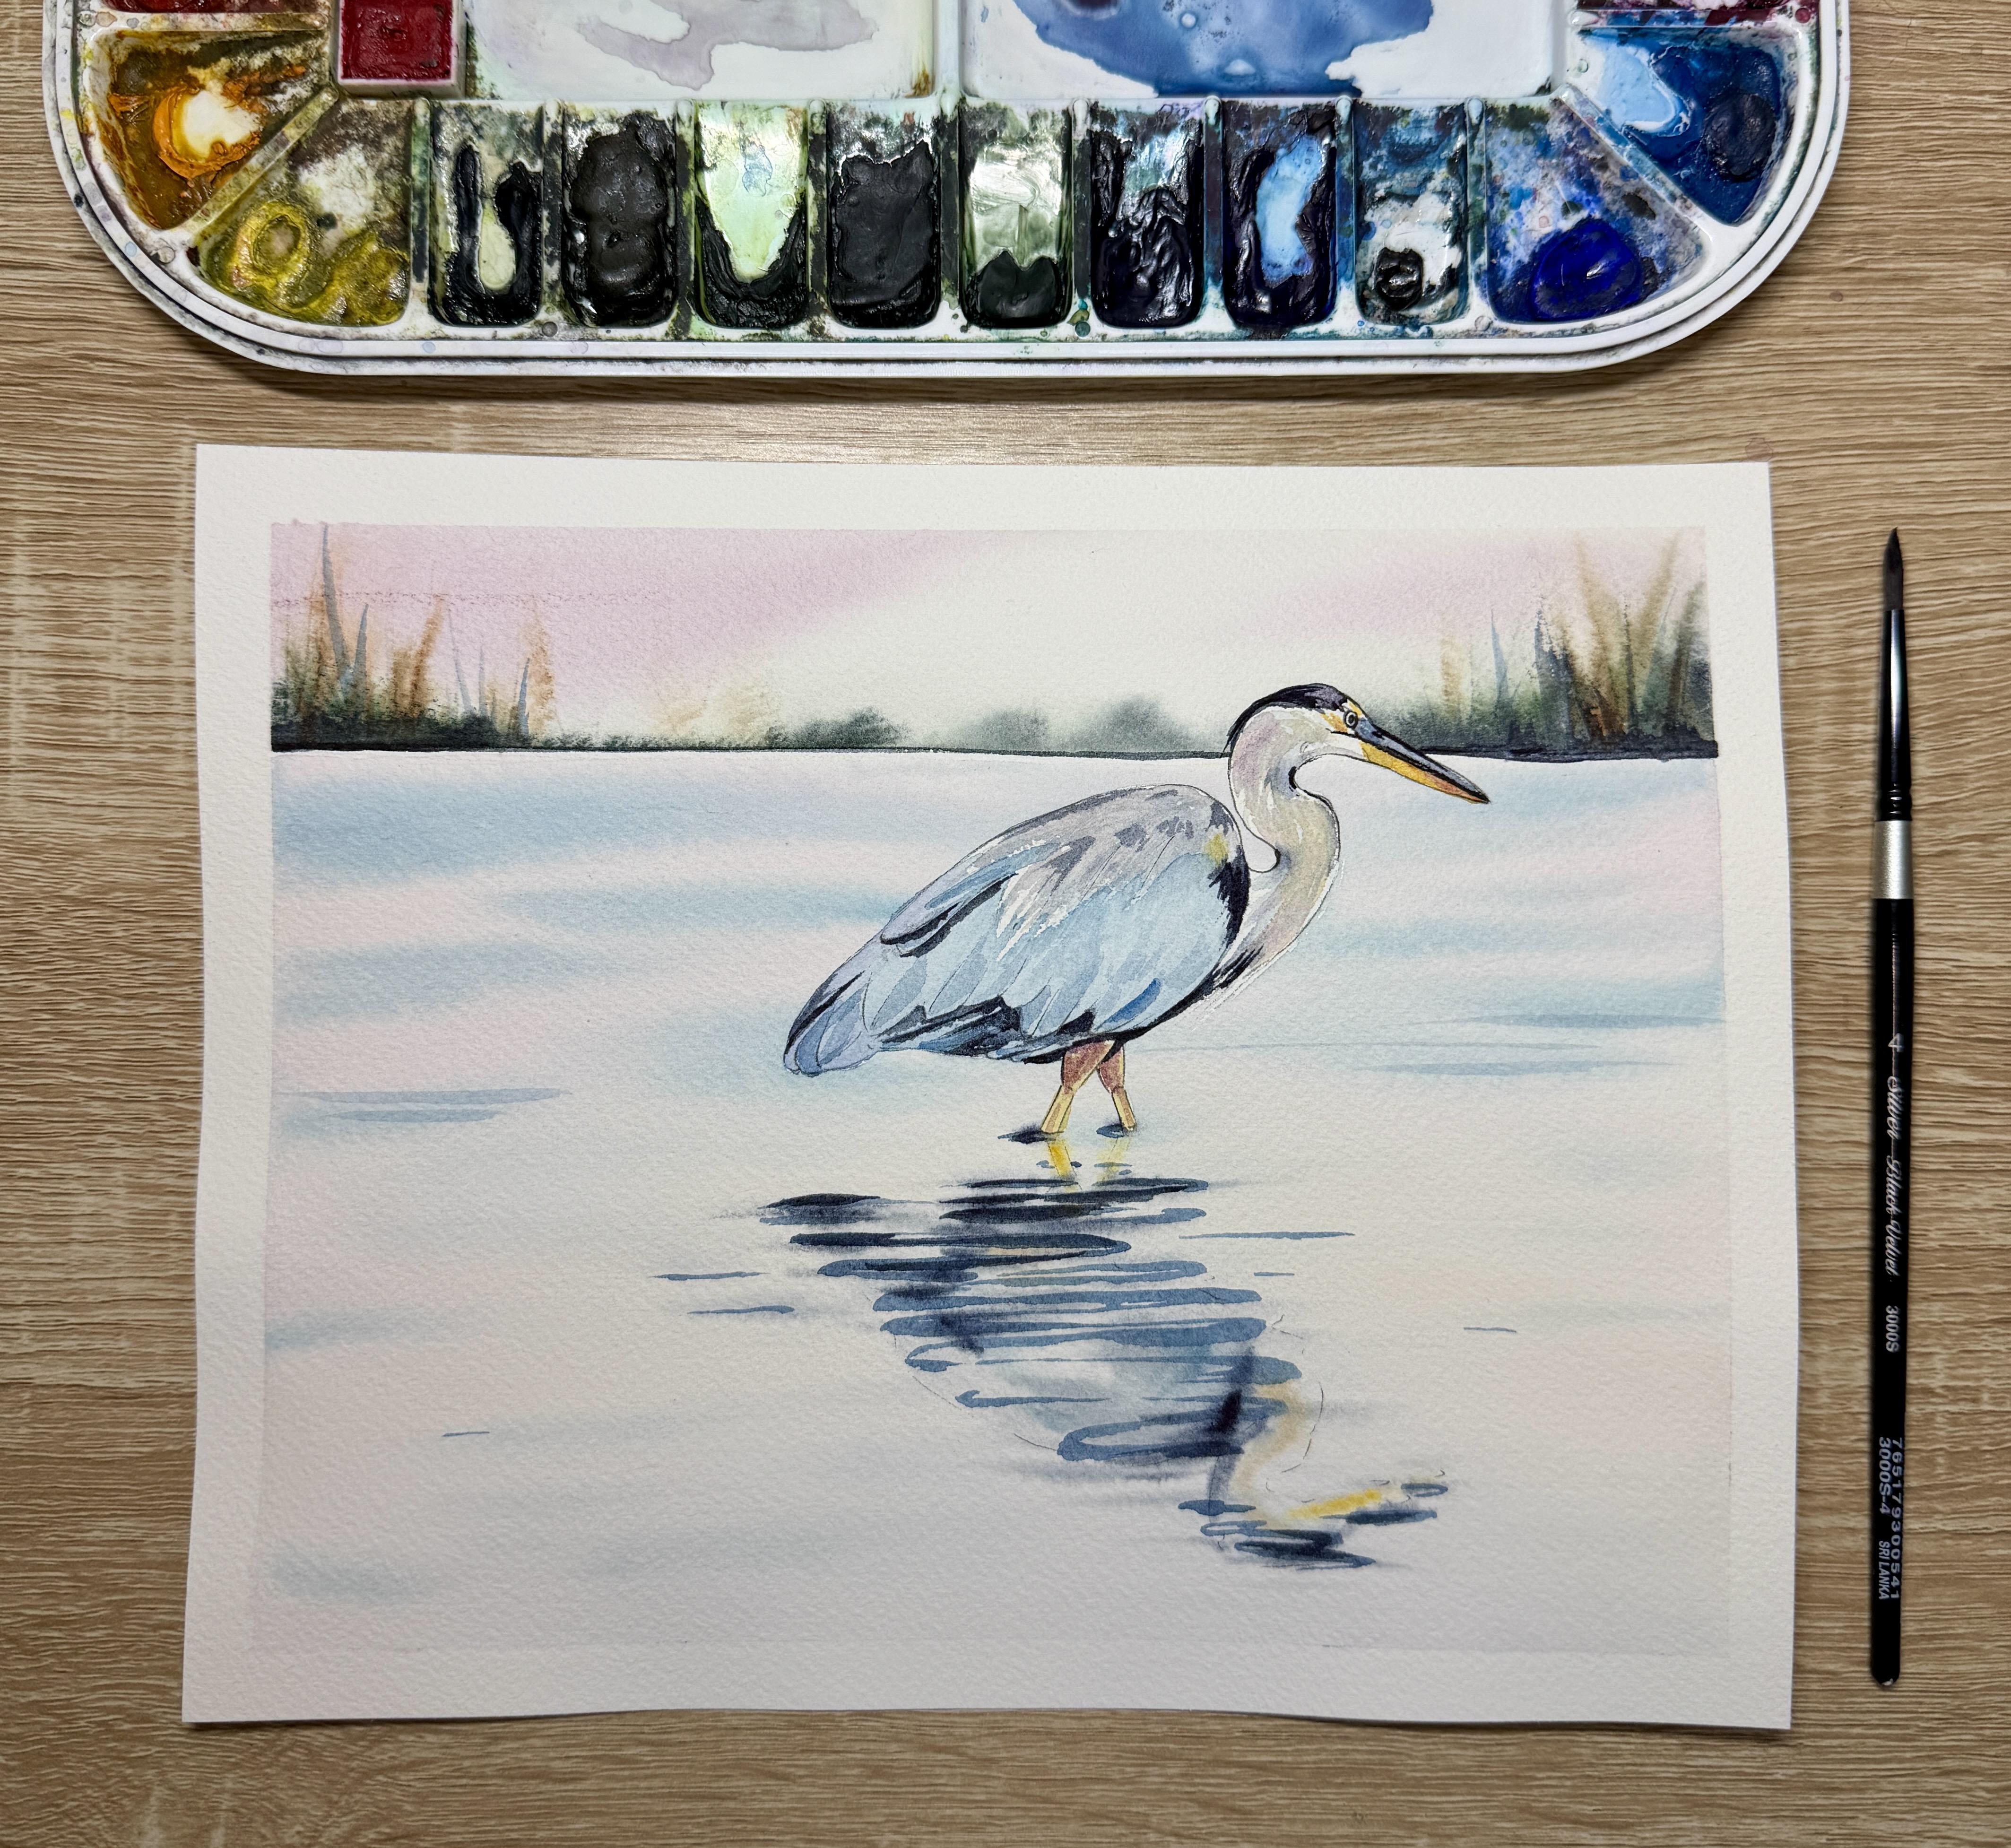
My name is Emily, and I'm an artist and instructor based in Madison, Wisconsin. In this Skillshare tutorial, you'll learn how to paint a great blue hern wading
through wetlands. We'll start by painting a
very blurry wet-on-wet, both sky and water reflection. Then we'll look at painting our Great Blue Heron in
two different layers first a wet-on-wet and then a wet-on-dry with
some finer details. And then our final layer will be a wet-on-dry layer of the reflection of our Great
Blue Heron in the water. You'll have access to a tracing template
included in this tutorial, as well as some color
reference photos and printout instructions that will teach this
tutorial step by step. So grab your supplies, and let's get ready to paint.
2. Supplies: Alright, so let's talk briefly about the supplies
that you'll need for painting your great blue
hern watercolor painting. So the first thing that you
will need is your template, either printed or
traced out onto an eight by ten inch sheet
of watercolor paper. I am using arches, cold pressed, 140 pound paper so that
you have plenty of time to paint wet-on-wet
for the water scene. I do highly recommend a high professional quality
paper for this project, since we need to make
sure that the Water stays nice and wet so that we can
drop in the reflection. Lower quality paper,
you might find that this section
will dry too quickly, and you might get frustrated with your wet-on-wet reflection. Before you start painting, I would suggest taping it down either onto your
desk that you're working on or onto a piece of
plastic corrugated board. I'm using a painter's
tape called Kiwi Hub. This is designed specifically
for watercolor painting. And I would suggest that
you tape on all four edges, making sure that you have
an equal distance of white space all around all four edges so that when
you peel your tape off, you can have this
nice white border. Now, in addition,
before we start, you are going to need to prep your watercolor paper
with masking fluid. I'm using Windsor
Newton masking fluid. There are many other
types of masking fluid. I do really like
Windsor and Newton, although Schminke also has
a very good masking fluid. I use an old brush to put
my masking fluid down. Now, these brushes these
old brushes that I'm using, they do not clean off very
well with masking fluid. So make sure that you're
using an old brush. You can also use a
calligraphy pen or you can use some sort of glass
pen or pottery tool, silicon pottery tool to
apply your masking fluid. We're going to
apply masking fluid to the whole great
hair and body. So over the whole body, the neck the beak and the legs here up to where
the legs go into the water. You'll want to make sure that you have a nice thick layer of masking fluid so that you don't have any color
peering through, and you're going to want to
let it dry completely for at least maybe an hour or so before you start on the
wet-on-wet background. For your brushes that we'll
use in this tutorial, you'll want some sort of
medium size brush for painting the great blue
hern and the reflection. I'm using a round size four by Silver Limited,
called black velvet. You might also want a few
smaller round brushes, either size zero, one or two for painting the smaller details on
the beak or the nose, as well as the legs. And then you're going to
want a larger capacity brush for painting the skyline, as well as the reflection. I'm using a large quill brush. You can use a large flat brush, so your flat brush
would look like this. However, know that
your flat brush doesn't hold as much liquid, as much water as your quill. So you are going to
have to really go over the water area multiple times with your flat brush so that
you can get it wet enough. As far as paints are concerned, you can use any of the paints
that you have at home. I'm using Daniel
Smith watercolors. We will be using a
variety of colors. You will be needing, though, some sort of To blue. So I'm using To Blue for
the water and our feathers. I'm using a deep sap green and indigo for our
background colors. I'm also using an indigo for our reflection and some
of our darkest shadows. Note that indigo in Daniel Smith is a lot
darker than an indigo for, say, Windsor Newton,
which leans more blue. So you can test out both for my grasses
in the background. I'm also using a
quinacridone burnt orange. You can use any sort of warm orange or warm
yellow for that as well. I am using a gamboge, new gamboge, which is a warm yellow for the
legs and the beak. And then I am using a
little bit of indigo mixed with a mythal blue
for my feathers here. And for a little bit
of nice sky color, I'm using a little bit
of quinacradon magenta. You can use whatever
colors you would like for the sky and a slight
reflection in the water. The exact colors that I'm using and a list
of those will also come in your color guide
section of this tutorial. You'll want some glasses of
water and a paper towel, and we're ready to
get started painting.
3. Testing out Wet on wet colors: Alright, so before we get
started on our final piece, particularly with this painting, I do want to test out some of the wet-on-wet colors
that I want to use for the water and specifically the reflection of the great Heron in the water. Now, I'm starting
off by, first off, I'm using a scratch sheet
of student grade paper. So I am going to have to work
a little bit quicker with this paper since it's not an
arches professional grade, so it's going to dry
a little bit faster. But I'm just going
to start out by wetting the whole paper. I'm pretending that
this is the waterline. So the waterline down. I'm starting off thinking maybe
I want to do some yellow, and behind the
blue of the water, just to kind of get almost
like a sunrise effect, I just want to see if
I can get my blues on top without mixing
them into green. So I'm starting off with a
really light coat of yellow. Um just heads up for everybody. I do end up changing
my mind on this one. So this is important for you to actually
test out, as well. Um, say there's a color
more like purple, maybe you want in the background
or, like, a light pink. I do end up testing
out a lot more colors. Um just to see what they
look like on my paper. So I have that I laid down
that background of yellow, and now on top, I'm
using Palo blue. I'm coming from the
outside edges in. I'm making sure that I
grab some palo blue, but then I'm mixing it on my
mixing plate so that I don't have a chunk of really dark blue when I first touch
my brush to the paper. That's really important.
So I grab a little, I mix it on my plate. And now I'm trying to keep the furthest away
to be the darkest. And as we come closer
to the foreground, I'm lighting it up, and my lines are going
to be a little thinner, a little bit more wispy. Now, as I'm doing this,
I'm going to start to paint the reflection that
I see of the great Heron. So I'm starting with
the yellow of the legs, adding a little bit of red. I'm doing this very quickly
because I know that I only have well my paper is
glossy to do this, once it starts showing
matt, I need to stop. So I'm doing some
horizontal line work here where I see the
body reflection. So I'm starting with some indigo towards the bottom of the
body where it's the darkest. Now I'm mixing in a
little bit of salo blue. You notice I'm not
adding any water. To this shadow. It's
really important that my brush is
damp and not wet. If it's wet, the color is
going to spread too much. So I'm making sure that
if I do wash my brush, I'm tapping it on my paper towel before I grab a
little bit of color. So I'm always concerned
that my brush has just enough water to have
it spread where I want it, but not too much water
where it goes all over. As you are testing out
these colors here, using indigo blue, yellow, mixing a little red there, kind of brightening up the blues wherever you see them bright, keep in mind that this whole section can
be done in two steps. So if you're noticing that
your papers drying too quickly before you can get the reflection
of the great Heron, I would strongly
suggest that you separate the reflection
into two parts. The first part being
the water reflection, where you've got that undercolor and the blue ripples
of the water, let that dry completely. And then rewet the
whole water section. With clean water and then do the great hear and
reflection in a second step. If you are able to do it
all in one, that's great. That would be kind of the
goal as a watercolor artist is to be able to do these
reflections all in one step. However, you also need to be
aware of your paint time. If you take a little longer
painting, that's okay. You just need to be aware
of it and then maybe put this one step and
split it into two. Alright, so now that we
have kind of practiced a little bit our
great Heron shadow, now I want to see about the tree line and kind of
this marsh line there. So I still want to make the background lighter
than the Great Heron. I definitely want my
great hern to stand out. So I wetted the whole sky, and now I'm just testing
out some colors here. So I added a little magenta.
4. Painting the Tree line and Sky: Alright, so after my test, I am feeling confident and ready to paint the
tree line and the sky. So I'm starting off
with my quill brush, and I'm wetting
the whole skyline up to where it meets the water. Now, obviously, I've already masked off the actual
great blue hern here. That's important. I made sure that it's
completely dry as well. And when I'm adding water, I'm going over this
skyline multiple times. I'm making sure that there
are no puddles of water, but that it is
absolutely 100% wet. Um, quick tip here. I grabbed some
magenta and did not fully dissolve it into my brush before tapping
it on my paper. And sometimes then you get some hard edged marks on your
paper when that happens, and it's very hard to get out. So make sure that you
really mix that color onto your palette first to really get it evenly
distributed in your brush. Now, I did not add a ton
of magenta to the skyline. I added two swipes, one coming in from the left and one coming
in from the right, and I left some white
paper to shine through. Now I grabbed some
deep sap green using a round size four brush, and not a lot of
water on this brush. And I added some of
that deep sap green to the tree line and making sure that it's the most concentrated
along the outmost edges. I definitely do not want to have a big old glob of green in the very center
of this painting. I want it more on each end. I did grab a little
bit of indigo to drop in where that green
is the darkest, and you'll notice that
wherever I'm dotting my brush, more of that pigment is
being released there. So I like to kind of control how much pigment
is being dropped.
5. Wet on Wet Layer: Water and Reflection: Alright, so now that we
finished with the sky, now we're going to start on
our water and reflection. So I'm starting by wetting
the whole water area. Now, of course, I have
to make sure that I have extreme caution along
this horizon line. I do not want my wet brush to
touch what I just painted. So I'm leaving a really thin
strip of paper of dry paper, and then I'm going to
wet everything else. Now, I am using a
quill brush and not a flat brush for this. I found that using flat brushes, although you can
wet large areas, you don't get quite as much
water on that wet area, and I really want to make sure that my paper
stays nice and wet for this water and
for the reflection. Now, remember, I'm doing
this both at the same time. So I'm going to start
with the water first. Now in the practice that
we went over already, I used yellow for
the under color. But since I use this
magenta for the sky, I'm going to use a
very, very faint, faint magenta for under the sea or under the
water, excuse me. So I'm starting with the
magenta along the horizon line, and then I'm just going to
gently ombre that down. Um, I can add a little
tiny hint of yellow, but along the bottom
most section, and then what that's going to do is it's going to brighten up. Along the bottom, you can choose any colors
that you would like. If you chose a different
color for the sky color, I would strongly suggest
reflecting that in the water. Now I don't have any pools of liquid, and that's important. I am my whole paper
is still wet, and so now I'm switching
to my round size four using the least amount of water on my brush
as I can get it. You notice I'm
tapping my brush on my paper towel to release
some of that liquid. And now I'm going to start
at the horizon line with a thicker brush stroke from the outside edge
of my paper inward. Then I'm going to continue
moving downward on my paper with these
horizontal lines. So for these water lines, my water lines furthest away are going to
be the thickest, as I come downward on my paper, I want these water
lines to be a little bit thinner and a little
bit lighter in color. So I don't want my
lines to be connecting. I almost want them laying sort of like bricks,
if you will. So if two of these lines
water lines are connecting, the water line below it
shouldn't also connect there. Hopefully that makes sense. As you see, it's really lighting up when I get to the
bottom of my paper. This is important
because I'm having a big reflection in
below the great herring. So I don't need a lot going
on in the foreground. I want more of these
watermarks in the background. Alright, so I make sure
not to spend too much time on these water lines because I do want to start
with my reflection. Now, the key here
is that I'm still noticing a very
bright sheen shine, meaning my paper is still wet. If your paper is starting to matt at all, you should stop, let it dry completely, and then re wet the whole thing with water and do
your shadow after. So I started out with a little
bit of that palo blue on the upper side of the body where all those really
bright blue feathers are. And now I'm going
in with an indigo. All of this, I have barely
any water in my brush, just enough water
to make sure that the pigment is
spreading slightly. So your paper towel is going
to be your best friend here. If your colors are spreading too much when you place
them on the paper, you'll need to tap your brush to your paper towel and
release some of that pigment. So I'm going along. I'm adding some indigo towards
where the feet are connecting to
the water and where the base of the great
hearing would be. The reflection is going
to be the darkest, closest to the body. And then as you move
downward, closer to the head, it's going to start
to lighten up because it's a longer cast shadow. I'm adding a few
horizontal lines with the indigo to just kind of show the movement
of the water there. Now I'm adding a few strokes along curved strokes along
what would be the back, the neck, and the
top of the head. This is all using that indigo. I want to make sure that I'm extending this indigo outside of the body because I don't want my shadow to be only
where the body is. There's going to be some shadow
marks that are extending. So I'm just using
whatever is left on my brush with that indigo
to just kind of create more horizontal lines to give
it this kind of fuzzy look. I'll add a little bit of
yellow to the reflection of the legs and to the
reflection of the beak. I'm noticing that my paper
is still reflective and completely wet. I
washed my brush. I grabbed a little bit
of my orange there, that same orange that I used for the grasses in
the background. My brush is still not that wet, but I'm adding a little bit of that orange to the inside of the neck and to where
the legs meet the body. I'll go back and add
a little bit more indigo of these
horizontal lines. You can see just how
dry my brush is here, because although the
pigment is spreading, it's spreading only
where I'm placing it. So I don't have a ton of spidering veins here
that's happening. You can see where where where I just place down
some of that darker, deeper pigment, it
spreads and spiders a little bit more. That's okay. I want the darkest sections, like I said, closest
to where the body is. That's gonna be where the
most intense shadow is. I can always fix some of that spidering later
with a dry brush, but for now, I want to get
my intense colors down. Now, the sections here
that I want to make sure that I represent are going to be the dark top of the head there and the
dark top of the back. I want to make sure that those dark sections are accounted for so that it kind of balances out where
it's dark by the legs. Once again, I'm going to let these dark lines extend
away from the body, and that's going to create
this really blurred look. So I'm just kind of flicking my paint brush outward with whatever indigo
is left on my brush, as well as some of the indigo
that's still on the paper. I think the hardest part here
is knowing when to stop. Now, I am noticing that my
papers starting to turn a little bit more matted and my colors aren't
spreading quite as much. And so this is my cue
to stop painting, let this layer dry, and then come back with
my wet-on-dry layer.
6. First Layer of the Great Blue Heron: Alright, so as we were painting our shadow reflection
of our great Heron, we've allowed the background
to kind of dry a little bit, and so we're gonna peel off the masking fluid of
our great hearing, the body, of course, and then we're going to
start painting the body. Now, to do this, make sure
that your fingers are clean, that you don't have
any paint on them so that you don't smear
or accidentally smear it. You can also use a gum eraser or a kaded eraser to
help you remove it. So for the main body, at least the underside
of the body, I'm mixing a thalo blue
with quite a bit of water. So, of course, I
want my first layer to be really nice
and transparent. I'm going to paint
the underbelly first. So those are those
under feathers. I'm going to start along the bottom section of
the great hern, and then I'm going to negatively paint some feathers along that edge where the
blue and kind of that those lighter
feathers on top are. So when I start from the bottom, you'll notice that
there's a little bit of a outline on your template that's going
to help you with this. I'm going to curve
under that wing, and then I'm going to
flick my brush upward. I don't have a lot of
liquid left on my brush. I'm basically using whatever
liquid is on my paper, and that's going to
create some negative, like, little feather wispy feathers that are
going to sit on top. I'll finish painting the edge
really nice and cleanly. I'm not going to paint the
leg since those are yellow. I kind of went over
the line there, so I press down really hard on my paper
towel to lift it up, and then I continue making sure that edge is really
nice and clean. I need to make sure my edges are clean before I allow it to dry. I'm adding more water
to the very inside there in an attempt to push
the pigment to the edges. I want that because it kind
of rounds out the body, and it creates a
slight highlight in the center to give
this kind of round shape. I can also use a
dry brush to lift a little bit of that pigment off if I need a
little extra there. I mixed a little bit
more water to that. And now I'm just going to kind of I don't like how
that edge was looking. It was almost
looking a little bit too intense, that edge there. And so I kind of
softened that edge with a little bit of color. I'm gonna go back add
just a little hint of purple to the exterior tail. Occasionally, when you
see great blue herns, sometimes the iridescence of the blue looks a little purply, so feel free to
kind of play around with this and add
a little bit of purple while that
blue is still wet. Alright, now for the white sections of
our great blue hern, I'm adding a little bit of
gray to that blue that I had mixed for the bottom of the
body and a lot more water. I want this shadow
color on the white to be slightly blue toned,
but also with gray. Now, here I'm painting some little tufts of
feathers along the neck. So I kind of I'm painting almost triangles coming
down from the neck. I'm gonna zoom in
a little bit so that you can see them
a little bit better. Alright, so with
these triangles, I've left a little bit of
white paper shining through, so it's not completely
soaking wet. Now I'm taking a
little bit of indigo and adding just a
hint of shadow. So I'm adding shadow where
the curves of the neck are just to kind of give it a
little bit more shape here. So a little bit at the curves and a little
bit at the base there. Now, remember that I can control where these shadows go
by washing my brush, drying it and using a dry brush to kind of
adjust those shadows. Alright, so I'm adding a
little bit more indigo to this kind of undertone
color that I mixed. I wanted a little bit
darker for the top of the beak and for kind
of the top of the head. That section of our great blue hens is a
little bit darker. So I'm starting with this
section of the beak. The top section at least a lot darker than the
undersection of the beak. And so I'm going to paint
just one solid layer of gray or indigo, depending on if your indigo is leaning a little
bit more gray. This is Daniel Smith indigo, so it does lean a little
bit more gray than blue. Then I'm going to add
a little bit darker, more opaque of that indigo
along the top of the head. Now, the top of the
head is smooth, but then once you
get to the crook of the neck where it starts
to curve downward, you do often find a few little hair like
feathers or not hairs, but a few little of the feathers
kind of coming outward. So you can either
start practicing that now or you can wait until you've got a little
smaller of a brush. But don't worry about
having a really, really soft edge along that back curve of the
head, right just yet. Alright, so the
bottom of my great blue hern has pretty much dried, so I'm ready to paint the legs. So I'm starting with
that same yellow that I used in the reflection. This is a new gamboge. My brush is a little dirty, so I tried that over again. I'm going to paint
wet-on-dry wet brush on dry paper for
both of the legs. And then, well,
that's still wet. I want to add a little bit of shadow on these legs that
connect them to the body. So I'll grab a little
bit of that magenta, the same color I
use for the sky, and I'll drop in
just a little bit where the legs are
connecting to the body. This magenta with yellow. When they mix together, it creates this really warm brown, and I love using
that for shadows. Alright. Now let's take a peek at these white feathers
on the top of the back. So I'm mixing a few
of the colors that are on my palette,
the lighter blues. I mix in just a little bit of that magenta that I
used on the legs. And this is creating my shadow color for the
top of my great blue hern. Now, these feathers are
very light and wispy, and so I'm painting them more like fur than feathers,
to be honest. So I'm starting in the
upper section of the back, and then I'm negatively painting and pulling
that color down. Allowing it to have
a little bit of white kind of peeking and
poking through there. And then I'm going to
grab a little bit of that darker indigo that
I used for some of the shadows and drop it
along the top section there. The hardest part
about this is trying to connect the two layers. So I cleaned my brush. I went back and I lifted a little bit of darkness
along those edges there, just to kind of lighten it up. Now, if you don't want to
do that with your brush, you can also use your
paper towel and dab with your paper towel along the edge of these two sections, and it's going to help
connect them a little bit.
7. Second layer of the Great Blue Heron: Wet on dry details: The next thing that's going
to help these two layers connect is adding a
little bit of shadow. So I grabbed more
of my indigo and mixed it with that shadow color just to lighten it up slightly. And now I'm painting along the edge of the body where
it connects to the head. I'm starting with this underside first because I know that that's where it's going
to be the darkest. So I'm going to start with
my darkest shadows and then move into the
medium shadows. I'm kind of picking out here a few different sections of petals on the
underbelly to paint. It's almost like
every other one I'm painting using this deep indigo, just to leave some of that
undercolor to shine through. And so it looks like there's some feathers on the underside. So I'm going along this
kind of scalloped edge that you notice on your printout adding a little bit
of extra color there. I'm not blending these edges here when it comes to
intense shadows like this. I actually don't want
to blend the edges. Otherwise, I lose
that intensity, and I definitely want to
keep the intense shadows. I'm going to add just a
few little shadows here and there on this white section or this lighter colored
section on the back. So I'm trying to keep it into almost like
a triangular shape, adding, you know, one or two or three little
shadows here and there. If I'm not liking how
any of them are looking, I can wash my brush, dry it, and then
use a dry brush. Just kind of extend some of them or lighten some
of those shadows up. And of course, we're always jumping around with watercolors. So while I give that
a little time to dry, I'm going to paint the
yellow sections of the beak. Remember that we only did
the top section because we didn't want the two
colors to bleed together. So now I'm doing the bottom
section of the beak, which is the section
that's yellow. I also notice a little bit
of yellow in the body. So I'm going to add just
a little highlight of yellow in the head and
as well as in the body. So there's a little hint of yellow kind of behind
the eye a little bit, and then also a little hint of yellow at the top of the body. Alright, so we had made
mention that we were going to do the darkest shadows
first, which we did. And now we're going
back, we're doing that medium tone shadow. So to that indigo that I have
on my paper, my palette. Sorry, I'm going to
add more water and a palo blue because we're
going to be painting on the light blue section
of our great blue hern. Now, to do this,
I'm thinking about these feathers here as
breaking the feather in half. So I'm starting by breaking
that point of the feather in half and then painting the
lower half of that feather. You can see it really clearly in that first feather
that I painted, where kind of that point is where I draw that center line. And then I'm using the edge of my brush to paint the
lower half of the feather. When we only paint
half of the feather, it gives us enough contrast. So the top side is light and
the bottom side is dark, and then it makes it
look like a feather. Now, if your bird
looks great from here, no need to continue painting. However, I'm adding
a little bit of that medium tone blue to the underside of my
great blue hern because, of course, all those
feathers would be in shadow. And so it would be a little
bit darker on the underside. I want those lightest feathers
to be on the top wing. Now, here I am using just water and kind of blending a little
bit wherever I'm seeing. I need a little bit more
connection between the two. I really like how that bottom. The bottom of the
wing is looking, and that top section of the wing kind of where
the shoulder is, I wanted to blend it
a little bit more. So I added a little bit of water to blend all those
sections there. Use water to blend
if you would like. You can also add little
accent colors here and there. At this point, I'm just kind of adding colors that I end up
seeing in my reference photo. And so this is kind
of not essential, but only if you're wanting to add a little bit more
color to the neckline, I added a little bit of
magenta to that neck, just to kind of reflect some of the colors that you
see in the sky. Now I'm adding a little
bit of yellow to reflect a little bit of the colors that you see in the sky. This, of course,
is all optional. And if you add too much color, keep your brush. Handy. You can either use a dry brush to lift up that color
if it gets too intense, or you can use your paper
towel to lift it up. If you are somebody who is just starting
out with painting, maybe you avoid this step. This seems like a little bit more of an
intermediate step. For those of you who have
painted a little bit more, adding some of these
secondary colors on top, like the magenta to the beak is it does actually round out your painting quite a lot
because they're bringing all these background colors
into the foreground subject. But it can be tricky to do if you haven't painted
that much before. And so test it out
if you would like, but keep your paper towel
handy so that you can lift off any of that excess
pigment if it gets too dark.
8. Wet on Dry Layer of Water Reflection and Final Details: Look. Alright, we are now ready for our wet-on-dry
water reflection. So with water, our first
step is always to create some soft ridges
using wet-on-wet. And now, afterwards,
we always do a wet-on-dry layer to
show the reflections. So I mixed indigo
with some thalo blue, and it's fairly
dark, fairly opaque. What I'm doing now, though, is I'm tracing
almost tracing using S curves on these
horizontal lines that I painted on the shadow. So you'll notice that
I'm kind of curving around these horizontal
lines and connecting them. I'm keeping a very, very soft, soft touch on my brush. This is definitely where you can use a small detail
brush if you would rather. And I'm also keeping these
S curves very compressed. So my S curves are not going
to be elongated at all. And I'm going the whole length
of the body, pretty much. So you can see where I had these darker reflections
and the first layer. And now I'm just coming along, and I'm elongating them. I'm leaving some
space in between the edges of the curve is where it's going
to be the thickest. So I've got that thick along the edge and a really
thin line in the center, barely touching in the center. Now, once I get
closer to the head, you notice that I'm kind
of skipping a little bit. I don't need to
have these S curves continue the whole
length of the body, so I'm going to skip
a little section and do a little section
on the top of the head. Wherever you're noticing the really light
colors along the neck, you're not going
to have a really, really dark shadow there. And so these dark S curves are mainly where we see the
darkness in the body. Now, I don't want to
leave it like that because otherwise it's gonna
look too out of place. So I'm adding a few
horizontal lines coming out from the edge of the body just to kind of
place it a little bit in the water instead of having
that shadow be sew by itself. Now, this section is optional, but I am going to water down
that shadow color and add just a few lines of wet-on-dry shadow to the
rest of the water area. I do need to water
it down, though. I don't want it to be as dark as the case shadow of
the Great Blue Heron. I'm still using this
round size four. However, you can also
use a detail brush. I'm adding horizontal lines it's in the sections where you
already notice shadow. And I'm not going over
every single section where you already notice shadow, but I'm just kind of
highlighting a few. And more towards the same horizon line as
where the body is. The rest I'm going
to leave alone. I'm taking a little bit
of that dark indigo, and I'm just tracing
along the horizon line. To make sure that that
division between water and land is really
nice and apparent. So a really dark line there
is going to make sure that the difference
between the tree line and the water is
really apparent. And then if you want,
you can always add a few extra wet-on-dry grasses sprouting out from that
line and once again, keeping those on
the outside edges of your painting nut in the
center of your painting. And then as I let the shadow dry a little bit on the water, I did notice that it dried a little bit lighter than what I was hoping for, which is fine. I'm just going to go back
and touch up a little bit of those shadows closest
to the body to darken them a little bit,
just a little bit more. And of course, I want to add some final details in the face. So I'm using a detail brush. This is still my size four, but you can use a
detail brush if you need a smaller brush. I'm adding a dark
line of indigo, where the two sections
of the beak are meeting, also where the nostril
is a little bit along the top edge of that beak and along the
back side of the head. So I really want to make those those dark feathers on top of the head be
nice and apparent. You can darken the eye if you would like the
center of the eye. You can also use
micron pen for this if you're a little
nervous to use indigo. And that's our finished piece, great blue hern and watercolors.
 Emily Marie Watercolors, Watercolor Artist and Dog Lover