Transcripts
1. Let there be light!: everyone thank you for joining me in this spacious house are glowing lights on watercolor nights, guys. Now I call it's patient because it's something really closed my heart. I love painting lights. I love baking. Thanks, guys. So I'm hoping to share some nice tips and tricks related to how to be waters. Night skies, how to take care off masking fluid, etcetera. So I hope you have fun. I hope you enjoy this and try it out, so that's fine.
2. All that you need!: So let's start with the materials that we be using. I'm using restaurant 300 GSM, 100% cotton people. You can use any brand of people. Just make sure that it's 100 wasn't cordon because it helps with the techniques that we're gonna cry out on that it's machine press because I'll be elaborated more on this in the masking fluid section for pains. I'm using Daniel Smith their hands down my favorite on be sharing sheet that I'm gonna be using for each of the projects that you can cry on, mix it up, or maybe magic with the brand that you have. And for brushes, I'm just using these three from sagebrush. Now, the size of the brushes will depend upon the size of the project that you're trying on a cry out. I'm doing all my projects on an If I say she people, so I'm just gonna be using these three pressures. And apart from this for the D dealing, you need some wash for the stars, etcetera, or you can use a white job and make this one. Thess is a universal passport skupin. And for one of the projects you'll be needing masking fluid. So I'll be sharing more details about this in a separate section, and that's about it, so that that's all the reels that you need to try out the projects in this class. So let's get to the next section.
3. Masking Fluid : Tips: Now let's talk a bit about masking fluid, so I have these two with me. This one is by similiar. It's got a nice minty smell to it now if make sure that if you're using a bottle, not to shake it, because the bubbles can cause problems when you're applying masking fluid and the other one here is by Donald Smith, it's got an applicator at the end, so it's super convenient to use. Now let's talk a bit about why we need mask includes in the first place. So, for example, if you see this artwork, I could have either painted around the small lamps being extra careful. Or I could have just mast them, painted a full wash and then, you know, just removed the mask include and being to clams. So it all comes down to convenience. So in one of our projects, I'm gonna be using mask include while the other two do not make use of must include and as such. So let's talk a bit about DUIs and ones, or the tips and tricks related to masking fluid. First of all, make sure that you do not use any expensive brush because mask include has a tendency to spoil brushes so I usually go for a very T brush, or maybe a toothpick, for that matter. But just make sure that you used using something which is easy to apply. Next, make sure that if you're using a brush, use a soapy liquid to wash the brush before and after. Applications of this saves the brush to an extent. Also, make sure that your people is completely tried before applying masking fluid. Also, after you know just before you're gonna take off the mask, include so, in either case is you need your people to be try. Otherwise, it might just ruin the application or the removal off masking fluid. And you need to use 100% Corton or rather, a machine press people because handmade paper does not go well with mask. Include. So this one here is a is a handmade people that I have, and I'm trying to remove the masking fluid and the people is coming off with it. So that's the reason I insisted that you go for a machine press paper because masking fluid works much better on them, even handmade paper. You can make it work by using a hair try. But if you were to go three easy way, it's better to use machine pressed paper. So that's all about masking fluid. Now let's dive into a little bit off basics in the next section.
4. Basic Techniques: just goes a bit about the techniques that we're gonna be using in this class. Thes are some very basic things like that don't read. Which means that your people spread on your dropping in some wet watercolor beaned on it. So this is about letting water glowed with one thing. You just letting it flow, create patterns. Now, this is one way of doing it, the other being that you already have in tone your people on your applying another sheet or another layer on it. Now, here what we're trying to do is to create a plan using Madonna here. My is already it's still bet on. I'm just a bank in second shed. Well, it so I'm able to blend it because beans are red. So it is creating a nice group. Now, apart from this, we need to know a bit about lifting on staining pigments. So let me just bean a badge moments you before we move on to discuss the pigments. I'm just gonna let this try while we discuss the staining and on training pigments. So here I have a dot card from Daniel Smith. Now, these beans usually come with details about whether they are steaming or non standing on. Do a little bit body deal about whether it's transparent. What sort of reading off light fast as it has specific to staining. What it means is, if it's a highly standing mean, it will leave a mark on your people. So if you try to lift the we have bean off the people, it won't come awfully so diverse to be some being left some speed left on the people. Whereas if it is a non stating mean you'll be able dearly lift it off So the white people beneath will be visible So let us pry Oh, lifting it all from oh, Batch most So I'm gonna be bean ding Another fragile issue and cried the lifting technique on this one First while the previous batters still trying. So now I'm gonna be using a clean brush, So just dip it in water, clean it on, uh, Abadan a tissue and then tried toe lift bean off. So, as you can see, it is creating nice clue effect. Now, since the layers still read, the pain will cried. Go back in. And that is why you can see that it is not completely lifted, the being the still going back in. And there is a slight fluid, really kind of feel to this. Whereas if he come to dispatch now, it's almost cried. So now I just think my brush once again and it is still slightly red. It is completely try like the previous time. So I'm just gonna be using a slightly red fresh first for one cab. Now, after this, I'm gonna be getting it. And now, if I tried to remove the bean, it is coming off pretty easily, and it's leaving a very hard edge as compared to the other match that we did. This edge has come out as much sharper. That's because the being has already tried so in the previous, when the paint was still trying to go back in. So once again, if you go for a highly stating being like this one, Cascade Green has got a rating off three. So if you try to lift us off the paper using any of the techniques with whether you're lifting it from a wet layer or dry layer, it's not gonna come off completely, Whereas any low staining pain would be much easier to lift off. So that's all about the techniques on. And now let's move to the next section where we talk about blue.
5. Let it Glow!: So in this section, I mainly gonna be talking about working good on without must include. So here I have a small section where I've already applied the mosque. Include on I also have seen the small lamb Where will be which will be pending around. So in this case, where I have applied the masking fluid, I can simply go for a normal wash without being worried about the edges. So I'm just gonna be applying us wash with you. It's all these sports that you see are areas that I covered with ask Include now, in this case, I can do the same thing. I can apply a wash, but I just have to be extra careful around the edges. So it's not like it's not possible to do it without masking it. It's just about convenience and ease of doing it. It's here and being just extra careful on anything around the edges close so that I don't mix up ain't inside on one status, daniken just simply being the wash around it. After this, we'll be lifting the paint as discussed in the last section. So I'm gonna be using a clean brush. Um, lifting it Now this is after the sense cried already. So first you need to bacteria a bit because this is already tried and then used to clean fresh toe live the paint off that this would create a slight blue around lamb. - Once you're done with all the lifting, what you can do is you can go back to the pending and another wash If you feel that the edges are have not come off well, so here, since my the part that I lifted is still slightly I'm just going back in tow, being around it. So that area next to it is darker. And that gives that clue that we were talking about. It's does this one way of doing it? After this, you can be in the lab inside, offer this one. I'll just paint in another wash on. Then, while the people are still wet, I'm just gonna be lifting the pain from it. So since the paint is already ready, it's gonna be giving you a gluey kind of feeling. And since your lamp is protected with masking food, really don't have to worry about the ages so that these are two ways in which you can treat on. We move to the next section
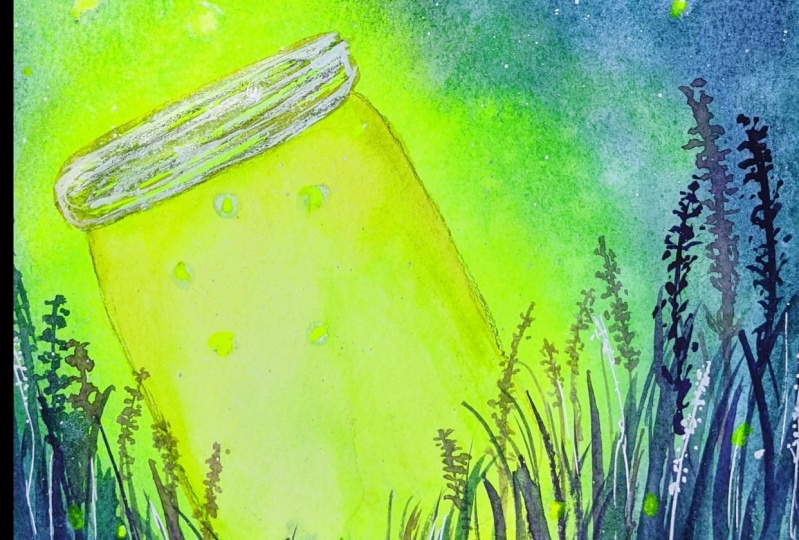
6. Project 1 : A million fireflies lit up the sky!: So we started our first project. Now here, I'm gonna be painting a little messenger full of fireflies. So I'm just getting the outline of the Mason jar over here. You can replace this with any other object that you like and stun. Now, the idea here is to have a source off light over here on. Then show that the lightest flowing outwards. So I'm just mixing my colors and I'll start with of light yellow. So I'm trying to show my source off light over here. It's still wet. I would like to lift off some color from inside the messenger so that we can pinpoint the exact source off light. Once you have lifted up the color, you can start with the out earlier once again. Now for the out earlier. I'm using a halo blue green shape in the process. If you feel that your blending has not work properly because you're trying to lift off the color from inside the messenger, you could simply use a clean brush toe, blend the edges, or maybe drop in a little more color. So I try and fix this by having a bit more yellow over here. Now we continue to work on the out earlier. How that this is done. I'm gonna be using. Ah, Dr Sheet. I just mixed indigo with the Taylor blue green shade that I was using for the previous Leo on gonna be adding it to the edges. This is to show the floor flight. So we are marking the ages as dog. Keep blending in words because this will help in showing the flu. Don't be worry too much about the bass part because we're gonna be adding some vegetation over there. I'll just add a little more dark green. Remember that. Your watercolors try much lighter. So I just want the edges to be slightly darker than what they are right now. So I'm just blending the ages once again over here. In case you feel that there are any hard edges tried to use a clean brush so my people is not completely tried. Still has some scenes. I'm just gonna spray some water on top of it. You can use a Miss Spray bottle or simply just drop some water using your hands as well. This is to create the clue Natural blue later on for the fireflies Now we'll wait for this to dry in case you drop some water inside the later period. Just use a tissue to lift it up, and then we'll wait for this to dry. Now that my people has dried completely, I'll start with some detailing on the Mason job. I'm using a slightly darker yellow to blend the edges. I'm gonna be using a clean brush with a bit of water and had a little bit dark yellow at the top. But we trying to do here is to show a gradual floor flat. And now we read for this to dry before starting with the next step. Now that my people has right, I'll start with the cross A to the beast. Just a random strokes. Make sure that your cross near the easier Well, you messenger is is lighter and color. Andi, as you good with the right where we have ah, slightly darker shade off blue. Or rather, the indigo mixed with blue. Your crass is also Doctor Ben. Well, I'm working near to the light. I'm using a lighter shade. - Don't use a white Ben. Do add some highlights over issue. I'm using a secure A jelly roll pen for the fireflies above. I need a slightly bigger tips. So I'm just using Ah, you nibble past boscap it, making sure that I add those white dots where we have the pattern created by water. So it gives that glow around your firefly. On that, I'm also adding some random dots here and there. Also in the little period. If you're doing this in the little Piri A. Ah, it's suggest that they are not as bright as the ones that are outside, so I'll be smudging them later once I'm done with all the fireflies outside. The gel pins of the white gel pins are not waterproof, so if it has dried up, we can simply use a wet brush toe. Smudge it a bit. Now I'll add some more in the crust, and that's it. That's our first project.
7. Project 2 : Your string of lights is still bright to me!: Let's start with our next project on this one is gonna be about the spring off lights and we be using the mask include for this project. So I'll just throw a shuffle plane off spring flights. I'm just using ah Freehand style to draw the lambs. You could go for a problem using a process are maybe any other shape for that matter. So I released the sketch a big on. Now I'm starting at the application off mask include I'm using a very cheap brush that I have now make sure that you are careful while applying it because the covered area would depend on how well you apply them asking. So just take some extra care Well applying must make sure there are no bubbles. - And now we wait for this toe. Try completely while I wash my impressions off water Now my mask include Has cried off mixed show that it is completely try or else it will spoil the bending. Now I'll just inward this a bit and start with my wash I'm starting big A little blue red shed He tried with any blue I'm amusing Just a little blue and go for this project. You can exchange this for any other. She's that you really like going for in the night sky, working better on Vick. I'm gonna be adding the vehicle. This is again our first wash. So be having another Washington off this lead. Ron, once this is try so don't eat. Worried about any harder to stop me. Come up right now. Keeping the people in flying helps the flu off colors. So this reason I'm keeping it slightly inclined. So now that my washes over, I'm just gonna let it try. But no, my first washes completely price. So I'm gonna be starting with my second wash. Once again, I'm putting in the little red shed and then adding indica wet on wet as a variegated wash and we'll have to let this tries article is all about the sheets. It's sweet. Now that my people s pleat Lee try. I'll start with stars. It's totally up to you. How many stars you want in there? High, Like a sky full of styles on. I should stop. So again, we'll have to let the stars try before we move on to the next step. So now we'll be creating glow using lifting technique. Thousands of people try. I'm gonna be using brush first for the first round and then simply a clean brushed lifted. You'll have to go around each lambs individually. No, this is a slow and being for crosses, but it really helps greet in some areas. Me see that this being on the mosque include, which can cost a bit of a problem. It's just clear that first and then go ahead with lifting, - being a little adventurous over here and trying to tow two lambs together because they're pretty close. Let's see how the scores. But just make sure that you spend enough time on this lifting part. If you're not confident about it, try it first on a sample, just like, you know, in the patch on. Try lifting the paint off and see if it eyes coming off for disdaining etcetera. Just that will really help the step, - and I'm almost done with lifting. Well, since we used a little bit of water for the lifting part, I'm gonna let this try off completely before I go ahead and removed. Must my people is completely trying. I'll start with removing the mask. Include you could do this with Reza also pleaded hand. Now this Since I don't have a lot of media covered with masking fluid, I'm just using my fingers. Make sure your fingers are clean on you don't lift up being with a red finger and then put it on the market failure. So you have to make sure that your fingers are clean. Have try. Honestly, this is like my favorite part, you know, to see the easier that was covered my masking. Now that my masking fluid is completely opal started painting labs, I'll start with a very light yellow Andi. Then add a bit of a taco sheet at the end so you could do it by using brushes so that you can work on each ham one by ones. Or you could go ahead and into three lambs together and actually is still working. Went on work on that. The previously It is not completely try by the time you at the next street off. You know this work on Islam individually or maybe a couple of lambs together. Make sure you're not planned. Indyk blue or indigo from outside into the lab. So just, uh, use a small brush and work just inside them and you're done. So once again, we'll have to let this little try before we add some final details. I'm gonna be using this white boscap in you nibble pass comment for adding strings. You can also use Wash in this case or any other color pen that works well on Big Sophie's and that's it. That spring Light project.
8. Project 3 : And at last I see the light!: So we start with our next project. Now this one is all about Chinese Landon's. I'm trying to sketch a rough out Lee, so I'm sketching big lanterns over here so that we can be easily around them on I'm I'm using a dog Benson so that it's blondie camp, but I'm gonna be raising the outlines. Lead Ron. - Now that I've erased the our lines a bit, I'll start with my wash, some using a car bezel. Wiley Trauma Daniel Smith You can use any violet treat. Oh, are dark one preferably because we're painting a very dark nights guy so that the Kloof within the lamps comes out as good. Contrast. So this being the first wash, uh, we really don't need to worry about you know, the hard edges that could be created because you're trying toe be extra careful around these lambs. In that process, it is quite possible that you and the bleeding's cardiges on the other side, but don't be worried about that because we be having another layer on top of this so we can definitely covered. But if you feel that it's become hard and edge, but you can do is just simply add a bit of being at the end so that it stays with a little longer earlier, working on the details around the lamp in back to these a bit because I'm taking my time toe being around the lamps because I want to be really careful and not miss of the ages. Once again, don't be worried if you feel that you might be forming Cardiges at the outside, try not, but if you do, it's OK. We still have one more layer to go on. Since this is such a dark shed, we'll be able to cover it up. In spite of going back to the decide so many times, I still can see a few of the heart it is forming on top. We'll just keep working around the lamps carefully. Take your time to walk around the lamps because you don't want to mess up the edges. Now for the next bit, I'll be adding mixture off crop ink on capsule violet that there's a smooth transition Over here. You can directly start with all problems. Pruthi bees. I'm adding plane or propping it. ISS still tinged a bit with the violet. That's okay. We'll wrap up this Leo over here on, let it dry before moving on to the next step. That might be anything is cry. I'll start with my next year. Now, this time you already have the lamps painted around, so it'll be easier for you to cover the area as compared to last time. He still will have to be careful around the edges, but you really don't have to worry about the hard edges anymore because this being a second there off the stock sheet, it's not gonna be an issue. We're still trying toe. Keep the peace quit. But you can see that I can be much faster this time with this leader because I already know where the color is once can take some time toe work around the edges. I know this contest impatiens, but it's needed so that we can get a clean edge around the lamps almost done with my violet . Now I'll repeat the same step from last time. I start with a mixture off propping on Carpizo Violet and then gradually more just clean Opera bank at the peace now that I'm done, but this'll ear once again, we'll have to leave it toe try for people want to the next. Now my being thing is cry So I'm just gonna be adding stars. I'm doing this beforehand because we're going to be painting the laps later. I tend to go overboard with stars where it's just something I really like Starry night sky . So I think I'll stop and let people try completely before starting with lamps. Now that my stars have cried, I'm starting with the Lambs. So I'll start with a very light yellow, maybe a lemon yellow, and you have tow work on one lamp at a time unless you know they're very small. So for this one, I started with the light Lemony Lewin arm, adding a darker shade of yellow. I'm I'm just gonna be blending this year with a clean brush and Reilly Christ. You can want the next lamp on. Repeat the same process, distorting a bit more doctors. You have to talk, repeat the same process with the other lamps, start with a light yellow and then had Dhaka shed at the edges. And this one's got a much better floor since since since this lamp is still, but I cannot be the adjust labs and co class to on these being small. I'm gonna be meeting them together. I've applied the first washing, and this wannabe went with the darker shade of yellow on. These plants have come out so well, so I'm just gonna be trying to correct this one. They see that water alerts are hard to correct, but there's no harm in trying. So I'm just gonna be lifting some being from the center. And now I'm just adding the same light yellow that used earlier. I feel it looks much better now. Okay, so I'll start with the last one since the other lamp is trying again the darker shade of yellow and you're all Muslim and that's it. Our projects.
9. Keep Shining!: so thank you so much for watching this class. I hope you enjoyed it. I hope you had fun creating beautiful night skies and glowing lights on in the process. I hope you learn something new about lights and watercolors on masking fluid. So if you want to connect with me and social media and there is that crazy doodler on Facebook and Instagram, I would love to see your project. So please, to upload them in the project section. And if you share them on social media, don't like me so that I can feature you on my peach. And I'd love to know your review about this class as it helps me in planning my future classes better. So do leave review. Positive. Negative. Whatever you felt about this class, I'd love to know about it. So let's stay connected, Andi. See you soon. Bye.
 Vinita, That Crazy Doodler