Transcripts
1. Class Intro: Hello. I'm Daniella Melon and author and artist here on skill share. Thanks for joining me for today's class on painting Watercolor magnolia blossoms in today's class will create five illustrations that are elegant, airy and, most of all, simple. In this class, which is geared towards beginner artists, we'll pay loose pedals that form globe like shapes to create a very graceful image for your class project. Start by sketching the Blossom Leinart image onto watercolor paper. I've included a downloadable template with five drawings that you can trace to make your outline sketch. Once you select the blossom you'd like to create, we'll begin painting pale and loose layers and building them up with only a few minor details. And once you get the hang of making these blossoms, I have a challenge for you. Try your hand at combining three or more blossoms to make a cluster. I've included suggestions on how to combine templates to do so in the chapter. I'm using your template when you're done, Take a photo of your artwork and posted in the project section. Please be sure to follow me here on skill share to get notified of future classes. Please consider leaving a review and most of all, thank you for joining me today. Now let's get started
2. Class Supplies: the class supplies for our watercolor magnolia blossoms class includes some watercolor paper. Here I've cut it down to five by seven inch rectangles. This is £140. I have the template that you can download. It's in the project section, and it's actually two pages, the first pages the one will use in class. And then I've included a bonus template of a cluster of blossoms. And lastly, I have a page that you can download from my sketchbook with just some ideas and information on the magnolia and some things that might inspire you. I have my water color pigments, an assortment of colors, three brushes, a 16 and an eight. I have a piece of paper towel just to dab up my water. I have a permanent marker here. I use a micron pen and that score, creating the outline. This step is optional, but I think it gives a very nice result. And then I have a couple of jugs of water. In the next chapter. We'll go over using the template and modifications to the template that you might find interesting
3. Using the Template & Variations: to use the template. I simply put it down on a light source here. I have a light pad, but you could use a window with the sun shining and behind it, or a piece of glass with a light underneath it. You could also just freehand sketch your image, or you could cut them out and trace around it. But for the demonstration, I'm gonna show you how to use a template to trace. It's very simple. You just put your light source down, illuminated if you have that option, and then put your piece of paper right on top of where you want it, and you can position your image where you'd like. You can also flip over the template to get the reverse image, which is kind of a nice option, and it gives you even more shapes of the flowers to use. And then I just go right in and I trace with my permanent waterproof marker, and I don't even use a pencil for this step. The lines are large enough. The Leinart is large enough that I think it gives. I can jump right to my permanent pen, and it gives a nice effect So with the template, I put down my paper and traced around and I got number one our first blossom that we're going to paint. And I just traced right over that. Then I let that dry. It takes only seconds For the 2nd 1 I did the same thing. I position it down the corner of the paper and this way up here I can include a sentiment if I wanted or leave room for a sentiment that I could add digitally, Um, for the third image. What I did was I flipped over my template like I discussed earlier, and I traced it down. And I did that with the intention of now flipping it back over again and tracing it this way as well. So we have two images and I can overlap them if I want, which I think I'll do just like this. And then I'll just trace around and I'll speed up this process. So there I took my number three image, and I have two images from that one template here. My fourth image of the same thing. I just traced it where I wanted it on the page and there's room. There if I want to trace another behind it or to the side. And I did a similar thing with the 3rd 1 that I on the 5th 1 that I did with the 3rd 1 I turned my paper so I could have my first image and I traced over it. And then I flip my template once again found out where I wanted to put the image and placed it down that way so you can get many looks from the single page of templates. Next chapter will start our painting.
4. Painting the Background Magnolia 1: to start my first image. I'm gonna start with the background. It's a very simple image, a very muted image. And I'm gonna take the colors that I'm gonna use in my blossom and just put it in the background. So it kind of looks like the background of the tree or the bush is in the background. So I'm just gonna take some Clearwater and I'm gonna mix couple of puddles, so mix Ah, puddle of green. And I'll take this deep green here and I'll mix a little sepia in with that, then a couple of brush fulls of water to really mute that down. And then I'll rinse my brush and I'm gonna make this a pink magnolia. So I put some water on my palette and take some of this brilliant pink and just a little bit of this crimson lake and again, another brush full of water or two. So now that I have very muted colors, got a rinse my brush and now that it's clear, I'm gonna very loosely paint around my image, not worried about getting everything perfect or exact, I just want to saturate my paper around my image. Once I have that done. I'll go in there and pick up a little bit of this color and I'm just gonna deposit it. And because I'm using the green, I'm gonna try and make it look like branches. So they're going to be these long lines that could be going in different directions. They don't have to be going in the same direction, but again, very muted. They will take a little bit of this green as well. And I'm just a few sections around the flower. I'll go up and create just a little blob of color, Then reverence my brush again and again. This is a very muted color pick up my pink, and I want to create the of illusion of there being some blossoms in the background. So I'm just gonna make kind of a V shape every now and again and again. I'll do the same procedure where I come up to the plant, and I just put a little bit of a blob of color just around it. I don't want any harsh edges, and I'm not looking to fill in the entire background either. From there, I'm just gonna take a little bit of a cerulean blue. Put it down on my palette, and I'll just add a few little touches of cerulean blue just scattered in the background. Any areas that didn't run her blend, I'll just go back in with the damp brush and create. It's a nice little blend there, take a look at my PC FAS, any areas I want to incorporate any more color. And once I'm done with that, I'll just let this dry. It's gonna drive very faint, and that's the look I want for this image.
5. Magnolia #1: First Layers on Petals: it's another background is dry and it dried very, very faintly. I'm gonna go in and start adding our layers to our actual pedals of our flowers with a number six brush All makes my color. First put a little water down on my palette some of his brilliant pink and then just a touch of the crimson lake again echoing the colors we already used in the background. But this time we're gonna use a lot more intensity. So I have a color that I like here gonna add one more drop of water to its I wanted to be fairly light. I'll clean out my brush again and I'm gonna go in. I'm gonna paint these pedals and I'll do two or three at a time. I'll start here on the left and I'm just painting the outside of this pedal where there's a very thin line. That's where the pedal had folded over itself. So that's gonna actually be the inside of the pedal. And I don't want back to have any color like this on it. So after I saturate that pedal, I'll go in with a little bit of this light pink and just put it on the kind of on the bottom and let it run up it. Then I'll move on over here to my next pedal. Saturate that and again deposit pigment at the bottom. I want this flower to look very loose, very wispy. So I'm not gonna put a lot of pigment. The key is not painting the contrast between the not painting in the paint. Same thing here. Gonna add my water and go. And I'm starting with my largest pig my largest pedals first and my first layer of pigment . Then on this one because the interior is on this side and this is the exterior where it's folded over. Ah, wet just the exterior. And I'm going to switch to my smaller brush my number one brush. And after that areas wet, I'll drop in my pigment. I'm only going up about half the flower. Then over here I gotta figure out where my exterior of my pedals are. And so on this one. This is my exterior pedal. We'll go in and drop pigment and let that run This is going to the next one. Here is the interior of that pedal The following pedal and then here. The big part is the interior. But this little fold is the exterior. So that's what I want to add, my pigment. I'm gonna let this layer completely dry and then we'll come back in and deepen that already wet pigment that we've added.
6. Magnolia #1: Painting More Layers on the Petals: Now that our first layer has dried, I want to go back in there and really deep in those colors in the first layer, but not entirely over the area we've already painted. So with my number six brush gonna go in and just deep in this color adding a little more brilliant pink and just a teeny bit of crimson lake. So the paper is dry and let's start with the pedal on the far left again. And I'm just gonna go in and deposit more color at the base, going over some of the image that we've already put down. I like to go up on the center when the panels are facing me and make theseventies of it the highest. And then it comes down somewhat. I'm just gonna go over all the areas that we painted, and then over here in this pedal switch to my number one brush and this is the all white pedal here. I'm gonna go in there and just wet the bottom and very gently, with very just a little bit of pigment on my brush. It's gonna introduce a little bit of color here, more of a shadow than an actual color. I'll do the same thing over here on this big one again. Just a little bit of color, A hint of color that's actually looks like it's ruling reflected off the other colors. The area is still damp here, where we just put down pigment and I still have my small brush I'm gonna go in and mix this color just warmer time, little deeper. So a little more Crimson Lake and I'm gonna go on deposit some color right in the center of each of the pig of the pedals that we put down And so here you can start to see three distinct intensities of color go over all the areas we did and then on these little areas Gonna just take a teeny bit on my brush little fainter and just put it in some of these areas here that we put down and I'm gonna let this layer completely dry.
7. Magolia #1: Painting the Branch : So now I want to work on the branch here and the little greenery at the butt of the blossom with my number one brush. I'm just gonna go in there with my water and wet that entire area, and I'm gonna put a very soft, very muted green down kind of an earthy green. So I'm gonna take some of this deep green on my palette in a little bit of sepia. Just a little more kind of an army green here. And with a sharp point, I'm just gonna go with the base of my plant here, all the way down right from the top since my brush. So it's damp and just blend this color out. Then I'll go back in with that color and just deposit little spots of it here and there on that branch, and I'm gonna let this layer completely dry.
8. Magnolia #1 Final Details: So now we're starting to see the real beauty of this flower here, this blossom. I want to add a couple of little shadows onto my pedals and then a little bit of color onto my stem. So I'm gonna went my brush, get a nice sharp point, and then I'm gonna go over these areas that are the interior of the pedals. So there's only a few of them here. This one here and this one over here gonna take a little bit of water on my brush, my palate, and add a little bit of black to that. And what a nice, muted gray. I had a couple of brush fulls of water. So I have a nice, muted color. Take a little on my brush and I just want to deposit a little bit of that gray at the top of those three pedals. We'll go in with a damp brush and blend out those edges again. It's a very muted color, Just a hint of shadow. Really? Then I'm gonna go in with that same brush and on these areas where the pedal has flipped over, I want to just deposit a little color as well and then with a wet brush. Pull that color down just so there's no harsh edge. We'll do the same thing on this one because it's so long and I'll start at the bottom, rinse my brush and blended on the way up then but a little spot of water on my brush and on my palette and take a little hands a yellow. Now that's really very bright. So I'm gonna move over here and had a rush full of water. I'll rinse my brush. I only want a touch of this. Hands a yellow, dry my brush. Pick up just a hint on the tip and just deposit that in a few spots. It's very faint. Just a shadow on those three pedals. Then maybe just a little here on that fold. But it takes some of that Hansa yellow again, that deep one, not the lighter one, and I'm gonna put some of it on the top of some of these little nubs and Nibs and folds on the stand. Then I'll rinse my brush, take a little sepia, and I'm gonna go in and introduce some sepia in spots onto the branch. And again, I'm looking just for variation. And then I'll come in with whatever step is left in my brush. I'll mix it with my green that we mixed and I deposited in areas where we put our first layer and let it bleed with the two other colors we just introduced When. But I'm happy with how that looks. I'll just let that dry. So there we have our first magnolia blossom.
9. Magnolia #2: for our second magnolia Blossom. I've already gone and done the background in the same fashion that I did for the 1st 1 And now I'm gonna work on the pedals and stem and I'm gonna try and do this all in one sitting . So the first thing I'll do is no Mix my colors with my number six brush would just mix some purple and some brilliant Pinkas Well, but I'll mix couple of spots of purple and a little brilliant pink. And then I'm gonna just water that down. Then over here I'm just gonna mix a little of this deep green and some sepia clean my brush and then I'm just gonna go over the pedals, Just the large area, the pedals. I'm not gonna go over the fold Just the large area, the pedals gonna switch to my smaller brush Take some of this purple that we mixed and again starting at the base I'll go. I'll introduce pigment until these blossoms to each of the petals. I started the base and then I go up and I kind of echo the shape of the pedal. So over here you see, there's like a mini pedal within that outline. Come over here, deposit a little more color, a little more pigment at the base. And then when I have all of my first layer done in my pigment, I'll just add in a little more pigment to get stronger intensity. So a little more purple and a little more of his brilliant pink. So now the colors a little more intense and I'm just gonna deposit it right at the base of these pedals. I'll do that on all of them again. I'm not trying to fill in the exact same areas that we colored in. I'm just trying to really intensify that base. And that creates a nice shadow on this plant on this pedal because we see so much of it. I'm gonna introduce a lot more pigment kind of all the way up the base that I'm gonna rinse my brush, giving a nice, generous space between the wet pedals and the branch. I'm gonna wet the branch here, and then I'll introduce my green pigment right at the base of the branch and let it run again. I'm leaving some areas dry, and I'm going to be very careful when I go in the areas next to where I wet pigment is on my pedals. I'll rinse off my brush, take some of this hands a yellow and a little of that deep green Go back in a little more hands a yellow So now I have ah, greenish yellow and I'll go in at the tip of some of these spots. I'll introduce some of this yellow. It gives a nice blend and then I'll take a little bit of sepia and a little water. Well, just deposit that somewhere is on the branch. Then I'll rinse off my brush and I'll finish off this painting by taking even more purple onto my pigment here and depositing it at the base. Supersaturated gets a brilliant color, and it has a different effect. Lastly, I want to come over here, make a puddle at a little bit of this black and a little more water to make that light gray Gonna dry my number one brush, Take a little of that water down pigment and just go over the shadow here off where the this pedal causes a little shadow on the one underneath it over and soft my brush so that it's only damp and blend that out. Then I'll take a little bit of this color and going at the base of this one and the base of this fold and the base of this fold, and I have to be careful in trying not to introduce that purple to it. Then I'll just take a damp brush and encourage that pigment of the dark gray to run, and then I'll pull down some color as well. And here we have our second magnolia blossom.
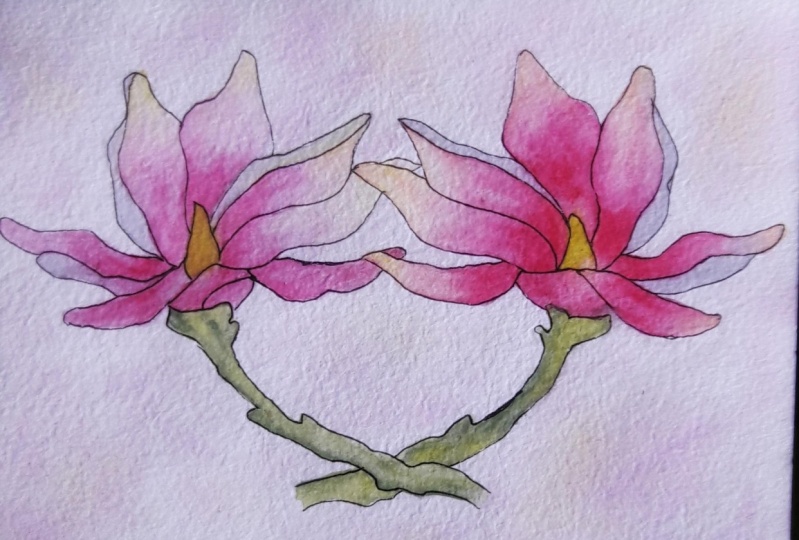
10. Magnolia #3: Petals Layer 1: for 1/3 magnolia blossom. And this is the image that we traced on with both sides of the template. We're gonna make this a light pink, so I'm gonna go in here and mix that pink. I'm just gonna take some brilliant pink, get a nice color and a little of this carmine red. Then I'll go back at a little more brilliant pink there. I have a nice image. Nice intensity. I'll go back in here, put a little on the palate over here and add a little water to that. So I have a nice, muted color. Now, these pedals are a little more delicate. So I'm gonna go in here. I'm gonna do one flower at a time because these pedals air so thin and wispy. I really want to make this look very delicate. So my first layer is gonna be a very muted layer of a very muted color. And all the pedals, whether they're folded in her out, will be colored light pink. I'll try and make the intensity closest to the center of the flower. But for the most part, they're all just gonna be very muted pink. And so I'll start with this pedal here and work my way around both flowers and all around because this is the first color and it's very muted. I could be a little, uh, loose with my details when we go to add our intensity. That's when we'll really fine tune which parts of the pedal are sticking out and which parts of the pedal are the interior. So I'll go over here with just some water on my brush. And again, I'm gonna work on this light color, just introducing a little bit of pigment to the bottom third of each of the petals. Take a little wetness on my brush, displeased those colors up, and I'll let that layer dry.
11. Magnolia #3: Petals Layer 2: Now the first layer has dried. I'm gonna going there with my number one brush. I have this pigment. I could just re wet it if it dried up a little. Think it's OK and I'm gonna go in there and I'm gonna create and determine which pedals I want to be pink and which pedals I want to be light the interior. So with this one, I'm gonna have this one really dark, particularly at the base and the same thing here with this one. After I put down some pigment, I'll rinse off my brush and just blend that edge out a little. Then I'll go here back and pick up this pigment. And on this third pedal over here, I want just the fold to be super pigmented and the same thing here with the fourth pedal. Just the fold, not the interior on the one behind it. I don't want that's gonna be the interior. So I don't want that to be pink pigmented. And I'll take this on this one over here because this is the part we're seeing with the color. I'll go back in deposit a little more pigment. Same thing with the pedal beneath it. We can't see the under side of it. And the same thing here with this last one. Go back in. Just deposit a little more colored closest to the center just to really make that part supersaturated. Then I'm going to skip over here to my next flower, and I'll do the same thing. This pedal over here, this pedal is gonna be the interior, the interior here. So I just go over the fold. And you could do this however you'd like. This is just my version that I'm gonna go in with the damp brush and blend this color out. Just don't really want harsh edges before we let this layer dry. I want to go in there, deposit a little more color right at the base, and I'll do this on both flowers. And this is just of the color we put down for this layer again. I want that intensity, that super saturation and we let this layer completely dry.
12. Magnolia #3: Petals Layer 3: So now I want to take a little bit more of this Carmine red and added to our color, just just super intensify it. And I'm gonna go over the base of these pedals again and again. I'll get that nice intensity. I'll go over all the images that we put down all the deep colors, trying not to leave any straight lines on my pedals. I started my other pedal, my other flower. Then I'm gonna go in and I want to work on the interior color. So I'm gonna mix too. Puddles of water. Take a little gray in one that's way too dark. So I'll add more water, actually pushed him over here and a little water to that. And with my brush, I'm going to start at the base and just move some of that pigment up and will start on my two largest pedals on the left hand side and they went some clear water. I'll drag it up, take a little bit more that pigment and go over right over here by the fold and right over here by where it shadows from the other two pedals. Come over here to the interior of this pedal and then just a little bit over here on that fold. And then I go back in with a wet brush and blend out anything, do the same thing on this side. I'll wet my pedals, introduced some dark color at the base and, with a wet brush, blended out, take a little bit of that color and just blend it out of that fold and I'll go. And here a little a swell just to create a little shadow. Then I want to take my second puddle that I started on my palette, teeniest bit of hands, a yellow. I'll go back in with some more water to make that nice and light. And at the tip, I'm just gonna pull in a little bit of yellow, and I'll go over those flowers, those pedals that folded in or that we're only seeing the underside of, and I'll let this layer completely dry.
13. Magnolia #3: Petals Layer 4: and now for the pedals. I want to do one more layer again. I'll take a little bit of this carmine red and mix it in with my pink color here, and I just wanted to dab a little bit of color right on the base of each of these pedals. I think it gives just that super saturation, creates a nice shadow and gives an interesting effect, very wispy. And I can go over some areas to that. I hadn't previously gone over. Got a rinse my brush pick up just a little bit of pigment and just with a very light hand, go over and create a little shadow in between these layers here. Then I'll go in with a damp brush and believe that out. I just want a hint of color just so that doesn't look so strange, so untouched when the rest of our, um, pedals have so much brilliant pigment in them. Go back in deposit even a little more color, and we'll let this layer completely dry.
14. Magnolia #3: Painting the Branch: So now I want to go in and work in our branch and these little areas here that produce seeds and fruit in the fall. So with a wet brush, number one brushing Clearwater just gonna go over lightly over my areas where the branch will be and where this little pod will be good mix my color here in my palette will take a little deep green, a little sepia, and I'm just gonna go over one side of each of these branches. I'll do one branch entirety and then the other branches. Well, it makes a little puddle of water here and take a little bit of hands a yellow, and I'm gonna color in this little area with this muted color, and they'll go back and intensify that color and deposit it on the top area of my branch. And then I'll take just a little sepia on my palette all by itself a little bit of water and with a very sharp point of my brush and just gonna introduce it in areas to make a little bit of shadow here and there. So areas where these branches might cross, or where it might be a little bit of growth coming out, and I'll just add a little bit of that color. I'll go back in deposit a little bit more color here and there to intensify it in spots. And when I'm happy with how it looks, I'll just let it dry. Just want to go and introduce some more of this Hansa yellow right up top here and then with a little sharp point on my brush, I want to add some green on one side and let that blend in. And here we have our third magnolia blossom.
15. Magnolia #4: for our fourth magnolia blossom. I'm gonna do this in yellow, so this is a fun way to work with it With a wet brush. I'm just gonna wet each pedal, leaving a little dryness in between each. And I'm only gonna go over the part that I want to introduce Color too intense color, too. So the exterior of the leaves. So if they're folded, I'm just gonna go over the fold. That would be facing me full of pigment on my palette. I'm gonna put some water and some hands, a yellow and a teeny bit of this yellow green. It's a very light green. Just enough to just brighten this yellow. Make it a little more natural looking. Gonna move my brush over here, pull some of this pigment and add a brush full of water to it. So it's nice and light, but not too loose. It won't take too long to dry. Gonna start with my biggest leaf on my left here and I'm gonna introduce some of this pigment and I'm being very loose not going right to the edge. I'm just adding the flower, the petals and the pigment to the flower, creating my shape here. I don't want to wet, um, an area on my paper because I want to introduce the additional layers right away. So once I have a nice bright color there, I'll go in with my brush wedded a little takes a more the Hansa yellow just to get a little more intensity. They're swap brushes. So now I'm on my number one brush. It's a little easier for me to control. And again, I'll start over here with this pedal and I'm gonna deposit it most of the pigment down at the base. I'll run it up the center of the flower as well. After I have that base saturated, and then I'll work on the folds. I want the base to be the most saturated, but it take my brush, rinse it off, make sure it's clean, and they were good. Dry it good, dry it, rolling it to create that sharp point. And then I want to pull the color from the top of pedal down. We'll go in, rinse my brush and do this on all areas where I've introduced color on that pigment on that pedal. Then I'm gonna create a little bit of gray on my palette. So I'll take some black to brush fulls of water, a little bit of purple. And with a sharp point, I'm gonna start at the base of the interior of these pedals and just deposit a little color that I'll rinse my brush and blend that out just so that there's no harsh edges on the larger pedals. I'll blend the color up higher than on some of the smaller ones. I wanna work lastly, on my stem here, so I'll take some of this deep green, some of the sepia and a, um, brush full of water. And I'm just gonna deposit color in a haphazard fashion, leaving lots of areas of white. Then I'll go in and pick up some of that yellow that we used for the actual pedals, and I'll drop in some of that yellow in some of those areas we left white. I'm still leaving some areas of the paper dry or white, and then I'll go in there with a little sepia, a little bit of water so it's loose and deposit that pigment on those areas. We left white because it's a nice variation on the branch gonna extend the branch just a little bit further than the drawing. Rinse my brush, make it clear and damp, and you just pull that color. I gotta go back in with a sharp point, some hands, a yellow straight from the palette. Here it's pull some color up right from the base of each of the petals that we added the pigment to. And there we have our fourth magnolia blossom.
16. Magnolia #5: Layer 1: for our last blossom. We're gonna make this very detailed and we're gonna use a purple So I'm gonna make some purple in my palette first, make some purple pigment and I'm gonna add some brilliant pink to that I think it balance it. It's it nicely and it still looks purple and maybe just a little carmine red. Now give it a little intensity. There we go. I'll add a brush full of water because these air small buds gonna go in there with a small brush. This is my number one brush, and I'm gonna introduce water about 2/3 of the way up each pedal. I'll start here with the pedal, the plant or the flower on my left. I've saturated the paper and now I'm just gonna introduce pigment. So all started the base, introduced my pigment and let it run and see where it goes from There. Now I have one brush full of water to my brush so the color is muted, but the brush is still wet, and I'll just pull that color up. I'll go back in, deposit more pigment at the base, and then I'm gonna move on to my next bud. So I'll do the same procedure where I'm gonna wet each pedal. Each of the three pedals on each of these buds leaving a nice dry area in between depositing pigment at the base dip my brush in water and that takes away some of the pigment but still allows color to stay to remain on the brush. And I'll pull that up, and then I'm gonna deposit more pigment right at the base of each of these pedals, and I'll let this layer completely dry.
17. Magnolia #5: Layer 2: our first layer has dried and I'd like to work on the branch with my number six brush. I'll put a little water on my palette and a little deep green and then a little of its light green to I'm gonna mix it together, mixed one brush full of water. So it's very loose, and I'm just gonna paint each of these branches. I'm not looking to complete the branch in entirety, but I do want to give a nice base color all the way down. I'll rinse my brush and then dry it somewhat So it's a damp, and I'm just gonna pull that color at the end so that the color fades just like that. Gonna switch to my smaller brush, pick up some of the green that we just put down and in certain areas, all deposit more color because it was a very light coating. Some of them may have dried already. I'm looking here now just to create a little variance, a little variety in our image next to it. I'll put a little water and a little the sepia take a little bit of the green and mix it in with that sepia and deposit that in certain areas as well. Again, the color blends nicely. And then lastly, I'll take a little of this hands a yellow and a little less light green a little more. And I'm just gonna deposit that throughout the stem here, this branch, I'll go back in with a little this sepia, just pure sepia, and in certain spots, I'm gonna add little bits of it. I think it makes it look a little more realistic for plant captures Shadows and Scalea nous . And if there any spots that are too much, you think that are too intense, just go near it with the one of the greens or the yellow, and that will help it to blend nicely as it dries. It will produce a much more subtle image, just some variation, and I'll let this layer completely dry.
18. Magnolia #5: Final Details: So now, just to add a little bit of definition, a little bit of texture to this, I want to make these pedals really pop. So I'm gonna go in here with some more of this purple mixed that in. So I have a nice, intense color, and then with a very sharp point, I want to start with this Bud, could it introduced some of that pigment right to the base. And I'm just gonna push it up with my number one brush just like that, while it's still damp. Gonna wash my brush, dry it within a sharp point. And now I have a dry, sharp point. I'm just gonna pull up on my brush, moving some of that wet pigment ever so slightly. If it drive quickly, I'll go back in pickup, just the teeniest amount, and create just a little texture. Then I'll go to the next pedal, do the same thing, join my brush and pull some of that pigment up. And it creates a little interesting shape. Do the same thing here in the small area. Here, deposit a little pigment, make a nice sharp point and just pull that up and it creates very interesting look lines, but a foot this one over. So you can see better do the same thing here, where I'm depositing the pigment at the base of the bud of the base of the pedal, drying the brush and just pulling that dry pigment up the length of the pedal. And then I could go back in, and any areas that really moved the pigment around just deposit a little more pigment. So over here I'll do the same thing. Deposited my rich pigment, dry my brush, get a nice point, and just pull that pigment and then deposit a little more at the base. Come over here, pull that pigment. And then lastly, on this pedal, dry my brush, pull that pigment and it moves that pigment around, and it gives a nice, fine edge. So when I foot my painting over, you can see a lot more detail. I'm gonna take a little sharp point on my brush and very carefully go over right over here just over the little edge, introducing just a little bit of pigment where there'd be a little shadow from where the two edges meat, rinse off my brush and just blend that out. Then I'm gonna go in here with a little bit of sepia. Very sharp point in just any of the area that would create shadows will just go in there, introduce a little bit of sepia. So where the branches cross or where the buds create a little bit of shadow and then I just blend that out with a damp brush, and there we have our final magnolia blossom.
19. Class Wrap Up: So here are all the variations that we painted of the magnolia blossom. We did the 1st 1 with pink nice layers and a nice variation in the branch. Here. It created a very wispy flower with a lot of little shadows. Very subtle effect, but very beautiful. We did the same thing, but this time we did it all in one step on the second Bengali A blossom. So as you can see, there's less variation because there's less buildup of color. But it's still very effective and very beautiful, very loose image. On the next one, we painted the yellow flower, and I think it is so pretty all the colors that it can come in Over here we did our double image where we reversed our template and we got a very fun and effective look. And then, lastly, we have our magnolia buds very pretty. While we were painting, we always painted with a little subtle background. It wasn't very dramatic, but it was very subtle. And so what I wanted to show you was the difference between the subtle background in the just the stark image of the Magnolia illustration. Still very beautiful and a very different effect. There's a lot more contrast here, but this one there's something very soft and elegant about it. And the last thing I want to show you was with the bonus template is if you trace it just as it is on the template. And this is this will be your end result. I did the same procedure. I just treated each one individually. I kept them all the same color, so each of the petals coordinate really well. And then I did the background in the same fashion that we did. I hope youll try your hand at one of these magnolia blossoms using your favorite color and post your work in the project section. Be sure to follow me here on skill share to get notified of future classes and please consider leaving a review. Thank you so much for taking the time to watch
20. BONUS Video: Cluster Painting Start to Finish Sped Up: eso here is my painting off the watercolor magnolia blossoms I didn't at four times the normal speed. I sped it up after I painted it, just so you can get a feel for the entire painting from start to finish. And what I really like about this painting is that it's so loose, and the attraction to it is the variance and the variation and color from the light light, muted colors to the very crisp in dark colors, the bold colors. And I think that really comes across in this painting. So here I took the template that you confined in the project section in skill share class, and I just changed it up a little, put it where I wanted to make it a landscape format instead of portrait format. And then it just started adding colors. I want to add colors that were found in nature that would look like what you're I would see behind the plants. So I did a lot of colors, a little florals, and then I did additional some of the colors from the branches and in the sky and sun, and I just let that dry and I kind of worked around it while it was still damp. And then I went right to work on the pedals. The pedals are my favorite part because I felt like you could be really expressive with them. You could just go very gently and muted for any of the pedals. Or you could make one side look super dark and one side transparent. Were you just seeing a little bit of that color from the underside of the pedal? To achieve this, I had to do multiple layers, and it was really fun. And even if it bled out a little, it kind of worked into the background that we had already created. So I really like that effect. It becomes very wispy, very light and elegant. The shape of the pedals are what's really dramatic when working on the branches. I didn't want to take away from the beauty and the boldness of the pedals, so I tried to make sure all the branches were very cohesive. There was just a little variation in the depth of color for each of them, but for the most part it was just one in the same that could be interchangeable. New had a rare. You put him on the painting, and I like the way that came out. I thought it made the pedals and the delicate nature of the flowers really stand out. And here I am, continuing. I just wanted to add another layer here, a little more depth so that there were some shadow when the back pedals and the pedals in the rear and some natural shadow that fell on the ones from the side. I think that gave a really interesting effect, and it kind of tied it all together. There was no harsh white colors were muted except for the bold color from the bottom of the pedals. To me, this painting really worked. I liked about it is I did it in purples, but you could do it easily. And pinks, reds, even peaches. Magnolias tend to come in whites, reds, pinks and purples and some yellows. But I really feel with the painting the way it's so whimsical and extract. You could use almost any color that you want it even blues, and it would still look very elegant and very light
 Daniela Mellen, Artist & Author