Transcripts
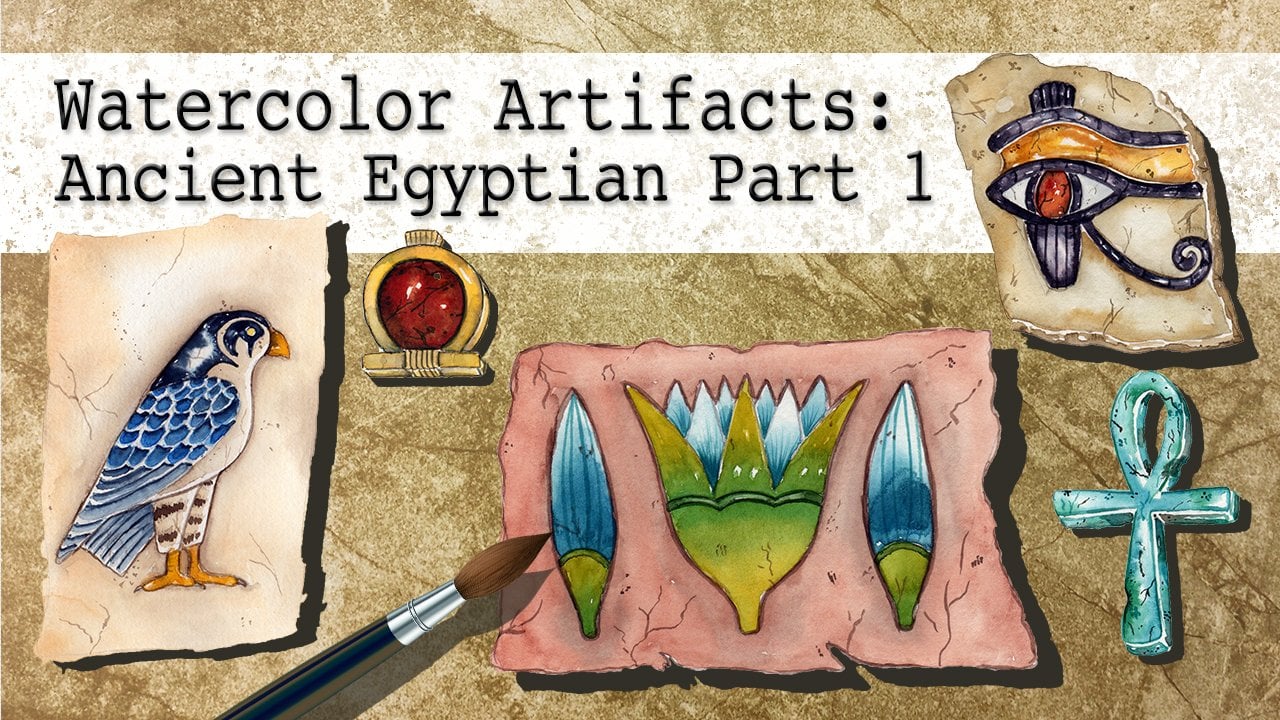
1. Class Intro: Hello, I'm Daniella melon and author and artist. Today's class is a continuation of the watercolor artifacts series. We will continue to combine historic symbols and images with modern watercolor techniques to make our illustrations. This class is the second in the series, and again focuses on ancient Egyptian images. Class includes the steps to create six illustrations. And since each image is based on actual objects from tunes, digs, and history, the paintings will appear aged in worn and antique. We want them to look like the relics and have survived for centuries. I've included the classify list and class template with all the images that you can download and trace. As we paint the images, we'll illustrate them as if they are centuries old but newly uncovered. I'll show variations on how to modify the templates to make the drawings appear chipped, Lorn and aged. So gathers supplies and join me for this fun class.
2. Class Supplies: So these are the supplies for the watercolor artifacts class, Egyptian two. There are two pages of templates and these have the images on them. Each image is labeled and it has a number six by six or eight by ten. And that's just the paper, the watercolor paper that I use for that illustration for the demo. Any of these illustrations can be done on any size paper of your choosing. I have a light source and that's my light pad here, but you could use a window. And then I have my watercolor paper cut down to those sizes, either the six by six or the eight by ten. I have a pencil and eraser, an assortment of paint brushes from a 164, and this is just a one inch flat brush to color and backgrounds. I have my six, what I consider Egyptian colors. And I'll have a list of this and a separate download for you, but it's a read, a deep yellow, green, blue, and Payne's gray. And then to age my artifacts, I use three shades of brown. I have a sepia, burnt sienna, and a yellow ochre. Additionally, in some of the artifacts I'll be showing using a metallic paint. And here I just have a liquid gold metallic, but you can use any metallic or you could skip it and just use different colors. There are a couple of tips to working with metallic watercolors that I've found and I'll be happy to share those as we go along. I have a bunch of water jugs and just a quick word on using the metallic inks or the metallic watercolors. I find that I always have dedicated water jugs and either separate brushes or I'm very careful to clean the brush after I used them from italics, those metallic or super fine and they seem to get in all my work. So I have dedicated brushes and water jugs for italics. Next chapter we'll go over using the template.
3. Using the Template: Now to use the template, I put the template down in my light source, and here I have a light pad. It's just a thin little pad that plugs into a USB port and I find it to be very helpful. I illuminate it from behind, and so therefore the image shows up. And when I put my paper that I want to trace my image right on top of, I can see exactly where it is. Take the illustration that I want to trace, and in this case it's going to be the crook and flail. And I take my six by six paper and then I just figured out where I want to put it on my temp on my paper, and then I just lightly trace over that with pencil. So now once I have my image traced, I'll go around it and erase any pencil marks that I don't want to remain. Tidy up any areas that I either overstepped are repeated the line. And at this point, this is where you can make any modifications that you want to your image. So to this image here, the crook and flail, I can decide if I want to make this look like it's a relief so that it's either etched or painted onto a stone wall. And if I want to do that, then I'll just trace in the wall behind it. Or I can make this actually a 3D artifact. Like maybe something that was put in the tomb or something that Pharaoh was using on his sarcophagus or something. And that's what I'm going to choose to do for this illustration. I'm going to make this into the 3D object, not a relief. So to do this, I want to lately sketch on the background a shadow. And I'm just gonna have a shadow falling behind it. I find the easiest way to do that is just to move my template to just the angle that I wanted and then trace over that again. So once I have that image traced that I wanted to be the shadow, I'll go in here with my eraser and make it very light. And this is really just a way to make it easier for me to realize the difference between my painting and my shadow. So I don't accidentally train it with a vivid color. And I'll do this with each image. Now, any image that I have altered from the template before we painted, I'll go over that and show you the differences I've made and all the little changes. In the next chapter, we'll start our painting.
4. The Crook & Flail: So to start this painting, I'm just going to visualize the colors that I want to use. And I want this to look like an actual gold artifact that was in the tomb of the Pharaoh. So I'm going to have different Gold and turquoise alternating stripes here on the crook and flail. And then after the first few layers, I'll start to add some metallic paint and we'll go over that next. So to make the gold, I'm gonna take my number one brush here. And the areas that I wanted to put in gold, i'm going to start with this yellow ochre. I'm using dry paper here and a nice thick yellow ochre, nice, heavy intense color. And I'm gonna start by outlining the top of this piece here. So all the pieces that I want to be gold, that's what I'm going to start. But I make a very thin outline right up to that pencil mark. And because there's so many layers to this piece, so many objects in pieces. I find it easier if I go piece by piece. So I have my outline here and then we'll come back in and I want to leave a lot of white on the paper. I know this is going to be one of many layers, but I like to have the basis of the color and then I can come back in and alternate. So I'm gonna alternate down this flail here. Every other one is going to be either blue or this gold. So I'm going to just make that same thing. I'll just go with the gold down the length. Again, I'm doing my outline first, and then I deposit color and I leave quite a bit of white of the paper showing. And this is just the first layer of this gold. We want to have a lot of depth here. And I'll come to the bottom of this handle. While I'm working on the flail here, I wanted these long pieces here to be gold as well. And so I'm using my thin brush. I'll turn the paper around. And again, I'm creating that shape, leaving a lot of white of the paper. Do that one more time. And then from here I can decide if there are any of the pieces on the flail that I want to make gold. And I think I want to make these long rods here. And maybe these middle shapes. So once I have that done and it's still a little damp, I'm gonna take my brush. Just put a little of whatever's on the brush, maybe a little bit more of this yellow ochre. And I'll take a little sepia and mix it in with that just so we get a slightly darker shade. And I miss gonna deposit it over here. And at the base of these objects where there'd be some natural shadow. Now looking for a lot of difference, just a little nuance. And I'll do the same thing here and I'm gonna do it on the right-hand side, just gonna deposit a little that deeper color because that's where my shadow is going to fall. Can add a little bit over here just to create that shape. And I'll let this layer completely dry.
5. Layer #2: So now I want to work on the crook here, and I want to do the same procedure. I'm gonna take my yellow ochre and a sharp number one brush. And I'm going to create each of those little sections, so little time consuming. But it does produce a really nice result. Really working on getting the shape of each of these sections. And I'm going to again alternate with the blue in-between. It's either a turquoise or a lapis. And that's up to you. So I'll go through each section. Again. I like to leave a little white of the paper. I just think that's a hallmark of watercolor painting. And then I can come back in and mix a little step yet in with that just to get a little dark color and deposited here and they're on the same side that I have my shadow going to go on. Just to give a little nuance. And I'll let this layer dry.
6. Layer #3: So now I'm going to come in and I want to work on that blue and I can make it a turquoise or alertness to me, the lap is just has a lot more blue than green and it's a little darker. So I'm gonna take this cobalt blue. Put a nice puddle on my palette. Take little Payne's gray with that. And just play with the proportions until I get the color that I like. To take a little bit of Deep Green and a little more Payne's gray. And then I'm going to start up top here on the flail. And again, the same procedure we did with that yellow ochre, where I outline it. But I don't fill it in all the way. There is still some nice white showing of my paper. And I'll continue this all the way down the flail here. I'll go back in and add a little more intensity on the right-hand side. And that's only because that's where our shadow is. So if I was doing a shadow on the other side or at the top, that's how I would do it. And then I'm gonna come in here and decide if I want to put any blue on the beads here. And I think I'll put some over here. Again, the same procedure. I feel if I get that shape or at least a good portion of it, the I will fill it in the remainder. And then maybe up here I'll just do these top little ones. And I'll lift this layer dry.
7. Layer #4: So now I'll repeat that procedure here on the Kruk, gonna take that color, that beautiful blue and create the sections here. Really making that beautiful rounded shape. Again, I don't fill in the entire area. And I do emphasize with pigment the area closest to the shadow. I'll go down the length of the crook here now and go back in at a little more intensity. And that gives a nice variation. And then I went to work just on a few of these beads here I want to introduce some additional colors. Take a little powerline red on my palette. And I'm gonna mix that with a little deep green. That gives me a deeper red. And I only need a little of it and I'll just do these little rounded balls here. So I'll make this shape and then introduce some color. And I like to leave just a teeny little spot of white. I'll do the same thing up here. And then lastly, I'm going to take some deep green on my palette. Going to mix a little of that red that we mixed previously. And then I'm just gonna do this final shape. So there we have. Our preliminary layer will let this dry. We'll come back, work on the shadow, and then we'll come back and work on the gold.
8. Layer #5: So now to create our shadow, I'm gonna take my number six brush and with a sharp point, I'm just going to whet the area where I made my sketch for the shadow. It's just a preliminary wedding the paper, but it will help the colored or run a little later. Then they switch to my number one brush so I can control it. I'm going to mix my shadow color, but it takes some Payne's gray on my palette. And then I'm just gonna add some water to it. I'll take a little bit of the blue color that I have already on my palette and mix it in. And then just add another brushstroke of water or so until I get a very light color, I'm going to start because I'm right-handed at the far left. And I like to start closest to my objects. And I create that shape. And this is the shadow of that first piece. I'll come in here and do the same thing. And again, I don't have to fill that area completely. The color will dry a little lighter. And that's a nice effect. And I'll come in here. If there are any areas that are too rough, I can blend them out with our damped brush. And then I'll move over here to this part of the piece. Now, these shadow will go over the top of the crook here. So I just paint right over that image over there. What my brush. Blend it out. And I'll just finish up here with this shadow. Can really emphasize the shape when I'm copying from dip my brush and water. Just to get a nice little blend. And then I can choose the pigment and add that. Again back to my shadow, closest to my object. He can come back in and a little more pigment closest to my object. Neaten anything up any of the lines up that I like. And then I'd like to take a damp brush and just go over the edges. And if there's any wet pigment, This will just fudge them out a little and just soften them ever so slightly. The shadow will not be as crisp as the image that we painted. And once I have that done, I'll let this completely dry. We'll come back and do a little work on our gold.
9. Layer #6: So now this step is optional, but it does add a nice little element to our piece. Here I am using a little bit of this. This is happens to be a Liquid Gold watercolor, but you can use a pan watercolor or a tube watercolor. And here's just some tips that I've found when working with metallic watercolors. This happens to be a very light gold, but gold comes in all different intensities. Yellow, gold, silver, gold. I just want the little shimmer, the sheen that comes from it. And here I have just a brush that I'm dedicating to the gold for my work today. It's a brush that I'll use in the future, but I will thoroughly clean it, wash it with soap, and then condition it afterwards. The shimmer is so fine that it will get right up in the feral here on the brushes. And I don't want to be using it for the rest of my work or you'll see shimmer in all my pieces, which may or may not be a bad thing, but that's not the look on going for. So I find the metallic paints, regardless of whether you're using a pan or a liquid, to be most effective if they're wet. So the pans, sometimes some brands will need to sit so add a few drops of water, even warm water to them to get them to activate them. Just ahead of time. Just a few moments should really be enough. And then to really get them to blend in, some gold won't blend, but it will run. And that's the look we use today. I'm gonna take water on a brush and I'm gonna just take a little of this deep yellow. You could use the yellow ochre that we had originally. The deep yellow would just give me a little variation. So I'm just whetting it down. I wanted to be a strong color but still usable. And now I'm going to start and I'll go over piece by piece and the begining to show you how I do it. So I'm just wedding the area on this flail here with this yellow and you can see how it brightens it immediately. Going to set my brush down and pick up just a little bit of this metallic on my brush. And then I'm gonna deposit it just in areas of the wet pigment. It will run somewhat. And depending on how much wet pigment you put down, you'll get a little more. So then I'll continue with this. I'm going to work on both of these sections that are side-by-side. So now they're nice and wet. I can come in with my metallic and drop that in. And I like to do it in areas so that it really looks. It catches the light. It's hard to see on camera. And particularly when it's wet, but it really will start to show up. So I'll do this on all the areas that I painted that gold. Come in, wet my piece. And then I'll just go and drop in a little of this gold. Now you can control it further. And to do that, you just really control in the initial background and whether that's red or yellow or whatever color you want to add. And go about being very careful not to cross contaminate my metallic and non-metallic wet a few pieces at a time. And then I can just go in there and deposit that little shimmer. Some metallic require a lot of buildup. And to do that, you'll let them dry, then come back in and add another layer. It's very difficult to build up on wet metallic. So there you have one way to use Metacyclics, and there you have our crooked flail.
10. The Scarab: So now to paint the scarab, This is not going to be an etching on a wall. It's going to be a 3D standalone little piece. Maybe about that big in real life. And that's what I'm looking for. So the first thing we're gonna do is wet my brush. This is my number for brush. And I'm gonna just wet the entire piece, not worrying about getting it covered completely, but I'm also not worried about staying within any lines. I'm not trying to avoid any parts of my scarab here. I'm gonna take a little water on my palette, mix some deep green. And I'll do this in two little puddles. And then I'm gonna take some cobalt blue on one. Just to make a really nice almost turquoise color. And then just mix a little of whatever's left with that deep green. And then I'm going to create my shape. So I'm going around and I want to create about 80% of the border with whatever's on my brush. Some areas will be more intense than others because I'll have less pigment remaining. And then I'll just add some color here in there. I want the lightest of the colours to be in the center of my piece because that's what's going to really come out at me. And then this area here, I'm gonna go back in with a wet brush, rinse the color off of it. Dry the brush, and just pick up this area here that I'm going to eventually make into a shadow. Going to push that pigment back onto my scarab so that my shadow was very muted. Now coming here, wash my brush again, pick up that second green that we have and just blend out any areas. Rinse my brush, put some water on my palette. Take a little bit of the deep yellow. Don't want too much. And I'm going to blend in areas as well. Really the pausing it and letting it blend, avoiding For the first time I'm going to avoid the area with the shadow. And then I'll come back in the last time and take a little of this cobalt blue on my brush. I don't need very much, but I do want to add a little few sections of cobalt blue. And then as you can see, we're getting really beautiful color blend between the greens. The yellow, and this blue can even come back in with a little more over here. Lastly, I'll rinse my brush. It's just clear water, removed some of that water and just push some of that water out from the center, not remedying the color, but just pushing it away. And I'll let this layer completely dry.
11. Layer #2: So now we're going to work on adding dimension to our piece. All the engravings we're gonna create. We're gonna avoid painting this area with the shadow and just work on the engravings. So I'll take some sappy on my palette. And then I'll just add a little water to that. With a sharp point. I'm going to start right at the top in the center here. And I'm going to go over my engraving here. Again. I'm not going to make a solid line, gonna make it kind of haphazard. And I just wanna go over it, creating that shape. Now this color is going to dry lighter. But right now we're creating the shape and working on creating the thickness of this engraving. I'm gonna go and do the second line behind it. And again, I'm not making a solid line. I am leaving a little gap of spaces here in there, creates a little imperfection. So this is the top of the scarab, the part that's closest to us. I'll rinse my brush. And now it's just a little damp but there's no color on it. Remove a little bit of the pigment. And I just want to blend. I can go back in Rio at my brush and I just want to blend over that line I painted. It will slightly thick in that line and it'll create a softer edges. Again because I'm now going over the line in entirety. There's any gaps. It'll kind of continue the gap. They'll still be a gap there, but it just softens it. So there I have the top of the scarab. I wanna continue outlining all the pieces here. Again, I'm going to work on outlining it. There'll be some places that the lines don't match. There'll be a little gap. And any blocks I'm not going to fill in all leave a little bit of the background showing through. But right now we're just working on the carvings. And this is where the dirt and years of Dustin infestation or gets stuck in some creating those shapes. Now work on the legs. I can take a light hand. You can always go back in and thick in any edges that you want. And lastly, I'll just come around and create that shape. Finishing off the scarab. I wanna go right around, separating the shadow from the base of the scarab. And I'll go all the way around the perimeter as well. And this gives us a guide for our next step. Last thing I wanna do is with just a small brush, is make these little etchings that run down the side of the piece. You can only really see it in a few areas. Again, it'll dry lighter, but we're just going for a little dusty look. Trying to keep those lines the same size and approximately evenly spaced, it doesn't have to be perfect. In fact, it's preferable if it's not through the years symbol have been shipped or filled in or worn off. And that's a great stopping point. So we'll stop there.
12. Layer #3: So now I want to take my number six brush and just wet it, keeping it nice and sharp point. And I'm going to work on this piece by piece. I want the base of this scarab here to be the darkest. So I'm just going to go over it with water and I'll just go over this half side here from this point to here. And then with a small brush, I'll come in with that sepia. I had a little bit more water in fact, because we don't need it to be as bright. And I'll just drop in some pigment closest to our peace. And that will look like dirt that's been built up through the ages. And I'll do this in steps. So I'll start with a little bit. And then I'll come back in and continue with just some clear water around the piece. Come back in. Drop that sepia. And the more you drop, the more intense the darkness comes, the higher contrast. And the more it's going to really show up as being 3D. But it does take time to build this up. So I'm just gonna go in here. And I can pull that color right up to the parts of the scarab here that we're trying to highlight can also go in there as the layers start to dry, deposit just a little more pigment. And I'll just work my way around with the Wet Water. No pigment on my brush, just the water. Now come in and drop the sepia, pulling it very close rate to that piece. So the scarab is on a little base and we're just adding pigment right to that scarab. Gonna rinse my brush. And the normal way number one brush, taking a little bit of that color and I just want to pull it down, creating just a little shadow. And then I'll rinse my brush and blend it out. I want the shadow to be very faint. And I'll do this on both sides. It blends nicely. And it's just a little bit of intensity. And I'll do the same thing around here to about a third, maybe a half of this part of the scarab. With the sepia. Rinse my brush and just blend that edge out. Can go back and repeatedly work that color. And that just creates a little bit of a gradual Fade between the lightest point of our scarab, which is the center and the edges. I'll let this layer dry and we'll come back and do just a little more shading.
13. Layer #4: So now that this layer is dry, we can build up the shading even further. Going to take my number one brush and mix them separate in without water. And now I just want to go around the edge one more time, closest to the scarab. Because I want this to be the darkest part. Rinse my brush and with it damp, just help blend it out so it's not a harsh line. And I'll continue all the way around the scarab, just around the places we've already done. Just takes a moment. But it does produce a nice sharp result. Continuing all the way around. First with the sepia. Slightly damp brush. So right around the edge you get is the peak of the jade. But the rest of it is like lots of age and dirt going to wet my brush. And now I wanted just a little bit muted of that sepia. And I'm just gonna go around the edge here, just the corners. Rinse my brush and blend that out very organically. And I'll do the same thing down here. Just want to add a little bit of a dark color, but not so much that it changes the color, just an overlay. I'm gonna take that color that we mixed and push it out from the edge here up top. And it'll do the same thing here on these little eye sections. Rinse my brush him, fade that out. And now I'm going to take a very sharp point and take some really sharp sepia, very intense color, make a very sharp point. And we'll start on the areas that I know are dry and I'm gonna create little cracks here and there. I like to take a few cracks coming out from the edges of the piece. And if there are areas that are wet, you get a little Blum. You can either pick up that blue or just leave it to dry. I really liked the way these cracks look. They will dry a little lighter than you see here. And I'd like to go around and just create a few little imperfections. Will let this dry. We'll come back at a few more cracks and just work on our shadow.
14. Layer #5: Should I just want to add a few more cracks and work on that shadow? Gonna take my brush, rewetting greenish blue that we used for the original base color on our scarab. And with a very sharp point, I'm just going to create a few cracks. Some short, some long, to some imperfections. I'll go all the way in different areas of the piece. And this will dry lighter at a few dots here and there. And then I want to come in with that yellow, that deep yellow we used and just add a few little dots here and there that just little specks, inclusions. Lastly, I want to take a little of that set via that very rich tone and just add a few cracks coming from the base. I like the way that looks on my palette. I'll put a little Payne's gray, and I'll take a little of that green, mix it in with that. Not too much. I still wanted to look gray. And I'm gonna bring it closest to the scarab. And the area we already painted for the shadow mix a little more grey with that. Again, I'm just sticking very close to the scarab right now. Rinse my brush. And now I want to blend it all out. Come back in with a little more of that gray. Then I'll rinse my brush and blend it out. And there we have our watercolor scarab.
15. The Benna Bird: And then for the bene bird, I sketched in a background here. So it looks like it's a relief painting on a stone piece. And the stone was the piece that was recovered. So it's going to be like a limestone. I'm going to go in there with a wet brush, just wet the background, avoiding the bird and avoiding the edges because I'll just do a little more fine work with a smaller brush, but I just want to create a lot of wet area at first. And then with my brush, I'll make my color. I'm gonna mix a little sepia with a lot of water and just a small amount of cobalt blue. I can also use Payne's gray. And then slight in this up. And I'm gonna go in there, and I'll move my palettes for now. I'm gonna go in there with this color and just carve out the shape. I'm not going to worry about the three-dimension part of this piece, just creating that top shape. And I'll start the exterior. Again. I'm avoiding the bird, but I'm also not going near the bird just yet. And then I'll come around, wet my brush so it still has a little pigment on it. And come near the bird. Again, I don't want to go over that bird just yet. Blended out so there's no harsh lines. Continue working my way around the top of this piece. Gets a very faint color, marking out the shape of this stone. And I'm scrolling all the way around. There'll be some areas that are white and from the paper. And then other areas where there's a little more intense pigment. So there'll be a lot of variation in the background, not looking for anything unified. After I have that first layer down, I can go in there, really fine tune the edges and the shape and then deposit any bit of color here. Along the way. Could take a little sepia, mix it in with that. So now I have just a slightly darker color. And I want to add some areas where there's a little more sepia, Just a little variation in the stone. Can come around, turn my paper. I like to go right where there's little crevices. Just adding a little variation, come back in with that original Color. Blend out any areas. And then I'll let this layer completely dry.
16. Layer #2: So now that our first layer is dry goods, we're going to actually paint our first layer on the bird. Maneuver for brush, I'm gonna mix some cobalt blue and my palette. And a little bit of this Payne's gray. I wanted to be more blue than gray, but just a little bit of a muted tone, a dusty look to it. Add a little bit of water. Then there, rinse my brush. And just with a wet brush, I'm gonna go over the entire bird, leaving areas of white. But just wedding that paper for that first layer. Be very careful here with the legs, beak. And then I'm gonna come in with that color. And I'm gonna work on the perimeter first and go around the main port of part of the torso, this body. It's only the first layer, but I still want to get it nice and sharp looking. After I have that perimeter, I'll dip my brush in water. So there's still a little blue on my brush. And I'll just blend it out, adding more water as I get to the center of that bird. I'll come back in with my blue, go around this head and neck shape to beautiful shape. And I want to preserve that with this blue. Again, I don't have to color it in completely. I want it to look faded and aged. And then with a very sharp point, I'm going to work on this beak here. Just going to pull that color in. Again, not coloring the entire area. And I'll do the same thing with these little feathers. I'd like to put a little pigment towards the perimeter of the shape. Kind of like a natural shadow. I'm going to switch to my smallest brush and do the legs. Again, I do the same procedure where I do the perimeter. I'm using my pigment on the perimeter of these legs and they're very narrow, so it is a little tricky. Mental dip my brush and water and just have that color run. Again. I'm not looking for that perfect homogenized color. Just a little variation here in there. I can come back in with that pigment, drop it in a few places to give some variation. Take it, drop it maybe in the tail feathers here. Put a little water on my brush to blend it out. And I'll let this Slayer completely dry.
17. Layer #3: So now at this layer has dried and we have these nice variations. We can start our detail work. My number one brush, I'm gonna go in there and mix some color on my palette. And I'm gonna take this Payne's gray and I'm going to mix it with just a little bit of the cobalt blue. I still want it to be really dark, but I just wanted to have a hint of that blue. And it was a very sharp brush. I'm gonna work on these areas here. On this little stripe that goes down behind the eye. It's important to get that shape. Just write. It parallels the neck and tapers as it goes down. And how much of a taper you add and how you do your little curve is up to you. And that will change the look of it drastically. Again, I'm going to fill in areas, not all of it with paint, but just enough to create that shape. And they can then work that shaped further and elongated if I want. Just to exaggerate it further. Going to take that brush and I'm going to create the shape of the eye and it's a very small shapes. So I'm gonna go very light handed. And again, add my pigment. I like it just like that. And now I'm going to work on some of the harder parts. So I'm going to very carefully trace the shape of this leg with a very, very light hand. I need to get that width just right. And then I can work on the foot here. And I'll do the same thing with this leg. And as you can see, I painted it a little narrower. So this is my opportunity to widen that leg just by pulling that line down a little wider than the original painting that I put. These little corrections you can make. And I'll work my way up with the legs, creating the outline shape. And then over here, I'm going to start making that detail work that we have on our template of our lines. Do the same thing here underneath this tail. We have these interesting parallel lines. And then over here we have a little bit darker tail feathers. I'll just pull that color out. I'll create this line here of the wing and the body. And you can do a lot with the outlining to change the shape. You can really refine it or even alter it as we saw with the legs. And I'll just continue outlining this bird. Again. We want a nice thin brush. And these feathers are ultra thin, so I really have to keep that very carefully. And now for the beak, could do the outline. And then the bottom beak is colored in. And again, I don't have to color it in completely, just the hint of that color. And so there we have the outline. I can tailor the beak shape here. And I'm going to let this layer dry. We'll come back using this color mix a little more and add even more detail work to the bird.
18. Layer #4: So now that our layer is dry, will take my sharp brush. And I want that same pigment I'm gonna mix just a little bit more. So I have a little bit of cobalt blue and a little Payne's gray. And then with a very sharp point, I'm gonna start my detail work. And this is just patterns. You can use any patterns you want. I just think it adds a layer of intrest. I'll add one more brush full of water. And that will dry a little lighter. And again, I'm really working on twisting that brush to get that sharp point. I'm going to start at the bottom, the feet, and I'll do one leg at a time. So I'm just going to create this parallel line at the base of the foot. And I'm just gonna make hash marks. So I'm gonna go all the way across with one direction of line and then the next. And I'm gonna do the same thing. I'll bring it up the entire length of this one leg, keeping those very fine lines very close together. And I'm going to width of the leg, right up to that line we created the first time. Then I'll twist this and do it all the way down the leg. I'll do the same thing on this leg. Starting at the foot and it'll go all the way down. So there I have the pattern on the legs. Could move, moving up. I'm going to add just a little more pattern here, just to carry it through upsell leg a little bit, kind of looking like stripes. We have this pattern here. I'm gonna go over just the base of each of these and they'll just create a different tone. And really want to work on this big wing. Glia divide the wing into thirds. So with a very light hand, I'm going to create just a guide for the thirds here. Just like this. I'll start at the base. And I want these to be parallel lines. Come back in with an even sharper point and make those lines very light in between those first lines that we put down. Then for the next section, I think I'm going to change the direction of the feathers and really exaggerate them going this way. Just like that. Going to create each one with a little cross hatch. I'll alternate and take my brush and change the direction. It's a very primitive looking feather, but I think it accomplishes what we want. And you can use any patterns here that you want. I just think it creates a different effect. And now for this last main piece of our pattern, thinking to go back to the ones echoing the shape here. But we're going to add some cross hatching. So I'll add some thick stripes. Again, I don't have to go the entire length. And now I want to add some crosshatching here. Very thin strokes, very light. I like alternating because I'd get a feel for how heavy each of these areas look. And I can come back in here and do the same thing. Just like that. Well, let this layer dry. And then we'll come back and work on the detail work of our stone.
19. Layer #5: So now when we do the detail working with stone, The first thing I want to do is create this dimension. So with a wet brush, I'm gonna mix a little sepia on my palette with little Payne's gray and a little cobalt blue, echoing that first color that we made. It'll be a little darker. And it can add a little more separate of that to warm it up. But it's still a grayish color. And then with that small brush, I'm gonna come in here and create that shadow. Going to bring it all the way up. And just a hair of white showing in between the top of this stone and this base here that we're creating. And I sketch this out in pencil when I traced my template. I want just the slightest space between the top of the stone and this area that we're putting down just now. And I like to start by adding that pigment to that furthest area from the stone. And then I go in with a wet brush and bring it just a hair below. And I'll do this all the way around. Wet my brush. Continuing around here and just leaving that little gap between the top of the stone and the dimension. And once I have that, I'm going to let that dry and then we'll come back in and add all our aging or cracks are inclusions and our stonework.
20. Layer #6: So here we have the stone and nice and dry with my sharp brush. I'm gonna come in here and add a little SEP ea to an area on my palette. Just a little pains greater that. It's a little too much at more sepia and add a little water. Now with a sharp point on my brush, I'm gonna start by making cracks and I like to come to an area where I sketched where it kind of makes a little bump, where it looks like a weak spot. And then I'll just create a little crack. Because I have a lot of water in this pigment. It will dry much lighter than it looks here. So I can take some of these areas and just enhance all those little cracks that it looks like would come from a piece of stone that was found. With this hidden treasure on it. Can do some cracks right in the center. Don't just do one more crack on this side over here. Coming up. Then I like to take that color. Just add a few little specks here in their little inclusions, imperfections in the rock. And I'll do the same thing on a few areas on the base of that rock and I'll add a human a little darker color just for more dimension. Can even spatter it ever so slightly. Then I'll rinse my brush with whatever blue we have left. I'll mix a little water in with that just to lighten it up. And then I want to create some cracks in the bird itself. They can be very faint or just little spots of different color. To create some imperfections. Less than I wanted to take one color and a warm it up. And this could be a gold or yellow ochre. Put it down on my palette. I'm going to mix a little that set via him with it just a little bit. And I want to do a little spatter of that as well. And I really think this captures some of the sand, some of the warmth right from our peace. And however much spatter you add is up to you. And there we have our Benner bird illustration.
21. The Death Mask: For our deaf mask illustration, I want this to look like a sculpture or a life-sized sculpture that's made out of stone. So it's not going to be the traditional 2D and common one you see with the golden blue stripes, it's going to be stonework. So with a wet brush, I'm gonna take it and paint all way around, over the face, over all the illustrations. And I want the end of this statute a kinda just fade. So now I'm going to mix my colors. Could take some burnt sienna and sepia. Rinse my brush. And I'm gonna add yellow ochre to that. Wanna really lighten it up. A little bit of water to that. And then it's going to create that first layer of that stone. Going to go over around the perimeter and just flick that color down, that brushed down at the end. I just want it to fade out. Come in, my brush and water. Go over the center of this pickup a little more pigment and just create that shape. Dip my brush and water, blend out any edges so there are no harsh lines. And then for the bottom here, because I wanted just to fade, just gonna go over it with a wet brush. Rinse my brush, go over it again, this time adding clear water to the base and then slowly working them together. So I get a nice little fade there. While my papers, when I'm gonna take a smaller brush. And I'm just going to add a little pigment to the exterior here. If my pieces wet, a colour will run and beat up kind of organically, which is what I want. If there's any areas where it's dried or there are lines, I'll just go back in and wet it. And then I'm going to let this layer completely dry.
22. Layer #2: So now our first layer is dry. We're gonna go in there and we're going to add a bunch of shadows. No, keep in mind because this is a piece of stone. The features aren't going to be as detailed as say a painting would, but we still want to capture them. And so the way I do that, the easiest way I do that is really think of the shadows. The part of the face that's closest to us would actually be the face, the nose, and then this beard here. And those things would cast a shadow. And because of this shape, the ears would cast a shadow behind it and the beard would cast a shadow behind it. And then this little head dress would cast a shadow behind that. So those are the things we're going to work on and then we can work on the stripes, the detailing. So with my number is six brush. I'm gonna go in there, wet my brush. And I'm going to work on the area beneath this where I'm gonna have my shadow and I'm going to have a light coming in this direction. So my shadow is going to fall to the right. And it's going to fall beneath this little head dress on both sides. To the right of this and to the right of this eye and nose. There will be a dark area in here as well so I can wet bat. And up here, might as well use this brush. I'm gonna mix my shadow color here. I'm going to take some sepia, put it on my palette, and just mix in a little water with that. And then I'm going to take my brush and it's a very thick shape right now. I'm going to go around these areas that I want to cast the shadow. I'll stick with one side for now. And I'm going to go on this line as well. Come down here, avoiding the eyeball. But going around the nose and even just below the lips here. Then I'm gonna rinse this brush and it's a nice thick brush. Dry it a little bit so it's damp and blend out that shadow. Again, I don't want harsh lines. I want that gradual shadow. If any areas of starting to dry, I'll go in there again, blend them out. We used a light color, so that gives us some area and some time to play. Can take that color again, that pigment, and work on this side, where there would be a shadow. Again, I'll go in with a wet brush. Blend that out gently. And we're beginning to see the first elements of the stonework and the scale come to life. I'll come in with a little more pigment going over the area we've already gone on just building that those layers up can add a little in here as well. And then a little shadow in the ears. I like to come in and blend that out. Again just to create somewhat of a softer blend. And then lastly, before we let it dry and going to switch to a smaller brush and just a little more set via pigment. And just control where I deposit that pigment. I want it ultra dark, right up against the area causing the shadow. I want those lines to blend out nicely though. So I don't want to add too much pigment. But I definitely want a contrasts between the first layer we put down and the shadow. After I have it down, I'll go in and blend it out. And it's this constant process of blending. Adding more intensity, blending, added more intensity. That starts to give us the look that we are going for. Going to take one more little bit of sepia here. Very late hand and just add that in. I know it's going to dry a little lighter, but I still want to carve those shapes. Particularly on this first layer. This outline that beard, a little. Outline that shape. Rinse my brush and just blend out these lines just to soften them. Again, I'm keeping the top of the nose the lightest point. And I'll let this layer completely dry.
23. Layer #3: So now we can start adding a little more detail work. I'm going to use my number six brushes because I liked the width of this brush. I'm gonna mix a little sepia on my palette and a little burnt sienna. This changes the color just slightly. A little bit of water, maybe a brush full, little more sepia. And then I'm going to turn my piece to the side and I'm going to work on the stripes that you see on this head dress. I'm going to start here right at this line that we made. I'm just going to pull that line across and then get a skip a spot. And I'm gonna continue up making this line. And I'm gonna go all the way up. Again. It doesn't have to be perfect. But I'm gonna go all the way up the head dress here. I'm pulling the pigment that the most of the pigment is staying out on the perimeter. Then I'm gonna flip this over. And here's where I have the challenging part. I'm trying to match these lines. Again, I'm drawing the pigment towards me. Pulling these stripes, go back IN, pull that color and I know it's going to dry lighter than it is here, and that's a great look. And then I'm going to start up top. I like to start in the center here. I pull that line in the center and then I work on either side. And this helps me keep it somewhat symmetrical. And it helps me with my spacing. You can always throw in an extra one. On this line here. I'm just gonna do a few straight lines, very thin just to give that shape. And then I'm going to take the remainder of the color and I'm gonna go down this mask with thinner lines. Again, I'm pushing the color to the outside. And then I'm gonna do the same thing on this side. And I can even turn the paper and pull it down and get a little bit of a better feel that way. And that's just personal preference. And then lastly, I'm going to pick up that color and it looks like I'm running low, so I'll mix a little more sepia with burnt sienna and a little water. And I want to do the same thing down here, down this beard. Gonna go around. Start with my widest stripe closest to the top. And then I have just a slight little arc on this beard. Again, I'm pulling the pigment to one side. And then I can just dip my brush and add a little dab of pigment to the other side. Just like that. I want to keep that pigment if there's any that remains on my palette for our next layer. But for now I'm going to let this dry.
24. Layer #4: So now that our pieces dried, I want to add some stone texture, some pebbles, the texture. The easiest way to do this as a spatter technique. And so we'll do that eventually. But first I want to create just some inclusions and some imperfections in the stone. I'm gonna take some yellow ochre and some sepia and mix them together and that'll be my first color. And I'm just gonna very gently create little sections. I'll start on the torso. Just a positing this texture. I start at the top of the torso and as my brush removes pigment, I gets lighter as I go down to write that too, that faded section. And that's what I want. So now I have a bunch of brush strokes that are faded as it goes down the body. And this is a very thick texture. Could do the same thing up here, but I'm going to water my color down. And just on the face, I'm just going to add some of this texture. Again, I want this stone to look like stonework. Then I'm going to come back in, put some yellow ochre on my palette and a little water. And I'm gonna take my brush and just add a little bit of texture that way as well. This will warm up the piece and yet add even more texture. Can mix a little more of that color, yellow ochre with the water. And it's a very subtle effect. Dip my brush and water and bring that down. And again, I'll add some of this to a face. Mix it with some more water. Very carefully. I'm gonna tap it very lightly over the stripes that we made. We're looking for a little variation here in this pigment. Trying not to have the stripes bleed or run, but just have an overlay of color in various areas. Mix more color is needed. Gonna rinse my brush, take a little step yet with some water, not too rich of a color. And then I'll just add some speckles. It will dry lighter and I'll create a little inclusions as well. The areas that are dry, it'll be nice rounded spots in the areas that are damp. It'll create little swatches. If there's any areas that I think are going to interfere with our shadow work. We'll just go in there with a damp brush, soften them up. And I'll let this layer completely dry.
25. Layer #5: Now there are layers dry. We'll add our detail line work just to really emphasize what we have here. I'm going to take step yeah, my palette and add a bunch of water. I want the color to be light and I don't want it to look like it's outlined. And then I'm gonna take a little yellow ochre to mix it in with that just to tone it down and warm it up. So now I have a kind of a dusty color with a sharp point on my brush. I'm gonna start outlining the piece and I like to outline the mask first. Very sharp line, very light handed brush. And I'll go up and outline the perimeter of the face. And I'll finish with a desk, the mask over here. And then I'll come down and outline the torso, letting it fade. I'll flip my piece over and I'll do the same thing. Continuing this outlining process. I outline the beard and the shoulder here. And then a good mix, a little more pigment, little more that step yet in with that color, what remains and we're going to work on the face. Now the key to working on the face is a very, very light hand and a very sharp line. To start with a mask. And just outline that mass given a nice little bit of depth. And I'll continue here with the face and the ear. And I'm going to outline the eyebrow, but I'm not going to go down the length of the nose. Just going to come to the bottom of the nose and then work on the nostrils. I'll do the eyeball ellipse. Now I'll continue on the other side of the face. Again, the eyebrow, not down the nose. I'll do the eye. Go over that eyeball again. Really emphasize the nostrils and the shadow beneath the nose and the lips. Now from here I'm going to wet my brush, take just the slightest amount of that sepia really diluted with water. And I want to blend out underneath those eyes and underneath that eyebrow. Want that to look very soft. Really fill that eyebrow out. And I'm gonna take a little more intense sepia to outline that knows. And this is all just about building up color and layers. Just like this. From this point, if you want, you can do your aging. So i take little set me on my brush a very sharp point and I'm gonna create this little cracks. They usually, the cracks usually start from a point where the pieces meet a weak point. I'll just create a few cracks here and there. If you have any of the cracks that go over areas that cross each other like this head mass comes down and then out towards us. You wanna make sure that you've changed the direction of the crack. One of the areas I find most valuable is to make a little bit on the face. And then lastly, I'd like to make just a little more shadow beneath this mask, so I'll go over twice with whatever's on the brush and then blend it out. And there we have our statue or a death mask.
26. The Cartouche: So now to paint the cartoonish, I drew another part to it. I drew some rope on the bottom and a little post for to lean on. And then I kinda drew something to make it look three-dimensional. So just with my pencil, I just created a little backdrop to it, and I'll just use this in my painting. Now, I did change some of the hieroglyphics over here just because I like to different ones to use, but you can keep it the same or alter it as you see fit. So the first thing I wanna do here is paint the inside of my cartoonish. So that's going to be these pieces here, the background of them. And I want this to be mostly gold with some of that blue lapis as well. So I'm gonna just what the background would just clear water. And then I'll get to making the gold background. And I'm gonna do this with two colors and then I'll add some gold at the very end, kind of like we did in the earlier piece. So I'm just taking some yellow ochre on my palette here. And then I'm taking some of this deep yellow as well. So I have just a few variations to work with. And would that yellow ochre, I'll come and I'll create the outline here. And again, I don't want this whole thing to be uniform. I want there to be some white spots. But right now I'm just creating that shape of this background here. Then I'm going to dip my brush and pick up some of that deep yellow which is very similar to that yellow ochre, and just drop that in a few spots. And again, you'll see lots of white from the paper. Some of these shapes are very, very small and it got little openings in the back where I want to make sure I get some pigment. Gonna switch to a smaller brush here. I'm gonna take that yellow ochre and just create a little more intensity around the edge. I'll create that little background all the way down. And then from here I'll take some of that yellow but deep yellow and I'll just brush it on some of the areas. Again, I want to leave white of that paper. I really liked the way that looks. In some areas it will be very haphazard. And in others I'll go right up to that shape. But not always. Once I have that done, I'll let this layer completely dry.
27. Layer #2: So now when our background, our first layer is completely dry, I want to go in there with a wet brush would just clear water. And this is a thicker brush than the number one brush. And I wanna go and create just an edge right around the interior of that perimeter. And so I'm saturating the paper just with water around the edge so that I can create a little bit of shadow. And I like to do this at first. Take a little sepia on my brush and I'll just create that shadow, very thin line right around the edge. And this is just a slight shadow that we're creating. We're gonna go over this layer again. But I like to have those nuances done down first. But I like to have those nuances painted down first. So while I have the sepia on my brush, I'm gonna create some nuances for our blue lapis as well. When I have this nicely done, I'm pretty happy with the way that looks. I'm going to come was it more sepia? And I'm gonna just pull out from either side of this, which is going to be rope on the bottom here of the stand, just to create a little bit of a shadow. And then I want to come up top here and do the same thing. And we're gonna paint over this. But I just want to create a little back painting here. I'm gonna come in with a wet brush and blend that out. Softening it as it goes. And I'll do the same thing over here. I created a little space between the bottom of this stand and the top. And I'm going to leave that white. And while I'm here, I'll just come back here and add a little bit of pigment. Pick up a little more sepia. And at the base here of this dimension of this piece that gives you the three-dimensional. I'm going to add the same little shadow with my sepia and blend it out. Lastly, I'll take that sepia and just create little striations here. That's going to become the rope. And again, we'll paid over this again. I just wanted to get that first layer down and we'll let this completely dry.
28. Layer #3: So now that this is dry, we can start on making our blue lapis. I'm gonna put some water on my palette and take some of this cobalt blue and make two little wells in one well, I'm going to add a little bit of the Payne's gray that will give us a deep blue. I'll rinse whatever's on my brush into that second well, that we have. And I'm going to add the smallest amount of yellow ochre to that other one. That adds a little bit of a green tinge. Since, since we're working with small pieces, I'm going to switch to my number one brush and I'll wet it and I'll take this deep color that we made. And I'm going to start on this long piece here. And I'm gonna create that outline. So with a steady hand, I'm just going to draw that line right across and they'll come back in and widen it. Again. I don't want to cross into the area of the gold on our cartoonish, but I just want to really emphasize the shape. I'll get my brush and water and just pull some of it closer to the Gold area. Again, I'm leaving a little bit of a border of white. I like the way that looks. It gives a little difference between the two and really emphasizes that shadow. I'll take whatever is on the brush here because it's a small brush of the blue and carry it over the top. And then I'll repeat that procedure where I go all the way across introducing that pigment to create that shape. And here we're creating a rounded rectangle. I'll come back with my pigment and go over my line again just on the edge. Because that really gives us a nice dark color, little intensity. And they'll do the same thing on this side. I'll go down the length, comeback and thicken it up. And then I'll go in there with some water on my brush. Pull that across. Again, leaving a little gap of white between sections. And I'll come in there with more intensity and drop that off. And you can add as much intensity as you want. Just continuing to add layers on layers as it sinks into the paper and absorbs, and it gives a nice little effect. Lastly, I'll finish the base here. Bottom section of this cartouche. Dip my brush and water and finish it out here. I want it to blend so you can't tell where I started this painting and where it ended. Nice, smooth blend. And I can go back in adding more pigment. Blended out with a little water on my brush. And then I'm gonna come in with that lighter color and deposit that just in sections. So every now and again, I'll add a big bunch of that lighter greenish blue. Mc is a nice little variation. I'll keep my colors on my palette. Well, let this dry and then we'll come back and finish the outer areas of this cartouche.
29. Layer #4: So now that our front pieces dry and we're going to work on that dimension. But it take a little more cobalt blue and my brush and mixed it with that darker color. Add a little more Cepheids to that at a little more pains greater that to get an even darker color. And then I'm going to start here on this right hand side. And I want to pull my color and I want it to go up three quarters of the way of the dimension with the most intense color being at the base. Dip my brush and water, and that dilutes it somewhat. And then I can pull that wet brush around again. Again. Each time I dip the brush, it dilutes it just that much more. And I'm pulling it up. And the lightest color will be closest to the cartoonish. Just like that. Take that same dark color and work on the bottom here. Again, I like the deepest color furthest away from the front of our panel. Dip my brush and water, and this time it's just clear water and that way it will pull the color. I'm going to take a little Payne's gray on my brush just a little bit. And while it's wet, I'm gonna just run down the length here. And this will even deepen it further. Casting more of a shadow. Could it come underneath here, pull this down. So it rests right on that bar. Then I'm gonna take my brush and I'm going to wet this top little shape up top here. It's really an ornament with clear water. I'll come in here with my dark blue and put it at the base. And with a very gentle hand I'll make the shape. But because there's enough water, it will run. I like that. There's an element of white here, a highlight. And I'll let that absorb a bit. And then I'll just deposit a little more of that pigment right on the base of this shape like that. And then I want to work on this bar. So on the bottom I'm going to start at the lowest section here, the dimension, and create that bottom panel. And then I'll just slowly bring that pigment up, dip my brush and water and bringing up again keeping that white area between the base and the top of that plate. And it'll do the same thing back here just with whatever's on my brush. Go in there, pulling a little pigment and drop it in. I'll take some of that blue pigment that's on my brush and pull it out, leaving a little space between the top of the bar and the bottom. And if the colors blend, I'll just take a paper towel, dabbed onto dry it, and go back and reintroduce it so that it doesn't blend together. So with that under painting that we have, we have a little tone and a little difference closest to this rope here. Do the same thing on this side. Dip my brush and water and blend that out. Lastly, I'll just take a look and see if there's any areas I want to add a little more pigment just for a little more intensity. Dropped those in, and then blend it out with the damp brush. I'll let this layer dry, saving the blue on my palette. And we'll come back and add some more layers.
30. Layer #5: So now that this layer is dry, we can add a little more to our piece. Going to take a wet brush. This is a larger brush, my number six brush, and with some of that lighter blue color, I'll reactivated. And then I'm just gonna take it and paint over sides here. This will give me just a little more vibrance and it will still maintain any of the variations in the previous layers. I also want this top layer to be my most intense. I'll take the same thing and do it on this bar, just on the face of the bar. So it ties in together. And then I'll do the same thing up top here on this little ornament. Switching brushes here. I'm going to take some of this blue, this deeper blue. And I'm going to start at the top of the rope here, create my shape and just pull down. And I'm not covering all the area with white, uh, go to the bottom as well and just pull up. And they'll do the same thing at the very bottom where I make my shape and push up. Then I'll rinse my brush and with the damp, I'll just work that bottom rope up and blend anything on the top out. So now I'm going to start working on the hieroglyphics. What I wanna do is paint them both gold and blue lapis that we have here. I'm going to try and make it so that it's somewhat balanced. So I think I'm gonna do this. Blue leads to blew. This one blew the triangle. And this little shape here. It doesn't matter what the shapes are. I'm just trying to come across somewhat balanced. So I'm gonna take my brush, mixin more Cobalt and a little sepia to get that blue. On the dry paper, I'm gonna create that outline first of the shape and it's a very thin Mark. And I just created. And then here I can add my texture as I like. And I'll go and create all my blue shapes first. This is more for my own 0s so that I know what's going on, what I'm looking for, and which ones I want to add that same color to create those shapes. Just the outline. Once I have that outline, I'll dip my brush and water and lighten up this color somewhat. And then I'll just come back in and add the pigment to each shape so that I'm covering a good portion of it, but not all of it. I like that look. And if you don't like that look, you don't have to do that technique. I do feel that it makes it look aged and adds interest. Now for this piece had, has a lot going on. I'm gonna come back and just echo the shape and leave just a little distance between each of the layers, each of the sections. Just like that. And that way I'll know its a twist and I'll just a single blob of color. I'm going to take some of this gray here, so I'm taking some Payne's gray, putting it on my palette and mixing a little of this yellow in with it. It makes a little more Payne's gray. And then I'm just going to come in here and just dab some of this color onto all of the ones that we put that first layer of blue. This adds a little tone, a little variation, and it ties it in with the gold. I'm gonna take that same color, can pull it down on the rope. And I'll let this layer completely dry.
31. 31 Layer 6: Now paint the remaining symbols because I want them to be gold, but I don't want them to get lost in the background. I'm gonna paint them within red base. So I'm gonna put some paralleling red on my palette. And I'll mix in a little of the deep yellow With that. I'll also take a little of this burnt sienna and mix that in as well. That gives me the red but a little brown. And then I'm just going to outline my shapes and add the color the same way we did with that blue. Again, I don't want to color and the shape in entirety. Then I'm going to take a little snappier on my brush. Mix it in that color that we mixed already. And now I'll just add that despots. Again, I want the red to be the most dominant of the colors we added. But I also want to little a shadow here. And I'll let this layer completely dry.
32. Layer #7: So now to create our gold in the background, to take a large brush. And we'll just put some clear water. I'm going to wet the background. I'm very carefully avoiding the hieroglyphics. So I just have a quite quick little light layer of wetness on that background. Could come in here and take some yellow ochre, put it down and just brush that down. This will enhance the vibrancy of the existing background, but not really change it too much. Then I'm going to take my gold, my Goldwater color pigment, and my dedicated brush and water jug. Turn my brush to get it sharp point. And I'm just going to drop in some pigment. No, it won't really blend. It might run where it's wet on the paper, but it's not going to really blend smoothly. So I'm going to have to do all that work. Blending it. I like this because it just adds a little bit of a shimmer to where I'm putting it. So I'll just do this very carefully. Again, I'm not looking for brushstrokes. I'll get my brush and water and help it blend. Along with that yellow ochre we put down. Once I have that down, I'm gonna rinse my brush and just set it aside. We're going to come right back to it. I'm going to take my small brush, my number one brush here, and I'm going to pick up that yellow ochre. And I'm going to go over a good portion of all of those hieroglyphs that we did with the red color. And that's because I wanted to have a red base. But I'm adding the yellow ochre now so that when we add the gold or gold can blend and really sit on top of that red color. So I'll do that just like this. If I want to build it up further, I'll let the layer of gold dry and come back and add more gold. But for now this is the look that I want right on the gold, and it is hard to see on camera, but it does have a little shimmer just enough to make it interesting. And I can go in there and just tidy up any images that I want. I'll let this layer dry. We'll come back and do some outlining in some aging.
33. Layer #8: So now that our gold layer is dry, I just wanted to do the final details and this might take a little bit of time going to come in here with a Payne's gray and the cobalt blue. And with a very, very light hand, I'm just going to outline the cartouche here. Any area that's blue. This will just sharpen up those lines. And I'll outline the interior as well. And again, I'm just looking for those sharp edges. Color will dry lighter, then we're putting it down. So I'm outlining all areas with a very thin hand. Once I have that outline down, I'll come in on the bottom piece here and just create that outline. And I'll do the same thing with this little bar. I'll post some color off to emphasize the shadow from the rope and make my outline. Then I'm going to take that blue wire while I have it and just really outline each of these hieroglyphics. Just quick and easy with a very fine point. Any of the blue hieroglyphics. When that's done, I'm gonna rinse my brush and take some sepia right on my palette. And I want a nice intense color. And I'm gonna outline all the gold hieroglyphics. Just creating a nice sharp edge. Again, this can work any mistakes or any rough lines. You can really make it clean it up a lot with this brush. Then once I have this done, I'm going to take that same sepia and I'm going to make very small little cracks, little inclusions, specs. I'll do some in the hieroglyphics and some in the edge here. And you just play around with it until you get the look that you like. Can even add a little speckle and a little water. And there we have our cartoonish.
34. The Feather: For our last image, we have the feather. And what I did was I took my template and I traced one that we're going to paint today, just like it is on the template. And then for the other one, I flipped it over to create its mirror image. And I'm gonna paint this one slightly different colors. And so we'll do that together in class. Now this is a small image, so I'm gonna use strictly my number one brush here. First thing I'm gonna do is create those different colors that we see in the background. And I'm going to start here with the colors that go here and skip and go up. So the first color that we're gonna use is this yellow ochre. I'm going to take it and I'm just going to vaguely coloring in this section and I treat each thing as a section. So I go around, make my perimeter, and then I'm just gonna put in a little bit of color. And I'll do the same thing on this side. I create my shape. And then I just put in a little color, not a lot. And then the next one I'm going to paint in a deep blue. And then the section I'm going to paint in the same color. So I want to do that as well. I create the shape and add a bit of color. Create the shape. And a bit of color. I'm gonna skip one because I'm gonna do that in this reddish color. And then the last ones that I do with this nice gold color, I'm going to be up top here. And again, I'm not coloring in the entire piece. For this feather. I want this to look gold. So I'm going to color in this base here that just trails off the page. And this little section here that holds it up. So I'll outline my shape. Get that very interesting shape. And then add pigment. While I have my pigment going on there, I just want to add a little bit of sepia, a darker color. Just on the bottom here. I had a little up top, but just on this section. And I'll let this layer completely dry.
35. Layer #2: Now this section and the top section, I want to be dark blue, so that's what I'm going to work on next. But a little water on my palate. A little Payne's gray. And then I'll add as much blue is. I want to get that color that I'm looking for. I'll take that and I'll create that shape using the same method we did for those gold areas, the shape. And then I fill in a little bit. And I'd like to do the opposite. I like to go right to the opposite, right away to see where we're at. And then up top here, for that last color, that last section I wanted to be that red. So I'm gonna take that powerline read, put it down on my palette, and some bird cnf. Take a little bit deep green and mix it in with that. Just enough to tone that a little dusty. And then I'll take that color and put that in here. And I'll let this layer completely dry.
36. Layer #3: So now that that layer has dried, I went in there and with an eraser, I just erased all the pencil marks that remain. And this is the shape I'm left with. I took my pencil and recreated that shape just on the side here, just like I did here for the shadow. And that way I have everything sketched out that I'm going to paint. So I want to come in here and add my color. I'm going to take some of this yellow ochre on a sharp point of my brush. And I'm going to outline the entire shape here. So now I have a cohesive shape. I'm going to take that same yellow ochre and leaving a little space of white. I'm gonna create that inner circle. Again, not filling it in all the way. And I want to come up here and fill in the shape of the feather as well. The little route. Now that I have that done, I'm gonna come in here and create just slightly darker versions of those colors that we used to create each of the lines of the feathers. I'm going to start with the blue. So I'm gonna take a little bit of this Payne's gray, mix it in with the blue and with a very super sharp point. I'm just going to start at the top. Pull the color down, and then create these lines very thin, right next to each other. I'll come back down here and do the same thing. I'll rinse my brush, take this yellow ochre, set it down. And I'm going to take just a little bit of Scipio with that. Come back in a little more yellow ochre. And I'm going to make the lines here. Now for the bottom piece here, I'm gonna make the lines all on one side are going to come right up. And I'm just going to treat that circle that's in the center as if it wasn't there, not going to go over it, but I'm just going to pretend the lines came out from underneath it. I'm going to let this dry and then we'll come back. And that'll just a few more touches to our feather and work on the shadow.
37. Layer #4: Now that it's drive my number one brush, I'm gonna go in here and rewetting this read that we made. Good, add just a little more parallel lean red to that mix just to get it a little more intense. And I'm gonna take a very sharp point on my brush. And I'm gonna start by outlining the feather just as we have with this one. It's a very light line, very faint, but it will make the feathers match. Come over here, create that complete outline all around and I'll start with the top of the feather. Pick up more pigment. And then we'll work on the interior of the feather here. I'll go around the circle. And then around this little route. Again, I get a sharp point and I'll continue right here. Outlining the entire feather. What I like to do is again, I go in there with that red and I'll outline on either side of these white stripes. And that just unifies the piece. From there. I'll rinse my brush and I want to work in that background. Put a little water on my palette. Little Payne's gray, little cobalt blue, a little bit more of the gray. And a couple of brushstrokes of water. And I'm going to leave a little gap between the actual feather and the side here, this little shape that we created to make our shadow. I'll do the outline and then I'll pull that color. And on that first feather that I did, I really emphasize the intensity closest to the feathers. So I'm gonna do that again over here. I have my shape. I have all my pigment down. And now I'm gonna rinse my brush again with a sharp point. And I'm just gonna blend out that edge. I want to skip fade, but the color be very soft. Pulling it down. Again, I'm just going back in, pulling it across, helping it to fade. And then I'll come in with a little darker color and just depositing that closest to the feather. And there we have our feathers.
38. Class Wrap Up: So here we have our completed images from class. We have the crooked flail, which uses the metallic watercolors just as the cartouche did. And so you get a different look when you use the metallic. It doesn't really capture on camera, but it's certainly captures in real life as a little shimmer, a little glare, and it just adds a little pizzazz to your paintings. Then we have our bene bird, which we created to look like it was broken out of a piece of stone on the wall or relief painting. We have our statue with our death mask that was made just using stone and soft colors, very natural and organic, earthy tones. Then we have a painting of a feather as done in Egyptian style, as well as our scarab. I wanted to show you a variation how you could paint these just as they are on watercolor paper, or you can use them in your sketchbook. So when I paint them in my sketchbook, I take the same images just on the template as they were. And then some of them all enlarge, but others I'll leave just as they are and then I play around with them. I wanted to do some more research on the scarab. And so under and on the Android side, they put hieroglyphic. So I just created that shape and just added some hieroglyphics to that. And then I added some other things from the tomb. So you can take your images and use them just as paintings. Use them for your own research in your own enjoyment of actually painting just for your sake. Thanks for joining me today. Please be sure to follow me here on skill share to get notified of future classes, please consider leaving a review, and I'd love it if you'd give some thought to taking a picture of your image that you've painted and posting it in the project section. Thanks for joining me.
 Daniela Mellen, Artist & Author