Transcripts
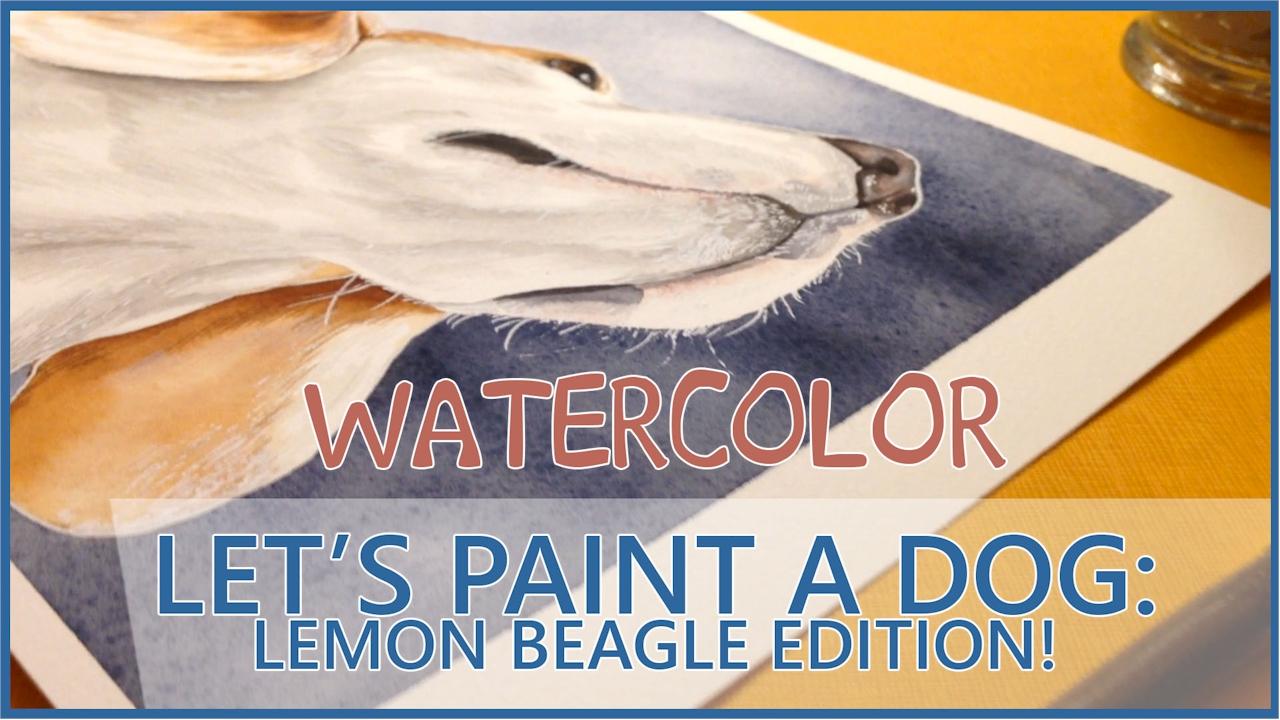
1. Watercolor - Let's Paint a Dog: Lemon Beagle Edition!: Hi, I am Mary Evelyn and in
today's skill share class, we are going to learn how
to paint a lemon beagle. Very excited to show you some of these
techniques that we're going to be using for
the back lighting, some of the highlights, all these fun little nuances
we're going to learn. This girl right here
is named Lu Lu. And my dear friend Vicki Lu
allowed me to paint her. So with this class, we are going to explore
the fundamentals needed to create an
eight by ten water color of a lemon beagle. This class is a great
starting point for those wanting to explore a
lighting effect with fur. During this class, we
will go over wet on wet, wet on dry, as well as using mark making
to refine the fur. And we will be using
a white gel pen to create those
brighter bits of fur. And I'm going to show you
how to use those to achieve the little tiny
furs that seem to sit atop the gray patches. So we're going to
bring those to life. Just bring you one more step
further if you're not super confident with pet portraiture to further your
watercolor journey. So let's just jump right in.
2. Supplies: We are going to go over our supplies needed
for this tutorial. All right, we're going
to start off with, I've got my water over
here to the side. I've got some paper towels. I've got my palette
ready to go with paint. We are going to use a number
12 and a number four brush. We've our block. I've decided I'm going to
do this on a block pad. This is Killman Jaro. I have taped off the
edges. So I have a nice eight by ten section and I have white
borders on here. Got me masking tape. You're going to need
a white gel pin. A pin so we can do
our transferring. I've printed out the outline, I've got my graphite paper. Our quick guide, if you've got everything
or something even similar to the colors, brushes that you know you like, paper that you like does not have to be any of
these particular things. But this is just what I'm
using for this class. Without further ado,
let's jump right in.
3. Transfer: Okay. I'm just going to
tape down my print out here to my lovely watercolor paper. Tape it down with
some masking tape. I've got my graphite paper here. We are going to put
that dark side down. There is a shiny side and
there is a dark side. I have done it the
opposite before. I got my whole piece
transferred and for nothing. So just make sure that's
up underneath there. If you need to add an
additional piece of tape. If you feel like your
paper is going to teeter, totter, go ahead and
add another piece. If not, let's just
jump right in. I'm going to follow
my lines and get this transferred onto our
watercolor paper.
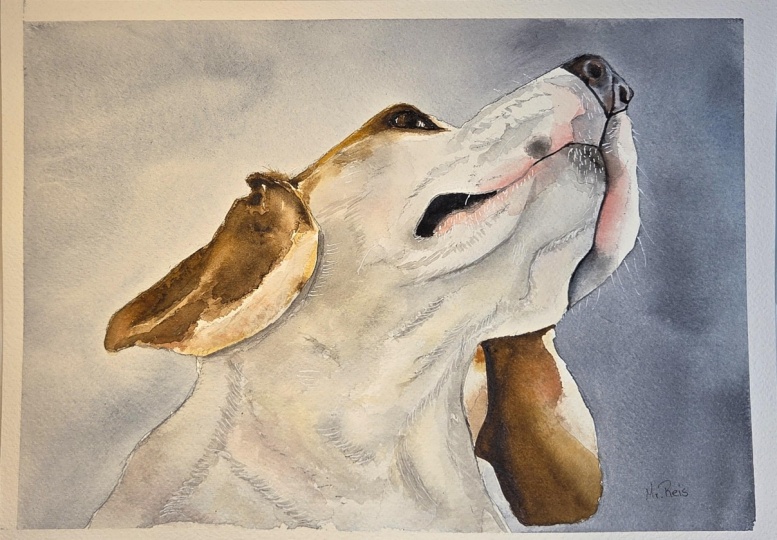
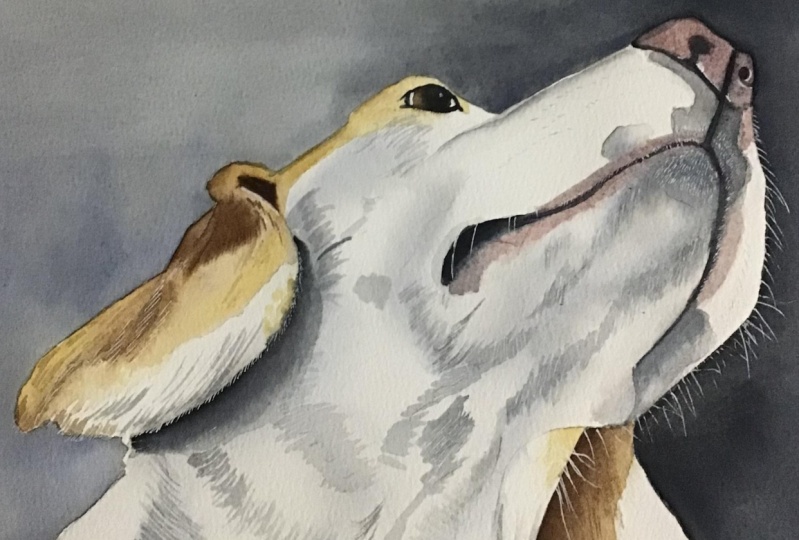
4. Background: Okay, we are going to work on
filling in our background. We're going to use wet on wet to create lightness
from left to right. We're going to have our
light area to the left. We're going to deepen that to the right and we are going to use our pains gray
to achieve this. I thought a darker background would be really
nice for this one, just to really accent the highlights that
are going to be on that nose and the
little lip area here. All right. Wet on wet.
Very exciting stuff. We're just going to put water straight down onto our paper. Feel free to be liberal with that water because we are going to go from
one side to the other. So we want it nice and moist, or damp or whatever
word you want to use to say that the paper has
a nice sheen to it. Before we start
adding the color in, you could go about this adding the color straight
on the background. But I found that
getting a wet on wet, you've got a little bit
more of a ease of color. Gradiation is what I'm thinking. Okay, keep on adding that water. See this nice sheen right here? That's what we're looking for. Okay, so just work on filling the rest of
that little area in water does have skin. You've heard me say this before. Your paint cannot go
where your water is not. So keep that in mind when
you're going around the edges of your pet portraits or whatever piece
you're painting on. It could be a floral piece, a portrait of someone. Yeah. Just remember that's
how that works. We create a little
barrier with our water. If you notice some places
starting to get a little dry, just go back over
it with your brush. Now, we're going to
come over here and work our Pines gray. Probably a good thought would be to add some water to this. Then go over here, get all
your water on the paper. Then come bring your pigment. Because the longer that
water sits on this pigment, the more reconstituted
it's going to be. So you're going to
have a darker pigment. But for the first side, it kind of works out
because we don't really want a whole lot of darkness. So we're just going to
start just pick a spot. It doesn't have to be
in this exact area. Just be bountiful with
the water. See up here. It's already starting to
get a little bit dry, so we're just going to we're just going to add more
more to that area. Okay. Your paper will
most likely start to buckle which is okay if you've done the
taped down method. You should be fine.
I should be fine. My block is holding
this paper down. Once it dries, it's
going to get flat again. I have followed some
people that like to put their water colors in between
books or something heavy. They splits the back
of the paper and then put it in a
book or something. I just like to tape
down the paper. I think that's a wise thing to do now with a
little more pigment. And depending on which
paint you're using, again, you don't have to use
the exact same thing I am. You're just going
to want to come over here and be even more generous with your pigments. Okay. I just like to guide my paint around
the edges just to make sure I'm good and then I
can bring that color out. You're always welcome
to tip your paper. If you feel like your pigments aren't quite going
where you want them to go, just
tip your paper out. See where those paints
are going to fall. I'm going to turn this and we're going to get the
side angle here. If you tip this, we're going upside down
for this angle here, you can see that paint move. If you're looking for a little
bit more of a gradient, you can tip, tip. It's always the really fun part about water color is
just going along, adding that color in, letting it do its thing, and you can come down with that and you're going to see all sorts
of lovely things happening. Okay? You can always take a tissue or a little
piece of paper towel. I'm going to grab
one of my tissues. The Dollar Tree is a great
place to get tissue that doesn't have any extra
lint or fuzz or lot, a scent, or perfume
or anything on it. They're just plain paper,
which is what you want. You don't want anything
to mix with your paint. When it comes to pulling up
pigments from your paper, if you feel like you've gotten some areas
that you're like, I don't know, it's
a little blotchy. It is going to come
with a bit of practice, but you can always
go over pieces. If you feel like like this isn't particularly
dark enough, you can always go back in
and add another layer. And might do a little
more tipping here just to get a little more Even as now where the
buckling of the paper is, I have noticed the pigment likes to settle in those little the valleys of the paper because it is doing
its own thing. Come under here, underneath
that little ear flat there. The cool thing about this too, you can always adjust
your outlining. If for some reason you
felt like you drew it and it wasn't quite where
you wanted to land it, you can always adjust it as you're adding in
this background. Okay. Now we're just going
to tip a little bit. See where we can go with this. Give you all that
side angle here. See that paint move. See
how wet that paper is. But if we want a
smoother gradiation, and as you can see, there's a little bit
of a pooling here. You can just tip it
a little bit more. You can really see
where that color is bumped up along the edge here. Just let it move back out. I think that is a nice
tone for our background. I like the depth. You
could always let this dry, come back on top of
it, do it again, deepen it, or pick an
entirely different color. My first round than I did
the first background, it was with Davy's gray, has a little bit of a green
undertone to the back. So you can definitely pick
and choose which one. I just thought this would
be a nice contrast. Let's move on to painting the
chest and the chin shadows.
5. Shadows: Okay, we are going
to work on giving the shading into the
chest and the chin area. It is going to taper
up a little bit into this top face area, but we are going
to use wet on wet, create those big
areas of shading. Then we're going to move
on to some mark making, and then we're going
to use a light wash of the ivory black. Again, just a black is fine or even a gray because
you're going to use a very watered down version of that black ivory,
very water down. And then we're going to use some of the white
gel pen to create really bright areas of
the whiskers that are underneath the chin and
up here into the edge. So without further
ado, let's go. I'm just going to wet
this entire area First, note to self, allow
your background to have a chance to dry reasonably well. Mine isn't completely dry. Still got some buckles
here and there, but it's not to the point where my colors will bleed
into the background. That's we want to avoid that. I mean, you don't
have to avoid it, but if you want to avoid it, I would say probably better
safe than sorry on that one. Super exciting painting water on paper, if y'all can tell. I'm going to tip the board here in just a
minute so we can see what kind of a sheen
I've got going on here. All right, let's
see what we got. Okay, see that Nice
she, the water. If I was to tip this
all the way up, it would pool just a little bit. But for now I think I'm
pretty happy with that. You can continue up in here, but we could connect
that when we get ready to paint this area here. So we're just going
to focus on the chest and up this direction here. Okay, I'm going to try to
take very light wash here. We're going to go into
this area, again, referencing our photo
and those dark areas. The idea is that we've got a, a pretty good shadow casting from underneath the
ear because our light source, I think I added the arrows. Now that I'm thinking
through this, the arrows, we're
coming this way, but really your light
source is almost from here and back. You're creating a shadow. There's a shadow
underneath that ear. So probably from the snout area, but we can go a little darker
underneath the ear area. Then we've got a little
dip underneath the chin. We come over here, there's
like a line that pulls here my water is the
paper soaked up, that water right
there pretty quickly. Then we're this little round
area here we're going to go, we're just going to bring
some shading up here, connect to that
ear a little bit. And now you're probably
thinking, wow, this looks really muddy, really dirty. It'll
pull together. It always does. It
pulls together. We're really just wanting
those soft base shadows before we go in and
do mark making. That's the idea. Anyway, and we're even going to go in
and add some more depth. Once this part dries, we're going to dry and
then we're going to come back in and do
some mark making. But right now you're just
kind of hopping around. You've got that
nice shiny paper. I'm going to show
you all this again, to the side here, show all what kind of a
sheen we have going on. The best way I know to do it
without anyone being here in person to show you how it looks. It's really something you get
the hang of with practice, even if you want to
practice this type of thing off to the side before
diving into the portrait, that is totally up to you. Okay, I'm feeling
pretty good about these soft, deep areas. Again, we can go a little
darker under the ear, however, to actually pull
that down just a little bit, I'm going to add
that drop shadow. Once this is dry, if you ever feel like
something's too dark, you can always come
take your brush, pat it on your paper towel, and you can come
along and pick up a little bit of the
pigment from the paper. Always remember that's an
option depending on your paper and the staining properties of the paint that you're using. That's the other thing. If you want to create
little striations, a brush is pretty dry. I don't really have
anything but you can go across your dark areas. You can create little lines. Just an option,
something to create motion and flow with
your fur texture. Okay, we are going to allow this part to dry before I come
in with a mark making. And then I will show
you how we're going to punch the shadows. We're going to get
them even deeper.
6. Mark Making: Okay, we've got our paper
dry for the most part. Maybe a little damp
here and there. You want to make
sure it's fairly dry before moving
on to mark making. I am also going to
be using this number four to create those
thinner lines. We are still working with
our black mixture here. Just very faint, could
even be lighter than this. All you're going to do, feel
free to use your palette. However, whichever palette you have and really get
in there and mix. I'm going to bring this over
just a little bit so you all can kind of see what
I'm doing here with this water and paint just
the lightest tones here. What I'm going to do is
I've got a little bit of paper towel past my palette
that I'm going to use. Okay, here we go. So those lines that we created
when we did our outlining, I'm just going to follow
those a little bit, create some strations here and a fun secret, I
think you'll know. I have a heat gen, that's
typically what I do with these. I just take a little bit of heat when I'm trying to get
this to dry a little quicker. You will notice your colors do some funny things when you apply heat to it, but that's okay. All right. We have
talked about this, if you've ever done my
classes before about how don't do a line. Line, line typically some like a curve a little
bit to these lines, each one you could
paint this three times and it probably would turn out three slightly
different versions. Just because you're going to
learn something each round, you do again. Instead of allowing my
fingers to move my brush, I typically move
it with my wrist. I don't know if that's
a help to anyone, but just thought I
would mention it, since it's something that I
do in my mind with my hand. I'm typically thinking of
a slight curve like flow. I like motion. We're just curving,
curving, curving. I like to try to make
these fairly simple. Not too simple. We need
to challenge ourselves. We do, But at the same time, give yourself some wiggle
room to really hone in on what you're wanting
to achieve with this. See this little area here. I got a little bit more
water pooling there. So what I can do is I
can just bring my brush, I can pull that color away. I'm dabbing my paint brush
onto the paper towel. I'm actually going
to move my palette back so I can use
the inside one, just so you'll see
my work flow here. You can always control how much paint you
have on your brush. Okay, what this is
coming down to is I'm looking at the general shadows on that
little quick guide, there's a black and white
version that might help you understand the depth of some of these shadows
that are underneath her chest and chin area. Okay, here we're going to
go up, tend to jump around. If I were left to
my own devices, I would be all over the
place with this piece. But I want to break
it down so that you understand how the
brush strokes work. Okay, again, strokes that we made when
we first did our transfer. I'm just simply
following those lines, that's the idea here. All right, And we're just
going to do strokes here, come down this way, add
some deeper ones here. Kind of swing those up to
fit into that groove there. And we're just following
those lines again, just depending on how much
you want this to pop, we can really lean in on that
shadow underneath the ear. Feel pretty good
about that anyway. And then I'm going
to add some more. Lines here. I think we've
got a little edging of fur right in this area here. Okay. And then just depending on how much of that curve you want to take, go up, up, up, up. There's a deep area here
in this little area. I added a little more
water and what I'm going to do is taper that out. A taper or feather, I think I've used
that term before. Feather it out, get underneath the edge here. If you feel like those
lines are still too dark, you can always go
even further with that and just create
lots of depth. Now, this area does
connect as well. I think I almost
forgot about that one. That is part of Nick. Nick flaps as we
will refer to them. So you can just add
a little bit there. And if you need to pull
up any of your gray, you can just use a tissue. Okay? And there is a little
bit of a shadow here around this jowl area here. Okay. And then we're just looking
over just to see what else we may need to adds a little bit of
a darker area here. If you've done my
classes before, you know you can
always go back in with a gray watercolor
pencil and really punch up those fur lines. If you like to try that. There are some
illustrations I do. I really like to outline with that watercolor pencil just at. Alright, deepening up that area. Now this is up to you as far as how much of the fur texture
you really want to indicate. You can either do that
dark area and go back over it with the white
gel pen or go in and create the little tiny
lines with your color. Couple ways you can do it
new, right or wrong way. Really punch that up and then if you need
to bring it out, you can always bring it out. Okay, we've gotten our
shadows done here. We're going to move
on to the next one where we're actually going to paint the jowl
area and the nose. So we'll get in
those pinks and a little bit more of
the pains gray. And I'll show you how to
deepen some of those areas. So that's what we'll
move on to next.
7. Jowl & Nose Part 1: Okay, we are ready to move on
to our jowl and nose area. So we're going to start
underneath this area, We're going to add that
little bits of pink. We're going to add the
pinks over here and a little bit up
underneath the nose area. We are going to do
a wet on wet to create the soft pink
areas around the jowl. And then we're going to allow
that to dry and move on to the darker areas. Let's jump in. I am going to need to
reconstitute this potter's pink. You also can just use
a pink in general, or even a red and just
the smallest amount of pigments possible. I'm going to rinse out my
brush. Come back over here. I'm just going to
add a little bit just around the edges here. She really has the most up underneath here
and around that edge. And then you can allow
this one to blend. We talked about the two colors going up against each other. But we can blend here. We can go up, up, up, up. And then we can come around
to this side here as well. Okay, I'm going to grab that
pink and dab, dab, dab. And I'm going to grab a little
pink and put it over here, and it should just fuzz away
from where the water is. And we can even go
over, we're going to have a dark patch over here, but we can go down
with that pink. That's perfectly okay,
not any big deal. Okay. If you feel like it needs to be a little darker over here, just tap, tap with that brush. Rinse off that brush
and come back over. We're going to go up and under that nose
just a little bit in same over here,
the tippy top. I'm going to come to
this other camera angle, to the tippy top
of this area here. And we're just
going to dab, dab, dab, all the way up. Dab, dab, dab. It's pretty straightforward. There's not really a right
or wrong way to do this. The potter's pink,
what I like about it, it is a Daniel Smith color,
It's very granulating. It has that tendency to spread apart and create a little
bit of that texture. Pant in over here, give a little bit and show you how shiny little
bit of that sheen. But it is very granulating. Okay, we are going to allow this area to dry and then we'll go over it with
darker pigments.
8. Jowl & Nose Part 2: Okay. We're going to jump in and work on a little
bit of areas here. On these areas, I do use
a little bit of the pines gray as well as the ivory black. I just go back and forth, make a little mixture of that ivory black and then bring some of that
navy or the pains gray. I just view it as like a pain, like a Navy, almost an
indigo in my brain. Then we are going
to do wet on dry. I'm just going to come over
here to this area here. It's a little darker towards the edge of that
separation of the lip. Rinse my brush off, dab, dab, dab, and I'm going to
pull that color out. This is how I tend to
get gradients when I'm working on a dark to
a lighter section. Then you can go in and tap along the edge and it will slowly
fade into that other section. Same thing up here,
we can start that. Just think about where
the lip curves under, how I tend to look
at these things. I have to think of
them in three D form. So that my brain can understand where shadows and colors go apart from just
looking at the picture. You can think about
something in three D. I do think it will help. Okay, we're in dab, dab. Dab do its own thing. I've got a little bit of
texture going on here. I'm going to come over here, hold up if you feel like you
have too hard of a line, if it needs to be
a little softer. You know, just to
rinse your brush off and just follow along
the edge there. That brings us into the area
where we're going to do a, a few more first strokes. A little bit of toning up here. We want some shading and some depth. We do
need to address that. The lip area is going to be a little darker
and that's going to get really dark when
we paint that in. But right now, I'm just
creating some depth. I'm just going along
the edge here, a little bit of that
darker pigment. I'm just barely touching
the tip of my brush in that little carbs
are and she has a swoop down on the tip there. Again, if you want to
pull some of that color, it fades this direction. That might be the
way to think of it in terms of tones and colors. Okay, so I've got just this really light
mixture over here. And we're going to go
ahead and follow some of those fur strokes
we made earlier. So we're just going along. We're tapping the brush
and we're kind of fading out that little
area, tap, tap, tap. And if you need a
little area darker and it's kind of damp in here, you can kind of tap
the color off there. And then we're just taking
little little lines. Do experiment with
different brushes. Your four round might be a little different
than the one I have. If it's an older brush, the tips do get worn down. Just experiment with how much of a brush stroke you want
on this particular port. And then right here,
if I feel like this is not really
working for me, just almost like scrub it a
little bit so it blends in. I could go back in and add a
little of that pink just to tie it together because we are going to go over that with
some white pin markings. Pull it out so the darker
you have your base, the brighter those whites
are going to stand out. Once we go back
over M. All right. Lulu does have this little patch you go to go about right here. You can do this one
wet on wet or you can put that patch on
there wet on dry. Not a big deal.
Either way you go, I think will be great. Come over here and we're
just going to add a few, a little extra strokes. Again, looking at
your reference photo. Throw it on your
TV, your monitor, your laptop in front of you, and just have it sitting there. Okay, I'm going to get
the bottom of this chin. Damp with a little bit of water. Okay, and bring it down. I'll show you where that
moisture level is at here. Let's see. Not a ton of moisture actually, it soaked pretty
quickly into that area. I'm going to get it a
little more saturated. Here we go. Res, or saturation. Grab a little bit of that black and then
we're just going to tap. I'm just going to tap in there. This is how I end up doing
blending or gradients. A, I will just tap in some
color and let it do its thing. That's the cool thing
about water color. Part of what I really like
about water color in general is how well you can
just layer in colors. Okay, got that little
lip area there. It's dark and we can bring that line all the
way up connects. I'm going to do a little
mixture of this black here where that lip under
lip, it's pretty dark. We can actually go under here, create even a darker line. Okay, following edge there
can go a little darker here. Then we're going to go ahead
and fill in this area. Get some more black mix mix. That is actually a
pretty dark area. If you want to get a really
nice saturated mixture of your black and some water, we're just going to
fill in that area. It does get a little lighter out towards the edge because we don't want just this black
pit for the mouth area. Wash my brush off
just a little bit. I'm pulling that color out. It's got a little bit of
a transparency to it. Hopefully that
explanation makes sense. It's not just a completely
solid black area. We've got a little bit
of gradiation happening. Since I am using a gas, it does move around
pretty easily. That is something to
think about depending on which paint choice you go with. You can go with a simple black for this, it's not a big deal. I just like the guash
for nostrils and eyes, it really creates
a lot of depth. Okay. And speaking of that, I'm going to go ahead and
jump to the nose Nostril. Since I'm working
on this color here, we'll go ahead and fill in
those little circle areas or oval areas or however
you want to call them. They're nostrils. That's
just what they are. They're not necessarily
a particular shape. All right, so we've got a curve there were that little nostril, we've got a little bit
of a curve area there. And then we're
going to take this, go ahead and shape
up that nose a bit. We do have a big
highlight on this side, I don't want to go too
with that side of it. The nose does have some
potters pink in it. It's got the little
brown edging, so we can mix some
of our potters pink and go around to
this little edge here. Swing around, bring it to here. Just fill that in. And then I'm going to grab
some of that guash and go around the edge, creates a little bit of depth. I'll bring this into
camera view here. We've got a nice
shiny nose here. Just rinse my brush off. Did a little bit of dabbing
just to give that nose. It is a pretty dark
nose that does angle in so we can fix that
with a little bit of the white angles here. So yeah, put the darks where the
darks go and the lights where the lights go
and you'll be great. All right, I'm going
to come in here and reconstitute some of this permanent white that
I've added to the palette. And I'm going to add a rim edging onto the nose area here. We're going to
just outline that. Seeing, we can make
that little line that I put on the outside
of there disappear. To me that's still,
there we go see. That's what I like
to see when I'm working with some highlights. I want to see it
because it will fade. It's not a super opaque white. Again, what you have, you do not have to use the
exact colors that I have. We are going to use our
gel pen on top of that as well to really stand out. But again, just following
your reference pictures, looking at where those lights, the high lights hit, like
underneath the little nose. You could really get
into it and add, there's almost some creasing that happens from the inside of the nostril to the outside,
if that makes sense. Hopefully that makes sense. Like these little creases, what we call what I've come to know with
noses, as nose leather. So that's what I mean by
like the little crinkle. It's really like a nose leather. Okay, we got that part done. Would you need to swing over and get a little bit
more of this area? Refined, again, just
glancing back and forth. What's like, what do you
want to show up and see? This mixture is pretty dark. So if you feel like you've
gotten to that point, you're like, oh man,
that's really dark. Just grab a paper towel
or tissue and dab it up. A few more areas here indicate those little
whisker, whisker areas. We will add the whiskers.
I'll add that with the pen. And then up under
here, and again, if I feel like it's too dark, just take your tissue and
just dab off what you think. See, I can go in
here and do this a little darker and then take my paper towel and dab it
off just a little bit. Also a good way to do it. Okay. And then you're
just scanning over, you're deciding, okay,
have I got it dark enough? Have we got all the
depths we want? I feel like the chin
can be a little darker, so I'm going to add
that a little bit. That was wet on dry. And then I'm just going to feather it out a
little bit more. I feel like I had a hard
water line right there. And then if you want to
continue to add more of those little highlights,
I think that would be great. I'm going to swing up here
and just soften that line, the edge from the
background to Lulu here. Okay? All right. So we are going to
go ahead and add, since we've gotten our
shadows and our depth, we're going to go ahead and add those white highlights on here. Before we move on to the ears, I want to start down here
in the chest area and show y'all on top of let's see, on top of this gray area. You're just going to
take just a line at a time and you'll
notice newer pins. The ink will work better. That's how we want to word it to make sure you can see this. Okay? Just adding little tiny first strokes on top of this dark gray. It shows up better
on the dark gray. And like I said,
sometimes you will notice your pin working
better or worse. Sometimes a good tap or two
helps the ink get going. Again, it just depends on how far you want
to go with this. And I'm going to come
up here and give you all a little look
as to some of that. We're going to come over here. Really short little
strokes are fine. Those work, you're going to give it that little punch that this portrait is needed
to indicate that. Fuzziness, That's the
words we want to use. Fuzziness, whatever terminology
you would like to use. I just think it helps highlight
things a little easier. I like to, when it comes
to this darker area, outlining with the white, I feel like helps a little bit. It'll take a little bit
of time and you can add as many of these little markings that you want to really create the
look that you're after. You could also use a
frisket or a miscuit on top of this to preserve
the white of the paper. And you can use it like this, but I like to go this
direction with it. Sometimes faster little
strokes get the inking. My favorite part of doing
this chin area is going to be the actual little
b, stubby chin. I love all these
little fur strokes. This can also be achieved
with some guash, white quash. Just tap, tap, tap. Show you close what
we're looking at here. See these lovely little
little fur markings. I'll come up here and
we'll show you a little, just almost want to pull down, just depending on how
you like to hold a pin. Like I said, if you buy these pins and they're
a little bit newer, they tend to work a
little bit better. These can always be
softened with a damp brush. If you feel like you
overdid it in one area, you can certainly take a
brush and tone it down. I always think
that's a good idea. If you're not sure how much
of that you want to include, then just working with
the direction of the fur, like she's technically got this really lighter area
that kind of sticks out. I probably want a to overboard with this
shadow right there. She's got like
this kind of pulls out here and then goes back in. And then same thing here, she's, this little jowl area goes up. And those little fur marks, they, they go up everywhere. But look at your
reference photos and find a direction
you can kind of follow, should help guide
you a little bit. And then up here
towards the top lip, I like to have them come over the top here
just a little bit. And then take these areas here and just follow your directional
fur patterns here. A white colored pencil
also achieves a similar, really soft for, especially around this like
little nose area here. If you were to use a
white watercolor pencil, it would create a
very soft look. This is a part where we can
go along the edge here, because there is a quite
the bright highlight here then if you like
that look, go for it. If you want to add a few
dots, go for that too. I really did leave this
area pretty bright. I could add a little
bit of shading there, but I don't think I will. This is a part where
you can have some fun, can bring those
little wisps out. Bring it over here. Show
you what I'm talking about. Just keep those curves going. Sometimes your pen will do
some crazy things here. You get all those little little
peach fuzz fluffs, okay? And then you just
decide how far to take those white lines
underneath the chin. Just adding the last little, a few areas here. Okay. And if you feel like
bringing that pink out a little bit on this side,
feel free to do that. If you're just looking
at it, there's always, you can always go back in and
add to what you're doing. If you feel like, oh, I'm not
sure if I quite got that. The dark, you know the
depths that I want. Feel free to just
go back over it, just experiment with
it, see what works. Okay, let's move on to the ears.
9. TheEars: Okay, let's pink the ears. We're going to be using
wet on dry to create a gradient effect from the dark to the light
towards the end of the ears, especially this ear here. And we're going to
use that Van **** and raw sienna to
complete this step. And then we're going to use
the white pen to create some edging and get that nice little fur texture that we're wanting to achieve. All right, let's dive in, I'm going to reconstitute my
Van **** and my raw sienna. Now, if you have a palette
that looks similar to this, feel free just to
dip your tissue or paper towel and give
it a nice wiped down. I do really love porcelain
palettes for this or ceramic. I just go, you know, TG, Max Ross or like home
goods or something, they have the
really great trays. Okay. So we're going to take
some of that Van **** Brown, and I'm going to start under the ear
and work my way down. I'm going to go ahead
and do this ear, probably sensibly, starting on this ear so that your
hand is not in it. Makes more sense. Just
paint how you'd like. Y'all probably know
me well enough to know how my style is. Okay, so I want a good, a decent amount
of pigment there. I'm going to come down here
and I'm also going to add more pigment there.
We have a nice sheen. And then I'm going to
take just some water from my container and I'm
going to pull that color down. See how we've maintained, we've got this dark underside and then we're just
pulling that color out. Then if you want to add a
little bit of light color here, add a little bit of that
Raciana down towards the end. The Rawiana has a
more yellow tone to it versus the Van ****, so you decide on which tone you prefer to go
after, but for her, since she is a lemon beagle, we can add a little bit more of that raw scan in there,
won't hurt anything. Okay. And solely up to you, I would say her furs tends
to be a little more velvety, but if you want to add
some texture in there, you could go in and
do some water blooms, do some lifting with
your paper towel. Okay. I decide on her ear. I think originally I might
have added a little pink, but I think it just is pulling these little strokes and
I'll show you up close. See we've got a nice
sheen on that ear. But we're just going
to pull little strokes up just to blend in that area. Then you can take a little bit of that gray
mixture we had up there, create a few lines to
blend the direction, basically like directional
fur, if that makes sense. Okay. If you feel
like you need to go a little darker
underneath that ear, get a little bit
of that Van **** or whatever brown you're using. Just come under the edge. If you will notice, I know we're into this
project quite a ways. But if you'll notice the way
I've been holding my brush, when I tend to fan out colors,
I hold it to the side. I don't hold it straight up. We go to the side, it
creates a nicer line. Okay, I'm going to swing
over while that's, I'm going to swing over here. Work on that ear. I'm actually going to start
up here in the top area. Work my way down
like I did here. We'll just come in, this
little swoopy area here, make a nice mark. Then she's got a
pretty dark area here, which I'm actually just
going to do wet on dry ink. I'm going to just leave it. That one I'm going to leave. Okay. We can bring
this color down. Her ear has got
some patches on it. I feel like there's
definitely some white that comes
through on those. So we can go back in with that pin or a little
bit of our white, which I think I'll do just
to soften the ear again, I kind of want that
area to be dark. So as you can tell, it's
definitely it pulls out as I go. Okay. So here now, as far as that guideline
okay, here we go. Make yourself a
little guideline. I'm going to grab some of that. Rosana, for the edge here. Okay. We're going to
pull that color up up. And then she's just got
some bits that come again. Just be observational. Observe your image,
your reference image, and pull from that as far
as color tones and where to add some of that mark making that comes into
play with this ear. She's got this little swoop
that comes down, okay. Then I'm going to come
in and add a little bit of gray around the bottom here, create some fur texture. Okay, so I'm just
adding a little, little bitty areas
of directional fur. So we've got two
little dots over here. She's got two little
little colored dots and a little bit of
edging here on her ear. And as I was looking at that, I realized over here, she's got a little small patch that just needs to
be filled in with some of that raw Sienna that she just Just a little patch. Just wipe your brush off. And then if you want to
pull some of those edges down so that it looks like it blends a little bit more.
Same thing over here. If you feel like that line
is a little too harsh, just flick and swish
just sometimes. Sometimes I feel like that's
how this works. All right. Let's add a little color
to the top of her head, just looking a little ghosty up there. Okay. Same thing here. You're you're just
going to gently pull your brush in that direction,
towards the right. Unless you're left handed, then you might go
towards the left. That makes sense to me. I am directionally challenged. I teach Zumba on the regular. There are definitely many
days where I shout out some direction and I am definitely not going
in that direction. Okay. And then we've got that fur band that sticks straight
up that way. Okay. I think all of our little colored fur
areas are accounted for. You can go in and mix
a little bit of ivory black with some of
your Van **** Brown. Create a little bit of a
darker brown if you want to go in to dab this
brush off Ababa. If you want to go
in and create a few mark making areas to
indicate some fur direction. If you like to leave
it solid and soft, that is totally up to you
and it's a great look. Just always want to offer
all options. It's my goals. Options. Options, Okay. And I'm going to take a little
bit more of that Van ****, I really want this
little crease to show. And then same thing here, give that pop that it needs. And then I notice she's
got a little bit of, I think a little
bit of the brown over here in this corner. Okay, same thing here. If you want to use a
little bit of that, make sure and go
through here and add a few lines to indicate
that direction. Fur direction. Blend some of it from the edge
into that white. I think that would be great. Okay, I think we've got
the ears filled in. We can do a little bit
of mark making one. You can do a soft cast
with some of this white. I really digging into this
white when I reconstitute pat. Get in there and get
the paint that I need. Not shy about it. You
can go in with that, create a soft look
because it will be soft, it will not be as opaque
what it's showing right now. It will fade quite
a bit as it dries. Which can be really beneficial
if you're trying to create a really nice soft
effect on this ear. Which I mean, who wouldn't want to make a nice soft effect on a cute puppy dog ear? That's for sure. And then
you can always blend. Always blend out if
you feel like, okay, that was a little
too much chunk, you can go that route too. Same thing if you want to
create a little little areas. Yeah. And that'll just create a really nice soft
little section. And same thing over here,
if you want to bring any of that, create some lines. All right. I'm going
to take a handy dandy. Sorry. Any of y'all that have watched blues clues knows about the handy dandy things?
Oh my goodness. When I'm trying to
get in a bold line and my pin is not cooperating, I'll tend to go in little
tiny zig zag motions, as it were, to get to
the effect that I want. You can, for the most part, draw on fairly damp
paper with this pin. It works pretty well. Not all
the time, but pretty well. Okay, and then I feel
like with this area here, I'm just going to
add a few lines here and there just to
bring it all together, like the ear goes together. We don't want the ear to
feel like it's too choppy. Hopefully that makes sense. And then I like using
this for outlining. I really think it
helps make things pop. And then the same
thing here, we can just make that part pop. And then if you want
to add some little fur as if it was coming down, that is a great idea too. Now I'm realizing
with this adding in a little bit more of
the shadow or the lines, this area is pretty solid. I'm just going to add a little shade and a little shade there. Okay, I think our
last and final step with this one is
going to be the eye. And then we'll do
some final details.
10. Eye and Final Details: Okay, we're going
to tackle this. I'm going to dig into
some ivory black. I'm going to do
the outline first. If you've done any of
my classes, you know, I like to do out,
for the most part, I like to do outlines first. Not always the case. You may notice with
this particular angle, you might be feeling a
little intimidated by the. Because I feel like
there is a balance at which the way it's supposed to and then where
it looks a little crazy. We're going to try to avoid the crazy look
we're going to do. We did the outline,
but in the pupil, the pupil is sitting towards
the right, that left area. I'm going to add
some Van **** too. It's really all going to come together with those highlights. I think based on I might have
made this a little taller. Again, if you feel like that eye is not quite working for you, change shape a little bit. Okay, I'm going to leave a
couple little highlights here. Going over here to see what I can do here.
Add some of those. Might go like a
really light mixture, almost not quite like eyelashes, but there's like a deeper
brown around the eye. Like I said, I might have
made this a little more. That top lid is pretty thick, I might have done that
just a little bit, as she does have some eyelashes. So you can always pull that uh, a little bit, you don't want
to get away from you either. Can always leave it.
Grab some of this white and see if we
can go in and add some highlights to indicate she direction that thing. It's really all that comes down to with eyes is the highlights. The highlights make or break, okay? And if you want to get some
raw Sienna in there too, try to lighten up that
one side of the eye. Just kind of play
around with it. We will add that really
bright highlight with the white pin, which is going to give
it a lot of shape. That here will bring bring
this in for a closer look, but we've got a little bit
of the highlight here, but we're going to bring it
even further with the pin as long as we've got
our pupil really muddied up the eye line
like the top of the lids. So I'm just going to
take a little bit more black and I'm
just going to follow. I'm not going to
make it any bigger, I'm just going to follow
what I have and then try to connect that. I'm going to take this pen and add a couple of
highlights here. I'm going to go
up and over here. Yeah, this n can get
away from you if you're not careful. Okay. And then if you need
a smaller brush for this eye area, I totally get it. It's a pretty small,
pretty small little area. I like to fuzz out the highlights when I
have them in pet eyes. And then go back in with
that white and really establish the high light so
it has a soft effect to it. Hopefully that makes sense. Might not. Try to explain
things multiple ways. I am going to add
just a little bit of shading under here. Try to indicate
that lidded area. Does that make sense?
Where it comes, the snout comes and you've
got this socket for the eye. That's what I'm right
now trying to achieve. And then again, if you
feel like it's too dark but like where the snout goes and then it's
going off into the eye area. And I'm actually going to lower this brown just a little bit. This is how I work with
pet portraits too. If I feel like I've either overdone something
or underdone something, I just tweak it a little
bit until it feels right. That's process guess
is what I want to say. That's part of the process. Okay. Feeling better about that? Better, yeah. Like I said, this was a little
bit of a challenge. I did it once through,
definitely learn from it. And I will show you all that different
color background too. We've got this one here, we've got the highlight, there's a little bit
of the brown here. And then we've got the pin up underneath the edge of the eye. So that's what we're
trying to achieve, just trying to make sure
we've got the darks, where the darks go and the
lights, where the lights go. And even if that means tweaking
things just a little bit, we will do it, add
that highlight in. Sometimes I just like to
tap towards a circle. Hey, I think that looks good. You're just looking
for the shape that's really your indicator of being completed or
not, is just that shape. Okay, then as far as
final touches go, you're just going to want
to look over your portrait, see if there's any
areas where maybe you want to add some
more white lines. We haven't really added
the whiskers per se, we've added this side whiskers. But as far as the big ones, I like to do those last
because one of them, they come from underneath
that chin and they go over the top of this ear. Things like that. You
want to wait until the very end to accomplish because they
just go over everything. Yeah, she's got a little
whiskers that protrude from the sides and we've
got those side ones, maybe a few that are longer. Like I said, if you
wanted to go through here and do some work and add those little
lines, be my guest. And then you can take a
brush and make it soft. You can do that. That's
totally up to you. Okay. I think I am
pretty happy with the way she turned out
and I think that'll do it for our
painting. You did it.
11. Post Your Painting!: Congratulations,
you just finished your lemon beagle painting. I would love to
see your results. Please feel free to share them. Ask questions. I'm here to help. I'll give you a little
bit of feedback. Please let me know if you need further feedback or if you
would like a critique. They're all my favorites, just because I think you'll
do such a great job. So I hope this gives you
some things to think about and give yourself
grace to grow, and let's get painting.
 Mary Evelyn Tucker, Full Time Artist & Coffee Aficionado