Transcripts
1. Introduction: Hi, I'm Elizabeth and welcome to watercolor for beginners
embracing the balloon. In this class, we explore how
to control water to paint ratio to create
different kinds of Bloom's, our
watercolor paintings. Whether you are just
beginning to explore the intricacies of watercolor or you've been using the
medium for awhile. This class is great for all levels and really
see what we can do with those watercolor
blooms and how we can manipulate them a
little bit to achieve the different effects that
are possible as we explore the intricacies and sometimes frustrations of those
watercolor blooms. Oftentimes watercolor
blooms, there's something that you don't
want in your paintings, especially if you're going
for a smooth background or you're just trying to have a really controlled
watercolor application. But I personally love
watercolor blooms and I think they make
a wonderful addition to my art practice. Whether that be watercolor itself or incorporating
watercolor with paint or other drawing
mediums or collage, or even scanning them in or photographing them into
my digital artworks. The ultimate goal in
this class is just to have fun to see
what happens when watercolor and water dance
across the paper and how you can manipulate it and let those happy accidents
Come on their own. But also how you can work
with those happy accidents to push the blooms and the watercolor
application even further. It's gonna be a ton of fun around your brushes,
grab your paints. Let's create some blooms.
2. Project Description: Your project in this class, you're going to be experimenting
with water to paint ratios and trying out three different watercolor
bloom techniques. They're each different
ways to approach, controlling and managing how the watercolor blooms
out both on dry paper, wet paper, and
painted wet paper. After you're taking some time to watch the three
techniques videos, try the techniques
for yourself and play around with
watercolor and water and different color combinations
to see what kind of blooms you can create
and how you can manage watercolor
and water to control the bloom so that you can use them in your artworks
in a variety of ways. After you've tried
the three techniques, be sure to take pictures
of your experiments and upload them to the project
section of our class. It's so fun to see what color combinations
everyone comes up with and how we manage our watercolor and water
ratios differently. And to see the watercolor blooms you create in this class, be sure to check out
the projects that your classmates created as well. A check back often to see what
other balloons are popping up and be sure to give each other feedback
because we all continue to grow as artists. And then if you happen to try any of the bonus
video techniques, be sure to add those to your project by
clicking Edit Project. You can add it and change
and alter your project. Post as many times as you like. If you really fun to see
how far you take this in your artwork beyond experimenting
with watercolor blooms, I can't wait to see what
you create in this class.
3. Materials: You will need watercolor paper. Any thickness is fine, but I'll be cutting mine
down to about five by 7 ". You will also need
watercolor paints. I work with a tube such, but you are welcome to use pans if that's what
you have on hand. And the brushes that I like
to use, our size 10.12. But really any brush
size will work because we'll be
working rather small. We'll also need a container to hold water and some paper towel.
4. Technique #1 Loose Color on Color Blooms: Watercolor as a medium that can often be intimidating
and frustrating. I really like to break down that stigma and help my students explore it and really see all
of its amazing potential. In this class, we're
going to break down watercolor blooms and
really find out what causes those blooms to
happen and how can I manipulate them so that I intentionally get
them in my artworks? And then how can I
use those blooms to enhance other artworks
that I'm creating? So this class is all about
embracing watercolor blooms, which are essentially
happy accidents. Sometimes when they pop
up in your paintings and you're not expecting them
or trying to achieve them. But this time we're
going to really, really push the watercolor
to see what we can get it to jail and really
focus on those blooms. So I've used a spray bottle, water just to wet down my
palette and get my chat open. I like to paint
really loosely and just kinda latch the watercolor. Have fun and dance
across the paper. I'm just going to
see what happens. So normally when
I'm doing blooms, I kinda like to work bigger. But I think for today
I'm gonna do it on the smallest paper and do
some smaller experiments. And really just play and push the boundaries
of the watercolor. So this method of
watercolor painting really focuses on wet,
on wet technique. So the first thing we're
gonna do is wet our paper. You can do that a
couple of ways. You can do that with
a spray bottle. You can spray the
paper and then kind of move it around with
a clean brush or you can do it from a water container and
brush it on that way. I'm going to brush it on with
water, what my watercolors. And today I'm gonna be painting with size ten and
a size 12 brush. Work really well for
really many sides papers, but they work well for this small, for what we're gonna do. But I could also do a
much bigger surface two. So I'm going to use my number
12 brush to wet the paper. Loaded up with water, really saturate the surface
of the watercolor paper. Then I'm gonna kinda decide what colors I
want to work with. I really like to use
analogous color schemes. So colors that are next to
each other on the color wheel. I really like to do a lot of intuitive color,
fun and blending. So sticking to an
analogous color family helps me kind of
ensure that I'm not going to end up
with muddy color. I think I'm going to go with
more of a warm color scheme. So first, I'm going to load
up my brush with the yellow. Some really, really loaded up. Get some yellow down. And I had a little
bit of green in that trade section,
but that is okay. Then I'm going to get
some water. Go back. Really move the yellow more. I'm already going to have
some cool bleeds happening, but I want to push it even
further so you can really see the balloon that's
going to come out of this. I didn't take this paper down, so it's going to
get a little crazy. That's okay. For this experiment. It's gonna be just fine. You can already see
how it's starting to bleed and move out. The more water
that's on the paper, the more movement
you're going to have butter that water is
in the water I applied the paper initially or the
water that's mixed with color that was put on with
the brush that was loaded. Then obviously you'll have
the texture show through two. And this is a pretty
textured paper. So that makes it adds
another fun layer. It's kinda starting to look
a little bit like scales. Then I'm gonna get a
couple of other colors here to try to really push, push the interests of the piece, but also kind of
push those plumes. Water. You really
get a juicy brush. Lettering with color. So this would be painting it on, enhancing on the color with
a wet on wet technique. And then letting the water dance and bleed kinda
where it wants to. For some semi controlled
accidental blooms. You can make the color
as bold as you want to if there's a lot of
water on this paper. So I'm going to go
back into my cadmium, put even more color
in those areas. I think I'm gonna do the
same thing with the yellow. It's really fun just
to kind of go back and forth and see, see what happens.
You revisit areas. A little more color
and more pigment. I can always pull it back with a paper towel if I want to. Just kinda let it do its thing. It doesn't take a long time. So that one is super wet
paper, super wet paint. Analogous color scheme. So now let's do more
of a controlled. And our next one.
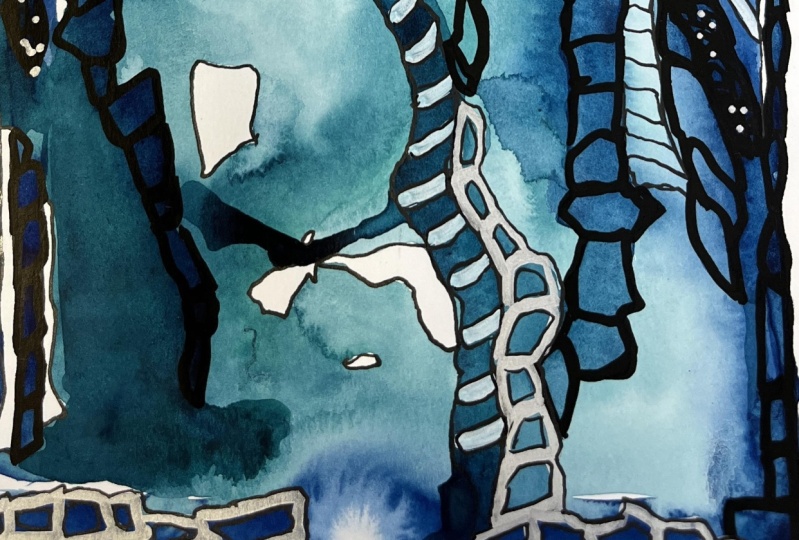
5. Technique #2 Controlled Blooms on Dry Paper: For this one, I'm not going
to wet the whole paper. I'm just going to work
on more of a focus to section and control it. So I'm going to use my size
ten brush for this one. Sky. And I'm going to go in with a color
first on dry paper. It'll still be wet on wet
because I'm still going to have wet paint
dropped into wet paint. Makes sense. I promise. I'm going to load
up my brush and then I'm actually going
to dip it in the water. So I can really get
that color down. This violet is pretty, is already saturated color. It's pretty saturated. So I'm going to wash my brush. Then I'm going to
load it up with another color, turquoise blue. For this bloom, I
want to control it. So I've got my brush
loaded up with paint addictive
back in the water because I really want movements
that I'm just going to touch it down on the edges. A little hard to see
the bloom on this guy, just because both colors
are so saturated, such, such bold hues. So let's do another one that
shows this a little better. And we don't, you don't
have to use really, really loaded bold, bold color. So let's do the same thing. But let's do it with
a lot, a lot of water, much less purple. So we're going to do more, more of a muted
violet over here. And that's a great
thing about this. You just, just play, just test it and
see what happens. There'll be a little bit
of bloom where there's some more pigment in some areas. But then we're going to pick up a little bit lighter amount. Let's make that a little
bolder so you can really see the balloon do its thing, bloom on the edges. So the same thing
that's happening here is happening here. You just can't see it
because the colors are so bold. So much pigment there. We can push this even further. I can load my brush even more. I can drop in even more of that blue and have
the blue blend into itself. It's really, really fun. You could just keep
building on this. So it started as kind of
an experimental page. So let's see what happens. Let's go a step further. I'm going to pick up,
pick up another color, that guy down and kinda
connect these two. Then this is really
fun because there was, the only plan was to
play with blooms, which we're doing
what we're letting, the experiments of the balloon and that dictate what
happens on the page. So the blooms are happening, but then you've also got like
an image is coming out of. This may not be a
representational image, but an image nonetheless. It's building, which
is really fun. And that's what I love
about watercolor. Like it's really
flexible medium. But I know it can
be intimidating. So fun. It's so fun to just play and change your
ratios of paint to water and experiment and see
different ways to apply it, different ways to manipulate it. So fun. So in the experimentation phase, well, for the whole class, what I really want
you to focus on in this class is just having
fun and kind of seeing what kind of blooms
you can get as you manipulate the water and as you manipulate the
paint and pigment. And just have fun. Then when these are try you
can kind of check out how your blooms turned out and find fun new ways to incorporate
those into other pieces. There's some bonus videos and how you can take
this a step further. And then if you have
too much paint, what you can do is just
take some paper towel, things get really out of hand in some areas or you just
want to pull it back. You just want to bring
back some stuff. I can put the paper towel
down. They'll soak it up. Pretty much. Grace, or at least make
it pretty ghost-like, which is another cool effect. So even now before this dries, we can already see some fun
blooms happening. There. Even hear some blooms
happening here. It's really fun.
6. Technique #3 Water Blooms: I really enjoy color
and color blooms, but you can also
do it with water. So the first thing
you're gonna do for this practice is to the
surface of your paper. Whatever color or
colors you want. I'm going to go on some
fairly saturated colors. Kind of lay down some color so you can kind of play around with this a bit. What I'm going to
smooth this out, there's quite a bit of variance between pigment and water
in different areas. Sometimes blooms happen when we don't want them to happen. For drawing a large area. You're trying to blend
your colors or you're trying to just get
a nice even wash. But we want those blooms. So we're just going
to enter paper fairly even evenly coated
in pigment water. And then we're gonna go in
with a clean wet brush. And the water is going
to create the flume. Because the water
is gonna do, it's gonna push the pigment out of the area where
the water comes down, which is exactly what
happens when we do color on color the new
pigment that comes in, but that's water pushes the pigment of the
other color hours. This time. We're gonna kinda
drop in some water. And you can do lines of it. You can do dads with it. You can just have some fun with it and kinda see what happens. So I'm just continuing to re-wet wash and then
re-wet my brush. And then going back in. And then the more more
water I put down, the more movement
we're going to have, it's going to push the
continued to push the pigment out. That first two pigment. That was all, that's
all the pigment that the water is washing away. The other thing you can do is
with a clean dry brush and soak up some of the pigment
that's on the paper. My lighter areas,
and it'll create more drama to your piece. Just keep trying it off. This is a pretty
dramatic example. But if you controlled it and you kinda played with
it a little bit, this could be really cool in the background to another
piece or just for fun. We'll have some time to create and you're like, I
just don't want to do. And you didn't just
sit down and make blooms and play
with watercolor and watch it dance across the page
and have some fun with it. I can also go in with a clean, wet brush and kind of
push play with pushing the color back into
where I pushed it out. Which is pretty fun. I just create some really
poor address areas. I really like this
texture a lot. These things really
appeal to me. And I'm really, really into texture in general
and my pieces, whether it's real or implied. So the idea that I can create this many cool texture with watercolor and water is something that I get
really excited about. Then I can also do both
techniques together and drop in some color and
have the color push back. Now, this section
dried quite a bit. So it's not going to react
as much too that I put down. But I can keep dropping
water into it. And kind of reactivating
what's already there and creating that push
and pull little bit. But these areas were still wet. Now I've got the cadmium
blending into my orange for the oranges also like
bleeding out from the wet. The water ear areas
break and I sucked up the paint is pretty fun. Then I drag this through
that shoots out that way, which is super cool. Getting into scatter. And that looks really awesome. So now I'm going to
push that even further. Oh my gosh. So fun. And then I just suck
up the extra water because I got a little crazy. I got the effect of the
paint that I wanted, but there was a
little bit of a cost. There. We go. Last wet brush dropping
in some more cadmium. I'm going to wash it off. I'm going to dry it
off a little bit. Really push just like a sponge. Go back in with my paper towel. Kinda go ahead and set that up. I'm going to go in, I'm
gonna go back in with some other colors I
originally put down. So pretty, I love, I love bloom so much. Like, kinda drop some more of that orange back in over here. I'm going to push
that with the yellow. Let me get my yellow and then put that down
in the middle. This is where you
have to get care. You have to be careful
because it's really easy to get caught
up in the Bloom's. And how things get a
little out of hand. For our class. We're just playing, we're just, we're just having fun with
blooms and paint and water. I'm seeing what we
can get it to do. I'm dropping in some water line, this edge curves this guy
to come out a little bit. Now I can push that paint. You get these wisps
that it looks like, it looks like like, like, whoa, like wisps of Waller
or wisp of cotton yarn. So pretty. So you can get this
one by pushing it, this kind of soft
haziness to it. Or you can, Kennedy's
harsher ones. And it's really easy
to look at this paper and it's not one. I'm going to save it. There's potential for this, there's potential for this to become something really cool. Just depends on what, you know, looking at it
in some different lights. And then the more you play, the more you experiment, the more you'll see
different ways you can incorporate crazy funky
blooms into your artwork. I can kinda start
the water to run. It's going to be too
harsh or too dry. Paper underneath
this guy is too dry. But I can get to the other way. Create a really
nice ombre effect. So taking the bloom
a step further, using gravity to pull it down. So have fun play
with this technique. Remember, we started with a painted surface while
it was still wet. We went in with a clean
wet brush and kind of started marking and some areas where we were going
to intentionally push the pigment out. And then we went in with a clean dry brush and have
added more drama by kind of sucking up some of
the excess water and pigment that
was left behind. And then we started dropping in some other colors and kind of
letting them play together, reintroducing the colors
from the initial background, and then playing with
dabbing the brush, jabbing a wet brush so
that the paint could really disperse and move a little bit more
controlled blooms aspect to grade this
softer passage. And then using gravity to really let the paint bloom
and then run. Also. Have some fun with this. And I can't wait to see
how your blames turnout.
7. Final Thoughts: I hope you had fun with
watercolor and paint and creating your watercolor
blooms in this class, I can't wait to check
out your projects, so be sure to post them to
the project section as we all get to see the beautiful
blooms that we each create, what I would really
appreciate it if you took the time
to leave a review. I love feedback, but how I can continue to grow as a teacher, as well as finding out what my students enjoyed about a class. If you'd like to stay up-to-date
on my newest classes, be sure to click the
follow button above. That way you'll be notified
anytime that I post a new class or when I have some exciting updates to share with my students and followers. Thank you for joining
me for watercolor, for beginners embracing
the bloom until next time.
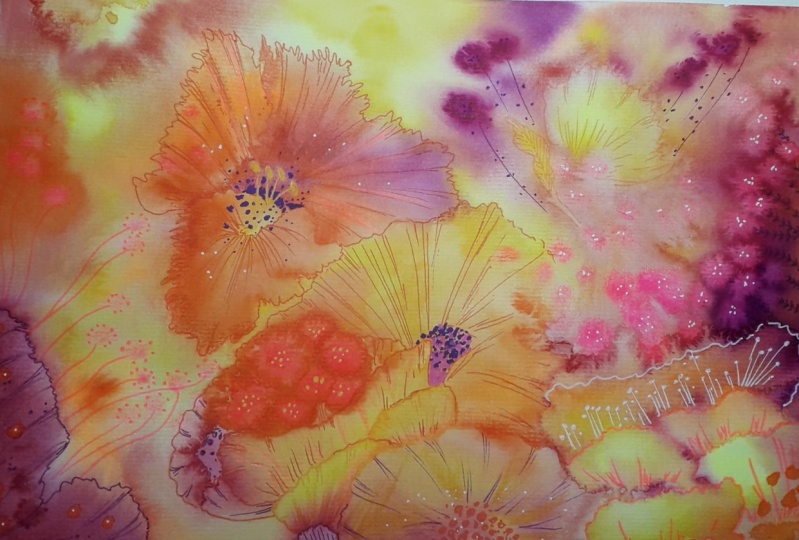
8. Bonus: Ink and Watercolor Blooms: I'm going to go
into it with ink. Just add a really nice
graphic element to it. I probably do a couple of
different ink options, but I'm going to start out
with my signal. Black pen. And inking into artworks is
something that I love to do. I really enjoy kind of
bringing out details in them and highlighting some of the textures that
happened with the balloons, with ageing of watercolor. There's really no
wrong way to do it. It's essentially
just a giant Doodle, which is really great. You can do some outlining, you can do hatching,
crosshatching, scribbling. You didn't do it over the color, even do it along the
edges of the color. You can do it within
the whitespaces if you left some on your paper. And it's a really
great one to just kinda keep coming back to. Because he's can easily take
a long time to work on. He's going to start
with some outlining. If you're new to add an
ink to your watercolors, definitely check out my intuitive art-making
watercolor and ink class. That one is about understanding
the basics of watercolor. But at the end of it,
we get into adding different thinking
techniques to our artworks. Can I demonstrate a lot of
different ways that ink can be applied to a piece. I think watercolor
and ink is one of my favorite combinations
of all time. Any kind of pen will work
pretty well with this as long as it has a
good flowing ink. Test, the info, the
signal works great. Another favorite of
mine on Micron pens. My go-to for I discovered how nice the signal falls onto the painted surface. The nice thing about
microns is they come in different widths for the tips. So you think it's a
really fine lines and some bolder ones and
everywhere in-between. So if you really enjoy engaging, you might want to
get a couple of different size micron tips and kind of experiment with
combining those in your work. They're also great for
adjusting sketching too. If you're going to
add ink to your work, It's important to take pauses. I'm kinda step back and
assess the whole work. Before you continue on x. It's very easy to overwork. A piece with ink. Just kinda get caught
up in the mark-making. You can kind of figure
out what to do next. So we've had a couple of
artworks lately where I went in. And I didn't love them. I'm a little bit nervous
about ruining it, but at the same time, I made this for fun. I made this for class. I made this to
grow as an artist. You know, there's
whatever it's going to be and I can't let the fear of ruining it stopped me from
growing and creating and experimenting and trying.
Just going to go for it. Look for some other areas
that I want to bring out. There's some really nice texture that's happening in here. I'm not sure if it's some
interesting fiber texture mixed media paper. And I don't want to lose. I'm gonna be careful. Be careful. It's not the right word. I'm gonna be mindful. And really consider where
I want to add the marks. The other thing you can do as if you can always cut this up, like you could decide that
you like certain sections of it better than
others and you can always cut your piece
and it gets smaller. I'm really loving this now. Like I'm very happy with the
direction that it's taking. So I'm just going to keep going. They also vary your line weight. So if you're just
doing a basic outline, you and just kinda desk
your pen across and let the ink show up in some spots and not in others
versus like a hard edge. That's another cool effect. The pieces can have dictating
where once marks to go. So you can keep going
as much as you want to. I'm going to actually
switch pens. So that was my black signal. I also have a white signal
haven't used in a bit, so I want to make sure the ink is flying by testing
it on a scrap paper. And I'm just going
to kind of add in a couple little details
with the white. Why not? Some nice contrast? It's fine. Alright. Now I'm certainly get
started, get sloppy with it. I'm going to stop. This wise watercolor blooms, let it dry and then you
can go in with ink. I used black and white. I just highlight some of the
edges of the watercolor. And you want to take
away anything from the blooms themselves, but just add some more contrast and some graphic elements. So if you give this a try, I really hope you do because
I love watercolor and ink. Please make sure you add it to your project section
so that we can all see me amazing adventures that you take your
bloom or arc sine.
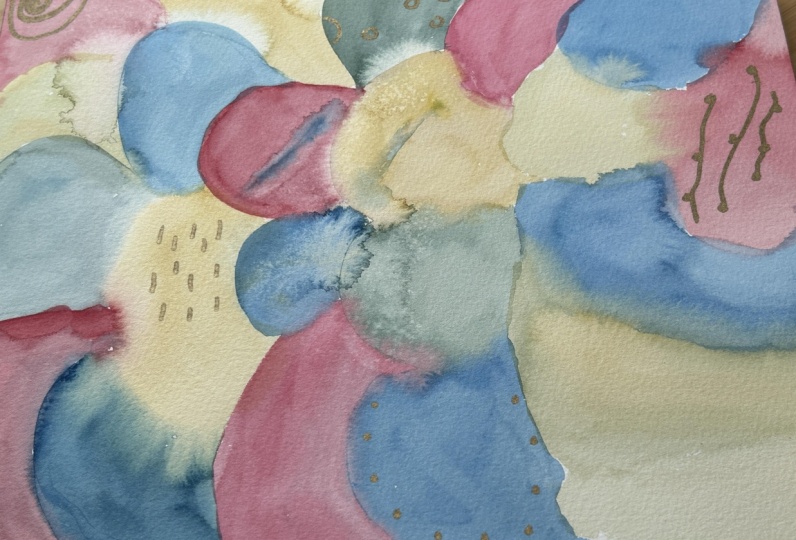
9. Bonus: Masking Fluid and Watercolor Blooms: In this bonus video, I wanted to explore first applying
masking fluid, letting that dry, and
then going in with the watercolor to
create the balloons. So I used a frisk fine
liner masking fluid and just drew in some
organic intuitive shapes that kind of alluded
to a floral design. And then I began working
from the inside out, building up my
essence of a flower. So I kept things
pretty minimal as far as colors in areas of the piece. So the middle section just has the pink and the
purple or violet. And then I was with
contrast also. I made sure that I had areas
where I was dropping in a really loaded brush
with lots of paint on it. Then also the wetter areas, the more watered-down areas so that I could
have that contrast. And then I was going
in with the greens to create some dynamic
leaf like shapes, kind of building off of the lines that I had
done in the middle. I was very careful to not put down colors
that we're going to bleed together in a way that I wasn't gonna
be excited about. There's a little bit
of nervousness it, regarding violet and yellow. I was very careful
when I started putting down the yellow
in areas where it was going to plead
with the violet to make sure that I let the water do the movement
and not the brush. So I didn't get a brown and didn't go back
in with the brush, I just let the paint do
what it wanted to do. I didn't end up with any
muddled browns in there. So you can see me
dropping in some value to add definition. And really playing
with a range of colors to create texture
in the watercolor, also creating the blooms, and then also playing off
of the masking fluid lines. Then I decided I wanted
to add a background. I wanted to keep it
very loose as far as the background versus
the painted flower. And I also didn't want to
wait for anything to dry. I really wanted to let
this piece evolve quickly. So knowing that there were areas where I let my brush get
right up to that green, knowing the green was
going to bleed into the blue and create
some blooms there and blur the foreground
background definition. But then I wanted to also
keep a little bit of a hard edge in some
spots for variation. So you can see me
getting pretty close, went that blue there, but I'm still letting
the line exists. If you give this one a try, please be sure to add it to your project section of class.
 Elisabeth Wellfare, Artist, Art Educator