Transcripts
1. Introduction: If you ever wanted to create
beautiful floral paintings but felt a bit intimidated by all the
techniques and colors, then this class is
perfect for you. Hi, my name is Jenny Flores. I'm an artist and a creative teacher from the Philippines. My art is deeply inspired
by my love for flowers. I'm captivated by their beauty and how they can
evoke deep emotions. I love combining delicate
floral elements with soft vintage tones to create pieces that are both
nostalgic and heartwarming. With nearly 80,000
followers on Instagram, I had the joy of sharing my passion for art
with a wide community, and now I am thrilled
to share it with you. In this class, we'll start
with the basics of watercolor. We'll master the crucial
water and color ratio, explore essential techniques to help you control your paint, and perfect the brush strokes
to bring your art to life. Then we'll move on
to painting one of the simplest yet most beautiful
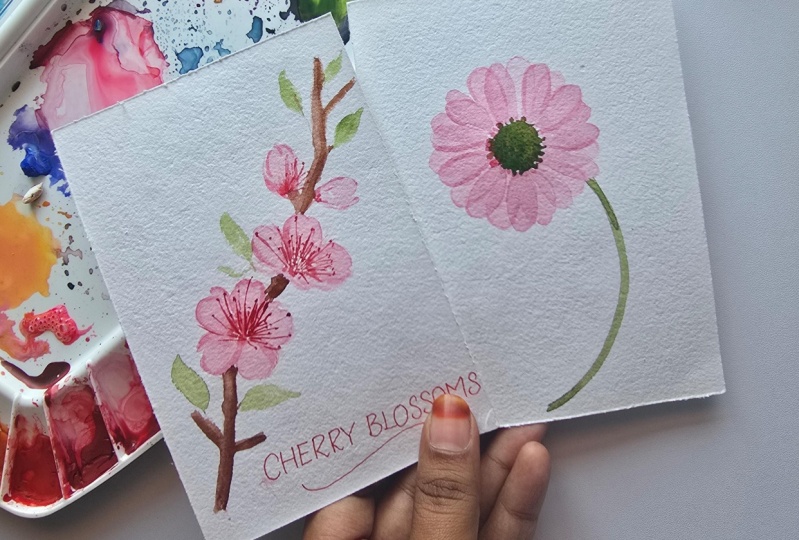
flowers cherry blossoms. As a bonus, I'll also guide you through painting
your bare daisy. Best part will just be
using three colors, which makes this class
both fun and approachable. Whether you're completely new to watercolor or you've
dabbled a bit, but still find it daunting, this class is designed to
ease you into the process. You'll build confidence
as you create sunning floral art with a few
simple techniques. I can't wait to see
what you'll create, so pick up your brush
and let's get started.
2. Materials Needed: Let's go over the supplies that you'll need for the
watercolor class. I'll be explaining each item and how you can use
it effectively. For the paper, we'll be
using watercolor paper, preferably cold
press because it has nice texture that helps you with the
watercolor technique. I personally use Bao
Hung watercolor paper, which is 300 GSM, cold press, and 100% fatten. However, you can use any watercolor paper you have on your hand as long
as it's cold press. Cold press paper has lightly
textured surface that is perfect for capturing
the details and delicate flow of
water in watercolor. Now next is brushes. For brushes, you'll need a few different
brushes for the class. We need round brushes
in size eight, a round brush in size two, a small Filbert brush, and a mid sized Filbert brush. Round brushes have
a round tip and versatile for detailed
work and washes. Filbert brushes, on the
other hand, have a flat, oval shaped making
them ideal for blending and creating
soft rounded edges in floral petals. For the class, I'll be using silver black velvet round brush in size eight, and size two. For the Filbert brush, I'll be using silver
silk 88 Filbert brush in size one half, and silver crystal Filbert
brush in size two. Next, our paints.
Watercolor paints come in various forms such as
tubes, pants, and cakes. I prefer using tubes
because they offer a more concentrated pigment
and mix easily with water. For this class, we'll be
using the following colors, a shade of pinkish red, a shade of green, and
a shade of brown. I'll specifically use
the following color, which are ruby for
the pinkish red, olive green or undersea
green for the green, and Vandekown for
the brown shade. You'll also need additional
supplies like tissue for blotting and cleaning and a mixing palet for
blending colors. And we also need a glass
of water for our brushes. Remember, you don't need to have the exact same
supplies that I use. Similar materials
will work just fine, especially when you're
just starting out. The goal is to get
comfortable with the tools that you have and enjoy the process of painting.
3. Basic Watercolor Techniques: Before we paint our flowers, we will first do a
recap of some of the important
watercolor theories. So first is water
and colour ratio, watercolor techniques, and some of the strokes and brush markings that we will be using in painting
our flowers. First is water and colour ratio. When you dip a wet brush
directly on your watercolor, you'll notice that
it will create a very concentrated
stroke like this. But as you add more
water on this brush, you'll notice that this color
is getting more diluted, lighter and easier to
swipe in your paper. There's no right or wrong, and there's no exact amount of water that you should
put in your brush, but it actually depends on what you want to show
in your painting. So if you want a
certain stroke to be just an effect or just
something in the background, you have to use a very
light mixture of color. But if you want
it to be a detail or something that you
want to emphasize, you have to use a very
concentrated mixture. And this very
concentrated mixture is what we call butter mixture. For those that are
in the middle, something pigmented but
watery, at the same time, we call it milk mixture, and those that are very light, very watery, we call
it tea mixture. When you apply it
in your painting, you'll notice that in this
cherry blossom composition, I use tea mixture
in the background, milk mixture in some of the shadow effects
and butter mixture in the details like the filament and anter
of the cherry blossom. Now, the next thing
that we need to remember is watercolor
techniques. There are a lot of watercolor
techniques that you have to know when you're in
your watercolor journey. But for today, I'm
going to discuss with you the two most
important techniques, which are the wet and
wet and wet and dry. So when you do the wet
and wet technique, you have to paint a layer. While it's still wet, you will paint another
layer on top of it. Usually, we use darker tone on the second layer so that
it will be more visible. But as you notice,
when you paint a stroke over a wet stroke, the second stroke that you have created dissolves over it. And this is not wrong. It just depends
on what effect do you want to see
on your painting. So the next watercolor technique that we'll do is called
the wet on dry technique. So for the wet and dry, you have to paint a layer and then wait for that first layer to before
adding the second layer. When you do this, you'll create a very defined and clean stroke, whether it's a dot
or a line like this, and this one is what we usually use when we want to
create the detail of, for example, the cherry blossom. You want to create the
filament and enter, you have to wait for
the base layer to completely dry up before you
add the filament and enter, because if you add it too soon, it will just create a blob and you'll mess
up your painting. So yes, patience
is important here. Next is brush strokes. We are painting
in a loose style, and that means we are going to maximize the shape
of our brushes. First is round brush. I have here my black velvet, my favorite round brush, but you can use any round
brush that you have with you. For our first stroke, let's do thin strokes. So when you do thin strokes, only the tip of your brush
will touch the paper. You have to control the
stress that you will put on your brush so that you can
create really thin stroke. Also, the position of your
brush should be perpendicular to your paper because if
it's a little bit slanted, you will be creating
thicker strokes. Try to practice creating thin strokes when you
don't have anything to do, and it's okay to have shaky thin strokes in the beginning that's
totally normal. But as you create more, I'm sure you'll be able to create clean thin lines easier. The next stroke that will
create is thick stroke. So when you do thick stroke, you have to add
pressure on your brush, and the width of your
stroke will depend on how much stress you're
going to put in your brush, as well as the size
of your brush. So thick strokes are so much easier compared to thin strokes. Let's do a quick recap of
a round brush strokes. So first is thin stroke, and next is thick stroke. Now, if you combine
this two stroke, you can create this
beautiful leaf stroke. So all you need to do is press your brush and then drag it
a little and then lift it. So when you drag it, you're slowly
lifting the hairs of your brush so that it can create a pointy tip like a leaf. You can also do the same stroke using a smaller
brush like this one. This is size two, and this
is perfect for creating smaller leaves like the ones
for your cherry blossoms. For our next brush, we'll
be using our Filbert brush, and for our first stroke, we are going to do
the flat stroke. So when you do the flat stroke, all you need to do is
press your brush and then slowly drag it to
create a thinner tip. So you're aiming for
a tear drop shape. When you use the
side of your brush, you can also create
something like this, but it's thinner since we are using the
side of our brush. Filbert brush is a nice
brush that you have to master because a lot of
flowers have round tip petals, and mastering a Filbert brush is such a big help for you when
you paint in loose style. A you can also combine the flat stroke
and side stroke. This is a nice
practice when you're creating the petals of
a big cherry blossom. So let's try it. Create one flat, and
then put another one, a side stroke beside it. So this is considered
as one petal. You have to ensure that they are placed too close to
each other so that they won't be taken as separate
petals. You can do that. We usually do that when we
paint smaller cherry blossom. But for a size like this,
we want to showcase the beautiful shape of
a cherry blossom petal, which is something like this. Now let's continue painting our flowers on our next video.
4. How to Paint Cherry Blossoms: Now, let's continue painting
our cherry blossoms. And again, we are going
to use our Filbert brush. So let's do the strokes
that we practiced earlier, a combination of flat
and side strokes. For this one, we are
using team mixture, very, very light mixture of the
color that we are using, which is Ruby from
Nevsky Paltra. Well the layer is still wet, I'm going to add some dots of the same color in butter
mixture in the middle. As you notice, this is a
wet and wet technique, and it bled so much
in the middle, which gave a very nice effect
on our cherry blossom. We will let this layer dry up first before adding
the second layer. And while waiting, we
are going to create a smaller cherry
blossom on the side. So this time, I am using
a small Filbert brush, and instead of
doing a two stroke, which is a combination
of flat and side stroke, I just use the flat stroke. And I also did the same method, which is adding a butter mixture of ruby in the center while
my layer is still wet. Again, we will let this
layer dry up first. And if you want it
to dry quicker, you can also use a hit gun. The first layer is now dry, now using milk mixture, and aside to round brush, I am adding some brush markings on some of the areas of the
petals to create depth. I know that this is an awkward
stage for your painting, but trust the process
because later on when we add the
anther and filament, you will see the
beautiful effect that this stage has added on
your cherry blossom. Again, we're going to let
this layer dry up first. So I'm going to use
my hit gun again before we add the next layer. Next layer is the
anorin filament. All you need to do is create a thin stroke with a dot on top. So it should come
from one area only. And what you need
to do is create smaller batch and then
something like middle size, and then some few
that are longer. The secret here is create very thin lines because if you are creating
thicker lines, it doesn't create a nice
effect on your painting. So you have to make
sure that you have a very small detail brush size two or something
smaller if you have. And again, you're using
butter mixture for this one. You have to control
the amount of water that you have on your brush
because if it's too wet, you cannot create a
very thin stroke. Add a few strokes that are beyond the length
of your petals. It gives a very nice effect
on your cherry blossom. You can also add a few small anorin filament
at the bottom, but just a few and just smaller. Don't add the long
ones at the bottom. Well, some of the cherry
blossom don't fully open, even if it's already
in full bloom. So let's try painting
a cherry blossom bud. You can do this by combining a flat stroke and a side stroke, using a tea mixture, and then while it's still wet, you can add a dot of butter mixture of the
same color at the bottom. We will let this layer dry up first before we
add another layer. And again, I am using
my hit gun here, but you can just wait for it to dry up if you
don't have a hit gun. Now, this layer is dry already, and using milk mixture, I'm going to add a
few brush markings to create depth on our
cherry blossom bud. Now using my color Vandek brown and my
Sirs eight round brush, I'm going to create the
branch of my cherry blossom. As you notice, I
just wiped my brush, and I am maximizing the width
of the tip of my brush. And I am stopping
once in a while, so it will create a nice
crooked effect on the branch. We let this layer dry as usual. And once it's dried
up, we can add a shadow on one
side of our branch. So we are going to use a darker mixture of
Vendek brown here. You can use milk if you use
tea for the initial stroke, or you can use butter if you use milk for the initial stroke,
which is what I did. Now for the final element, let's add some falling
cherry blossom petals, which is done by just maximizing
the tip of your brush. Just do strokes like
this. And that's it. We have finally completed all the elements of
a cherry blossom. Now, let's go to
our next video and apply what we have
learned on a project.
5. Class Project: A Branch of Cherry Blossoms: Before we start painting, let's create a rough sketch
of our branch first, so we'll know where to
add the branch later on as well as cherry blossom
and the cherry blossom buds. Now using my knee eraser, I'm going to erase the
sketch that I've created, so it won't be very visible
later when I faint over it. You can skip this part if your sketch is very
light already, but if you have created
a very visible sketch, I suggest you erase
it a little bit. So for first cherry blossom, we will use team mixture, as I've mentioned, and I'm combining flat and side
stroke for each petals. We're going to make five. This layer is still wet. I'm going to add a few drops of Ruby in butter mixture in the center of
my cherry blossom. So for our second
cherry blossom, I'm going to put it here, and I decided to make this
one an angled flower. So I'm going to
make three petals, and the fourth one will be placed at the
bottom like this. While this is still wet, we are going to
add a few dots of rub in butter mixture as well. Now next are my
cherry blossom buds. I'm going to put one here. Tea mixture again, and I'm
going to add a few dots of butter mixture at the bottom to make
it bleed a little. As you noticed,
mine bled so much. So it happened because my
base layer is too wet. So what I'll do now is get a tissue and let it
absorb the excess water. I'm going to add
another bud here. Same procedure, I'm going to add dot of butter mixture
at the bottom. Now, my base flowers are done, and I'm going to wait
for these layers to dry up before we
add another layer. The layer is now dry. It's time to add depth. I will be using milk
mixture of the same color, and I'm going to
add a little bit of brush markings on
some of the petals. This will create
depth to my flour. And again, I'm
using milk mixture so that it won't
create harsh line. There's no right or
wrong in this process. And if you're having a hard time deciding where to put
the brush markings, I suggest you stop
once in a while, look at your work in a distance, and you'll notice which areas
are lacking some depth. Don't worry because you
are using milk mixture, so everything won't
be very noticeable later on when we add the
center of our flour already. When you're done, wait
for this layer to dry up first before
adding the next step. My layer is now dry, so it's time to add the
anther and filament. So I'm using my size two round brush and
butter mixture of ruby. You can also use a
dark milk mixture if you find butter
mixture too bright. As we have studied earlier, your lines should be
coming from one area only. Create small dots on
top of your lines, and for the lines, vary it in length. Some of it should be too long
and some of it are short. You can also add some
short lines at the bottom. For the second flower, everything is just going up. But we're going to
use the same color as our first flower. We'll pretend that some parts of the anther and filament
are covered by the petal. As you noticed, by this time, your shadows or the depth that you have initially
created isn't too noticeable anymore
because the attention of the viewer is now focused
on the anter and filament. Using milk mixture, we'll
be adding a little bit of depth on our cherry blossom bud. We're going to do the same here. Remember, just use milk mixture. Using milk mixture
of Vandek brown, we're going to create the
branch of our cherry blossom. So just create flat stroke
using your round brush and follow the initial sketch that you have created earlier. Y. You don't have to follow
exactly how I did it. You can create a different
shape of branch. It's up to you. I
also want you to explore and exercise
your creativity here. So it would be nice if you create a different shape
of cherry blossom branch. Our next step is to add
shadow on our branch, but before that, we
have to wait for this layer to dry up
completely first. Now that it's dry,
I'm going to add shadow on one side of my branch. This is using butter
mixture of Bandik brown. We are almost done, and now it's time
to add the leaves. So using my round brush, I'll be adding some leaves on some of the areas
of my composition. It's up to you where you
want to add the leaves, but don't overdo this process. A cherry blossom tree doesn't
have a lot of leaves, so make sure to control where you add and
how much you add. Now it's time to add
the falling petals. So using our round brush
and tea mixture of ruby, I am going to add
a little bit of falling cherry blossom
on some of the areas. Now for our last
step, I want you to take a look at your
work in a distance. Check if you need
to add more detail, if you need to add more leaves or if you need to
add more shadow. If everything is done already, it's time to put
your brushes down. We are finally done. Thank you so much for
completing the project, and I'll see you
in the next video.
6. Bonus Project: A Gerbera Daisy: Second flower, we
are going to paint this simple yet beautiful
flower called Gerber Daisy. To have a guide where
we are going to place our Gerber daisi I'm going to
sketch the center lightly. And using a tea
mixture of our color, we are going to paint
the petals of our Daisy. Remember the flat stroke that
we have created earlier, we're just going to make
it longer than what we used in our cherry blossom. Add a lot of petals
on your flower. The petals should
be from the outside going to the circle that
we initially created. Once you have completed
the first layer, we will let it dry and
add another layer later. Now that the first layer
is completely dried up, I'm going to add
another set of petals. I'm adding it on top
of my first set. But as you notice, I am not covering the first set
that I initially created. I'm also ensuring that there are some petals from the first
set that are still visible. We will let this layer dry up again before we
add the next step. Using a smaller filbert brush, we are going to add
a smaller set of petals near the
center of our flour. We're going to use milk
mixture for this set. Remember the flat
and side stroke, we're going to do those again, but this time, we're going to make it shorter and smaller. Once again, this
layer has to dry up completely before we
add the next step. It's totally fine to
touch your painting if you're not sure if
it's completely dry. It's better to touch it than
to ruin your painting by applying a stroke while it's still wet or
it's still cold. Now, for our next stroke, we are going to use milk mixture and my size to round brush. I'm going to add
I'm going to add brush markings on
some of the petals. We do this because sometimes
we create a lot of petals, and these petals tend to look like they are
just one big petal. And the only way to
separate them from each other is to add
shadows like this. We are also going to separate the small patters that we have
initially created earlier. So I'm just going
to pick a few that I will be adding
some shadows too. Again, we're going to let this layer dry up before
we add the next step. For our next step,
we are going to add some stippling strokes in
the center of Gerber Daisy. As you notice, I am leaving a little bit of white
spaces on some areas. This is to create a bit of highlight on the
center of our flower. Watercolor is translucent, so that means we
don't have white. And the only way we
can create white in watercolor is to
leave white space. Let this layer dry up completely and then add shadow
on the next step. Using butter mixture,
I'm going to add the same stippling motion
in the center of my flour. I'm going to add this on the lower left
side of my center, and I'm going to leave
the upper right side empty so that it will just create a shadow effect and not cover the whole
center completely. Using butter or a milk
mixture of olive mean, let's add the stem of our flour. So I'm using a small
fiilbet brush for this one. And just like the
real Gerber daisy, stem of your flour should
have been equal width. And that is it for
our Gerber Daisy. Congratulations for
completing this project.
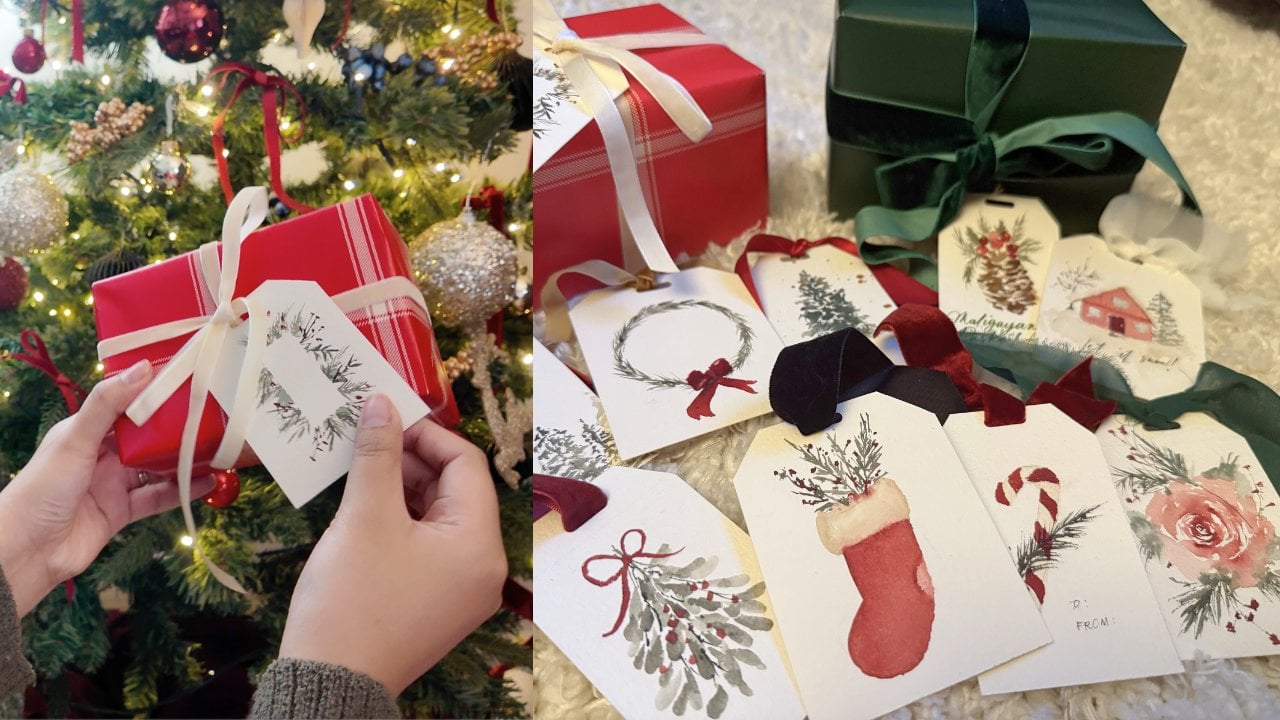
7. Bonus Project: Cherry Blossoms Envelope: Hi, everyone. So today, I'll show you how to make
a watercolor envelope with a cherry blossom design. It's a fun and easy project, perfect for adding
a personal touch to your letters or gifts. So grab your brushes,
and let's get started. First, we need to cut our
paper into a square shape. I am using fabriano 25%
cotton and 200 GSM, and I cut mine into this size. This paper weight
is just right for envelopes because it's thick
enough to hold its shape, but still easy to fold. Now, once you have your paper
ready, it's time to paint. Start by adding a cherry
blossom all over the paper. Remember our technique. Begin with a single petal using the flat inside stroke
of your Filbert brush. For color, use a tea mixture
of the color that you want. So usually, of
course, it's pink, but you can also
use something like an off white color
because there are some cherry blossoms
that are color white. Use the mixture for
soft delicate petals. And while it's still wet, drop in a bit of
a butter mixture in the center to
give it more depth. Spread the flour
all over the paper, but make sure to leave space for our leaves and
falling petals later. You don't have to make
every blossom fib petal. So can have three or four to create effect
of fallen petals. Also vary the angles of your flowers so it
won't look too uniform. Loosen up and let
your petals stand. Once you're happy
with your flowers, let them dry completely
before moving on. Now, it's time to add some brush markings using
milk mixture of your color. These are small,
soft details that help define the petals
and add more depth. Use your round brush, the small round
brush that you have, and lightly flick
some strokes along the petals edges or in areas
that need more contrast. This helps make the flour look
more layered and natural. Once that layer is dry, we will add the filaments and anthers by using a butter
mixture and a small brush. Make sure your lines
are really thin and delicate to make the
flowers look natural. Vary the direction
of the anthers. This will give the
effect of flowers facing different angles instead
of all looking the same. Now let's add some
falling petals. Use the tea mixture
and the tip of your round brush to create
soft petal strokes, keep them light and
random to add movement. Add this all over
the place so that our painting will look
very full and happy. Now, once you're done
adding those petals, it's time to paint the leaves. So again, vary the size, shape, and placement of our leaves, but don't overthink it. Just lose up and let them dance. Hello. Once your whole
painting is done, let it dry completely
before we start folding. Okay, time to make your
painting into an envelope. Now, the first thing
that we'll do is to create an X
mark on our paper. So we're going to put
on some lines here and there so that we
will have a guide when we fold our paper later on. The next step is to fold both side edges
toward the center. I And then this area, we will mark this
one because this will be our top layer later on. So once you're done marking, it's time to fold
the bottom part up to the top layer that we mark earlier and press it firmly
so we can create a fold. Finally, fold the top flap
down to close the envelope. And that's it. But of course, we don't want our envelope
to look very flimsy. So it's best if you will be putting some
double sided tape on the edges of your envelope so that it won't open easily. You can also use a
sticker or wax seal when you close your envelope or after you add the
letters so that it will look more personal
and more acute. There you have it a beautiful hand painted cherry
blossom envelope. So aside from cherry
blossom, of course, you can also do this with the Gerbea Daisy that we
have practiced earlier. I hope you enjoyed this
project because this is such a simple yet creative way to add a personal touch
to your letters or gifts. I'll see you on our last video.
8. Final Thoughts: As we wrap up this class, let's take a moment to
recap what we have learned. We started the class by mastering the essential
water and color ratio, which is the foundation of
controlling your paint. Then we explore various
watercolor techniques to help you achieve beautiful
fluid washes and effects. Finally, using
just three colors, we practice
brushstrokes to bring our cherry blossoms and
Gerbero daisies to live. I hope you now feel
more confident in your watercolor skills and are excited to keep experimenting
with the techniques. Remember, practice is ki, and every stroke brings you closer to mastering
the art of watercolor. Don't forget to
share your artwork in the class project section, I love to see your creations
and offer feedback. If you have any questions
or need guidance, feel free to reach out through
the discussion section. If you could leave a review
in the review section, it could really help me improve my future classes and continue creating content
that you find flable. Thank you so much for
joining me in this class. It's been a pleasure
guiding you through these techniques and
seeing your progress. Keep picking your brush and
exploring your creativity. I can't wait to see
what you'll cake next. Until then, happy paintings.
 Jenny Flores Art, Top Teacher | Watercolor & Gouache