Transcripts
1. Welcome To The Class!: Hello, everyone.
I'm Will Elliston and welcome to this
Skillshare class. Today, I'll take you through my process of painting a dog. This step-by-step guide will
teach you how to create a beautiful pet portrait using the delicate and expressive
medium of watercolor. Whether you are
just starting out, already have some experience, you will learn
various techniques such as layering colors, blending, creating texture
to bring out your pets fur, eyes and personality
to life on paper. I've been a
professional watercolor artists for many years now, exploring many
different subjects, from wildlife and portraits to cityscapes and
countryside scenes. I've taken part in many
worldwide exhibitions and being lucky enough to win awards from well-respected
organizations such as Winsor & Newton, the International
Watercolor Society, The Masters of
Watercolor Alliance, and the SAA artist
of the year award. I also have collectors that buy my paintings around the world. Watercolor can be
intimidating for beginners. My aim is to allow
you to relax and have fun learning this
medium step by step. Hopefully, by the end, you'll surprise yourself
with a nice painting. If this class feels too
intimidating or too simple, please check my other
classes as I have them available
across all levels. My approach to watercolor
starts off loose and expressive with no fear
of making mistakes, because we're just
creating exciting textures for the underlayer. Then as the painting goes on, we'll add more details, bringing the painting to
life and making it pop. I try to simplify
complicated subjects into easiest shapes that
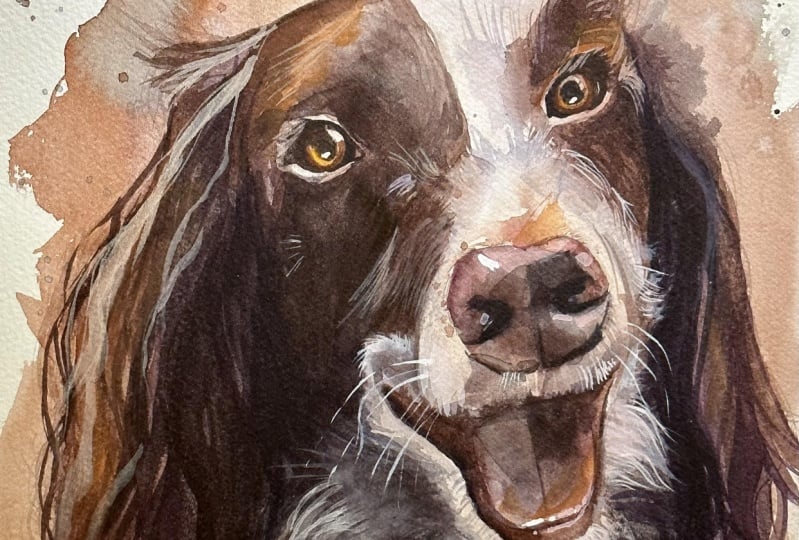
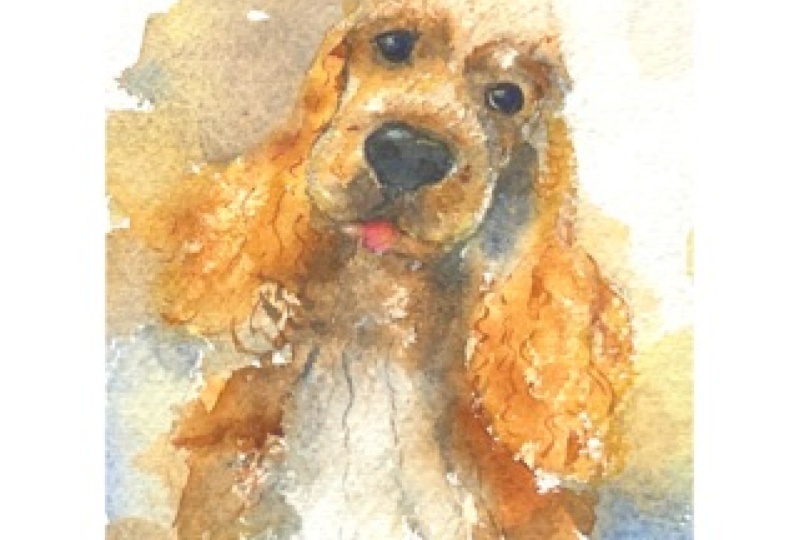
encourages playfulness. Our subject for this class
will be a beloved Cockapoo, but the techniques
we'll be covering can be applied to any
dog breed or pet. I will share tips
and tricks on how to capture your furry friends
unique personality. When you enroll in my class, I'll give you the
high resolution image of my painting to
use as a guide. Today's focus is about
painting rather than drawing. I have included
templates you can use to help you sketch out the
drawing before you paint. I'll also include
my color charts, which are an
invaluable tool when it comes to choosing
and mixing colors. Throughout this class, I'll be sharing plenty of
tips and tricks. I'll show you how to use
mistakes to your own advantage, taking the stress out of the
painting and having fun. I'll explain which
supplies I'll be using so you can
follow along exactly. I'll also cover how to choose
and mix harmonious colors. I'll be splitting
everything up into short videos so it's
easier to take in. You can also pause at any moment if you want
to take more time. If you have any questions, you can post them in the
discussion thread down below. I'll be sure to read and respond to everything
you guys post. Don't forget to follow
me on Skillshare by clicking the Follow
button at the top. This means you'll
be the first to know when I launched
a new class, post giveaways, or just have an interesting announcement
to share with my students. You can also follow me on Instagram to see
my latest works. By the end of the class, you will have completed a watercolor portrait
that perfectly captures a dog's loving essence and we'll be cherished
for years to come. Grab your brushes and
let's get started.
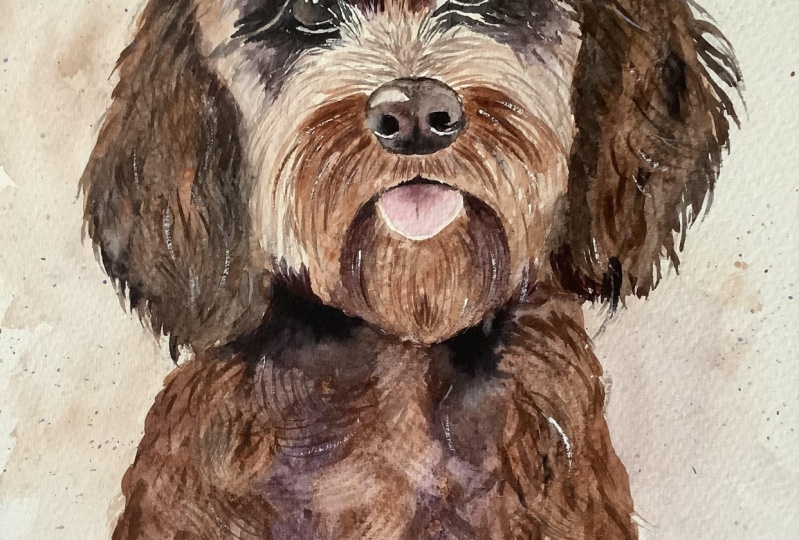
2. Your Class Project: To begin with, I want to express my gratitude for your
choosing this class. I deeply appreciate it. I'm excited to teach
you how to create beautiful watercolor
paintings using a relaxed and enjoyable method. Today we'll be working on
painting a dog portrait, a Cockapoo in this case. Since watercolor can
be unpredictable, I may make adjustments
along the way. Therefore, it's advisable for you to watch the demonstration before painting
along so that you can anticipate what is ahead. [MUSIC] You're welcome to
copy my drawing and follow it exact or experiment
with your own. I will put my painting in
the resource section so you can use it as a reference
throughout the process. There's also a
template you can use to trace and transfer
it onto your paper. Don't feel guilty
about tracing when using it as a guide for
learning how to paint. It's important to
have the underdrawing correct so that it doesn't inhibit your ability to practice and learn the watercolor
medium itself. Whichever way you
use this class, it would be great
to see the outcome and the paintings you
create in this class. I'd love to give you feedback. So please take a
photo afterwards and share it in the
student project gallery. You can find the gallery under the same project
and resources tab. On the right, you'll
see a green button that says Create
Project. Tap that. Once you're there, you'll
have the option to upload a cover photo and a title and
write a little description. I would love to hear about your process and what you
learned along the way. Once your project is uploaded, it will appear in the
student's project gallery. You can view other
projects here, and I'd highly encourage you to like and comment on
each other's work. We put so much time and effort into creating our paintings, why not share it with
the world and help support each other
along the way? Now that you have a good
idea of this class, let's get stuck into it, starting with the equipment
and materials I'll be using.
3. Materials & Supplies: Let's go over the materials and supplies you'll need
to follow along. We'll start with
the colors I use. Unlike most of the materials
we'll be using today, is a lot to do with preference. I have 12 stable colors in my palette that I
fill up from tubes. They are cadmium yellow, yellow ocher, burnt sienna, cadmium red, alizarin crimson, ultramarine blue, cobalt
blue, sorelian blue, lavender, purple, viridian,
black, or neutral tint. At the end of the painting, I often use white gouache
for tiny highlights. I don't use any
particular brand, these colors you can
get from any brand. Although I personally
use Daniel Smith, Winsor, and Newton
or Holbein paints. Let's move on to brushes. To keep things simple, I'll only use a small selection. First is this mop brush. Mop brushes are good for broad brushstrokes and filling
in larger areas or washes. But they also have a tip
for some smaller details. They are one of my
favorite types of brushes. Next is this,
Escoda Perla brush. I use various sizes, but for this painting, I'll use Size 8. These brushes allow for
more precision because they have a finer tip and
last quite a long time. For even more precision, when painting final
touches or highlights, for example, I use a
synthetic Size 0 brush. All brands have them and
they're super cheap. This here is a sword
brush or a rigger brush. It's quite long but thin. It's only used for
very small details, much like the Size 0 brushes, but it holds more
water and pigment, saving time and
effort refilling. The only drawback is it's more difficult to control
as it's more flimsy. That's it for brushes.
You're of course, welcome to use your
own favorites as well. Onto paper, the better
quality your paper is, the easier it will be to paint. Cheap paper crinkles easily
and is very unforgiving, not allowing you to
rework mistakes. Good-quality paper, however,
such as cotton-based paper, not only allows you to
rework mistakes over multiple times but because the pigment reacts
much better on it, the chances of
mistakes are a lot lower and you'll more likely
create better paintings. I use arches because it's what's available
in my local art shop. Next up, some various materials that will
come in very handy. A water spray is
absolutely essential. By using this, it
gives you more time to paint the areas you
want before it dries. Also, it allows you to
reactivate the paint if you want to add smooth lines
or remove some paint. Lastly, masking tape. This, of course, is just
to hold the paper firm onto the surface to stop
it from sliding around. That's everything you
need to follow along. Let's get on with the painting.
4. Getting Started: I decided to sketch this
out off camera and go straight to the painting
stage because it was very time-consuming and
took a lot of editing to get right and the principles are the same for drawing,
whatever the painting. So that's a different topic
for a different video. But one thing I will emphasize is the eyes are important to get right and make sure you draw very thickly so that when we paint over them in layers
you don't lose them. I did a few practice
paintings for this, testing out different poses
and it's very easy to lose eyes and get them back
in when it gets all chaotic. We'll start off doing
a background and then merge it into the front and any of the light
lines can get lost. Make sure you're not shy to
emphasize the lines here. You can always rub
them out later. But it's better to have
too much than too little. [NOISE] I'm going
to wet my brush and I'm painting
my parent's dog, which is a brown Cockapoo. I'm going to go directly to burnt sienna here,
which is brown. I'm going to do a few
different variations of brown. Create down a bit
with some black here. Here is a purple hair slip
it purple, cobalt blue. Like I said, I did a
few practice poses, a few drawing sketches as well, just to make sure the pose
is right because it can be difficult to find a right pose especially with a dog like
this that's got so much fur. It's difficult to
see the shapes. I've found one ultimately that has a nice silhouette. [NOISE]
5. Painting the Under Layer: Now let's move in. Don't be worried the
stage to go past over the drawing as it will
dry, it will dry lighter. Let's try to create a few
organic background shapes. You don't need to worry
about it being too wet. You can mix wet with thick pigment and that's
what creates interest. Add a bit of a splat here
and there like that. Drops of dark pigment there. Blend out to nothing, so clean my brush completely and then go right there and it
should blend out. These are very abstract. I'm not thinking much about this because I don't want to overdo it, but
at the same time, want to create some interesting textures in the background. To create a playful
energy like a wet dog. It is too much, like that, just dab it off a bit. Might look overwhelming
in this stage, but it will look a bit neater once we've actually
painted the dog itself. It looks unnecessary and messy doing it but if you have faith, it'll actually add to the
feeling of the painting. Add a bit of purple. You can add just for a
tiny bit of contrast. You don't even need to
worry about the status on there because that'll be covered up with thick pigment
at another time later on. You can even brush it a bit. It's time to get some of the color into
painting itself now. I'm making sure I'm
observing these areas here, the tongue, the nose, this row got the eyes there. This is just the underlayer, of course, at this stage. This is the fun part of
painting where you can be adventurous with
your splats and expressiveness and then later we can try and hone in
some details into it. Some pure water splats there. [NOISE] I'm just going to move to a smaller brush just to make these
a bit more organic. Now I'm going to use the
hairdryer to dry this down.
6. Painting the Ears: Now it's all dry and it looks
a mess and that's okay. That's what we
want at this stage that creates the interest that the imperfections
make it more human, make it more
interesting to look at. Now we're going to add
depth and pull it together. I'm going to grab a synthetic
brush whether it is this a SKODA brush or I've got
a Van Gogh brush here. I think I'll go
with this Van Gogh. I'm going to add another
layer of darkness now. Going down the tonal range. I'll use a bigger
brush that's orange. I'll start off at the top
and work my way down, leaving the [inaudible]
until later. At the moment I'm just wetting the areas where I'm
planning to go. You can see some
of the lines have already started to disappear, but there are only minor details we can make those
up as we go along. They're not important really. I tend to wet where I
want to go first and then add thicker pigment
afterwards like that. I think I might even speed things up
we can go even larger, go back to this mop brush, because we're just going to add in some black colors
and then as it dries, then we will add details
to make the fur, to imply the fur. You can twiddle around, create a different point. Of course, I have my
water spray here. If it starts to dry,
this water spray will help reactivate it. Sometimes it can be scary to
put dark paint on like that, but it will dry
lighter trust me. It is starting to go down
the [inaudible] now. As this dries, I'll
start to dab a bit more on the edges and trying
to use that point to make some hair silhouette. That's too much red, that's okay we can neutralize that a bit with a bit of green. You put something
on this side too.
7. Bringing the Wash Down: We'll come back in with
some darker darks later. It's all about
having a good time and not trying to be stressed by the process because if you get stressed then it definitely
will create problems. But if you have a
positive attitude and just go with the
flow whatever happens, then it'll just be a much
more enjoyable process. Now we're going to get down here and I'm going to be a bit
more expressive again. I've got my board
on a bit of a tilt. I can drop some bluish
purple, I think. Cobalt and purple again for some exciting color
opportunities because blue and orange
go well together. We've painted around the face
really just doing the bits that don't need as
much detailing. I'm going to change to
this brush because it has a nice point, this
calligraphy brush. I'm going to go in.
Got a nice point, but you can also pan it out and create multiple points with just one stroke. That's
what I'm going to do. I'm just moving the
pigment around with it. Only just starting to imply
the curly fur at the moment. Up until now, it is just
blocking it out really, and we'll be
concentrating on how to create the fur more so later on. But at the moment it's just
the edges and filling it out.
8. Adding Pigment Whilst Drying: Getting some black
hair and right here, going to where the
darkest areas are. Soft edges at the moment. To create a nice
range of textures, you have to think separately. Whilst it's wet into soft textures and
then when it's dry. Later we'll do the
fine rough textures, which is where the curls
are really get involved. Already starting
to dry so you can start thinking about how you're going to put
pigment in as it dries. The different consistencies on your brush will affect
the lines that dry out. It can be quite difficult
using dark pigment because it looks like dark
when it's on your brush. But if you apply it onto paper that's
already wet or damp, then it can spill out with
the rest of the water and actually make the area
lighter than it was before. I'm going to give it
a bit of time now. Maybe I'll use the
hairdryer just to dry it down so that
it's not completely dry. Just so that it's not wet. It's damp. Then we can
create some more textures. Now I dried off a bit
and I'm going to go back in as it's drying now and
just do some curly textures. I'm moving all around, taking some from down here, moving up there, back-and-forth. You can use this to
balance out your tones. Here, I want it to
be a bit lighter, I'm sucking out
some pigment there. I'm dropping it off up here. Let's dry it off
again a bit more. Not completely dry it. You can see as we're
drying it on the stage, the lines are getting a
bit thicker, less blurry. On there ears, the
swell is a bit more, the stressor because gravity
is pulling them down. It's not as curly. Now I'm going to
dry it completely.
9. Pulling Away Pigment: Now before I do the
details on the face, I'm just going to make
sure the values on the body are right and the texture so that
it fits in okay. Because the details have
to be done very carefully obviously to get the lightness
of the pet, the dog. I'm going to start
adding scrolls with a wet brush [NOISE] and then
rubbing away like that. [NOISE] Of course,
the longer you wait, the more pigment
will be picked up. [NOISE] The quality of paper is quite important
for this technique. On cheap paper, the paint stains it very
easily and unfortunately, it's quite difficult to do this. [NOISE] There are some cheap
papers that do it, but they're not brands. They're some random papers
that I've found in the shop. [NOISE] I would create a soft edge there to
create interests that's it's harsh half and
then soft there. Not afraid to use my fingers to blend and blur it as well. [NOISE] It looks like we're painting white actually, but we're literally
rubbing away. [NOISE] Later on we
will come back with some dark pigment again to rarely add a bit more
texture and depth. There is so many different
ways [NOISE] to go about it. Different artists do different
techniques and that's what creates a unique style. [NOISE] If you're starting out or you're more intermediate, you can look at different
teachers to get different styles and then
combine them into your own. [NOISE] I have to replace the tissue
every now and again. Doing things like
this, you've literally got to think of the
bigger picture. You can't be thinking of
the individual details. [NOISE] Things like fur, can't make sure the fur in that little centimeter
square looks correct. As it looks like as a whole
when you step back from it. Because if you look up
close, these details are very loose and not very
well done altogether. But that's not the
purpose [NOISE] of, they just there to imply detail. When you step back, [NOISE]
you can see what it's meant to be [NOISE]
and we tissue. [NOISE] This is not going to make it super white, this isn't white,
it's just brown down, but when in contrast. Another reason why I'm doing
these textures here first, is because I can rub onto the face without ruining the detail that
isn't yet painted. If we put details
there and then rubbed away we would
jeopardize that [NOISE] the edges and soften that line. [NOISE] You take it back to a regular
brush and just [NOISE] do any specific details that a smaller brush
can't do. [NOISE]
10. Starting the Face: Now, I'm going to take a bit of alizarin crimson and
paint the tongue. When painting the nose, to do that I'm just going to start off with the outline, keeping
the highlights. That's why it's useful to
paint dark pencil lines. To draw in dark pencil lines
at the beginning so that you can see them even when
the paint is over the top. There is the under layers
of nose and the tongue. Now, I'm going to
paint far around that. Again, I'm going to do a
little bit of an underlayer. When am I not going over a bit? I'm keeping a boundary somewhere
but for the most part, it's okay that the
total differences are enough to go
past those lines. Using the tip of the brush
to create some [inaudible], flick a bit of water. Now I'm going to go to the other end and
work my way down. Reactivating the edge, we're going to drop in a few
different bits of color just to make some blue. The other bit of interests, because it looks at it flat that's on the darker bits here. Now, I'm going to
start on the eyes. I want them to be very bold. I'm going to go straight
to the black to begin with leaving couple
of white dots there where the eye is wet
and there's some reflections. Now, we're going dark and
then working our way out. When he put the eyes in the facial feature is where
it really starts to pop. Since I'm done with a black and then I'm going
to go into the brown, of course, and start
bringing it out. Now we're going to go over to the upside and do the other eye. In hindsight, I should have
done this eye first so that I wouldn't have to risk
smudging the other one. But these things happen. You have to just go with
the flow sometimes. Again, very thick black
paint at the moment. Now, alternatively, you
can just paint it all black and then come over with
the white paint afterwards. But that's going to be tricky to get accurate and you won't
see the pencil lines anymore. That's why you have to do this fiddly part of
painting the black first. They got coming out with
the rest of the pigment. To add some direction lines to refer here to help guide me. Good, pull off a bit
of the black here because it was a bit too heavy. Add a bit of brown to it.
11. Varying the Colours: Now, I've dried that, I'm just going to go over
there with some brown just to knock off those
highlights just a tad. I'm going to start looking around and this purple there I think I should
spread around a bit there, I'm going to mix a bit of
purple and start adding a few dry brush marks. I'm teasing up the
silhouette again. Isn't fine tip of the brush during an outline. Even as a teacher, I'm not afraid to say or
admit that during paintings, I don't know whether a
painting will be a success or failure until the very end. With this painting, even
though I've gone through roundabouts or thinking,
should I give up? Maybe I should just start again, wow, is he really looking good? I go back and forth again, changing my mind depending on wherever it's going
to plan or not. These textures do
take quite a while. The single lines going
around and swirling motions. I think the highlights
are too strong here, so I'm just going
to go over them, bring them down a little.
12. Building on the Details: So as you can see, I'm bouncing around in no particular order. I started the nose, started the tongue,
started the eyes, and I move on and I just do
whatever comes to my mind. When I see there's a
narrow that needs fixing. So I'm going to go back to the tongue now or at
least the mouth area. Let's start trying to improve
the form around that. I want the tongue
to pop a bit more, so I'm just going to darken the area underneath it to
increase that contrast. The layer is nicest. I want more contrast
here as well. So then I'm going to make
this a bit darker here. I'm just going back and forth. Mix some more brown. Using a bit of dry brush.
13. Painting the Nose: I'm going to paint the
darks of the nose. Stopped here for almost black. Then is kind of , what is that? Is that reddish brown, dry that off. The highlight is a bit too harsh
for my liking. I'm just going to
get down a bit. Using smallest brush, I'm just going to
paint in the nostrils. You have a couple of broad brushstrokes
just coming off there. We're going to stick with
this small brush and just add a few fine controlled details. Just a couple of fine
lines in the right places. Because enough just
to bring it together. Now bear in mind that I have
sped parts of this video up. It does take time. I didn't paint it as quick
as the whole class is. You can go on further adding more details until
you're satisfied. It's easy to get carried away. I'm trying to filter what's essential and what's
just fiddly and then soon, we'll be done.
14. Finishing Touches: Now I'm going to get this
Holbein Jaune Brilliant No. 1, which I'll use as a highlight to really
make some parts pop. I still keep on seeing
things I want to correct, that I think are essential. I think there needs to
be a bit more in here. Because we've phases of being loose and then tight again, loose, expressive, and then trying to be a bit
more controlled at that. I'm going to go back
to the highlights, and I'm just going to
finish off with the eyes. I'm over and done
with white gouache. Really make them pop. Impress them in.
Scratch some of it. Came back to my Jaune, which
is basically yellow ocher. I've got this little board
here which helps me, again, to find like chisel edge. Not really going to some areas, just to define, pop out some highlights. It's very easy to overdo this, so I'm only doing
it in a few places. It's quite difficult to
know when a painting is finished or to predict
when it will be finished. Usually, when you bring out
the highlights like these , we're getting close. Don't be worried if you can't do this much detail or
detail overwhelms you. Lots of it's to
do with patience. It might be difficult to find the patience if you
don't have faith in it if you think it's not
going to go anywhere. But this is, although
it takes a lot of time, while compared to oil painting, it doesn't take much
time at all actually. It can be quite therapeutic. You can put some music
on in the background, listen to an audiobook. You can get together with a group of friends
and do it together. I try to emphasize the
details on the face and then gradually decrease them as you move
away from the face because it'll distract from
the center of interest. When your eyes have
been looking at a painting for so long from
beginning to almost the end, it's hard to get a
fresh judgment on it. When you feel like you're
coming close to the end and you're struggling
for things to look at. It's a good idea to end at
that stage and possibly come back in the future, in a couple of hours time, to see if you can
make any alterations. I think what I'm going to
do now is take a step away. If any changes need to be made, then I'll make the changes. If not, I'll see you in the breakdown and
sum-up of the class.
15. Final Thoughts: Welcome back and
congratulations on completing this class on
dog portrait painting. I hope you enjoyed watching. Now it's time for you to paint your dog or even a friend's dog. Remember, that painting is
not just about technique, but also about expressing your creativity and
personality through artwork. Don't be afraid to
experiment and try new things for your
watercolor paintings. Whether it's with
different colors, brushstrokes, or a composition, as you continue to
develop your skills, take time to practice
and hone your craft. With each painting,
you will learn something new and
improve your technique. Be patient with
yourself and enjoy the process of creating
something beautiful. If you'd like feedback on your painting, I'd
love to give it, or if you'd like any advice
related to watercolor, please share your painting in the student projects
gallery down below and I'll be
sure to respond. If you prefer, you can
share it on Instagram tagging me @willelliston
as I would love to see it. Skillshare, also love
seeing my students work, so tag them as well
at Skillshare. After all that effort
we put into it, why not show it off. Remember, please click
the follow button up top so you can follow
me on Skillshare. This means you'll
get a notification as soon as I publish
my next class, or have important announcements
like free giveaways or sharing some of my
best student artwork uploaded to the project gallery. Thank you so much again
for joining this class. Please leave any comment in
the discussion section if you have any questions or
comments about today's class. If you have any subject wildlife or scene you'd like
me to do a class on, please let me know about it in the discussion section as well. If you found this class useful, I'd really appreciate
getting your feedback on it. I hope that you continue
to explore the world of watercolor and capture many more beautiful
moments on paper. Until next time, bye for now.
 Will Elliston, Award-Winning Watercolour Artist