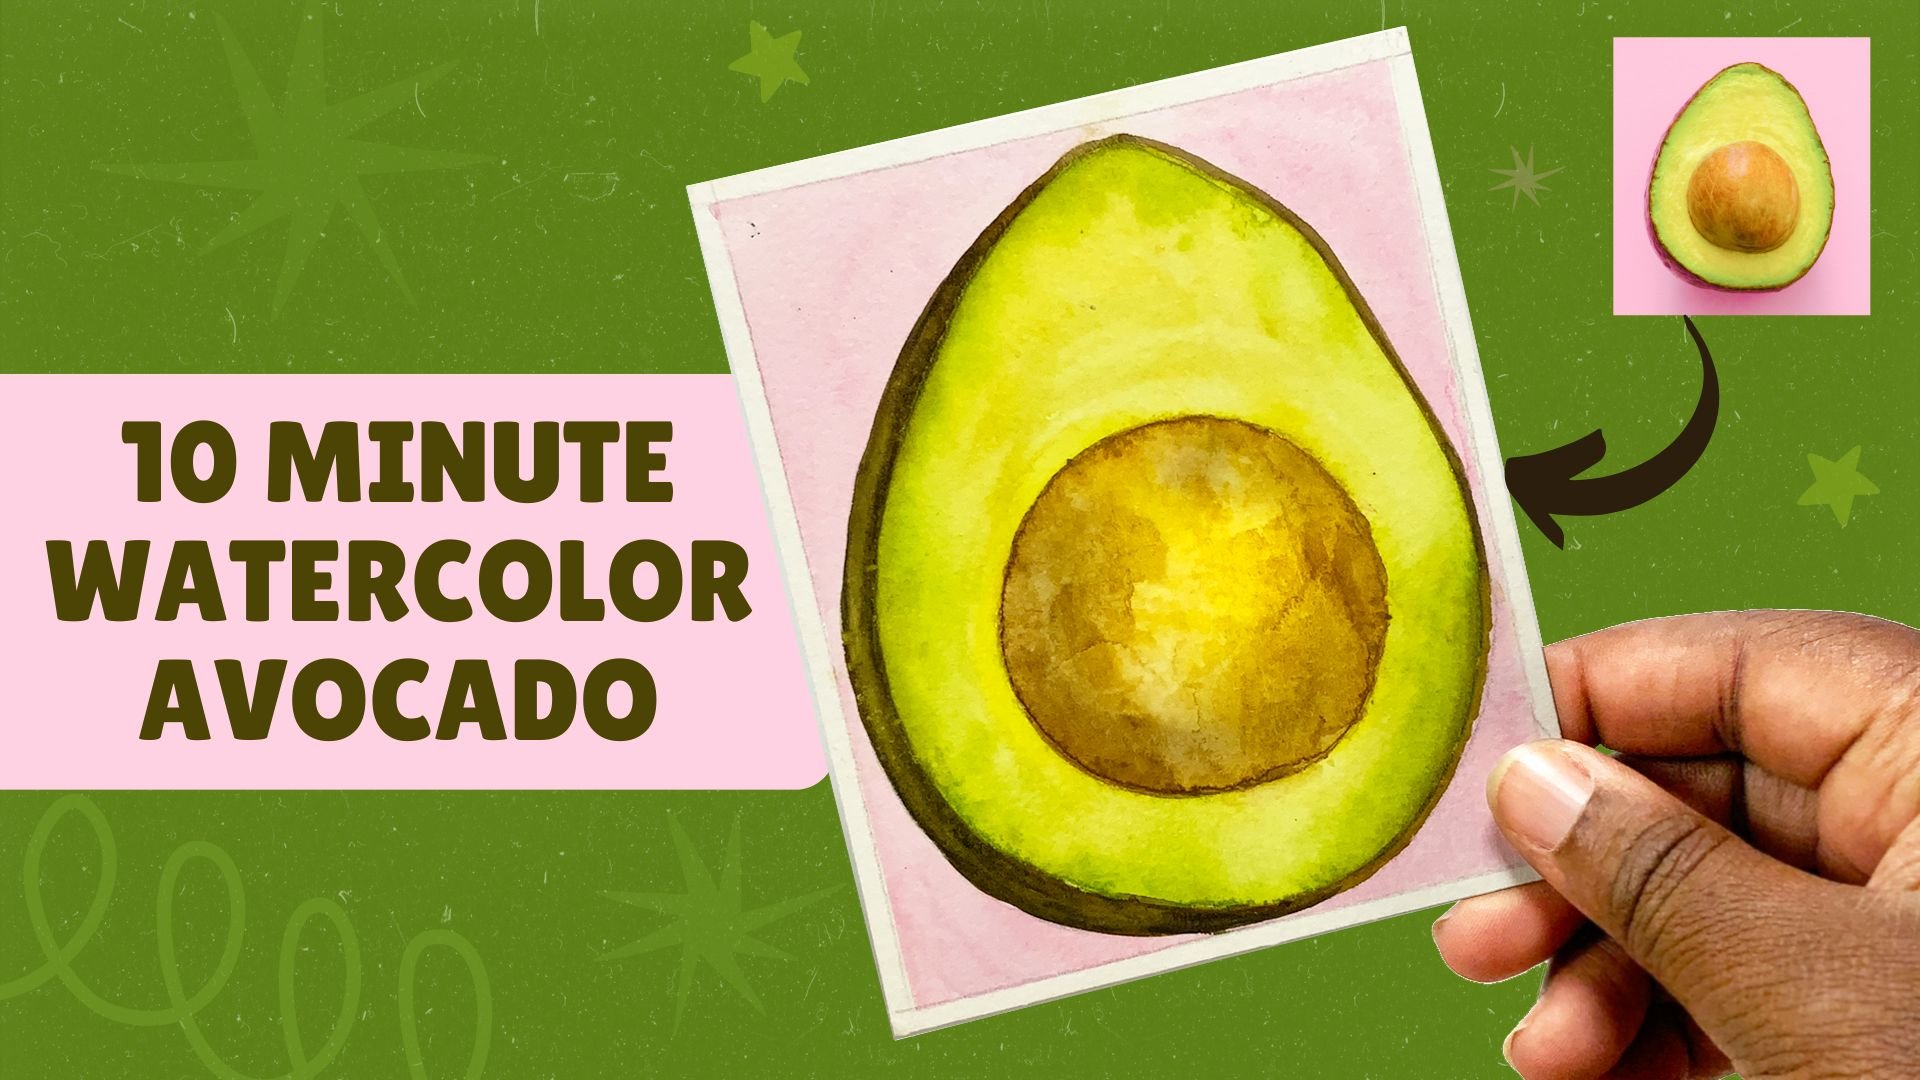
Transcripts
1. Introduction: Watercolors are amazing. The vibrant colors,
the fluid movement, the meditative blends,
and let's not forget those beautifully
unpredictable textures are unlike any other medium. But understanding all
the ways you can use watercolors to create expressive paintings
doesn't come easily. So imagine if you could
learn how to harness those unpredictable
qualities in order to create your own stunning
artwork. Hi there creative. My name is Shannon Lane. I'm an artist, a hund letterer, and a teacher here
on Skillshare. In this class, I'll be sharing all the techniques that I
wish I had known when I first started
learning how to use watercolors from basic
painting techniques like wet on wet and flat washes to more complex
ones like blending, glazing, and even scumbling. Plus we'll also be
experimenting with some household items like gauze and soap to create
beautiful textures. Then we'll wrap up with a class project where you'll combine some of the techniques
that you've learned to create a beautiful, expressive i fish painting. This class is perfect for all skill levels from beginners who are
new to watercolor, but may be struggling with
painting washes, blending, or creating textures to more advanced
artists who want to experiment or
refresh your skills. So if you're ready to dive into the wonderful
world of watercolors, I'll see you in
the first lesson.
2. Supplies: In this lesson,
I'm going to share all the supplies that you
will need for this class. Don't feel like you need
to go gather all of these items right now because that can be
a bit overwhelming. We are going to be
experimenting a lot. So I would suggest that you wash the lessons before you
attempt the exercises so you can get a good idea of
the exact supplies you need for certain techniques in
that particular lesson. Overall, the main supplies
that you will need for all the lessons
are watercolor paints. You can use whichever brand of high quality paints that
you're comfortable with. Watercolor paper that is
300 GSM and cool press. You will need about three
or four sheets of these because we'll be practicing
30 different techniques. Paint brushes, particularly some row brushes in a few sizes, as well as a large flat brush. A palette to makes your
paint in Two jars of water, one for rinsing your brush out, and the other for
picking up clean water to add to your paints
or paper as needed. So paper towels to remove excess paint from your
paper and your paint brush. Then for some lessons, you
will need masking tape, mask in fluid, sketching
supplies like a pencil, an erasor and a ruler. A heat gun to help you dry your water colors in
between layers and some household items
specifically for the lessons where we're trying different
texture techniques. If at any time you don't have these exact materials I'm using, feel free to substitute or experiment with other
materials that you may have at home or you can even skip that
particular technique and just watch for the reactions and the results that I achieve. Once you gather
your core supplies, you can divert into the
next lesson because we'll be practicing some basic
painting techniques.
3. Basic Painting Techniques : Well watercolor is an
unpredictable medium. Learning the basic techniques of how to add paint
to your paper can make it so much
easier for you to get the results that you want
when you approach a painting. I'll be showing you these
techniques in real time. If you want to paint
along with me, grab a sheet of
watercolor paper and divide it into two
columns and three rows. Then you'll need
to mix your paint, and the mixture that you're using should have a
consistency similar to liquid watercolor where it is watery but
still very pigmented. Of course, test it out on
a piece of scrap paper before you start these
painting techniques. The first technique
you need to know is the dry brush technique
where you add paint onto dry watercolor paper with a almost dry paint brush. Dip your paint brush into the mixture and pick
up some of that color. Then dap it onto a piece of paper towel to remove
some of that paint. As you paint, you should get a scratchy effect that allows the texture of the
paper to show through. I love using this
technique to add texture, but I'm painting landscapes, especially to capture aves. The next technique is the
bet on dry technique. Where you add paint onto dry
paper with a paint brush. Start by beating your brush with clean water and be
sure to drag it along the edge of your cup to get rid of any excess water. We want the brush to be
damp but not dripping. Then pick up paint and
paint onto your paper. This technique
allows you to have control as the paint
you add will remain in the area you
put it and it will only move if you push it
around with your paint brush. The next method of painting
is the bat on at method where you add paint onto
paper or with a pate brush. So you're going to start
by wetting your paper with a p brush filled with water or a square
bottle if you have one. As you're wet in your paper, you want to make sure that
it doesn't have any puddles, but instead, the paper
should look glossy. If you have water pooling in
any areas to form puddles, you can use a paper towel to get rid of the
excess water from your brush and use your brush to lift the
water from the puddle. Once your paper is
covered with water, you're going to pick
up some of your color with your brush and add
it into that wet area. I am painting the
exact same strokes that I painted for the
wet on dry technique, so you can see the
difference in the effects. And you may also notice that as you paint the color
bleeds into the water, and it doesn't stay
exactly where you add it and it may also have
some softer edges. So this technique, the only
thing that you can really control is the initial area
where you add your paint. Since the paints
will pretty much go wherever they want
within that wet area.
4. Lifting Techniques: Now that you know how to
add paint onto your paper, I want to share a few
techniques that you can use to remove paint
from your paper. These techniques are
very important to know, because they allow you
to correct mistakes, create highlights, and give you a little bit more control
when you're painting. The first method we can try is lifting from back paint
with a paint brush. So paint a small section of color using the
bat and technique. Then rinse out your brush
and remove the excess water from it by dabbing it onto
a piece of paper towel. Drag your paint brush where you want to
remove the paint from. If you want to
remove more paint, just dab that paint brush onto
the paper towel to remove the color that you lifted
and repeat those steps. You can also give this
lifting technique a tray with the wet on wet method to see how different
the results may be. Another way you can lift
color is called blotting, paint a small section of color using the bet
on dry technique. Then use a dry paper toll to lift color from
the area you want. And just like the first
lifting technique, you can give this with the
wet on wet method as well. Now, I want to show
you how you can lift color but the paint
is completely dry. You're going to paint two
sections of color using the wet and method and
allow them to completely. You could use a heat gun if you need to to speed
up the process. Use a red paint brush
to add water to the area where you want
your color to lift from. This help to reactivate
your water color. Then dab your brush onto a piece of paper towel to remove
some of that color you've lifted and just repeat those steps until
you're happy with it. One thing to keep
in mind is that some water colors will
stay in your paper. While you may be able
to lift some color, your paper won't go back to its natural white color. Okay. Then for your next section
of color g to combine using the paint brush and
the tissue to lift color. So vet your paint brush and paint it over the area
you want to lift color from then use your paper towel to up that color. So that's it for
some basic painting and lifting techniques
that you should know. In the next lesson,
you learn how to paint perfect watercolor
washes with ease.
5. Watercolor Washes: The term watercolor wash refers to a method of applying paint across the paper surface in a
smooth uncontrolled manner. Washes are often used as backgrounds or base
layers and serve as a foundation for
additional layers of paint to be added to. Learning how to paint basic watercolor washes
will help you to create cohesive paintings with
smooth transitions and vibrant even colors. I am using a new sheet of paper divided into three
rows and four columns. The first and the
most basic type of wash that you can create is a flat wash and it
involves applying a smooth, even layer of color
across the paper. To get started, load your
paint brush with paint. Then you're going to
use your brush to smoothly pull that
color across the paper. When you notice that the
brush is running out, pick up more color and add it to the section
where you left off. Blend that new paint seamlessly
into the previous set, then continue to move
it across the paper in the left to right
motion as you go down. As you are painting this wash, you want to have a small puddle, and this is what
you'll be pulling downwards to make sure
that your wash is even. If your paint is not moving to the bottom and it is puddling
in the middle of your wash, you can tilt your papers so that gravity will help
to pull the paint down. Yeah. When you reach the bottom of where
you want your wash to end to get rid of
that puddle of color, simply use a paper towel to take the paint
from your brush, then lightly d that bright brush into the color and your brush
should absorb the paint. Then you can remove the
color using the paper towel and lightly brush across the bottom to smooth
out any color. Then you're going to
allow this paint to dry completely on
a flat surface. The next wash we're going to
try is a red red flat wash. The process is the same, but we're going to
wet our paper with clean water before adding color. I'm using a large flat
brush because it is just easier to bet larger
areas with these brushes. And remember that when
you're wet in your paper, you want it to be glossy
without any puddles. Once your paper is bet, you're going to load
your round brush with paint and add it to the paper
starting in one corner, using that left to t motion
to pull it across the paper. You're going to pick up more paint as needed
and you can lift the paper if you need to help that color be pulled down a bit. Yeah. And when you reach the bottom, use your paper towel to
help take the paint from your brush and then use that brush to remove
any excess paint. The next wash we have
is a graded wash. This is a variation of the
flat wash where the color gradually transitions from
dark to light or vice versa. You're going to start
with your brush fully loaded with
paints and add it to the top of your box. Then instead of reloading
your brush with more paint, like you did for the flat wash, you're going to
load it with water. Don't raise your
brush completely just simply dip it
in clean water, and this will remove some of
the paint from the brush and also add water to the paint that remains and creates
a diluted volume. And you're going to continue and instead of picking up paint, you're going to be picking
up water each time. When you reach the
bottom. You should be painting with clear water. So the bottom of this should
be a very late value. Then you're going to
allow this to dry completely on a flat surface. Again, if you need to get rid of any puddles
at the bottom, just use a paper towel to take your water from your
brush and use that y brush to get rid
of your puddle. Then you're going to repeat
this graded wash technique, but using the wet on
wet method instead. Another type of wash that you can create is a variegated wash. This incorporates multiple
colors within a single wash, creating a really fine and
dynamic gradient effect. So you're going to start a
flat wash with one color. Then rinse your brush and
load it with a second color. The paint should have
the same consistency in order to make sure
that they blend smoothly. If one is too thick, you may have trouble getting it to move or if it is too watery, it could move around too much. Be sure to test out
your colors and your mixes on a separate
piece of scrap paper. Then I'm going to add my second color along the
bottom of that first color. Your paints should try
to blend on their own, but you can use your
paint brush to smoothly blend them together using
that left to right motion. And just continue to paint
and pull down that color. If you want to add
another color, simply rinse your brush
and repeat those steps. Remember to tilt your paper to encourage your
colors to flow down. Now with this wash,
you really want to make sure that you're
using colors that will blend nicely
together and not turn into dark or muddy colors. Okay. And again, you can repeat
this same technique using the on method to
see how it turns out. Know that we've done some
basic watercolor washes, it is no time to explore some
blending and de techniques.
6. Blending and Layering Techniques: The first technique that I want to share with you
is called feathering, and this is used to create soft delicate edges
and transitions. This technique is very similar
to what we did to create the graded wash. Start by simply applying some
paint to your paper. While that paint is still t, use a clean brush to gently pull along the edge you
want to be feathered. Blending is a technique
used to seamlessly merge two or more colors together to create smooth transitions
or gradients. Start by applying your paint onto your paper
and while it is t, use the clean brush to add a little bit of water along
the edge you want to blend. Then pick up your second color and add it next to that t edge. Then use a dump brush to pull
those two colors together, working in small
circular motions. If needed, you can also
add more paints and continue blending until you
achieve your desired effect. Glazing or layering is a technique used to
build up layers of transparent color to create depth and intensity
in your paintings. Use your paint
brush to paint and transparent wash of
color and allow it to. Then you're going to add another thin transparent
layer on top. You will notice that this will change the value of the color
of the layer underneath. For example, when I
painted pink on pink, it became, but when that same color was painted
over blue, it became purple. The next technique I want to share for layering
is called scumbling. This is a dry brush
technique used to create texture and visual
interest in your painting. Load your brush with a small
amount of paint and remove excess moisture
by blocking it on a piece of paper
towel, if necessary. Then you're going to add it to your paper and vary the pressure and direction
of your brush strokes. Basically, all you're doing is scribbling with
your paint brush. Then you're going to
allow that paint to dry completely before
repeating this step to add another layer of color. If your pain is wet, you won't be able to get
the defined edges that really make this
technique look beautiful. Because if your paint is wet, it will bleed and spread and create an abstract
background of color. This technique is really
great for foliage and adding texture to trees
and bush and grass. As you are adding your layers, you're not trying to
cover up the entire layer that you painted before because you want some of
it to be visible. Rips and splatters are fun spontaneous
watercolor techniques that can add layers, texture, movement, and visual
interest to your paintings. I'd like to add these as the
final layer to my pieces. Sometimes I add them to
areas while I'm painting, and they are artists
who also start their paintings with
drips or splatters first. Before we start to
do some spiders, you need to know that drips and spiders can get everywhere. So cover any areas that you
don't want your spiders to go with a piece of scrap paper before you even start trying
these techniques. To create fine splitters, pick up some paint
with the bristles of your brush and then tap the
handle of your paint brush. For larger splatters,
you can use a dropper or a water brush
to pick up some paint. Hold it above your paper and squeeze or tap to
create large splatters. The further away you
hold the dropper, the larger your
splatters can turn out. To create drips, you can use a water brush or a dropper to squeeze paint onto your paper and then tilt that paper so the paint runs down and you can manipulate this a bit by moving your paper to create different paths for
your paint to follow. You can even use your paintbrush to push paint around as well. That's it for blending and in, I hope you're ready to learn a few more fun experimental
techniques that you can use to create textures because that's what the
next lesson is all about.
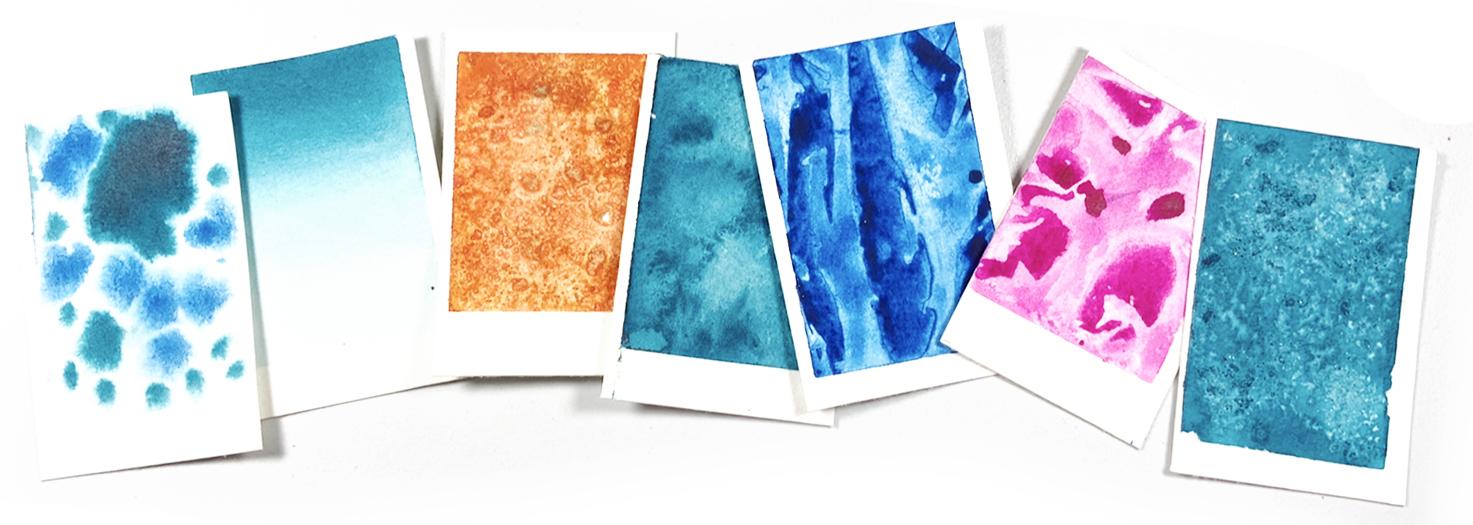
7. Texture Techniques: These net techniques are fun ways to add textures
to your washes. These are unpredictable
and it will produce different
results each time. Most of them can be achieved
using household items, and as is going to make
these even better. So once again, I'm
using a new sheet of watercolor paper
that I've divided into three rows
and four columns. And inside each of these boxes, we're going to try
a new technique. The first texture technique we're going to try is
called dry brushing. This involves using a
nearly dry brush to create textured and broken
brush roll on dry paper. So paint your background in a flat wash of color and
allow it to dry completely. Then mold your brush
with paint and remove the excess moisture by blocking it onto a
piece of paper towel. Apply that paint lightly and sparingly onto that dry paper, allowing that texture
of the paper and the color that you painted the background
to show through. Feel free to experiment with
different breast sizes and pressures to create a variety of different textures
and effects. This is a really, really great technique
for creating wood texture for adding
texture to the ocean. Even rocks, this is really great for bringing life
into those objects. Blooms are created
when you add water or wet paint into an area that
has already started to dry. If you add wet paint, this causes the pigments to spread and create
organic shapes. If you add water, the
pigment is pushed away from the area where the water is added and the white of
the paper will show. Start by applying a wash
of watercolor paint to the paper and allowing it to partially dry until it
is no longer shiny, but it still appears damp. Then load your brush with water or another
color if you want to try with paint and drop
it into that background. You can also tap
your brush to as some splatters or even use
a spray bottle with water. These will all produce
different effects. I love using this technique
when I'm painting galaxies to add a
little bit more texture and color variation, or if I'm just creating
an abstract background, this works really
great for that. Tissue texture involves pressing a piece of paper towel or tissue onto wet paint to lift some of the pigment and create
a soft texture effect. Apply whatever color you want and allow it
to dry partially, then place your paper
towel onto the color and lightly press it
in before lifting it. As you will see, the pattern for the paper towel is
transferred onto your color while
some of that color being lifted to create
a really cool effect. Scratching or scraping involves using a sharp tool such
as a palette knife, an old credit card, a toothpick or even the
end of your paint brush to scrape away some paint
and expose your paper. Apply whatever color you want and allow it to
dry a little bit. Then scrape or scratch
away areas of paint, creating lines,
textures and shapes. Not only can you experiment
with different tools, but you can also try
different pressure levels to create a variety
of different effects. To get the salt texture, you're going to paint some color and allow it to
dry a little bit. Then sprinkle some salt
onto your damp paper. The saturation of
your paper plays an important role in the amount of texture
that you can achieve. If your paper is too wet, the salt will likely dissolve before it can produce texture. If your paper is too dry, you may not be able to
see any texture at all. Different types of salt will
also have different results, so you can experiment with
finer grains of salt as well as larger coarse
grains to see what happens. Then you need to make sure
that your paper is completely dry before you use your
fingers to brush it away. This usually takes
quite a long time depending on the
humidity where you live. For me, I usually
have to leave things overnight when I use the salt texture because I
find that the salt also pulls moisture from the ear and
it leaves your paper damp, so you want to make sure
it is completely dry before you brush away your salt. Mine isn't dry yet, so I'm just going to move
on to the next technique. We are using rice, and this is very
similar to the salt. So you're going to apply
your color onto the paper. Then you're going to sprinkle
some of that rice onto it. Unlike the salt, the rice
is not something that will dissolve into the water
if the paint is too wet. Instead, the rice will
absorb that paint and give you a really cool
texture once it is dried.
8. Texture Techniques pt2: To create the next texture, we're going to use some plastic. This can be plastic
wrap or a plastic bike. You're going to paint
some color and then apply that plastic onto
your red paint to create a crinkled and
irregular texture. You can also try this
with foil paper, was paper or parchment paper
to see the results you get. Then you're going
to allow this to dry completely
before removing it. This will also take
a while to dry. So again, this is
another one that you may need to leave over night. Don't be tempted to
use a heat gun to speed this up because if
you're using plastic, this will likely cause the
plastic to melt instead. The next texture we're going
to trace with alcohol. This involves applying alcohol, either isopropyl alcohol
or rubbing alcohol and this will create some interesting
patterns and effects. After you've painted your
paint onto the paper, dip a clean brush, even a cotton swab into alcohol, then apply it to your red paint. You can also pick up
some with a dropper and squeeze it onto your
background as well. The alcohol will repel the
water color and create a very unique texture
once it evaporates. Another pussol item that you can use to create
texture is a sponge. So add some paint
onto your sponge, or you can lightly
dab that sponge into your paint and then stamp
it onto your paper. You can also create
texture with soap. In a small container, make some water and this so
until you get some bubbles. I use some of my paint water
that was purple so that you can see this a little
bit better on camera, but you want to use
some clean water when you're doing
this technique. You're then going to paint your background in
whatever color you want. Using your paint brush, you're going to pick up some of those bubbles and add
it to your paint. You can also create texture with watercolor pencil shavings. So use an exacto knife
or botcutter to scrape some color from
your pencil point and onto a piece of paper. Then you can sprinkle
those savings over your bed background and then allow this to dry and see the type of effect you'll get. The final thing
we're going to use to create texture is gauze. So after playing your
paint onto the paper, lay a piece of gauze
over your painted area, press it down with your finger. You can leave this as it
is and allow it too dry. Over you can even add some
color on top of that gauze. Most of these textures will take quite a while
to drain naturally. So you can leave this sheet
of paper for a few hours or overnight and then come
back and remove your salt, your rice, your plastic wrap, your gauze and see the
effect that you get.
9. Resist Techniques: The final things
we're going to look at are some resist techniques. So these are just
techniques that will help you to preserve
the whiteness of your paper in certain areas. So first thing I'm
using is masking fluid. So if you're using maskin fluid, you should use an old brush, and you should also dip
that into some salt water before you dip your brush
into the masking fluid. This salt water acts as a barrier and just
protects your bristles. So I'm just going to use the brush to draw
a few shapes and a few areas that I
want to remain white, you have to be very careful
where you are applying this masking fluid and make sure you don't
miss any spots. The next thing we're going
to use is masking tape. You can also use washing
tape or painter tape. Apply your tape to whatever area you want to
remain white and then paint. After the paint is dried, you can then remove your tape. The final thing you
can use is a white was creon or even an oil
pastel if you have it. I've just used my oil
pastel to draw a shape, and now we are going to
start adding our color. For the masculine fluid, you need to make sure
it is completely dry before you paint over it. Minus still hasn't dried as yet, so I'm not going to paint
in that section as yet. As I was removing
the mask in fluid, I did end up pulling some of my mad paint into the area
that I wanted to remain white. Definitely make sure
your paint is completely dry before you remove
your mask in fluid. A few ways you can remove that is you can use your
finger to rub it away or you can use
any erasor to help you rub off that maskin fluid, or you can peel it up depending on how
thick you applied it. If it is very thick,
you may be able to hold it and lift it like
you would tape. And to remove your tape, you can just lift it off. Now, you can see that this one, the paint completely see true, and that was because
these weren't applied as properly as the first
two pieces of tape.
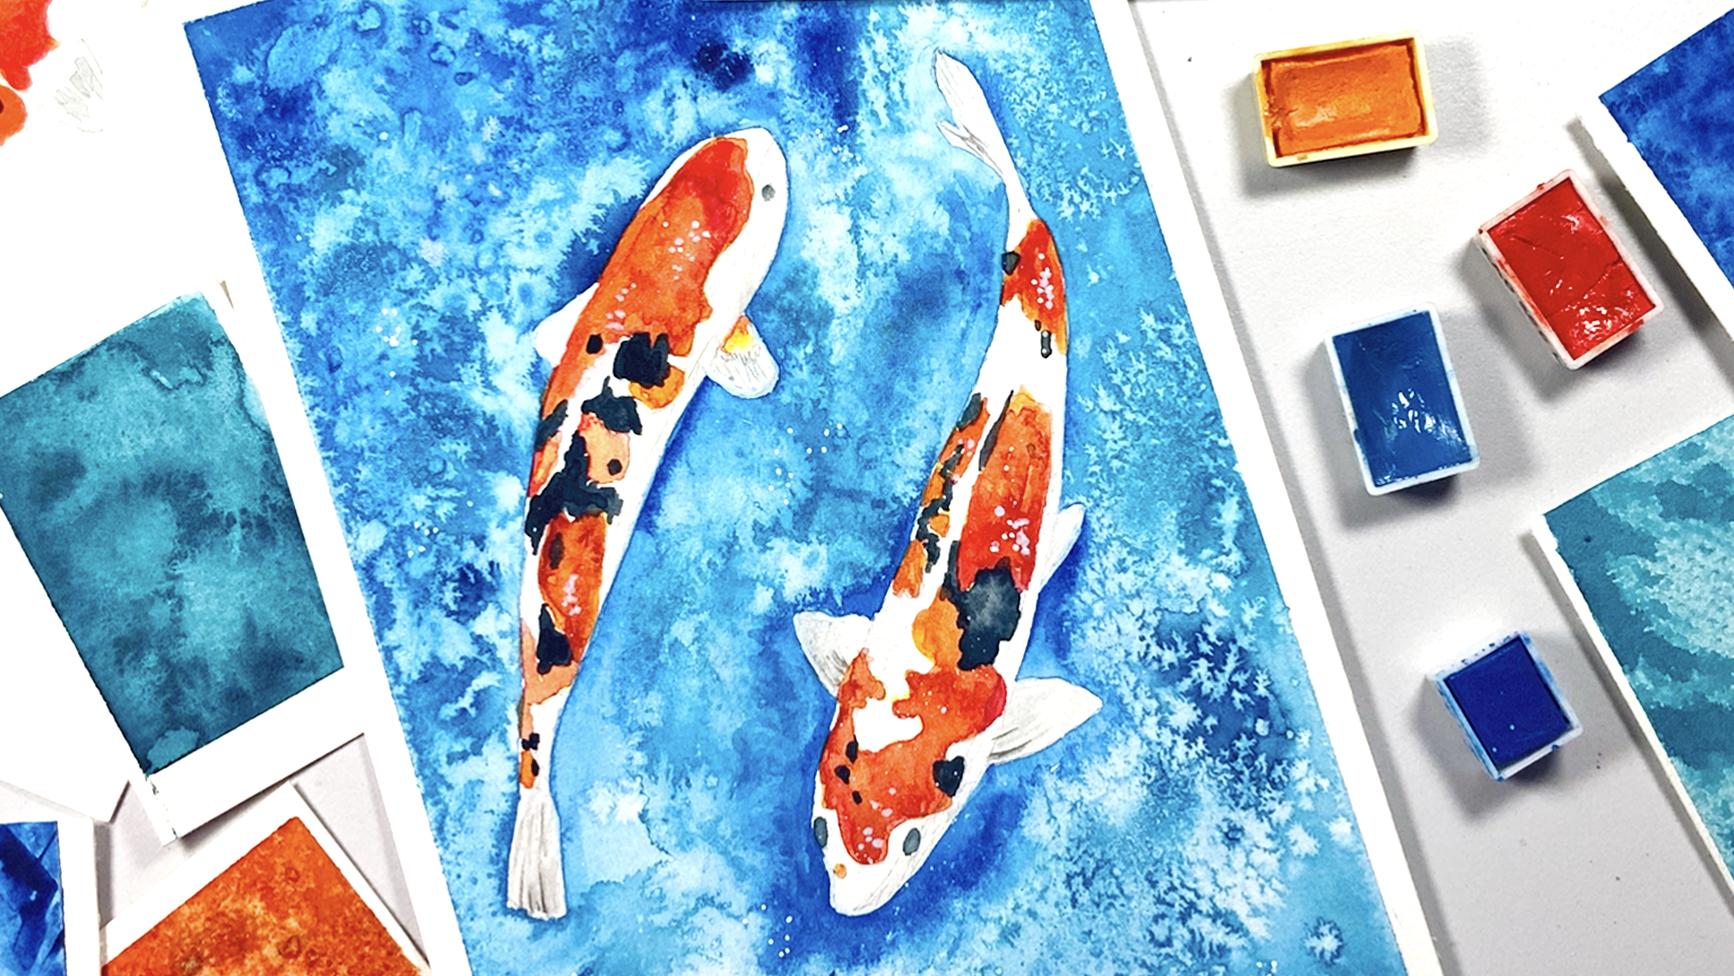
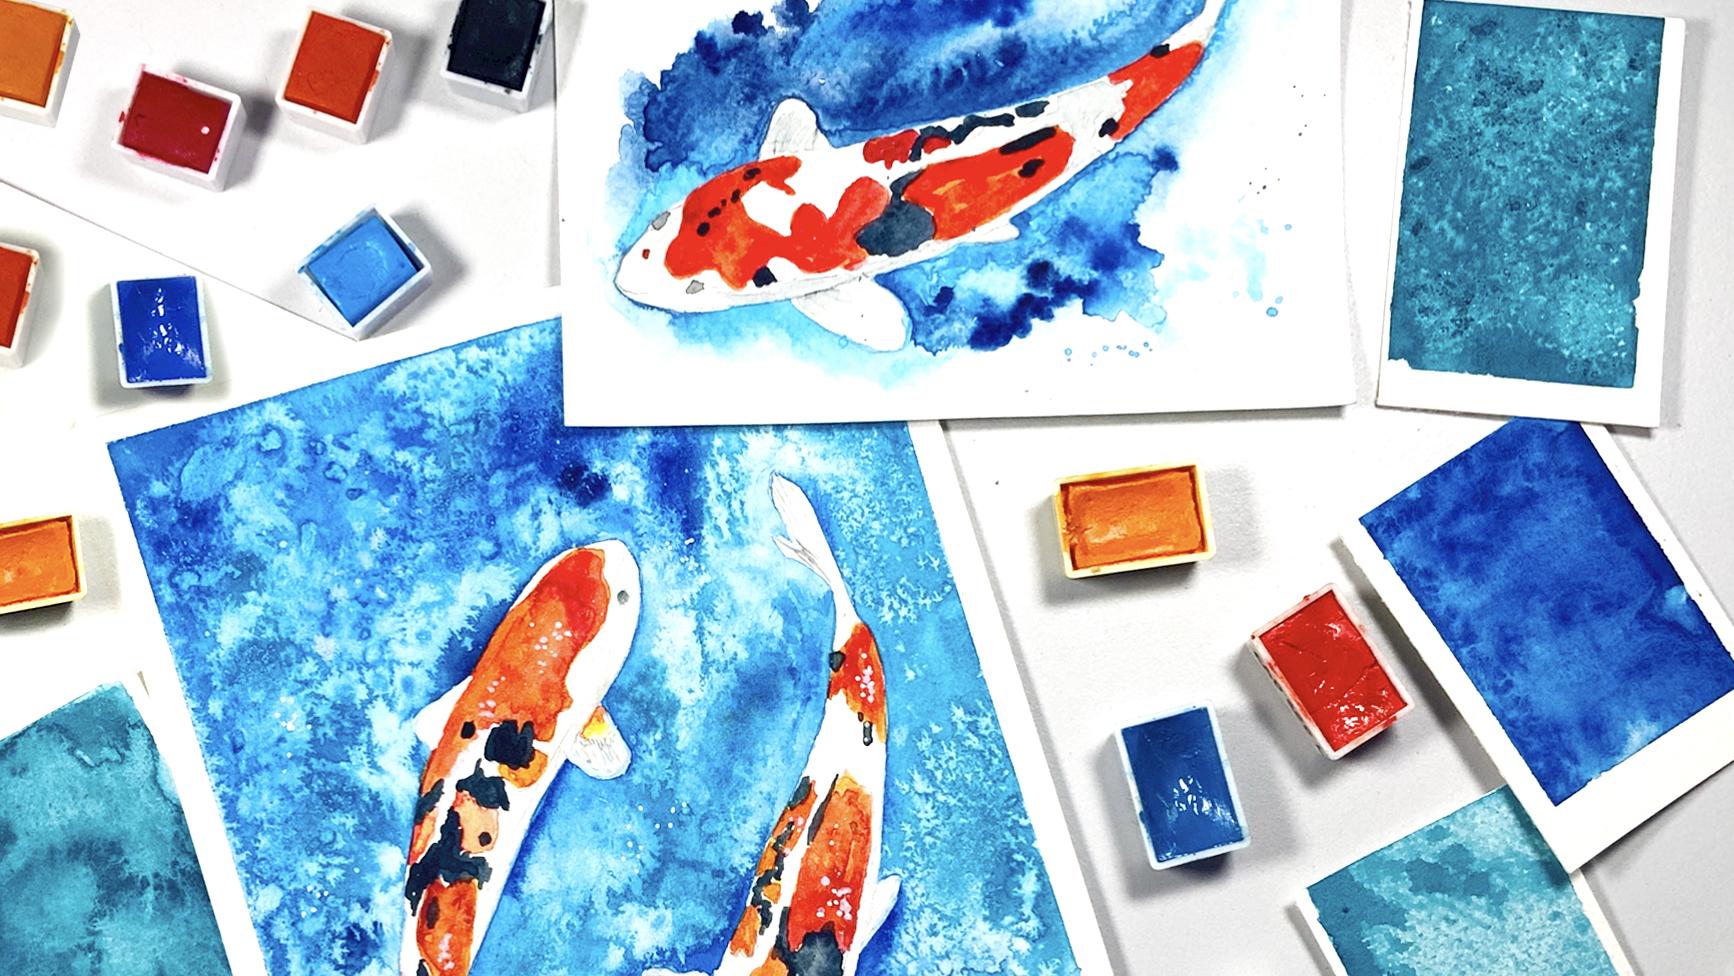
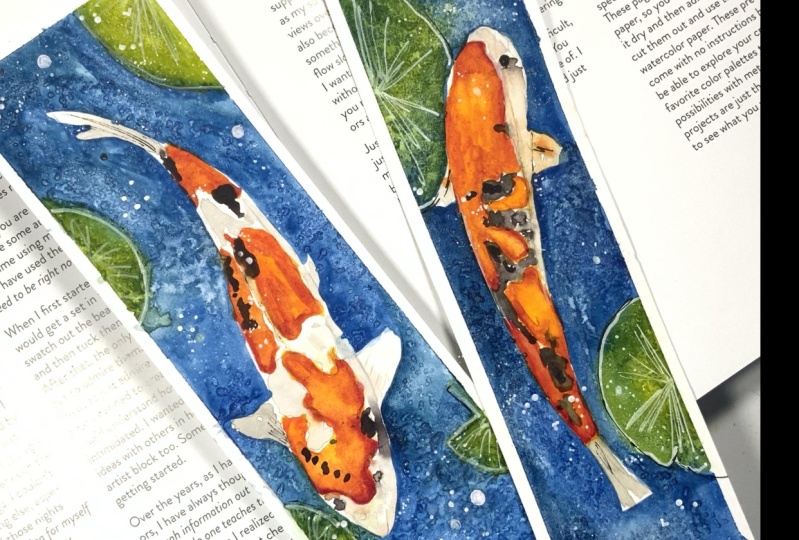
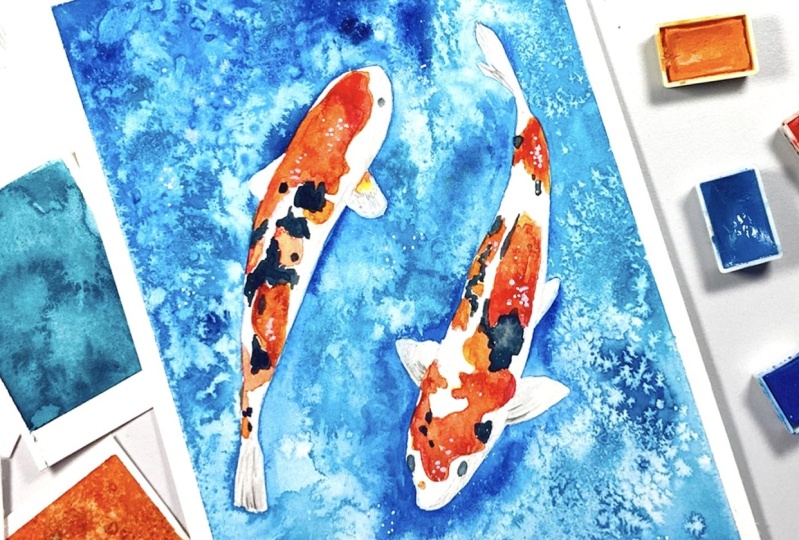
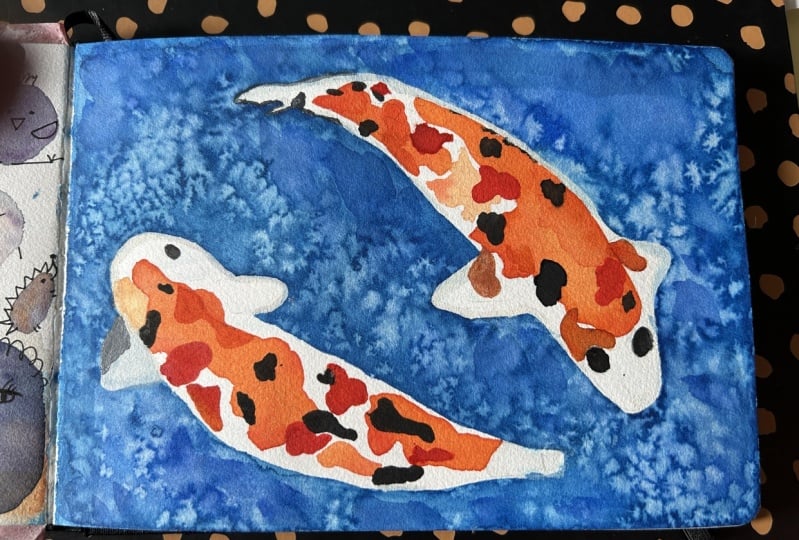
10. Class Project: Paint Some Koi Fish: So now that you know all
about adding paint to paper, creating textures,
resist techniques. We're going to get started
on our class project. So make sure that you download the sketch as well as
the reference image, and you're going to sketch your design onto the
watercolor paper. The areas that you see in on the reference sketch
are the areas that will remain black
in your painting, and the areas that are in gray, those will be in orange. The areas that remain white in the reference sketch
are the areas that will be white in the final painting. Once you have your image
sketch onto your paper, you can secure your paper
onto your surface by taping the edges with some
masking or washy tape. Then I'm going to start
mixing my colors. The first color I'm starting with is a yellow orange color. This is called tangerine. I'm just going to
use that to add my first layer of color
to the orange section. The reason why I'm doing that is because we
are going to be working in layers so that
we can get a more vibrant, more intense orange
color for our fish. I'm using a small paint brush to add that paint to the
Range spots of the fish, using the wet on technique. Allow the paint to dry
on that first layer and then choose a warm
red color and mix it with some water
and a little bit of that same color that you
use for the first layer. Then you're going to paint that color over
your first layer. As you paint, you should
still be able to see some of the yellow from
underneath showing. You can also add some of
that red without mixing in yellow to it to a few places to add a
little bit more contrast. A. To complete these orange spots, we're going to add
a third layer. This time we're going to
take that red and add a little bit of brown into
it to make it darker. Be sure to test this on a
piece of scrap paper to make sure it is dark enough before you add it to the fish. Add your color in sharp
choppy brush strokes, and then use your paint
brush with a little bit of water to blend the color
into the background. Unlike the previous layer, you don't need to cover
the entire orange spot. You're just adding a
little bit of shattering. You can of course, look at
the reference image to see where those darkest areas are
and add your color there. Once you're finished
painting those orange spots, allow the paint to dry completely because
in the next lesson, we'll be painting the rest
of the details on the oh.
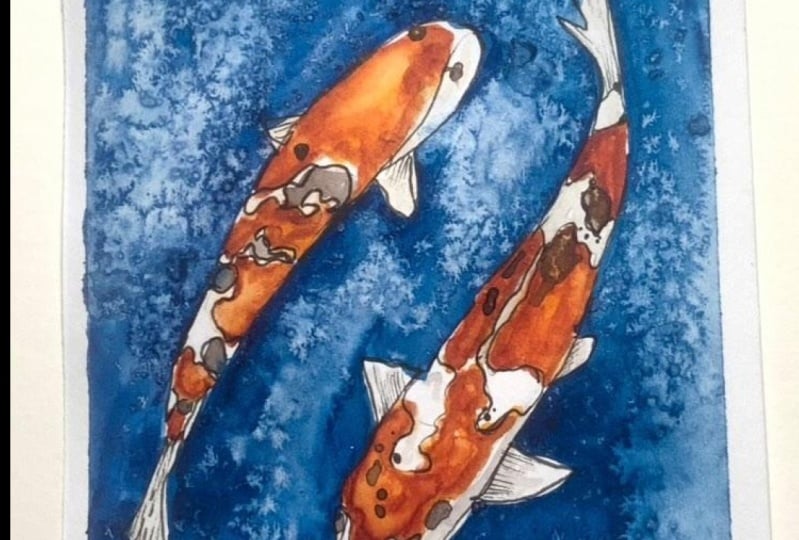
11. Adding Details: Now, we're going to paint
the spots on the fish. But instead of using
straight from the pan, I'm going to use a blue and mix a small amount of into it. When you have the
color that you want, use a small brush to
carefully add those spots onto the fish. Yeah. To pad in the remaining
ears on this fish, I'm actually going
to use some gray and add a bit of water to it
so that it is diluted. I'm also adding a little
bit of that blue. And then I'm just going to paint in some of
these white areas. If you look at the
referenced image, there is very little pure
white on these fish. It is kind of like
more light grey. So I'm just going to try
to mix that color again. We can test it out until you get the color looking
who you want. And then I'm just
going to go in and roughly add that
color to a few areas. Now, I'm not covering in
the entire a white spot. I'm going to use
some water to help me blend the color
into the paper and pain attention to the shadows that I can see
on the reference image, and just making those areas
a little bit darker by using a more saturated version
of that grayish color. When you're finished adding in the gray paint to completely, and I'll see you in
the next lesson, we paint the background.
12. Painting the Background : After you finish painting
in those gray areas, your fish are complete. No, we're going to focus on
painting the background. And this background
is going to be a wet on very loose, very
abstract background. So to avoid any bleeded color running into or from the fish, I'm going to use my gun
to just make sure that this painting that we've
already completed so far is completely dry before we move on
to the backgrounds. Then for the background,
I'm going to use a mixture of different
shades of blue. Then I'm using that
same small brush, and I'm going to paint along the outside edge of
each of these fish. So after I add a line of color, I'm just going to
pick up some water and blend the outer
edge of the line. And I'm also going to be
dropping in some color. And I'm just going to do this all around both of these fish. So once I finish painting
all around the fish, I'm going to use a larger brush and add a lot of water
to the background. When I see a lot of water, I'm not adding puddles. I'm just wetting the paper enough so that the
paint can move around so the paper it's blossy and it doesn't
have any puddles. I've added that water into
the area next to the fish, and I'm just going to be
dropping in and adding some colors just to create a really fun abstract
watery background. Okay. And to pay attention to any areas
where you already add color and appears to be drying
it appears to be dry and just add some more paint
to it or some water. You really don't want any of
those harsh edges to form. We're trying to go for
a cohesive background. Once you're happy with how
those blues are looking, we're going to add some
texture before it joys. So I've just picked up some
clean water on my brush, I'm just going to top it lightly over some areas on the page. So wherever scatters
of water landed, you're going to see that
it pushes away some of the pigment and it's
going to create a really fun texture. You can continue
to add your blue any places that you feel
needs to be darkened a bit. So I'm adding some of the
blue directly from the pan. And just going along the
edge of this first fish. Another fun way
to add texture to this background is just to
sprinkle some salt across it. So I have allowed the paint to dry into the paper
just a little bit. And then I'm just going
to add in some salt. And you can see that I have a puddle forming
towards the bottom. I'm going to add a lot of
salt there because that is going to help absorb some of that I've used fine salt as well as some thicker
coarse table salt. Any type of salt that
you have will work. Okay. So then going to use my size to brush to paint the outside
of the other fish. I'm using the same
technique where I add color and then
I use water to just blend it into the other part of the background that
we've painted already. Yeah. Once you finish adding that blue color around the fish with
the fine brush, you can then switch to
your larger brush and just add some water to get the
paper a little more saturated. I'm just going to go back
in with my different shades of blue and add the color
all across this background. Once you've finished
adding in that blue color, you can then add some
more salt all across where you just painted just
to help create that texture. And another way you can add texture is by using
some white paint. We don't use white
paint very often. Well, specifically,
white water color, we don't use it very often
when we're painting, we usually use the
white of the paper. So I'd like to just pick
up some of that white and add some splatters all across what we've just painted. If your white is a and
a little more opaque, it's going to dry that way
and you're going to see it. There are some white
that when you add it, it's not going to
be very visible. I'm not sure about this one, so I'm just experimenting. I've added some spiders, and I'm also going to add
a few dots in some areas. And you can see in the areas where the paper is still
wet, like the background, the white sort of just sprites into background and has a really fun texture. On top of the fish where I
add the white is very dry. So it stays in place. Once you're finished,
you're going to allow that to dry or you can use a hat gun to
speed up the process. If you notice that
there are any areas that have a visible harsh line, you can just add
some paint on top of it and blend it into
the background. To help smoothen the edge
that you've just painted, you can use a paper towel to
just dab it along that line, and it will just
help the color fade into the background
a lot easier. Once you're finished and your
painting is completely dry, you can remove the tape because your painting
is complete. Okay. And I hope you
enjoyed painting this. I know I loved painting this. I've struggled with
painting quite in the past, but I found that really taking my time and
doing it in this way. It was very fun and I really
liked how it turned out. Love all the fun texture
in the background, I love the texture on the fish.
13. Wrap Up : Congratulations on making it
to the end of this class. Together, we've explored
painting and lifting techniques, watercolor washes,
layering and blending, along with texture and
resist techniques. I hope you enjoyed
playing around and experimenting with your
paints as much as I have. I'm very excited to see not
only your class project, but also some of
your experiments. So head to the projects and
resources tab of this class, tap the Create Project button, upload an image of your
ifish painting along with any other relevant
information you want to include, and then click that
published button. If you share your
project on Instagram, you can tag me at
By Shannon Lane, and don't forget to leave a review sharing your
thoughts on this class. Be sure to follow me on my
Skillshare page so you'll be the first to know about
what I have coming up next. Now that you've mastered these 30 essential
watercolor techniques. You can continue to build upon your watercolor skills with the next class in this
watercolor basic series, all about color
theory and mixing. In this class, you'll learn
the basics of color theory, how to mix vibrant colors. Then we'll wrap up with a
super fun class project, which not only uses everything
we cover in that class, but it will also include some of the texture techniques
from this class, so you don't want to miss it. If you have specific questions or want personalized guidance, that's where my one on
one sessions come in. These sessions are
perfect if you're looking to get
feedback on your work, if you want to tackle
challenges you've encountered. It is your time to ask anything you need to take your
art to the next level. Thank you so much
for joining me, and I'll see you soon.
 Shannon Layne, Lettering, Procreate & Art