Transcripts
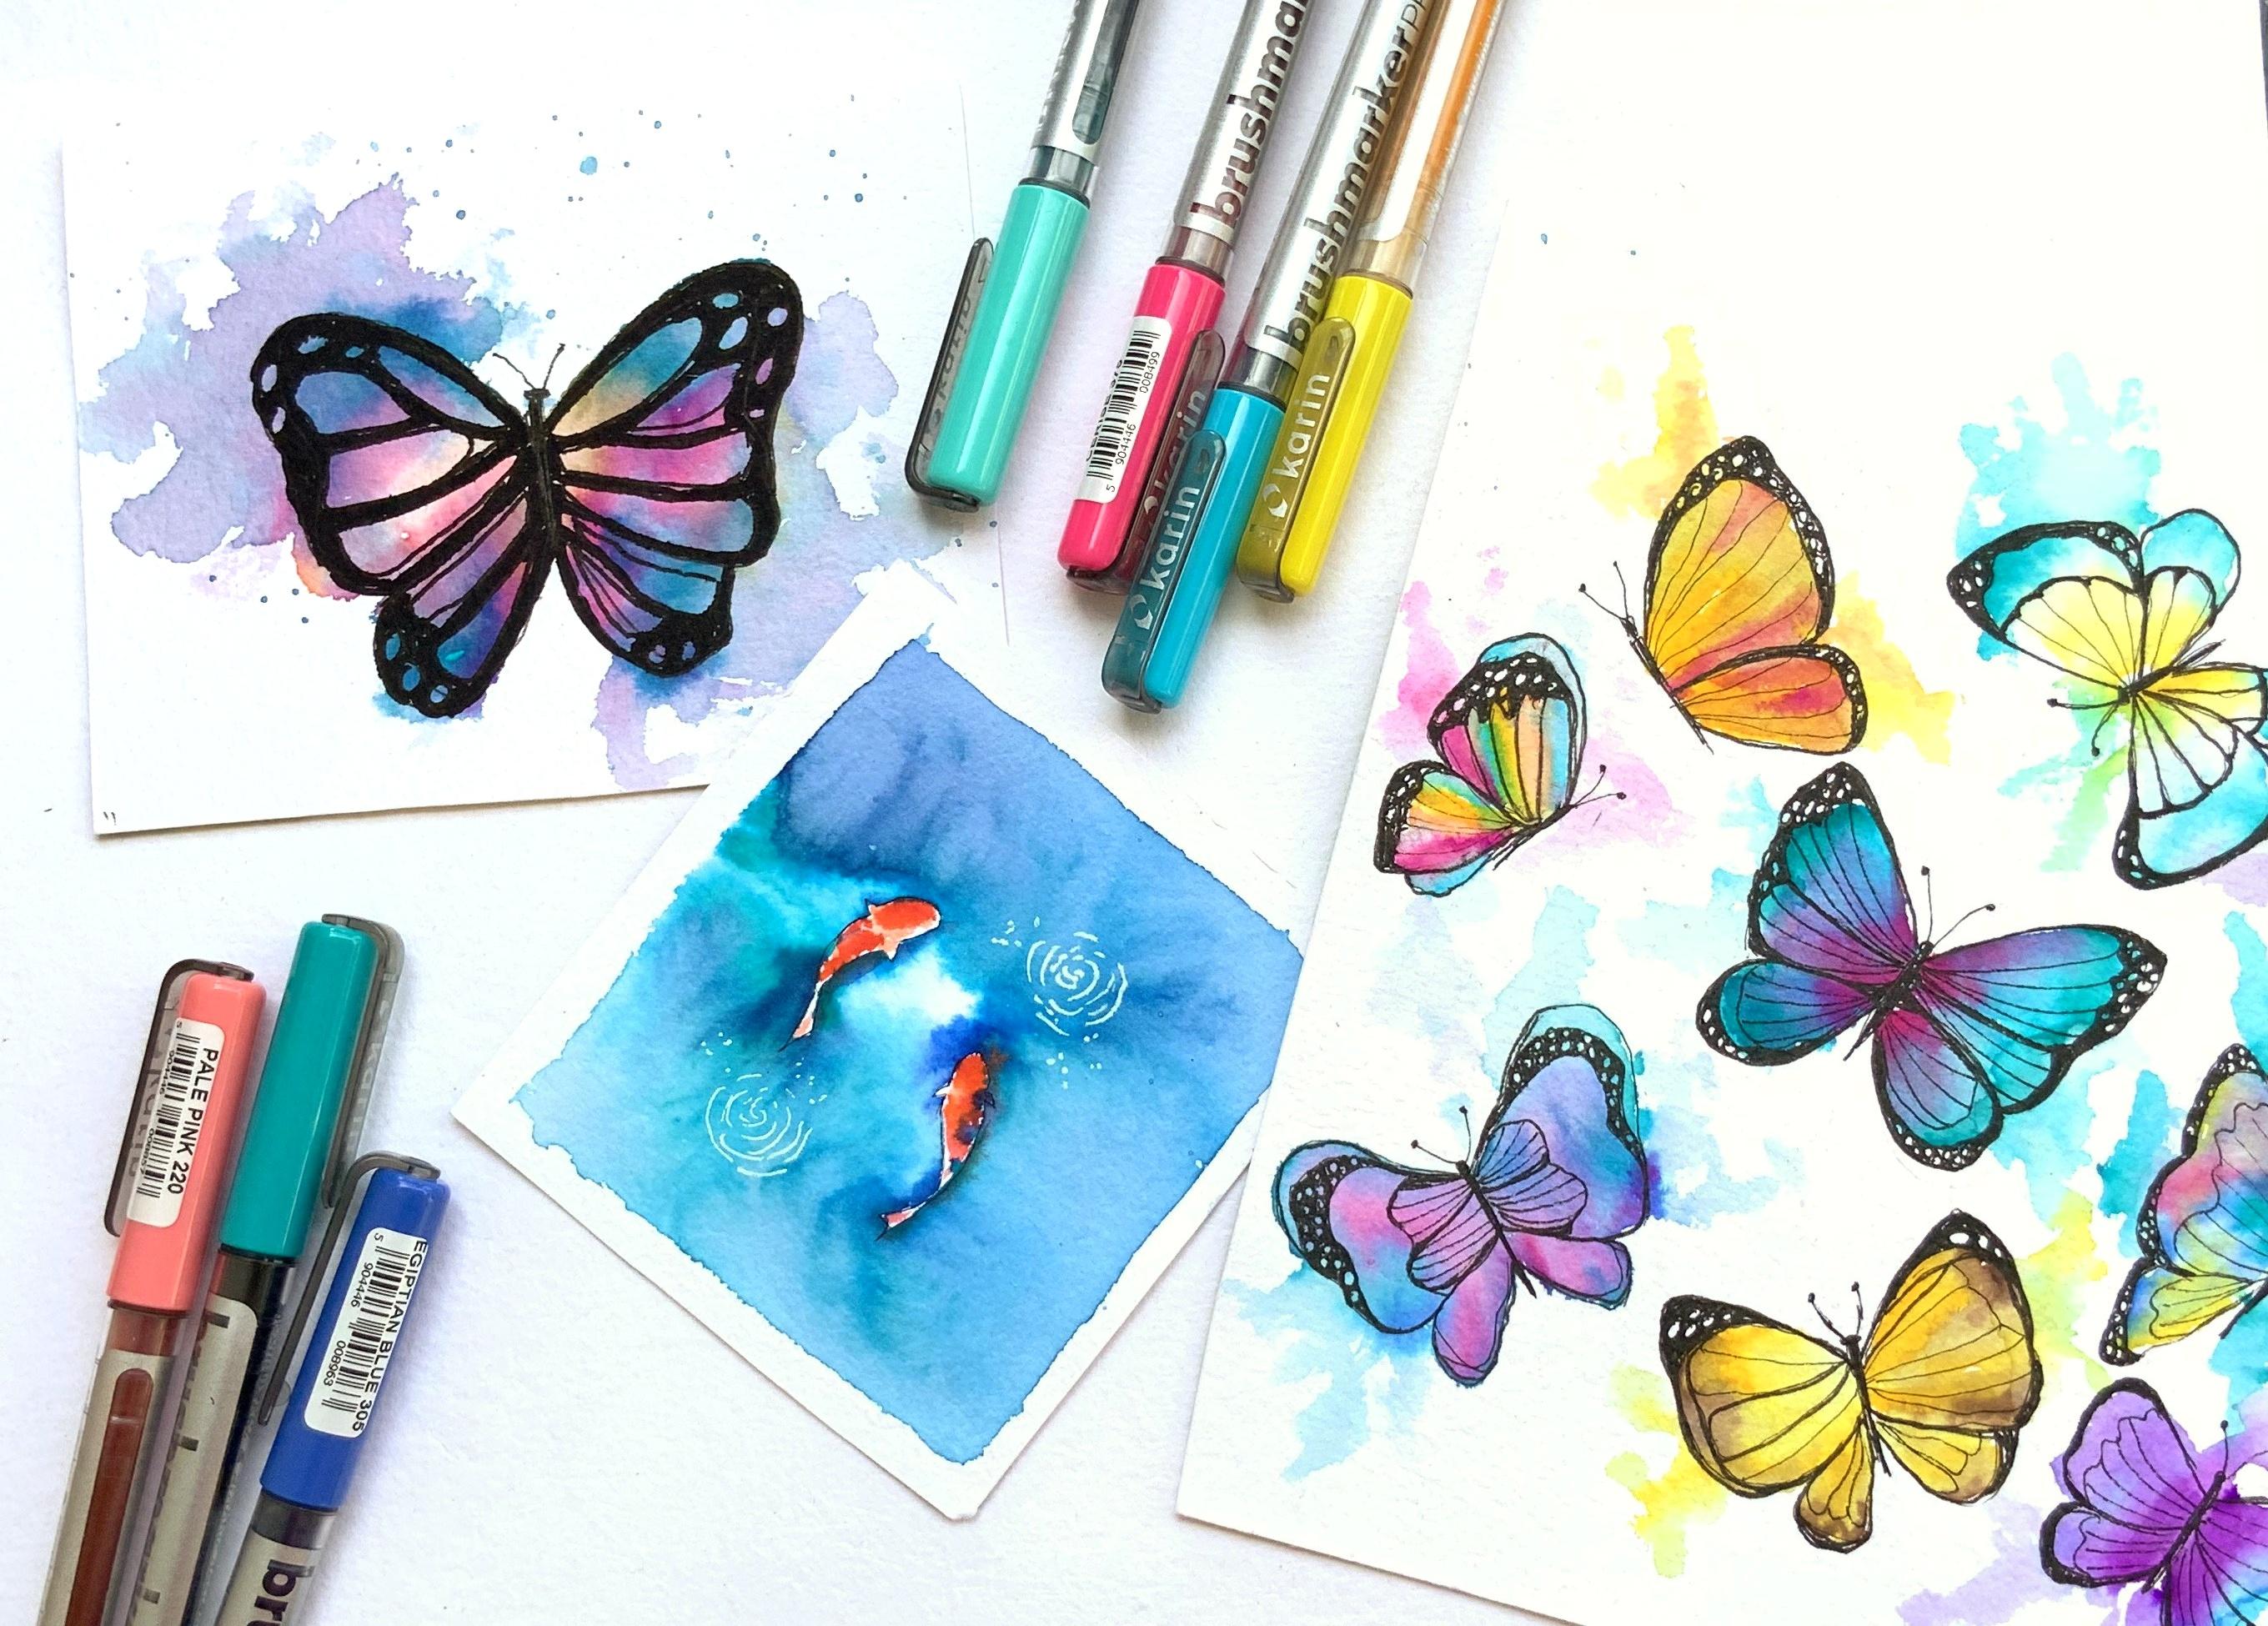
1. Class Introduction : Hey, guys, this is me. With the intensity of the creative waters and founder off limitless arc today in this class , I'm going to share everything you need to know about what would these Marcus These water? These markers are recently pretty for blow, mostly for calligraphy electric, and I'm going to share how was tell. These markers can be used to be on lettering and create beautiful and magical illustrations , which looked like water Kalou's. I'll be sharing different techniques that can be used with these water based Markos, and you'll also learn how to makes a lot of colors ridges limited Marcus. Afterward, she would be creating thes class projects, oneness with koi fish, and the other one is these butterflies. I'll also be giving you a lot more ideas on how you can illustrate and paint with these markers. And by the end of the class, you would have thes two beautiful class projects and, lord, if ideals, to paint with these brush. Marcus. So what are you waiting? Pick up your water bills, my uncles, and let's get started. I will see you in the class by
2. Materials required + choosing the right paper: for the class. You would off course need some water based Marcus, but you don't necessarily need to have any particular brand, Marco, especially not the ones that I'm using. You can have or use any Marco that you have with you, but make sure it is water based. You can test them before you use them in the class. The clouds will be using these card markers. They have Freddy vibrant language. I really love about them and next is the papers. Have a bunch of watercolor papers before we use them in the class will be later testing them after I show you the rest of the materials. So next huge requires this water brush, bent it simply or brushed where you can just fill in water and you can just use and off course. You would need a pigment liner or a waterproof in which we will be using toe. I'd line drawings or make line illustrations before we paint, and you would need a blender panel to. This is not compensating for the class, but if you do have the spin, you can learn babies techniques. With this, it can be generally found at any craft or stationery store or even online and a white gel pinto de deals to our class projects, and you will also need a non pull surface. No, any click board will do. But what I'm using is a water color palette where I'm just gonna pull out the ink from the brush and use it with my water brush. You can even use a plastic suffers or even cling wrap. Oh, any other things that you have with you. Now we'll get some papers and see how each and every water cooler people behaves differently with these water. Be smart. The 1st 1 you order Shatha more working people. It is cold pressed but has little less greens than more. Or it isn't smooth. Not sure if you can see the texture, and then after applying the wannabe is Marco. What I'm doing is I'm trying to smudge the colors with the water brush and trying to blame , and you can see that it's not blending really well. But I still kind off like it. The next people that we got the test is the prima watercolor people. This is wonderful people for watercolors, and I really love painting landscape on this, but sadly, it doesn't work with Marco's, and it doesn't blend at all. Maybe the paper absorbs ink immediately. I'm not sure what it is, though, but you can see it just gives add softness to the brushstroke sport. It doesn't smudge, and also the in bleeds on the other side of the people. So this is not recommended people. So you can have a couple off people's like this or whatever watercolor peoples you have and keep testing because these smokers going to behave different on every people. So the next one year amusing ISS heartless people. It is very smooth to use the brush Marco on this, probably you can use it for oh, telegraphy or something, but definitely not. If you want to use it for watercolor illustrations. You can see at least marches, and I really don't like the result off. The last people that I'm gonna test is the Indian watercolor people, which is by the brand Chitra put, and it is. It has a very draft picture. There's 300 GSM board, it has so many greens, but in this it blends really well and gives in Africa, which is more warlike world. Hello. So this is my to go people. If I want to do border close with these brush markers so you can just test a couple of peoples and try which works best for you. And once you have the best people, you can take that and be ready for the class. Let's loan some basic techniques in the next lesson.
3. Basic marker techniques - using water brush: in this lesson, I'm going to share some techniques that can be used with water color markers and for that of illustrated, just simple leaves. And I'm picking three colors, which is all green, then apple green. Um, oh yeah, loco. We will go one by one with each technique, So the 1st 1 here is dialect. Marco, you would just use your Marcus over the paper directly. I'm just crippling some, like Darko green on the leaves. This technique will. It's not my favorite technique, and this would give you very bright and saturated Brazil's because you're using only eggs and nor diluting with any water off blend. Oh, the dip for direct Marcus is to go from doctor light so that as you apply the lighter colors, you can also overlapping with the darker colors and also blended. So I'm just adding some yellow and trying to blend it, but you can see that the the other layers that I added previously is still standing out. This technique actually depends upon the project type or the wrestles that you wanted to be , definitely not my favorite technique, but that's just personal. Someone might even like, or as they said. It depends upon the projects that I'm working on a different illustration where this type of defectors record. I think I would like to do with this in the direct market technique you can keep on adding as many layers you want. So now like after adding three players off, Denham's starting a little more off talk, agreeing to give in oh, shadow effect. And the next technique is Markopolos water. So it's basically the first technique that we did just apply Direct Marco, after which, but we would just take a water brush. Angie's blend all the color during water, just adding colors all over the leaf. And when you're doing this, you really don't have to be very perfect with your strokes, unlike their direct Marco technique, because in this one's you add water toe over these, everything is just going to blend so you can just, like, scribble and doodle away or illustration. And after you done, take your water brush, Marco and check If Clearwater is coming out off the brush, and then you can just gently move your brush over the markka Leos, and it's gonna blame very beautifully. You can see how all the colors, the light and dark. Everything is just planning Sobel and giving a wonderful effect. This is also happening because off the people, if your paper is not good or a dozen blend well as we saw in the previous lesson where the blending depends from paper to paper and it is not same for all paper. So it really needs to be good watercolor people for it to blend so well. I really like the second afraid that the Marco's give and the 3rd 1 is water plus Marco. So we're just going to do the opposite way like forced apply water and then apply Inc with the Marko's. So this effect is likely going to be different and much more lighter because, ah, base layer is all the water. You can see that leg. The things that we're putting is becoming more light and light or because there is a layer of water. So any color you, but just gonna become more lighter than light, especially if you use colors like yellow and light clean. It's badly gonna be visible, but the suffering this technique gives you a very soft and no, you know, SEPTA. Look with beautiful blending effect. And in kids, when you're doing this with, you know, water, like putting your markers on water, there are chances that the water might get onto your brush naps. So what you can do with you can just simply scribble on a scrap People like I did before so that it works just like before and the ink floors over again. I'm just going to repeat the same for all of the leaves, and you can just watch how I'm doing this technique. Also, it is very interesting that just a divorce off the previous technique can give a completely different fizzle, like the 2nd 1 that we did mark a bliss. Water is very vibrant and beautifully blended. Where is where you're just using the same marker on top of water. It's becoming more lighter and the blending as even more different and beautiful. So, yeah, I think I like the Markopolos water and the water place marker technique. So these are my favorite second tell. Also, one more thing that you need to keep in mind when you're doing this technique is that you don't overdo with your Marcos on the red. People like that is when the papers spread and you keep horn, you know, adding more and more colors, because when you do that, the paper fiber might just come off like you can see little in the topple top leave. Like when I'm adding yellow color. You can see those little condition where that is, where the paper fiber is actually coming out and getting accumulated. So this my true when your people, if you keep over doing it, so keep in mind about this, the next one is using marker like watercolor. So would you could do is just like take you Marco and scribble on a pallet or a glass office or any known absorb itself is like this. Even a plastic surface will go, and what you can do is just use them like you would use water colors. I'm just picking the ink from the apologist like I would bake pain from the watercolor. I'm just painting and blending, So this also gives a different effect, like moreover like watercolors, because it just think basically, And in this since you're using more directing, the things that will be on the paper is going to be moved, saturated Dan the water plus market technique. You can already seat difference how the green is more saturated and more brighter. In this technique. The more water you add, the more light or the ink or the color is gonna be on the people. If you don't not off the colors on the palette, you can just simply redo what we did like scribble with the Marco and then use it. I think this becomes more easier toe. Use it like just watercolor. Think this would be great for traveling in just take or non absorbed and Sophie's like this ? And few markers bear and a water brush making to simply paint like just water goes. So I think the last three techniques that we're doing should be my favorite techniques over water based Marcos because they give results moral like political over, which is my all time favorite medium. Mm, yeah, that's it. So there are four techniques that we have loaned, like each and every technique is very similar, but the bristles that you get is very, very different. All right, so in the next lesson, I'm going to share techniques that can be used with blending Marco
4. Basic marker techniques - using blender : the second part off the technique records a blending Marco where we would be using this market to blend all the colors inside off the water brush. This can be used in different ways. So the fourth technique here is catch plus blender, so that is basically like you put colors with all the Marcos on the people. And then after you have done adding all the colors, you just take a blending Marco and just blend all the colors. But the blending. Marco, you can see that the colors will only blamed to a certain extent. It's not gonna really playing like how it did with the water, so we're just getting slightly blended together. But also again, it depends on the people and varies from people to people. And when you're using blending markers over the color, what happens that the tip off the blending Marco picks up the colors that you have overlapped with? So what do you can do is just like on a piece off scrap people you can just Kribel with the Marco on it would become colorless again and you're blending. Marco would be ready to blend moguls. This you can do if you want to, you know, change different colors. But if it is the same color like you would just want to blend green shades, I think it would work fine. Just finishing the landing Marco for the other leaves. And the next technique is gonna be only blend off, for which you can just repeat the same and make your mark o colorless. And for this technique, you would need to take out the ink on non porter soffits like this palette. But something similar, like the water brush technique that we did. But instead of the water brush, we just gonna pick the color with the blending, Marco. So you can makes two different colors and take it on your blending, Marco, and just put it all people. And you can see that how beautifully and soft affect you get. But beautiful radiance indoors. This technique will also give you the most lightest to Sylt off, out, off all those six techniques that we're doing, you can compare it and see how different it is. It is someone similar to the four technique that we did, but it is more lighter again because the blending Marco on the plans it makes it more softer when your big every color this is one be off coloring, but only the planning market. Another is just two steak off the excess color. And what he do is take the marker directly and touch it with the tip off the blending Marco like this so that the inquiry transported the planning. Marco, you can do it with do the three shades and then after the yellow, just touching the darko green color to the tip off the blending Marco. And now, when I put it on the people, it's gonna come as agreed. Inter Fred like green to yellow. So the scandal to be not obey, but not my favorite technique again for a comparison off thes techniques on a different people. Older Peter on a smoother watercolor people, which is called president but has less greens, and you can see the difference in the direct Marco technique. I quite like the direct Marco technique on this model Watercolor. Be put on the texture one, because it gives a very nice fee feeling and the picture to it. The next one is Marco plus water brush, so you can see there's a huge difference of the people that one is planning so much. And here you can see actually the brush strokes. The next one is using Marco like water cooler, and you can see how, though there are so many patches in the smoother watercolor people rattles. This one is beautifully blended and green because off the quality off the world color people and the next one is sketch plus blender and only blender, and you can see difference and both the techniques. So basically these markers were different on every people. So you really need to see which paper works best for the missiles that you want. So that's it about the techniques with water babies. Marcus. I'm sure that so many of the techniques to and it depends on the artist and the way they want to use. So this is my way off. Just like you know, I'm just sharing the essential techniques with these markers.
5. Color mixing with limited markers : So now, after the basic technique has done in this class, we gonna learn color mixing. I want to tell you that you really don't required so maney markers to do an illustration. It just like a watercolors like you can have, like the basic markers, the colors, the red, blue, yellow and greens. And you can make a variety off colors with just these fine market. Or you can even, you know by a set of 12 markers, and you can makes colors like you would just do with watercolors. But before we go into the color mixing, we would learn how to make tonal colors that is, lighter shades off the same color. This just like the same. What you do and watercolors add more water to meet the colors later. So in this case, you wouldn't need a you know, like Dredd, marco or light yellow marker. Or maybe you know, light pink marker or something like that. You can just makes colors and just make any lighter shades off the Carlos that you want. This technique can save you from buying more lighter shade, Marko's and just for your information, this is only for watercolor markers that also alcohol Marco's for bridge. It is not soluble, and you need to have leadership. Marco. So this is one night, one page off water soluble Marcos. Let's move into the color mixing part. So I'm just taking in from the pen to my palette, and I'm just mixing mujao with a little bit off blue to get a lovely buying color. So we had. That's how you can make scullers and just use them like you would do with Portugal. Makes a little bit off your load of the previous makes. And now I have a beach grayish page, kind off color and same way you can just keep exploring and makes colors. And you can also actually do this as an exercise so that you are very off would find off Carlos. Just limited markers can make. So this becomes easy when you want to travel or something like that, like you just take five. Marcus, a water brush and or non border self is like this, and you can just do painting on the go. It makes it very easy for traveling. I think, if you know color mixing with, however, I haven't tried exploring with these Marco's out those awful plane a painting, but I'm just assuming with the range off body or the landscape. Kyllo's just the limited my uncles can make, so I didn t think it should be great. I'm just going to keep mixing a couple of colors and see Ward Carlos. Can I get with just his mark? ALS. You can also have, you know, a particular colors like, you know, maybe pink, purple and yellow. It depends not primary colors, but using the primary colors You can possibly make all shades, but in case even if you have, like you know your color palette or your color team, I think you can even just pick those markers and just make a color chart out off it also, so you can know. How was that? I loved his markers. So yeah, that's it about the color mixing on the tonal values. I really hope that you found this lesson very helpful in the clouds because it is very important for you to know what possibilities can limited Mothers cloak and make Souljah. Let's move into the sample class project
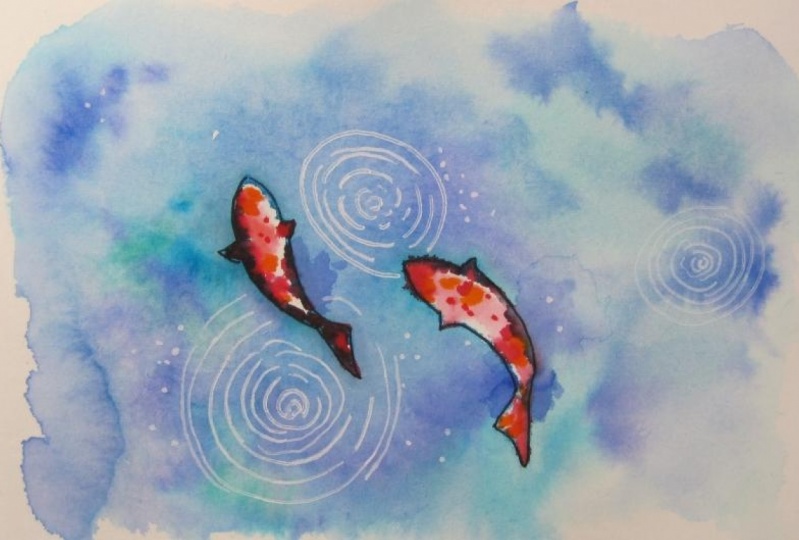
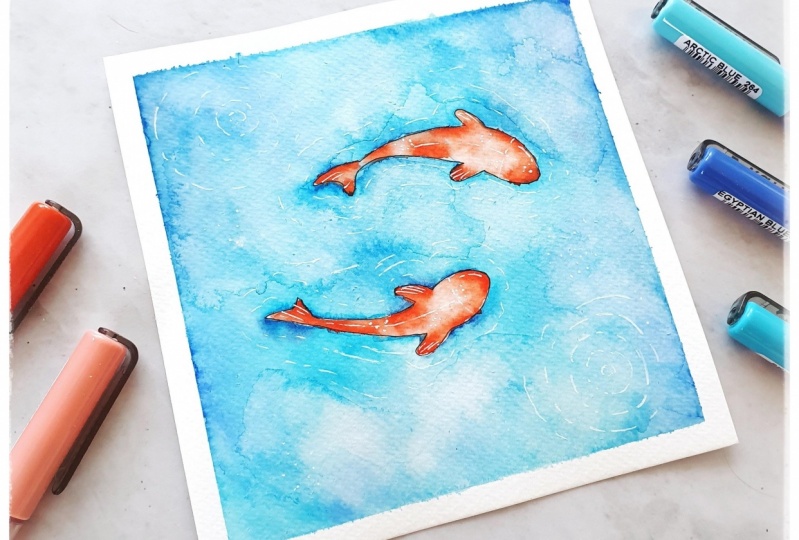
6. Sample Class project 1 - Koi fish : in this lesson, I'm going to guide you step by step on creating a course freshwater pond. Not basically upon Just like to go officials surrounded by water and I'm gonna show you everything's there by step on how to add colors and everything. So first wouldn't doing is with the pain with the waterproof micron pen. Just trying to go refreshes like this. You can probably schedule with a pencil and then overdose with Ben if you're not very comfortable on during a directly with the pen After sketching these coefficients, what you would do is take you water brush and just add a vet's office hopes my water is little dirty. So just gonna squeeze little on the background so that I get Clearwater and I'm gonna spread it all over the people accept the koi fish. I'm particularly adding move water so that as we do with the markers, the water doesn't get dried up. So I'm just adding load of water all around. So even if there's a lot of water, you don't have to worry, because in the end everything is going to dry up. But just that what would take a lot of time to dry temple s quarter. But with more water on your paper, it's going to be so much fun painting with these brush mob, so carefully apply just surrounding the fishes. If you have water on your fissures or something, the blue color is also going to go on your fishes and ruined the color. So be very careful that you don't apply a layer of water or your fishers. So once you've evenly applied water, pick up the marker and then directly. Just put it over the people and you see how beautifully it spreads. This is because you're adding died Concentrated Inc over the water. And since we have added a lot off water, there's even spreading so much in case, if you would have at a less water, it's gonna spread less. Saia. It's so much fun to put thes mark als or a lot of water and see how beautifully they move, just going to keep out in Moshi aids off blue and all the four sides, and just keep playing around and also just surrounding the fishes and making it more concentrated so that when you add the orange color, it shows and kids. If you feel that the water is drying up or something. You can always squeeze out water from your water brush and then make it bet again and then start playing with putting these mark als when people it's basically like you know you do or Britain bread technique with the paintbrush. It's so much fun to watch, and you can actually meet these photo effect like the water movement or the waves affect kind off. And sometimes even if you want to spread, you changes. Use you water, brush and spread the colors all around and then keep adding Moe Kyllo's. Also, if you closely observe, you'll see how I'm holding the Marco and getting a lot off incurred off it. I'm holding the brush paint horizontally so that a lot off the tip off the brush comes in touch with the people and water and so more and flows off. If I was holding the brush pain vertically. In that case, only the tipple touched Oh, people and the water and only bless amount off in cual flow out off a marco. So this is one way to do if you want, like a lot of ink and Carlos to come out off your mark up. It's so you can keep adding more than more layers off colors until you're satisfied with. I'm just going to add a few more Leo's toe. Bring that water effect and you can just watch it. I'm just gonna leave the video real time so that you can watch how I'm doing it. If you leave it as it is, it's gonna try up. But what I'm doing is and just, you know, tenting my paper and making the water move so that more ink blends and smudges. So this is only if you want to do and you can. I didn't mocha lows. I think I'm very happy with how it looks. And now I'm just adding some finishing touches and let you try. But then, after Dries, you can see that this is gonna completely dry, different than it looked like before. So the FX and everything is different. And kids, if you want, you can so called from the edges. So, yeah, this is again like watercolors, like it looks something, but when it dries, that has a completely different. So I think this is lovely. Do I really like how that is a water movement and there's a light in the center off the fresh is so I thing that looks very beautiful toe and next stuff did this one? Oh, I'm just gonna add water to the fishes. But when you're doing this, make sure that though Leo surrounding though fishes is completely dried orders because what a Bismarck owes are concentrated in. So there are chances for local toe come inside when you read it. So after you reading it, you can just, you know, do the same threatened with Take me that you did for the water that the same thing with the fresh charges applied one laid off orange. And then just to bring in Moken contrast, I'm gonna have a threatened read off with the red Makoto. So it looks. It's very simple and it gives a wonderful effect when it is trying. So yeah, it is very simple and easy to illustrate with what Abi's markers, just like it would be with what a colors. But here one thing is that you have more control over everything, then the water colors. So after painting the fishes now I'm just taking a white bend and adding some more details to make this little painting look more interesting. So they go, You have, ah, little painting with court officials and water surrounded by and it looks pretty beautiful . And I hope you had fun painting with the water be
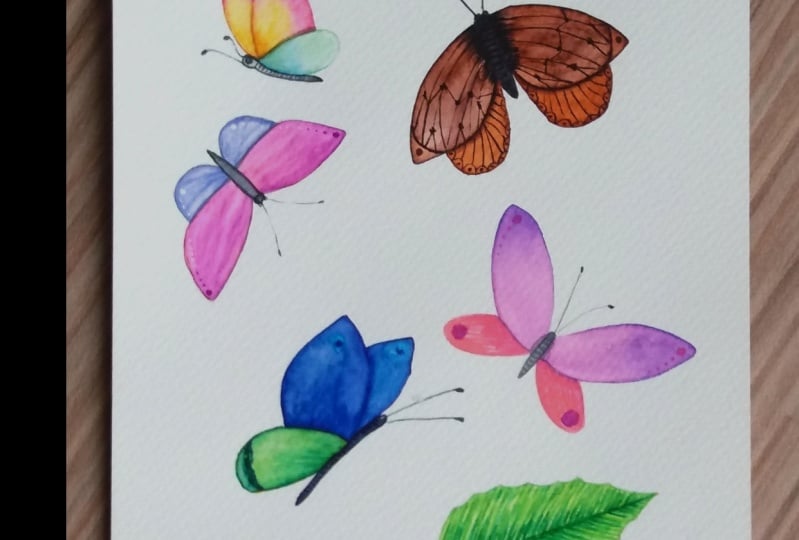
7. Sample Class project 2 - Butterfly : So the second class project is painting butterflies, which is already simple subject. But I'm gonna teach you how to play around with these brush pens and make your painting look more creative the first time just going to draw a basic outline off the butterfly. Amusing. No reference. But if you want, you can use the reference. Also, this is my first time painting about a fly, and I'm just directly according it. So let's see how it turns. So just a basic outline in the shape of the butterfly. And once I'm done with the basic pencil sketch, I'm gonna take my pigment lineup, which is waterproof, and I'm just going to draw Toby's culture, and I'm not adding any more. Any details toe this outline or something? Just basically that, as you paint by the lines doesn't feed off. So just thinking this, and then I'm gonna add some more lines the rings off the butterfly to make it look more beautiful and just have not the layer, and if you want, you can add just taken awarded. But I think this adding two lines of the rings meets it look better, and when you're done with the outlining part. You can just eight days off the pencil marks, and then comes the most fun part off painting are illustrating with these markers. Just pick any colors that you want to have your butterflies with, just taking blue, pink and yellow. And it's so much fun that you can just scribble over the illustration like this and not worry about no, like the colors mixing or how it's conveyances randomly gonna scribble like a kid. And I think this is the most fun part because you don't have to worry about the result. Oh, like you would do with watercolors. When you're using watercolors, you need to be really careful with the amount of water you taking your brush, the colors ut the mixing off colors when you put them beside each other. There's so many things you actually need to think when you're doing the same with the water . But it's just very simple. With these brush markers, you can just cripple off and then just put in some water. And it's like magic like, although scribbles off the totals you have done. Everything just blends together to give beautiful color combinations and mixes, and I think this would look more interesting than awarded. I mean, off course you can do this in watercolors toe, but I think that takes a lot of time and control, as I said before. But there's just having fun, and it's actually what art is all about. Just like having fun in the process, off creating and to make it look more interesting. I'm just pulling out some Carlos from the bottom flight. That's just by squeezing some more water and just pulling off the Carlos. And if you observe, that friend is still very the brush mark. ALS drugs that we did is still visible, like you can differentiate between the red and the yellow Leo. But once it dries up, it's gonna blend even more and make it look more smoother. And you can always add in mocha lows if you want when it is red, just like the written red technique that we learned like when the paper is ready, you can just that so you can keep outing as many layers you want, and you can also blamed in case if it's required. And I think that's it. Once you're happy with it, you can just a lover to dry before we add another Leo. And also, if you want, you can add some most plateaus for that. What I'm doing is just squeezing out little water from the water brush, and I'm coloring the water with the thing. I'm just laughing. This is even more easier with a normal watercolor brush. But you can also do with this particular water brush and stop it from bottom, and that's it. And once it is a joy ride, you can see how the colors are blended beautifully, and the results after drying is even more beautiful. And what I'm doing now isn't starting moody deals with a black man. So one thing you need to be careful here is to add only when it is completely tried. And that is when if you're using a Marco, what a soluble Marco. But if you're using a Sharpie or in your dough pend, I think you don't have to be careful because it's not gonna spread. But what I'm using here is a water soluble paint and the brush markers also ordered, so you need to really be careful when you working, ordered. If you put a drop of water on this. Everything is just gone as much and playing, which is going to ruin your illustration. So be careful about this where you're using players after it is tried. I just need some random designs and shapes on the wings off butterfly. And now for them just gonna colored with, oh, brush Marco and finish the illustration. And I think I'm almost done with this and should have been better with the killing part inside, because this looks little or to me, but now mine. Because there's just my first try and I think I'm happy after that. I made this second illustration off the butterfly, and this one is done in the very similar V. But just that I did go details before even like, you know, painting. And once I'm done with the baby, I'm just gonna color it. So there's just a different we have just explored. And I think this works better because, you know, and have an idea off how you want go output to be and lets it. I hope you'll find interesting and fund using these brush Markle as much. I'm finding it, though honestly. It's a new medium, but I think I've got along with this medium very fast, and that's why I'm able to share my skills with you. That's what we have. Beautiful butterflies illustrated but brush markers in the next Listen, I'm going to show how to paint a variety off butterflies, something like this image.
8. Butterfly time lapse: in this video. Listen, I'll be showing you how I paint an entire page for butterflies with these Marco. You can also download the coloring page from the link in my class and printed on a watercolor people. And then you can paint along with me. And if you wanted, draw them by own. You can all things do that. And once you have the line drawing, you can begin the fun. Amusing. My most favorite technique. That is, those troubling with Marco's and then mixing and blending colors with the water. And you can always feel free to use any off your favorite techniques off. What we don't. You can even read those sofas and then at Carlos, Or how will you wish? Just make sure that you're having fun by being for even if you want. You can makes all the techniques in just one page and paying. The entire output will be even moved a friend and because all the butterflies look different, so just have fun and finished the entire page off butterflies as you like
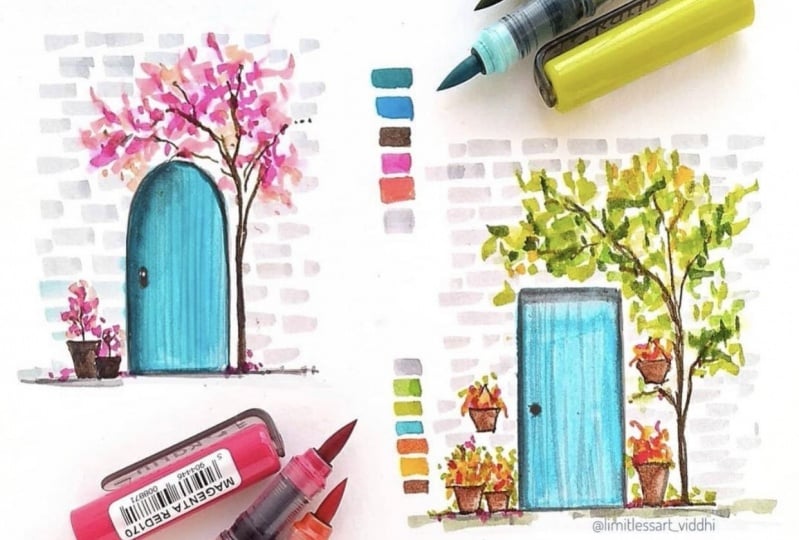
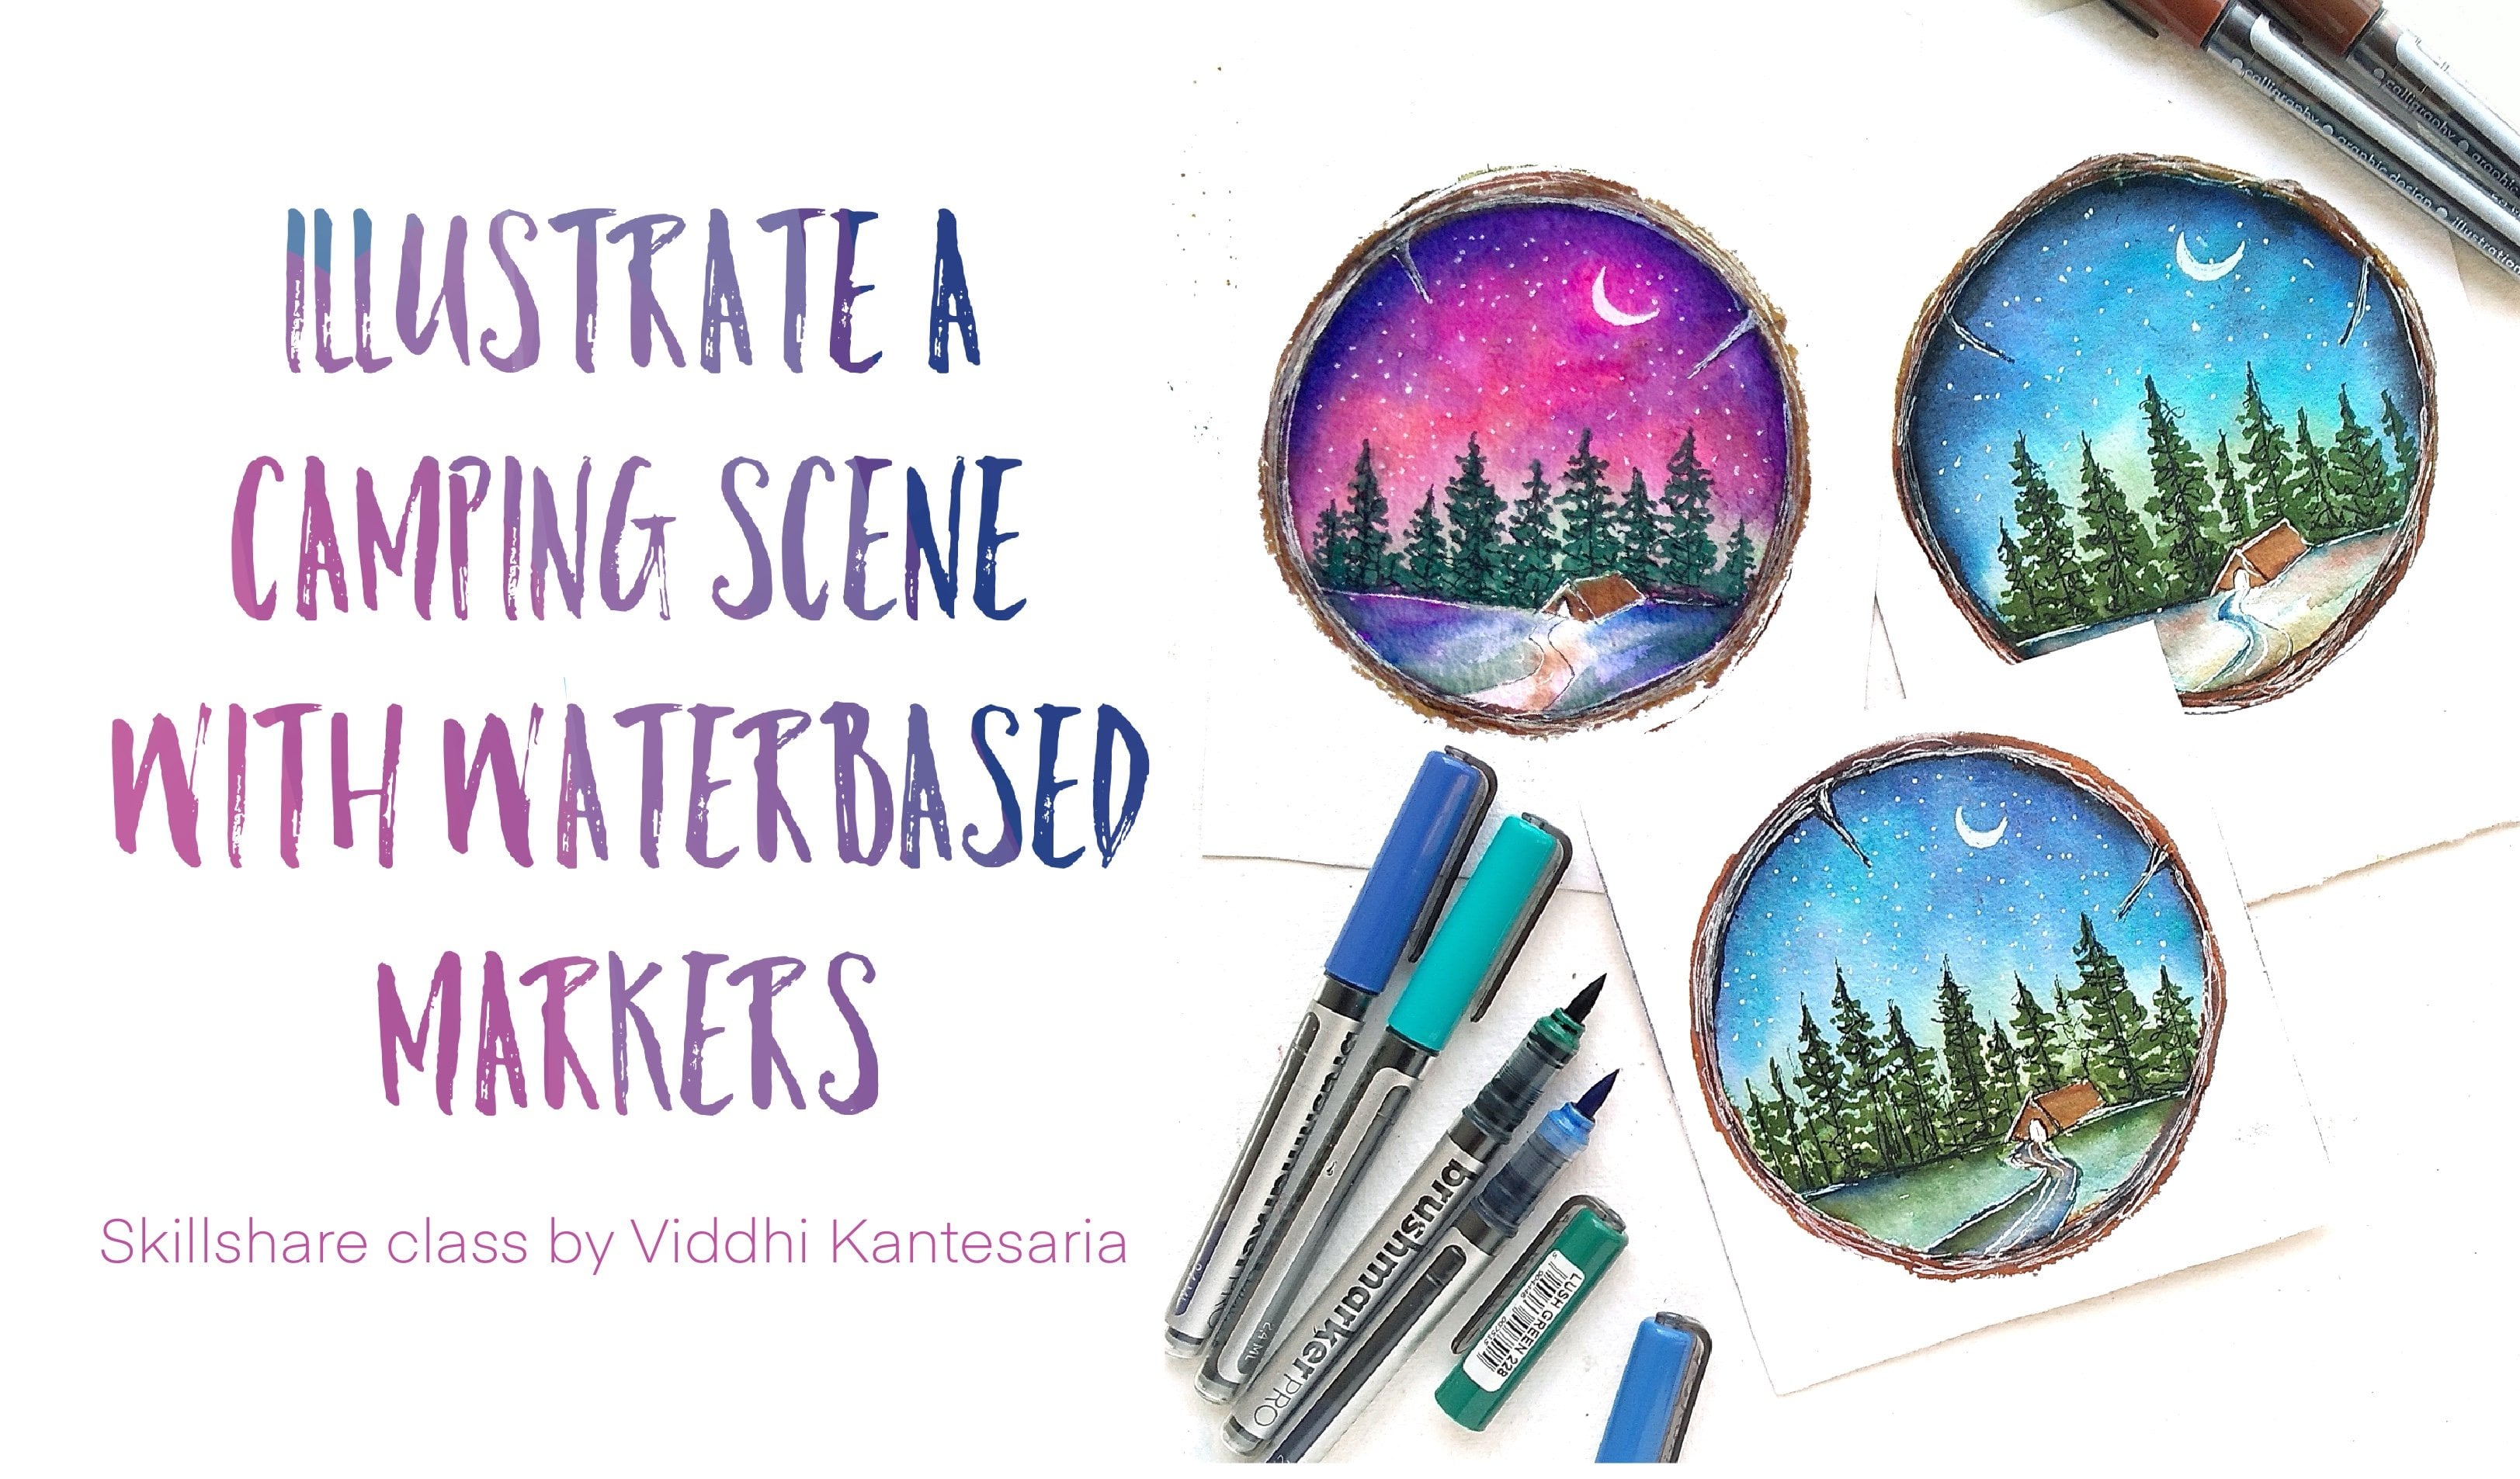
9. conclusion + more ideas : I hope you had fun in illustrating and painting with water based markers. Isn't it? Very simple. Get beautiful With the magical prisons and our poster you get So I only thought you too simple subjects for the class. But you must also know that you can use these would be markers in so many different like something like opens catching. I already did illustration off. Not them with this. And I'm just keeping it again and showing you how you can give a touch off watercolor in just few minutes with these wannabes, my uncles and it is very simple. And also apart from Oban illustrations, you can also use them to create simple Galaxies or study nights like this. Just scribble off some Marcus on the people and blended with water brush and they go. And also you can also use these to create for illustrations these trees or something like that. I just created a simple donut and look how quick and easy it iss. So there are no limits to work with these. Marko's so feel free to share class projects with me because I would really love to see how creative you can be with these water babies. Marcos Alonso, appreciate your feedbacks from this class which will help me create the next class, which is something like this O starry night with pine trees and a small camping house completely made with water beings. Markers. Your response to this class will actually encourage me. Toe. Make my next close with these water bays. Marcus, I will see you soon in my next club. Until then, keep creating and have fun.
 Viddhi Saschit, Author|Artist|Surface Pattern Designer