Transcripts
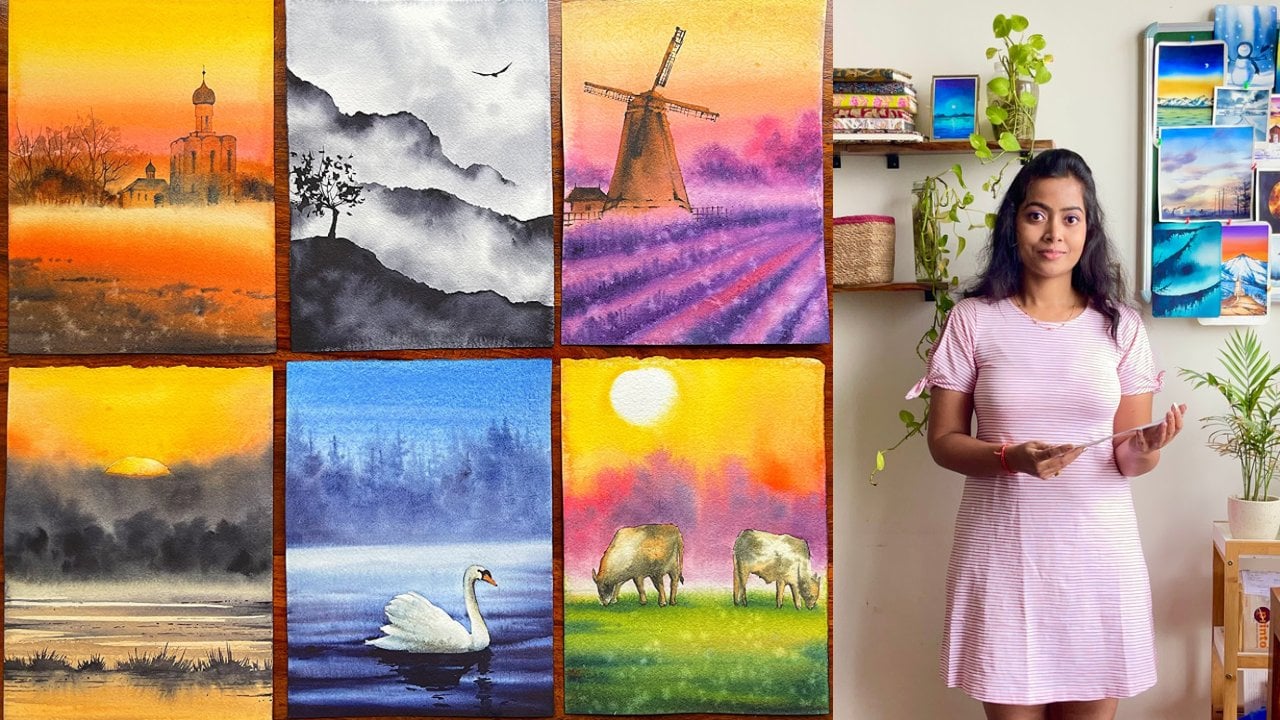
1. Introduction: Painting waters has always been challenging
and painting water, sea ocean waves, et cetera. With water colors is
even more challenging. Hence, I have designed
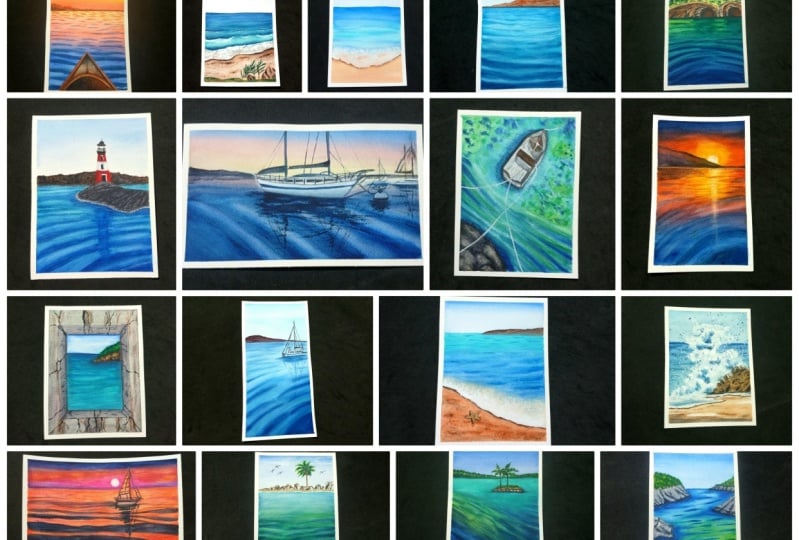
a class g into the sea, where we get to paint 15, beautiful, water color
seascape paintings. Ganan dicaran an artist
instructor, mother, a beach and brad owner
of iron puzzles, where we manufacture
handmade sketchbook, artist grade paints
and much more. In case you are joining
me for the first time, I go by the name watercolor dot Illustration dot
letter on Instagram, as well as on YouTube. Most of my artworks are
displayed over there. We start from the basics
like knowing your colors, then understanding the mixes, which you do in your colors, mixing your person art from Marin to create darker values, or maybe just going ahead with washes like flatwhvargated,
wash etcetera. Once fall of the system, we start out with
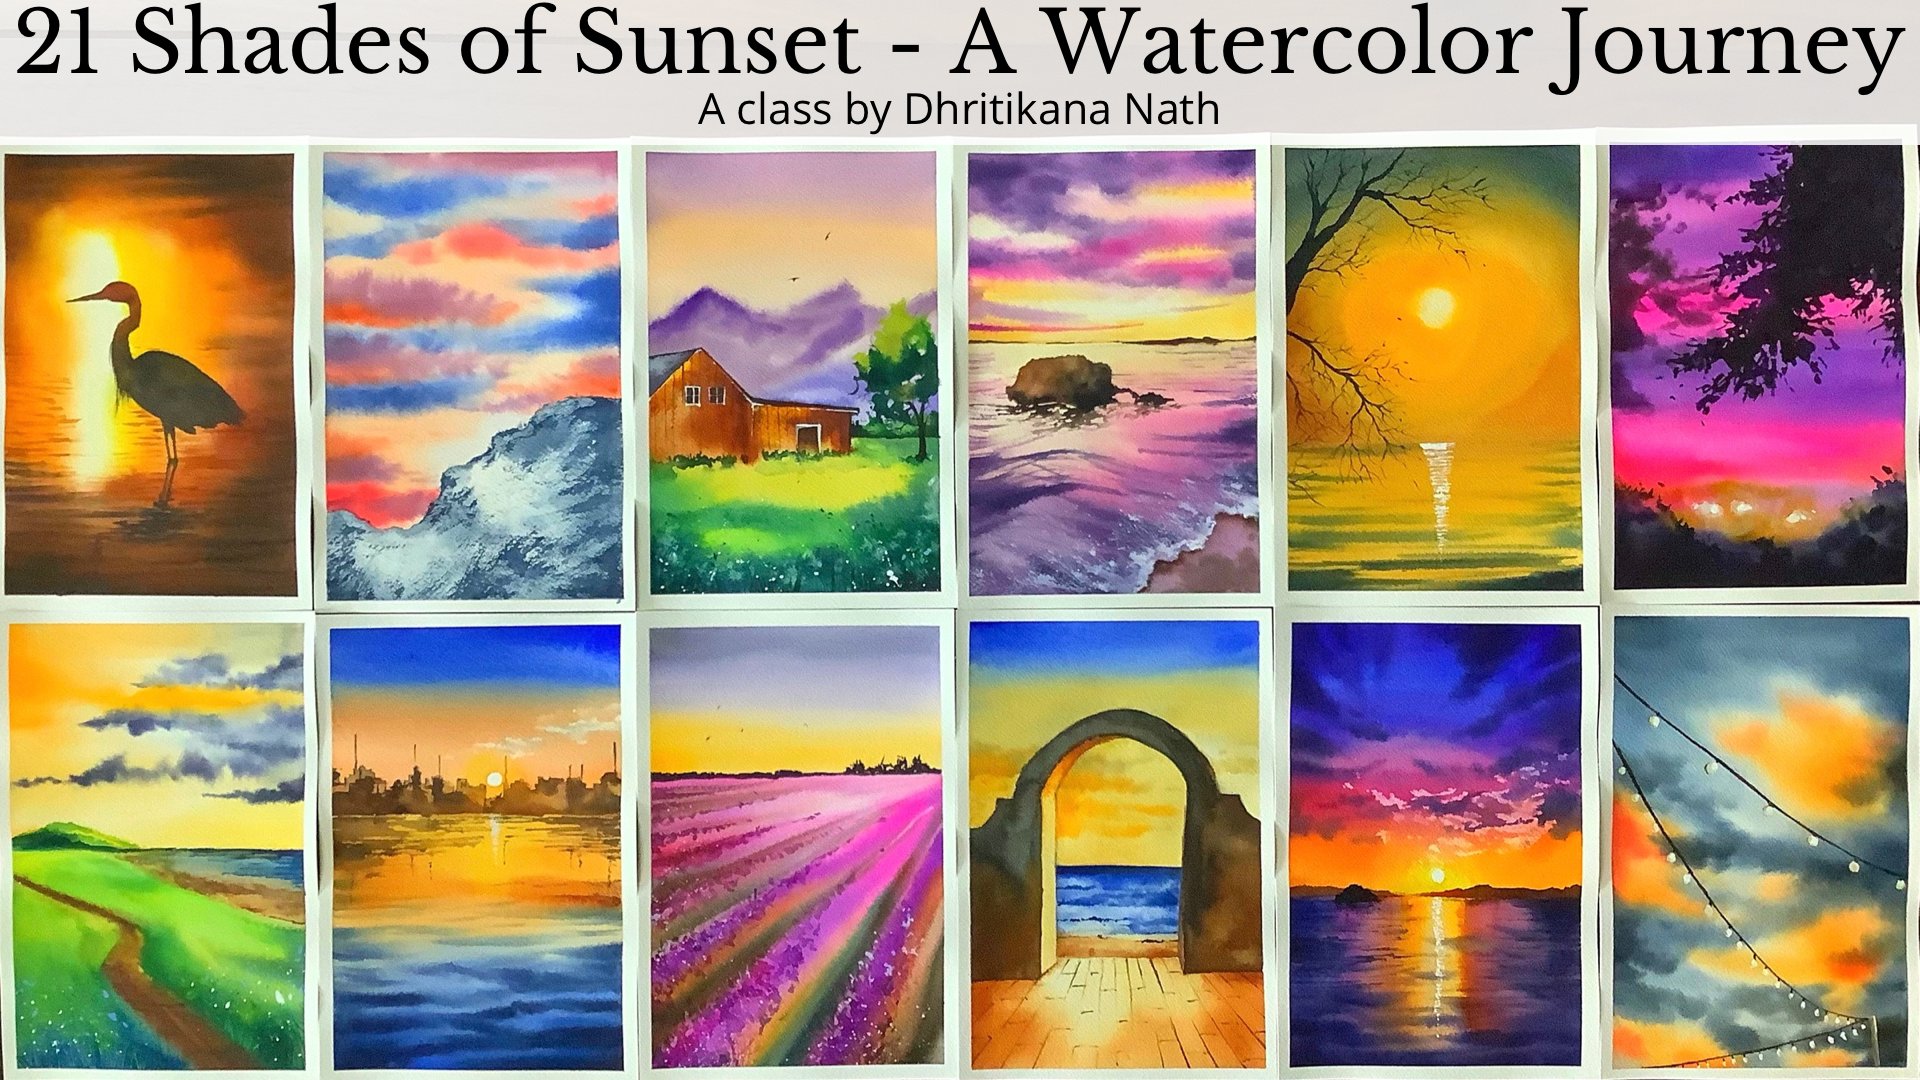
our first part. First part has got
eight paintings in it, and each of these
paintings are bingo level. I have specifically
designed it on an A five size paper so
that you guys do not get intimidated with the size
of the paper and can easily finish each of the paintings within the next
20 to 30 minutes. All the videos are real time and hence you can
faint along with me. The second part is all about painting from your ninth
day till the 15th day. Each of these paintings are
done on bigger size paper, four or a bit smaller size, depending on what we are
going to paint as a subject. There will be a
alternate upload so that none of us have the pressure of
completing it quickly. In case you are an
intermediate level artist or an advanced level artist, you can directly start
from your ninth day. Welcome to a Brand
new Skillshare class where you paint C with Quotas.
2. Flow of the Class: Let us understand a bit
about the flow of the class. The flow of the class
is simple and easy. The first part has about
eight paintings that are A five size and each of these paintings is unique and
different from each other. You can either start from the first day or start
from the fourth, fifth, seventh eighth, any of the days as per your liking. But the order of the lessons are always in an increasing
order of difficulty level. As we start out
with the Part two, it's more to do
with paintings on bigger size paper and
there is more complexity, which has been included. The first part will be
uploaded on a daily basis, and once we move to
the second part, it would be an
alternate day upload. Okay. All the videos
which I have given is real time so you can follow along with me and
paint along with me. In case you are someone
who loves to first, go ahead and watch the video and then
paint along with me. I think that's one
of the best ways to work around with your
watercolor paintings. Do watch all these videos
on a bigger size screen like your laptop or
an iPad so that you can even see all
the minute details as we work along on each
and every painting. None of the projects
is difficult. Painting water with watercolors is any ways a bit more trickier than any of the other subjects that you might have
attempted to date. Go with a lot of confidence
and that's all you need with some amount of patience for each
of these paintings. Once you are done with
all the projects, I would request you guys to upload it on
the project call.
3. Materials Required: Let us discuss all
the products that I'm going to use for completing
all these paintings. The first is the people. It is arches 300
100% cotton people. There are various sizes
which I'm going to use, starting from A five A four, and there is another size
which I'm going to use. This is approximately
15 into 30 centimeter, that is six inch into 11.8 inch. Okay. So you can see
that the size is almost similar to the one
that you see over here. And hence this particular
size is needed when you are doing any advanced level or intermediate level pending
starting from day eight. Another one that I did tell
you is the A four size paper, and this is the particular size, which we are going to use for completing the final
both the last painting, and this is a pretty
complex painting that way. Hence I have added
it as the last one. I will need a bit of masking fluid in one
of my paintings. One part is just to add the borders
over here so that I do not take any colors
into this boat because the boat is of
the lightest value, and hence it's good to use
a bit of masking fluid. I have kept two kinds of tapes. One is a bit larger in size. I would say that is because
it has more broader compared to the one that I have over here and
it is more thinner. Variety of brushes, which
we are going to use. But before that,
I will tell you. The first is the pencil,
then is the eras. You don't need both of these. This is for applying
your masking pi zero brush from
Winsor and Newton. I will keep a wash brush of 1 " pretty handy for
completing my paintings. Size six and size four
silver black velvet brushes. Then I have my three by
zero file aqua soft brush, and the vinci zero brush. All of these four brushes play a major role
in our paintings. Okay. Now, this is basically
to remove any extra pains, just the way you
see over here for creating the wave like
structure in the water. Hence this is Ruby satin, silver size ten brush, which I'm going to use. These are for adding
any thinner lines. You can go ahead with a zero, zero brush like this or
a one brush like this, whichever is available with you. There are a variety of brushes, do not get into the complete whatever is available with you
is good to go. As well as it all depends like the size of
the paper pretty much rules the kind of brushes you use and hence
whatever is available, you can use that Bleed proof
PH Martin white paints. Now this is again,
important when we are making some
kind of waves, et. At that particular time, it becomes really important. I will keep tissue
very handy for myself. This is most important thing that you are going to use in all your
watercolor paintings. I have colors. All the colors that I use
are artist grade paints. Though I have a variety of
paints from various brands. Some of them are art philosophy, then some of them are senalo, Winsor Newton, Daniel
Smith, et cetera. I use a variety of paints from various paints
manufacturer, whatever I like I use from them. Hence, a list of all of
these paints one after another will be given at the
beginning of your paintings. As well as I do suggest
alternate colors that can be used when you are
working on your paintings. For removing the masking fluid, you need a kind of eraser. Now, this is the masking
fluid eraser, which I use. If you don't have it,
that's also fine. You can go ahead with
any other eraser that's available with you. Two jars of water, one for removing the colors from your brushes and
another fresh supply. That's all. From all the
products perspective. You know that I have a
ceramic palette over here. This is equally important
for knowing your colors. Why I keep a white
ceramic palette as it can be cleaned
very easily, as well as I can see
through the colors. Water colors are
transparent in nature, and when it works on a ceramic
palette, it's even better. Now we can move on
to our next lesson.
4. Tips for Color Mixing: I know you all might have learned a lot about
color mixing, but right over here, today we are going to
see how we can make a few shades that are not readily available
in our palette. The first color,
which I'm taking is Indian yellow from
the brands inlier, you can go ahead
with gambos yellow or any other yellow that's
available with you. Then I'm going to
use my tail blue. Now tail blue is again from
the same brand that is senor. So I will mix both of these
color in definite proportion. Of course, my yellow blue will be higher and
my Indian yellow, of course, would be lower so
that I can get a teal green. The teal green that I get over here might become a bit
lighter compared to what you observed me
using during my paintings because that tailor
green is from the brand, Daniel Smith, and I have
readily available with me. But if you are someone
who doesn't have a color like this available
on their palette, this is a particular
way which you can always go ahead and make it. If you vary the amount of
tailor blue in your mix, you will be in a position to get vary or you may vary the shades of tailor
green that you get. When I mix some amount of
white into my yellow green, I will get a color that
looks more like p bar gray. Of course, it might
not be exactly the same as what I am using from various brands like my yellow
Mission gold or you can say even from the
brand whole bean, but it is somewhere closer to
the ones that we are using. Do make sure that you do
not add a lot of white in it or else the color will
become pretty opaque in nature, and water colors is
not about opacity. It's all about
transparency and vibrancy. I would like to
keep that as such. Going ahead with my next shade, which is burn sienna. If I add some amount of
ultramarine into my burn sienna, you will see that how
these two colors give me a darker value that usually we do not use
in our paintings. I love to add both of these colors together
to create my rocks. That's one of the reasons. I wanted to show this
experimentation to you, rather than using
the ndiK brown, you can also go ahead
with ultramarine. To create the darker values. Now, if I say that is
this the only way to create cobar green or
any other tailor green? No. You can always
experiment more. You can change the intensity of the color or the amount of any particular pigment
that you are using and you can see various
different shades appearing. It's always good to always try new and I would
say different colors, which you prepare
on your palette rather than using readily
available colors. Though in my
particular painting, I know that I have used
a lot of amount of tto cream and a good
amount of cbaren for which I have used
it as it is readily available in cubes rather than always going
ahead and preparing. But if you are suffer who
doesn't have it available, do not worry. I
have you covered. I'm going ahead and
adding some amount of my ultramarine into
the burnt sienna to create the darker
value of brown. And you can see how this
granulating effect has actually changed the whole look and feel of the
darker brown value. The colors that you
observed right now will become way more lighter as
the whole paper dries off. There are usually two ways
of mixing your colors, one on the palette, like we created the tail
green and bar green, and another one is how
we mix it on the paper, exactly the way you have created the darker
value of brown. I would request you all to
create your own sheets and colors in case you do not have a trady available
for your sir, and then go ahead
with your creativity.
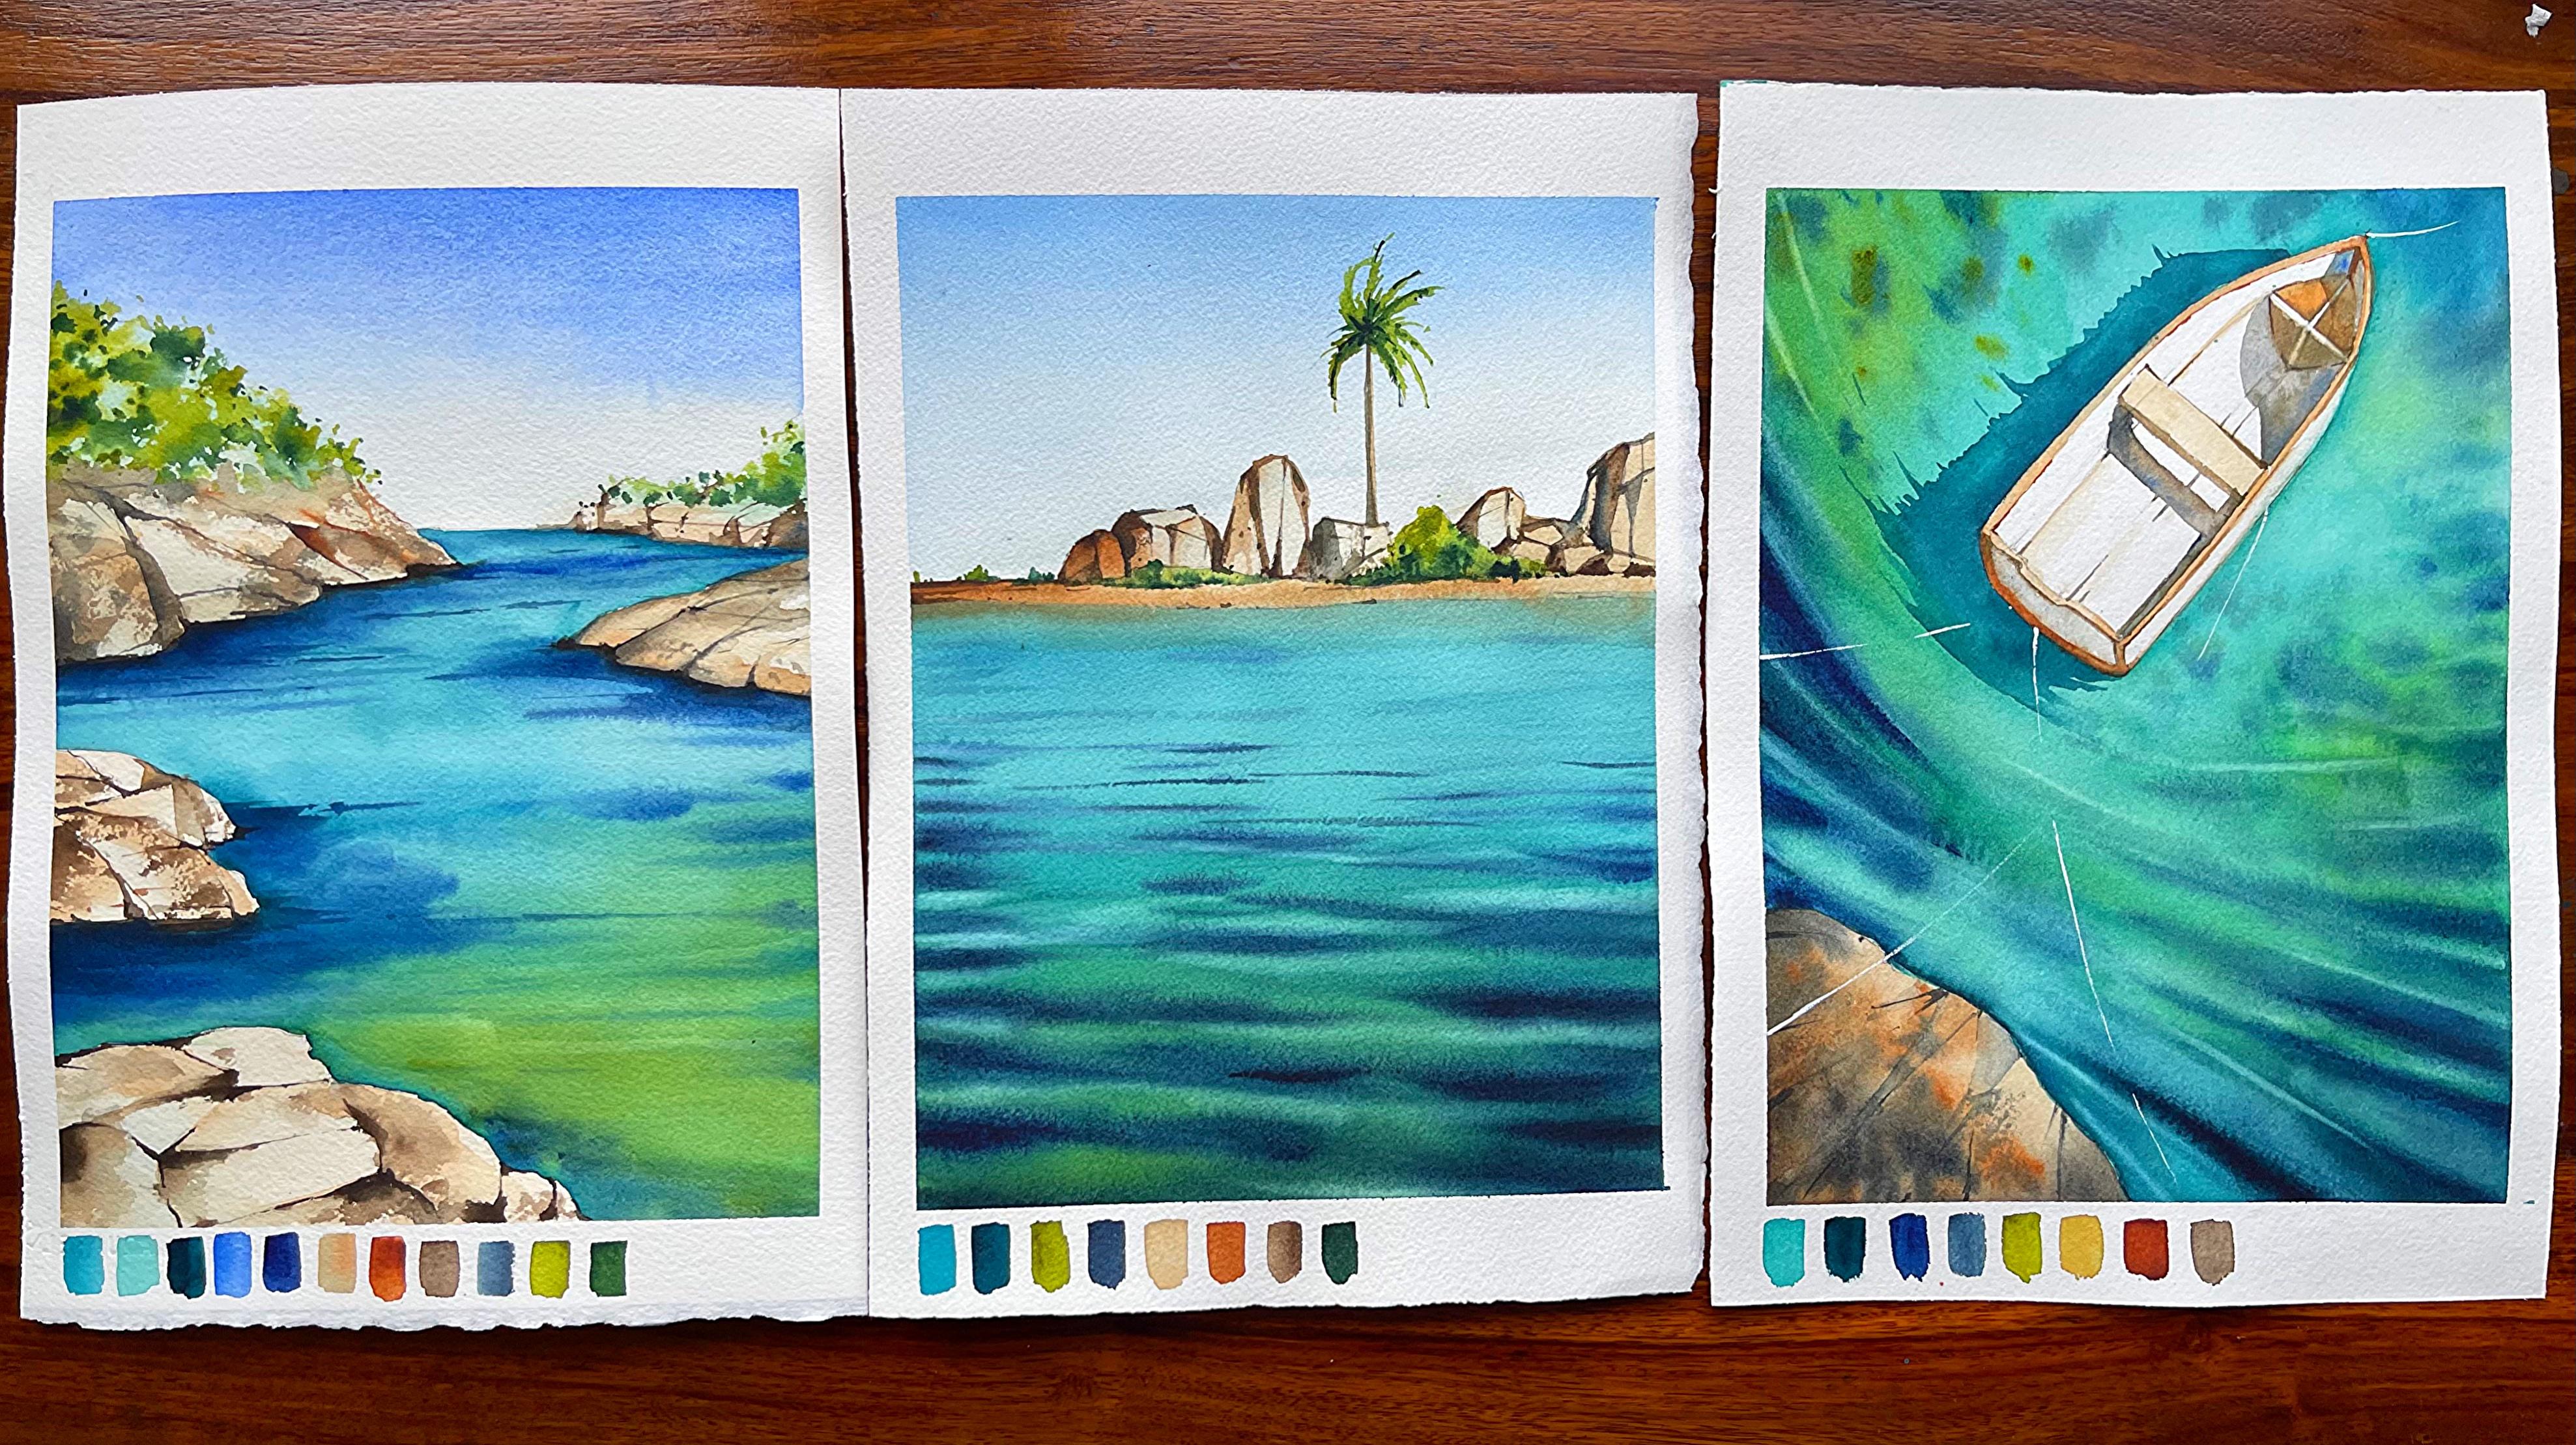
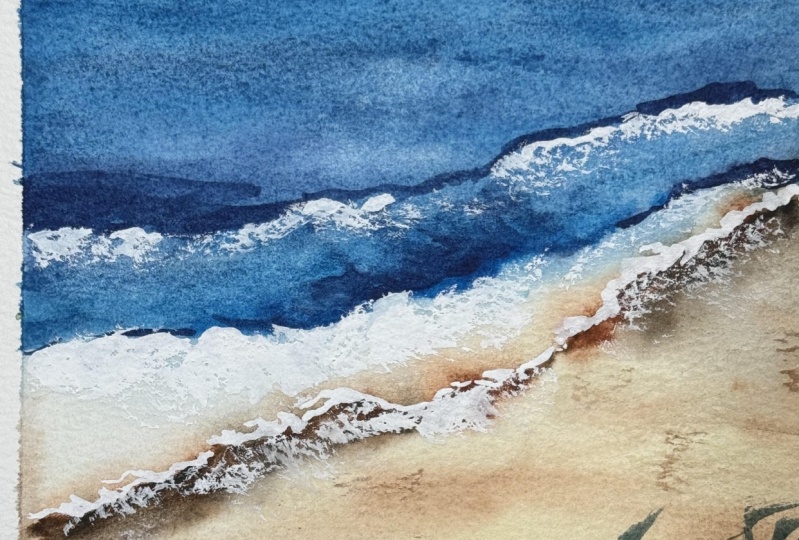
5. Practice Exercise 1: Let me start by knowing
all the colors. The first color that
I'm going to use is tocream CobalGreen
or horizon blue, ultra meery John number two, burn Siena and Wendi K brown. The top part is the flat
wash and the bottom part, which is majorly your ocean
is your barricated wash. I'm going to first
make a horizon line. This is around three to 4
centimeters from the top. I have taken a small size paper. It's a bit bigger than your A six size that
we usually use. So you can say it's a bit longer in terms of the A
six size that you use. I will go ahead with a flat wash and this is with the color
that is ultramarine. Now, what is a flatwh? Flatwh that single kind or a single color wash that you apply on top of your paper, which has equal amount
of pigments in all area. Therefore, what I would say is that the flat wash is going to be your absolute
basic that you are going to apply on any kind
of painting that you do. I always love to use flat
wash for my sky and you will see that most of our skis are very simple as we progress
to our paintings. The first seven
to eight days are more bigger friendly exercises and paintings that we
are doing and post that, it would be more of
intermediate to advanced level. And hence we are
going to complete the total number of days
for the seascape that way. Go ahead with my
John Brilliant two, this is one of my
favorite colors from the brand whole pain. If you don't have this, a
similar color is yellow occur that's available with you and just blend it
with the burn Ciena, which you observe over here. I go ahead and add this to the entire bottom part and then blend it with clear water. I need some of the amount of this particular shade of
brown that is on brilliant, as well as a bit
of my Bersana even towards the top area.
Now, why I say this? Because when your
ocean meets the water, there is some amount of sand that's also seen from
the bottom part, and we want to show
that and keep it absolutely just the way you observe on any kind
of a beach or ocean. We're not going to do much of I would say
difficulty or add a lot of difficulty in this painting
and many of you might have already attempted
these paintings earlier. Having said that, it
is important to give a quick start to your
painting exercises, and this particular painting
is a good way to do it. I will go ahead with clear water while I go towards the top area, and then let this
paper dry off before we go with the ocean part. I have absolute dry paper now, and I'm going ahead
with my many. You can see near the horizon
line I go about very slowly. As I don't want to mess up my
horizon line at this stage, though the horizon
lines, as you progress, you will understand that I
love to add a small hill or a small mountain or whatever
small green patch maybe. Just to show that the
horizon line is is seen in a good way and you can clearly distinguish
between the horizon line. That is your sky
and the ocean area. Most of the sky, as
I have told you, will be more of a flat
wash or a gradient wash, where you are going to go
ahead from the darker valley towards the top towards the lightest value as we go
towards the bottom area. Okay I'm using either you
can use Goba green orals, you can go ahead
with horizon blue. Now, these are the
two shades orals. You can also go ahead with any kind of blue that's
available on your palette. Tail green is a beautiful color. The other options of
teal green is turquoise. I love to use the turquoise if you don't have
this tal green. Now, the tylogreen is from
the brand Daniel Smith. I ever you want to
invest on a good color, I think this is one of the shades that you can think about. Since my brown or the
color that I've applied, has already dried off, so it is not much of
a difficulty for me to get the darker and
lighter values over here. While I go towards the absolute bottom area where
my sand meets the ocean, I would keep it
way more lighter. Towards the top, it is more of your
ultramarine in between, it would be a bit more of
the greener shape that is taloocs whichever
is available with you, and then just blend it
with some clear water. Once this part is done, we will go ahead
and use our white. Though I'm not a person who
loves to use white or not, but over here in one
of the paintings, we are going to use our white, and that is our first
painting altogether. We are going to do a few
things in a similar way. Yes, I think I have to be in line and it is good
to practice at this stage. Go with our darkest
value just to draw a few of the birds towards
the top area of the sky. I have kept it on
the right side. You can keep it
wherever you want. I've just concentrated four
to five of them over here. Once this part is done, we will again get back
to the bottom part. Why I did leave the bottom part, I wanted it to dry off a bit. It is the hot peak summer
season that we see over here Eastern part of India and hence my paper is drying
off very very quickly. I'm only using 300
GSM at this stage, and this is Arches paper. I will use my PH Martin
white bleed proof color. This is more opaque in nature. And hence, I love to
use this color for most of my exercises, which I do for
showing the white. Though most of my
other paintings or the earlier classes,
you would have seen. I have not used white almost, but this is more
winner friendly, and many of you have
white bh available. So go ahead, use that boh and let's just create
a beautiful wave. I'm going to occupy the
whole of the bottom area and then do a bit of this dry
brush technique over here. You take off all the pains from your brush into the tissue and then apply it on the paper exactly the way
I am doing over here. We have to also show one more thing and that is
the shadow of the wave. It is a clear blue sky or a
very summer kind of a day. Hence, it is important
at this stage to go ahead and show that well. So let's go ahead and do that. This part of the paper, what I'm doing right now was wet enough and I could retouch some of the areas with the
john brilliant color. It doesn't react with the blue or give me
any kind of green. So I have already
tested that part, and I'm very happy with how
the patches are coming up. Having said that, some of the areas are again
drying up and I might have to go ahead with some clear water to blend it. That's absolutely okay. These kind of things
do keep happening if your paper is very
dry or the climate where you are working
becomes really awful in terms of the heat that
you are observing. I don't usually use a fan or a conditioner when
I'm painting with steel. It becomes really
tough to work on small size paper
even like this one. Going ahead and creating
my shadow of the wave, and then blending it
with clear water. Now, I love this process of blending where you just
blend your colors with some clear water and applying some clear water even as I
go towards the bottom area. This is a very,
very simple wave. You can see we have just created the variegated
wash technique, use the variegated wash
technique towards the top. Apply some ultramarine and
as we go towards the bottom, we have just blended our two to three shapes to
create a ocean structure. Believe me or not, this is the basic for all our paintings. Even as we progress to
our more difficult ones, you will see that this learning comes very handy in most of
the paintings that you do. There are going to be a
four size paintings also. So be around. You would love the
whole of the series. There are easy tuff mediocre, every kind of painting
you can think of, and the whole of the
glass is leveled up. We are going to paint one painting every day so that there is no pressure
on any one of you. I would just apply some
more of my whites, and this is again the
dry brush technique that you see me
working on over here. This is more of the whites and the white is more
white, I would say. I wanted to show the waves that are just there touching
it, the white foam. A bit better. Though you can also
leave it at this stage. I would not say you have
to do this technique, but we'll give a bit more
edge to the painting. Let's go ahead, add a bit more of these dry brush techniques. Some of the places
you have seen, I've also added some more of the darker value of brown into the sand earlio while we were continuously talking about
other things as we progress, how the class is going
to shape up, et cetera. Okay. Now, let your paper dry off and have a final
look at this painting. I'm pretty sure you
would be really proud of yourself. Okay.
6. Practice Exercise 2: Colors are Copartrin
teal green tramarin paints gray, burn sienna. This particular practice
exercise is going to help you learn a very
important technique, and that is all about
painting waves. Now, what do you mean by
waves, water, et cetera. Now, when you have moving water, it creates waves,
and that's what we are going to also
add Tavo painting. The waves which are
closer to to our eyes basically are thicker and
bigger in size and shape, that is towards the bottom. As we go towards the top, they will become
more thinner and hence you can see
it almost flat. Okay. Let's go
ahead and start up with a basic wash of
the cobalt green. You can also go ahead
with horizon blue or any of the other lighter
shades blue like royal blue, et cetera, that's available um. In case you do not want to
add the greens that you have, you can have
alternate colors like simple colors of
your ultramarine, then some amount
of Persian blue. Those can also help you to get a similar kind of final outcome. I was not very sure
that I want to actually go ahead and
paint till the top area. That's one of the
reasons. I just went ahead and erased
my horizon line. I would go in and around the
top area as you will see, we progress and we'll
add some blue over them. Right now we're concentrating
on the bottom part, and this is majorly my tell grain from
the brand ail Smith, which I am using mixing it with some amount
of cobalt grain. As I did tell you, I love the ultramarine color always in and around my horizon line, I would like to go ahead and add some of this
ultramarine color. It's a beautiful shade,
always granulating, something that you would love to use in most of
your paintings, and all my watercolor paintings, which has water scape or seascape in it, this
is a part of it. We will be using some
amount of white quash, as you have seen in
the last painting, and even in our future
paintings, we will be doing it. As this particular
part is more to do with bigner
friendly exercises, except one of the crashing
waves that we are going to do last at the end. Okay. But before that, let's continue to work on it. I have mixed some amount
of my paints gray to it. You can also go
ahead with any of your dgotates to get a darker
value of this talo green. I'm going very random
at this stage. Believe me or not. I haven't
thought much about it. It's a wet on wet technique
that we are going ahead with. I know in my mind that the waves that
are closer to my eyes, as I did tell you earlier, towards the bottom, needs
to be more thicker. That's the only thing
which I mean that keeps me in my thought process
and I continue to follow that same pattern,
which I have thought about. This has got a very, very important work in one of your future paintings
that we are going to do. It is a day two from the series where you
will see a boat getting into the ocean and ocean or sea because it's
voyage into the sea, so it has to be the sea. I think my colors have just moved into
each other a lot more, and hence I might have to
go ahead and apply it a bit more or add a bit more of the darker values
as we progress. We will do that. Right now, I'm using the tip of my brush. Believe me, these kind of
problems do keep happening, and I have intentionally
done it so that you guys can observe that these are the problems that
everyone goes through. And that's absolutely fine. Go through these issues, solve it on your own, use a damp brush to clear out some of the spaces where you think that you have actually added more
colors than needed. You can mix some more amount of your indigo or paints
gray and apply it on the waves where
you think that we need to go ahead and make
it a bit more darker. So these things continue to
work out for you and you will get a final painting
that is as per what you want. This particular part is simple, interesting, and it finds a lot of usage even in
your future paintings. Go ahead and adding a few more lines here and there as you see me
adding over here. It's simple, easy, interesting, may not be that
perfect wave that you have created, but
absolutely okay. Embrace whatever
you have created. Creativity is most important. Believe me or not, it takes a lot of courage to
pick up your brushes, paints, paper, and start
painting after a difficult day. And that's one of the
reasons I always say. The people who can be creative
or who have the power to create are someone whom I
always always admire the most. Go ahead and adding a
few more of our waves. You can see that
my paper is still wet at this stage
towards the bottom area. It is almost five to 6
minutes that I can work maximum on a 300 GSM paper. Believe me or not,
the last class which I gave was all about clouds and I worked
on a 1805 GSM paper, which did stay wet for about 8 minutes or
seven or 8 minutes. Whereas now the
climate has changed to such an extent that it
is so so hot over here, the paper is becoming
dry within minutes and. Frankly, it's becoming very, very tough to work on any water related
paintings for sure. And here, there is
a lot more of wet on wet that we are exploring. Hence the difficulty
level is a bit more. You know, even if I have some wetness towards
the bottom area, the top part is absolutely dry, and I can really work on
the small hill kind of thing that I want to create in this painting in and around my horizon line to make it
look more differentiating. That is it helps you
to differentiate between the sky and the
water in a better way. I'm going ahead with my burn
Ciena from the brand PWC. You can also go ahead
with Mjo Mission gold. PC is one of my favorite brands. Again, add has, I am using it in this particular
series the most. I'm using again, the tip of
my brush to work this out. I can see that this brush
has a beautiful tip compared to all my other brushes till date, which I have used. Of course, it's Devins, and one more is Rafael. So both of them are really
amazing to work around with, and I am now going ahead
and adding my glue. Now, what is this blue?
It's ultramarine blue. I can create the darker value of brown when I add this blue. I have used this
technique very often, even in my future paintings and hence it's important to go ahead and continue to add some of the amount of blue
over the bottom area. It is the ultramarine
blue, as I have said, and I will go ahead and
add the darkest value. We always don't need colors like entice brown or CPA to
create the darkest value. You can always explore
your own colors. One of the good ways to do is just to mix a
bit of blue with your brown and you will get beautiful shades of the darker value or
brown that you need. Another thing that
I need to tell you, I love the granulating
effect that happens on any kind of a rocky mountain, or you can say any
kind of rocks, and this particular hill
is also a rocky one, and hence I'm going ahead with the blue shade to get
that kind of granulation. Though if you are someone who doesn't like granulation much, you can go ahead with
any other darker value of pure blue or else, go ahead with your paint
screen, neutral tint, black, whatever you think
is best can be worked out. Once this part is done, we have to create a few waves
towards the bottom area. I'm using my size for brash
from the brand server. Now, this is a
brush that's making its comeback in my
water scape again. Now, watercolor ocean waves
is one of the classes that I gave when I
started out in 2019. Now again in 2024, you can see that
this brush is making its comeback and adding a few smaller lines
here and there. Believe me or not, but this
has got an amazing tip. Though the tip seems
to be a bit spoiled, as there has been a regular use over these last few years, and that's one of the
reasons that the tip seems to be a bit
more smiled than what I thought that it would be. Go with my flat brush now, this is a beautiful brush
again from the brand silver. It is Ruby satin brush and it gives a beautiful,
nice thin lines. I will use it to my advantage to create these kind of waves. As I did tell you as
you go further away, these waves will become thinner and shorter compared
to the longer ones, which we did add
towards the bottom. The best part about this
painting or if you can say about the hot season is that
you do not need to wait for your paper to dry off. It automatically dries off. Okay. So mine was
drying off completely, and that's one of the reasons. I just could paint on
anything that I wanted. I did not wait any
particular time. Now is going ahead with my finish brush to add
one or two more lines. You did see that I
did blend a few of my smaller waves that I did create as I was
really not happy with it. Hence, I just blended
with the clear water. So it's so easy to just get away with your
mistakes in water colors. Yes, guys. It is really easy. Just that we don't know how to actually overcome many of our
shortcomings in the pains. Initially, when I started out, it was very difficult to do it. But now I know the
h tips and tricks, and I love to share it
with all of you because I know many of you
are big nurse and you might be struggling
at this stage. So it's time to
now paint the sky. Sky will be almost
the same color that I have on my brush. I would be using that
color or pick up some color from your palette and then use it for the
top part of the sky, blended as you come to words to. Bottom area like above the horizon line
below the horizon. So continue to paint
it and just blend it. You will see that
there's some color in my brush because of
which there will be a small gradient that can be absorbed well in this painting. Okay, Blending my color and then just taking it away
though I can see that a bit of brown
actually got over to my sky and I'm using my flare brush to take
away the extra paints. Let it dry and your
painting is done. I'm so happy with both
of these paintings now. Let's go ahead with
our first day.
7. Day 1 The Starfish: Let us know all our colors. It's Altra Mari, Kobalre, John Brilliant number two, Burnseno and Vanda Kira. I have always been in love
with the colors of the sea, and that's all you're going
to see on the palette. I did not wash it
because it had colors, and I really did
not want to take it away or waste my colors. But first, let's just
draw our horizon line. I am choosing a par 5
centimeters from the top. This is an five size paper, and I'm drawing that line. Once I have added the line, I would do a quick
sketch of the weight and a stofish that's
present on the shore. It's going to be a simple
and easy painting. It's not going to take you more than 15 to twentye minutes. Believe me or not.
This was a very, very quick painting for me as
this part of India is very hot right now because of which the paper is
drying up too fast. Even switching on the AC and then working was
not a great idea. The complete paper was getting
dried up very quickly. Anyways, you cannot work
directly under the fan. The bits and parts of your
paper will keep drying up and rewetting will be
the only option once your paper is
completely dried up. And again, you will
keep working in layers, which might make your
painting way more dark. Okay. For all my starfish, I did actually divide it into five small lines.
You can see it. And now I'm going in and around those lines to make the
curve like structures. That's how I always
love to actually break any kind of structure
into smaller lines, shapes, circles, et cetera. So it's going to be a very, very easy way of how you
approach, I would say, shape size structure of animal board or even any kind of buildings, et
cetera For buildings, it's easier because it's more
street and slanting lines, whereas for birds than
any kind of animals, it becomes a bit tough. I would be covering
up the area of the starfish with the
help of my masking fluid. It is from the Brand
Winsor and Newton. Added a small hill to depict my horizon
line in a better way. Once you have
covered the starfish with the masking fluid, let it dry completely
or else once you apply water on top of this area, the masking fluid will
stick to your brush, and it may spoil your brush, as well as that whole area will be also touched
with the colors, status of the s. Now, why I did mask out only a small area like this
and not the waves, et cetera. Now, there is a huge
chance that I would actually touch the starfish
while I have to paint my sad. The whole of the painting I told you is being done very quickly. So it leaves me with less
opportunity to wait and then just go in and around the starfish and come back
to it. It's a great idea. You can go ahead with it. But for me, I just wanted
to avoid that situation. I'm using my ultra marine for
the top part of the sky and then blending it with more water as we go towards
the horizon line. I have been end up with water
colors from the beginning, but more so with ultramarine. In any of my other
paintings, too, you can see that this is a color that I have
been using very often. Right now, I have mixed
some amount of cobalt green with my existing color that is talogreen
and quarter color, which is more lighter cooise
then I would blend it with more water and lighter value of cobard
green as we progress. With the cobaren, I would be
also adding some amount of my ultramarine as we continue to progress towards
the bottom area. These are darker and
lighter value play, which you will see very often in the paintings to create the tonal values of
the waves, et cetera. It would give you
structure like effect and it's kind of an illusion
that is created well, but it's not exactly how you would see actual actual
seascape or an actual ocean. This is more like an illusion that we create for our painting. I am going ahead with some
of microbalt green and then adding some ultramarine to the darker parts that is going
towards the bottom area. Now, there is another sheat
which I'm going to use, which is from the
brand whole brain, John Brillant number two. Now, if you do not
have the shade, please go ahead and apply
some amount of your naples yellow into the burn sienna and get a color
that looks similar. Orals, you can also
use yellow cor. But you have to test the
color of yellow occor so that it doesn't
give any kind of a green when it mixes
with the tra meerin. Artramarin has got a
beautiful granulating effect and some of the spaces in white, I'm leaving over
here so that I can show the white wave
or the crashing wave, which usually you will see
some amount of foam that appears in around
the beach area when, of course, a wave is coming
towards the shoreline. This is easy one. Just that we have to
add some more drama to our C. We will
add a few lines. I would be working
both with wet on wet and wet on ry
for this painting. There will be paintings where it's more to do with wet on wet, but these are the
main techniques, which I have been using
in many of my paintings. Another one that is often
said is the wet moist, maybe, I would say, or more
of a damp kind of a surface. Now, this kind of thing is not used very often and it's often considered as
wet on wet only. Yes, let's just
continue to mix some of our ultramarine with
John Brilliant number two from the brand whole page, but if you don't
have, you already know the options
that I have used. I'm going with some
more of my burnt sienna and you can see that my
starfish is completely dry. If you don't have
this masking fluid, you can always go ahead with any kind of masking tape, 1 ", draw this particular
starfish on top of that, and then cut out the
edges to just paste it on top of the paper and
get a similar outcome. This was a bit more easier for me as I had the masking
fluid available, but that's another way which or that's another way of approach
that you can always take. There are a lot of hacks, tips, et cetera that
can be followed. It's only the intention
of creativity. As I say, the more
creative you are, the better would
be your outcome, and, you know, the
intention matters the most. Over here, you can see some of the areas will get
dried up very quickly. The area near the middle
part of the sand is drying up and I'm
just trying to add some more water to keep it wet for a
longer period of time. Adding some of my darker value
of brown as we go towards the site of this ocean
part and then blending it. I love to add some amount of my ultramarine into
the burn sienna that I have and then blend it to get
that effect of granulation. Granulation looks
great when it is a sand like effect that
you are trying to achieve. Okay. I guess this looks well. We will go ahead and just apply some of our ultramarine
into the area, which is majorly in and around the horizon line to depict the horizon
line in a better way. Now, this is a small hill. You may add it, you
may not add it, but it helps to actually show that there is
a distance or a difference, I would say, between the sky
area and the water area. Though many people even
love to blur it out, but for me, I love to keep
it intact and constant. Okay. I have mixed
some amount of burn sienna into the
ultramarine and you can see how the granulating
effect is even covering our small hill space. I'm going with some of my ultramarine lines and back with the silver
velvet brush. This brush you would
have seen me using even in many of
my other classes. There was watercolor ocean waves one and watercolor
ocean waves two. But white into the sea is something that I always
always wanted to make where various subjects
from the sea can be covered in our paintings. Continuing to add some of the lines of ultramarine
into the water. Now, this is a semi dry kind of situation which
I have over here. I'm not stopping myself
to add these lines. I'm using the tip of my brush
to add these smaller lines. As we go towards
the middle part, our lines will
become more broader compared to the ones that we
have added towards the top. Once this is done, I would add a few more
lines even on the left. Continue to show that these
are basically the ripples. It is a wet on dry
effect for the ripple. In the other painting
where there's a boat and there is a sunset, you will see that
we will go wet on wet method for
showing the ripples. But there is no best
way, I would say, where you can show
the ripples in a wet on wet wet on
everything is great. Whatever you can
create is good to go. I'm adding some old lines as you see me progressing
towards the middle area. It would become a bit more broader compared to what
we have added earlier, and be ready for
some white foam. Now, this white foam
will be created with the help of an
opaque white water color. I have a PH Martin white, and that's pretty
opaque in nature. We'll be using that for
creating the white, as well as we'll pick up the
extra colors from the brush into the tissue to get the effect of the
dry brush technique. This is a very, very
important technique that can be used very often for creating any kind of
crashing waves or for creating any waves even
in your future paintings. D or do try this out in your other projects to that you'd want to attend
in your future, it should be very helpful for your bottom area of the sand. Just pick up the extra colors on the tissue and then apply
it to show the texture. Now, the texture of the
paper is automatically helping this brush
stroke to create some of the spaces that
has the brown like effect from the base paper and leave some of the
spaces in white. So most of the work is
being done on its own. That's one of the
reasons I always say please use cold
pressed paper. Cold pressed paper has
these structures in it, which can give you nice texture. Using a rough paper
is also great, but rough is way more textured than what
we will be using. Though I will not say
that you cannot use it. If you don't have
any other option, please go ahead with your
rough textured paper too. But make sure that
it is 100% cotton. It is very, very important
in the hot season to go with 100% cotton 300 GSM paper. Try to use only
cotton paper orals. It will become very, very tough even in your future paintings to
continue working on it. I'm adding the shadows in the darker value of
prom which I did create with the help of a
mix that I did on my own, mixing your ultramarine
into the burn Ciena will give a color
that looks similar. Creating the shadow of this small starfish and then adding a few more shadows
on the other legs too. I love how this whole
paintings comes together in a very
quick and easy manner. First, I was trying to draw the small dots lines, et cetera. But then I thought that
this is just not how I want the structure of
my beautiful sand area. I would love to have
it more textured and I took out the extra
paints from my brush and started creating these kind
of effects that really helped me to make the
sand look more realistic. That's what I would be doing throughout the left as
well as the right side. I never place my subject in
the middle of the painting, as you always know. I try to place it
in the left right. Basically the focus points, and hence it is as for
the rule of thirds, if you divide the paper
into nine equal halves, the only intersecting points would be the focus
areas of your painting. I'm adding some amount
of burn Siena into the area of my
beautiful starfish. This is the last thing
that we are left out with and I'm going
to do that now. I've already picked
up the application applied masking fluid. Yes. And now I'm
adding the colors. I think this is one of the
best ways to go about it. Having said that, you
might have your own way. I just love to add some lighter value and then
go a bit deeper into it, meet the lines that we
added in the beginning. While we were trying to
create the starfish, I will add some whites to over here along with
the dark value, a bit to show the
shadow in a better way. Continue to add it.
Now, why the shadows, it's a hot summer day
and the sun is shining because of which the color
of the sky is less of blue. Yes, putting
everything together, you can see there
will be shadows. I'm adding a bit of darker line stretching from the
middle towards the end. This is a very small paper and we can get it
done very quickly. I think I'm pretty happy
with it a bit of white for the highlight of my
starfish will be added. Then I guess it's great. Let's just finish it off
and have a final look at this beautiful outcome that you guys have created
along with me. I am super excited to even
move on to our next painting where we are going to learn
more about seascapes. Let's just add the white
and let it dry off. Once it is done,
I would add a bit of brown on the
sides. That's it. Just blend it and keep it ready. Okay, we have to just cover the left side to
continue working on the right side
of the paper. Okay.
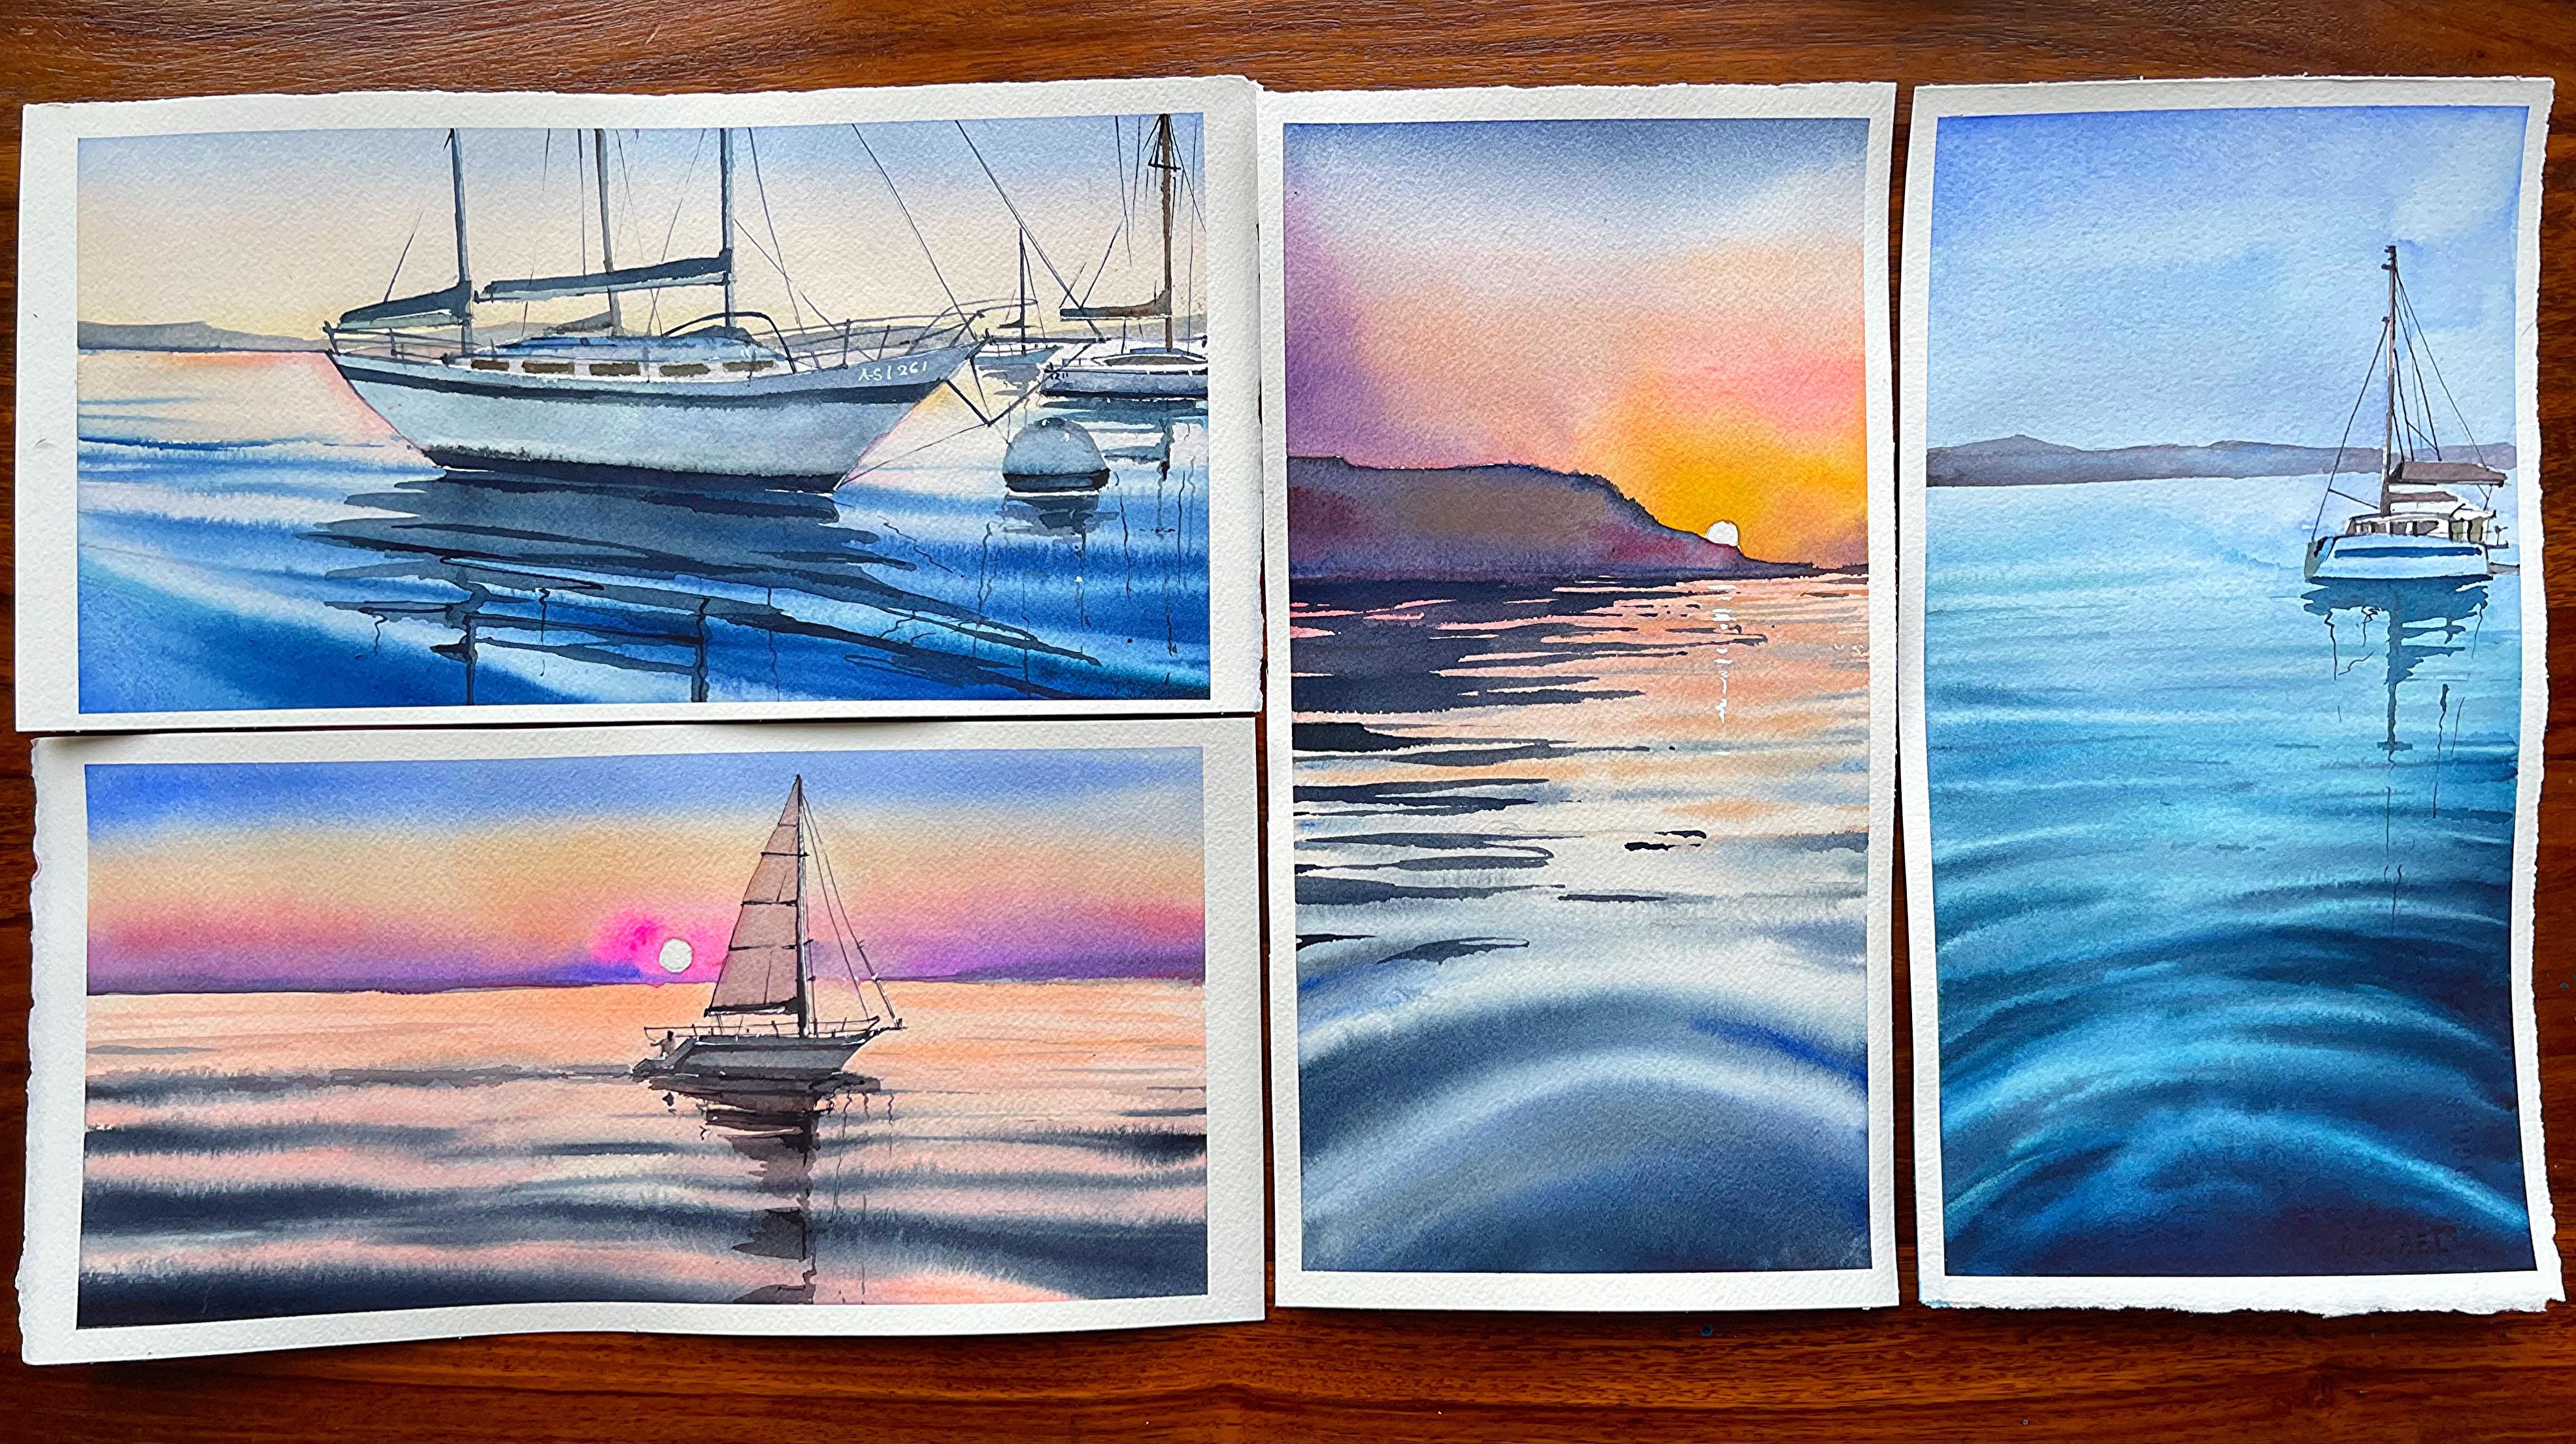
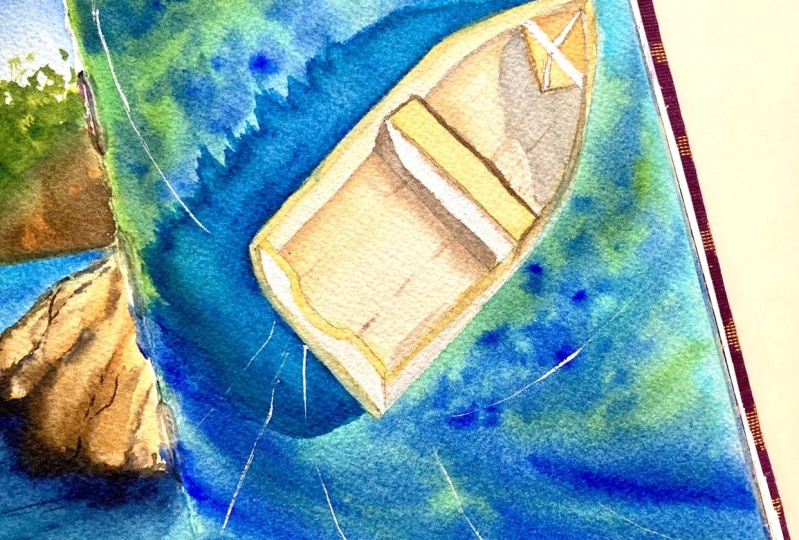
8. Day 2 Evening Sunset: The colors yellow
quad coral opera, trad three indico cena, and you can always create
darker values b with tram. I've already created
water wet method. It's time to work wet on wet. Of course, many of you feel that wet on wet is
more challenging, but do not worry, we
are going to go ahead, make a small boat. You can see I've already marked
the middle line and taken around five centimeter on
left as well as on the right. And then going in a
triangular motion, you will see how I
just joined the dots. Everything that I make,
whether it be a boat, whether it be building, whether it be starfish, I go with the basic
size and shape and then we can modify it to
get the final outcome. This is the way you should
also approach a subject. Easier modifying rather than just trying to go with all
the curves, et cetera. If you break it
into simple lines, it becomes easier to make
the curves later on and get done with the final
painting in a quick manner. Now, I know that there is even side on the left
as well as on the right. I will go ahead and just make it a bit more
curve on the top, and then add two curved lines on the left as well
as on the right. Of course, it was not easy. Believe me, I was
also struggling a bit while I was trying to
add the curved lines. None of us get it very easy
and it's absolutely fine. You can take your time. Go
ahead with a graphite pencil, which is two edge. Now, it is very light, and that's one of the
reasons you will see that once you apply the
watercolors on top of it, the graphite marks
will not stay. Or, you might have
to use an eraser to just take off I think it is the needable eraser that you
need to take to take off all the graphite marks before you apply your final colors. Always remember water colors are transparent because
of its transparency, the graphite marks can
be seen very easily. We must take off any extra graphite marks just the way you
see me over here, taking off the extragraphite
marks on the left. The boat structure, which we
have kept is very simple, except a few lines
that we are trying to draw to depict this
boat in a better way. You will see how we are going
to mix only two shades, that is your burnt sienna
and some amount of ultramarine to create
the darker values within the boat area. It's the evening
time and we will have a beautiful evening sky. The sky area is small and
hence the blue shade, which I usually see towards the top area of the sky
cannot be seen over here, but it is going to be
reflected in the water. It is deemed accepted that
we have some blue in the sky though we cannot depict all
of it in a five size paper. You guys know that everything can't be done in a
A five size paper. I've applied some naples yellow. This is one of my
favorite shades and now I'm going ahead with
quin acrodone coral. If you don't have this
quin acrodon coral, you can mix any of the orange with a bit of pink to
get the shade or else, if you have your opera color, mix with some amount of
yellow to get a shade that's closer to the one which you are observing right now. I did apply a very light sheet
of blue towards the top, but it would not be
helpful, believe me. The yellow is going to
dominate at this stage, and I don't want to take
away the beauty for sure. I'm using my largest
brush at this stage. This is a small size
paper and hence I can cover up very quickly
the area of the sky. Never feel scared
of water colors. You have to cover a smaller
area with a larger brush. That's absolutely fine. If there are no complexity, you may not find it tough to
actually cover up the area. The colors were really
light in values, which I did apply earlier, and hence I have gone ahead
with my round brush to apply some of the
darker values in few of the areas as
you can observe. Now it's time for water. Water is something that all of you have dreaded
for a lot of years. Believe me, I also dread it. I dread it like anything in the past when I started
out with watercolors, maybe about five
or six years back. I was so terrified
to paint water. Water was something
that I never attempted. It is because of the nature in which we have to paint water. The only thing that you
need to keep in mind is water color of painting waters
also is all about mindset. Mindset is something
that you need to understand and you need to
keep building up for yourself. I will go ahead and apply some
quin acrodon coral towards the bottom area as well as
apply some of my ultramarine. You will see that the
quin acrodon coral turns this ultramarine, a bit pop color, which we will go over it
to apply some more of the absolute blue ultramarine and that is going to be
the sense of the painting. The base layer of ultramarine
really helps to actually showcase the darker values which we are going
to apply over it. Now, the darker values, either you can use
Prussian blue, ontrne blue or paints gray. For me, I love to use paints gray or dico
to a great extent. First, going ahead and applying some of my
ultramarine as I was very not happy with how the purplish shape
took over completely. I always say that the water is an exact
reflection of the sky. Near the horizon line, you can see more of your reds, et cetera, or you
can say the orange. Now, whereas when you come down towards the bottom
area for the water, just in and around the horizon
line, it's more yellow. We are going to use wet
on dry method to de pic that red kind of situation or the orange kind of
situation into the water. Do not worry. I have
this mirror image always in my mind when
I think about water. So, you will see the exact colors and we are going to just apply
some wall lines. I'm going to apply
these lines again with a pretty broad brush and then just go ahead with some of my quinacodon
coral again. So that I can get
a complete blend. I was really not happy with how the blues were turning up. I might have to go
over it once more and create the final outcome. It's absolutely fine. Sometimes we have to
go over a few areas, one or two times if we are
not happy with the outcome. If you're happy
with that outcome, please do not again
try to attempt it. It's absolutely okay. I was really not happy
and insighted it, but you do not need
to do that thing. Okay, applying some of my Naples yellow towards the
top area of the sky. Then now it's time for the
darkest value of blue. Yeah. What is the darkest value of blue as I did tell you. It would be more of an ultramarine
mixed with donne blue, as well as pains gray. You can also go ahead with
only ultramarine and pinsray. Both the colors go
very well with each other and they give a
fantastic panel outcome. I'm going ahead with my size one brush from the brand coda. There are a variety of brushes which we have used
in this painting, but believe me, whichever brushes you're more
comfortable with. Use those brushes. I feel it very strongly
throughout my entire journey. I end up using only a
few of these brushes. Sometimes a few more depending on what kind of paintings
I'm attempting. If I'm attempting bigger
size paper paintings, then there will be more
of product brushes. This particular series has
all kind of paintings in it, and hence there is a large aria of brushes that
I'm going to use. Go ahead with some more of my darker values and then
applying it on the water area, you can see how beautifully it is blending with
the ultramarine. I'm super happy. The paper is still wet. Believe me, if you're
working under the fan, you will not be in a
position to do this and your paper will already
be dried up by this time. Similarly, in case you're
working under an EC, then again, you
might not be able to get this as the final come. Though I would leave
that decision up to you. My place is really hot
and hence I had to be out of both of this
to get the final effect. That you see over here. Climate always has a huge role
to play in our paintings, and hence knowing the
people is very important, always use the paper that you
are most comfortable with. For me, Archers has been always
the go to kind of paper. But other papers like Saunders, Papriano are equally good. If you are someone who
wants to paint water, it has to be 100% cotton paper, 300 GSM orals, 1805 GSM is also good in case you are living in
conditions which are more Gut or you have more moisture in the air maybe where it's
more colder and more moist, you may be in a position
to even use vanity ens. I'm mixing some amount of my quinadon coral
into the blue mix, and we are creating
some finer lines now. This brush really helps me to get those thin
lines that I need. I would not add more
lines towards the top. I would go ahead and just apply some more amount
of nacidn coral. You will see how
I create that and Naples yellow to get
a color that looks more orangeish and
apply it towards the horizon line into the water. Part. You can see on
the left bottom side, I would be again picking
up the same color to showcase the sets of
the quinacrodon coral, which you see in the sky areum. Currently, going a bit slow. At this stage, I know my
painting is mostly covered. To be frank, my water is
done, my sky is done. I'm just finishing it off
or topping it off with a few smaller ripples
towards the horizon line. You all know that towards
the horizon line, when you add the ripples, they need to be smaller in
shape and size as they are far away from us and hence it is as per the
rule of perspective. Continue to work
through it and add more and more smaller
lines towards the top. Use the brush, use
the tip of the brush. I would say don't press your
brush more at this stage, or else you will get more broader strokes
which we don't want. Absolutely working on a
few more thinner lines and then it would be done. If the place in and around your boat
is already dry enough, we will start off with the boat. But before the boat, you
can also check around the horizon line in case you
can paint the small hill. Both the paintings that you
see on the left and the right had a very similar sky. That is, we kept
very small space for the sky and more space
was given to the water. This class is not to be
on the side of the water, and we will be discussing
water more in this class. Hence, most of my skies
are kept very simple. They are just a gradient wash or they are gradient
wash of two shades. Something like that,
so that there is not much confusion or we are not
concentrated on skies, et. We can work through
the water part or the boat part as
you are doing now. I'm going ahead
with a flat wash of burn Ciena right now to
cover the entire boat. Once you have covered
the entire bot, we will start out
with darker value. Now, how you can
create darker value of this particular shade. I usually use some amount
of ultramarine to do that. I will go ahead with my
ultramarine blue and apply it on the darker sides
wherever it can be added. It is still wet and
hence I'm working more wet on wet workings over here. Go over the top area also again. Now, having said that, is it a lot wet? No, I will not say
it's more to do with damp or it being moist so that I get the correct
amount of moisture and my colors are not
flowing from top to bottom. You will see or observe that
the colors don't move a lot. They are more concentrated. Only two a few areas
where I'm applying. I'm using my size four brush
from the brand silver, and it is one of the
favorite brushes of mine for painting waters. You will see more of this brush coming up even in my
future paintings. Yes, if you are ever
planning to invest on a good brush, this
might be the one. I always observe my paper. Now, the paper that I have towards the
bottom area is more wet because of the
boat and hence I have moved on to my hill
near the horizon line. I'm first adding some amount of beautiful burncana
that I have, and then I would be going over it in few of the areas with ultramarine or the broche that you already have
on your palette. Okay. I'm a strong
believer that you should not be wasting
any of your colors. Hence, whatever color is
available either on the palette, please go ahead
with it to create the final shades of this hill. It's not very important to
actually mix your colors, but believe me when you
start mixing your colors, you get to understand how
each of these sheets can be also done with very simple
shades of just two mixes, maybe blue and brown. Hence you don't need to
own a lot of shades. Though, I would be using various shades and I
would be giving you a strong reference
to all the colors that I have used
in my paintings, but it's not a necessity is
all I'm trying to tell you. Going with one of the
darkest value of brown, and then I would be applying
some more burn sienna to it. Blending it with some
of my art marine. You can see how this tra meerin creates the beauty of the boat. It's reflecting the
light in some of these places with
the lighter value of burn sienna and the
darker spaces is well created with the help of
the blue and burn cien mix. I will now use the
burn sienna to blend the colors which I have already applied towards
the top part of the board. You can see it's
a simple process. Though it's simple but blending the colors correctly and having the correct amount of poo is something that I
would like each one of you to understand while we are working through
this painting. Though the main idea of the painting was to
create water and simple water where we had a bit of our ripples
towards the bottom, as well as towards the top. Along with it, a boat is
always a great addition. Continue to work a bit more
and blend your colors. The whole of the
video is real time. That's one of the reasons. You can just watch
it once maybe at two x speed and then follow
along with me to paint it. You will be in a position to get almost the exact shapes,
colors, et cetera. Once you start following
along with it. One thing that I know
about watercolors, it's that it's a medium
which anyone can pick up. I have picked it up
a few years ago. So I think if you have the correct paper
brushes and colors, you will be in a position
to paint well and there is no way you will not be in a position to
get a good outcome. I think this is one of my favorite paintings till
now from the entire series, and I will show you a few more. Of course, they are a mix of tough and easy paintings that
you are going to follow. But none of them are like it cannot be attempted or
you are intimidated with it. All of them if followed along in a stepwise
manner can be achieved. Only final condition is the climate and the
wetness of the paper. If your paper can
hold more water, it becomes easier for you
to work along with it. In case your paper cannot
hold a lot of water, then it becomes tough
and it leaves you with really less time to work
on your wet on wet part. Hence, choose your
paper very carefully. It's something that I have
been telling always and I say it very often in
most of my classes. Right now, the paper
is wet enough or moist enough so that I can
draw a line like structure. I will just add a
bit of blue even on the bottom part of the left. You can also do it on the right. I would leave that
decision up to you and add some
more darker values. Remove the tape and have a
look at both the paintings.
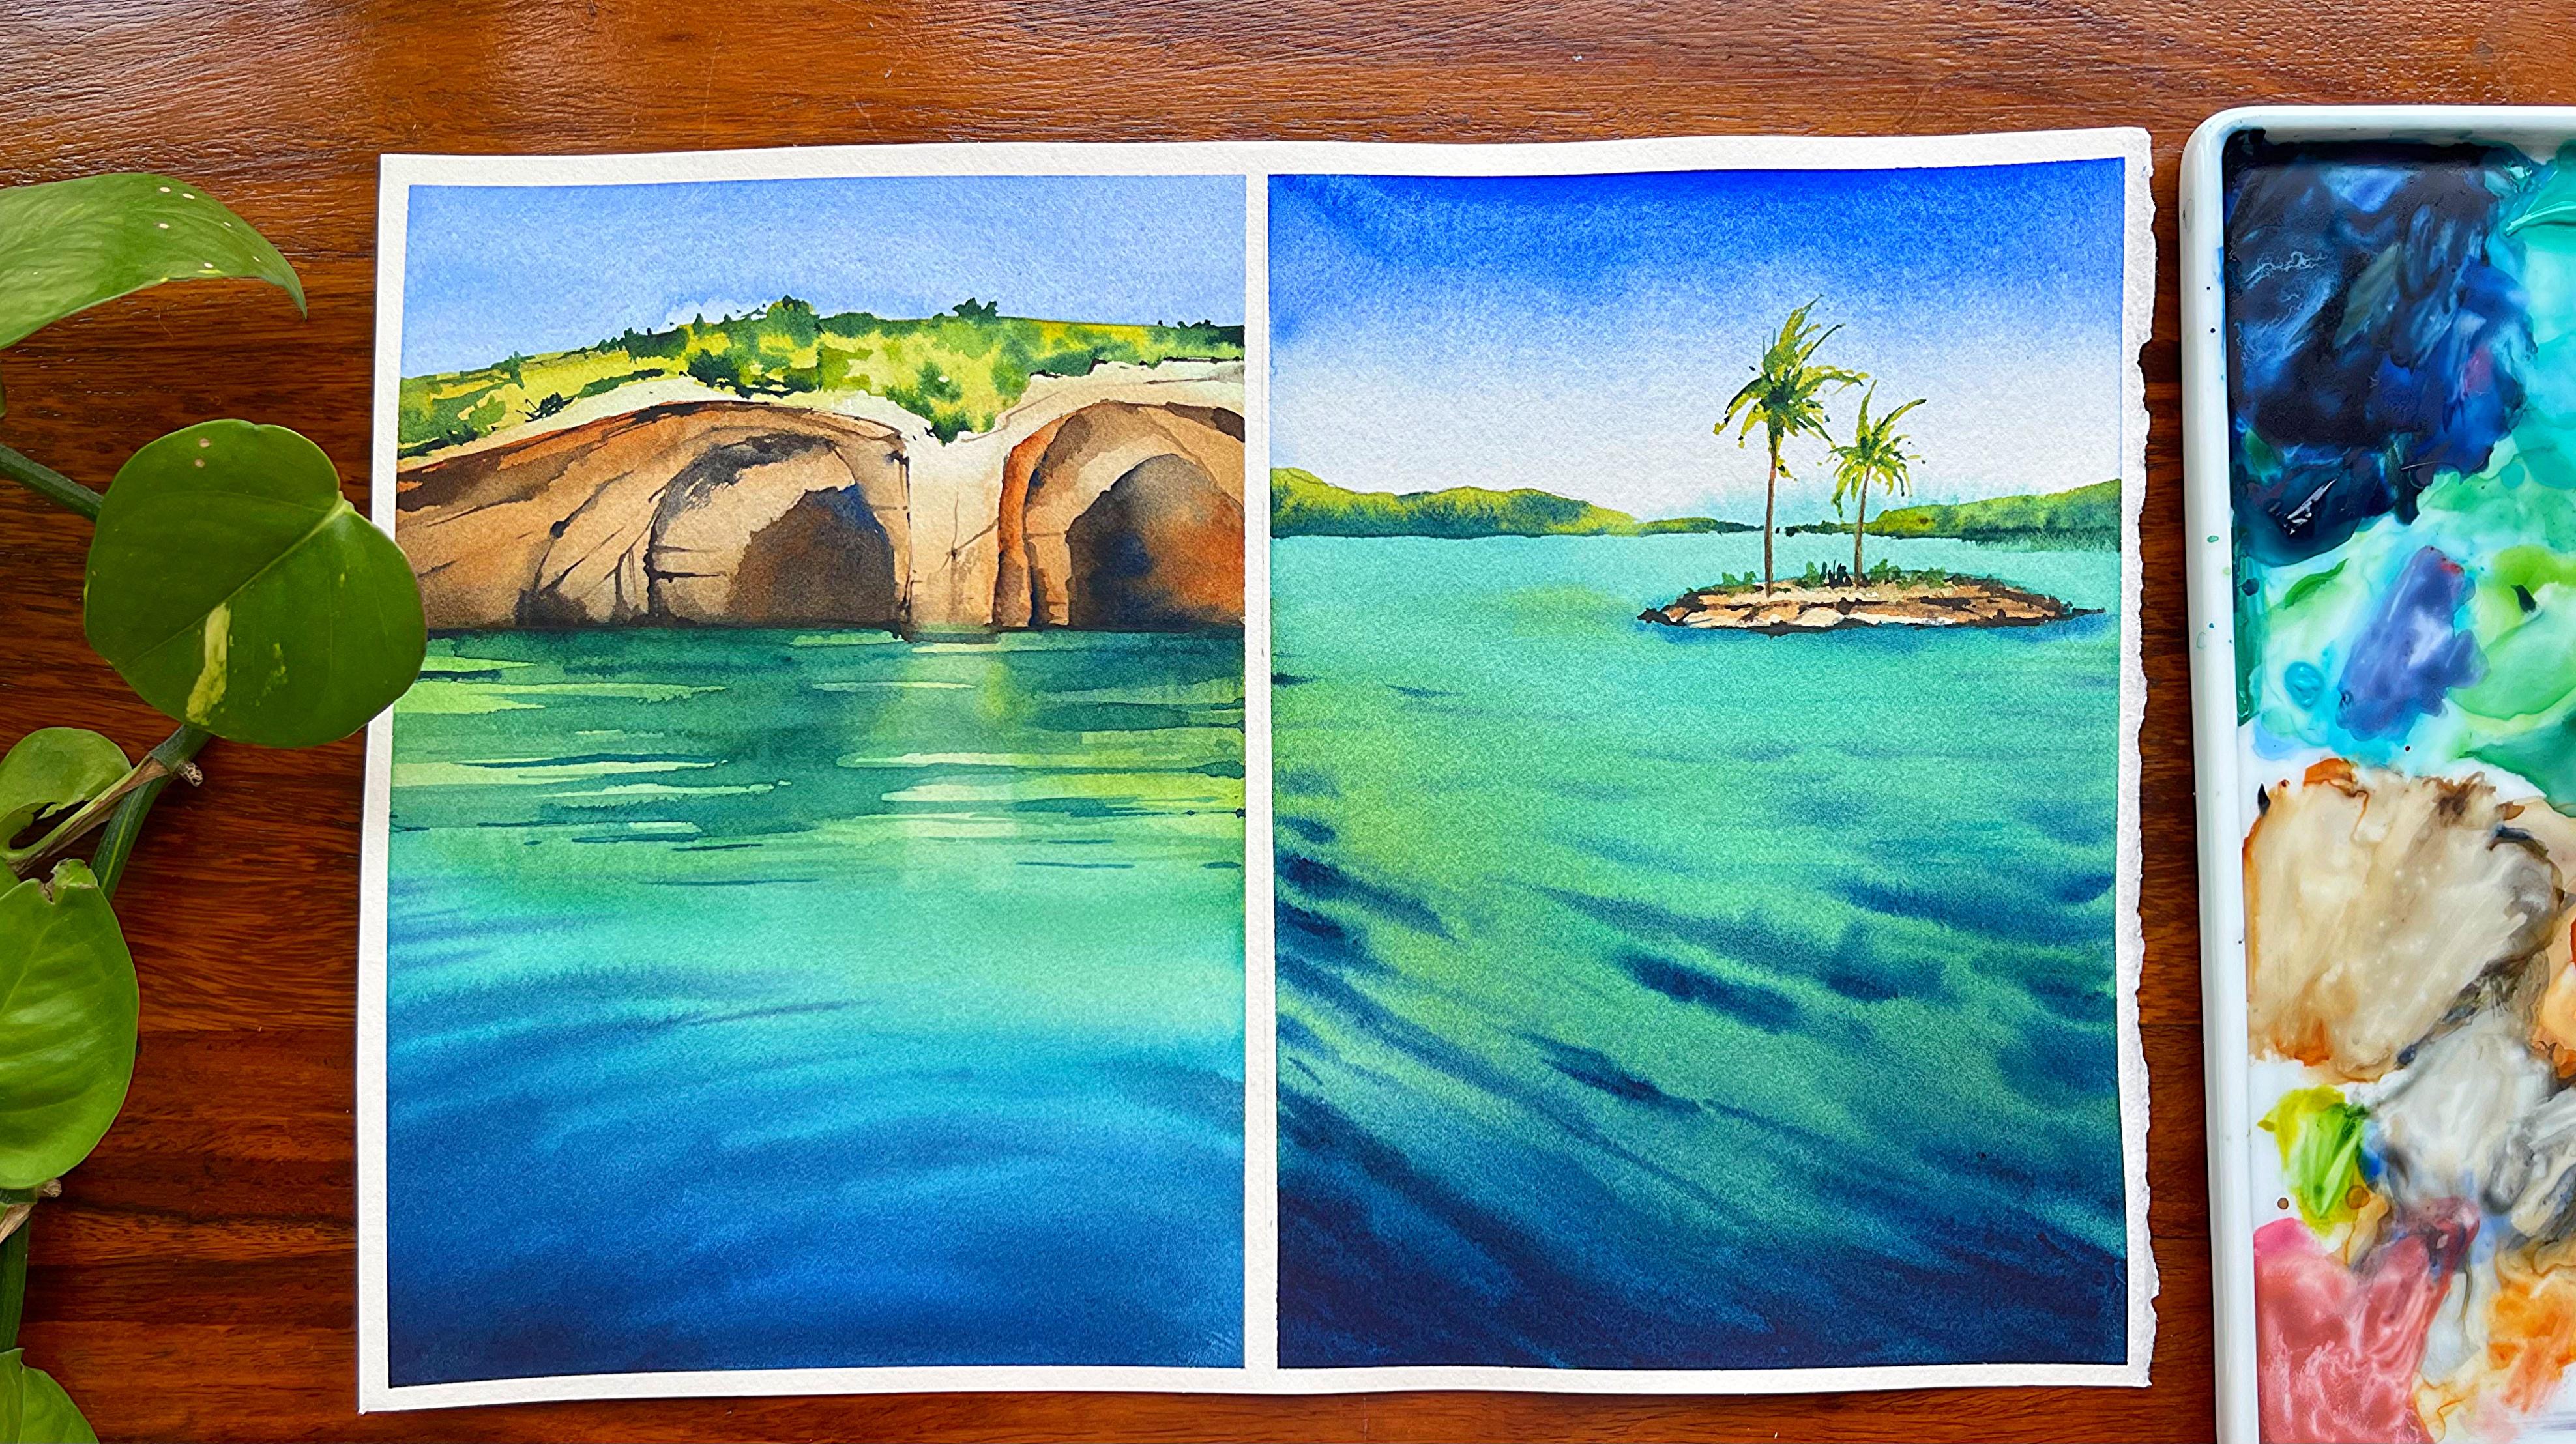
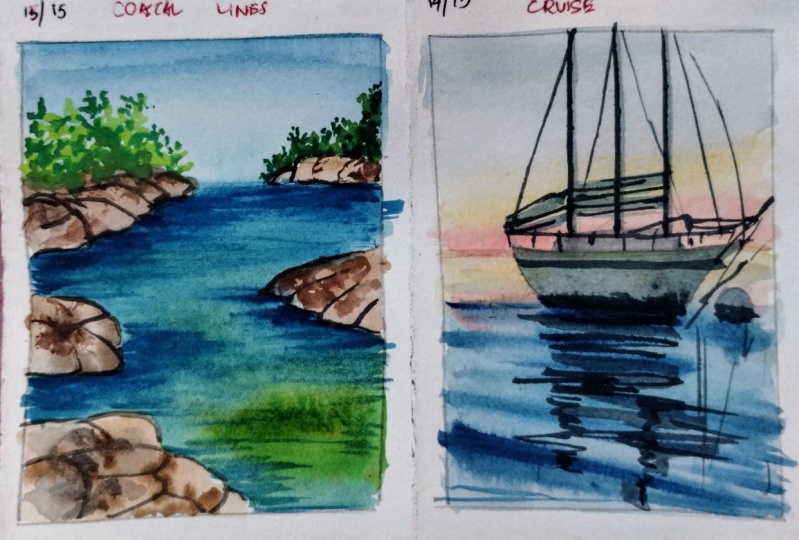
9. Day 3 The Small Island: Colors ultra medal green, yellow green, Vanda green
generally number two, Burns and Vendi K brown. Today is day three of
our voyage into the sea, and I'm super excited
to start out. This is again going to
be an easy painting. Just that you have to be a bit vigilant about
how you do it. I'm going to first divide
my paper into two halves. One is my sky area and another
would be the water area. Water has a small
island in it and we are going to add that for sure. But before that, let's
add a background here. It's at a distance and hence
when you are adding it, make sure that you
make it smaller in size and shape rather
than making it too big. It is far away from our eyes, and we are going to also depict
it through the sketching. Let's go ahead and start adding our middle point of the island. It is going to be
around small part, not exactly around its oval practically and it's a
really, really small part. You can go ahead mask
this area if you are someone who is not very confident about going ahead
and painting it without the masking flod as
you may think that the colors can go into
this island and all. But I did not mask it out. So it was easy for
me to go ahead. The far away waters doesn't
have much of movement in it, and hence I really did not want to play much around
this part as of now. I just added a few
colors for the water and that's all and I
protected this area. I did not go into this
area with my brush. That's the only thing
which I kept in mind while I was working
through the silent part. I'm adding some darker values and few of the areas
because those are the rocky terrains
that I want to add over here into
this island part. In the first two and three
or even the fourth painting, you will see, there
is very less amount of sketching that I've included. We are more focusing
on any kind of waves, painting, water, and not
focusing on the sky either. The main idea of this
is to just work on the water area and understand how we are going
to have directional wave. Directional wave is
something that I have not taught much in any of my earlier parts or any of my earlier sections of whatever I did teach
on Skillshare. This is one of the paintings where you are going to
understand more about direction and how you will have wet on wet direction
for your waves. We do have watercolor
water scape plus where you're painting
two different kinds of water scapes, and there was a directional
wave over there. But that was more to do
with wet on dry method, and here it is more
on wet on wet method. It might sound really
difficult to you initially, but believe me, it is not. Right now, let's just
focus on the sky. I'm going ahead with
ultramarine and then just adding some amount of water
to create a gradient wash. Rdient wash is all we are
looking forward to in sky area. I'm not going to
complicate it much. We will add some colors. For the top part, it is going to be darker, and as we move towards the horizon line, it's
going to be lighter. That's all you need to keep
in mind while you work on your sky area and then let it dry before you go
to the water area. Now, since right now in
the eastern part of India, it has become very hot. That's one of the reasons
even if I don't wait much, I'm okay to go ahead and
start painting immediately. The paper is drying up
very, very quickly. I'm working on a 300 GSM
archers paper as you all know, and it's pretty
thick, but still it cannot hold a lot of water
for a longer period of time. Whereas the last class where
we did see on 1805 GSM, we could work for about eight
to 9 minutes or 10 minutes, and now it's absolutely different even on
a 300 GSM paper. I do not get more than
four to 5 minutes or 7 minutes to work on. So keeping all of this in mind, you have to always
understand that climate has a great role to play in your painting
and how you paint. So be a bit more kinder
towards yourself. If your climatic
conditions are not great, the people might dry up early and you might not
get the softer, I would say waves,
et, which you might have thought initially that
you would be creating. Go ahead with my co
batr This is one of my favorite colors
and you can go ahead with any kind of blue like horizon blue if you
don't have this bar train. I've already explained in
the color mixing section, how you can prepare this bartrn. Please go ahead and
check that out in case you are someone who
has just started out. I think that section has a lot of information
which can really help you to only stick to few
colors rather than having a lot of colors in
this kind of series. Okay. Now I'm going ahead
and adding some water. But as I progress
towards the bottom area, I would switch my brush and
move on to a thicker brush. Ticker brush helps
you to work very quickly through the
whole of the area. As well as it gives me a
lot more opportunity to just add colors and
even add the waves, et cetera, which we want to
do in a particular direction. I'm mixing some amount
of my teal green in it. Yellow green is again
a beautiful color. If you are someone who doesn't know how to prepare
this teal green, please go ahead and check out my section where I have
tips of color mixing. It's very important. I cannot tell you how important that
particular section is. Along with it, if you are still struggling with how
to paint waves, go ahead and check out
my second exercise. It has a lot of
information about how you can paint straight waves. I would be breaking the waves in this particular painting and
doing it in a direction. But if you actually know how to make waves in a straight wave, it would be easier for you to understand this
kind of painting. Going ahead and adding some
more of my call green, and then I added some
of my ultramarine. You might have to go ahead and add some green into
your painting. This green is majorly my yellow green from the
brand yellow mission goal. I have been using this green in many of my other
paintings too, and you will observe
that this green has got a lot more
beauty as we progress through more of
our paintings and come to a space where we
will be doing even ose. The next painting, of course, also has this
greenish yellow shade that I would be adding
into the water, and some amount of direction or wave is also present
in that though that has more to do with wet on wet and wet on dry waves,
both of them together. We are going to include
a bit more complexity in the next painting compared to what we have done till now. Keep adding some
more of the green and the paper is lot wet. I am actually in a good
condition to play with my colors rather than thinking much about
how to go about it. I continue to work through
the bottom area and add some of my darker
colors soon. Do not worry. I'm just mixing some
amount of my don frame. If you don't have this color, you can also go ahead with a few other shades
like your indico, or else you can also
go ahead with chand. These are two alternate
shades that can be used, and this is the darker value, which I'm going ahead and
adding towards the bottom side. Bottom area, of course, needs to be more darker, as I've told you, it's
closer to the ice, and you can always go ahead and see more of intensity
into the places, as well as a lot more detailing. In the areas where it
is closer to your eyes. It is as p perspective. If you have something
far away from your eyes, it would not be as clear as whatever you see
close to your eyes. That's what we are also going to include
in this painting. I am adding some of my
darker values and trying to create my directional wave. As I did add earlier, I'm adding even some
of my lighter values, but I feel that the lines are becoming not exactly how
I would have liked it, so I'm blending it with
my flat brush more. A flat brush comes to a help in all the areas when
it's about blending. That's one of the reasons
keeping a flat brush and a thicker flat brush or a broader flat
brush becomes very, very important at this stage. Adding some lines, this is my size four silver
black velvet brush, and I've added the darkest
value of blue into it. I'm breaking the
lines and adding it so that I can get the
directional wave, which I want for this painting. Some more of the
lines as you see, and I'm adding some of my
darker values just near The island area. Now, why I add the sky
of a darker value, you will usually see
wherever there is island, there will be some
amount of shadows of that underneath or there will be some amount of coral
reef in and around it. So just to make it a bit more realistic and it is
somewhat realism. It prevails in that case. And hence we are also
working on the same lines. I am good at this stage. I've just blended it a bit
more with my flat brush, adding some of the lines again, you will see that
my paper is still wet and I will continue
to work on it. As the paper stays wet or as I see that the
paper is still wet, I can work on it and it gives me a lot more opportunities
to play with my colors. The paper is not very wet, that we will not be in a
position to work on it at all. Whereas, it is not like that it doesn't have any kind
of wetness in it, that I will get any kind
of patches or dry marks. This is something that I
always say in every class. If you have to work wet on wet, it has to be real Okay. In case you can work quickly. You will get the
desired outcome. If you are watching this particular place where
we are creating the waves, I would request you to first watch it and then attempt it, then it would be easier for you to work through the
detailing part, majorly how to create
this space orals. If you stop and again, do it, listen to me and then
again, come back and do it. You will lose out
a lot of time and hence your paper will dry up, which would lead
to patch patches. That's what I don't want
any of your paintings. This is a method, which can be applied even
in your other projects too. It has got a great edge
if you are planning to paint any of your
watercolor water scapes, like earlier later, you
want to attempt water. This is one of the
paintings which can really help you to get
direction or wave wet on wet. I continue to work on the bottom part a bit
more in darker values. And as I go towards the top, you can see that my
colors will become lighter in tonal values. Again, the perspective
plays a great role in it, and I have already
explained the same. So continue to work on
few of the smaller lines, and then we will add
one or two shorter, smaller and lighter
lines as we progress. These waves have the tendency of meeting to one single point known as your vanishing point. You have already done these kind of paintings and you already know this concept, but it can be also
applied to water scapes. I've applied the same
concept to water scapes, and this is what we have landed at creating waves in a
particular direction. I know at this moment, you frankly can't imagine how the total painting
is going to look. Like, and believe me
till you are done with 75% to 80% in a
watercolor painting, you really don't understand how the total painting is
going to turn out. That's what I have seen
and I have understood. And even in few of my paintings, I have seen that it
is almost 90% done, I'm never convinced with
the final painting. Watercolors is a
medium where you can't actually get a
final outcome known or you can understand where it is going to you are done with 80 to 90% and frankly speaking, if you're done with 80 to 90%, go ahead and finish
off the painting. Believe me or not, there's a lot of learning when you
finish off painting. I never keep any of
my paintings undone. I always go ahead and
finish off a painting. Even if it is overdone,
let it be overdone. There is some amount of learning that I have in an
overdone painting. I needed to stop earlier
rather than what I did in this particular
part. Okay. Time to create some of
the same concept that we applied in our initial
exercises exercise one and two. I have added some
light green color and then towards the
bottom of the same. Here, I have added the darker values to
create that beautiful look of lighter and
darker tonal values that create the patchy
effect of greens, which are not like a flat wash. They look more like
variegated wash even in smaller spaces. Variegated wash looks
much better if you see. And they look amazing when done even on smaller
spaces like this. I love to do it, and
I have been doing it. Many of my earlier
exercises too. And this is one of the
space that I would suggest you to work on even to understand how variegated wash works for smaller areas rather than only working
on larger areas. You all know how to
work on larger area. On smaller areas, also,
they look amazing. I think I have taken the colors way more down than I
would have liked it to. So I might have to go ahead
with a flat brush and clear off a bit of
this darker value. Here you can always
use a flat brush and pick up extra colors
wherever it is necessary. Keep a thin brush like
this available for yourself whenever you are doing
this kind of an exercise. Add some more of the darker
values, if needed, be. Once your paper is in a semi
dry kind of a condition, and the colors will
not move a lot. I'm done with this
particular part. Now it's time to go ahead with
my beautiful island area. Now this island area is majorly done in shade like John
brilliant number two, which is a very, very
light shade of brown only. It looks more like brown, but of course, it's not brown. It has some amount of white in it and it's a bit
opaque in nature. Use a very transparent color it. If you plan to use it
or else you can also go ahead with yellow c
or burns and mix. That also looks absolutely fine. Watercolors is all
about transparency, as I always say, and the idea is never to
make it look paque. You can use very light amount
or really light values, as I understand,
and then go ahead with this part of the painting, which is majorly
your island area. I'm just taking off the blue that went into
this particular part. It happens. Whenever you are
going ahead and painting, these kind of smaller
things can happen. Do not take it to the heart. Try to fix it as
much as possible. If you cannot fix it, let it be as is and it will
not look bad overall once we add some greeneries into it and some darker and lighter
values, it will improve. Initially, I'm
adding burn Ciena, and then I would go ahead
with darker brown color. You can also prepare
this darker brown color mixing some burn
sienna and blue in it. I would show that to you
in this painting also, as well as you can go
ahead and check out the tips as I always say
tips of water color mixing. That is a great place
where I have mixed my ultra meanin and burn seiner to create the darker values. I always refer back to these smaller ideas because they play a huge role
in our paintings. Time for making the tree trunk, and this is basically
a coconut tree. Usually, coconut trees
are found in a lot. Quantities. I would say a lot more of quantities
in the beach area, and I want to also do the same. Again, realism There's
a lot of role in this. It has to be more realistic in nature and going with a
lighter value of green, and then adding some amount of darker value of green
to make it like, of course, there has to be
a change of tonal values. You have to make lighter
green and then darker green. Add a bit of darker
green into it. That's absolutely fine. The tonal values will change. Some of the areas will be
in shadows and some of the areas will be more
litted the darker values, I would add more
towards the lower half, and the lighter values
will be seen that way. Always make sure that
whenever you are adding the lighter and
darker values add the darker value on
top of the I mean, on top of the lighter value in a way that lighter
value is also seen. The idea of lighter value is not to create any kind of undertone. It is more to do with,
it has to be seen. It is seen in the lightest of the areas of my I would say, the greens that I'm adding, and the darker value is seen in the darker values are more
into the shadows area. So that's what the whole
concept is all about. Last few minutes of the
painting, and then we are done. At this stage, you should be the least stress because most of the difficult
work has been done. It's only a bit of details of paints or some browns
that we are going to add, and then whole of the
painting has come to life. Something that I
always say the last three to film 4 minutes
is to step back, see what is needed and
what you want to just do to let this painting
see the light of the day. The light of the day
is going up as one of your favorite
paintings on your wall or it being as one of the most good or
beautiful paintings that you have done till date. So all of these are emotions, and it plays a lot of
role in every painting, you know, whenever you
are watercolor artist. There will be a lot
of failed attempts. Be not this particular painting. I did two times,
which means that I did attempt it once
in my sketchbook, and then I did go
ahead and attempted on this particular sheet, and AI size so that
you guys exactly know how to go ahead
and paint this one. So, even experienced
artists and people who are more or have been
painting for many years, also do practice a lot and
then only get a painting that they can present in a class or make a final painting
that is of their choice. It needs a lot of practice
and a lot of dedication. It's absolutely fine. If you are not getting the exact outcome,
be happy with it, you will get it maybe
today, maybe tomorrow, but it will be a very,
very good outcome. Adding some of the greener and the darker values of brown, and smaller dots here and there, and I would go ahead and
paint rock like structures. These are mostly done with the darkest value of brown
and adding some lines. With my thinnest brush
size one or size zero, whatever is available with you, you can go ahead with that
and just finish it off adding some darker
values in the areas, which looks more like
your rocky parts. And then adding one or two dots here and there for the
detailing. Okay, great. I think this looks
absolutely fine to me except a few greener dots
that I want to add towards the middle part. Just observe what I'm doing, make one or two dots. If you are left out with smaller space or you're
working on a smaller paper, this island will also be
smaller and you might not be left with this
much space to work on. That way you can also
leave it and just see what's the outcome
that you are getting It's not necessary that you have to always follow all the steps. What works best for you? Just follow that,
and you are done. Let this dry off and then have a final look at
both the paintings. Tomorrow, we would
be going ahead and learning the left
one where it is more about painting your caves and how the reflection
will fall into the water.
10. Day 4 The caves: Colors are Bond
brown, ultramarine, bar green in Dre, Painkre or in the yellow green ndikGreen John ant number two. Let's start by doing
a rough sketching of what we have to
cohad and paint. It's always good to do a rough sketch before we
head with the final one. I have just gone ahead
and added a line. This is basically
my horizon line, but I'm really not fine
with it not being straight, and hence I'm using my ruler just to make
it a bit more straight. To this step you can
also avoid as it's fine. It's nature that we
are drawing and it's okay to not letting it
be absolutely straight. That's absolutely okay. If you want to do a
free hand line drawing, please go ahead and I would
encourage you to do the same. I'm going ahead and adding
cave like structure. How I do it, you can
follow simple aspect. Just draw some curvy
lines as I work on it, and then you will
see that I will add some semicircular
round structures. Now, the middle part, of course, would be in more
lighter value as it is more lited whereas as we go towards the
inside of the cave, it would be more
darker in value. I will continue to add more graphy marks for
creating the cave. You will see that the
cave is more in layers, which means that my
cave is going to have more of darker colors in some places and more of
lighter colors in some places. Right now, this is secondary. What I want to achieve at this moment is
a framework of the cave and just understanding
how and where I would be exactly placing
my darker lighter values. You can always do another
thing that is shading. We will see how we do
that part of shading also as we progress in few
of our other paintings. But right now, it's important to exactly know how much would be the darkest value where you are going to apply. So just the inside
of the cape would be the darkest in
value and the rest of the parts would be more of the lighter and the dark browns
that we are going to apply. Okay, continue to work on this part and
almost we are done. It usually takes
three to 4 minutes to create the cave.
Believe me or not. I'm also not that experienced in terms of creating an exact
sketch in the first code. That's absolutely fine. Use your eraser, but do use
a lighter graphite pencil. That is, again, very important. If you don't use a
lighter graphite pencil, what happens in the
processes that you will get a lot of darker values, which is really not
required in the painting. Go ahead and adding my
ultramarine, as usual, this is my favorite color, and I am using it towards the top part just
above the cave area. To practically show the sky, you can also use any other blue that's
available with you. It can be bar blue, cellum blue. These are also great options. Again, I'm using my ultramarine and then using some amount of my cobalt green and adding it as I progress
towards the top area. The lower part would be
more darker in value. And as we go towards the top, it would become more lighter
and lighter in value. The reflection of the cave will also come onto the water area. We'll see how we do that. But let's first work on our
water creating the water. This is more like a gradient
wash, which you can see, and now I'm adding my yellow grain as I
progress towards the top. I am using my mob brush, which is zero by three
from the brand refile. It's amazing as it
has a great tip, which I can use to my advantage, more and more of liquid colors. You can see watercolors
is always transparent and nature and the white of the paper practically
reflects back. You can see the
white of the paper, the vibrancy looks amazing, and something that I have been falling in love
with more and more as I continue to progress on
this journey of watercolors. Adding some of my blue into it and creating a
tal kind of a color, or you can say this
is a cobaGreen color. Some of the areas
are more darker. You can also use tailor green
if you don't have any of the other greens like
bar green mix a bit of white in it and you
will get the exact shades. I always love to continue blending my colors as I progress towards the top. Something that I've
learned over tins, the more colors you create by actually mixing your colors, the better is usually
your outcome. And hence I do follow
this part completely. Go ahead and adding the darker values
towards the bottom area. Initially, I did
add my ultramarine. Now I'm mixing some amount
of my don frame blue and some amount of
any darker value, it can be putian
blue or it can be indico or even it can
be your pain screen. Depending on the pain scray should not be more
on the gray side, it should be more
on the blue side. Adding a bit of darker values just near the cave ending area. Why I do this, because these
parts are going to be way more darker and because
when a water hits a rock, you will see that some of the portion will
become darker in value as there is either some deposit or there
are cuts because of water, there are some kind of algae growing or all of
these usually happens, and that's what we are going to show even
in this painting. The middle part, of course, I'm clearing it out so
that the reflection of the lighter value of the
cave area can fall into it. And now I am just blending
the colors a bit more. Blending is very important, and I am frankly, highly struggling
with the amount of water and the moisture
of the paper, et cetera. Believe me or not, it
is close to 40 degrees. And I'm struggling with
the wetness of the paper. It's drying up very, very quickly compared to what I have faced during
my winter season, the summers are very bad, and climate has a lot of impact
on the kind of paintings, the water that
stays on the paper, et cetera, in a great extent. Going ahead and creating
the directional waves. The directional waves
is something that I've explained even
in my last painting, and I did leave this out for
this particular painting. You can see that I'm
making more curved like waves from left to right from left to
towards the right. And on the bottom corner,
it's more darker. I'm adding some of my darker
values of blue as I create the spot and then keep adding the darker values
towards the bottom area. Yeah, the paper is still wet and I can work
on this paper. I would request
you guys to first watch this and then only
go ahead and paint it. If you are staying
in the summer parts, believe me or not. Even using a 300 GSM or a 400 GSM paper might not
be enough and you may face the difficulty of challenges keeping your paper wet for
a longer period of time. So that's one of
the reasons when you do this kind of thing, make sure that you watch
it and then start painting along with me so that you know your colors, you
know your mixes. It will not take you
much time to finish off the painting and you can practically work well
with the wetness. For waters, you have
to work really fast. For sky, you have to
work really fast. For what is also, you
have to work very fast. Yeah. I know that
I have always told that water colors you can keep about seven to 8
minutes or 9 minutes. But depending on the climate, I'm getting max six 7 minutes right now to work on my paper, rather than it being
eight 9 minutes during the winter season and I was
working on 1805 GSM paper. I would have got it ten to 12
minutes on a 300 GSM paper. So even after switching on my AC or working not under an
AC and not under a fan, still the paper is drying
up absolutely quick. I'm going ahead with a mix
of my John brilliant number two and then blending
it with clear water. The water is not
absolutely clear, so you already see that I'm adding some amount
of green as I go towards the top area and then blended with some brown as I
go towards the bottom, I feel that this can be lighter and lighter as you were going initially
with the pains, and then it can go way more
darker as we progress. This particular part is
going to take some time, as well as your reflection of the cave into the water
is going to take some time. The paper is not very wet, so I can go ahead and
work with the wetness of or you can say the
moisture of the paper well and add the darker values
wherever it is necessary. Currently, all my
values are lighter than what it would finally
be on the painting. I go a bit slow with the
whole of the painting as I don't want to overdo
it at any point in time. And if you overdo
it at the initial, then what happens
as you progress, it becomes more difficult. Cleaning up the space
in the middle area, you can see, and the
paper was still with. So it was easier for me
to work around with it. I'm using some of my brown
and adding it over there. Believe it or not, this
will be fine when we are working finally on
the paper as we are going to add more
of our waves which are going to be a reflection
of the cave into the water. And that reflection is
also on a moving water, which means you will see more of dancing colors
coming up later on. Don't need to worry. Just follow the steps, and that's it. Let your paper dry
off before we go ahead and add more of
the darker values. Now, I've started out
with my Burn Sienna slowly adding some amount
of darker value of brown. This is vendi K Brown, or you can go ahead with Any of your other dark browns that's
available on your palette. I'm not a person who really
thinks about the colors. It's more about what we
are trying to create. You can always mix your colors
and create something nice. You can see that I'm now
going ahead and adding the darker values as the
rock meets the water. You know that those
areas are usually dark, and I wanted to also
keep it dark as such, using the tip of my
brush to my advantage. Washing it, and then
again, adding burnt CNA, blending it with the colors
that I've already added, you can see that my paper is becoming dry and dry as
we keep progressing, and I'm frankly struggling with watercolors at this moment. I don't know. The best way I think to create this
would have been to apply your water on the back side of the people
rather than taping it down, but I really like the nice tape that usually is
there on the sides. If you are someone who is
struggling with watercolors, go ahead and try the strip, apply water on the back side of the paper and stick it
to your acrylic board, then start with all
your painting part. But before you do that, make
sure that you are done with the graphite marks or the sketching part and
then do this part. I guess that would
really help you to ace through the dryness that
appears on the paper. I have to continuously work on the parts where I really
don't want to touch, but I have to add water
there and then again blend it and just add it with the
background bottom area. It's not very nice
to do this process, but if you have struggles
with your watercolors, you ought to do
something about it, and this is what came to my mind as best
possible solution. Go with my lightest
value of green, that is my yellow
green and applying it towards the top
part of the cave. Please pardon my voice. I know that it's
been very difficult. My voice, of course, is a bit cracked up because
of viral infection, and now I am recovering. So maybe by tomorrow you will have a better voice coming up. But let's go ahead
and add some of the darker values of
green here and there. I will just add a few dots and then add some
of the greeneries. I'm using again, the
wetness of the paper, that is the lightest value of
green, which I have added. To the paper and then using my thinnest brush to add the
darkest value in this way, I can control the
water on my brush. Only a few places will
become more darker and some of the places will
still remain light that way. It's easy. Is all I can say. Just you need to follow
the instruction. We all are struggling
with the summer season, and you might also struggle
with the summer season. So it's absolutely fine. Do not switch on your
fan or AC if possible because both of them is going to actually make your paper
more and more dry. If you are working
with watercolors, they are not a great source to continue working
with watercolors in this kind of a season. Going ahead and adding some
of my darkest value again, putting a few dots
over and there. You can see how I continue
adding these dots. These dots are basically
my greeneries. I don't want to add a lot
of details at this stage. It's pretty far away, and only a few lines that is basically your
craters or the caves, how the formation is. That is only going to be seen much grasses in the background you frankly can't identify, and hence we will keep it
more on the loose end. I will check the paper once that if it is dry enough to keep working with the darker value that right now we are adding. It's my darker value of brown and then it's my ultramarine. Yes, I have been working
with ultramarine. I have shown you how exactly the colors work when it is
ultramarine and burn Ciena. You can go ahead and check
out the mixing of color tips. There are a few important
ones over there because that really helps you to understand the
mixes, et cetera. Even the blue, the cobalt, all the mixes are
given over there. Okay. Adding some darkest value. You can see that I have already added the lighter value and now it's time for the darkest value. Go ahead and picking
up the colors from where I think
it is not necessary. I do this exercise very often because sometimes I don't like a particular
shade color, et cetera, and I will just pick up that shade with
my damp brush. Time to add some of
my darkest value. As you can see, I am going
ahead and adding my darkest of the colors with the help of my thinnest brush and creating
some rock like structure. You haven't done
rocks much as of now, and I will teach you in more detail as we progress
how to create rocks. We have a full A
four size painting where we are going
to create waves as well as rocks along
with Ireland. Be ready. There are more
paintings coming up when we are going ahead and
working post day eight. So till day eight, it would remain more of a
five size paper. Easier paintings compared
to when we reach the line. It would be more of bigger
size paper, et cetera. Adding more lines
here and there, you can see how I progress. These are just few lines, which I continue to add and then create the craters
wherever it is necessary. Add value at the
value and then blend it with the help of the colors or with the help of
my blending bruh. This is a continuous process, and there is nothing much
to explain at this stage. So you just follow
how I continue to create or add these
smaller and thinner lines. Always altering the values of your color is a great
idea when it's all about working on any rock
like structure or adding some smaller
details here and there. I do work on darker
values in some areas, and some of the areas, I still think how
I should progress. Something that I've learned over time is you should
always step back, relax, understand how
you want to progress, and then only progress
with your final painting. There is still a
lot of time left. About one third of the time, we are going to work on
the next set of a part, which is majorly
about the reflection and some amount about
creating the rocks. In a similar way, you
have done the left side. We would be working, of course, in the same way and
creating the darker and lighter values of the cave
even on the right side. You might find it a bit longer and tedious process
at this stage, but believe me as we progress. You will find it more and more easier in your future paintings. Rocks, yes, we are going
to paint quite a lot of them even as we progress
with our other paintings. But this is going to
be some few lines, and you will see how
I just add a bit of darker value in some of the area and lighter
value in others. I have two more paintings to go where you are going to work
some of the rocky terrains, et cetera, and one of them is going to be
very, very interesting. Again, I told you about
a size structure, a paper, et cetera. But having said all of it, I have been enjoying
by painting throughout this whole of the series because water is somewhat very
challenging when we start out. But if you have the
steps laid out or if you just know how
to progress with it, I think it becomes
way more simpler. And most of the process over here is wet on wet
or wet on dry. Those, any ways are the basic two important ways to work on your watercolor
painting service. No other technique that works compared to wet
on wet or wet on dry. Yes, a more
sophisticated technique that many of us to approach
is the water control, and water control is
your paper measuring the moistness of the paper or the amount of
water on the paper. If it is not watery, then of course you can control your colors to a great extent. If it is more watery, then you really
can't control it. So those are the only concepts
that come to your use. There's nothing much of concept, which I would say
that you need to know for any of your paintings. Continuously going ahead and adding a few more
lines here and there, darkest value, as always, It is some more of rocky areas
that you see, I will add. Once this part is done, I'm going to go ahead and
work on my reflections. Reflection is a very, very important concept, and I have not touched upon it much. Until now, we will work
upon it as we progress. But yes, over here, what we will be doing is a very simple way of
reflection of this cave into the water with
the same kind of colors that we already
have in the water. We are not going to go ahead and add any browns, et cetera. We are only going
to go ahead and add a bit more of
the darker value of green and mixing
it with a bit of blue to get the final results. Adding some of my
darker values and making the cave that
is there in the front, moving a bit I mean
towards us, I would say. Blending it with the
help of my flat brush. Then again, I'm using the tip of my flat brush to
blend it a bit more. This is how I continue to
work on my rocky areas, but now I'm pretty satisfied
with how the hood of the caves look and the
feel I think is great. I'm trying to make a bit of
green and blue kind of mix. This is more of a tailor green, but a bit more lighter than tail green tailor
green is very dark and hence you can
go ahead and make some amount of lighter
value of green. I'm going ahead and
making some lines. It's the similar
way like we have done our waves in
the boat painting. I will go and add some
of my lines more. I'm using my size four or size six brush.
Both are good to go. If you are doing this kind of a painting and add
more and more lines. Progress with it, make some of the broken lines as you
progress a bit towards the bottom of it and continue to add some of the lines
even on the left. You can make it a bit broader, and as you come on the right, just make it a bit more thin. Add it, continue to work on it. It's something it's like meditation for me.
Believe me or not. I never think about
the final outcome. It's never about
the final outcome. It's mostly about how
I add these lines, how I add just thinner and
smaller lines as we progress, using the tip of my brush,
learning more techniques. That's what I think about, and that's one of the ways I have learned way more than
I've thought about perfection. Perfection is not there.
No one is perfect. And I would say none of the paintings are
absolutely perfect. We don't need a final
perfect painting. We just need good
learning and progress, progress is most important,
as I always say. You just think about
the progress and rest. I think everything will
fall in line automatically. Adding some of the blues
into the wet areas, but you can see already the
wet areas are no more there. Even I have added these lines
just a few seconds back, you can see, but the paper
has already dried up. I'm using arches 300 GSM paper, and that's one of the best
that you have in the market. Still there's so
much of struggle. Yeah, we continue to
struggle, but that's okay. All of us struggle. Some
of the other way we will be struggling
with water or people. It's watercolor, right? We have to struggle
a bit or else, what's the fun of working
with watercolors. The whole fun is all
about learning how to keep your paper for a
longer period of time, or how to keep working
on your paper, even when it is dry, how to overwork a
bit also, right? Many of us have
overworked in the past, and I have overworked in
so many paintings of mine. But now, sometimes, you know, I just under work It's like I don't go
ahead and work more. I've just thought to
leave it like that. Maybe it's more
loose and keeping it like that makes it look better. That's it, and
adding some more of thinner lines as we progress
towards the bottom. I'm very happy with how
this has turned out. There is a medium
part where you can see that I can see the reflection of the
rock into the water, and I'm extremely
happy with that part, adding some of my darker
values over there, just near the cave
and keeping it like that washing your brush and then again,
blending it a bit. To show that darker value as we did on the left
and on the right, extremely amazing how
this painting has turned out and let's remove the tape and
have a final look.
11. Day 5 Gazing at the Sea: All the colors are same, so let's have a look at it balin Kalo Green Ultramarine
John Brilliant number two, Burn Cena and DK Brown. I must say that this is one of my favorite painting from
the series because you are watching out of
the window and you can see the beautiful seascape. I think this is my favorite, one of my favorites
from the entire series, and let's see how we
are going to do it. It's going to be a
very simple process. I'm going to make
a horizon line, and then we are going
to mark a middle point. Now, this middle
point is basically where exactly I would
be drawing my window. The window is absolutely
straight line that I did at this moment, but I would go ahead and make
it a bit more rectangle. You will see that I have to take equal halves on the left,
as well as on the right. And I need to also make
a window like structure, which means that it
would be more rocky. And that means there will be some amount of mixture
of John in number two, Bncena as well as my favorite
that is ultramarine. I love to see the
granulating colors of ultramarine on the wall, and it gives the picture of how a wall is ruined over time, which means that there is a lot of wear and air
which it goes through. If it is made out of stones, still it will go through
a lot of wear and air, and that's what we're also going to show through
this painting. I use a very lightrified pencil, which is two H. It's more
like a drafting pencil. That's one of the
reasons if you're watching on a smaller
screen like a mobile, it might be difficult for
you to watch these lines. I would highly recommend you to watch it on big screen
like a laptop or an iPad that would
really help you to understand where exactly
I'm drawing these lines. I will draw two parallel lines. You will see how on the left,
as well as on the right, we continue to draw these
two parallel lines, make sure that it is equal on the left, as
well as on the right. This is something that I must tell you the windows
are manmade, and that's one of the reasons the proportions should be equal. We cannot go really
off in terms of proportion when we are talking about windows or
buildings, et cetera. If you are working on
nature, that is plants, your ocean and some
kind of rocks and all, you can for sure, go ahead
and do as much as you like. But for buildings, et cetera, there is less way you can go in terms of going random or adding more
randomness into it. It has to be in a particular way only as per the rule
of perspective. I'm taking the help of a ruler. As I know, many of you might be bigner or intermediate
level artist. In case you are an intermediate level artist and you are well versed with how you should
draw straight lines. I would highly recommend
you to use that technique. In case you are starting out, it's good to use a roller and understand how you can go ahead and make lines and then only start off with
your painting. Once I have erased
my middle line, I would go ahead and
mark a horizon line, as I did tell you initially, for separating the sky as
well as the land area, and then I would go ahead and start by marking my land
area on the right inside. Along with it, make
sure that you have a good amount of space
which denotes your water. Of course, I did not cover the entire part with my
sketching, et cetera. I tried to keep it as
simple as possible. Always simplicity is the key in any painting
that you are doing, the more complex is your sketch. The difficult it might be for completing or
understanding your painting, try to keep your
sketches more simpler. In case you are going with a line and wash in those cases, I would highly
recommend you to go for more complex sketches
and add a bit of light washes on top of it to create the final painting. But for the paintings
where we are doing heavy washes and working
on a 300 GSM paper, It's important to keep your
graphite marks really light. Watercolor is a very,
very transparent medium, and we are using
the transparency of this medium to create some beautiful and
vibrant paintings. You will not see
that I will take more than four to 5 minutes
to sketch the entire part. And then I would go ahead with my John brilliant number two from the brand leban this is
one of my favorite colors, and this particular painting
is done in two parts. One part, where we will
be painting the window, and another part will
be where we are going ahead and watching the sea. Now, the C, of
course, is a very, very simple part that I have
kept as we are working in a more complex not
exactly complex, but more I would say,
lines perspective, et cetera that we have added to the window
compared to what we are going to do in
our seascape part. Most of the seascapes that
you have done till now, this is, I think one
of the easiest of it. It might take a bit of time for making your window or
sketching your window, rest, everything
is really simple. Once you have added this color, please go ahead and add
some of your burn Ciena. Now, the burn Ciena that
I have is on my palette. I have been using
this burn Ciena from the brand PWC for
quite some years now. I have mix of colors from various brands as
most of you asked me. I mostly use brands like
majo Mission Gold ener, then incur Newton PC, Shinhan watercolors, and all of these are
the major brands, which I have been using
for many years now, and they're all artist grade. What positive that you get with an artist
grade watercolor is if you apply one layer of it and
wait for it to try off, the shade will be only one or two shade lighter
rather than it being three to four shades as it has only binder
and pigment in it. Rather than when you are using any kind of
student red paint, it has also fillers in it. Adding some of the
other colors here and there and blending it with the help of my thickest brush. I have been working with this thick brush
for many years now. It is 1 " brush. Covering the entire space
becomes very easy with this. Some of the spaces, I
have kept it lighter with my burn sienna and some of the spaces are more
darker in value. As you progress
with the painting, you will understand
that the darker values, which we have added for the window area are more
to do with the shadows. And the areas which
are more darker, that is on the top, it is kept in a lighter
shade and value. I'm right now mixing two colors, which is my Burnsiana
and dik brown. Tough you can also
mix your blue. And this is my ultramarine,
which you can see. The paper is wet
currently where I am painting and hence it's more of wet on wet technique
that we are exploring. Let your colors flow, let I would say, pigments dance, let
your brush move around. This is something that I always love to see and I
always love to create. I can only tell you the more
you allow your brushes to dance and the more you allow
the paints to move around, the better would
be your painting. Mix your colors on the people, which means that once you have
applied the burnt sienna, apply your ultramarine on
top of the burnt sienna, which you have already applied, exactly the way I'm
doing right now. And that way, what you can make sure is that
some of the areas are really darker in values and some of the areas
are lighter in values. The blue will be
also seen as well as many other colors will
also form in the process. This really helps
you to show the worn out or the wear and
tear over the years, which has happened
for any kind of a stone like structure
or the walls that that you believe is there or standing
for many years now. Going ahead and adding
some of my darker values. And this is my size four brush from the brand
silver black velvet. It has been with me for
almost five years now, and I have been enjoying
painting with this brush. I think that the tip is now not that great as it was about
four years or five years back, but my size six brush
is still the same. I might have to go ahead and
purchase one more size four, but usually these brushes
actually last very very long. Adding some of my Bersana
even on the top area. And then I did
also apply some of my ultramarine towards
the bottom part. You can watch very well that I continue to use my size for brush in few of the areas where I want to add some
of my darker value. The paper is still wet, and that's a great
news to be Frank. The paper is not staying wet
for a longer period of time, and I have been struggling
with watercolors. But when you are occupying or when you are working
on smaller spaces, This is never an issue. If you're working on
really, really small paper, even a 1805 GSM, 100% cotton paper is good to go. Time to mark the
area of the hill where I would be adding
the greener part, and some of the areas, of course, would be
in the rocky terrain. The rocky parts are majorly with your darker values and
lighter values altering. You can also go
ahead and just mark some of these areas
where you want to add the darker sheets
and just shade it a bit. As you will I mean, no one will be in a
position to see that through once you apply the
darker value on top of it. That way, it becomes
easier for you to frankly understand where
exactly you want to add the darker value
and where exactly, you want to add
the lighter value. When I usually do
my own sketches, there are times where
I do these exercises for a better understanding of my color shade value,
stones, et cetera. I really wanted you guys
to also explore it a bit, and that's one of
the reasons I did show it to you on a
smaller space like this. Continue to add a
few more lines with the help of your pencil
shading and then taking it towards the
bottom area where exactly the rocks
will meet your water. Where exactly the rock
meets your water. That particular part
is, of course, dark, and you can continue to add some of your darker parts there. I think I'm good with
the pencil sketch now, and I would let it be as though there is
always a tendency even with me to
overwork sometimes. But it's good. I mean,
if you don't overwork, then you really don't get to
know what are the learnings or what you did as
a mistake, correct. So nothing is bad
in watercolors. Earlier, I used to think
this is gone wrong, this is bad, but now I appreciate everything that
happens in watercolor. Go ahead with my burn
sienna and then just blending it with some water
towards the top area, I did add it and then
adding some water again to low it down
in the tonal values. Finally, I guess
it's important to continue painting with
your darker value of brown as you see over here
and then add some more of your burncena
towards the bottom area. As I did tell you, that would be way more darker, correct. So keep all those
things in mind and keep a real picture of it in your mind when you
start painting it. Just fill up the area, which is white, and then start adding some
amount of your blue. The paper is still very wet. At this moment, at
night might not be the best time to continue
adding all your colors. But some of the spaces which
look a bit more like done, or it is a bit drier than what you usually see in terms
of the water being there. You can add the darker value of blue there or the
brown as you want it. I will not say that you have
to really use the blue, but you can always
try it, you know. It's great to try out shades. It's great to see how the water is being done or how these whole rocky
terrains are being done. I'm using my size one brush
at the moment to create these darker shadow
areas of my rocks. Paper is wet, as you know, and this is a really,
really small area. So everything might not be
seen in the best possible way, but that's absolutely okay. You do not need to have a lot
of detailing at this stage, a bit of detailing and
that's good to go for us. It's time to work
on the greens next. I would go ahead with a
very light value of green. It is my yellow green that
I'm applying right now on top of the brown rocky terrain
that I did add earlier. And then I can go
ahead and add some of my darker value
of green in some of the spaces just to show
light and shadow as this looks really flat
and I don't want to have an absolute flat color. In each and every space. I'm using again,
the ultramarine, but you can, of
course, blend it with some of the darker
values of green. Keep it simple, keep it easy. It's not that you cannot cover it with some more of
your yellow green. I'm again adding some more
of my yellow green and then covering the spaces
where I need it's necessary. Go ahead with a smaller
brush or that way, you can really control your darker and the
lighter value of green. This bigger brush
is difficult to control if you are
new to watercolors, and that's one of the
reasons I would like to suggest you to go
with a smaller brush. Adding some yellow, and
you can see I continue to even pick up the colors wherever
I think it is necessary. Okay, great, let's just blend
it a bit and then leave it. We will start out with
our water after this. Water again, would be either in compose blue or cobard grain or any of the lighter value of
green shade that you can see. Go very easy towards the top. I'm adding this
cobalt green color. And then as we come
towards the bottom, we can go ahead and add
some of our darker values. At this stage, you can do one more very
simple trick in and around this window where there is a square
like structure. You can add a masking
tape, and that way, it is way more easier to cover the entire wide
space of the water. You can do it. You can avoid it. I would leave that up to you, but it's a good way to
use the white space. And that way, what happens is, you can also control the
colors and the final outcome. It will not move
into the rocky area, or it will basically move into the rocks
as well as the walls, which we have added
for the window part. Blending with some of
my darker value near my rocky terrain of the beautiful seascape that
I'm painting right now. Super excited and happy. Believe it or not,
this is a very, very exciting and
amazing painting that you are going to attempt. You are looking
out of the window, and if you can see
such a peaceful, meditative and nice
serene seascape, who will not be
drawn towards it. I think I can only imagine
it and be happy about it. It's already very hot
in this part of India. And I'm really waiting to
go to any of the places, which has beach, and I can just enjoy some
good time over there. Blending it with some of my tromin as I go
towards the bottom area, and then keep blending. You can see that I'm using
the vinci size zero brush for doing whole
of this exercise. It's good to use
your bigger brushes if you are comfortable with it. Believe me or not, these
are few of the brushes that I have been using for
years now and they are great, even after years of use and
regular use day in day out. Okay, let's wash our brush
and just finish off by adding some more colors in the white of the
area for the water. Adding a bit of teal blue towards the top
area of the water, and then I will just blend it
a bit with my clear brush. I mean, with clear water, of course, which is
there in the brush. Add a bit more of blending
into the space that we have created for
our seascape area, and then let this part dry off. I would like to let this
part dry off rather than continue working on
the sea right now. We can work on our
window as of now, and add the shadows, as well as some
cracks, et cetera, which would make it look like as if there is a
lot of wear and tear, which has happened
over the years, which means that rainfall has happened, snow has happened. Son the sun rays
would fall on it. And overall, yes, you can see a lot of
changes in the color. Some of the spaces are darker. Some of the spaces are lighter. I'm really not comfortable
using a thin brush. I might have to go ahead and switch to a bit
more ticker brush. Of course, it has to be the wise or some kind of
silver black velvet. Size six brush. Both are good to
go at this stage, and I'm using the same colors that you always
find on my palette. These are the shades. These are the common
shades you have been observing me using
for all my paintings, and they would remain same for all the paintings that we
are going to do except one or two even in our paintings
from day nine onwards. Believe me or not. All
the days you can attempt. There is no difficulty in
attempting any of the days. We start from sketching
and go till the end, which is the final painting. I explain each step in absolute detail and every
video is real time video. You can paint along with me. So continue to add
more and more cracks, ridges or I would say,
darker, lighter values. It's a wall, and we have to make it look
more like a wall. Adding some more of
my darker cracks and then blending it
with the background, which we have already added. This background is
dried off completely. So there are less chances that the colors will mix
up at this stage. You will only get the
colors that you are adding right now in the shadow
or the cracked up areas. Adding some more lines with the help of
my thinnest brush, that is size zero,
and then again, adding some more of these crack like
structures on the left. I would continue to again
repeat this process in a few more areas and then make some of the parts more darker as we have
already done this. I know it's a very,
very iterative process. It's not that something
new we are doing. And one thing that you have
to always keep in mind is try to just blend the darker values a bit
with the background. That way, it would look
more organic in nature, and it doesn't look
any way artificial. I am using my dry
brush technique to add some dry brush stroke
in few of the areas, but with a very, very light value of the
darker value of brow. Continue adding some more lines as you see me adding
towards the top part. The bottom part is done, but we have to also work on
the top part of these walls. So let's go ahead and add it. I'm using my size
one brush as of now, but I have to go ahead and use my blinding
brush for sure. So I will also do that
using my free hand line at this stage to go ahead and add a few lines
over here and there. I guess this is
something that I can appreciate as I understand most of the painting is
close to being done. Whatever we are doing right now, believe me or not these
are more of detail. If you see in totality
some of your painting is already I would say 70 to 75% of your
painting is done. It's only the last 20, 25%, which is left. Some of the area near the rock, I know it is way more lighter than it should have
been in terms of the sea. So I will just add a
bit of green and then just blend it with
the background color. We will work on making some
lines and into the water. After this, it's a very, very interesting
process, we on method. That I will use for this particular excise or this particular part
of the painting. You have already done
it in our day one, and we are going to use the same technique
in our day five. Yeah, we are already
on Day five. I'm super excited. The one third of our
class is d done, and we will be working on the next two thirds
as we progress. Adding a few more lines
towards the bottom, as well as I would take it as we go towards the horizon line. When we are at the bottom, you all know that the
waves would be thicker. And as we progress
towards the top, the waves that come
up are more thinner as it is far away from our eyes, and we cannot see
it very clearly. That was. We will
just keep the area near the rocks or near the land, basically, which we did paint a bit more darker and rest would be lighter
and lighter waves. As we continue to paint with
our size one coda Pol sis. Pool is, again, a
very beautiful series that I have come across. It has got a very nice tip, and I use that tip to my advantage in most
of my paintings. At this stage, all I can
say is less is more. Do not try to cover the
entire paper or the page where you are painting
the sscape with as many waves as you
want, it's not required. You can just add a few
and that can really do the job of showing the
waves in a better way. Why to actually go ahead
and cover the whole of the paper or the whole of this blue area with
more and more waves. When you can work with
lesser number of strokes, do that, if you still need, then of course, go ahead
and add some more. Adding a few more lines
and then breaking it, adding the cracks and making a few more cracks
with my lighter. I would say the tonal
value is lighter, but it is of a darker pigment. I'm mixing some amount of
my blue into the burn Cena, and then now just
adding the crack, darkening it in few areas and letting it dry off after this. There's not much to be
done. As I did tell you. It is more of refinement, and it is more of detailing that we continue to
work on at this stage. Now, since the more detailing, as more and more detailing
you are going to do, the better would be
the outcome for sure. I can say that as we have a lot more
space, which is left. Which can be really covered for showing this particular area of the window in a better way. There are two stages
of this painting, as I did tell you initially on. One would be this window part, and another would be
the C scape part. The C scape part is
way more easier, and the window part
is again easy, but you have to
mix your colors or at some darker and lighter values wherever
it is necessary. So all those things you need to continue working on
till it is done. I will go ahead with a gradient
wash for the sky area, which is still in
white as of now. We will also work on that area and create the gradient
wash at the end. Almost done with
whole of this part, some more darker value
and then touching my brush and making it a bit more I would say nicer
in look and feel and touch. So all of it makes it look
way more interesting. Using my size four brush
and adding more shadows, blending it, you can blend it with any brush of your
choice or wash this brush. Then again, blend the colors as I continue to
do it over here. This is a great way of progress. Believe it or not,
it in sense steps, but we get to learn so much in the whole of this
part as there are more elements that we
have added on rather than only getting fixated
on sea or ocean, which we have done earlier. At this time, you
need to step back, relax and think what
is exactly left. Do we really want to retouch all the areas or do we really
want to leave it as such? Those are the decisions you
need to take at this stage. Continue to only work if it's needed or else
don't work on it. You have to make a
gradient wash for the sky. Do remember that. We are going to work on that
particular part for sure, but are we going to
work on all the areas? Exactly, no. Why? Because we are done. We have to always think with
a mindset that less is more, and I'm not going to touch all
the areas even if need be. Using my flat brush to
add the ultramarine. Right now I'm adding
the ultramarine towards the top part. Slowly, you will see that
I will blend it with clear water as we come
towards the horizon line. I will continue to work on it, bring it towards
the horizon line, a more water, and then again, bring it towards
the horizon line. This way, we continue to work
on the important aspects or the parts of our
sky area and keep blending it as we work slowly
towards the bottom part. I think it's good we should
let our sky dry off, and then some of the
areas if need be. You know that there is some shadow which
we have to create. So I'm going with my flat
brush to only do that. I'm not going to touch
all the areas anymore. Let it dry off, have
a final look at it, and I'm pretty sure about it, you would be very, very proud of yourself with
what you have created. Believe me or not,
creativity is not easy. And you have done a very, very difficult job
at this stage. So tap on your back, be proud of yourself
and know that we have completed day
five from the series. Super excited to
share the day six. It's an amazing painting with lots of reflection
into the water, which we are going to create, and it's a lighthouse that you're going to paint
with some rocks, et cetera. Okay. I can't wait to
again, see you tomorrow, and once you are done with this, do upload the project and the project section.
Do not wait. I am eagerly waiting for each one of you to
submit your projects. Let's meet again
tomorrow then and I will finish this for sure
before I leave you guys.
12. Day 6 The Lighthouse: Colors are tram, bar, green, Burna in number two, red and paints gray. Excited to paint the lighthouse, but before we paint
the lighthouse, it's important to
do a rough sketch of what we are going to paint. Let's go ahead and
mark our horizon line. Once we have marked
a horizon line, it's important to
go ahead and then start out by marking the rocky area on top of which there is the
small lighthouse, which we are going to paint. Okay. I was not very happy with how the light
turned out, free hand drawing. So yes, I have gone ahead
and make it a bit more even. This is a choice that
you have for yourself. You may do that, you
may not do that. I would leave that
decision up to you. But going ahead and making this whole structure is
something that I am very, very excited to show you. As I know that there is a lot of learning
which we are going to have in this
particular painting. Why so we haven't
approached a lot of your reflection of
a particular object into the water till now, and this painting is
going to do that for us. Making a few lines that would actually help us to detail
the rock in a better way. I'm making easy
details on my rocks. You will understand
that we will just mix a few colors and
create the rock. Along with it, only
these lines are going to denote the
formation of the rock. Make a middle line and then
you will go ahead and start adding the structure of
our smallest I would say, the lighthouse that
you want to make. Of course, you are
looking it at a distance. It's not just in front
of you, absolutely, and that's one of
the reasons you see it a bit smaller than what
you would have observed, it would have been
just in front of you. Adding a bit of I mean, thicker lines and
few of the places and thinner lines and e of the
places. Some of the place. I like to detail it a bit more. I can see it even if there are darker values applied on top
of that particular space. This particular space
would be having more of maroon kind of a shade and hence
it's important to just mark out these
areas in a better way. Adding one more line towards the top area and then
making the top area. It's a small structure. So don't be lot carried
away with the structure. I would say it's not an
overwhelming feeling at all. The structure is easy. You can go ahead and make a
simple structure like this, whatsoever it be and then just add a bit of
a triangular top. As you observed me
doing over here, add a small line towards
the top and break your top part of from this particular
lighthouse into 223 parts. I would say not
exactly the top part. I mean, the bottom part into two two areas where one
part would be darker. The front part would
be a bit white, and then again, it
would be darker. Exactly how you have seen in the initial when we were
discussing the colors, adding my line, and then I
would just let it be as is. I'm not going to change
a lot as of here. It's a simple and easy painting. So let's do it now. I will go ahead and make
my sky again, very simple. But for denoting
the horizon line, I will add a small hill
even for my background. Now, for my background, I do like to keep it simple, but adding a hill
really helps me to denote all of this
in a better way. That's one of the
reasons you would have seen in many of
my paintings now, as well as which the projects
that we are going to do in the future is going to have
this kind of denoion of line. Adding the reflection
into the water. I don't have a very, very dark graphite mark pencil. I usually don't keep it
as I did tell you even in the initial parts while
we were discussing. You know, watercolor is a
very transparent medium, and because of its transparency, if you have a very,
very dark pencil, it becomes difficult
for you to have a outcome that will not show off the graphite
marks from the bottom, and that's one of the reasons I like to keep my pencil
marks pretty light. In this case. You can also go ahead and erase it with the
help of a needle eraser. For me, I keep it very
simple and easy this way. Okay, adding some of your darkest value for
this particular part, and then I'm trying to actually make the reflection
on top of the waves. There are waves. The waves are similar to the ones that you have
done in the cave area. Of course, none of them are absolutely straight that
we have done till now. There has been directional
wave in most of them or there have been
curve kind of waves. We're going to do more
of them as we progress. But yes, at this stage, you can see that
we are going ahead and trying to make more
curve like structures. Everywhere, whenever you
try to paint waters, waters will not give
you straight waves or one single directional wave multi directional waves that you would getting or sometimes even round,
semicircular, et cetera. So all of that, let's try to add
it even over here. Add some of my tram for the
top area of the sky and then creating a gradient
wash. You all by now know how to create
the gradient wash. It's easy simple add some
water as you progress towards the bottom area or
above the horizon line. Then go ahead and start out with either your rocks or water. I'm going ahead with my water. This is either the
cobalt tring you can take horizon,
blue composed, blue. These are few of the colors
which are great option. You can also mix your
tailor green with any of your sorry, I mean, your tailor blue with any of your dark greens or yellow to create this kind of
tailor green and mix a bit of white to get a color that is
similar to this one. It's all your choice, what you want to create
the colors that you want to have and the
final outcome that you would love to actually progress or have in
your progress thing. I am in love with the
color called cobaltrin and I have been using this
color for a few years now. Most of my waters, if you see, do have this color a lot, and the usage is pretty
high in that case. I have used some amount of
ultramarine in the middle. As I go towards the bottom, I'm trying to make
it more and more darker with the help
of the tailor green. Now, either you can create this darker value of
tailor green or else I have the tailor green from the brand Daniel
Smith watercolors. You can also have any tailor green from a particular brand, but make sure that it
doesn't move a lot. Now, what do I mean by
it doesn't move a lot, that it should not spread
a lot and that way, frankly controlling the
watercolor becomes very tough when you are planning
to make waves, et cetera. For me, this turquoise or
tail green from the brand, Daniel Smith is
an amazing shade, and I have been using this
color for a few years now. I know how good you can
control this color, and that's one of the
reasons I have even told you that you can go ahead and purchase
this tallo turquoise, teal green from this
particular brand. Okay. Adding a few more lines, you can see that they are a wet on wet kind of
technique, which we are doing. So in this particular
reflection, we will go wet on dry. But at this stage where you're creating the waves,
it's wet on wet. Wet on wet and wet on
dry goes hand in hand. I must mention it to you that usually when
it is in layers, layer one may be
your wet on wet. Layer two may be also wet
on wet, but layer three, as you go may go to a wet on dry method
and you can frankly complete most of your paintings within the first two
to three layers. You frankly do not need anything more than that for
completing your paintings. Adding a few more lines. And once we are done
with these lines, we will start out
by adding some of our thinnest details or thinnest waves as we
go towards the top. You will see that whatever
you observe from a close, whether it'd be water, sun or any kind of rock, whatever you're
observing, maybe a sunset that you're
observing, very close close. I mean, on the beach you're observing a good sunset and it's absolutely nearest
to the beach and observing it bears If you are
observing it from a deck, it might just appear
a bit more far away. And that way you will have more details of reflection
into the water, et cetera that you can see Very well for the sun when
you are just on the beach rather than being on any kind of restaurant deck, et cetera, which is a bit far
off at least if I see and what I have
seen from my eyes. Most of you know that I do visit on any kind of ocean sea. I need the spite from
the sea for sure. Yeah. It really attracts
me to a great extent and I do go every year in one of
the beach locations for sure. Okay, adding one or
two smaller lines as we go towards the top, I use the tip of my
brush for doing this. The tip of velvet brushes are amazing black
velvet brushes, and I can get
exactly the outcome which I do think of Okay, great. Let's go ahead and
just add the brown. The top area is day dried off, and this is practically painting in and around
your horizon line. The horizon line is day denoted, and we are going with our
Burnsena at this stage. Next step is to just first complete this hole
of the white patch, which you see over
here, and then mixing some amount of trimery
towards the bottom area, which is basically
my horizon line. I have been doing this mixes, as you can see even in
my previous paintings. I would say that start out with your first painting and
then go to the six 30. It's not like you can always, of course, jump if you
are an immediate artist, but the preference is
to go step by step, as it is very bigofriendly
and initially, and as we progress, it stays at the same level
till the eight day almost. Then we will again
level up from day nine til the end which
is basically D 15. Now time to switch my brushes, to size one and then
just mix it with my ultramarine to create this beautiful shade which
you can observe over here. It's a mix of your
darker value of brown, some blue, burniena, whatnot. I guess, one of my favorite combinations
always to work on. I would do the same process
even towards the right part. Um, nothing different
that we are going to do for most
of the rocky areas. I'm going with the
same similar kind of work or the similar
kind of mixes, either on the palette
or on the paper. Yes. If I have a larger space, I love to work on the paper. In case I feel that
it's better to just mix it on the palette and put
a few lines on the paper, then I do it that way. Overall, the mix
remains the same. It's just the palette or
the paper where you are mixing your colors changes
to a great extent. This looks fantastic
to me at this stage. Excited to just complete the water area even
on the right side. Let this part dry off
and then use any of your brush to just fill
up this particular area. Once it is done, again, let it dry off orals, you can also start out
with your reflection. I prefer going with
my reflection at this stage so that I'm
done with my reflection. I know how this reflection has turned out in
case I need to go ahead with one more layer over my reflection. I can do that. That's my reason for making the reflection first and then
going with the top part. Adding some lines, I go
very slow at this stage. It's a very, very important
part of our painting, and I do not want to fast
forward this process. Having said that,
many paintings, yes, I have done very
quick easy and all, but this painting is really
my heart, believe it or not. All the reflection, all
the water paintings is something that I have always always fallen
in love with. Painting waters is not that I do it daily or I paint
every day water. But whenever I'm
painting waters, I take a lot of interest in it. I sit, I understand and
then only progress. There is a stepwise approach, which I always do, and that's one of
the reasons all of these paintings are real
time videos so that you exactly know that
all these paintings can be done within the stipulated the that you also over here. A bit here and there because of the drying time and all that, of course, will happen, but rest, everything
remains same. I'm using my mob brush to
add these smaller lines. As you can see, we did even add it with the
help of our pencil, and I'm breaking
up these waves a bit and going with
basically filling up all the graphite
marks that we did add initially for
our wave structure. Breaking the waves, adding
a few lines here and there, and that's it, we are not
going to add a lot of them. Always know that
lot doesn't work, less is always good. That's one of the reasons
I always say less is more. Believe me or not,
it has been my Ma for so many years now. I have realized that
if you actually work with less colors or you actually work
with less strokes, not filling up the entire space, you get an outcome which
is up to your liking, which you fall in love. Adding some of the
darkest value towards the bottom part or exactly where the
rock meets the water. This is usually seen
and that's what I'm also going ahead
and adding over here. This is my darkest value. You can go with any
mix of ramen and your paints gray or maybe a bit of your you go
into it to create this. Finally, it's my lighthouse. I'm super excited about it. What I did, I mixed
a bit of my paints gray into the pink or
the red which I had, and now I'm going ahead and
extending it a bit below. If you have any kind of maroon
already existing with you, you can use that maroon and the color would be something similar to the one
which you observe. All the colors, I don't
have it available with me. Believe me or not, I keep
creating the sheds a lot as you observe me either mixing the colors on the paper
or on the palette, there is a lot of mixing
matching which I continue to make and work around
with. Okay. Great. Let's go ahead and even fill up the bottom part of
this lighthouse, and then we will work on the
smallest of the details. I love to go ahead
and just remove the extra colors from
any space there. I think it is not necessary even with my fingers,
that's okay. Everything can work for you. Anything and everything can work for you is
what I would say. Okay. Adding some of my darkest value lines just
to outline a bit and then adding a bit of blue for the door area of
this lighthouse. We can go ahead with some
lines, a few more of them. This is just an absolute detail. You don't need to have
a perfect outcome and nor I am looking for
that even in my painting a bit of darker and
lighter values added to create lighthouse that looks
more realistic and original. That's the whole approach. I mean, not I would say it's not 100% realism that I am
trying to approach, but what I'm trying to get
is lose yet captivating kind of artwork where there is realism to an extent
that we add on it, but in our own way. In a way where you
can actually show your artistic voice at how you
proceed to see the things. Continue to add some of
the darker values again. Then once this part is done, we will work on
our rocky terrain. Rocky terrain is not
going to be simple. Believe me or not, you have to work around with your burn. John Brilliant
number two is again a shade that I have been
working very regularly with, and I would be even
using it over here. If you don't have the shade, you can mix any amount
of your Naples yellow into the Barca and get shape that looks
similar to this one. Even yellow occur is great. This one is a bit
more pale in color, and that's one of
the reasons I love this shade more compared
to mixing the colors. The idea is to get a shade that looks similar,
nothing else. Blaming it with my
burncena a bit, and then we will add some
amount of our ultra meine. You will see how
we continue to add some amount of our
tramearne into the major rocky area that we have wanted to actually
add into this painting. You'll see that ultra meine creates a beautiful,
I would say. This is one of the most I mean, most amazing experiences and post captivating
experiences that I have with so many colors that if you have a ultramarine
into the burn Ciena, it ends up not only
creating granulation, but also so many colors within a small part when this
mix happens on the paper, and that's what we
are also going to achieve through this particular
part of the painting. Just blending my blue again into the sana and then creating
the darkest value. Let your paper dry
off after this once you have mixed this area, and then we are going
to create some lines to actually show the rock
formation in a better way. This is not a better
way, but yes, a bit more detailing
is all I can think about when we work through
the rock formation. Blending some of my darker
values for the water area, and then just adding it on top of the colors
that we have already added, not going over
different area anymore. It's just making it a bit
more dark. That's all. We are left out with
the final 4 minutes. And at this moment, you shod know that we are just going to add
few details and. All the painting is in place. What we are going
to do is to make a few lines for basically
showing the rocks. You can see these kind of
structures where there is usually a bit of shadows
or there are some cracks. None of the rocks
are a single rock without any wear and tear. There would be some
kind of wear and tear because of the
weather conditions, because of the water
coming over and over again to the same
place, meeting the rock. All of this is nature, and we are also going to go ahead and do the same
in our painting. I'm going with my smallest brush and it is pretty
meditative along with it. It is just pretty iterate. So there is not much
in terms of addition that I can tell you except a few curvy lines
that you need to add. Some of the spaces, we will meet up with the rock. And while you go to
wit the bottom part, the lines would be a
bit more tickle and broader as the cracks originate from that
particular part. So, that's how we are going to continue to add a few
more lines here and there. Complete it. Just follow how I work in and air down it and then let your
painting dry off. If you have been painting
along with me and you have reached the six,
believe me or not, you have done a lot in terms of watercolor sea skates and you are already eling
each part of it. This really needs a
tap on your back. And I'm super excited about
the next two paintings which would actually make we will be completing
our Part one. Moving on to Part two post Part one has been
very exciting for me. I am so glad that all
of you are joining in and actually considering
to watch this class. It makes a lot of
difference always. Continue to add a few more
lines as you see over here, and then of course, you need to let your paper dry off before removing the
tape pattern angle. That's something not to be forgotten at
any point in time. Most of the paper is
actually dry now. It's just these few lines, which we are adding
towards the end, which needs to get dried off. See you again tomorrow
with another new painting.
13. Day 7 Sea Beach: Okay. Colors are composed blue tra maarin
grain in number two, burn Siena pain
creen indthree blue, royal blue, vendi K brown, yellow, green, dark green. Okay. It's our seventh day, and I'm really excited to
teach you this lesson. First, let's go ahead and
just do a basic drawing, or you can say it's a simple sketch of the final painting that
we are going to do. This helps me to bring
together the framework, and I have a rough idea in my mind how I want to progress. The first goes as
my horizon line, and once I have added
the horizon line, I will go with my waves. All the waves are kind of
layered waves over here. You can see one of the
waves is a bit far away. Then there is a second wave, and then they goes
for third wave. This is as for the
rule of perspective, they all go and merge to one single point
towards the right. While we go towards
the bottom area, you will find more of rocky structures and
a bit of greenery, which I'm going to add. The whole of the painting, which is majorly my C, et cetera, is pretty simple. Only a bit of rocks, and the greens which we add
is going to take some time. Let me just leave you at
this stage to understand how I add microphyte lines
and how I draw my rocks. Rest, we are going to start
out with all the colors, et cetera, as we progress. You already know the colors, but what colors exactly you say, you are seeing my
palette on the left, and almost the same
colors we are going to do even on the right side. Only different shade that is coming in this
time is compose blue. Now, compose blue is very
much a color that looks more like the royal blue
and a bit of green in it in between the cobalt
green and the royal blue. Something is what
I can understand. That would be one
of my basic colors, which I would be going
ahead with for my sea. Continuing with our sketch. Now, there are few of these
greens as I did tell you. Now these are small
plants and there is a sea breeze because of
which these waves are coming. Now, when there is a sea breeze, you will see that
the leaves will fly from one single direction
to another direction. And mostly all the
leaves that you're going to see is going
towards the right. That's it, what we are
going to show over here, and going ahead with our
John Brilliant number two. This is one of my
favorite shades from the brand hole beam. Though you can get similar shade in many of the other brands all yellow occur might
be a shade that is quite closer to what
I'm using right now. Whatever is available
on your palette, as I did tell you always, even in all the other
different exercises as well as days that we have done that whatever
is in your palette, you start and start
with your painting. Only make sure the
water colors that you are using is hardest
great because then there is a lot of transparency in your colors and you may not have to go ahead
with two to three layers for your painting. I continue to cover this whole of the area
and then take some of my compose blue
as I did tell you earlier and then blend it with my John
brilliant number two. Now, these are the sheets which I primarily use for all
my beach paintings. You will see that all the sheets which I'm using even right now are the ones that we have used previously in
all our paintings. Nothing extra or nothing new I add in any of these paintings, except the fact that all the
ways or different kind of ways in which we paint the beaches or the
subject, et cetera. The left one that you see
over here is a crashing wave. And we are going to attempt
that as our day eight. Once we are done
with our day cell. So something that I have learned over time is that you need to continue to understand and continue to develop
your skill set. Even if you are attempting only one single subject that is painting beaches or
painting the sea, you can always just go ahead and see whether you want
to paint simple waves, whether you want to paint
some crashing waves. You want to paint reflections, rocks, island, et cetera. Whatever will be the best you
can go ahead and do that. Towards the top, I
have added the arumery And if you don't
have this color, you can also go ahead
with don free blue to don free blue might
become a bit more darker, but that's also always
a good substitute. You can see that my
paper is still wet and I'm going ahead with
my darkest value of brown to some of the spaces and basically to cover some of
the spaces which are still in the lighter value of the John brilliant number two or the brown sheet,
which we have added. It's always a mix that
you go ahead with. It's never or in the first go where you
add your first layer, you can never see how this whole painting
is going to turn out, and that's one of the reasons. If you're not happy even in
your first or second layers, do give it a full fry. Go ahead with the
floor, understand it, law, unlaw, whatever
you want to do, please do that because the first painting that you are doing might come up
with challenges, but as you progress, and as you continue to
paint the same subject, you get to understand
what's the best. What's not working out for you? What's working out for you? Yes, there are a lot of things that you
continue to develop. Adding some of my blue
colors in the darker values. That is majorly a mix of my
teal green and ultramarine. I will add it on the wet paper. Now, this is a 300 GSM
100% cotton paper. You can see that only
three to 4 minutes or 5 minutes have gone by, and if the paper is still wet, that's one of the reasons I
can continue to work on it. I'm mixing some of
my darker value, which is my paints
gray to wet to continue adding
some thinner lines. This is my size one brush
from the brand coda. You can go ahead and always
purchase a brush like this. Believe me or not,
this is one of the finest and good brushes
in an affordable range. If you are looking out
for something like this where you get
a great outcome, as well as in a good range. I think coda Polar
series is one of them. While I let you know all this, I have added a bit of blue
towards the bottom area, and now I am going
ahead with my green. Now, this green is majorly my yellow green from the brand
majo Mission gold again. You can go ahead with any green that's available with you. Now, I'm going over the brown. Which I have already added. So this green will have an
underlying, you can say brown, and that's one of the reasons
it may appear a bit more darker than what you usually
observe in my o paintings, going with some of
the darker values, I have mixed my alto
meery with burn Ciena as we have done this
exercise even earlier, and there is a color mixing part where you might
have also seen it. But this is one of the
most amazing techniques that I have learned over
years. Believe it or not. This did not come to me
very arly and it is one of the best ways to mix
your color and get the darker values of brown
whenever you need it. Blending it with the help of my flat brush, and then again, lifting up some of the
darker values of the color, pre applying it in the areas, wherever I feel that
the colors have gone a bit more lighter
than what I did expect. I will go on top of the
rocks with a blend of my darker and lighter
value of brown and then again mix that color towards the base area of the left as well as on the
right, along with the green. It's time to paint the sky, and I will go ahead
with my royal blue. This is one of my
favorite shades. That is anything where I want to paint lighter
skies, et cetera. This is one of the colors
that is my co two shade. You can also go ahead with
celium blue if you are not having this particular
shade in your palette or else go with some amount
of ultramarine on top and then bring it towards the bottom with
the help of water, that is making a
gradient like structure. I'm also going ahead
and adding some of my ultramarine towards the top
and creating the gradient. You can always create the gradient with one
single color or with multiple shades that I will always leave the
decision up to you. There is one great
use of my flat brush. I have done that earlier, and I'm repeating it again. I use it to just
pick up my colors. In few of the spots
where I think it is not necessary or
it was not required. It has gone above the
horizon line, et cetera. It's a great way to work it out. Now it's time to add some more lines and
create some waves. I'm going ahead with my brush. This is from the
brand silver velvet. I have already told
you about this brand and all and it's
an amazing brush. It has got a great tip. You can make smaller
lines, thicker lines. You can add a bit more pressure and make it a bit more thick. If you use the tip by adding
only a little pressure, you will get the thinner lines that you see me
adding over here. We continue to do the same
exercise. There's not much. The blend of colors, of course, is ultramarine and
the existing shape that I had on the palette, which is some amount of
compose blue and you can add either do three blue or
some amount of tail green. That also works.
The Taylor green many of you are inquiring
is from which brand. It's basically Taylor turquoise
green or you can also see as tail green from the
brand, Daniel Smith. Daniel Smith is again
a brand from US. You will get many
colors from them, and they're all
artist great colors. Go ahead and check them out. If you want to really try. This is a beautiful shade that I've been
using for a while. Going with my PH Martin
white shape now to apply some of my white over here for creating
the wave structure or just adding the
white form of the wave. Do make sure that you are going with the
tip of your brush, rather than with a lot of pressure initially
only to create thicker waves and This
is a simple easy. Yes, we are done with most of the part within the
first ten to 12 minutes. What are we going to do next is something that you all
will be thinking about. There is a lot of fine tuning that we
do in this painting. Why I say this, it's not only about creating
wet on wet or wet on troy adding
just one layer and getting done with
that one single layer. There is mot and that's what we are going to explore through this painting. Continue to add this white gash, or you can also go ahead
with Gash if you don't have this particular
shade available with you. That's an amazing
color to go with. I mean, the titanium white
is also opaque in nature. As I told you, that's an
amazing color to go with. Or else, you can also try the PH Martin white
that I'm using. You can also go
ahead with white oh, but do not go with acrylics. Acrylics and water
color don't wear together as I am not doing
any mixed media kind of fart, we want to stick to
only the mediums that has water in common, and all of these have
water in common. Working with rocks
and the structure of the rocks is something that
I have been thinking about, and I really want
to work through it entirely always in
most of my paintings. Some of the darker
values and few areas and some lighter values
in some of the areas, making sure that we are altering the values
to a great extent. Okay. Why values
is so important. Now, values usually create the light and shadow effect that we need in any
kind of painting, as well as the values play an important role when you
are defining perspective. Now, why do we have maybe something that is
far away from our eyes may become way more lighter
and it is not at all detailed compared to the ones that are way
more closer to us, and it is more
detailed as you have darker lighter value and a lot of shadow and
light play in it. It is more impressive
to our eyes, and that's one of the reasons
I have always stressed upon the different values of the same shade that
we have been using. You have seen me mixing the same color that is
ramain into the brown, whereas going with it
in different values in various layers that we continue
to add on our painting. I guess this is a very small
trick that you can use in all your paintings and create very impressive
final outcome. I continue to work with some
more of the darker values for our rocks and give a
final finish to this part. Once this part is done, we will work on our grains. There is very less at
this moment that I need to tell you because
of our water, sky and land, which is the major portion in our painting and that we
are already done with. I'm going with my
John Brilliant number two to add some of the darker values in few of the areas where I
think it is necessary. For last four years, I would say, I have
struggled to paint rocks. It's not pain and easy
journey. Believe me or not. Creating rocks was
a nightmare for me. Slowly all I realized
for rocks is that you need to only play
with the values. That's all. It was a very easy concept, but I really could not get it As I progressed in
my watercolor journey, everything I could manage to do, but rocks used to
be a nightmare and I never used to paint rocks
in any of my paintings. You can see all my
earlier classes too, and this is a kind of point
that I'm making over here. Many of us have
some other things that we don't like to paint, or we just don't want to paint but making or continuously
working towards it, understanding the concept and trying it all over
and over again, really helps us to
develop our skill set and also helps us to
manage our learnings. Now, earnings is a
continuous process, whether you are a teacher, student or even you
are doing a side ssle. Learning is a very, very constant aspect that we continue to work on as we continue to progress
in our journey. Okay, adding some more of
our greens and a few of the places and then
making it more dark. You can see that I'm not
making it very dark, whereas I'm not making
it lighter too. Some of the areas are a bit darker and some of the
areas are less darker. Okay. Though I would
say that this is very, very thin space and there
is not much to play. So go as you would like to its size one or size zero brush you can pick
up to do this exercise. I am just applying a bit
of pressure as you see, and then again,
lifting the pressure. I will do the same
process here and every leaf is done
with the same process. There's nothing. I mean, no difference that I try
to create in this space. Some more leaves are being added and some small small dots or grass like structure are coming up in the background area. I love to leave some of the spaces in the background
color that we have applied. Everything that we have applied, I don't like to cover up. This is something
that I have always always followed throughout
my journey of water colors. Never cover up the entire space. Leave a bit of space,
which is needed. And whenever it is needed, you should leave that space
and then only continue to add more lines or
structures wherever it is, or whenever it is needed. Smaller lines, smaller
glass grasses, and I guess almost
a painting is done. I will add only a few
birds in the empty sky. It just looks too empty, though. The vastness of the sea
always always attracts me, and it is something
that I have wondered how beautiful nature is and
it has so much in itself. Okay. The darker values that
I did add for my leaves. I have also added some
dots in the background. This I usually do in
most of my paintings. You will see that I like to use the same color in the background as well as
the leaves or the trees. It's a great thing that you
should continuously work on, always always use whatever is there on the brush rather
than washing it away, and it helps to create a color scheme that is very pleasing and soothing
to your eyes. I've added some dot, and with my hands, I'm just blending it
with the background. You can add some more dots
and do the same process. We will even go with a dry
brush technique like this. I'm adding over here. I
have already picked up all the extra paints
from my brushes. Again, taking it
off on the tissue and then doing this
dry brush technique. This can be done with any brush, but yes, round brushes are
best to go ahead with. Many of you might feel that I've been rough with this brush. Believe me or not.
This is one of my favorite brushes
and it stays the same, even if I'm being rough
at some point in time. It's one of my comfort
brushes to go to. I am now just letting this
look as is taking a step back, realize what more I should add. I think it's only the birds
that's left and rest, everything is the same. I will add I think
two, three, four, five birds maybe, or five to
seven birds is all we need. It's a fleet of birds that we can go ahead
and add in the sky. Remove the date and have a final look at the
painting once you are done. Let it dry off before that.
14. Day 8 Crashing Waves: Let me walk you
through the colors at StrameGcia bar green
or composed blue, tail green purple Bandke
brown, in number two. I have kept this
painting for the last because this is one
of my absolute favorites, which is crashing waves. Watercolor ocean waves I have
given two classes on it. You can go ahead
and check them out. They are having a variety of
ocean waves in it and you can always refer back
to it if you want to paint more ocean waves or
crashing waves, et cetera. This particular painting is more to do with crashing waves, and that's one of the reasons
we have to first mark a horizon line and then go ahead and add some
of the stones. How do I add the stones? I start with a few curved lines, and then I would
be adding some of the spaces where there
will be darker values. You will see how I use
the blue burn Ciena as well as John Billing Tamper two to create all the shades values, et cetera within this
small part of the rocks. The waves are coming and
crashing over these rocks. We will be using some amount of masking fluid along with it, some of the white sh. Though if you are someone who is very confident about
masking out the spaces, not masking out the spaces
and just going ahead and creating the colors wherever it is needed, you can do that. But I would highly
recommend you to mask out the areas before you go ahead
and paint crashing waves. I'm Simmon who is in love with the mastic part at least for the crashing days for
quite some years now, and it works out best that way. Go and adding some
of my other rocks, and then we'll just
add the darker values in the areas where there is a shading of the graphite mark. It becomes very easy that
way just to track back and rely on the fact wherever you have added
the graphite mark, you need to add the
darker values there rather than adding it
on the entire space. We do have to keep this in mind that all the rocks, et cetera. It's usually a bright sunny day, and then there would be
darker values in the areas, which are in the shadows and lighter values for the areas
which are in the light. Creating a rough
outline of the wave, you can see how it
is going towards the top area and it is
flushing over there. Once it comes down,
it secles a bit. There are various
parts of a wave, and I'm just trying
to mark that. So that post this, I can add my masking
fluid in the areas where I think it is
necessary rather than adding it on the entire
part of this way. You will see that I don't
add it on the entire space. I add it on the spaces
wherever it is needed. Some of the areas will be
in the white of the paper, and only a few of
the areas will be with the masking
fluid. Let's go ahead. I'm using my Winsor and
Newton masking fluid. I have been using it for
quite some many years now. And this is one of the
good masking fluid that's available in the market, along with enlia masking fluid. If you are someone who wants
to try out masking fluid, I think inelia and Vincent and tin are too good go to brands. This has got a bit
of yellow in it, which helps me to
actually see through the hole of the white and
the muscin fluid separately. I'm not applying it
on the entire space. Some of the spaces
I'm keeping in white. You can observe it over here. I'm in love with my
watercolor paper, and I love to use the white of the watercolor paper,
most of the time. Now, watercolor is a transparent
medium as you all know, and it is very vibrant. So these are the
two major qualities which we need to use
in our paintings. Adding some more of it towards the bottom area as
you see over here. I'm using a very thin
brush for this exercise. It's from the brand
incer and Newton. You can go ahead with
a size two brush or a size one brush. It's an A five size paper in case you are using
a smaller paper. Accordingly, your brushes,
et cetera, will also change. Make sure that your masking
fluid is completely dried before you go over
it with your water. This is a very, very important process
and you need to follow it in all your
major future paintings. Towards the top area of my sky, I would be going ahead and
adding some of my ultramarine. This is not only the top area. I think even the bottom area, I would go ahead with
the ultramarine leaving the part where actually
the water is flashing. That thing you need
to keep in mind, it's a wet on wet
technique right now, which we are using for
defining our waves. I'm using ultramarine to actually paint
this sky and leave out the areas where I have to
paint the splashing waves. This is wet on wet as I
did tell you earlier, and I'm going to add some
darker values in few of the areas to show the clouds in a better way and
some of the areas, I would be leaving it as such. There have been a
lot of discussion around values around the
colors, depth, et cetera. All I can tell you
in simple words is that some of the areas need
to be in darker values, and some of the areas will
be in lighter values. This actually helps to distinguish between the
darker values of the sky or where exactly the
clouds are and some of the other parts where actually the clouds are not concentrated. If we look from a
clouds perspective, that's how we go about it. More to do with the water as we progress, I
will let you know. M. Blending is the key
for most of our work, and that's one of the
reasons why I was going towards the
top part of the sky. I did blend it with
my flat brush. Now going with a
very light wash of the blue and adding it in few
of the areas in and around my smaller rocks where exactly the whole of the watercolor ocean
waves is concentrated. And then slowly, you
will see how I develop on the values depth
of these spaces too. Some of the areas would
be bit more darker. Some of the areas would
be a bit more lighter, how we build on. Each smaller things
will be also covered. So just hold on and continue
to paint along with me. The whole video is real time. Therefore, you do not
need to worry at all. My recommendation would
be to watch this video at a two x speed first and then paint along with me as
the video is real time. Hence, always always you guys are welcome to paint with me. Watching the video
actually helps you to understand exactly and how you can work
on smaller details. Adding some darker values of tra maarin and a bit
of violet in it, the violet is hardly seen, might be around five to
7% in the whole mix, and then adding some
amount of composed to orals you can also go
ahead with Copart green, whatever color you like
and is of your choice. You can go around with that. There are always
two ways of mixing. As I did tell you earlier, one is mixing on your palette and one is mixing on your paper. Here, we are going to
mix on our palette, where I have taken
some amount of my purple and then
mixing it with my to get a darker value shape
as you observe over here, and then just adding it a
bit of it here and there. I'm using the tip of my
aquas off brush from file. It has got an amazing tip. It's great for doing
any kind of clouds painting as well as you can
do your lifting technique. You can work on a whole
painting with one single brush. I have realized it very recently that one single brush
is pretty enough for a small A size or a bit smaller than a five size kind of a paper if you're
using this brush. And to add some of
my darkest value. And this is basically
a bit of brown, which I'm going
ahead and adding. It's exceptionally nice brown, and then it gets
mixed with blue. You will get the black
kind of a shade, which you absorb over here. It's basically brown and
you can see how it is. It's a drty brown black kind
of a color which you get, and we really wanted that
even in our painting. I have to go ahead and
blend the color that appears on the top
with some clear water. You always see that I have
two jars of water on the top. On once a brush is dirty, I wash it in one of the jars, and the other jar is always kept clean for the supply of water. Pick up your John Willian number two and start adding
it in all the area. That is clean and
a round the beach. I am going ahead and adding it with the help
of my round brush. That is the one which
I have used even for painting my waves. Over here, we are just
adding some burn Ciena now, and even on the top area
where we have the rocks, I would be going ahead
and adding the same mix. I love to use this mix
of ultramarine and brown and you would have seen me
using it in all the spaces. I'm going ahead and again, using it over here and creating different
values as you see. The John number two is
hardly seen anymore. I know and then around the
beach, but that's okay. It was surfaced and when you
are not sure about a color, go ahead with the
lightest value, then go over it with
the darker values or the colors you have about which you want to add
to your painting. Adding some of the
lighter values, which is John
Brilliant number two. Now, this is a bit
opaque in nature. So when you add it,
you may feel that it is giving you a bit of white
or opaque kind of color, which is absolutely fine. Do not worry on that and
just add more of your blue. This is traian blue, which I'm adding into the beach
area to create the parts. I'm picking up some
Tatro blue and adding it towards the top area. I will blend a
seam color and add some water to treat it as I
reach towards the bottom. That's how I go about
into any of my paintings, and this is what I'm doing with my beautiful shade
of cobalt green. I know many of you might have
earlier also seen me using cobar and this is one of the most beautiful cobaltrings
that I have used to date. Or else, you can also go
ahead with composed blue. Both are great colors,
as I always say. Both can serve the
same purpose and then work on some of
your tad green towards the top area from Daniels
as you guys day have seen me using it in view
of the paintings. Blended planet as you go towards the bottom area in
and around the waves. While you reach the bottom, you have to apply
some darker values to show the marked areas of
the white in a better way. I'm picking some darker values
of the blue and working towards the top area above the
rock and then blending it. It's a very simple
and easy process, as I always say, Do not
complicate your process. It might take a bit longer, but that's absolutely fine. But try to keep
your color simple. Do not go with a lot of shades, water you can decide your
shades and for the rocks, we will keep it as you
observe over here. Making a few lines with
my tdo green and then even reaching towards
the right side to make the similar
kind of lines, which actually shows the kind of current that you
have in the water, Majorly the waves which usually is seen in any
kind of sea ocean or Crashing waves beach side area. I usually use a big
blending brush. I would always recommend
each one of you to have a bigger 1 " or two inch brush by a side always always
because this really helps not only to
cover smaller spaces, but also it works great as a blending brush in
many of our paintings. It's so that you always
paint on an five size paper. You also paint on an four
or a three size paper, and that's where it comes
to the greatest of the use. Going ahead and adding
a few of my lines for the wave like structure
as we did earlier, and then again using the same technique till we
come towards the bottom area. I'm using my size one brush to do this part of the exercise. Now it's time to remove
the masking fluid. I will go ahead
and use an eraser, which is mostly used for
picking up the masking fluid. And then I would go ahead and keep taking off
this masking fluid. Of course, this fluid
is always dry and it's always great to
clean up the spaces on top of the masking
fluid before you go ahead and just remove
it from the white parts. Though I did not do that, but I'm suggesting you
the best way possible. In other paintings of mine, I did it where there's
a white span et cetera. But here, it's not
that I would be painting the whole of
the waves in the white and hence I just left it as
this going ahead and adding a few lines as you see over here while we go
above the rock area, and then this is basically
the shadow part, and I want to show
it in a better way. That's one of the
reasons shadows are always darker compared
to the lighter values, which are basically
the areas in light. So light and shadow plays a great role in any kind
of watercolor painting. You can use it for waves. You can use it for buildings. You can use it for fields, animals, anything that
you want to paint, it can be used, and it can help you to really create
the depth to a great extent. And it also shows the
majority of an artist, which really helps you to ace through any watercolor
painting in a better way. I would like to tell you
a bit about my mixes. Some of the areas, of
course, are in ultramarine. Some of the areas are a mix of your brown and ultramarine, which gives me a bit of a
dirty brown shade sometimes, and some of the dots because of my whole approach of this crashing waves
has to come over. Some of them will be in darker, some of them will be in white. We will be working that out. We do not need to
right away, do it. But yes, we are going to
do it as we progress. I would again blend this area a bit as I go
towards the bottom. I'm using any round
brush to do this part. It can be size four, size, two sides, whatever
round brush you have. It's better to have size
four or above as it is going to work as
your blending brush. I will then allow your
entire painting to practically just go dry off and then remove the rest of the masking fluid from
all over this part. Add some of the blue that
you see on the right, and this is majorly
the ultramarine blue, adding it with the help of
my size one brush from coda. It has got a very
nice tip again. And anyway, whenever you're
using a smaller brush, you can use it to better
control your pins, et cetera. Blending it with my 1 " bruh. Though I'm using the
tip of this brush, which can really help you to only contain your
strokes to the areas, which is more in white. This painting is all about detailing and a
lot about laying. You will see each and every
part that I'm adding. I'm slowly retailing
each and every part, step back relax and then only start adding all these details. Why? Maybe because I would say that I want to take
it slow in this painting. Crashing waves are not a
very easy subject to paint, and it takes you a bit of
understanding of how we do it, the shadows of the
crashing waves and how they are just moving into
the air and also all of it. Put together is not so simple to just understand
it very, very simply. And this exercise
is, believe me, not even like 1% of what
you can in reality, paint if you are exploring
waves or crashing waves. This is going to help you to get an understanding or a basic basic understanding
of the crashing waves. If you are someone who is
interested in crashing waves, as I did tell you earlier also, I have watercolor
ocean waves so one where we are majorly painting
crashing waves only. There are two smaller paintings
and two larger paintings, which can help you
to ace through that like through that
particular subject of yours, which you have been thinking. And I know this is not a very, very simple subject to explore, or it's not a simple
subject to understand also. All of us do struggle initially, but as we progress, I can tell you it will make
you fall in love with it. I'm only in love
with this subject, and I can't tell you how much. I adore to paint
water ocean waves, then the kind of reflection. I think Lighthouse was
another painting of mine, which I loved it completely because of the
reflection that we had, the waves that we
had everything put together really helped me to depict the painting in
such a great way that I was super happy with
the final outcome. And to add some blue as
well as some dark value of brown as you go towards the
shadow area of the rocks. I will keep the
rocks very simple. I'm not going to add
any texture into it. Just the darker
and lighter values to show the light and shadow. As we have been discussing
light and shadow, we've discussed so much
through this entire painting, and I know that there is so much stress that I've added
in other paintings about light and shadow so you guys are already you have already,
I guess, completely. I'm so still holding onto this pack that it might
be tough for many of you to understand this
light and shadow. It is. I mean, I think that it requires an entire
class altogether, just to understand light
and shadow in some of the important subjects that we want to explore
ever in water colors. Okay, I guess this is great. Let's continue, and
let's continue to add more of colors,
more of paints, wherever it is needed
and continue to add more of our darker brown lighter
brown, et cetera sheets. There is no much
difference in the process. We continue to do the
same process as earlier. Some of the values
have just changed. Some of the areas are in blue
and some of the areas are in that's the only difference
which has come over. And a few of the lighter spaces, I did apply a bit of my dry
brush kind of technique in some of the colors
of light brown or some of the darker
value of brown. But in a really, really
light tonal I mean, with very, very less
pigments in my brush. That's how we go about it. Some of the even the shadows, I'm adding a bit more darker
and some of the areas, I'm ing a bit lighter. Since the layer that I added for the darker parts
has already dried up. Frankly, speaking
at this moment, I'm pretty happy with how
this painting has turned out, and we don't need to
actually do much. If you are confident enough, you can just leave it at this stage and
have a look at it. I think you will be
super of yourself. All the things that I'm
doing now is just detailing. Detailing detailing
and detailing, you may leave it or you may do it that all depends up to you. Four or 5 minutes is nothing but just some of the detailing
in terms of smaller lines, then we will add a
bit of white quash. That's all we are
going to do for the platters which we are going to add in our crashing data. There's a lot of excitement. Actually, it's high
energy, I would say. Now, if my wave is high energy, then we also need to
actually reciprocate the same kind of energy for painting any watercolor
ocean moves. Hence it is going
to take for time. Believe me or not,
whatever is high energy, where you see a lot of
crashing, moving, et cetera. All those things have to be depicted a bit more detailed way and hence
it takes more time. Splattering some
of the white wash or this is opaque white
watercolor from PH Martin. I have been using it for many
years, as you guys know, and now there are a few drops, which fire adding
towards the top area. Some of the drops are
good to go always add it, and I think that's it. This is all we want to
create in this painting. There is a slow
process at this stage. I am processing every bit of it. Some of the areas, of course, I'm adding the
plateaus and some of the areas have leave
as a few lines to show the form of
the ocean when a wave crashes into the these rocks. Of course, there's some ocean
foam that's also seen and hence I want to show that with
the help of my white wash. If you are someone who is end up with the
white of the paper, you can always go ahead
and mask out this area, but I really do not want to
do it for this painting. So just let it be. I worked with my
white ah all the way through this so that I
get a final outcome. That's easy easy to
work around with. Okay. Continue and
just mask out the area of these rocks as I
could see that there are a lot of splatters that
we're getting into the rocks, and we really don't want
this along with it, my plant is also becoming
white splattered, which is okay because I can
clean it up later on. Yeah. But yeah, there's no intention of adding those
platters on the plants. It's just getting
added because of my white quash splatter, which I'm adding right
now into the painting. From tomorrow onwards, we
are going to move on to a bigger size painting
is all I can say. I'm not saying that it will not be an A five size for sure. So it is going to become a
bit bigger than A five size. The dimensions are
going to change, and I will let you know
in detail as we progress. So be there and you will
get to know more coming up. These are not much advanced. It's again around 40 minutes of time for the initial
two, three exercises, and then we will be
progressing into a bit more difficult ones
or more detailed ones. I would say on bigger paper. And bigger paper, of course, will take a bit more time.
See you again tomorrow.
15. Day 9 The Sunset: Okay. Colors are Naples yellow, Indian yellow, pin
acadoncoral, opera purple, don the blue, Ultramarine,
and paint spray. Let us draw a
horizon line first, and this is basically
towards the top area. I would be adding more
of water and less of your sky or any kind of other
elements into the painting. This whole part is majorly to actually help you understand how we can make curved waves. So I know you all have
learned it during your lighthouse painting
low with the reflection, but we will go a bit in depth
while we do it over here. This is a larger paper, which is 29 centimeter
by 15 centimeter. It's not really small. And I wanted to actually show you the movements of the
water in a better way and how the curved waves
actually turn into more of your lines as you approach
towards the horizon line. But before that, let's
go ahead and draw a hill around the hill
on the right side. There is a small sun and the reflection of the
hill would be fall Uh, I mean, we'll be
forming on this water. We are going to also
go ahead and do that. I'm just making a very, very rough sketch for it so
that these graphite parks, I can see once I even apply water or colors
on top of the paper. I have myself kept
this drawing pretty simple because simplicity
has always been the key, and you guys have done a lot
till the crashing waves. So let's keep it simple for the next two to three exercises, and then we would be moving to a bit more interesting area. You will be in a position to
nail all your paintings just that you have to follow very
few simple instructions. Everything is real time, which makes our work even more eso. Continue to work on
these graphite marks, lines, et cetera that
I'm trying to create. It's basically the reflection of the hill into the
water and it is sunset because of
which this would be a whole lot more
darker in value. You will see how we go about it. I am trying to actually add
some curved ways as of now. This is more to do with your semicircular
kind of structure. I'm going with a free hand. You can also do it this way
or else even add it directly. When we are doing a
wet on wet method. Go ahead and adding some
of the lines on the right, as well as on the left. I continue to work on
this as we progress. But let's first go ahead
and just wet our sky area. Or do you want to
work on the water? We can also work on
the water, you know, because water has a lot of
movement and water gives me so much more I would say there is so much
more excitement when I have to paint water. Let's go ahead and
paint water first, and then we will move
to the sky area. Adding some clear
water on top of the paper initially is
what we keep in our mind, but we are going ahead and
adding some of our orange. Now, this orange is practically
a mix of your Naples yellow and some amount of
the exact scenarier orange, which I have on my palette. You can see on the left, I have made that mixture and adding some of my opera on
the top left hand corner. I continue to just blend it with some clear water as we
progress towards the bottom. You will see less of my palette, but do not worry. I'm here to help you out
with all the colors, et cetera that I'm
using in this painting. With a very light
wash of traman, you have to end it while you go towards
the bottom and then blend it with the
colors that you have added towards the middle. Now, color in the middle
will remain very, very light as it is a transition
from the darker value of blue towards the bottom to the lighter value of orange. I will just take some amount of my paints gray and some of my dontry blue and then create a shade that looks
really, really amazing. I'm playing with the
values of the blue, as well as the
colors of the blue, so just keep that in mind that some of the areas
would be lighter in value, and some of the areas
would be darker in value to show this
movement in a better way. I have added a real dark line, and you can see that right
now I'm trying to blend it. Believe me or not,
it is really hot in this part of India and keeping your paper wet for
a longer period of time, it's becoming very, very tough. That's one of the reasons
you will see less of I mean, time that I get in terms of the painting or in terms of
adding wet on wet strokes. So you will continue to
see a lot more struggle. Your climatic conditions are
very important when it is all about a wet on wet kind
of a journey in water colors. Or else, you can
do one more thing. Just go ahead, apply
water on the back side of this paper and then start
painting on the top side. That way, you can keep your paper wet for
a really long time. I will use my
blending brush very often to make all
these areas look more smoother and it
will make it not so dry. I am using my 1 " brush, as you know, that this
is a pretty large paper. So a 1 " brush is good. If you are working
on a smaller paper, you need to take the brushes
accordingly as I always say. I will go slow at this stage. I have already added the major two to
three wave structure that we have thought of adding. And again, going with the
mix of my don frame blue, as well as some amount of
my paints gray into it, you will get a shade that looks similar to the
shade which I'm using. Go with my lightest value as
I progress towards the top, and this is more of orange, as you observe me rather than
it being any other shade. Of darker values that we have
added towards the top area, blending it with some
more of my blue, and I continue to add some of
my thinner lines over here. I've changed my brush
because of the same reasons. I do not want a lot of color being added in the middle
part at this stage, and just a few lines, few strokes here and there, make sure that your
paper remains wet. That is very, very
important in case you are doing any
exercise like this. Watercolor is a slow
built up process. I would say, even if you are someone who has a lot of
experience in watercolor, you would like to go ahead
with the lighter values first, and then slowly add more and more darker values with the progress that you continue
to make with watercolors. Now, progress in a way that
your painting is a layer one, then layer two, layer
three, like that, you progress or else you
are going wet on wet. Your first layer of
wet on wet is done, you might go ahead with
another layer of wet on wet or slowly you start
adding darker values. Initially, you add
the lighter values. So, this also helps
to build a lot of confidence like we
are doing right now. I'm someone who always
likes to build up slowly and steadily our
painting. It doesn't come up. At this stage, you really don't know how the painting
would turn up. Believe me or not, there are so many times that
I have thought, Okay, so the painting
doesn't look great. Do I still go ahead
and work it out? But I do that in
most of my cases, as I know that that painting
is going to work for me and it would look amazing
once we completed. Adding a few more lines. And this is very, very light value lines that I'm going ahead and
adding towards the top, mixing it up with
a bit of orange. As you can see that my paper is going to dry up very soon. Even if I'm using
my arches paper, I know that some of the areas
are going to dry very soon. If I need to progress, I have to progress right away. I mix more amount of
my naples yellow, as well as some of
my orange to create a shade that looks similar to what you serve on
the left hand side. You need to also
add some amount of quinac coral into it or opera. Whatever color is available
with you add it and get a color that looks more
orangish over here. We continue to add it
mostly below the sun and then take it towards the left as well as
towards the right. You have really less
color in water, and this is a great
way to progress. You do not need a lot of colors to be added into
the water to show that, of course, it is water. Water doesn't have any color
of its own, as I always say, it is basically the reflection
of the sky into the water, and this is all we
are doing over here. It is a sunset sky. The colors of the sky
are getting reflected. And this is all we are going to even add it in any of
our future paintings, where you see the blue, the
sky will be also blue almost. And if you are seeing
something green and blue, it might be because of the
corals, algae, et cetera, that's usually seen in any of your ocean paintings or any of your
ocean photography, also, you can go and also see
that's why they are darker, lighter patches here and there because of the coral reef. Okay. I guess I'm good at this stage. I will continue to add a few more lines and
then let it rest. We will come back
for our top area. That is major any of
the areas of your sky, as well as the mountain. Pick up any of the colors
where you think it is not necessary with the
help of a flat brush. I'm using my Ruby saddle size ten brush for picking
up these colors. Let's start with our sky. The lightest value will
go in and around our sun, and this is majorly
the yellow color, which I'm going
ahead and adding. The yellow shade is
from my brand send, and it is my in yellow. You can mix it with
a bit of your Naples yellow and get a shade like the one which I'm
using over here. Blend it with some of your
Naples yellow as well as opera and then get a shape
that looks in value, exactly the way we
are using over here. You can always go ahead
with another layer. No need to worry on that. Go with a lighter
value as of now. Using my flat brush
to apply my colors, and then we will go slowly towards the top with some
more of our darker colors. Yellow, opera, purple and orange are usually the shades
that I use for my sky. Now, the orange that
I create is with the Naples yellow
and the opera orals, you can also go
ahead with some of your Indian yellow and
opera to create the orange. If you want more of your
darker value orange, then use your Indian yellow as well as some of your
opera to create that. Color mixing is a very,
very important point, and you should continue to
always do it in each of your painting rather than going ahead with the colors
that you already have. More colors you use from a mixed one that
you have created, it's easier for you to actually see how beautifully
the whole painting turns up. But along with that,
to keep in mind, if you have a pigment
that is made up of a lot of pigments in itself, which means that you
have a particular blue, which has four different
varieties of blue in it and not a mono pigment
kind of a color, then when it mixes
with any kind of other pigment that might also have one single shade
of pigment in it or two, three different pigments in it, it might produce
you dark colors, and they can be really bad. So be sure whenever you are
using any kind of colors, they should not have a
lot of pigments in it. And usually if you use
artists great paints, they don't have so many
pigments being used, except a few shades like
paints gray or any of the other ones in
blues, et cetera. You will see shades
that are darker, lighter and having less
of your pigments in it. There can be one single
pigment or two pigments. It should not exceed
three, four, five, then you might get when
you mix the colors, you might get all those
dot mixes anyways. It's time to add the blue
to with the top area. We will use the ultramarine
blue with some of my purple. I'm also going ahead and adding some more
purple on the left. As I want my sky to
be a bit more darker, though you can also
leave it at the stage. We have it over here, but I wanted it, of
course, a bit more darker. That adds so much
drama to the sky and it looks so much
more attractive. I will take a dark mix of my
shades like your besana then paints gray and add it towards the bottom
part of this hill. Continue to take it towards the bottom where there
are curved waves. You will see that towards
the top just near the hill area where
it usually ends. You will see broader
strokes and larger strokes, and they would be
way more thicker. And as we approach towards the middle part of the water area or as we
progress towards the bottom, they will become smaller and really a few of them
will be left by them. Okay. This part is a real meditative process. I will continue to add the thinner waves on
the right of few dots. Small lines using
the tip of my brush. I go slow at this stage. It's a very, very important aspect that we
should keep in mind. You use the brush on the tip as well as
you sometimes use it. At an angle to create some
of the broader strokes. You see that I have started
leaving some gaps now. These gaps will become larger and they will
become more and more I would say smaller also as we progress
towards the bottom. I haven't thought
anything about it while I was creating it. It's just that I had this
in mind that my reflections do become smaller as we
progress towards the bottom, and they will be
a fewer compared to what we usually
see ne any object. Always consider your reflections
as your mirror image. If you can consider
it as mirror image, it would be easier
for you to frankly deal with your
reflections Most of our paintings from here on
will have reflection or some kind of you will say
waves structure, et cetera. You will see lots and lots of different kind of aspect of reflection that
we have covered, sometimes with the boat, sometimes with the hill, and sometimes with some of the other ways in which
you can paint your waves. There is a lot that is covered in your future
practice exercises, as we progress in the days, you will see that there are more concepts that
I'm going to cover. It's on the go, so
you make a project, you get to learn a
lot of concepts, and then again,
it goes that way. In this I mean, if we move this way, it becomes really
easy for you to understand and retain
all the concepts. You can also use it even
in your future exercises. That's one of the
reasons I love to use the concept in our
final day projects. Final day projects means all the projects
that we are doing. Every project has got
a different concept, and we are covering each and every concept in
a greater detail. Starting out with
more easier ones, and as we progress, they will become a
bit more tougher. I'm mixing all the same colors that we had on our palette, and you can create any
kind of a mountain. You can also make it
black or paints gray. You can go ahead with any of your darkest shade
to create this. I would leave that
decision up to you. I'm mixing the same colors
that I had on the palette and now creating my hillside. I will add some orange
just near the sun area and then extend it with the blue
as we go towards the right. I guess this is great, and I'm happy with how
this has turned out. There is some more
blue and then blending it with water, water. You can also use your burnt sienna with the blue to create
the darker values. I don't have much in
mind while I am adding this color or the darkest value, lightest value, the
oranges, et cetera. It's just a mix, which I'm applying and trying to just ache all in all the
beauty that I see in nature. I want to go ahead and
create that for myself. This looks super amazing to me. I continue to just blend
and make it more even. Adding some more colors of
orange as I was not very happy with how it has turned
out. I guess this is it. Or Naples yellow so you can add, but Naples yellow will become
more opaque in nature, so it's great to
add more of orange. Some lines here and there, and then let's go ahead and
just let the paper dry off to a good extent or I would
say let it dry off completely before we
go ahead and create the reflection of the
sun into the water area. Picking up some of
the colors from a few of the spaces
is a flat brush. My paper is still very wet. That's one of the
reasons picking up the colors is really
tough at this stage. So let it be as is and just
blending some of my orange or your opera into the
shades near my sun area. I always love to use the same shade as we come on the left as
well as on the right. I continue to use the
same colors of the sky also into this particular
hillside, maybe more of blues. That's the only difference
which we are creating. Okay. I guess now you can
see that I have lifted some of the colors
well from this hill. Remove the tape at
an angle and have a final look at how
this is appearing. The one on the left side, we would be also attempting, so be ready, there
is a lot to learn, and there is a lot to explore. I'm just removing the
tape for both of these, and I will teach you
this on the left next, so be ready with something
more interesting. I am using some of
my white quash to create now the
reflection as I wanted to let my paper
dry off completely before I had any kind of
reflection into the water. Continue to add one
or two more lines. These are smaller lines.
I'm using my size one rush to actually do this. Some of the places, it's dots and lines, that's it and have
a fan look at it. I'm already mesmerized
with the beauty. See you again tomorrow
with a new lesson.
16. Day 10 Sailing Boat: Colors are barren composed, blue Donrne blue, paints gray,
ultramarine neutral tent. You can also use any of the other sheets of blue that is available
on your palette. I will start out
by creeping down my paper and then marking
the horizon line. It's one third of the paper that I'm
marking horizon line. You already know the
size of the paper. It's 15 centimeter
in breadth and the 29 centimeter in length. If you are planning to
go for a smaller paper, make sure that the dimensions
are also accordingly. So if you are taking
a ten centimeter, take by 20 centimeter in length and ten
centimeter in breadth. So that was at least
you are keeping the size almost equal. Let's go ahead and
just add the boat. You can zoom in a bit and see how I continue
to work on my boat. Okay. The whole painting
will come together with only one single
boat which we are making in the
foreground and rest of the things remain as usual. Again, we are not going to complicate this painting at all. It's just a few
lines for our boat. It is at a distance
if you see and the reflection of the boat
will fall into the water. I am adding two of my
lines towards the top as well as the bottom area and then easing out the extra lines, which I feel is quite
unnecessary at this stage. This boat will have the
colors of blue and white. White means the white
of the paper that we are going to use
in this painting. I am a true believer of
using white of the paper, though we have used a bit of quash during the
initial paintings, but believe me or not, I would not like to use
any quash in my paintings. If on a regular basis, you see my paintings, they are more to do with masking out that area
or going ahead and just leaving out some
spaces in white and then coming back over it to paint something
if needed, be. Adding a few more lines, and then you can see that these are more to do with the
structure of the boat. The top area or
this is a really, really small cruise
kind of boat, whatever you really want to say, and it is at a distance,
which we observe. Because of which I
don't want to add lots and lots of
details into it. Having said that there has to be some details that we add onto it so that it looks
more like a wood and the reflections are
also to the point. If you have already taken
day six where we have painted the tower or you
can say the lighthouse, you exactly know how I paint my reflections
and it's easy. It's a mirror image, which we usually do. So go ahead and
take that lesson. If you are jumping
onto this lesson, that lesson is going to
help you out a lot in the understanding of this
particular lesson for sure. And secondly, if
you are someone who has not seen the other
parts of the painting, the last one where
it was ten nine, and we did go ahead and
add more of curved ways. We will be using the same
concept in this painting too, just that we are going to add the reflection and
the boat into it, making it a bit more complicated compared to what
we did in the last one. Adding a few lines
and then you can go ahead and make more
of a slanting line. Then I will just make the
middle line a bit more thicker. I'm really not happy with
how it has turned out, so I will take the help
of my scale to make it more straight, but that's okay. I mean, it's a decision that
I would leave it up to you. Most of the parts
of this painting, I'm not done with any
kind of scale, et cetera. You will see more and more. I will avoid using
scale as we progress. I know as big nurse, it is
tough to maybe avoid scale. But as we progress, you have to go ahead and make things more with
your free hand line drawing. I do that very often. I try to do it in
most of my paintings. Yes, maybe some kind of
finishing, et cetera, where I want to add some
straight lines and all. You can still do that with it. But rest of the parts, I would request you guys
to try on your own, try the free hand line
drawing, et cetera for it. Adding two smaller lines, as you observed over here for basically the sailing part of the boat we have to
add in this case. Then a few lines here and there, you do not need to actually think much while you
add so many lines, there are a lot of ropes, et cetera in a boat, and we are going to also do that kind of work in this space. I think I'm pretty happy with how this boat has turned up, and I did get back to
my original ratio, which I actually
started off with. And then added a bit of a mountain on top
of my horizon line. You know that I like to
add a bit of a mountain or a hill for a better definition
of my horizon line. This really helps me
to understand that the defining part of the sky, as well as the defining
part of the land and something that I have realized on my own is when a land needs water
and sky together. I think that's one of the most beautiful painting that I can ever see in my life or I am so much in love with that painting
that I can't tell you. Using my flat 1 " brush to apply the ultramarine on
the top part of the sky, we are going to
go ahead and just apply one single color
that is ultramarine and take towards the horizon line over which you have
added the mountain. Again, a very, very simple
process not to do much. I think I have just pulled
it way below above my boat, and I'm even covering a
few parts of the boat. That's absolutely okay. Go ahead and just keep
applying the color. Make sure that your
paints are not dried off. That's the only thing you
have to keep in mind. Initially, I had this
in mind that I would be going ahead with only the
sky and then the water, but All of a sudden, this is an artist's mind, maybe. We sometimes just think
something and then go ahead and apply colors
on the whole part. I will continue to apply
more of this color. While I take it
towards the bottom, I will add colors
like bald green or you can also go ahead with
any of your other shade, like horizon blue, et cetera, or even sereniu blue
is ok if you don't have these greenish shades of the blues available with you. I am right now painting
in and around my board, and it is taking
a bit of a time. Some of the places I
want to ep in white. Now going with some more of the ultramarine
and then blending it while we go
towards the bottom. You can see that even a
300 GSM paper is trying up so quickly and this whole
thing can leave a few marks, which may look a bit patchy. But that's absolutely fine. You cannot fight
with the weather. We cannot fight with the
climate if it's dry, it's dry. Or you can do one more thing and apply water on the
back side of the paper, that would give you more
time to paint on top of it. Mixing some amount of cobaltrine while I go towards
the middle area. I'm just blending it with my cobaltrine as you
observe over here. I will not be touching all
the places of my water area, blending it as a cross
swatch kind thing. You can see, I don't just keep or go ahead and add the
colors at one single place. I'm trying to cross it on
the entire water area. Slowly, steadily, we are
going to build it up, so do not worry in and
around the horizon line. It should be lighter and that's
what I'm going to pick up the colors from there and
keep it a bit more light. As we progress towards
the bottom area, it will become more darker. Trying to blend my sky
in a bit more better way and making it look more
organic and less patchy. I told you because
of the climate, I'm pretty much struggling
at this stage to just have a clear wash or just to have a simple flat wash
in many of the spaces. But that's okay. It's part and parcel of a watercolor paint. You can't always
have the best of the conditions at your disposal. The idea is to paint and
that's what I'm going to do. I will make sure that
the bottom area is still wet to a great
extent and then pick up extra water if there is any and start
adding the value. This is majorly the don threin blue or you can also
go ahead with a bit of your paints gray into it to
create darker values and then start adding the
circular kind of waves which we did in
our last painting. Now it's time to add the
wave like structure. You can see that as we
progress towards the top area, these waves will
become more and more thinner and that is as for
the rule of perspective. You have already done it in
previous all the exercises. I mean, majority
of the exercises had something like that. Over here, also,
we will be using the same concept and
painting the waves. Some of the areas
of these waves will be more darker and some of
the areas will be lighter. That's all you need to
keep in mind while you paint any of your waves
with water colors. I'm going ahead and
waiting some parts of my paper again as the
paper has already dried up, and I will not be in a
position to add waves into it. You can see that the
paper has dried up. This continues to
get this way only. I had to just apply more water and take it
towards the horizon line. That's all we can do,
frankly speaking. I continue to create the movement that is
semicircular with my brush, and this is my size
four brush from the brand silver valvet
you already know that, okay, so the brush is
server, black velvet, whereas the company
server brush company. So you can also
go ahead and have a brush like this or A four
size brush can also help. Continue airing and breaking the waves as you progress
towards the top. Now, breaking the
waves is again very important as the
waves will not be in a continuous movement
or way as we progress towards the ship or
towards the horizon line. Those things, just keep in mind and work with all the paintings. That way, you will be
much more at ease. You just know the concept, and you need to build in
and around that concept. I will continue to
add more round waves and towards the just
below the boat, almost, they will end and then they will become more flatter. For painting the waves, it's not only about the concept. I would say it's
also about the fact that what's the water
control of the paper, the amount of water that you
have on top of the paper, it should not be a
lot and it should not be a less for the
best of the outcome. That's something which I
have learned over the years, is that your water control is the main thing in any
watercolor painting. While we continue to
mitch our ind blue, as well as some amount of
cobre the major part that still is important is to understand that the paper is wet when you're
applying any colors. Do not apply the colors
if your paper is not wet or else you might
have to go ahead and again, blend in and that blending and blending and blending
with the blending brush actually creates lines or
patches, which we don't want. Even cauliflower effect
can be created that way. So be aware of these
smaller nuances, which we have in water colors, and they can really help you to at any of your future
paintings too. You can see that I've applied the color that is
the darkest value, and now I'm trying
to blend it now. This is something
that I do very often when my paper is not wet, but believe me or not, you may create patches
with this kind of a technique sometimes.
But to experiment. Something that I always say is experiment, experiment,
and experiment. If you don't experiment,
you don't get to realize what works
best for you for me. I never thought that retting
can work great for me. But over the years,
after painting, I have been retting
a lot of places when it is very hot during
the summer season. I can't do much
with the climate, but all I can do is to
work with the paper, which I have in my hand. And rewetting is the only
option that I had if I did not apply any water on
the backside of the paper. Let us continue to add a few more lines as we
go towards the top, and I'm using right now the tip of my brush to add
these kind of lines. I would even add
it below the boat, which I have to paint. I'm pretty happy with how this
is turning up altogether, and now it has a better look and feel of the water compared to
where we started off with. Slowly and steadily,
every painting develops, and you have to
also keep that in mind to not give
up at any moment. This is the very
truth of watercolors, a mindset that you have to develop for your watercolors
is very, very important. If you are just going
ahead and painting, maybe that may work for you
or may not work for you, but that intention
of creativity. And always thinking from your heart that you
can actually nail this painting can help you to a through any of your
future projects, even whatever you want to paint, I think it can help you. It has really helped
me in my past journey. I think it will also
help you in yours. I will continue to
add lines only where the water is still there or you can see the
moisture is still there. I'm not going to add any further lines on the
spaces where I don't see any kind of water or
moisture being available. Water control is a very,
very important mechanism, as I've told you earlier, and I continue to follow that as we continue to progress
with this painting. It's been tough, believe me or not working in this hot weather. I would always refer you
to go ahead and just apply one at of wash
on the back side of the 100% quarter
300 GSM paper. And then paint on
the top side of it. Use more made papers. They are way better and try
to avoid cells paper because loose paper will not allow you a lot of time to
work on top of it. It would dry off very, very quickly compared to what
we want in our paintings. I think that I'm happy with how this is turning
up at this stage. So let's continue to work on
smaller and bigger strokes. You can just follow
me over here, and then we will move on
to painting the boat, as well as the small
hill or mountain. Let's not try to complicate
this painting much over here. Whatever we have done, we will be going over it with a bit of our darker
values, and that's it. The painting process of the
waves is always very slow. That's one of the
reasons. You need to keep the patients at the stage. It's going to end
very very soon. Then we will move
on to our boats. So hold on, work with shade or this particular
color that we have created. It's basically a horizon
blue kind of color, and then adding some train into it to add the
darker values of it. Adding one or two
lines here and there, using the tip of my brush. The top of the paper you can
see is already dried off, and it might not be a great idea to add a lot of
lines over there. We might have to go
ahead and again, just wet the paper if you want a wet on wet kind
of lines or else, let it be as is, and just add whatever shades
or the darker values. You will always see that there is a gradient kind
of a wash. Now, gradient wash even in water is darker values are
towards the bottom, and as we go towards the horizon line, it
will become lighter. That's what you have to keep in mind when you are painting with any of your water
paintings for sure. That way, you can frankly just feel that all
the water paintings are coming together
very quickly. I'm using a thin flat
brush now to just pick up some of the colors
from a few of the areas. I have done this
previously also, but this painting, of course, is very special to me. Believe me or not,
there are only Shades of blue, which
I have applied, and I'm super happy with how the blue will look
at the final stage. So continue with it, and there is so much fun that we are going to
have in this painting. I think all of us have
this habit of retouching. I continue to retouch in
many of the areas and you might also have to continue to retouch in
many of your areas. But this habit of
retouching can also lead us to a lot of difficult
final outcomes. One is the patches
that appeared. The second is we might have
to go ahead and get lines which are more dry and they are more maybe than if
it is better on wet, your lines are way
more lighter and they are softer
compared to here, they would be more
of the harder lines. And finally, the last one, which is a cauliflower effect. That is movement
of your water from the more wet kind of a surface
into more drier surface, which will give you
cauliflower like effect, and we have seen it in
many of our paintings. You will have also seen it
in many of your paintings, if you have been a pretty
regular person at painting, or even if you have started out, you are experimenting,
you get to understand, yes, there are a bit of cauliflower effect
that you may get. I'm using my thinnest
brush as such and creating a few lines as
we go towards the top. You can see that some
of the areas I have removed with the help
of my flat brush. This is Ruby Satin brush
size ten flat brush, and it is an amazing brush. I'm so much in love with this flat brush that I
frankly can't tell you. It is such a relief to
actually go ahead and just remove or take out a few of the areas where I want
to lift out the paints. This lifting out
technique we will be using even in our
future paintings. So it's kind of just an
introduction in this painting. We will create more and more beautiful
paintings as we progress. Now it's time to paint the boat. I have picked up the color, which is majorly my ultramarine and some of the darkest
value that we have applied for our bottom
area of this part. I will go ahead and keep
applying the color. If required, you can also wash your brush at
any stage required. So don't think much while you just continue
to wash your brush, adding some of my darker values on the left, and let's in. I think it's time to zoom in and continue to
work on this board. Having a closer look at it, you can understand that some of the areas are more
darker in values or they look a bit more dark compared to the few of the
areas, which are more lighter. I continue to work with my size six silver
black velvet brush and add some of my darker
kind of values. If you add some amount
of brown into the blue, you will get a set that
looks similar to the one, which I'm using for my painting. I will pick up some more of
the darker value shade and then use it on the bottom part of the board
to create the reflection. Now, reflection
is something that I always love to create
in any painting. Now, since this
particular painting has some amount of you can
say movement in it. Hence the reflection
will also be as such. Though while you go towards the middle or towards
the horizon line, you can see that
the movement has decreased to a great extent
and we will also show the same into our painting. Mm. Let's work with
our darkest value, and this is a neutral tint
that I'm going ahead with. I would add the mountain or the hill in the
background with this. You can see that I am using
a lot of pressure right now while I'm applying the
line towards the horizon, just above the horizon, and then I would even add
it towards the right side. Some of the places, of course, I would be adding the ridges, as well as some amount of crooked lines so that it
looks more natural as well as it can give the image of a hill in the in the
background and all. So continue to do that. And once this is done, we can go ahead and add
somewhat darker values as the paints on the paper
is still wet and going ahead with darker value can really help at this stage to let the colors move in a good place. Continue to work on it, and then I have even
added some amount of ultramarine towards
the middle part. While I start
working on my board, it has to be the darkest value. I'm going ahead with
my darkest value. That is the neutral tint
and creating a few windows. Now, the other part, of course, will be in the
white that we have left and we have not
touched it at all. I love to always keep
the white of the paper and use it to my advantage
whenever I need it. Continue to work on
the window part, and then we will move on to the other parts of this fading, that is the sailing of the ship. And a few lines that you need to add for this boat, a ship boat. I mean, small crews, whatever you want to say,
you can name it. I will add a bit of my ceenliar orange and create a color, which looks more brownish, add it towards the right side, as you observed me
adding over here, and then we are going
to go ahead with one more smaller piece in
the just just below it. So keep adding this and
then add a straight line. I am going to use the
graphite mark that I did add during the initial
phase of the sketching. The sketching is not a very prolonged
process on this one. Only part that is important in this
particular space is to understand how you continue to actually work on
with the values. And they can be less colors, which is absolutely fine, but working on the values and a few lines is something which
is very, very important. I'm zooming and again to get a few lines as you
observed over here. And then these are basically the detailing part
that I always say. It doesn't need to be
very, very precise, just a few dots and shorter
lines here and there, which you need to add
for this painting. Go ahead and working on a few
more lines towards the top. I have used my brush, which is zero, zero for
adding these lines. Continue to add it till the bottom area and
then work a bit on the right side for adding the darkest value of the
sailing part of the Of course, this is a sailing boat, and we have to show
that boat rows, whatever you want
to say, small ship. I always say that I leave
that decision up to you, but the major part is
adding a small subject into the painting and then creating the reflection of that
boat into the water area. I will add a bit more darker
value for my windows to. I continue to work on this smaller piece a bit
more in detailed part, and you can see that my
brush is now zero, zero. Hence there is not much scope, I mean, in terms of the boat, which I am painting, there is not much scope, which is left for
moving to a really, really small paper,
even for you guys. Believe me or not,
you can just go ahead with a bit smaller than
this, but not much. But you need to keep the ratio
same that is one to two. If you're length has to be
twice off your breadth. So that's how you
have to keep it. I will make a few
twisted lines, dots, et cetera, for the reflection
into the water area. I really like how this
painting has turned out. It's not complex. It's
just that you might feel a bit overwhelmed when you are working on
the waves part. It is overwhelming. Water is overwhelming. Believe me or not. It has taken me years, and I have tried to
practically break down everything into really,
really small pieces. While you continue to
add a few more lines, I would love to add it to you that whatever water
you paint is great. It is one of the
toughest subjects that you might have
ever attempted. What we are doing is taking
it a step forward where there is some more amount
of reflections boats, sailing boat or
even stagnant boat, everything is going to add on. There is a lot more
projects that you will see, which is a bit more
complex than you have attempted in the
last eight of them. Hence, Just be with
me is all I can say. I think that you will enjoy this journey of
watercolors where you are going to paint
something fantastic, amazing. I'm thoroughly in love
with it till now. How much water I paint I still
fall in love with waters, springs, florals, et
cetera, every time. Once your paper is dry, it's not of much
use in terms of we cannot lift the color
as much at this stage, compared to what we
could have left. I mean, lift it out when it was semi dry kind
of a condition, and it had some amount of
moisture on top of it. Rest. I guess I am y. I will still try to lift
out some of my colors, but I'm pretty sure about it. I will not be
capable in doing it. However, hard I try
at this moment. Let's remove the tape now
and have a final look at it. I'm pretty sure about it that you are already in love with
both of these paintings. Yes, it is a bit advanced, but I hope that
you are liking it. Do let me know either
review or feedback section.
17. Day 11 By the Sea Part 1: Okay. Let us go
through the colors. It's Atraar Naples yellow, orange, opera Pains
green neutro tent. You can keep any of the other colors that's
available with you in your poet. I'm using the same size of paper that we used at the
last two exercises. It is 15 by 29 centimeter, only the differences,
the way it is used. Right now, it is in a landscape
size rather than it being in in like a portrait size. So that's the only thing. Dropping in two dots first
and then joining the lines. I will make two pattern lines
to start drawing my boat. It helps me to just
give a rough idea how I want to place the boat
on top of the water aium. This particular video is
divided into two parts. One is basically the drawing of the boat and then how
to paint your sky. The next part is all about the water boat
reflections, et cetera. As the paintings
are becoming a bit more longer than all
the lio paintings, hence I just thought
that from now on, we can divide our paintings
in either two or three parts. That way, it would be easier for you to follow along with me. Okay. Let's continue to add
more lines on the boat area. And I will just give you
a bit of Zoom in part so that you exactly
know how I am going ahead and adding these lines, as many of you still do follow my classes
on smaller screen, though I have been always
iterating that follow the class on a bigger screen
like an iPad or a laptop. That way, it's easier
for you to actually look into it and follow
along more easily. At least for the
drawing parts and the boats are
usually smaller than what you may observe in many
of your other paintings. Initially, we just want to create the structure
of the boat, so there will be
only a few lines, later on, we will keep adding more and
more details into it. That way, it becomes
easier for you to not only place the
boat well on the water. It gives you a lot
more confidence to how you want to develop this
particular painting. Go ahead and adding the
sailing part of this boat, basically the cloth area, which you usually observe. I'm going ahead and
dropping in a few lines. Go slow with the process because this is basically the
base of our painting. In case you can
nail the drawing. I can tell you that you
would be in a much, much better space
and you will be much more confident when you approach
any watercolor painting. I have realized it. I know you have heard
me speaking about it for a lot of times in
various videos earlier. But all of these
small tipsentrics, I did learn later in my journey, and it took me a lot
of years to learn it. But over time, I really want to impart all that
knowledge to you very quickly so that Even if you are starting out
with this journey, you should always
try to sketch a bit and then go ahead
with the paintings. Adding some more
lines on the right, as well as few more lines will
also be added on the left. This is just to
balance out basically the sailing cloth that you
have added in the boat area. It's not that we are
going to completely go ahead and just replicate
a boat altogether. What we are trying to do
over here is allow yourself to add the structure and the
look and field of a bot. Few of the nuances may be different and that's
absolutely okay. Somewhere or other
we all can just go ahead and not have a similar both that
we thought we will. Adding a small human figure
towards the left side, I'm pretty happy with
how I have added this. Believe me or not.
Is it is actually a great way to balance out
your paintings when you are adding figures
into your paintings. Great. I guess this is good. Let's just go ahead and keep
adding some more lines. The hand is on the left, and I'm just trying to add that hand for this small figure. You can also make it a
bit gray as this would be the darker value
for the figure. It's a sunset. At
the end of the day, if it's a sunset, you will have darker and lighter
values dropping in. I'm just trying to add the boat which is
sailing in the water. Of course, it would
leave a bit of your foam or something
on the water area. I mean, it has
passed it, correct? So that's why I'm adding it on the left and a few more lines
on the sailing boat area. There's a sunset sky, as
I did tell you earlier, so the sunset has to
be near the boat area. It's not exactly in the middle, a bit on the right if you see. So not placing the entire
subject of mine in the middle. You all know that
I don't do that, and I have made it pretty much conscious in my mind that I don't want
to do it that way. Continue adding any
more lines if you feel it's necessary like the
one I'm adding right now. Believe me or not, this is
a bit different sunset. We will be having some of the darker values
towards the bottom, and then the middle area will be more in the yellow and the
top area will be in the blue. That's how I want to add it compared to what
we have done to date. Let's chump onto it. I'm starting out
with my opera color. You know that I am very
much a person who is in love with opera shed of mine, and I'm just blending it
with my Naples yellow. Now, this Naples
yellow, of course, is from Cinlio and this
is Naples yellow deep. It's not Maples yellow light. Naples ellowlight is much
more opaque in nature, and I don't like so
much of opacity. Hence, I love to just
add it this way. So more of my compose opera. Cos opera is practically
something like Carmine. If you are not having
compose opera, you can go ahead and use
carmine in that case, and then adding some of my most beautiful shade
that is ultramin. Of course, I'm in
love with this color. You guys know by now that one of my secret ingredient to very painting that I
do is ultramarine. Yes, I think this is
a beautiful shade. It's great for sky,
it's great for water, and it's great for most of our paintings. I'm
just blending it. But on the right,
you can see that my paints are becoming more dry. Hence I have to go ahead on the right and also
add the colors. This is my sy zero
brush from the brand, the Vinci going ahead and adding the opera shade compost
opera shade on the right, and then blending it with the maple yellow that
we have already added. More of ultra man
towards the right side, I am happy with how this
painting has turned out. Middle area, I did
tell you I would be using more of my Naples yellow, and I will now bring
in my flat brush, which is basically kind
of my blending brush that really helps me to
any of my paintings. And the paints I can also
see moving a bit up because of more water that it has
seen towards the top area. I will wash my brush, take off all the extra
paints or just go ahead with one more flat brush to blend the colors as
you observe over here. No greens will be
seen in our painting. One thing that I have observed in most of my
paintings is Naples yellow doesn't go ahead and blend with the ultramarine to create the green shades
that we usually see. For that, you need to
only see one thing that in Naples yellow is not
reacting every time. So yes, use it on
another piece of paper. I have been using this
Naples yellow for years. Now, it's been, I think four or five years
that I've used it, for doing all my sky paintings, and this is one of them. And hence, it's easier
for me to see this, but finally how you
actually go ahead and paint it is something that you need to observe when
the kind of Naples yellow. That you have right
now in your palette is what I can say is
important to understand. It will react with the colors
that you've added or not. Okay. I guess I'm good
adding a few more details, and then we will be shifting
to let this paper dry off completely and
then go ahead with the bottom area as well as the ship area or the boat area, whatever you want to
say, that's up to you. Now comes one of
my favorite color that is quin acrodn coral, and I'm using it just towards the bottom left side
to blend the shades, even on the right
side, I can use it. My paper is still wet. Now, until your paper is
wet, you can work on it. Once your paper has
dried up completely, you cannot work on
it any further. So make sure if your
paper is drying up, leave it at that stage. Do not try to go ahead
and keep touching it. I would like to just
remove the colors from the area of this
ceiling boat part, and then we will go ahead
with some more of the colors. We will go ahead and add
on top of it. That's okay. But right now, we need to
just remove the shades. I will use my flat brush. The paper is still wet. I always told you
that at this stage, you can go ahead and remove
the colors if you want. I think by mistake, I did also remove the colors from
the right in side, where I should not usually, but I did remove from that
side now adding a bit of shades or colors that I mean,
basically in this part. Though there will
be more of lines, et cetera, I mean, this kind of I mean goof
up everyone can do. I can also do it a few times, so let it be I'm just adding
some more and let it dry off before you actually go head and add more lines or any
more colors on top of it. If the paper is
already dried up, do not try this technique. Only try it if your
paper is not dried up. Go ahead and adding a few
more lines just to show basically the way you
have to add your waves. This is a very, very
important part. Let's just zoom in
and understand. I will add gray shade in the
areas where it is basically the darker values of my waves is going to hit and leave
the other parts of ***. This is a great
way to distinguish between the darker
and lighter values and it's easier as a guideline for anyone
who is starting out. Though this painting
has come, I mean, you can just do it
within 30 to 35 minutes, so it should not be a problem. Just adding it will work or
serve as a framework for us, and it would be easier
for us to work through the entire I will see you in the next lesson
where we are going to discuss how to paint
the water and the ship.
18. Day 11 By the Sea Part 2: Let's start with the bottom
area as well as the boat. It's going to be
very interesting. Believe me or not, but this is my favorite out
of this painting. Go ahead and mixing
some amount of my maples yellow and my opera. This is a very important
step as we are going to add the water in the
lighter values of the sky. Though I am not using exactly the same colors that
you observe in the sky. It would be a bit different
than what we have used there. Though this is a sunset and there might be
an exact reflection. But what I observe from my
end is the darker values of my neutritin and some amount of the orange that
falls into it. Now, it's all about
observation and it's all about how you actually see the painting working up and how you actually
develop your painting. For me, right now, it's important to
use the same colors, which is orange and the
yellow into my water area, and that's the only
thing which will be constant for the sky as
well as for the water. The rest of the part will be in the neutrtin as I did
tell you earlier. I did already mark out the
areas where I have to add the lighter values
as well as the areas where I would be going ahead
and adding the darker value. Darker value is basically
the neutral tent. I'm using a bit of my
pains gray into it. You may even avoid the step that I will leave it up to you as there is a bit of blue
also in the sky and hence I just thought that it would be good to use my paints gray. My paints gray has a
touch of blue in it and hence this is always a
great option to go ahead. Some of my darker values, which I am adding
in the darkest of the spaces that we did
already mark during the initial sketching
part and then adding some of the thinnest
waves as we go near the boat. There will be the reflection of the boat into the water area, which we are also going
to paint as we progress. But the idea is to keep
wet on wet as of now. All the painting that is
done is mostly in wet on wet clearing out
some of the places where I think that
the colors are moving too much
between each other as my these waves are not
at a lot of distance, and hence I need
to keep it in mind that they do not touch
each other altogether. Though you can see that my paper has actually some crest
and troughs into it. Yes, a bit here and there
will always be possible. Do not worry much about
all those things. Some of it will be not
so great and there will be some of the best
of the moments that you will also
get in watercolors. Watercolors is never
about perfection. It's just about being
happy in the moment. The colors of the water
will remain same. You can see that I have
opera tin bnples yellow and some amount of the orange
color, given over here, and the bottom area
or the darker values of the bottom area are
basically the colors, which is neutral tint, as well as some amount
of my paints gray. So those are the
only things which are going to be added
into the painting part. All I can tell you is
that the intensity or the way in which
you would be adding the colors is all that
matters in the painting. Some of the parts
will be darker in values and some of the parts
will be lighter in values. Another thing that I
should tell you is this is only going to work
when your paper is wet. If your paper has dried up, then these kind of
strokes might not work. You may have to go ahead and apply the colors once more or apply some water once more before you go ahead
with the next year. It's always a great idea. To let your paper
dry off completely, then apply a clear coat
of water and over it, you should go ahead and paint. That's really simple way, as well as it will not give
you any patches or anything. To be frank, if you see the
middle area of this painting, there are some kind of
patches which I can observe, but at the end of the day, I don't need to think much I will be coming up
with some lines over there and all and hence it would be
fixed in totality. I'm even blending it with
my clear flat brush. That is really a huge help. The flat brushes can actually add a bit of
mushre into your painting, that gives your paper
a certain amount of water on top of it so that you can still
continue to paint over it. I'll just add a few more lines
as you observe over here, and there will be some lines that would be added
even on the right. And just below the boat area. The darker values will
be coming up there, and then I will come up with a beautiful mountain
in the background. You can do this or else even just go ahead
and let it be as. If you are not very confident
about it. I don't know. I am not very sure of it to be Frank and I might just go ahead and blend it with
the background. Yeah. These kind
of things do keep happening and you may not be very happy with
the final outcome. At that point in
time, you should go ahead and just blend it
with the background. I did the same technique of adding mountains
on the right side and they're blending
it by flat brush. I would go ahead with
some smaller strokes now as we are coming closer
to the boat area. When we are closer
to the boat area, it means that there will be smaller and smaller lines
that are going to come up. It is further away
from our eyes, and that's one of the
reasons that it is not going to be bigger
in size and shape, it will be small. Adding some of the
lines on the right, and even just below the boat. Again, just to make
it more darker. I'm going very slow
at this moment. Believe me or not. I don't have any particular idea in mind. It's just that I have
to create a reflection off the boat into the water and that's only
there in my mind, but how I should go ahead and make my smaller
and thinner waves. I'm just going with the
flow and adding it. This is my neutrotan
adding it on the boat area and then just covering the entire boat
bottom area with it. Blending the colors and
blending with the bottom part, you can see how pufly the
colors are getting blended. It's almost dry the
bottom area and hence there will be some
lines that will come up, but that's absolutely okay. We are not thinking much into all those small smaller
aspects of painting. I mean, don't beat
yourself up with smaller aspects of
painting. Just enjoy. Go with the floor. Whatever
be the final outcome, just tap on your back and say, you have created it,
and it's amazing. Creativity is a gift. It's a time that you
have taken out for yourself and you are
doing seriously amazing. Going ahead with a
lighter value of my orange that I had on my
palette and some amount of the neutral tint and creating the ceiling so there's
a sailing boat. Then there's a
cloth. I'm covering that area with this
particular light mix. There's a small person
who is sitting over there and I'm covering that up even with the lightest
value for now. Once this part is done, we will create the area or
basically the ocean foam, which usually comes up
when any kind of boat travels faster or any cruise
smaller cruises, anything. Travels on the
water, you will get this kind of ocean foam, and I'm just trying to imitate the sceam with my watercolors. Time to have a closer look at everything that we
have painted till now. Believe me or not,
I'm super excited. We are zooming in and
understanding what we have done till now, it's super pretty
this boat painting. I'm always in love with. There is so much to be done in any kind of boat
painting that you do. Over here, we are also
creating a few lines, and then we will be going
with the darker, lighter, all kinds of values
to create some lines. Just follow the kind of
strokes that I'm adding, and I guess you would be good to actually go ahead
and sail on your own. We are just zooming in
and then going ahead and creating the smaller lines that is important
for this boat area. This is more of
detailing to be frank. At this stage, we are
majorly done with all the important rights that we had to do and the
waves are also time. It's just the boat and the smaller important
things like a fuel lines, darker and lighter values. The area, which we did
paint in the orange part, which is majorly the cloth
area is still a bit of it, and that's one of the
reasons I did not go ahead and make a full line. Orals, it would
have moved a lot. I mean, the paints
would have moved a lot. Adding a few more lines, as you see on the right side. This is great, you know, I just feel so much happier when a painting
is almost coming to life. I have such less
work at this moment. But if you overwork
at this stage, believe me or not, your painting is not going to come
together very well. Last four to 5 minutes is
the time to step back, relax, have a cup of coffee. Just step out for a while, come back and see that is there something
else that you really want to add or is it that you're just adding
something extra. So for me, I really need to add some reflections
into the water area, and that's one of the reasons I have to continue
working on it. I did add a bit of doc value even on the person who
is sitting over there. I'm going with a
simple color wash, which is majorly the
same colors that we have added for the
waves, orange, as well as our neutral
tint and creating these beautiful
and amazing lines. Oh, my God. I think
it has my heart. I can't tell you how much I am touched
every time I create. Any kind of lines or any kind of beautiful reflections
into the water area. Every, of course, the
reflections will not be seen and that's one of the reasons I'm not going to
add it everywhere. Just in few of the areas where I think it is necessary
and some of the lines, which we did add, those lines need to be added
even in this case. We are going ahead
and using the tip of our size for brush
to do this exercise. Oh. At this stage, my only advice to each
one of you would be to go slow and be on it, be on top of the painting. But not beating yourself up just to think that,
is it complete? Do I need to work more or do I need to work less,
what I need to do? Think that it is a
painting that you have already done and it
turned out already beautiful, just a few more touches and it's going to be super amazing. Using some white
and adding it in a few spaces where
it is necessary. It's just for a bit
of highlight into the darker colors that we
have added for the boat area. A few more strokes and
we are good to go. This one is the whites, and then I would go ahead and
add some more darker values into the area of the
reflection of the boat. Now, that is something
which I always always say it's important
few of the areas will be a bit more
highlighted than the other areas that we have already added into the paint. I will go ahead and add
a few more lines and using my size zero brush
for doing this exercise. At this moment, I
would just let you work and see how I
paint my strokes, how I go about with
my thin brush. That's all. Enjoy the moment. Finally, I'm almost done it's few more lines as I
did tell you earlier. I would go ahead with that
and create some of my lines. Just below the boat. You will see how I created, and then final at this painting. There's not much to explain from here on, as I always say. But these darker lines are not going to cover up
the entire space. It's only going to work on a few of the areas and those are basically the highlights and rest of the areas would remain. I will meet you again with another ship or boat
painting very soon.
19. Day 12 Waves Part1: I SOA colors in a
bit different way. I'm going ahead with either
you can go ahead with your compose blue or you can go ahead with
your horizon blue. So both the colors are good. To be taken. I can go ahead with
even tail green. You can prepare the tail
green if you don't have it. Then your lightest value
of green or yellow green, along with it, keep
your paints gray or co. Both of them are good to go ahead with John
brilliant number two. This is the lightest value
which we are going to apply on our sand area. Then our pca K brown and last is dk green
for our painting. The size of the paper is a bit
smaller than your Ao size, not much smaller, so
you can also go ahead with the Aosize paper or
a bit smaller than that. Actually, the board is
around a four size, and this paper is a bit smaller
from the size if you see. Go ahead and just marking
about 10 centimeters, and then I would go
ahead and draw a line. Now, 10 centimeters, there's
no particular idea about it. I initially wanted
8 centimeters, but then I thought ten
centimeter would be a better idea to draw
the horizon line. I would go ahead and just make a bit of an
island over here. Island means that I would
just add some sand, some rocks, et cetera, and then create a bit of greenery to make it look
very organic that you can see from a distance
the beautiful island and the bottom part would be
more of waves, et cetera. Very excited to create this with you guys.
Believe me or not. This is one of my
favorite paintings from the entire series, and we are moving on to
now bigger paintings. There will be a mix of bigger
and smaller paintings. Do not worry on that part, but mostly what you will see at least three
paintings that are coming in the following days
are more bigger in size. I'm adding some line
curved lines across these curved lines are majorly for the
areas of the rocks, and then I will even add some more darker lines towards the bottom area when
you go towards the bottom. Going ahead and adding
a few more lines for creating the rocks and
then again shading it. You will see me shading
up a lot of this area. As it is the darker values, and it makes my work way more easier as I progress
with watercolors, the darker areas will
be in darker colors, and the lighter areas will
be in lighter values. That way, it provides me
with a better guidance, and I continue to work
on few more lines. There is not much that I
can explain over here. It's only few lines, entries, et cetera that
we continue to build on. Of course, the sketch
is always a framework, and if you create the framework, we your final outcome of course is going to be
even more interesting. Having said that if
you are not very well versed with sketching,
it's absolutely okay. You can make your rocks
in your own style. You do not need to follow
the style over here. We have all de painted
rocks do in this series. So you can refer back to those and this all will be
done in a similar way. I go very slow at this stage, as I want you to
get everything that I'm doing right now in
this painting. It's easy. It's not difficult at all, and there's a mindset, which I always say is prevails
in watercolor. If you go with a
positive mindset, your final outcome
will also be positive. But if you are not going with
a very positive mindset, what usually happens is that your final outcome
somewhere or the other, at the back of your
mind, it's always working that no the
outcome may not be good. I may not be in a position to create the correct painting, and I might not be very happy with how it
turns out, et cetera. But we always recognize the fact that the
positive mindset is very, very important in watercolor. W is a watercolors
anyways is very tricky. If you are then moving
on to a medium, which is so much tricky with not so great kind of a mindset
or a doubtful mindset, then the final outcome may be
a bit difficult to attain. And that's what I say
that go with a very, very positive mindset, and I think that you would be in a position to nail
your painting. Now, let me add my
trees over here. I would go ahead and create a few lines where
basically I would be marking the whole of the
leaves. This is coconut tree. Of course, it's an island and it's in the
middle of the sea. There has to be
coconut trees, right? Let's make one of
the coconut trees, and on the right, I'm even
adding some more of my rocks. M. Even while you sketch, you can do a bit of detailing. You can see that some
of the areas you can mark in a bit of darker
value of the pencil. Though I'm going ahead and using my two Etch pencil that
is very, very light. But on paper in few of the areas where I want a
darker graphite marks, I do shade those areas well. We are going to have a lot
of blue into the water area. I'm going ahead with my beautiful This is a horizon blue from the
brand mago Mision gold, but you can go ahead with any of your other blues that's
available with you. I'm pretty sure that you
have even a cobalt green, though we are going to
add some green into it and create our own
beautiful cobalt green, mixing some amount of Mello green into it and
getting a darker shade. These things, you know, you can always continue to add on your own and just mix up your colors
to get the final outcome. You really don't need
to have the colors, which I am using right away. You have also seen in
the color mixing part, how we have created
tail green or the colors that are pretty
much used in this painting. I will add some
more of the colors towards the bottom area and then go ahead towards my top area. The top of the area, of course, is becoming more and more
drier and we might have to go and add some
of our blue colors even over there so that it doesn't become
absolutely dry and that will lead to lines,
which we don't want. That would be the talker
or the patches and lines, et, which usually happens
in a dry kind of space. Okay, great. L let's go ahead with some more ultramarine while we go
towards the bottom area. You can see that right now
my water looks pretty flat. Is this what we are going
to paint? No, really not. I'm going ahead and
adding a bit of my darker green into this water. You can also see that the lower bottom part is more of greens that
we are going to add. Either you can take
the yellow green right now or go ahead with even any of your other greens that is a bit yellish in color over here to create this kind of a hue that you observe
in my painting. I am going with my flat brush so that I can go ahead and cover a larger area compared to
what we have done earlier. Now, larger area
coverage is very, very important in the painting. I would say that is basically
the whole of the water. And going with some
of my greens more towards the bottom area and then blending it to make it
look very, very organic. Now, what do I mean by making it look very organic
so that there is a clear transition from the green to the blues that you observe in the water area. I'm going pretty
slow at this stage. You don't need to worry. Just observe that how we are
creating some of the waves. Believe me or not, this is
a very simple exercise. While you create the waves, it might be a bit difficult
or look a bit difficult. But overall, when
you continue to add these lines on a wet surface and continue to
control your water, you will exactly know that
this process is very simple. You've already created
waves and you know how creating waves is
easy on a wet surface. We are just taking it a bit up. We are not going with as route straight waves
throughout some of them are at a gap with each other as it
is a larger paper. Only thing that you need to
keep in mind is that there is Good amount of water
on your paper or else. There should not be puddles. Now, if there are puddles,
your colors will move a lot. If there is less water, then your paper
will dry up fast. There has to be an
optimum amount of water. That's what I am always always trying to
tell you it's a hot. Summer season in India. So it might be difficult for many of
us to keep our paper. You should know your climate
and then accordingly work. That's a very, very
important tip, which I want to give
you that climate has played a great role in
my choice of paper, the kind of paintings
that I do and the layers that I can
apply on my paper. For the darker values of blue, you can make some amount
of your go or paints gray. You can also go ahead with
some of your onrene blue. That's a beautiful blue which you have from the branch senala. Actually, I own of one of
the onre blues from them. I really love the
color that they have. It doesn't move a lot and you
can really control it well. I haven't tried onrene blue
from any of my other brands. This is one of the brands which I have fallen
in love with, and I still really like
to go ahead with it. Continuing to add
some more lines, and you can see that these lines look so
much more organic. While you go towards the top, they will become
lighter in values and they will become
smaller or shorter. You will see how
you continue to use the tip of your brush as you
go towards the top area. I am just washing my
brush and picking up some more of
the darker values to apply towards
the bottom area. The underlying water
is of course green, but the waves that we are
creating is in darker values, and that's what
matters at this stage. Believe me or not, right now, I was not sure how the whole painting is
going to turn out. And it took me a lot of time to really realize that
the whole painting is going to turn out well. So never never give
up in between, always continue to
work on your painting. The colors are the same. Some of the areas,
I'm extending a bit. You can see I'm mostly using my brush at an angle
so that I am not using the tip
entirely and not even the bottom part of
the brush area, which is way more thicker and it will give
me bigger lines. Going ahead and using
some more of the tip area of this brush to create
some of my lighter lines. I have washed my brush and whatever be the color
that's left on my brush. I'm using that color to create the waves when I
go towards the top area. This part is already
pretty much dry. Only a few lines is what
I can add at this moment. Now we are touching on a
very important concept that is lifting of colors. We will go ahead and take wet or you can say a brush
that is damp and clean. We will wash that brush
and then again pick up some of the areas
with the same brush. I'm using a round
brush at this stage, but we can also go ahead
and use a flat brush that really helps you to pick up the colors even more quickly. That decision, I would
leave it up to you. I continue with this process and I will continue
cleaning the brush at regular intervals
when I think it has become more green
or blue like that. I'm not going to pick
up at every place. There will be only a few places where I'm going to
pick up my colors. And that's how we
are going to create our ways at the beautiful
light shade just underneath. I have seen her in
many paintings, but this was the first
where I wanted to try it with you all and hope
you were going to like it. Once we have made these lines. I will go ahead and start
working on the top area. Now, you can only do this exercise till your
paper is semi wet. So it's not absolutely
wet and it's a condition where your paper is damp
rather than being wet. So do keep that in mind
when you do this exercise. If your paper has
dried up completely, then it might be a thing that you will not get these
lines correctly. Going over to the sky area, I'm going ahead
with my royal blue, and then I will mix it
with some amount of my ultramarine to create the darker value
towards the top side. But as we move towards
the bottom area, it would be lighter in value. Now, that's how we
will continue to add the gradient wash. Now, gradient wash is
something where you can work with one
color two color. But as you progress towards the bottom area or
around the horizon line, it will become
lighter and lighter. Exactly the way you observe
on my paper right now. You can make it a bit
more darker if required, that I would leave it up to you. But this kind of a gradient wash is very often
seen in many of our patas. It is easy to create
as well as it doesn't need much of much of a
thought process altogether. When we are working more
on the waves and water, I would try to keep
my sky more easy. That's how I look into it. I don't want my sky to have a lot of
drama into it and all And there is another thing
that I want to tell you the color of the sky always gets reflected into the water. That's one of the reasons I
love to keep it simple blue so that I can get usually the same color into
my water area. Met you again in
the next lesson.
20. Day 12 The Waves Part 2 : Let's work on the island part. Now, this is very interesting. I will go ahead with
my John variant number two and start out with my area where I have
major the island. I will go ahead and make
some amount of brown into my John variant number two and
start applying this color. I will apply first a bit of
a concentrated mix and then again tone it down
with the help of some water as well as
John in number two. Both of these colors, I have been using pretty alternatively, and I will even apply
some darker and lighter values on the rocks
that we are going to paint. Okay. If I'm not
satisfied with my blend, I always use a flat brush
with clear water to apply so that I get
an absolute clear, nice finish on top of my paper. Let's cover up the
entire area where it is rocky with the
same color mixes. It's majorly your this
brilliant number two, as well as the other
browns, et cetera. So, keep covering up the areas, and then we will add some darker values in some areas and lighter
values in some areas. So that will, of course, continue to work the way it is. Because till you actually change your values or add darker
and lighter values, you will not be in a
position to basically distinguish between
the light and shadow, which is falling on this
particular rocky areas. And that's what will distinguish
your painting being more aesthetically
beautiful compared to all the other paintings that
we might have done till now. No, I think I will
just continue to work on it a bit more and always always do understand
at this stage also. You frankly can't think how the whole painting
is going to turn up. Continue working on it, continue to develop your painting, take small steps, sit back, relax, enjoy and then jump out. I can tell you you are going to just enjoy the whole process. You can see that I
will lift out some of the colors and few
of the places and I will actually add darker values and few of the places right now. I'm going ahead and adding some of my light brown
in the tree trunk. So, that's how it is going on. Let's have a look at it. I'm in now. And going with
my lightest value of green. It is my beautiful yellow green that I'm going ahead with and
adding on the tree leaves. I know that usually
coconut trees are common, and that actually makes up your painting so beautiful
with the greens, then the browns, the
blue sea, blue sky. I think everything just comes in together in
such an amazing way. What I usually do is I
will draw a line and then just extend smaller
lines in and around it. I continue to do it in all
the leaves that I add, as well as once I'm done
with the greener parts. I will also add a few
of the darker value of green in some of the
areas for the highlights. Now, this is a very, very good highlight
that we continue to add into our
coconut tree painting, and it really makes the painting stand out and not
look flat absolutely. There are places where it is more into the shadow
and there are places, which is more into
the lighter areas. Let's add a few dots here
and there to end it. Once this is done, you know that already the brown areas of the
rocks are dried off. And some of the areas, I want to add in green. You can see there are lines, lanting lines, et cetera,
which I have added. I will go ahead with my
yellow green in this area and then add or make some amount
of my darker value of green. It can be even hookers green or it can be even Panik green. Whatever you want to add, you can also go ahead with
some of the colors of green, mix a bit of brown into
your green and then add it. I would leave that
decision up to you see. Color mixing is an art. The more and better, you can actually
mix your colors and come up with your own shades. I think the painting
looks even more. Beautiful and aesthetically
pleasing in that way. We continue to use the
same process even for the left side of the greens and add a bit of
dots here and there. This is just my edition of
where you're going around it. Yeah. It's like the
smaller dots add so much of beauty to
these paintings. I just leave it like that. I mean, few few drops
here and there. That's all. And you automatically get a
beautiful outcome. Darker value of brown that we
are going ahead and adding in some of the
areas of our rocks, you can see it over here, and I will also add the same colors in the similar
process on the right side. So it's pretty iterated
from this place to be flat. There is not much that
we are going to do except a few color shades
that we are going to prepare. You already know that
if you use ultramarine and your burncena you will
get taker values of brown. You can create taker
values of brown like that. Corals use K brown exactly the way I use
it in my painting. I always like to
first go ahead with my lighter values
because then I can play a lot with my darks and
the lights and that really marks the shadows as well as
the lights in our painting. One more that I can always
give you while you create these lighter and shadow
areas is the area, which is already in your I mean, the graphite marks
which are already dark and you have
shaded the areas. Those are the areas, that
would be way more darker. And the areas, which you have not shaded,
would be lighter. So whenever you are
applying the colors on it, just blend it with
a bit more water in those areas and then apply
some darker value required B. Or if need be, that's
a great way to actually use it in any kind
of your watercolor painting. This is not the final project that you guys are
going to create. You going to use
all the knowledge from here in your
future paintings, and I'm really waiting
for all those paintings. You can connect with
me over here in the discussion section,
upload your projects. I would be more than happy
to go through each one of them and give my feedback. This is one of the
classes, which is tense, and there is a lot of learnings
as well as I'm trying to actually add as much knowledge
as possible into it. So hopefully, you are
going to take away some bits and parts
of it that can be very helpful in the long
journey of watercolors. Finally, I think we are in the last four to 5 minutes of our painting
where practically, you are just going
to go ahead and sit back and only work on the lines that you
have added initially. We are not going
to work more than that as most of the
areas are already done, we have added all the
details that was needed. Some of the areas
even the short line, I'm defining a bit. That's it reset be. We are not going to
touch every area. Believe me, I have this
tendency to overwork, and I know all of you Do try to overwork in
many of the areas. I do mix out my colors, that is blue and this Berciana to create the starker value. You can see it on my palette on the top right hand corner. I have intentionally actually shown you the palette so that you can also go ahead and create your own shades
with the help of this. The coconut tree also will
have two shades in it, and I continue to work on it. Sometimes it's good to
do even two layers. So two layers or three layers. So two layers is what we
have done for our rocks, and in some of the places we
have also done three layers. We are also doing the
same kind of process even in the green spaces
that we have added. I will use my size
one brush to actually apply some of the tarker
values in some of the areas, as you observed, and some lighter values from the palette, whatever colors and now
they're on the palette, I would be using
the same colors. I'm not going to change
my colors, et cetera, for the whole of the excises. Whatever is available,
use that to just get the final outcome done. By this time, you all might be actually feeling a
bit more impatient. I know it's been a bit long, but this is what is the best. I think it can be done
within 30 minutes and that's something
that I really enjoy. You can just clock in and then see that it's
usually 30 minutes. You can watch this first and then go ahead with
your painting. I think that would be the
best way to progress. Do use a 300 S 100%
cotton paper or more. Otherwise, it would
be difficult for you to keep the paper wet
for a longer period of time. For these heavy washers and
Aize paper or bigger paper, it's always suggested to go
ahead with thicker paper. Knowing that
everywhere in India, it's warm and hot even in
the places outside India, there would be more
of summer season. I mean, that's how it's going, and hence the climate has
changed to a great extent. According to that, the
paper should also change. I know that I did
already see all of this, but still, I think, every time we need to always continue to add this
point everywhere so that we are pretty much aware
and we are thinking from it's just there in our subconscious
mind what to use, how to use, and that really makes a lot of change into your painting as a big
nope I just started out. I wanted to use much
cheaper paper and all. But all I realized was the expensive paper made a lot of difference
to my painting. Believe me or not, even if
you are wasting the paper, it's going to help
you learn exactly, you know where you
have gone wrong, and all the difficulties that you have faced
with the paper, you can overcome on the back
side of the same paper. Use both sides of the paper. That's one of the reasons you
have taped down this paper, and I have used backsides
of so many papers because always you cannot create an exceptional painting in the first row.
It takes a while. It takes a while for everyone. So I continue to always, breach whatever I have
been doing as a practice, and it's a great practice
that you can also build in. Okay, I guess it's time to let your paper dry off and then just remove the tape at an angle and have a final
look at this painting. I'm pretty sure about it, you will be already
in love with it. See you again tomorrow.
21. Project 13 Coastal Lines Part 1: Let's understand all the colors. I'm going ahead with
my first shade, which is my composed blue or horizon blue,
whichever you have. Then you can go ahead
with Cobalt green. Now, these are the two
options which you have. You can use any of the
options of your choice. Next, going ahead
with my TadoGreen. If you want to exercise this, you can of course, go
ahead and exercise this. Then we will be going ahead
with some of our ultramarine. This is a beautiful shade, as always, and then
some of our donne blue. You can see I have
used the mix of this ultramarine and donrein for many of the shadow
areas in the water. John brilliant number two for the basic shade of the rocks, burn Siena again, to create the darker and the lighter
values of the rocks, dk brown or you can go ahead
with CPA last but not the least either an
indigo or you can go ahead with pains
gray yellow green, and the darkest value of ken, which is dike green. Let's first start
out with our sketch. I would take any
pencil of my choice. You can also go ahead
with any pencil. Just make sure
that it is Edge B. For me, it is more of a drafting
pencil. It is to wedge. I have done all the
sketching with this pencil, so go ahead and
just mark a line. It can be around eight
to ten centimeter, whatever you want to select. Go ahead with that, and
that's our horizon line, which is going to separate
the water from the sky. Going ahead and making small hill like structure
on the right side. These are basically rocks, and you have to add these kind of rocks
even on the left side. That's one of the reasons
you would see that I did not actually go ahead and add the line even on the left to a greater
extent because I know the rock on the left is larger in size compared to what we have added
on the right side. It's more of easing and
then again, drawing. It's an iterative process. So just follow how I
go ahead and add it. The paper size of course is
huge and it is around A four. So if you are someone who is not very much into
a bigger size paper, you can also make this painting
on an A five size paper as there are not very
large number of, I would say that you
don't actually add a lot of nuances or lot
of detailing into it. These are just a few detailing
which we are going to do, and even an A five size
paper is good to go. Though the main idea of this
painting is to paint bigger, as well as gain all
the confidence that we need for painting on
bigger size paper. I have about three to four
paintings in this whole of the series where we are going ahead and making
bigger paintings. So this is one of them, and I'm going ahead and making
the rock on the left side, even more bigger,
as you can see, It is going to have a bit of shadows as well
as light into it. You are going to see how we add those light
and shadow areas. Mostly everything
what we paint during the initial part would
be of lighter value. And as we progress, I would be adding more
darker values into it. I would like to add
the shadow area in a bit of darker
value of my pencil, which means that I would
be shading those area. Though, this is not a necessity. I like to do it as
those are darker areas, and it really doesn't
matter if I even shade it. You will see that the
darker areas will automatically become more darker when you enter darkest
value of colors. Like your Vinike
brown CPR or any of your darker values when you
mix blue with Burnsena, you will get those darker
shades that you are going to add in total these shadow
areas of the rocks. I would leave that
decision up to you. You can go ahead and make it more shadowed or do it later on, that's up to you, absolutely. Once we are done
with these shadows as well as the far away rocks, we would go ahead
and add some of the rocks which are more
closer to our eyes. Now, this is something that would help you to
develop perspective. And perspective is all about the closer the rocks
are to our eyes, the greater detail
it would have on it. So yes, that's what
we are going to do even on the left side of
the paper, if you see. I would add some more rocks
towards the bottom mea, It's a simple process. Just go ahead and follow it. So, some bigger because everything cannot be big in terms of rocks
and everything, of course, cannot be small. So yes, we are going to
blend it in terms of small, big, shape, size, et cetera. It's nature, and nature
is absolutely random. I would use that randomness of the nature to work into
this part of the project. Once I'm done with
the rocks that is towards my front area, I would go here and start out with the lightest
value of colors. Now, why the lightest value
of the colors initially? Now, initially,
when you work with the lightest value of
colors in watercolor, you always have the chance to go back to the darker values. If you start with darker values and you want to go back
to the lighter values, there's no way you can go back. So always develop your
painting in layers, and if you go one
layer over another, it is also known
as clazing Though this technique has been used very often in most
of the paintings, but I would say that it
has not been named always. Hence, you might not be in a position to always
understand what we are doing, how step is it's moving. But every layer on layer as you keep
developing your painting, you will see that the darker, lighter shadows,
depth, et cetera, everything gets
created very easily. I would go ahead
with my framearin and start out with the
top side of the paper. Before that, I would just add
a breath of pressure with my fingers to keep down the paper well because
otherwise, what happens is, this colors will move into the specific
areas of the paper, and I will not get
the exact crisp edges which I look forward
to every time. I will go ahead and use a gradient wash
technique in this case, starting with the darkest
value towards the top. And as I go towards the bottom, I will add some water
to make it more lighter and lighter as we
approach the middle part, or you can say towards
the horizon line. Then going ahead with my
John brilliant number two. This is one of my favorite
shades from the entire series. You right now know it. It's from the brand in
if you don't have this, you can also go ahead
with your Naples yellow. Mix a bit of burns and
into it and you will get a shade that looks closer
to the one which I'm using. I am adding the same color on the right side and on the other
parts of the rocky areas. This is a great start,
as I would say, it's one of the lightest
value that you can add to your painting
and slowly steadily, you can build up on it. I will also add it
on the left side of the rocky areas as well as
towards the bottom part. It's a step pise process, so you have to keep
a lot of patience as we work through this
entire painting. Though it might look a bit long. This part is almost
close to 20 minutes, and the next part is also
close to 20 minutes. That's one of the
reasons is that we are working on a bigger size
paper and bigger size paper, you have to cover a
larger part of the paper rather than only working through the smaller parts as
we have done earlier. Though you have already
done the last painting, which is pretty huge and I know that all of
you have nailed it. I think that you
would be also in a position to nail this
particular painting there. There's no difficulty
in overall sense. It's just a mix of
color shades, darker, lighter values, wet on wet, we roy techniques which
we are going to cover. I manage some amount of green. This is majorly the
yellow green and the green that's available on the right side or
on the palette. Again, you can use any
green that's available. For yourself. I am using a very, very light tonal
value and adding on the top part of the rocky areas. I will again load
my brush and just add some of the areas
and this green value, whatever is required,
and then mix it with some of my en
brilliant number two. As I think I was not very
happy with how it turned out. These things do always happen. I sometimes keep
experimenting with my colors, and if I'm not happy, I would go ahead and just cover
it up again with the help of my other shade that
I did apply initially. Once this part of the
painting is dried up, we will go ahead and
start with our water. Now, you can use either
compose blue to start it out or any blue that's
available on your palette. Now, there are composed blue, horizon blue, then other
shades of blue that are there. You can also go ahead
with turquoise, mixes a bit of
whiting to it to get a shade that looks similar to
the one which we are using. I will just towards
the right side because you can see that there is a small
rock over there, and I don't want to
go over the rock. I will start working towards
the entire part very slowly. So just be along or just
follow love with me because it's going to be
a bit longer compared to what you might
have thought earlier. Let's go ahead and
just add some of our dark values of
blue and ether, it can be in Dn three blue
or else you can also go ahead with any of the other blues that's
available like Crucian blue, et cetera, in your palette. I'm always a person who loves to go ahead with whatever is
available on your palete. You really don't need to go
ahead and buy any colors. I think everything that
we have is good to go. Though the season has
changed and it is very hot because of which my colors are drying
up very quickly. I'm using my mob brush, though to just add a lot more water than what
you could have thought about, as well as my brush also
holds a lot more water still. This painting is drying
up in a few places, and you will see me regularly
going ahead and just struggling a bit in
few of the areas wherever the colors
are drying up quickly. Now a few of the
colors also do have a property of drying
up very quickly. I've seen that with some
of my shades like Arlene, I have seen it dries
up way more faster, and it also spreads a lot
more because of which that particular space
where I've applied Alene gets dried
up very quickly. So yes, all these experiments
I keep doing on my own, and I see which
colors are drying up faster and which colors
are drying up later. The smaller aspects
of watercolors, but these are very important
aspects of watercolor, and that's why I say
that you have to continue working on the smaller, smaller things and
smaller, smaller details. So if your colors, know your
color that you are using, know your brushes,
know your paper. I have been using Arch's
paper for many years now, and that's one of the papers that I've fallen in love with. So I like to use this paper
in most of my paintings, whether it be 1805 GSM or
whether it'd be 300 GSM. The GSM to an extent
matters when it is different and different
climatic conditions. And also depends on
the size of the paper. If I have a larger size, I always love to use 300 GSM. If I have a smaller size, I always go ahead with 1805 GSM because at
that point in time, it really doesn't matter much. So overall, if we are
going with heavy washes, again, 300 GSM is
important, by the way, I have used some amount of
my green into the painting, and this is major
my yellow green from the brand majo Mision gold. Yes, it is a beautiful
green that I have. And I have been using this
screen for many years now. You have seen me
using it in many of my eudio paintings too, and I have this set
for a lot of years. I have long, long years now. I have a lot of sets now, and still I feel
that this is one of the shades colors that I love to use often
into my paintings. Go ahead and adding
some of the other blue. This is a mix of my ultramarine and some amount
of dontrne to add the darker values wherever I want to add some of the
shadows into the water area. This is majorly the shadow of the rocky areas that
we have added earlier. Do keep in mind you can only add the shadows till the
paper is wet enough. If the paper is drying up, then we can't go and add
these shadows anymore. Adding a few lines wherever
the paper is again wet. The paper will remain wet
if you are using a 300 GSM. In case you are using
a smaller size paper, then it will not
stay wet for longer. So yes, do keep
that in mind where you work through
your palings and I would go ahead and just add some more of the shadows
on the left side as you observe over
here and then blend it with another brush with the
green stat you observe. Okay, I can see that
towards the bottom are, I have left a white space
and that white space. I am really not thinking
much about at this stage. I have to think about that
white space too because it is not the rocks that is there, so we have to blend it and
add colors over there too. Okay, great. I guess this is good to go. We have to now go ahead and
some blue and then figure it out how we are going to cover the area before the
papers or Detroit. Now, these are some
challenges that I to always face in my paintings. I would cover it up
by using some of the colors and then tending
it with a larger brush. Applying some more lines, and this is just almost
complete, I would say, I'm not going to touch more over here and a few lines using
the tip of my brush. This brush has a beautiful tip. It is an aqua soft, I guess it's aqua soft
brush and it's from the brand rap one of
my favorites nowadays, I can use it for
all my paintings. Mostly small bake. It really
doesn't matter. Okay, great. I guess this is good and I can observe that there is
a space which is left, which we need to go
ahead and also cover up. Some of the areas on
the top also needs to have a bit more shadows. So yes, applying the
shadows even over there and blending it
with some of my green. You can see that
I'm just blending it with the colors
that's code there. I will add some of the darker values again
and blended blended because it's sin wet kind of a situation where it becomes tough if you are
not blending well, and you will get a few lines, which we really don't want at
this stage of the painting. It happens in many
of my paintings, believe me, I just fix it. Yes, we fix all our mistakes.
That's most important. Even Watercolors has got a lot of mistakes that
we continue to do. Fixing it is very,
very important. Continue to fix it
at various stages, the way I'm fixing
now my mistake. Yeah. I do make a lot of mistakes. It's just that you
may not see it because many of my paintings
are done twice or thrice. If I do a mistake on the first, I cover up and the
second go or the third go that you usually
observe me paintings. So that's one of
the reasons there is less mistakes that
you might have seen. With the artists who
are painting or you're observing the instructor
particular instructor. Mistakes are normal, continue to make them because if you
don't make these mistakes, you will never get to learn. If you don't apply
your brush paints to your paper, you
don't get to learn. And if you don't continue to actually go ahead and add more
paint brush to your paper, you don't continue to learn. I can say that I took a quick break in between
as I was unwell, and when I started
painting the after a week. Oh, my God, how bad the
first set of paintings were. It is all I would say the kind of work
that you continue to do, and it's all hands. If you are not working on
something for quite some time, I know that you will not be satisfied the next day
with your painting. So these kind of
things do happen. And whenever they do happen, there's a lot of learning
that I get in terms of that, I need to continue working on my paintings has
and when it comes, or else I might not
get the exact outcome. I might not be happy
with the final outcome. And the more you paint, the better your outcomes are the better is
your finishing, you get to realize the mistakes,
you get to learn more. You even discover a few
techniques on the goal, which which you
may not know all. It's just by some accident thing that you get to understand
and continue to work on it. I am great, and I know that we are progressing well
on this painting, so let's continue
to progress and have a final outcome
that looks even better. So just blend it with
some of the greens and the blues as you
observe over here, and then let's move
on to the next part where exactly we would
be furnishing it off.
22. Project 13 Coastal Lines Part 2: Here goes our Pato Pato is just adding more of depth
into the rock areas. A as pas finishing it
off with more layers. So you will see me
adding more layers with more I would say
pigmented colors. That's all we are going to do. I'm going ahead with my Bonsiana mixed with a bit of
brilliant number two, and then just blending it with my background color that I did already
add initially. I will go ahead
and add this kind of a mixture in all the rocks, and as well as go ahead with some darker values
as we progress. This is something
that you must know as you are working
through your watercolors. Everything can't
be done eaton wet. Some of the areas needs
to be done in ton dry, and this particular area, what we are working on
is more wet on dry. Some of the areas I'm adding in the darker values and leaving a few spaces in
the original color of John brilliant number two. Now, this is just to
show the contrast, or you can say the
light and shadow of the sticular rocky areas
and the rocky terrain. Everything cannot
be in light and everything also
cannot be in shadow. So to differentiate that, it's important to
darken out a few of the areas and to keep some of the areas as
absolutely light. I think the whole painting
is turning out as I want. The water has come
out beautiful, and that's one of the
most important aspects, I think when you are painting S. The lighter values are towards the top area
or near the horizon. And as you progress
towards the bottom, you will see a lot of
shadows coming in from these rocky terrain
into the water area, but they plan so nicely into the background that
hardly you can see something that goes out of the order or there is less
of wet on dry method, which we have applied
into the water. Mostly every time we
are painting water, we are going wet
on wet technique rather than going with
the wet on dry technique, I really love them
whole process of working with wet on wet
mostly in the water area, and I love to use it for
most of my water techniques. Having said that, I do even like to do that for most of
the other paintings, whether it be landscape or
any of the other areas. But here, right now, what we are going to do
is work on the rocks. I have mixed some amount of
blue or dark colored which whichever you want to
use if you are more fine with using CPA
or vendik brown, please go ahead and start
adding it to these rocks. Okay. I always keep blending my
colors a bit in few places, and in few places,
I leave it as this. This is a technique that I've been using for
many years now, and you have seen me using it even in earlier few exercises. So just follow it. There's nothing to explain
in some of the areas. You just blend it with
the background so that it doesn't look
off completely. And some of the areas, we just leave it as when
it goes towards the top. Now, why the top area is like that because we are covering
lesser area over there, whereas when it is towards the bottom or near
the water area, there is a lot of water that hits into these rocky terrain. And because of that hit, there is a lot of algae
deposit or there is a lot of darker values of shades of
these rocks. They usually. There are lots of
terrains, et cetera, that works into it or you will see a lot of holes,
small, smaller holes, and snails, et everything attaching to it because
of which these areas needs to be way more darker than other areas that
is towards the top. I would use the same technique of using the darker values and add it in few of the places
even in this rocky area. By seeing this, you will
not be in a position to actually guess how the whole painting is
going to turn out, so never leave a painting,
as I always say. Do not give up at this moment because the final painting
is going to look amazing, and you are going to
nail it absolutely. So do continue to work on it, and working is something
that I always say. You need to do in layers. This is a bigger painting, and that's one of the reasons
you might have to work for around 30 to 14 minutes
to complete it. But this particular painting
can also be done on a smaller size
paper as there are not much complexity in it, which I usually see in the other paintings
which are coming up though there is a smaller
size painting also, and then there is
a final large boat which we are going to paint. That's one of my
favorites till date, and I have kept that for the last because
it's going to be a longer one compared to what
we are attempting right now. There are patches that I have added onto these rocky terrains, and you can also do the same a few lines with
the help of the thinnest bh, which we are going to add on the far away mountain
or the rocky areas, as well as the ones which
are closer to our eye level. Watercolors is pretty
accidental or I would say that everything cannot
be planned in advance. Over here, also,
whatever I'm explaining, it came over time, and I have painted these kind of
rocks earlier too, but maybe this is a
technique that we are learning fresh in
the last painting and this particular painting. It's not that every painting, we have used the similar kind of technique or similar
kind of lines, blending, et cetera when the
painting goes a bit bigger. Of course, the techniques
also changes with that, and it comes up with beautiful
and amazing outcome. Okay, I guess now adding some water towards the top
area so that I can make those loose forest parts that I really aim
to nail completely. Though it is darker
and lighter values, but it adds so much more beauty into the painting when you add a bit of greens
here and there. Even in my urban sketching, I love to add somewhere
or the other, a bit of green that really adds so much more
beauty and light, as well as life
into this painting. I can always say that this
is what I want to do. Towards the top area, I have
added the lighter values, and as we go towards the bottom or near the rocky terrain, we will be adding the
darker values of the cream. You can go ahead with
any green For me, I have gone ahead with the
yellow green and added it with some of my
darkest value of green. It can be your
entakeGreen or hookers green or any green
mikes a bit of blue into the green
that you already have, maybe sa green and all, and you will get a darkest valume. Don't think much when it's
about green, browns, et. Every color can be created
and mix your shades, and you will see that the final outcome looks
very different than what you usually get with the shades that's already
available on your palette. Mixing your colors is not only about creating various shades, but it also gives you a lot more understanding
about your own colors, part pigment, then what is the final
outcome that you get. Sometimes, you know,
you get all of a sudden some granulating
colors because you have added a bit of
ultramarine into the burn Ciena that
was already existing. And that particular outcome may look very
interesting to you. So these kind of
accidents which happen in water colors only happen
when you start experimenting, and that's one of the
reasons I have al always asked you guys to
experiment with your colors, to experiment with
your pigments, mixing up of colors, et cetera. Everything which is given
absolutely is given, and we are using those shades
for getting an outcome. But if you mix some
of the shades, like the greens that
we have added into the compost blue that was
already present with us, or the horizon blue, whatever blue you have, you will see that these greens
create a beautiful shade of greenish blue color that
looks more like tailor shade, and that tailor brings
much more beauty into the painting and much
more life altogether. Okay, continue to work on
these smaller green areas. And this is not much to explain as we have done
the right hand side, we have done the left hand side, and we will continue to work
on it in a similar way. But there's less of greens anymore that we are going
to add into this painting and more of the browns and darker value of browns to create the shade and I mean the lighten shade into
your rocky areas. I'm using my size ford brush
from the brand silver. It has got a very nice tip. That's one of the reasons
I've been using it. I have also used the Vinci
brushes in the past, and they also have
a very good tip. So yes, I think these
are two of the one of the most recommended
brands that I can tell you when you are going to
invest in good brushes. These are the brands that
you can look forward to. Over the years of use, yes, a brush might get spoiled, but it can last you about five to six years or
maybe a bit more. So it really makes sense
when you are investing. It can yield you great results, as well as it's one of your
favorite brushes in future, which has given you some
beautiful and amazing paintings. I think I have explained
these lines and all even in the other rocks
that we have painted. I'm going with an
absolute I mean, I mean, very random way
of drawing these lines. It's just the areas where I see that there's a ridge
or there is a curve. I start a line from there
and take it towards the top. That's all I keep in my
mind when I'm making this. And while I go
towards the bottom, I would like to make
it a bit more darker. So that will be the thing
that's going to come up. And I guess if you keep this
particular thing in mind, the whole painting
will fall in place. There is less complexity, as I say, in this painting. It's more simple steps
that you need to take to paint each and every
outcome of this painting. Use the same technique that you have done on the left
side of the painting, that is near the greens, which is just blending
with the rocky areas. I've just blended it
with some of my brown. You can use any brown
of your choice. Now I'm using the darkest brown, as I did tell you
even earlier that I would be making the
bottom area a bit. That's what is being
done in this case too. Flat pressures are
great when you are thinking about
blending and you can blend it even with the blues that you
have added earlier. It's basically the
train or the in blue. I love these two shades and I've been using it a
lot for my water. I'm using the tip of this
flat to create a few lines. This is more wet
corn dry technique that we are using at this stage. So yes, you might
have to also do the same to create a few
lines. That's it. I guess this is it. I'm not going to exaggerate it a lot more than what we have
finally in this as an outcome. I am to work on another rock, making it again darker towards the bottom area as we did
it for the leftop side. We will do the same
thing over here. I mix some amount of blue into my burn Ciena
and got color that. This is again a very, very simple process, which
I continue to work with. I usually like to
repeat my process. I don't go ahead and change my process in every
step that I take because this then creates a lot more harmony into the painting if you continue to work with the same process, if you are changing your
process again, and again, what happens is, we don't know
what would be the outcome. And Predicting
watercolors is very difficult compared to
if you are working with any of the other medium
where there is a chance of going back whereas
in watercolors, there's chance to go back
to what you had earlier. So be aware of how you take the steps and how you work through
your paintings. Repeating the same step again. So there is very less
to explain over here. Please continue to paint, and I will just
add some music for you guys to enjoy this
part of the painting. I will work on the
last rocky area now. This is majorly the rocks
that is there in the front. I am using the tip of my brush again to add
one or two lines. It's great when I see how we are constructing
this whole ping, there is no h. Something that
I have learned over time. Do not rush with
your watercolors. Given the time it needs. If you want to take a
break, take a break, you can work through this
painting in various settings. You do not need to
complete it at one go, like we completed the
water in the first, and you can work on these
individual rocks separately. So there is less, I would say, in terms of stopping you from
completing this painting, like you have to sit
and complete and then only you don't
need to do that. So that is a great, great I would say final outcome, which you can look forward
to in a painting like this. Go ahead and adding one or two more lines in
this area and making it bit. I will blend it a bit more
with my blending brush. You can use any blending
brush of your choice. I basically use a round brush. I think it is size
four or size six, whatever you have,
go ahead and use it. Add some more lines. And as we progress
with these lines, they will add the shadow area, which we have pain
looking forward to. Now it's time to just
go ahead and add any further detail that's needed because most of
our painting is done. I'm not going to touch the sky and add any
birds or anything. I would leave it empty. The whole focus of this
painting is in the water, and we have added a lot of
depth into our water area. The colors you can
see at the bottom, and in the beginning also
I have already told you, adding of the value and then
have a final look at it.
23. Day 14 Cruise Part 1: We are starting out
with our horizon line. I'm really not happy with
the first one as I was not sure of how I
want to mark it. I think it is just a
bit lower than what I want to actually add
to this painting. So I'm going ahead and
marking a line that is a bit above what
we did mark earlier. The water area would be
larger than the sky area, why I see this
because over here, we are going to actually add a big boat and even multiple
boats in the background. The multiple boats in the
background will not be a lot more detailed
compared to the boats that we are going
to do over here. I'm constantly going ahead and marking the line exactly
how it should be. If I'm not happy with
what I have done as a free hand line drawing, I sometimes go ahead and just mark again these areas
with the help of my scale, and then you get
a line like this. It's absolutely okay to use the resources that is available with you rather than
just thinking that, okay, I'm supposed to always mark with a free hand
line drawing, et cetera. These are part and
parcel of our learning, and it's okay to use your
resources rather than just depending on your self
for a good outcome. I guess I would go ahead
and just mark a line to understand where exactly I want to place my biggest boat. Biggest boat, of course, cannot be in the middle of
the painting altogether. It has to be bit on the right
side or on the left side. That way, your whole painting
will be much more balanced, and the outcome that
you would get will be of better quality, and it will look really nice
to anyone who is seeing it. I'm just marking a
rectangular kind of a structure, and later on, we can think of how
we want to add it to the final painting or how the exact structure
of the boat would be. When you're starting out, just break any kind of a subject or any kind of thing
that you want to add into a simple part
that is square, rectangle, circle,
triangle, whatsoever it is. We do not want to
initially only start out by complicating the
thing or maybe a rubs. So parocram. Anything can work. These are basic
shapes and sizes that all of us have learned
when we were young, when we were small, and hence we are going to apply
the same knowledge to our painting too. I did not discuss the colors at this stage because it is
really not important. Right now, the most important
part is to go ahead and just add the smaller boats. The bigger boats go into
more detailing of that. When we start out
with the next lesson, where it's all about painting, you would be in a position to understand and what
are the sheets, colors, et cetera that I
have the entire painting. Let's concentrate a bit more on the cruise or the
smaller boats kind of structure that you want to I'm not going to
complicate it much. I will just add a bit of you can see that there is a small
area on top of the boat, where basically the windows are, and there is a small area
where you are going to I mean, the control panel, et cetera,
the whole boat is there. It's not like a boat which you are going to control
with your hands or we are not going to go ahead and use only a simple motor to
just move it around. We are also going to go ahead and add some of the poles
into this painting, as well as some amount of you can say these
are basically the long, long cloths that
usually is seen to actually help the boat to
sail in and around sea ocean, whatsoever you want to
go ahead and name it. It can be also used in
big sized, rivers, lakes, et cetera, Whatsoever
you want to go ahead. And all the knowledge
that you gain over here. Again, we used any
of future painting, so yes, everything
is kind of reusable. But let's go ahead and just mark the bottom
part of our boat. And then I will tell you exactly how my water I'm going to draw. Now, this is something that I'm going to do as per the
rule of perspective. You have already
learned earlier that all the lines move
to one single point, and that is called
as invisible point. We are going to do the same
for this painting, too. It's time to make
some smaller boats, Let's have a closer look at it. I would go ahead and just zoom it a bit more so
that it's easier for each one of you to have a look
at what I'm doing right now as there are more
detailed lines, and some of them
are really close, which I want you to
see it in more detail. I would request you to please
go ahead and see it on a bigger screen
that would help you to understand e small detail, which I have added
onto this painting. M. Starting with a few more
lines on the right, as well as on the left. By the way, you might have some sound at the background because it's raining over here. So I really can't help this. You might have to
go along with that, and I will continue
to explain it to you how I'm adding a few
lines one after another. These are more curved
lines that I'm going ahead and adding onto my cruise boat. You can say, this is not exactly a cruise and not exactly a
body somewhere in between, where, like, three to four
people may sit and just enjoy. By the way, let's just go
ahead and make some more of the cloth area that usually helps every
boat to sail through. Initially, when I'm
working on I would say, any kind of these compositions. I usually go with a very
gray light profite mark. And as I progress, I make it a bit more darker
just to understand where exactly I should apply my colors and where
exactly I should leave it. So yes, you can
also go ahead with that kind of thing in your mind when you
are starting out. Add some light refite
marks and stow you can continue to build upon
the whole of the painting. Adding some windows on the
top part and we can go ahead and add some more
lines, some more details. There will be railing
to this boat, which we are going
to paint later on. I'm going very slow
at this stage, just to ex you each
and every bit of it. There is not M in terms of
smallest of the explanations, all you have to do is
follow along with me. The basic explanation
was to actually divide any kind of a
subject into simple, I mean, shapes and sizes, which we have already done. It's simply going ahead
and refining all of those shapes and sizes
into some of our lines, windows, et cetera,
whatever you can think of. See, a broader outline
is very important, and then you can build upon it slowly steadily to
get a final outcome. O. Keep your eraser by your side. But whenever you are drawing, do not always
always keep in mind that you cannot draw on a watercolor paper
say about 100 times. That will not be a possibility, or else you will get
some graphite marks, which will stick to it, and it might be difficult
for you to actually release it later on or take it off
with the help of your eraser. So every time you go ahead
with any kind of drawing, make sure that you are not
going to go at any area or just only think about the fact that you have
to make an outline. It's not about making it as a final sketch or making it as the final painting at
that point in time. You can slowly build upon
it and have a good outcome. Please continue to work up
on this simple simple paths, which I'm adding right now. And then I would say, I would like to add
some music over here. I don't have much to explain
as I have already told you. I would like to explain
the waves part for sure. So once we are done
with the boat, we will go ahead and see how we are going
to add our waves. Finally, we are
here on the waves, and I'm very excited
to teach you this. One thing that I've always learned is the invisible point, and I have taught
you in a lot of my earlier classes about
this single point. All of these lines
are going to merge to one single point outside of the plane of the
people right now, like outside on the
left side somewhere. And they will all merge
to one single point, and that point is called
as an invisible point, which has got a lot of relation to any kind of painting
that you are going to do. We are not talking about any of the other points right now. It's just the simple invisible point that we're
going to talk about. The whole of the painting or you can say the
whole of the waves. And the reflection on top of the waves is based
on this whole thing. So some of the areas of this
would be lighter in value, and some of the areas
would be darker in value, and that darker
light value is based on the fact that where I
want to paint these waves. You might all be feeling at this stage that there
is a lot of details, which I've added
for this painting. But believe me, this is a
very, very easy sketch, which we have gone
through the sketch. Really, really complex. I always try to keep all
my sketches really simple, and you all can easily understand how to
work upon each one of them. Having said that, there
are a few nuances, which is important
as per perspective. And as you can say any kind
of sketches that you do. One of them is to understand
your vanishing point. Another point would
be your horizon line, how you want to place it, whether you want to place it on the top one third part or
the bottom one third part, because we usually don't place the horizon line in the
middle of the painting, how you want to
paint your subject. Usually don't paint our or add our subjects
just in the middle. Here, you will even find my subject bit tilted
towards the right. The left side I kept
absolutely empty. And the right hand side, most of my boats or
cruises or whatever it is, it's all there rather
than being on the left. So if you're occupying the
complete of the space, then it's not a well
balanced composition, and that's what is very important for each one
of you to understand. All of us can do painting. There's no I would say there's not much
of rocket science, but what is important
to learn at the stages, how to do a correct sketch. The sketch can help you as a guideline to approach any
of your future paintings. And believe me, it has helped me a lot during all these years. I have frankly refined my
sketch to a greater extent. I have learned a lot more in terms of how
I should sketch, how I should usually work
upon my vanishing points, or how can there be multiple vanishing
points, invisible points. And are a lot of things that you can
learn in perspective. Each and everything
is important, whether it be urban sketching or whether it be any
kind of water scapes. Met you in the next
lesson where we will talk about the colors and
the final painting.
24. Day 14 Cruise Part 2: Let's have a look
at all our colors. It's tram pains,
green, maples yellow. When Acrodon Coral burns
Ciena Don three blue. If you don't have done blue, you can also go ahead
with Brucian blue. We are starting out with the basic background
for our sky. It is basically Maples yellow, mixed with some amount of another yellow
like Indian yellow, and then I would go ahead
with some amount of Just to make the sky look really nice, and it gives that
vibrancy to my painting. So going ahead and applying the colors towards the
top part of the sky. You can use any shades
that's available with you don't think much while
you apply these shades. I'm going ahead with a bit of ultramarine towards the
top part of the sky, and you can see I'm using my flat brush to
cover a larger area. Now, we have already done
this size painting earlier, so you can go ahead
and use the same size. For this part of
the painting, too, we have already done the
sketching as in the last video, and this is all about painting this beautiful and amazing vote along with the reflection
in the water area. I am going a bit slow at this stage and using some
more amount of Naples yellow, but I just feel that the
Naples yellow is too deep, mixing it with some
of my composed opera and just applying it in
and around the boat area. I will not go ahead and
apply it on the boat. That's something which I will
keep in my mind as I want more of blues to get into
that particular area. Okay. Again, working
with my flat brush. Flat brush gives me
the edge to cover up the entire space very
quickly compared to what we can do
with a smaller brush. Go ahead and applying the
colors even on the right side, leaving the middle
part in white. I would ask you to do this painting on a
bigger size paper only. Please do not select a
smaller size paper or else, lots and lots of detailing that we are going
to do will get missed. I'm going ahead and
applying some amount of my ultramarine into
the water area. And all you will
see over here is a lot of perspective that we are going to
work around with. It would be more of wet
on wet game initially, and then we will
work wet on roy. Wet on Wet Wet on oy has a great role to play
in this painting, though, for mostly waters, I haven't used it much till now, but this is the place where I'm going to work
around with it a lot. I have taken some amount
of my endo in blue, and now I am going
ahead and adding these darker values over
here as you can observe. I will go ahead and
paint some b lines. I have even some amount of, my green, which is basically the tail green that was
available on the palette. A bit of it. I have mixed, though that's not necessary, but you can also go
ahead and mix it and trying to add some lines
which looks like waves. Now, waves can be of various
nature, size, et cetera. Over here, we are trying to just go ahead and
choose the waves like we usually do they're all
going to one single point, and that is called as
a vanishing point, which is outside the
plane of the paper. So that's what I have used
in terms of my perspective. And then I will go ahead and clear out some of
the spaces where I think it's necessary
as the water was pretty high at this stage. I mean, the mature on the paper was pretty
high at this stage. So we might have to
go ahead and again work on some of the parts of the water to make it look
the way we really wanted to. Again, adding some of my
naples yellow towards the top and my hair
is making all the de. In this painting, believe me, I do not want to
show the of my hair, but it just comes in because
there's a larger space, and sometimes I want to have a closer look before I apply
the colors on the people. I'm going ahead and
applying some more of my darker values
as you can observe. The lines are becoming
more and more dark. You can also take prucian blue. If you don't have dontne blue, that's a great option
which you can exercise. Okay, adding some more
of the darkest value, and then now adding
the lines as you see, it looks more organic and
the colors are moving, colors are flowing, and I'm so happy to see this happening. The first layer,
I think was great because we could get the
lighter values that we wanted. And slowly steady now
we are building up. You can go ahead and use a
six size or a four size bruh. I'm using size four brush
from the brand silver velvet. You can use any brush that has got a nice tip to
work around it. Do not use a mob brush. Otherwise, it can
hold a lot of water, which might not give you the exact wave like structure that we are
building over here. Waves a pretty
iterative process. You can see that we are making the similar kind of waves as we go towards the horizon line. I'm just adding a
bit of blue here and there and just blending
it with the background. The paper is still wet, and I have this to my
advantage that I can use it to paint all the beautiful
aspects in water colors. Wet on wet has all my heart was, and that's one of the
reasons you will see me working a wet on wet
in mo of my paintings. It's more just fine tuning it. And once the fine
tuning is done, I think we will let this paper, then start working on the boat or even work on the shadows. Which you will see coming up
in an round or over this, basically overlapping
this area of the waves. There is lots to
do, and believe me, this is one of my
favorite paintings from the entire series. I haven't taught any
painting like this. It is way more detailed, and that's one of
the reasons it's being broken into two parts. One part is all about the sketching that
we have already done, and one part is all
about the painting. There is a lot to be done. So just hear your surf up. I know you guys have already nailed the
earlier paintings, and you would be in a position
to even nail this one. So be around, and then
don't lose your patience. That's the only thing
which I would say. Break it up into two sessions,
one for your sketching, and one for your painting
because it's not so easy when you want to do
both of them together, but it becomes way
more easier when you break it up into two
different sessions. Now I'm taking some brown
and blues to create a darker value of my brown. Now, this you can either
do it on your own, mixing some blue,
paints, et cetera. Or else go ahead with the CPR that you
have on your palette and start adding lines
for the areas of, areas of like the
boat, et cetera. You need all of it as
there are a lot of big, big poles that you
need to paint. And for that, we have to also apply the
rule of perspective. Some of it would be smaller, some of it would be larger, as well as the reflection of those has to fall
into the water. Keep all of this in mind while you actually do this
complete exercise. I think this has become way more thicker than I would
have really liked it. So I would go ahead and just take off the
extra paints that I see over here with the help of my flat bruh and then
start painting over it. I am sometimes not very
happy with how it turns out, and I use my flat brush to pick up the colors
wherever it is necessary. I have done it in the past and all the paintings that
we have done til now, and we would be also repeating the same process over here. I will use my thinnest
brush to apply the colors and
then just complete this particular
part over here so that you can see very well
the distinctive areas. We will have a closer
look at it very soon, so do not worry. We will go ahead and see how
we are painting the smallest of the areas and
how each and every detailing works in this
painting altogether. Going ahead and again adding the seam lying that
we did earlier, which I did not like. Now I am adding it
again with the help of my smallest 00 brush. There is a lot of work
that you would be doing with the help of
your smallest brush. Keep a very thin
brush by your side. There are a lot of
boats that we are painting in the background as
well as in the foreground. All of that cannot be done
simply with one single brush. And that's one of the reasons. This whole of the series
has a lot of brush, which I am exploring
throughout the whole series. We cannot just go ahead
and work with one brush, as I did tell you earlier also. Okay, adding some more
of these blue values, you can use in three
in blue or mix it with a bit of brown as you already
have on your palette, and then add the darkest value
towards the bottom area. The place which is just
touching your water. Usually that is way, and we are going to
also work the same. Again, my hair is stewing
a lot of def over here. So around, I know that you might feel a
bit irritated at this stage, but we will have a closer look at it as I did promise Audio. This lot of paints gray, which I'm going to
use and blend it with the browns that we already
have on the palette. I usually use a ceramic
palette so that I can see through the colors
that I'm making as such. Now going ahead and adding one more line on the top
area, as you can observe. And then again, pulling it
towards the bottom part. I would do the same as we
continue to work on it towards the right and pulling some of the
other lines too. We will add a few more
lines just on the basis of intuition as there are a lot of boats even
on the background. So keeping that in mind, we work through this part. For the background boat, I would go ahead and use again any blue of your choice
and just add it. There is not much in terms of blue that you want to choose, use the blues and
add it on the boat. Usually, they are white color, but because of the
water reflection, et cetera, they
turn a bit darker, as well as it is
the evening time, so it cannot be very white or you will not be in a position
to see the exact white. Of the boat, there would be more of the darker
values also dropping in, adding some more lines, as per the basis of intuition, you can see that I'm
adding some lines, and this is all going
as per I want it. Slowly, steadily, this whole
painting will come together. Believe me at this stage, you might not be in a position to actually look through what we will be getting
as a final outcome. But while you keep
progressing on this painting, you will understand that smallest of the
things have a lot of, I would say value when you
look forward to wanting to paint anything or wanting to
add some of the reflection. Over here, you can
see that I'm going ahead and sketching a
bit of reflection as I want some guidelines of exactly how I will go ahead
and add my reflection. This might be I would say this can only happen once your
paper is dried off, as well as it might not
come naturally initially, but as you progress, you will understand
that the reflections are a very important
part in water. And if you can
create reflections, it gives a lot more beauty depth and understanding
to your painting. You understand water
in a much better way. Continuing to add
some more detailing into our painting with the help of the graphite
mark of the pencil, and then we will go
ahead with our paints. I'm starting with a
lighter value of my blue, and this blue is basically my any kind of paints gray blue, which has more of
blue in it or go. You can see I mix my colors and just blend it with some water. Now, this is how I go about it. One of my u Water is usually clean. And another supply of water
is where I go ahead and just take off all the
colors from my bruh. I always have two supplies of water readily
available with myself. I will go ahead and
cover the entire place and then just blend the
colors into each other so that it doesn't look odd or it looks more
organic in nature rather than some of the places being very dark and some of
the places being very light. So that's it. You
need to keep in mind. Adding the darkest value of
brown to make these windows. I'm going ahead
and using my size fold brush just to
mark the entire area. And once this is done, we will go ahead with
some of our blue, blend it with what we have, and then apply the darkest value towards the bottom
part of the boat. I think this has
become way more darker than I would have wanted it, and it's moving a lot, so we have to just control it with the help
of our flat brush. I will take out all
the extra paints into my tissue and then again, go ahead and paint over the
bottom part of the boat. Blending it with my flat brush so that if there are
any extra colors also, it can move with the
help of my flat brush. If smallest flat brush
can't do the job, let's go ahead with
a bigger flat brush, which can do the job. So these kind of smaller,
smaller aspects, and these kind of accidents do keep happening in any
painting that you do. So be aware of these accidents and just
accept it and move on. There will be few which you
cannot edit or which you cannot really have
chance to get back to, and few of them, of
course, we can change. There is more of water
and more of moisture that's on the surface
of the paper. I will also go ahead with
a lighter value of blue towards the top or the
roof area of my boat. You can see some of the
areas I do keep in white. And some of the areas I continue to work
through the blues. There is less to explain
over here, frankly, because we will just go ahead and keep applying
the colors till we reach a position where we are
working on our reflections, which is a very, very important
part and how we work on the reflection is something that I want to really tell you. So continue to work with some darker and lighter
values and continue to apply your colors with the smallest of the brush
that is size zeros blow. I'm going ahead with
my darker value of brown and then creating a line, which looks more like a steel
rod that we usually see, and then there would be railings that we are also
going to paint next. So be around and I think small things we are
going to cover at this stage. So continue to work on
the smaller aspects. These are also very
important compared to what we have done in the past. Oh. Now is the time to
pick up some blue or any darker value
of blue and start out with our reflection? Yes, we are starting out with our first reflection
of the boat, which is just on the right side. Why I go ahead with a smaller
reflection at this stage. I want to gain all the
confidence initially, and then go ahead with other reflection of the larger boat. So always keep this in mind that you can gain a
lot of confidence and then move around
with other boats rather than going ahead
and just starting out with the toughest reflection
that you want to paint. So keep that in mind when you are working
through the reflection, let's go ahead and work on
the easiest one initially. Gain all the confidence and then go ahead with the others. U If I'm adding any line on the top area, I would also add that
in the reflection. This is basically a mirror image that we usually
see on the water. Water doesn't have
any color of its own. It will reflect the color
of the sky into the water, as well as whatever object
is placed on top of it, it would be a
mirror image of it. When you are creating
the reflection, keep that in mind. It's a very, very
important aspect. In any reflections
that you create and continue to add some
more of these lines. They will not be
exactly straight lines. Some of the places
would be broken, and some of the
places would be a bit moving because there is
motion in the water, and we also want to
show that motion through the reflection that
you are creating over here. Now we have all the
confidence to go with the largest reflection
of the boat area. I'm using my paints gray and then starting out
with the reflection towards the bottom area and even covering the entire bottom
area to a greater extent. I will blend with the help of some water and
colors and continue to add the reflection as
you see me doing over here, though, I am very, very cautious at this
stage, how to go about it. You can see that I
am first drawing it, and then again going over it. This is something
that I've learnt. Your drawing always
works as a framework. If you go over it, there is no chance
that you can go wrong, but if you directly
go ahead and paint, then there is less chance
to come back, though, I will not say if you are a more experienced
artist and if you are advanced level artist, you can always go
ahead directly. But for me, I love to cover up myself before I go ahead
with the final reflection. And this is the largest of the reflection that we are going to create in the water area. Let's continue to create
these reflections. You can see that
I'm using one of my darkest values as
it is paints gray, and goo, whatever color
is available with you. We continue to work with that. And I've already told you that this is one of my
largest reflection. What I usually do is you can see that there are different
that are coming in. So not all the places
I would be occupying, only on of some of the areas
I would be working on, and some of the areas will be a bit more I would
say, not so aligned. So it cannot be straight, right. There are waves, and hence, the lines would be more crooked. And that's all we need
to also apply over here. I'm using the tip of my brush
to create the same effect. Just make sure when
you are creating the reflection not to
occupy the complete space, and the reflection
is all about you going ahead and reflecting what you see on
top of the water. Water doesn't have
any color of its own. It's usually reflects
the color of the sky and the boat of which
is sailing on top of it. Hence, make sure
that you exactly go ahead and do the same in this part of
the painting, too. I would go ahead
and start making a few more lines as we progress. Water is always moving, and hence it is really difficult to capture
these kind of views and come with an exact reflection
of the boat into the water. Hence, what you can
do is you can always, if you want to really paint from real paintings or like real
photos or real videos, you can take a
video and then get snapshots out of it
to understand how exactly a boat travels on top of the water and how
exactly the reflection is. I took a recent
trip to Sundavan, where we had to actually
travel over the water, and it was a boat on which we traveled from
one part to another part. I really observed how the whole of the reflection
works out in water. And it also depends on the time of the day
where you are traveling. Sometimes it's high tide, sometimes it's low tide. Sometimes the water
is way more calmer, so there are different
kind of reflections that also happens on
top of the water. So you cannot frankly generalize
as such the reflections. Hence, it is a very,
very tricky subject. All I can say is
it's a mirror image. And you always need to
actually go ahead and understand how you can
create that mirror image. Nothing else I think stands
important at this stage, except that mirror Image part. Rest, I guess, everything
will fall on line. We have gone ahead
and moved on to the top part of the water area, which is maturely the boat. I'm covering it up with
the lighter value of blue. I will continue to alternate the values to a greater
extent at this stage. Even for the reflection, you have seen that
some of the areas I have added more of
the darker values. Some of the areas I've worked
with the lighter values. I always do this for
most of my paintings, and it really adds a lot
more depth into my painting, and visually it's very
pleasing to anybody's eye. I will continue to work
on the railings of the boat as well as
the smaller details. Frankly speaking, at this stage, there is in of what
we have to do. We have already covered
the majority of the area. But lot and lot of periods needs to be added
in to this painting, and hence, we will go ahead and continue
to work with that. Most of the colors are
blue that I'm using. I am smitten by the blue
always, as you know. And one of my favorite
blues is tra Marine, though I could not use it for a longer period of time in
this particular painting, but believe me, I
have been using that particular paint for so long for creating skies
for creating water. For creating whatnot
possibility, and it has always given
me great results. I am so happy every time I
use the ultramarine and I am stunned with the colors and the gradient that it comes
up with It might be a very, very simple color,
but it has a lot of role to play in any
or every painting. And it's one of my favorites and I must have for
each one of you. I usually use Winsor and
Newton professional grade ultramarine color,
French ultramarine. That's one of my favorites. Though there are other options also available in the market. But this I is tried and tested, and I have used it for many
many paintings of mine, and it has given me the
best of the results. So let's go ahead and
add some more depth, some of the area, I'm keeping in lighter value and
some of the area. You can see that I'm
adding some more lines to show the to part
of the boat area. We will also go ahead and add
some of the darker values to these poles that are
there on top of my boat, and then add few more lines, which are connecting
them to the boat. Oh. Frankly, speaking at this stage, I have less to explain, and it's more about you to just continue
painting along with me. It is going to be
a slow process. We have to think
a lot more before we apply any colors
on our painting. I will go ahead and start adding the lighter
value over here, and then maybe go ahead with some more darker value to create the depth reflection and all. It's a very, very slow process when you
develop a painting, I say, but it becomes very
important as we progress. This kind of a painting
that you create with watercolors is something
which I have learned, I mean, really requires
time in the beginning. But towards the end, when it's only about
detailing a few touches, we should be aware
of where to stop. Sometimes we get carried away, and the whole painting
that we have done may not come out exactly
the way we wanted. I have come across this kind
of a problem so many times. Before I have achieved
these kind of paintings. Believe me, I have failed
a lot of time beforehand. And every time I
fail, I'm like, Okay, I'm not going to do this
particular mistake again. So failing is a part and
parcel of watercolors, and there are lots
and lots of failures. That's one of the
reasons I love to keep sketch books for myself. Sketch books give me
a lot of freedom in terms of how I want to
paint, what I want to paint. I just go ahead and paint whatever I like rather
than just thinking about, okay, I should paint this
or I should paying that. And am I going correct or not? So all of these thought
process, I leave behind, and I just go ahead and paint my heart out every time
I'm even traveling, I love to carry a
sketchbook of mine. Maybe I'm sometimes capturing something or sometimes
I don't, but Yeah, I do love to sit
on the location, have a look at the outside
area and just paint. That's all we continue to do. Okay, great. I think I will just switch my brush
to a smaller brush. As you know, this can
be size pan brush, size zero brush, to continue painting the railing
of the boats. You can go ahead
and also add this. Don't add all the lines, or it's okay to just the
one or two here and there. So many of you have
asked me that how I make these straight lines or sometimes they're
not straight too. So it's okay. Go with
all the confidence. If you can create the
straight lines well and good, if you cannot read
the state lines, that is also great enough. You do not need to
worry for water colors. All you want is
either it be loose or either be whatever kind of
painting you want to pro, we are just going to learn new. Every day wherever
you are painting. So that's the basic
intent in watercolors. You should learn
something new on a regular basis and feel
the energy of watercolors. I think watercolors is
one of the mediums, which is pretty challenging, but as you get a grasp of it, it starts rewarding you as I did tell you even
earlier about it. Not only it's a great
rewarding medium, but more than that, it's a very satisfying
and stress rely kind of a medium when you see the colors flowing
into the water, the kind of effects
that it creates with salt or maybe
lifting out of colors. Everything is so interesting. And sometimes you cannot get
back to maybe the original, shade that you want it, but you create a new shade. Even simple, simple, and small, small learnings have
such a big role to play in watercolors that
I'm super impressed with how it really really
works or helps me to grow, also as an artist, and learning something new is always always in my mind when
I work with watercolors. Okay, great. I guess this is it. Let's continue to work with some more of our
lines on the top. And exact reflection needs to be also painted towards
the bottom part. Make that sure that you do
the same for this painting. Oh. The color did dry off
very light an what I would have really wanted
my reflections to be. And now I'm going ahead
and making some more of my darker value lines
over here just to show that the reflections
have the lines, which we have created
on the top for the ropes being reflected
into the water area. And some of the
areas I am making it more darker as usually what I see in the
water or I have seen is some of the areas because
of the water and reflection, there are shadows and
reflection both in the water. And these shadows
and reflection, some of the areas are
being more darker, and some of the areas are
being a bit more lighter, but with the reflection, few of the areas will be a bit different than what you usually observe only with the reflex so all I want to say is
shadow plus reflection is more darker and only reflection may be a lot lighter or only
shadow may be a lot lighter. So that's it. I guess I am great with how
this has turned out. We will go ahead and even add a very light colored
background hill or mountain, whatever you want to create, just to define the horizon
line in a better way. Oh. I'm to work with my white ash. This is majorly from
the Brand PH Martin. It has got a white
opaque watercolor, and I'm using it to
mark a few areas. And even I will write some
number on top of this sport. Usually, I see that these smaller cruisers also have some numbers on top of it. I would like to add any
number to it. That's it. I mean, no particular
number name in my mind. It's just that, I wanted to add some more reality
into the painting. Ohh. You're almost done
with this painting, and the last few
stages are only left. All I can say is I have enjoyed this painting to a great extent. Tomorrow would be a bit more easier than what we
have done today. Believe me, it is easier. Having said that, it is
also going to take you around an hour or so as
it is done on an e size. So be ready to create a
beautiful boat painting. It's a reflection
on top of the water and how the I would say, beautiful sea looks like
it's voyage into the sea, and I wanted to have a
final amazing painting to be done with you guys. I have kept it for the last, and I'm waiting to work along with all of
you on this painting. They then continue to enjoy this painting and have
a final look at it. If there is anything left, like a bit of detaining,
which I'm doing now, do that and enjoy happy painting and meet you very soon with the next
and final lesson. Then we will move on to
a new class after that.
25. Day 15 Reflection Part 1: Let us see all the colors
for the last painting. The first is my cobalt green, or you can also take compose blue or any blue
that has bit of green in it. I would go ahead
with paints gray, ultramarine, prucian
blue, or rico. You have yellow, green, yellow, some amount of burn Ciena, CPA, or ndake brown. This is part one of
our last painting. It's going to be
very interesting. Believe me, it is being
divided into two parts. One part is going to tell you everything
about the sketching, like we're doing over here. And the second part has to do everything with our painting. And that is more
about finalizing your water, your
boat, et cetera. And in the first part, we're also going to paint the water. You will see how
easily we can paint good and beautiful waters. This is a top view,
and hence I will go ahead to draw a boat. Now, the boat is in the top part of this
particular painting. The bottom part will be a
small rock and only water. We're not going to
complicate it much. You might not be in
a position to see a lot over here. It's okay. We are going to zoom in,
and then you can have an absolute look at
how I progress. Okay. I'm just marking a bit
of a line over here, though this might not be as
important as it is right now. It's just to understand where exactly and how exactly
I want to place my boat. I will tell you that
if there is slanting line that I'm going to draw
from left to the right. Not exactly in the middle, a bit towards the right side, you will see that
the boat is placed, and then I will mark
the boundary of the boat and then easily
go along with it. But first, let's mark that line, and let's divide our
boat into a few parts. Now, this division
is very important to understand where exactly is
the top part of the boat, where exactly is the
middle part of the boat, and how we want to
go ahead with it. Towards the top
part of the boat, we will drop in a
triangular kind of a shape. That is basically I mean, the way the front
side of the boat is, and the back side of the
boat would be more flatter. You will see how we approach in a very
easy and simple way. Basically, I have divided
the boat into three parts. One of the part is really small. That is around 2.5, you can see is how the division
is altogether. And this is a slanting way. As I did tell you, the boat
is tilted a bit towards the right and starts
somewhere from the middle, and you will see that mostly, whenever I'm placing
my subjects, either it has to be towards the top area or either it would be towards
the bottom area. Let's have a closer look
at it, as I always say. I am going ahead and going with a very,
very light pencil. My usually the pencil is either an HP you can take
or a two edge pencil. Why I always suggest a
very light graphite mark. Because on watercolor paper, it becomes tough otherwise
to take out these marks. And hence, you may get the graphite marks
being showing up from the bottom part of
the paper rather than using only the colors. The whole idea of
watercolors is to have a great u outcome of
colors, et cetera, and not showing up all the graphite masks
that all of us usually try to add in when there is any kind of water color that we
are working ahead with. Go ahead and marking
some more lines. You can see I am quickly
connecting all these lines with the already
existing three parts that we did draw in issuing. Then there will be
a small marking that we are going ahead with. The boat we are having a
top view of this boat. And hence, there is
a bit of a change. You can see how I continue to mark the sides of the
boat and how I extend it. Go slow in this process, as I always say, drawing the boat is the first, most important aspect of the whole watercolor that
you're going to set. It's basic framework of your
painting and hence going slow can really help you to a through this
painting completely. Sketching initially,
when I started out, as I always say, I was not
very happy to do all of them. And usually I went ahead with free flowing
watercolor paintings. But slowly steadily, I realized that there's
a lot of importance that you have with every sketching that
you continue to do. And hence, it's important
to sketch well. And it only comes with lots and lots of sketching
practice that you continue to work on as you
explore your watercolors. For me, I still sketch for at least 15 to 20 minutes every day or maybe half
an hour every day. It's never about the only
final painting which I get. I may not actually get
a great final outcome. I am absolutely okay with it. It's just the importance which I always associate with
the sketching part, and that sketching
part really gives me a lot more confidence and boosts my confidence
to a greater extent. Whenever I need to even go
ahead and do a final painting. I have something very ready
for myself as a sketch. Sometimes it works,
sometimes it doesn't work, and that's absolutely okay. There are my good days.
There are my bad days. I accept it with a lot of ease, and that's what
makes watercolors a very wonderful and
beautiful medium. There is so much of uncertainty, it attaches itself There is a time where I was very stressed about why my form
is not changing, why I'm not progressing and all. But watercolors comes with
a really slow progress too. You cannot say you were going to improve on the first day, but as you continue to paint on a regular and daily basis, you will see a lot
of improvement in your watercolor journey. I am going ahead and
finalizing this boat, though I am very chatty today, because I know this is my last painting video
with all of you, so you might go
ahead and avoid it. If you want to
have a good music, go ahead and listen to it, I just want to tell a
lot of tips and tricks through this particular
video for sure, and hence. Many of you might have already
listened to all of it that I did tell you earlier in many of my other videos classes, et cetera, but to all of them
who have joined me today. I think this painting has got
a lot of lots and lots of, I would say, learning. It's easy, beautiful, and it has it has a learning even of how to use your
watercolor masking fluid. Masking fluid is a
very beautiful thing. Till you have started using it, you don't get to understand that how you can preserve
the white of the paper. Though we are going to use
a very, very small amount. So you may even avoid it. It's just that I did not want this boat to get ruined at any point in time as it
is completely white, which I wanted to
show and hence, I think I just had watercolor masking fluid
in my mind to really, really mask out the
sides of the sport. And that's all I'm going to
do in this painting part. Okay, let's continue
to draw our boat. It's kind of a long process. Yes, it's not been very, very easy. I know. I have not taught
everything very easy, but at least the last
paintings that I have kept is a bit tough than
what we have done initially. The idea is to learn as much as possible and this
might be a better class. If you have practiced all the other videos
earlier in this class, you know that day 15 is going to be very easy for
each one of you. Okay, great. Let's continue to draw some more of
this boat area, and then we will go ahead
and paint our water. One thing that I have
learned with watercolors is to have a of enthusiasm. Now, enthusiasm is all about the fact that I can
nail this painting, and if you go with
a lot of happiness, enthusiasm, you are going to frankly have a
beautiful outcome. Either you can
nail the painting, you may not nail the painting, but the happiness
that we get from the progress which we
have made in a single day is something that
really helps me to satisfy my inner
goal of being creative. Creativity is the key, as I always say, rest, everything is okay. While you can see that I have finalized the boat
to a greater extent, and now all the lines
that I'm making is frankly going to
define your shadows. It's amazing the way
we are going to define our shadows and lines of the middle of the
boat, et cetera. It's okay to think and draw, as I always always say, Thinking and drawing gives you a lot more space
to understand that whether you should go ahead
with that line or not. If you are okay to
work on anything else, you really want some lines, or you will do that later on. All of it gets defined at
this stage. Okay, great. I guess I will just
add a bit of line. More. Everything that I'm
doing is not so dark. So again, as I say, that graphite marks is what
I don't like in watercolors, as it is a very, very
transparent medium, and hence, keeping
it light is great. Going ahead and dropping
in the shadows, which we usually see in
a painting for the boat. You can see that the shadows
are coming on the left, and we are going to also paint the shadows
as we progress. O. What are reflection boats or you can say even the shadows, how to paint all
of this has been a pretty daunting
task for many of us. It has been a daunting task, even for me in many
of my paintings, and that's one of the
reasons when I was actually going ahead and trying
to draw this class. It was important to even include
a few intermediate hand, I would say advanced
level parts into it. Now, these are one
or two days which are more advanced
that I have included, as I really wanted you
guys to get a taste of how every thing can be even easy when you think
that it's complex. So breaking a complex thing into an easy outcome is something or you can say
into easy step wise, final outcome is something
that I look forward to. Adding my masking fluid
as you observe it, and I'm going ahead and
adding it just on the side. You will see that I will
draw a very croped rock towards the bottom
part on the left side. Now, this rock is
intentionally being done because my boat is tied
to this rock altogether. That's the reason
I made this rock. I will start out with my compose blue or you can also go ahead
with cobalt green. These two colors are pretty close to what you get over here. I have already
told you initially in the color mixing part, how you can create
these kind of shades. Just go ahead and start
adding it on the sides. But before this, make sure that your paper is completely dried with the masking fluid that
you have added onto it. What I have usually
seen over the years of using the masking fluid
is that for some time, maybe five, six months, the masking fluid remains well, and then as we progress, it just starts accumulating and becomes harder or stickier, and I don't know the
particular reason for it, but that's what I have observed. So whenever you are
using a masking fluid, make sure that it's in
good shape and order. Rather than it being not so great and it's
sticking to the paper. You might find it really difficult to take it
off. In those cases. I would ask you to just go ahead and start painting in and
around the board with a smaller brush
compared to what you might have used like a
bigger brush as we did here. This is a AO sized paper, and that's one of the reasons
I have used bigger brushes. I have masked out this area. I need to work fast. It's already the summer season, and my paper doesn't stay wet for a longer
period of time. It's being very, very hard
for me to keep the paper wet. Believe me, it's a
300 GSM paper and still me getting so much less
time to work on top of it. I am going ahead and
applying some more color on the right as well as or towards the top part
and blending it. The blending you can
see is becoming harder, and that's one of the reasons I always see that when
it's summer season, it becomes very tough to
draw paintings like these, and you might have
to approach it more like breaking it
and then approaching it. But I don't know how
exactly you can break up something which has
a continuous flow. Like this watercolor part
has a continuous flow, and we are going to add
more and more colors. I will go ahead and start applying some amount of
ultramarine, or else, you can also go ahead with your very light color of donne, blue, or yellow, blue, whatever is available
with you to just change a bit of
shades over here. We are going to introduce
a bit of blue shade. You can see that I'm
just trying to keep my people wet for a
longer period of time by applying more and
more colors or more of your fluid on
top of the paper. And for this, the
fluid, of course, it's water and colors. So continue to do that. And then we might
have to go ahead and switch to a smaller brush
to make some lines. And those lines are basically the waves that we add
into the water area. I will go with a darker value. And this darker value, either can be your prucan
blue or nthm blue. These are two of the most beautiful shades
that I love to add. Along with it, you can also just add a bit of tealow green. Now, Tello green really adds so much beauty to any painting
that I really can't tell you how I have been using it so much in all my
watercolor seascapes. It gives that greenish color, which we usually see in seaside
or in areas like molds, et cetera, the green
blue shade of the water. That really takes away my heart. Introducing some of
my yellow green, and this is basically
some dots, lines, et c that I have added into
this part of the painting. You can see that slowly we are adding or
introducing colors. We did not introduce
in the first. I always add a simple layer
and slowly build upon it. We have done this in the
past. We are doing it. Now it gives you a happiness, and more than happiness, it's all about at control. Control really helps you
to put your painting in order and understand that really you are going to
need all the shades, or is this lighter shade and darker shade
is needed or not? Or maybe this is what you wanted throughout
your painting. So everything comes together. You can see that
all the dots that I added have now blended
well into my painting. I'm adding some darker
value in and around my rocks and then trying
to add some of my waves. Now, these waves, of course, the paper has to be wet for painting these kind
of waves, all lines. I'm going ahead with
my size four brush, taking off all the extra
color on the tissue, and then I have started
to add these lines. You can also use a mix of your ultramarine and dont
in blue for these lines. They look nice, and I really
go slow at this stage. I'm introducing the darkest of the value in my water area. I will continue to paint this
line till the paper is wet. Now, when the paper
remains wet is something that we all
have to understand. You cannot paint on
top of the paper when your paper has become
semi wet or moist. Now, why I say the
semi wet and moist? Because if your paper has
turned out semi wet or moist, you might get the hard edges, and we don't want
hard edges in any of our paints at for
the water area. Yeah, we have worked
wet on wet and wet on both you are going to experience through all
these paintings because every painting that you do needs to have wet on
wet and wet on dry. Those are the basic
two techniques that all the watercolor
artists have worked with. And hence, introducing that in your painting is so important. I will not deny that yes, you can work only wet on dry also and only
wet on wet also. But mostly, I have a mix, which is great, I feel. This mix really helps you to balance your painting
altogether and get a final outcome that
is up to your liking. Okay, adding some more
dots and some more of the darker values
of our cobalt green. You can see that I'm
introducing some wave structure even with the
cobalt green in and around the board
towards the top side. This is at a very, very initial stage where we aren't
developing the painting. Some places I might
keep dots, some places. I'm just occupying with
some darker color. Till the time your paper is wet, you can work upon this. My paper remains wet for a longer period of time
because I'm going to introduce fluid at regular
intervals on top of the paper and keep
it wet for longer. Or else, I really can't
work on our A four size. If you were someone who is not very comfortable
with the A four size. You can go for A five size. Though it might be a
bit difficult to draw the boat and the detailing
that we are going to do on it. But having said that, your water would be done
pretty quickly and you can actually go ahead and
use this boat later on. Of course, you can continue
to paint the boat, but with smaller brushes
compared to what I have used. I keep on detailing the water. Just see how I detail. I've already told you
the mixes of blue, it's ultra maine end on three and some amount
of your paints gray. Ultra maine is one of my
favorite shades always, and I introduce it in
most of my paintings. I've worked through the
skies, water, et cetera. Everything I have worked
with the ultra man and I have literally fallen in love
with this particular color. I will add some more dots
towards the top left hand side, and these are more
lighter value, or you can say more less
pigmented and more water in it. So yes, we will add some of these even on the right
side and on the left side. I can switch to a smaller
brush that would be more easier for us
to work through. Though you may not
see my palette, but I'm continue to
see telling you about the sheates and the
colors which I have used, and these are the
sheetes that you have even used in other
many paintings. Of course, there's
a bigger paper, and it might be a bit
difficult to observe everything at this
stage. Okay, great. Get some of your flood brush to blend and add some colors. Your paper must be drying up. That's one of the reasons
I love to introduce this shade again and
add on top of my paper. I did blend a bit, and now I'm going ahead
and adding some more dots, introducing some dots here. This painting is still not
done with the first layer. We have to work a bit more
with our first layer, and it's going to
take some time. So the layer one gets
continued even in part two. If you are someone who is done with this part of the painting, that is water part and
getting dry patches, I would ask you to
go ahead and let it dry completely apply a very, very light wash of
water on top of your paper and then
start painting over it. That way, you can really help in terms of not
getting any kind of alflower effect or displacing your pigments that is existing
on top of your paper. Everything put together
no hard edges too. So yes, that's a great way to rewet your paper at
regular interval. Once your paper gets dried off, again, rewet it, work on it, your paper becomes semi dry
or moist kind of a shape where you are again getting some qualiflower kind of colors. Some of the paper has
become dried off, some of the paper is still wet, so all of that can be
controlled this way. I have introduced
some more greens on the top left corner. I think greens is a very important part
of this whole painting and introducing this
light yellow green really improves my painting
to a greater extent, and it makes the painting. So I love to introduce this color on theft as
well as on the right. I will just blend
it some more on the right bottom part
and then introduce some more waves or smaller
dots as we did earlier. Sometimes even after
introducing dots and this, I might go ahead and blend it. Those things happen as we continue to progress in
our watercolor journey. We may not like something
and we may blend it. Again, make it more simpler or difficult like
whatever it is, like. We keep introducing
newer things into the water or keep experimenting
with our watercolors. Okay, some more lines, some more darker values. This is more of your
paints gray and less of the other
colors that we have. You can see that my paper has become really dry
at this moment, and I continue to make
it a bit more wet. I continue to work on the dry patches with
water, clean water. Though this is not I would say this is not
the ideal way, Bulli me. I have worked this
way for a really, really long period of time, and that's one of the
reasons I like to experiment it by continuing to work on it. But for you, I would ask you guys to just let it
dry wherever you have started getting the
dry patches and then apply a light wash as I
did tell you earlier, and then go with the
next set of layers of water color that you want to introduce on
top of your painting. Many of you might get bored
with the water itself. Yes. But once you have the
final painting with you, I'm pretty sure about it, you are going to fall in
love with this painting. This is one of my best outcomes in the whole of the series, and I have tried to, like, break it as I would say, easy as possible throughout
the entire painting, the idea is not to make it, but having said that, the painting itself is very, very easy or very, very simple. So It might need. It is a bit more
challenging altogether. But having said that, it
is broken up into very, very easy parts
or simple things, like introducing
some darker values, introducing some lighter
values, blending it, introducing a few green shades, or yellow green, any
kind of shade of green that you want to
introduce in your painting. Let's continue in the next part.
26. Day 15 Reflection Part 2: Part two is all about
all the details. And you have already
applied a lot of colors. T though you have seen that this painting has turned a
bit patchy on the right side. I will go ahead
with my flat brush and just apply some of
the colors with a very, very light wash of cobalt green. This has just hardly any cobalt in it and more of water in it. To make the whole part
look seamlessly beautiful, and no one can actually
get the fact that, yes, there are any patches or I was not getting
the smooth lines, which I really wanted. All of you have been
painting along with me, but have you ever
wondered the kind of painting that we
are doing right now? If you are not painting
inside the object and if you are painting in
and around the object, it is called a
negative painting. I have not introduced negative painting in the
whole of the series, but in this particular part, I really want to tell you that sometimes unintentionally, too, we keep doing many of our
paintings or keep introducing, I mean, different kind of
techniques in a painting, which you may not know
exactly by the name. But yes, when you
do not paint inside the object and start painting
in and around it to create, the background or just to create the outline of that
particular flower or that particular
boat, et cetera. Usually, these are done
when your object is a lighter color or values. And hence, negative painting
has got a lot of importance, even in all your florals or in your various
other paintings. Throughout this painting,
I have not tried to achieve any kind of realism. Now, if you are
someone who wants to record every window
or every window pane, every part of the board, and not leaving
any part as loose, You are practically going to make a very realistic
painting, which is great. I will not say that
it is not great. But when we're starting out, we look more into realism. But as we progress
with watercolors, I think the lose approach really helps you to nail the painting, and it really tells you or focuses you
as a painter rather than you being or you only recording what
you see or observe. So that's something which
I can tell out of my own, um experience that, yes. Initially, when I started out, I was doing a lot of detailing,
and slowly, steadily, I am trying to make it as loose as possible for
most of my paintings, and that really adds a lot it really says
a lot when we are u thinking to develop ourselves
as one of the, et cetera. I guess this is it. I'm pretty happy with
how it has turned out. Maybe a bit more of
colors here and there. Then we are going to create
a reflection of the boat into the water or the shadow of the boat into the water
on the left hand side. It's very interesting. I have loved the whole process, so let's continue to work on it. One thing, before we
introduce any shadows, I would like to add some
whites into the paper. Now, how do I introduce
whites into the paper? Is it t h? No. Not exactly. I usually lift up my colors. If I can't lift out my colors with the help of my round brush, I will use a sharp I not sharp. What I want to say
is a brush which has synthetic bristles that can
really pick up my colors. I am going to pick up
some of the colors when the paper is semi
dry. It cannot be dry. It has to be moist to
really pick it up so that I can create these kind of lines that you were observing
right now on my paper. You can see how beautifully
the lifting out will create a few areas in white, which will look more
like the waves, and the lighter
parts of the waves that we usually see in water because of the
shining of the sun. Uh, by the time, by the time you see the
painting right now, it might appear a bit dark as I was painting I was with the flu and the timing of
the day changed. It's almost sunset now. So yes, there can be
a bit of shadows, but if you can adjust to it, I think this is going
to be a super painting. Let's continue to just pick up our colors in
the other areas, too, and then we will
create the reflection. But the reflection can be only created once your paper
is completely dry, it cannot be created beforehand, so keep that in mind when
you are painting this. We have introduced these
lines in most of the places, and you can see that how I
have lifted out the colors. But in some of the other
places in and around the boat, I want to lift out some
more of the colors, and I'm using my ruby sat
flat brush to do the same. Now, this is a great for lifting out any
colors of your che. From your paper. But
all I've seen is that your paper needs to be semi
tried to do this technique. You will not be in a position
to actually pick it up. If your color has got a lot
of staining miss, then also, what happens is that picking up the colors and making
it white becomes stuff. And for many blue colors, that has been the case,
what I have observed. So always always
check your colors on a separate cotton paper to see that whether you can
actually lift it up or not. That's one of the very, very important
techniques that you must see whenever you are
buying your colors. For me, I usually buy colors
from Mijello Mission Gold, senalo and brands like Vincent and Newton
Professional Great. These are all artist rate colors because of which the
stainingness is not so high. As well as, I always see
the kind of opacity, transparency, et cetera that's written on top of
each of these shades. So every shade comes with its own set of
characteristics on top of it. And whenever you are
buying the colors, it's very important
to be informed about the colors and then
only buy those colors. Though I haven't covered much about the colors
or stainingness, and the basic properties
of it in this, um, particular video or any of the other videos that
we have done til now, but there are many other
courses in the initial part, like the Polaroid
series and all there. They have lots where
I have covered about the basics of the
colors that you must know. Okay, let's continue, and you can only work on this
part of the painting, which is majorly about
adding your shadows, only when your paper is dry. Otherwise, you cannot
frankly add the shadow. So I would go ahead and add this shadow of the boat
into the water area. And then go ahead with
a bit of these lines. And you see how beautifully
they have they look now. Now, when you're
working on reflection, your water is moving
towards the bottom part, and when your water is moving
towards the bottom part, the reflection of the
boat will also move towards the bottom area where we are covering
it right now. We'll see that there would be a few more extra lines over there compared to what you
have actually done earlier. I usually go very slow when it It is about reflection
into the water, and then I'm like, Okay, fine, let's continue to work
upon it, et cetera. Though the reflection
could have, you can argue why it
is on the left side, why it is on the right I mean, this is usually in water, you see two different things. One is reflection,
and one is shadows. So this is usually the
reflection that you can see, and the shadow or the darker part would be
actually on the right side. Now, why I say that the darker part is supposed
to be on the right hand side? Because you can see that
the boat you can say, the shadows also come
on the right side. And in particular,
this painting, I have only concentrated
on reflection. We are not focusing on shadows, et cetera, so we have
just left it out. But there are usually two
concepts, spanish shadows. Another is your reflection. So yes, sometimes I have seen they falling
on the same place. Sometimes I've seen
that they're falling on two different or
separate places. It's all about learning, and it's all about in depth learning when you
keep working with waters, you get to understand it more. Believe me, at this moment, we do not need to do it. So I'm not introducing
all those concepts. Let's focus on how
to just work this out in an easy way and move it. So something that I
have learned over time, it's amazing to see how
you can just progress with watercolors or
keep going through water colors only with
very simple steps. You don't need to always go
ahead and complicate it much. Just follow these
steps, and we are done. Okay, continuing with a
few more lines towards the top area you have seen
and now is the bottom area. Where I'm going
to paint my rock. Now I'm going with
my burn Ciena, and then I will add some
amount of blue into it. You will see how I introduce the darker value patches into
it with some dots of blue. I'm not going to go ahead with a lot of colors
at this moment, but that blue when
you introduce, it will have various shades
coming up on the rock. And that's the beauty of
mixing on top of the paper. So there are two
types of mixing. One is that is you do on the
palette and another mixing, which you do on the paper. This is the mixing
which I really love a lot as it comes up with many different
sheets and colors compared to when we
do it on the palette. Because on the palette, you are mixing the color and just introducing
it on the paper, so it comes up with
a single shade. Whereas when you
introduce more shades and colors in your paper itself, that you get to see
a lot more shades coming up than what
you observe elsewhere. You can use done blue or tomy my favorite to go ahead and add the darker
values of these rocks. I will not be adding the
darkest of the values everywhere wherever we go only in few places,
and that's it. Et's just blend it with
as you can observe. And we will add some lines
on top of it to show that the rocks has some dest of the values and some
lightest of the values. Everywhere the lock can't be in a single value, et cetera. So you can also pick up the colors in view of
the places if you want. Once the bottom part is done, we will just pick up
our masking fluid and then start out
with our boat. I'm going ahead
with my Burn Siena. No Burn Siena is
the lightest value or the value which I'm
going to add for my boat. I'm going ahead with a very, very light shed of it and
adding it on the sides. I would go ahead with
kind of a flat wash on the side and add it on
overall part of the boat. So you don't need to be when you work around
on the boat part. Even if it is a
simple wash like just adding your brown
color somewhere. I frankly haven't done, I haven't actually fast
forward the video. I have kept it real time, as it takes time for every development or
progress which you make. And hence, keeping it
real time gives you a better idea of how I have
worked through the process. And if I can work through the
process, re sure about it. You guys can also work through the process and make it
simpler for yourself. Okay, adding some more
of the lighter values towards the top part
of this boat area, because you can see
that some of the area where the boat is, I mean, few of the areas can
be seen, that is, exactly the bottom part or
the middle part of the boat, and some of the areas are
a bit on the right side. And the bottom part is
also seen that way. Okay, great. I guess I'm cool and happy with how
this is turning up. Slow and steady,
as I always say, Windsor is at least
for watercolors. Watercolors doesn't
need to be fast. Watercolors has to do
everything with a lot of love, I would say, It is one
of the mediums that's very rewarding only when you start falling
in love with it. Okay, great. Let's
continue to work on it. And I will get back
to you wherever I think it is necessary
at this moment. It's just going with the flue, and I would like your
guests to listen to the music and continue
to paint along with me. You will see right now
that I have started adding a bit of shadows
here and there. It's not that a lot of shadow, which I'm going to add
only the shadow of this middle part of the boat where we have painted
it in a very, very light color of burn Siena. That only I'm going to, like, see how the shadow
works over there. Rest, I think everything
is going to be very, very simple and easy. Okay, I am actually
mixing some colors, which is basically your
ultramarine plus some amount of your burn Cena to get the
darker values. As you observe. It might look a bit greenish in shade because it's
all the evening. As I tell you, so don't follow the colors
that you see right now on the palette because
of the change of the light. It might appear a bit
greenish, but let it be, we can continue to work with the burn Cena and the
other shades to show this. Okay, I guess I would add some more of the
shadows over here. Then let it dry off After that, only you will be in a position
to observe how beautifully this boat has turned out
with only such less chokes. You don't need to
go ahead and color everything that we observe. Only a few places if you
color that's good to go. Sometimes it's
great to loosen up, and this particular
boat is not so loose. Though I do love to
paint loose paintings, and I really fall in love
with loose paintings. As you keep developing
your water colors, the more lose you paint, the better artist you can be, and the better
outcome you can have. So that is something which we will work on in future date. Till then. Let's work through
what we have in our hand. Believe me, this is something that I love to do keeping the
white of the paper. That is not working through
everything that we observe, just keeping the
white of the paper to show the boat and leaving
everything as is. Few strokes of brown and some darker values can
actually define your boat in a better way rather than going ahead and working through
everything that you observe. Yes, I guess this is all I have learned through my
time in watercolors, and all I can say is that
you guys can also learn a lot if you continue to approach watercolors
with this mindset. Watercolor is all about a
mindset to just go ahead, go with the flow, enjoy the
moment, enjoy the progress. Every day, you will not
make a masterpiece. And most of the days we
don't make a masterpiece. There are only a few times where we go ahead and
make a masterpiece. So never thinking about the
fact that you cannot do it. It's all about the fact
that you can do it, and you can really
make something very beautiful on
a regular basis. Okay, great. I
guess, that is it. Let me continue to paint
with watercolors more. And let's just finalize this
painting at this moment, what we haven't
had, as I'm still working through a bit of a
smaller part at this moment. I will add some more lines. If it not necessary,
it's just, you know, that mental satisfaction that we get out of adding a few
lines here and there. Okay. So of the places, you can see I don't mark, and some of the
places I only mark. Now you can see a great shadow
coming up on this boat. And this is what I always say is something that I
have fallen in love with. Okay. I am happy with how the
whole part is turning up. I'm going with a very, very
light wash at this moment, and I have introduced blue, which did act very dark, and I am now adding more
water to make it lighter. These things do keep
happening in water colors, and you will see that some of the area you have
covered more ta, some of the area lighter. So, yes, mistakes are a
part of water colors, and we can add more
water to make it look less to actually make it less In terms of
the mistakes that you've done less vented,
is all I want to say. Okay. Great. Let's have
a final look at it. At this moment. You don't need
to continue to work on it. It's important to see
how it has turned out. Do you need to add any further lines or
any further colors, or do we go ahead and just work on very simple aspect
of the rocks now? I know I did take
a lot more time on painting this boat compared to what you would have loved. But it it is what it is, right. And we have to give it the time it needs
for this painting. So I think I am happy with how this
painting has turned out, except the bottom part
where we need to work on. Rest everything
looks fine to me, and I don't want to touch upon all the parts and
areas of this boat, except a few lines
here and there that I continue to add to make
it look more organic. And you can see that, yes, there are parts of the
boat which are darker, and there are parts of the
boat, which are lighter. It's basically the sun. And the sun adds those shadows. The shadows really
completes the painting. Shadows and reflection. Shadows the potent reflection of this boat into the water. Time to add some lines
onto the port area. You can see that again, I am adding some darkest of the lines and some
lighter parts, too, I will be also adding a bit of white
quash at the end. So just continue
painting with me. It is size one brush
from the brand Escoda, and I am day in love
with this brush. Continue painting
some of the areas where it is needed and
some of the darker areas. I'm just adding water and
making it a bit more lighter. This part is dry before
we add these lines. So your paper also
needs to be dry before you go ahead and
add all of these lines. I. And I wanted to show you
the mistakes that I do. Yeah. I am also not
happy and many times, man, I paint something. And I just pick up those colors with the help of my tissue. Tissue is one of
your best friends, as I always say in the
beginning of any class. If you have tissue, you can pick up most of the colors that you add
onto your painting, and wherever you think you
have made any mistake, that can be corrected
very easily. Time to add some white quash
as I want to make some ropes into the water as it is
holding this boat for us, and adding that rope really really adds so much
life to this painting. The first rope, he
can't see properly, but the second rope, yes, I am only in love with it. We can see it well. And even on the top part, I would be adding a small
line to show another rope. You cannot hold a boat
so easily, right? So continue to add
a few of them and remove the T pattern angle
to have a fine look at it. I hope you have
enjoyed this painting. If you have liked anything
about this class, do drop me a comment or just put a comment in
the discussion section. Drop me a feedback. A constructive feedback
is what I'm looking forward to and see you again in the next class where we are going to paint something new
and something more exciting. I hope you continue to fall
in love with watercolors and happy painting to
each one of you who is exploring this
beautiful medium.
 Dhritikana Nath, Watercolor Artist and Instructor