Transcripts
1. Welcome to the Class: Whenever we have
birthdays in our family, I personally love to
create a handmade card, wishing them happy birthday. Or any special occasion
which is happening. Are you someone
who loves to make handmade cards whenever
you're gifting, then this class is
absolutely suited for you. Hey, everybody, you are most
welcome to my new class. Myself Ruthwik Butle.
I'm a self taught, independent artist and an interior designer
by profession. I personally love to explore different art forms and styles and not stick to
one particular thing. So if you're joining
me, you'll find a variety of classes
that I create. In this class, we
are going to create a beautiful birthday card using easy and simple craftwork. For the entire
class, you'll need some basic art supplies that you'll find very easily in
any nearby local art store. Or you can go for any other
good alternative as well. We are going to start
by understanding all the art supplies that you will need for
the entire class. In case you're missing out on
any particular art supply, you can find it very easily in any nearby local art store, or you can go for any other
good alternative, as well. We're going to start by
creating the base of the card first using a
brown and white paper. We're going to use
a pattern scissor, which will give you a beautiful
effect in the borders. Using a white pen,
we are going to give a nice text to the entire card. You're going to
write happy birthday in a calligraphy manner. You're going to add
some minor colors to make the card look a
little bit attractive. The major element is going to be a little bouquet that
we are going to create. Using easy craftwork, we'll add a little bow and some flowers
in the entire bouquet. Combining all these
little elements together, we are going to form this
beautiful birthday card, which is going to be minimal,
simple, yet beautiful. The class is absolutely
suited for beginners and also intermediate and advanced
level artists can try it. I'm very happy to share
this class with all of you, so just enjoy the
process of creating. It's a short class that will
not take a lot of your time, and it will elevate
your craft skills. So without any delay, grab your art supplies and join
me on this creative journey.
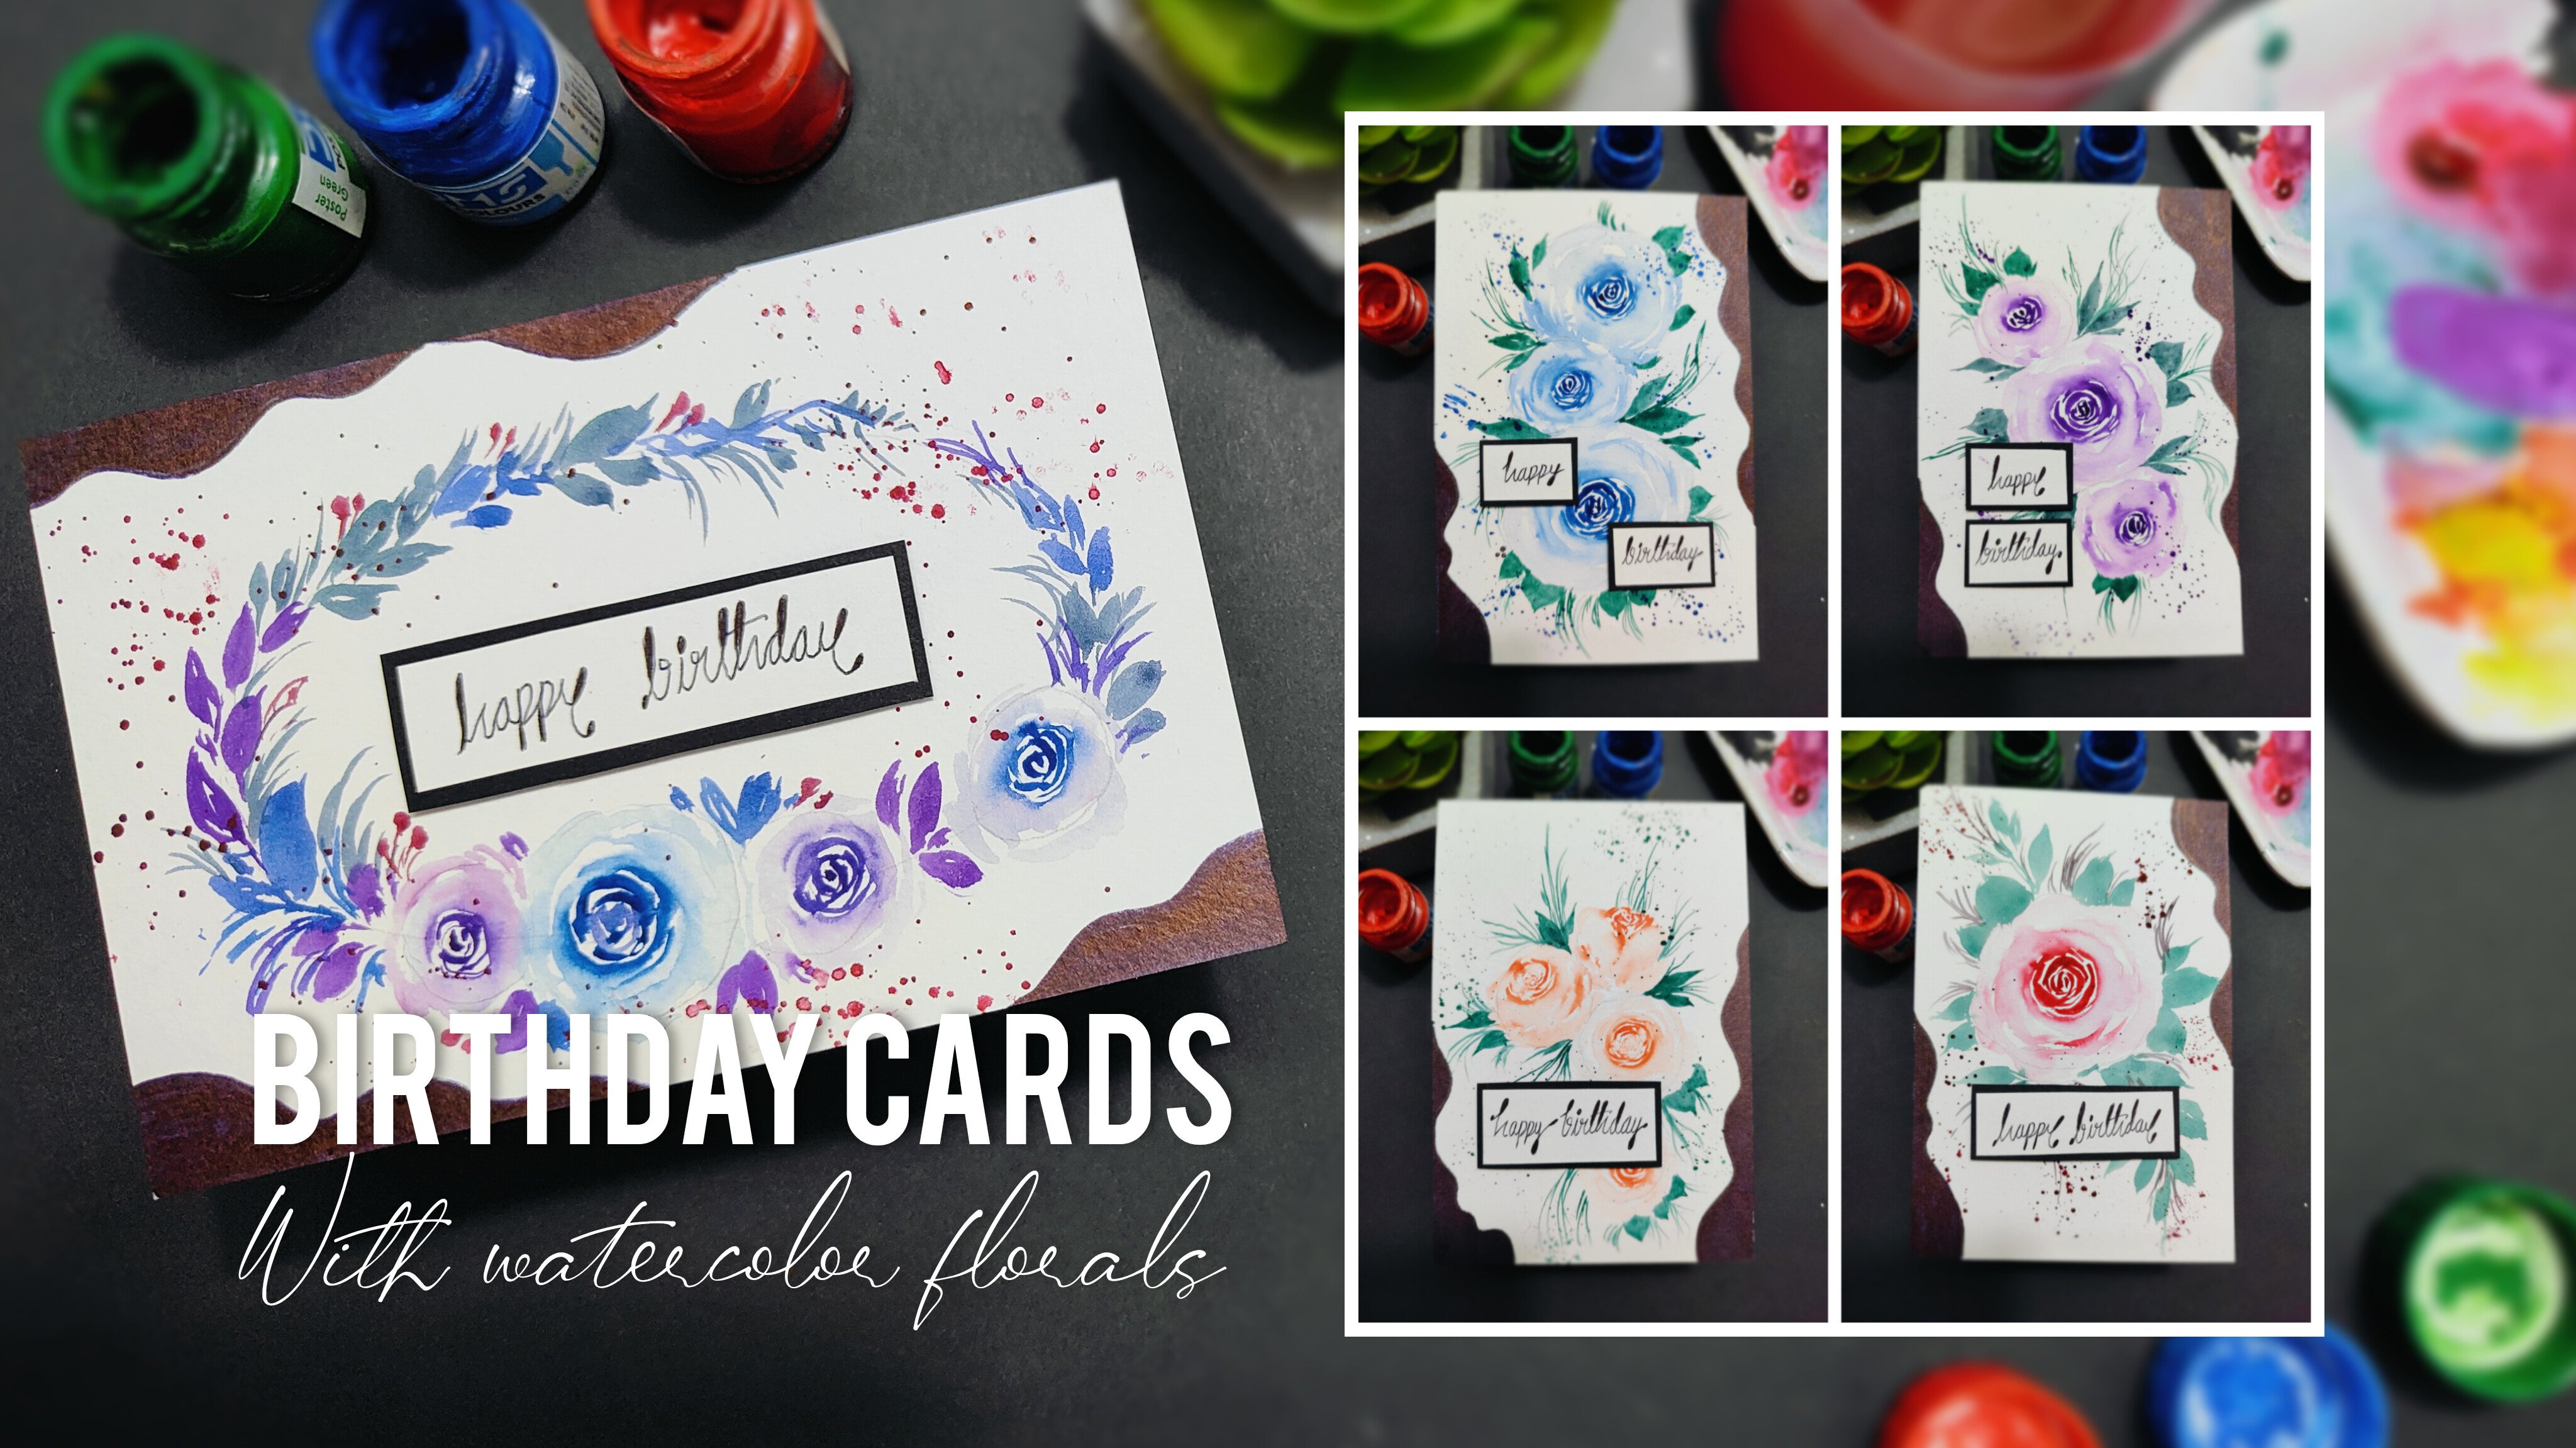
2. Details About the Class Project: Hey, everybody. Now let us talk about the class project that
we are going to create. I'll be giving you
the details about the class project
and the elements that we are going to
create one by one. Observe them carefully
so that you get an exact idea about
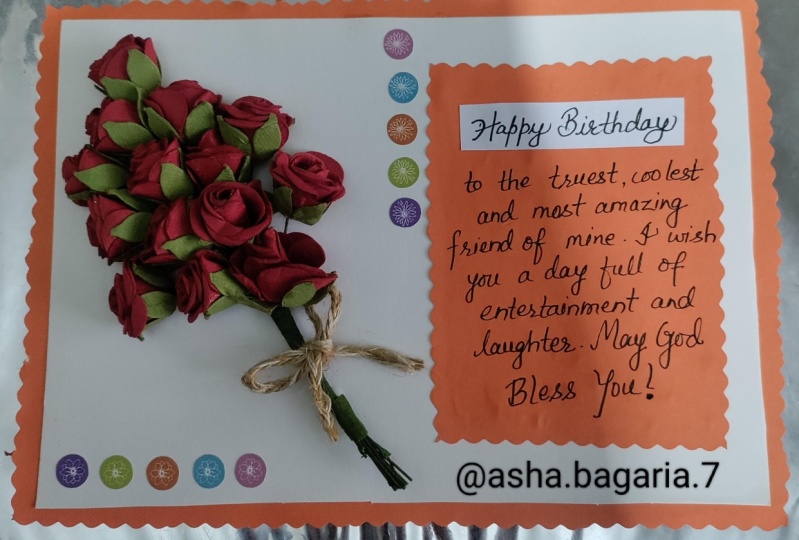
the class project. So I have placed our birthday
card on the desk surface. Let me take you a little
bit closer so that you can observe all
the details carefully. So there are these
little elements in the entire card which
are combining together. The first one is a simple
bouquet that you can observe, which is placed on
this rectangular base. And there are two basic colors that I have used in the paper, which is brown and white. You can observe
these little hearts that we are going to
draw using a red pen. Then we have this
beautiful little bouquet on which I have placed a little green bow and
some dried flowers that you'll find very easily in any nearby local art store. Now, there is this
little message of happy birthday that I have created using a white
tag placed on a brown paper. And if you observe this wavy pattern that I have created using
a pattern scissor, you're going to write a
message using a white pen, and we're going to add
these little colors. It's like a color
palette to enhance the entire card and make it look a little bit
more attractive. And trust me, we
are going to use some easy craft work to
create the entire card, and you'll definitely wonder how easily we are going to
complete the entire card. You can use the entire card to gift your loved
ones or add it to any of your gifts
whenever there is a birthday or any
special event happening. So there are going to be
fun steps that we are going to follow that you are
definitely going to enjoy. I hope that you got
an exact idea about the entire birthday card
that we are going to create. Now let us move
towards the next part.
3. Art Supplies: Hey, everybody. Now
let us talk about all the art supplies
that you will need for the entire class. No
need to worry at all. In case you are missing out
on any particular art supply, you'll find it very easily in
any nearby local art store, or you can go for any other
good alternative as well. Now, let me give you the details about the art
supplies one by one. So as you can observe,
I have placed all my art supplies in
a systematic manner. Now let us talk about
them one by one. So the first art supply is a simple plastic tape
that you can observe. It is a transparent
tape that you'll find very easily in any
nearby local art store. So we are going to use this
tape to create our bouquet. Then the next art
supply is, again, a tape, which is basically
a double sided tape. So you can observe the
thickness of this tape. We have stickiness
on both the sides. So we are going to
use this to give a nice three defect to our card. No need to worry at
all in case you are missing out on a
double sided tape, you can still take up
the entire project. Then the next art supply is a simple plastic ruler
that you can observe. It is having dimensions
in centimeters. So we are going to use
this ruler to take our measurements while we create the base of
the entire card. So a simple ruler will be very helpful to take
the measurements. Then the next art supply is a very interesting
art supply. It's a simple pattern scissor. You can observe the pattern that it creates on its surface. So again, no need
to worry at all in case you are missing out
on a pattern scissor, you can still take up
the class project. Then I have a simple scissor
that you must be having. So it will help us to cut the paper in a
comfortable manner. Then the next art supply is a simple glue that
you can observe. This particular glue
is from camelin. You can use any
good alternative. You just need a simple glue
to stick the paper surface. Then I have a simple eraser, which you can use
in case you make any mistakes while using
a pencil, basically. Then let us talk about
the main art supply, which is the papers that
we are going to use. So there is going to be
one simple brown paper and one simple white paper
that we are going to use. Let me give you the details
about that as well. You can find the
brown paper from these beautiful
scholar sketchbook, and you can find loose sheets
of brown paper as well. It is a five size
sheet, 170 GSM. Then we have white
paper from Canson. Again, it is a five
size sheet and 300 GSM. You can take care
of the GSM as it is the thickness of the paper and your card will be
very much strong. So these are two papers
that we are going to use. Then the next art supply is a simple pencil
which we are going to use to take the
measurements on the paper. Then I have a simple red
pen that we are going to use to draw some little
hearts on the entire card. You can observe it is
having a nice thin tip. You can use any
good alternative. It is absolutely fine. Then I have a simple black
marker from art line. You can observe its tip again. It is a very thin tip,
so we are going to use this marker to
write happy birthday. Now comes the white pen
that we are going to use to write the text
on the entire card. So you can observe the
tip of the white pen. The white pen is from
sakura jelly roll. You can use any
good alternative. It gets a nice contrast
on the brown paper. That's why we are going
to use a white pen. Then I have these
loose sketch pens, and you can observe it is having these beautiful colors like
green, brown and blue. You can use any colors. It is absolutely fine. We are just going to add
a little color palette in the card as you can observe
on the topmost portion. Let me take you a little
bit closer towards our card as well so that
you can get an exact idea. So these are all
the art supplies that will be required to create this beautiful
birthday card that you can observe
right in front of you. Now, apart from all
the art supplies, there is this one different art supply that you will need, which is a simple green
thread that you can observe. We have used a
beautiful bow and we have just pasted
it on the bouquet. So you can use any
kind of a thread or a green rope to create this
little bow on the bouquet. You can use a ribbon, as well, but you'll need a thin
ribbon to create a bow. And you can observe these
little dried flowers in the bouquet that
you'll find very easily in any nearby
local art store. I hope that you
got an exact idea about the art supplies
that we are going to use. Now let us move
towards the next part.
4. Creating the Card Base: Hello, everyone. So let us
start with the first step, which is creating the
base of the entire card. You can observe that
I have placed both my papers brown and white
on the desk surface. Now you will need
a simple pencil and a ruler to take some
basic measurements, and we want to create little rectangular shapes from these A five size
sheet of paper. Now I'll also use a simple
scissor once we are done with the measurements
to cut the rectangles out. So now take your ruler
and simply place it on the down portion of
the first brown paper. Now, the first measurement
that we are going to take is 9 centimeters, and I'll just simply put
a dot at 0 centimeters. Similarly, to get a
nice colinear line, you can add one more dot. So we have two basic dots
which are quite less visible. So let me make it a little bit darker so that you can
get an exact idea. So you can observe two beautiful dots that we have created, or you can also consider
them as little lines. Now simply place
your ruler there and draw a simple line
using your pencil. Now you can observe a
beautiful rectangular shape that is created on the
entire brown sheet. Now simply follow
the line and use your scissor to cut the entire rectangular portion.
No need to hurry at all. Be a little bit careful whenever you're working
with a scissor. So slowly, I'm just
following the line, and we have got a beautiful
rectangular piece of paper from the brown paper. No need to throw the
remaining portion. It will be useful again
once we move further, and it is always
good to save paper. It will be definitely
used again. So now I'll take my
white sheet of paper, and this time we
have a little bit of difference in
the measurement. So now this time we are
going to place the ruler at 8 centimeters and I'll put
a dot at 0 centimeters. One more dot you
can put so that you can get a nice straight line. Now simply place your ruler on both the points and
draw a beautiful line. So as you can observe, we have got one more rectangular shape. Now, again, we are going to use a plain scissor to remove
the additional part. Simply take your scissor
and follow the line and start cutting. No
need to hurry at all. Also be very much careful whenever you're using
a simple scissor also. And we are done. So again, just keep the
remaining portion aside. It will be really helpful again. So no need to throw
the remaining part. Now you can observe we have got a beautiful brown border once we place the white rectangular
sheet on brown sheet. Now we want to remove the
side a little bit as well so that we get the brown
border on all the four sides. So for that, what we
are going to do is that you can either randomly remove some part or
take it at one centimeters, simply put your ruler at one centimeters and put a
point at 0 centimeters. Now simply draw a line, and it is absolutely fine. You can approximately
remove some part. So it is a small portion, and we are going to remove it using a plain scissor again. Simply follow the line
and cut and we are done. So now, once you put your white
paper on the brown paper, it will have a beautiful brown
border as you can observe, since the rectangular paper, which is in white, is
a little bit smaller. So this is one base
that we have created. So now we are going to place our white rectangular
paper on brown paper. So I'll use a simple glue so try to apply the glue on the entire surface
of the white paper. You can make sure that you
apply the glue on the borders also so that it gets stuck with the brown
paper in a proper manner. Use your finger to spread the glue properly on
the entire surface, especially the
edges and corners. Now once you feel
that the glue is completely applied on one
side of the white paper, we are going to place it very carefully on the brown paper. Now you have to make
sure that you leave even space on the brown paper. Now simply put it on one edge. Now, once you have
placed your white paper, try to apply some pressure
using your fingers. No need to worry at all. It will take a little bit
of your time to paste the papers well because the white paper is
a little bit thick. So I'm just making sure that I leave even space
on the brown paper. Now, once you feel that the
paper is placed correctly, apply some pressure using
your thumb and finger, you can use your entire
palm as well and make sure that the paper is completely stuck with
the brown paper. So now you can observe a beautiful base that
we have created, having a nice brown border and a beautiful
white background. Now, let us move
towards the next part. Keep your rectangular
base aside for a while, and we are going to place another beautiful
rectangular sheet of paper on this one. It is going to be a little bit
smaller and it is going to be placed on the right hand side of the base that
we have created. So again, I'll take my ruler, put it at 5.5 centimeters and put one dot
at 0 centimeters. Now simply make your
scale vertical, align it with the dot
that we have created, put it at 7 centimeters and put one point at 0 centimeters. So it's basically a
simple rectangular shape, which is having length 7 centimeters and
with 5.5 centimeters. So now you can observe a
small rectangular shape. We have created the pencil line. Now using our simple scissor, we are going to separate the
entire rectangular shape. So be a little bit
careful whenever you're using a scissor also. Now, one thing that I
would like to tell you is that this is the
remaining sheet of brown paper that we kept aside when we
created the first base. So never throw the
additional parts of the paper which are left. It is always great
to reuse paper. Now this little
rectangular brown cutout, we are going to place
it on one side of the rectangular base
that we have created. You can observe its position. Now, let me show you
how we are going to place it on this
particular base. I hope that you
got an exact idea how you have to cut a
small rectangular shape. Now, we are going to use a
simple pattern scissor on which you can observe this
beautiful wavy pattern. Now, in case you do not have a pattern scissor, no
need to worry at all. You can keep the base as it is having these beautiful
straight lines. But in case you have
a pattern scissor, just simply use the pattern
scissor on the borders. It's a very fun and
interesting process, and you'll observe that you get a beautiful pattern
on the edges. You can observe that we
have got a nice pattern on one side of the first base
that we have created. Now, similarly, we'll add this particular pattern
on all the four sides. So now you can observe
that we have got this beautiful wavy pattern on all the four sides of the first base that
we have created. Now, similarly, we
are going to add this pattern in this smaller
rectangular shape as well. Be a little bit careful just apply the scissor
on the borders. You can observe, I have created this beautiful pattern on
this small brown paper. Similarly, we are going to
add it on all the four sides. So now you can observe
that we have got this beautiful pattern on all the four sides of this little rectangular
shape as well. You can remove the
additional paper pieces aside and let me show you how the entire piece will
look on the first base. So we are going to take
our brown piece of paper, and we are going to place
it on the white paper. You can decide the position of the paper according to
your convenience, as well. It is absolutely fine. This is how we are
going to place it. So we are ready with the base, which is the first step of
creating the birthday card. I hope that you enjoyed
the entire process. Now, let us move towards
the next part. Oh
5. Adding Text: Hey, everybody. You are most
welcome to the second step, which is adding text to our
beautiful birthday card. So I've placed the
little brown paper on a white paper so that you can observe the
details carefully. You have to take your
ruler and simply create a simple reference
line using a pencil. Keep a little bit of distance, try to place your
scale parallel, again, draw another
line using your pencil. So try to keep an equal distance between all the three
lines, basically. Now you can observe that
the lines are very light. We are going to remove
them with eraser once we are done with
writing our message. So I'll be using my white
pen from sakura jelly roll. You can use any good alternative
which works for you. Now, we are using a white
color because it will create a beautiful contrast with
a nice brown background. So the text message
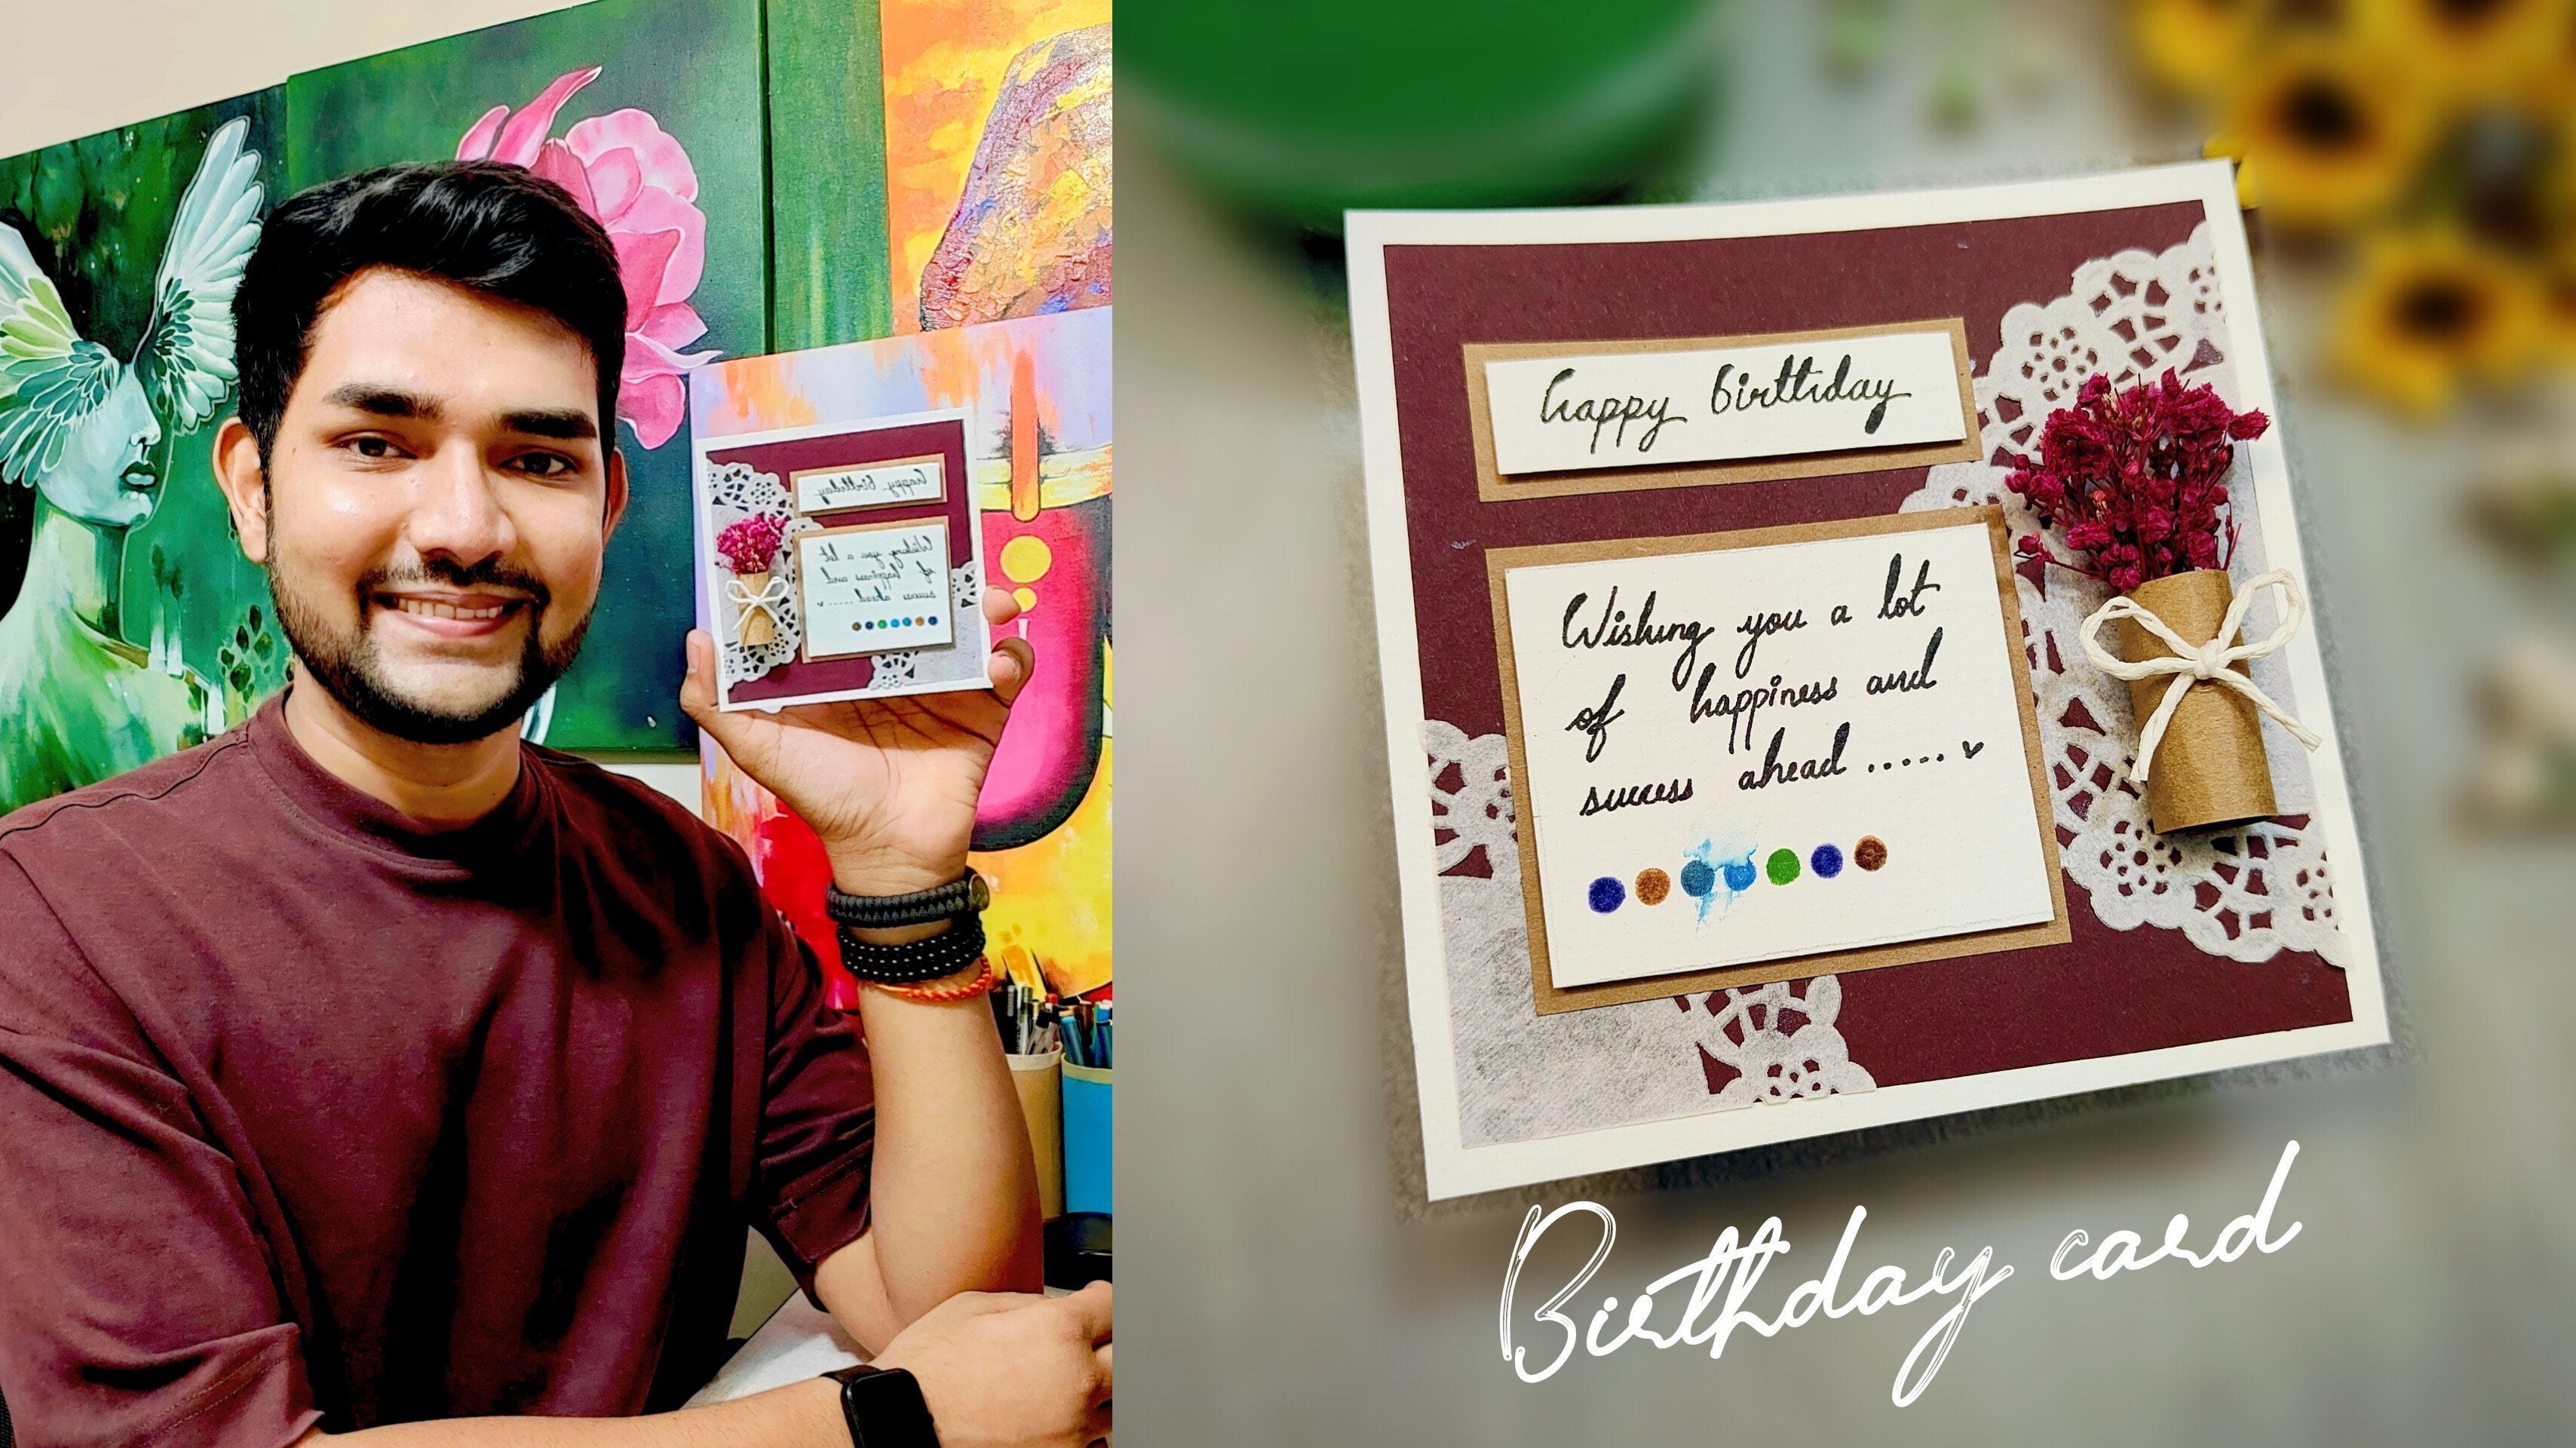
that I'm going to write is wishing you a lot of
happiness and success ahead. Now, it is not at
all compulsory for you to write the same message. You can write any message
according to your convenience, according to the occasion. Since it's a happy
birthday card, that's why I'm writing
this short message. And one more thing I would
like to tell you all is that no need to worry about writing
it in the exact same way. You can write it in
your own handwriting, whether it is in a
calligraphy manner or in a very random
rough manner. It is absolutely fine. So I've written the first line. I'll complete the
entire message. You can observe it carefully. F So we have written the entire message. I hope that you got
an exact idea of how to write a beautiful
message on a brown paper. Now, apart from this, let us add a little color palette
on the bottom portion. It is a very random step. There is no specific way
of using the colors. I'm just using these random
sketch pins that I'm having. So I'll just add few
shades of blue, green, and brown together, and it will basically create some
aesthetics in the entire card. It is not at all compulsory for you to use the same colors. You can experiment, and you can use a different
color palette as well. It is just an element to make the card look a little bit
more attractive and aesthetic. You can just simply
create a little circle initially and then fill in the entire color in
the inner portion. He As you can observe, we are done adding
the color palette. Let me take you a
little bit closer so that you can observe
the details carefully. This is how the entire
message card looks, and we have left some space on the topmost portion where we are going to write
happy birthday. So let us move towards
the next step. I'll take a little portion of white paper that you can
observe right in front of you. And we are going to write the happy birthday message
on it using a black ink. So the reason behind
using a black case, it will give us a nice contrast with the white background. So I'm going to use my
marker from art line. Let me show you that as well. It is having a nice thin tip, and you can use any good
pointed black marker, having a thin tip so that you can write in a
comfortable manner. So now, I'll just
write happy birthday on it using a
simple calligraphy. No need to worry about writing
it in the exact same way. You can write it in
your own handwriting. You can even use simple letters
to write happy birthday. It is absolutely fine. So now, once I'm done
writing the entire message, I'll just highlight a
few letters like why. You can observe a
beautiful contrast of the entire message and the
white background color. Now, we are going to remove
the additional part. So just take your simple scissor and remove the additional
part from the white paper. Make sure that you
make a parallel cut so that you get a
beautiful rectangular tag. So we are done with the happy
birthday message as well. We are going to place it on this little brown paper
on the topmost portion. So for that, what I'm going
to do is I'll be using a little bit of my glue to
place it on the back portion, and then we'll simply
place the message. Now simply take the backside
of the happy birthday tag, use a little bit of glue and simply apply it
on the backside. No need to hurry at all, apply
some good amount of glue. Now spread the glue
using your fingers so that it gets applied to
the entire paper surface, especially the
corners and edges. So I'll just simply use my
finger to apply the glue well. Now, once you find that the glue is applied on the
entire paper surface, we are going to place
it on the brown paper. So there is this
beautiful empty space on the topmost portion. So be very much careful, use your fingers well and apply your tag on the
topmost portion carefully. Leave some space on
the topmost portion. Now, once you have applied the birthday tag on
the topmost portion, use your fingers to
apply some pressure so that the entire paper gets stuck with the background paper. So I hope that you got an exact idea of how
you have to create a beautiful message tag by adding these beautiful
text to the entire tag. Now, we are going to place it on the first base that
we have created. Now, in order to create a
little bit of three defect, what I'm going to
do is I'm going to use my double sided tape. You can observe that
a double sided tape basically is having a
nice thickness in it, so it gives a beautiful three defect to the
entire message. In case you do not have
a double sided tape, it is absolutely fine. You can simply place the
message using a glue. So I'm going to take
two basic pieces of the double sided tape
as you can observe. Now, one by one, we are going to place it on the back side of the little brown paper
message tag that we have created. No need
to hurry at all. Take your time and do
this particular step. And in case you are not
having a double sided tape, just simply apply some glue on the back portion
of the message tag and paste it on the base. Now I'll simply remove the back sticker from
the double sided tape. Now, once we remove
the back sticker, we can simply place the tape on the back portion of
the brown paper. Similarly, I'll
take another piece, place it on the bottom portion, and simply remove
the back sticker. No need to worry at all.
Do this step carefully. Now the entire message tag
will have a little bit of three D effect because it will have a little bit of
space from the base. Simply place the
entire message tag on the first base
that we have created. Try to keep equal space from the top and bottom portion and a little bit more space
from the right inside. Apply a little bit of pressure using your fingers and thumb. Now the message is
completely stuck. I don't know whether
visually you are able to see the
three D effect or not, but it creates a
beautiful effect. It would be visible
when you do it live, so it basically creates a little bit of
space from the base. So we are done adding the text to our beautiful
happy birthday card. Now there is this
beautiful space where we are going to
add a beautiful bouquet. I hope that you enjoyed
the entire process. Now let us move
towards the next part.
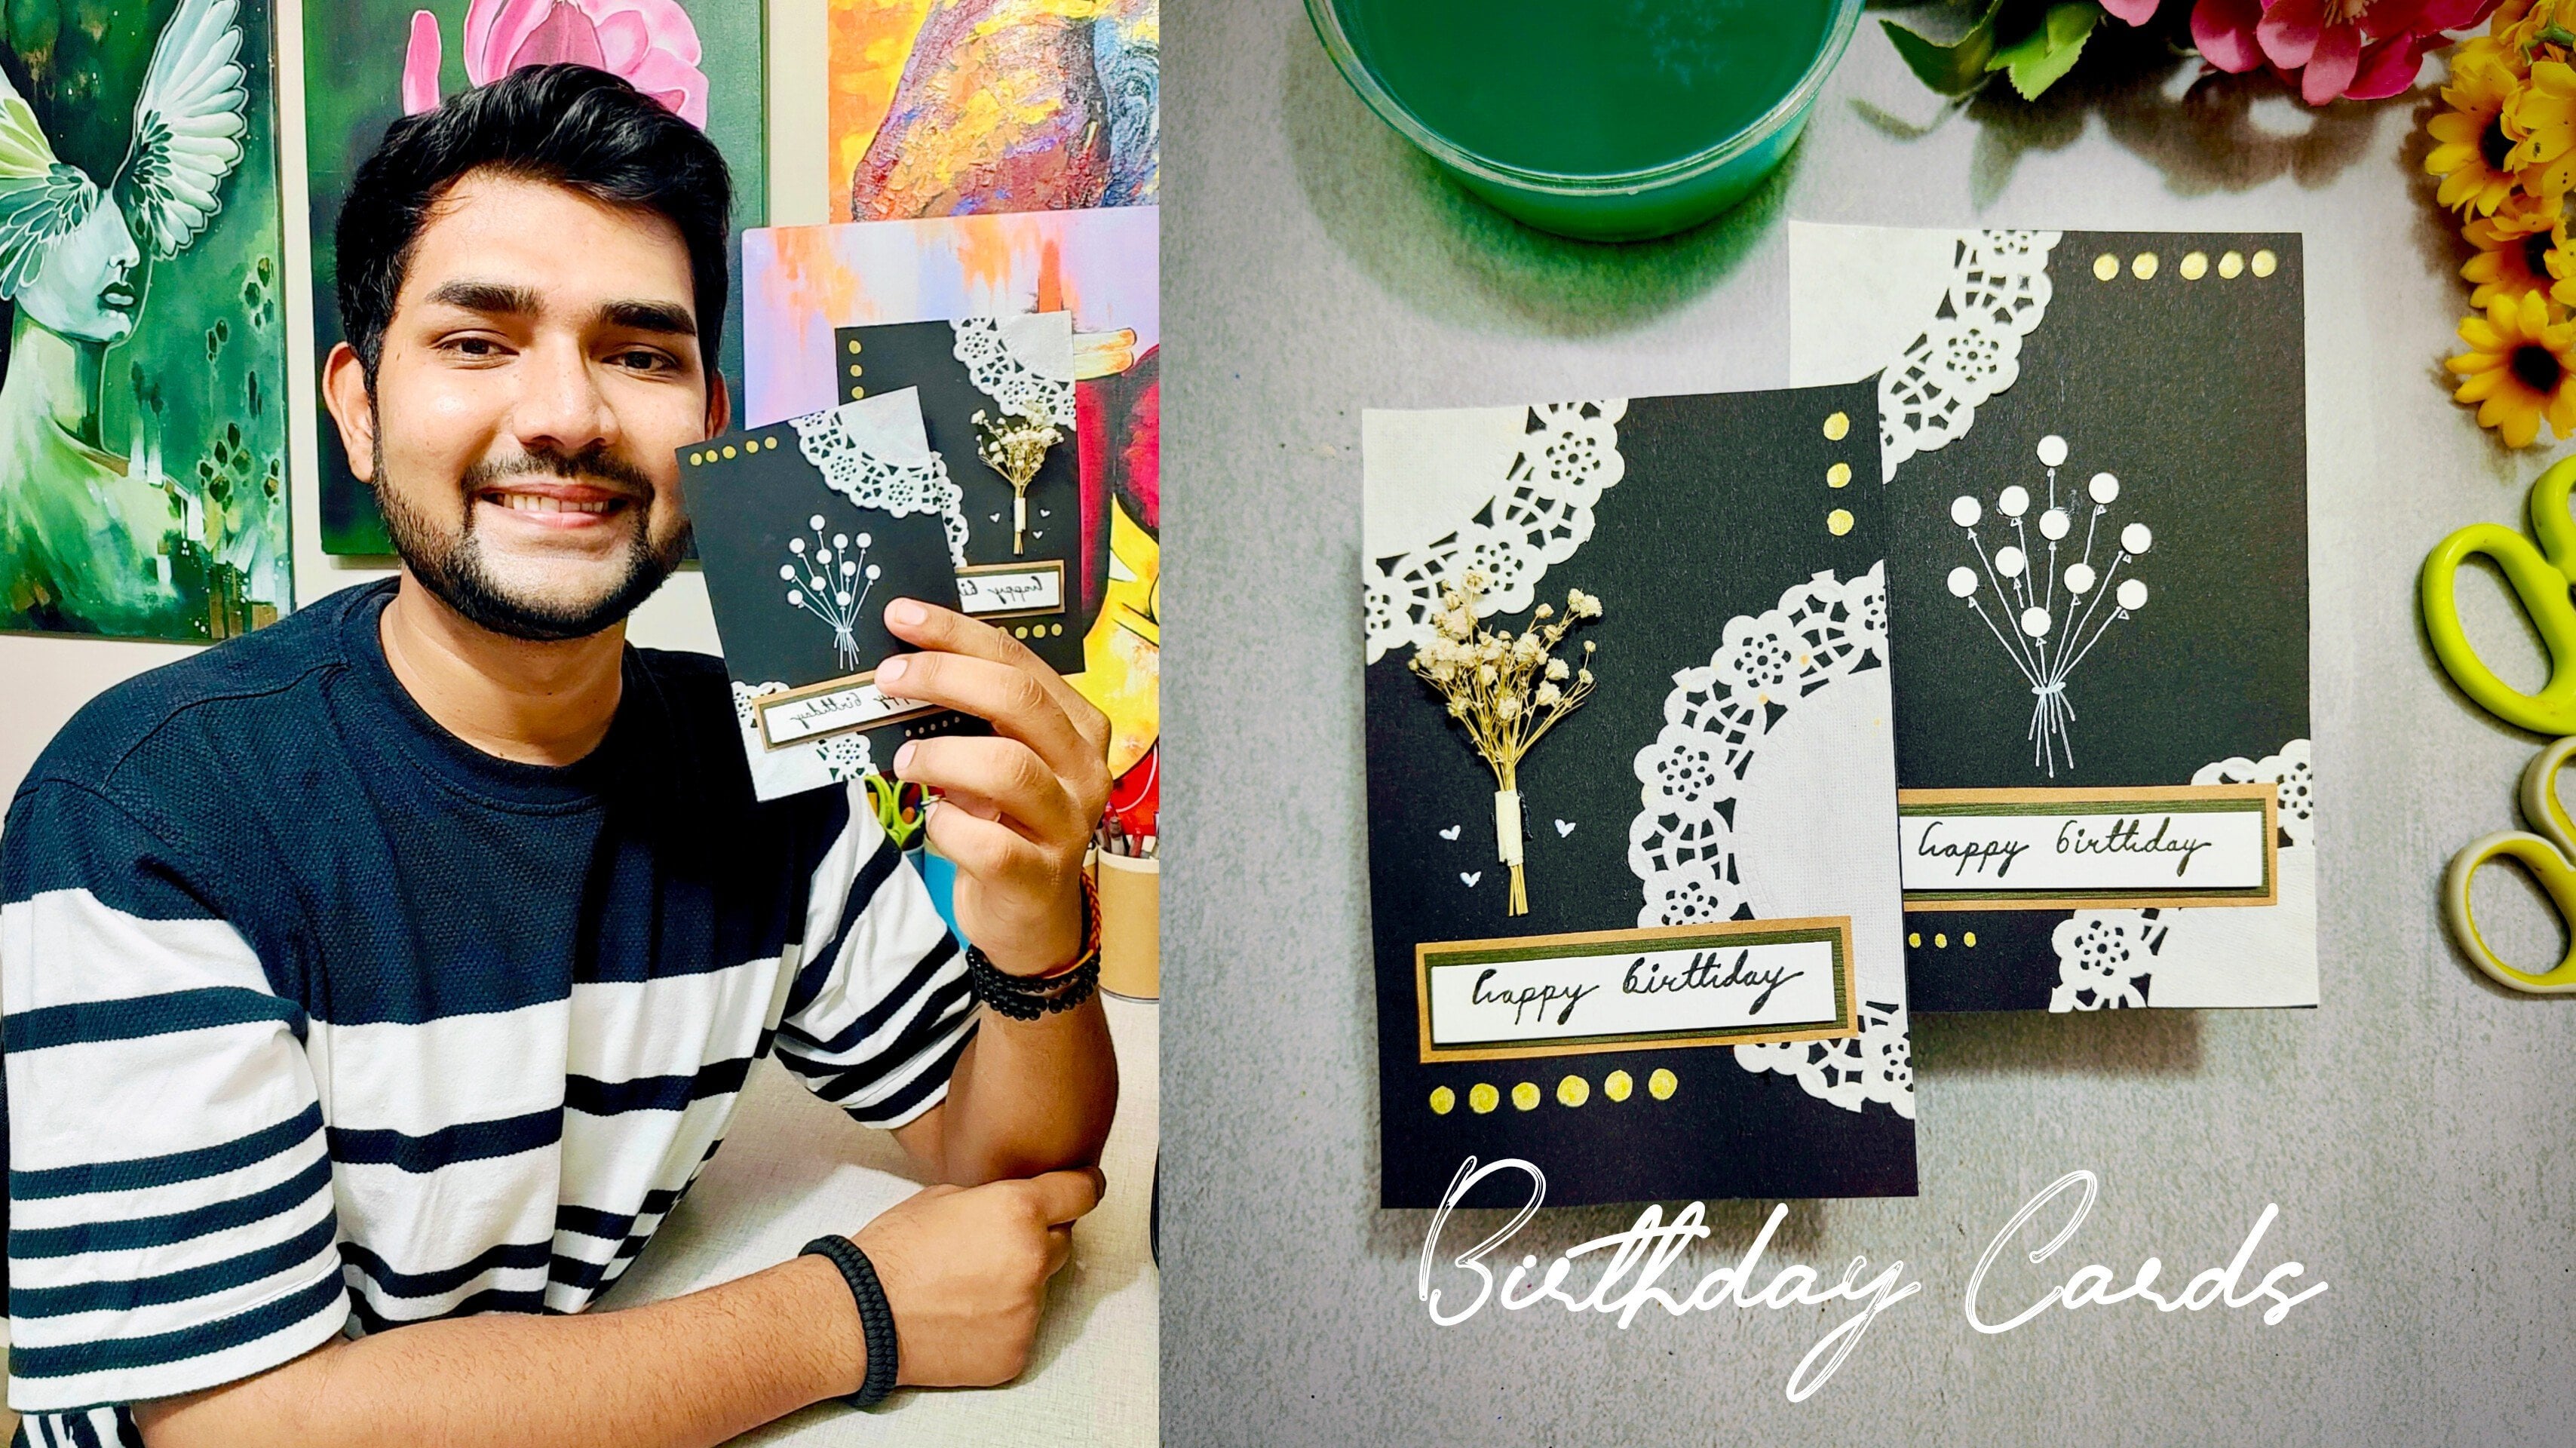
6. Creating a Small Bouquet: Hey, everybody. Now let us
complete the last step, which is creating
a small bouquet. So as you can observe, we
are done with the card base. Now, I'll be just creating a little cone shape using
a simple piece of paper, which is in brown that you can observe is placed
in front of you. So again, from the remaining
piece of brown paper, you can just take out a
little piece of brown paper. I'll take a transparent
elotape and I'll place it on the
desk surface right now. We have to keep the piece of
elutape nearby because it will be used immediately once
we fold the brown paper. Now you can observe
a little piece of brown paper over here, and this step is a
little bit tricky. You just have to convert it into this little cone shape
that you can observe. You just have to
fold the edges and try to convert it
into a cone shape. No need to worry about getting
it in the exact same way. You can explore and experiment. So I'm just using my fingers and I have created this
little cone shape. Now, we are going to take
the piece of sellotape, and we are going to place
it on the bottom portion. So you can observe the
piece of brown paper. I have just opened it up for
you to get an exact idea. So you just have to simply
take the bottom corners and convert it into
this little cone shape. Now, once we have
converted the cone shape, we are going to
place the sellotape on the bottom portion so that the shape will remain
at its own position. Now near the pointed part
in the bottom portion, you just have to hold
the entire cone, take the sellotape using another hand and simply place
it on the bottom portion. Make sure that the surface
gets attached with the sellotape in
a perfect manner so that the cone
will not open up. It is a little bit
tricky, I agree, but you'll somehow figure out to get a beautiful cone shape. Now you can observe there is this irregular part on
the topmost portion. To make it a little bit aesthetic and look a
little bit attractive, we are going to use
our simple scissor, and I'll remove these
additional parts from the topmost portion. You can observe I have
taken out one single part, and I'll just make another. So now you can observe that it looks very similar
to a small bouquet. You can press using your thumb to make the
bouquet a little bit wide. So we are ready
with the bouquet. Now comes my favorite part, which is decorating
the entire bouquet. Before that, let us place it on the white surface of the
base that we have created. Now to place the entire bouquet, we are going to add the double sided tape on the
back portion of the bouquet. Now, again, in case you are not having a double sided tape, you can simply use some glue or sellotape to place the bouquet
on this particular area. So what I'm going to
do is that I'll take a little piece of double
sided tape over here, and I will simply place it on the back surface of
the entire bouquet. You can carefully
observe the position of the bouquet on the white surface where we are going to place it. I'll just take a little piece
of my double sided tape, place it on the back portion,
apply some pressure, remove the back sticker so that you get a nice
sticky surface. Now, simply, I'll just place the bouquet on the
white surface, try to get a beautiful
center position to maintain equal distance from the text
message that we have created and the
edge of the base. There is equal space left on the top and bottom
portion as well. So we are done with
the entire bouquet. Let us decorate it a little bit so that it looks
even more beautiful. So I'll just create a little
bow using a green thread. In case you do not
have a green thread, you can use a little ribbon, as well, but you
have to make sure it is having a less thickness. You can observe this little green bow that we
are going to create. It is a very simple and easy step that you
have to follow. You're going to place
the bow on the bouquet. So just take a green
thread in your hand, flip the thread on both of your fingers and create
these little loops. Now, you have to make a beautiful interlock
between these two loops. So just place them
one over the other. Take one loop and create a
simple knot between them. Now, you have to pull
both the sides equally. There might be an
uneven loop right now, but you can simply adjust
by pulling the threads. Now, once I pull the thread, the bow will get
smaller in size. You can observe that we got a beautiful little
bow over here. Now, there is additional
thread on the bottom portion, so you can just simply remove them using
a simple scissor. I'm going to cut the threads
on the bottom portion. So this is how we get
a beautiful little bow that we are going to
place on the bouquet. The green color also creates a beautiful contrast
with the brown color. Now, in order to place
the bow on the bouquet, we are going to use a
little bit of glue. So I'll just take
a little bit of glue and apply it
on the bouquet. Put a little bit of glue only, no need to apply a lot of glue. I'll simply take a tweezer and place the bow
on the bouquet. You have to give it a little
bit of time to dry so that the bow gets attached
to the bouquet surface. So now we are done
with the first element to decorate the entire bouquet. Let us move towards
the next part, which is adding these
beautiful dried flowers. You can observe these
are beautiful red, pinkish kind of flowers
that you'll find very easily in any
nearby local art store, or you can even use some
natural flowers to add. So we are going to place these beautiful dried flowers
in the entire bouquet, and this is one of my most favorite part
of the entire class. You can simply hold
it using a tweezer or your fingers and just add the entire flowers
in the bouquet. And you can observe how
beautiful the entire bouquet is looking with the message tag that we have created on
the right hand side. I'll just use a red pen, and we are going to create
these little hearts around so that we add this beautiful
element to the white surface. You can add few more hearts according to your convenience, and in case you want to keep it completely white and plain, that is absolutely fine. So you're free to
explore and experiment. So I have added four hearts
on the bottom left corner. Similarly, I'll be adding few on the topmost part as well. So we are almost done adding all the elements and
creating our birthday card. Now, I will simply use a mob brush which is
completely dry and clean to remove any dust
particles if there are on the birthday card and
make it completely clean. You can observe the way we have added these little
craft elements and combine them together to form this beautiful
birthday card that you can attach to any
of your giftings. It is not at all compulsory for you to create a
birthday card only. You can use it as
any different card, giving a different message
according to the occasion. Let me take you a
little bit closer so that you can observe all
the details carefully. I hope that you enjoyed
the entire class and the entire process of creating this beautiful
birthday card. It is not at all
compulsory for you to create the card in
the exact same way. You're free to explore and experiment with the
entire class project. I would be very happy and excited to see all of
your class project. Enjoy the process of creating without worrying
about the output. Now let us move towards
the class conclusion.
7. Class Conclusion: Hey, everybody, you're most welcome to the class conclusion. I hope that you enjoyed
the entire class and got to learn something
new and creative. One thing that I always tell my students is to maintain
an art journal in which you can practice on a regular basis and keep
a record of your artwork. I will be very excited to see
all of your class projects, so do not forget them to add
into the project gallery. It would be really
great if you leave a review for the entire class as it encourages me a lot and my class can reach many
more students like you. No need to worry
about the output, enjoy the process of
creating and no need to worry about creating the
card in the exact same way. You're free to explode
and experiment. At the end, I would like to say, keep learning, keep practicing. Thank you so much for joining the class and happy painting.
 Rutvik Patel, Artist and Instructor