Transcripts
1. Introduction: Creating content can be
incredibly fulfilling. But let's be real editing can sometimes feel like it's
eating up all of our time. I have been in the
editing game for about eight years now and boy, I have learned a thing or
21 of the biggest lessons. Editing might take more time
than you initially expected, but it doesn't have
to be the case. Hi, my name is Selvog. I'm a professional video editor and motion graphics designer. I have edited projects
spanning social media videos, brand animations,
explainer videos, promotional campaigns, and Youtube videos
for my own channel. Over the years, I have
honed my process to become more efficient and dare I
say, even more enjoyable. Sure, crafting that perfect edit still requires significant
time investment, but trust me, it's always
worth it In the end. That said, efficiency is
the name of the game. With the dash of patience and
sprinkle of organization, you will be amazed
at how much time you can save while
editing in videos. In this class, we
are diving into the integrity of trimming down your video editing
time and turning you into an editing wizard while
keeping all things fun.
2. Class Orientation: Before we dive into the class, remember that this
class does not teach you how to edit on Premier Pro or any other particular software that will take Arsenas
and a separate class. Rather, this class will teach
you how to edit faster. Regardless of the
software that you use, you can take the same techniques
that I will teach you in this class and use them
in any other software, be Davis or Final Cut Pro. I'm taking Premier
Pro as an example. Because I use Premier Pro to
edit on day to day basis, you can use the same steps to whichever application you are currently using to
edit your videos. You can use the same
files that I will provide you and follow
me to edit this video, or you can create your
project using your own files. I would encourage you to share your experience after using
all of these techniques. How much time does it take you to edit a particular video? Now, which of these
techniques did you implement in your
editing workflow? How much time did it save you? Share this in the
class project and start conversation
with fellow editors. Let's get into the class and
make your faster editor.
3. Planning and Folder Structure: Editing starts right after
the production stage, and the first thing
we do is plan and organize our files before
producing a video. I write down my script with all the visuals that I will
need to film at this stage. I also write down the things I need while editing the videos. For example, any stock
footage or of template that I will need or an animation that I will need to
add to the video. This will improve my flow
and make me more productive. When I get into
the editing stage, I've created a
folder template for every time I create
any kind of video. So I have all the files here, but they're quite messy. And I don't know
which one is which. I have this template here. I'm going to duplicate it. And I will show
you what's inside in this folder in a minute. But first I will
rename this folder. I name all of my files
with a number first and the name of the video that I'm
creating for this video, it's going to be number 64 and the name is going
to be Bean Took up. I'm also going to write
Skillshare Project, because this is not going
to go on my Youtube videos, It's just an example
video to show you my editing process now
that I have renamed it. Let's see what's inside. I have a few folders
already named here. There is an Role
B, Roll graphics, music photos, exports,
project files, voiceover, sound, defects,
and aerial footage. You can create your own
folder template according to your most used type of assets role is something that
you are seeing right now, videos in which I am directly talking to the
camera or I'm rating something or I am interviewing someone and someone else
is talking to the camera. That all goes into the roll folder for this particular video
that we are creating. We are not going to need role because we are
just going to create 1 minute trailer type video which will have a
voiceover on top. I'm going to delete
this roll folder because we do not need it. Then we have a B roll folder. This is not a talking head
or an interview video. It's a kind of a video that
you can use as a slow mo, aesthetic shot of a
place or an object that you're describing in your
A roll or voiceover. It should be used to give
your audience more context of the things you're
talking about on your A roll or voiceover. In this project, we are mostly
going to use the B roll. So let's go into my main folder, which is not organized, and I'm going to sort out
all of the B roll videos and paste them into
our B roll folder. Then I also have
voiceover for this video. I'm going to move that also
into the voiceover folder. Then I have music
and sound effects that will also go into
their respective folders. Another important tip that
I want to share with you is related to that folder that you keep going back to
during a project. It might be your
current project folder or an export folder. You don't need to
keep manually handing it down every time you need it, just grab that folder
and drop it in the File Explorer
or Finder side bar. Now, every time you want to open that project you are
currently working on, it's right there on
the left side bar. And when you're done
with that project you don't need it anymore, right click on it
in the side bar and the space is open for
your next project. Go ahead and create your
own folder structure, template and drop the files that you need in this
project accordingly. In the next lesson, we are opening up our editing software.
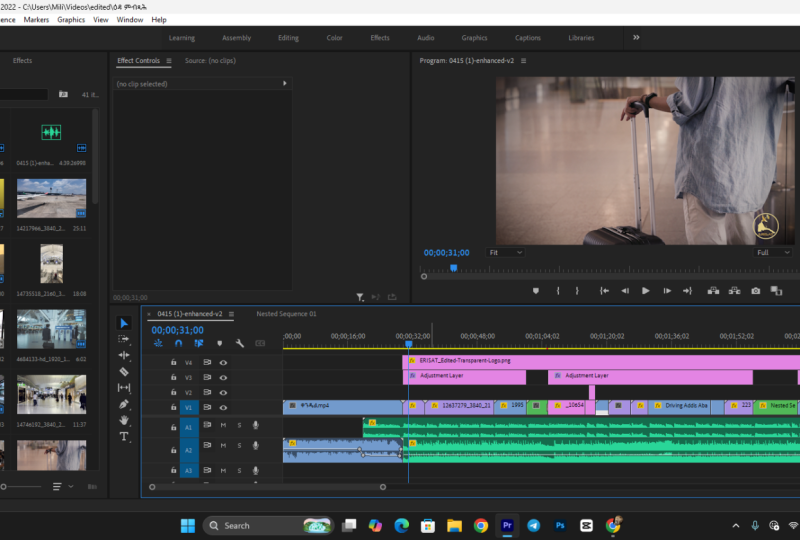
4. Workspace Automation: Sequence Settings: In the project files folder, you can see there is a Premier pro project already copied. I'm going to rename
this to Bean to Cup. And if you need this
exact folder template, you can download it in the
resources section below. Let's open this project. Now you can see here that this project
has already been created, so usually what we do is go over here and click
on the new sequence, and waste a few minutes every time you're
editing a new video. But Premier Pro has this new
feature where you can select the project template and you can actually make your
own template here. If I just go to social
media template project here and created, you will see there are so
many video templates here. What I'm going to do is I'm just going to select all of these. I only make Youtube videos
and Instagram videos. I'm going to click
on Instagram real, this Youtube ad
Universal Save Zone, and I'm going to delete
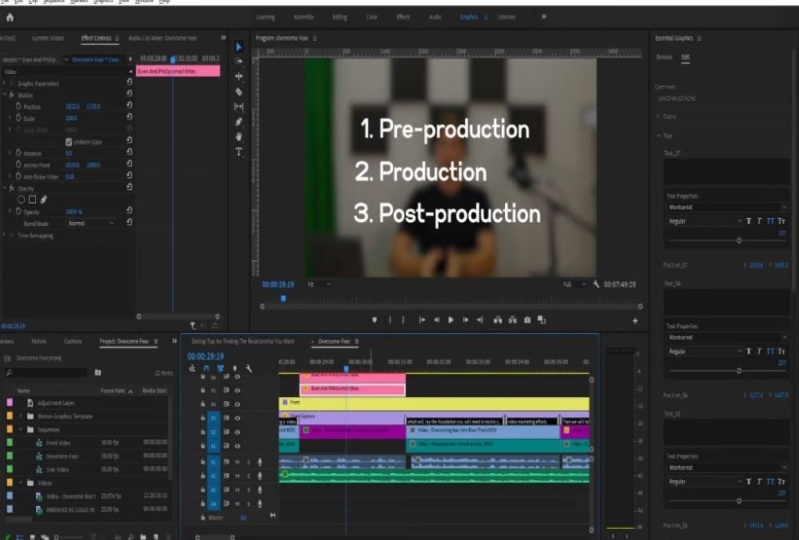
everything else. If you open up Youtube
ad Universal Safe Zone, you can just delete this.
This is a safe zone. This is the demo video that I
had created for this class. And you can see the set up is looking a
little bit different. Now, I'm just going to
make in and out point. I'll show you what this
template is about. Now I am on this template page and you can see all of
the gray lines here. If I want to use any
title or text here, I can just use all of these
places so that I will know that my text is not getting hidden by any of
the Youtube features. It's the same thing
for Instagram reel. I'll just go to this
Instagram reel. I'm just going to delete these. Then I'm going to change
my Workspace to Vertical, in and out points
and put it on here. When I play this, you can
just see there are lines here and here where it is showing that this will
be cut off on the phone. Then there are these
like comment share and the audio placeholders here. You will get your
user name and all, and then above you will have all the other placeholders
in the middle. If I just turn off the captions, you can see where all
you can put your titles. I'm encouraging you to create a template anywhere
you can because it's essential to create the
system wherever you can so that your editing process
will have a smooth flow. A way to create a
system is to recognize and notice the things that you're doing over
and over again, and try to find out if there is any way that you can
automate that process.
5. Workspace Automation: Custom Export Settings: One thing that helps when
you're editing is if you have filmed
everything by yourself, You have an idea of
which take is good and what you want to
use in the end video. But when I'm editing someone
else's footage, for example, if I have taken a freelance gig or editing some other
client's video, then I will have to go through the whole footage and see
which takes are good. And I'll have to sort out
everything and think from a perspective of what exactly the client wants
from the end video, let's import all
the files that we have collected into the project. A simple shortcut to import
your file is the control I. We will dive into the keyboard shortcuts later in this class, but for now just
remember control I. After this stage,
you can go ahead and select your in and out
points from your B role. If you have any interview
or talking ahead, you can select the best
cuts from them also. And you can sort them so that it will be easy
process for you. When you get to the edit stage, the last thing to automate
is Export settings. I'll go to the export page
now and show you what I mean. There are lots of settings
to customize here, but the most important one that we need to focus
on is the preset. You can create custom
export settings presets. And save in Premier Pro
for any kind of video, be it Instagram reels
or Youtube videos. I usually start with
the default preset loaded in the software while
creating my custom preset, I'm going to go with
the Matt Source adaptive high bit rate. Now you might ask, why not use the presets that are already
provided in here. Well, these presets are not
foolproof for social media. They were initially created for industry standard cameras. We need something
compatible to prevent social media platforms from compressing our files Further, let's roll down the video window and take these two
boxes that say render at maximum depth
and use render quality. Now we need to go to the
bitrate settings for Instagram. I keep this at seven, since Instagram is mostly
oriented towards smartphone. But for Youtube right now, I'm going to make it tell. Now this one is optional, but if you use close captions
in your videos often, then you can turn on this
close captions toggle. Just make sure that
you are in the project that has close captions before creating this preset or this option will
be logged off. Then all we need to do is go to this and click on, say, preset. Rename it in a way that will
be easily identified by you.
6. Customizing your Keyboard: Keyboard shortcuts enable
you to work faster, more efficiently, and
with increased precision, thereby saving you time and
improving your productivity. In this lesson, we will go over some of my favorite
keyboard shortcuts, how to customize them
in your own software, and how to import
the shortcuts file that I have provided you. Let's open the keyboard
customization window by going to Adobe Premier Pro and clicking Keyboard
Shortcuts on Windows. You can do this by going to Edit and clicking on
keyboard shortcuts. The default shortcut for this is Control Out and
K. But you don't need to remember this
because I'm going to set up even easier shortcut to open this window
from time to time. When I started using shortcuts, at first I was using the Default Premier
Pro shortcut file. But over time I
realized that I can set my frequently used shortcut on the left side of the keyboard so I don't have to move my hand as much reaching out the keys and my right hand doesn't have to leave the
mouse while editing. I've already set up my custom keyboard shortcuts preset here, but right now I'm going to
go to the default premier pro shortcut file
and then I'll show you how you can
customize your own. One of my most favorite
keyboard shortcut is Q and E, currently Q and are
set up to ripple trim, previous edit and ripple
trim the next edit, but I want to be the
ripple trim next edit. What I'm going to do
is I'm just going to write down ripple trim, next edit to Playhead, and I'm going to drag this over E. And I'm just going
to remove from here. Now that we have W open, I want to use this
as a cut tool. I do not have to move to
Cut tool and then click on the timeline to cut something that
will be too much work. So what I'm going to do is
go here and type add edit. Does the keyboard
shortcut command for cutting something
on the timeline? And then I'm just going to drag on to W. Let me show
you how it works. I'm going to go to this
demo that we edited before. If I click you now,
it will delete all of the previous footage
that is there in this clip. If I just go a little ahead
and then if I click on E, then it will delete all of the next footage that
is from this playhead, the most important
shortcut that I love. Instead of just going here or using C and then
clicking here. I don't like the shortcut.
It's too much work. So I'm just going to go
back to my Select Tool and I'm going to hit W. I
have a cut on my timeline. I'm going to go to my
keyboard shortcuts again, and I'm going to make it
my own custom keyboard. And hit okay so that I
can go through all of these with you and show
you how you can use these. Another shortcut that
I used to love on the premier pro default
shortcut file is JK L, but it's on the right
side of my hand. I have customized it
to go on my left side. I have made them into 123. When you click three
or L, the video plays. And if you click it, it
will play in two x speed. And if you click it again, it
will play in four X speed, and so on and so forth. If you want to pause the video, the two will act as a Space bar, and one will act as
reverse or backward. And just like three,
you can click it again, and the playback will
go backwards, 2x4x8 x. These shortcuts
come in handy when you're scrubbing through
a huge timeline. Now let's go back to our coffee video and
I'm going to B roll. I have all of this footage. What I need to do is go
through them one by one, select the important points. I'm going to find
the one that has, that's named Green
cherry picking. I'll just click on this. I can use three to scrub
through it faster. I think I like the
starting part where this person is picking
up cherries from backside Premier pro
default shortcut is I and but I have customized them for 4.5
since they were open. So I'm going to hit four here. And go ahead and I like
this much of footage, so I'm going to hit five. If you want your footage
to be on the timeline, you will usually hit comma so that it will
get into your timeline. But I have programmed it for six and now this footage
is on a timeline. It's huge for our composition. I'm going to hit
Command and so it will resize it to frame width. If I hit A, the Track Select Ripple
Edit Tool will be enabled. And I can just click on File and all the files ahead of this file
will be selected and I can move them ahead and create a little
bit of gap so that I can put some B roll or some other files in
here while editing. These are the most
important shortcut that I use on a daily basis. You already know control, which is to import
files to this. Instead of right clicking here
and then clicking Import, you can just click Control and you will be able
to import your footage. The last one is not
really shortcut, but something that I do quite often when I need to
duplicate some layers, I'll just click on
this file and move it while holding option
and then leave it. This will duplicate the
layer in some other place. It's the same layer
that you can see, same footage but it's
on another place. Let me show you how you
can use the file that I have shared with you
in this project. You have to go to
keyboard shortcuts again, just as we went before. I'm going to click on and I'm going to use some weird name, which will not appear
somewhere else on my computer. So that I will be able to identify where this
preset is getting saved. Right now, I'm just
going to dance. The spelling is wrong.
Dance. Okay. I'll save this file and then I will go to my finder
window, right Dances. I'll go to this Mac. And
here I see there's dances. I right click on
it and I'm going to click on Show
enclosing folder. I have custom keyboard shortcuts that I am using in
Premier Pro here. So I'm going to delete both
of these that we created. If I go to this folder, I have my shortcut file here. I'm going to copy it, paste it in the folder
that we were using. I'm going to go to
Premier Pro again. I have my keyboard shortcut
file installed here, which you can use
it for yourself. I've shared the
keyboard shortcut files for Premier Pro and Avengers of. You can access them in the resources section
of this class.
7. My Workflow: My editing process starts with one or two big files of just a role or an
interview video. What I will do first is colgrate the whole video and edit
audio modulation first, and then I will start
cutting up the video. This is an example footage
from my recent Youtube video. I'll just drag it
into the timeline and then I will start
colgrading the whole video. This will save you
quite a lot of time. Rather than cut
the footage first, and then you have to
individually color grade all of the footage or copy paste the effects
from one to another. If I get into cutting the videos and just
forget color grading, then there's another option
that I would suggest to you do is use an
adjustment layer. If you're going to use
an adjustment layer, just keep in mind that the lighting conditions of all the clips
should be the same. If you use the same
adjustment layer in different lighting situation, then your clips
will not look good. Let's go back to our
Cope video project. Since I'm going to
use voice over here, I will drag my voiceover
file into the timeline. And then I'm going to go to Essential Audio and
correct it a little bit. I'm using a podcast
preset here as a base and then manually
correcting some parameters. Once that's all
done, I'm going to remove all the pauses,
the arms, and Ars, and wherever I am
taking a breath, this will make my
edit sound crisp. Premier Pro and
Davinci resolve has a feature to accelerate
this process. It's called text based editing. What you need to do is
go to text and then trans select your audio files
and clickon transcribe. You can go to this icon to
customize the settings, but the default settings
work quite well for me, This will take a minute. But once it's done, you can
select pauses or bad takes. And then you can
just hit Delete, and the whole video or audio will be cut
from your time line. No more scrubbing through
the whole timeline. To delete, delete pause, This feature helps you when
you're editing a big project. It will reduce your editing
time and you can use that time into more
valuable creative processes like color grading. Although I have streamlined
all the tasks in this stage, the editing process
is a bit chaotic. So do not hesitate to go back and forth to edit
if that's needed.
8. Bonus Tips: Here are a few
important tips that will make your editing
more enjoyable. Get yourself a large monitor. I mean, this might seem
like a no brainer, but it makes a world
of a difference. Editing is just way more enjoyable when you have
ample screen realistic. It's like night and day when I'm editing on my 13 inch Macbook. Compared to sitting
in my home office with a spacious 24 inch display. If you're using just one
desktop for all of your apps, then you're missing out on some serious productivity gains. Whether you're on
Windows or Mac, you can create a virtual desktop to keep your space organized. On a Mac, they call them
spaces. It's a piece of cake. Just initiate mission
control and add another desktop in the top
right corner. Now why do this? Well, you can easily switch
between spaces on Mac. Use three fingers to swipe
between them on your trackpad. Or if you prefer shortcuts, hit control left or
right arrow keys. This virtual desktop
thing is a game changer. You can have Premier
Pro in one space and your Script in
motion app in another. It's like having multiple
screen without extra hardware.
9. Thank You!: Congratulations, you have made it to the end of the class. I hope you keep using these
techniques in your edits and improve each time if you made
any video using these tips, don't forget to share
it in the project. I would love to see
what you have created and it will inspire new
students joining this class. I will make more classes
like this in the future. So check out my Skillshare
profile and follow me on Youtube and Instagram for behind the scenes
and more updates. And as I've already
told you before, in the resources section, I have included the
keyboard shortcuts for Premier Pro and solve both. A PDF containing
all the description of all the shortcuts and
being took up footage file. Take this with you and
make amazing content. Wishing you all the best, I will see you in
another class soon.
 Snehal Wagh, Filmmaker