Transcripts
1. INTRODUCTION: Hello, fellow artist,
I'm Neha Poddar, I'm an artist and a
surface pattern designer, and also a digital creator. I have immense love
for Posca markers. I think it is quite evident looking at
the wall behind me. Today's class is all
about Posca markers. Started my artistic journey with Posca markers and I have
never looked back since. So why Posca markers? Well, let me tell
you these markers are like a dream for an artist. The colors are vivid, an opaque, and gives an unmatched matt illustration
look to our painting. In this class, I
will share tips and techniques on how to make the most out of your Posca markers. Yes, I'm back with another
Posca markers class, and this is going to be a very, very sweet and delicious class. This is the first class in the series of sweet
little things, and we are going to paint
this vibrant looking cupcake. So, fellow artists, I can't wait to see the wonderful projects that you all are
going to come up with at the end of this class. So grab your Posca
markers and let's start.
2. Paint a Cupcake Part 1: So let's start with
taping down our paper. So the reason that we are
taping our paper because I'm going to use acrylic color and which we'll have
some water in it. So I don't want that
while applying, my paper it gets a little bent. So that's why we're
taping the paper. But in case you're using
your colors directly, you can just skip this step. Today we're going to start
with this delicious artwork and you can either mix this with a little bit of
red, blue, and white. Uh, more blue and
more lots of white. And let me try and
mix it for you, also. So I have this purple
and white color. So and I'm going to
mix this over here. I do my posca trials and
all the mixing over here. I'm putting it in a
tiny bit of water. So let's add a bit more purple. So add your purple
little by little as we don't want
to go overboard. This looks pretty interesting, I think. What do you say? This looks n, I think we
can go ahead with this one. So now let me just
switch to a flat brush. Let's start. So I tend to paint from left to right as
they are shorter strokes and just try to fill
in each and every gap and don't forget to just
do all your corners. So this step of painting
the background with acrylic color gives us
a smooth background, and also it preps the paper, and Posca markers they
flow smoothly on it. We'll be starting with
this pastal green. Okay. I'm using this after a while, so just make sure
that you shake well, and then try it. So this will be one of
our primary colors. And then as you can see, we have a secondary we have one more primary
color which is pink. Primary color. So this is like something which
is being used more. So again, let's
test out the pink. Well it's so pretty. So these two are our main primary elements
and colors on this. Secondary colors that we have
in this is this light pink, where we're using
it for the dots, and the second layer
of the highlighting. So this is also from
the pastel collection. So shake well and just
try it out. There. Now, I think, as you can see, this mostly our second w, we can even give the
brown over here, the brown color, the sprinkle and the chocolates
in our painting. So this is like,
very pop colors. And now let's come
to a highlights one. So for highlight, you can you can go for see I've
taken a cream base also. Okay. It's actually there
for our brown parts, but in case you don't
want to go for a cream, you can go for a white also. So my cream color is str, so let's not go over it, and then you can use white. Okay, I think it will
not come over here. So what I'll do is
I'll just put some brown or you also put some pink. Then later I'll put
some cream on it. We have our bits
where you can just outline some part or even highlight it
with a deeper color. So you can use a
deeper brown for this or you can go further. Black. So our main elements
is quite complimentary, and you can see like they are really giving the pop colors, and then the highlights are coming either
from the same color, and we're just getting lighter. And then we've just
added a little bit of brown for the chocolate
part and the sprinkles. Okay. So now let's
start with our drawing. So now let's start, and we're going to start
with this pastel green. And I've kept this plastic sheet of palette beside me where
I can just test the colors. And in case I want to just
prime it again, I can. So what we'll do is we'll
start with this green color. So when we mark our outlines, it just, you know, it
becomes a bit more crisp. So just remember, because we
have given a color behind, what will happen is
it'll dull color a bit. We short strokes to fill it. So just whenever you feel, you need a little bit
of, just go ahead. After priming, can you
see the color has come out a bit more
opaque and thicker? So fill in with
very short strokes. So this part is a
bit more, deeper. So I'll just go ahead and just give this part one more round. So they both will look the same. There. So in case we have
to come back to this color again,
we'll just come back. But till the timing, let's leave it to dry, and we can now move
on to the pink color, which is over here and
shake your color well. Just try it on the side.
Oops, can you see? Like, I've not used
this pink in a while, and there's a blob,
but that's okay. That's part and parcel
of using Posca markers. First, I'm just
giving it outline. I'll just lay down the
color and just remember, this is the layer, which will have the most
number of colors on it, right? So we might just have to
come back to it again. For this, I a three M posca
but since the space is a big, you can go ahead and you
can also use five M one. There's a lot of
pigment over here. I'm just trying to pick some pigment over
here on the pen, and don't let this one go waste. So we might just have to come back to this color
again so that, you know, this color
just a bit more. As you can see with
the green one, it's actually quite solid. We really don't have
to touch it again. But I can see the
little, you know, some bits of the purple
peeking from this pink. So that is why we
go at it again. But we'll do that once
it is completely dry. Okay, so let it just dry. Meanwhile, this is also drying. So what we'll do is since
both the colors are drying, what I want to do is, we'll just fill in the brown
color till then. Let me just prime it up. And So just remember, since this color is, in fact, is on top
of both of these. It's below this, but so
it will come a little. You know, it will
not over par this, but it will overlap
this over here. You can overlap also because
the brown part is dripping. So you can just give it
more curve and make it, like, look a bit more neater. At this point. So now we have to wait for
all these colors to dry, and then we'll come back and do a second
layer of the pink. So I'm still waiting
for our colors to dry. And we cannot do even right now when it feels
like even slightly, it's like wet because otherwise, we'll activate this green again, and we don't want to do that, so we'll wait for it
to get completely dry. Then only we can put
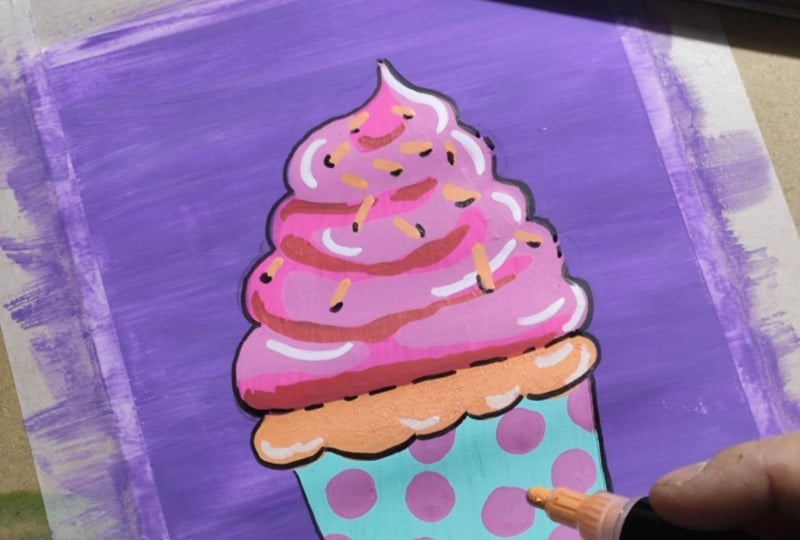
the polka dots on it. So now all the layers are dried, and I'll just put a second
layer of the pink again. So this one looks
pretty done now. Okay. So the second layer is now really popping
up and you can see, it's not very
transparent as it was. So now let us give this some
time to get completely dry. And meanwhile, we can just move on to the spots over here. And for that, we're going to
use this light pastal pink. So remember, you
can use any color. But we're going ahead with
a theme that we're doing. So So just come up with the small polka dots. Can you see like, right
now, there's a deep color, and we are putting up a
lighter color on top of it, and it's still coming
out really fine. So give those half or
the incompletes also, we'll be doing a
line a little later. M So some of the dots, they look a little transparent. So let's just wait
for them to dry, and then we'll do
another quote on them. So there, as you can see, like, these are also
quite popping up a bit. So maybe like few of these, I can just go back again
once it dries off.
3. Paint Cupcake Part 2: So now our artwork
is completely dry. And what we'll do is, we'll just mark out the places where we're going to
do the light pings. So these places, okay? So these are the
parts which is more, you know, on the upper
part of the this cupcake. Okay. So like, we're
not going to touch the below lays since it
is going in a swirl. Okay, so we're just trying to put this highlight where it's catching
more light, okay? So, and these are mostly like, towards, like, it's coming
from top right part. So that is why this part
is completely highlighted, and then some parts
where it is also coming. So we're just going to put
this highlight over there. So you can either mark
it like on your own, or you can just
eyeball where you feel like more light
is going to come. So just And this
is a below part, so, uh, there's a little
less lighting over here. So the highlight
is a little less. So now this is completely dry. So what we are going to do is, we'll again use the same pink, and we're just going
for a lighter pink over here to give the highlight. And I'll just come back
to this one which I felt, like required a little bit
more color or just saturation. Yes. So now, I think you
cannot make it out, but I can. So So a right part, the light is coming
from this part. So this part is completely lit except for this last tiny bit where the light is
unable to reach. I know it's not making
met sense right now, but just trust the process
as every bit will just help us into forming the ultimate and the final artwork
that we are going for. So just keep using
small strokes. As with small strokes, we get an even background, and it doesn't get streaky. Again, as you can
see, we have put another lighter layer
on top of a deeper lay. So that is the beauty of Posca markers that you can lay
as many times as you want. So I think we're done
with this pink part. And now we have to wait
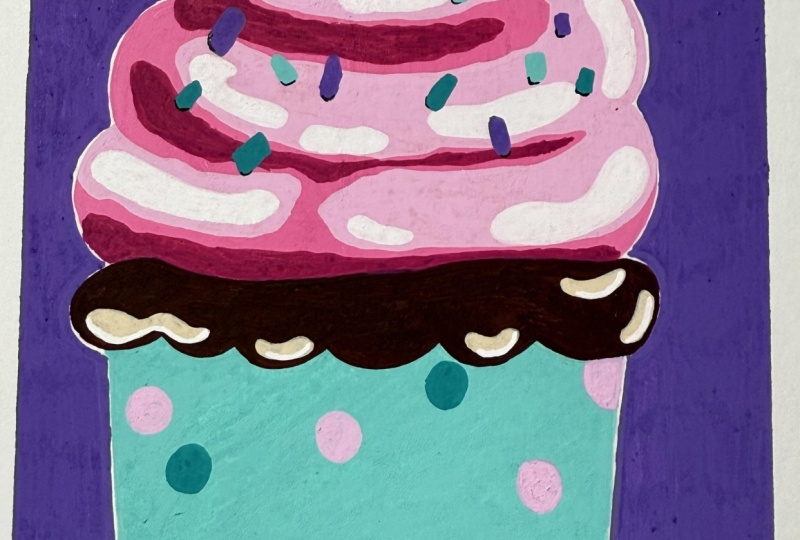
again for this to get dry, and then we'll come back to the final highlights for this one. So our brown part
is actually done. So what I want to
do is, I'll just go ahead and give some
highlight over here. So, you know, just
give some flakes. So we're just giving
the highlight. Okay. So we're just giving
the highlight on the browns. In case you have a beige or a cream color, you can
go ahead and do that. So now, the painting
is completely dry, and we come to the final
highlights of this cupcake. And we'll give this where the
light is, you know, coming. So especially these parts. Since they have this curve also. So So for this, you can even use a five M
nib of your Posca marker. Okay? Because they'll just come
like just a slightly curvy. But right now, I'm
just using my three M. So now I would also see,
as you can see, you know, it's still looking a little bit not, you know, incomplete. That is because we have
given all the highlights, but we have not given
any of the shadows. So now let's work on giving
the shadows to this cupcake. So what we are going to use
is this deep color pink. Okay, this is Fia color
and Posca Makers. And we're trying to give
shadows in some places, especially where we know that
the light is not reaching. You can even give this white
highlight a little later. First, you can give
the shadow part also. So this part is not
getting any light. And therefore, you know, we're just putting some more. I've just primed the pen again. Oh. We'll just wait for
this to get dry, and then we'll put on the
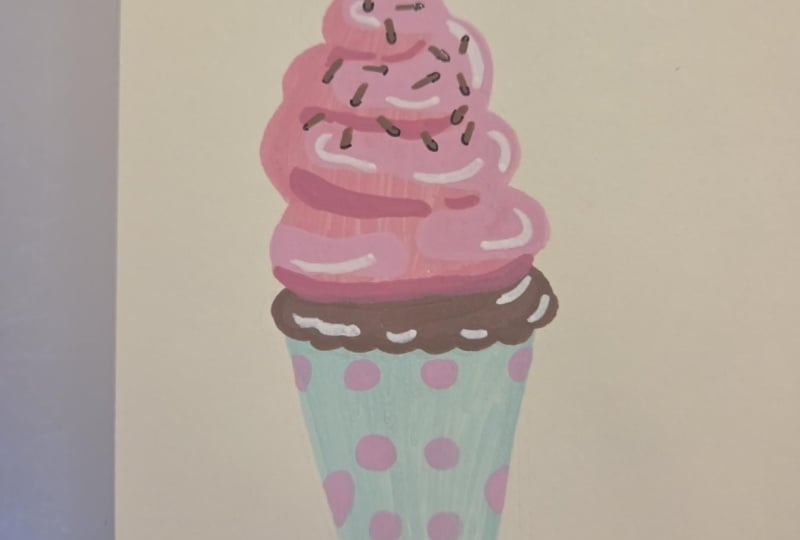
sprinkles on top of this. So now, let's come to our
final part and where we are just going to put some sprinkles all
over the cupcake. So it's mostly on the top part, so we'll not come
like quite low. So just go for it in
different directions. So I'm just putting
these very randomly, so they can be a little
small, a little big. Then that's it. We'll just
put it on the top part. Now we'll just wait for
it to get completely dry. Meanwhile, what we can
do is if you want, our artwork is right
now also it's complete. In case you want to just
make it a little pop, then you can just
go ahead and do some outline with a black color. But I think it's looking
pretty nice like this, only, so let us leave it
with a no outline. And what I'll do is, I'll just give some shadows to the brown. Lets just dry completely. And then what we'll
do we just give a little dimension to
the sprinkles over here, and it'll just make it
look more beautiful, okay? So this is also the
time where you feel if you want to do some changes, just go ahead and just do those. So yeah, the browns
are pretty much done. So what I want to do
is now just give very, very small shadows, okay? See the light sources
coming from here, so I'm just trying
to give you can also do this with
deeper color of brown. So that just it gives a
little bit of dimension. So just make sure that the
artwork is completely dry. Otherwise, you'll ruin if you're doing it with a, you
know, fine liner. Can you just see how it's just making these
sprinkles pop a bit? These are just very
small things to do, but I think we've covered
all the sprinkles. Now it's just giving a
little bit more depth. In case you want,
you can do a bit, on the other layers also, but that's not required. So we're not doing an
outline right now. In case you want it to
have a sticker effect, you can just go ahead and
give a white all around. And then you can just scan it and use it
for stickers also. So, you can go
ahead and do that, and that will also make it
come up a little bit more. But yeah, I think
we're done with this. So let me just take
off the paper. And let's see the final outcome. So we messed up a
little bit over here. And this is the first
time that I'm using this paper tape and hence, you know, I've not tried it. That's why it's
come out like this. But no problem. Let me just, you know, take our white color and make
sure your white is, like, not like pink because
we had used it over pink. So just use it on the
sides and then just come So it will just lighten it out
and make it look good. In case I want, I will just
come back to it again also. Almost gone. There. So I hope you like this
one. We'll come back again. And you can see how many
layers we have done over here. It must be closed to
like four or five. But that's the beauty
of Posca markers, and it looks so pop
as you can see. In case you want, you can go ahead and do some
graffitis over here, and, you know, just to
make it look more fun. So now, I'll see you
in the next class.
 Neha Poddar (The Doodle Keeper), The Doodle Keeper