Transcripts
1. learn to draw a realistic big cat in watercolour pencils: Hi My lovely creatives. My name is Jane and I'm an artist and illustrator
from the Netherlands, and I'm based in the UK. In today's course, I
am going to teach you how to make drawing and
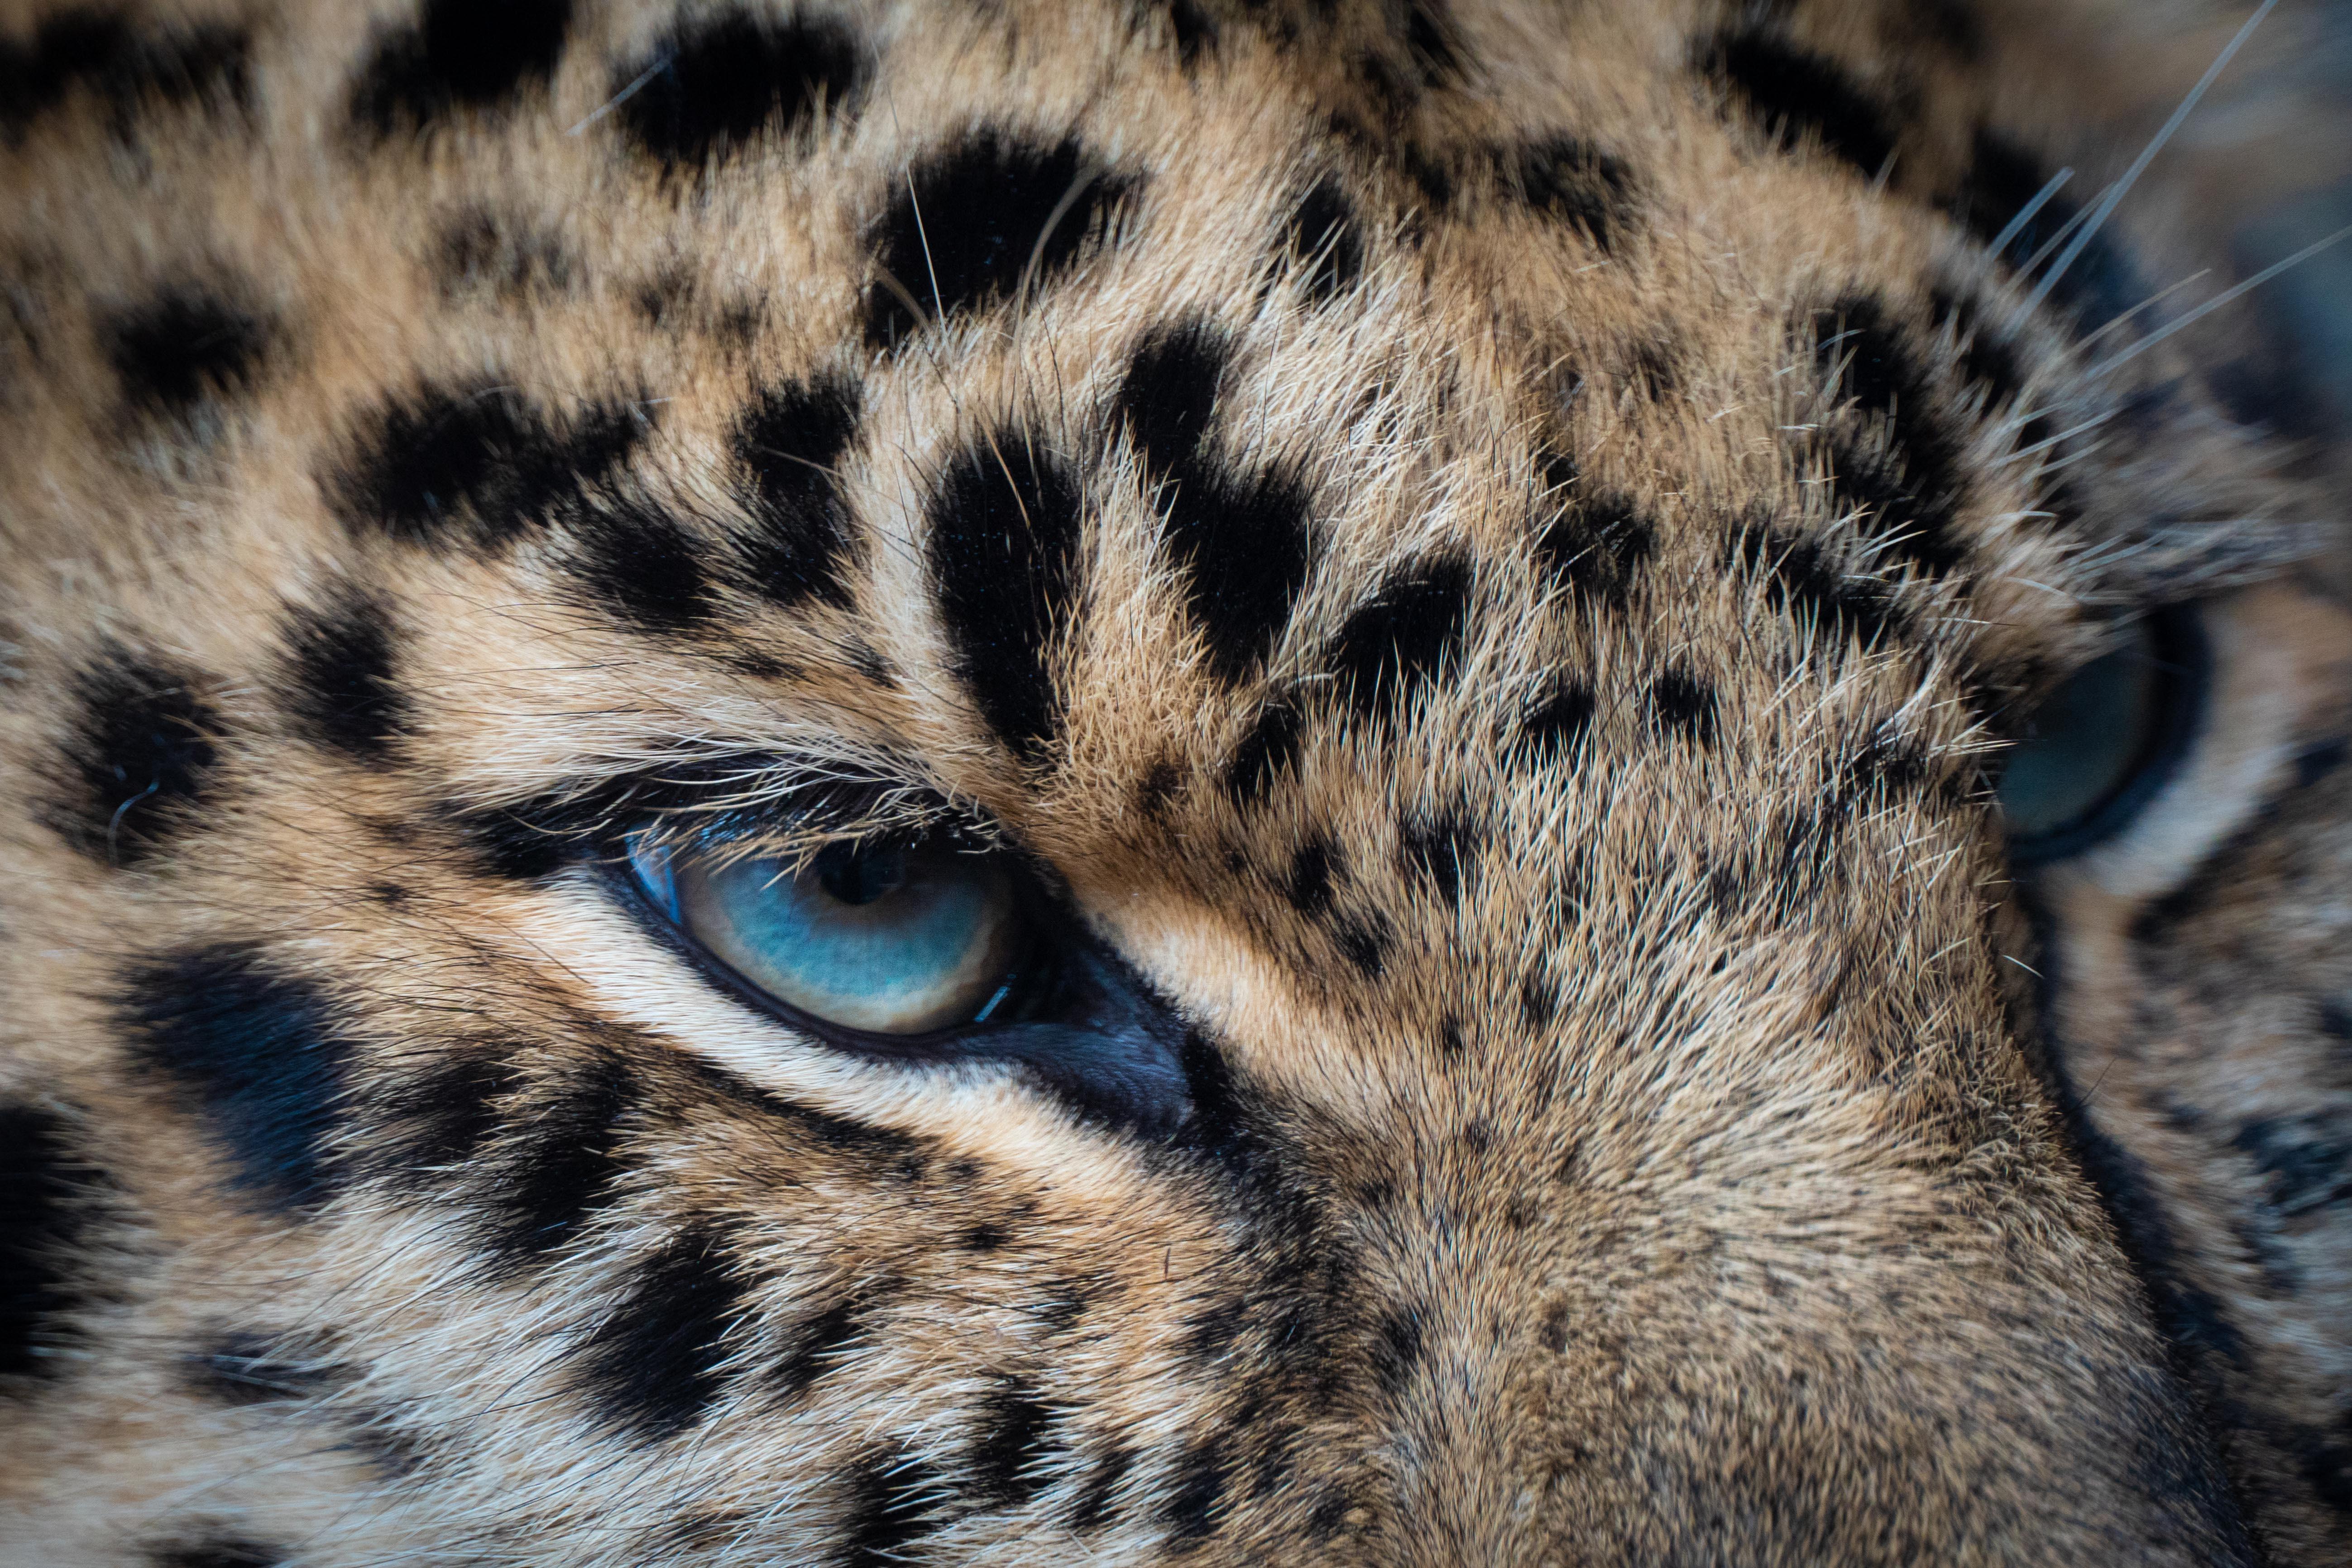
watercolor pencils. We're going to draw this picture
when large get-together. And we're going to go
for it all the way from sketch to a finished,
completed illustration. I absolutely love
drawing animals and I love using
watercolor pencils. I really loved how
much detail you can add in your illustrations
by using this medium. And I really wanted
to give you some of my enthusiasm as well and
teach you how to use this. Maybe in my
illustrations have been used range of
different products. I've illustrated the number
of children's books, and my illustrations
have been used for pattern designs and
products as well. You can find me on Instagram
and making some using some. I have a YouTube
channel as well. Thank you so much
for following along. I really look forward to
seeing all your creations, so make sure you
share them with me. I'll give you
feedback if she runs. And I really look
forward to seeing all the illustrations
to hear me. Thank you so much for
being here today. I'll see you next class.
2. What materials do you need for today's drawing class: Good morning everyone. In today's course, I will teach you how to
draw the picture of this big cats in watercolor pencils and
normal color pencils. The beauty about
watercolor pencils is that he can make an
underlayer painting, which speeds up the process significantly and it
is a lot of fun to do. So the materials
that you need for today's class is a paper I am using free on the
GSM watercolor paper because I will be using some
water for the first layer. If you use any other
Fick drawing paper that works well as well. My paper is cold pressed, which means it has
a little bit of tooth to it, a bit of grid. But you can use hot pressed
smooth paper as well. This is completely
up to you today. We start our drawing with a sketch pencil and an
eraser to set up our sketch. I will be using two sets
of watercolor pencils. The first one is Bolt mere, premiere art materials,
watercolor pencils. It comes to the paintbrush
and it is called a cheap set that I've
put here at the works, which is an art shop in the UK, is a very cheap sets and I
would highly recommend it, but it's perfect for when
you get started and just to try out the art material
for watercolors. The second set is a watercolor pencils
sets from costs art, which is also an art
shop here in the UK. It's also very affordable, but a much better quality. So if you're looking for
affordable art materials, I would recommend these sooner than the first
set that I'm using, but I want it to be
complete until you all the materials
that I'm using today, I'm using my fabric cost
or polychrome most pencils to add details at the
end of the painting. This is optional
because you can also use your watercolor
pencils to add details. And I'm using a white gel
pen to add some details, some white highlights all the way at the end
of the picture. This is also optional. You don't need to do
it. I just think it elevates your picture to add
some highlights at the end. You will also need a
paintbrush of some kind and some water and a cloth
to wipe your brush them. Needs for any specific
materials here is to create the underpainting and spread out still watercolor
pencil in the beginning. So grep, use all the materials and
then let's get started.
3. Let's start a sketch together: I'm starting my sketch with an HB sketch pencil and I
haven't eraser at hand as well. I'm sketching very
light and it's really important to
just take your time and spend some time looking at
the picture just to see what their proportions are and what the placing of the
ice looks like. As you can see, I'm
sketching freestyle. I'm not using a grid or any other methods to make
my sketching more precise. And the reason I'm doing
that is simply because I really enjoy
freestyle drawing. If you're new to drawing, you might find it
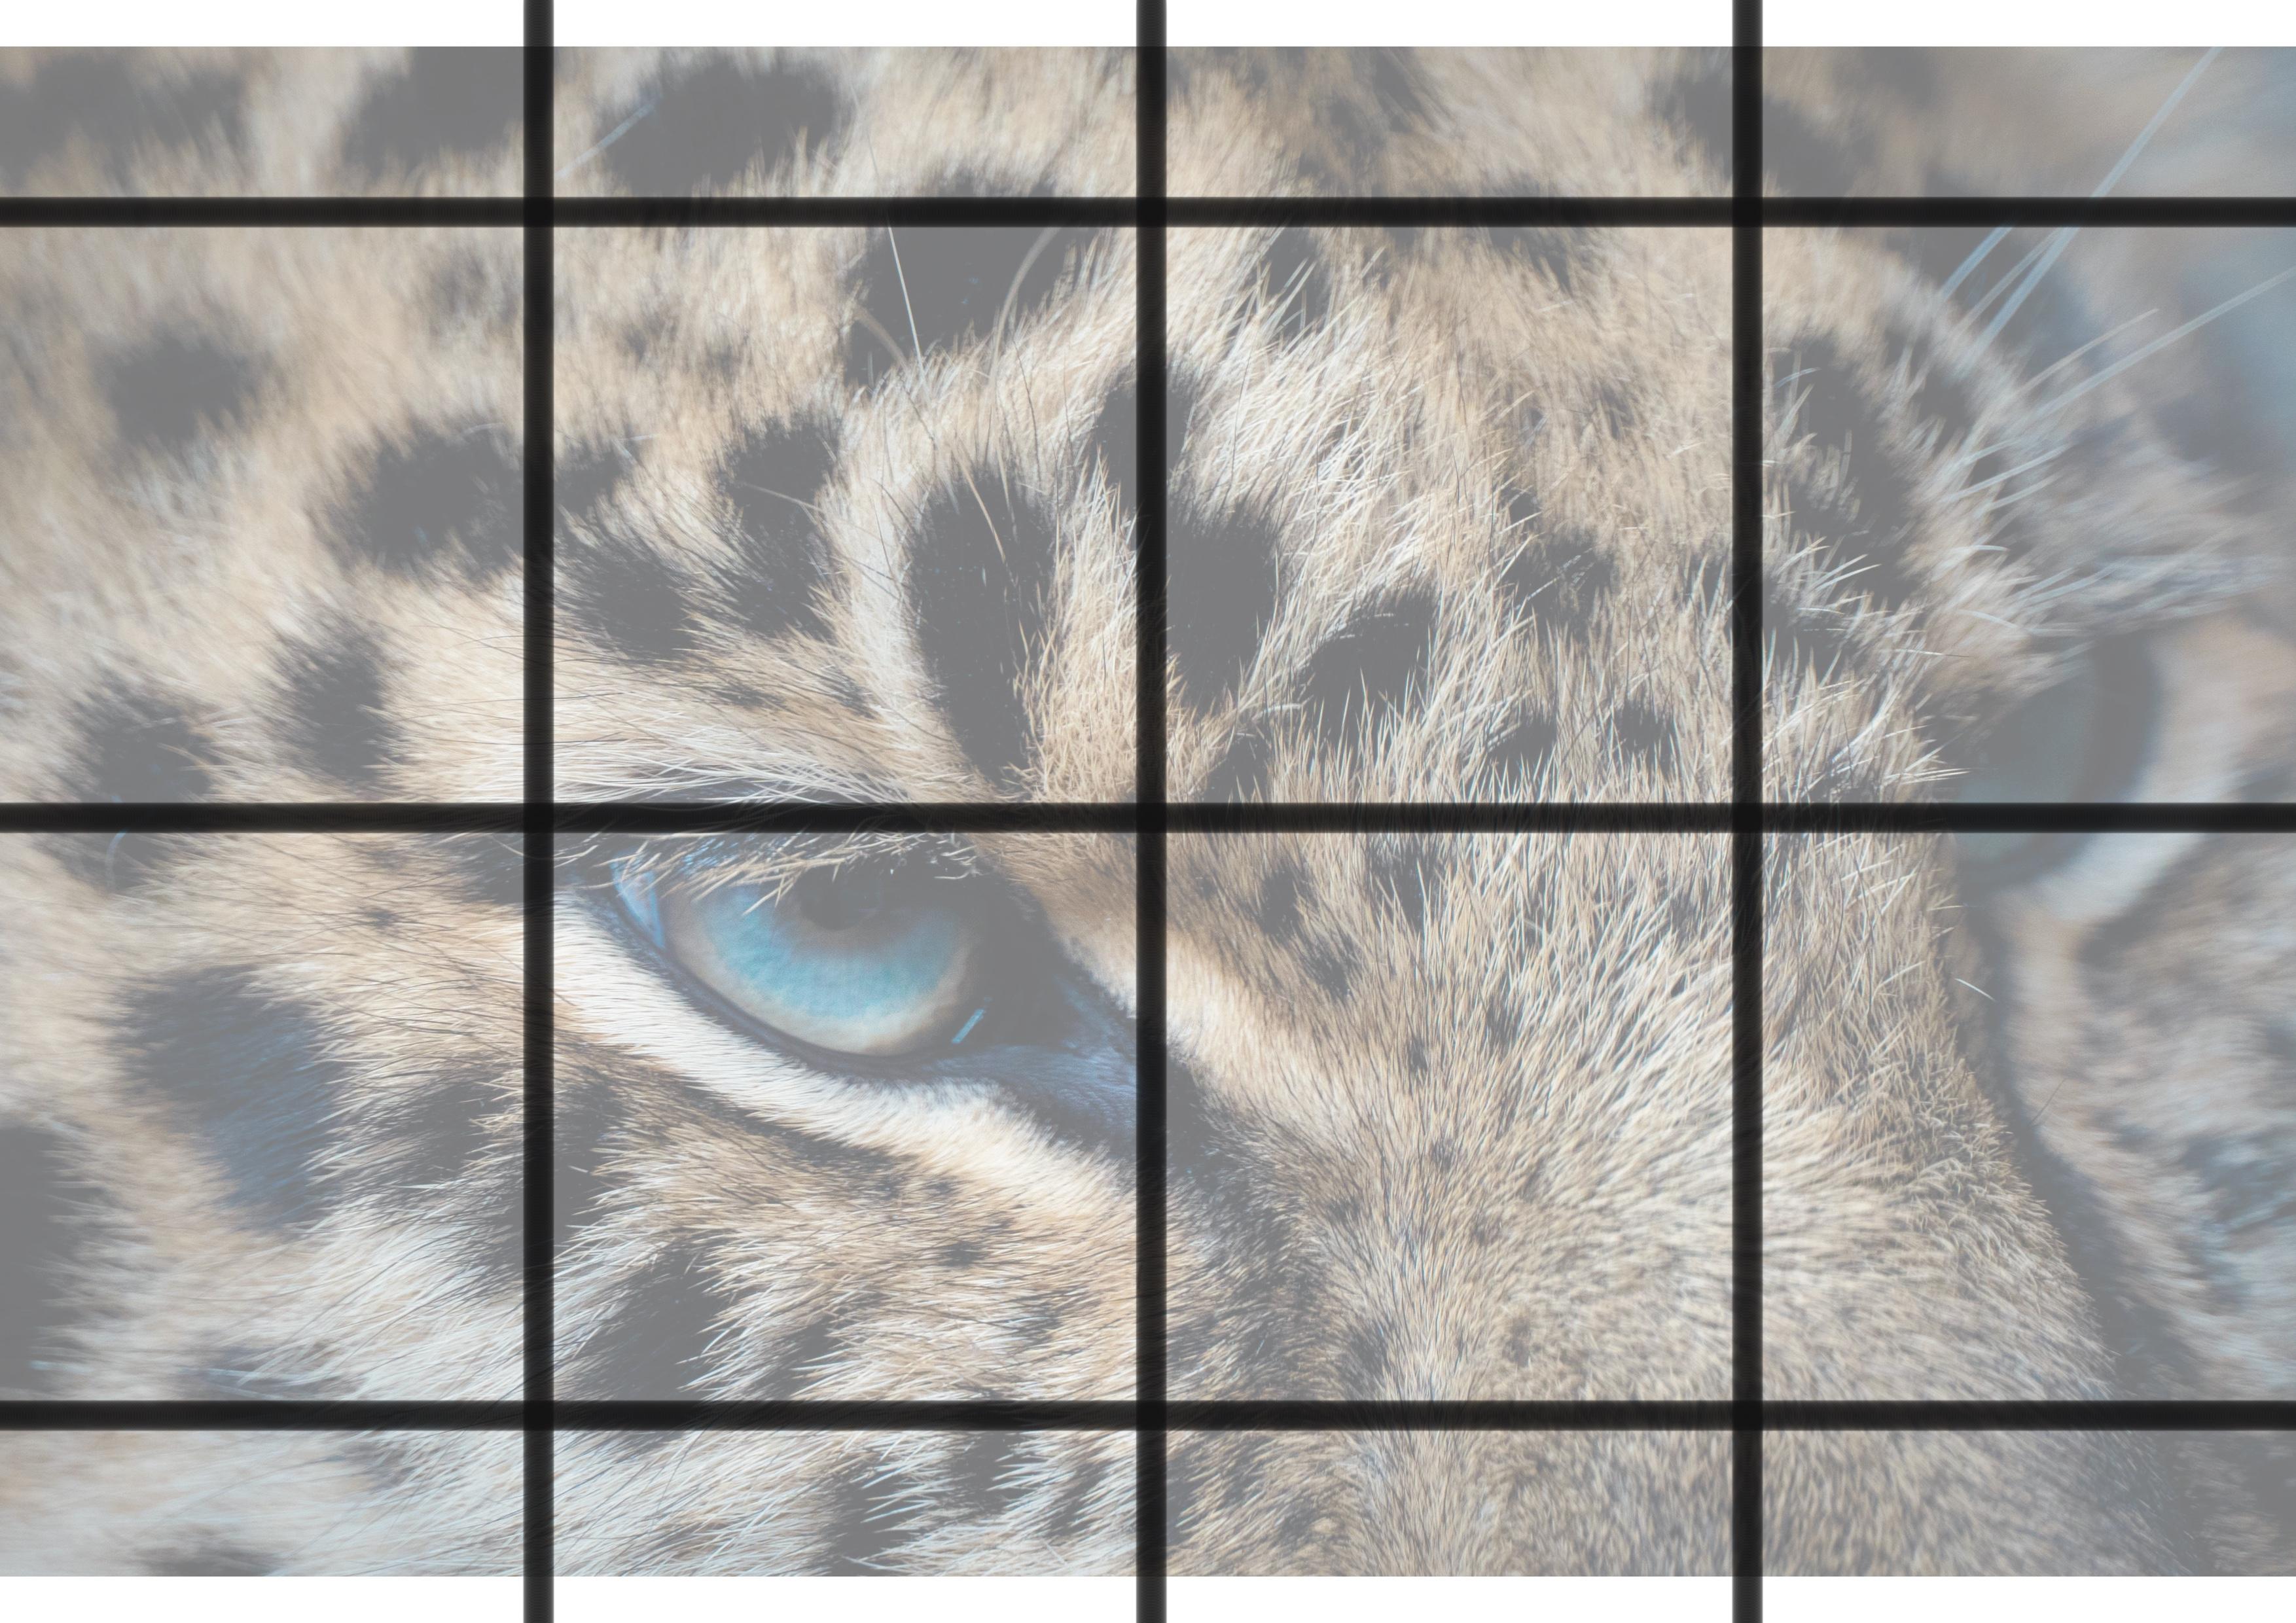
easier to use a quit. So I've created this
picture that you can download and use to
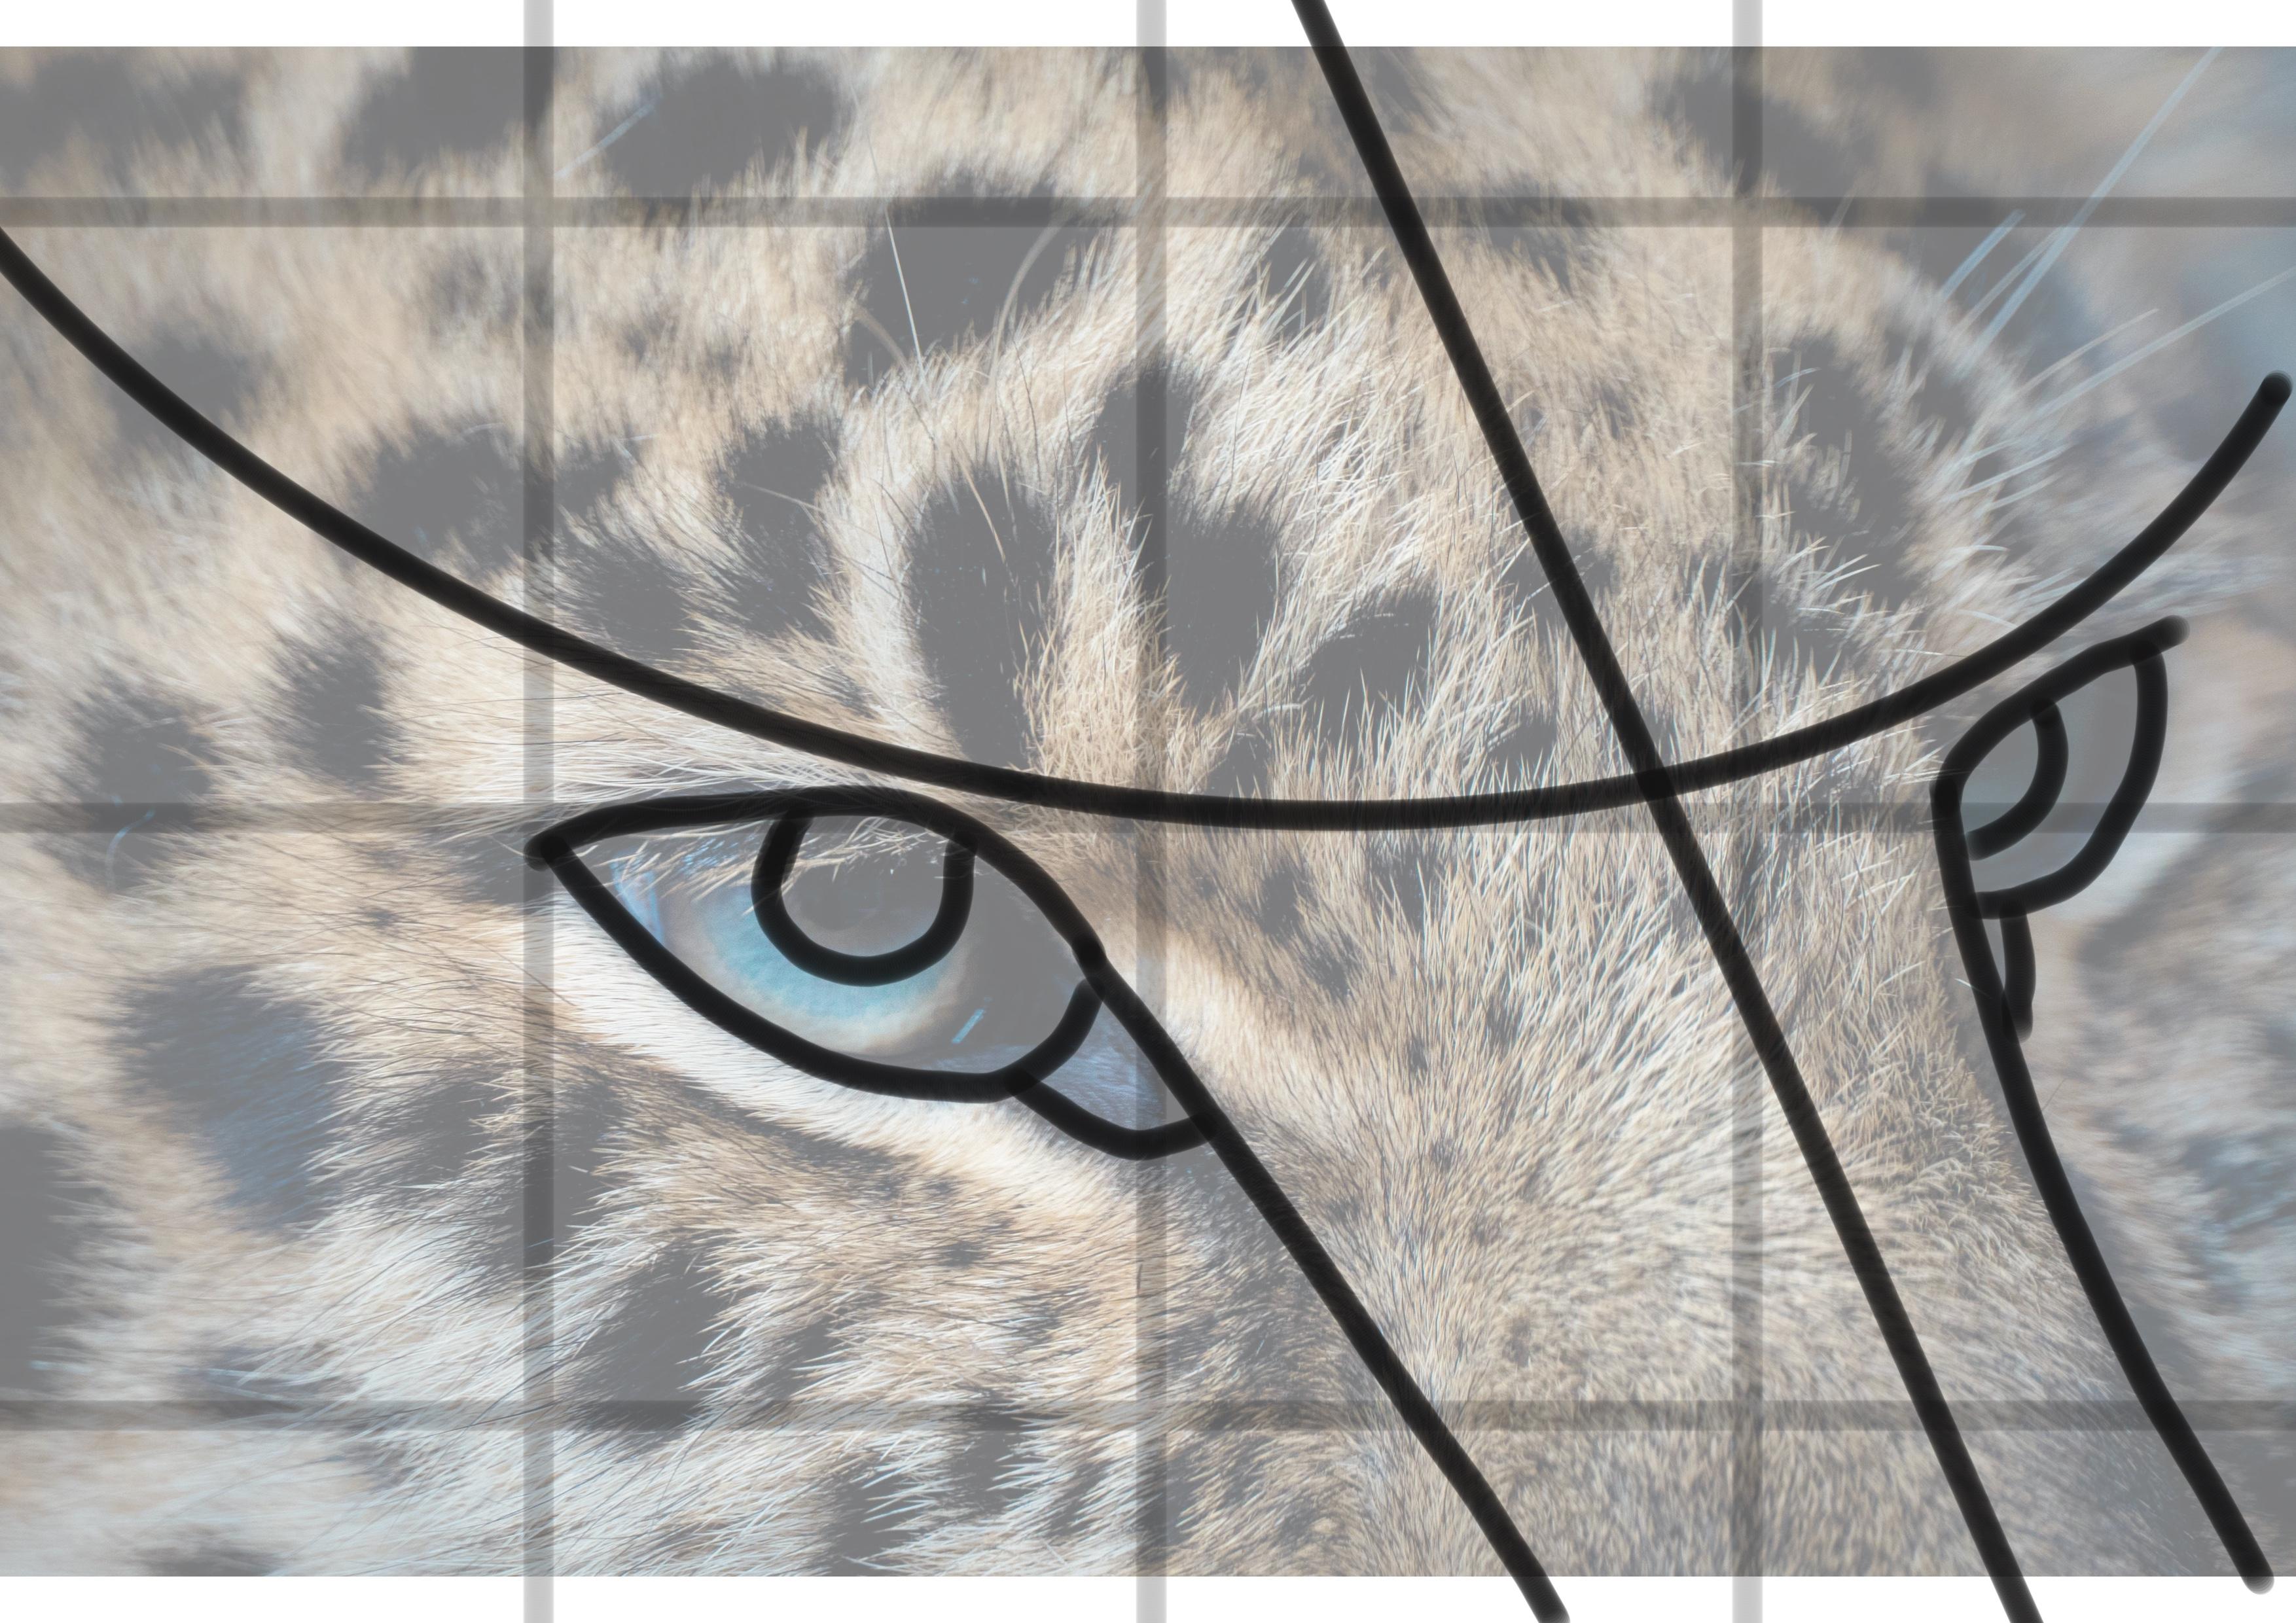
set up your sketch. I also created a second
picture where you can see the main shapes of the photo and the main
shapes of this Get face. There's a bit of a curve
for the foreheads, straight line from the
forehead to the nose. And then the shape of the eyes, which connects to the
side of the nose. And if the picture would
zoom out a little bit, you can see the
actual nostril shapes of the cat connecting to those lines that are coming
from the ice downwards. In reality, it took me about 20 minutes to
set up this sketch, but I will speed up
my video a little bit because the lines are really light and it's a little
bit hard to see. You can see a took my time to really look at how big the shape of the eyes we're going to be. My paper is a little bit larger than my
reference pictures. I really wanted to
make sure I've filled the paper completely
in that the eyes are on the right placing. So I didn't want the
face to be won't keep it the eyes to be
in the right place. There either is a bit further backwards, is a bit smaller. I that is closest to us, is a little bit larger. You can see I've put a few
help lines down just to make sure that the eyes are
in the right place. They tree sketch very lightly. You can always go darker, but it's a bit harder to bring
your sketchbook to light. I do also add in the main
spots and the directions of the hair a little
bit just to help me plan my drawing a
little bit further. And a big part of the sketching
process is visualizing. Where are you going to
go with your drawing? Later on when you're
adding color to it, you start to visualize in your mind's eye what your
picture is going to look like. You can see that the I that is further back at the moment
that it's too high. And later on in my sketching
process, I realized this. It already felt a bit
off at this stage, but later on I realize it and I raise it and change to placing. If you feel like
you're drawing is off, I would recommend figuring
out first why it doesn't feel right and change it before
you carry on using color. Because as soon as you
start using color, all the main shapes
are sort of locked in place or they're
much more permanent. And you want to feel good about the proportions of your
drawing before you continue. Otherwise, you're going to
run into problems later on. You might not be able to fix. So it's okay to just really take your time
for your sketch. As I said, I took about 20
minutes to set up my sketch. If you take too much longer,
That's absolutely fine. Take your time and
just enjoy it. Maybe step away for a moment
if you're not quite sure, and then look back a
few minutes later, can make a cup of tea. Then when you come
back, you look at your drawing with fresh eyes. With a new perspective. You might notice some things take you didn't notice before. So I wonder if if you're
watching this video, if you notice that the further
back if it is too high, and when I change it shortly, if suddenly start falling into place and it feels moral rights. And the reason that
a place of I too high is because I did not
use that grid methods. If you do use the grades, then it's much easier to see if things are at
the right height. My papers also quite large, which makes it a bit harder to see the proportions
immediately. Sometimes I have to step
back because I'm using my pencil to judge
the height of that. I just erasing it because a sketch lines
I can easily do that. And here I'm changing
the proportions. I also made the eye a
little bit smaller. So you can see on this, Ainsley feels much better,
much more natural. Eyes hidden behind
lots of eyelashes and for much smaller in proportion to the eye
that is closer to us. So you can see a mapping
out the main shapes, including those of the jaguars, black spots because they are very prominent
in the drawing. And I want to make
sure that I sort of placed them roughly
in the right places. Put into spots nearby
places is not so important. You're very welcome to
play around with that and it's more or less
spots to the drawing. You can also change
this into a tiger or just make it a yellow and make
it look more like a lion. It's completely up to you. I decided to follow the
photo fairly detail. For the last part
of this sketch, I have slowed down my video
again to the normal speech. He can see how long it actually takes me to
make the strokes. I've also used my eraser to lighten my drawing a little bit. And this is because I
don't want the sketch to show who my color drawing too much lightens my drawing and I'm ready to start
going with color. So grab yourself,
your colored pencils, your watercolor pencils,
and let's get started.
4. Start your first layer of watercolour pencil: Let's start adding some
color to our drawing. I've finished my sketch and I
would recommend that you're happy with your sketch before
you start adding color. If you need to do a little
bit more tinkering or raising or change some of
the shapes to their first. Because once you
start adding color, it's much more difficult
to make changes to the proportions are the shapes of objects in your drawing. I would also recommend to take an eraser and lightly go
over your sketch first, take all the extra graphite
off the paper you don't need, your sketch needs to be light. And we're going
over it with color. It doesn't matter if you see your sketch food a little bit, but you want your light below
your lines to be light. It's a bit of a
tongue twister there. I'm using my watercolor pencils and it means that the lead, the lead independence
is water-soluble. At this stage, you wouldn't
really notice a difference. I'm just going to add
layers and layers of color pencil to my drawing
to create an underlayer. I'm not adding any water to
my picture in this step, I'm going to do that next step. So at the moment I'm just
going to shade and color these initial layers
and are starting at the top slowly working
towards the bottom. Something that I'm
doing is putting all the limestone creating in the direction of the
fur is going into. So I'm checking the photo and I noted here at the top
picture of going upwards, under the eye, It's sort
of going downwards and then over the nose it's
sort of waivers out of it. And I make sure that
my strokes are in the direction of the hair. Also. I'm not too worried
about keeping my strokes very smooth because
differ is quite fluffy. And once I go over
this with butter, everything will blurs out. And if I see a few
of the lines of my pencil shine through,
That's absolutely fine. That just adds to the effect. So I'm basically working
in free colors here. I'm adding black to the dark
spots in yellow in-between, in some brown in-between as well to create a bit of
depth of color, a bit of shading on firm. You can see I also prepared some oranges and some
different color brown. But for now, I am
keeping it very minimal, so you don't need lots of different colors to
add this base layer, we can always add more color
later the details phase. I'm also keeping some areas
of the paper white where the firm is lightest. So for example, underneath the eye is an area
that's really light, which I'm going to
keep lights as well. As a few other
spots in the photo. You can see where the
first really lighter. For now, I'm keeping those
empty of any color pencil. It took me about 2025 minutes to cover the entire paper in my first initial
layer of color pencil. And speed up the video a
little bit because it's very repetitive and it will be a little bit boring
for you to watch. I'm keeping my layers
quite light at this stage. So I'm also starting
to add a little bit of dark areas around the eye. But I'm keeping it very light and now I can always go darker, but it's much harder to take away colored pencil
that you don't want. It doesn't erase very well. So keep it light,
just shaded softly. You can see I'm keeping
my pencil a little bit on an angle,
holding it gently. Don't grip it really hard if you pick up your
pencil really hurt, you automatically
get harsh lines. And I'm just slowly
shading the entire paper. I find that a lot
of fun to see how slowly the drawing is
coming together this way. Adding color mixer,
two-week difference. And it's really fun to do. So. Just take your time
relaxing into it and slowly at these layers of color pencils in the direction of the hair. It is good to remember that not everything has to
be done in one layer. It is much safer to do multiple layers and slowly
build up your drawing. If you work really harsh
on the first layer, it's really hard
to correct it, uh, your your lines will be
harsh and color pencil will not blend out as nicely where we go over it with water. So softly shade and slowly
build up your drawing. You can see I'm starting
on a second layer now. I start to add some
color pencil to areas where I've
already been before. And I slowly started to make my drawing a little bit
more colorful and a little bit more vibrant. After we've added water in the next stage and
everything is dry, you can add more layers
to your drawing as well. You just need to make
sure that between every layer everything is dry. Even if later on
you designed your, your colors are not
quite vibrant enough. You can always add an
extra layer later on. Term Butte patient,
just work slowly. I might go a little bit
faster than my drawing. If your paper is a bit
smaller, rush, take your time. It's absolutely fine to just take your time
for your drawing. Slowly easing. I decided to make the background a warm yellow, orange color. Chapter two, you can
see I've started to add my first layer of orange or dark yellow to the background, and I might make it a
bit darker later on. You can also make your
background VD dark. It would give a different
five redrawing. It will make it look more like a nighttime scene or
a little bit darker, but I decided to keep its
vibrant and fun and colorful. When you're working color
pencils always make sure you have a nice sharp
tip on your pencils. Makes your world of difference. Now I've done my first
layer I'm going in, this is my black pencil
and start to add some extra contrast in these
areas that are darker. So in particularly the ice. And around to knows. She can see I'm making short strokes with
my color pencil. This is still a
watercolor pencil. Just good to remember. What a colored
pencils tend to be. A little bit more soft and a bit more a bit more soft and
a bit more fibrin Stan, normal colored pencils, so they work a little
bit different. You can also keep them
as colored pencils and not at any water
to it if you want to. I didn't know butter
as a bit of magic. It's a lot of fun to do. I said this before, these
colored pencils are not great. The ones I'm using, even though the color
is quite fibrin, so they keep breaking in. They sharpen, very
difficult to us, a little bit frustrated with
them after awhile and I swapped to a different
set that I have, which is a little bit better. But is good to realize
that you don't need really expensive
art materials to make a fun drawing. Materials I'm using here today
were not very expensive. So surely going around the eye, there's a bit of
dark line around the outside of the eye,
which I'm adding in. When you go and add in the
color around the iris, the pupil, I should say. Remember that there is eyelashes that are going over the pupil. And the best way to
keep these eyelashes light is by keeping them
light from the start, adding some shadows in-between. Just got negative throwing. So we're adding in the shapes in-between objects overdrawing. But that way the
eyelashes stay in light. All the way at the
end, I can go in with a white gel pen and add some
white delicious pumpkin. But the more I pay
attention to this now, the less I have to tinker
with it afterwards. You can see him slowly making
my drawing a bit darker, adding a bit more contrast. Once in a while, I'll
take a little break, step away from a drawing and look for my little distance to see if I'm placing these dark
areas in the right places. The photo is quite evenly lit. We don't have really
harsh shadows today. That makes it a
little bit easier. When you make a drawing by yourself and you pick
your own reference photo, make sure you pick
a photo that is sharp and clear and evenly lit. I make such a big difference. I am to portrait commission sometimes not very often at all. Pets, sometimes. You'd be surprised
how many people sent me really blurry photos of their pets are really
difficult for others to see. And unexpected me to make a great portrait is
really hard to do. I always need a really
nice, clear photo. We can see the right angles. It's welded to make
portraits obituary. In the next page I'm
going to add some water. I'll see you shortly.
5. Adding water to our underlayer and see the magic happen: Hi everyone. You can see
that I've now finished the first layer of color on
my paper is still very light, but I'm ready to start
adding some water and see some magic happen with
my watercolor brush. Because these are
water-soluble pencils, I can add water to my painting and change the lines of
the pencil into paint. And this is a really fun
part of this artwork. So you can see, I'm using a fairly large watercolor
brush in some clean water. And I'm going over the entire paper to
start blurring out, depends on lines and
change them into pain. And I would recommend to
start with the lighter colors first and then slowly
move to the darker ones. Or if you do a darker area
like the way I started to really clean your brush before
you go into a light area. You don't want to get
dark marks or gray marks everywhere over your light
yellow pieces of the artwork. So starting with a light areas first and then move
to the darker ones. This is very important. The process of adding
water and then adding a bit more
pencil and adding water took me about an hour and it's absolutely okay to just
take your time for it. You can do multiple layers. Just make sure that
your painting or your drawing is completely
dry in-between, adding new layers of pencil. If you're a pencil
to the wet paper, the paper is a bit more fragile. It might damage. You can see that by adding
water to your pencil, the colors become a bit more
vibrant and a bit more dark. They might blur out a
little bit as well. And it's a lot of fun to play around with this and just see what magic happens when you add water to these pencil strokes. I will shortly speed up my
painting a little bit or my, my video a little bit because it took me
about an hour to do this and it'd be
a little bit long for you to watch
it in real time. I've sped it up a little bit. But this is basically
what I'm doing. I'm using my brush in the direction of
the pencil strokes. This is also important
because I want to keep the illusion of the movement of the fur in the direction
of the fur is growing. I'm using my brush and my water in the direction that
the fear is going into. Before when I edit the color, I really kept an eye on the
direction of the first well, so I'm keeping that
same process going, working from the top towards the bottom so the area can dry. And I don't have to worry
about switching it with my raised on the eyelashes. I'm being very careful. I don't want the color of the eyelashes to blur
in with the blues. So make sure your
brush is small enough. You use a bit of a
delicate touch to make sure that the colors
stay separate. Same here around the eye. I want to make sure
that the light colors around the I do not
mix in with the black. So sometimes you need to have
a bit of a delicate touch. By adding water to our picture, we create an underpainting. The colors will come
a little bit more vibrant and a bit more soft. And they, the individual
lines disappear a little bit. It becomes more of a painting
instead of a drawing. And it creates a really
wonderful underpainting there we can then use to
add details on. This process is much faster than when you
blend the colors of color pencil without using
any watercolor pencils. And it's a lot of fun
to do. Take your time. There's absolutely no rush. I'm just slowly go over
your entire drawing and start adding water
here in there. You don't have to do every
part of the drawing. Maybe there's some areas
that you want to keep this pencil lines and that's
absolutely fine as well. You can see I did the
same for the background. Surely going over there. And you can see the picture appear as if it is
magic from these lines. There might be areas that
you find a little bit too light and it's fine
once everything is dry, we can add a second layer or even a third layer of color pencil on top
of our drawings. So you can see I'm
doing this now, going in with more
watercolor pencil. And then we can add water again. Just make sure I
said this before, but I want to make sure I'm
very clear on this that your paper is completely dry before you add any
more color pencil. So sometimes you need to
be a little bit patient. I'm adding all these lines in
the direction of the firm. So here on the cheek the hairs
are a bit more horizontal. On the forehead, the hairs are going a little bit more upwards. On the nose, hairs are
going a bit more downwards. And I'm also playing
around with the colors. Here. I'm adding a bit
more darker colors, some browns and some blacks
and some darker colors. I read before I used
mostly yellow and oranges. Once I add water to it, the colors will mix
up a little bit more. This gets firm, has so many
different colors in it. So you can really
play around with the browns and yellows to Hugh
Hefner, your availability. And create an
interesting picture with a little bit more yellow or a bit more
brown or bit more orange, depending on the colors to hue. The side of the face
I'm working on now is a little bit more shadow than the side that
is closest to us. So I'm making it a
little bit darker, little bit more intense colors. This cat's face is
fairly evenly lit. I don't have to worry about any really harsh shadows
approach from around the eyes. You can see why I why I
split up the picture, the video a little bit
because otherwise, it would be a very long process. Depends on them. Using a set is in my
product description. Depends on us I'm
using are not that great and they keep
breaking when I'm trying to sharpen them some sharpening
down with a craft knife. It's a little bit more
precise and less, more delicate on my pencils than using a pencil sharpener. We use a craft knife to
sharpen your pencils. Make sure you're very careful. I do not want any responsibility for cut fingers to make sure you are careful
when you use mice. The spots on this
jaguar quite dark. So I'm going over there
with another layer, making sure that the layer
underneath is completely dry. Really making these spots a bit darker there
quite an intense color. And contrast is very important when you
create animal drawings. Having the right amount of
contrast to divide Phil use is more important than having
the exact right color. Make sure you have your lights in your darks in
the right place. I might even create a few
more freckles or sports. This cat's face. Colors in-between
the eyelashes are also very dark little
bit of shadow there. And I know that I can add in a little bit more shadow
at the end once I'm done with the underpainting. So I'm still working on
this layer right at water to my layer to create
a soft underlayer and colors slowly and
building up my drawing. What's okay to really take
your time so you don't have to put lots of
pressure on your pencil. It is better to do
multiple layers instead of one. Really harsh. Been slowly and steadily. My paper is filling up a little
bit more sharpening here, you can see I'm using
an old painting to catch all my discard. Made everything a bit
darker and now I'm going over it with somebody. And you can see especially
when the layers of pencil are a bit thicker, that when you add water to it, that everything becomes a bit more intense, a
little bit darker. This is quite a fun
process to watch. Especially going over these
darker spots in the moment. Be mindful that if you go
over a black spot with your brush and you would
go over a lighter spot, then you'd have some of
that black paint stuck to your brush to make sure that you clean your
brush properly before you go into a lighter area. Let everything dry. And I'm still adding
a little bit more of my watercolor
pencil to the picture. Now shrunk to this second set of colored pencils
that I like to use. This is the QSR set. It has less colors
than my first set, but the quality is a
little bit better. I got a bit frustrated with the breaking off the
tip of my pencil. I'm adding even a
bit more yellow. I really want my colors to be
rich and full and vibrant. Maybe a little bit
more fibrin Stan in the photo gets into
picture is fairly wide. And I wanted it to be a
little bit more colorful. When you're an artist. And if you're drawing or
painting with me today, you are allowed to query
is health and artists. You don't need anyone's
permission to do so. I've given you
permission right now. If you're making
any type of art, you are welcome to call
yourself an artist. But what I wanted to say is
that as an artist you have all the freedom in the world
to make a picture your own. If you want to draw this
cat's in purples and greens, you are very welcome to do so. If you want to change the cat's in a way that it has antlers, or there is an magical elf
sitting on top of its head. Or change the proportions
or anything like that. This is your artwork. You are very welcome
to do so we are using and reference picture that is royalty-free and you're
very welcome to copy it exactly or to make as many
changes to it issuance. That sets. I'm keeping it is quite close
to the reference picture, but I'm making the picture
a little bit more vibrance. You can see that this
layer of water that I'm adding to the picture now has really made a
large difference. I edit quite a bit more pencil. I wanted everything to
be much more vibrance. And by adding the water
to these pencil strokes, the entire picture suddenly becomes really fun and vibrant. This is the amount
of color that I was looking for, for
this underpainting. So I'm going to
finish this part of the underpainting
and then let it dry. And then I'm ready to
start adding details to my drawing so you can see how
much more color I have now. I really feel like everything
starts to come together, so I'm going to let it dry and then ready to start
adding detail. I'll see you in a short moments
when everything is dry.
6. Adding details to our drawing: I let the underpainting
dry completely. And now I'm going to add lots of details with my color pencils. I am selecting lots of browns and yellows
and colors that I feel I provide the colors for these animals are a
lot of sense colors, yellows and browns and some pinks as well
for the white areas. And I'm using a combination
of my fabric cost of polychrome was pencil and my
Durbin pro color pencils. These two brands are
artists grade pencils. They're not cheap,
but they're really great for adding details. You don't need any artist
grade pencil that you don't need any
normal color pencil. You can use your watercolor
pencils to add details. I just really prefer these. And I find that they are
great for adding detail. So again, I'll have to
speed up my video a little bit because
otherwise it would just take way too long. But I spent about an hour just adding lots of
detail to destroying. And I really feel
like at this stage, this is when I go from a nice painting to really something with lots of detail and much more realistic. So I love this stage. This is a lot of fun and I can spend hours just going over my drawings with my
pencils and just adding lots of little
strokes and little details. The main things that
I want to add is lots of little
hairs and the verb. You could do this
with color pencil without doing an under
painting in watercolor pencil, but it just takes much, much longer to make sure
that I have nice sharp tip. So my pencils, and I'm just going over the entire drawing, adding lots and lots
of little hairs. Some of these lines are put
quite a lot of pressure, my pencils and some of them, I'm keeping things much lighter and creating really
soft little hair. So I do make sure that
all the lines are in the direction of the hair throughout
the entire artwork. It's very important to
go with the direction of the hair to make everything
look more realistic. The dark spot on these animals for really
dark in a photo as well, you can see that there is a lot of contrast and they're
really proper black. So I spent a lot of time
making these darker ones. My pictures dries after last layer to black has
become a little bit muted and I really
wanted to feel quite deep and a full color. At this stage. I don't
have to worry too much about proportions anymore. I've done all of that during
the sketching stage and then after that doing the
base layer stage. So this is really
about adding lots of detail and I really
find it a lot of fun. The eyes are really eye-catching
us in this picture. So I spend a lot of time making sure that the
colors of the eyes are really precise and there's lots of little
details in there as well. So you'll see us prints
quite a lot of time around the eyes and lots of little
strokes there as well. In this details phase, you can have a little bit
of fun with colors as well. Because belt color pencils have really fine strokes, fine lines. You can add a little bit of an unusual color here and there to make things
a bit more interesting. So you can add some
purple in the eyes, things in the white areas, and just have a
little bit of fun. Experiment a bit with colors because the
lines are so fine, especially if you
use a large bit of paper like I'm doing, each individual
line is not going to make your drawing look
completely different, but adding a few lines in a different color
can just really make the drawing pop and make things just a bit more for,
a bit more interesting. So that's something that
I really enjoy doing. At this stage of the drawing, you can spend as long or as little time on adding
details as you want. Sometimes it's really
hard to know when your drawing is finished
to just have fun with it. Don't worry too much about it
and just enjoy the process. Here I'm adding a bit more
blue also to the black areas. I think blue and black
are really lovely. Complimentary can make the blue look a little
bit fuller as well. Making sure that my lines
are a bit more sharp. The watercolor pencil can
sometimes be a little bit blurry on the edges when
you go over it with butter. So going over it
with a black pen. So mixed lines, a bit
harsher bit more precise. Meaning some brown to
the eyes is for the eyes have a combination of
blues and browns in there. Put the pinch I use most at this stage is to black,
which is unusual. Usually, my black pencil
is something that I use mostly with my
charcoal drawings, not in colored pencil drawings. It's a color I use for each partially because it can
be a bit overpowering. But in today's drawing, I use lots of flex to really make those dark areas
of the drawing pop. Can see that over
each of these spots I must go at least five times to add lots of
details and make them darker until I'm happy
with the result. The spots here with
further back or a little bit more muted
in color and photo. I want to make sure
that they are still. Divide the value that
I'm looking for. I'm going over there, I
think lots of little lines. I'm also aware that the inside
of the middle part of each of these plots is
a bit darker and the edges is a
little bit lighter. So I'm focusing on
the middle part and then slowly blurring out the outside edges
because light hairs growing over the dark hairs
to give a bit of depth to these areas and make sure that the middle part of
these dark spots is darker than the outside. And this is something
that I'm doing at this stage as well. The wide areas might have some
dark hair snares as well. That's takeout. Or some shadows
between the dark hairs which we are creating
with our dark pencil. Once in a while at a stop, take a step back and look at my drawing from
a little bit of a distance just to see if
there's something missing, if the contrast is right. Taking a bit of physical
distance from your drawing can really help you look at your
drawing with fresh eyes. Sometimes when we're
drawing up close, we can be like literally so close to our artwork
that it's hard to see. General Pictionary, the
overviews are stepping back and taking a bit
of physical distance can really help a lot if you're not quite
sure of where it had more or where to go or even taking a little break
or make a cup of tea. When you come back, you
look at your drawing again, you might notice something that needs a bit of extra attention. These eyelashes that
this tiger has are mostly created by making
the areas in between the eyelashes darker is a great technique for
creating light edges. Make sure that this eye
is really targeting. The eye that is a bit
further away from us, is very much hidden
in the shadows. So a lot of what
we're creating is suggestive instead of actually
creating the details. Sorry for my head pinging. I'm sure concentrated
on my drawing that I need to lean over it
a bit once in awhile. It's all part of the process. Looking up close and then taking a bit of distance and then
looking up close again. Zoom in a bit more so you
can see what I'm doing. That's just tiny little strokes. Because you've been working on this trunk for such a long time. You don't really
have to worry about messing things up right now. The stages where most
things go wrong, he's doing the sketching phase when the proportions are wrong. At this stage, we're
really looking at increasing the details and
to fail you of the drawing, something really strange must happen for things
to go wrong now. So don't worry too much
about what you're doing. Each line is so fine that in
the bigger scheme of things, you might not even notice it. But once you add a
100 lines together, you are, somebody
has the drawing. One line is a little bit
in the wrong direction. That's absolutely fine. Don't worry too much about him. I'm adding a little
bit more beige, like a burnt umber color
of my favorite colors. You can see I'm using it quite loose, some longer strokes. Just to generally add a little bit to the
fluffiness of this for you think that slowly the
drawing is coming together. I feel like when you sometimes see an artwork and you
see the finished result, It's hard to visualize
all the steps that have been taken to create
it in the first place. But if you look at a picture like this and you slowly
see it coming together, I think it makes it
a lot more sense. I hope you enjoy watching
this class with me. If you're drawing along with me, make sure you share your projects with me
because it gives me so much joy to see
everyone's creations. It really is one
of the best parts of my job as an art teacher. So make sure you share them. I really, really would
love to see them. You can see I'm changing up
the colors a little bit. I'm adding some reds
and some purples and some maybe colors
that he would not necessarily expect in this fair, because it makes the color
a little bit warmer, a little bit more interesting. So here I'm going over it, adding a bit of really bright
red. Only a little bit. You'd have to look up close to find the individual strokes, but it makes the entire feel of the artwork a
little bit warmer. With a very sharp tip just
going over the entire drawing, adding a little bit of color. To differ. I'm doing the same in green. Green might seem a really
unusual color to use here. I love adding a little bit
of green to my drawings, even to animals take you might not think
of green in them. Just to make the entire artwork little
bit more interesting. I love a bit of
rainbow colors in my art and I think if you follow me along or
you might notice, I love a bit of a
brighter color. And I think adding a little
bit of extra color to refer just increases the
depth of the colors. Especially if you look
at it from a distance, you might not recognize
that green immediate leave it changes the tone of
this for a parallel, they're still make sure you go in the
directions of the fair. This is very important. I'm almost done
with this picture. There's just one more
thing I'm going to do. I'll show you in the next video. And this is a little
bit of a bonus. We should do not need
to do this at all. I'll show you in the next video. Maybe a little bit of
yellow to the eyes. She changes the color of the
eye a little bit further, even though the eyes
were mostly blue. Playing around with color is one of the best things about drawing it
in color pencil. So I'll see you in the
next video. We'll finish.
7. Adding finishing touches to our drawing: The drawing is finished, and the only thing
I'm going to add a little bit of highlights
with a white marker, adding some white highlights
here and there just really allows you to
put some white back in. After all the layers and the
details that I've added with my watercolor pencils now
with my color pencils, some of the widest cuts
in a little bit lost and there are some white, sort of long eyebrow whiskers and some eyelashes that
are really hard to leave. White if you just try and let the white of the paper p Proof, I'm using a white marker
to add those back in. You can use a gel pen or white
marker with acrylic paint. I quote, I'm using
at the moment, or an really fine brush
with some white goulash. All of these work really well. These are really fine
details and it won't make a huge difference to
the outcome of your drawing, but I really enjoy it
and I just find that these little white lines just make the drawing that
tiny bit more realistic. So I'm going, I'm adding
in some white hairs to go over these dark spots. A few long whiskers,
a few eyelashes. And then I'm going to say, my picture is finished. The market and I'm
using this very opaque. Can see I can go over the dark colors and
the marker coverage. It's completely so I
really need to use and gentle touch when I do this
and also not overdo it. We don't want to end up
with big splashes of white paint all over the drawing that we should
just spend hours making. It's all about adding
in some fine details. Now one of the best
parts of this artwork, little bit of ASMR. Let's take the tape off. Make sure you have your
sounds and I just loved this hand off tape being peeled. That is her artwork all
finished for today. I really hope you enjoyed it and thank you so much
for joining in. I really love to see
what you've created, so make sure you share it. And then Thank you so
much for being with me. You can find me on Instagram
at making some usings. I have a YouTube
channel and my website is makings am usings.com. Let's have a little bit of a
closer look at this artwork. And I'll see you next time. Bye-bye.
8. thank you for joining this course: Thank you so much for joining
my Skillshare class today. I hope you enjoyed it
and I look forward to seeing your creations
in the project step. I always love seeing
what everyone makes. I would also really
appreciate it if you leave me a review as it helps other
people to find my classes, I ever few other classes
here on Skillshare. So if you enjoyed this one, make sure you check
out my drawing with minimal materials class where we are drawing house plans
with ballpoint pen. Or my other class where
we are illustrating a fantasy creature
from our imagination. Bro, lots of funds, so make
sure you check them out. You can find me on Instagram at making some musings
or on Facebook. And I also have a
YouTube channel, so make sure you
check it out and I'll see you again soon. Bye bye.
 Irene Ruby, Illustrator and Mindful Art Teacher