Transcripts
1. Class Trailer and Introduction: Hi, my name is Paul. I'm a designer and I'm in the creative industry for
over eight years now. Today, I want to show
you how you can use artificial intelligence
and machine learning in the newest version
of Photop Photoshop to enhance your
creative workflow. It can really make your life easier and it can
enhance your processes, make them faster and open
new creative possibilities. But how can you integrate those tools in your
own creative workflow? I will walk you through all the functionality and give you practical working
examples of how to use artificial
intelligence day by day. Hi and welcome to this class. Great to have you
here. My name is Paul. I'm a designer living
in Berlin, Germany. Artificial intelligence had
a big rise in the last years and it got implemented in a lot of software
we use every day. I guess, especially
for creatives. It has great potential
to use AI because it gives us completely new
possibilities to create faster, better, and more accurate
if you know how to use it. Right. I decided to make
this class to show creatives how they can use AI tools to implement them in
their own workflow. But let's talk about Adobe Photoshop and it's new tools which are all
based on Adobe Sense, use artificial intelligence
and machine learning. First of all, I want to show you all the tools which come with the newest version of Photoshop. With the newest version, I
mean Photoshop 25 and higher, I want to show you
what they do and afterwards you can try them out on your own student project. Then we look at some
different use cases together which show how endless the possibilities are when using a Photoshop I tools in
your creative workflow. Okay, let's jump right in and see what the generative
fill option is.
2. Generative Fill: Generated pill is the most
used AI tool in Photoshop. It gives us the option
to generate objects, backgrounds, textures, whatever by using
optional text prompts. It's a classic text
to image tool. It works with all
kinds of image styles. It adapts what's already
there or what you describe. Yeah, it speaks over
100 languages so far. It's not necessary
that you type in those problems in
English to show you what generated Phil does and how to use it and how endless
the possibilities are. I would like to use an example. Yeah, you can use
any picture I chose. This picture I took
on a job in Slovenia. First of all, if you don't
see those buttons here, you have to double check if
the window is activated. To do so, go to window and check if the contextual
taskbar is activated. This is also a new thing. Maybe if you updated
your Photoshop version, maybe it's not activated. Make that sure to start, I need a plan. My plan is to change
that house, for example. Maybe I want to use
the picture for a different reason
and I don't want to see such an old little barn. Maybe I want to see a really
modern type of home in here. If I would try to
do that by hand, I need to search for a house
which looks like I want and also needs a pretty
similar perspective and needs pretty
similar lighting. Then I need to, yeah, isolate and put
it into the image and it takes a lot of steps
to make it look natural. This would be a really
complex task to do, but I tools make that
way easier for me. First of all, I select
the area I want to change to do so I
select the lesser tool. I can make a rough selection. Actually, it's not
necessary that you make a pretty
accurate selection. It would be enough
if I say, okay, those two people, they
need to stay here. I'm pretty careful, but
can be pretty rough. And I can also say the house
needs to be a little bigger. So I also select
this area up here. This will be my selection. Then the contextual task gives me the option to
use generative fill. I click here. Now there is a field where I can
type a text prompt. This text prompt is optional. Actually, I don't have
to type anything. But in most cases, Photoshop removes the object. Then we can try that out. Just click Generate. Then we always need to wait a little. After a while it did his thing. We see, like I said, the object is gone
most of the time. It's pretty good. And it's better than using the
content aware fill option. This could also be a use case, but maybe I don't
want to remove it. Like I said, my plan was to replace it with
another house. I do that, I click Generated
Fill again and I try to describe
what I want to see. For example, modern house with wooden elements, but it could also be
German, or French, or Spanish or whatever language you're talking, I type that in. You can also use different
attributes to describe it. Try to avoid using words like
change, replace, delete, edit, whatever, and start describing what you want to see. I type that in and
click Generate. It takes a while again, now we have our result. It looks weird
because I think he tried to add a car in here. Maybe he had some reference
image where this happened. But yeah, this is not
the only option we got. Because here in the
properties window, make sure you have
the properties window selected as well, which is right here. He gives us three variations and he gives us
three variations. Every time we use the
generated fill option, I can click Generate again to
get three more variations. But we can also
define that prompt if we not completely um,
happy with the result. We can say, for example, modern house with woods and
glass elements or something. Wood glass elements. Then it's a little
more accurate. Maybe we can click
generate again. You see right here that he loads three more
variations for us. Okay, let's see what we get. This is a little different. Actually, I think
this is pretty good. I take this, what I meant
with it's all non destructive is that photop gives us a
new layer and also mask. I can deselect this to show what's under it and
I can reselect it here. It just replaces that
area we selected and we can always change to a
different variation he created. This is all saved in that layer if you want
to edit this layer, to adjust it, or to retouch it. If you're not completely
happy with the result, which is the case
most of the times, I would say, then you
can of course do that, but then ask you to restorize. Then of course you lose the option to
switch the variation. But yeah, you can do that. And then you can, for example, retouch those things here on the roof and do
whatever you want. Yeah, that's
basically how to use the generated fill option.
It's not that hard. Of course, you can add
more layers if you want to generate more objects in that image just by selecting a new area and type
in the next prompt. But yeah, I can say it's a lot about trial
and error to get to know that and to learn what prompts to use to get
the results you want to see.
3. Generative Expand: The generative expand option helps us to solve
a common problem. Imagine you want to use a
picture like this on a website. Let's look at this example. We have a website and
we paste that image in. But the layout of the website
ask for a horizontal image. Of course, you can
crop the image, but we lose a lot
of information. Now we just see the house and the complete mountain
part is gone. Which will be sad if you
want to see the mountains, the house and the
people are gone. This really does not work. It would be nice to have
this image just horizontal, but we don't have it because
we shot it like this. But Photoshop and the generator expand option helps us
to solve that problem. Let's see how it does. We are
still editing this picture. We can use the crop tool by pressing C or just
selecting Crop tool here. Yeah, choose the
resolution we want. In this case, it has
an aspect ratio of two to three and we want to
change that to horizontal. When I drag it, the background is just black. We can select the fill
option here usually. I guess, Yeah, it's had to background default and my
background color is black. It makes the background black. I can do it like this
and you see that we have a lot of space
with no information. But when I select
generative Expanse, it's pretty similar to the
generated fill option. We have that prompt feeling. It's optional for us
to type in a prompt if we want to define what kind
of background we want to see. In some cases we have images with maybe a portrait
and it's just a hat. And there's not many information
for Photoshop regarding the background we can type in like forest or green
background or whatever. In this case, I guess
it's pretty obvious what environment
this picture needs. I would leave that prompt
field blank and just click Generate or press
the checkbox right here, because I selected generative
expand as the fill option. Now it generates these
two blank spaces. And gives us again,
three variations, exactly like we know it from
the generated fill option. Boom, we got it. Let's click through
the variations. You can also use
those arrows here, a little different,
a little dark here. The first one looked a
little more natural and the third one is
also pretty good. This or the last one? The first one I like because the mountains here
look more interesting. Yeah, this is what we got. Again, it's all non destructive. Photoshop gave us a new layer which is called
generated expand, but we can rename
it to background, for example, oops,
like I said before, it has also a layer mask. It only affects that area. And we can refine it
if something is wrong. But normally it's just good to show the before and
after and also to maybe make changes afterwards if we see that we need a
different option. In this case, the
result is pretty good. I can definitely imagine to
use that image right now. But I want to show
you what happens if we use the prompt field to define the generative
ex pand option. Just as an example. Now we typed in nothing. But maybe I wish that we see
Frozen lake or something. On one side, I typed
in Frozen lake. And let's see what
Photoshop generates us. Okay, I think it didn't
work pretty well. This is not too bad. This looks like a lake area here and here. Okay. This is funny. This part actually looks not too bad, but this really weird. But maybe we can combine them. To do so, I would
duplicate the layer. The bottom part should
be this one, I guess. Yeah, because right part here is pretty good for
that one, we take it. Like I said, it's
all non destructive. It works with laysks. In this case, I just want to show the left
side of the image. As you know, the white
part of the laak is visible and the black
part is showing the, the content from
above that layer. I want to adjust
the mask and select the brush and make it black.
It's already black here. And just brush it out to make
the layer above visible. Now the layer mask is just
white on the left side, The part which I
want to show now, I combined two layers, two generative expand layers. We have the left side and
we have the right side. Now we have a frozen
lake that side, which is pretty good, a modern house, and expanded image just by using
text prompts or nothing. Yeah, Photoshop did
a pretty great job. I think all the tectures
look pretty natural. It's not like when
using the stamp tool that you see all the same
textures again and again. You directly can say, okay, this is a stamp tool,
it's all natural. The clouds look pretty good. All the tetures here
look pretty good. The only thing you will
notice when using it, that the resolution
is often not so good. Here you can clearly see where the generated layer begins and what is
the original image. But when using the pictures in not such a high resolution, when using it for Web purposes, for example, it's not
a problem, I guess. Okay, this is the
generative expand option and how to use it and
how to adjust it. I'm pretty interested what kind of results you are getting when you start to try out
these two options.
4. Neural Filters: Talk about using AI tools
in Adobe Photoshop. We also have to talk
about new Will filters. They're all based
on machine learning and they're still
in development. But some of them are already out and some of them
are in beta version, But they can be really
helpful in some cases. I will give you a
quick overview of the current state and
the functionality. You can access them
by clicking on Filter and go to neural filters. Then filter gallery pops up. It's similar to the filter
gallery, you already know. There you have a list of all new filters
which are available. We also have a weight list. This features right now, four filters which are still in development and which
will come out soon. I guess the list of
filters can be downloaded. Maybe some of them are already downloaded on
your Photoshop version, but on some filters is a small icon with
a cloud or something. Then Photoshop needs to download some data to use that
filter for the first time. Let's see what things we can do. You see that we have
different categories. First is portraits. It's all about skin or changing the face,
changing makeup. Then we have the
category creative. This is all about
style of the image. It's about changing the mood, changing the light, and also
changing the overall style. Like making the picture
look painted, for example. Then we have color, this
is a little more subtle. It's about changing
the color of an image and also using a reference
image to do that. Yeah. Then we have photography. We have two filters in here, super zoom and depth blur. Right now it's new. It works
pretty good, I think. Yeah. The last part is restoration, which is also useful. These two are my most used
filters, I would say. It really depends on what
you do in Photoshop. Let's have a quick
overview and talk about every filer once to get a
little idea of what they do. The first thing is pretty
obvious and the filter is called skin smoothing.
It smooths the skin. In this case, it's not
really necessary I guess, but you may have a pictures
where you need to do that. Maybe you know that also
retouching the skin. Retouching the face can
be pretty time consuming. If you want a quick solution, it's definitely a
good try to do that. I would say the result of this filter is good
most of the times, maybe it's a little
bit too extreme. But you can change
how it behaves when you start to
use that toggle here on blur and make it less heart as you can decrease
or increase the smoothness. Maybe it looks better
than in your case, but you can, yeah,
try that out here. It's pretty easy. I guess. You always see a preview
of the current result with the settings you have right here to switch between
before and after. You can toggle this in here, show the original image. Click on that and
you see the before. Click again. You
see the preview. Okay, let's see the next filter. I turn that off now and
I go to Smart Portray. Smart Portray does something which does not work really well. I would say most of
the times I used it, I had weird results. It's not a beta version anymore, which I do not really
understand to be honest. But yeah, it automatically
detects your face. If you have multiple faces, you can select the
face manually then by clicking on the blue rectangle. Now you see different
options here. On the right side
we have featured, then we have expressions, global settings, You
can just around here. Be happy is actually changing the whole
mimic of the face. It's not only about the
mouth, it's actually, when you laugh, you're not
only laughing with the mouth, you also laugh with the
eyes and something. It tries, yeah, to solve that
problem when, for example, made a group picture
or something and some people do
not look happy, and the others then you
want to retouch that. But this is actually
pretty hard. The idea of the filter is nice. But the results, like I
said most of the times, I thought they look really. Strange, but we can try again. When you start adjusting
the settings here, you will notice that yeah, it takes a lot of time to
process. Now it's done. You see my face is
actually pretty destroyed. It does not look really natural. Yeah, I redo that. Yeah. We can also change some other things like hair
thickness, eye direction. If somebody does
not look directly into the camera, it
could be useful. Now, it looks that I do not
really look into the camera. I look more to the right
side of the image. Yeah. This could be
helpful if you have someone should look directly into the camera, but doesn't it? Yeah, But you see that he always changes the whole
look of the eyes. They always get darker. Sometimes the results
are not really natural. You can also mess around
with expressions here, but like I said, you
have to try it out. Maybe you have a picture
where it works great. But all the time I tried it
when using it in my workflow, it has not really
worked so well. This is a thing I
have to be honest with you, it would be great. I think the idea of the filter
is actually pretty good. You see that worked
with machine learning, but I think it still
has to learn a lot. Moving on to the next filter, it's called make up transfer. It makes it possible
to transfer the makeup onto your image from
a reference image. This is pretty funny, actually. I think it works pretty good. I was surprised when using this. You can select the face if
you have multiple faces, like I said, you can
select it right here, clicking the blue rectangle. And then you can select
a reference image of some portrait which shows
makeup you want to transfer. Yes, select an image
from your computer. Select Kate Moss '80s
makeup, for example. Some different image like
you see it transfers. And the style and
makeup of that image. Now I change the image to have a look at the
other filters. And I selected the landscape
photography because Photoshop noticed that we do not have any
faces in that image. You see that the portrait, newer filters are grayed out. That makes actually sense. Looking at the landscape mixer, you see here, it's still in
the beta version right now. It gives us the possibility to change the overall
look of landscape, which could mean that we
can change the season. For example, I have this imaged here and maybe I want to see how it looks in winter. We can adjust that
manually right here. Or we can use a
preset which gives us different landscapes which have different lighting,
different seasons. I start by activating
the filter. Yeah, selecting preset
to see if it works. When I want to see that
landscape in winter, nothing happens right here. Maybe I click this one. Okay. Yeah,
processing on device. Wait a second here, you see the landscape picture. In wintertime, I'm not sure
how natural it really looks. Maybe you have to
decide for yourself. Maybe you can try
something different out. Maybe something here
with sunlight actually, he changes a lot of
the environment here, put trees on here, which I think is weird. I'm not sure why he does that, but when using this filter, you see that it's
them beta version. I guess this is nice, I would say yeah. But it really changes
the whole mood and sometimes it does not
look really natural. But to get an idea to visualize
a concept, it could work. Moving on to the next one, It's called style transfer. It gives us the opportunity to change the style of a picture. In this case, it's a
photography and we can make that look like a painting
on canvas, for example. Click that, Artists Preset and it takes a way
to process it. Gives me that oil
painting look which has that impressionistic style. But we can also customize
the styles here or give him a custom
reference image, which could be also
really helpful. The harmonization filter I would like to show you in a
working example later on, but this is pretty helpful
when making manipulations. When combining images, maybe
you change the background, for example, or you put in an object into an
existing photography. You always have the problem
that things do not really fit together because they have different contrast or different white balance or something. And this harmonizes the object or the layers you took together. It's actually pretty nice
to have that option, but I show it later
to you in action. The next filter is
called color transfer. You can be really
creative with that. I actually thought about
a realistic use case. An idea I had is to change that image here into
an infrared film. Look, I tried it out by
activating the filter and see what presets
we have here. Maybe this is not too
bad because it's pink, but also the sky or the clouds are getting pink now. So this
is not what I want. I go to custom
select an image and select infrared photography
I found in the Internet. I try if that works. Yeah, actually it's
not too bad to get this effect in light room or info shop somewhere else. Could take a while to
make it look good. If it needs to be fast, I guess it could be a good
solution to use that. You can also change
the settings right here to make it a bit less
extreme, for example. Or maybe change to a little
bit if it's too pink. And do you want to make it more? Maybe this is a little nicer and a little
less saturated right here. Yeah, brightness a little
down, for example. This looks not too bad, I think. But maybe you find
another use case where this filter
could be helpful. Next filter is called colorize. You can imagine it colorizes
black and white images. If you restore old images, it's nice to have that
process automated and not selecting every
color by hand. Next one is Super zoom, which is also
pretty cool because sometimes you work with
low resolution images. Sometimes clients deliver
really low resolution images. Maybe it has just that 500
pixels in width and it should be used on the website and you need the
double resolution. Then you can use super zoom. It can compensate the
loss of resolution. To do that, you can just click the factor of
zoom you want to have, maybe two or three times. Then he tries to
process it and make the picture bigger for you without really losing
a lot of quality. You can also remove JP
artifact with that. One important thing when using the neural filters, for example, when you enhance resolution
of the image and you want to adjust the filter
or any other filter, always ask you what
output you want to have. You can select new
document if you want Photoshop to open that
image on a new document, or you can select new layer. In this case, when I
update the resolution, I think new document is pretty helpful because I can
save that as another file. But in some cases, new
layer is also nice. But then, yeah, he crops
the image because you have certain image
size selected. Talking about the last filters, we have the death Bla, which works, I think especially for pictures
you took with your phone. This could be really helpful because sometimes
they look a little less professional
because phone cameras do not have natural death blow. Most of the time to activate, just click the toggle
here like you know, and it starts processing. It does his thing pretty good. You can adjust the
focal distance, which I do not want because he made that pretty good on the
person right here. We can adjust the blur strengths because this looks
not really natural. When would shoot with a professional camera
and professional lens, the background wouldn't
be that blurry. Actually, maybe
it would be like, this looks less than a
smartphone picture because it looks like shot with a lens
with a longer focal length. When you work with low
resolution images, the next filter could
be also really helpful. It removes J pic artifacts
from a low resolution images. The last one is
photo restoration, which helps you to restore
old images, remove scratches, And we have a look
at this later when I show you a working example
of restore an old image.
5. Your Student Project: Now it's time for you to get active too because as you know, you learn the best when
you try out things. Also, when using the AI tools, it's a lot about
trial and error. I would suggest to
pick a picture, maybe something you
took yourself or you find something in
the Internet and use that and start exploring what possibilities the
generative AI tools offer. For those of you who don't have the newest
version of Photoshop, which could be a pricey, to be honest, you can use Adobe Firefly to make
your own student project. To do that, you can just Google Adobe Firefly and
you will find this website. Adobe offers a lot of
generative AI tools, which are available in
Adobe Photoshop and even more which are integrated
in Adobe Illustrator. For example,
completely for free. You have certain credits
and you can start creating and using text
image or generated fill. It works pretty similar
than Adobe Photoshop. You can use Ad Firefly. It's all browser based,
pretty easy to use, and you can still work on
your own student project. Then if you don't know where
to find a good source image, because maybe you don't
take photos yourself, I can recommend splash to you. This is a website where you
can find free stock images. You can unt them off for free. The only thing you
have to do when using it is mention the author. I guess I think this
is a good deal. It will be also
really nice if you share your results with
everyone who takes this class so we can share our experiences and have a little conversation
about the results. That will be really interesting.
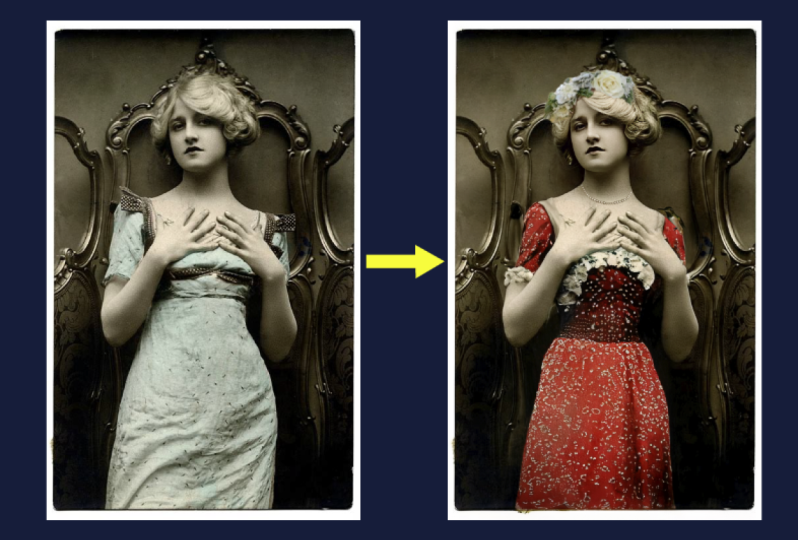
6. Project People (Change Body Parts and Clothes): Now we want to start
with the first project, a practical working example. We start with fashion subject. I want to see how easy
it is to change clothes, to change body parts
or decorations. We have this source image. I imagine that the client maybe asked for a
change of style. Now it's really simplistic. We have just white and white, but he asked for
different changes. I can maybe take this dark blue colors
reference and add some decorations and maybe
changing the clothes. First of all, I thought
it might be possible to change her hands and make
them flowers or something. I select the hands, maybe like this as you know. It could be a little
rough flower, flowers are a little bigger. This will be my selection. I go to Generated Fill Ok of flowers blue and white. I click Generate Nice. First of all, I thought he changes the whole hand and
makes it just flowers. But now he saw that
there is a hand. As a reference, he made her like just
holding the flowers, which I think looks pretty nice. And he also gave her a bracelet, which I think looks not too bad. I switched through
the variations. Okay. The first one looks
pretty good, actually. I think I like that. I guess that worked pretty well. Now. I can imagine to try now, I wish to change your clothes from white to maybe blue dress. To do that, I would
select her body part. But you have to keep in mind that we have
a generated layer here and the normal
source layer under it. But I want to keep
those blue flowers. But when I would
make a selection, I would just use that layer, but that do not include
the blue flowers. First of all, we need
to make a new layer. Combining those two to that, I click control shift and creates a new layer which combines every visible layer. This is my new source. Now I make the selection of the body. It can be actually a little
more rough because you know that it would be pretty
hard to isolate the hair. But a good thing with generated fill is not
necessary because he sees that there is hair and he tries to
generate it naturally. I just make a rough
selection of the body here. I just select the clothes, not the flowers, maybe it works. Let's see, I try to
not select the foot. This will be my selection. Now my generated foot, Cmd, will be dark blue dress. And let's generate that. Look what it does,
that's pretty nice. He completely replace
the shoulders and he shows more skin here, and he really made a natural looking figure
here on the foot. It does not look really good, but we can refine that. I think he messed up a little
bit with the flowers here, you see that my selection
was pretty rough. Maybe it's sometimes better to make more defined
selection to avoid, yeah, seeing the old dress
here in the background, but overall, it's a pretty
good looking result. Also, when you look at the reflections
here at the old wall, lighting looks really
natural and it could really be shot in the studio. If I want to retouch this now, because this is
the thing you will notice at first to brush out. This seems easy, but this
is a little messed up. I try to generate
this area again. Now, I tried to prompt
black shoes to replace it with the shoe that
was way better because, yeah, otherwise he showed me some not natural
looking feet. Okay. This is not a good result. Those two are pretty good. I think I like this one. It still looks like 1 Ft is
hided behind the other one. Yeah, I think that works fine. Now, I also would like
to edit her head area. I would love to have some
blue flowers around her head. I select the last layer
which is visible and yeah, make a selection
around her head. Maybe like this. And I type in blue and
white flower crown. Okay, let's see what
variations he generated. Actually, this is not
too bad. It's blue. Just white Looks nice
with the hair up here. Yeah, I like that. I
keep it like this and see what massive changes we did really quick change whole mood
from this one to this one. Yeah, this is crazy. Talking about this
fashion subject here, you often have something where you would like to
expand the background area. Usually you would select
and maybe use condo pill, which works good at some points. But in this case, for example, I think it could be really tricky.
So let's try that. But when making the same thing with the generative fill option, I think the result is
better in this case. Yeah, you also generated some weird body parts and shadows which
shouldn't be there. You also see here the border where the
original image ends. Let's redo that. Let's use the generator
fill instead. Yeah. Maybe type in nothing. Okay, It doesn't look perfect
but it looks interesting. I think also better
because for example, he extended the
shadow which usually ended there because the
background ended here. But of course when we
expand the background, we would like to have
the shadow expanded too. If we now would start
to retouch it with some clone stamp or also
with the healing tool, I can't imagine that we
can create a good result.
7. Project Animal (Change Background): In the next working example, I chose a picture of an animal, in this case a horse. But it could also be your
pet or something else. I don't want to
change an object, I want to change the whole
environment in this case. Let's see how we do that. First of all, I duplicate the
layer to make it editable. I start again with a selection. You see here that
we have a lot of fine hairs which is
always hard to select. I would suggest my plan for the background is
to have a forest again. In this case, we have also
a house in the background which does not look really nice. I would like to have a magical
forest in the background. It will be probably also green. It's not necessary
that I have to make it completely perfect
selection here. But also if I would change it to
something really different, I would suggest to
not make it defined tear selection here because
you will see that afterwards. It's better to let Photoshop make those
edges a little softer. And yeah, let Photoshop generated some kind of selection tool, it
could be anything. In this case, I will choose the polygonal lasso
tool to yeah, zoom a little more in and
start selecting right here. I also can select
some of the hairs, you will maybe generate
them again later. I select the horse here, I'm a little bit careful
because of this fence. I don't want it in there. I guess some of the
meadow here can stay, but all the other horses
need to be replaced. Make a selection of
the whole background. I come in again here and try to be careful up
here with the fence again to delete it. Yeah, this will be my selection. Then I think I type something in like magical beach
forest or something. You can be pretty
Pacific actually. If you want to see
a certain trees, you can just type that in. Let's story we replace. And then I start
with my text Pm. This is the variations we
get. This is the first one. This is the second which
looks a little more natural. You see that he tries to blur things out in the background as it
was in the original image. We also have the
ground here just blurt up front and just sharp in the middle areas and
then it gets blurred again. He really tries to
reproduce that, which I think is good. Yeah, this looks really natural. I think I'm actually
happy with that. You could refine
that area here to cut up the tree here
for the first try, I think it's pretty
nice to refine area. I would try to use the stem tool or healing tool when we
rasterize the layer later on. But one thing I want to
show you is that you may notice that the generated layer does not look
completely natural. Regarding the colors, this here looks really
dry and really warm. The background, the green
is really saturated. Normally it would have maybe a little different tint To make that look a
little more natural. We can use a neural
filter for that, I go to filters. I select the, the layer first. Then to filters neural filters, I select the Harmonize filter here in the color category
and click activate. Now I'm able to select
the layer which is the reference for
the harmonization of the generated layer. This is layer run or background actually
the same right now. Then it starts the process. You see that it looks
way more natural. If we switch back, you see that the contrast is a little
lower and it's way warmer. And also the green
is less saturated. Looks a little bit more than
it fits to the meadow here. This is a really
quick adjustment. We could also refine
the adjustment here, but I think it's pretty good.
I'm pretty happy with it. Now I select the output, could be a smart filter or a new layer smart
filter. Sounds good. It shows up here.
And when I have the feeling that I need to
change it, need to adjust it, I can double click it
and it opens up again and I can changes
all destructive. Yeah, to finish
this, like I said, I would now resize it by making a new layer of all
visible layers by pressing again, control shift. And then I would use maybe the heating brush or clone stamp or whatever
and would try to, this is the wrong heating brush would make it look
a little better. Stem tool is better here. Yeah, make this tree
a little better. So now it looks all natural. And when you show that
picture to someone, I think you wouldn't notice
that this is a fake.
8. Project Restore Old Pictures: In this example, I want to
show you a quick way of how to restore historical
photograph with the help of artificial
intelligence tools. In this example, I want to
show you a quick way of how to restore a historical
photograph with the help of AI. Some of you maybe
know that it can be a long and hard process
to restore old pictures, but it can be a
really cool thing. Also as a gift for your,
your grandparents. If you scan old
pictures and try to restore them to make them look a little better because some of the old photos have not really good quality or the scans do not
have good quality. This is something you might
be experienced that yeah, but it takes a long time. And also, if you have
multiple pictures, like 2030 of them, it takes a lot of time to
look at all the pictures, try to retouch them, try to get rid of
all the scratches. Also, in this example, you
see that the faces and the overall picture
is a little bit blurry because I think the
camera was not too good, maybe it was a small camera. Nevertheless, the picture can definitely use some retouching. To make this really quick, we use a neural filter, which is for photo restoration. We go to filter and
neural filters. We select the last one here
in the photo restoration. This tries to automate the
whole process a little bit. Of course, you can
adjust some things, but it does a lot of
things automatically. And it's a perfect of course, but it can speed up
things very much. To show you the differences, I zoom in a little bit here. I also turn on scratch reduction and let it process again. Okay, great, let's have a look. First of all, he enhances
the picture by lifting up the contrast and
also reducing noise. He also enhances the faces,
which you can see here. The faces were really
bury and you can't even recognize real
look of the face. But he tries with the help of AI to replace mouth and nose
to enhance the faces. I think in this case it looks
really unnatural because you definitely see
that this is replaced. I would decrease this
enhanced face a little bit. Now it looks a little better, but the difference is huge. When looking to the
original image, it really makes the
face stand out a little bit more and you can definitely
recognize it better. This is something which I
think is pretty cool when using the scratch
reduction also work good. You see like pretty
big scratches here and just deleted them. This is also pretty nice. I think you also erased stuff which wasn't
actually a scratch, like you see here
some dirt and stuff, but people won't notice if they don't know
the original image. If you don't want to do that
manually all on your own, it can definitely
speed up things a lot. You can also play with
the adjustments here. You can also enhance the noise reduction if the
picture is still too noisy. You also have color
noise reduction. If you work with color pictures. Yeah. And different
adjustments here. This is something I really
wanted to show you, which can be pretty cool. When working with old pictures and working with a
lot of old pictures, it can make your
life a lot easier. Of course, you can
set the output, I would love to have it on a
new layer or a smart filter, in this case a new layer. And you can start with manual adjustments if you still not happy
with the result. But yeah, that's it.
9. Project Storyboard: In that last project, I want to show an example which is
a little bit more for people who work in the film and video industry
they are familiar with. Yeah, creating
storyboards, making concepts to plan and
communicate a video shoot. For example, when you're
in pre production, you create storyboards to plan what shots you
want to produce. Yeah. To see if the whole
story works or not. To do that, you usually need
to have skills for drawing. I personally don't have them. There were a lot of situations in the past where I wanted to create
storyboards and yeah, really try to find mood pictures which
actually fit my vision. But this is a really
hard process yet. Would be way easier if you
have like drawing skills and just start drawing the
scene you want to show. With the new artificial
intelligence tools for Adobe, it's way easier to create a sketch just with
the text because, yeah, explaining
what you want to see is way easier
than drawing it. So I want to show an example
where we create a sketched storyboard with Adobe
Firefly and Adobe Photoshop. First of all, I create
some art parts. I go to a new file
here in Photoshop. Yeah, click on new file, and now I make a classic video
resolution, 1920 by 1080. I click the checkbox
here for parts that will create multiple art
parts and not just one image. Resolution is fine, RGB
color is also fine, and background White
is also fine for me. You can also create a
different kind of background, but this is what I
want to choose here. I click Create. Now we
can select the artboard, and we can also add some
more artboards here or under it to have a storyboard
playground here. If I would like to
generate some drawings. The first thing, I tried to just use the
generated fill option, but he does not have
any reference here. The background is just white. You can try to use generated
fill just on white. It does work partially, but most of the time creates just scaled version of the
object or seen you described. I'll show you an example. When I type in go on a bike, pencil drawing for example,
and click Generate. It will produce some
really weird stuff. I show you how to do it, right? You go to fly, you can use the text image tool. You go to text image,
click Generate. It opens up this page and you can just start to
describe what you want to see. In this case, I want
to see, for example, street with family hoops, houses on each side. Pencil drawing and
click Generate. Then you can also
adjust the whole look. I imagine something
without color. I also imagine something
which is not square. I adjust this, I go
to white screen, can also change color and
tone to black and white. Lightning is good right now. Composition, it's also good. But I can, for example, choose wide angle
or shot from above. If I imagine some
more specific shot which is made, for example, with a different lens or in
a different perspective, it's pretty helpful
especially for story bots. If you're done with
the adjustments, you can just click
Generate again. Okay, great, I really like this one. I
also like this one. Can then just click on it and switch between the
variations here. Yeah, I think I choose this one. If you want to download this
and put it into Photoshop, you can click here
on more options, Click on Download, and then
yeah, downloads your image. Now we back in Photoshop and I paste it. In
some environments. I always would suggest if you want to create
the storyboard, you have some ideas
and you write them down when you want to work in Photoshop to reorder
them or to adjust them, for example, with
different objects, different variations. You paste those environments in. For example, a
street, for example. A road coming from the mountain, the meadow with a street
in the background. A street with some water
in the foreground. Things you imagine
to have in the shot. It could be also something
which is not that white angle, could be something
which is also more close like I showed
you in firefly. You can adjust this
and you can also just adjusting by writing
it into the prompt. Now we can work with this. If I select this art here and now I want to add
the girl on the bicycle. I make my selection
for the place I want the goal and the
bicycle in, for example, right here I click
generated fill and type in little girl writing. And now you see he not really adjusted the style totally
because he used color. So this is not too bad. But I want to have a black
and white pencil drawing. I adjust the prompt by writing. This variation is actually
good. In this case. It fits from the size and
also fits from the style. So you can clearly get when
you want to communicate here. And of course, it works
with other objects, for example, of the street here. And want to add, for example, a hot air balloon or something. I just mark the part where
it needs to be type in. Hot air balloon pencil drawing. This is what we get when you
type in hot air balloon. Then he tries to adapt
the style of the image. First I try to, just to type in hot air
balloon pencil drawing. What happened is that he gave me object with a
white background. Maybe because he
thinks pencil drawings need to be on clear
white. I'm not sure. But yeah, if you just
type in hot air balloon, it really fits the style. That's all right. You
can continue like this. Just type in what you want
to see on every environment and you can create story bots pretty easy also
if you can't draw, which I think is pretty helpful when creating story bots
for video projects.
10. Thanks: Thanks a lot for
taking this class. It was a pleasure to show
that new tools to you. I hope you feel inspired and
I hope you start exploring and use that tools in your own creative workflow
to make your life easier. Feel free to share
all the results you created when making the
soon project or afterwards. If you have any questions, also feel free to ask
here in a common section. I try to help you with
everything I can. If you're interested in
more software classes, then you can also
check out my profile. Thanks a lot and see
you soon. Bye, bye.
 Paul Cybulska, Creative Director