Transcripts
1. Introduction: [MUSIC] It's easy to look at something
and feel totally overwhelmed on how
to possibly draw it. I fully understand that. I am an artist, and each time that
I sit down to draw, I feel like I don't know how, but that's simply not the case. It really comes
down to challenging ourselves to just
see with new eyes. In this class, you're
going to embrace the imperfections and character
of one-point perspective. You will learn how
to easily identify the necessary areas in a scene that will help you
build out your entire sketch. You'll also learn
how to power through the ugly stage and trust that the process is intentional, and of course,
then you will walk away with an adorable
acquaint sketch. I am so excited to take you
through what I have found to be a rather profound
adventure and discovery. I just think that there
is nothing quite like seeing something and adding
your own unique spin on it, whether that be in
style or selections, energy, color, any
or all of the above. I'm Peggy Dean. I am an artist, a best-selling author,
but first and foremost, my true love is education. As a self-taught creative, I have a unique approach in my classes that I am so
excited to share with you, things that are very doable, exciting and could be the entry to a whole new
passion in your world. Grab your sketchbook and
come along with me on an exploration through
some old city charm. [MUSIC]
2. Welcome & Sketching Tips: Welcome to the class. Your project for this class will be to take the tools
and skills that you've learned and apply them to create a quaint sketch that is
bursting with character. You can make this
experience your own. In fact, I encourage
you to do so. Remember that as you connect
with your creative side, this isn't about
drawing perfectly. You don't even have
to know how to draw. Well, I will be taking you through the key rules
that you need to know, that will allow you to feel the structure that you
feel that you need. I will also be allowing
you and giving you permission to be free
in that as well. Sketching our surroundings is better presented when there is an organic element to your energy put into your sketch without
the perfect lines, without the perfect
symmetry or proportions. Being free in that way will
allow you to cultivate a much deeper connection
to your surroundings, which is what this is all about. I do encourage you to be on location during your
sketching practice, and I understand that it's
a little bit tricky when we're learning on a
computer [LAUGHTER]. For that reason, I have
created a Pinterest board. I've linked it in the
downloads for you as well, that gives you some
additional inspiration. But as you learn this stuff, go out on location, find an awesome scene, and sit and enjoy your surroundings because
that energy is what really infuses life into
what we're sketching. That being said,
let's keep going.
3. Sketching is Not Photography: Sketching is not photography. When we draw without
limits or guides, we can make it our own. That is allowing for
wobbles, irregular shapes, wonky proportions, and some people's least
favorite word, mistakes. If we tried for
perfection, our art, especially our
sketches, they would be technical, they'd be flat. Let's look at the differences
in these house sketches, for example, which one
draws your interests more. I am willing to
bet that it is the wobbly lined, imperfect version. It adds character and coziness, because sketching
is not photography. We're not trying to
win an award for the most photographic
freehand sketch. [LAUGHTER] We're
just simply sitting down and enjoying
our surroundings and taking a picture with pen and paper instead of with a camera. While I'll be
introducing some of the main sketching rules
to help guide you. I do want you to think
about these rules loosely and allow yourself to feel free in your
sketching practice, there's not a right
or a wrong way for how you show up in your art. I want to encourage
you to embrace imperfection as it arises
and celebrate mistakes. I want to talk about
photos a little more because when we
take photographs, we record that exact moment. Let's say we're viewing
a beautiful building and it's got incredible
architecture and we take a picture of it. Then later we review that
picture and we might see some unsightly items that we didn't
initially noticed. Maybe there's a
construction zone at the bottom of it with a dust cloud and people in
hard hats and maybe there's a bunch of cars parked in front. It just takes away from that initial magic that you wanted to capture in that photo. But when we sketch
our surroundings, we have the luxury of
picking and choosing every detail that we
want to record on paper, And then we can
leave out the rest. Everything that we want
to remember is a choice, and that's pretty magical. Capturing these moments with our own unique interpretation, it's intentional, it makes
them even more special. I just want you to put that note in your
pocket as you sketch. Remember that this
moment is yours.
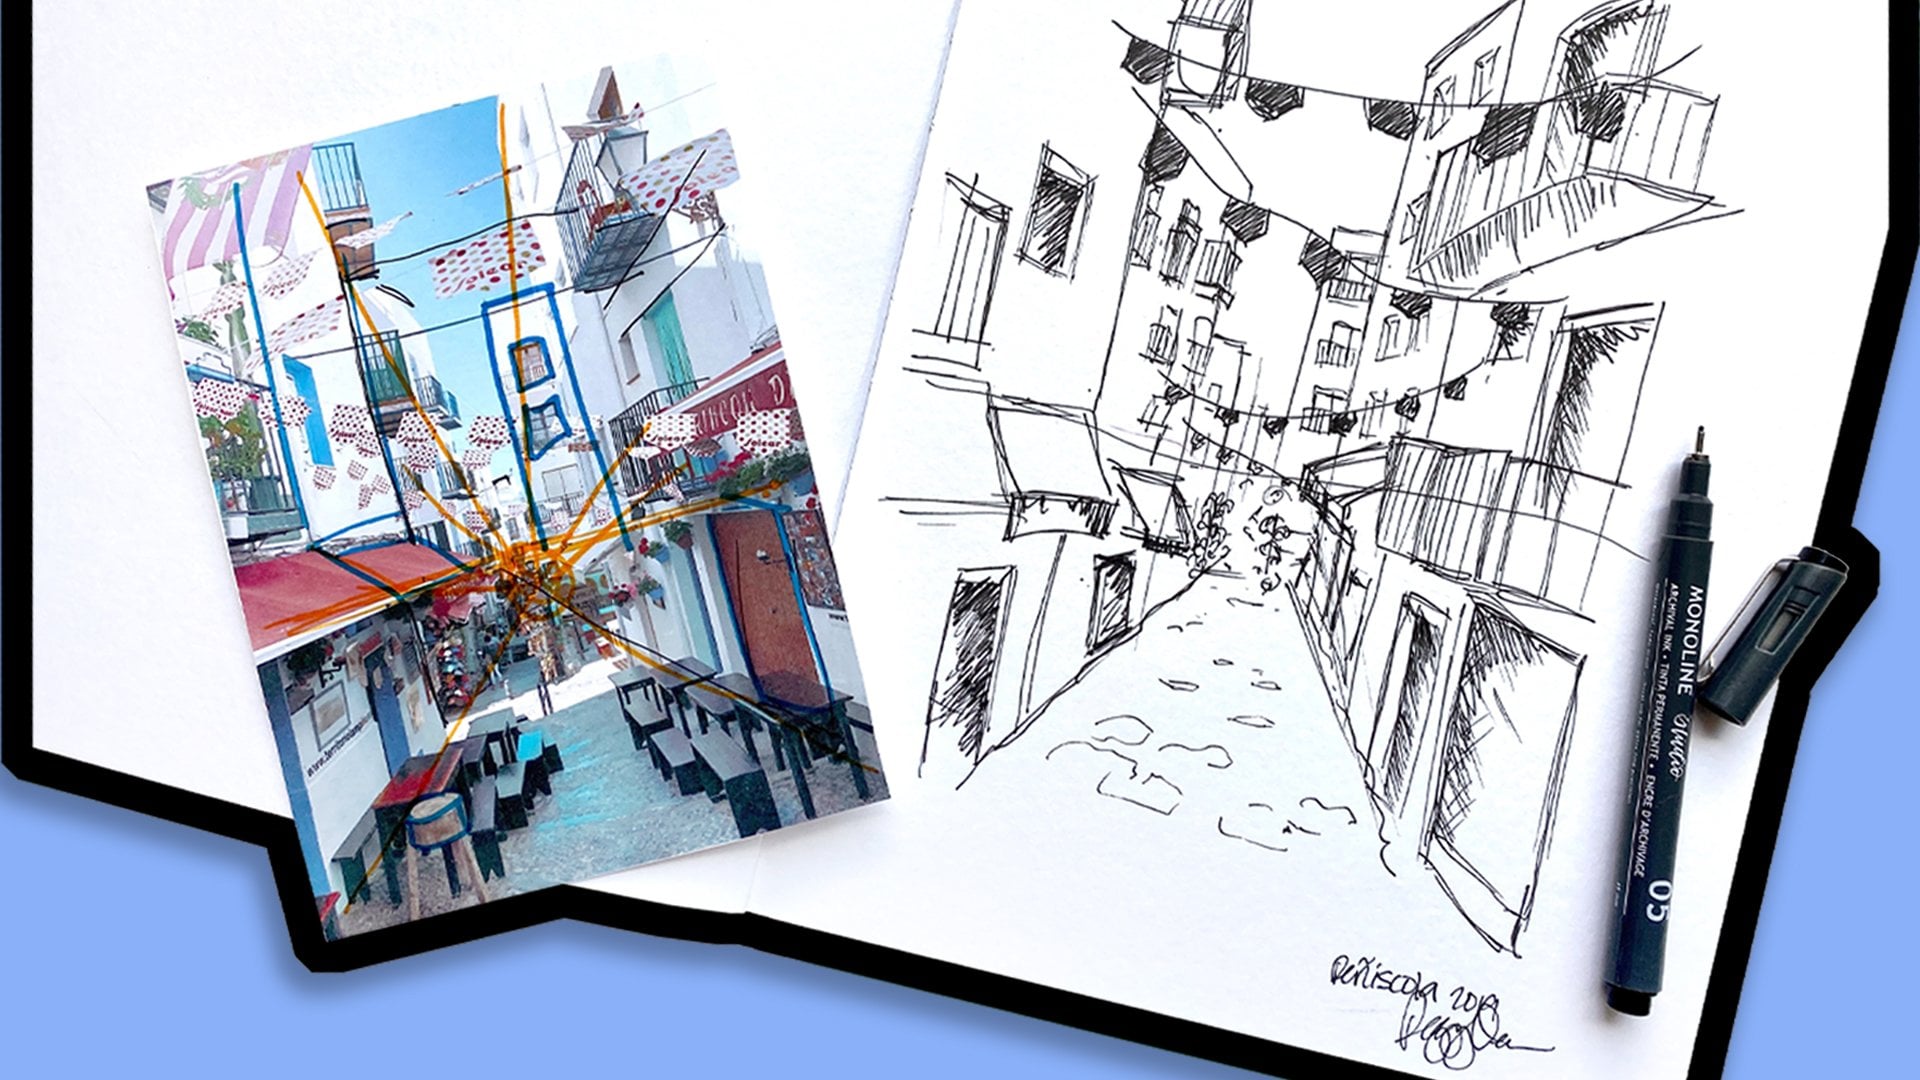
4. Identify Key Points in the Scene: Guys, in this walk-through
we're going to be identifying vanishing point
in a photo or a scene. You might be in an actual
place which would be super ideal for this type of sketching because it's so
fun to do on location. But if you want to
work along with me as I am using this photo, you can snag it right
under Downloads. I took this photo when we
were visiting Rosenberg, which is an adorable
little town in Europe. Visit this. I also have a
perspective guide to download. Head over there and grab it. Let's start. I am going to help you with one point perspective
because it will help you. Basically, you can still embrace the imperfections of urban
sketching but it's going to allow you to actually
feel a lot freer in making basically
your perspectives look more true to life. It's like learn the rules to break the rules kind of thing. This is actually really easy. Typically, in a
landscape or a scene, you're not going to have a
building right in the center. Instead, you're going to see basically where the
land meets the sky. In this case, we can't
see that but we can find it by going according
to the vanishing point, which we can very easily see because these buildings
will point there. Going off of the road, let's say there
wasn't a sidewalk, we could go off the buildings but basically
one-point perspective, everything is headed
to the same area. You can see everything is
pointing this direction. Sidewalk is going that direction
and you can see that in these spaces they're
pretty wider and they get smaller
and smaller and smaller and then they meet. Everything is meeting
about right here, which means that's where
our horizon line is. What you'll also notice is
that that is our eye level. A quick tip that we're not even going
to go over [LAUGHTER] this part but if you ever want to draw people
in your sketches, you'll notice that all
of their heads are basically along this
eye level line. They might be slightly
above or below depending on their height but for the most part they're
all on that line, even when they're closer
to us or further away. They would just get larger and smaller but they would
stay along the same plane. That's just a quick tip. Now, you will see
the buildings will also come down towards
that vanishing point, the elements within each
building also pointing. See if I go along
this window area, if I go along the side here, everything is pointing
towards that vanishing point. If I continue on, we're all going to
end up meeting there. That is the easiest way
that I can explain how to basically eyeball and see where that
vanishing point is. When you start a sketch, knowing that in mind
you're not going to have these bright pink arrows if you are setting up an actual scene. I know some people
who will actually lay down their
horizon line first. It's totally your discretion
if you want to do that. I'm just going to
use half of my page. I'm going to take this
away so that I can focus just on this space only because it's easier
for me to see, considering that it's
about the same size. It doesn't have to
be. It's just I'm doing it right now.
That's what I'm doing. Horizon line, you can see
it's basically takes up, if I measure that 1, 2, 3, 4, 5, a fifth of the scene, so it'd be about right here. Sometimes I'll just do a
dot and that'll represent my vanishing point or I'll
draw the actual line. It just depends on
what you want to do. Drawing the line in does that whole embracing
imperfections thing where you are really going to let loose and let that flow. It looks really cool sometimes, but if you're trying for
something a little cleaner, I wouldn't say more
perfect by any means, it's just more of
a cleaner sketch then I would go this route. Now that we have identified
our vanishing point, we're going to move
in the next lesson into figuring out scale
based off of what we see. I will see you there.
5. Break Down the Scene: Now that we have looked
at vanishing points, let's figure out how we can
scale this in our sketch. I want to look at, okay, I'm standing basically
in the center here and my sidewalk is about, if I was to split
this in thirds, it would be just outside
of those thirds, so I can start my sidewalk like knowing
these are my thirds. Maybe right here and right
here-ish doesn't have to be perfect. That would
have been done here. Then I can have that lead
to that vanishing point. But what I also want to note is that my sidewalk doesn't
end at the vanishing point. It actually ends
before that because I have this building in-between. Something to help me
out here is I can just draw that line in
and then I will see easily that I can just draw my sidewalk and
I'm intentionally making my lines wobble, because I like the
look of it better, so I have where my land meets, I have my sidewalk, and I can continue. If I go out a little bit
further and see the width of the sidewalk in reference
to the edge of the page, it's probably about halfway, so then I can bring
this and have it meet and go about here. I'm not having it
meet perfectly, but I wouldn't because it doesn't go all the way to the vanishing point,
if that makes sense. You'll also notice that I
am doing this very quickly. I'm not putting a lot of thought into it because I'm sketching. I don't want this to be overly
thought up or whatever. Now I can pick any element in here that I
want to base things off of, so larger objects are easier
to get out of the way, just make sure they're
not like overbearing. When we look at
buildings from the side, this is what can constantly trip us up a little
bit because it's like, okay, this one's pretty big. Let's draw it this hallway, except we didn't realize that it actually only takes up
about this much space, and the rest of them
are very skinny. It just looks large to us, because our minds
make it very 3D. What I'm going to do is, I'm going to draw
this line and I don't care that it's going to
interfere with this detail. I'm just going to draw
it straight down and I also see that it probably meets basically
where the sidewalk, maybe as a corner. Probably right around here, I will note that and
just draw a line. But first I want to see how high up that goes
before the roof comes in. If I look at it in
the fifths again, it's probably one, two of the way down. A fifth, one, two maybe right write, draw that line down like this, and then I'm going to measure basically the width that
I can do the next part. Let's see if I measured it
according to the sidewalk. The longest part here, I would measure that and see. We got one, and then maybe like a third. Note that the measurement here may or may not
be the same here. I'm just thinking, okay, the sidewalk is one-and-a-third for the measurement
of the buildings. Here I've got that, then I've got one, and
then a third of that. Probably just about right here. Just extends a little bit. You can see that's actually a
very small amount of space. The other part is
that we want to make sure that as we draw this up, we don't meet it. It comes down to where this
vanishing point would be. If I was to do it in perspective and line it
up like about right here, it would come to about here. It doesn't have to
be perfect again, but that way we can really see the direction that's going. Then we'll do the same
thing with the rest. Now, I'm not going to sit
here and measure everything. I just wanted to
show you that trick so that you feel more comfortable as you are creating your pieces in a
perspective type of way. But again, learn the
rules to break the rules, I'm going to be loose here. This part right here, you can see that it drops below. I'm going to drop below
and then come down. That is too wide because I was going off of this
mark that I made earlier by accident,
but that's okay. I'm just going to make
it intentional and pretend that is the
way that it was, and I'm not going to have
a reaction about it. I'll keep going along
the horizon line, I'll bring this down like so. These are probably going
to want to be longer and I am totally good with overlapping lines if
there are any mistakes or I need to go longer and I don't just want to add
only to the bottom, I can drag that up and make it look like it has a
lot more character, and I do that a lot in
my pieces because I have to fix it a lot. Now let's see this one. I can bring in, and then it looks like it meets with a friend here
which juts out further so I can bring that up to about right there at the bottom and
then it comes up more. I think I'll just do a
straight line just because the details are so
small there and I don't want it to detract too much. Obviously, the roofs
aren't this low, but I only did this part of the buildings
and now I can add onto it. I did that because that was a
straight line that would be a lot easier to follow. Not a hard word to think of. I'm going to do the same
thing to the other side now. Obviously this
building is cut off, so I'm going to be about just
basically the edge in here. It does line up with the
sidewalk in the picture. Well, actually no, I was coming in
anyway, so we're good. I'll come in a little
bit and then draw that straight line up to about the same height
because you can see across and now I'm using
my buildings that I've already drawn as my reference
versus doing measurements. It's going to be approximate. Then I will do the next one. This one, I'm not going
to draw an edge too, this one I will because
I'm going to have it jut out that direction, but this one's going to fade off because there isn't
that corner that I see. Then I'll do the same
thing on the way down. I just know my vanishing
point is here. I want to draw these
buildings getting skinnier and skinnier as
they continue on. Then you can see there's
another building here that juts out, which we can add in a minute. Basically so far we
have the structure of one point perspective
with a vanishing point, which is exactly what we want. Now that we've identified our vanishing point and our
scale, in our next lesson, we will be going over
actually getting some of these quaint little
details place so we can start to
build our scene.
6. Begin to Build the Scene: Welcome back. We've gone over perspective and vanishing
point and scale. Let's start to build our scene. Now I'll put this
little tunnel in here. I can see it's pretty
small at a distance. I might just make a
creative choice here and go a little bit larger
than what it actually is, just so that I can clearly
see what is down there. Then I can go over it one more time [LAUGHTER] if I
don't like their shape, but that's another
creative choice. I wouldn't go too much with adding depth
to the background because you don't want to draw too much attention there when you want to pay
attention to the foreground. But this is one where
everything is very attractive. Use your discretion on how much detail you want to add or
subtract and what not. Now we can add those
smaller details and you can see there are a
lot of windows to play with, a lot of doors to play with, roofs to play with, which
I'm going to put in first. But I don't want you guys to get discouraged knowing that
these are angled roofs. Just know that if you follow
the general guidelines, you're going to do all right. Just know, like here is the
base of this building here, so I can draw that base up. This is the angle it's at. You can see that this angle here is going towards the
vanishing point. If I know that, then I can come up
and draw it like so. Then the roof, this is the only part I
really need to pay attention to as far
as like something I don't have a guide
on the paper for, I will just make sure
you're in frame, here we go, which is the angle. The angle is not completely
vertical, it's slightly up. In our minds, we know the
roofs to look like this. But if we did it like that, then it wouldn't be
true to perspective. You can see, where do
my vertical lines lie? It's just off of that, so vertical line,
just off of that, and then think about also how
tall it is in comparison. It's just a little bit shorter
than my actual building. I'll just go to right here. It's going to make sense
as we go so don't let it deter you or make you freak out if something
doesn't look just right or you didn't
get your angles perfectly. That's okay. Then from here I see that
I have a roof that juts up from just above that roof, so I'll do that and it looks like it's not quite vertical, but just for the sake of this, I'm going to make mine vertical. It's going to make
things easier, not quite vertical. That's okay. [LAUGHTER] That's another
thing that can happen. I'm looking at this angle
also not making it perfect. Remember we're sketching and we're just creating interests. My width right here,
might not be perfect, and my length might
not be perfect, and my lines might
not be perfect, but that's not what
I'm going for. I'm going for just interest and capturing an overall
mood with these things. I have this detail
which heads along my vanishing point here and then my roof connects and then I've got this
vanishing point. That might look really steep, but when you line
everything else up, let's see, I guess that would
be done about right here, according to the vanishing
point then you can see as you finish
filling this part out, it starts to make
sense because you see that the angle is
just really steep, and then when all the buildings start filling out this way, you will see that they
are just really steep. I did that a little bit low, a lot a bit low. I might even just come in
and redo it and then just draw my windows over that
and I'm fine with it. Those are those
little imperfections. I'm going to bring this up, vanishing point and then it looks like those are
the only line lines. Then we can go into
the next building so it has a line along there to, so see how they're just going to start gradually going out. This is about halfway
through the roof, so I have that end and then
I have this angle that meets the bottom
corner of this part, so I'll bring that down and then another one
that looks pretty vertical and connects and then align this line
that goes straight down. Again, not going to be
perfect and that's okay. Now I can do this
side of those roofs. See what I'm doing is I'm outlining and putting
things, like basically, building up the larger
shapes and then going back in and
doing smaller shapes, and that's what I've
done the whole time, I outlined my vanishing
point from the ground. I did the general spacing of the building and
how that will look. Now I'm going in and
adding the roof parts. It looks like this one has got a double situation going on
for the sake of right now, I'm not going to
worry about that and I'm just going
to go straight up. It's toward the top of my page
because it's pretty steep. I'm just going to have a
little slant down like this and connect, and then this one we'll jut out. I'm just going to assume I can, see the top of that
and bring it over. Remember, horizontal lines
and vertical lines are always actually
horizontal and vertical. It's the diagonal lines that
are going to go according to the vanishing point unless it's like a
weird slanted roof, but the top of it, horizontal, aka, horizontal [LAUGHTER]. Then there is that
definition or that, wait you can't even see this, that line here, so
I'll put that in according to the
vanishing point. I mean, I'm not
lining a ruler up. I'm not making this a thing. I'm going to bring this up
so you can see it better. I'm going to keep
repeating that stuff because I want you
guys to really embrace the fact that this
does not have to be perfect by any means. I'm going to come out here, do the same thing
with those lines. That one is going to be a little wonky and
I'm okay with it. About halfway down, I've got another roof here and
it looks like it's going to come down here and
then there another wonky one. The cool thing is though like
the more wonky they look, it just continues adding
so much character, and I'm so all about that because when you see the
complete and finished look, it just looks hand-drawn. It looks like I did it and it's more special
that way for some reason, anytime that I see a sketch, I feel energy and
I feel character, especially like old cities like this I just
think it's magical. I think that, let's see,1,2, there is another one right
here, that seems okay. Then this building comes up a little bit higher
than the other one. Then it's got one of these guys. But see how I'm not even
measuring this extra part, I'm just putting it in because
I can see that it's there. But I mean, nothing about
its perfect at all. Sorry, I'm a broken record, but you're going to
be happy about it. Oops, I put that
in the wrong spot. [LAUGHTER] See what I mean, it really doesn't matter as much as we want
to think it does. Those little details
are going to happen. Now I can start adding
detail and what not. I'll add this building
actually in real fast so I can think
about that in a grander scale and it looks
like I'm going to make it pretty wide according
to what I have here. I'm going to just bring this false line in
so that I can have a skinnier portion of
space to work with. Creative choices they change everything for us
in the best way. I'm basically just
creating a separation whether it's super
accurate or not. Then I will add in
this part at the top. See how it's just very basic. They're expressive lines, rather than being too particular. We're pretty
particular as we start building this main structure. But then from there that's
where things get really loose and playful and fun. Now we have built out the
skeleton of this, if you will. Let's move into doing
these same techniques on a smaller scale as we add in our windows and doors
and all of the like.
7. Add Details & Features: Let's do this on a
smaller scale now. There's tiny windows in
here that I'll put in a little bit bigger just so that they're more recognizable. Then this looks like
a brick buildings, so I'm just going
to wait and see how much detail that I end up adding to everything
else before I add any wall texture in. It looks like there's
a clock right here. But I also really want to draw this overhead hanging light,
another creative choice. I might include the clock, and then come back in and make this maybe a little bit lower, or something so that it's also its own differentiation
type of thing. Windows are tricky. You will want to draw them [LAUGHTER] wider than they
actually are, don't do it. For this one, you see how thin, I probably did it
a little thinner than it actually is.
But that's okay. There's two sets and they're
going to be very skinny. What I like to do is separate
the center part of it, go along my vanishing point, and then follow that up. It looks like
there's three here, and two there, so not perfect. But I put those in and
I also really like, especially in the foreground, putting some framing around them because it
adds that detail. But as we get
smaller and smaller, I want those details
to be less and less. This is gestural
drawing [LAUGHTER] where it gets very quick. I'm putting lines in there that don't need to be in there. If you want this to be cleaner, you have full control
over making it cleaner. I just want to show you
that you don't have to put as much crazy
thought into making things just so if
you don't want to. But now I'm just looking at
things and building them up. Then I can have
that shooting out. I'm going to wait though
and see how things are looking as I continue
on to this part. I don't want this side, something that's
basically vanishing. I don't want that to detract from the scene that I'm actually trying
to draw attention to. You can see how this
window down here, it goes up, and this one slant down because they're all going
toward that horizon line. Excuse me, I keep saying that. Well, it is the horizon line, but the vanishing point. Something to note that because these are higher
up than our eye level, they're not going to
meet that exact line, whereas this one will. Basically, there's room here. There's room here because this
building is in the center. If our horizon line is right here and this
building wasn't here, you can see that they would
all be going into that spot. Just as an FYI in
case you're like, but this isn't lining up. This spot right here, it looks like there
is some bushiness. I love putting plants in, and I do them just by doing
these basic squiggly lines. Then I will just
add a little bit of the same on the inside to add some
depth, and that's it. I wait to do that shadow and stuff until the end so I can see what I actually want to emphasize whereas some people
do that part right away. I think that once you get into your sketch mode
and your work mode on how you want to accomplish
these shapes and what not, you will come up with
your own preferences. Sometimes I know
that I'm going to want more darkness
in these bushes, so I'll just throw
a little bit more. It looks like this one's potted, and I missed that opportunity. [LAUGHTER] It seems fine. I don't need to add the,
pot but I could've. Then on this side, same thing. I will have this window, basically like this line is less slanted
than the other one. This window is a
little bit shorter. It is what it is. It's fine. Can I
get these guys in? You can see these are just very quick marks
and then I'll do these little balcony deals. [LAUGHTER] That's how they are officially called.
No, they're not. This one is pretty steep, so using that guide
line will help, and you can see I
made those too wide. But I'm not too worried about it because those closer to me, so it's not the
end of the world. There are also little spaces
in these windows that have, you can see the interior framing if you want
to put that in, totally could especially
if you have cleaner lines, it looks really nice. [LAUGHTER] My lines are never
very clean when I sketch, I just prefer them
to be a lot looser. This set of windows, looks like I only fit four in
there and I'm fine with it. I didn't really worry
about angle so much because I'm just
mark-making at this point. Then I also like them to
start looking a little bit wobbly because I just find it
to be more characteristic, so that's just something
that I have done over time. I just want to tell you about my thought process
around it so that you both have ideas but
also aren't questioning, if you're doing
something too different. Mostly just embrace
that there's not, with sketching anyway, some official anything
that you have to follow in my opinion except for learning the rules
to break the rules. [LAUGHTER] You get
what I'm saying. [LAUGHTER] If you
don't, I'm sorry. [LAUGHTER] I have my scene sketched out as much as I want, as far as structure goes. Now, I can add detail
in where I want to. I don't know if you can
see over my pink line. [LAUGHTER] But there
is some action going on behind,
underneath here, so I could add
buildings that are peekabooing through if
I wanted to, like that. I do like the look of it. But I also want to basically add a lot of depth so that it's clear that
that is a tunnel. I will walk you through mark-making techniques
here in the next lesson, and we will apply that
to our entire scene.
8. Add Depth with Mark Making: Once a full scene
is sketched out, it can look a little bit bare, and that is where
we're going to go in and add mark-making
for depth. I'm going to go ahead and
just do these hatching marks. I'm doing them pretty quickly so that they're nice
and thin and flicking my pen so that they get
less dark as we go, and then basically add a sidewall even though
it's on the wrong side, but that's okay
to elude to that, the road goes in and then my horizon line as
somewhere like this. Now I'm going to do this same effect anywhere
that I want to add, any shadowing, so maybe
underneath some of these ledges. Hatching is just one
way you could do it. I mean, you could
do crosshatching, which looks like those lines, but then the other
direction too. You could do actual
scribbles from mark-making. You could do these types of lines, horseshoes that overlap. Anything that adds depth is going to give you the effect
that you're looking for, so don't think it has to be
clean or anything special. The one thing I would
recommend is just making sure it's consistent amongst your entire sketch
because if it's not then it can start looking like it's trying to be some form of texture instead of shadows. Like these lines here. If I was doing these
here and these here, that doesn't correlate really, so that's where I want
to keep that in mind. I don't really have a
set style of shadows. I do hatching a lot, but I feel like sometimes something is different
because I just want it. I don't know. It's
like my mood that day. You also don't need a particular style that you
stick to every single time. I know some people who
just go in and scribble, which is really satisfying. Maybe you haven't
ever just gone in and added some depth that way. I'm just going to
do this quickly. I don't want to bore you
guys with me doing this, although I think that some
people have said it's really satisfying to either watch
or do and I'm sorry, but I disagree.[LAUGHTER] But I'm really engaged in
and that's why I love sketching so much because
it's something that I can do and have these really
beautiful results without having to put a lot
of effort or energy into it. [LAUGHTER] That's me. Let's see. There's something
here I'm missing. It looks like these
tiny windows. That seems good for now. I might add some more
later as we build. Well actually inside some of these windows
that are larger, I could do some link
door frame shadows, either the whole
thing if you want to. Like within those spaces, I know some people who
do a lot of contrast, and it looks really cool so you can do as
much as you want. Once that's done now I
see, here's my contrast. Here are my angles. What details do I want to add to
bring this more to life? I did notice this was
a brick building. However, it is more
toward the background. It's not like super
deep in the background, so adding a tiny bit of detail wouldn't
be the worst thing. But when I do this, I'm going to bring
you even closer now. When I do this, I am basically drawing bricks that are
repeating rectangles like this. But when I'm doing it small, it's just going to
be really light like this in a couple of places, maybe even smaller than that, and it's just to
show that there is texture on this
wall and that's it. I don't need to do
the whole thing. Just from these small marks, it shows that that
texture is in there. Same thing with roofs like
this one's got these really pretty what do you
call them, shingles? I don't know, but I'm
going to do a few of them and just little
clusters, and that's it. That's it. I'm not
going to overdo it. I do want to add
that guy and just because it's such a
prominent feature, so I'll just add that
much of it and that's it. I'm going to do a
couple of little shingle marks on some of these roofs and I don't know if they all have the
same style or not, but I don't care
because I want them to. [LAUGHTER] That's another
thing where it's like, okay, I'm making these
creative choices, and what do I want my
sketch to look like? What character do I
want it to portray? Then lastly,
cobblestone streets, I never want to leave
those out. I love them. Thing to note about cobblestone, I'm going to make mine larger than what's shown in the photo, just so I can
really make it out. But this is the same
thing as that brick lay. Only these are
circles that are just really wobbly and I'm only
doing like that many. Then as they get further away, they get both
shallower and smaller. You want to keep that in mind. If you're doing any texture on a road or something
that is going further away like so and then
basically, that's it. I call this done
as a fun sketch, super easy to do. If I want to add a splash
of color, I totally can. But as far as just the
illustration part of it, you can see how it was
super easy to build up. I can pick and choose what
stuff I want to put in there. I also opted not to add
people you probably noticed. Because I just wanted to
really show you guys and break down how to go off of one-point perspective of vanishing point that will help
you build an entire scene.
9. Continue Your Sketching: All right everyone, we have
come to the end of the class, which means it is
now time to get out there and draw a beautiful, charming little scene, and I cannot wait to see it. Be sure to share because the way that we all interpret these
different scenes, and these different energies that we bring to our
sketches is just magical, so I can't wait to see it. Be sure to follow me on Instagram at The Pigeon
Letters, check out my website. I've got tons of
freebies for you at The Pigeon Letters.com. I just love this
community and I want to really inspire creativity
as much as possible, so can't wait to
see your projects, and I'll see you next time.
 Peggy Dean, Top Teacher | The Pigeon Letters