Transcripts
1. Welcome! : I'm my most creative and peaceful self when I'm surrounded by nature. I love long hikes, going camping, and getting super far away from civilization, but currently I'm living in a city. But I've realized that instead of waiting around for my next camping trip or adventure, I can use nature journaling as a tool to find gratitude and natural inspiration right in the middle of the city. Hi. My name is Rosalie Haizlett, and I'm a Nature Illustrator. I really enjoy creating vibrant detailed paintings that showcase all of the awe-inspiring intricacies of the natural world. I also like to create artwork that's educational, and I've been really fortunate to get to work with outdoor gear brands like Keen Footwear, and educational organizations like the Smithsonian, and the US Fish and Wildlife Service. Nature journaling is the practice of following wherever our curiosity leads us and documenting the discoveries that we make outdoors. This activity allows us to step away from our phones, experiment with new artistic mediums, and learn just for the sake of learning. In this class, I'm going to transport you to the sidewalks and parks of Pittsburgh, Pennsylvania. I'll guide you through seven days of artistic prompts that will help you find, observe, and depict different aspects of the natural world that are right in your city. All you need is about 30 minutes each day to take a quick walk, and complete the prompt. This is a mixed media class, so we use a variety of artistic materials to develop our nature journaling pages. This class is for everyone regardless of your talent or a previous art experience. It's not going to be about creating a beautiful frame where they're painting, instead it's about cultivating a sense of gratitude for what's in your surroundings and developing a curious creative mindset. When you start to be able to gain inspiration from nature that's around you however limited it may be, you don't need to sit around waiting for those rare opportunities to travel to beautiful natural places. You can find beauty right where you are. I'm excited to see the creative discoveries that you make throughout this class. If you're ready, let's get started.
2. Your Materials: Let's chat about the materials that you'll need for this class. This is a mixed media class, so there's a really wide range of materials that you could use. If you'd like to see the exact materials that I'm using in this class, you can find a booklet under the project resources tab that goes over everything that I'm using. What you definitely need is a sketchbook with at least seven pages if you plan on doing all of the prompts. If you don't have a sketchbook, you could always use seven sheets of loose paper and you could put it on a clipboard or a hard surface, and that'll work totally fine as well. If you're planning to use mostly dry mediums like pens, pencils, charcoal, you could use regular sketching paper, but if you're planning to use watercolor or gouache, then you'll definitely need mixed media paper or watercolor paper. That way the paper will hold the water without the paper tearing. It's helpful to work with a small sketchbook like this one because it's super portable, it's put in your backpack, and also it's a small space because we're just doing quick prompts. I found that for me sometimes if I'm working with too big of a page, I get a little bit stressed out about how to fill up the entire page. You'll also need a pencil, so we will be beginning most of our prompts with a light pencil sketch, so you want to make sure that you have a pencil on hand. It's also really helpful to have an eraser. We'll be doing one prompt that's focused on interpreting the world around us in black and white. You'll want to have some materials that are black and white. For me, I'm using a black pen, I'm using my pencil, and a gray watercolor pencil. Anything that you have that's black and white, maybe it's black watercolor, maybe it's black colored pencil. That'll work great for that prompt. We also want to capture all of the vibrant colors that can be found in the nature around us. Make sure you have some colorful art materials on hand, whether that's paints or markers, or colored pencils.
3. Project Overview: Your project is to follow each of the seven prompts in this class. But there's a lot of flexibility here, so you can just work it into your schedule however it works for you. I'd recommend allowing about 30 minutes to an hour to complete each prompt, and that includes your walk outside and filling out your nature journal page. You can share all seven of your nature journal pages or just the one that you feel most confident in. You can also spread these prompts out over a longer time period so if you wanted to do one each week for seven weeks, you could definitely do that or you can complete one each day for a full week and see how that complete every day immersion into the natural world changes the way that you see things. Once you have all of your materials ready to go, follow along with each video and complete the corresponding nature journal prompt. You can work from live or you could work from photos that you take on your walks around the city. Since it's early spring where I am and it's super chilly, I'm going to be mostly working from photos so I don't freeze my fingers off, but a couple of days I will bundle up and spend some time actually creating outdoors. I want to take a second to acknowledge that not everyone feels safe in their city surroundings, so if you want to do these exercises but you're thinking, I don't feel safe sitting by myself in public for extended periods of time, you're not alone. You could either try going to a playground or another similar location where there are a lot of other people around so you feel safer or you could even do this exercise from your window or the porch of your home. If you do it from your window, you could focus on the sky or the trees or birds that you see outside of your window. You could also recruit a friend to be your urban nature journaling buddy and the two of you could do these exercises together. If you can, I'd encourage you to find a place to sit outside, whether that's a bench, a stump, maybe your front porch to sit outside and nature journal in the fresh air. As you complete them, you can upload one or more finished journal pages to the student project section. Also, it's really fun for me and your fellow students to see an actual reference photo of the plant or animal or whatever you were working from. If you want to include a picture of that when you upload your artwork, that would be great as well. I'm super excited to see how you creatively document your discoveries.
4. Day 1: Color Matching: Hi friends, today we're going to focus on the colors that we can find around us. As you can see, it's really early spring here where I'm, so most trees are dormant, there's not a lot of green going on. But that just adds an extra layer to the challenge. Today, take a walk, could be five minutes or 30 minutes depending on how much time you have and try to find one one object that has some interesting colors in it. I found this colorful ivy that was growing on a rock right beside the sidewalk. I'm going to really look closely at this and break down the different colors that I'm seeing in the ivy. Get creative with how you interpret these colors. You could make a bunch of fun shapes and fill them in with the different colors that you're seeing. You could do stripes or wavy lines. However you feel like you'd like to translate those colors to your page. I took a nice photo of the ivy on my walk, and I'm going to work from this photo since it's really cold outside today. I'm starting with my permanent micron pen and drawing some flowy wavy lines. Now I'm going to just go through all the colors that I'm seeing and I'm going to try to match them using watercolors. You can use any colorful medium here from pastels to colored pencil, marker, watercolor, gouache, crayon, anything you want. I decided that I liked to work from warms to cools as I make my way across this page. First, I'm starting with a bright yellow and then an orange, and then gradually moving on to other warm colors and then cooler colors as I transition across the page. I'm going to start mixing up some purples, blues, greens, and grays that I'm seeing in this photo of ivy. If you happen to know the common name of whatever plant or animal you're depicting in your sketchbook, you could always write that name down maybe in the corner of your page or on the back of that sketch page. If you don't know the name, that's totally fine too. You could always just write a description of what you're seeing in the corner of your page or on the back. That goes for all of these prompts throughout this class. If you're curious about what the common or scientific name is of what you're seeing, you could always look it up when you get home. You just don't want to be looking up things on your phone while you're on your walk. If you see a plant that you'd like to figure out the common name for, most of the time I try to really look closely at what I'm seeing and come up with a really good description of what it looks like. Then I'll type that into Google or another search engine and just see if I can find something close to what I found in person. I've noticed that I get a lot out of doing these color matching exercises especially in the winter when there's not a lot of obvious color around. Maybe I'm feeling down because it's been a long, cold, dark winter. Doing these color matching exercises is a good reminder that there is light and color that can be found even on the coldest, darkest days. Sometimes it's a little harder to find the color out there, but I promise you that it is there and it's quite satisfying when you stumble upon something colorful in a sea of browns and grays. That's a wrap for day number 1.
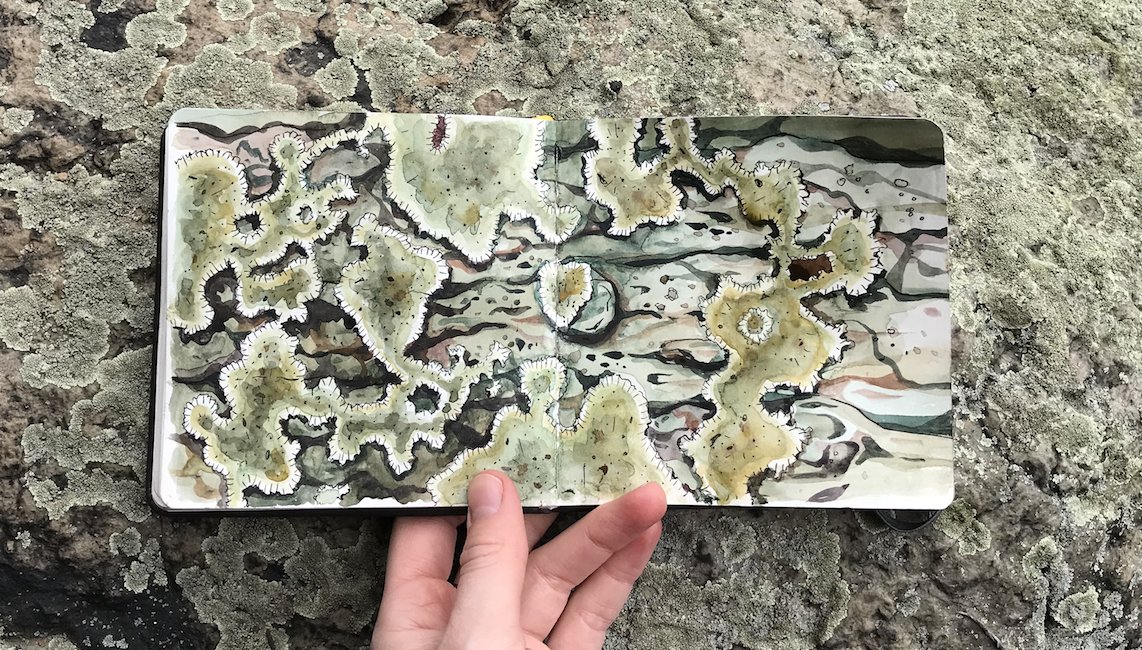
5. Day 2: Texture Circles: Welcome to day 2. Today we will zoom in and focus on the textures of nature. In order to not get totally overwhelmed by all of the details of the textures that I want to capture, it helps me to create a little circle in my sketchbook, and then fill in that circle with the texture that I'm seeing. To prepare for your walk, make a perfect circle in the center of your sketchbook page. If you're starting to get worried because you don't know how to draw a perfect circle, that's totally okay. All you have to do is grab a water bottle or a candle or something else that's round and fits inside of your sketchbook, and then trace around the bottom of it. If you have a little more time or your sketchbook is a little bit bigger, you can create a little texture series by tracing two or three circles in your sketchbook and focusing on a couple of different textures. Now let's take a walk and focus on the textures that we can find in things like moss, lichen, an icy puddle, stones, tree bark, leaves. I found a patch of moss that was growing in a flower bed that was along the sidewalk in my neighborhood and I really liked the spiky, elegant nature of this moss and I also really liked all of the faded, muted purples and grays and browns because it looks very different than it would in the summertime. I also like how when you touch this moss, it's pretty stiff and crunchy, even though most moss is pretty soft. As you're sketching out your textures, feel free to write down any observations that you make that you'd like to include on your page. For example, when I look really closely at some types of moss, each little sprig looks like a tiny fern and I just think that's a cool detail to include and remember. I decided to start out with a micron pen, and so I'm going to do the line drawing in the micron pen, and then I'm going to add some pastel pencils over top because the pastels of this pencil set match the muted colors that I saw in my subject. I also don't often use pastels in my work, so I thought that these quick exercises in this sketch book would be the perfect opportunity just to break out some materials that I don't often use and give them a try. Capturing the textures of nature is one of my favorite things to do in my work because for most of my life, I really focused on the bigger, more impressive aspects of nature like mountains, and rivers, and big old trees. But over the past few years, I've begun to really look at the tiny aspects of nature that I previously overlooked and walked right past. I've noticed that my hikes and walks in natural places are so much more enriched because even in the dead of winter or in a barren field where it looks like there's nothing interesting growing, I can find things to delight in and I've really discovered that that's a learned skill. You just have to keep going out with an open mind and open eyes to notice those wonders, and then you'll be able to document them in your sketchbook and it's really fun. For this prompt, allow yourself to delight in those hidden treasures. Notice any lines or dots that you see on your subject and try to capture every little detail, and there you go. Urban nature journal page number 2 is complete. Funny story about the flower here. I actually referenced what I thought was moss for my texture study because back in March, there were no flowers and it looked exactly like moss so I assumed it was a moss. Then all of the sudden in April, it started to bloom with all of these bright purple flowers and I realized that I was wrong. I think it's actually a moss phlox. It's just fun to see how things that you think you know might change over time, and nature journaling helps us to capture how things evolved throughout the seasons.
6. Day 3: Black & White: You made it to day 3. Today we're going to interpret a natural object in black and white. The purpose of this prompt is simply to help us see our surroundings through a different lens. Let's go for a walk and find one natural object of any size that captures your attention. Next, we'll interpret that object in our sketchbook using any of our black and white mediums, so that could be pencil, pen, black watercolors, black wash, charcoal, any of the above. I actually found my inspiration for this prompt right outside my front door literally. We have some river stones that are filling up a part of the yard beside the road. Even though I would actually secretly prefer if the stones were replaced with native plants for pollinators, and birds, and the environment in general, I'm just a renter, so I can't do anything about that. But I do find these river stones to be really beautiful just because they're so smooth, and I really like all of the different shades of gray that they are. Some of them have these small freckles or lines etched into their surfaces that I think are really lovely. For my page, I'm going to first sketch out the rough shapes of the river stones with my pencil. Now I'm going over my lines with my micron pen. Here, I'm filling in the dark background in between each stone with this black artist ink pen that has a thicker tip than my micron. When you're working in black and white, it's important to create a lot of value in your piece. Value is just a fancy art word that means the contrast between dark and light colors. If you use a lot of similar shades of gray in your piece, it's not going to have a lot of contrast and it probably won't catch the viewer's eye. But if you use white and deep black or gray in your piece, you'll create a lot more contrast. To add the shading here, I decided to try out a gray watercolor pencil. This is another material that I don't use that often, but watercolor pencils are really great if you are hiking outside and you don't want to take a lot of art materials with you, but you want to capture some of the color that you're seeing, they're really awesome because you could just take a few pencils with you. You can do a little sketch out in the field. You don't have to carry a jar of water or brushes with you, you can just add the water when you get back home. Day number 3 is complete.
7. Day 4: Hand-lettered Questions: Welcome back. It's day 4. Today, we're going to mix things up a little bit. Instead of focusing on art today, we're going to tap into the curious sides of our brains and we're going to ask questions about what we're seeing and hand letter those questions. This practice helps us to see curiosity and question asking as a good thing. We live in an age of information when we can find answers to pretty much any question instantly using our smartphones. But having immediate access to answers takes away some of the fun of just wondering about things. When I was growing up, my sister and I would sometimes need some quiet reflection time, so we would go outside, we would find a quiet place to sit and we called it our plop spot. For this exercise, we're going to go on a walk and we're going to find our own plop spots to sit and quietly observe. To begin, turn your phone on silent, that's a super important part, and spend 10-15 minutes just sitting there and observing anything that's happening relating to nature. Before you start your plop spot time, I recommend hand lettering a couple of words in the center of your page that set the theme for your plop spot time. You could write, I wonder, I notice, nature musings, or anything else that you'd like to title this page. First, I always like to sketch out my lettering with a pencil to make sure that my letters are going to be spaced out correctly. This also is very helpful, because it ensures that my spelling will be correct before I start in with any permanent mediums like ink. I'll often draw a horizontal baseline across the page and then add my lettering using that line as a guide so that my lettering doesn't get crooked. However, keep in mind that hand lettering isn't supposed to look like a font, so the imperfections are what make it unique and human. I like to use a mixture of cursive and printed lettering, so for this page, I printed the "I", and wrote the word "wonder" in cursive just for fun. I added some dimension to the lettering by adding a thin line of thicker black ink to the left-hand side of each letter. That's just a really quick way to make your lettering pop off the page. As you sit at your plot spot, write down any questions that arise about what you're seeing without needing to find the answers. Ideas of different questions that you might want to ask are; I wonder what bird just flew by. Is it migrating somewhere or is it here to stay for awhile? What is this plant that's growing next to me? I wonder if it's native or invasive? Are there any insects that I notice crawling around near my feet? Based on the sky right now, what kind of weather does it look like we'll have later? For the questions that I wrote out, I just wrote in all capital letters because I tend to have neater handwriting when I write in all caps for some reason. If you're having fun with hand lettering and you want to dive deeper, there are a million awesome resources out there and I included links to those in a document under the class resources tab, so make sure to check that out. At the end of your quiet question asking session or when you get back home, you could always embellish that page. You could add some doodles that relate to maybe something that you wrote about on that page or you could just add maybe a light watercolor wash to the background. If you'd like to look up any answers to the questions that you asked, maybe in a field guide or on your phone, feel free to do so. You could add any of the information that you learned to the back of your page or if you could fit it in the front, you could do that. But just try not to look up any answers to those questions while you're at your plop spot. Nice work. You are finished with day number 4.
8. Day 5: Nature Pattern: [MUSIC] Today is day five, and we will be focusing on abstracting some of the things that we see outside and turning them into patterns. Many textile designers and artists who create abstract patterned work actually derive a lot of their inspiration from nature. Let's go on a walk and find two or three different natural objects that have outer shapes that capture our attention. For this prompt, the color of the actual object doesn't matter because we're going to be making up our own color schemes. You really just want to focus on the outer shape. We won't be replicating exactly what we're seeing, but we're going to be rearranging those shapes to make our own unique patterns. I found two sources of inspiration for this prompt. The first is this spiky, weird, sweetgum seed pod. It's just the shape that you don't often see in nature, and the second piece of inspiration that I'm using to make my pattern is this plant that I found, that has lots of little leaves with smooth rounded edges, and it also has a long curving stem. So first I'm painting a plane light blue background. Here's a little trick that I learned. If you'd like to get the opaque, chalky look of gouache paints, but you have watercolors already and you don't really feel like going out and buying a whole new expensive set of gouache paints, you can make do with just your watercolors and one tube of white gouache paint. So you take your white gouache paint and you just mix in a little bit of watercolor and the watercolor paint will tint that white gouache and give you that thick, chalky appearance that you want. So I'm just mixing my white gouache with a bit of blue watercolor paint to get my background color. Now I'm going to let this layer dry completely. When I'm creating a repeating pattern, I will start with my first object and I'll sketch it out a few times all over my page. I try to space it out somewhat evenly around the page, but it doesn't need to be exactly the same size or the same distance from the other subjects each time I draw it. It actually adds more action and interest if you vary the sizes of your shapes. Another thing to consider with pattern-making is that, having an odd number of subjects actually leads to a stronger, more dynamic composition than if you have an even number. I'm not exactly sure why this is, but it's just a thing. Now that my sweetgum pod shapes are down, I'm going to take another look at that plant that I want to reference, and I'm going to make some of those leaf covered stems wined up between and around my sweetgum shapes. So my sketch is complete, and now I'm going to mix up a darker blue gouache and watercolor combo, and I'm going to paint within my sketched outlines. So to make that darker blue and keep that chalky consistency, I'm just adding a larger amount of blue water color to my mixture and using a little bit less white gouache. You can choose to use whatever color scheme you like for your pattern page, I decided that I'd like to work in a limited palette for mine. If finding color schemes is a challenge for you, I recommend just choosing one color and then working in a couple different shades of that one color, because you really can't go wrong with that formula. When you're selecting natural items to create a pattern with, it might be helpful to try to pick a couple of different contrasting objects. The spiky, round, sweetgum pod that I found creates a shape that is very different from the lobed curvy stemmed plant. This means that my pattern will be way more interesting because my two objects are very different[MUSIC]. Now that my flat pattern has been painted, I just want to add a couple of funky embellishments because why not? I'm going to add my own twist to this pattern, by adding some little white rings within the sweetgum shapes and I just think that'll be a fun finishing touch. So feel free to take that inspiration from nature and run a little bit wild with it[MUSIC].
9. Day 6: One Meter Challenge: It's Day 6, everybody. Today, we are going to go outside and see what we can find on just a tiny area of ground. Find a patch of grass or a flower bed, and make a mental note of a one-square-meter area of ground or about three by three feet. Then find three natural objects within that area. It could be a tiny hamlet cone, a leaf, or a small branch. At first glance, you might not think there's anything there, but get down, look closely, and I'm sure you'll find at least three interesting things. Try to arrange those three items in a little mini still-life composition to show their relationship. Even if those objects aren't tied together at all from an ecological standpoint and they just blew there or fell there, they all arrived here in the same place, at the same point in time. Use whatever art supplies you want to capture these three natural objects on one page. The backyard of my house is very small and currently, there's nothing growing because it's wintertime. But this challenge is perfect for finding beauty in places where it seems like there's nothing at all interesting. I decided to look at a one-square-meter area in my yard, and I found a few different things that were actually very interesting to me. The first item is this wispy little seed pod, I'm not sure what plant it belongs to, found a whole bunch of tiny mushrooms, I'm going to look at one of these mushrooms for this prompt, and I also found a bur. Quick side note here. I brought these three objects up to my studio in my house because two reasons: One, they were dead, and two, I found them in my own yard. But try not to pick any living plants for this exercise or any of these exercises, and definitely don't pick anything in a public park or someone else's yard, that's a big no-no. You can also work from photos of the three subjects or you can sit down and draw them on-site without having to disturb them, and whenever possible, I really like to do the latter. To create a composition with your three subjects, you can feel free to adjust their sizes, to scale them up or down to fit your page. For example, I increased the size of this tiny baby mushroom because it was so small. If I had it be the same size that it was in real life, it would be the size of my thumbnail, which would be a little bit strange for my sketchbook. I made the mushroom way bigger to balance out the size of the seed pod. You can also try to manipulate your three objects a little bit to make them look nice together. In my sketch, I curve the stem of the mushroom a little bit extra to make it flow and then nicely with the other shapes. You can also try overlapping your objects to make for a more interesting composition. I'm filling out this page with my micron pen, some watercolor pencils, and my water brush pen, but you can use whatever colorful art materials you want for this prompt. I just added some vertical lines here with my ink pen to add a little bit of something to my background. But you can feel free to just be creative with this and add whatever decorations you want to your page. Before we move on to our final day together, I want to show you how to add a page to your sketchbook. This comes in really handy if you're like me and you accidentally miscounted how many pages were in your sketchbook and ran out of pages. All you need to do is get some tape, scissors, and a loose sheet of paper. Then go ahead and measure the size of one of your pages in your sketchbook and cut out your loose sheet of paper to be the same size. Then just tape it on your sketchbook and you can make a little pullout page. This is also a great tip if you complete a page in your nature journal and you're like, "I do not like this page and I'd like to try it again." Or if you really enjoy doing one of the prompts and you want to try it a couple of different times, you can just tape another page on top and it's a creative way to have more pages in your sketchbook.
10. Day 7: Mini Nature Map: Today is Day 7. It's our final day together, so let's go out with a bang. Today we're going to find a new plop spot and we're going to create a mini nature map. I love to create illustrated maps that show the ecology of parks and forests and wilderness areas, and other places that I visit. Most of my maps are really big and detailed and complex because they're made into posters, but for this prompt, we're going to scale it way back. We're just going to focus on capturing a few things that we find in the area immediately around where we're sitting. My plop spot today for this nature map prompt is a fallen log next to the stream. This is one of my favorite spots in the area surrounding my house because it feels very private even though it's right next to a busy highway. To start out, draw a little compass in the corner to show that it's an app. You don't have to do this, but I like to pull out my phone and orient myself using the compass app towards north. I'm sitting looking at the north and that's a fun way to know which direction you're facing as you're sketching. First, place yourself toward the center of the map. You can mark your own location by putting a little star and saying me, or you could even draw a little cute stick figure of yourself. Next, look around and locate three to five natural elements that you'd like to include in your map. I'm noticing a big nest up there in the tree to my left and I'm not positive, but I think it might be a squirrel nest because it's so large. I'm also noticing that there's a big beautiful beech tree to my left and I'm impressed because the beech tree has hung onto a lot of its leaves over the winter and the leaves are really pretty yellow-orange color. I also noticed that there are a lot of sticks and fallen logs in the stream, so I'm going to include those in my map. Then using whatever art materials your heart desires, sketch out those elements relative to where you're sitting. Remember that these can be very simple basic drawings, like for example, if you want to draw a squirrel near where you're sitting, it could just be a blob with the bushy tail and an eyeball. If you want to practice drawing realistically with this prompt, you totally can, but don't get hung up on the details unless you want to. You can use whatever art supplies you have for your map, but I just decided to use pen and my watercolor travel palette, and a water brush pen for this page. There we go. My little map is finished and my entire sketchbook is filled.
11. Wrap Up: I am so happy that you decided to spend a full week exploring the natural world with me. I hope that you gained some new creative ideas and maybe like I did feel a little bit more grateful for your everyday surroundings. I hope that this is just the beginning of your nature journaling journey. There's so many different styles of nature journaling, some are more science and numbers-oriented, like for example, you could use your nature journal to track constellations or track the weather. Some are more creative and artistic, like the prompts that I shared with you in this class. It just depends on your personality and the way that you want to interact with the outdoors. I compiled a list of continued learning resources that I really liked, under the Class Resources tab so you can continue learning and nature journaling long into the future. Don't forget to upload at least one of your nature journaling pages, we can all see it, be inspired by it, comment on it. I'm so happy and thankful that you joined me for this class, have a great time exploring and creating.
 Rosalie Haizlett, Nature Illustrator | Top Teacher