Transcripts
1. Introduction: In this course, we are going to learn the basics of lighting in Unreal Engine 5 by lighting up our own game ready scene from scratch. If you're interested in one of my other courses, you can check out my profile on this website. Whether it's blueprints to create your own game without writing a single line of code, or if you're focused on learning Unreal Engine 5 in general, you can find a course suited for you. Farm Tale that I released on Steam is an example of a game only using blueprints. This is especially useful for artists like me to program a game from start to finish, even though I do not have a programming background. Go ahead and check out my profile to see what courses I've released so far. My name is Mustafa, and I am the CEO, Game Director, and Designer of Titanforged Entertainment. I've been working in Unreal Engine for the past six years. I have recently released Farm Tale on Steam, which is received very positively. I have also spent 1.5 years developing my personal project, Bold Craft, and currently I am directing, designing, and programming my company's new big title, which is an unannounced 3D platformer. This course contains everything you need to get started with Unreal Engine 5, including my personal experience over the many years and projects that I've worked on. At the end of this course, you'll be able to confidently light up any game environment in Unreal Engine, whether it's your own game or for a client, This course is divided into sections and we'll cover and Unreal Engine 5, overview and navigation, lighting mobility, adding a custom sky, skylight directional light and fog, outdoor and indoor environment lighting, lighting flicker, lighting optimization, post-processing, and at the end, we are going for presentation. I designed this course for anyone who is interested in creating games in Unreal Engine 5 or struggles with creating a game that will live up to the current industry standards. I hope you'll enroll and join me in this course. Also remember that I am here all the way throughout the course to help you out. I hope to see you soon.
2. Downloading Unreal Engine 5: To download Unreal Engine 5, you first have to go to epicgames.com. Inside of here, you are actually going to download the Epic Games launcher because the engine is inside of their launcher. Inside of here, you can click on this blue button called "Get Epic Games," and when you click that one, you can see it's going to install the Epic Games launcher. Now, I've already installed the launcher, and this is what it looks like when you have finished installing the launcher. Inside of here, you can click on Unreal Engine. Inside of here you can see something called UE5, and this is Unreal Engine 5. Clicking on that one, you can actually click here, "Download Early Access." Here you can download Unreal Engine 5 Early Access. Now it is a bit different from UE4 because UE4 was actually here, and you could download it through their library. You can see here you have a plus button. If you wish to download Unreal Engine 4, you can do that here, clicking on the plus, and selecting what version you want to download. But it's a bit different for UE5, you actually download it through this button. Now, once you have finished downloading Unreal Engine 5, it appears inside of your library. You can see here, if I just close this down, you can see here this is Unreal Engine 5. It appears here once you have finished downloading the engine.
3. Downloading the Project: Now I have uploaded a project file for you that you can download from this website. This project file is basically from my personal game called BoardCraft. We're going to light up that environment and learn how to do the outdoor environment and also the indoor environment as well. You can download this project file here called BoardcraftLighting, it's a zip file. You can put it on your desktop or wherever you like. It contains this Boardcraft folder, which is actually the project here, as you can see, it's the project that you can download. This one you have to extract inside of the project, or inside of the engine. Here, my default place here is this computer and Documents and Unreal Projects. This is the default path to saving Unreal Engine projects so that you can see here are all my other projects. You can go ahead and find your default Unreal Engine projects folder. When you're inside of here, you can basically drag out this BoardcraftLighting project and drop it out here. We have extracted the folder here, BoardcraftLighting into your default pathway for the Unreal Engine projects. You can go ahead and close that down, and you can have this open. I can show you what you can do with this. Basically, you can open the Epic Games Engine again and inside of library here you can see your projects. If you have extracted it here, you can see the projects over here. But right now, the project is so new, we haven't opened it yet, so it might not appear down here in my projects. What you can do basically is you can basically click on "Launch" the Unreal Engine and then open it from there. Or a second thing you can do is actually go inside of this folder, and you can double-click this "BoardcraftLighting.uproject" and it will open Unreal Engine file automatically. But right now basically I want to show you how you do it through here. Clicking on "Launch" in the Unreal Engine 5 and when you launch Unreal Engine 5, this is what it looks like. You can see your recent projects. You can make new projects here when you make games. You can check out my other courses to see how we do these things. It's pretty cool. Here, you can also make actually film and video with Unreal Engine. It's not only games, and you can see all of these other things. Now, in the recent projects it might not appear, so what you have to do is click on "Browse" down here. Clicking on "Browse" and basically you have to browse to the project. Here, we extracted it inside of the Unreal Projects and then BoardcraftLighting. Here you can actually double-click this or just click on "Open" here. Now, when you click on "Open" it's going to open the engine and enter the project. Now, sometimes it's going to tell you that the project has been made in a different version and this happens when they update Unreal Engine 5. When you get on a newer version of Unreal Engine 5, obviously you have to click on "Open", "Copy" or whatever it's going to say. But basically, we are inside of the project, and you can see it's actually not empty. This is because we don't have any lighting, and we're going to light up the scene as we go. This was basically for this lesson. I just wanted you to enter this project. I want to explain to you the basics of the engine UI and what you can do inside of here before we do any lighting. I think it'll be easier for you if you know what these buttons are doing. Let's not waste time and let's go over to the next lesson.
4. The Toolbar: To start off with the Unreal Engine 5 overview, I want to start talking about the Toolbar. Before I do that, let me go over to this here and change it to, Unlit. Just so we can see the environment for now because we don't have any lighting. Basically, the Toolbar is up here in Unreal Engine, and you can see your project's name up here. You have these default buttons that you have in almost every software you download right now. Basically, inside a file you can make a new level, you can also save the progress you have going on. I use this Save All button all the time, or you can see here what the shortcut is for it. For example, Control Shift and S will save everything. You can also open a new project and make a new project as well, so very default buttons here in the file. Inside of Edit, the most important things are the Editor Preferences. Clicking on that one, you can see you have a lot of things you can change. Basically, what the Editor Preferences is, is you can change things on how your editor is looking like. It's not really specific for this project you have going on here, but it's specific for the engine, so it won't affect the project, it will affect your engine. For example, if I click on something, you can see here I have this yellow selection color. I can basically change this color by clicking on here. But I've honestly never been inside of here. I have never had the need to change anything inside of the engine. I like the engine as it is. But you can see, you have a lot of things you can change inside of the engine, and you might want to take a look around if you like that. I'm going to close this Editor Preferences, and back to Edit, we can click on this one called "Project Settings". Now the Project Settings is not really important for us in this sliding course, but basically inside of the project settings, you can set a lot of settings for the project that you have going on right now. You can see here, I'm using this project from my Boardcraft Game, my personal game that I was working on. Here, basically you can write what type of game you have going on. You can write a description, a project name, you can even write your email so people can contact you when you have released your game. You can write something here for the copy-writing and so on. Also, you can add a movie. Usually in games, if you download a game on Steam or whatever, when you start the game up, they are playing a movie before they open up. Basically, we're not really going to use the project settings for the lighting. There's a lot of buttons inside of here that you can work with, but basically with this course, we're not going to work inside of the project settings, so you don't really need to know this right now. But basically, it's very important that you only learn what you need right now, because you can see there are a lot of buttons inside of the engine. It's better if you take everything in small bites, and from there you can of course develop your knowledge. Inside of Window here, you can see, you can actually open multiple windows. For example, let's see here what makes the most sense, inside of the view-port, you can open a new view-port. It opened in my second monitor here, and if I set the lead mode to Unlit here, again, just like I did with the first view-port, you can actually see I can have two different view-ports open. It's actually the same thing, but basically, I can use this on my second monitor. Now, I can actually view this in full screen. I can full screen to my second monitor while I'm actually working inside of here. You can see this is very useful for when you have multiple monitors. You can basically open multiple windows, you can even open three if you want. You can open multiple windows with most of the things inside of the engine, so it's very cool; you can customize it so much. Here, for example, the Details panel, you can open one more. It's basically this panel here. This is the Details panel, and when I click on things inside of here, you can see they display the same information. Maybe, you want this window on your second monitor as well, and you want to close it down here. You have a lot of possibilities with this windows, and you can see, you can open a lot of different windows here. Inside of the Tools, we're basically not going to need anything here for now, so I'm going to skip it. Inside of Build, we're going to work with it later. We're going to build the lighting and take a look at the Lighting Quality. Inside of the Help, you can watch the documentation from Unreal Engine. Sometimes it's a bit difficult to understand because they're very technical, but you can take a look if you want to, and they have tutorials as well. Down here at the toolbar, you have the Save Current Level button. When you have done some work on this level, you can basically click on this, "Save Current Level". You have the Create, and inside of our Create, very important button, you can actually create items inside of here. Here, we are actually going to create our lights, so we're basically going to click on here. For example, if I click on the "Point Light", you can see it creates a point light. Don't worry, I haven't explained to you how you can move things inside of the view-ports, but I can basically just show you. If I go to Lit mode, now, you can see we have a lighting here. You can actually create things inside of here. We can create lights, we can create shapes, we can place shapes around here. You can see, I can place this shape here. Everything's looking a bit weird because we don't really have the correct lighting, I I will go back to the Unlit mode. You can create cinematics. You can create a cinematic camera, You can create visual effects, and volumes. We're basically going to work a lot inside of here, so we're going to create the lighting, the post-processing, and so on. Very cool about Unreal Engine 5, something new, they have added the Recently Placed, which is not in Unreal Engine 4. Very cool, and also some basic things that you use all the time, they have placed out here. Inside of the Content button, you can basically open a new content browser. If I click on this one, you can see here, I can actually see my files. I can see them as well if I click down here. Clicking on this "Content" row, you can basically see the same thing. Again, just like up here where you opened multiple windows, you can do it here, basically, as well. You can also access the marketplace for the Epic Games and also Quixel Bridge. We're working with Quixel Bridge inside of my beginner's course, so you can check that out if you're interested in creating hyper-realistic environments. Inside of the Blueprints, this is where you code the game, and basically we're not really going to focus on any programming here, but if you want to program is well. This programming is, basically, not like C++ or any other programming language that you might find difficult. Here, it's actually a visual programming language. It's very visual and you can see here, you can print a string, and you can create events like Begin Play. What happens when you begin playing the game, and should print a string, and so on. It's very visual and you can create very powerful games with this. Basically, my game Farmtale on Steam is basically made with blueprints. I have never used C++ or anything else inside of Farmtale when I programmed it. If you're interested in programming, go ahead and check my other courses. You can basically check my profile on the website and see what courses I have done so far. Inside of the Cinematics you can make cinematics, and these are very important. You have different buttons. This is the Select button. You can, basically, select things inside of this view port. Here, you can click here and create a landscape. You can see when I click on it, it's going to show me this green area, and I can basically tell it where to create my landscape and how large it should be, and so on. Then I can create the landscape, but we're not really going to create a landscape here. But just so you know, it's there. We have the Foliage tool, which you can use to paint foliage on the ground, when you have a ground. Basically, painting grass, painting rocks, and whatever you have. Then we have the Mesh Painting tool. With the mesh painting tool, it's basically where you paint things on top of the ground, so you paint textures. If you have two different textures, you can basically paint them together. This is typically used for environments. If you can see here inside of my beginners course, we are painting the ground to make it look different and not have this repetitive pattern. Next, we have the Fracture tool. We're going to skip that for now, not really of relevance right now. Then, we have the Brush Editing tool, which we'll skip as well. Then, we have the "Play" button, which we can click to play the game and test it out. Then, we have this called the Platforms. Basically, inside of here you can package the game when you are finished with the game. You can see here for Windows, for example, which I am on right now. You can package the game and ship it when you are finished with it. The last thing inside of the Toolbar is the Settings button. Inside of here, you can see the world settings, we're going to work here at later on. You can see the Project Settings. Just like what you did here up in Edit, this is the same button. I would say the last important things for us right now is, if you want to hide these buttons inside of the view-port, you can basically click on this button. You can see, you can hide them for some reason if you want to, and you can click on them again to make them appear. I'm going to click back on the "Editing Mode" here. Let's go ahead and take a look at the Details panel.
5. The Details Panel: The Details panel can be found here to the right. With the Details panel, it displays details about the items you have inside of your level. Basically, you can see here inside of the viewport, we have this level, and remember to set it to unlit if you haven't because inside of lit we can't really see anything. We don't see anything because we don't have any lighting yet. Going back to the unlit mode and you can click on an item, and when you click on an item, you can view information about this item. If I make this larger, so we can see what's going on. We can basically see what location this item is in. You can see the rotation and the scale. Very important to know that the red here is the x-axis, the green here is the y-axis, and the blue here is the z-axis. Basically, you can write numbers here, for example 250, and you can see this location change for this one. I can click on Control Z to undo my change. Basically, instead of writing, you can also click and drag. You can see here, you can click and drag and do some smooth movement. I'm going to click on Control Z again. Basically, you can view information about your item. You can view the physics, the collision. When you are going to work with collision, you can see the lighting. If the item should cast shadow or not, you can actually remove the shadow and the item will not cast the shadow. Sometimes this is very useful for small items that you can't see anyway. When I click on another item inside of the level, you can see I can view different information about this item. Clicking on this visual effect, this is not a 3D model, you can see I can click on different buttons, I can reset this emitter, so resetting this effect. This will be very important for us when we're working with the lighting because we have to change the intensity of the lighting and if it should cast shadow and if it should be warm or cold lighting and so on. Basically, you can also change the name up here if you wish to, you can double-click up here, and you can change the name of the item. If you wish to search for something specific, you can click on this Details panel or just search details. You can basically write shadow, for example, and you can see everything that has to do with the shadows just in case you can't find it when you're scrolling down, and you can click on this X or remove it to remove the search word. The last important thing I would say right here, so basically, we're going to work with this and you will learn it throughout this course as well. This is basically what the Details panel areas, and very important also, we have this button here just in case it messes up for you. You can actually collapse all the categories, so you can see it's like this. You don't have to click on everyone and open it, you can basically click on the Settings button and click on Expand All Categories if you wish to, and you can see you can open and close them quickly.
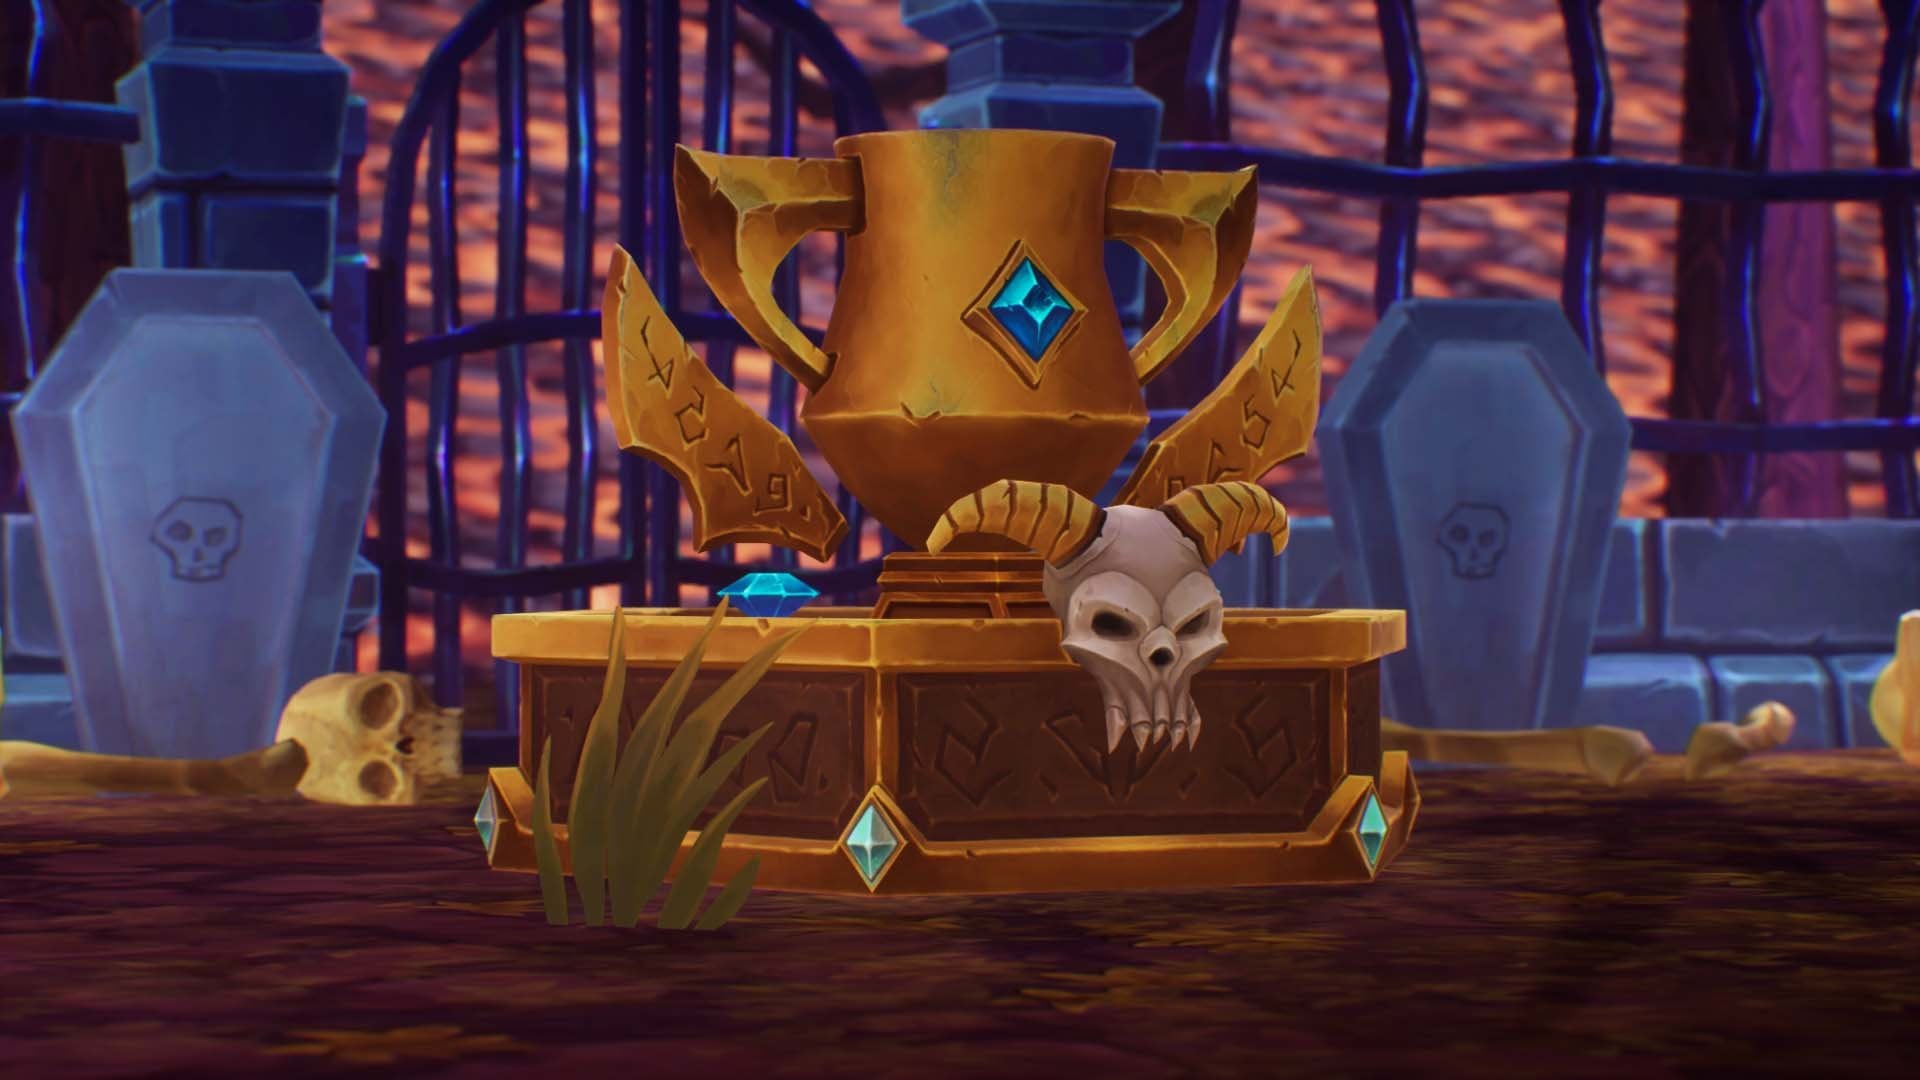
6. The World Outliner: The World Outliner can be found here to the right. This is the World Outliner, and what it basically is, it shows you what items you have inside of your level. It can basically see here we have a lot of items inside of here, you can scroll down and check it out. You can select items in self-selecting inside of the viewport, you can actually click on the World Outliner and it can select the specific items inside of here as well. Basically, if you want to select this portal, you can actually click on it up here, and it will select this portal. If you want to find something specific and you can't really easily click on it on the viewport, you can actually click on it here and select the item. Basically you can see here, they are sorted inside of folders and this is what I've done. Everything that is inside of your level, it will be displayed inside of the World Outliner. If you wish to make new folders, you can basically click up here and click on this New Folder here, and you can make a new folder and we're going to do that later. For example, one called lighting and we will add all of our lighting inside of here. Right now I'm going to delete it for now. This is basically what the World Outliner is, it's not something very complex, just that you can view all of the items you have inside of your level, inside of here. I would say very important that you organize this from time to time. But because you can imagine if you keep placing items inside of your level, this can be very huge and it's very nice that you can put them inside of folders here and organize them so you can see what's going on later on in the project.
7. The Content Browser: Inside of the Content Browser, you see all of the files you have uploaded to the engine, to your game. For example if you have characters, if you have audio, for example sound effects, music and so on, it's inside of the Content Browser that you see those. Firstly, you can click here on the "Content Drawer." If you click on it, you can see it pops up. You can also click on "Control" and "Space." We can see if I click on "Control, Space," it also pops up here. You can again click on here if you don't want to click Control, Space. As you see here, if you click this browser here, you can see it's called Content Drawer and not Content Browser. The Content Drawer if you hover your mouse above it, it says, it opens a temporary Content Browser. It's actually temporary this one, because you can see if I click on something out here, it actually minimizes all the time. If I click on it here again, and I click on something inside of the viewport, it minimizes. It will be annoying if you're used to having this app, if you have worked in Unreal Engine 4. Also I think it's better for you to view the course with this app all the time. This is a temporary Content Browser. This is called the Content Drawer. Basically if you want the Content Browser up all the time, there is a button here called dock in layout. If you click that one, you can see it actually docks this window to the engine. Basically here in the Content Browser you see these files. This is what this project comes with, and we have the 3D models. You can click here, you can see we have the door. You can click and drag and you can see you can put them inside of the level. I'm going to press and delete, and basically you have all of these 3D models. We have the map which we are in currently. We have the visual effect, which is this portal here and also this candlelight over here. Basically all of the files that you upload to this project will be displayed down here. When you upload sound effects and audio music so on, they will also appear down here. You can see every time you click on a folder, you can see them over here in a larger view, just like that. You can go inside of folders like this, or you can actually just double-click over here and go inside of them. Inside of here, you can actually change the color of the folders if you wish to. If you want to be organized, you can right-click and then you can click on "Set Color," then you can change the color for this folder. For example, I want something red like this, clicking on "Okay." Then you can see this folder actually has a red color now. If you want to search for something specific inside of here, you can basically search over here. It actually matters where you have clicked inside of the folder. If you click on this folder and search here, you can see it says search VFX. It means that you are going to search for an item inside of this folder. If you want to search in the whole project, you have to click on this content first, then you can search in all folders. It actually matters where you have clicked before you search. Right now, I'm only searching inside of this 3D folder. For example, if I search for candle, you can see here all of the things that I have called candle will appear inside of here and you can remove the search word by the deleting it or clicking on this X here. The last important thing inside of here is you can actually click on "Add" over here and you can add items. You can also do this by right-clicking out here, and this is what I usually do. I never use this. I right-click here and you can see you can add items such as in your level. If you wanted in your level, a material, things for animation, things for you AI, artificial intelligence. You can see a lot of things if you're working with sounds, if you're working with user interfaces and so on. But we will not really go in depth with this. This is naturally relevant for the lighting course, and there was basically it for the Content Browser. This is a very important menu that you use all the time. But basically inside of the lighting course, we don't really need these things, so we will skip those.
8. Viewport & Navigation: The final thing before we get into lighting is the viewport and the navigation. I would say this is the most important part of the engine. The viewport is here in the middle where we can actually visualize the game. You can see this is the level, we have all of our items inside of here, our visual effect and so on. So this is the viewport. Inside of the viewport, if you navigate around, you can hold your right mouse button. Holding the right mouse button and moving around, you can take a look around. While holding the right mouse button, you can click on W to move forward, you can click on D to move right, S to move back, and A to move left. This is basically the most important controls because I use this all the time, holding right mouse button and W, D, S, and A. So moving around and you can actually look around here. A very important button is this button over here, the camera speed. If you think this is too quick, you can click on it and decrease it to maybe something like two, and you can see now you can actually control it a lot better to move around in a small environment like this one. Next, you can also hold the left mouse button and move the mouse and you can see you can actually move the camera while you're holding the left mouse button. Honestly, I never use this. I think I've used it once on my laptop, but I never use this control. You can also hold the right mouse button and the left mouse button. Doing so and moving the mouse, you're going to move up and down, holding both mouse buttons. You can also do this if you hold the right mouse button and you click on Q, you move down. Clicking on E, you move up. This is the same thing as holding both mouse buttons, but this time holding the right mouse button and clicking on E to move up and clicking on Q to move down. The last thing is the mouse wheel. Basically, you can zoom in if you scroll up with the mouse wheel and you can zoom out if you scroll down with the mouse wheel, just like that. I actually never zoom in and out like this, I basically just hold the right-click and you can move forward just like that. But you choose of course. That's just me, you choose how want to move around. Maybe you want to hold the right mouse button, clicking Q and E to move up and down. Usually I just move down and then I look over here, but that's just me. You can try to move around inside of the viewport and see how you feel comfortable with moving around. It might feel awkward a bit from the beginning if you're not used to it, but it will get very easy to move around inside of here. This was basically it for the navigation. Up here in the viewport, we have these different buttons. Clicking on here, you can see you have a lot of buttons, but the most important thing is "Show FPS." We don't really need to show the FPS right now for this course, but just so you know, it's there and showing the FPS right now it's actually kept or set to maximum 120 FPS. This is very good to check just to see if your game is lagging or not and you can disable it by clicking on it again. Next, we have the field of view. This is the field of view and sometimes you see, for example, in Doom games, you have a field of view like this when you're walking around. Basically you can change it here and the default is 90. The next important thing inside of here is the game view. Game view is basically showing you the icons and hiding the icons. You can actually see here the shortcut is G. Click on G, you can remove all of these icons. Clicking on G again, you can display all of these icons again. Sometimes it's very nice to remove those icons if you want to see and visualize your game without all of these noises here. The next one is the immersive mode, and this will full-screen this viewport. Full can press on F11 to actually do this, so F11 to minimize and F11 to maximize. I usually maximize like this, clicking G, and then you can actually visualize the whole level without any icons and in full screen. Clicking on G again and clicking on F11 to get back. The last thing here is the high resolution screenshots. You can actually take a screenshot inside of yours. You can see this is the screenshot window and basically, you can look at something and it will take a screenshot depending on what you are looking at right now. Sometimes I use this and I actually send the screenshot on this code to other developers. Basically, when I'm working on projects, I can take a quick screenshot and post it somewhere where I want to, maybe I want to post it on social media. But this is basically a quick button for the screenshot. Next we have this button over here, and here you can switch between perspective mode and orthographic views. Orthographic views is basically viewing the game from a top view right now, from a bottom view, from a left view. Now you're watching the game from the left view and you're watching it from the front, for example. This is very useful for when you want to place something specific here. For example, I want to place this potion. So if I go back to perspective mode, this is the potion I have selected, you can click on orthographic, for example, "Top," and you you see where this potion is. Basically orthographic views are used when you want to place something in a specific area, like 100 percent specific in a location. For example, if I want to place it here in the middle of this portal, it is very hard to do so if you are inside of the perspective because where is the middle of the portal? It's very hard to decide. It's a lot easier if you go to the top view and you can actually see it spinning around of here and you can basically move this inside of the middle of the portal. I'm going to click on Control Z. I'm going back to the perspective mode and over here, you have the different view modes. Basically it starts out with the lit mode, so this is viewing the game with the lighting and right now, this is very dark because we don't have any lighting inside of the map. Then we have the unlit mode, this is viewing the game without any lighting. We have the wireframe mode, we have the detail lighting, and so on. You can try to switch between those to see what's going on. Then we have the optimization view modes we will skip for now. We will get to that later. Going over to show, you can basically show and hide different things. For example, you can click on this grid to show the grid and I'm not sure if it's visible. It's actually here, if you can see it. This is the grid. Basically if you want to hide it, you can click on "Show" and clicking on this grid to hide it again if you don't wish to see it. I'm going back to the unlit mode here to see the game here. This is basically the show. Now the next buttons are very, very important. Over here you have the "Select" button and here you can basically select items inside of the viewport. You have the "Move" tool here. Clicking on it, you can see we have some pivot points we can move around. We can move it in this direction. If you click and drag, you can move it in this direction or you can move it in this direction. If you want to move it in two different directions at once, you can click on this box here and you can move it two directions at once, just like that. If you want to move it in all directions at once, you can click on this white circle here, and you can move it in all directions. I'm going to click on "Control Z" to actually go back so I don't mess everything up. Basically this is the "Move" tool and going over here, this is the "Rotate" tool, and here you can see you can rotate things. Again, clicking on this ground, you can basically rotate if you click on these here in each direction. Again, just like I said before, very important, the red color is the x-axis here, the green color is the y-axis, and the blue color is the z-axis. Very important to know. Also when you rotate inside of here, when you do this, you can actually also rotate inside of here. So you can click and drag and you can see you can actually rotate here as well. You can rotate here and you can rotate inside of the viewport, you can write specific numbers. For example, in the Z, I want 25 degrees. You can click on "Enter" and you can see this is very specific now. I'm going to click on Control Z so we can get back to where it was before. The last tool we have is the "Scale" tool. Here you can scale things. For example, we can click on this broomstick and clicking on this white square in the middle, you can size it uniformly. Scaling it uniformly if you click on this white box. If you click on this green one, you scale it in that direction. If you click on the red one, you scale it in that direction, and clicking on this blue one, which is the Z, you scale it in the z-axis just like that. Clicking on Control Z to get back. Now it's very, very important to know the shortcuts for these tools because it takes a long time to click on the Move tool and then you move this item, then you have to click on rotate to rotate it, and then you have to click on Move to move it again and so on. So it takes a long time to go up here and click all the time. Basically clicking on Q, you can have the Select tool and clicking on W, you can have the Move tool, clicking on E, you can have the Rotate tool, clicking on R, you can have the Scale tool. So Q, W, E, and R. Next we have the snapping tools. These three here are the snapping tools. Basically you can see here, if I get close here, when you move things, you can see it's laggy and it's actually snapping. This is what's happening. If you click on it here, it becomes a white icon instead, it's basically disabled and now you can see you can actually move the item smoothly. Clicking on it again, it's going to snap it around. If you click on this number, you can choose how much it needs to snap. 100 will snap a lot more, so 100 units inside sort Unreal Engine. You can see here when I move it, it's snapping a lot more now. I can click on Control Z to get back here and you can try to click around and see what's going on here. This is how you learn the best. Basically this is the Move snapping and over here is the rotation. Clicking on E, you can actually rotate and every time you rotate, you can see it's rotating 10 degrees. If you wanted to rotate a lot more, you can choose, for example, 30 degrees and you can rotate every 30 degrees now. If you want to disable the rotating because you want smooth rotation, you can click on the icon and then you can rotate smoothly. I'll put it on again here. This is the Scale snapping. Just the same principle, if you scale you can see it's snapping like this and you can also disable it by clicking on it and you can see you can scale smoothly now. If you wanted to scale a lot more or a lot less, you can basically click on these here. You can see here now you're snapping a lot more. If I enable it here, I eye snap, you can see it's snapping a lot more now. This is looking a little weird now. Let's click on Control Z to get back where it was before. As the last button you can see here, we already talked about it, you can increase and decrease the camera speed for how much you're going to move. Basically when you have a big, large open world game, you want to put the cameras speed very quick because you want to move around quickly inside of the world, but basically we have a small room here so we don't need a high camera speed.
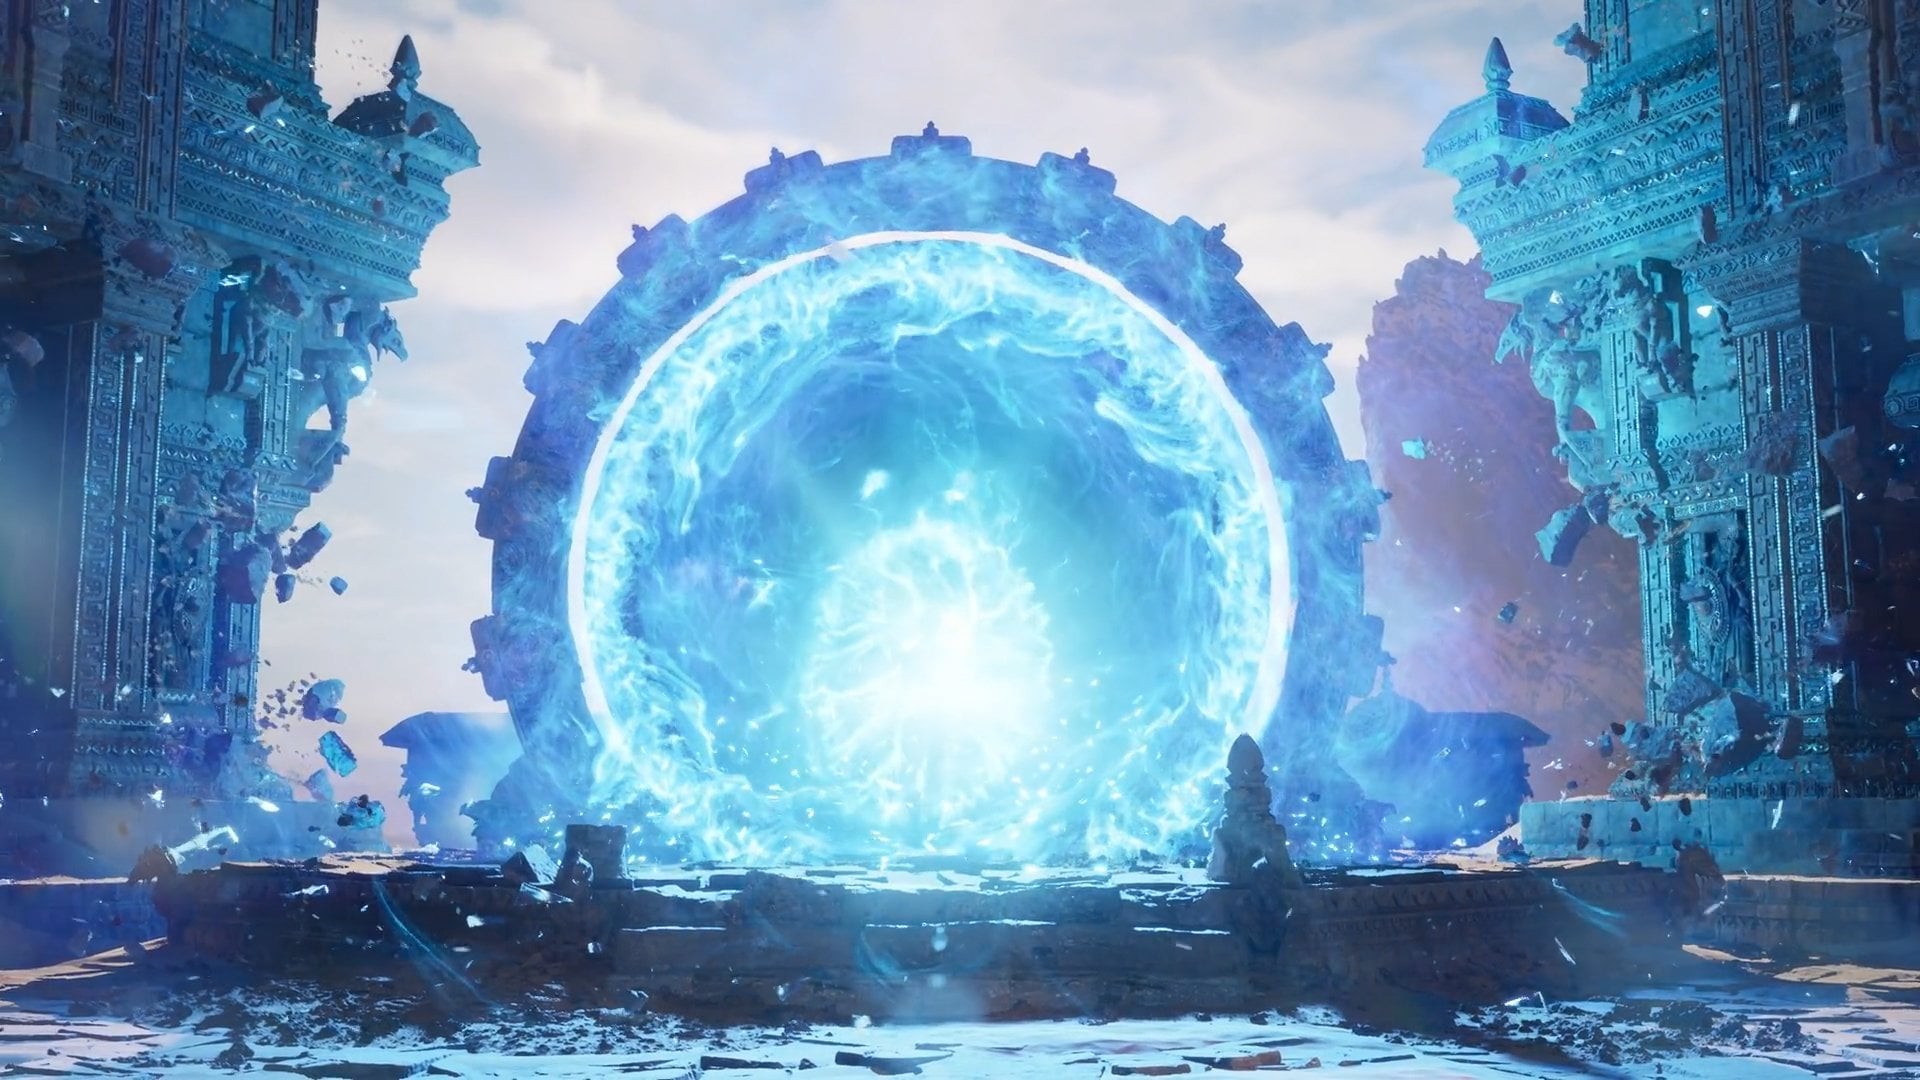
9. Introduction to Lighting: Now that we have learned some of the basics of Unreal Engine 5, we can now try to work our way from the unlit environment and then lighting the environment. We will light the outdoors environments, the sky, and we will add some stars. Then we will light this indoor environment. We are trying to light to this goal here. Before we have the unlit mode like this one, and by the way, this is the Unreal Engine 4. This is an example from the game because when I made bought Kraft, it is actually made in Unreal Engine 4 because 5 was not out yet. We're trying to make this in Unreal Engine 5 going from this unlit mode and then lighting the environment to this lighting here. I'm also going to teach you how to set up a camera like this. If I move over here, you can see this is a very nice lighting from the moon, the moonlight that is coming inside of the window here. I'm going to teach you all of this and we have a lot to learn. You can see here, the candle flickering like this as well. We have this launcher giving light. We can have this bottle giving light as well. We have these diamonds lining up as well. Ultimately, we want to reach this type of lighting. We have a lot to cover. Let's go over to the next lesson.
10. Importing the Sky: To begin with, we need to import a sky. You can see here outside the environment here, it is very dark and this is because outside we have not added the sky. This is something we need to add. You can add a sky by clicking on the "Settings" here and clicking on "Show Engine Content". This will make these folders appear over here. Clicking on this folder, you can try to up here, search for sky. Doing that, you can see you have a sky that you can use here. Now, this is the standard sky that comes in Unreal Engine 5 or Unreal Engine in general. But I want to show you another sky that is a lot better that you can use and it is for free. Opening the "Epic Games Launcher" here, you can click on the "Marketplace" inside of Unreal Engine. Clicking on "Marketplace", and inside of here you can search for sky. Doing so, you get a result here, the one called the goods sky. This is the one that you can use for free. This one is very good to use because it has a lot more settings that you can actually use inside of your game. If you haven't downloaded it yet, you can go ahead and click on "Download". You can see I've already downloaded it. Then now I can click on "Add To Project". Then I have to select what project I want to edit for. If you don't find your project here, so right now you can see I can't find my project, then you can click on "Show All Projects" because right now you can see this is only compatible for 4.26 at maximum. But this is not a problem, it's still going to work for the project. Clicking on "Show All Projects", and then I have to scroll down and find my project. I can see the project over here. Clicking on this one, then changing these diversion to 4.26, and then you can click on "Add To Project". Now, it's going to add the sky to the project. If you go back to the engine, so if I click here and click on "Show Engine Content" to remove these two folders. You can see here this is the good sky that we have downloaded. Inside of here, we have this sky.
11. Adding the Sky: To add this sky to the level that you have, you basically have to drag this out and place it inside of the level. You can see this is actually the icon of it, so don't worry about it, this doesn't mean anything. It doesn't really matter where you place this sky. It doesn't matter if this sky is over there in the world or it's over here. Usually, I sometimes just write 000, over here, so it's actually just centered in the level. But ultimately, it doesn't really matter where it's placed because this doesn't affect anything. You can basically see now you have a sky and I'm not sure if you can see it, so clicking under lit mode, you can actually see we now have a sky and if you look outside of the window, we have these stars. Over here to the right inside of the details panel, you can basically change settings for this sky. Right now, we are not interested in changing any settings because at first, I usually when I do the lighting, I usually want to add all the elements, and then I want to adjust because sometimes when you adjust things before you add everything then you add something after you have adjusted and that messes up with the settings you have adjusted because suddenly the scene is looking very different. Basically, I like adding everything first before we do any adjustments. This is how you add the sky, and as I said, you can use this one, or you can use this sky over here, that is up to you. But basically, the one you have imported from the Unreal Engine Market is a lot better to use because it has a lot other settings that you can play with.
12. Adding the Directional Light: To add the directional light, you can click on Create, go inside of lights, and then choose the directional light. Basically what the directional light, it is basically the sunlight. If you click on Add, you can see here that all of a sudden we have our environment lit. Basically, the directional light, as I said, is the sunlight. You can actually rotate the slides and you can see a difference between the shadows and how the light is affecting the setting. Right now, this scene looks a little bit weird because the sunlight is not really adjusted correctly and the lighting is very strong and this doesn't make any sense. We want to make a night scene, so this is very strong. But for now, you can try to reduce the intensity, so you can play around and see what you can actually do with this. For now, let's just write one inside of the intensity so it's not really too strong to work with. Basically, this is how you add the sunlight. The sunlight, this is actually what we use. If you saw in the other example where the light came inside of the window and made that god ray effect. This is basically, this directional light that is responsible for this. Directional light equals the sunlight and we will adjust things later. But just very important, know that with the rotation tool, you can rotate the sunlight and you can actually try to make some interesting shadows inside of your environment.
13. Lighting Mobility: Before we continue, I would like to explain to you the lighting movability. It is a very important concept that you have to know about because we're going to use it all the time inside of here. Over here to the right when you click on any lighting. So right now I have selected the Directional light, and sometimes it is very hard to find the lights you have added. If you want to find them inside of the level, you can basically click on the World Outliner and try to search for them here, this is the Directional light, which is the sunlight. Clicking on this one, and inside of the Details panel you can see something called mobility. Here the mobility we have something called static, stationary and movable. What the mobility basically is, is when you have a static light, it uses less performance than stationary and movable. Ultimately you want all of your lights to be static as much as possible. I want to explain to you the difference between these three. But basically we aim to have all the lights set to static, unless you really need to set them to stationary, and then to movable which is the one that uses the most resources from your computer. This is the cheapest one to render, this is the medium, and this is the one that costs a lot to render on your computer and also takes much of the performance. Having a static light is basically having a light that is static, so it's a bit self-explanatory. Having a life that is static, it is very easy to render and bake the lighting. But the problem is with static lights, you can't have dynamic objects running around and creating dynamic shadows. Imagine if I set this sliding here to static, so this is the sunlight. If I set it to static and basically I went inside of here, and I added a sphere and I took the sphere here. Let's imagine the sphere is my character. Having set the sunlight to static here, I can try to click on Build here and build all levels. Now when I finished building the lighting, you can see here, when I move my character here, you can see the shadow is actually not moving. This is what a static mobility is doing. Static just means the item or the environment you have set the shadows I am baking now, or pre-baked and I can't bake dynamic shadows. If you have an area where the character is moving and you need the shadow to follow along the character, you can't set the light to static. Static basically just means everything is pre-baked and if you have something moving, for example, a character that needs the shadow to follow with him, you can't set the light to static. But let's imagine I did not have a character and I only had this book and this stand here and nothing is moving in my environment, then I would set my lighting to static. Just remember, static lights cannot have moving shadow. If you need moving shadows, you cannot do static lights. I'm going to delete this sphere again, and I am going to change this mobility to stationary. Now with stationary, you have to click on Build all again. Clicking on Build All Levels, we have to build the correct shadows. and now it's finished building. Now with stationary, you can have moving shadow. If I go ahead and create a new shape, I add the sphere again, and I move the sphere to my environment, you can see here the sphere now has a moving shadow. This is what a stationary mobility is doing. Stationary just means that the light itself cannot move, so basically this sunlight that I have made, the Directional lights, which is the sunlight. It cannot move, so it stays like this but the environment is moving, so the character is moving and you're having a dynamic shadow. The light itself cannot move. If you need a day and night system, in your game you have day system and a night system that the sun goes down, the sun rises, you cannot have this if you set it to a stationary, because stationary means the light itself. So the directional light cannot move, but everything around it can make dynamic shadows. The character running or something is being thrown and the shadow's showing, you can do that, but the light itself cannot move. If you try to do a sunset or something like that, you cannot do that because the lightest stationary. This gets us to the movable. Movable is the one that cast the most of the performance and it basically means that the light is movable. The light itself, this directional light, this one here, you can actually move it during the game like this. This cannot be done using a stationary light, but this can be done using a movable light. As you can read here, it says movable light can be moved and changed in game. While you are playing the game, you can have a sunrise and whatever you want to have, you can move the light. You can do that with everything, not just the sunlight. You can do that with a simple light bulb here at the point light. The scene is totally dynamic and you have dynamic shadows, but this is the one that casts the most performance. When you need dynamic shadows, you have characters running around that light, you need shadows that are a dynamic, basically using the stationary light. But if you want the light itself to move as well, for example, the sunlight, the sun going down and up, you can use the movable. If you have an environment where everything is standing still and you don't really need dynamic shadows, you are going to set it to static, and this is the one that is best for performance. Basically try to aim to have all of your lights to static unless you of course need the character running around and you really need dynamic shadows, then clicking on stationary would be the best solution. Now inside of this example that we have the scene that we are going to light. We basically don't have any characters or anything that needs to move. So basically I can click on the Directional lights and I can set it to static. This is how you can work with this because you don't really have anything moving around and we don't really need Dynamic shadows. Now again, just to end this, I can click on Build, Build All Levels. Now that the level is built, let's go over to the next lesson.
14. Adding the Sky Light: It is now time to add a skylight. Basically we have added a sky, which is this one, but the skylight is something different. It's the lighting from the sky that bounces on top of these objects and creates the light that is coming from the sky. Clicking on the "Create button" here, going to lights, and here you can create a skylight. Basically clicking on the skylight, you can see everything becomes bright, and basically the skylight just means that it is the light from the sky, the sky shoots the light to the ground and basically it bounces the light on top of these items. This is why everything down here all of a sudden became more light. Just like everything else, we have the things that we can adjust for the skylight, for example, our intensity. You can see you can increase the intensity of the skylight. But basically I still want to add everything before we change any values here in the details panel.
15. Adjusting the Exposure: Before we can do any of the lighting correctly, we have to adjust the exposure. It is playing with the lighting a little bit and it's distracting us from actually doing the lighting correct. You can see here, if I get close to something, the lighting change. If I get away from it, you can see all of a sudden it gets darker. If I get closer, all of a sudden the environment becomes lighter. If I go away, it becomes darker. Now this is okay for realistic environments. For example, if you're making a movie or something like that. But for games, this will be very annoying because the character is running around. You can see this is very dark now. All of a sudden when you get close, everything is light. We don't want that. We want the light to be somewhat the same all the time, and we need to disable this exposure effect. The way you do this, we are going to talk about the post process volume later on, what we have to add it now to disable this exposure. Basically, you can create on Create here, this button here, and go inside of the Volumes. In here you can see something called Post Process Volume. In Volumes, Post Process Volume. Clicking on that one, then you create a post process volume and you can see it's basically just a box like this one, and I can drag it in. I will talk about this post process volume later. It doesn't matter where it is inside of the environment. If you want to, you can write zero, zero, zero to have it inside of the middle here. Basically what we want to do is we want to go inside of the Exposure, go to the one called minimum brightness and maximum brightness. Ticking those, then setting it to one. The brightness is basically one at all times. But basically you can see nothing has changed. Nothing changed inside of our environment even though we changed those. This is because you have to go to the bottom of this post process volume and you have to click on the Infinite Extent. You can see everything becomes dark all of a sudden, and this is because we removed the exposure. Not really removed, but we set the value to one, so it is static all the time. Basically now when I move close to an object and I move away, the light is going to stay the same. I want to explain this post process volume later on inside of the post processing section. So don't worry about what this box means and what all of these values are. We basically just wanted to disable the exposure so we can actually work with the lighting. Another thing you can disable right before we end this video that is also affecting our style of lighting, you can minimize this exposure and you can go inside of the one called Image Effects. Inside of here you can take the one called Vignette Intensity, and you can set this to zero. You can see the edge becomes lighter if you do that. So if I click on this arrow, which means go back to default, you can see things become dark over here. This is because this is like, if you don't know what a vignette is, it's basically that cinematic effect, the black border around the edges. We don't want that right now. We want to light the environment first, and after that you can actually add it in. Setting the vignette to zero for now so we can actually adjust the lighting correctly. As always, clicking on the File and save everything.
16. Adding the Lightmass Importance Volume: The light mass importance volume basically tells the game or the engine where you need the lighting. Where it is important that I built the lighting inside of the level. You can go ahead in the "Create", go inside of "Volumes" and clicking on the "Light mass importance volume". Now, when you do that, you get this volume here and you can basically increase the size of it through these settings over here. Right now I'm just going to set the location to 0,0,0, so it's inside of the middle and I can increase the x like this to encapsule the environment, and increasing the y and increasing the z like this. I can move it up if I want to encapsule this environment. The lightness importance volume just basically tells the game where you need the lighting. Where is it important that I build the lighting, that I make the detail that I need? This is what it basically means and it doesn't really need to be very specific. Now I can increase the camera's speed to go around a little bit quicker and to see what I'm doing. I can increase the z value, just move a little bit up if you want to, look down and just make sure that the environment is encapsuled inside of this light mass importance volume. Again, you don't need to be very specific, you can go ahead and click on "File and Save All". Now we have told the game or the engine that this specific areas actually where we need the lighting and this is where the detail is happening.
17. Building the Lighting: Every time we add a light, if we want the correct shadows and the correct lighting, we basically have to go to Build here and click on Build All Levels, or you can also click on Build Lighting Only if the lighting is the only thing you have changed. What building does, it basically bakes the shadows that you have finished. Basically when you set, let's imagine you have this light here. You have a point light and I move it inside of my level here. Remember we talked about the lighting mobility and I set it to a static because I don't have anything moving inside of my environment. I basically have to click on Build and to Build Lighting Only or Build All Levels. I need to do this to bake the correct shadows. If you don't build anything, you're not going to see the correct lighting. Basically, you can see I have built now, the light looks different from what it did it before. You can see it built all of these shadows that I have in my environment now. This is basically what building is. It builds the correct lighting and the correct shadows. This is very important if you have the mobility set to static, because you can read here it says, a static light can't be changed in game. It is fully baked lighting. So it pre-bakes the lighting, so when the player gets inside of the game all the shadows from the static lights will be pre-baked and they will never be moved. It's just some data set inside of the computer. This data can only exist if you click on Build and build all lighting, so the lighting and the shadow is correct. You have to be aware that there is something called Lighting Quality. You can increase the lighting quality to view the lighting in higher resolution. But basically, if you click on Build like before, the time is going to build is a lot larger than before, so It's going to take a lot more time to build a lighting if you set the lighting quality a lot higher than preview. But basically the lighting is going to look a lot nicer if you set the lighting quality a lot higher. But usually when we are inside of development, we always use preview because we don't really need the cinematic view. But later on, when you have finished the scene, you can basically click on Production, clicking on Build after you have clicked on Production, it is going to take a lot time to build the lighting depending on how much lighting you have inside of the level and how fast your computer is. Before we end this, I'm going to click on this light, clicking on Delete. Basically you can see nothing happens when I click on Delete because, remember, this is pre-baked. This is a pre-baked light. I had to click on Build just make sure my lighting quality is a preview again. Then I can click on Build All Levels, and this data here that we built before will be gone now. Now here after I built, the build is finished, you can see the lighting is gone.
18. Setting up the Camera: Now that we have added all of the lights that we need, we basically need more light, so we need the diamond sliding up and the candle, and so on. But we can add that later on. This is not very important right now. What was important is the sky over here, the skylight, and also the directional light, which is the sunlight that we have here. Now that we have these inside of the levels, let's set our camera because basically, I made this to look like a main menu so that when the player joins the cameras like this, and it's the main menu and the buttons are inside of here and so on. I want to set the camera just like how I intended this environment to be. To create a camera, you can basically click on "Create", go to all classes. Inside, of here you can see something called camera. You can add it this way or a second way you can do it by clicking on this button in the viewport. Click on "Create Camera Here", and then you can click on this one called "Create Camera". You can see it creates a camera actor where you were looking. If you move around, you can see the camera here. Basically, you can right-click this camera and clicking on pilots. By doing that, you can now see it says pilot active camera actor. Now you're actually inside of the camera. When you move with your keys like this, you are actually moving the camera. Basically, if I move it over here, and I click on this eject button to go out of the camera. You can basically see I have now moved this camera to here. Right-clicking on and piloting again, I'm going to move the camera here. I'm trying to adjust the location on this one. You can adjust it like this, very rough to begin with, with your keyboard keys. Later on, you can actually use these keys here to try to adjust the location of this camera. To adjust this location, I'm basically going to click on this View Mode and clicking on unlit because I really want to see the environment when I'm doing this. Now, I can adjust the x, y, and z. I'm trying to adjust the z value here. I think something like 130 would be optimal for this. Now I can adjust these over here. I also want to rotate the camera because I don't want this to be visible. You can see there is a window back here, and I don't really want it to be visible. I'm basically going to change these values here. Putting this one to 0, we don't really need a y rotation. The x is going to be 0 as well. We can rotate this z value to have it looking correctly. Basically, the one I liked is minus 15. Having it to minus 15, and then I can try to adjust the x here, so it can go backwards a little bit and maybe something like this. Now you have to adjust this y-value, y-value to just move it from side to side. I think if you will like this would be cool, so you can check it out by clicking on F11 and seeing it in full screen. Now I am going to click on G to remove all of these icons, so I can actually see my environment without the icons. Basically, we can see the broom. It is not cutting out too much. I'm also seeing this book over here like I want to, so it's cutting out nicely. I think this is the camera I actually want to work with. If you want the same position for the camera, I can click on this camera here. This is basically the location of the camera. Now later on we are going to create another camera that we can use to present our work though as cinematic camera that we can use to create cinematic shots for your portfolio. But basically, this camera here is going to act as our main camera that we will use when we enter the game, and basically, this is our main menu. I'm going back to the loop mode here, and I'm going to save everything. Now, I can click on this eject button to go out of the camera. Now that I have the camera inside of the correct position here, I can right-click this camera, go to transform, and then clicking on log actor movement. This is what you do by locking the actor's movement. I can't move it by mistake because I don't really want to move this camera anymore. I have said it correctly. Even though you right-click here and clicking on pilot, you can see the camera is locked you can't really move it with your keyboard keys and I'm going to eject it. If you want to move it again, you can basically right-click go to transform and clicking on this again. This is how we set up the camera. Let's move over to the next lesson.
19. Adjusting the Sky: It is now time to adjust the sky that we have over here. Firstly, before I do that, let me actually go ahead and make a folder just before all of this gets messy. I'm going to click up here and click on NewFolder. I'm going to call it lighting. Then I'm going to drag the directional light, the skylight, and also the sky. I'm going to drag all of those inside of the Lighting folder. I can make a new folder up here called PostProcess. These are the post process volume, and the light mass volume I'm going to put inside of lighting as well. The post process is going over here. Now it's a bit more organized and we can work like this. Basically I want to adjust this sky in this lesson. Going ahead in the World Outliner, you can click on your good sky, this one here. Now here in the details panel, you can adjust a lot of things for this sky. First of, you can choose the sky preset here. Right now it's custom mode. But what I want to do is maybe go with something here in the midnight, since we are going to create some midnight scene here. I'll try to choose one this midnight here. Day 0, so the time is zero, it's in midnight. Also for the sky coverage, I'm going to select it here and select Clear. We don't really have any skies, but again, this is just a design I'm working with. If you want to make a daytime or if you want to have slight clouds, if you want that, you can go ahead and do that there is not really something wrong or right here. You can go ahead and do what you feel is the best solution. But for me I'm going with the clear so we don't have any clouds and only the stars. Then you can scroll down here, and here you can find the sun and stars. Now you can actually adjust the amount of stars and how large they are and so on. Right now I think these stars are way too large. I want to increase the UV tiling here like this so they get smaller and they actually look like stars. By the way, you have found out that when you slide on these sliders here, when you reach to two, you can't really increase it more, but you can actually increase it if you write a number and it's actually going to work. These stars are going to have a small effect when you look outside of the window. I think if the stars are at 2.5, for me, this will be a good size. Before it was one, they were too large and we can make them to 2.5 and they look a lot better like this. You can also adjust the brightness of the star, so you can make them brighter if you want to. Right now it's one, maybe I want to make it 1.5 so it's slightly brighter than normal. Then you have some fall off intensity here so you can increase it and see what's happening. You can see you have this stars pattern were they're some a blinking pattern here? But I don't want to make it this extreme, it's going to look a little bit weird. I'm going to maybe 0.18 is the number. You can see that you have some sort effect happening. This is actually all that we had to do for the stars. We have this sky here. The reason is why we're not changing any colors right now is because we are going to adjust the sunlight and we're going to add some fog. All of these are actually going to affect this color out here. But basically in the end I want it to be more bluish over here, but let's not worry about that for now. It's going to look a lot better when we add the fog and we adjust the sunlight.
20. Adjusting the Directional Light: Now it's time to adjust the directional light, which is the sunlight. Basically, I'm going to click on the World Outliner here and click on the directional light. Before we work here, let's actually disable this portal because we don't really need to see it right now. I'm going to click on the portal here. You can see an eye that you can click on. When you click on that icon, you can see that portal disappears. We don't really want to see the portal right now, it's not really of relevance for us right now. I'm going to click on the World Outliner and click on the directional lights. The most important thing here first, remember to set the mobility to static because we don't really want the sun to move around inside of this environment. We don't really have anything moving inside of the environment, so we don't need dynamic shadows, so it doesn't really need to be stationary. Then we can click on static. Basically, we can adjust this intensity here depending on the sunlight. Just imagine how it would look like if it was nighttime and this lantern is not working and this candle is not working as well. It will be very slight light. If you set it to three, for example, this is way too strong for nighttime. If we set it to one, I think this is still a bit too strong. I set it to 0.5 and usually nighttime is around 0.5 in lux and I think this is looking a lot better, so 0.5 would be nice. Next, I'm going to change the light colors, so I wanted to be a little bit bluish. You can see when you change the color, it affects how the light is. I'm going to give it a slight blue color here, just like this. You can adjust here, of course, if you want to make it saturated or desaturated. Basically, I'm going with a level like here. This is fine for me, so I'm going to click okay. Also what you can do if you want to, you can click on use temperature and you can make the light colder or warmer like this, depending on what kind of environment you're going for. But basically, we're going to do this inside of the post-process volume later on, so I'm just going to uncheck this for now. Then I'm going down here. Basically, we need to make this into an atmospheric sun, so atmosphere sunlight. I'll show you what this is actually going to do. We are going to enable this light shaft bloom and the last shaft bloom is actually the thing, the effect I showed you before where you get like those god rays from the sunlight or the moonlight hitting through the window. This is basically the light shaft bloom and you need some fog for it to work. I'm going to click on create up here. Then inside of the visual effects, we can add an atmospheric fog. Then again inside of create in visual effects, we can add the exponential height fog. Let's add that. With that, let's go to the World Outliner. I'm going to select both of these. Actually, I'm going to, let's put them inside of the lighting, I don't think it makes sense in the post-process. Inside of the lighting, and now you can click on the directional light again, so our sunlight. Inside of here, you can increase and decrease the bloom scale here. Basically, you don't see anything happening. This is because you have to rotate your directional light. Basically, if you rotate the light here you can see, you can try to rotate and then try to see where the sunlight is at. Basically, I don't see anything right now. I'm going to click on the directional light here going up to the top, and you can also rotate it here if you want to. Now you can see here is our bloom. These are the guard rays that I was looking for. I believe the x can be zero. The y is directing how far up and down the light shaft bloom should be. I think something about minus 20. Minus 20 degrees will look nice, so we have those guard rays hitting the ground just like that. Then you can adjust on where you actually want those bloom effect here, this god ray effect, and I think something around here would be nice, so around 130. Now I can go down here and inside of the bloom tint, I want to change the bloom tint as well. You can see if you change it, you can see you can get this colored effect. But basically, I just want this slight bluish color. Maybe I can just go up here and copy this Hex Linear color. I'm going to copy this and I can go down and paste it here, so it's the same thing. You can see it's a bit more bluish and we can always adjust the color of the sky out there. Now, what you can do is right now it's way too strong, so basically you can adjust this bloom scale, so it's not too strong. We need to adjust it to something that we think looks great. Maybe like this for now, so 0.2 might be a good number here, or 0.1, very slight effect. You can try to play around with it, and we can always adjust it later. Just because we're adjusting it now we're not going to leave it alone later on, we're going to adjust everything together later as well. We just want a base to start with, so this is looking good as the base number here. Now just to make sure that everything is looking correctly, we can go ahead and save everything and then clicking on build all levels. Now we have finished building here, and there goes a second or two before the lighting actually appears correctly, just like that. Yeah, so we have those guard rays and you can see this is the light we have from the sun. I think it's looking good because you can imagine right now all of these things are dark. This is because we have rotated the sun, so it's actually coming. Not the sun, basically it's the moon. When I say the sun, I'm used to say sun with directional light. Basically, it's the moonlight, so the mood light is hitting here. You can see we actually have a color from this moonlight which is hitting this wall here. Basically, we don't have any lighting here and this is very realistic, so this is looking good. We only need light here because the moon is actually coming from this window and not this window over here. Now as the last thing before I end the video, sometimes you get these very realistic metallic reflections here. I don't think you can see them quite if you are not used to lighting. But what you basically can do here is clicking on create and inside of visual effects you have something called Sphear Reflection Capture. Clicking on this sphere reflection capture and setting the location to 0, 0, 0. You can see here it has a sphere you can play around with, so you can increase this sphere radius. This is the sphere if you want to see it. Increasing the sphere, so it's actually encapsulates this environment. Now you can go ahead and save everything again and clicking on build. Basically, it's going to build and what the reflection sphere is doing is basically calculating the correct reflections. Right now we don't really need those realistic reflections because remember this is a stylized environment, just like World of Warcraft, for example, we don't really need very realistic reflections. I think it's looking good now. We have adjusted the directional light, so we have the bloom here from the moon. What we can do now to make this whole scene a lot lighter, we're basically going to adjust the skylight and have it lighting up this scene.
21. Adjusting the Sky Light: Let us now adjust the Skylight. Going to the World Outliner here, I can click on my Skylight, and before I do this, actually let's put this sphere reflection capture inside of the lighting here and clicking under Skylight, I can then actually before I do anything, I can set it to movable. The reason I set it to movable is because basically movable is when you want to move the skylight in real time, like when you're playing the game, as I explained before, and if you want dynamic shadows, but basically we don't have dynamic shadow, so why do I set it to movable? Basically, I want to use this setting down here called distance field ambient occlusion. You can see I can select it now and I can actually change values. But if I had a set to stationary or static, I can't really work with it here, and I actually want this setting here. Basically, I want to explain this part later. Let's set it to movable for now. The most important slider inside of this skylights, and you have to remember this. The most important thing inside of the skylight is the intensity. Basically, let's actually go ahead and click on Build Now that we have set the light to movable. The good thing about setting things to movable or stationary is that you only have to build once, you don't have to build all the time. Basically, the intensity is how dark the shadows are. Basically, this is the light coming from the, consider it lit everything up when I increase this. Basically, the skylight is the light that comes from the sky, hits the ground and bounces of these objects here, and if you increase the intensity, the shadows will become lighter. For example, if you have to one, it looks like this. If you have to five, you can see the shadows become lighter now. If I have a to 10, the shadows become lighter again, and if I put it to 20, you can see the difference and so on. What I want with this skylight is I basically want it to look like the moonlight is lighting up the scene. I don't want you to make it too bright, so I don't want you to go insane and do something like this. Because remember, this is nighttime, this is not daytime, and the light we want inside of this room is, should be mainly coming from this candle and this luncheon. Also some of it will come from these diamonds. We don't really want a very strong light. We just imagine that this light is coming from the moon. Basically, a number like 40 here is too high. This would be very unrealistic if this was the moonlight, it's lighting up the scene like it's 9 or 10 a.m. in the morning or whatever, so reducing this again, we want a very minimal value. I can try to go with something like with a value of six and try to play around with it, and maybe this amount of light would be very realistic if we don't have any lighting inside of here. Let's try to set it to six for now and we can always increase it later if we think this is actually too low or too high. You can also adjust the light here if you want to. Basically, you can set this light to a bit more and this bluish area instead of fully white. What you can do also is if you scroll down and there is an arrow here inside of the light. You can click on this arrow and you can see something called lower hemisphere color, and you can change this. You can see here, if I change it to red for example, and I changed it here, you can see everything becomes red, and the lower hemisphere is basically the light that is hitting the ground and then hitting those items. This is the light that bouncing light. What color do you want it to be? Basically, to make realistic lighting, you basically have to go to lit here, this view mode, and going to buffer visualization and clicking on the base color. Now basically, you're viewing the base color of the models, and to make a realistic light, if you basically have to select the color of the ground, because the light is hitting the ground and the ground is then pushing this slide to these models. Basically, you actually want to click "here", click on this color picker, and then pick a color from the ground. But remember you have to go in this base color visualization mode to view their true base color of the ground. Basically, you can select a color from here and something like this would be nice for me. This brick coloring looking thing here, so I'm going to click on the link mode again going back, and I'm going to the World Outliner, selecting my skylight again. Now this is the color that we have. Now what you can do is clicking on recapture in the senior recapture is to make sure is correct, and then you can save everything, and let's build all the levels to be sure that we have the correct shadows and light. As the last thing before we end it here, let's go to the, if I go down here to the distance field ambient occlusion. If you don't know what ambient occlusion is, it's basically the shadows that surrounds the models. If I go to the lit mode here and I select the lighting only, you can basically see here we have a lot of shadows hitting, and those shadows, if I go to the World Outliner, select the skylights and then go down to the distance field ambient occlusion, you can see I can decrease and increase those shadows. You can play around with those shadows. But just very important thing to remember, shadows are very expensive inside of the engine. Don't go and make it too insane because this will cost a lot in your game and it might lag your game if you're going way too insane with it. Basically, I want to go with something that looks good, so this is way too much. I'm going to decrease this exponent here, and let me decrease everything and see what's going on. Maybe something for 400 and 500 and I think 400 or 600. I don't remember the exact number, but this is what Fortnight uses. It's around this area here, and you can play around with the exponent here and maybe 0.7. This contrast is very handy because you can fake the darkness of the shadows, and this is very cheap. This is not performance heavy. You're just increasing and decreasing the darkness of the shadows. I think I'll go with a value of 0.7, 0.3 here in the contrast, and 250 in their collusion max distance. This is what it looks like now, and if I go back, it's probably going to be a lot lighter. You can see here the scene is actually a lot lighter than what we left it with. What we can do here is we can go up and you can actually decrease this intensity scale just, so it's looking a lot better and more realistic. If I set it to one now you can see the lighting is down again, so I'm going to try to enter adjusted again up here. Then what I'm going to do is for now just set it to 1.5, and this is what the lighting is looking like with the 1.5, and if it's too high or too low, we can always decrease it and increase it, and this was actually for the Skylights. The most important thing is the Intensity Scale and the lighting colors, so you can change those here, and basically the lower hemisphere color, which gives it that bouncy color on the models. Then we adjusted this distance field ambient occlusion, and remember the ongoing saying with this, it's going to cost you a lot in the performance and basically in the occlusion tend you can also change the color of the occlusion here, so you can see, you can change the color and we might go with a bit lighter here, so you can see, if I go very high, they become very light, and the dark one is very dark. I'm going to increase it a little bit so it's not too dark, so just consider a slight effect. This is what it was before and this is now and clicking on "Okay", and I think this is good. Let's click on "Save All", and less spill everything before we end this video. Now that we have built everything, this is what it is looking like right now. Again, we can always adjust things if we like, if we think something is going to be a bit different, we can always go back and adjust it. This is looking good so far and let's continue.
22. Adjusting the Fog: It is time now to adjust the fog, and before I do this, I'm actually going to click on the "Skylight" and reduce the intensity scale to one. I think 1.5 from the last lesson might be a bit too much, but we can always try to adjust it later, so putting it to 1.4 now I think it's better. Clicking on the World Outliner, I can click on the "Exponential Height Fog". This is what we want to adjust for now. Basically, you have to just the fog density here. You can see if I increase it, this is the fog that we see here, and I can also increase, and decrease the falloff, and this affects how it looks like here outside of the windows. If you look outside here from the environment, you can see if the falloff is slow, it fills the whole environment. If it is high, it's going to lay low here on the ground. Basically changing this density is self-explanatory is how much fog there is. Now, you have to increase, and decrease the intensity of this fog here. Basically, I think around 0.03 might be something or a good number. But I just want to let you know that if you increase it to the maximum here, if you just click on slide to the maximum, you can see the maximum is 0.05. But you should just know that you can actually increase it further. This is just by clicking and writing a number. You can see here, this is very dense now. Just so you know, by sliding it, you can only come to 0.05. But again, you can actually write numbers inside of here, and increase it. Let's put it around 0.03, like this. We can increase, and decrease the falloff, and you can see it gives that effect outside of the windows. How light it should be. Something like this, 1.5. Now, we can go down, and we have something called Directional In-scattering colors. You can change that as well. Basically, I'm going with a bit of a purplish color, and also you have to enable the volumetric fog. With the volumetric fog ticked on, it gives those Godrej effects. Basically, you can adjust the view distance, and you can see it's affecting a little bit here on the outside how light it is here on the outside. I'm going to put it on 4,000 for now. You can also change the color of this fog here. You can see it's not really changing a whole lot. I can see it on my screen. It's actually changing a little bit. I'm not sure if you can see it on your end. I'm just going to choose a bit of a dusty effect here. Something like this, and it's not really anything that is too strong that you can see. This doesn't really affect the whole environment a lot. I'm going to go up here. We don't really have more settings that we can work with. Going up here, before I do anything else, just set this one to static because we don't really need the exponential height fog to be movable. This will cost a lot for us in the performance. I'm going to set it to static, and before we do anything else, let's click on "Save All", and build everything. You can see here when we build everything now with the mobility such as static, everything becomes a lot darker. This is very important why I have to change the mobility, and remember to click on Build. Because if you don't do this, the light will be wrong. Because remember static lighting is pre-baked lighting, so you have to bake the lighting every time you said something too static. But basically, I am happy with this for now, and for the atmospheric fog, we don't really need to change anything. I'm going to let that be for now. But I'm going to click on this "Skylight" again because here we actually need to adjust it again. This is becoming very dark, and I actually basically have to increase this intensity here. What I can go with for now is an intensity scale of three. With an intensity scale of three, you can see here we have a bit more lighting coming from the moon, and this might be okay for now. I'm going to let it be on three for now. This is what I said before, even though we are finished with the skylight in the previous lesson, we are going to go back, and edit stuff again in the directional light, and skylight, and balance things. Because every time we add a new element, for example, this fog here, you can see it suddenly changes the whole environment. We have to go back, and forth to change things. Just as the final thing, try to look around, see if the bloom is still here, if it should be stronger or not. I think actually we can make it a little bit stronger. Clicking on the directional light going down, finding this light shaft, and this is the Bloom Scale that is 0.15 right now 0.4. You can see this is what it's looking like around 0.4. You think this is too strong, we can decrease it a little bit, and 0.3 might actually be a good number here, or 0.25. Just like that. Just a very slight effect that we have going on here. This is what you can do here. You can go back, and forth and adjust things, but I think basically the sunlight itself, so the moonlight here is okay, so we don't really need to change anything. Let's continue to the next lesson.
23. Light Complexity: Welcome back to this new section where we are going to light the indoors. We have lit this outdoor environment with the skylight, with the fog, with the light source here, the directional lights. We made this cool effect here. Now it's time to light the indoors. Before we do any of the indoor lighting, I want to explain to you some optimization things because these are very important just before you go crazy with the lighting inside of the environment. I want to explain to you something for optimization. You have to know that light inside of the engine is very expensive. You don't have to go crazy with the lighting. You also have to be aware of the optimization windows that you can look at to know if you have gone too crazy with the lighting and if the player is going to lag in the game because you have went too crazy. Here it's just not up with inside of the view modes here in the lit one. You can go inside of the optimization view modes, and you can select the light complexity. Right now you can see it's very dark, nothing is going on. This is because we haven't really added any light yet. We haven't put a point light yet. Clicking on the point light, adding some light to our indoor environment, you can see it becomes blue. Blue inside of this engine means this is very optimized. Blue means you are not using many resources. Blue is good inside of this engine. Let us go back here, so you can see what's actually going on. Going to the lit mode, you can see we added this light bulb here inside of our environments, and we have lit this environment. You can imagine this could be the lighting for the candle here. Now let us go back to our optimization view mode and back to the light complexity. I am going to create another light here, going to add another point light. You can see now we have some of it that is blue here, some of it that is green, and some of it that is darker green. When you get green, this is optimized as well. Green just means you are using more resources than blue, but you're still in the green area, you're good to go. You're not using when resources. I'm going to add another light here, and you can see now it becomes orangey. Orangey means be careful because now you are actually using a lot of lights together. You can see if I move one light away if I make the camera a bit faster, and I move one of the lights away, you can see it actually becomes green here because now you're only having two of these point lights together. The third one is actually outside here, you can see this is the sphere that it affects. It's not really affecting this area here. This is green again. But if you move this light inside of this area, and it's actually affecting, you can see this part is actually becoming orange because this orange part means all of these lights are now affecting this area, and you should be careful. I'm going to add one more light here, going to create another point light. Now you can see it becomes this purple color, and you have this dark red. Now, this is, I wouldn't say very bad, but this is getting into the bad area. You should be careful. You should actually think how you can optimize this environment because most of it is orange and red and this purple here. Now, if you add one more, it's going to be very bad. I'm going to add another point light. You can see it becomes this color and white inside of the engine means very bad. You shouldn't have this color here inside of the game. If you have this white color here, and this purple color, it means you are going way too crazy with this, and also it shows you have an x here. I'm going to explain why this is happening. Basically, try to stay with the blue here, blue means very optimized. This is only if you can. Adding another one, making it green like this doesn't really matter. This is optimized as well. You shouldn't be worried at all. Adding another one. This one, if you have a small environment like this, I would not be worried at all. Don't be worried because it looks like this. But if all of your game is looking like this, then you should think, do I really need all of these lights, or can I do something to optimize it. I can show you some tricks to not use as many lights as this one in place. We have this light complexity view mode here. When you are lighting this indoor environment, just keep going inside of here and actually take a look at what you're doing. Be careful you don't go crazy with the indoor environment like this.
24. Lightmap Density: The next optimization thing I want to talk about is light map density. I'm going to delete these points here from the last lesson. I'm going to delete those, so we're back to zero again, and I'm going to go inside of the lit mode here or the view mode here. Inside of the optimization view modes, I'm going to click on the light map density. Now, I've already done a lot of the work for you because there's actually taken from my game. I want to explain to you what the light map density is. The light map density is basically each of the 3D model you can see here has a light map, and this is how good they receive the light and how good the shadows will look on these models. If you have something blue like this, so like these walls, they will produce low-quality shadows. Remember what I said in the previous lesson, blue inside of this engine means slow. For example, you didn't use as much performance for the lights here. When we looked at the light complexity, and it was blue, it meant it was good. You didn't really use any much resources. Inside of a light map density, blue means low quality, light maps. The green one means okay, it's medium, that's okay. Then you can go up and boost them. You can see there are a bit orangey here, and you can make them very harsh. Very red-looking models here in the light map density means you are using way too much share resources. Basically, I can click on this shelf here, and I can show you. Clicking on this one, instead of going inside of the 3D here and trying to find it here if you don't know where it is, it's basically inside of shelves. If you did not know, you can click on it here, and you can click on this magnifying glass. It will take you to this folder, and you can double-click this model here. Now we have this model, and you can basically search for light map or just light. You will see something called minimum light map resolution and light map resolution. Now I'm going to minimize this a little bit so you can actually see the model inside of the viewport as well. Going here, inside of here you can increase and decrease the light map resolution to increase the quality of this here. Basically, when you increase it, and it becomes more green like these books here, it creates better looking shadows. If you have all of your environment blue like this, it might go very low-quality shadows, and you might want to increase them to actually make your scene look better. For example, this shelf here, we can increase it. We start with four in the resolution. Very low. This is used for very small items, details that you almost cannot see as a character. Four, you can see here if I actually go and click on "build all", you basically have to build every time you change it here. It's going to take a lot of time. You don't have to follow this video. I actually just want to show you and this is very low. I have actually never seen it be this blue before. This is insane, this is very low. Going with four, and you have to multiply it by two all the time. Four, eight and if you want to increase it, you will go to 16. If you want to increase it again, you'll go to 32. Basically, let me put it on 16, and you can see what's happening. If I go ahead and build it now, it's going to be less blue than this one. This one was the resolution of four. When I build it, it becomes, you can see the patterns become visible here. You can increase it to just 32, and then you have increased it to 64. Then just keep multiplying by two, then 128 and then 256, and so on. Now I can actually try to build with 256. You can actually see what's going on here. This is what it looks like with 256, and I would say this is too much for the model. You shouldn't try to aim to have all of your models like this. Because remember, every time you increase this number, you are automatically going to use more resources from your player. Try to keep this at a minimal level, but still don't make it too low. Your environment is going to look bad. But you have to balance between performance. The larger you make this, the more it's going to use of the players computer. Basically, if you go insane and do something like, so this multiplied it by two is 512. Going with 512, you can try to see what it looks like. I would say from experience 512 is probably way too high, and it's going to look red. You can see this is very red and this is very bad. You should not aim to have this. I want to go back to 64, and it was actually good as what it was before. I'm going to build it again as 64. You can see that this takes some time because you have to build all the time. If you want to increase it, you have to increase it to 128. Basically, you can increase it to 128 and see what it looks like. If it looks too much, if it becomes too green or too orangey, you can decrease it. It looks like this, and you don't have to make all the models green like this. This is actually still using too much in my opinion, for environment like this. I would take it down to 64, and actually, I would be happy with it. I'm going to build everything and 64 is what I want. I probably can't remember because this has been more than three years. I probably have went through all the models here and try to make them as fast as possible. If you have a very low light map density on the ground and the sun or whatever light is going, for example, these shadows here, they're going to look very wavy when you have very low-quality Light map density on the ground. Just to show you, I went inside of this ground here and put the light map density to four, so very low. If I go back to the optimization view mode and the light map density, it's basically almost a pixel. You see your head is very low quality here. If I go back to the lit mode, you can see the shadow actually disappeared. If it was 128 before, if I put it on, let's say 32, just like that, and I built here, you can see here that the shadow actually appeared. It is still looking very low quality, and it doesn't make sense for what we have put down because it doesn't really look like this, and they don't even connect here. You can see here it affects the shadows of the light a lot. This is what it's looking like right now inside of the light mass density view. You can basically see it's blue, it's low quality, so you have to increase it. Previously it was onto 128. I'm going to put it down and click on build. This is what it was looking like initially. If I go back to the link mode, you can basically see the shadow is high-quality or just at high-quality, but just as it should be. The green one is very good. I use almost the best light map resolution for the ground because it's so important. All of these models, this one basically it is getting a bit blue. You can see here this is less blue than this one. This one might be a bit too low quality, but you can judge if the shadows from it are looking bad or not. If they are looking bad, you are more than welcome to increase them. Let us continue to the next lesson, and I'm going back to the lit mode.
25. Stationary Light Overlap: The last optimization I want to show you is basically the stationary light overlap. Going back to the view mode here, clicking on Optimization View Modes and clicking on Stationary Light Overlap. Right now it's very green and this means you are good to go. Nothing is happening here. If I go ahead and click on Create, add some light, so a point light again here, you can see it's still green. We're going to add one more light. I'm going to add one more light. Now you can see it becomes darker green. Basically, remember, when we create a light, these are automatically set to stationary. If I move it a little bit, you can see it's affecting now. Before it was green because we did not have, even though we created one light, it is not overlapping with any other stationary light, so it's good to go. If I put another stationary light on top of the other stationary light, you can see it becomes darker green. If I go ahead and click on Create and put one more stationary light, you can see here, if I just keep putting stationary lights on top of each other, it becomes bad. You can see this now. This is for the stationary light overlap and this is what's happening if you put too many on top of each other. It's also going to show you here some excess here. It's going to show you, this is not going to render because I have too many stationary light overlapped. I believe you can have up to four stationary lights overlapping each other. Then if you have five, it's going to put that x on this stationary light, just one in random and it's going to tell you, you have created way too many stationary lights, should you consider trying to remove one of them? Basically, if you have too many stationary lights, this is what's going to happen and the stationary light overlap will become insane like this. Basically, when you light the indoor environment, you have to keep an eye on the light complexity. You have to adjust the light map density to make the shadows look good in your environment and you also have to take a look at the stationary light overlap if you are using stationary lights. But basically much of our environment is going to be static lights. But again, we are going to use somewhat of stationary lights and we can explain throughout this course why we are using the stationary lights and so on. You can go ahead and delete all the lightings here. Going to the World Outliner, clicking on these point lights and deleting them. I can now go back to my Lit mode. This is where we started back here. Let's go over and light our indoor environment.
26. Candle Lighting: It is now time to light this candle here. Let's go over and click on "Create", and inside of Lights we have to choose the Point Light. Out of all of these slides, the Point Light is the one that fits the most. Clicking on that one here, and you can see it's created here. I'm going to change the position to 000, so it's close here. I can take it and move it. We're going to move this light here close to this candle here. Taking the move tool, try to center it and if you don't want the snapping here, you can basically snap it off here, clicking on this "Snapping disable". I can move it around just like that, and just moving it above the candle. Right now it's very very strong. We're going to fix that in a little bit for the intensity. Basically what you want to do is you want to place this light here, this point lights above the candle where you want the lighting to be. Now you can see here to the right, we can adjust some settings. Now firstly, we can adjust the intensity of this light. This is very important because you have to imagine how much of the environment this candle realistically is going to light up. Basically the lantern or the candle is probably not going to light something like this up. It's probably going to light up I'm thinking, imagining, and this is an artist decision, so there isn't anything wrong. You can do your best. I'm thinking it's going to light up somewhere around here and then it's going to stop. Basically what I want to do is, I want to go down here, and if you haven't clicked on it, there is an arrow down here in the Light. You can remove this Use Inverse Squared Falloff. You can disable that. Then you can adjust this intensity here. Basically down here, you can also adjust the falloff. You can actually light all the room if you want to. You can actually fake it here just like this if you want to. But we don't really want to light all of the rooms so let's try to set to 10 for now and actually just adjust the radius here. Try to increase it and decrease it depending on how much this light should affect. Right now I'm just going to, clicking on this default button here so it's back on eight just like before. Let me try to adjust this radius. When you adjust this radius, just imagine how much of the environment is this light going to light up. Right now, I'm just thinking a little bit of this door is going to be lit up as well, so maybe 450. This is what it will look like when the lantern is on or the candle is on. It's going to light up this out of the room and also a little bit over here so it's falling off here. Then you can adjust the intensity. Basically, I'm looking at how intense it looks at this wall because if you put it too intense, this is going to be white and it's not really going to look good. I'm going to reduce the intensity and try to choose a good intensity to make it look good. Maybe four would be really good for me here. Next what you want to do is, you want to adjust this temperature. Clicking on "Use Temperature", you can lower it to make it look warmer. This is going to be what we want to have because basically the lantern or the candle light is a bit more orangey than white, because right now it's looking like this, but we want to reduce this to make it look a little bit warmer so it's more realistic coming from a candle, so 4,100 might be a good choice for this one. Maybe that is to orangey. We can also try to put it up to 4,400, just like that. Next what I want to do is, I want to disable this volumetric scattering because right now, I don't know if you can see it but we could see it before. If we create a new light here and I move it inside of the room, you can see that it has that loudly look, this foggy look. This is because we have this volumetric scattering on. We don't really want that for this candle here. We don't want the room to look foggy like that. Clicking on the "Point Light", I'm going to disable this volumetric scattering and actually just writing zero down here. The last thing I want to adjust for this one is the Light Falloff Exponent. You can try to adjust how much of this candle is going to affect. Trying to look at the room and see what makes the most sense for you. I think something about nine would be very realistic for me. The candle is lighting a bit up here and it's also lighting a little bit over here. The last thing I want to tell you about this light here is, basically we don't have any dynamic shadows inside of our scene. Basically, we could go with aesthetic mobility and this is what we should do. But since we are going to flicker this light, so later on I want to make this lighting flicker so the light is going to flicker, then you actually need it to be stationary. Because if you go down here, you can actually play around with this light function and this is the light function material and through this, we are going to make it flicker. Now if you set it to static which is not wrong, if you don't want to make it flicker, it's not wrong. We don't have any dynamic shadows inside of the scene, so it basically should be static if we didn't want to make it flicker. But you can see here I can't play with the light function here if it's set to static. This is actually why we are going to set it to stationary so we can make the lighting flicker later on, this candle flicker. But let's not do it for now, but just so you know that. Right now we actually want it to be stationary and not static. As the last thing, let me take this Point Light up here inside of the lighting. I'm going to click here and call it candle, so we know what lighting that is. Then we can go ahead and click on "Save All" and move on to the next lesson.
27. Lantern Lighting: Now we are going to make this lantern work. So going over to create, into the lights, we're again going to create a point light. Creating that setting the locus into 000 so we can quickly grab it here, and before we do anything else, we can remove this volumetric scattering so it's not looking that foggy. It doesn't have that foggy style. Writing zero in the volumetric scattering and I can move this point light over to the lanterns. I'm going to move it up here and if you want, you can go over to the perspective and the top view and you can try to find the lantern which is here. You can drag it over and place it in the middle of this lantern just like this. You can go to the, for example, the right view. You can see what it looks like here, and this is a lantern and we can basically move it over to the lantern so now it's in the middle. Sometimes it's easier to use the orthographic views if you want to play something specifically in an area like this. I can go back to the perspective mode and you can see it's actually inside of this lantern. You can move it a little bit if I want to adjust it here. When you are finished adjusting this, this is what it looks like and we're going to adjust the light. But before we doing this, I'm actually clicking on this one here and I'm disabling the cast shadow so I'm going to find the cast shadow, and it's actually already disabled. It was enabled like this before and I probably forgot to enable it again when I uploaded for you this pack here. But basically, when you upload models or models to the game, they have cast shadow, just like this book here, has cast shadow. This stand here has cast shadow if I try to find it. Here cast shadow, you can see if I remove it, it doesn't cast shadow anymore. This lantern here comes as default with cast shadow and I wanted to remove this cast shadow from this lantern because this looks stupid, because the light is actually inside the lantern and it's going to cause these weird shadows that doesn't make any sense. I'm going to disable the cast shadow for this lantern so it's not casting these weird shadows. I'm going to grab this point light again so going back to the World Outliner, I'm taking this point light putting it inside of the lighting and I'm going to rename it to lantern. If you want to make it flicker, you can basically set it to stationary. If you don't want to make it flicker, you can set it to static so let's set it to stationary for now. I haven't decided yet if I want the lantern to flicker or if it should be a static light, so we can put it to stationary for now and we can change it later if you wish to. Just like the candle here, we are going to adjust the intensity, the attenuation radius, just like before. Try to think of how much this light is going to effect. You can see here we can increase this and it's not really lighting much of the room up here, so we actually have increased this attenuation radius quite a bit so we can see increasing quite a bit, but it's not really giving much light here to the other side of the room. Just like before, we have to go down here to the inverse square falloff, and if you haven't clicked on the arrow, just like in the last lesson, you can go into light and click on that arrow down here to show advanced, and remove this, use inverse squared falloff. Doing so, you can actually increase this radius and you can see now you can actually light the whole room if you want to. We are going to reduce this and I want a value that's actually makes sense here. I'm going to let the intensity be as it is right now. We can adjust it but basically try to play with this and see how much it's going to affect of the room. Maybe I wanted to affect the whole room but tried to reduce the intensity to see where we are at. Maybe 1400 will be fine here and 1.2 here. I can try to look around the room and see what's happening. This is what it looks like with the light on and we can try to say affect world, we can uncheck it, so you can see what's actually looking without this lantern lighting. We can see how much it's affecting currently, just like that. You can also play with this source radius and basically what the sauce radius does, is it fills those black areas. You can actually try to move it up, and you can basically see here before it was dark and if you up the source radius, you can see these dark areas also up here on the shelf. They basically become lighter, and you can give that small effect to this world. You can actually increase this and you can see, you can give this minimal effects so it's not fully dark so maybe like something about 70, not overdoing it. What we want to do as well is use temperature, so trying to make it more orangey than it is right now and basically you can see it's very orangey here on the, this is basically a texture that I have put on. You can click on this slide and I'm actually going to make it the same temperature as this one, I think so 4400. I'm going back to the lantern and I'm choosing 4400 here, just like that so it's a bit more orangey rather than being all white. Last thing you can do here is also play with the light fall of exponents so you can see how much is it going to fall off. Right now I think it's sliding too much up right here. I'm going to increase the fall of exponents. I just want a minimal amount of lighting on the other side of the room. Right now it's looking like this, I think it's too much. What I can do is just having something like this, so maybe sending it to 10, just like that. Most of the lighting is being lit here from this lantern and some of it is actually hitting over here so we have some of the lighting being here. This was it for the lantern and for the candle, but maybe right now you're still thinking, why is my room still so dark. We have to adjust the skylight now because we don't really have anything else to adjust. We have adjusted the candle here, so the candle lighting is correct. We have the amount it is affecting and the intensity of it and we don't want to make it more strong. We also have adjusted the lantern lighting and we don't really want to make it stronger as well so this is looking good for us. We also made this directional light so this one, if you remember, the directional light, the moonlight, we made that as well. This is looking good for us as well, so we don't have really much more to add. Later on we are going to add the lighting for the diamonds, but basically the diamonds are not going to light up our room. It's basically just going to be some cosmetic, good-looking thing that the diamonds are lighting up. The only thing that we can actually adjust is the skylight. The skylight remember, we can increase the intensity scale if we want to, to make the whole room light up. What we are going to do is we're going to fake this skylight. This is what we are usually doing in game development. We try to fake as much as we can and we can use this skylight to light up the room. Maybe for example, 10 or 20 or 30 or whatever looks good. We're just faking it and it looks like it's coming from this lantern and this candle here and yeah just looking like nighttime. But basically we're faking it through here the intensity of the skylight. I'm going to put it back for now. Let's save everything and let's move on to the next lesson.
28. Readjusting the Sky Light: Let us now adjust the skylight here. Basically, we are going back to the skylight if I can find it here. We're basically only going to change the intensity because all of the other settings we have already adjusted and everything looks fine, and we want to fake it a little bit so it's not really too dark. Remember the skylight, when you increase the intensity, you're basically making the shadows lighter. This is what you're doing. Basically, right now it's on three. We don't want to bump it up like a lot to something like 30 or 40. We don't really want to do that because remember, later on we are also going to add post-process volumes. Through those we can actually edit our image or our scene with other lights and we can even reduce the shadows and so on. Right now it is on three here. What I want to do, my aim is to make it a little bit lighter. We can try it with 10. We can try with 20. Look what it looks like. We just want a dimmed light. Basically, I think 20 is a bit too strong, so I'm going to try 10, see what it looks like. Maybe we need to add a little bit more. Maybe it's something like 13, we can try now and see what it looks like. Basically, this is something good for an artist. You can sit here and try to adjust and see what's looking best. I'm going to go with 11,12. Let's go with 12. I think that's a good number, so let's save everything. This is what it looks like basically. Right now the shadows are much more light than before, but they are still dark. We can still adjust things, but we don't really want to adjust it here, we're going to adjust it through the post-process volume. Right now you can see our light setting is currently set to preview. If you want to, you can set it to medium and see you what it looks like. You can click on medium now. Now that you have done a lot of lighting, you can click on medium, and basically you can build all the levels so we can see what the lighting is actually looking like without the preview. Now, the lighting has been built and the lighting quality is medium. Basically inside of medium, it's going to look a little bit better than what it does inside of preview. This is the current scene that we have. What we can do for adjustment, we can even change the color of the sky. I'm not really satisfied with it. Just before we end the video, I actually also want to click on this "Directional Light". Remember the directional light gave us this gloomy god ray effect here down the window. Basically, what I want to do is, I want to go to the world outliner, going to the CameraActor are that we actually created, right-clicking "Pilot this CameraActor". What we can do here is going back and clicking on the "Directional Lights". I actually want to rotate it, so you can rotate it this way here. You can see the god rays is actually coming here to the screen. You can try to rotate it. You can see here now it is very visible. Maybe we want something like this. The god rays are coming through here or maybe you want it to go here. But try basically to adjust the god rays so it looks good on camera because just imagine this is your main menu and this is what it looks like. It looks good if the god rays are coming through here. If you want, you can also remove the snapping here. You can basically smoothly rotate those god rays here. I think something like this looks very good. We have some slide god rays. If you want to you can basically go down here in the light shafts in the bloom scale, and you can increase it, and decrease it as you wish. But basically right now we have it to 0.25, and I think 0.25 is fine for now. But later on we're going to change the color outside here. I don't think it looks good right now. But before we do this, let's actually work with the other lighting that we have, the diamonds right now and the portal actually, we also have the portal which gives some lighting. Then we also have the candle here that we need to make it flickering.
29. Portal Lighting: We're now going to add the lighting for the portal. Basically what I want to do is we just basically have to click on "Lights" and clicking on "PointLight" so we can add a PointLight just like before. Right now I'm inside the camera. I'm just going to highlight out of it, so eject from the camera. I'm going to set the position of this light to zero, zero, zero because basically our portal is in the middle here. We can move up the lighting so it's around here. It doesn't really make a difference if it's down here or up here but basically imagine the portal is around here and we can always adjust the location of it here. What I want to do with this lighting, again, disable this volumetric scattering. We don't want it. The next thing we want to do is, I actually want to disable the lantern and I want to disable the candle over here. We can disable the DirectionalLight if you want to, but you don't have to. I think this is fine. I actually just disabled the candle and the lantern because I want to try to see how much this is going to light because we have to adjust the radius here and we have to adjust the intensity. It's a bit hard for me if the candle and lantern is on as well. It interferes with the lighting here. I'm going to disable the lantern and the candle so it's the only lighting. This lighting here, if I go down and drag it up, this point light, this is the only lighting now inside of this room apart from the SkyLight and the DirectionalLight here. Basically, we have to choose how much lighting this portal is going to give. I'm going to enable it again here in the World Outliner and I'm going to call it Portal just so I know which light is what. Basically now we have to adjust the attenuation radius. How much it's going to affect the environment and the intensity of it. For the environment, basically, just like before, I'm going to disable this Use Inverse Squared Falloff, so I can actually affect the whole room if I want to. I'm going to increase it a little bit and I'm also going to decrease the intensity, so basically, it's never going to be that intense. Maybe a good starting point is somewhere around two. Now I can increase and decrease this radius here. Somewhere around 600 might be a good number. I can try to increase the source radius. Remember the source radius, when you increase it, it's going to fill those black holes. If I increase the intensity here, it's going to fill those dark areas. You can basically see here on the table, when I increase the source radius, it's actually filling this shadow here with light. It gives it a little bit of a cool effect instead of being fully black here. I'm going to decrease the intensity to two again and trying to adjust the attenuation first. Basically this lighting or this portal light is going to affect 700. Let's put it to 700. Then I'm going to increase the source lighting here to something that makes sense. We can see here it fills this table light. This is what I'm actually mainly looking on right now. You can see it becomes a bit lighter, and basically I actually want a small effect here. Writing 300, just like that, we have that small effect. Next, what I want to do is, I'm actually going to adjust this intensity now to something that makes sense. For the portal, I don't want it to be intense. I just want something with a small effect. Actually I might just put it to one. You can see zero is looking like this and one is looking like this. 1.0 or 0.9, I'm going to put it to 0.9. It's not going to light a whole lot, but it is going to give it that small effect. 0.9, just like this. Next, we can click on this "Use Temperature" and we can basically increase it to make it colder. Remember, if you decrease it, you make it warmer like this. But the portal is blue. I can go ahead and enable the portal so we can see it. This is the portal and when you enable it, it's not going to appear because you have to click on it and click on ''Reset Emitter" just like that. Basically, I can go back and click on the Portal lighting here. You can increase it to make it more bluish because it's basically a blue lining here. You can try to judge where you want to put it. Maybe 9,500 is the number to put it on, just like this. Then the last thing again, you can adjust the Light Falloff Exponent. You can see here when you decrease it and increase it, how much it's going to affect the whole room. Basically, I think nine. It was on eight before, but nine is maybe a better number. It doesn't really affect the whole light if you set it to eight or nine. It's not going to give it that different feel. The Light Falloff Exponent is fine here. Now, for this one, we might adjust it a little bit more for the intensity because we are going to set it to static. I don't think I'm going to make it flicker because I think it's fine if it's static lighting. But if you want to make this portal flicker as well, when you learn how to flicker this lantern or this candle, you have to set it to stationary just like I said before. You can use this light function here. But basically, I think I'm going to set it to static and I'm going to click on ''Build all levels''. I actually just want to see what it looks like as a static light. Because when you change it from stationary to static, it's going to change the intensity a little bit, and I just want to make sure that the intensity is correct. Basically, this is what it looks like. If I disable this portal light here, or just going down and clicking ''Affects World'', like disabling it. I have to build again to see what it actually looks like without it. Just to make sure that it's actually giving that effect we are looking for. You can see it actually gives a good effect. Right now it's very dark, and if we go ahead and enable it here, Affect world, you can see it gives that cool small effect. Let's build all the levels for this portal and we basically set it to static. This is looking fine and I'm going to close this now once it's built. We can go ahead and re-enable the candle here, and we can re-enable the lantern as well. Now we have the portal lighting setup here. Basically what we are missing now is we are missing those diamonds. Let's go ahead and make those diamonds shine up. After we do that, we can go ahead and do some post-process volume. This is where it gets really, really fun because then you change the whole look of the scene. Let's go ahead and do the diamonds.
30. Diamonds Lighting: Now it is time to light up these diamonds over here. Before we light them up, you can actually do it yourself, if you want to. You can try without me and then I can show you how to do it. But basically it's the same method as we have been using here with the Point Lights. But if you want to, try it with me and let's go here. Firstly, we are going to click on Create and then choosing a Point Light, just like what we have done here. Changing the position to 0, 0, 0, so it's in the middle of the room. I can easily grab it here and I basically just want to move it in front of this diamond here. Something like this here. What I want to do now is basically over here change this volumetric scattering to 0, so we don't get that foggy effect and then I want to change this intensity. But basically, just like before, just so the intensity is not fully here in the middle, I basically want to untick this Use Inverse Squared Falloff. I'm going to untick this one here and you can see we can basically control the intensity better and we can even light up the whole room, if you want to. The Attenuation Radius, I am going to decrease it. Basically, I'm trying to find the the best balance between intensity and this radius here. You can see when I increase the radius, I basically take a look at how much it is lighting up here on the sides of this shell. Basically, I can increase the intensity a little bit and just to see it better. I think maybe 130 is a good number here. You can increase and decrease the intensity to see how much you actually want to light up and I think something around 12 will be a good number. Now we have this light over here and after that, what we can do is we can go over and change this light color. You can click on this light color and it can basically choose a color for this diamond. Basically, you can see these diamonds are teal colored, so light blue, teal color. Basically, you can go ahead and change the color here for this diamond, whatever you think fits best. Then what you can do after that, you can actually slide this up and down to actually choose a good number, because this might be way too intense and you can decrease it to even make it invisible. But basically I want to just decrease it a little bit, and something around here, just like that. Then I'm going to click on Okay. After that, as the last thing I can do is actually just on this Falloff Exponent, like we have done before, and basically I can set it to nine. It was eight before and I can just set it to nine, not a big difference, just a small one now. We can save everything and what we can do next is just go ahead and click on Stationary for the mobility, because we don't really need any dynamic shadows. I'm going to click on Static and then to fully prebake the lighting, I'm going to save everything and then I'm going to click on Build and Build All Levels. It's going to take one second or two seconds and then it will appear correctly. This is what it looks like now and I think it gives that small effect. It looks cool that this one is shining a little bit. If you want to, you can go ahead and increase the intensity a little bit more. Maybe I can set it to 16 instead of 12. Right now it's going to light up a lot more than what it actually is going to be. Because remember, you have prebaked the lighting and when you increase and decrease the intensity, it's actually going to light up a lot more. We have to click on Build All Levels. Very important when you have a static light and you change the settings, you have to rebuild. Remember that before you continue. Now it's going to rebuild the sliding. This is what it's going to look like. I think it gives that small effect from this diamond and it's looking cool, so we can actually continue from here. What we can do with this, we can actually click on G and we can hold Alt and I can drag while I'm holding Alt and this will actually duplicate the lighting. We can actually use this one over here, so we don't have to remake it, though now it's in front of this diamond over here. You can now adjust the settings if you want to and you can actually play with the Attenuation Radius if you want. Maybe this one is a little bit smaller than this one here. Basically when you have finished, you can again click on Build everything. You can either do that or you can actually just wait until you have finished all of the lighting. I'm actually going to wait with building. I'm just going to move this one down because there is a small diamond down here that I actually want to make lighter because I want this cool color on the ground, it gives it a cool effect here. When it's in front of this diamond over here, you can see what it looks like. Again, you can increase the Attenuation Radius if you want to and I just want a small effect here, just like that, so maybe just 80 and you can increase and decrease the intensity. It was on 16, I think 16 is a good number, so what it looks like from a far is this. Basically 16 will give it that cool effect. You can see if you click on Affect World, this is what it looks like without and this is what it looks like with. It gives that small effect that we can use in the environment. Now I'm going to duplicate this light here to the next one at the door. For this light over here, I'm actually going to change the Attenuation Radius again just to see how much it's going to affect. I just want a small effect here on the sides of this, so maybe 150 or 160. Something 160 I think is a good number here. It affects a little bit of the corner of this door and then I'm going to duplicate this again and place it in front of this window. When you have positioned it to this window here, again, you can change the Attenuation Radius. This one is probably not going to be as large as the door. Basically, I think something like 90 would be a good fit here. The last thing we want to do is copy this again and then we want to move it to this diamond down here, which is over here. For this diamond specifically, we actually want to change it to Stationary. The reason why we want it to change to Stationary is when you click on Play, you can actually see this book is actually moving. It might want to give dynamic shadows from this book because the book is moving. You can see here, if I go closer and I click on Play, you can see we have some shadows moving here and this is actually coming from the lantern and the candle because they are both stationary and they produce dynamic shadows. This one could also gives shadows. I'm not sure if it's large enough to actually do anything, but I actually want to set it to Stationary just to be sure and just to make it look a lot better. Now, when you have placed this light here, you can adjust the intensity and I have set it to, let's set it to 25 for now and you can change the Attenuation Radius and you can change the Falloff. The Falloff, I think I'm going to take down a lot more, fill maybe something like three. Then I can reduce the Attenuation Radius to something like 60 because you can see here, you actually see the diamond lighting here. If I put it to 20, you can see it disappears, 30, 40, 50, and 60. Now you can actually see the diamond lighting here and I think it's a cool effect. I think I can reduce this intensity to 20 instead. We have this cool small effect on the book and the stand, just like that. We can actually reduce to 15. I don't want this to be very intense. I can try now to save everything and then clicking on Build All Levels. Now when it finished building, it's going to take a second or two before all of these lights are going to appear just, like that. This is what it looks like so far. Now we have this light from the chest here, the windows, and this shelf, and this diamond on the stand. It's looking a lot better than before and we have some lighting going on. Basically what you have to do, remember you have to go to the Viewmode here and you have to go to the Optimization Viewmode and take a look at the Lighting Complexity, because we don't really want the light to be very complex. You can see here we have some orange spot and this is okay. The thing you can do here if you want to optimize it, basically we can't optimize it here because basically this is the diamond lighting, but you can optimize the radius. Basically if you made the Attenuation Radius something like this and we can go back to the Lit mode and you can take that up, the Falloff, just like that. Let's imagine you did something like this. This is looking good and you can see we have some minimal lighting here on the lantern, looking great, just like that. You take a look at the Optimization Viewmode and you'll see this in the Lighting Complexity. Basically what you can do with this lighting, you can decrease the Attenuation Radius because this is what it's affecting. You can decrease it and basically you can decrease the Falloff. You can see you can actually light a lot more within this small area here and this is what we're trying to do. I can put it to three, just like before, and you can increase and decrease it to see what's best, maybe 50, 60, 60 is a lot better. Now you can take a look at the Optimization Viewmode Lighting Complexity. This is a lot better than before. Just be aware that you might affect a lot if you use a stationary light and you increase the Attenuation Radius too much. Basically try to adjust the Attenuation Radius to a smaller area and then try to adjust the Falloff Exponent and the Intensity for this light. Now we can go back to the Lit mode. We can even try to go through this camera. Let me actually rename this Point Light to Diamond. You can give them different names, but I'm actually just going to copy this and just call them all Diamond here, just like that. What we can do is we can actually go in the Lighting Folder here or just make a new folder up here and call it Diamonds. Then place this folder inside of Lighting and in this folder we can actually place all of these lights. We have a sub-folder inside of Lighting called Diamonds and we could put it inside of here. Now we can right-click this camera and click on Pilot just to see what it looks like through this camera. This is now what it looks like with the diamond. It gives that cool effect on the book. You can see this teal color and as well as this diamond over here. Basically, if you want to increase the intensity to make it more shiny, you can do so and I think it's fitting for this window. I think it's looking good. We have a small cool effect from this chest.
31. Candle Lighting Flicker: Welcome back. It is now time to do the flickering for this candle. This is the last thing we have to do for this environment. After that, we are going to work with post-processing, which basically changes the whole look of this environment. Let's birth to the flickering for this candle here. What we want to do is we want to create a material. You can click on this "3D Folder." I have made a folder called master materials. You can double-click on that one. Basically I made this material here already, the M light function. This is not really a materials' course, but I just want to explain to you how you can get to this result here. This is actually the function that we use to basically create that flickering light effect. Let's go ahead and do it ourselves. Basically, if you are lost, you can click on this one and actually take a look at what is going on. But basically what a material is if you don't know already. If you click on any of these 3D models, you can basically see they consist of a material. Clicking on this Door over here, you can see it consists of a material, clicking on this Shelf it consists of a material and so on. If I click on this M base color, this is basically material I created for the items here, the models. Basically you have a texture. A texture is just if I click on the door and I click on "Textures". This is what it looks like when the text artist is painting this model for you. Right now this is the door. This is what it looks like when the artist is painting this door for you. This is what it looks like. He or she imports this texture to the engine. This is the image that the artist has made for this door. Basically you take this texture. If I go back to the master materials here, basically you take this texture and then you plug it into the base color. Now this material is displaying the base color of this door. You can basically click and drag and drop it on top of the store or just drop it over here. Basically it goes from being a texture, if go back here. This is the ground that the text artist has painted. Basically it goes from a texture and then you put this texture inside of a material. This material, you actually put on top of the 3D model. You don't just drop a texture on top of the 3D model directly. Also with lights, you can basically make them flicker through a material. To create a material, you can right-click inside of here and click on "Material". You can call it M_LightFlicker, for example. With this one you can actually double-click now this material. Inside of here you can see this is the material graph that you open here. Basically, if you have a texture, so you go to any of these folders, basically you can drag in a texture. This texture, you can then plug into the base color, because basically this is the base color texture. You can see here this is actually now the material of the ground. Right now we don't really need to make any textures plugged-in here, because basically we need to make the lightning flicker. What I wanted to start with here is, I want to click on this one and I want to change this material domain. I want to change it to a light function. This is the lighting we want to make flickering. We only have one plug-in here that we can plug anything inside of here. Basically what we want to do to make the light flicker, you have to right-click and you can write Constant if you want to. We are going to use a Constant3Vector. Basically what you could have done as well if you wanted a fast shortcut to this is clicking on three on the keyboard. Holding the three button and then you can click here. Left clicking here and there. You can see you made this one. You can also hold one and click or hold two and click. You made a Constant and Constant2Vector. Using this Constant3Vector, we can actually right-click it and clicking on "Convert to Parameter." We can call it flicker speed. Basically this is the speed of the flickering. It might sound a little bit weird because if you haven't worked with this before, how is this our speed? What a three vector is, just imagine them as constants. Clicking on one here, this is the constant here, clicking on two on the keyboard. Holding two on the keyboard and clicking with the mouse here to make this one be Constant2Vector. Just imagine them as constants you can edit numbers on, to do something with them. There are just these Constant3Vector. We can use this to change the colors. Basically what you can see here, if you click on this, you can actually use this to change colors of things as well. This is just a color node here. I'm going to reset it to default just for now. What we can do with this one now is, we can use a multiply node. Holding M on the keyboard and clicking you get a multiply node. You can also right-click and write multiply and find it here. Basically when you right-click in here, you can basically find all the functions. You can also see palettes here that you can click on, on the side and all of them are actually here. Basically you can see material graphs can be complex. There is a lot going on here. Some people actually have a full-time job just working inside of here. For example big companies, they actually have people doing this full time, just working inside of here. Basically we're not going to go this advanced. I can start from the beginning so you can get the hang of it. Holding three on the keyboard, left clicking outside of here, you make a Constant3Vector. We can use this as the flicker speed. Basically, I want to right-click and convert it to a parameter and just call it flicker speed, just like that. Then I can hold and click "M" on the keyboard. Hold the M button and left click here to make a multiply node. I can plug this into B. Instead of A, we can plug something called time. If you search for time, this is a node here, and you can plug it inside of here. Now that we have the base down here, what you can do now is you can use something called sign and assign, if you don't remember, you can actually Google it, it's just like math, and the sign going up and down just like this. We can use this to control how much the lighting is appearing and disappearing. What we want to do is, we want to divide through right-clicking and writing divide. We can plug this inside of here. We don't need anything inside of B. But basically I want to change the B value to 1, just like that. Then we want to write Add, selecting this Add node here. For this Add node we are going to change the constant 0.5, and as the last thing, this is actually all we need. As the last thing we want to do is, we want to write clamp. What a clamp is, the clamp is basically you clamp the value to something minimum and maximum. Basically, if I write 0.3 here and I can write 2 here, what this does is basically the value will never be below 0.3 and the value will never be above 2. Clamping just means I want this value here that comes out of this. I want it to be between these two numbers. It will never go up or down below this. This is what a clamp node does. Basically, you can connect this now to here and save everything. Now you can see, now it's going to compile some shaders, so I'm going to wait for that, and it's done already. You can see nothing is happening right now. This is because we have to work with this one flickering called flickering speed. When you change, the values are this one. Clicking on this default value here, you can see you can change it, and you can try to write something here. Now you can see it's actually changing. Right now is just changing in the same pattern. For example, the best numbers I found. I was trying to test this out and see what numbers were good for the lining, and 0.3 here is nice, 0.5 here. Now you can see it's lighting a little bit more, and 0.8 for this one. Something like this, and you can see now it's actually lighting and some cool effect here. Basically, you can try your way from these numbers and see what's looking best. I think this is looking good. I can close this, and it's going to say, "Do you want to save?" I'm going to click on "Yes", I want to save. If I go back to my master material here, the M light flicker that we made, you can actually now click on this globe here and this point light or this candle. You can go down and remember we had set it to stationary, so we can actually use this light function. Basically, I can drag this light flicker and paste it on top of here. This was actually all we had to do it. Now you see, the candle is actually flickering. If you want to control the speed of this, you can basically go inside of here and change the numbers here and save it just like that. You can actually try your way to make it flicker differently. But basically this is the best for me, I wanted to choose. If you want any other light flickering inside of here, you can basically do the same. If you want this lantern here to flicker, so if I go inside of here and I choose this lantern lighting, and basically what you can do is you can just put this light function inside of here, and you can see this candle or this lantern is going to flicker as well. But you can see they are flickering in the same speed because basically you're using the same material, you can make a new one to make them flicker differently. I can show you a trick before I end this video, just some extra information. You can actually right-click now this material and create a material instance just like that. I can call it MI for material instance and I can call a candle. Basically, since we right-clicked this node here and converted it to a parameter just before, and we call it flickerSpeed. When you convert anything inside of here to a parameter, when you create a material instance, you are going to see that if I click on the right thing, this candle here, material instance, basically you can see this value. When you have made it into a parameter, you can actually see this value here, when you make a material instance. How can you use this? Basically can see when I click on a material instance, it's not going to take me to a graph just like I did when I clicked on the ordinary material, just like that. What a material instance is, you can actually change the values you make into a parameter. Basically, you can click on here, and you can change the values as you want to. Basically, for this candle here, I can actually click on it and click and drag this material instance instead on top of here. What I can do is right-click again here, create a material instance and I call it MI_Lantern for example. Basically, instead of making a new material and doing all of this again, just to change the values of the flicker speed, it is better to make a material instance, so you can use the same material, but make multiple material instances. Since we changed this to a parameter, we can now take this lantern here. I'm going to choose the point light for this lantern. I'm going to plug this lantern material instance that I made. Basically, you can double-click it now, and now you can change the flicker speed to be different from the lantern or from the candle. Basically, if I write 0.8, 0.8 or wherever you want to do. Now this is looking stupid. Basically, you can actually write. Let's write something here a bit less, actually, something like this. If I close it now, basically this lantern flickering is going to be different from the candle now, because this candle has this flickering now. It has these values, while the lantern has these values. These are actually two different ones. You can even change the Alpha to make it how strong the flickering is, and now it's very subtle. Maybe it's too subtle, but you can see you can actually control them differently now using material instances. I actually just want to remove from the lantern, I like the lantern being static. I'm going to delete this one. But basically, if you want to use anything else inside of here to make them flicker, you can basically use a material instance from a material that you make. You can basically just change these values for each of these sliding that you want to flicker.
32. Adjusting the Post Process Volume: Welcome to this new section about the post processing. This is going to be very fun because now we are actually finished with lighting the environments. What we are going to do with the post process volume now, is we can change the colors of all of the environment. We can even make it lighter. We can make the shadows a bit less dark, and so on. Very important step in the lighting, this was only half of it. Half of it is actually post processing. Just like, for example, imagine they shoot a movie outside the cinematic movies, and then when they are finished with shooting the movies, they have to go into post production and there is a team sitting in front of the computer and changing the colors of the images to make them look good for you, so you can watch them inside of a cinema. This is what we are going to do. Remember in the world outliner, if you go inside of here, I think we already made a post process. If I just make the folders smaller here. If I click on this post-process here, remember we made this post-process volume a long time ago, this was from the beginning of the course. I just wanted to talk about the post-process volume now. What a post-process volume is, is simply something you can make to change the look of the game. Just like when you use Photoshop to change an image color. You can use Photoshop to change the color of the image, how saturated it is, you can change colors and so on. This is what a post-process volume does inside of a game. It just changes the look of the game. You can see when I create a post-process volume. When you go ahead and click on create inside of visual effects or inside of volumes, it's also inside of visual effects, but it's also inside of volumes. In visual effects you can see something called a Post Process Volume here. You can also find it inside of Volumes. Here inside of volumes is the Post Process Volume. When you create it, you can see that the post-process volume, if I move it up here inside of the environment just so we can see it, it's a box. This box here, remember previously when we started the course, we actually clicked on infinite extent here. I'm going to untick it here and you can see everything gets lighter and I want to explain why. If you remember it, you probably know why. When you create a post-process volume, this is what it's going to look like. The only thing we did with this Post Process Volume previously in this course is, we just clicked on the exposure and we set the minimum and maximum brightness to one. It was on something else. We just set those minimum and maximum brightness and the exposure to one and one. Then we clicked on this "Infinite Extent". What this Infinite Extent does, it just affects the whole world. Right now when you don't click on Infinite Extent, you only get this exposure effect you have changed. You only get it when you get inside of this box. If I get into this box, you can see everything gets darker just like before, and if I get outside of this box, everything gets lighter and everything has a high exposure. If I get inside of the box, it gets slower. If I get outside of the box, it's going to get a lot higher. This is when you click on "Infinite Extend". It's going to affect the whole world. It doesn't really matter if you're inside of this box, or outside of this box anymore because you are affecting the whole world. The use of this sometimes when you, for example, make an RPG game and you make a cave, and inside of this cave you want it to be a lot darker and so on. You just take this Post Process Volume, instead of just clicking Infinite Extent, you can resize this. Clicking on R so you resize and you can resize this box and select an area you want to effect with this, for example, the cave. When the player enters the cave, it gets a lot darker and so on. This is the use of it. I'm going to click on "Control Z". We don't really need the size of the box because we're just going to click on "Infinite Extent". It's going to affect the whole environment here. Now we can start to do some stuff here with our Post Process Volume so we can actually change the look of the scene. Just so this box is not distracting, I'm just going to set the position to zero, zero, zero. It doesn't matter where it is. I can also just move it beneath the ground if I want to. That's up to you. The first thing I like to do here for an environment when I start with the Post Process Volume is, I want to change the color. I want to change the feel of it, so clicking on this "WhiteBalance". This WhiteBalance, you can actually change the temperature of this environment. You can check the temperature and the tint here. What we can do is, you can decrease it to make the environment colder, and you can increase it to make the environment warmer. What I want to do is, I just want to make it colder. This is what it looks like before. I'm just going to decrease this here to make it a bit colder. Though nothing overdoing it like this, actually a lot less. Four thousand nine hundred would be a good number. This is without and this is with it. It's actually a bit colder now. I can use this tint to make it look warmer because it's going to look purplish. I'm going to increase this at maybe 0.2, just like that. You can see this is without the tint and this is with the tint. It's a bit more purple compared to before. Then what you can do here after that is, I like to go inside of the global. You can see we have a lot of other settings. We have a Bloom and so on. But I just don't want to do this right now. I like starting down here in the color grading first. Click on this "Global", you can actually change the saturation. Clicking under "Saturation", ticking it, you can click on this arrow to change the values down here. I just want to control the saturation a little bit here. Something good to look at right now, this is a very good indicator. This lantern here. Because if you make it too saturated, you can see this is way too saturated. You have to just try to make the saturation as good as possible. I think 1.16 is a good number. This was before and this is the after. I like it being a little bit more saturated than before. I think it gives out that vibrant color. The next thing you can do is contrast if you want to. I don't think we need any contrast. It's already too dark, so we can increase it. You can see, you can give the environment a bit more contrast depending on what you're trying to go for. But I just want it to be one. I don't really want any contrast inside of my environment. I'm going to lower this a little bit here so I can see a bit more of the environment. I'm going to uncheck this contrast because we don't need it. However, I'm going to increase the gamma and the gain to make the environment looks a lot brighter, so it's not that dark. I'm going to take a look at the Gamma and the Gain here. Looking at the gain here and what I want you to do is firstly, just increase the gamma and you can see it lightens up the environment. Don't overdo it because you're going to make everything look washed like it's being white and washed like this that it's not looking good. Starting from one, I just want to give it that small effect 1.06. The gain, you can see you can increase the gain to make it look a lot brighter. 1.16, I think, is a good number for this year. However, I still think the shadows are a bit dark. It's too dark for my liking, so I'm going to go inside of the shadows. I'm going to minimize these now, this Global here, and inside of the shadows here, I actually just want to click on Gamma, and Gain just like before, and I want to increase, and decrease those so I can actually make the shadows a little bit brighter. With this Gamma, again, don't make it too intense that it's going to look a lot weird. Going from one, I'm going to increase it slightly. Actually, that's too much, 1.02, I think just a very small effect that you can't see, but it's still affecting. I'm going to increase the gain. You can see when you increase the gain is also going to look weird if you're overdoing it, and 1.15 might be a good value here. I think this is actually looking good. You can even go to this temperature here, and increase, and decrease it again to change it if you want to. I think actually 4,900, we hit a good point here. You can change it to 5,000 if you want to, like that, 5,000. I think 5,000 there is a lot better actually. For the tint 0.19, just like that. I'm going to decrease the saturation a little bit. I think it's too much, so 1.12, just a little bit less saturation. I'm going to save everything here. What I'm going to do next is I'm going to click on this Bloom, and I'm going to click on this intensity, and just take a look at what we can do. You can basically see you can create this dreamy effect for this environment. We can make a 0.7, I think it's good. The next thing we can do is instead of image effect, remember we turned off the vignette. The vignette is basically this dark border around the environment here, just so we can get this cinematic effect. But basically, I don't want to overdo this as well. I think 0.2 would be a good number for this one, and what we can do now is we can go down at the bottom. We have some effects here as well, and we can take a look at the ambient occlusion. The motion blur we can set to zero. I don't think I want any motion blur inside of here, and the ambient occlusion, you can increase, and decrease the intensity here. Basically for this ambient occlusion, I want to take both of these. You can change the values, but it's a bit hard to see what's going on, like here. You can see there is no difference. Basically, you can go inside of this view mode, and inside of buffer visualization, and you can go down to something called ambient occlusion, and you can see here when you change it here you can actually see a difference. It's basically the shadows, how dark they are, and how much they are affecting. What I want to do here is, you can make them intense if you want, like this, and you can choose how much it's affecting. I think if it's a number like this, it's affecting way too much. Remember these shadows inside of the engine are very expensive. If you bump it up to something like this, it needs to do a lot of calculations because the shadows are hitting so many areas that it's getting expensive. Don't overdo this. Try to reduce it as much as possible. I think something like 50 would be a good number here. Now, we can go back to the Lit mode here and save. Right now I'm taking a look at my environment, and I still think these shadows are a bit too dark, and I don't think we can affect it with the post-process volume, because it's going to be washed out, it's going to look washed out. What we can do, we can try to go to the post-process volume here, and if we are lucky, we can try to increase the Gamma or the Gain. You can see here it's 1.15, we could increase it a little bit, and it might actually look okay, so you can see right now it's 1.15. Looking like this, we can increase to 1.3 for 1.2. It's actually looking good, so we can either do it that way. I actually want to test a new method if you want to. We can actually do it either inside of here, and we can do it inside of the skylight. Because remember, inside of the skylight, when you increase the intensity scale, for example, something like 20, it's going to lighten up all of these shadows here. Right now, if I click on Control Z, it was on 12, and if I just increase it to 15, like this or 20, I think a number of 20 is actually a lot better. Previously, it was like this, and I think 20 would be good here. If you want to, you can also increase it inside of the post-process volume. We can go here inside of the shadows, the gain, we can try. I think 1.15 was fine. If you want to, you can increase it a little bit more. The Gamma basically I don't want to touch, it's going to look bad here. The contrast, it's going to look bad as well. I'm fitting this to one, and I think this is fine. Basically what I was looking at is, looking at the shadows here, I just basically, want to see this ground here. Because before it was way too dark. Also looking below this table here, it was way too dark. But I think it's looking a lot better now actually. We can let it be like this. If we want to actually want to decrease the saturation a little bit, it's still bothering me a little bit here, 1.08, just like that. Basically, this was all we had to do for the post-process volume. Basically, we had the bloom that we could change, we had the exposure. If you want to give it a cinematic look, and you should probably not do that in the game, people would be annoyed. But you can apply the chromatic aberration, and you can see it gives that cinematic look, and not overdoing it, just a little bit of an effect. Something like this, and you can give it, some of a cinematic effect. But basically, this is very annoying if you use it in a game, so don't, unless your game is very special, you can use a dirt mask. We don't really need anything here, and lens flares, we don't really need anything. We made an image effect. We color graded here. We also did some ambient occlusion down here, and we turned off motion blur. Basically, this is what the environment is looking like, and we can even pilot the camera here just to view it through the camera. We can full-screen it like that. I think it's looking good actually. This is what it's looking like. You can even turn off the post-process volume to see what it's looking like before and after. You can click on this enable here, unticking this. This is actually what it's looking like before. Clicking on it, this is what it's looking like after. You can see how much post-process volumes actually do if you tick it, and untick it like this. It's looking so much better, and so much more vibrant using this post-process volume.
33. Finalizing the Environment: The final thing we have to do is just finalize this scene and take a look at what it actually looks like and if there is something we want to change. Right now I'm piloting this camera and I'm going to click on F11 just to see, take an overlook at the scene here. Basically I think the lighting looks good. I think the shadows are nice. You can see here, I don't like the shadows being too dark. It's not really realistic looking or good-looking. I like that you can see the shadows here, so you can see below this table and you can see the details on the ground here as well as over here. Just be careful that you don't make the shadows too dark else your scene is going to look a little bit too contrasty and actually looking too indie looking. Almost a beginner mistake sometimes when you make the shadows way too dark, so just make sure the details here are seen, the scene will be a bit more interesting. The other thing I'm taking a look at this light here, the texture, it is not too saturated and this is looking good and we have our diamond lighting. I think everything looks good here, the only thing that I'm not satisfied with is the skylight here, the sky is looking a bit weird, I just want another color and I also want the stars to be a little bit more bright. What we can do is, I think basically this is actually the fog and not the sky here, so basically if we click on the exponential height fog and we have this fog in scattering color. Basically when we change this color we can see the sky is actually changing, so basically it's not the sky color it's actually the exponential height fog that is affecting this color. I'm going to make it full screen and I just want to have maybe a little bit of a purplish color just like that so it fits the environment, just like that. I'm just making it very saturated here and then you can take down the saturation just like that, so basically just here a little bit and something like this. I can click on "Okay," so now it's a bit more purplish and what I can do is I can go over and click on the directional light. You can change this column here but I think it's fine. I can change the light shaft color, so these blooms, Godrej effects, so I can increase this bloom scale and you can even change it to be a bit more bluish or purplish just like that, I think this looks good actually. What you can do with this previously it was on 0.25 but I believe we can increase it a little bit more and I can make it full screen and I think something like this will be cool, so just try to adjust this color here. I don't want to make it too insane actually, I just want a small effect and you can see you can do this. You can have a threshold, so you can change the threshold if you want to and we might do that actually just bring here 0.1 just like that. We can put the bloom to 100 and then we can decrease this to 0.5 just like that and we have a small bloom effect that we can see here. I actually want to rotate it a little bit so I can see it better. While you have this rotation snapping unticked or disabled you can actually just increase this here so I can see what is going on and can actually try to rotate the bloom effect towards the camera like this, it's looking a lot better. Basically you can try to make some a cool bloom effect like this 0.6 and try to rotate it just like that and just like this, I think this is looking a lot better. Right now I want to make the stars a little bit brighter before we end this so I'm going to click under good sky here and I'm going down to the sky moon here or actually not the moon. If I go up here to the sun, stars, and inside of the stars here we can change the brightness, so right now it's 1.5 and we can increase the brightness. I can see here, and maybe we can put it to, let's put it to five, so before I believe it was 0.5, no, 1.5. Now we can put to five so it's a lot more brighter than before and we can take a look here and you can see here now the stars are actually a lot more visible and it gives that cool effect here. This is actually the scene that we have created and as I said before we can try to disable and enable all the lights to see what the difference was before and after. I think this is looking good, so what I mainly look after when I'm finished, I look after the shadows to see if they are looking good or not, I look after to see if both sides of the table look good. Try to check all the sides of this scene here to see if everything is looking good. If you look outside the window, does this color look good compared to the indoors? Basically just all the models that you have in the room and just in general if everything is looking okay.
34. Presentation: Before we end this course, I think it's a good thing to make some presentation before we end this. I feel like the course is not fully done if we don't do any presentation. To begin with, I want to go to Build here. In the lighting quality, we can basically now set it to your production, because now we're basically finished. Let's set it to Production. I'm going to click on Build All Levels, and build it in this production quality. Now the building has finished, and now these scene is actually built with everything, all the lighting and so on in production quality. This is looking good now. What we can do now basically when we click on Play, just like that, you can see we're actually not using the camera that we made here. This is our main camera. You can see when I click Play. I just basically click some play on a random section of the screen. Basically what we have to do is go and set a blueprint. This is not a programming course, but this is very simple. Clicking on Blueprints, this is the programming section. Clicking on Open Level Blueprint. Inside of here, we need to call an event. So an event called begin play. We're just writing begin play, and basically, you just right-click here. Maybe I'm too quick. You right-click here and write begin play, then you click on this Begin Play here. Basically, this is an event that says, what should I do when I click on this Play button, and we just want to attach this camera, so we start at this camera over there. Taking this out and writing set view targets and let's remove this Context Sensitive. You see something, a function called Set View Target with blend. This is what we're going to use. This is all we need to use. Now it's asking, what should I set your target to? What do you want your view to be? I want this camera. What we actually basically have to do is I need to click on my camera. Go over to the scene here, click on the camera, open the level blueprint while you have this selected. Just like that. Now you can actually right-click and remember to set this Context Sensitive on. Now we can create a reference to this camera actor because you have it selected in the level. Now, this one, you can actually plug in here. In the target you basically have to drag out and say, get player controller, just like that. That is actually all that you had to do. Now you can save and close this down. Now when you click on Play, you can see that you're actually starting on this camera and I can make it full screen. You're not piloting the camera anymore, but you're basically actually clicking on Play just like you would in a game, and you're actually inside of this camera. You can actually see now you have created the scene. The lantern is moving around with the animation and the book is moving around as well. This is looking great. I'm going to stop this by clicking on Escape. If you want to present your work, not through this camera, but if you want to make a cinematic camera, basically you have to try to look at something. Look at the scene like this here. You can either create a cinematic camera by clicking on Create, and in Cinematic, you can click on Cinematic Camera Actor. Another way to do it is basically sometimes I like to look at the shot, for example here, and then I can click on this button and then click on Create Camera Here, and then cinematic camera actor, just like that. Then it actually creates the camera where you have been looking here. You can right-click this camera and click on Pilot Camera Actor, so this is the cinematic camera. Here to the right, you have some settings you can change. Now, I want to change it to a DSLR camera. The lens we need to use, I think the 85-millimeter lens is good for blurring so just like that. Now you can just basically move it around with your mouse, or not mouse, with their keyboard and basically try to find the shot you want to have here. Then you can click on this Focus Settings here, click on that arrow, and then you have a Debug Focus plane. Tick that Debug Focus plane, and then you can actually decrease the focus here. Just like that. You can see this plane here. If you do not have this ticked, it's a bit difficult to see where you are actually focusing. Basically, I like having the debug focus here to see where I'm actually focusing. Now basically, if you want to focus on this candle here, you have to move it on the candle like this, and then you can remove this debug focus here. Basically, you can click on F11, and now you can see this is looking great. It's a bit blurred here from the cinematic camera, and you can basically take a shot like this. What you can do here is basically click up here on this button, on the Viewport, and then click on High Resolution Screenshot, just like that. You can take a screenshot from here. Basically, when you click on this here, you can see now it opened on my second monitor here. But basically, now you actually have a screenshot of the game that you can upload anywhere you want. You can even take it to Photoshop if you want to. This is the cinematic camera. This is how you do. I can just go out of the cinematic camera if I don't want to be there anymore. But basically, you can use this cinematic camera to do some cinematic shots, and you can even place it on this chest or this shelf here. If you want to, you can even start the game through this camera here. Basically, going to Blueprints while we have this selected, going up here, and you can actually right-click and now call a reference to the cinematic camera actor instead. You can even plug that in instead here as the target and not this one. Now we're actually going to start from the cinematic actor when you click on Play. You can see here, now we're actually viewing it through the cinematic actor. You can present it as you wish through this camera actor or through this main camera. This is basically all that we had to do.
35. What Now?: Now we are finished doing all of the lighting for the scene and actually well done. This is not easy to get through if you have never done lighting before. This took me a lot of time actually when I started out doing any lighting to understand any of this. Really a great job. Now we have learned how to light this interior scene and how to make these cool effects. You can basically just use all of these techniques to light any indoor scene that you have. Basically going to create any of these slides here, creating the skylight that we did, the directional light. Then basically just using either direct light, the spotlight, and the point light to do some lighting. We have been using the point light so far. But if you have some lights that look like a spotlight or a red light, basically a light that you see those big stance in a football stadium, this is a red light. Just coloring or lighting the scene, just using the same methods that we have been using here. What you can do is basically you can exercise on another indoor environment or outdoor environment, if you want to, to see if you can use what you have learned here in this course. I would love to see what you have done with this environment. If you have done the same thing or if you have changed the lighting style here, I actually want to, if you can post it here on the discord server or on this website, just so I can see your projects and what you have finished. In the future, I am going most likely to create a bonus section for this course. In that bonus section, I'm just going to design an outdoor environment from this board craft because basically we designed more environments for board craft. I want to design an outdoor environment. Actually we can use this to light an outdoor environment instead of an indoor. But basically an outdoor environment is a lot easier to light instead of this indoor environments. You actually have learned a lot more. It should be easy for you both to learn and to do the outdoor environment. If you want to expand your knowledge apart from lighting, you can basically take a look at the website, at my profile, I have a lot of courses finished. You can see a Blueprint course, if you're interested in programming visually using the Blueprint coding. This is very cool to use. This is very cool for artists who do not have a programming background. You can basically program a game without writing any code. This is pretty cool. You can check out my course to see if you are interested. If you want to learn the engine in general, you can take a look at my beginner's course as well. I hope it has been fun for you. Definitely it has been a lot of fun for me. If you want me to create some course that you have in mind, that you want to see. Maybe you want to see an FPS course, First- Person Shooter, maybe I've already created it at the time you are watching this video. Just make sure you watch my profile to see what courses that I have. If you have another suggestion for what you want to see, you can basically contact me on this website or on my thiscourseserver. Thank you for watching this course and I really hope that I will see you soon.
 Pixel Helmet, Game Developer & Publisher