Transcripts
1. Introduction: On these lessons, let's see
how to create an amazing, toxic waterfall in
and reel engine. Hi, I'm Gabriel Leger, founder of the Gabriel Le
gia Prod YouTube Channel, where we teach visual
effects for games in Unity in real and G Do. And we also have one of
the biggest libraries of visual effects assets
ready to be used in games. I'm also the founder
of golden Dox toes where we are developing abidte. Today, let's see how to create a toxic waterfall
in Reel engine. We're also going to use blender and material
maker for texts. So without further ado,
let's get on with it.
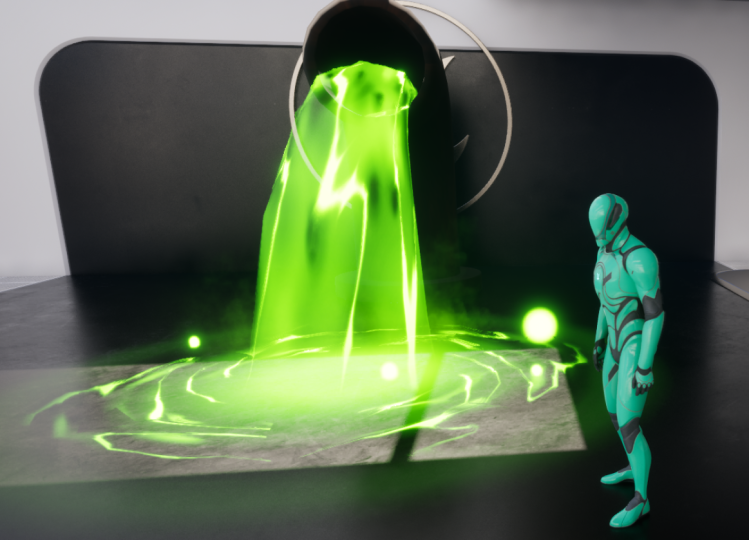
2. Niagara System, Waterfall, Puddle and Shockwaves: Let's begin with
a Niagara system. Right click create one. We want to create an
empty Niagara system. We are going to show you
everything from scratch and we can rename it
to toxic waterfall. In here, we also
want a minimal emter which is basically
an empty meter. In this case, for the pipe. Let's add the pipe right here just for visualization purpose. Let me just make it bigger
and move it back here. And now the most important
part is the waterfall, the liquid that comes
out of the tube, right? And we can duplicate this Niagara system
called waterfall. And on the mesh
render down here, we want to assign the waterfall. This specific waterfall
is exactly the same from this tout that I
made a while back in unity. Feel free to follow exactly those steps to
get this waterfall. Or if you know how
to treat the model, you can come up with
something different, right? Once you have the mesh, the most important part
is the material itself. So let's see how to
create that part. With right click,
I'm going to create a new material, call it erosion. The blend mode, it's going to be additive and it's not going to be influenced
by the light, so I'm going to say unlit. And as it is very common, we want to have a
parameter to D, texter sampler parameter to D, so we can control the texture
of our main text property. We're going to use one of
these noises, the noise 01, and these three
texts right here are available for free on the
link below, by the way. Also duplicate this
Pemter to D for the mask and the mask here. It's an extremely simple texter. If we open up material
maker, you can Google it. It's a free software that allows you to create
textures via nodes. With material maker, I
can show you that we want this gradient
right here, this node. If you select, you
can preview to D what's going on on
this window on the left. Essentially, we want to
create this gradient right here with these keys on
the right, it fades out. It's very important
to have this mask so it blends properly
the waterfall. And once you have
created the gradient, you can with right click
export this texter on the preview to the window and export it as a PNG
textaF example, I'm going to call this one
gradient and now back in reel, going to assign it to
the mask right here, just so you can see how some very simple texts can be created with
material maker. The noises are a bit
more complicated, but it has a bunch of
noise nodes if you want to dive into that and create
your own noise textos. You will learn a
lot more that way, but that's up to now
the idea is to use this mask in conjunction with
this particle color node, so we can allow Niagara to control the color
of this material. We multiply these two together, the RGBs, and connect
to the missive color. If on the preview we
switch this to a plane, you can see we have
that small artifact and it's very simple to fix. It has to do with the rap mode. So if we go to our
texter on Advanced, you want to say the X axis is clamp as well as the Y axis. With both axis clamped, the textar cannot
repeat itself now, but the artifact also goes away. And since we are creating
an erosion shader, the way we can do
it is by connecting this main text to a power node. The power will kind of erode
the main text in a way. But to erode the geometry
itself, the mesh itself, we can connect these
to the alpha of the mask and the result
of this power node, and we could already
connect to the opacity, but if we connect a
power node in between, we have a bit more
control over the erosion. And to control those
values directly in Nagra, we usually use a
dynamic perimeter. For example, the index
zero can control the power and the index one
can control the erosion. Power is right here, the power of the textor itself, and the erosion is the amount of erosion we want to
erode the mesh itself. And we could control the
default values right here, by the way, but we can
leave them at one. Now, since this is a
little bit too static, we need to animate
it so we can pan these textures and we can see
an erosion moving around. And since it's a waterfall, it makes even more sense. Let's begin with another
dynamic parameter. This time, it's
very important that the parameter index is
set to one down here. It's another channel, basically. But this time, the index zero is going to be for
the text tiling X. The one is going to be
for the text tiling Y. The two is going to
be for the text bid X and the last one
for the text bid Y. All of these values are to
control the main texter. So let's begin with tiling. First, we create a
texter coordinate node, which is basically to have
access to the UVs of the mesh, and then we append the tiling X and the tiling
Y to create a new vector, and we multiply that with the UVs up there with
the texter coordinate, and for now, that's it. For the speed, we can
control them manually, but in our case, we want to use the time variable so they
are animated automatically. I want to create
two multiply nodes, connect time to each one, and then we have the
speed X and the speed Y, and now we can append them
to create a new vector. That's what append is
and if we add these two together and then connect to the UVs of the main
texter, here we go. We have control over the
tiling and the speed now. And let's see that in
action inside Niagara. First, we can create a material
instance of this erosion. Don't forget to save the
material, by the way. We can simply call it MI
underscore erosion 01. It's the first erosion material. And now in Nagra, we can assign it right
here to the waterfall. As you can see right now, it's sucking everything
into the pipe. And I think we are aiming
for the opposite, right? It's all a matter of
control those speed values. First adjust the color. A greenish one will do just
fine. All right, here we go. And then the dynamic
material parameter can be added in
the particle spa. It automatically goes to the first channel,
the zero channel. We can insert three for the power and a
small erosion of 03. But down here, then
we can control the speed and the tiling
on the second channel. The tiling is going
to be one by two, so we stretch on the Y axis, and the speed it's going to be minus one dot five on the X. I think that's a good
velocity to mimic toxic waste coming
out of the pipe. And we can drag our ***** system into the scene just
to see how it is. Here we go. This is what
we are beginning to have. Okay, so let's improve this. Let's add a few more
elements, few more details. Back in our Niagara, we
want to copy the waterfall or duplicate Control D
for a second waterfall, and what's going to change
is the material itself. We can duplicate this
material instance, Control D, double click to open it up, and here we can change the main texture to
the second noise. And as you can see, the
result is totally different. Noises textures play an important
role in visual effects. Why it's really important to learn how to create
your own textures. Now, back in Nagra, let's
assign this new material, and we are beginning to see something very
different, as you can see. Let's isolate this one. And the cool thing
with our material is the parameters we
created because now, as you can see, it's
way too visible. It has a lot of noise. But if we increase the
erosion, the value of tree, we get only these curvy paths, can even adjust the text tiling, zero at five and maybe
they can be slower. It will create a
really nice contrast with our first waterfall. And in terms of color,
this can be bright. Increase the value, and
here we go. Really nice. If we see this in our scene with the post processing effects
in action, looks pretty cool. Let's just disable antelazing because it creates
some artifacts. The waterfall in itself, it's pretty much done. What we can do is work on
the puddle on the ground. And for that, we
need a new emiter an empty one, minimal emiter. You can call it puddle or, like I did text to 01, which is a little
bit more generic. But the idea is we use a
mesh render down here, and we want to replace
this with a circle, but it's a very specific circle. So let's go to blender inase
you have blender around, I can show you how
to create this part, and let's start with
Shift to add the sand. On this bottom left panel, we want to make sure it set to nothing, the cap field type. There, we want to select the top edge loop and scale it down by pressing and then zero
and then move it with G, lock it on the Z axis,
and then type zero. Now we want to push
the bottom edge loop up by selecting it, and then with G, lock it on the Z axis and push
it to value of one. Let's rename it circle 01, O, and let's enter it mode
again and we Control R, we want to add a few edge
loops so it becomes smoother. And then in object mode, we want to press Control
A to apply transforms and we can export as
an FBX to our project. Once we are in our project, we can assign it right
here. Here we go. We don't see anything
because we aren't spawning. On the emitter update, let's
a a spo burst instantaneous. Let's sol this. Here. This is what we have. Now we need a new
material and we can actually reuse one
of these erosions. Let's duplicate it,
open it up and in here, the biggest difference
is the mask. We need different gradients. Let's go back to material make. Begin with a gradient note. It's going to be a
very simple gradient, by the way, but we need
to adjust the keys. The first one, the black one
is going to be transparent, Alpha at zero, and
then this key, we can push it all the way back to more or less zero or two and say the Alpha is going
to be 70, for example. It's smooth, fade in. We can add another key
more or less around here, but this time the Alpha is
going to be at its maximum, and then we can add
another key after that and the Alpha
say it's transparent. So this is the kind of
gradient we are looking for. We fade in and then
we fade out abruptly. This will make certain parts
of our circle visible. Let's export this to our project as the
gradient 02, for example. And assign it here in our new material. And
this is what we get. As you can see, it's a
very different result. Let's turn enable
material override and assign the new material
we created right here. Here we go. This is
the result we get. That's why we made
that gradient. So it connects perfectly
with our toxic waterfall. Now let's take
care of the color. I'm going to use this one with these specific values,
and from there, we can adjust the size down
here, scale mode uniform, and it's going to be a four
Yeah, four, that's right. And now we can adjust the
erode and the power values and whatnot with the dynamic material parameter
on the particle spa. For example, a power of four, but an erosion of one
will look really nice. That's small details
that we want, small ripples, and we
can adjust the tiling. We can double it in terms
of speed, a value of one. This is the illusion
we are creating. It's really nice
already. Pretty cool. We can improve on top
of that, obviously. In this case, for example, let's duplicate this
emiter and call it text 02 or puddle 02. But instead of this material, we can change it, duplicate it. And in this case,
for the main text, we are going to reuse the other noise that we have already used
on our waterfall, and it will look superb. It creates these nice waves. We can just call it so it's
a little bit brighter. And maybe it doesn't need
to be that big, like three. In terms of material, we can adjust to power, yes, but it's going to be much
more eroded because we just want small details
from that texture, right? And we don't need
to repeat that much detailing one by two
should be enough. In terms of speed,
could be slower. Yeah, zero at seven, and
this is what we get. If you go back to our scene. Yeah, it really pops out. Still can see too much
of the ground below. We can make a few improvements
in relation to that. Let's duplicate this text to the second pedal,
called beam 01. We're going to solve this
and we need a plane here. We can use a plane
from the engine. We can turn on engine content, search for plane,
and use this one. We'll do just fine. As for the material, we need a new one. From scratch, it's a
simple, simple material. Can even call it
simple material. Let me just disable
Auto exposerblend mode is going to be additive, and then it's going to be lit, just like the other
one we created. And it's as simple as
creating a text of sample prime two D for our main texter and
then a particle color, so Nager can change the
color of this material. And we want to multiply first the two RGBs connect to the missive color and
then the two Alphas, we can use another node, so it blends with
anything that it touches. Instead of cutting abruptly, it will blend nicely. And for that, we can
use a depth fade, connect it right here and
then connect to the opacity. In this case, we can control the depth fade with
a dynamic parameter. The first parameter here, we can even call
it the same name. Here we go and default
value of zero. Oh, and for the
texture itself, yeah, we are going to need a beam, which is extremely simple. If you go back to
material maker, it's as simple as creating
a shape a circle shape, control the radius and
the feather to 07, for example, that should do it. We can blur this out
with a Gaussian blur. If you increase the sigma, which is strength a lot, we
look better, and from there, we can use a
colorized note remove the black background by saying the alpha of the
first key is zero. Here we go. If you select
the colorized note, now we can export this texture directly to our project,
always as a PNG. Let me just disable
engine content. Here we go and assign
the beam right here. Yeah, the death
fade. Sorry, it's connected on the fade
distance. Here we go. It's used it to fade anytime this mesh touches another mesh. You can create an instance
from this called Beam 01 and assign it right here to our beam 01 emiter. Here we go. It's super bright.
Let's take care of that by saying the
color is softer green. And we can increase the
scale. I think it's six. It will do just
fine. Here we go. We have that bright
spot in the center. I could even be a little bit
bigger, but that's fine. Another detail we can
add is some shock waves. You will see what
I mean by that. Let's duplicate it.
Call it shock waves. And we can duplicate this beam 01 instance and call
it the circle 01. For the text right here, yeah, we need another one. And in material make you will see how simple
it is to create textils and start
again with a shape, but this time with
no feather, zero. And if we connect this
to a transform node, we can decrease its size to 75% and then use a math
node to subtract A from B, and by subtracting these
two, we get a ring. As you can see, it's
very strong ring. We want to blur this out. Can use a fast blur. Here we go. That looks much
softer, and that's it. We can then use a
colorized node to remove the black background by saying the first key as
an alpha of zero. And then we can export
this to our project. And assign it right
here as the circle, 01. By doing so, if we replace this material on the
shock wave meter, with the circle we created. We will have a very
interesting effect if we say the lifetime
is only 1 second, and the color can
be even softer, as you can see, and
we want a rate here. Spa rate on the emeter
update of two oh, we have the dynamic
material parameter. Let's remove it here and
on the beam as well. We don't need I mean, there's the fade
option if you want, but by default, it's at
one, so that's fine. And for the shock waves,
they should grow. It will create very
interesting motion. So on the particle update, we can use a scaled mesh size, convert this vector to a float and convert
the float to a vector, so we can say that it
grows exactly like this. If you select all of these keys, you can are in auto mode, so we can control the
handles just like this O, and we can push the first
key up, zero to two. So the shock waves
don't start from zero. We can also fade these out with a scale color so they don't disappear out of nowhere, right? It's the same process we
convert this to a float, and then the float to a curve. And yeah, something like
this, we'll do just fine. The first key is
going to be zero, and then we can add another key, more or less at 03, zero at 25, and we can
say it's values one, so it fades in and then
it slowly fades out. That's what this curve does. Use Auto mode, so we can adjust
these handles as we wish. Because busy curves make everything much
smoother and nicer. Here we go. Actually, it
needs to be bigger, yeah. A value of 12 on the size will do just fine.
Now, that's better. And in just a few minutes, we got a very decent
toxic waterfall. That's it for this lesson. On our next one, we
are going to see how to add a few more details.
3. Poison Bubbles, Smoke and Wobble Effect: Let's add a few more
details to this. For example, some
poison bubbles. Let's begin with a
minimal emitter. And rename it poison bubbles. First thing you want to
do is emit something. So on the emitter update, let's pounder rate of four, so it continuously spouns. Let's isolate this so we can see what's
happening. All right. So down here, let's
switch the sprite render the material
with our own particle, the MI, and the score Bm 01. Now let's make sure they
have a random lifetime. We don't want them to
leave all the same time. Random uninitialized
particle for the lifetime, zero dot five and one dot
five will do just fine. As for the color, we have this specific col,
feel free to copy it. So it's this green,
yellowish poison color. Now, on the sprite itself, we want it to be
random sized as well. Random uniform 20-60. They are all spawning
on the same location. So on the particle spaw
let's add a shape location. So the pound in a torus shape. We can switch it up
here, here we go. This is what we have at this
point if we un isolate. Yeah, I think the large
radius could be bigger, 200 and the other handle
radius 100, here we go. And we can make it flat. On the Z, the torus, it becomes like a circle, like an area within a circle. Now, let's make sure
these particles move, right? We want them to float. An ad velocity on the part cos bound, we can
do exactly that. We get this warning, basically. If you select it, it
will tell you what's happening and you
can click fix issues or fix issues and
that sit will add the solve forces
and velocity module in the partics update,
which was missing. And real takes care of that. Automatically, now we can say the velocity itself
can be one on the Z. But we want the
velocity speed scale. We want to scale that velocity. Want it to be random. And here
we can control it 40-160. As you can see, it
goes up very nicely. These poison bubbles
are getting there. On the particles update, we can use a scale sprite size. It will scale the sprite
based on this curve. But we don't want
this to be linear. So let's select these two
points and select Auto so we can have
these basi handles and create this curve like this. Great. Fantastic. Another
thing we can add is drag, and you will notice it's
a very tiny detail, but it will slow down at the end their movement
when going up. Now, based on this,
we can generate an event when they die and
create kind of a burst. With a generate death
event, we get this warning. Basically, it means we
don't have persistent IDs. Each particle needs an
ID to be persistent. We can fix it by selecting
the emitter itself, and in the emitter properties, we have this requires persistent
IDs. Let's turn it on. Here we go. Problem fixed. Let's copy these poison bubbles, Control C control V, and
call it poison burst. We're going to burst bubbles. Basically, we don't
want a spa rate here, and we also don't need
a shaped location. They will spaw on
the poisoned bubble, and it doesn't need to
generate its own death event. What it needs is the
ad velocity model, but in a cone shape. So when it bursts, it
spreads all over the place. Let's say this velocity
speed is random, a random range 100-300, and the cone angle
is 360 everywhere. Now as for the curve, we want the oppose from big to small. In Autos, we have
the handles smooth, and it's a shame we
don't see anything, but let's have the
gravity force. It will look awesome. When
they burst, it will fall down. And we don't see
anything because we are missing stage, the
event handler, and it needs a source, and
in this case, the source, it's going to be a dead
event of the poison bubble. Execution mode spaw particles. Let's say spun number is five. Now, when they burst,
we get this effect. Let's have the
received death event just to make sure it works well. And let's make a few majus because it's not
that great for now. Lifetime could be shorter, 03, zero at eight. And they can be smaller
6-20. Here we go. It will definitely
make them look better when they
burst, as you can see. Now let's work on
another detail. Let's make sure we add
some smoke to this. We can copy the poison bubbles and rename
this emeter to smoke. Herb goal. Let's isolate this. Yeah, it's the
bubbles right now. We need to make a
few adjustments. For example, we don't
need to generate a death event because we aren't going to spa anything from this. And for the sprite render, well, we need to first duplicate this material and call it
MI and the score smoke, for example. Let's open it up. We want to change the texture
with this smoke right here. Let's save it. You can follow along with the text we
have attached below. It's free. Here we go. And we see the full flipbook. We see the wall sprite, which means on the
subUV we can tile this. Basically, it's a
six by six image, and as soon as we do it,
we can see the smoke. It isn't animated yet, but yeah, now let's increase
the sound rate already to 50, for example. You can leave a little
bit longer 1-3, and in terms of color, it's
going to be much softer. You can copy these values or test different
ones, feel free. Now, in terms of size, it's
going to be a batch bigger, 200-400, and we also want to add random rotation
exactly like this. Another detail we
can take care of before animating this
is the shape location. Instead of a torus, it can be a sphere with a
radius of around 250, as you can see, so it matches
the size of the waterfall. Basically, that's
what we are doing. Yeah, it's going a
little bit way too high, maybe 10-40 on velocity, so it doesn't go that
much higher. Yeah. You can also use dynamic
material parameters to use depth faith of 150. If it touches any of the
meshes, it will fade. And how to animate this,
it's very straightforward. All we need is the
sub UV animation. Once we add it, we get
this little warning. You can select the
sprite render itself. And as soon as you do it, you can see it's already
being animated. You can specify the start
frame and the end frame. Six by six is 36, but since it starts
animating at zero, we count one less, so
it's 35. Here we go. And it's being animated. Looks beautiful.
This smoke is great. No, we have a small tutorial in other classes or
lectures or chapters. From other effects, we show
how to create a smoke. If I remember correctly,
it's the meteor tutorial. So yeah, in case
you're interested. Tiny adjustment on to drag,
so some of them go up. Yep. And this is a great result, as you can see, looking
very, very nice. Another small detail we can
add, it's a bit trickier, and it's a wobble effect
where we play with the vertice of the mesh to
make it look like it's moving. So let's open the original
material erosion. Let's just disable the exposure on perspective. There we go. Okay. So basically, we have
this world position of set, and that's what we
are going to use. We are going to upset each
vertex independently. We are going to begin with a
time node, so it's animated. And we want to get
the local position, which essentially
represents the mesh, the local position of the mesh. And from this X Y and Z, we want to mask out
only the R channel which represents the X vector. From here, you can multiply
the time with a value. We are going to leave
it at one by default, but you can make it faster
or slower right there. And then we are going to
add this to the mask. From there, we can
use a sine wave. We have cosine waves
and sine waves, and we want to multiply
these with the vector tree. As a matter of fact, we can use this dynamic
parameter to control the wobble speed and wobble distance directly
inside Niagara. So let's rename them to wobble
distance and wobble speed. Wb speed, we can connect right here, multiplying
by the time. And wobble distance we
need a few more things. But essentially, we can multiply it first
with this vector tree to control how much of set we
want to add to each vertex. Connect to multiply right here, so it works with the sine wave. And all we need now is to go back and multiply
again with the X. In this case, the mask R and connect this to the
world position of set. And if you play here
with the vector tree, which controls the distance, yeah, it's working
well, as you can see, and by default, we
can leave it at around zero dot one even
less zero.05, a tiny value. So it works when we increase it from the wobble
speed inside Nagra. As long as we don't leave
it at zero, otherwise, the bobble distance will do
nothing inside Nagar, right? Oh, and by default, let's leave the wobble distance on the
dynamic perimeter at zero. So it doesn't apply to all the emters that use this material. And then save it, go back here, and we can, for example, go up here to the text 01, which represents the
ripples on the ground. And we can see the wobble
distance, for example, is one dot five with a speed of two dot
five and we get this warping this wobble pretty if there were really
waves happening here. I think this is a
really great detail. You can also isolate
here the second text, which is another ripple
we have here with a bubble distance of one dot five and speed of two dot five. Here we go. Look how
awesome that is. It's just a tiny detail, but it makes a whole
lot of difference. It's a bit heavier in terms
of shaded performance. So be careful. But we can also apply this
to the waterfall. Let's isolate it. In this case, bubble distance can be
zoot four and speed two. So yeah, not that much,
but it's visible. And if you increase the
polycunt of the waterfall, it will look even better. It's also a bit heavier, but it will look smoother. Also apply to the
second waterfall, which is the bright
ripples on the waterfall. Yeah, same value. And let's show everything.
Let's save it. Let's go to the scene,
and this is what we get. A beautiful toxic waterfall
which can be used as water or any other
liquid, in fact. And yeah, it came
out really great. We hope you guys have enjoyed this one. It's a special one. You can do a bunch
of stuff with this. Yeah, that's it, folks. I hope you have learned a lot. We have seen a lot of tricks. We have quite a few more of these lessons where we create
visual effects for games. So check out my profile to find out more about it,
and that's it. I hope you've enjoyed, and I hope to see you on the next one.
 Gabriel Aguiar Prod, Game Development