Transcripts
1. Introduction: In this course, we are going to learn how to export a game from Unreal Engine five and upload it to steam to release it to the public. If you're interested in one of my other courses, you can check out my profile on this website, whether it's blueprints to create your own game without writing a single line of code. Or if you're focused on learning Unreal Engine five in general, you can find a cause suited for you. Bombshell that I released on steam is an example of a game only using blueprints. This is especially useful for artists like me to program a game from start to finish, even though I do not have a programming background, go ahead and check out my profile to see what courses are released so far. My name is Mustafa and under CEO, game director and designer of typing forged entertainment. I've been working in Unreal Engine for the past six years and have recently released fun tale on steam, which has received very positively. I have also spent 1.5 year developing my personal project, bought Kraft, and currently I am directing, designing, and programming my company's new big title, which is an unannounced 3D platformer. This course contains everything you need to get started with Unreal Engine five and steam, including my personal experience over the many years and projects that I've worked on. At the end of this course, you'll be able to export your own game from Unreal Engine five and uploaded correctly to steam to be played by the public, family and friends. This course is divided into sections and we'll cover how to download the Unreal Engine five game package settings and export. Also create a company which is optional. Outer joins Team works, the steam works dashboard and documentation. The store page, how to upload the game to steam. And at the end, Steam keys that you can give out to family and friends. I designed this course for anyone who's interested in creating games in Unreal Engine 50 for the Steam platform, but unsure on how to upload the game to steam and get started. Just be aware that this course is not about creating a game in Unreal Engine five, but how to release a finished game from Unreal Engine five to steam. I hope you'll enroll and join me in discourse at remember as always, I'm here to help you throughout all of the course and I'll hope to see you soon.
2. Downloading Unreal Engine 5: If you for some reason haven't downloaded Unreal Engine five-year, you can go ahead and go to Epic Games.com. This is Epic Games website. And from here you can click on this blue button called gets Epic Games. This will basically install the Epic Games launcher, and I've already installed it. So I'm going to click on cancel. And I'll bring up the launcher here. So this is what it looks like when you have installed the launcher. And inside of the launcher, you can click on Unreal Engine. And inside of here you can click on this tab called Unreal Engine five. This will bring you to this tab where you can click on Download early access. Once you have finished downloading Unreal Engine five, you can basically go to the library. And inside of here you can see their engine that you have downloaded. This is Unreal Engine five. If you're for some reason want to download one of the earlier versions like Unreal Engine 4. You can click on this plus here, and then you can select what version you want to download it in.
3. Creating the Project: All right, so maybe you already have a game you want to release. And this is why you're watching this course. And basically in this course it's not important what game we are making. I just wanted to show you how to release a game if you have a game finished. So basically let's go ahead and click on Launch Unreal Engine. And basically I just want to choose a default game from their template that we basically can use to release a game to a steam. So we don't really have to do anything here. Now when you click on Launch on Unreal Engine, this tab comes up and you can select their recent project if you have one. Or you can click on this Games tab and you can see here you can create a new project. Basically what we want to do, we don't want to. This course is not about creating a game, it's about releasing a game to steam. So basically I just want to select one of these templates that Unreal Engine has. So maybe this first-person shooter game and this one, I'm just going to call it you E5, Stephen. Just like that. And the project location is just the default one. The and everything is just default here. That is fine. And then I'm going to click on Create. All right, so this is what it looks like when you have launched Unreal Engine 5. And it says update the project. I'm going to click on update and it says new plug-ins available, managed plugins. I'm going to click on dismiss. You can go to Plugins. By the way, if this, this box disappears, you can click on edit and click on plugins here. And what I'd like to do is I like to go down here inside of the plugins and click on Virtual Reality. And I like to disable the Oculus VR and the steam VR. And this is for when your game is not a VR game. And basically when I released, I'm going to click on restart now. Basically when are released from jail and steam, I had those enabled and it kept launching my game with VR mode, even though it was not a VR game, some people were frustrated about it. So it was actually it helped when I disabled those. So I'm going to close the plugin SAB and your engine. If you haven't opened it before, it might look a bit different. So it might if I close this down here, it might look something like this instead, just like that. Okay, so this is the game and when you click on Play, you're basically playing the game just like that. So this is the game we want to release to steam. And basically we don't want to create anything for this game. This, Let's pretend this is our 3D game and this is the game that we want to release. So let's move on to the next lesson.
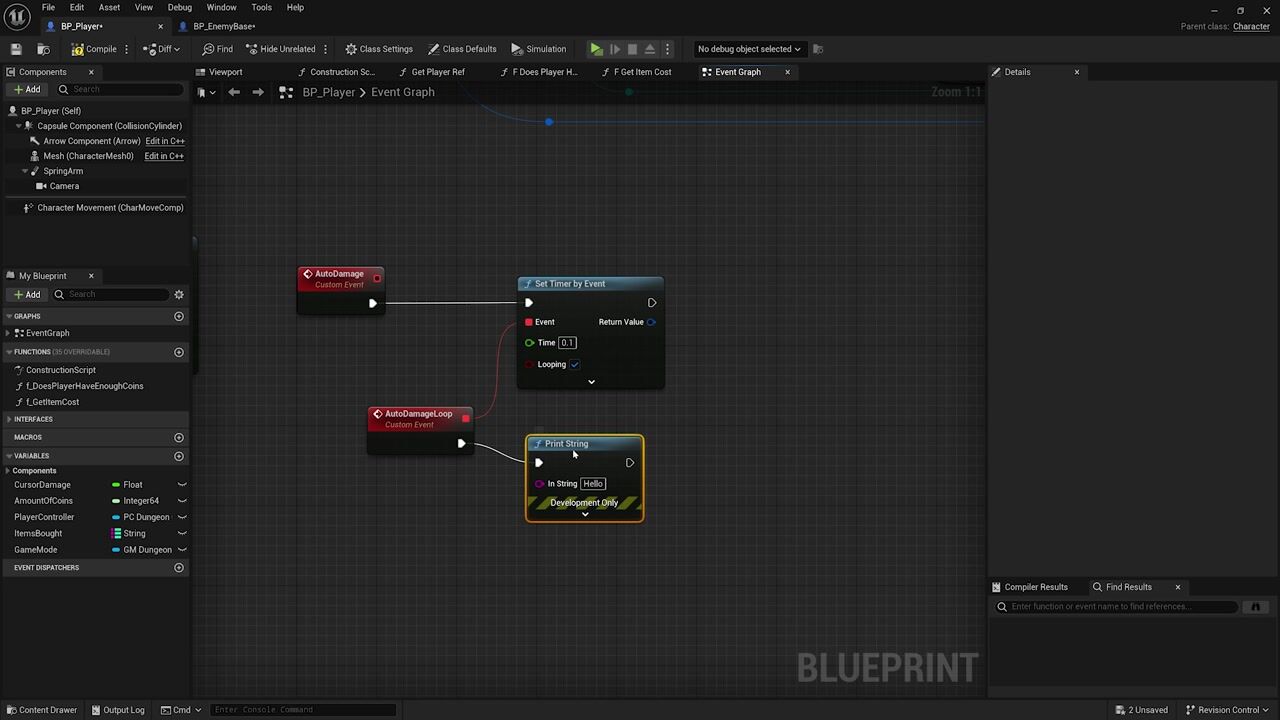
4. Game Package Settings: Okay, so before we throw the game out of this engine, we are going to look at some packaging settings to get it out from the engine. So we have to take a look at those settings and make sure it's fine. So basically what you want to do when this scheme is finished like this and you are ready to release the game, you want to package the game and packaging just means that you want to get it out of the engine to put it on Steam. So basically before you package the game, you have to check these settings and you can do that by clicking on Edit and going to the project settings. And inside of here you can see you have a lot of settings. But the one we are interested in is this one called packaging. And basically in their description also you can write a description. So you can write this as a first-person shooter about, let's pretend it's Counter-Strike. And you write your company name, your homepage, your support contact, so your email just in case they have some box and they want to contact you. So you can fill those information and if you want to, and you can put in a movie if you want to. So you can check if they should wait for the movie to complete before they can continue on, so on. And then it can click on this one and add a small movie, maybe a 3 second movie, or when your game starts up. And the one we're interested in right now is the packaging. So inside of here, the settings that are most important is basically this one. And build configuration. We can change it to shipping. We are ready to ship it out. And then we are going to take the full rebuilt. So it's going to rebuild. And basically the rebuild is just rebuilding up here, rebuilding all the lighting and so on. What we'll rebuild is, and I like to do that when I ship. And we can take for distribution. And when you tick for distribution, basically if you already know how to program. So in the blueprints here, basically you have some functions here that are only for development. So basically this print string, this is development only. And when you put something to shipping over here for distribution, then it is not going to to print out these workforce development functions. And the next thing we want to do is basically going down here to packaging here, click on this arrow. And here you can choose the localization to package. So if you have translated your game two languages, then you want to go down here to the list of maps to include in a package built. And basically if you have a lot of maps over here, so if I open this project up, the only map we have inside of here is the first-person BP. And inside of here we have our folder called maps. And in this maps folder, and by the way, if you're not used to working in here, you're basically click on this content rower to get up here. And if you want to, to have this appear all the time, you can click on this duck in layout. So you have it all the time up here. And here you can basically click on maps. And this is the only map that we have for the scheme. And basically it's going to ask you what maps do you want to package? Now, you don't have to fill this in, but if you want your game to be optimized, maybe you have three more maps you're not using anymore. It is very important to not package everything because you're not really using those three other maps. And you're making, you're just making your game larger without any reason. So let's talk maps to include. You can click on this one and click on Choose file from computer. And basically you can go ahead and try to find the first-person BEP here, and click on maps and then click on first-person example map. This is the map we want to package and it is in here and out. Okay, so this is the only thing that we had to do. We can close that down now. And so the platform, so up here, you can basically go to windows here, and you can also change it to shipping over here as well. Now before you ship and other thing you can do is you can go to the Project Settings again. And basically you can go down here to Windows. And if you want to, you can choose what Direct X you want to use. And then you can also change the picture in how the game looks like when you are opening the game. So you can see, you can change your icon and so on. But basically, I don't want to change anything for this, for this course. I basically just wanted to show you how to release the game. But just to, just make sure you have changed all the settings that you need inside of here. And the one that we looked at, the most important ones was the windows here and inside of the packaging over here. So let's close down the project settings and let's choose File and Save All. And let's go over to the next lesson and package the game.
5. Packaging the Game: All right, So baggage of the game will have to click on platforms. And inside of here we can go inside of Windows. Now basically when you want to package a game, so let's say you want to package it for a mat. You have to have a Mac to package it for it. So you can't, you can't be on a Windows and package it for a Mac. So right now I don't have a Mac. So basically if I wanted to release my game on both Windows and Mac, I have to buy a Mac to package the game there and then I can actually release it. So this is why you see all of these warning signs. So inside of Windows we can click on Package project, just make sure the configuration here is shipping. And then what we can click on Package project. And basically it's going to ask me, where do you want to package it, where do you want to save it? And I'm going to go to the desktop. And here I made a folder called U5 steam. So I'm going to select that folder and I'm going to send the game to this folder. So I'm going to click on Select Folder. And now you can see its packaging that project and now it's already completed because it's a very small template. And you can click on Show output log to see what is happening. And basically inside of here, what are mostly interested in are the arrows. And I'm usually when I'm package my game is I click on the filters up here and I remove them messages so I can see what warnings I have and what errors I have. Warnings are, errors are more important than mornings. So usually I look at arrows here first. And basically it's saying something will unhandled exception unable to pass and then it gives me that build. So something is wrong with these build rules and I'm not sure what it is because we haven't really worked on this project. It's basically a template. And what I'm guessing is happening is something wrong here. So I'm going to go inside of this folder, the unreal projects. This is the default path. And I'm clicking on the U5 steam. And inside of here I'm actually going to remove the intermediate here. And I'm going to remove the saved. These files are just temporary. And basically let, let us actually see what's inside of the Save because I have to close the project to delete it actually. And yeah, I have to close the project. So let's close the project. And I'm going to delete the saved folder here. The intermediate and the derived data cache we can actually remove as well. So we only have script content and conflict left. So let's go back to library and I'm going to relaunch this unified steam. And then I'm going to click on platforms again, windows and package project. I'm going to select the same project here, and I'm going to package now and see what happens. And now when I open the output log, it seems like the aerosol are gone and it's actually packaging and it's taking a lot more time. So this is a good sign for us right now. Alright, So the packaging has finished and it actually took surprisingly a lot of time. I believe it took 15 minutes. So if you if you're doing something, you can go ahead and get some food or whatever, it's going to take some time. And I can click on messages here now and see if we have any errors and we actually don't have anything. So that is nice. And these, these warnings don't mean anything to us. So the most important thing is that you get, you get rid of all the errors for your project. Now basically, for your project specifically you are going to have some, some specific eras. And I might not really be able to help me out because it's your project and you know what you have been doing. And so it is a pain sometimes to package projects because you have so many errors and you have to fix the eras. And it is a pain sometimes it is not very easy. But once you have fixed all of these eras is basically easy from now on. You can just package without any eras. And now that we have baggage, we can go over to our this folder here where we package the project and I can click on the Windows folder and you can see this is the game that we have.
6. Testing the Game: All right, Once you're finished packaging the project and you go inside of the file where you have packaged the project. It is very important that you test out your game. It might work differently in a packaged form, because even though your games working inside of here, it might work differently when you have packaged. So just make sure that you test your game for at least 30 minutes or however are big your game is, it might be a small game or it might be a larger game. But basically just test out your game to see if it actually works. And if it does, congratulations. And right now I don't want to shoot the weapon because there's game is so loud, I'm going to click on Escape to get out. And actually it's not escaping, not even working. I'm clicking on four to close the game here. So basically this game is working now and we can go ahead and actually upload this to steam. So basically, very important, actually try out your game when you package it. Because you can't trust that just because it works inside of here. It is going to work outside of here. So just please test your game before you actually upload it to steam.
7. Zipping up the Game: All right, so basically you have to make your game into a zip file to upload it to steam. So let's go back to the U5 Steam folder. And here this is the game that we have packaged. And basically what you want to do, you don't need to set this file. So right-clicking and clicking on Add to archive, and then choosing a CIP file. But you don't, you're not going to select this file. You actually have to go inside of here and select these files. If you package this file, it is not going to work. So basically select these files here. And those selected files you can right-click now. And you can click on Add to archive. And doing that you can click on the CIP file here it has to be a zip file, and you can call it your game name. And let's just imagine this game is called your E5 steam. Basically for my other game called Pfam tail, I basically just called it fun tail. And then you can click on OK. And now it's going to set the file. And when it is finished, you are actually ready to upload it to steam. And this is the one that we have to upload to steam. Just make sure you don't sit this file. You have to go inside of here and actually set these four files here.
8. Creating a Steam Account: So if you don't have a Steam account yet, you can go ahead to steam powered.com. And inside of here you can click on Login. And when you do that, you actually can click on Join steam. So most of you probably already have a Steam account, but if you don't have to create a Steam account first, with that created Steam account, we can actually upload the game to the Steam platform.
9. Creating a Company (Optional): All right, so let's talk about creating a game development company. And basically when you release a game on Steam, you don't have to have a game development company. So basically this is optional. You don't have to. If you want to, you can create a company. You can see here for my game, I actually created a company and it is displayed here. But if you don't want to create a company, you don't have to. So you can basically write your own name here when you create an upload this game. And of course I can't really talk or you're living in other countries basically, I love in Denmark, so I know the rules in Denmark. I don't know the rules in the US or Poland or any other places. I'm not a lawyer. So when you create a company, if you want to, as I said, it is actually optional to create a company, but I just like to have my own company and upload the game there. But if you want your own company, you can you can contact a lawyer. That is the best thing to do. Can contact a lawyer. And they can do it for cheap for you. So it is very hard to create a company if you don't know the rules, and I didn't even know the rules. So I had to get a lawyer to create my company and they will create it very quickly. I don't think it's it was cheap here in Denmark because it's just a process that takes no time to do because people like the lawyers have done it so many times that it doesn't take any time from them. So it is cheap, it doesn't take time, and probably it depends on what country you live in. But if you live in Denmark, this is your lucky because you can actually create your company online. You don't have to hire a lawyer. This is basically a lawyer online legal desk, and this only works for if you will live in Denmark. And the price is very cheap. This is about $100, a $110, and it takes 10 to 15 minutes and you basically can start to apply online. So if you're from Denmark, you can actually use this website. I created mine through this website and they were just heard everything and they gave me a severity number and yeah, this was very easy. So if you want to create a company, just make sure you talk with a lawyer and they will create one very quickly for you, maybe you, for your country as well. You can try to Google and see if you have something online. So this is it about a company. And if you don't want to create a company, that is fine as well, you can basically just write your name as a developer and as a publisher here.
10. Joining Steamworks: All right, so now you want to join the steam works when you, where you can upload your game. And basically to get inside of here, you have to write partner dot Steam games.com. And this is the steam. The steam works where you can upload the game. And basically I've already created a fake account to actually show you the process. So I made a one called mold and bolt. And I can write a password and click on sign-in and I probably will get a password here. And this is sent to my e-mail so I can copy paste it here and click on submit. And now I can actually proceed to steam. So when you look into this team works, this is what it's going to look like. And I am a game developer and publisher, so I need to sign up for this one. So clicking on Sign up here. And now you are going through this process to join these GMOs distribution program. And very important, please read all of these things. Don't just skip them. So don't just go down here and clicking on continue. Basically, this is very important. And if you want to make money also from your game, just make sure what they are writing here and you agree with all the things they write. And just making sure that you follow the rules they have. Just, just keep reading here. And when you are finished reading over here, Basically they also tell you if, if it is not a game you're releasing, if it's a program, what programs are they allowing and so on. So just read all of this thoroughly and when you're finished, you can click on Continue. Now the next thing you are going to enter the name and address. So basically enter your legal name as written on bank documents. If you don't have a company, so if it's just yourself, you have to write your name. But if it is a company, you have to write the name of the company here, and then you have to write the company forms. So what type of company do you have? And if it's just a company. So it says if you own the content as an individual, you have to write this so you can copy this and paste it here. So this is only if it's just you owning the company here. This is the type of company I have here in Denmark. I just made a, a one man company and I just pasted it here. And you have to write your street address, your city, and fill all of this out. You have to write your email. And I don't have effects, so you don't really need to write anything here. Most of you probably don't have effects. When you are finished, you can click on Continue. So basically I haven't finished anything here, so I'm just going to click on the next one here. Signed the NDA, and this is the non non-disclosure agreement. So you have to read this as well. If you agree with everything, clicking on this one and clicking on continue. And then you have to sign the SDA. And here, this is the stream distribution agreement. You have to write your name, your title, for example, you are the owner. So just make sure you read all of this text. Don't go too quickly through this. Just make sure you have understood everything. And basically, if you're the owner, just like me for my company, I can copy this and paste it here. Just writing owner. And you can see here, this is the e-mail that I'm using for my Steam account. And you can agree with everything when you are finished and you have to write this. Okay, So basically I can't show you up to this point here because now you're actually going to pay a fee. Now when you have signed this and you are finished with the steps, you are going to pay $100 and this is four. So you can distribute your game. So you have to pay a fee of $100. And if you'll make enough money and I don't think it's a big amount if you make them money. That amount the rights. I'm not sure actually right now what the amount is. But basically, I think it is written here. They basically give you that $100 back. So if you make the money they have set like the minimum requirements, they will give back the money that you are, the $100 that you paid. And if you don't make any money from your game, if it's a free game, it costs $100. So it's not the biggest amount, it's it's fine. $100. And then you have to enter the payment and tax info. So entering your bank account number and all of these things. So we can, I think also so they can give you money once if you begin earning money. And then it's actually finished. Then it says, Welcome to steam works. And basically it takes some days for them to review your application. So just make sure you don't do it at the, at the day you actually want to release your game because it's actually going to take some time. I would say it takes at least two weeks because when you join this team works, you also have to prepare and so on. So just make sure you don't rush through this. Make it like doing good time, but just make sure you're actually going to release your game because you actually have to pay $100 before you can release it. So it would be a bit of a waste if if you're in that releasing the game. Yeah, so this is the process for joining the steelworks and becoming a partner with steam. And in the next lesson, let's actually take a look here when you join this team, how the dashboard looks like and what you can do inside of there.
11. Steamworks Dashboard: All right. So when you log into steam work and when you finish all the people work, you are inside of here, and this is the steam works dashboard. Now instead of here, you can click on the PC steam direct fee if you haven't done that already, but you can pay another one if you want to games inside of Europe. And basically you can see I have my game farm til inside of the year and my font sales soundtrack app here. Though, I went ahead and paid the steam fee again so I can actually show you what's happening inside of here. So now one API, the steam fee again, so I paid another $100. And now I can actually click on the Create New app. And I can select what app it should be, and then I can select the product name. Now basically I have my 3D platformer game in mind, So let me, let me create it for now and I can use it later. So I'm going to call it, It's Barclays adventure. And I'm going to click on Create now. Now you can choose if this is a free game, you can choose this as a free product. I'm going ahead and clicking on Create now and it's going to create this new app. And when it finishes, you can see here it is going to show me this is my app and this is my steam ID. Basically, you can view that publicly as well, so it doesn't matter. So I'm going to click on it and you can see this is an incomplete build, incomplete store page and you have a checklist do you have to fill? So this is what the dashboard looks like. You can enter the store page, you can view the store page. You have some steam work settings, achievements, and you can even post some news to your fans here. And basically, you can see the release date you can set that, you can set the launch discount and you can also set the pricing up here. And over here we have a checklist that you have to go through before you can release the scheme. So this is what the dashboard looks like and I want to go through this checklist with you so you can have a feeling of what is needed to have this game up and running. So let's go ahead to the next lesson.
12. The Checklist: Okay, so now when you are ready, when you are inside of here and you have your app created, you have to go through this checklist before you can actually release the game. So these are minimum requirements that you have to go through. And basically the first one says that you have, that you need some basic info and description. And this is basically done inside of the store page. We are going to go there later in a later lesson. So don't worry about it for now. Then you have to fill in the mature content, which is this one is just a survey that takes two minutes, just making sure that you are not releasing anything illegal. So something that is against the steams rules. And then you have to fill in this self-rating questionnaire. And basically you can actually click on it here. So if I click on this questionnaire, you can see now I'm inside of this questionnaire. And then you can fill it in here and click on save. And basically this is for Brazil. They require something from steam. I guess you have to answer something before you can actually release it in Brazil. So clicking on here and answering it, and then you have to plan a release dates. So clicking on this one, and then you can actually planner release date. I'm going to click Cancel. I don't care about it right now. And you don't have to set this one unless you're about to finish the game, then you have to add five or more screenshots. And this is basically also inside of the store page, so we are going to go there later. The same goes with the capsule image, the library assets. You can click on this one support info and you can open it up here. And here, you can basically write in your support website, your email, and your phone number. If you have one, you don't have to. I believe. So. At least your e-mail and your websites so they can actually contact you. I'm not sure if you need all of them. I think basically if you have an email, I think it's sufficient, then you have to fill in your developer and publisher name, which is also inside of the store page. We will go there in a bit and then you have to fill in the descriptive tags. And this is also inside of the store page. And after that you have to put in some communities stuff. So community capsule, community icon and client icon. And all of these are inside of the store page as well. So most of these things are inside of the store page. And basically when you upload the game, it's actually inside of the steam work settings. If you need something for achievements. So steam achievements, these, it says these items are strongly recommended but not required to spice team to release. So basically these are inside of the steam works and you can add achievements if you want to. I would also advise to add achievements for your game. People like achievements, some of them even buyer game just to complete some achievements. So you can go ahead and add some here. And the Cloud service also inside of the steam works here and other things here are the pricing for at least one of the packages. So the pricing you can actually set here. So if you hold the mouse over this icon here, it says view and adjust pricing. And this one is for a discount. So this is when the game is already released. And this one is one. You are going to set the price for this for this app here. So if I go down and it says trailer uploaded, and this is also inside of the store page and we will go there soon. And then you have to add some launch options. And this is also inside of the steam work things. So these are all the minimum requirements that are needed to have this game up and running. So basically filling all of these here, adding some, some screenshots, the images here, adding a description to what your game is, answering on this content, material constant settings, changing that here. And also the self-questioning, very uploading the game that trailer and also sitting some lunch options settings. And if you want more people to work with the onset of year, maybe you're not alone. Sometimes I have my developer here and I can have someone else here. I can click on manage users and permissions, and I can actually add another one. And I can give them what permission they can edit here, so you don't have to give them permission to edit the game. Basically, if you have a marketing analyst, you can actually give them the permission to only view marketing stuff. So you can give some market are some permissions here depending on what the guy that's working for you is doing. And also very important to read up here. It says prepare your store and community pages for listing as coming soon or for full release. And now you can see this checklist and when you fill that out, you can actually set it out there as coming soon if you want to advertise your game and you're not finished yet. So people can actually see it in the store. So you don't have to plan a date here coming soon. Just basically means it does not have a release date, but you can see it and you know it's coming sometime in the future. And then you have to prepare your game built and packages. And this is when you upload the game here. And after you do all of that, there will be a button visible here that you can click. And steam will actually review all of the things that you have done here. And if everything's fine, UK, you are going to release. If not, they will answer you bag and basically tell you you are missing this or you haven't filled out this one. And there are very fast to answer and the steam staff is very nice and they will actually help you a lot here. They basically helped me out a lot better when I had problems also, I contacted them and they answer pretty quickly. I have a feeling that they answer a lot quicker to developers compared to if you're just someone who's buying a game and you have a problem in there. And you can just click around up here and see what is going on. So basically financial info, if you have finished the game and you're gaining some money here, you can view all of your applications and all of these things here. So let's go over to the next lesson.
13. Price & Release Date: All right, so to set the pricing for your game, you have to click on this icon here. And it says view and adjust pricing. So clicking on this icon and it will get you to this part of the website. And here you have to select the price for your game. And before selecting a price, what I would advise you to do is actually go inside of the Steam store. And for example, my game farm tail is a clicker game and also a mix of an idle game and a building game. And basically I go to the Steam store and I tried to find similar games and try to see what the prices of those are and also how much content to these games have. So tried to go inside of the Steam store and compare your game to the market out there. Try to see how much they actually cost. And also remember to see on how much content they have. Some maybe they have more of the new. And this is why it's more expensive. Or maybe they have the same as you and new thing, this is actually a good price. So just analyze the market before you set a price, because it's very difficult to choose the price. If you set it too low, you'll lose money. But if you set it too high, you lose money as well because no one is going to buy it or not as many is going to buy it as you would have when you set a lower price. So basically, let's say your game costs $10. So we found out your game plus $10. And you can see here that steam actually converts it to all of these currencies for different countries. So you don't have to do it yourself. This is very nice actually. And you just have to be aware that it is not $10 for every of these countries. Basically, if I go to steam db dot info and I search for my game fontanelle here, that's already out. Down here. You can actually see the true prices for all of these. So basically the game I have set to $5, so €3.99. And if I look at male, For example, they are actually paying a lot more for my game. So they are paying €4.88. And if I look at Turkey or Russia, they are paying 1 or 1.51.01.5. And I think steam actually looks at the, the contrary in general, the economy of it, the way of living, and how much money the country has and so on compared to each other. So I would not advise to change you to change anything in here. I would say that you should let it be. This is a pretty clever calculation of steam. So they take a look at each country and the way of living and how much money they have and so on, I think. So basically in Russia, you pay less compared to Norway and so on. So I would say let it be, but maybe if you want to change anything inside of here and the British pound, I would maybe change it to 49 here. Just so it's a good number. It's not looking weird in the store. And 8.19 our change to 4.49 instead. So basically if you change it to hire believe is going to be red. Yeah, you can see it's going to be red and it's steam is going to wonder why have you put this much? So basically you choose the price and if it's too low, it will also tell you you have a large difference here. Okay? So I can actually just select it again just like that. And if you go down here, you can basically select that you are finished with selecting the price. And you can either publish them immediately after they have reviewed them or you can publish them after, you know, Valve reviews them and then you can publish them as you will later on. Then you can click on Save the pricing, and there you go. So then you have all of this pricing set. So when you are finished setting the price now go back to all my applications and I will go back to Spark is adventure. And inside of here you can also set the discount if your game is already out. And after that, you can set the planned release date and you can click on this one and click on Edit here. And basically you can select a date for your release and also at what time you want to release. And when you have select that, you can click on update. And this will actually appear inside of here. And it will also appear in this team store if you have already released the game here. So it will actually change from coming soon to this state here. And people who watch your Steam store page will know when this game will be out.
14. The Store Page: All right, So now it's time to talk about the store page, which is probably the biggest one and the one you're going to be inside most of the time. So clicking on this one edit store page, I'm going to go inside of here. So basically inside of the store page, you have to write the game name so you can actually change it here. And you're also going to set the developer. So basically here I wrote tightened forged entertainment. And here you can write another developer if you have, but basically are usually you're just one developer or one company. And then you have to write a publisher basically if you have developed the game and let's say I, I released your game. So I will write tightened forged entertainment here and I'll write your name here so you can write two different things, or you can write your own company name if you have published it as well, then you can add some external links. So your game website, your main website, a forum. If you have meso, meta critic, if you have one, your Discord server, if you have one, you can link your social media. And this is very important here. So the search keywords is basically when people are on Steam and the search for games, you can actually write some keywords. So basically my game fontanelle, I can write fan tail. So basically when people search for Font sale, and then you have to write a comma just like that. And let's say my game was also called if t, though, if people search for FT, they will find my game. And maybe farm tail just like that without like two words. And just keep writing a lot of keywords like what do you think people will search for when they search for your game? And you can also see also another example here. So left but that the search for d or left for dead or left for that. And so on are zombies and so on. So try to find clever words that they will actually search for, for when you fall, when they search for your game. So this is actually a very, people don't realize how important this part of it is. It can basically give you a lot of sales if you hit the correct words and their Steam also rise. These should not include the name of products made by other companies. So basically if I write star do Valley, and my game is fun tail, just like that and just writing. If I have started Valley inside of here, steam will probably be mad at me. You don't like, you shouldn't write other games inside of here. I don't think this is the way to do it. This is probably cheating. And you have to write the supported platform. So right now for example, only Windows, you have to write the minimum specs for how much like the worst computer that can run this, you have to fill that in and then you have to select the release date. And if not yet released, show coming soon on the stores or I can click on that. And then you can select if you have, if your game is in multiple languages. So basically, you start with English or something like that. And then you can select other languages if you have your game translated to other languages, next, you have to select how many players you are. You are. So basically a single-player game, for example, or a multiplayer game. You have online PDP, or you have, let's say it's a co-op game and it's online. It's also a local. You can choose both. So you can actually choose what your game is and you can use the tags that fit here. Maybe it's only a single-player game. So the only thing you need is this single-player here. Then you have to just select if you have steam achievements, if you have in-app purchases and so on, you can try to go through this and see what you have. And basically the genre that you are running with, for example, an adventure or an action as well. So this is the primary genre that you have to choose. And then you have to apply some tags. And then you can click on this one tag my title. And this will bring you to another website. And this is like a wizard, tag wizard. And it tries to select the best texts that you have for your game. So basically, your top-level genre lets me try, for example, to use adventure. And then you have to then choose sub-genres and so on. So this will take probably 30 minutes depending on how fast you go through it. But this is very, very important to fill out. So don't, don't go too fast for it because this one is actually going to choose where your game is going to be listed. So if you go to steam and here inside of steam, if I click, for example, on Adventure, basically your game will pop up here in adventure if you have selected the correct tags, and also if you click on a game. So for example, let me select something random. This one lost and random. That's a good name, I just said random. And basically when you click on this game, your game is going to show down here because this is more like this. And if you have selected the correct tags, it will show down here. So basically when I searched for my game fun tale, you can click on this one and basically done here, you can see more like this. So you can actually see if you have selected correct tags because then you can compare to these games. Is fontanelle similar to these games? And basically it is. So it is similar to farm together. It is similar to plan and X2. And I think I haven't played this. I think it's the same, similar path as this one. So basically tried to look at what results you get because it will show you the results when you finish this tagging. And try to judge if this is actually tagged correctly or if you need to redo it and you have to select the controller support, the taglines and the support info. Okay, This was all of the description here. So the next one is that description about the game. And this is basically the description down here. So you have to write that over here. And then you have to write the small description, which is the description up here, this one here. You have to let me close this down. You have to write it here. And if you have any reviews, you can add them and so on. So here you can actually add the custom images. So screenshots, I think it's required for you to add a minimum of 50 screenshot. That's what the checklist said. So adding five screenshots here, then you go to the ratings. And this is the Brazil west generic that you had to fill in, which is also required from the checklist. And then you have other greetings. For example, Peggy. For example, sometimes you hear that the game says Peggy 18 or piggy 12 or whatever. And this is actually the reading, so we can add the rating here. And I don't have it in writing, so we don't really have to if you don't have any. I think this is only required if you release it on Epic Game Store and also releasing it like in real life boxes. You have to have a reading. What basic lot of steam you don't really need one. If, if you don't have one. Then in the early access basically you can see here, I have a early access box here that you can fill in and you can try to tell more about your game. Why have you chosen early access? And probably not? You shouldn't write because I need money. Even like most of the time you're releasing early access because like this is the reality of game development because you're broke now you have spent like $10 thousand developing and you're broken, you're releasing it by basically you have to select Y early access. Most, like some people also use it to try to see what people actually think of your game before you proceed. So tried to see in what path you should go for this game. And basically, early access doesn't mean that the game is not finished. It had not finished, but it needs to be playable. So don't release your game if it is not playable, it needs to be a playable game. So why early access and so on and so on. You can go through these and fill this out. Then in the graphical assets you have to fill in the rehab to add thumb capsules that are mandatory to have. So for example, the main capsule you can view outside of here. Actually if I go back and then you have the vertical capsule, the small caps, I believe the small capsule is when you go in one of the tags, you can see very small images. So these ones, these are the smaller capsule here. And you have the hetero capsule. So you can actually read more about these capsules inside of the, the documentation for the steam works. So basically here in the localization and languages documentation just clicked that one, like opening a new tab. And inside of here you have something called graphical assets overview. And I would tell you that you should actually go inside of here to see the sizes of these capsules. And also see them here. I believe you can actually see them here, but you can actually give this to your designer. So if you have a graphic designer, he or she can actually go through this and try to see what steam actually requires. So basically we can see what it looks like and it's a very, very good documentation. So for example, the community graphical asset, they tell you how large it is and what it looks like. And they give you some examples of what it actually looks like for other games. Good documentation for the graphics that you have to go through and then add up all of these. And how you add these is actually up to the top here. It says drop image here to upload. So basically just rub the image in Salvia and it will. And then you can select if it's a header capsule or small capsule. And it will actually detected automatically, because if you have made it this size here, it will actually just detect that this is a hetero capsule. So go ahead and fill all of these and basically you can add the screenshots here. Before I told you actually that you could add the screenshots here on this slide. These are custom images that you can add to the description here. So basically, for my game or less, Let's try to go on a random game here. And basically they don't have images, but if you want images inside of your description, which I would advise you to do because it catches the eye of people a lot faster. You can actually add the images here and you can add them here in the description. And for the graphical assets, you can add the five screenshots over here, okay, These were the store assets. You can also click on the library assets and you have some more, like more images you have to add here. So these are all the images that you have to add. Then you have the trailer and you can basically upload the trailer here when you are finished. Then you have some special settings. And here you don't have to fill anything if you don't have it. So basically Google Analytics and basically if you know marketing and you work in all of this, you can add this here. And then at the end when you are finished with all of this, you can go ahead and click on Publish. So basically, you haven't really published and it is not visible, so you control the press published, but there's usually a button here. And then when you are finished you can click on this one, store beta mode. So now I can actually see my store page here. This is brackets adventure, and this is viewing the store in beta mode, so no one is actually seeing my game here. So if I go back and you can see that a button up here store beta mode so we can click on this one. So when you fill in the description, remember to click on Save. I have done this so many times I have written something and I have not clicked on Save. And I've clicked on here and it's actually, it actually disappears and I have to write everything over again. Yeah, so this is all that you needed to do for the store page. And if I go back to the dashboard, you can also view your store page by clicking on this button here, our view in beta mode. Now before I end this lesson, I actually wanted to tell you about this video here. So to fill out all of these things that you have inside of your stoppage. Basically, you can go to You Tube and right. Steam store page tips here from Jonas, I believe his cold, he's the release the publisher of the game called the islanders on Steam. And basically he has made a video here which I actually saw before I release my game, how to sell more games on Steam. I would suggest that you watch all of this before you actually release a game. And basically, this guy, I'm not sure who he is. Basically someone who's good at. I've been working with Steam store pages for a long time. And basically he tells you like things that you should do. For example, here for the tagging and things that you should not do because it doesn't work. And what people look at in the store page and what you should be aware of and all of these things here. So I will suggest that you take a look at this video which is one hour long, how to sell more games on Steam if you're interested. And I basically it's all just one all the way. And I think it's very interesting. And I'm pretty sure that there are a lot more videos to these kind of things. But basically, I think this one was the best one that I've saw. And it's also really nicely made. And I will suggest you take a look at it.
15. Steamworks Documentation: So I think you should start with when you are very new to this dashboard here. I believe it's a good idea to go to the steam works documentation. And inside of here, you should take a look at all of these things. So basically the things that you need. So getting started, I believe you should just take a look. Just begin reading from the beginning. This is the steam direct P and how much it costs. And when you are going to make those $100 back, can basically click on are all of these and dates also tell you about the store, So the store presence. And here they tell you all about these things. Store ox or for example, coming soon. What does it mean? Benefits getting, getting set up, where and how it appears and so on. So they give you a lot of information here in the documentation. So basically tried to look through and see what you can use. So for example, testing on Steam or maybe you're interested in trailers. So you can take a look here and even have a video of how to get started with marketing tools if you have no idea on how to market things, they basically tell you about the sales and marketing if you're interested. So basically we take a look at this documentation, and it is also here that we looked at the graphical assets for the steam page, so the sizes and so on. And you can also take a look at the pricing. For example, if you're interested in some questions that you have for the pricing and how much steam will take from it. And paid ads and things like that. If you're localizing, are translating your game into different languages, you can basically read more about it here. So I would suggest that you get inside of here in this team works documentation. Obviously, I have not read all of this, like every single word inside of here. Basically, I don't think I have been down here. This is also something very new, the steam PC cafe program, but basically tried to look at something that you think would be useful for you and important for you. And probably the store presence is the one that you should spend the most time in. And that will get you started very nicely with setting up your store page.
16. Uploading Game to Steam: All right, So now it is time to upload our game to steam. And remember, we already made this one, so we took these files over here that we exported or packaged from the engine, and we right-clicked and made it into a zip file. And this file is actually the one that we need to upload to steam. So I'll put it on my second monitor for now and I'll go down here. And inside of the edit steam work settings, you can click on that one. Here. You can change the name of the game if you want to. And you can also select which, which supporting opera operating system that it supports. And basically, for example, only Windows 64 bit only. And then you can go up here and inside of the steam pipes, you can click on this one called Build. And by the way, if you want to add some achievements, you can see them here inside of achievements. And I might make a more advanced tutorial on all of these things that are more in depth in this dashboard. And basically you can click on New achievement and you can make the achievement and link it inside of your game. But for now, let's go back to the steam pipe here and click on the one called builds. So click on builds. And here you can actually upload the game. So clicking here, it, here it can actually upload zip files. So clicking here, and then you can choose what file to upload. So basically if I go back to your E5, this one, and this is the one I made. So here I can click on open and I can click on Upload. And it is going to take some time to upload. So I'll make the video a bit quicker and wait for this to finish. Alright, so when it finishes uploading, it's going to say waiting for Depot built and it's going to count a little bit. And when it finishes building this, when it finishes counting, you basically now have two. Right now I did not upload it fully. So remember to click on this button if you want to upload, else, if you go to another page now, have to re-upload. So here you can put a comment and I'm just going to write you E5 tutorial or course just like that. So I know later on this is not relevant for the game. And then I can select something here, basically none. And then I can click on Commit. And then it says build commit successful. And now can actually click on this Publish, publish button. So if you click on the Publish button, we can now see you prepare for publishing. And basically if I go back to the builds here, you can now see I actually have a built here. And this is, this is the bill that I have uploaded so far, and this is the one I can play. So basically if I go and steam to play my game, this is the one that is being uploaded and I will show you how to get Steam keys. So you can actually add your own game to your steam account and you can try this out. But basically when you upload a build, you have to go to build or to publish, and then click on Prepare for publishing. And then you can click on published to steam. And basically it says you are about to publish changes to the public universe and you have to write steam work for it to work. So running steel marks here and click on really publish just like that. And now it's going to put all of these changes to steam. And basically now even though we have published so I can actually now access to you can, you can write an announcement and if you click on that one, you can see it takes you to this page, but basically you haven't really published out to the public. Because remember your game is still in beta mode. And inside of the dashboard, you haven't relieved if I go to steam here, Spark is adventure. You haven't really release your game to the public, so you can't really see it. The only thing you're publishing is so you can try it out. Or if your friend have a steam key and they can actually test the game with you. And basically, you can see down here that says at least one depot configured. And now we can click on this one, at least one built configured. So this is the belt that we have set. And basically we can say selected here and selected to be the default branch here. And now it's in the default brands. So said Build live. Now for example, I can click, I can click it here. So now this is the belt that is live. You can see this is actually the default. You can give it another name if you want. So now if I go back to the dashboard to Smokies adventure, and down here, you can now see that at least one build configured has been finished and inside of this launch options. So you can click on this one and open it up. Basically, you have to add a new launch option and you need to configure at least one lunch option. So that's team knows what action to take when customers tried to launch your application. And basically you can see my settings inside of a fan tail here. This is very simple. You just click on add new launch option and then you write the name of the executable. So the, this one here, if I take it here. So basically this is the game you are launching or releasing. Basically you have to write your E5 steam dot EXE. And this is the launch. Launch type is default. Operating system is Windows and 64-bit only for example. So very, very simple, and this is how you set up the launch option here. So this was basically it for the launching and for uploading the build. And let's go over to the next lesson.
17. The Release Button: All right, So when you're finish up this checklist here, and when you finish just reading this, so basically this just tells you that you should finish the checklists. And when you do so, a button will appear here and you can actually collect I release. You can basically select to release an early access or econ release in full, just basically for the release. And you can also see here from my game farm tail, this one is actually already released. You can see the release date. And right now I have released in early access. And basically here, I can transition from early access to follow release. And I can click here and it's actually going to follow release and steam will review it. So this is very easy. Basically just finish up this checklist here and you're actually finished to go, a button will appear that you can click and you can release your game.
18. Steam Keys: If you want to try out your game yourself on Steam or send it to friends so you guys can test it out. Or maybe you're a development team. Basically here inside of the dashboard for your game, you can go ahead and click on Request steam product keys. So you can click on that one. Then you can select what type of keys do I want? So it is, it is it crowdfunding? Is it a giveaway? Is it a beta test as it or press and revenue? And basically for your for your use, it's just a beta test here. So clicking on that one. But I believe this is actually for your own use. So if you want to 14 yourself, this basically gives access to everything. So clicking on that one and you can actually request some if you want to give it to friends, maybe you can give them a beta test key and you can click on that. And if you give them one of those keys over here, they actually can't get into the beta of the game. So if you, if you want your friends to test out the beta of the game and not the full release. You basically have to give them a beta cells. They will not be able to get inside of the Beta here. So giving a better key. And then you have to just select the tag that you can actually track. So maybe sometimes I give them for YouTubers. So I like to write YouTube and this is just the tag. Maybe you just want game tester so you can write Chester just like that. Continue. And then you have to select the game just like that. And then you have just a right, How many do you actually want? So for example, phi, I want five keys for myself or just for some France that can test this game out. And then you have to click on Continue. And steam will actually try to review it and they will answer you within 48 to 72 hours. And sometimes the answer pretty quickly, so below one day. And the reason why steam has made it like this. So you have to ask for keys is probably because if you ask for too many, it will not be fair for the people who actually buy the game from steam. So if you prior to release 100 keys and only, let's say 50 people has bought your game from the store. It will be unfair for the 50 people that you are releasing so many free copies. And why should they buy the game if you just release it for free? I basically think this is how steam wants to control it. They probably had problems, so did before. And you don't don't worry about it like you get plenty of keys from steam. I have I think I've taken about 800 or 900 Steam keys or foreign sale here. And I don't know if you can see them, but if I click on Request stinky for farm sale here and I just this one show key history. Basically here you can see how many keys I've requested, and I have requested a lot of keys. So they are generous with how many keys they give you, so don't worry about it. But basically you don't need more than five or 10 keys from the beginning to start the game and so on. So this is how your request keys, and you can actually take this key attitude or steam, and you can play your game from steam instead of just playing it inside of the engine.
19. What Now?: All right, So that was actually all the information you needed about releasing a game. So basically packaging it from the Unreal Engine. Then you sip it up into a zip file. Then you get in here, pay the $100, and create an account here, pay this fee, make this app here. And then you can go ahead and fill out this list. Basically, if you want to make a company that is optional, if you want to not make a company and just want to write your name in there. You're more than welcome to do so. A company is not really required. I just feel it is nice to have a company for these things. But sometimes you don't really need it if you don't want to make something big here. If you want to learn how to make games, try to take a look at my profile. It will help me a lot and it will hopefully help you a lot. Also, I make courses on how to make games inside of our neural engine. So if you want to learn Unreal Engine in general, you can take a look at my beginner's course, or you can take a look at all of the other courses that I have. For example, the lighting course that I just finished as well. And if you want to program a game, I have made it courses on how to program games using blueprints and Unreal Engine. And basically, blueprints inside of Unreal Engine is so nice, it's visual scripting, so it's very nice if you are an artists, because blueprints basically can program a whole game without writing a single line of code. And it is so powerful. My game farm sale is a game that is only made with blueprints. So I made it together with one of my friends and we basically did not use any coding. So we coated the whole game. And so we made the whole game and programmed it visually. And it's very nice one we're both artists and not programmers. And you can check out my profile and take a look at the courses and see what it's all about. Just take a look at the introduction and see what's what it's about. Thank you for watching this course. You're more than welcome to join the Discord server. And you're welcome to also write in the social media or just write questions inside of here is also nice to read. So I hope to see you soon in my other courses and have a nice day.
 Pixel Helmet, Game Developer & Publisher