Transcripts
1. Introduction: In this course,
we're going to learn how to use Unreal Engine five, including blueprints by creating two very different
games from scratch, this course contains
everything you need to get started with
Unreal Engine five, including non-real engine five, overview and navigation,
importing assets, environment design and lighting, blueprint basics,
character movement, making routable items, creating checkpoints,
Animation, Blueprint, weapon shooting and
reloading, creating enemy AI, level of difficulty,
health and death, game UI, music and
sound effects. And at the end we are
going to package the game. My name is Mustafa
and I am the CEO, came director and designer of
Titan forced entertainment. I've been working
in Unreal Engine for the past six years and have recently released
farm sale on steam, which is received
very positively. I have also spent 1.5 years developing my personal
project, bought Kraft, and currently I am directing
my company's new big title, which is an unannounced
3D platformer. The end of this course,
you'll be able to confidently create your own game
project from scratch. I designed this course
for anyone who's interested in creating games
in Unreal Engine five, but struggles with creating
a game that will live up to the current
industry standards. I hope you'll enroll and
join me in this course. And also remember that I am here all the way throughout the
course to help you out. I hope to see you soon.
2. Downloading Unreal Engine 5: Okay, so let's start by downloading the engine. And to download the engine, you have to go to Epic Games.com. This is epics website. And inside of here you have to click on the blue button called get Epic Games. And this will actually download their launcher, the Epic Games launcher. And I've already went ahead and downloaded it. So it's here. Inside of this launcher, you'll probably be a DIY home tab. So you have to click on the Unreal Engine button over here. And then you will see all of these button on top, all of these buttons on top. And on these buttons you have to click on the Unreal Engine five. Inside of here, you have a button called download early access. And this is how you download Unreal Engine. Once you have downloaded the engine, you can go inside of your library. And inside of here, you can see which Engine versions you have downloaded already. And if you want to download morrow fair or Unreal Engine 4, something, you have to click on this New button and select which one you want to download. But to download Unreal Engine five, you had to go in and sort of this set so they have put it separately. So once you have downloaded or Unreal Engine five, you can click on Launch here on the engine. And if you have previous projects, they will appear down here. So let's go over to the next lesson and actually create a project.
3. Creating a New Project: Let's go ahead and create our first project. So clicking on the Library button here, you can launch Unreal Engine five. Once you have launched Unreal Engine five, this tab will appear. And inside of this tab, you can either open recent projects or you can create a new project by clicking on games. And when you click on games, you can see different templates. So for example, if you want to make a first-person shooter, you can click on this first Person Template. And it gives you some sort of a basic template for a first-person shooter. So you can go around in a first-person mode with a gun. If you want to make a puzzle, it gives you that template. If you want to make a top-down game, that will give you like a top-down view. But what I want to do for tutorials, I like to start with a blank project because I think you can learn a lot more by creating everything from scratch. I dislike sometimes when people start teaching others by starting with the template I like to start all from the beginning. And actually you can create all of these templates inside of a blank project if you know what you're doing. And after this course, I'm 100% sure that you can create all of them. So let's start with a blank project. We learn a lot more by doing so. And here to the right, you can see that you can either select a blueprint project or a C plus plus. We are going with blueprints and not C plus plus. And this is desktop, and this is the maximum quality preset. This is probably checked for you. I am going to uncheck the starter content. I want to start all from scratch. And ray tracing is disabled. We don't need that. And now we can call your project something. So this first game we are creating, we are calling speed ball and then you choose the location you want to save it in. I will just leave it at my default location and I'll click on Create Projects. Okay, So this is what it looks like when you open the project for the first time. And let's go ahead to the next lesson and actually tried to understand the UI and how to navigate inside of the viewport.
4. The Toolbar: Let's talk about the engine, the user interface, and how to navigate around. So at first it might look confusing if you have never been here before. If you are from Unreal Engine 4, you have a, a slightly more understanding of what some of these things are. But let's start from the beginning and I promise it will be a lot easier. So to begin with, up to the top left, we have all of these different buttons that are usually normal. And every software to begin with, we have file. And inside of file you can create a new level. You can save your work, and you can also create a new project inside of the edit. What's important here is the editor preferences. So clicking on the editor preferences, here you can change things about the editor. So for example, you can see here the viewports selection color if you wanted to differently and so on. Honestly, I've never played around with it. I usually tend to leave the editor as it is. I like the way it is, but you can try to look around, see if there's something you'd like to change. And then we have the project settings, and here we will be a lot. So inside of the project settings, you can edit the project's settings. So for example, the description of the project, the company name, if you have one, the other homepage support contact, and this will all appear when you release the game. So people have a chance to contact you. And you can edit settings for when you package the game and want to release it. You can edit settings for when you click buttons that we will use this later on. And we can edit the default map and so on. So we will work here in the projects, project settings later in the project. The last important thing is the plugins. And clicking on the plugins, you can see we have a lot of different plugins. Don't worry about that for now, but you can see we have a lot of plugins and what's cool about this later on you can also write now it haven't come out to Unreal Engine five, but the steam multiplayer is a plugin that you can enable here, but it's not released yet. It's only for Unreal Engine 4 right now inside of Windows, so you can open new tabs. So for example, you can see here I have something called a details panel and South window. There's also this Details panel and you can see I've already opened one, but I can open a second one if I want to. And these are basically the same. So if I click on an object here and the level, you can see the same information is displayed. And this is pretty handy for if I have two monitors. So I can pull this on my second monitor and I can actually work there. And this is especially useful for if you want to open two viewports. And now we have this viewport and I can put it on my second monitor and watch it from there and it's pretty cool. So instead of Windows, you can open multiple windows. Now there are a lot of other things, but I try not to cover them for now. We don't really need them to begin with. So let's go over the tools. We have different tools here, but let's not worry about that. We have the belt near. You can build the lighting, for example, to make it work inside of your level. So this is the most important thing is the build or levels, the lighting. I can also adjust the lighting quality. And this will take a lot more time if you put it to the highest when you try to build the lighting. So we always work in the preview or medium to begin with. And it's out of help. You can see the documentation for Unreal Engine five. Okay, so down here we have the save the current level button so you can save the current level you are in. And then you have the Create button. And here you can create different things. So for example, the lights, this is a very important button. You can create lights, you can reach shapes, you can create cameras. So you can create something for the visual effects, for example, a metric Cloud or sky, atmosphere and so on. So here you can create different items. And the content is, you can open a new content browser. And if I click on Content browser, you can see over Clinton browser here. And this is actually if you click that button down here, this is actually the same, so I have the same constant here. So now you can also have multiple windows for that. I've never needed it, so I'm going to close it again. But just so you know, you can open it here. And you can also get or open the Quick sold bridge, but we will not Will it right now. And inside of the blueprints, this is very important. We will work in here. And here you can open the Level Blueprint, which we will actually work in, but let's not worry about that for now. But this is the blueprint button. Here we will program the game. We have this in a medics button. Don't worry about it for now. We have the Select button so we can select different items inside of your viewports. You have the landscape tool. You can click on it and here you can create a landscape, but let's not create one right now. And here we have a foliage button. And this is actually for, if you have grass, for example, you can put the grass inside of this foliage painter and you can actually paint all of the grass on the ground. Or it can actually also paint other things. Think grass. So for example, if you have stones or rocks, you can paint those. Then we have the mesh painting tool. So if we have a mesh just like this ground here, you can paint on it. If you have a texture. There, didn't. We have the fracture tool and then we'll have the brush editing mode tool. Let's not worry about this one and this one right now. Then we have the play button and you can click Play to test out the game. We will do so. And just so you know, there are three buttons beside the play button. And you can actually choose to open the game in its own editor, the new editor window, or as a standalone game. But we'll just play it through the viewport for now. And we have the platforms and here you can package the game two different platforms and so on. I will show you a letter on how to package it again when we are finished so you can release it and your family or friends can try it out. And here in the settings, we can hide the viewport UI. It can also show it again. If you want to show it. We can also enter the project settings or the plugin that we just viewed earlier. And an important one is the world settings, which you can also see over here. And beside this one we will work with also later in the lessons. Okay, so let me go back to the Select tool so I can get these away.
5. The Details Panel: The next important thing inside of the viewport or inside of the engine is this Details panel. So you can see when I click on different things inside of this viewport, I see different details. And this is showing the values for all of the things that are inside of the level. So if I click on the Sun here, the directional light, I can see the location of it, the rotation of it, the scale, the intensity, and the angle, and if it should affect the world or not, you can see here I can check it and uncheck it if it should cast shadows or not. So these are all different settings or details for the directional light specifically. So if I click on this ground mesh, you can see I get different settings. I can see which static meshes used, what the material is. And I get to all of these different settings for everything I click on on the viewport. So this is a very important part of the engine. Here you can see the details of each of these items inside of the viewport or inside of the level. You can also edit the names of those items. Up here, you can click and you can change the name and you can see what components they consist of. And don't worry about this for now.
6. The Content Browser: The next thing before we talk about the viewport is the content draw. And this one, you can actually add all of the files you have for the game inside of here. So if you have the character files, you are going to add the character files here. If you have audio files, any, any type of file, 3D files, 3D models, if you have sound, visual effects and so on. This will all be here. And the way you add them inside of that level, you just drag the item and drop it inside of the root level, and we will talk about that later. So just be aware that all of the files will be inside of here and here we can choose to save everything. We can also add different items inside of this content draw. You can see we can add blueprints, this we will work with also. You can create a new level, it can create a new material and new folder. For example, if I click on create new folders can see here it's a new one. And you can click on it to change the name or you can press F2. This is a pretty handy shortcut. So clicking on F2 and changing the name, you can right-click it. You can set the colors so I can set the color to something and you can click Okay, and this is pretty cool for organizing things. So I'm going to delete it again. And if you don't want to click on it all the time, you can see here, if we click on it and you click away from it, it will go away. If you are used to Unreal Engine 4, this was always on top. And I'll actually also make it on top too, just so it doesn't disappear for you when you're watching the lessons. This will be very annoying, I think. So clicking on the dock in layout and this whole docket inside of the layout. And it will always stay up here.
7. Viewport & Navigation: Okay, So we're almost all of the things. The last thing and probably the most important thing is the viewport. So the viewport is where you visualize your level. So here you can see all of the things you have inside of your level, and this is where you build your game. So to begin with, inside of the viewport, we have this button to the top-left. And inside of this button, you can choose to show the FPS. And this is very important. So you don't see you that your FBS is 60 when it's supposed to be a lot higher later in development. So this is always good to check, but this doesn't really matter from the beginning to airline ticket. You can change the field of view and let's keep it at 90, which is the default. You can also was very important. Here is the game view. So clicking on the game view, you can see it hides all of them or all of the icons and also the grid. So a shortcut to this is pressing G. So click on G. I usually do this to see my level without any icons. And clicking on G again, we'll make them appear. Another call button is the immersive mode, and this will fullscreen the viewport just like this. The shortcut for this is if a London, so FL1 to minimize it, F11 to maximize it. And it can press G to hide all the icons. And now you can see our game in fullscreen. And there's a pretty cool. So clicking on G at the London again. And going back. And another called button is the high resolution screenshots. So here you can take a screenshot of what you're currently looking at. The next thing inside of the viewport is the perspective mode. And here, this is the mode that we are currently viewing the viewport in. You can also view it from the top, just like this. And this is pretty cool for when you want to place something specifically. Like for example, if I want to, let me go back to the perspective mode, if you want to play something specifically here, it is a lot harder to just move around and place it here, but it's a lot easier to just go in the top view, CORREL placing it and just placing it correctly. Okay, so I'm going to click on Control Z to undo. So these are the different modes. You can view it from the bottom, from the left, and so on. And these are also called the orthographic views. And you can also have a cinematic viewport which you can view it through. Let's go back to the default viewport. Let's not worry about the cinematic for now. We also have the different humors. Four, for example, when this is for when you have light of the scene. So you can see here, it's there let mode. We also have the unlit mode. We can view the scene without any lighting. And we can also send it to wireframe mode. And you can see the different wireframes. And it can also check the wireframes of different 3D models, detail, lighting, and so on. So we have a lot of the remotes. We also have the optimization view modes which we will touch later in the lessons. So let's go back to the ellipse mode. Next we have the show, and here you can display and hide different things inside of the view port. For example, if you don't want to see the grid, you can make it disappear. But I actually want to see it again. So clicking on it again. And here, very important buttons, and probably the most important are the tools you will be working with inside of the viewport. So we have the Select tool. And you can see here when I select different things, I can select them. And we have the Move tool. And here, if I drag on the pivot points, I can move them in different directions. And if I click on the box, you can see that two of the pivot points highlight and this means I can move them in these two different directions. So if I hold it under this box over here, I can move them along the ground here. And so on. Clicking on this ball, white ball and the middle, I can move them in all directions. Wicking on one pivot point, I can move them in one direction. Okay, So this is the move tool. We also have the Rotate tool. Here. You can rotate in different axis. You can see here I can rotate in these different axis. And before I forget to say it, you can see you, we have a red color, green color and blue color and red color. You can see here, this is also read this as dx. If you put the mouse on it, you can see it. So this is the red, this is the green, it's the y axis, and this is the blue, and this is the z-axis. And you can also see the axis when you rotate, you can see them down here. What you're facing currently, the last tool we have is the scale tool. And clicking on the scale tool, you can scale it in different directions. So just like the Move tool, if you hold it on one pivot point, you can scale it in one direction. Or if you hold it above. These rectangles, you can try to scale it in two different directions. But if you hold it on the white square in the middle, you can scale it uniformly. So if I click Control Z, I actually click it a couple times because I want to go back to where I was. I can actually skeleton them formally by clicking on the white box here. Okay, so very important, I usually use the shortcuts and you should probably London too, because it takes a long time to click here, move them, the new click up here to rotate and then rotate and so on. So a quicker way to do it is pressing Q. This lecture will pressing W for the move tool, pressing E for the rotate tool, pressing R for the scale tool. So for example, I click W2 to move. I click E to rotate, I click R to scale it. I click W again to move it and so on. You can see it's a lot quicker than all the time clicking up here and clicking Control Z to go back. The next thing is the grid snapping tool. So this is how much it's going to snap. So you can see here, when I click w, For example, if I click this player starts icon here. You can see if I move it, it's snapping, It's not moving smoothly. And this is because of this snapping tool. So if I click on that number and I increase it to 50, now snapping every 50 units inside of the engine. And this is pretty handy when you try to align something together uniformly, for example, walls or floors. And they snap together. If you want to remove the snapping, if I click on this icon and it will become white and you can just move it as you wish. This is very smooth now, if you want to take it again, click on it, and then it's going to snap again. And here again, you can increase and decrease the snapping. Just like the snapping with the move. You have this snapping with the rotate. So clicking on here you can see it's rotates every 10 degrees. And if you click on this same degrees, you can change it just like the move tool. You can change it to other degrees. And you can click on the icon to remove the snapping so you can rotate smoothly. And you can also do so with the scale tool. So clicking on the numbers also click on the icon will remove the scale snapping so I can scale it uniformly and so on. Or scale it smoothly, sorry. So I'll just go back to all of them again as default settings. And this is the camera speed. This is very important. This is how fast your camera's moving inside of the viewport. And I will talk about how to move inside of the viewport. I haven't touched it yet. So here you can change the speed. So for example, if you have a big world, a big game world, for example, it's an open world, something you can increase the speed and you can move a lot faster inside of your world. If you have a very small game, you can change it to a smaller speed and you can see it's very slow now and you can even make it even slower. This is also cool for just faking cinematic sometimes. Okay, let's go back to four, which is the default. Okay, so the last thing before we finish the video is getting pretty long. So the last thing is how to navigate inside of the BYU, but how do you move around? So I usually move around by holding the right-click. And then you can use the a, w, D, and S keys on the keyboard. So while holding the right mouse button, you can click on AWT and S and you can move around. I can see you, I'll holding the right mouse button and clicking on these keys, you can move around inside of the level. This might feel awkward to begin with, but if you are used to playing games, you're probably used to moving around like this. If you, especially if you play shooter game. But don't worry, it will be natural for you if you haven't tried that before. Clicking on Q and E, while you are holding the right mouse button, you can see or you can go up and down. I usually never use it. I just go up and down but you can just use it. So you know it's there. Another thing is if you hold the left mouse button, you can see here that you can move around while just holding the left mouse button. I never use it. Actually, I use it on my laptop if I'm working when I'm on my way to my day job, I usually click on the left. This is a lot easier on laptop. And holding the left mouse button and the right mouse button, you can move up and down, just like you did with holding the right mouse button and clicking on Q and D. The last thing you can do is for example, holding the right mouse button and clicking on estimate back, we can then W to move forward. You can also use the scroll on your mouse to scroll in and out. And this is pretty much it for the movement. And what I usually, as I said, use mostly is just holding the right mouse button and just move around like this, I feel more comfortable, but if you feel more comfortable doing it another way, feel welcome to do so. And remember if you have any questions at all, you can always write in the social media are willing to help you out. And you can also write in the Discord server, very much happy to have a chat or help you out inside of there. So let's go ahead in the next lesson or the next section and actually start our game.
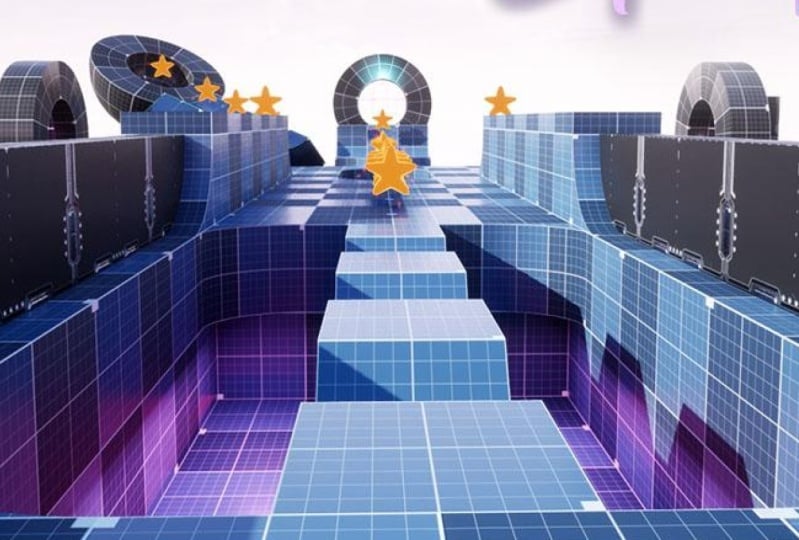
8. Game Introduction - Speed Ball: Hello and welcome to this section. Here we are going to create a ballgame. And this game is about a ball which you can move with your keyboard. And it's like you're racing through the levels, you're collecting stars. You're going through the portals and you're going to new levels. And the game is about just surviving through the levels, collecting the stores. And at the end, you will go to a wedding screen. So with this project, you are going to learn a lot. You're going to learn how to build a level, how to do the lighting out, to do blueprints, blueprint actors, blueprint classes in general, and working with the Level Blueprint as well. We're going to see how you make the losing condition. So if your ball falls down, how to respond at checkpoints are to go through the portal and lots and lots of things to learn. So let's go ahead in the next lesson and start our game.
9. Initial Project Setup: Okay, So let's start doing the project. And before we do anything, I just want to show you something. And here inside of edit and plugins, you can go down to virtual reality over here. And you can disable the Oculus VR and disable the steam VR. And the problem with those is I released my game farm tail on Steam. And these were checked on when are released again and again, kept launching in VR mode for people. Even though farm tail does not have a VR mode. So it was pretty annoying. People were confused of why it was running on VR mode. So every time I start a new project, I disable the Oculus VR and disable the steam VR. Of course, if your game is a VR game, you don't want to disable them. But we are not making a VR game, so I'm going to disable them and clicking our Restart now. Okay, so now the project has been restarted. I can go ahead and close that down and click on Save All. And this is actually the only thing we had to do. So let's move on.
10. Importing Assets: So now let's import some assets that we can use for the project. So first thing here inside of the Epic Games launcher. Here it is. Here you want to go inside of the marketplace. And let's go and download some free assets that we can use for the game. And here you can search for grid. So writing grid up here and clicking Enter. And inside of here, click on this. Max bribes free, so we don't pay anything while making this. And here is the super grid startup pack. Working on this great asset, we can create a pretty cool level with this for our first game. So go ahead and download it. I've already downloaded it. And then you can see after you download it, it says Create Project. So unfortunately you can't just import it directly into the project for these assets, you have to create a new project. So clicking on this, and then it doesn't matter with the name, just let it be as default. And you can change your default folder, but I never change it, so I'll just let it beer. Unless you have space issues on your driver, but just let it be if you don't. And then you can select what version you want to make it in. And right now this is not compatible. It hasn't been made for a project five-point zero, so Unreal Engine five. So go ahead and credit in 4.26, we will not have a problem with this, so this is fine. And glide and clicking on Create. I've already clicked on Create. Now I'm going back to the library and I'm actually going to look for it. And it's here, super good starter pack. And you can double-click this project. So once the project opens up, it will probably see compiling shaders the first time you open this project. And it might take some time, maybe 10 minutes or 15 minutes. I don't know, depending on how quick your computer is. So it will take some time to compile the shaders and let it compile, let it finish before you do anything. And when it's finished compiling the shaders, right-click on this super grid map. So you can see here are super grid folder. You can see here, inside of here we have different and blueprints. We have different meshes and material instances and so on that we can use for free. Though this will be pretty cool for us. You can see there's different meshes or star and so on. So this is pretty cool. We want this inside of our project. And to do so, you have to right-click the super grid folder and click on Migrate. This is how you move stuff from a project to the next project. And then you just hit, okay. And then you have to select what project you want to migrate to. Tell right now we are creating the speed ball projects. So clicking on the speed ball, this is the project, it's inside my this BC and then documents and then unreal projects. So this is the default path. So go ahead and find your unreal projects. And inside of here, click on the project you are creating. And then you want to click on the Content folder. This is very important. You don't want to just put it inside of here, it will not work. So clicking on the content folder. Again, very important. Do not click on other folders. Don't go inside of here and put it here. It will not work. So remember to stay in the content folder and then click on Select Folder and then it will migrate and it will copy all of the files. And don't worry that it will say that some of the files could not be copied. This is all fine, it will work. So going back to the project that we have, you can see it has migrated the super grid pack that we asked for. And these are all the files that are inside it. And they will work with our project. So before moving on, let's actually import some other stuff. I have uploaded. Some items, are some materials for you. And the things I've uploaded for you on this website, you can go ahead and download it. And it's these items that I've uploaded for you. We have an icon we can use. We have some music that I found on YouTube, some royalty-free music. We have some sound effects, and let's go ahead and create a folder and import them. So inside of the content folder, you can right-click and click New Folder. And I'm just going to call this one UI user interface. And inside of here I'm going to make a new folder called icons. And technically we don't really need that for this project because it's so small and this is probably the only icon we will need. But I just want to show you if this was a real big project that we're working on, what I would do. So I always want to organize my things. And I'll put the star in here. And you'll probably realize that I, that I call it ICO from the beginning. This is for icon. I usually call icons, this naming convention. And then we want to make a new folder called we can call it audio, and we can call one. Or actually I'll just import everything here. But if you have many soundtracks and many sound effects, you'd probably want to make a folder for music and a folder for sound effects, but let's just import these and let's drag them in inside of this audio file or audio folder. And here's all the audio that we have. Okay, I might play it, maybe it's loud and be careful. Now this is fine. So now you can here, these are the facts. And then we have also some music. So these are actually all the things that we need to make our game. So now that we have imported the assets, let's go ahead and create the level.
11. Creating the Level: So let's create the level. And before we do that, let's actually go ahead and save our project. You can see here we have some stars. And these stars means that these are unsaved files from the last lesson. I'm going to go and click on save and our File and Save All. This will save everything. And let me right-click on the content folder, create a new folder and create one called maps. Can also call it levels. That's up to you. And here, inside of here. Let's go ahead, click on the mouse or just click on File here. Actually click on new level. Unless we can either choose an empty level and then place our lighting, or we can choose the default level and just adjusted. So let's, let's just use the default level. So we have some sky and whatever. And now you can see here we are inside of the new level. This almost looked like the level we were already in, but this is actually the new level now. And let's click on this Save current level button. So click on this one. Let's save that level we are in, clicking on the maps, and let's call it map. So I like to start with a naming convention for all my files. And this is pretty useful for when you search for items up here. So if you want to find the maps specifically, you can write map up here and all the mouse will be listed. Or if you search for as Fx, all the sound effects will be listed. So it's pretty cool to write a naming conventions are a prefix just before he arrived the name of that map. So this map we will call bead ball. So we only have this map. So let's go ahead and click Save. And you can see that this map has been saved and created. And before we do anything near, let's click on this one. This is the reflections fear, so we don't really need the reflection sphere. So let's go ahead and delete it. And to the right inside of the World Outliner, you can click on it. And this is actually where you see what is inside of this level. So for example, if you click on the atmospheric fog, you can see here it selects the atmospheric fog and it can actually also select them inside of the viewport. This is the same thing. You can also select them inside of here. And you can actually just check to see if there's some things that we don't need. We have a skylight, sky sphere. This is fine. So this is the skylight disguise. Fear is all of this. This is okay. And then we have the player starts, we will adjust it later so it's fine right now. We have the sunlight. This is a light source with, which is called the directional light. I have the floor and then we have some atmospheric fog. I don't know if we need the atmospheric fog. Let's actually just delete it for now. And the floor, we will delete it in a bit. So let, let's let it stay inside of here. So click on File and save all. Now we're actually ready to design the environment. So let's go ahead in the next lesson and design it.
12. Designing the Environment: It is now time to design the environment. And to design the environment, we have to go inside of the super group folder. And inside of here we have the starter pack. And tell the starter pack we have the folder source and meshes. Okay, so inside of here, inside of the meshes folder we have a lot of meshes that we can use to design our level. And you can see here we have corners and cones and spheres, and we also have cylinders and boxes. So for this, I'm going to delete the floor mesh here, standard floor mesh. And we can grab this one called Zuber grid box. So try to drag it in. And then you can see here, if you click the arrow button to scale up, then you can use the scale tool to actually scale it in one direction or the other direction. And it can actually build from these boxes over here or just in general from all of these meshes. So I'm going to delete this one and to make the ground, I like to use the plane. And here, the reason I'm not using a, a box here instead for the floor is because this is more optimized. You don't want all of these different sites beneath the ground. So for example, let me take this, press the R tool and then scale it on one side, skeleton, another side. So if you did this with the box and we tried to scale it up, the difference between these are this is more optimized if it's used as a floor because this one also have sides over here and sides here and sides here and sites beneath also. And these sites you might not see if you're actually using this as a ground and you're standing on it. Why would you need these different polygons which are on the sides which you will never see. These, these are also taking performance. So you're making something as a floor is better to use a plane unless the player is going to see the sides. So I can show you what I've done for the level 2. I'm doing it and mix. So for example, we can make this floor. And what I can do is I can take this box and you can you can move it down just right, right beneath the ground. And here in front of it. You can actually use it just like this. Let me just scale it down. So you can use it just like this one. The player moves here to the side and actually can see this side because the fluorines here, I can scale it up. Then the player will see like a awol kind of thing here on the side. So you can kind of fake it. Can rotate this. And by the way, to copy, I don't think I've mentioned it all the old button. So clicking on the rotate tool, it doesn't matter which tool you have, but right now I want to rotate. So holding the Alt button and then Rotating will duplicate the mesh that you're rotating. And this goes with everything. If you have the Move Tool and hold Alt and drag, it will copy the the mesh. So for example, you can do this. And for this one I don't want walls here along the side because I have walls over here and the player will not see. And let's move it to the side. And this is so cool using the snapping tool, I don't have a fight, didn't have the snapping on. It would be more difficult for me to position it exactly here at the end. This would almost be impossible for me. I'm going to click Control Z and just let the snapping beyond. And if you're designing a huge level, you counsel set it on 50 instead. And now snapping every 15, This also works. So what I do with the walls, instead of putting them on top of the floor, I put them on the sides here. The player will not to notice anyway. I'm just making sure it's not it's not cutting. And essentially flying about. What I want to do is clicking on this. I'm going to put the plane on 000 000 just to make sure it's actually centered and this is easier to place. So put this on zeros 0000 also. And now I can use the snapping tool. Now it's going to snap perfectly. So just like this now snapping perfectly. So this easier to just putting it on 000, 000, 000, it's in the middle of the of the level. And now you can drag in here and do the walls. You can hold Alt and then move to duplicate it, put the wall here. And then you can make the floor larger if you want. This is the starting area of the level. So maybe I can make this a bit. Bigger. And by the way, I have already created the level. And I will show you, I'm not going to design it all this video because this is going to take hours. Maybe. If I, if I don't have them in my mind, what I want to create. But I've already created a level, but I just want to show you how you can get started and do this. So I hate just skipping in tutorials and you don't learn too much. So let's try to do the first part together. So now we have build these walls. And what I can do here, Let's hold Alt again and move to duplicate this. For example, let's say you wanted to, you wanted to have some sort of a room here. And let's duplicate these walls as well. Let's say you wanted to build something here. For example, I can take this grid box again. And what I can do is move it down so it's been needed the ground. Now you can make it larger just like this. So it's like a, a bridge. And maybe just make it one more, just like. So your chosen how you want to create your level that's up to you. Maybe you want to cut it here, and then you actually want to rotate it. Just like this. So just be creative with creating our level. It doesn't matter in the end what you creates, we just want a level and this level we are going to program so the game is working. So technically it doesn't matter what you creates, but it's always fun to see creative levels and see what people are doing. So for example, something like this. And this is not looking good in my opinion this year. The part of the ground we want something going down. So I'm going to click on E hold Alt and drag here to duplicate this wall. Then just move it down. And I'm going to move it in gum. I need to move this a bit more. I'm going to, by the way, I'm clicking on Control and clicking on all of these parts to select them all. And I can move them back slightly just like this. So I think this looks better if we have something down here. I don't like the floor just being cut off like this. And the same thing we can do with this one, I'm going to move it, duplicate this. Okay, and I want to again hold Alt and move down. I want to duplicate the floor and maybe put it down here. So when the player falls down in this hole, the level or reset, and it will put the player on the checkpoint that they are at. So we will create checkpoints as well. And again, I'm just going to rescale or just tried to make it fit and try to create your level. And it can duplicate, keep duplicating, create the level. Just like so. I can duplicate this as well. Just like that. And this one is actually going, I can actually delete this. And I can just make this as long as this one. Just make it longer. Just like this. And I can do the same over here, just like that. So now you have a level and the Balkans start here, for example, and you have a wall, just write it behind it so the ball doesn't fall down. I'll place it here, so encloses just like that. So the ball starts here in this room here. And it can move and move over this bridge. And then you can just try to do the Daniel level as you wish. This is the main principle. You just keep copy pasting code pasting. And also a cool thing to do, you have this ring here as well. You can just make tunnels if you want. Just make sure the ball fits right here. So maybe doing the tunnel like this. And it can actually use the scale tool as well for this one. So it can make it larger and actually make some sort of a, a tunnel to go through. And a complex around. Maybe you want to place a wall here, just make sure it's not the, it's not overlapping like this because LC will close it inside of the sphere. So just I tried to see if that looks good. Sometimes something doesn't look good and I'll just deleted again. But sometimes you can try your way and see if it looks fine. I'll place it in the middle. Just like this. Bunch of copy this and see if it's in the middle. Oops. Yeah, so it's in the middle. Maybe you can do it like this. Or maybe you want to add, by duplicate this. Maybe you want to add a wall up here as well. Just like that. Okay, so you can make your level the way you want it. To just be creative. It's always fun to create a level you have spent time on. And you can always try to use all of these grids structures, take them out, it's tied to scale them and see what happens. Maybe you can add some sort of like arts that will stop your ball and you have to avoid these parts like obstacles. And so this is how you build a level if you want to be creative, please. I'm happy to see what you've done. You can link it in the Discord server or link it in our social media. It's pretty cool to see what people create. And let me go ahead and show you what I have created for the level. So here is the level I have designed. So this is the first level. And you started here with the ball just like we created before. And you just have a basic hole here. And again, this is just like what we learned before. This is just a wall and surrounding the floor plane here. And this is the wall that we also created on the last one. So just basic, basic boxes. I just scale up just like before. I have this level and I have the bridge which is just the wall again. But I put here and you go over this bridge and I have around that you fly over 0, fly over this, this part here, which is also a wall. And also the floor here and the wall over here. I'm going to click Control Z to go back and to change the material to make it look dark. And just like this, instead of blue, you can click on one of these walls that you have put down. And you can see this magnifying glass. And this is the material that actually make the look of this mesh. So you can see here that this is the blue material. And to go to this material, you can actually click on this magnifying glass which says Browse. And this will take you directly to it so you don't have to go in here and search for it. So clicking on the magnifying glass, it will show you the one it's using. You can see here there's a default black one beside it, and this is actually what I'm using for this one. So what you can do it to change it as you can just click and drag and it can put it on any, any mess you want to use it on. So for example, if I want you to turn this wall, I can click and drop. And you can see it becomes black. If I want to make it default again, I can drop this or blue on top of it. And you can try to use all of these different ones. So there's a cool checker one that I actually used for level 2. We can see this is pretty cool as well. Own you have all of these different patterns that you can use. Okay, so I'm going to go back to this blue one, and I'm moving this black 12 for this, for this RAM, because I think it's a bit difficult to see it like this. So it's more interesting to make it black here. So you'll fly over this and you land here. And you have this smaller bridge again. And here I want to make a puddle to go to level 2. So this is a very simple level one. And to make multiple levels you actually, you actually don't want to go inside of this map and make a new level. What you want to do is just make a portal here and it will report you to the next level, but it's actually not a real next level. It's just over here on the other side of the map. So she'll create multiple levels. Just create them inside of this level. Okay, So just inside of the host level, don't go in here and make a new level. So here we have level 2, it will pour tube, so this part here. Then we all start here. And then you'll go over these cylinders. These cylinders, you can see here, if I click on the magnifying glass, it will take me to the head head folder called tutorial level. And inside of him see here where it was just a few wanted to find it. But tutorial level. And then inside of the material instances, then you have all of these cool looking materials that you can drag and drop on top of this. And here will be the last portal. And if you enter this bottle, you'll get to the end screen. So you have only two levels here. And again, it's very handy to make the camera a bit faster if you have a larger level, so it can move faster over here. So we have the level 1, we go through the portal, we have the level 2, we go through the portal and then you will get to the end screen, which is over here. So this is the level and then this is just some basic walls surrounding a plane. So this is the basic that I've done. You can create as many levels as you want. The programming we're going to make will be, will fit all the amount of levels that you want. For example, if you want to make 10 levels, that's all up to you. The programming is going to work for all ten of them. But right now just to make it not too long, I've made two levels. And I've made an ending screen, which the ball will spawn here at the end of the screen. So this is how you design the environment. And please go ahead and be creative. I love seeing what you guys are doing. Sometimes you actually do a better job than I do. Some of you are really, really creative. And if you don't want to make a full level, that's all right for you. If you, if you want to focus more on programming, that is fine as well. It doesn't matter. And if you want to be fully creative, please go ahead and post it in our discord server. I actually want to see what you guys is going to create. So let's go ahead in the next lesson and take a look at lighting.
13. Lighting the Environment: Now it is time to take a look at lighting. So before we do any lighting, I wanted to go to the World Outliner. So this is where all of my things are inside of the level. And what I want to do is just organize a little bit so you can see are different folders which is looking weird. Going to click on one, hold Shift, click on the other one here. I'm going to move it inside of this 3D folder. So dragging it inside of here. And I'm also going to click on this one. Click on Shift, click on the last one. Now shall also dropping it into this folder. And I'm going to delete these folders that I have. And a better thing to do actually is dividing them into levels. So level one should be in a level 1 folder and so on. But it's fine for now. I'm not too worried. And now we have some lighting, so we have the light source. This is what we began with as default. So this is the sunlight that we have. And we also have the skylight and skies fear. And to make the sliding, if you don't have them inside of your level, you can go ahead and click on Create up here. And in lights you can create the directional light, which we already have. This is the sunlight. And it can also create the skylight, which is the, yeah, it did so fixed story the skylight. And in order to create this sky sphere, you have to do something else. You have to go inside of the settings here. And you have to go inside of the show engine content. And when you click that, let's minimize all of these folders. Can actually see, now you can see some engine engine content folder. And if you click that one and you actually search up here or sky, then you see something called BP sky sphere. And you can actually use this one to get some sky up here. So what you can do here to begin with is just clicking on the on the light source here, this is the sunlight. So clicking on that one, I'm going to click E to rotate. And we're going to rotate it here to just give it a call. Just find a cool spot or what you want your level to look as. I think this, this rotation of the sun is pretty cool. Okay, so this is pretty cool. And before we do anything else, you can see here, when I go away, it becomes darker. When I get close, it slowly becomes lighter. And we don't want that in our game. This will be very annoying for the player to all of a sudden get darker and all of a sudden gets lighter. This is not, we don't want the lighting to be at that realistic. So what do we want to do is we want, and actually this is for the next lesson. We want to create a post-process volume, but we have, we have to create it now in order to do some good lighting. So go inside of visual effects and click on the post-process volume. And what a post, post-process volume. It's just like if you want to edit images inside of Photoshop. So you would do color grading, you edit the colors of the image. This is the post-process volume here. So you can, you can edit colors inside of this level, but we will talk about it more in detail in the next lesson. For now, I just want to remove this exposure, which makes the sun lighter and darker and so on. So this is actually making it impossible for us to light the map. So clicking on the exposure inside of the while clicking on the post-process volume. Clicking on the exposure, taking the minimum brightness and maximum brightness for the exposure. And it can set both to one. And you can see nothing happened. And this is because we have to go down. And here we have something called infinite extent. Because right now, let me slow down the camera. Right now the post-process volume only works if I go inside of the volume because he now it changed. But if I go out of the volume, it's not going to work. It's going to be light by going inside again, going to work. And using the infinite extent, this means apply this what I'm doing to the whole map. So if I click it, you can see it now looks more normal. Now the map will not go darker. If I go away, it will actually stay at the same lighting. This is what we want. Okay, So now we have that. And you can try to go inside of the sunlight or light source here and adjust the intensity of the light. So now you can, you can edit the intensity. And I think this sliding is perfect. Actually, I don't want to edit anything. What I want to edit though, I think these, these shadows are dark inside of my level. So I want to make them a bit lighter. And what I want to do is inside of the World Outliner, click on these skylights. And inside of here we have something called Intensity Scale. And you can see if, if I write three, for example, these shadows will be a lot lighter. And I don't want them to be very dark. I want actually the shadows to be light so we can see something. I don't want them like this. Now I'm going to put a 1.8. I think this is the value I had before. Try testing it, or maybe we can write two. So this is pretty cool lighting. Maybe if I go here and see what it looks like, I think two is fine. So this is what we can do. So then, now the skylight is a lot lighter. This was before, and this is now. And let's click on Save All. And I also want to add some lighting here because this is very dark and I actually, you'll have a portal here later on. So when I want to do is go ahead and create lights and create a React or red light. So here this is the reactor. And I'm going to decrease the camera speed. This is too fast. And clicking on g so I can see what the lighting is. So it's like, like here, so it's sliding in that direction. And I'm going to decrease the size or the heights here, just something like this. And maybe decreasing the intensity. You can play around with these radiuses and see what's, what's looking good for the level. Using the source heights might be better to have this height. So it's not too harsh on the sites. And endless sea. Maybe just then tensity in general. Okay, something like this. This is fine for now. And the last thing is we will have a portal here, and I actually also want some lighting here so you can see the portal. So go ahead and create, I'm going to create a spotlight. So technically we don't really have a spotlight realistically, but I just want to put one inside of here so we can see the photo on the end. And think this is fine. And then here again, you can adjust the intensity of it. You can change the radius, you can plus g to actually see the cone changing. So this is the how far away the light is going and how, how big the inner cone is to smooth it out, how big the aggrecan is and so on. But I think I'll just let it be like this. This is fine. I'm going to click File and Save All. And this was it for the lighting. So we created a sunlight that we had. We have a skylight. And you can try to, if you have dark spots inside of your level, you can use, you can use either a point light, a spotlight, a red light to light your environment. This was it for now. And let's go over and talk about the post-process volume in the next lesson.
14. Post Process & Lightmass Volume: It is time to talk about the post-process volume. And before we do this, let me go ahead and hide the engine content folder again. So clicking on Settings and clicking on Show engine content, this will hide it. And the next thing I want to do, you can see I close the project since the last lesson. So I want to open the map again and remember to do so. Lc will be inside of the empty map. And I'll show you later on how you can change the map to be OK to open in default in this speed ball map. So double-clicking the map, so I'm inside my game map. So we've already created a post-process volume in the last lesson, if you remember, and if you haven't watched the last video just in case you create a post-process volume by clicking on Create and visual effects. And post-process volume can also find it inside of volumes. There is the post-process volume. That's the same thing. And when a post-process volume is, you can imagine it just like in Photoshop. When you put a picture inside of Photoshop and you are going to edit the colors of that image. This is, this is what a post-process volume is. You can edit the colors of the picture inside the game, so can edit the look of the game. You can edit the saturation of the look, the brightness, and so on. So this is what we're going to do. So we've placed this post-process volume already. And what we did in the last video, the only thing we did is going inside of exposure and taking the minimum and maximum brightness and setting them to one. And this is because if they're not one, the lighting will change all the time when we move around and we don't want that. And you also remember to click the infinite extent unbound. And if you don't do so, if I uncheck it, you can see the light will be strong again, but it will only work if I go inside of the post-process volume can see now it lowers it. If I go outside of it, it will be high again. So if this is the use of this, sometimes let's say you have a cave inside of the map, inside of your game or something else. And you only want the, you only want the specific area to be affected by this color. Let's say you go inside of a house and everything you see is purple. You can do that with a post-process volume. And let's say I scaled ticking the scale tool. I scale it to this area only. And for this area only it will lower the light, for example. So this is the use of it. If you don't want it to affect the whole map, you can affect specific areas with specific lighting that you wish. And you can, you can insert as many post-process volumes as you want inside of the map. But for this we want to affect the whole map. So clicking on infinite extent, and it doesn't matter effort and now inside or outside of it, it will affect the whole map. Okay, so we adjusted the exposure. And the next thing I want to do inside of here is actually affected the white balance. You can see we have bloom. This is if you want bloom or not. So if I put it to jury can see, now it looks less gloomy. And if I put it hi, you can see it becomes blew me. I'm just going for the default value doesn't matter for me right now. And we also have image effects. This is also pretty cool. You can add a vignette and see the vignette is just these, just like in Photoshop to add like a black blur around the image to make it look more cinematic. And you can usually games have it to 0. I also have a 200 on-farm tail. Because some people think it's annoying that you have some sort of a dark blur around the image for their game. But this is the default. And we can put it to 0.2 just so it's not too strong. And this is the white balance. So the white balance is, you can edit this temperature. So you can see if I lower the temperature, it will become colder, fire higher the temperature. It will be warmer. And low. Take the bloom. Blooms fine. Okay, So this is the temperature that you can edit depending on what look you're trying to reach. And by default it's 6,500. So I'm going to lower it a little bit. I actually wanted a little bit colder, so maybe 5,800. And what I like to do now it's a bit colder. I like to up this tint a little bit. You can see you and I put the 10 dub, it becomes more purplish. I think I'll put it a little bit up so it doesn't look too to purple, to blue, sorry. Maybe there's 0.1. So if I uncheck it and Ticket to various, I don't know if you can see it on your end, but it's a very slight difference. So doing that and I think I will lower the Blumer little bit, It's annoying me. So 0.3, I think it's fine. So this is the only thing I want to do with the post-process volume, but you can go ahead and see if you want to do more. And what you can do also is inside of global, you can edit the saturation of, for example, if you want to increase the saturation and make it very saturated, I'm going to put it back to one again. You can edit the contrast, for example. So depending on what kind of look you want for your game, you can do that, achieve that here. And also remember if, if the shadows for you is too dark, you can always go inside of the skylight. And inside of the skylight. Remember you had the intensity scale and you can always make it higher if it's way too dark for you. And if you'd like to have it a bit lighter. So this is what we have right now. And I think this is fine. And if we need to do more adjustments later in the future, we will do so. But for now I think this is okay, and let's try two, proceed. What would what we have? So just to make sure in the end that everything is built correctly for the lighting, we can go ahead and instead of built, you can click on either build lighting only or build all levels. I'm going to click on Build all levels. So at belts, everything. And this will make the lighting for the meshes that you have inside of your level. So it looks correctly. And when you do that, it says no importance volume found for the scene. So I will show you what you can do here. And this is also important that you place importance, light importance, volumes. So clicking on Create in volumes, you have something called light mass, right? Mass importance volume. And this volume here, you can try to tell the game what parts of the map or what parts of this level you want to focus on regarding the lighting. So I'm going to rescale it as large as this level and also re-scaling it and the z-axis so it covers all of the level. And so you can do that and also write your copy it. Maybe I'll just, I'll actually just scale it the whole way and cover everything instead of making multiple. So just covering everything. They don't have to render more than what you need here. And the building is complete. And this is what we have so far. So now we have created the lighting and we have the post-process volume, and I think it's it's beginning to look great. Now we don't have more things to do regarding the design of the game. So let's actually go ahead in the next section and program the game and tried to make everything moving and working.
15. Blueprint Introduction: Hello and welcome to this section where we will actually program the game. And when I say programming, we're actually focusing on Blueprints, which is the visual scripting language in side of Unreal Engine 5. Now in this lesson, I want to explain to you the UI of the blueprints or a blueprint editor. And if you've watched my other video about the blueprints for beginners, you probably already know and you can skip ahead to the next video. But let me go ahead. If you haven't seen the blueprints editor before. Let me go ahead up here and inside of blueprints and clicking on open Level Blueprints. Click it. You'll get inside of this view and this is where we will be working mainly. So inside of this view here in the middle you can see we have some notes, and this is the begin play. So here you can tell the game what you want to do when you begin playing the game and when you drive out of an execution pen. Can see here some execute, the executable actions will appear. And here we have a lot of functions that we can add and we can tell the game what actually to do right now. So it looks very confusing when you open it for the first time. Because look at it and then you think, how the hell am I going to remember all of this? And you don't you don't have to remember all of this. It will come slowly. Was let's not worry about that for now. So you can drag out of here and you can choose a function you want to add. So for example, the very simple one you'll learn about in the beginning is the print string, which prints a text to the screen. And it will say hello whenever you start playing the game. So if I compile, and it's very important to compile because then you can think of it as like cleaning the code and remember to save. And also it can click Play. And you can see it says Hello up here. And if I click stop and play again, it says in low up here. Now this is how it's used. This is the Event Graph. This is where you will write all of your blueprints. And to the left we have different things. We have the graphs here, we have the functions. So you can create your own functions. So if I write print string again, this is a function, you can see it says f, this is called a function. So the functions are attached to events. And so an event will drive the code. So there has to be an event for code to be executed. And the things that are being executed are the functions that you can create your own functions. We don't need that right now. We are going to get into it later. And you can create macros which are basically just like functions, like this. But the difference is that you can have timed functions inside of it. So for example, if you have the delay node, this will delay the code by, for example, two seconds, and then it will print another string. If I say print string, let's say again and click Play. So it will narrow goes two seconds before it says again. So this is the delay function and belief are timed to functions. You can see there's a clock here on the top. Timed functions can't be collapsed into functions. So if you right-click a glutton to function, it will say collapsing to function failure. And this is because timed functions cannot be inside of the function. You can't collapse to a function, you can only collapse it to a macro. And this will be possible to macros are just like functions, but just this slight difference. Well, let me go ahead and delete it again. And you have variables, and we'll get to that later. And we have event dispatchers which are simply like events. We have the save button, we have the Find button so you can search for blueprint code that you wrote. And especially if you have a very long line of code, or if your game, if you have been working for six months and now you're going to search for some code you've written before. We have the Class Settings. And there are some things that we can edit. Don't worry about it for now. We have some class defaults and don't worry about it for now either. You can see there are some defaults for each blueprint. And it can again click play to play the game that you have. So this is simply the Blueprint editor and we're going to work in here. So I'm going to close it down. And I'm actually just wanting to show you something else. So inside of this blueprint folder I made, so right-click, make a new folder, and I call the blueprints so it's empty right now. And inside of this folder you can right-click. And you can see there is something called Blueprint Class. Can also find it inside of blueprints. All the Blueprint Class. A. Clicking on this, you can see different classes and I want to explain to you in the next lesson what these classes are.
16. Blueprint Classes: Before we proceed, let's talk about the blueprint classes. So radical occur in the blueprint folder and click on Blueprint class. This will create a blueprint class. And then you see this window appears and we have different classes that we can recreate within blueprints. So we have something called an actor. And an actor is just an object that can be placed inside of the level. So for example, when we create the portal that will make the ball appear in the next level, that is an actor. And for example, if you have an RPG game and you place some sort of a coin shop or a weapon shop. And this weapon sharp consists of a wooden sign and the building and so on. This is an actor is just a and an ICM or a building or whatever that can be placed inside of the level. This ramp can also be an actor. And then we have upon and upon is an actor that can be possessed and receive input from a controller. You want to make something that can move. You will have to use a pond because upon can be possessed, we can actually give it inputs, we can move it, we can use the keyboard to move this point. And for example, the ball we are going to make is going to be the point. We can't create an actual from the ball. The ball we're going to move with our keyboard. We can't make an actor of this. We have to make it as upon, else it cannot receive input. Then we have a character. A character is a type of porn that includes the ability to walk around. So now the character is actually a type of ponds. So this is the main class, this is the subclass. So the character, you can see the character can also receive input. We can also make it work. So what is the difference? And when, when are you going to make upon and when are you going to make a character? So the way you have to think about it is, do you have a character with two arms and two lakes that can walk around? If so, then you want to make a character. If you don't, for example, we have a bowl that we are going to race with, then you are going to make a point. So our character is like a real character. Two arms, two legs can, can walk around and so on. So for example, if we are making a Conda strike or we are making a World of Warcraft. These characters are actually characters and not, not two points. And it has the ability to walk around. So it also receives input from a controller. Now we have the player controller, and the controller is an actor responsible for controlling upon, used by the player. So the player controller, it's not the same thing as the controller you have at your home, your Xbox controller or PlayStation controller. This controller is the one that we code in to give movement to the character or the point. And I will show it to you later. So through the controller, I usually do all of the movement logic. So if you click W on the keyboard, you move around and also do the user interface inside of the player controller. So you have to think that each pawn you make, an, each character you make will be, will be receiving input by this player controller. Then we have the Game Mode. And again, mode is the one that is controlling the rules. So the game mode based defines the game being played, its rules, scoring and other facets of the game type. So for example, if you have a game mode called Capture the Flag, you are going to code all of the rules inside of this game mode. So for example, how many points do you get for delivering the flag and so on. How many are many seconds or minutes? Does the round last? And this other components here, don't worry about them for now. And we are going to work with all of them when we are going to create our first game and second game. So let's not worry about them for now. We are, I'm going to explain each one as we move along.
17. Level Blueprint vs Blueprint Class: So before we create our first blueprint class, let me actually tell you the difference between the Level Blueprint here and the difference between this and the Blueprint class. Or if I create a blueprint actor, for example, just a quick one and I double-click. And you can see I also have this graph just like before. If I click back to the, to the Level Blueprint, you can see these are two graphs. There are some slight differences between the Level Blueprint and the blueprint actor. For example, you can see this window doesn't look the same as here. But what is the difference? When are we going to use the Level Blueprint and when are we going to use the blueprint class? So the main difference between them is inside of the Level Blueprint. This is code that will be specific to this level you are inside. So if I go ahead in the maps and I create a new level, this code, which is written here specifically inside of this map speed ball, will only be for the map speed ball of high-grade new level and go inside of this new level. This code here will not be carried on to the next, to the next level. So then you might think, but why would you do it like this? Why don't you, why don't you just write all the code inside of a blueprint class, which will actually be carried over to the next level. And the reason for it, maybe sometimes you want specific code for a specific levels. For example, let's say for this level specifically called map speed ball, maybe you want the speed to be five times faster than the next level. So that the thing that makes the ball five times faster, you would code inside of the Level Blueprint because it is specific for this level, it will not be carried on to the next levels. So this is how you have to think about it. If you have something very specific for this level, that should only be in this level, you can code it inside of the Level Blueprint. If you have code that you want to be carried over to the next levels inside of the game. You have to make it as a Blueprint Class.
18. Variables: Now before we continue and actually start the game fully, Let's actually talk about something called variables. And this is very important to understand because it's one of the main concepts of programming. And so let's go ahead and click on Blueprints and open the Level Blueprint. So in here, we can delete these events. We don't need them right now. And I want to explain to you what variables are. And you can see here to the left, we have something called variables. And what variables are you can imagine them as containers. And they can contain information. For example, they can contain information about what level your character is if you're playing an RPG game. They can contain, if your character is dead or not. They can contain how many coins you have loaded a few alluding coins inside of your game. And it can also contain how much time you have left from your round if you're playing a shooter game and so on. So variables are very important to understand and they are the main concept of or one of the main concepts of programming. They are just containers that contain information for whatever information you are storing in them. So to create a variable, you can simply click on this plus button. And this all create a variable and you can give it a name. And the first one we can call coins, and so on. Now you have changed it a name and you can see here to the right, we also have details. You could have changed their name as well here to the right. And then you have to choose the variable type. You can either choose it from here or you can choose the variable type from here. And you can see we have all sorts of variable types and I'll go through each of them. So for example, here at the beginning we have a Boolean. And the boolean is just something which is true or false. For example, we could, coins wouldn't make sense for this Boolean. So let's change the name to this one is dead, and I usually write B for Boolean to begin with every time I have a Boolean variable. And I can write is that ADH, now this Boolean is storing if my character is dead or not. So now it says, please compile the blueprint before he can change anything in the default value. Now you can click, Compile and Save. And you can see her now this one appears. And a boolean is just a value that is either true or false. So you can see here now it's false. And if I tick it, it's true. That was either true or false. And you can choose whatever you want to do with this. So for example, let me write the begin play events. Now have the begin play event, and let me write print string to print a string to the screen, or print a text to the screen. And let me drag out this variable so we can click and drag it to the Event Graph. And now you can place it. You can either get the variable or we can set the variable. So right now I just want to get the information of this variable. And I can actually link it to this string. And it says, I am going to convert this boolean, boolean variable to a string, which means to add text that they can display to the screen. So this is what I'm doing for you. It's, it's changing the Boolean into a string and it's printing it to the screen. So right now when I click Play, I can see that it says false. So now it's saying false. And this is because this variable is actually false right now. And FI ticket and click Play. And it's going to say true. A Boolean variable is and its source. For example, if you have a shooter game, it can store it if you're roping is holding a weapon right now or not, and you can use that information to something. So the other one is called a. The, the other three actually I just wanted to make quickly is the integer. And an integer is a numeric value. So for example, here it makes sense to call it coins because coins are numbers. And we can compile to see the default value. And this is just a numeric value. For example, I have 25 coins. So I can try to get this variable and put it down here. And if I print it, it will say 25. So the next one I want to make is a float. And a float is also a numeric value. But it has decimals. You can't have decimals with integers, but you can have decimals will floats. So if you have a number that needs decimals, you cannot use an integer because it does not have decimal. So if I write decimals here, it will not accept it. So here in the float, for example, we want the weight of the character. And here, for example, the way it is 75.5 kilos. And here we have the fluid variable. So it is a numeric value with decimal places. And an integer is a numeric value without decimals. And we can create something called a byte. This is also a numeric value, but the maximum value for a bite with me drag it out and I can just call it stereotypes and I'll explain why. I can just drag it out. And by the way, if you want to drag it out and not click Get and Set, you can actually hold Control while you're dragging out. This will get it automatically. And if you hold Alt and hold it and drop it, it will set it automatically. So instead of dropping it and clicking on get our set, we can just hold Control to get it and hold Alt and drag to set it. So here, this byte is also a numeric value, but this one can only store up to 255. So this is very important to know. This. For example, not be used for coins. Imagine if you have 2000 coins, you cannot have the value of 2000 here because the maximum number is 255. So the way you use the bite is you just imagine for a game when you're creating a mechanic, then you're thinking, is this value going to be larger than 255? If not, I can probably use a bite. An example of this is hair types. So for example, if you are in a character selection screen and you are going to choose a hair type. You probably don't have more than 255 the hair types. So for example, I can select hair type number 58 and so on. So this is the use of bytes. So these three are numeric variables. Now let's create a new one, and let's talk about the text, the string, I'm going to create three and in name. So now we have a text string and name and these are text variables. So let me call this one, for example, when message and the other one I can call Thurber name. And the third one we can call weapon name. And I'm going to explain to you what each of them are. I'm going to hold Control and just drag them out so you can see them. All three of them. So what is the difference between these? These are all if I compile and click on them. Now you can see I can actually put in some text on all three. So what is the difference between these three texts variables? When should you use this or this, or this? So the most simple thing to think about is the text, which is the upper one. This one, this is the text variable. The text variable you are able to translate to other languages. So for example, if you want your game to be in German, or you want your game to be in Chinese or Japanese, or whatever language you want it to be in. You can actually translate the text variables. This is the only text variable that you can translate. And if you use a string variable, which is also a text, you cannot translate it to other languages. So you have to have in mind, if you want to translate your game into other languages, go ahead and use a text. If you have no plan of translating anything, you can use a string instead of a text. And for example, this one can say, awesome, you've won. And now if I print it to this screen here, if I just delete this one and then put the Boolean up here. If I print this when message, I can click Play and you can say also mu 1. Okay, so here you can write a text and you can actually translated into other languages. So the string here, you cannot translate into other languages, but you can still use it as a text, just like the text variable here. So this, and you might have known that this is the string variable. And in this one, the print string is actually also a string variable. So if I connected it will not change anything. Just like for example, if we did with this one, it converted the text to a string. It will not do it with this one because it's already a string. So I usually use this whenever I need to translate my game, for example, and farm tail, which is on Steam. I translated my game to 16 languages and I had to add the things I wanted to translate into a text variable else this was not possible. And if you don't want to translate to anything, go ahead and use a string. And then you might ask, why don't I just use a text for everything that I have? Why should I bother using a string if I can just use a text? And this is because of memory and optimization. And this one uses more memory that takes variable. Obviously you're not going to feel anything if you just have, let's say 100 of them. But if you have thousands and thousands of texts, this one is taking a lot more memory than the string. So go ahead and use the string whenever you are able to else use a text. And again, this is for translatable text, and this is not for translatable text. Now the last one we have is the name variable type. And here you can also write something. For example, I can write AK 47 and sampling C's go. Now I have AK 47 and this is my weapon name. And while a name variable is, you can see it's also a text just like the others, but a named variable. You cannot modify the text within it. So for example, the server name, Let's say I created a server name and it was called Rus to Danish server. So let's say I created this server inside of rust. And what I mean by modifying is you can modify string and you can modify text variables. And what that means is, let's say, I don't want to allow the word Danish inside of my game because maybe it's a bad word. I don't know. So I want to remove this Danish and what I can do with this is I can actually, in real-time during the game, I can modify the game until it. If you find the name or if you find the word Danish police, you remove it from the server name before you create it. So when the player upgrades to the server, it's actually just going to say Russ server 24, 7 open without the Danish. So this way, we can actually in real-time, modify each X variable during the game. Maybe you want to remove that last part or remove the first part and just say you have one. And you can also modify the string variable, but with the name variable, you don't have any functions to modify them. So if your if your name here is AK 47 is going to be AK 47 and not something else you cannot modify, you cannot remove the seven or the a or whatever. So the way to use the name is if you have something that is something static and is not going to change at all, for example, a weapon name. A weapon name, you probably will not translated to other languages. And you probably will not need to modify it because it's a name. Why would you change a name? And for that, I would use the name variable. Now, it doesn't mean that you have to use it for every name. For example, let's say you're playing an RPG game and the player chooses a name, for example, he wants to call himself john. And you don't really need to use a name variable for that, because let's say he named himself john and something bad after it. And you want to modify it and remove it and make sure it's gone. You can actually use a string for names, for character names and so on. So the name variable, you can think of it as just an ID that will not change at all during the game. And of course, this one uses less memory than these two. So remember when you're programming, just use whatever makes sense for the scenario you are creating. So if you're creating something that does not need decimal places, you are going to create an integer because it does not have decimal places. If you need to create something with decimal places, use a load. If you need to create some texts that you will translate later on in your game, go ahead and create a text variable and so on, though the last variables I want to touch, let me go back here and you can see something called a vector and create one more, a rotator. And when we create the last one, a transform. So for example, the vector I can call and the rotator I can call floor rotation. And by the way, you don't have to follow me. I just want to show you what each of them are before we go ahead. So you have some sort of a basic knowledge of what variables are and what types we have. So the last one I can call lord transform. And I can go ahead and hold Control and drag all of these out. So these are the last one I want to talk about. And what a vector is, is a variable that contains three numbers. So for example, if I minimize this and I click on the flora that we created here in our level, this floor, you can see here it actually contains these numbers. And with a vector, we can actually modify these three numbers so the location of the floor we can actually modify with this vector. So we have something called set actor location. And I can't drag out from this and do it that actual location. And right now it created this reference because I have actually selected this. And you can see here if I write a few select, if you're inside of the Level Blueprint, you can only do this in the Level Blueprint if you click on something and you can right-click and say Create a reference to this. So this is what it did. And it's going to say set at your location. And I can actually set this location to this new location so I can change the floor location during my game. So when I click on Play, Let's say I want to change the floor to 10, 10, 10. So when I click Play, it's going to change the floral location to this new location. So this is a vector variable and you can use it to change the location of anything in the game, whatever you have inside of your game. And the same thing here. This is not the location, this is a rotator variable. And here you can change the rotation of the mesh you have in the game. So same principle, but instead of setting the actor location, you are setting the actor rotation. And the last variable I want to touch is the transform variable. And the transform is almost the same as this, but it is all of them combined. You can actually change the transformation of a mesh. And for example, this is the transform that you can see here. Each of these meshes inside of our level, they have a transform and it can actually change the transformation of something. And just you can change the location of it that the rotation and the scale. And this is useful also for spawning characters and our game. So for example, if we want to spawn a character in the game, we have to specify, specify what location do I want to spawn the character, what is a rotation of the character and what is the scale of the character. Okay, So this is can be used with a transform. So these are all the variables I wanted to touch. And just so you have a chance to understand what we're doing later in the, in the videos and the lessons. And we are going to use them some more during the lesson. So don't worry about it right now. I just wanted to explain the basics of each. And you can see during the, during the game creation, you can see how we are going to use these variables to actually create the game. So let's go ahead to the next lesson.
19. Creating the Ball: Now that we have a basic understanding for the Blueprint Class is let's go ahead and create the ball that we are going to use inside of the game. So inside of the Blueprints folder, I'm going to right-click and clicking on LaPlante class. And I'm going to create a pond. Now the ball needs to receive input. We have to move around with the keyboard. And it means we need to possess it and move it. So we have to create it as upon and not an actor. Well, clicking on upon and what I usually call blueprints is BP as a prefix. And then I will call it ball. So this is the pon class that we created. And we can double-click it to enter this point class. And you can see here you are now inside a viewport. We have the viewport, we have the construction script. So the construction script is a script that will tell the, this specific blueprint class what to do instantly when it spawned right before it does all of this code over here. Though, this is very important code that should be executed right before you do anything else. Just so you prevent bugs and the game sometimes. And inside of the Buford, we can now add this ball that we have. What you see here is a root components. So this is the root component. And again we have the class defaults and a class settings and class defaults and we can edit some settings, but let's not worry about that for now. What you want to do is add a sphere as that will act as our ball. So up here in the clicking on the Add button, you can click on sphere or a search for sphere rather. And clicking on this shape, sphere. So this shape is the same shape as the grid go up here inside of shapes and clicking on sphere. But now we have created the shape inside of the blueprint class. And now you can see this is the sphere we have created. And you can move inside of the Event Graph or inside of the viewport, just like you did over in this view ports. So this is the sphere that we've created. And this blueprint class consists of all of these different components. And it can see all of these components. We can add anything we want. So right now we only need the sphere. And you can right-click this and click on Rename, or you can click on it. I usually use this shortcut, clicking on F2 on the keyboard. So clicking on F2 and call it, let's call it ball. So now we have this ball. And the next thing we want to add is a camera, because we want to see this ball from a, some sort of a top view. And therefore we have to go inside of add and we can add a camera. So if your search for camera, but before we add a camera, there is something called a spring on. So adding a spring arm. And then I want to add a camera just like this. And you can see we have the ball and inside the ball we have the spring arm. You can see if you move this spring on up to the roots and you can attach it to the root. Now it's outside of this bowl. It's not attached to it. But I wanted to put it inside of the ball just like before. So it's actually a child of this and the camera is inside of the umami or their spring, um, and let's bring down is just like a boom. So you can see here if you click on the spring arm, you have different details that you can edit for it. And for example, the target arm length you can increase. So this is how far away you are from the bowl and sort of the game. So it's just like a microphone bloom. If you've seen one of those. When you see journalists go around and, or movies and they hold this boom that holds the microphone above the characters. Though this is technically what this is. And I want to make this 900. So let's make it 900. This is the specific number for the game that we want to use. And also I just tested these numbers so I didn't know it from the beginning. So when I make a game, I have no idea what this should be. I just set it to a specific number and I I play the game and see if this is what I want. If not, I will make it further away and so on. So first game, Let's use 900. And we want to see this game from a top view. So clicking on the E to rotate. And remember you have clicked on the spring arm and not the camera. Then you have to rotate it up here in the y-axis. And let's rotate it. Let's use 40 degrees for this game. So now we are going to view the game from this view. So this is all we had to do to the ball. And the last thing, let's actually change the look of the ball. So clicking on the ball, you can change the material. And I want to find. So if you go inside of the super grid folder and clicking on tutorial level, looking on material instances, I want to use this yellow color. So if we go back to the BP ball, this over here, I'll just minimize it a little bit. And I go down in the details and here the material, you can drag this material on top of this one. We've changed the look of it. You can also search for it if you click this one here and you know the name of it, you can search for it. So now this vault looks like this and we have the camera, which is which we have put above it. So this is all we had to do to the bowl. We can compile and click, Save and save everything. And you can see here if I close it down now, and I go back to the Blueprints folder, we're reading the ball. I can actually drag and drop this ball anywhere inside of the level. And you can see here this is our ball. And you can also see you, we actually have a camera. This is how you view the ball. So if you right-click and click pilot and the ball, you can see it from the camera you have put on the ball, and this is how you're viewing it. So if you click f 11, you can see this is the view that you are going to get. If you're not satisfied, you can go ahead and click on the spring and you can change the length to something else. And you can see now we are very close to it. This is the look, you want to go for it, but let's change it back to a 900. And I'm going to, going to press this button to stop piloting the ball. So this is what I talked about in the last lessons. I talked about that blueprint classes, you can carry them to the next levels. So this one, when we change level or if we change level, we can actually reuse the code that we have for this bowl. And now you can see it's inside of the ground, like this one. I spawn it, but don't worry about it for now. We are going to spawn it later. But this is all we had to do for the ball. Let's click Save All, and let's move to the next lesson.
20. Game Mode & Player Controller: Let us now create the game mode and the player controller. So instead of the blueprints, I want to right-click and clicking on the Blueprint Class. And let's first create the game mode. So clicking on the game mode, it doesn't matter what TO create. First. Let's grab the game mode. And for game modes, I like to call them GM for a game mode. And then I like to call it the game name, so speed ball. And let's right-click again. Luke month plus unless create the player controller. So flow control, I like to call PC for player controller. And also calling it for the name of the game which has people. And I'm going to click on File and safe all. Now we have to make the games default Game Mode as this one, this custom one we just made, because by default we have a default Game Mode. And now we've created our custom game mode here. So you have to change the game mode for the game. So clicking on Edit and going to project settings. Inside of here we have something called maps and modes. Inside of the maps and modes you can see the game is currently using this default Game Mode, which is again mode base. What do we actually want to change it to our Custom Game Mode we just made. And inside of the Custom Game Mode we are going to code the game. So clicking under GM speed ball, which is the Custom Game Mode we made. And you can see there's an arrow here in the selected game mode you can click. And then you can see these different default classes for their game mode. We just selected the default point class we have, we want for our game is the bowl we made. So instead of making a default pond, we are going to choose BP ball. So this is the pon that we are going to use. And for the player controller, we also just make, made a custom one called PC speed ball. And so instead of using the default player controller, we want to use our own player controller called PC speed ball. This is all you had to do inside of here. Also, if you want to change the default map that the editor starts with. Because every time you close this project and open it again, it's going to open and empty level. And this is the template default. But you can change the editor Startup Map, and you can change a tourist speed ball map, as well as the game Default Map. You can change it to your speed ball map. So this is how you do it. And let's close it down again. And to make sure that everything is correct, Let's double-click this game mode. And here to the right, you have to check if it's actually set to PC speed ball for the controller class. And if it's actually set to be people for the default point glass and it's already doing that. So that's looking all good. I'm going to click Compile and Save. Compile and save on the BP ball is very important, important that you compile and save. And also a very handy trick. You can click on these three dots beside the compile. Go to the Save on compile and click unsuccessful only. So now when you compile and it's successful, you don't really have to click Save. This is, this saves you a click. So closing it. And the last thing we want to do to make it work. So specifically for this level we just made. So the map speed ball which we are in currently, you have to go to the World settings. And inside of here, there's something called Game Mode override. And I want to use this custom game mode that we just made. So the customer and mode will work. And you can click on this arrow to make sure that we have the PCS speed ball as the flow controller and the BP ball as the default or default upon class. And this is all we had to make for the Game Mode and declare controller for now. So let's move on to the next lesson.
21. Adding Ball Movement Part 1: Let us now add the ball movements so we can move around with the ball. So double-clicking on this player controller, because I want to add all the movement through the player controller. What you can do also is just create the movement inside of this bowl specifically. But I like to do all of the movement inside of the controller. So this is optional, and it depends on the programmer you are and what, what you are used to. And what I like to do is just creating it through their player controller. So I'm going to double-click the controller and we're going to add the movement inside of here. So we are not going to do anything inside of a viewport and going directly into the Event Graph. And for now we can just delete these events. So click on Delete. You can always create them inside of this event AND function viewer. So to begin with, in order to add some movement. For example, if we move forward, you can write, you can right-click and write W key. And you can see here we have something called the W key on the keyboard. This is keyboard events. So these are events for clicking on w. And by the way, the events will, will show as red, just like when we saw the begin play. So what happens when you begin playing the game? When you start playing? This code will be executed. And you can see all the events are red. So if you're, if you see a node that is red, this means this is a, an event. So for example, an event, if I click W on the keyboard, this is an event. So when I click WW, something should happen. For example, I want to print a string and say hello. So if I compile and click Play, you can see here when I click w, it says Hello every time I click WW. So this is an event, and now you can do it this way. So you can do it so that you can do with the movement by writing the keyboard key inside of the player controller. But there is something that above this. And the reason why we don't want to do it this way. For example, you can imagine in the game, if you have your settings menu and inside of the settings menu, the player actually want to change this key. The player don't want to move with the W, the player wants to move with the up arrow for the player want to use the up arrow on the keyboard and not the WWE. Now the player cannot change this inside of the settings menu anymore because you have hard-coded the W key, it's always going to use the W key if you do it that way. And the player can not change it through the settings menu because you have hard coded the value. And the way we can avoid this. So let's delete this one compound save. Let's go over to Edit. And inside of Project Settings, we have something called input, and we want to add the keys inside of here. Instead of clicking on input, we have something called the Action Mapping and access mapping the action, you can think of it as one-click. So for example, if I want to click E to open a door, if I click are to reload or if I click G to drop the weapon, these are all action mapping. So clicking on a key, the excess mapping is the movement. So for example, clicking on W to move forward and clicking on the up arrow or clicking on the joystick, on the Xbox controller and so on. To move, these aren't the access mappings. So since we want to do the movement, Let's go ahead and make an axis mapping. Click on the plus button, and click on the arrow. And for this one we're going to call it moved forward. And by the way, they move forward, we're actually going to move forward and backwards. So this is just me. I like to call it move forward. You can also call it move, move forward and backwards with an R instead. And that's up to you. I don't want to make the code too long. I just call it move forward and this is what I'm used to. So here you can choose what key you want to move forward with. So you can write the W key and you can see here you have the W. So now I can move forward with this. And we also want to move backwards. So clicking on this, I can search for the S key. But a cooler way to do it, a very quick way to do it is just clicking on this button. It says select a key value. So clicking on it. And now you can click the S key on the keyboard and it will assign it automatically. So the scale far it is minus one because you can imagine it as a graph. This is forward. In the axis, it is as one. And when you go backward it is minus 1. And let me create another axis mapping. And now we want to move to the sites. So I'm going to call it MOOC rights. But technically it's moving right and left. So we can also call it move horizontally or whatever. I'm just calling it move, right? This is what makes sense for me. And clicking on D here, clicking on this button, clicking on D. And let's add a new button, clicking on a and this one, and this is minus1, so each in different directions. Okay, so now we have these keys and let's go ahead and close it down. We can double-click on the player controller again. And inside of here we can actually now find the events we just made. So rating, move forward. You can see something called the axis events. We have an event called move forward. So clicking on it. This is the event we just made, or you can click it and W and S. So this is the cool way to do it. Instead of writing the W key and hard-coding the code. In this way, the players will not be able to change this inside of the settings menu. It is better to do it this way then the player can choose what they want to change to move forward. So they can always go ahead and change the key. Instead of making a W that can make it up arrow, for example. And let's go ahead and add our other event called moral rights. So this is the event and we have something called torque. So let me try to drag out from this execution pen and you can search for TOR, TOR q ui and remove this context-sensitive to view it. So you can see here at torque in degrees and radians, we will choose the one called add torque in radians. Now, torque is some sort of physics, and this is what's used to drive our bowl. So this is some forests we are adding to the bowl to move it around. And I'll show you how this works once we have this going. But before we can make it work, we have to select a target. We have to, we have the target is the ball. So we want to add this physics, this force that will move. The item we want. This is the ball we want to move, so this will be the target. But before we can continue, I have to teach you about the Blueprint communication because the target here needs to be the ball, because we want to add this physics to the bulb so we can move it. And the ball is another Blueprint class. So how are we going? How are we able to access this ball mesh to be used inside of here? How are we, how are we able to connect this ball mesh from this BP ball inside of this flow controller and connecting it to this target. So you have to learn about Blueprint communication before this is possible. So let's go ahead Before we continue to the next lesson.
22. Blueprint Communication - Casting: It is now time to learn about Blueprint communication. So the problem we are facing right now when we are doing the movement is we want to access to this BB bowl and we want to use this ball mesh because we want to connect it to the target, because we want to add to this bold specifically to make it move. So the target needs to be the bowl. But how do we access this ball inside of BP ball to use it inside of the controller? And this is what Blueprint communication is. You have to communicate between two different blueprints and use information from that blueprint and use it inside of another blueprint, which is here in the plebs on shoulder. So for example, we are now inside of the controller and we want to use the information inside of BP bowl, which is actually a pawn. And remember, that ball class we made is actually a pawn class. So you can see the parent clause here to the top right. It's a pawn that we created. So here inside of the player controller lag and right-click and say gets layer upon. So you can see here it gets warm. We don't want to get player character because remember it is not a character class that we made it as a point character. So clicking good player upon. And from here we can see past two, we have something called casting. So what casting does is we want to use information from a specific blueprint. And in this case, the pon we want to use is our custom porn, which is BP ball. So we can say cast to BP ball. And you can see here selecting costs to BP ball. And we can now connect the execution pin so it's working. Okay, so what we've done here is we have got the default player pawn class. And then we are casting to this specific Pawn Class that we made because this is the one we want to access. And now, here, you can now access all the information which is inside of BP balls. So for example, if I want the ball mesh or if I want an event I meant here or some code I mean, or if I wanted a spring arm and so on, I can access everything from this pin here. So if I go down here now and I write ball, and you can now see it says get ball. So now you are going to get this mesh, which is this one. So now got this mesh called ball. And now this mesh you can now connect to this target. So this will now work actually. So now you have costed to this BP bowl and now you are connecting it. So this is how your cost, and this is how you can communicate. You have to look what the parent class is. So if I go to BPI ball, I can see that parent class is porn. So I first have to get the player porn. And from there I can cast to the specific class I want to access this case. I want to cars for BP ball. And when I have done so, I can now access all the information inside of BP ball. So this is what casting is, and you can do it with other blueprints. So for example, if I wanted to access this Blair controller inside of BP ball, so let me go inside of BP ball just for practice, you don't have to follow along here. I just want to show you. So inside of BP ball, let's say I wanted to access this as I wanted to access this player controller, and I want to use some code inside of here. So what I can do is inside of BP ball, I can right-click and say Get layer controller. Because remember, the parent class for the player controller is player controller. So I get the player controller and I can then say cast too. And you can choose the PC speed ball, which is the custom controller you are using. And you can, you can add it to an event you want. And now you can use any information you want inside of this block controller. Okay, so let's go ahead and delete. I'm just going to delete all of these events inside of BP ball. We don't need them. And so now this is how you cast and access information. And this is how you communicate between blueprints using casting. Now, the only problem with casting is if you have too many things, you're casting too. So let's say you're working on a bigger project and you are using casting all the time. You're casting to this and then you're causing to that blueprint. And then over there you then again casting to some other blueprint. And this is going to create hard references. And this is going to slow your game because costing will create Hart references. And what that does is you have to load all of these costings before your game will proceed. So sometimes I see people having a menu, main menu when you started the game, it will take seven seconds or 10 seconds for the game for startup. And this can be due to casting. If you cast, let's say you're casting your costing ten times two things. And again is know the code is getting pretty long. And you're casting and cussing and casting. And it's going to make hard references and it's going to increase the load time a lot. So what I want to teach you in the next lesson, which I use all the time is Blueprint Interfaces, which will avoid casting. So casting is not bad. You don't, you don't have to misunderstand what I'm seeing. Casting is good, but only if you do it a few amount of time. So don't do it, don't overdo it and cast all the time, this will not be good. But if you have a situation where you only have to cast one time or two times, that is all fine. It will not affect anything and you should probably do so. But in the next lesson, I'll teach you about Blueprint Interfaces. And with that, this is what I use all the time. We can avoid creating the height references, which is done by creating casting and are called will also be a lot cleaner. So let's go ahead in the next lesson and learn about Blueprint Interfaces.
23. Blueprint Communication - Interfaces: In the last lesson we talked about casting. So now let's learn about Blueprint communication. And this is what I use all the time instead of casting and are only cast very, very few times. So let's close this and inside of here, we can create a new folder. Inside of the blueprints, create a new folder and call it interfaces. Just so we are a bit more structured. And inside of the interfaces folder, you can right-click. And under Blueprints you can see something called Blueprint Interface. So let's go ahead and create it and then I'll explain what it is. And for interfaces are usually called them int in the beginning. And for this one, we want to make it specifically for BP ball. So I'm just going to call it the people. So what Blueprint Interfaces are, you can create functions inside of here and you can avoid casting. So let's take an example, Yana example, and take a look at what, how we can use this. So for the BP ball, we want to create a new function. So here you can create all of the functions you want to create inside of BP bowl. So I'm going to create a new function and call it get's ball ref. So I'm going to get the ball reference. So this is what we did here inside of the controller when we did casting, we got the reference to this ball. But we want now to do it through the interface. And I'm going to call this function get Bellerophon. And now you can add an input or an output, and these are variables. So I'm going to click on Output and clicking on this plus. Now you can see here, can choose what type of variable you want to add, and you can also call it something. So for this variable, I actually want a reference to this bowl. So I'm going to write VP ball and find this BP ball that I created and credit as an object reference. I'm going to change the name of it to bowl. So now we have this function. And what can we do with this function? So I will go ahead and open bp polygon. And to use a Blueprint Interface. This is very important. Firstly, remember to compile and save inside of here. And the next thing you want to do is inside of the class settings in BP bowl, because this is where we want to use it. Here. There's something called interfaces in the Class Settings. And you want to add the interface you just made. So clicking on Add and searching for the interface and clicking on it. And just realize here that an interfaces tab will appear when I selected. And you can see this appears so Compile and Save. You can now double-click this, get ball ref. And you can now see the functions that we created. We can't edit the function here. You can see I tried to drag and pull here. I can't do anything. Here in this interface viewer, we can only create functions. And these functions we create, we can use inside of the different blueprint classes depending of if we have added it to the class or not. So here we have added the good ball ref, and if you double-click it so you can access the function. And now I can drag out of here and drives self. And what this does is it's asking what, what is the reference of this bowl? So we added, remember a variable called BP ball. And here we are just writing this reference. Bp ball is actually self because we are inside of baseball. So this reference is self. This is this blueprint class. This is how you do it. And now we can actually communicate with this blueprint. So let's go back to the player controller and I will show you. So the same as we did here. You can say it gets layer upon. And from here, instead of doing casts to BP ball, you can now say gets all ref. This is the function that we created with the interface. And remember always to use the one saying message here in the end, because this is from the Blueprint Interface. Now, this is working exactly like casting. We now have a function and instead of casting and created, creating a hard reference, we can actually now just use this Blueprint Interface function that we've made. And here we can now access the ball just like we did with casting. So you can write ball and the variables are all the way to the end. Or you can write the VaR, who were four variable. And it will appear working on ball. And then we can add it to the torque, just like what we did here would be costing. By the way, you can hold Alt and clicking on the target here or clicking on any node here and you can remove the links. So this is how you use Blueprint communication. So now what we are not casting anymore, we are using Blueprint Interfaces, and this is what I prefer to use just to also have a much more cleaner code. So I'll just give it a quick run through just so I'm clear or I'm sure that you're understanding the concept. And Blueprint and surfaces is usually the hardest things for beginner to understand because we are going back and forth and it might get a little bit confusing. So just quickly let me go back. We created a Blueprint Interface by right-clicking, creating the interface. Inside of the interface. Like before you use the interface you have in mind, what do you want to do with this interface? In my mind, I want to have a reference to this BP ball because I want to use this wall mesh inside of my controller. So I want a reference to my BP ball. So I create a interface and I call it BP ball. And inside of here, inside of the interface, I create a function called get the ball reference. And it doesn't matter what you call it. This is, this is what makes sense for me. And then you make an output of a variable and you choose this blueprint class that you want to refer to. So I want to refer to this BP ball. And then what you want to do is remember to compile and save and go back to the people. And inside of here, remember to go into the Class Settings at the BP ball interface. And then this appears now we can access the function. And you have to define, even though you wrote that the variable is be people. You have to define to the engine what you mean by this. So inside of this function, you drag it out and write self. And this means that this variable here is actually a reference to self, which is the BP ball. So it's just tried, is the same thing as writing. This reference is the P ball, which is actually the Blueprint Class we are currently in. Now, when you would have done this, you can go back to the controller and get the Upon class. Remember, you have to get the parent class, which is Po1. And you can now see get ball ref. And by doing so, you can now use this variable ball, which you did, what you did make here. And from this you can drag out and access any thing you'll want inside of the people. I hope this has been understandable and not too difficult. And we are going to use it a lot throughout programming the game. So if you haven't understood it 100%, we are going to get more examples of this. And if you, if you need help with any of the things I see in my lessons or in my courses. Let's go ahead and connect to the Discord server or write to us in the social media. And I'm willing to help you out with anything you need. But now that we know a little bit about Blueprint communication, we can actually now do the middle part of the movement. So let's go ahead in the next lesson and finish the bowl movement.
24. Adding Ball Movement Part 2: Now that we have learned about Blueprint communication, let's actually go ahead and finish the player movement or the bowl movement rather. So let me delete this casting now that we have created this Blueprint Interface. And let me connect it to the event. And let me connect the ball that we got to the target of this torque. So now what we are going to do is if we click w Or we click asked to move backwards, it's going to take this ball and connected to this target. It's going to add this physics to this ball. So it's going to move the ball with this physics. And we need to compile and save just to remove this error. And we need to tell it the torque that it's, that it needs to apply because right now it is applying zeros 0000 force. So right now when I click W, It's not going to move at all because there is no force applied at all. But I need to apply some force for it to actually work. And the way we do this is actually by connecting this axis value. Because if I click on W, I can try to write printed sheets so you can see what this is actually doing. And let me just quickly just connected like this. So it's going through the code. I'm going to click play. And when I click w, You can see it prints out. So this is when I move it, it's going to print the values. And I can also just, instead of printing hello, I can actually connect this to the string here. And it's going to convert this float variable to a string variable so it can print it to the screen. And let me actually just move around so we can see what's happening. It looks very Guam Girard now. So just like this, I am, I can remove this from the duration. Right now, it is going to print the value of this to the screen. So if I click Play and actually w, You can see it gets one every time I click W. And if I click S, it gets minus 1. So this is the x value. And we need to apply this to the, let me go back. I know are about this error. I will show later why, why we get this. And let's go back to the player controller. At now let's connect this axis value to the torque. This is what we want to apply. Let me connect it back. And what do we want to do? So if we go back here and we place the ball, so inside of blueprints, we have placed the bowl. You can see here, when you place the ball, you can see the pivot point. And remember, remember these pivot points, the red one is x, the green one is the y, and the blue one is the z. So this is the Z. We want to move it forward, but we don't want to move it through the x. Because if you click E to rotate, so this is the rotation tool. We actually want to rotate it along this y-axis because when you rotate, you don't rotate this way. And you rotate and move the ball. You actually wrote it this way, okay? You're actually rotating along the y-axis. So this is why we want to go back to the, to the SIR. And we want to apply this movement to the y-axis and move it forward by applying force to the y axis. So this is the vector variable having three values, we can actually right-click and say Split Struct Pin. And this will split it into these x, y, and z. And we can now apply this torque to the y-axis. Okay, so now if I compile and before we can actually test this out, I have to, Let's delete this bowl and I have to add a player starts. So instead of create, we can create this player starts. So this is where the player was dots and click on G to view the icons. If you have hidden them, like me, and you can move it. And I will end up layer 2 on the pledges spawn here, for example. Just like here. And you can click on Play. You can see nothing happens. Let me go back. And it says access non trying to read the property, get ball Earth. And when it says access, none is trying to get this ball Earth and trying to make the ball move. But if the ball does not exist yet in the level, it is getting confused because why, why do you want to move this ball? Because it can't find anything here, it can't find the mesh. And therefore it's going to give you an error. Just imagine, for example, in Counter-Strike player joint C server. And the player has to select if they want to be a terrorist or a counterterrorist. And if the player has not chosen anything yet, they are still in the spectate mode. This code will give an error because why do you want to move the terrorist or the concern as to why you want to move the player if the player has actually not spawned yet in the labile. So this is, this will give you an error. And what you can do to avoid this is right-click here. And convert this to a validated get. And what this does is, it's going to first ask, does this ball actually exist in the level yet? If it does, if it is valid, then go ahead and apply the torque. So if I compile and click Play, it should get rid of all of these errors. So if I do this, you can see now we have spawned in the level, we are not getting an error anymore. And in fact like W, nothing happens. And this is because the torque we have applied is not hard enough. And the second thing, remember that I said that torque is physics. And when, when we apply physics, we have to simulate physics for the ball. So if I click escape, It's going to say simulate physics. I can go back to my VP ball and clicking on this ball, I can go down inside of physics and click on simulate physics. And if I click Play now can move, but the force is still very low So I can't, I can't do anything. So I have to go inside of the player controller. And what I can do is just apply a, a harder talk to this so it can move. So apply more force. So let's do this by dragging out here. And I want to multiply this number. Multiply. And I want to multiply it by length 35 was a good number for me. And you can test this out. You can just talk numbers and see which is too fast and too slow. So now I am applying a force to this, to this ball, and I'm multiplying this x-value by 35. If I click Play now and I move, filling up, moving up, and that is just me for getting something. I actually, I wanted to click on this accelerate change. And what this will accelerate change will do is it will actually ignore the mass of this ball. Because the ball right now, this sphere that you have added actually will have a mass. So it has a weight. And this weight will not take into account if you have this ticked. Although if you do not have checked, then you wonder mass to be calculated, you have to apply a much higher force or a much higher value, the airforce 2 to make it move. But right now I do not want to take the weight into account and I just want to multiply by 35 and this should be enough. And now I'm actually getting this error because I actually have two player starts. So I just realized that inside of my level, I go back. I have a closed dot one, which is actually the plus dot we are using right now. And I'll also hopeless Tatu, which is why it's not spawning my bowl and a given me an error. So I'm going to delete the plus d2. And when you click Play, it should work as it's supposed to. So now when I click W and move, you can see the cameras actually moving with the ball and is looking also li and we'll probably get sick if we look at this too much. So let's go ahead and fix this. So inside of BP ball, we can click on the spring up. Here in the spring arm we have the rotation. We don't want these bring up to rotate together with the ball. Well, clicking on this rotation and changing the rotation to world instead of relative and clicking compile save. And now when we click Play and move, we can now move the ball back and forth. So now it is working. Okay, awesome. So now we want to add the left and right movements. So let's go ahead and finish the movement. So we already made the move right? Inputs. And inside of here, we can just go ahead and say, get borne. By the way, you can also copy, paste this text or this, this code. But I just want to show you just for practice. And it can get ball ref to get the Blueprint Interface function. And here you can access bold, again, the ball variable. And it can convert it to a validated gets. Now you're asking, is the bowl valid? If it is, then we want to apply this torque. Torque in radians. Now it's going to apply the torque. And now we want to right-click here in the torque and split that struck pin and to move right and left, if I place the ball to move right and left, we have to rotate along the x-axis. This is the red one, this is the x-axis. And we have to apply torque to the x-axis, which is over here. And we can apply it here. And remember to multiply the torque. They'll multiply the force. The force is not strong enough and will not move the ball. So now we can add the force here and we can double-click on this, on this line here to make a rewrote node. So this will actually make your code a lot cleaner and nicer with these lines here. And let's remember to click on absolute acceleration change and Compile and Save As this should work. So let's click Play. Now it can move left and right. And you'll probably realize we're actually moving in the wrong direction when I click a, we're moving right when I click D or a million left. And to fix this, we can go inside of the edit, inside of the project settings. In input. Here we can just reverse these scales. So writing minus one here and writing one here instead. And this should be fixed clicking on Play. You can now move the ball at supposed to and you can actually play the game now with this ball. So this is how you create the ball movement. And now that we have the ball working, now we can create the service which will be looted by the bowl when you interact with the starts. So let's go ahead and make the star.
25. Creating the Star: Now let's go ahead and create the star for the levels. So inside of the blueprints, I'm going to right-click and clicking on Blueprint class. So the star is just an actor because we don't really need to control the star or anything silly like that. So let's go over and click on actor. And here we can call it bP star. And we can double-click job in this actor. And here we can now add the stars. So remember just like the bowl, we can add components. So here we can add a static mesh and we can add the star. So I'm just going to call it star. And here in this Static Mesh, it's now searching for a static mesh and you can actually use the star here. You can also find it inside of, I think it was super grid and tutorial and then utility and the meshes. And here is the star. So we can actually use it comes with the super grid pack. And you can also just search for it, just search for star. And you can click on it. And you can see this is actually the star. And as you can see here, it's actually moving. But we don't want to do that with the material. We actually want to move it through code. Click on this magnifying glass, a glass to find it to this utility fav icon material. So clicking on the magnifying glass, it will take you here in the server or in the content browser and server or browser to get you to this content browser and gets you to the material. If you click on the magnifying glass and you can double-click it. And this material node opens. I don't want to make this about the material editor, so don't worry about what's happening right now. But I, what I simply want you to do, to do here is just hold Alt and click here to disconnected this save and that's it, close it. You can see it's not moving anymore. And this is what we want. We actually want to control the movement through code. The next thing we want to add is a particle effect. So clicking on Add and searching for particle system. So clicking on this particle system, and I'm going to call it P star, P for particle effect or particle system. We can also call it a PS. That's up to you. I'm just going to call it P star. And here you can, again choose what kind of particles they want. And there's someone, some articles called P star. You can click on. And you have some star. Actually, I don't know if this is too huge because you can see the articles on inside of here. And I don't know if this star is too huge. So let me actually, the way I can test it is clicking on the blueprints. And here, let me actually drag this blueprint window and attaches to here so it's easier to see. And we can now move this star up. And yet it's very huge So we can actually reduce the size of the star. So clicking on the star, I can reduce the size to 0.50.50.5. And let me drag it out again, though, very huge. So let me reduce it to 0.3. And instead of changing all three, I can click on this lock. So it will change all three at the same time. And this is still a bit too large. Maybe 0.20.2 might be the perfect. Maybe still too large, but actually it's fine. Now. Now I can click on this particle effect. I'm going to, you can see here it's attached to the star. I can attach it to the root. It's attached to a star, so it's actually reduced the size as well as the star. So let's delete this P star. Let's make a new political system just this is the quickest way. Oops. Click on Enter, make a new particle system. This is the quickest way and call it P star again. And here you can find the star. And now it's large and it's looking a lot better. So this is what it looks like right now. We're at a day particle effect. And the last thing we want to add is something called a trigger sphere. So calling searching for sphere. You can see here a sphere collision. And this is, we can use this to tell i'm, I'm going to call it bigger sphere. And we can use this to tell what happens if we, if we collide with this sphere. So this is a collision sphere. So I'm going to click art and resize this to a little bit larger. Or you can click Control Z and you can actually do it here in the sphere radius. You can do it as well. And just adjusting it. So if my ball goes here and roles on the level and actually goes inside of this sphere. It will trigger an event so that we can use this triggers fear or collision sphere to trigger events. So now we have this, we have the star, we have this particle effect, and we have the collision sphere. Now let's click Compile and Save, and let's actually go back and try to place this inside of the Levels. So dragging on the star, placing it, I can drag it up here. And this is fine. And I can actually edit. Let's just make it like this and let's click Play. And you can see here now we have this star and it's a bit too large so it can reduce the size slightly. And you can see if I go inside of it, it's actually blocking, so we have to change the collision of it. So the way we do this is going back to the star, clicking on the mesh. And here down in the collision, we can remove it. The collision presents. So clicking on this Collision Presets and clicking on no collision. So now it has no collision at all. And when we click Play and we actually ups, if we click Play, we can now see here we cannot collide with it anymore. So now we can actually look to this, and this is what we want to do in the next lesson, making it work with the looting. So this is it and let's actually reduce the size of the star. I'm actually going to drag out the particle effects, so it's not reducing in size to do, I'm going to attach it to their roots and just reducing the size of the star to 0.15. And then I'm going to attach the effect to the star and play. And now the story is more reasonable. So now the size is good and we just want to make the looting in the next lesson. And before we do any alluding, let's actually just add some movement to the star because right now it's a bit boring. It's surges to study star that there's no movement I wanted to like over up and down. Just like if I remove this snapping, I want to move like this. And we can actually do this through code. And if you double-click on the star and he go inside of the event graph, I just want to delete these and we can use the begin play. We can do something called timeline. And what a timeline is. If you click on Add Timeline, you can call it something, and I just wanted to call it started movements. What a timeline is, we can actually do smooth movements with it. So for example, if you have the star, in this case, we want to make the star hoover up and down. We can use a timeline. If, for example, you have doors in your game and you want the door to open smoothly. For assemble a double door to open smoothly, you can use a timeline for this. So anything with smooth movements, you can use a timeline. And the timeline you can double-click on. Then you can see here it's an empty graph. And inside of this you can either make a float graph or a track. Here in this case they call it a track or a vector track, an event trach, collar track, and a curved track. So here we want to, let's go back and I will show you how we decide what to make. So the thing we want to do is we want the star here. We want it to change the location. We wanted to move up and down. I'm actually going to hold Control, drag it out. And here I am going to drag out from this star and then write sets relative location. And if you don't know what the function is called, the easiest way for me from the beginning, I just wrote location. And then here you can see all of the functions with the location and you choose the one that makes sense. So here we have the set relative location or a set world location. And what is the difference between these? The set relative location is the location where your star is currently at. And you just change the location depending on this location it's currently in. If you do the set well the rope set world, that location, you are going to set the world location of the star and it will not be here anymore. This will be easier once you get to working with it. It was also confusing for me right from the beginning. And some people have, have problems with it. So let me write location and do the set relative location. So I just want to change the location slightly. In this location It's currently in. So I'm going to connect it with the update. And now I need a new location. And for this location you can see it's a vector variable. It's yellow, it's a vector variable, and it needs three numbers. But what I can do it here in the timeline, if I double-click on it, I can actually create a vector track As I need a vector. And inside of here, you can call it the vector graph something. And here I actually just wanted, want to call it location alpha. Okay? So now if you compile and save and go back to the Event Graph, you can see whatever you call it, it will appear here and it can actually connect it to the new location. So now we're actually going to create this graph. So we can create, this is very easy. You can create three different keys for adding three keys. And here you can choose the length of the timeline. How much should it loop? So I'm going to look at by three seconds. So it's going to go up and down. And this is one loop, this is three seconds. Then I'm going to begin again, up and down and so on. So three seconds. And here you can change the time. So the time, we can set the 0 and the value of 0. And the last point, the time is three, so this is the last point here. And the value is also 0. And I want this to be in the middle, so 1.5. And the value we want to move it in is actually the amount. If I go back here and disconnected, it's the amount we want to move it up here. So if I connect it again, double-click. And here the amount I want to move it in for me, what's worked best for me was 20, but you have to test it out. Maybe you start with five and then you say, this is not too much moving. So I need to move it a lot more. So 20. And to see the whole graph, you can click on these arrows. Okay, so let's just it out and see if it's actually working and see what happens. And now we have a little mistake here, but let's play and I can show you, you can see it's actually moving, but it's not looping. It, it moved slightly, so double-clicking on it, on the timeline, we can click on loop, Use last keyframe. Now it's looping. But you also saw that the movement was actually not moving upwards. It's moving an a, B, a weird way. It's moving to the side. And we don't want that, we only wanted to move upwards. So the way you would do this is disconnected here. And here you can write me convector. So now you have split this vector. Another way you can do it is just right-click and splits struck pin. Now you have this and here you can also right-click and split the Struck pin. So it's up to you. You can do this, this way or you can do make a vector. And here you have to break the lecture. So Greg, a vector. Now this is the same way as before. And here what you can do is actually connected the z value with the z value. And this should work. It should only move upwards, which is the z value or the z-axis. Compile and click on play. And you can see here it's now, now moving up and down by full screen so we can see it better on your screen. And now it's moving up and down. So now this is working and the only thing we need to do now is actually make it loadable. So let's go over to the next lesson and learn how to make it suitable.
26. Making the Star Lootable: Let us now make the star loadable. So in order to do this, we have, remember created this triggers fear or collision sphere. And we want, when the ball hits this sphere, we want to do something so we can generate an event from this collision sphere. And what we can do is we can go down to the bottom. And here you can see events. And you can see there is something called a one-component begin overlap. Clicking on this plus will create an event inside of the event graph. So now what will happen if we overlap? This triggers fear and that we called Oracle lesion sphere. Now what I want to happen is just simply lute this star. So actually we can say something like Destroy Actor. So you can see here if I now compile and click Play and I go and overlap with the star, it will destroy the actor. So it's like faking the looting. This is how we do it in programming. We just destroy the actor. So let me go back inside of the star blueprint. And when I want to do here is we want to give the player one star for losing this. So we actually need to create a variable that will store the amount of stars that we have. And the way we do this is let's go over and open the game mode. Because remember inside of the game mode we can add variables or just things that will control the rules of the game, or how much score you have, or how much points you have and so on. So inside of the game mode, let's only just create here a variable and call it star, stars. And let's change it into an integer because this is a numeric value and we don't need decimals, so we don't need to change it into a float. Just an integer will be sufficient for this. The next thing is inside of the game mode, I want to create a custom event so we can add the star every time we alluded here. So what I want to do is just delete these normal events. And here we can actually write custom. So now we can create our custom events. So add custom event and give it a name. And let me just call it add star. Okay, we can do it like this. Or we can actually instead of doing a custom event just like this, we can actually do it through the Blueprint Interface, and this is a lot better for communicating between blueprints. So let me delete it and let me go back here inside of interfaces. Remember we created int BP ball earlier. I want you to create an interface for the Game Mode because I want to create a, an event inside of here. So right-clicking inside of blueprints, clicking on Blueprint Interface, I'm going to call it int Game Mode. Opening this interface, we can now make a function, and now I'm going to make one called add star. So we want to add a star every time we hit this overlap. And with this add star, what you need to know about interfaces is if you have a function without any return nodes, it is going to be an event. But if you, if you click on this output and you add a variable, just like we did here with our bp ball. If I go back, if you haven't returned node like this, if you have something in the output, this is going to be a function. If you don't have an output, just like here, if you don't add anything here, this will be an event. So this is very, very important to understand that you cannot have an event if you have an output here. So now this is an event called that star. And you can also add inputs to this event. That's all good, but you cannot have an output. So inside of the game mode, remember we have to add the Blueprint Interface before we can use it. So writing in a mode and we add it, we can compile and save. And you can see this is now yellow because this is an event. If it was not an event, it will be, if I go back to the ball here, be blue. If it's not event and it's a function. But if it's an event, it will be yellow here, here, and I can't double-click it and access it because it's an event. So let's right-click here and write at star. Here it says event at star. We can run this. Now we have this Blueprint Interface function, our event. And you can see here this is from the Blueprint Interface. This is what the icon means. And what we simply want to do with this is just drag out the star integer. So hold Control, drag it out, or you can drag it out and click on Get. Thus the same thing. And here you can say plus, plus and click on it. Here is, it says add 1 to the specified value, then set it. So we're adding one to this star. Another method you could have done it for it is just clicking on plus, clicking on add. And here you're going to add one. For example, every time we'll look, we're going to add one star. And then you are going to drag it out, click on Set, and drag it up here, and then connect everything. So this is the same method as plus plus. However, the, the plus plus is a lot shorter to write, so I like to write it. And remember this is, this can only add one. So if you need to add. A value of two or more, you cannot use this. So right now we're only want to add one star, so I'm going to delete it. This is fine for us. So now we are going to add one star. And what, this is, what we want to do here every time we overlap with the star, we want to add one to this stars integer variable. So we are going to increase it by one and it's going to store the amount of stars we have loaded. So what we want to do is remember, we need communication between these two blueprints. I actually in the star, I need to use the information that is inside of this game mode. So what I can do is writing gets a mode. And now this is the general game mode. Remember this is the parent class of this game mode. It's game mode. And now I want to just, just like writing costs to our Custom Game Mode. Instead of casting, I want to use the Blueprint Interface. So inside of the interface of the game mode, I'm going to add a new function and I'm going to call it get's Game Mode ref. So get the Game Mode reference. And this is going to be a function, so I'm going to add an output. And the output is the, The Game Mode you're trying to refer to. And this is the g m speed ball. So running the GM speed ball in my variable type and clicking on object reference. Now I can call it game mode. Compile and Save. And inside of the game mode speed ball, you now have this function you can double-click. And now it's asking what is this game mode variable? And here I can see it is self. So it's actually this self, meaning this blueprint class you are currently and this is the Gemara want to use. Now this is very easy here. We can now say get the game mode. And now it's going to say what game mode you want to get. I want to get the debt. Game Mode ref, the one I just the function I just created in the Blueprint Interface. And now it knows I'm referring to this game mode because here we wrote self. So from here, let me connect it to here. And inside of here, we want to use this at star event. So we are going to call this event. And here, the way you call events is just writing the name of the event. So writing add star. And here you can choose this message. Remember this is a Blueprint Interface Event we made. So we have to click on Message, the one called message, not this one or this one. So now it's going to call this event. So every time we overlap with this star, Let's say we have a lot of stars in our level. Every time we overlap with the star, we're going to the game mode. And we are running this event. And this event will give us one star to this variable. So it will increase this variable by one every time we hope overlap the star. So we get a star every time we overlap it. And we can now add the Destroy Actor. And let's actually print this to the screen so you can actually see what's happening. I'm going to write rents, print string, and I am going to print this value. So you can see it's actually increasing every time we hit the star. So save everything and remember to compile and save everything. Let's minimize it and let me click on the star, hold Alt and drag so I can copy it a few times. And so you can see I'm actually loading the star. So clicking on Play. Now, I'm going into one. You can see it says one to the top left if I make the screen bigger. So the top left you can see now 23456. So now we're actually loading the stars and it's adding one to the stars variable every time we start. This is, this was a quick way to do it. And what I want to do actually in the next video is instead of just making it disappear like this, Let's make an animation so the star will fly up and spin and then disappear.
27. Adding Star Loot Animation: Let's now create the animation for when you load the star. So when you look at this star, I want to start to move upwards and it's also going to rotate at the same time. So let's go ahead and double-click on the bP star that we made. And inside of here I want to make another event. Now we can go ahead and make a Blueprint Interface and through that interface for the Star, make an event. But I actually just want to make a customer normal custom event because this is the only thing I'm going to make. So I don't want to make a whole interface just for this. So let's call this customer event star alluded. And here we are going to make all of the animation. So right now we haven't called this animation. So let's go ahead here and say, what did we call it star alluded to here we can say star alluded. And now we call the event. Remember you have to call the event for it to work elsewhere. Game doesn't really know when to execute this code. If you haven't told it anywhere in your code, one to execute this event. So when you overlap with the star, we are going to lute this star. So we're going to add the star that we added here in the game mode. And we are going to run this star alluded event. So now let's build the code inside of here. So what I wanted to do is add a timeline. So we'll write a timeline. And this one we can call dark mood movements. So just like what we have here, the star is moving up and down. Now we want to start to fly upwards when we alluded. So when we hit the star and we're going to play this timeline. And inside of here, what we want to do is we want to change the location of this blueprint. So when we have the stallion that level, we want, we want to change the location of this bP star. So to do this, we can just say, right-click and say yet actor location. And if you don't know what it's called, the dusky just right location. And you will find it. And it says you can scroll up and down to find it if you want to. And this reading through and here you can see get actor location. So now you are getting the, This actors location right now. And what we want to do is we want to set the location, so said actor, relative location. So this is what you're going to use. And so now the target for this is just self. We don't need to add a target because the thing we want to change their location on is actually this BP stars. So this, this is what self means. This is, this means is that the target is this blueprint. So this is correct. So what we want to do is change the actress location. So change this blueprint, blueprints location. So what is the location? Let's, let's make a vector here. So now we want to change the z value, just like what we did up here. We changed the z value to go up and down here we want to change the z value so the star flies upwards. So let's double-click on this star loot movement. And inside of this timeline, we want to create a vector drag. And inside of those Vector Track, let's call it location alpha. And here let's create, let's go to 2, so two keys, adding two keys. And let's make the length of this may be 1 second. We can always try it out and see if it's too much. And clicking on the last keyframe. Now let's hover and select these three points. And by the way, I say three points because they are three points if you move on and you can see here these are actually three points because this is a vector x, y, and z. So clicking Control Z, selecting these three points, and then I'm going to write 0 at this time and the voltage 0 and at time 1, which is the last keyframe here, is going to be, Let's move it up by two. Leaking on these fit horizontal and vertical so we can see all of the graph wicking on compile. And now I think this is fine. So let's, let's go ahead and go back here. And inside of here, Let's drag out from this and we can write break vector. Now. Now we have broken the vector and we can now do some input here, the disease. So let's connect the z. And this is what we want to control. We want to control the Z input because we want to make the star of fly upwards when we alluded. So this is what we're trying to do. And now it's not going to work Legos and I will show you why. So if we tried to compile, save, and before I click Play, Let's remove this Destroy Actor because it's going to destroy the actor once we go into it. We don't want that right now. We just want to go into it and then. It's going to play this animation. So let me compile and click Play and see what happens. So now it's disappearing. And actually the code is working. It's not because it's not working. You can see here, if you look closely, the, the particle effect is actually still playing. So if I remove those, the particle effects still playing. But the problem is we're not setting the location correctly. So it's actually, the code is working, but we're not sitting correctly. And this is because right now we're setting the x and y to 0. This is not true because we don't want to set these values to 0. This is why we have to write this. From the beginning. We wrote get actor location. And what is the actor? And the actor is self. This is the bP star. We want to get the, the location of the star which were it is currently at. And let's right-click and split disrupt pin. And we want to connect the current location of the x two here and the current location of the wire to here. So now we're getting the current location of the star, the x and y, and we're plugging it in. And we only want to change the Z value. The Z value. We also want, we want the current Z value. And then we just want to change it depending on where the z value is currently at. So here I'm just going to write plus to add weight to move this a bit further away. And I'm going to connect the z value and then connect it to this final Z value. So we're taking the original z value where it's currently at right now. And we're adding this to that is currently inside of the the timeline. This is what we're looking at right now. And let's go ahead compile, save everything, and click Play and see what happens. So now if I go inside of the star, it is going to fly upwards. So this is what happens and this is actually what we want. Okay, now it's looking, it's looking cool, looking grades. And what do we want to do right now? We're actually also wanted to rotate. So let's go ahead and do that. Let's write set actor relative rotation here. So now we're going to set the rotation as well. Now instead of getting the actual location, we can also write gets after rotation. Now we have this rotation. And with this rotation we only want to spin. If we go back inside of the viewport, we want to spin along the z-axis. So we can see here, we want to spin this way. So we want to spin along the z-axis. And let's go back to a VP star. So let's split the Struck Pentagon. And let's split this one as well. And we only want to spin the z axis, so the x and y rotation will be the same as the current law as the current actor rotation. But we only want to affect the rotation of the z-axis. So the way we do this is also with the timeline. We want to rotate it. So double-click on the timeline. And inside of this timeline we actually have to make a new graph. So this new graph we are going to make, Let's make it a float. And this flawed, we are going to call rotation alpha. And here let's add four keys, but adding 1234, so on. Now we have four keys. So the first key I want to be a 000, so at time 0 and value 0. And the last one I want to be, I actually tested this before so I know what the values will be. But if you like from the beginning, when you try to make this, you just try out values for example, here you are right at time 1. Maybe you want to spin to be 360. So now it's turning one way. It's turning 360 degrees. And I have set some values here. Let me check what they are. So at, at time 0, 25, I have the value to 180. So it's going, let me fit this viewport. So at, at time 0.25, it will turn 180, so halfway. And then it at 2.5th, it will turn 360. So now turned one, onetime. And here at, let me see here, Let me add one more, one more 0, 75 is going to turn again. And you can actually a cool way to do it if you want to turn it 180, again, just write plus 180 and it's going to calculate it for you. So at one, I'm going to say plus 360, just like this. And we can fit the graph just like this and Compile and Save. Now it's going to rotate like this. Let's go back. And this is the rotation alpha. We can now connect it to the rotation here. And let's click Play and see what happens. So if I go inside of the star, it's going to rotate upwards and this is what we want. So this is pretty cool. Now it's working. And now we want to destroy the actor when it's up here, so it's not visible anymore. And the way we do it, Let's take this Destroy Actor and let's use it here. When the timeline is finished, we are going to destroy the actor. Let's go ahead and clean up a little bit because it's getting a bit messy. So maybe put that, put that down here. And this one, we can maybe just drag down to put it beneath everything so it's not messing up the structure. Something like this. Now. It's looking a lot better and a bit less messy. So something like this. And when it's finished, it's going to destroy the actor. Now another problem we have is the particle effect is still appearing and we want to disable it when we looked. So here, let's actually take out this P star. This is the particle effect that we added earlier. And with this particle effect, we want to affect the visibility. And clicking on this particle effect. And going down here, you can see we have something called visible. And if we disable the visibility, the particle effect will be gone. If we enable it, the particle effect will be here. So we actually want to make it invisible. So checking this out and writing visible. And you can see here we have something called set visibility. Clicking on this. And let's connect it. And the new visibility is unchecked, and this means it will not be visible. If we had this ticked, it would mean that the star visibilities should be enabled, but we will disable the visibility and it would that the article effect will be gone. So clicking on compile, clicking on play and we can test it out. It's going to spin and it's going to disappear. Once we've alluded at the star.
28. Creating the Star UI: Now we're ready to create some user interface and to display that how many stars the player has loaded. So right now when we click Play and we move around, you can see that it displays to the top-left how many stars we have learned. But this is just a print string function and this print stream, the player will not able to see when your friends or family playing it. This is just temporary for development. And so we need to create actual user interface or an actual UI to display how many stars declare has loaded. So here inside of the UI folder, I'm going to right-click and clicking inside of the user interface, looking on Widget Blueprint. And I'm going to call it WB for Widget Blueprint as a prefix. And then I'm going to call it main because it is, this is the main UI that we have. Let's save everything. I'm going to double-click on this Widget Blueprint. And you can see we are inside of a, a graph or a designer. And here to the left we have different things. We can add, for example, a button or an image, or a slider, or some tags. So there are some elements that we can add to this UI. And down here you can see all of the elements that you have added to the UI. Currently it's empty because we don't have anything. And up to the right you can see we have a designer which we are currently in. Here. We designed the UI. And to the right there is something called graph. And inside of here, this looks just like the blueprints, glasses or Level Blueprint that we have been working on. And inside of the graph, you can actually code functionality to the buttons you design inside of here. Right now we don't have any buttons, so we can't do anything. And before you design UI, you just have to think about what are you trying to achieve the right now, we only want the star, so we need a star icon. And beside the star icon we need to display how many stars the player has loaded. So we already inside of the UI icons, we already imported this icon star. And if you haven't already done it, I've uploaded on the website. So you can upload this icon star. And we need this icon inside of here and some texts beside it. So to do this, the icon is just an image. So we need, we can drag this image either on top of this designer and drop it. You can see it adds a tear to the canvas panel. And if I deleted again, clicking the delete button, I can actually also drag it down on top of this canvas panel and it will add it automatically. Usually I work like this, so I added inside of here. Now we have this image. And you can see when you click this image, we have a lot of properties to the right, we have something called an anchor. So these anchor points define where the image that we have clicked on right now, where it is inside of the designer. So for example, if it is an image that should be centered on the screen, I should click this. And this one is not too important right now. I will explain it later in detail in another course. But here you can position, you can position the, the image, or you can simply click and drag. Also, that works. You can see the position is changing, can also change the size of the image. Here. You can change the alignment of the image. The thing we need to click is brush. So instead of brush, if you click the arrow, this is the appearance. Here. You can actually choose what image you want. So actually we want the star icon. So you can either click and drag here and drop it on top of it. Or you could have just click on here and search for star and you would have found it. We're doing it in these two ways. Okay, so now we can adjust the size of it. And you can see here, when I adjust this size, this image size, nothing happens. And this is because right now we just drag the image on top of this canvas. And we can actually change the size of this up here and not down here. So this image size can only be changed down here if it is inside of other elements. And I'll show you what I mean. So basically we also need to put it inside of something and I will show you what I mean here. So let's delete this. And there is something called a horizontal box and a vertical box. A horizontal box, I can show you what it is. It says allow switches to be laid out in a flow horizontally. And this is what we need because we need a star icon and we need some texts beside it. So we need a horizontal box here. So clicking and dropping this horizontal box here, you can see now we have a horizontal box. This is just an empty container, but when we drop items inside of this horizontal box, it will lay out the elements horizontally everytime we drop something. And let me show you. If you now drag the image, we have to drag it on top of the horizontal box, not the canvas bundle. So on top of the horizontal box dropping it, you can see now it's inside of the horizontal box. And if we put some texts because we want to display how many stars you have looted, dropping it on top of the horizontal box. You can see they are now horizontally beside each other. So if you keep dropping items on top of the horizontal, horizontal box, you can see that there are added horizontally. Now this is what a horizontal box is. Fine, make it larger just like this. So let's delete all of this text. We only need one. And when do we need to do here is we need to add the star. So clicking on this image here, going to the brush appearance. And again, let's find the star. Click on the Start to add it. So now we have the star. Now you can see we don't have a size up here that we can change. And this is because this image is now inside of this horizontal box. You can only change the size up here if it's the parent, the parent element. So if you have children inside of it, all of these children don't have a size up here. Can only change the size for the parents. Okay? So for the children, you now can change the size down here. So now this is working. For example, if I want the stars to be 5050, something like that. And you can see I changed the size but nothing happened. And one is working, but this one is not working. So well. Let me change the 1550. And this is because we have something called horizontal alignment and vertical alignment. And you can see here, it's trying to stretch out. It's trying to fill this image horizontally and vertically. And we don't want that, we just want, Let's put it inside of the middle. So clicking on this and clicking on this. Now it's in the middle of this box and this text. Let's do the same. We don't want to fill. Let's put it in the middle, in the center. And for this text we can write. It doesn't matter right now because this will change dynamically depending on how many stars you have loaded. So let's write 23 just for now so we can visualize what it actually looks like. Okay? So this is looking like right now. This is the image and this is looking good. But what I want to do here actually is I want this star 2 or I want this text to be a bit further away from the star. And you can see here you can also click something called fill. So in the image here, if you click on the image and let's actually rename it so it's better to look at. So clicking on F2 and let me call it IMG for image. And let me call it star. And here F2 TXT for text. And I'm going to say star, star, that's fine. Compile and Save. Now if you've liked this image star, you can click on something called year in the size, something called fill. And this means it's actually going to fill. You can see here if I double-click on the horizontal box, now if I drag it around, you can see, even though I'm making it larger heel here horizontally, it's not moving. And I like to have my UI dynamic Lee moving. For example, if you see if I drag it down, it's moving correctly. So depending on how how big this is, but it's not working this way. And I like my UI to be fully dynamically or a fully dynamic. And to do this, clicking on the star, you can click on the button called Fill. So now it's filling. And you have to do the same here with the, with the text. So clicking on fill and you can see it's actually filling. So now these are taking, the star is taking half of the space of the horizontal bugs, and this text is taking the other half. So they are trying to fill depending on how much space there is. So now you can actually just move it closer. Maybe something like this. I would just like this. And if you want to visualize the UI would without all of these dashed lines, you can click on this button up here. So now you can see the UI without all of these dashed lines. And I think this is looking fine. Maybe we need to reduce the size here to 45. 45. And this is looking good. So now we have this text. We have, we can set the font we want to use. We can set the color of it so it can change color if you want. And let's just, I don't know, let's change it to something just for fun. Or maybe something orangey as well. So something like this. And now this is the top of the UI. So imagine this as your screen. And you can now drag this over here on top of the screen. So up to the top left here. So something like this. And let's save, and this is fine for me. Now, we have designed this star and this will look fine. What do we have to make this number dynamically? It has to update depending on how many stars you have loaded. So clicking on this, there is something called here in the text, something called bind. And this bind, you can create a binding and you can update it to dynamically depending on how many stars you have loaded. Now clicking on this, 23, here in the text, you have something called bind, clicking on it, create bind. And here you can see we are now inside of the graph instead of the designer. And it actually created a function here, wanting to click bind. It created a function for us. And let's change the name of the function because it's looking weird right now. Let's click F2 and say Get star amounts. So this is what it will get for us. So Compile and Save. So now I have to code something inside of this and this is very easy. Remember, we coded this. Let me go back to the game mode. Inside of the game mode, we made this starts variable, which actually stores how many stars we have and we need to access this variable. So now again, we need to do some Blueprint communication because we need something from the game mode and the game mode. We already created the ghetto Gamow dress. Remember in the user interface we created this. So now we can get the reference for this game mode. And again, the way to do it is looking at the parent class. So we're adding get Game Mode. And now it's going to ask what game or do you want to, to ask for? And I want my get Game Mode breath because I made this in my user interface. So writing good game mode ref, and it's a message because it's a user interface function. And now when I connected, now I can access everything inside of my game mode. I want to access the stars variable. So dragging out here and writing star, and you can see here get stars, we can now get this variable. And now this variable, we can now plug into this text. And it's going to say, you are trying to plug in an integer variable inside a text variable, I am going to convert the integer to a text before I can do this. And this is what it's doing. It's saying to text, and this is the return value. So it's making your number to a text and then connecting it. Now let's connect the last thing here. So now it's actually going to work. It's going to update automatically. This is very easy. Well, let's save. And this is the only thing we had to do with the UI. We just wanted a very simple UI that will display how many stars we have. And it now displays automatically or dynamically. If you go to the graph, you now have this function. Just don't be confused. If you are in the Event Graph and you see it's empty. It's because you have made it inside of your function. So get started amount if you double-click it and open it, you have your code inside of here. So let's move on to the next lesson.
29. Displaying the Star UI: Now we have created the UI for the star, so it dual display how many stars the player has alluded. But we have to add it to the viewport. So right now we don't, we can't see the UI that we just created in the last lesson. So let's go ahead and display it for the player, and this is very easy. So let's go over to the blueprints. And I like to do my UI inside of the player controller. Some people like to do it through the game mode, and it depends on what kind of programmer you are, what you want to do and what what you're used to do. So I like to do it through the plaque control. I think it's easiest. So here, right-clicking and doing the begin play event. And I want to display the UI as soon as the planet or as the game begins playing. So here in the begin play event, I want to drag out and do something called creates widgets. And you can see here we have something called create widget. If you click on it. Now you can select what widget you want to create. And here I want to select my w, The main, this is the UI that we created and the Owning Player is the player that owns the widget. And this means we have to make a reference to get flare controller. And the good thing about this is that you had to do it like this if you are in the game mode. But right now we are coding it inside of the player controller. So this way we don't actually need a black controller because we are already inside of the plebs controller. So this is why I like to do it and doing it in here. So I don't have to write this down here. Okay, so now we have created this UI. But before we can see it, we also have to display it. So these are two separate things. You have created the UI and then you write Add to Viewport, adding it to the screen. So you're creating the UI and then you're adding it to the screen. So this is very simple. This what, this was all we had to do. So clicking on play and see, now counting up and it is working. This is very cool. Let's remove the print string. I can see it's counting two times because we also have a print string. And let me see, or it was actually it wasn't a game mode, I believe. So. Inside of the game mode, we have this print string less now deleted. We are now displaying it. And we also have something seeing hello every time we, every time we started the game and I think it's in the bowl. I don't remember where we made that print string. Okay, so now I can't find it by the quickest way. If you have a lot of code, maybe you have to find something like this in a larger game. That way you can do it is clicking undefined. And then you write print string because this is what it's doing. It's saying hello every time we start the game. So print string, I'm searching footprint string, but right now it's only searching inside of this blueprint. So you have to click over here on this button. And now it will display all of the places. It says print string. And you have to look at the titles. And it's here. This is our, our blueprint that we made the inside of the map, maps people. Now this is actually the level blueprints, so double-clicking on it, you can see we have here, this is what we made before in the earlier lesson. Let's delete this and I'll also want to do this. And I also want to delete all of these actually because we're not using them. Just like that, compiling, saving everything. And it is now working as it's supposed to, and it's counting.
30. Actor Has Tag: Before we continue, I want to show you a node called actor has tagged. And let's go ahead and inside of the bP star, well, double-clicking on it. And here we have the logic for when we overlap with the triggers fear or with the collision sphere. Let me actually move this down a little bit. When we, when we collide with this collision sphere that we have over here, we are doing some stuff. So now whatever you had MPC's or enemy's, enemy AI inside of your game and they collide with this sphere. This will actually trigger the code. And you don't want that. You only want the player to trigger this code. You don't want your AI to. Two. By mistake, stepping inside of the star and the star will actually get looted even though it's not you loading it. And to prevent this, we can use something called the actor has tag. So let's move this to the side a little bit. And this is the actor. The other actor is the actor that is overlapping this star. So now what we can drag out of here, Android actor has tag. And we can use this function. And now you can write at what sagen does the player have. So this we can actually edit if we go inside of BP ball. So double-clicking on this blueprint class. This is the ball that we made inside of here. You can actually, in the class defaults, you can search for tags. And you can actually assign tags to this actor TO clicking on this plus button, we can add a tag to this BP ball. And I want to add a tag called player. So compelling and saving. So now inside of bP star here you can write a player inside of this tag. So now you're saying if the tag is player of the actor has the tag player, then you can interact. So dragging out of here and clicking B to make a branch. Because now this is, this is asking if something is true or not. So this is a Boolean. Remember if we create a variable and the Boolean is red, so this is a Boolean. And what a Boolean was, is it a value which is either true or false? So if you're dragged out of this Boolean and write B, you have something called a branch. And the branch is just a condition. It is calculating, are seeing if this condition is true or not. So I'm going to connect it. And now you're asking, check this, check this other actor that just overlapped and the star, for example, if the embassy or if it's the Blair. And check if the actor has the tech player and we just added the tag player to our bp ball. So now, now it's saying, is this true? Does this tag, or does this actor has the tech player? This is what the branch does. It says, if it's true and go ahead and run the code. If it's false, then don't do anything. So we don't have to connect anything here. So with the MPC, MPC now walks inside of the star. Nothing will happen because the MPC does not have a the, the tag player on it. And right now we don't have any embassies or enemies, as this is just in theory. But if you have a game with AI, they cannot overlap the star now unloaded, you can only do it because you have the tag player on your feed people. So now we're making sure that only the player can lead to the star.
31. Creating Checkpoints: Now we're ready to create some checkpoints. And after creating the check points, we can then create the portals which will lead us to the next levels. But first we have to check to produce some checkpoints that we will jump from the different levels. So let's go ahead and work on the checkpoints. Firstly, we want the Gamow to control the checkpoints because this makes the most sense. It's controls the rules of the game. So let's create some variables for the checkpoints. Now firstly, you have, before you make a variable, you have to think about what are checkpoints. And it's just locations in the map and locations. Remember, the location is the vector we used before. Just like if you set an actor location, you will have to use a vector. And in this case, we can also make a vector variable. So let's go ahead and make a variable, and let's call it current checkpoints. Now this is the current checkpoint. But we also saw, let's make it into a vector. But we also have to make another variable, and this variable will contain all of the checkpoints that we have. So we have two different variables, one for the current checkpoint that we are at currently, and one that contains all of our checkpoints in the game. So let's create another variable, and let's call this one checkpoints. Oh, this one contains all of the checkpoints. And for this one, I'm actually going to use a map. So here, so far we have created normal, normal variables. So just creating the variable. But here to the right, you can click on this small button and you can actually change this normal variable to something else. And in this case we are going to use a map and I will explain to you what a map is. So if you click on the map, so a map is two different variables in one variable. So we have 22 variables. So here let's start by changing it to a string variable. So a string remember, is just a text. And the other one, we want to change to a vector. Okay, so what is a variable? So let me drag it out and show you, for example, I can drag it out here. This is what it looks like, and this is what a normal vector looks like. So now what we have a map, and you can see the icon becomes like this when it's a map. And the pin becomes like this if it's a normal variable. So if I click Compile and Save, you can see here we can add a default value. So if I click on the plus, you don't have to follow along right now I just want to show you. So if you click on the plus button, and here we have the string variable, and here beside it we have the vector variable. So for example, if I write first checkpoint and it's the first checkpoint and output plus again, I can add something else, and I can add something else here and so on. So this is very cool because you can use this information. So for example, I want to get information from the first checkpoint. And when I do that, it will give me this information, the vector. So let's go ahead and work with it. So it's just like a map. You want, you want to access this information, which is this string. You're telling the retelling the game. Go ahead and move to the string called first checkpoint. And then it knows the first checkpoint actually as this location and the second checkpoint has this location and so on. So we will try to create checkpoints like this. And I think you'll understand it better if we start working with it. So let me delete all of these and have nothing because we want to add them later. So let me delete it. And I want to work with my checkpoints. I want to create them inside of the Level Blueprint. So going inside of the blueprints and opening the Level Blueprint. So inside of here I actually want to make my checkpoints. And the reason I want to make them inside of here is because now I can place these player starts. So let me place one here and let me hold Alt and drag to copy it. So now this is the second one. And again, let me hold Alt and drag it to copy. And let me place the third one inside of here. So if I click the World Outliner, I now have up. Let's start 123 and let me rename them. Are going to call it PS4. Player starts again, 0, 1, and the second 102, and the third one 003. Now now I have three player starts. So these three player starts what I can do now inside of the Level Blueprints. You can actually, if I make it a bit smaller, I can actually click on one of the player starts and right-click in here and create a reference to this player starts. You can't do that inside of blueprints classes, you can only do this inside of a Level Blueprint. So clicking on the second one, I am creating a reference here. And the third and creating a reference. Now we have a reference to all of these player starts. What do we want to do is we want to get the location of these player stats. So dragging out and writing gets actor location. Because we want to set the check point to this location. They are ads currently. So I'm going to copy this and connected a few times. Okay, now we have gotten the actual location and we can now do something with dislocation. So right now I want to access the variable here that I made called checkpoint inside of game mode. So let's go ahead and say git Game Mode and get the game MoGraph, which is the Blueprint Interface function we made. And here as the game mode, we want to get the variable called checkpoint. So just getting it. And then we have other functions. So inside of, if you move down the utilities and inside of map, you can see this variable has a lot of functions that we can use. We can add stuff to it. We can clear the whole variable so we make it empty. And we can find items inside of it. We can ask if it's empty or not, and we can do that something with that information. So we have a lot of functions we can actually use. So let's click on Add because we want to add some information to it. So here we are adding, let's connect it. So now we need to add some information. And the information we need to add is actually this, this, these checkpoints that we have burden because we want to add all of the checkpoints inside of this variable. So here in the text, you choose what you want to write here. So for example, I call it first checkpoint. And it's asking what is the location you want to add. The location is actually this player starts. We've got the location of this layer starts, so it knows it's actually here now. And this we want to connect to this variable. So now we have added the location of this, and we can always find this location by using the first checkpoint string. So this is a map. This is how I use it. We have a string and we can find the location for it. So let's do it a few more times. Let's try add. And here we can connect it. We can call it second checkpoint. And we can connect the second checkpoint. And let's add the third checkpoint. And we can connect that one. So now we have added all of these three checkpoints. And now this, this map variable, just like you saw before here. When we added stuff, now we have a first checkpoint, a second, third, and it knows the, the vector or the location of these checkpoints because we added the actual location to it. And now what do we use them inside of our game? We can actually call it by saying, I want to, I want to make the ball go to the first set point, then it knows what location you have added. So this is how it works. And let's compile and save. And here we want to the ball at the first location. So here I had begun play. We actually have something called a sequence node. So dragging out and writing sequence. And sequence is just used to clean up the code. So it's a flow function, it's called a flow function. And it's used to clean the code. So we don't have to write all of our code in one line and it gets big and messy. Then a good thing to do it is like dividing it up into several pieces. So for example, here, for this game mode, I actually want to make a variable. So let's, let me click on x and, and just drag it out here. Let me connect it here. And what I can do with this game mode here, instead of just calling this every time, I can right-click and say promotes a variable. And I can call it game mode. So now we have this variable of the game mode that we have. And instead of calling it All of it all the time, I can now actually just drag out this game mode variable looking on gets. And now I can just connect it directly to checkpoint. So now when we get this game mode variable and we write, for example, we want to get this current checkpoint. We can see current checkpoints get the green check point. So this is a lot more cleaner. Instead of calling this all the time. So if you have to use the Game Mode multiple times inside of your blueprint, go ahead and make a variable of it. If you only are going to as a onetime, you don't really need to make a variable. So now we made a variable of it, and let's connect it here. So this sequence node is saying, firstly, it will go ahead and execute this pin. So it will go ahead and create this variable. And then it's going to execute this code. And if we add something third, it's then going to do this. So it's a way to break up the code and make it look more clean. Well, let, let us put this up here. And let's drag this over. I'm going to, I'm going to go over all of these, select all of these and press on Q. This will straight. Now, the line here, we're going to drag those up, double-click them. So you create a reroute node. And I'm going to disconnect it by holding Alt and clicking. And I'm going to drag from this and connecting it, double-click to make a reroute node and selecting all of them pressing Q. So now it's looking a lot more clean and we understand what is actually written here. So the last thing I want to do is spawning the ball at the first checkpoint. So now we can drag from here. And now we can say we need the ball reference. I don't think we have a ball reference here. Yeah. So here we can say it gets lighter upon because remember, our bowl is of class porn that we made. And here we can say gets porn or get ball Earth, because we already made. If you don't remember, the ball is earned classes pawn. And we already made a interface function called get ball rife. They'll get the ball ref. Now we can access anything inside of this EP ball. And the other thing we want to access is this ball mesh. Writing gets all. And we can use this variable called ball. And we want to set the world location. So we want to set the location of the ball to the first checkpoint. And now we need to use this location. So the way we do this is we get the game mode. We get our checkpoint variable. And remember we assign the first checkpoint dot up here. So we actually have this information now. So now we can use inside of utilities, you can see something called Find. And now we can use the find function and we can find the burst check points. So now it will get the location. This is the vector, this is the location of the first checkpoint. Now, this is correct and we need to connect. It goes like this. So now we have, we are defining the game mode. We are assigning the checkpoints. And here in the third one we are responding the ball at the first checkpoint. Let's compile and save. The last thing we want to do before we end this is we actually want to define what is the current checkpoint. And the current checkpoint right now is just the first checkpoint. So we can go ahead here and write. We can get the game mode, but the easiest way to do it is just getting this first player starts. And then we can say, and just add it here and say, now I forgot what I wanted to do. Yeah, I wanted to assign the current checkpoint. Sorry. And let's go here and get this current checkpoint. We already have the game mode. So let's drag out the game mode. And let's drag out and say current checkpoint. And we want to set the current checkpoints. So clicking on set, and we want to set it to this current actual location for the first bond player starts that we have in the map. So connecting it and this will be assigned as well. So this one is, we are going to use it a bit later. It doesn't make sense right now to assign it, but we have assigned it now and we are actually going to use it later, so it makes sense for you. So this was it for the checkpoints and let's go ahead and create the portals.
32. Creating the Portal: Now that we have created the checkpoints, we can go ahead and create the potholes and then add the checkpoints to it. So let's go ahead and create the portals which will teleport us to the next level. And here we can right-click and choose Blueprint Class and click on actor. And you can create one called BB portal. And double-click on this BP portal. And inside of here, you can click on Add for the components. Let's add a cylinder. But once you actually can add this directly is this ring. So if I go back to super grid starter pack horses meshes, here we have something called the super grid Hering. So let's use that as the portal. Well, let me go back to the blueprints, open my portal. I can search for. Let's add a static mesh. For adding a static mesh. And let's call it portal. And here we can search for the sukha group. Thing is called ring, yeah, super grid resentful, this one. So now we have this portal here. For this module, I want to add some sorts of a bottle looking thing in the middle. So here I'm going to add a plane. So using this plane, and I'm going to call it, and we can just call it plane. It doesn't matter right now actually. And let me click the art tool, rotate it like this, and let us scale it up like this, so it covers and let me move it back a bit here. And let me go back to the super grids tutorial level material instances. And we can use a material from here. So if I open back my bottle, I can actually drag a material instance on top of this. So you can see, can actually make a portal looking thing here. This is looking pretty cool. Now I also want to make this black instead of blue. Now if I click on the magnifying glass for this material, going to take me to this material, I can drag this black one on top. Oops, not here, on top of here. And now we have this dark bottle can compile and save. The last thing we want to add is actually a collision box because we want to interact with this portal. So clicking on Add and searching for collision. And you can see one called collision box. So trig clicking on it and I'm going to call it trigger bucks. So this box, we can actually move here. And you can trace the size of it here. Just to cover the whole portal like this and the size of it. And make it smaller. Something like this. I can drag it back and forth to see how it is. I think this is looking fine. So it now It's covers the whole portal. And let's click Save and compile. We can do now with the spots or lose. Actually go ahead and place it in the level. So I'm going to enable my grid snapping. And I'm going to blueprints sort of my Blueprints folder and dragging this parcel and placing it here. We're going to move it up just like this, so it's barely touching the ground like this. And now I can use this as the portal. I'm going to move it back, reduce the snapping to 10. Just like this. Now we have a particle and let me actually do it over here. So let me increase the camera speed. And it's over here. And this is the last portal we hit. I can move it in the middle, above the ground and here on the top. Just like this. So now we have two portals. So let's, let's go ahead and go back to the BP Portal. And now we want to do something with this trigger bucks. So clicking on this trigger bucks and going back to the bottom, we can click on the UN begin overlap. So what happens when you overlap this Trigger box? First, just like before, in the other actor. We can write actor has tag to make sure that it is the player which is triggering this event. So remember we used, we wrote the tech player in that inside of our rbp bowl and the previous lesson. And here we can make a branch, so writing branch. So now it's going to say, does the player has the actor or does the actor has the tag player? If that is true, then go ahead and do something. If it's not true, then don't do anything. So here what we want to do, we actually want to set the location of our ball because we want to teleported to the next level. So we need a reference to the bowl. So here we can say it's layer upon and get ball ref. Of course there's a Blueprint Interface function. And here we can get the ball variable. Now this is the static mesh. And for this one we want to set the world location so we want to teleport it. We want to teleport at it from here to the start here. So we are going to set the world location of it. So sad, world location. Now it's asking, what location am I going to set it to? The dislocation is actually the go back in the Level Blueprints, the locations actually these checkpoints that we assigned in the previous lesson, the first segment, second, third. So we can go ahead and get the reference to the game mode because this is where we've made the variable. So writing gets Game Mode and getting the Demode reference. Now, now we get the Game Mode. And inside of the game mode we want to access the checkpoints. This one, we want to teleport Doppler to the next checkpoint. And here we can say find, because we want to find the checkpoint. And here, encoding when we coat something, we want to make as much as possible dynamics so we don't have, for example here, let me show you if I connected, I connect those. So here for example, I can say find first checkpoint, and then I can always connect it and so on. But what if this portal is not the first checkpoint, then we have to make another overlap or the second portal and then say, go ahead and find the second checkpoint and so on. How do you know this is the first checkpoint or the second one or the third or the 40th, or how many levels you have made. We haven't got to make a dynamic. So it knows this one is the first one, for example, or the second one and so on. So the way we do this is inside of BP portal here. We can make a variable and we can make, we can call it and then name this variable. We want to change it to a string, so it's just a text. Compile and Save. For this one, we are going to click and clicking on instance editable and expose on spine, Compile and Save. And what this is going to do is it's going to spawn the variable so we can edit it inside of the level. So if you click on this portal, you can now see we now have exposed this variable. When we clicked instance editable and exposure and spawn, we have now exposed this name variable that we made, which is a string. We can write a text. We have exposed it so we can actually edit it here in the Details panel. So this is what you can do. You can make all sorts of variables, even if it's a Boolean and you can make it exposed on spawn. And you can see this Boolean now appears. So this is very useful if programmers do this for artists also. So they can work without going inside of blueprints if they have no idea what blueprints are. So now we have exposed this name variable. And what we can do here now we can make the portal so unique. So here we want to go to the second checkpoint. That can checkpoint. So when we enter this, we want to go to the second checkpoint. And for this one, this is the last one. We want to go to the third checkpoint. So now inside of BP portal, we can now say find. And then instead of writing it statically, we can make a dynamic. So we can drag this name variable and put it on top of here. So it's going to say get this checkpoint variable, find this checkpoint. So it's going to find, for example, the third checkpoint. So it's going to find this name that you have written inside of your level here on the portal. And now it's going to find this location because it knows that third checkpoint. We already have assigned it, which here it's going to take the location of this layer start three. And we can use this location to set the actor location. So it's going to find whatever name you have written. So if we enter, if we enter this portal over here, it's going to teleport you to the second checkpoint, which is over here, which is this player starts that we made over here. So let's go ahead and test and see if it is working or if we have some bugs. So let's compile and click Play. And let's move around. And here I'm going to enter. And now we have a bug here. And the bug was that we actually, for ago, if I go back inside of the portal, clicking on this plane that we created, let's remove the collision because you can see it pushed us away. So inside of its collision. And that collision preset, we can click on no collision and then compile save. And hopefully I hit the jump and then I can go ahead and enter the portal. So now you can see it's actually working. And if you don't want to move, if you want to make the ball goes still here. When you're teleport. You can go ahead here and say, you can drag from this ball and say physics. And I will show you the function. So the physics, we have a lot of functions, so it's not easy to find this one set physics linear velocity. But this one will make the ball and not move at all. If I compile and click Play for the last time, and I moved and I enter the portal, is going to make my ball goes still, and then I can move again. This is, of course, if you don't want to move the ball when you when you, when you took part to the other level. But if you want to keep your speed, just go ahead and remove this one that's up to you depending on what you want to create. So before we end at, let me create a rewrote nodes so it's looking clean. So double-clicking here. Like this. Maybe just creating one railroad node will be sufficient like this. And we can create a rewrote node for this one as well. Remember to clean the code else. It's going to be very, very messy at the end. For now, this is the portal we created. And let's go ahead in the next lesson and actually create the logic for when you lose. So when you fall down here, it should tell a port you back to the checkpoint. And this should be easy to do because we already have the logic for it. But let's go over in the next lesson.
33. Creating the Losing Logic: So let us now create the losing logic for this game. So when the ball folds down here in this hole, we have to teleport the ball back to the checkpoint, so you're not getting stuck here forever. And let's do this by go ahead and create. You can, inside of the volumes, you can find it, but you can also find it here, which is called the box trigger. So clicking on the box trigger, you can see here it created a box if you press G to view the icons. And this box trigger is just like the triggers we made here in the portal, for example, the ones we've made previously. Well, this one here we created inside of the level. So creating this pokes trigger. And we can increase the size of it here to cover what we need to effect. So I want to affect this part down here. I'm just going to make it a bit taller. So affecting when the ball hits around around down here. So on the ball is down here, it's going to trigger this box. So I'm going to increase the size and I actually want to cover all of my maps. So covering this. And because these are the same height you can see here, and the ball falls down here. It's going to want to reset the game to the checkpoint. So I want you to make it as large as the level. So now it's covering all of the ground, which is around down here. And we don't want to cover this because this is the one area. We don't want any triggers or here. So snow covering all of the grounds down here because it's covering this whole area. And we can go ahead and rename it up here. You can rename it loose trigger maybe. And let's go ahead and create some logic for this. So over here, we want to create, we want to get a reference to it. And the way we can do it is inside of the Level Blueprint. So clicking Open level blueprints. And inside of here we can right-click and inside of events at event to trigger box. This is what we want and the collision event. And we want to do something on the begin overlap. So when the ball overlaps this Trigger box, we want to do something. And again, in the other actor, we can say actor has tag. If the actor has the tech player, then go ahead and, and remember this is what we created in the last lessons to as the actor has the tag player, then go ahead and this is very easy because we already have the checkpoint. We want to set the world location of the ball, so we need to get a reference to the ball. And you can see here, we already got the reference here, so now we are going to use it multiple times. So why don't we just create a variable of this so we don't have to create all the time. So here we can actually right-click this ball or this, this variable here and create promote to variable. I'm going, I'm going to call this one ball BP. So you don't get confused here because this is the bone static mesh and this one is the BP ball. So this one is actually the blueprint class. So this is the blueprint class. And from here we can connect it to the SPP ball. And connected just like what we did here with the game mode, we made a variable from it. We can also do it here for the bulk. Now, instead of doing all of this, we can now use our variable. So taking out this ball BP. And we can now see, we can now get, get the ball. So getting the ball mesh. And we can say set world location. And what is the world location? We want to set? The word location is this current checkpoint that you made. So I'm going to get the game mode and saying current checkpoint. And this current checkpoint where you want to connect here. Because remember, every time you enter the portal, you are going to find this. But here we also need to set the current location because we need to update this checkpoint for this, this current location to a checkpoint. To this checkpoint we are at right now. So here when we enter the portal, we are going to find, for example, the second checkpoint, depending on what the name of the portal is. And we are going to sign this location before we do this. So let me move this a little bit further. And I'm going to get the game mode here and get the current checkpoint. And I'm going to set it here to this one. So we're going to set the current Checkpoint every time we enter a portal. So this current checkpoint variable updates geolocation every time you interrupt portal. So say you are at level level 20 and you enter the portal at level 20, it will update this location to, let's say your checkpoint number 21. So it keeps updating the current checkpoint. And let's go ahead and do this. And what we can do actually, you can, it's the same thing because now you've said they can check points. You can connect this pin here to here, which we have done right now. This is correct, but you can also do it here. That's up to you because this is the same thing. You keep setting it to this variable. Let's let it be like this and let's regulate bit closer. So now we said the current checkpoint all the time. So what we can do here is get the current Checkpoint every time we fall down and lose to support us to the current checkpoint where we are at right now. And just again, just like before, with the bottle, we can go ahead and use this set physics linear velocity to not fly around so I can pause the ball. So I can say here sets linear physics, linear velocity. And I can connect it. And the velocity is just 0, 0, 0. And we can go ahead and click on File, Save and click on play. And if we go down now, going to teleporters to this checkpoint by fall down again. And let me go over to the next level and see if it's actually working. If I teleport here and I fall down, it's going to Tilburg me to the current checkpoint that I am at right now. So this is working perfectly and it's going to teleport us to the checkpoint while we are at.
34. Win Area: Let us now focus on the one area and actually creates the end screen. So when we enter this portal in the end, we want to set the view to here. So right now we don't have a camera. So what I want to do for this one screen, I actually want to just let me reduce the cameras feed. And I want to just view the game like this. And you can move with your bowl freely, but the camera will be static just like this. So let's find a good, please try to find a good place. And let's say I wanted here. And what you can do here and the current view you are at right now, if you're happy with it, you can click on this button up here. And it can right click on Create camera here and create this camera actor. And now I can click this and you can see it creates a camera actor. So now I can actually again move with this camera. This doesn't matter. And I created this camera actor where I was looking. And I'm going to right-click it just so I don't move it by mistake and say Transform, lock, actor movement. Now you can't, you can't move it by mistake. So if I right-click and click on pilot, you can see this is what it looks like right now. I will click this one to inject removal of piloting. And now we want to set to this view whenever we enter this when area. And we can do this if we go to the portal. And here, remember, the last checkpoint we have is called third checkpoint, and this is the last, the last bottle. So if I make my camera very fast so I can go here. This one does. The last puzzle has the name per checkpoints, so this is the last place. And what you can do here in BP portal, we can say if this name is equal to third checkpoint, then go ahead and do something. So here we can see this name. And then we can say, is this equal? So to make that equal, just strike the equal sign. Maybe I did it too fast. So writing the equals sign, I click on the SQL is this name. So now we are checking for this portal name and checking if it's a third checkpoint so you can copy this third checkpoint. Is this equal to third checkpoint? And let's make a branch. So now, if this is equal to third checkpoint, we can go ahead and set the view to this camera here. And the way we do this, we can get the camera first. And the way we can do it is yet actor of class. So getting the actor of class, we are getting an actor. What, what do we want to get? We want to get the camera, the camera actor. So now the get actor of class is getting the camera actor, which is right now inside of the level. And you can see here, if I search for camera, we only have one camera out there. So now we have this one camera actor. And what do we want to do is something called set. Do you target with the blend? And if I remove this context sensitive, and I scroll down this one set viewer target with blend. So what this does is it sets the view target to this camera. So when I entered the third bottle, we are going to set the view to this camera. This is the set view target would blend. And now it's at, it asks for a target and it says player controller object reference. We have to call the player controller. I'm going to take this context sensitive again. And here I'm going to write the get layer controller. And this one, just like this. And now it's going to work. So if I click on play, actually, I don't want to start right from the beginning. We're just testing the game. So I'm taking this player starts and I am dropping it over here just so I can just enter the possible without playing the whole game. Up looking on blue. And now you can actually see you, we have a bug. And the bug is actually the losing trigger because this part of the map was working. But when you enter here you can see it's, the map is actually going downwards. And right now the losing trigger is, if I move it here to the side, you can see it actually covering all of this loop such as this one. Sorry, this was the like mass importance volume. So if I move it down here, you can see it's actually covering all of this area. And therefore, we don't have a way to enter the portal. So it's correct here. But it's not correct here because the map is going down and we need to enter here. So we need to fix this and let's fix it later. Right now, I'm going to push this a little bit down so we can play the game. I'm going to play and I'm going to introduce Portal. And now you can see we have set the view target will blend. So we have set the due to this camera and I can still move. My ball is looking pretty cool. And this is the winning screen. Let's focus on finishing their winning area. And at the end, Let's fix the bug would be losing, losing area and other bugs that we might, we might find during the way.
35. Creating the Win Screen UI: Let us now create our final UI. And the final UI is the winning screen. So when you wonder game, it's going to say you have collected and it's going to display how many stars you have collected. So let's go over inside of the UI and right-click user interface and create another Widget, Blueprint. Let's call this one WB for Widget Blueprint. And let's call it when. Double-click this Widget Blueprint. And inside of here, just like before, we can drag in and add some stuff here. And what I want to add is just saying you have collected and beneath it is going to display the star icon and how many stars you have collected. So before we used a horizontal box, right now, let's use a vertical box because we want text up here and beneath it. And the amount collected, I'm going to drop the vertical box. And I'm going to search for text and dropping that on top of the vertical box. So now this text, I'm going to say, you've collected like this. And let me click on this vertical box, make it a bit larger and drag it here. Now this pivot point, you can see that right now It's up here. So imagine if you had this game and the player wants to play in windowed mode, and the player scales like this. This text will actually go towards this corner when you rescale. But what you want is, I want this text to be here in the middle. So I don't like if I put it here in the middle right now. And the player is going to rescale the window. It's not going to stay in the middle. It's going to be pushed towards this pivot point. And I don't want that, I want it to be in the middle. What I can do here is here to the right, and the anchors change the anchor point to be in the top middle. This is where I want the main place to be. And what I can do here is let's keep developing here on this UI. So what I want to do here is I want to center it. So clicking on this horizontal align, center, just like this. And the next thing I want to add the star icon beneath it and the text. Now we can't, we can't just get here and add it like this because you can see that imagine this as the star icon. And then I, we'll add my text to display how much I have collected. Now this is a vertical box, so it's going to put things vertically like this. But we wonder star here and we want the text beside it. So what we need to do first, we need to add a horizontal box. I hope it's not getting too confusing because you have to think and extra time before you understand it. So you have this vertical box, we have this text. And inside of this vesicle box, I now add this horizontal box. Now I want to add my image inside of the horizontal box and my text. So now they are horizontally beside each other. So clicking on this horizontal box, I want to click on this horizontal alignment. So it's in the middle. And let's just write 23 here. It doesn't matter what that text here says because we're just going to add code to it and change it dynamically. But this one, the star icon. Let's click on this here in the brush image. Search for a star and clicking on our star icon. Let's make it the size to 45. 45, and just like before. And so this is the star icon and I want to center this right now It's a bit to the top, so I want to center it. We're looking on horizontal and vertical alignment. And I want to push this a bit away. The text is too close to the star tool clicking on the text here in the padding, I wanted to move it to the from the left. That's how you have to think about it. You have to move it from the left. So pushing it away from the left. So for example, I can write five or 10. You can see it's getting pushed away from the left. And if I click on this dashed outline just to see what it looks like, it's a bit too far away. So let me write five instead. And I want to push it from the top, maybe to like this. Now it looks good, it's in the center. And maybe I need to increase the size of my text. So clicking on this, I can increase the size to 40. And let's also increase the size to foresee as well here. And the star, Let's increase the size to 7070. Yeah, this one is fine. And you can see here you can now increase the vertical box and make it look however you want. I'm just going to make it like this. And we can also click on the Vertical bugs and push it away from the top and the padding. So pushing it by five or 10. We are now pushing it a bit away from the you have collected text. So now to center perfectly to this pivot point, we can see here we have a position x and position y. So writing 000, you can see it goes to this top corner. But I wanted to be in the middle. And this is, this is where the alignment goes in. Because 000, That's fine. We want it to be centered, but we want to actually align it to this point and not at this point. So here, this is the X. You'll see this is alignment in the x, and this is alignment in the y-axis. The y-axis is perfect. We just want to aligned and dx. So here if you drag it, you can see you now it's in the middle. So 0.5 is the middle. If you wrote 1, it will align to this point here. Running one will align it to this point, 0, 1, and 2. This 0.5 will align it to this point. So now it's correct. Now I just want to push it away from the from the y because it's, it's under screen edge. So I am going to position it on the y like this. You have collected and there's some text in the middle. For now we want this text to work just like we did with the other. Luck with the menu I we did. So clicking on this 23, I'm going to click on bind here on text, clicking on Create Binding. I'm going to rename my function, clicking F2 and writing gets stars and mount or get star amount, that's up to you. And here we want to access the star amount or the star variable, which we have in our game mode. And we want to access this star variable. So writing gets came up and getting. Now which game mode do you want to get? Gets him or graph. This is the interface function were made. And from here we can now access the game mode variables. So now we can say stars, stars variable. And we can now connect it. And it's going to convert the number, which is the integer to a text before it can print it out. So just like this, and I think we're finished with our UI there. Next thing you can do, or if you want to, you can always change the colors. If you want to. We can change it to something orangey. And it contains this color and all of these things. But I think this is fine for now. So let's compile and save, and move on to the next lesson.
36. Displaying the Win Screen UI: It's now time to display there when you i that we created in the previous lesson. And remember we did the UI inside of the player controller. So the first one we made was this main UI or that we made. And we do it in the same way, but here, we don't want to display it right from the beginning when you play the game, we want to display it whenever the player, it's the End Portal and interests that one area. So at first, we need to create a custom event to show this, this UI. So first, we have to, let's create a Blueprint Interface, right-clicking, creating a Blueprint Interface. And let's call it int player controller. Now let's double-click this one. Let's create one called Display. When UI. It's going to display them and this is just a, just a, an event. So going here in the player controller, remember to add your interface. I will see you will, it will not be working. So clicking on Class Settings, going to add and writing int player controller. Now you can see this interface event that appears. And here we can write display. Display when your eye and you can see. Now this is not the correct one because this is a function. And this is because we have to remember to compile and save. Now we can write display when your eye and you can see it appears this event. Now we have this event and this event we can now say create widgets. And what do we want to create is this winning screen. And you can now add it to the, your thoughts. Now this will add the winning screen. And now we have, at some point we have to call this event, and we can call this whenever you win. So when you, when you enter this last portal. So let's go back to this portal, BP portal. And here we made this logic here. Let me delete all of these events. We made this logic where you enter a few enter the third checkpoint. It is going to set the view of the camera. But here let's also display the winning UI. So here we want to get the reference to the player controller. And the way to do it, Let's go back to our interface function or a Blueprint Interface, and click on Add. Let's make a new function called gets layout controller ref. And here we can add an outputs and we can write, we can write the variable on what this flow controller is you're trying to refer to. And we're trying to refer to PC speed ball, KPC speed goal. And show the tier and choose the object reference, and let's call it player controller. Compile and Save. And inside of this flow controller, we can now double-click this function. And now it's asking what, what do you mean by player controller? I mean self. This means that reference is this player controller we are currently in. This is what self means. So now inside of the BP portal, it can now say get Blair controller. We can just use this one. And now we can say the player controller I'm talking about is this as my own called ISI speed ball. But remember we made this function called gets their Controller reference. And this is a message because it's an interface function. And let's connect it. Let me double-click to make a reroute node like this. And as this flow controller, we want to call this event that we just made the same display when UI. So saying when display, when you are here, this is a message like this, and now it's going to display them when UI. So if I go back, click on play and I enter, it's going to display this when you identify, maximize the screen, you can see it like this. But the problem is it's also displaying the menu I you can see up to the top left. And we want to remove that. So let's go back inside of the controller. And we need to remove this one from the viewport. And the way we do it, we need to do it is just like we created references. What the game mode and the BP ball. Previously. We can right-click on this one and say remote to variable. And let's call this one w be main. And let's connect it. And let's connect this one here instead. So now let me hold Alt and disconnected, and let's connect this instead, just like this. And now we have, we have a variable that we can use now for this main menu. And what do we want to do is taking out this variable and saying Remove from parents. And that's how you remove things from the viewports. And now we can connect this. And now it's going to remove it from the viewport and then display. And then display our UI. So you can see, you know, the main UI is actually not displaying anymore. And you can actually edit this white text. It's not too visible if you want to, but I don't want to bother right now. This is looking fine.
37. Camera Fade: All right, so we are almost finished with the game. And with this, Let's add some camera feeding. And I'm going to click on this player start that I moved previously just to test out the game. And I move it back to the level one that I made here from the beginning. And I want to click on My biggest fear or losing sphere. Again that I moved and I'm going to move it upwards. We're just going to move it up so it covers this ground slightly like this. I'm going to cover the whole map. So now when we play the game and we fall down, you can see it instantly respond to us, but I want some camera of fading does so it looks good. And to do this, let's go over in the Level Blueprint where we have our losing logic and creating are clicking on open Level Blueprint. And inside of here you can see this is what happens when we, when we interact with this loose trigger. And here we want to do some camera fading. And to do this, let us move these functions and nodes over here. And let's just connect it by holding Alt and clicking. So here we want to say dark camera feed. So we have something called starts camera, the ID. And if you remove their context-sensitive, you can see, we can find it here. Okay, so we have the start camera fade and we need a camera. And here it says the target is player, a camera manager. So if you drag out and say player camera manager, and if you go up or down, let me find it here. Get player, camera manager, this is what you need. And now you need to set the Alphas. So now it says to the Alpha at which to begin to fade, the range where 0 is fully transparent. So right now it's fully transparent and one is fully opaque. Now, if you, if you write one here it will. The screen will be fully black. With this color, you can change the color, but let's make it black. This is fine. So it's going to fade. When we hit the losing trigger. It's going to fade from transparent to a full solid color, just like this. And we have to write how much is the duration it wants to fade in. And here, and let's just write 1 second. Okay, so now we are grading the camera. So if we click play and let's try it out. It's going to fade the camera. And you can see it's going back again. And this is because let me open it. And this is because we have to click on this hold, one finished. So it's going to hold at this dark color. When we fade. Now we can now connect this again, but you have to be aware of that. When, when this camera feed is played, we don't want to change the location instantly. We can add a delay node. So we are waiting for the fade to jump in before we do anything. So let's delay by 1 second because the duration of this as 1 second. So it's going to delay or there's going to fade the camera and then delay the same time. So we're waiting 1 second. So it's fully delete, fully faded. And before we go over and execute this code, because I want to teleport the player whenever the screen is actually black or dark. And after this, we can do start camera fade. And actually let's get this camera and manager and get our camera manager. And let's do Dot camera fade like this, and let's connect it. And here, after we have teleported the player, we want to go from being fully black here to no color at all. And the duration is also 1 second. Now, I can show you something here. And instead of writing a static number here, hard-coded number, imagine if we had a lot of these in our game. And you decided one day that you want to change it to two seconds instead of one. Now you have to go in and change it to seconds everywhere. And it might take a lot of time if you have a lot of them. And this is not optimal, we want something that is very easy to work with. And this is the why. Writing 1 second again, this is why you can right-click on this duration and clicking on promote to variable. And this one I'm going to call fade duration. You're going to see it. It made a float variable. And this one, I can now connect to the delay as well now and are all connected here to the other camera feed. This one is feeding back from black to white to transparent. And now I only have to go in and change the fade duration inside of this variable. And it will change it for all of these because all of these are using this variable. So this is very easy and I only have to change it in one spot. Now let's go ahead and play the game and see what happens. So if we go down now, it's going to fade and we're going to go back. And if we go again, going to fade and go back. So now it's working perfectly just as we want to. In the next lesson, we are going to fix the bug that we previously had, where we had the losing sphere also covering this part of the map. And we couldn't complete the game. And let's go ahead and distribute the stars along the levels, things like that. So let's go ahead and finalize the game.
38. Finalizing the Game: Hello and welcome back. So in this lesson we are going to fix the bug where the losing area is actually covering the end part of the level two. So I'm going to move it here. And you can see when I click Play and the losing part is, is failing me away because it's covering this area and I don't want it to. I'm going to move my player start back. And here it's working correctly. What here the map goes down and it's therefore being covered even more. And this way, Let's go ahead and fix it. So clicking on this losing trigger that we had before, I'm going to make it smaller and let's make it smaller through here. So I just want to cover a bit less. I want to create a new one for this other part of the map. So covering this and let me see how much it's covering. It's covering here. And I think this should cover a bit more. So covering somewhere like here and just a bit more. So it's covering this. So I think this is fine. Now an hour covering this and this is looking good. And what you want to do is go ahead and select, Create, and create another box trigger. And this box trigger we want to move down and let's make it larger. And this one is going to cover the finishing area here at the, at this map. Let's go, going to cover this hole right here. So the height of this, I'm going to lower a little bit somewhere here. And I'm going to cover this whole just like this. Okay, so now this should work perfectly and we need to add, we need to change the name. So let's change it to lose trigger 0, 2. And let's go ahead in the blueprints, open the Level Blueprint. And now let's right-click. And we have to remember to click on this losing trigger. And here we can right-click and clicking on the context sensitive. We can now click on Add event for Trigger box and then collision and begin overlap. So what happens when we overlap with this? And what you want to do is just the same thing as we did with the first one, because we already have coded the logic. And instead of copy pasting, remember, when you copy paste in code or a blueprint or whatever. Just to ask yourself, why are you copy-pasting? Can to do this in a more efficient way? Why are you copy pasting the same code and just pasting it here and doing and making it so long and confusing. There is a cool way to do this and we can do it by hovering on everything here. So let me see if what makes sense, the Ls, let's take all of it here. And let's right-click. And you can actually say collapse to function or Collapse to Macro. And this will make it into a function which you can reuse everywhere you want inside of here. So just something that you have to be aware of. We have this delay function, and it's called a timed function. It manipulates time, which, which, which is why it has this clock here. And time functions cannot be collapsed into functions. So collaging it into function, it will say collapsing to function failed. And so we have to make it into a macro instead. So right-clicking and collapsing to macro. Macro is just like a function. But the difference is we can have these timed functions inside of it. So you can see now it has this clock, meaning that it has a time to function inside of it. So now let's rename it and let's call it respond ball. Okay, so now we have this macro seeing respond bowl. And if you double-click on it and you can see this is the macro that we created. This is the input. And now we also have an output, but we haven't anything connected to it. And that's fine because we really haven't anything we need to connect afterwards. But just in case, just for, for learning purposes. If you wanted to add some more stuff here, looking on this output, you can add. Here in the output, we can add a variable. And here you can add an execution pin. And if you connected and just call it x execute or, or exec or whatever. And this one is also called the exec. So let me I don't know if I can call it the same name if it lets me exec, nope. Let's call its outputs. And let's compile. And you can see here. Can now add some more code if you wanted to, but that's fine. Let it, let it be like this. And now we have this macro. So now this macro we can reuse down here. So let me copy this code. Thing actor has tags. So just to make sure there's a player hitting this regard sphere. And then we can drag out this macro and we can place it here and we can reuse. So this is a much more efficient way. Then copy pasting all of this code to make this work. And the problem is if you copy pasted all of this, if you change something inside of it, you have to change it everywhere. You have this code copy pasted. But if you have a macro, just edit it once I'm inside of the macro, will edit it for all the times you have used this macro. And we can do it like this. And now this is fixed. So the next thing we want to do, we want to distribute these stars. So I'm going ahead quickly and distributing them. Okay, so now I have distributed all of the stars, so I've added some here at the end. I've added a lot of them here inside of this tunnel. It will be fun I think to just load everything here. And I've added some on the way. And we can add maybe one on each of these fillers just as a finisher will fun to have I think. And adding one here. You just need to move it a bit upwards because this was financial. I thought it was lighting, something like this. Okay, so now we have this star is distributed. And the last thing we want to do is actually add some sound effects because the game is a bit boring without any sound effects. So let's go ahead and start the audio. We imported the sounds and I uploaded them to the website. If you haven't upload, uploaded them yet into the engine, you just drag them in here and there will be uploaded. Now we have this star sound, this bottle sand. And then we have some music. So now these ones, Let's right-click the star first and clicking on Create q. And here we can call this one is C for sound cue, and let's call it star. Let's do this for the other ones too. So the portal create queue, bottle and the one on the music as well. Just like this. And what you can do with this sound cue, we can use them inside of the blueprints and you can double-click the star. And you can see, we can click on the output and you can change the volume if it's too loud or too low. I think this is fine. And what you can do here, you can drag out and there are some functions we want to use, the one called modulator, this one modulator. And let's connect it. So now this modulator can change the pitch of the sound so it doesn't sound the same all the time or play it. So this is faking the sound. So it sounds like we're using a lot more sound effects. So maybe making their pitch max to 1.2 and the minimum to 0.8. And you can click on play it and hear that the sound is not the same all the time. So this will be a bit more interesting. And we have the music which is fine, and the portal. Maybe I can reduce the sound of this one just a little bit, 0.6. And that is fine. So now let's add these sound effects quickly. So go ahead and end the blueprints and double-click that bP star. And here, when you look at the star, you want to play the sound effect. So you're adding the star. The star is getting loaded. And let's drag out of here. And by the way, this is the one we overlap with the star and load it. So here we can say lay sound 2D. We have something called play sound 2D. And let's play it. And here let's search for SC. And let's take the star, Compile and Save. Now let's do the same with the Portal. Let's double-click the portal. And here when we interact with the Portal, let's go ahead and let's see where it's best to put it. Let us, lets put it after or just before we tell about the player. So let's actually just put it here. And let's say play sound 2D. And we're going to play the sound called, Let me go here. Let's play this sound called portal. Just like this. And the last thing we want to do is we also want to play the music. Let's save everything and let's test it. Just tried before we play the music, just so we can hear that coin sound. For now, let's work on. The chalkboard. Sound is also working as well. And the fading is working as well. Okay, awesome. So the last thing, let's play the music. And to do so, Let's play it right in this map. Let's click on Blueprints, open Level Blueprints. And you can do it inside of here. So you can either do it here or you can do it in the Game Mode. And I want to do it here, let's just do it here. So we are defining the game mode and we can actually just play the music here. We can even add a new sequence node and say this, connect all of those, and start by playing the music. So play sound 2D. And then we can say as music. Now we're going to play the music as the first thing that we're going to define the Game Mode. Then we're going to add these checkpoints. And then we are going to set the ball a location. Just like this. Let's compile, click, Save and begin, and see what happens. Awesome. Now it's working and I'm just going to lower the sound a little bit. Just for the tutorial, it's a bit maybe it's a bit loud on your end. I'm an avid afraid it's too loud to find the music. By the way, if you want to search for something, you can click on the magnifying glass. Aswell quickly find it in the browser and you can double-click and maybe lower 2.660. Fine. Okay, there was everything. So now we are finished with the game. And in the next lesson, I actually want to teach you how to make your code more structured and comment everything and so on, which is very, very important. So let's go on to the next lesson.
39. Cleaning up the Code: Hello and welcome back. So now we are finished the game and let's go over and clean up the code. And this is very important because imagine if you take a break and you come back one month later, you will not remember what you've done unless you actually commented what you've done. And especially if you also a one-day hire a new programmer for your game. And he or she has to program the game for you or help you out. It will be very difficult for that person to know what you've done if you haven't really made any comments or anything or what you did. Okay, so let's review the code quickly. So here under Level Blueprints, let's take a look. We have this flourish start. And here we can, for example, select this and pressing on C. You can see we can now comment something. So here we can say start game music. So start again music. And you can always change the color if you want to. You can also, if you over away, you can say show bubble here when you're away from it. Okay, So now you have this start sound and here you can say define Game Mode variable. Well, this is the second thing you are doing. And here you are. You are defining or you are adding the checkpoints. So let's actually hover all of these. And I went over these without, without this one. So here I am going to right-click and clicking uncollapsed to function. And I'm going to name it set checkpoints. So now we are setting the checkpoints. This the function. You can double-click it and you can see it has collapsed to a function. So this function is setting the checkpoints. But this is a lot more clean now. And we can now here, drag this a bit closer In this down. And what I like to do is just making condensed. So I do this. I like doing that. And we can actually, we can move it a bit further away so it's not too compact, just like this. And here you can comment out and say starting point variables. Okay, so now you have this setting checkpoints variables. And the last thing here we have is spawning the ball at the checkpoint. So I'm going to move this a bit closer. And I'm going to mangle this and say bonding all at first checkpoints. Okay, So let me remove. Actually, that's fine. So now we have these domain, we just remove it. Just move it a bit further down. Just like this. Okay? And this one, just moving it like this. So now we have these comments. And this one, these are the overlap, so I'm going to group them here. And we already made that macro so it looks clean. And let's come in it and say Ray's phone layer when falling down the map. Let's call it this and put it over here. And we can always make this another color just so we know this, we know that this is the player starts. Or actually we can hover all of these clicking on C. And I'm just going to call it begin play. I like having, like knowing whether begin play is in my my blueprints. So this is what I usually do. And you can always make this one and another color just so you know it. This is the begin play. And you can show the bubble where we can see this is the begin play. I don't know if I want to show this actually these, Let's hide the bubbles just like this, so it's not confusing. Well, here we have the begin play. Let's compile and save. And here we have they're responding logic. So this is looking clean now and the function, we collaborate this to a function and it's looking good. Okay, so let's move on. Let's click, close it down, go into BP ball. And here we do not have anything. We all have this function. And this is looking good. So let's close the BP ball. Let's open the portal. Here. Inside of the portal we have quite a bit going on. And here I want to over from here to here, I think this is, this is the responding logic. So here we're setting the refunding that checkpoint and we're setting the ball spawn at this checkpoint. So I'm going to right-click and collapsing it to a function. And I'm going to call it. Respond ball at checkpoints or not respond actually just spawn ball at that point because you are going through the portal. Okay, so responding the ball at the checkpoint, so double-clicking and let's move this a bit down. It's cleaner. And this one can move this a little bit down and double-click to make a railroad node. Hovering on this click on Queue. This is fine. Just like this. And now this is clean as well. And here we are spawning ball at checkpoint. And this one we're saying if the if the name is equal to third checkpoint, we are going to the View target and so on. So this is, this is fine. This is looking good. And what we want to do here is we can actually just like this and comment. And here we can write upon layer check binds when entering the portal. Something like this. Okay, so now this is looking good. Let's compile and save. And by the way, for the variables, you can also clean that up and you can click on the variable. And here in the category, you can change the category here. And since we don't have anything here, I don't mind just making a default, but if you change the name it we'll give it another category here, just like the components. So for this, let's let it be like this. We don't have more than just this. So it's fine going in the star. Let's see what we did in the beginning play. We're playing this here. We can just say play initial star movement. And this is what it's doing. And down here, we can say add 12 star variable. And these are pretty bad comments right now. I mean, I'm just doing them quickly as I just as they come in my head. And so that video is not getting too long. And here in the star alluded, let's see if we can change something. And this is setting the rotation. I think this is fine. And with this, you can comment and say play, play star, star animation. Okay, listen and don't have to add loci placed star looped animation. So when you lose it, it's going to play an animation. So here we have this code compile and save, and let's close that, open the game mode and the game mode. We don't have anything else than this. And this one we can say add one to that star variable when loaded. This one here. And now I can show you this default category because now we have multiple variables. And here we can, for example, call it here in the category we can call it checkpoints. And this one also I can call checkpoints or you can select it from here now. And here are the stars, I can just call it the category is going to be called currency. And now you can see, now this is a lot more clean because we have two categories, one currency and one checkpoints. But this is also cleaned up now. And then let's compile and save. Let's go back to the lab controller. Now this is the last one. Here we're going to say display, display main UI. When starting the game. And down here we are going to say, Yeah, this one going to say ball movement. Just, let's just call it a ball movement. That's fine. And here, the last one is display. When you lie, when all those display or new AI, that is fine too. So now we have this and this one is looking good and everything is looking good. Let's compile and save. And this is how you clean your code. It's very important to collapse two functions wherever it makes sense, Just be careful not to collapse too much because it can also get confusing. If you're collapsing this and inside of this, you're collapsing this and so on. It will, it can be more harmful than, than useful. And it just, just do it wherever it makes sense. So let's close that down and this was it for the game. Let's go ahead in the next lesson and actually just, just said the test, the game and just play it.
40. Packaging the Game: Okay, so now we are finished with the game. Congratulations, This has been very fun to make, and I hope you've had fun as well and learned a lot. So now before we play the game, Let's actually package it so you can send it to friends and family or someone, you know, if they want to play it. And what we want to do here inside of platforms up here, you can click here and go to packaging settings. Then over here, you can change this Build configuration from development to shipping. And then you can check this full rebuilt. So it's going to rebuild the game when it's shipping it. And it's also for distribution. And what do you do with this is now all of the things that you have written inside of your game that are only for development will not be included in the game. And by this, I mean, for example, the print string function. And we don't have a print string anymore. But if you had a print string function inside of the game, that print string function will not be included, which is a good thing. And I've also went ahead and deleted the super grid Blueprints folder. It was giving me a lot of problem problems when I package that the game earlier. So here in the super grid, it's not really our fault, but something is wrong with this package that's giving us eras. Inside of this tutorial level, I deleted the folder called blueprints. And also in the particles, I deleted all the particles except for the p star that we're using. And inside of the utility, I didn't delete anything. The material instance, I didn't do anything either. So I deleted the blueprint folder and I only have these three inside of the tutorial level. Now, I also deleted the overview map and the tutorial map. So here I deleted all the maps. I think there was a map in here and the starter pack, I didn't touch anything. And here I deleted that overview map here. And I also renamed the, the package to super grid too. So I just click that do renamed, it's just putting it to behind it. It was giving me a lot of errors. And when you rename something, sometimes the folder does not disappear. Just right-click here in the content, a browser and click on fixed up read directors in folder. Sometimes there are invisible files which will make the older and our disappear. And if you have a folder that's not disappearing, just go ahead and click on the folder, make sure if there's anything or if it's empty. And if the old folders fully empty, tried to click Delete on it and delete it. But this one, this is the correct one. I just changed the name. And if the other empty, sometimes Unreal Engine, the empty folders cannot be deleted even though they're empty. And I think it's a bug. So what you have to do is you have to go inside of the project files, inside of the windows here in the File Explorer. And then you have to find your project. So speed ball and inside of the content and in the super grid too. So this is the one I am using now. But if you have a super grid, that is the old folder, you can go ahead and click on Delete. Okay? But these are the folders we are using now. So this is correct. And sometimes it can be tricky to cook a project. Sometimes it will say a lot of errors, some random ones and you have to go and fix them. But let's go ahead and try with this. Now I renamed it. And we shouldn't be having any eros because we didn't I don't think we did anything wrong. So let's go ahead and see what the package is saying. No, now we did all the settings and go ahead and click on Windows. We want to package for Windows and choose the package project. And here you have to choose where you want to package their project. So I have made a folder here called New Folder 2. And inside of this folder, if I double-click it here, I can select folder. This is where I want to package it and it doesn't matter where you package, that's up to you selecting it and clicking on this show output log. Now as its packaging. And the most important thing here is to view. You can view and see if it's continuing. But you can also remove the messages and see the eras and the warnings. So right now these are warnings. These are okay. Some warnings doesn't matter. And some warnings you should fix. And the eros you should have 0 of so you should not have any eros. And they will be in red text if you have any eras. So I'm going to let it package here and wait for it, and here it is complete. So now let's see the arrows. It's talking about VR, so virtual reality. And this doesn't matter for us. Now saying missing resource from Core style, that doesn't matter. Missing resource from the NEA gara editor style. And this is the particle system style. So it doesn't matter for us unable to find platform info for hollow lens. Okay, So this doesn't really matter. It's whatever. So now we have packaged the project and if I go ahead inside of my desktop, if I just pull it up here quickly. And some of the windows, we now have this speed ball. And if we double-click it's, we have this game opens on my second monitor. You can see here and actually fled again now. All right, awesome. So now we can play the game, and this game is packaged and you can actually send it to your family and friends. So the way you do it is just sending in this file or you can send them this. So just select all of those and adding them to a zip file and doing like this and call it whatever. And just making it into a zip file and just sending it to your friends and family. And this is actually how you do it. And this is what we do with farm table and release it on Steam. We just package it like this and we zip it into a file and we upload this to steam. So this has been very fun working on this first game with you. And I hope you've learned a lot. And if you have any questions, please, please write to me. I will be more than happy to answer you. You can write here in the comments are inside of our social media or a police comments to the discord, even if you just want to chat and we can chat with you or help you out with this course. So I hope you've had fun and London lot and you can use your new skills to develop your own ballgame. And in the next section we are going to develop a game. What do you have? A, you can say a real character with arms and legs. And I will show you how to set up this character. We're going to make a shooter game. And I'm going to, this is a little bit different, a bit different setup, but still almost the same code, but we will still learn a lot of new things. So let's go ahead and the next section.
41. Game Introduction - CloneStrike: Hello and welcome to this part of the course. So here we are going to create a game called clone strike. And what we're basically going to create it as a top-down shooter. Here you are going to learn how to create more advanced GUI. For example, a health bar in enemy counter. And you're also going to create a pretty advanced mechanics, for example, shooting and reloading and counting ammo. You're also going to learn how to set up a character running around and how to add weapons to that character. We're also going to work with NPCs. So AI running around and actually chasing the player and trying to kill the player. And we're going to make this whole game like from the beginning where you start with the main menu and you play the game, you get into waves. The game gets harder as you progress through the game. And at the end, when it gets too difficult, the kill you. And you'll learn how to make the death animation and the game over screen.
42. Creating the Project: Hello and welcome to this section. So now we are going to create our top-down shooter game. And we're going to learn a lot because we are going to do the character. And this time we are using a real character, which is a bit different from the bowl we used in the previous game. Though. Let's go ahead and create the project. So first, go inside the library and launch Unreal Engine. Next we are going to go inside of games. And in here we are choosing a blank project using blueprints and it's desktop. We are unchecking the starter content. And let's call it clone. Strike. And with that, let's create the project. Now that I am inside the project, before we do anything else, I want to click Update here, clicking on update, and I want to manage the plugins. And you can also access the plugins by going up here in the Edit and then plug-ins, that's the same thing. Came up here in my second monitor and didn't hear him plugins. I want to go down to virtual reality, just like we did in the previous project. And I'm ticking the Oculus VR and steam VR. So it doesn't start as a VR game when we release the game. So clicking onRestart and wait for it to open up again. So this was all so that now the project is ready. And let's go ahead in the next lesson and import some assets.
43. Importing Assets: Let us now import some assets that we can use for the project. So right now I am inside of the Epic Games launcher and inside of the marketplace. And here I want to find real assets. So going here to Bree and clicking on, Let's click on permanently free collection. And inside of here you see something called military-style mannequins looking on that one. And then go ahead and download it. I've already downloaded it. And when you have finished downloading it, you can add it to the project. So clicking on Add to Project. And then you have to add to the project. You have the 0.5. But it's not showing because you can see here it's not supported right now, but it doesn't matter. It's going to work or clicking on Add to Project and then taking the show all projects. Now you can see the 500. And here I am going to find my clone strike there. This is my project. And then you have to select the version which is supported for so 4.26, the latest one. And clicking on Add to Project. Just like that. And it's going to add it to my project and it's already done that you can see here inside of my project, I already have this added now. So going back to the Epic Games launcher, I'm going to go back and I think in the final the final page, yeah, this one, we need the super grid from the last on the last game we added. So looking on that super grid asset here as it back, we got on that one and then downloading it. And you have probably already downloaded if you followed the last game. And then just go ahead and create the project. This one you can't add directly to your, to your game. You have to create a separate project. So create a project and just call it whatever and create it. And once you have created it, I've already created it. So going inside of the library, you can find the project you created down here called super good starter pack. So I'm going to double-click and open it up. Now that the project is open, I can now go here and right-click this super grid folder. And over here I can go ahead and click on the Migrate button. Okay. And then go ahead and find the folder or you have it. So mine is inside of the Documents, Unreal Projects. This is the default folder. And going, going ahead and clicking on Clone strike. So this is the project we created. And clicking on content, it's very important that you are inside of the content folder. If you are outside here and trying to save it, it's not going to work. And if you are specifically in a other folder inside of content, it's not going to work either. You have to be, you have to select the content folder specifically, not another place. So right here inside of the content folder, select that folder and it's going to copy the folders. But then it's going to successfully copy it. And doesn't matter that some content couldn't be successfully copied. That's all right. And I'll go ahead and close this project. Then I have the super grid. And the last thing before we end this, I want to open the Epic Games launcher. It closed for some reason. And going back to the marketplace, here you have to go to a free and then Epic Games content. And inside of here and the last page, there is something called an animation starter pack. So clicking on this bag so we can have some animations for the character 0, clicking on it, and clicking on Add to Project. Now let's click again, show all projects and clicking on Clone strike and choosing the latest version it's compatible for. And then clicking on Add to Project. Now, now it added it to the project. And you can see here we have now important the animation sets, the mannequin, which is the character we're going to use. And see this is the character. And also we have imported the super grid that we used in the earlier game. Okay, so the next thing we should add is the weapons, are the weapons. So here inside of the marketplace you can search for weapons. And when you search for weapons, you can click on the Free a filter here so you can see the free assets. And here you'll want to download the FPS weapon bundled. You can see there are other weapons you can use for fun if you're a confident. But let's go ahead for this tutorial and use the FPS weapon bundle. So clicking on that, and I've already downloaded it so you can download it. And clicking on Agile project one is downloaded. Going to show all projects looking on Clone strike and selecting the latest version. So clicking on Agile project. Okay, so the last thing we can add for now is the enemies because we need some AI. And here you can go to free and Epic Games content. And down here I think it's on page five. So let's check it. H6. And hearing the page six, we have something called Infinity Blade adversaries. So let's click on that one. And here you can see we have a lot of different enemies we can use for the project. So clicking on Add to Project. I've already downloaded it, so you need to download it first. So clicking on it and show all projects. Go to clone strike kills the latest project and at two projects. So now this is going to be added to the project. You can see we have now all of these five assets. And if we need more ISS later on, Let's go ahead and import them. If we need some, some music or sound effects or whatever, I'll take a look at it later and downloaded it. But for now this would be a fine and let's move on to the next lesson.
44. Creating the Level: Let us now go ahead and design the level. And the level I want to make very simple. So let's just go ahead and start. First, we have to right-click create a new folder and let's call it maps. And inside of here we're going to right-click and clicking on level. So we are going to call this one map, and let's call, call it, let's call it main. This is the main map, so double-clicking on it. Obviously we have to add some lighting. This is very dark now. We're going to create lights and directional lights and going out. So I had to create lights and creating a skylight. And the last thing we want to do is over here in the settings. Here we can show the engine content. And inside the engine content here, the folder will appear when you click it here, leaking on it and searching for sky. And importing this sky. You can see we have a sky. And if you see on the Details panel for this sky sphere that we added, you can also change the son heights and you can see you can change the day and night just like that. Okay, so now we have this. Let's go ahead and create the level. So remove this search word so we can see the package here. And inside of here we can go to startup pack and source meshes. And in here we have different tools we can use. So let's drag in this super grid plane, was dropped it underground. And I'm going to click our bolded here on the white box and re-scaling it up, Will the ground will be created. And right now it's very dark because of the sun is very weird and you can see they're light is changing slowly and we don't want that. So let's go ahead and create visual effects and post-process. And this post-process volume, we are going to remove the exposure. It's going, it's a bit annoying when we are making games. But it's, I think it's a good thing if you are making like cinematic views, but when you're making games, this exposure is very annoying. So clicking on the minimum and maximum brightness inside of the exposure and the post-process and setting those values to one. And to affect the whole map, you have to go down and click on this infinite extent, just like this. So now the exposure is as it should be. And the reason it looks like this is because the sun is coming off a wrong direction. So clicking on the World Outliner, you can click on the directional light. And here it is. So it's beneath the ground right now. You can try to rotate it and see which direction the sun should be. And a very good reference here. We can say our mannequin. So in the ODS mannequin, the mannequin here, character mesh. And we can say that this mesh and place it in the level just so I can see the sun. Or clicking on the directional light. I can now rotate it to my liking. Depending on the character. I think something, Something like this would be fine. And right now the sun is very, very strong. So let's go up here and insensitive and set it to three. Now we will do the lighting in another lesson. So don't worry about for now. Right now, I just want to just make somewhat of a decent lighting just so we can work a bit. And here for the sky sphere, you can increase the intensity. And I'll increase it to two for now. And for this one I want to reduce the shiny parts. So clicking on this displaying here, clicking on the magnifying glass for the m super grid and double-clicking this. And here we can set the, you can see if I minimize this a bit, we have something called max roughness and minimum roughness. So the higher you increase it, the less glow it will be. So if I put it on one, you can see these squares become less glowy and discourse as well. So for this, I think I'm making it 0.75 or the maximum roughness and the minimum. Let's try 0.5 and I think it's too much dopamine 75 and 0.8 possible or zero-point nine. I think that's fine for us. Now let's close down and save everything. Okay, so now that we have somewhat of an okay lighting, we can now try to work with the level. So let's go ahead and create it. And I want to make it very simple level double-clicking on this one. I want to set the location of its zeros 0000. And just the character as well. Let's set the character 0, 0, 0. And here we can move them a bit to the middle. So this plane we want to resize depending on the size we want. And it doesn't matter how specific it is, honestly, we just want some room to work with. And the less credit 30 actually here you can click on the lock so it changes all the values at once. Clicking on a writing 30 and it will create this. So now we have this and let's, let's add some walls. Now, I'll go back to let me find it, the super grid here to super grid and start a PECC sources meshes and here in the box, and I'm clicking on this box, placing it. And I'm going to move it here to the corner like this. And then you can scale it along with the, with the wall here are the ground here. And you can make it larger for the wall. Something like this. And you can rotate it. And by the way, you can hold Alt and rotating, this will duplicates. You can drag this over. And let's make a very simple level. So let me actually, I'm going to make this one a bit larger, so it covers here. And I'm going to drag this. I'm going to make the snapping a bit more to 100 and clicking and dragging to duplicate here, going to make this smaller so they don't collide here. And I'm also going to hold Alt and dragging it and the bouquet in through here. Now, now we have a small level and I think this is fine. Let's just add for fun the censored box here. Let's add some obstacles. And maybe something like this. So we can add a few obstacles just so we have something in the map that's blocking. So I can add one here. And add one here. We can add four random ones. Can also make them in different shapes. That's okay. I like that. And just making it like this instead. Yeah, I think this is fine. So this is our very simple level that we can work with. And what we can do is having the shooter game here and you can spawn enemies and so on. And if you want the level to look a bit different, you can always click on one of them, looking on this magnifying glass on the material. And you can see how different materials that you can choose from whatever he wants. You also have some materials inside of the super group folder and tutorial level. And then the material instances you can see you have different grounds you can select if you wish to choose something else. We have even like flood colors, these are very glowing like that, and you can use those as well. So, but for now I'm going to this standard one.
45. Lighting the Environment: Okay, so before we start the programming, let's last thing. Do the lighting quickly so we don't want to do something really shiny, but let's, let's make it a bit better here. So let's go over and rotate the sun. So clicking on the direction light, tried to rotate it to your liking. See what you think looks good. And maybe I want something like this, covering a little bit shadows here and something like this. So I like this here. The shadows fearing. And I'm going to change the intensity depending on the day. And I think 3.1. Fine for me. I'm going to make it larger here by pressing on FL1, maximize the viewport. Just trying to take a look and seeing if this is looking as the daylight or not. Because sometimes you can lower it too much and it's looking like like nighttime. And I think 3.133 is fine. You can use the temperature yuan, so making the sun colder or warmer. But for now, I will just let it be as it is. And this is fine for the sunlight. So let's go over to the skylight. The skylight, what you can do here is you can change the intensity depending on the shadow. So this is, this one is affecting the shadow. So if you see the shadows being too dark, you can go inside of the skylight and change the intensity scale. And you can see here, the higher you make it, the less darkness the shadow will have. And another cool thing is here inside of the skylight, you can click on this small arrow. And this one is the lower hemisphere. This one is affecting this lower part of the mesh. And right now it's very dark. So to make it more realistic, we have to sample this color here. So because this color's not duck, so this color can change. And what we can do here, to choose the right color. You can't, you can't just pick a color like this because this will be wrong. What you have to do is wicking on the, actually before we click, Go, go to the lymph node. Inside of buffer visualization, you can choose the base color. So here now you can see sample the true base color. So clicking on the skylights, now you can go down. Here's the correct color now. So let's choose this color. Now this is the collect color, the correct color. So clicking on Okay, go back to the skylight. And now you can click recapture because recapturing means by go back to the lip mode here. Recapturing means also that it really captures the sky sphere here. Right now it's day time. If you change it tonight time you have to recapture again to Alice recapture. And it's going to be correct, and the color is correct as well. And it's using the lower hemisphere and so on. So now it's a lot more correct. So now let's go over and increase the intensity scale will make the shadows a bit more good to look at. I think I'll decrease the sunlight a little bit. Two-point aids. Maybe two will be fine actually, let's see two. Yeah, I think because it's very strong and this displaying here. Let's try that. Let's try two. And for the shadows, let's go back to the skylights. Unless the three, Let's do four. So now this is looking fine. Okay, so what we can do next is add some fog. So clicking on Create and inside of the visual effects, we can go ahead and click on exponential height fog. And you can see now it's adding some fog. So if we increase the fog density, you can see it increases here as well. And we can we can add some light fog. It doesn't have to be insane. But this is the fall off is fine, standard. And it can also change the color of it. I just want to see it. This is fine. And the density. Well, let's go out to the World Outliner. Hey, it on and off to see. And I think this is fine for now. So let it be like this and we can always adjust it. So let's go over to or we actually already created a post-process volume in the last lessons. So clicking on the post-process volume. Now, the post-process volume, we can change the image look just like in Photoshop or edit the look of the game or the picture. Here you can edit the look of the game would be post-process. And with the post-process, for example, here we have bloom. You can increase or decrease in the bloom. And for bloom, I think 0.4. So a bit under. Little bit under the standard one, because the standard is 0.6. And exposure we sit down, we can now add image effects right now, zero-point for this is the vignette. So you can see if I increase it, there becomes a black border around the edges. And I think I'll put it to 0.2. Now the white balance we can adjust. So for example, the temperature can be a little bit cold. You can see it. It's warm if I increase it and it's called if I decrease it. So this is the standard and then we can decrease it a little bit, maybe 5,800. And clicking understand I can increase it to make it a bit more red and maybe making it less cold. So five thousand, nine hundred and zero point zero nine. Just a slight difference here. Okay, So this is our level right now. And what we can do in global, we can change all of these. You can change the gain if it's too dark and always change it out. But right now I think it's looking fine. And we don't need that. You can play with the ambient occlusion and motion blur and so on. So I think this is fine for now. And let's me see if he's underground. He is looking on the job. This is looking fine. Okay, So this is what we have so far. This is looking great. And we can work with this. And let me check out the fog and see if we need it or if it's too strong or not before we continue. Let's just small zerocoins, just a small effect. Urine the VAB. And now we have this level with this lighting so far. So I think before we continue, we can add or increase the saturation a little bit slightly before we continue. Let's see what it looks like. Saturation and see if I increase it a little bit. So 1 to one or 1.05. And decreasing the fog little bit, the zero-point. Point zero one goes like this. Okay, so now we have the lighting done for our game. And before we end the video, Let's go ahead and add a light mass importance volume. So in here and that creates inside of volumes, you have something called light mass importance of volume. And this just defines what is important for the lighting to render. And we just want this to cover our whole level. So clicking on this one and you can change the brush settings. So increasing the size just so it fits all of the map. And it doesn't have to be specific. So it just needs to cover them up. I'm going to make it a bit larger, something like this. So now the light mass is going to render here. And to build the lighting to make it correct and build it and cleaner. You can go ahead and click on build and build all levels right now I just have one level though, clicking on that and it will start building, okay, Now that building is complete, and this is the final look of the level. And if we need to adjust something later, for example, we don't like the saturation this much. Are we? We want to make it warmer or anything else? Let's do it in the future. But for now I think this is good. And let's move on to the next lesson.
46. Setting up the Character: Right now it is time to set up the character. So this is the character we have, we have imported in the last lessons. So this one called ODS mannequin. We're going to use this character and let's set it up so it's ready for our game. So let's go ahead and side of the content folder and right-click it, make a new folder called blueprints. And by the way, you can move all of these marketplace folders inside of a marketplace. I'm just going to make a new folder called marketplace. And let me select all of these marketplace folders and put them inside of the market place. I'm probably going to take a bit of time. So looking on move here. Okay, Now it has moved to all of the folders, to the marketplace folder. And you can see these folders did not delete themselves because I can also see them inside of the marketplace folder. So this is a book sometimes with Unreal Engine and you have to click Delete. And if it does not delete it, Let's see if it dilutes it. Before I click Delete London, actually right-click on this content folder and click on fixed up read directors. And it's going to fix up summary directors. And let me select those again outside of the marketplace folder and click Delete. And now they remove themselves. So sometimes you have to fix up, read directors. They are folders or files that you cannot see. And so this one as well. And this one I cannot delete. So I'd have to restart the engine and you, if it never delete here, you can also delete it from your browser and file browser outside of the engine. But for now, let it be like this, it's fine. Let's remove these engine content folders by clicking here and clicking on Show engine content. And now they disappear. I won't bother with this for now. So now inside of the blueprints, Let's right-click and click on Blueprint Class. And to create our character, we have to create the character here. Before in the previous game, we use Po1. And this is because our character was just a ball that rolled around. But now we have a real character, like two arms, two likes walking around. And for this we need a real character, not upon, we can't make it with upon. So creating a character and let's call it BP. Bp, BP character base. So now this is the base class of the character. And I will show you something. Here. You can right-click and click Create Child Blueprint Class. Now, from this main Blueprint class, which is the character base, we are going to make two children blueprints, one called bp, player base. And right-click again under character base and do the Create Child Blueprint class and call it BP enemy base. And now you're wondering what this is going to do. A why don't we just right-click and create a new blueprint class and create a character and just call it enemy base or enemy and create a new character called player. The reason we do it like this, like right-clicking and creating a child is because sometimes you want to edit something for everyone. For example, here, if the enemy, it needs some edits and the player base needs some edits. And they both need the same edit. You have to go in here, edit something, and then you have to go inside of the player base and edit something. And instead of doing the same thing over and over, you can just simply go inside of the character base and edit something. And when you edit it in here, it will edit it on all the children. So now these two, if you hold the mouse over it, you can see the parent class as the character base for both of them. So if I added something here in the settings, for example, if I untick this, it will untick it for both of those. You can see here now they have a star. It means something changed. So this is a pretty cool thing. If we need to change something for everything, we can just simply go inside of the base class. If we need to change something specifically for the player, we can add it inside of the player base. And the enemy base will not be affected. Because the enemy base is the child of the character-based, not the player base. Okay, so now we have a character base in any rebase, a player base. So from the player base we right-click and create children Blueprint class from this one. And this one we're going to call BP machine. So our character is just called machine, just like Terminator. Imagine if it's terminated or playing around. And you can right-click here and make a new folder. I'll call this one enemies, and I'll make a new folder called players are just Blair. And you can go ahead and move the player base and the machine inside of the player and move the enemy base inside of the enemies. And we will focus about enemies later on. And I will just let the character-based be out here. So now instead of the player, now we have the player base and we have the character. You could have called it bp player. For example. I just wanted to call my character machine just like if it's terminator or BP terminator. But if you edit something inside of player base now, it will also be edited inside of machine because machine is a child of player base. So this is a pretty cool thing. If we need to edit something for everything, we can just simply go back and edit something in the character base and it will affect both the enemies and the players. And for example, when we do something that's, well, the players, for example, if I do something here inside of player base and I have a lot of characters. Let's say I created a lot of children here. I have a lot of different characters. Imagine that if you're playing Fortnite and you have a lot of skins, that, and basically you have a lot of skills. You have three skins here. But I want to do something that is similar for all of them. For example, if you walk into this wall, you will die. Then you're not going to program this code inside of here. Because I want to make it happen for all these three blueprints classes that I made, all of these skins, fortnight skins. And the way you do this as just coding it in player base, because all of these are children of this. And if you do code in solid, good player base, it will do the logic or affect all of these three others, which are the children of this player base. Okay, so let's delete it. And actually I didn't mean to leave that BP machine. So just like this. And now I'm going to go inside of the player base. And actually let me go inside of the loop runs now in the character base, I am going to remove the starts with tick enabled. And this is just for performance. So just compiling saving, That's all in character base. Inside of player base here in the mesh. I actually want to add a camera because we need to view the character from a top-down view. So clicking on this mesh here. This is the character by the way. And here you can see it's almost just like the actor. We can add components to it. And just like the porn we made, the point, we added a sphere. And here in character, you can see you're actually getting something called a mesh. And this mesh is actually the character. So you can add the character you're using. So you can add this character here. And you also have character movement. And here you can edit the general movement. For example, the acceleration, gravity. You can edit the walking, you can edit the jumping and falling. You can also edit something with multiplayer here, with swimming, how you're, how fast you are swimming and so on. So you have a lot of movement options inside of this character. And when you make a game, you have to go in here and balance all of these things. So you have to make your character unique with this movement component. And here inside of mesh we add the character and we can also assign an animation blueprint to animate the character, which we will also do in the later lesson. And you have an arrow component. It shows you what, What is the front of this viewport. So the character should be facing this way. This is what it's telling. And then we have a capsule and this one is just like the Trigger box we made before. We can make events from this ON begin overlap just we, just like what we did in the previous game. And in the player base, you can edit a lot of settings. You have Class Settings and default. And down here, you all already know what you can create. Variables and macros, functions and so on. Okay, so let's start here. Instead of clicking on the mesh, Let's go ahead and add a spring on. Just like what we did with the sphere with a ball we made previously. So this is just like the boom microphone you see in the news and on the television. And then you add the camera. So this boom, boom arm or a spring arm is holding the camera. And you can now click on the spring on. And you can click and rotate it. And I think I'll rotate it until 70 degrees. And now you can choose how far the camera should be from this target length. Let's try 600 and we will just change it. If we, if we think it is too close. Let's compile and save. Ok, and let's actually go back here and let's close this. I'm going to player and here. And so this is the player base. I'm actually just going to see if I edited in the wrong one now. This was correct. Yeah. This was on the player Bassanio to the camera. I thought I did it in the character-based. And the reason why you don't want to add the camera in the character base is because if you add it inside of here, it will also, it will also be available for the enemy class. And why would you need a camera for the enemies? You're not going to control the enemies. So this is why we do it in the player base instead. So instead of a machine, if I go in here. Remember, machine is a child of this blueprint class. So if I go in here, click on Open full blueprint editor. You can see the cameras already here. And this is because this is a child blueprint of the player base. So everything you create in the player base, even if it's variables, you will be able to access them in the BP machine because it's a child. Okay, so in here in the mesh, we need to add the character. So let's go ahead and find the character inside of the marketplace. Ods mannequin, mannequin character mesh. And the characters here. Scroll down a bit here and find this skeletal mesh here. And here you can drag in the character. So let's maximize it and view it. So this is the character. Let's click the art tool or a click E2 for the rotate tool. Rotate it so it's phases to this arrow. It's in the front and now go in, in the left view or front view, that's up to you. I'm going to the left. And then here you can drag down the character, so it's actually in the ground here. I'm going to disable the snapping. I can move it smoothly and just move it as best as you can here. So it's this one is the ground moving it down. Just like this. I'm going back to the perspective mode. So now the character is in the middle. And don't worry about this for now. Let's compile and save. And the last thing we want to do is clicking on this machine, the class defaults. And inside of here, Let's see if the movement is correct. They user controller rotation, your LEA can uncheck this one. And all of these pitch, yaw and roll. These are the X, Y, and Z. This is what they're called. You can see that the rotation, the excess cold roll, the die is called pitch and DZ is called yaw. And this is what it's going to inherit from the controller. So when you press your keyboard and move around, it's going to inherit the movement from these pitch yaw and roll. But we don't want to inherit any movement. When we move around in the top view game, we just want to move the character without moving the camera. So this is looking correct, and I'm just going to make sure everything scrolling down here it is. And let's go in the mesh this to see if something needs to change. It's all good. So inside of the spring arm, you can remove them, do collision testing. And what collision sex testing is as if you're looking down here on the character and the character or something gets in the way, the camera will actually be pushed down because of this item that pushes it away. But we want to remove this so the camera will not be affected by anything in the world. And let's remove the camera settings, inherit pitch, yaw and roll because we don't want to move it around. So it should just be like this all the time. Yeah, that's looking fine. And inside of camera, we probably don't need to change anything. Inside of the character movement. However, we are going to hear in the rotation settings, you can take this one, orient rotation to movement. So when you move around the character, we're, we'll rotate depending on where you clicked. So pressing D will make him face to the right. And this is what we want from the top down game. Okay, so now we have this movement. And if you want to rotate quicker, so when you walk around you can increase this number. So let's put it on 600 for now just to make it rotate faster. And everything else is looking correct. So let's save everything, compile, save. And remember you can always click these three buttons. Go to save on compile and success only. And this will do so if you compile and it says success like this, you don't have to save because it saves automatically. So it saves you want click. Okay, so now let us close this one down. And now we have, if we go back to the blueprints and side of the player, now we have this player base. We can do some code in that will affect all of the players if we have many. And then we have something specific. For example, this machine. And imagine I can have another character. I can have a character that is another machine, just a normal humanoid. And I can go inside of this character human, capture and add my mesh. Because now we added this mesh inside of this children blue, Blueprint Class. And therefore, if we can create a child now here, also, if we want to add more players, we can go ahead and clicking on the mesh and adding a new mesh if we wish to. Okay, so let's delete this one, and let's delete our fake character that we used before. So now you can see, now you actually have the camera. You can right-click and click on pilot. And he can see what it looks like if you press F 11 to maximize the viewport and clicking on g to remove all of these, you can see how close the camera is and it's pretty close. But without going out from the camera, I'm just going to double-click here and clicking on. Let me actually do it from the player base. I don't want to change the settings from here. I want to change, because if I change it in here, it will only affect this blueprint. If we had multiple players, they would still be looking like this. So I want to do it in the player base, clicking on spring arm and make it 900 and see what it looks like. Yeah, this is looking a lot better. So 900 and the target arm length for the spring arm. Let's save everything. And everything's looking correct. Let's close it down. Save everything. And this is all we needed to do for the character. So now in the next lesson, we will go ahead and do the Demode and player controller before we do any movement.
47. Game Mode & Player Controller: Let us create the Game Mode and under player controller. So let's go back in the blueprints. Let's quickly right-click and click Blueprint class. Go ahead and create a player controller. And this one is going to be called PC. I can call nonpolar control. Actually, I used to call it the name of the game. So this one is called clone strike. A PC is for player controller. And let me right-click again and create a game mode called GM clone strike. And four. For the game mode, you can actually create multiple game mode. So if you have a game mode, let's say you're making a board game. So you're making checkers or chess, or snakes and ladders or yet see, or anything like this. You have to create multiple game modes for those. So if you have a game mode for chess, you have a game mode for checkers. You will have a game mode for Snakes and Ladders. You will have a game mode for when you draw, I don't know, whatever games you have, you'll have multiple game modes. So right now we just have this one game and we only have this one game mode. And it can also have multiple controllers. Okay, so now we have this and the next thing we want to do is we actually want to set it up. So going ahead and edit inside of the project settings. And here you have something called maps and modes. So clicking on maps and modes, you can, you can change that default Game Mode. So your Custom Game Mode here. And inside of here, you can also change the defaults here. So in the default font class or an Alice changes to BP machine. This is the layer we actually want to spawn. And or the controller, let's change it to the PC clone strike. And for the maps here, the default maps, we made the map called main. So I'm going to change the editor Startup Map 2 mean. And again, default map to me. So now when you open the, the editor, you're not going to start in that empty level all the time. Now you're actually going to start in here. So let's save everything. And to make sure it's working, I want to go inside of the game mode. And here to the right in the class defaults. I want to check that my controller is PC clone strike and a player is BP machine. And this is correct, and we don't want to do anything in here. This is fine. Inside of the bladder control largest checking everything. And this is looking fine as well. We don't need to do anything inside of here. And then the last thing here, inside of the world settings. Here you have also something called Game Mode override and you have, you have to remember to change this else, that game mode will not work inside of this level. So clicking on it and changing it to GM clone strike, clicking on these arrows just to make sure that the flow controllers PC clone strike, and the Default Pawn that will spawn is the BP machine. And by the way, the thing we created a pure right-click and create a blueprint class. You can see here we created a character. So why is it called here? Why is it called a pond? Because the point is what we used in the last game, in the last game we created upon. But right now I'm printing a character and there is an edge here. A character is a type of porn. So this is actually also upon, so this is a type of bond. This is the wire. Why it is called on here. And the character will work here because the character is actually a type of cone. Okay, So this is what we had to do with the Game Mode and player controller for now. So very basic. And let's go ahead to the next lesson.
48. Adding Player Movement: Now we can do the movement for the character. So to do the movement, first, we need some inputs. And just like we did with the first game, going ahead inside of the edit and go inside of the project settings. And inside of the input, you can hear create access mappings. So I'm going to create one or two, actually one called move forward. So this is when we move forward and backwards. So this is y, this is what I call it. So it's actually just moving forward and backward. And this is move rights and sexually move right and left. So let's look on these pluses. And you can click on this button, click on the W on your keyboard, or you can find it here. That's up to you by writing S key, for example, or S. It cannot find the key, so click on S and finding it. And here, the easiest way, just clicking on this click on the D button on the keyboard and clicking on the button here. So let's make this one minus1. So going forward is one going backwards, minus1 going to the right as one going to the left is minus1. It can imagine it just like in a graph, plus and minus. So access mappings are used for the movement here. These are the access mappings and the action mapping we're going to use later. This is, for example, if you click a button, so if you click E to open doors, if you click the left mouse button to shoot your weapon and so on. So these are their button clicks, a few, a space to jump. This is also an action mapping. So now we created this forward and right, and let's create other movements later. I, I like to create things when I need them. So I don't just go ahead and create 10 different action mappings. And maybe I'm not using half of them later, so I only create them when I need them. For now we've created them and I like to do the movement inside of the lab controller. So clicking on the player controller here, clicking on open full, full blueprint editor. Let's delete all of this for now. So in here we can right-click and we can do the move forward that we called it. And here this is the event we need. So this is what happens when we click W to move forward or estimate move backwards. And the other one was called MOOC, right? Okay, so now we have moved forward and right, and the thing we need to move here. Remember in the previous game we use torque is torque, which is a type of force that we moved our ball around. But here we are actually going to say add movement inputs and remove the context-sensitive. And you can see here is something called a function called add movement inputs. And this is what we're going to do is I'm just going to right-click here and clicking the context-sensitive again before we get. So let us copy this one also and do it here. Let us now connect the axis values inside of the scale value. Though, when we plug w, This one will be 11 with folic acid, this one will be minus one, but this will control the movement. Okay, so now we need that target. And the target is of course the player. We want to add movement to the player. And this is also why sometimes you do this and right at the movement inputs and you don't see anything. And this is because you have to draw it out from the target. For example, if we had the character and we drag out and write at movement input, it will actually appear. But if you do it just like this without the target, it will just be a general search. And you're searching for a context-sensitive. So something that relates to this event and nothing's being shown as why I remove it and add it. But if you're dragged out from the target and search for add movement input, it will connect it automatically to this and find it. Okay, so I need the target, which is the character here. So the target is the character. And it is actually, let me save. And this is the player base that we need. So we need the player base. And there isn't as the player, all of these are eternal children of the player base. So if we just take this one, all of them all have the same input. So we need a reference to this player base. And the way we do this, remember in the previous game, we have to communicate between blueprints using Blueprint Interface. So this is the same thing here. And let's go over and create a Blueprint Interface. So right-click. And let's make a new folder called interfaces. Inside of here we're going to right-click do blueprints, Blueprint Interface. And this one I'm going to call int player base. Because this is specific for the player base. I'm going to double-click and make a function here called gets layer base rep. Or it can also just call it. I'm just going to call it get player, player reference. Just not to make it too long. And here I'm going to make an output. And the output is going to be the piece or BP. Oops, bp player base. You have to reference to the thing you want to have the reference for. And in this case it's bp player base. I'm just going to call it called the variable player. So Compile and Save. And now we have to open the player base to edit. Click on the player base. Let's delete all of this for now. Inside of the player base, you have to go to the Class Settings. And remember you have to add the interface before it works. So searching for int layer base and adding it, you can see the interfaces actually appear here. So Compile and Save. Let's double-click this endless right, drag out and write self. Now it's asking what is this reference, this row reference itself, we are inside of cloud base. And therefore, now it knows that the player you're referring to is actually player base. This is what self means. It's referring to solve. So what we can do now inside of here, remember that the player base is a type of character. So you can see or the parent class character base. And if we go inside of the character base, the parent class is character. So what we need to do inside of here, inside of the player controller. Let's do a sexually do it in the beginning play. But what we can do here is say gets character or gets good player character. And this is what we can do because the play, the character Bayes is the type of character like the parent classes the character. So get the player character. And now we have to reference to this specific player we want to get to, and we want to get to the player base. This is what we're trained to refer to. And remember we made this function that we can refer to. So going here and saying gets layer graph and it's a message because it's a Blueprint Interface. Let's do that. Begin play event here. So when we begin playing the game, this will be called. And the player here is now this because remember we wrote self here. This is why it knows that this good player ref is actually this one. Here we can access all of the things in the inside of the player. Now here we've got the character, we've got the layer REF, and let's create, right-click this and say Promote to variable. And let's call this player upon. So now we have a reference to the player point, which is this one. And before we do this, let's actually make a valid node. So saying get player character, then saying is valid. So it's going to ask, let's connect this like this. So it's now going to ask, get the player character. Is this player character valid? If it is, then go ahead and do this reference. If it's not valid, then delay by 0.2 seconds. And then tried to fire this again and see if it's valid. So we can move it up here. And this is done because sometimes the character is not spawned yet. For example, I refer a lot to Counter-Strike. Imagine in cabinet strike through. You just joined the server and you're supposed to select a team, a counterterrorist, or a terrorist. And if you haven't selected a character yet, you're not actually inside of the game, so you don't have a player character, you're still in the spectate mode and you're selecting a character. So therefore this will not be valid, so it will wait for you. It will go ahead and delayed by 0.2 seconds. And when it's complete, when it completes this delay, we'll go ahead and try to fire again and see if, if you're a valid. And if you still haven't selected a character, it will go again and delay in the land lay Ontario's. You select a character and it will go ahead and create a reference to your character. Okay, so now this character that we have, we can now say drag out from this pen. And here you can see gets control rotation. So we're getting the rotation of the control. So when you click w, it knows that your rotation is this way. If you click on D on the keyboard, it knows you. The control is this way and so on. So you're getting the rotation of this control. And here we say get forward vector. This is because we want to move forward. This is the direction we're facing, get the forward vector. And the other one is get right to the vector. And now we can plug it in here. And this is how we do it. So if we compile and now it needs a target, of course that's me for getting. So the target is just display or you can actually just go ahead and connect it like this, but it looks a bit messy, so I want to create something new. But before we do this, Let's actually drag this out here. Get the point again. You can right-click and click on Convert to validated get. And just like this one, it's going to check if the character is valid because you're not, you don't want to do the movement if your character hasn't spawned, doesn't make sense. So it's going to check is the character valid? If it is, go ahead and do the movement input. The target is just a square. So this is the same as connecting this one here. So this is the same connecting it here. And I'm going to do the same here is going to check if the character is valid before it does anything here. Else it will give you an error and say, Hey, your character is not valid. How am I supposed to do this movement? So this is what we avoid, avoid some errors. And let me double-click to add our reroute node just to make it a bit more clean and moving them down here. So now let's compile. And I forgot, sorry, I always forget the target here. Let's save All and click on Play. And now it's going to say error. And let me, There's BP first-person character for some reason, cancel it may actually see what that is. Let's go ahead and click on Browse. I actually wanted to see what that is. And this is inside of the tutorial level, which doesn't make sense because we don't really need it. But let me click deletes here. And actually I'm going to delete all of this first-person folder. Let's delete it. We don't really need it. Let's save everything and click on play. And we dropped through the ground. And this is not supposed to happen. This is because we're not, we haven't added a player starts solid circuit again and click on Create. Click on player start. This is what we need L, So we're going to fall here from the top. So this one is going to say bad size if you have it beneath the ground like this. So just moving it up slightly. Something like this. And when you hit Play, you can see you, we are now moving around. So this is awesome. I click f 11 to full-screen it so you can see you are moving around. And that's nice. So the next thing is we can add some animation for it, so it's actually running around. And for now, I just want to show you one mistake. We did and I did. Actually, it has nothing to do with you. So clicking on the BP machine, you can see here we actually added the change these settings by using the controller rotation. You're inside of BP machine, but we're supposed to do it inside of player base because it needs to be applied to all of the characters who creates and not just this one. So I'm going to hear in the class defaults, take this one again. Out of the mesh. There is nothing inside of the spring arm. I'm going to take all of these three again. And inside of the character movement, I'm going down to the rotation settings. And I'm taking this again and making this 360 just like it was before. That. Let's actually do it through the player base. So this is the correct one. That's my mistake. They'll removing this inside of the class defaults, the, your inside of the spring arm removed the collision testing and these inherits. And in the plant movement, Let's go down and do the rotation, which is here. Click on this and make this 600. Though just a small mistake. The Alaskan play and make sure it works and it does. And let's go ahead to the next lesson.
49. Retargeting Animations: Okay, so let's go ahead and see how we retargeted animations. And before that, I actually made a folder inside of assets, metacharacters folder. And inside of here I dragged this mesh here. So here it was inside of the ODS mannequin and mannequin and character and mesh. And these ones, I actually dragged inside of my own assets Characters Folder and called them SK machine, or this one's the Skeletal Mesh. And the physics asset is k machine and the machine skeleton for the skeleton. So I have these in here just so it's more organized. Okay, So now let's retarget animations. And remember we imported animations in from the marketplace and we imported this animation starter pack. So clicking on it, you can see a bunch of animations. And all of these animations, we need to add it to our own character because this one is just the Unreal Engine default character. The way we do this, we have to retarget the animation. So we first have to see what our animations are we going to use? So what we need for our purpose is the idle rifle hip. And you can also search for S4 it here. So it's baseball rifle. You will have a better chance of finding it. And here you can find the aldol rifle hip. So you right-click on it and the retarget and duplicate animation asset. But I just want to explain to you quickly what it means. So all of these animations, they are linked to a skeleton. So just like here in the character, we have a skeleton for our character. All animations are linked to skeletons. So here in the ODS mannequin, our mannequin folder, we also have animations that came with it. And actually going to duplicate them just are actually going to see, funny. I don't think I need them. But you can double-click on him and you can see what it looks like. And these are for our character. So these animations are linked for our character, for our skeleton. They are using the skeleton. However, this animation startup X, they are not using our skeleton. They're using this skeleton inside of uniform mannequin mesh and have this skeleton which is using this standard mesh. Well, so this is how you, why you need to reach target, because we need to use our own character. And the way you do this, go ahead and let's search for the animation we need. And let's start with this idol rifle hip. So the idle rifle, right-click it. Retarget animation asset and duplicate animation assets and retarget. Though clicking on this, this viewer will come up. And this is the viewer where you select what skeleton you want to target two. And right now you can see nothing is appearing. This is because you have to sometimes a untick this one saying show only compatible skeletons. And you can now see all of the skeletons in your game. And these are, for example, weapons. They have skeletons as well. We have the enemies. Whatever we downloaded, this is some Him for or whatever. So we have a lot of skeletons for random things, but we want to retarget to these SK machine, So our own characters skeleton. And then you can just click RE targets. And now it has retargeted the animation. So if you go over to the content folder here and the base content folder, you can see your animation here it has retargeted it, and now this one is on our character. Okay, so let's do this for the rest. So we also need a move forward. So searching for rifle, and I'm going to take this one jump forward rifle. So if you double-click it, you can see is jogging forward. This is what we need. I also need a death animation. So if I remove this rifle, so now I have the jug forward selected. And if I hold Control and can also click on this, that three. So now I have both selected and I can right-click, Right-click and read targets. Remove the compatibility search for SK machine. We're going to sit and read targets. Now if I go back to content, you can see we have a bunch of animations now that we can use for our character. And we have here an idle, we have a jump forward, but we also need a fire and reload. So let's go over to the animation starter pack, right rifle. And let's search for it here and reload rifle hip. This one, and the other one is firing. So this one fire rifle hip. So these two here, right-click, read targets. Remove this, search for the skeleton. And go ahead and retarget. Okay, so now you can see I'm seeing everything. This is because I'm searching here, it's searching in old folders. So removing it, you can see we now have all of these animations we can use for the character. And I'm going to go here in the assets folder and the characters right-click make a new folder called animations. And inside of here I'm going to drag all of these animations inside of this Animations folder. And this is more organized. And what you can do if you want to make it more organized here in the Blueprints folder, you can set a color and you can change whatever color, maybe blue for blueprints. Just like this. And you can see now we have a blue, a blue one. So if you're looking around here, you can easily spot it. And it can even make all of them, All of them blue like this if you want. Okay, so now we have the says animations. We have the animations ready and retargeted. And this was it. And if we need more animations, we can always go ahead and retarget some more. So this is it for now. And let's go ahead in the next lesson.
50. Creating a Blend Space: Now that we have the animation is ready, let's go ahead and create a blend space. And the blaze and blend space is simply just putting the animations together so we can use it in an animation blueprint, which we will create later. So let's go ahead inside of the blueprints and inside of player, and let's print it in here because it's Player Specific. A right-click here, animation, and then choose the or the blend space 1D. Or clicking on it, we have to select what skeleton we want to use, and we want to use our own skeleton called SK machine. So clicking on that one, and let's call it BS for blend space. And I'm going to call it jog because this is just the job would derive fall. So we can have blend spaces of the character jogging the character walking is another blend space. The character, let me think. Sprinting is another blend space. So we have a blend space for each movement. And for example, for jogging. Realistically, this should be called jug rifle, because we have a rifle jogging. And you also can have a BS jog without a rifle. So just calling a joke. But right now we're ho holding a rifle, so calling it jogs rifle. Clicking on this blend space, you can see you have this new viewer. And making this a bit bigger, you can see we have a horizontal axis and this is the movement speed. So calling it movement speed. And this movement speed, the minimum value is 0. This is fine. We can, we have the speed of 0 and we stand still. And the maximum speed, let's put 600 and we can always change it later if we want to increase it. Everything else is fine. So here, down here you can see we have a graph and this is where you put your animations. And if you put the animations, you can see your character moving. And to the right you have all these animations. So now what we want to use is the idle hip that we retargeted. You can also find it inside of animations here where you put it, you can drag it in or tear and somewhat easier to find it. And here at the movement speed, you can see here down in this axis is the movement speed from 0 to 600. So now at 0 we need the idle because we're not moving. So we're dragging this idol and putting it on top of here. Now you can see the coaches idling at speed 0. So this makes sense. At speed of 600, we want the blood should be running. So here, Jacques, forward, we're going to put it here. So now when you hold Shift, you can move this and you can see, you can actually preview the animation if you hold shift and move this, this pointer, this is what the character will look like. Okay, so this is cool. This is everything we need to do. Very simple. Click on Save and click on Close. So now inside of the Brooklyn's player, a player, we have the blend space called joke rifle.
51. Animation Blueprint: Now we have the blend space ready. So now we are ready to create the animation blueprint. So let's go ahead. Inside of the player folder, we're already in here, inside of player. Let's right-click. Go to animation and do the animation blueprint 0. Clicking on that one, we have to select what kind of skeleton we want to use and we want to use our own called Escape machine. So selecting that skeleton, clicking on Okay, and here we can call it and MVP for animation blueprint. And we can call this one for player. So this is for our player. So double-clicking this animation blueprint, you can see we get into a graph and this looks complex, but actually it's very easy. You can see here to the left, just like the blueprint class, we have the macros, variables, functions, and all of that. So this area is to see this. Now, we have this preview and here we can see how the character is moving. And inside of here we have the Event Graph or animation graph. Sorry. We have an event graph where we will code just like we do in the in the blueprint classes. We have the Event Graph and also have the animation graph. So this is a new graph of what the animations. And to the right you can see different animations, just like when we created the blend space. Okay, So these are the animation previews. And this is all good for now. Okay, so this is all you need to know for now. And then to create our first animation, we have to create a state machine. So right-click writing States machine. And you can see here we can add a new state machine. This state machine, I am going to call it local motion, hello movement. And we can collect connected this one, not collect this one. We can connect this one. And we can double-click this state machine that we created. And inside of here we're going to do the movement. So simply what we want to do is we want to do the jogging. So here, go ahead and drag out and you can either add a conduit and a state can do it is just like a connector that you can do to clean the code. They'll go ahead and add a state. And the state we want to add is jogs. So let's, let's write joke. Let's double-click this state. And here you have to insert the animation. So just going back to so you know what's going on. And the same warning because we haven't done anything here, just like this. Let's compile and save. So we created a state machine, I connected it to this pose. This is the result. And we're going to double-click this state machine and we added the state. And inside of the state, the state we need to add the drug animation. Though here we made a blend space. We're not going to add this jog, or would, we could do this and the player would jump forward. What we want to add this blend space jargon because we don't want to jog when we have this bead of 0. So let's pull that up and was connected. And you can see we have something called movement speed. And if I double-click the blend space, remember, movement speed is this one. So whatever you called, it will be displayed here in this variable. So this is the movement speed we have to add. With the movement speed is 0. The player is going to stand still. The movement speed of 600 or maximum, It's going to be moving. And we need to plug in the movement speed until the player old or tilda animation what the movement speed is currently. Okay, so now we have connected it. The movement speed is 0. And you can see if I write 600 and I compile is going to run. But we want to calculate this dynamically depending on how fast you are running. So to do this, you have to go in the Event Graph and do a bit of code. And this is a simple one. Here, you have to write initialize. And you have an event called Blueprint initialize animation. And this is just like the begin play in their blueprint actors. And this is simply a begin play. When the animation begins playing, what do you want to do? Just like a begin play in all of the author Blueprint Classes. Let's take this one, try Get Pawn Owner. Let's take it up here. And here we can say is valid. So is this pawn valid here? So as, as this one valid, if the point is valid. So if you have created your character and the character actually exists in the level, Let's right-click remote to a variable and call it layer upon. This is if it's valid. So let's double-click to make a reroute node and make it. Make it structured. So if the layer is actually inside of the level, so if it is, the character here is valid. If it has spawned inside of the level, go ahead and create a variable of this bond. If it's not valid, Let's delay by 0.2 seconds. And when it's completed, Let's reconnect it here and there is valid. And what this does is if the character has not been created yet, it's going to go ahead and delay by 0.2 seconds. And when it's complete, it's going to run this as valid again and again and again and again until your character is actually valid and it will create the variable. Okay, so now we have a variable, now we have this Player Pawn was drag it out. And here we have to write velocity because we want to get the movement speed. Remember, we have to get the movement speed of the character that we're getting the velocity. And remember in the movement speed, if we go back to the jock state up here, we need it in a float variable. So this is a float, the green variable here for create a new, whoops, not a function with a leader there again, create a new variable here. Remember the green ones are the floats. So a float is simply a number. A compile here is simply a number with decimals. Now I'm going to delete this one and let me go back to the van graph. So this one is a vector right now. And to get it to the velocity to a float, we just have to write length. So we're getting the length, length of this vector. So getting the length. Now this is a float and this is the movement speed. So we're going to right-click promote to variable and say movement speeds. Now let's connect it. And now it is going calculate their movement speed. Now we don't want to, we don't want to run this code because this code is going to run untick and running on tick, meaning it's going to run every frame. And we don't want to run it every frame if their character has not yet spawned. But because, why would we, this would be a waste of, of memory. So let's go ahead and take out a player pawn here. Let's right-click and say Convert to validated get. Take it down here. So now we connected when the player porn display upon here is valid. Then go ahead and calculate the movement speed. This means if the player has spawned, go ahead and do this. If not, don't do anything, and we don't have to connect anything. So it stops here. It checks if this is valid. If it is, then it will go ahead and do it. Okay, so Compile and Save. And now let's go ahead and side of the jug state, and we now have them movement speed. So let's drag out this variable and let's just put it inside of here. And you can see the movement speed is now connected. Let's compile and save. And now it should be working. But now we have to connect this animation blueprint to the player. So let's close everything. Let's click on the player. So the layer base, because we want to affect all these players. Imagine if we had a lot of players, a lot of characters, sorry, if we had a lot of characters, we want the same running animation for them. I'll click on the player base and let's actually add it inside of the player base. So inside of the player base, you can click on Mesh. And inside of mesh, you can look here in the animation mode. And the clicking this, use animation blueprint. This is correct. And use what animation clouds do you want to use? We want to use the NBPA players that we just made. Let's compile and save, and this should work. So if you go inside of the BP machine, the viewport can now see your player is actually moving. And this is called now, now the player is moving. And this is pretty cool. So let's go ahead and click on Play and see what happens if we have any bugs. So clicking on the movements. You can see that the planet is moving and all the animations are playing. If we stand still, we're not doing anything. If we move, are moving. And when we click Escape or not getting any errors. So this is very cool. Now if you want to turn faster or slower, you can go ahead inside of the layer base and you can go inside of the character movement. And down here in the rotation that we changed earlier, if you decrease it, you will rotate slower. And if you make it the higher your view will rotate faster. And also inside of the animation blueprint or inside of the blend space. Here you can change this interpolation time. This interpolation time is how quick it's going from the idle state to the running state. So you can see if I increase it insanely high, I click on Play. When I run, you can see it's sliding and it's going to the running state. When I stub and run, it's good. Because you want to stop, It's going to turn slowly back to the idle state. If I run, it's going to go to the running stage. If I stop, It's going slowly back to the idle state. So you can play around with this one. Sometimes your character is sliding and you can go ahead and add just some values. You can adjust the speed, adjusting interpolation. And right now I think 0 is good. So you're just looking fine, so that's fine. Okay, So this is our character moving. And the next thing we can do, we have all sorts of things we have to do. We have to attach the weapon, we have to fire the weapon, we have to do the enemies and so on. So let's move on.
52. Attaching the Weapon: Hello everyone and welcome back. So now we have set up our character and we can now move around. And you can see here and move around and that's looking good, but I just want to do a little bit of an adjustment. So I want to rotate a little bit Foster before we go to the next subject. So let's click on the blueprints layer. And in the player base, Let's go down in the character movement and go down to rotation, and let me make it 700 instead of 600. And the next thing, I think the character is sliding a little bit when walking. So here in the walking animation, if we click on the jog, you can see here this is the walking that we did before. Here for the running animation, if you click down this one called joke forward, you can increase the scale and you can see he's running faster. If you increase the scale of it. Whoops, not the, not the idle, sorry, the, this one, the running animation. So I want to increase it retinoids one. And I want to make it 1.1.2 just slightly faster than it was initially. So this is how you make animations faster just in case your character is sliding or your character is a small character and needs to run faster than a normal character to make it look more natural. So right now the speed of the normal ones like this, and we can make it a little bit faster. Just like that. Let's try it out before we go and continue. Yeah, I think just looking at a little bit better and we can also rotate faster. Okay, this is a lot better. So let's go ahead and attach their weapon now that we have the character. And the way we do this is you go inside of the mesh. So let's go the easiest way. You can either actually go here in the character. And let's open this, this mesh here, the character mesh that we, we added in here. And in here you can go inside of these Skeleton Tree. Okay, So with this skeleton tree, we want to attach the weapon. And before we do that, let's actually preview an animation. And we want to preview, Let's preview the idle rifle hip. So he's standing like this and we can add the weapon. Let's stop this timeline so we don't want it to animate. And we want to attach the weapon to the, to the right-hand here. So you can see here when you click on an on him, you are, you are choosing some bones. So these are bones. And this is your skeleton. So you can see here when you take the rotate tool, you can rotate the skeleton. And sometimes you can do this actually to modify animations just in case her animation is looking wrong. You can see here now it's ingested DIBL animation. But now let's click Control Z. And the thing we want to do is clicking on this bone or selecting it here, the hand right here we want to right-click and we want to add a socket. So a socket is just a, a holder we can use. So just an empty holder. And this socket, we are going to press F2 to rename it and call it S for socket. And I'm going to call it weapon. So this will be the one holding the weapon. And I'm going to right-click this one and you can add a preview asset. And the one we're going to preview is called K. And this one, K is 74. You. And I have no idea why. It's called KA I'm pretty sure it's called AK 70 for you and not K for some reason out of them. Let's click on this one. And you can see now I'm going to decrease the cameras. So quick. You can see now we added the weapon. So clicking on this socket, you have the socket selected. I'm going to rotate this in a way, so 90 degrees this way. And I'm going to move it in a way that he's actually holding the weapon. Goes like this and tried to do it as best as you can to make it look believable. So this weapon is not made for this character. And what you want to do when you're creating your own game. You want the you wonder weapon artist to fit to the warp into your character that you have. So custom made. So we're trying to do our best year. And it's probably not visible from top-down, so it's it's OB I'll be good for something like this. And he's holding it a little bit to the left, maybe. Something like this. I think this is a, this is close enough. So this is this is fine. This is the best we can do it. So now the weapon is attached and his hand is on the trigger and it's looking good. So. Top-down, you're not going to see it anyway. You're going to see it like this. Okay. So now we have added this weapon sockets. You can go ahead and actually right-click and do will remove all attached assets. Just like this. Remember the one you added is just a preview. So it's not the weapon. You just previewed it just so we can move this socket so it's actually connected correctly. So are, are not connected correctly, but it's in the right place. When do we use it? So now this is the weapon. We can go ahead and close this skeleton or in this mesh. And now what we can do is go inside of our, our blueprint folder and inside of here, going inside of player and clicking on the layer base. Okay, So inside of player base we need to add the weapon. So we need a component over here, just like we have this, measure the character, we are going to have the weapon. So clicking on Add and searching for skeletal mesh. So there are two types of measures. There is a static mesh and there is a skeletal mesh. And what a skeletal mesh is, is everything that has an animation. So you can, you can imagine if you have a staff in a, the RPG game, the staff, if it's not an immediate or anything else, it's just a staff you're holding in your hand and you're casting spells. This will be a static mesh. However, if you have a gun and you should have gotten, for example, an AK-47, The the back end of it is going to move and so on. So if, if parts of the weapons are moving animated, it will be Skeletal Mesh, just like the character here it is, it's animated. The character is walking around and therefore it's a skeletal mesh and not a static mesh. Okay, so let's grid a skeletal mesh because the weapon is animated. So here let's call it weapon. And this one is inside of mesh. So you can see here if I click there or it will disappear because it's a child of mesh. And the reason it is, the reason we needed inside of here is because here to the right, we can select the socket we need to attach it to. If this one was outside here. And if it was not attached inside of mesh, we can't find any socket and this will not work. Therefore, weapon needs to be inside of mesh year for it to work so we can find the socket. So right now we can't find any socket because we don't really have a character here. But let's add a character for preview. Clicking on this mesh and searching for our VP and machine or escape machine. Now let's add this mesh just for review and let's rotate it quickly, 90 degrees so it's facing forward. I'm going inside of the left view. And this one doesn't really matter too much. I just want to preview my weapon here. So therefore I'm making it work just like this. And here, clicking on weapon now, now we have the mesh, and this is a child of the mesh here. And therefore we can click on socket and we can find this circuit over here. So now it's attached to S weapon. Okay, So let's say and this is all we had to do right here. So now let me go back and close this down. And you can see here, if I double-click that BP machine and I opened the full blueprint editor. You can see now I have this child called weapon. And the reason we made it inside of player base is because if we make more characters, just like before with the example I used before, if you have multiple characters, for example, fortnight skins, you have maybe ten of them here. All of them will now have this child called the weapon. So if you made it specifically inside of here, it will not appear for all the other characters that will look alike. And therefore, you would have to code the same code over and over again ten times, and we don't need that. Therefore, that is why we create children of blueprint classes. So going inside of BP machine, clicking on weapon, we can now attach a weapon to this, to this mesh here. So if I search for k 47 new, and I think we use this one, the y. So clicking on it. And you can see here now the weapons attached to our character is holding it. And it's also animated and it's, it's attached to the character. Okay, so before I said, this was a skeletal mesh. You can imagine sometimes when you shoot a weapon, this trigger here to the side, we'll move backward like this to do an issue. And therefore this is Animated. Also when you reload the weapon. So when you remove this clip and put a new one in, that is also an animation. And therefore, when it's an animated weapon, it needs to be a Skeletal Mesh. Okay, so now we have this weapon attached to, and let's click on the weapon just before we play the game. Let me actually do it in the player base. So it updates for everything. Click on the weapon and go down and find was find collision. Just make sure it has no collision else. It will collide with our character and cause problems. And also, let's disable gravity. We don't really need gravity for this weapon. Okay, so now I can go ahead and click Play. And here when I click Play, I full-screen, you can now see I have a weapon and I can move around and it's attached to my character. All right, so this was it for attaching the weapon to the character. And we also need to fire the weapons. So before we do this, let's go ahead and set up an enemy, which we can shoot with the web in later on.
53. Setting up the Enemy: All right. Before we can continue with their weapon, let's go ahead and set up an enemy class. So here in the blueprints inside of enemies, remember we created and Enemies folder, and we created previously and enemy base class. So this one is a child of a child of character base. So we created character-based, we right-clicked and created the child of it. And here is an amine base, just like we did for the player base. So with the enemy base, imagine if you have a lot of enemies and maybe many of them have the same code. You don't really want to do the same code for all of them, but you want to code it inside of enemy base. So it is like it is coded for all of them. It works for all of them. Okay, so we have this in a base and the MPC we want to make or the enemy we want to make. We downloaded some enemies inside of marketplace. So going inside of the marketplace folder, we downloaded this Infinity Blade adversaries from the engine or from the marketplace, sorry, and inside of the enemy, there are a lot of enemies, but the one I want to use is called me, see if I can find him this one. Master grants. So I want to use this master grunt as the enemy. It looks intimidating and scary and we need them. So clicking back on the enemies folder, I'm going to right-click here and create a child of this class. I'm going to call it BP grants. Let me go inside of the enemy base, open the full blueprint editor. We have a skeletal mesh here. And just to see if we have to edit some basic stuff here. And for now, no, we don't really need something, so let's close it. Let's go into grant and setup the enemy. So clicking on the mesh, let's find the grunt. So searching for Grunt. And it's this one called Master grant is k Master grant. So clicking on them. Now let's rotate him so he's facing forward like this. You can always look at this arrow to see you what is forward. And let's move him down just like we did before. From the left view, we can do this or right view, that's up to you. And we knew that this capsule to fit to this character because this capsule is what we are going to shoot and it will detect that you have shut him. So I am going to increase the highlights a little bit. So moving down and tried to make it fit here. Just a little bit more. And this is just a test game, so it doesn't have to be one hundred one hundred percent specific. And if you're wondering yes, you can you can make detection on the mesh itself Like when you shoot the mesh specifically, it will detect it and not this capsule. But this is just a starter or just a simple project. We don't want to go too complex. But realistically when you make a first-person shooters. So this is not, this is not too critical for if top-down shooter, but if you make a first-person shooter like Counter-Strike and you have to shoot this enemy. Don't want to shoot here and hit the enemy. So this capsule, if you should hear, y'all had their enemy. But then a first-person shooter, you don't want to shoot here besides the player and the pleural get hit. You want to be very specific and even hit when you hit over here and not hit when you hit here beside it. So you can detect the bullets through the mesh itself. But it will take a lot more setup. And this is not too critical for the top-down. Sure, so we're going to use the capsule. And in the future I will make a more and more complex system. So let's work with this for now. And the height, I don't want to adjust the height. You already have a good heights. So going to adjust the capsule or the radius just a little. I think this is fine, something like this. So when we shoot the bullet, it will hit this area, this capsule area. Okay, so let's compile and save. And that is all we needed to do to set up the character. So in the next lesson, let's go ahead and do the Animation Blueprint.
54. Enemy Animation Blueprint: Okay, Now that we have the character of setup, let's go ahead and do some animation for this grunt. So right-clicking, just like the character going to animation and creating an animation blueprint. So clicking on this, and we have to select the skeleton. So I'm going to search for grants. And I'm going to select this skeleton called Masdar grunts clicking OK. And I'm going to call the Animation Blueprint and MVP grunts. Ok, so now we have this grunt. And by the way, if you're wondering what is a skeleton, just in case I just want to be sure. The skeleton is this one and every character has a skeleton. So every character you import inside of Unreal Engine has a skeleton. And you can see here if I click around, if I can hit something, I cannot, unless I make them visible. But you can see here now we have these skeletons. So this is a skeleton. Each, each character you import has a skeleton. So we have to use, it asks you to use a specific skeleton when you make an animation blueprint. And let's hide this again inside of character bones and selected only. You can also select the bones over here. So this is what a skeleton is. It every character has a skeleton that, that, that needs to be there for the character to move and so on. So this is what the animator does, and the animator will regular character and animate the character for you. And let's go back to the enemies. This one, the animation blueprint that we created. I'm going to double-click it. And here, just like the character, we are going to make a state machine. And I'm going to click F2 and call it local motion, which simply just means movement. And I'm going to connect it compile. Okay, so inside of here, right now seeing warning because there is nothing, I'm going to click on it and we need to make a new state. This one we can call jog, but realistically it is idle. Idle jog or walk or whatever you want to call it. So that's up to you. So clicking on it, we need, now we need some animation. We need to plug in an animation, and we actually need to create a blend space because they guarantee the character is going from from idle mode to walking mode. You can always drag something here. For example, this idle mode here and, and connect it and compile because he now the character is idling. But the problem with this, if you don't create a blend space, you can't really have more than one animation. You can only put one animation. And so if we want the character to be idle when he's standing like this and then moving when he sees you. We have, then it means we need two different animation with which then means we need a blend space. So let's go ahead and right-click and animation. Blend space 1D. And let it, let us select the scale. I'll just go and search for grants, SK master grants, skeleton, this one. And let's call it for BS for blend space. And let us call it grunts are actually, let's call it, let's call it George. He's jogging or walking. So here in the horizontal axis, this is the speed. So movement speed, I'm going to call it. And the minimum value is 0 when he's standing still, I know when he's moving. Let's just try 200. We have to test this. This is how fast he will, he will walk. Okay, So this is it. And that was it actually. So over here and speed of 0, this is the movement speedier down here, speed of 0. We want to drag this idle animation and pull it up here. So now the speed of 0, he will be idling and at the speed of 200, he will run towards you. So here the extra gain muscle, grunt walk forward. So he's going to walk forward here. So if I hold Shift and I move my mouse, you can see this is how they transition. So he's going to move and you're going to stop. And he's going to move if he runs after you. Okay, So I want to make this animation just a little bit faster. So here in the monster grunt walk forward animation, I'm going to increase the rate scale by 1.2. Who's going to walk a bit faster. So then emission is a bit faster. Okay, so let's save this and let's go ahead and use this blend space. So let's close it down. And here we can now take this blend space. You can either take it from here or you can take it from here. So taking this blend space and plugging it in and compiling, we now need a movement speed. So we are going to tell it what movements, but it is, and this is 100% like the character. So let's go back to the then graph just in case you don't remember. Let's write, initialize. And by the way, feel free to do it yourself and then watching this if you want to challenge yourself. But if, if you don't remember too well, because this is the very first time we're trying to do with No worries. Programming. After all, sometimes you just need to do it again and again and again. And in the end you just remember you can do it in your sleep. So here we are going to use the event Blueprint initialize animation. This is again just like the begin play in the normal blueprint classes. So when you start the animation, take this, try, get the Pawn Owner. This is the pons, This is the enemy Po1. And take this and say it's valid. So is the enemy, is this grunt inside of the level as it is he valid? Is he there? If he is, do something? If, if not, we will get to that later. So right-click this, try and get Pawn Owner and promoted to a variable and call it NME pod. So if the enemy is valid, if he is inside of the map, go ahead and create it into a variable called enemy upon. If he isn't valid, the V isn't inside of the map, right, to delay this animation blueprint and run it. Tried to run it again and see if his valid. So it's going to go inside of this loop until the enemy is inside of the level. And then it will create a variable when he is inside of the level. Okay, so now we have this pawn. Now down here we can drag out this bond. And then we porn. And here we can say, we can right-click and convert to a validated get connected here. So now we're saying, is this enemy porn valid? Is he There? He is. He created. If he is, go ahead and do this code. If he's not, Don't do anything because we don't really want to do this code. This is running on tick, which means it runs a lot of times per second or per frame, sorry. So for example, 60 frames per second. This is going to run a lot of times. And therefore we don't really want to run this code unless the enemies actually inside of the level, because it doesn't make sense to keep running it without the player being insoluble level or the enemy, sorry, not the player. Okay, So is this pawn valid? If he is, go ahead and do something. What do we want to do? What we, we simply want to do is we are trying to remember get the movement speed. So I'm going to drag out and say get velocity. So now we have the speed of the unimportant. And to get it to be a float variable, we have to do just like the character vector length 0. Taking the vector length will make it into a float variable, which is simply just the number of decimal places. And this one we can right-click and promote to a variable and say movement speed. We can now call, connect it to as valid. And now we have the movement speed. So let's compile and everything's looking good. Let's go back to the idle state here, and let's add the movement speed. Just like this. Well, let's compile and if you want to test it, you can always click on the movement speed variable and you can set the default value to something else. So for example, you can set it to 200, which is our max value. And you can see he's walking now. If their movement speed is 0 is not working anymore. So now this animation blueprint is working and he can walk and we have the movement speed. And later on we are going to add some more stuff to it. So for example, if the player dies or if the enemy dice, we need an, a dying animation. But for now this is fine. Let's add it together when we you make the weapon and damage and so on. So, okay, so let's get back here. And over here we want now to apply our Animation Blueprint. So double-clicking on the BP grant. Here, we can click on Mesh. And inside of this mesh we can go ahead and in the animation and animation class, we can assign our Animation Blueprint, Blueprint grunt that we made. And if we go back to the viewport and Compile and Save, you can see here that our character is now moving using the animation blueprint we just created. Okay, So this is looking great and that's all we had to do. We can drag out this character and you can see what it looks like. If I click Play, we walk around and you can see this is our character that is moving around. Okay, So this was, this was it for this lecture or lesson. And let's move on.
55. Firing the Weapon: Welcome back to this lesson. So now let's go ahead and do the firing logic. So when you fire a weapon, something happens. And to do this, let's go over and click on the player. One other player, the blueprints and clicking on the player controller. Remember we all have all of our inputs or the movement inside of the player controller. And I want to do all of the movement here. So when you click the mouse one button, you will fire their weapon. So this is also going to be here by just like what we did here with the move forward and move right? You remember that we made them inside of the project settings. And we're going to click W to move forward and so on. We need to make one for firing the weapon. Though, minimizing this, I'm going back to the Edit Project Settings. Inside of input. I'm going to create an action mapping. And the difference between axes and action is axis is the, you can imagine there's the movement that is continuous. The action is, for example, for example, if your fire their weapon, if you jump, if you interact with things like looting weapons or loading items and so on. So just clicking one button. Okay, so for this, let's call it fire a weapon. And to fire their weapon, you can simply click on this and click again on your left mouse button if you want to assign it. And that was that was it actually. So if we need more things, we can go ahead and go in here. We probably need some reloading, but let's do it later. So over here inside of the player controller, we can now write buyer what bin, and you can see your event that you just created. And here we want to fire their weapon. So what I want to do is when I click, I wanted to fire their weapon. And I want to make the code inside of the player base, because this will be, this will be available for all the players I have. So if I make ten players, all of them needs to be able to fire a weapon, and therefore, I don't do it inside of BP machine. I want to do it in sort of player base. So all of the players have this code. So I want to make an event called fire weapon here, which I can call here when I press the mouse, left mouse button. So I want to go ahead and make custom events. And to do this, let's go over and do it inside of the interface, Blueprint Interface. So we already, we already made one here called the player base. The interface We used to get the reference to this player, and we used it inside of the player controller here. In a previous lesson, we created the player controller and we got the player and we made a reference to it. And this is what we're using here. So we already have this interface. Let's go ahead and click on Add and function. So here, adding the function, we can now call this function fire wetland. And it doesn't have to match the name of this one. I just call it whatever. You can even call it firing weapon or firewalls are just fire whatever. So let's compile and save. And this is going to be an event. Remember, if you're inside of a Blueprint Interface, if you don't have any outputs, this will be an event. However, if you have an output, so if I double-click on this one, if I have an output, it will not be an event, it will be a function. So we can see here this is a function now because it has an output. This one, this one does not have an output and therefore it's an event which is yellow. Okay, so now I can use this as an event. So I am going to write fire a weapon. And you can choose this one called event fire a weapon. And you can see here this is a Blueprint Interface function because of this icon. So now I want to call, I want to make the code here when you fire their weapon inside of the player base. So here inside of the player controller, I want to call this event. I want to execute this code when I press the left mouse button. So what I am going to do, the thing you want to do, just like communicating with blueprints. This is the player base. You just look up here. This is the carry from the character base. So the character base parent class here. If I search for it, if I click the magnifying glass and I double-click it. Remember the player base is a child of character base. So inside of the character base you can see the parent class is a character. And therefore inside of here, what you do is you get the player character, you get the play upon and so on. But we already have done that. So getting the player character, getting the reference, and also getting the Player Pawn. So this is very easy for us because now the player points actually this one. It's very easy to call this event now. So this is why you do it like this in the begin play. And you don't do this all the time everywhere. You just do it up here and the Begin Play. And then you can just use this one just like we did here, all the places. So dragging out from this play upon, it can now say fire weapon. And I can call this one called message because this is a Blueprint Interface function. So now I am going to call this code whenever I am going to click fire weapon. And you can see this if I go back to player base and I just say print string and saying hello. You can see here if I click play on the game, I click on mouse one. You can see to the left, top left, it says low. So it is working. Okay. Now let's do the firing logic inside of the base. So what is the firing? So what is a weapon firing had simply just aligned. So if we drag out here and write a line trace by channel. So this is what is used to create this. So firing is just, just a line. You fire a line from your character and out in the open in front of you. How, how long ever want to fire it? So just to explain it better, I want to just explain this function here. So you need a starting point. So where does this line starts? And the line starts if I click Play and I click if eights. And so I can go out of here, though the line starts at the weapon here. So this is the starting location of this trace, and the end location of this trace is just somewhere out in the open here in the front. So it can imagine if you shoot a bullet and you shoot it here in the front. This is the end location over here. So this is what we want to do. We want to a line that if you click the button, it will read a line in front of you along one. Okay, so let's go ahead and do this. So let me stop the game and let me take these targets are what is the starting location? I actually want to make a component here. You can just hear, basically you can just try to get the accurate location. And then from this actual location can say this is the start. But just to be a little bit more specific, we can click on this mesh. You can even click on the weapon actually, let's click on the weapon. And inside of here, Let's go ahead and click on. Let's click on an ad and let's make a scene. So what is seen is, is just an empty component that just has translation like this. So this one, I'm going to call it bullet spawner. So what I've seen is seeing component is just is just an empty components. You can't do much with it. You can see you can't do much, but you can use it inside of code and you can use it for translation. And this is actually what I'm going to do. So this bullets Bono that you have created, we are going back to the viewport. Let's move it a little bit so it's in front of the weapon. So just moving it a bit forward, like this. And if I go to the front view, I'm just going to move it up front of the weapon. I can just imagine the weapon doesn't have to be specific. Just like this. Something like this. And we can always adjust it if something is wrong. So let's go back to the perspective view. Now we have this bullet spawner. Let's compile and save. And with this one, we can now go ahead and say, can now take out this bullets Warner. And we can say Get world location. So now we have the location of this bullets Bonner. This is the start. So the line starts from here, from the bullets guano from the scene. Here starts with a line. And when we fire their weapon, we can say, we have to find the end. And the way you do this is you take the rotation of this. So writing rotation, you can see something called Get world rotation. So taking the rotation and taking the forward vector. So forward vector, get forward vector. So now we have, we have the rotation and we have the forward space. And from this forward, we have to say multiply. And we can multiply this number. Let's right-click here on this vector here we just want a number. So right-click and say Convert pin to float. And we can multiply this forward vector. So we're going to send it out in the space like in front of us, let's say 5000. This is a long distance. And now we can say the end is the starting point. So the end of this is the starting point where you started from the bullets foreigner here. And you end, you say plus this number. So you start from here, plus this number. This is the end. So this is how it's done and I can actually just show you to see what I mean. So clicking. On this one Draw Debug type so you can see the lining in the game and clicking on persistent, click on compile. And let's click Play and see if it works. So clicking the mouse you can see that it draws a line out in the open. But right now it's, it's actually firing to the side when I click. And this is because the orientation of the, well, it's bonded here is wrong. So I can click E to rotate it, and I'm going to rotate it 90 degrees like this. And it's 90 degrees. Let's compile and click Play. And if I fire, now, you can see I'm firing a bullet from the bullet spawner. And however, however much we multiplied it by. So it's going to fire a direct line and end somewhere here in the, in the end here. Okay, So this is what we're trying to do with a line trace by channel. Simply drawing a line. And let's go ahead and organize this. So I'm going to double-click here. There's so we, so it doesn't look too confusing. And what we can do instead of hard-coding numbers were, I don't like that too much. So I can right-click this one and promoted to a variable. And it also just calling it a bullet distance, or firing this tense for example. So each weapon can have a different firing distance. So just like this. And now we have this firing a weapon. Okay, So let's add some sound to it. And I realized when I looked at the weapons that there's actually no sound inside of. Lemme see here. And so the FPS weapon bundle that we downloaded and some of the weapons there isn't any sounds or effects. So let me go back here to the Epic Game slider. And inside of the marketplace there's this one called military weapons dark. So if you go inside of the marketplace and you search for weapons. And here, let me go back and I can actually show you just in case. So here inside of weapon or inside of the engine marketplace you can, you can write weapon and then click on the Free hit here. And you will find something called the military weapons dark. So clicking on this one and actually downloaded and added to the project. So remember to click Show All Projects and then selecting your project. And remember just to select the latest version here and clicking on Add to Project. So I've already actually, I haven't yeah, deleted again. Just to show you. So clicking on it, I will go ahead and select the latest version. Click on Add to Project, and it will add it to my project. And this one actually has some effects for it here. So here this is the downloaded one military weapon, Doug. And if I click on it, you can see we have effects, so some visual effects, and you also have sound. So let me go into sound and show you how to add some sounds to the weapon. So clicking on rifled, this is the best one we can use. And this one called this one rifled be fire q. And let me actually, before I play the sound, I think this will be very large for you. I'm going to double-click it. And inside of here, I'm going to click on this output and lower the volume over here. So allowing you to zero-point, I think zero-point three was a good one. See, we have some sound. I actually want to remove this crossfade. So if I hold Alt and just click on this and hold Alt, I'm just going to remove this one. And I'm only going to use this one heard by player. I'm going to drag this and inside of the modulator and what the modulator is. So if you drag out from here, just like blueprints, dragging out from here and writing modulator. And you can make this one. And what this does is just changing the pitch of the sound a bit so it sounds different every time you should. Look in here. It's not actually the same sound all the time. So it, and you can hear it a lot if I make it a lot higher or lower. But now sounds silly. So I'm going to Control Z and just stick with this. So now this is the sound. And we want to use this. So if I go back to my blueprints inside of the player and that player base. So this is where we fire their weapon. And I want to do it before this line trace. We're going here and saying, whoops, let's drag this a little bit back. I can use it. I'm going to say play sound. So you can either do play sound 2D, which will just play the sound and you can hear all of it. Or he can play sound at location, which is a bit more or a lot more correct in this situation. Because imagine if you have a player standing away from you. Don't want the sound for him to do. Sounds like you're standing next to him when you're 10 thousand kilometers away, then you just want to play it at this location where your weapon is, where your character is, the play the sound at the location and it asks you what location do you want to play the sound in? And just play it where the actor is. So where are this player is standing? So get accurate location. And the target is self. And self means that this player base and just plug it in here and now we have to add some sounds. So going, I'm going to minimize it and going back to military weapon sound rifle and dragging in this rifle, fire q and now we are going to fire a sound whenever you fire it. So if I click Play, and now when I move around unclick, I am going to play a sound. Okay, so the next thing we want to do, before we finish, let me go back to the blueprint and opening the player player base. Now we have this line trees and the lines raises firing a line. If Brian from start to end location. And what do we want to do with this line? So there's something called out, hit, Okay? There's something called OUT it. And if you say break, break hit results. So now we have the SCID results. And if you click on this arrow, you can see all the things you can do with this line. So what we want to do is here in the head actor because we want to hit the enemy. So here we can say actor has tagged. And this one we used in the previous game and the ballgame, we said player. But here in this case, if the actor has tag enemy, if this is true, then we want to do something. I'm going to click back on this arrow to make it smaller. And we have to give this enemy the tag enemy because we didn't give any tags yet. So let me minimize it. Go back to the enemy on the enemy base because we want all the enemies to have this tag. So clicking on the enemy base, open the full blueprint editor. And over here in the class defaults, you can search for tag. And you can see our a tag click on the Plus. And given this one a tag and that's called enemy. So now in the player base, if the hit actor, then the actor who has a tag enemy, you can then do something with this. And you can see here, if I go ahead and click Print String or write print string, and now I can go ahead and click Play, but nothing will happen and I will totally awhile. Now if I go ahead and go to the enemy here, I just gave it the tag enemy. We're going to shoot it. But you can see the line is still a red. It's supposed to be green just like this one I should something that's hit. But if it doesn't hit something, it's still going to be read. By hits something. It is going to be green, but there's not going not being green. And the detector enemy. And this is because this line trace, if we go back to the player base, this line trace is hitting the Visibility channel. And what this means is if I go back to the enemy base and I click on this capsule, I removed this tag so I can see everything. And I don't know if you can expand everything here, expand all categories, just like this. And I can go down and here in the collision, no clicking underscore that and remember that you have to click on the capsule first. So this is because this capsule is what we want to hit. So clicking on the capsule going to collision, and here you can minimize it. And this collision preset, you can see there is something called visibility and it's right now it's ignoring the visibility, but this is what we're using to hit the player or the enemy. So we want to block this miscibility or overlap it. So on this pond collision preset, we can go ahead and click on Custom and then clicking on block for visibility. So now let's compile and click Play. And if I go over to the enemy, you can say it now says hello. And the lines also green because I just hit this NME. Okay, so now this is working, going back to the player, player base. Let's go ahead and play a sound when you have the enemy. So I'm going to say play sound at location. So what is the location you want to play the sound and I simply want to play the sound or the enemies hit. So here, going down, clicking down the arrow, there are something called location and this is where it hits that. This is where the line hits. So the loci, the location where the line hits, I want to play a sound. And remember it is only going to hit enemy. So and that nothing else going ahead. Clicking on compile and play can see here, oops, I didn't even add a sound. I'm too quick. So let's go ahead and add the sound. And what I can do is we can go back to the rifle and there is someone called, I think this one, be careful, maybe it will be too loud. This one, yeah, this one is sounding good. And I'm going to double-click it and just minimizing the sound to 0.3, so it's not too loud for you. And I am going back here and assigning the sound. So I'm going to drag this one inside of here. And now I can try it out. So clicking on play. You can hear those sounds playing. And it's not playing when I said something else. But it's blame when I hit then in me. Awesome. So now we hitting the enemy, but right now we're not doing any damage. We haven't set up that logic yet. And as the last thing before we finish it, Let's actually add some effect as well, so it looks a bit better. So here in the enemy base or the declare a base, sorry, if I click here after the sound, I want to make a, an effect. So what I can do here is say Lay emitter are actually spawned that play spawn emitter attached. So spawn emitter attached and connecting this. So the emitter is just a visual effect we can spawn. So here what we can spawn, it's now saying, what, what do you want to respond? What is the effect? So the effect is if we go back to the military weapon dark inside of their rifle are actually up here and the effects, we can add this one, the muzzle flash. So if you drag it inside of here and attach two components, so what do you want to attach it to? We can simply just attach it to the bullet spawner. So I'm going to drag this out and put it on top here. And attach point name. That doesn't matter right now. What is the location? So the location is actually just the same as this one. And since we have to use this code more times, more than one time, so this one is going to be copied here and I'm going to put it here. But instead of copying, let's actually make a function so it can learn about functions as well. So if I hover over these two and I right-click and say collapsed to function. I'm going to collapse it to a function and I'm going to call it bullets. We can say gets bullet. Hello, thief or location and rotation. There's nothing like this. This is the best I could come up with just quickly. And we can double-click, click this one and move it down. It's like this. So this is the function, and instead of calling them return value, we can say location and rotation. So this is more clean, more cleaner name. Okay, so now we have this but we don't really want to connect it. We just want to get the information. But clicking on it, we can click on this one. And here we can see pure. So clicking on pure, clicking compound Save, you can see out here this became just like the green function over here. And this is because we don't really want to connect it up here. It doesn't make sense. We just want to get the location and rotation. Don't want to go through the code. So now this is cool. What I can do it, this is just using this again and again if I find it to. So this is the same code now. And what I can do here is I can drag out this function and actually use it like this. So this is pretty cool. Instead of having to write everything, you can use it like this. And now the scale of this emitter is just 1, 1, 1 and location, we might need to change it, keep whirled position. So keep well position. And here it's just going to say I'm going to alter destroy myself when I finish the, the emitter and this is good and outflow activates. Okay, so now this is what we have. And if we click Play, you can see we now have an effect. And if you don't like the location, if you don't like the location of the effects, you can go ahead and inside of the player base and you can move this bullet spawner because this is where it spawns so you can move it a bit forward if you want. Yeah, I think this is fine. So this is looking good. And this is looking at, okay, so now I have an effect, we have a sound. I know this video is getting a bit long, but I hope it's exciting to go, the sound working and the effect. It's a bit boring without anything. But now that we have the firing logic for the weapon finished, we can go ahead and do the damage for the enemy.
56. Enemy Damage & Death: Hello, and we'll come back though now we are going to do the damage on the enemy. So to do this, let's go ahead and enter the enemy base. Because we want to do the damage inside of the enemy base. Because we don't want to do it in sort of BP grunt. And the reason is we want all the enemies we make to receive damage. So this is why we do it here in the, in the parent class of these enemies. So inside of here, Let's delete all of these for now, these events, compound save. And let's also open the lecture, the player and that player base. And let's click on the event graph up here. So now and the last lesson we created the weapon fire and we made the sound and also the effect. And we made this line trace, and we're shooting lines. And here we hit the enemy. Okay, So here what we want to do is before, it doesn't matter, actually Butler's do it. So it makes sense before we play the sound, let's say applied damage. So this is how you damage the blueprint classes. So the enemies in this case. So we have the damaged actor. So what is the damaged actor? He damaged the actor is just this actor over here at the Hit Actor. So this is the enemy we are heading. So I'm going to drag it and connected here. So what is the damage you want to do? So the damage you want to do is, for example, 25, though the event instigator is just a reference to the controller. So the controller who controls whatever shut the weapon, and the one that's shooting the weapon is the player. So we need the controller for the player. I'm just going to say getline controller and that is it. That's enough. Let me move it a bit here. So go cloud controller and the damage caused, so the actor that actually caused the damage. And here I'm just going to say self, the player caused the damage, just like this. And then you don't need to do more. Now, let's click Save compile. So it knows that the damaged outer is the enemy. Because we connected this Hit Actor and it only, it only goes through this branch if the target has the actor or the tag enemy. Okay, so now we are applying damage. And the next thing inside of enemy base. Now here in the enemy base, we can say any damage and we have an event called any damage. And you can see here if I just print a string, it's going to say hello if it's hits by this. So click on Play. I'm going to hit it. And it says hello to the top left. Okay, so it is working. So now we are causing damage. So the thing we want to do is here in the variables. We want to say help. So we want to make a health variable. And this type is going to be a float because we wanted to be a, a numeric value with decimals. So clicking on Compile and Save. And you can see now we can enter the help. So let's set the default health value to 100 plus clump, compile and save them. So what's cool about this is right now you are inside of the enemy base, so you are inside of the parent class for these enemies. So if I go here to the enemy base is the parent class or this grunt. And when you make variables inside of the parent class, and they will also be usable by the child's. So this health variable that I made in the intimate base will be available here for BP grunts. If I opened the full blueprint editor, you can see here to the right, I actually have health. So here to the right I have the variable Health, which is the one we just made. Okay, So this is very cool. Every variable you make here will appear here. And this is cool because imagine if we have multiple enemies. Now we can edit the health of these enemies so they can have different health. So this is very cool and this is how you can edit them. Maybe we have a giant and the Giant have 200 health and said 100. Okay, So this is how you do it. This is pretty cool. So every variable you make will appear for these, every single child you make for this from this blueprint class. Okay, so helpful, just be 100 for now. And let's draw out this health. And with this, what we want to do is say minus, so subtract. So this health minus the damage. So for example. Health is 100 and the damage for one bullet is 25 currently. So it's going to say 100 minus 25, it's going to be 75. So we are going to take this hell, and we are going to set it. This is the new value for help. So now it's 75. If you shoot one time, you should 2 times 2 will be 50 and so on. So I'm going to connect these two. And then just to test it out, let's say print string. And with this print string, let's connect this value inside of the string so we can print out the value to the screen. And let's put play and should the enemy and see what happens. You can see the hell dropping and now it's 0. Okay? And let's say this enemy base. So now we need to make a condition for what happens when this becomes 0. So now the health is counting correctly. What I want to do is take this out and say, if it is less or equal to 0, then do something. And the thing we want to do is we want to tell the engine or the game. We want to tell it that this enemy is that. So let's make a custom event down here. And let's call it that. And I couldn't have made it this this custom event. I could have made it with the just going in and making a new Blueprint Interface. But I don't think we are going to need more than this one. So I don't want to go in and waste time on making a new Blueprint Interface for the enemy base and so on. But if we needed to, Let's make it later. But right now, what you can do is just writing custom and making custom event and you can name it anything here. So now this that we can call it here. So let's call it and say Death, called this function. So now when the health is 0 or below, it's going to call this death, that event. And now we need to code something here. So what happens when the enemy dice? I'm going to create a new variable here and call it B is dead. So B for Boolean and is dead. And I'm going to change it to the type of Boolean. So what the Boolean is is just something which is true or false, just like here. This is also a Boolean. So it's something that is either true or false. So I'm going to take this out. I'm going to hold Alt and drop it so it sets. And I'm going to connect it and I'm going to take it so it's true. So initially, this value, if we compile and save, this value is initially false. The enemies alive. What, when you kill it, it will set it to that. And we can do something with this. And the next thing we want to do is play an animation that we want to play that animation. So let's say this character or this mesh here a second down. And let's say Lay animation. And we have it here, like on it. And now you have to select an animation. So let's go ahead and see what animations we have. So here inside of a missing your marketplace, infinity blade adversaries inside of enemy. We have our master grunts, and then we have the master grunt animations. And inside of here we have this one, extra game, master gland death. So this is the death animation. This is the one we want to play on the NMI dice. Though I'm going to minimize this a bit. I'm just going to drag this one here or you can search for it. That's up to you. So I'm going to drop it here. And it's not going to loop. We just wanted to play at one time. Well, let's just, just an island seed for fun. Now is going to play this animation. Cool. Now we have our problem. You can still shoot it. You can see it, its place again. Or you can also see here it blocks, you need a plan to walk past it. So let's fix that. But the first thing we want to fix is it's blocking you. So the thing that's blocking you is because let's take this mesh. And actually we can just use this measures the same variable. Here we can say collision. Because remember the collision is blocking you a collision. And you can see something here called, I'm gonna see where it is Set Collision enabled. So this is the same as this one. So if you click on Mesh, you go down here, you can see this collision. This is the collision preset that you have currently. This is the one. And we want to put it to no collision because we don't we don't want to collide with it anymore. So no collision is put on. No. Okay. Well, let us create a in here to make it look better. And the next thing, remember we also have the capsule, and the capsule is the one we are, we are shooting at. This one. We also want to remove the collision because the collision is on initially. So taking out this capsule and also set will login enabled. Clicking on that and setting it to no collision. So if I compile and play and I should the enemy, you can see I cannot shoot it anymore. This is because of the collision is disabled. Okay, So this is very cool. And just to be sure. So it's, sometimes it's unnecessary was just to be sure I like to take this Character Movement Component and disable the movements there so it doesn't work out. Especially this is done with characters. So players that if you have a multiplier again, for example, or your player, the one you are playing with, going to be to have the movement disabled just to be sure you can't move while they were at that pay. So the last thing, remember inside, let me go back to the Blueprints folder and enemies. And here the animation blueprint, sort of event graph. We made this movement speed. And if the enemy is valid, we are going to calculate the movement. This is what we did previously. And what I want to do is actually also add that if the enemy is not that, you can go ahead and calculate. Because here, now we have the is dead that we can use. And we can say, if the enemy is not dead, go ahead and calculate this movement speed. And now I need to, I need to reference this enemy base because right now the variable is inside of here. For either I could just take this enemy porn because we already have a variable and say asked to task 2, enemy base. And by doing this, we can access because right now it's just taking the general points. So this one is called try Get Pawn Owner. So it's going to get the general enemy porn and it knows who owns this bond. Now we are, we want to, we want to access the custom events inside of here, inside of this enemy base specifically. So this is why we take this and say costs to, whoops, I created this by mistake. This is why we're saying costs to, and you're casting to this NMI based specifically. And from here you can say is that for example, here you can take this variable. We can do it like this, or we can do it through a Blueprint Interface. And this, the problem with this is it's creating Hart references and it's bad for performance. It can increase the loading time as well. So I'm going to delete it and let's actually just do it through the interface so you can get practice in that as well. So this is the last thing we're going to do. So going inside of the interfaces, right-click, create a new Blueprint Interface and call it int any base. And inside of this one, Let's make a new function called gets enemy ref. So good the enemy reference. And let's click Create and outputs and find the VP NME base. So this one, BP enemy base. And let's call it, let's call it the enemy. Let's compile and save. So inside of the enemy base, inside of here, we're going to click on Class Settings and then add and search for ints, enemy base, compound, save. And you can see we have now this function that we added inside of our blueprints in surveys. So clicking on it by double-clicking. And here it's asking you what, who is the enemy? And the enemy is self? So the enemy is this enemy base. Okay, so now we have this and now inside of the animation blueprint here we can actually now say in S2 this enemy porn and say gets ME ref. And from here, let's actually push this away. Actually we can do it through here. So let me move it away. So now it's saying, is the enemy in the level? Is the enemy valid us and the enemy? The enemy exist in the level? Yes, it does. So after this, you are, we want to ask, is the enemy dead? And to do this, we can either draw this out just like I did before, but actually we can do it through here. This is the same and a lot more cleaner I think gets enemy, my abet, get enemy rough. And connect that. And from here, we can say gets. And we can see here, down here at the bottom is always the variables and the one we want to get is dead. Is dead. This one get is that this is the variable that we have here in the enemy base, is that. So it's this one. And here we can say, is the enemy dead. So if this one is true, don't do anything, but if the enemies alive. So if enemy is not dead, then go ahead and calculate. But just to make it more readable, this is a little bit confusing. I'm going to say drag this out and say not. So if the enemy is not, did then go ahead and calculate the movement speed. This is a bit a bit better on reading. So it's not too confusing. I'm going to put it together first, just like this. So if the enemy, the enemy exists and the level is the enemy exists, is the enemy dead? Or here is asking, if the enemy is not dead, then go ahead and calculate the movement speed. So this is what we have for the damage we created, the applied damage. So we are applying damage and right now we are applying 25. And this is fine for now. And also in the grant we have some health that we are so subtract subtracting from the any damage event. And when you are dead, you are going to play an animation and remove the collision. Okay, so this was it for this lesson. And if you want the enemy to disappear when the enemies dead, that's up to you. I don't really want to make it, but I can show you how to do it just, just in case if you want to delete the enemy. So here we can say delay. For example, we want to delete the enemy after five seconds. So let's say delay with five seconds and then destroy it. So now you're going to destroy the actor. And what is, who is the actor? What is the target? The target itself, the enemy. So clicking on Play, you can see up to five seconds. It's going to delete the enemy or destroyed or either just like this, That's up to you if you want your game like this. For this one, let's just let it be so we can see the enemies stack up. That's fine for now. Okay, so this was it. Thank you for watching and let's go over to the next lesson.
57. Enemy Spawning: Okay, so now we have the death done in the last lesson. So now let's focus on spawning the enemy. Instead of just dragging the enemy in like this, we want to spend the enemy dynamically. So let's delete this one, and I'm going to delete this one so the whole level is empty and it's only us running around and we can shoot. Okay, So right now we want to spawned the enemy. And I think I want to make the spawning inside of the game mode so we can make this bonding inside of here. So double-clicking on the game mode here. We don't have anything done yet. And if you have events here, you can go ahead and delete them for now. So to do this bonding, Let's go ahead and make a custom event. But before we do that, let's make an interface for the game mode. So inside of the interfaces in Blueprints folder, right-click. Go to blueprints and Blueprint Interface and let's call it End Game Mode. Lets double-click it and get Game Mode graph. This is our function we start with, so it makes it a reference to the game mode. And here, let's say we call it GM clone stretch. And let's call it game mode. Okay, so now we have this function, and we have done this a lot of times now. So going inside of the Game Mode, I'm going inside of my class settings. I'm adding my Blueprint Interface. And here double-click the interface and write itself. So now we have a reference to the game mode if we need it. Okay, and here we can also make custom events because now we have the game or the interface. So here in the Blueprint Interface, Let's make a new function and call it on enemy. And this one, enemy is just an event. So let's compile and save. And let's go back here in the Game Mode and less right? Spawn an amine and you can see the event called spawn enemy. Okay, so now we have this event. What we want to do is we actually want to use a timer. So now I can teach you about timers. So if you drag it out and write timer, you can see something called set timer by event. So clicking on it. This is just a timer that will run. So we need an event here. So dragging from this red one called event, we need to make a custom event and write custom and click on this add custom event. And let's call this one enemies fauna. What's called the Enemy Spawner. And let me print a string so you can see what it does. So print a string, this is how often the timer will run. So if I write one, this will run every second. I'm going to put looping on, so it loops this timer. So if I hit play now it's going to say that he LOW every 1 second. And before it can do that, we have to call this event. Else it will not do it. So here I just want to call it in the begin play. When we start playing the game, go ahead and do this action for this event. So we'll spawn enemy. So it's this one, It's the interface call. Okay, So now we're responding the enemy. If I click on Play now, it's going to say hello to the top-left and it disappears. You can't really see it, but it says it's actually does it every second. So if I go back to my game mode here and I put 0.2, it's going to say Hello every 0.2 seconds. So it's going to say hello five times a second. You can see here to the left, it says in low. Okay, so this is how a timer works and it's looping. And we have to stop at some time if we don't want to loop it anymore. Okay, so we want to do here with this timeout. We want to spawn the enemy. So here you can drag it out and say spawn accurate from class. So we want to spawn an actor. And the actor we want this phone is our enemy. So if I search for BP grunts, this is the guy we want to spawn. And now it's asking you, where do you spawn? Where do you want to spawn this guy? And first, before we can do this, let's minimize here. And we have to tell the game where the enemy can walk, because the enemy shouldn't be walking on top of this box or inside of the walls or anything else. So here we can go ahead and create and create in volumes. We have some sheen, something called Nav mesh bounce volume. So some navigation for the for the enemy or MPC's or whatever you have in your game. So let's break this down. So it's underground. And if you click on P, You can see this green, green box. So remember to click on P on your keyboard. So now we have this box and this is a worthy enemy can walk. So I'm going to go down here and make it larger here in the box shape, our brush shape, you can choose what type of shape you want. The box one is perfect for this example. So I'm going to make it larger and I'm going to cover this whole area. Just like this. So now the enemy can spawn within this green area. So the enemy cannot spawn here. If you wanted the enemy to spawn up here, you just had to make this larger. So you can see this box is large now and you can see they can spawn on top of here. And this is exaggerating a little bit. I can see if I can see this box just like this. If you wanted to spawn up here, you could make their books larger. But for us, let's do 50 and this is fine. So now we can tell the game than the MPC can spawn anywhere or the enemy can spawn anymore within this green area. So let's go back to our blueprints and the game mode. And here we can use a function that's called if you, if you write navigable, you will see something called getrandom point in navigable radius. So it's going to get a random point in this navigable area, which is the green area. So it's getting a random point and you can spawn at this random points and the origin. Now, where do you, where is the origin? So where, where does the word do you want to start? And from there you are going to search for points. We're just wanted to start in the middle of the map, so we want to search from here. And to get this specific area, let me actually move this player start that we have worthy response. Let me just move it in the middle of the area just like this. And I'm going to go inside of here and say gets actor of class. And I want to get the player starts. They'll get the actor of class is going to get any actor of this one, the player start inside of the map. And we only have this one, we only have this player start. So it's going to get this player start in the map. And with this plastic part, what we can do, let's connect it here. What we can do is say get actor location. So this is the location we want, this is the origin we want to search from. And how much do you want to search? What is the radius do you want to search for? So let me write one hundred, five hundred. So it's a big radius, it's going to search so the enemy can spawn anywhere inside of here. If you made it very small, the enemy would only spawned right around this spawning area. So let's make it large. They can spawn around the whole map. And now we need to plug it in, but this needs to be a transform. So we can say this or we can say transform. And there is something called make transform. I would rather do this and then plug it in the transform. Then we can control the, the rotation and the scale. Okay, so this looks good for now, let's compile and save. And here in the collision handling override, we want to say bye to adjust location. Don't spawn. If still colliding. There are for responding, let's say San enemies. If one of them is going to collide with another, we don't want to spawn an enemy on top of an enemy. This will both again. So don't spawn if the enemy is on top of the other enemy. So don't spawn if colliding. You can show it. Let's try this. Let's try this collision mode and you can see what it looks like. So try to adjust location, but always spawn even if they are colliding. So let's try this. And this is now going to spawn every 0.2. And let's hit Play and see if we have got everything right. So now we're responding this, see, now are responding enemies. And now you can see here this enemies bumped is finding, winning the ground, running on top of each other. And we don't want that. So let's go ahead and say tried to adjust location, don't spawn if still colliding. So if you are inside of the wall or if you are beneath the ground, or an enemy's on top of another enemy, don't spawn. So let's click Play and see what it looks like. And they are not colliding with each other. Okay, So the spawning system is working now. And let's go ahead in the next lesson and work on the animation for when the enemy spawning.
58. Enemy Spawn Animation: Let us now work on the animation for 1D enemy spawning. So instead of just spawning like this out of nothing, I wanted them to jump down from the map. So let's go ahead and side of the enemies. And inside of this animation blueprint we made earlier, leaking on that one. And inside of here, if we go to local motion here, so if I go back so you can see it. So this is our, our event or animation graph clicking on the local motion you made earlier. And before this, we want to make another state. So click on stage and I'm going to call it spawning. And then after that we will go over to the eyeball and jog. So we want to make the spawning and double-clicking and the spawning. I found a good one. Somebody dropped down, this one dropped down. If you can take this one out and connected. And you can see what it looks like. He's actually dropping down from the sky. So if you can't find it, then here you can go and set up a marketplace and you can find it in infinity blood adversaries, the enemy, the Master grant, and emissions. And inside of here you have this one called dropdown. So this is, this is the one. Okay, so now we have this spawning animation and we want to go to this idle after you have spawned, we don't want him to jump all the time. And the way we do this is we have a transition here. This is called the transition. So if you double-click this, it asks you, what am I, how am I going to transit, transition from spawning to idle? So from this state to this state, and I'm going to double-click this and writes time remaining. And you can see this one called time remaining ratio and double-click this. So it's going to take the time remaining ratio of this animation, the drop-down innovation. And it's going to automatically find this animation because we already logged in. So it's going to search for what did you plug in here. So it knows it's this animation. So if their time remaining is less than, Let's try 0.5 and let's compile and save. So if the time remaining of this, if the ratio, time remaining ratio is less than 0.5 for this animation, go ahead and switch to idle and jog. So if we click on Play and see what it looks like, it's transitioning a bit too fast. So if I go back to my animation blueprint and a right 0.2 instead. So you have to test a value and see what it looks like. Yeah, so now it's looking a lot better. So now you can see the animation spawning was looking a lot better and they rubbing, rubbing from the sky.
59. Spawn Waves: All right, so now let's create some waves. Now the animation is working and they're responding. But let's create some waves and they can spawn in waves. For example, you have level one, level two, level three, and more and more enemies will spawn each time you defeat them. So to do this, let's go ahead and go inside of the game mode. So this, this lecture is going to be a little bit more complex, but I hope I can explain it as best as I can. Okay, So here, let's actually right-click this timer we made earlier, and let's promote it to a variable and let's call it spawned time. Ok. So we can use it later on to stop the timer. Then we have, we have a variable we can refer to if we want to stop it. So over here, what do we spawned this enemy? Here in the Game Mode, we spawned the enemy in a random point in the navigable radius. I'm going to right-click this enemy and call it NME point O. Now we have a reference to this spawned NME, and I want to add it to an array. So what an array is, let me create a variable here. So I'm going to create a variable. And this variable, I am going to change here the type of it. I'm going to search for an actor. And you can choose this actor and the object reference. Okay, and this one, I'm going to call enemy ons. So then S, we have multiple ponds. And I'm going to click on this actor here, this icon. And I'm going to change it to an array. And you can see it becomes, if I drag it out, it becomes these boxes instead of an ordinary circle. And what an array is, is just a container. And it can contain a lot of items. So if respond, let's say 10 enemies. We can add all 10 enemies inside of this array. So it's just, it can imagine it's like a box. While this, this normal variable can only contain 11 reference. This one is like a box and it contains, for example, 10 of these inside of here. So it's like a box and you put all the enemies inside of this box and you have a reference to them. Once you need them, sometimes you can try to do something with all of these 10 enemies inside of this box. Okay, So, so an array is just like a container, just like a box. And it can be anything. So for example here, I could have changed it to a, an integer and integer array. And you can compile and save. And you can see here, I can have a lot of numbers here. So it's just like a box. An integer or an array is just like a box with a lot of items. So for example, if it's an integer which is a numeric variable, it can contain, for example, 10 numbers. It's up to you can add even 100 numbers, that's up to you. So this is what an array. Array is. It's a container of items. And in this case, we want to save all of these spawned points inside of this array. And I can show you later what, how we can use that. So to add something inside of this array, we can go ahead and say, you can, of course click on it and click on the plus and you can select something, but let me delete it. We are going to add these ones. So going here and writing AD. And you can also see if you drag down and go down to utility array can see all of these functions that you can do for arrays. You can add, you can clear the array so you empty it just in case you have a lot of items inside of it. You can see if it contains a specific item. You can find an item. You can see if there's something identical with the thing you are going to add. You can see the length of it, which we are going to do and so on. So there are a lot of functions for arrays that you can use. And here we are going to click on Add, because we want to add something to this box, to this array. So the thing we are going to add is this enemy phone. So you can click here and connected. And now it's going to add this enemy porn to the array. And you can imagine here, right now it's going to loop this timer. So it's going to spawn an enemy every 0.2 seconds. So it's going to spawn five enemies as second. And all of these enemies, every time it loops, it's going to add, add, add. So every 0.2 seconds we're going to add an enemy to this array. So by the, by 1 second, we have five enemies inside of here. Okay, So this is the container we are adding the enemies for. And let's make a variable called wave because we want to make waves, for example, wave 1, wave 2. So more and more enemies will spawn each, each wave. Let's make it into an integer because a wave is just a number, just like level one, level two. And let's go, let's go back to the ordinary integer variable. And you can see we can now add a number, for example, wave 23 or level transitory or whatever you want to call it. And let's change the number right now it's 0 as default. Let me change it to one. So we start with Wave 1. And I'm going to take out this wave by holding Control and dropping. And I'm going to say length here. So here I am going to check the length. And here I want to say, is the length greater or equal? Oops, greater or equal. I punted the keys. So if the length of this array is greater or equal than this wave, so if the number of enemies we just spawned is greater or equal to wave, the wave number which is one currently. If this is true, then go ahead and stop the timer. Okay, So the timer, remember we made this variable that we can use. And I'm going to drag it out and say clear, clear, and invalidate timer By handle. This is how you stop the timer. So I am going to start the timer. And so if the wave is one, so right now the wave is one. If the enemies spawned are greater or equal to this one, then stop the timer. So right now it's going to spawn only one enemy. So if I click Play and I tested out, and I searched for this enemy, then we can find anywhere. So I only have one enemy and I don't have more. And if I set this one to five, now I'm going to have five enemies. So they're responding 1, 2, and 4 or 5. So now I have five enemies. So this is working. So if you're amount of enemies inside of this array you just made. If it's above this wave number, then stop the timer. So this is how we can control how many monsters are enemies we can spawn. And for example, if you are at wave 50 or level 50, you will spawn 50 enemies. So right now let's change it back to one. Right now it's working. And to make sure this wave number is increasing every time here, let's go ahead and make a new, I knew what is called event here. And to make a new event, Let's go over and, and the interfaces and the game mode interface. And here we can make a new event. So create here, click function, spawn, or just wave counter, compile and save, go back to game mode and write wave counter. And this one event called wave counter. And so I'm going to take this wave and say plus, plus. And the plus, plus is it adds one to the specified value and then setting it. So this is the same as writing like this. So if you take one and say plus1, so the wave plus 1, and then you set it. So this is the new value. So this is the same thing if you, if you did like this and you've connected, this is the same thing. So instead of doing all of this, you can just say plus, plus if you want to add one specifically. Okay, So now we're adding one to the wave. So every time you stop the timer, I want to add one to this wave so I can use it later. Because then it's going to be two instead of one. And the next time I fire this event, the wave is two instead of one. So here I am going to say wave counter. And it's this interface called, okay, so it's going to say plus 1 and the wave will be two. So the next time I call this event, it's going to be two. But right now we haven't called this event again. So even if I play, nothing will happen, even if I kill the one enemy that is that as fond yet. Because we haven't really told the game to run this code. Again. We haven't told to run this code again. So the next thing we want to do is actually run this code again. After the enemy, all the enemies and the level has been, have been killed. So the thing we need to do to check if all the enemies had been killed is actually go through this array and make sure that all of them are dead. And the way we can do this is in different methods. But the one I want to show you is every time we kill an enemy, we want to remove this enemy from this array. And once this array is empty because we removed or killed all the enemies, the code will run again. And the next time the wave will be two. Because we run into here, the last time we respond the wave. So next time it's going to run the code, it's going to be two, and the next time is going to be three and so on. Okay, so the way we do this is let's go back to LeBron's in their enemies, and let's go inside of the enemy base. And inside of the enemy base, we want to create a new, a new event. And this event we want to call remove pond. So let me go ahead and I think we made in interface for this, so we are enemy base. Let's go inside of here. Let's go ahead and add a function. And this event we will call remove palm. So we're going to remove it from the array. So going inside of the enemy base, calling the event called removed on. And this one. And to get access of the array, remember it's inside of the game mode, the enemy bonds. So we need a reference to the scheme mode. So in the inner references game mode, and we already made this get Game Mode reference. So going back to enemy base, and here I want to say it's Game Mode. And then gets Game Mode graph. Looks like this. So now we've got the game mode and we are specifically referring to our own game mode. And the way we do this is we made this function, and remember we wrote self. So remember to do this else that will not work. And here inside of this game mode, we want to access the enemy Ponts array. So enemy pons, good that one. And here we want to remove, so dragging out and saying Remove. We want to remove an item. And what do we want to remove? We want to remove the, the, the enemy that just got hit and killed. So we want to remove the dead enemy. And the way we can do this is just go ahead and dried self. Because remember we are already inside of the enemy base. So though the enemy you hit is inside of here and you can just say self because you are going to remove that enemy which just got hit. So self. And then we, after that, we want to check if this length. Go ahead and write length. So we want to check if this array is empty after we have removed this. So going to this and saying equal o is the length equal to 0. If it is. So click on branch. If it is 0. Then go ahead and run this code again inside of the game. So we want to run this code again. And I need to run this code again. And instead of running it all the time, I actually want to make a begin play. So begin play. Here. I'm going to take this Demode reference, getting adherence that. And I'm going to right-click and promote our variable and called Game Mode. And I have a variable to, or I have a reference to the game mode. And I can just use this to connect to those. Instead of calling all of this again and again. Now I have a reference to it. And this reference I can then use here to run this code again inside of the game mode collage, right? So I can now run this code called sworn enemy. We're going back to the enemy base and writing spawn, NME. And it's this one message because it's an interface function. Okay, so now it's going to spawn the enemy once this array is empty because you are removing this killed upon. And after you remove, it's going to check, is this array now 0, is this empty? If it is empty, go ahead and run the next wave. So right now we haven't, we haven't called this event yet, so removed upon. We don't have it anywhere in the code. So we wanted here 1D player or the 1D enemies dead. And let me actually make this into an interface event instead just to make it more clean. So let me go back to the game mode and dried death, Compile and Save. And here I can write depth and take this. Actually, let me, oh, I think I made it in the wrong one. Yeah, that was in the game mode. Let me go ahead in the enemy base and make the death. And let me delete this one. And right there and saying this interface event instead, just to make it more clean, I like mechanical clean and removing this one and calling the death interface colon instead. So now we have this, that event. And here in the depth, once the enemy dice, I want to remove this enemy. So the enemy dies. And then you are going to call remove on. And it's an interface call because it's an interface event. So after the enemy dies, you are going to remove the enemy from this array, Compile and Save. And then it's going to check if the array is 0. And I don't know if you have missed something, let's actually play and see if it says error or something like this. So I'm going to call this one and once bond to respond. And let me see if mom's point. Now we only have two and if I call those or if the sound is too loud. Now 2s bonding here. And three. So now it's working. Now we're responding the enemies. And I actually want to rotate the enemies so it's facing towards the camera. I think it's going to look a lot better. So clicking on the game mode and the rotation here, remember respond the enemies here. I want to make the rotation for the z 21 AD. So now there are going to face the camera. So now the enemy is facing the camera. Okay, so this was all for these bonding. And before we end this, I actually just want for fun too. Explosions when they die. Because why not? We love explosions. Here. Let's go ahead and spawn an emitter. So before we removed upon, let's say, spawn a mirror at location and respondent in mirror. And the thing we want to spawn, I just want to spawn some explosion because, why not? It makes a lot of sense. Going in the military weapon dark inside of effects. There is something called grenade explosion. So this is the one I want to spawn. So if I go back to my enemy base, so inside of my enemy base, I can minimize this a bit and drag this explosion. So now we are going to explore the time they die. And the location we want to spawn this effect in is just the location of the enemy right now. So good actor location. And the rotation and scale is fine out to destroy, and everything is fine. I also want to play a sound and the sound I want to play. Let's, let's just write play sound out location. Let's play a sound and let's find the sound quickly. So inside of the weapons here, we don't have a better sound, so I just want to improvise a bit. So going inside of the sound and let's go inside of the grenade launcher. And I want to use this explosion, but before I press it, I think it's too loud. So let me put it to 0.2 and hope I don't blast your ears. Let's just do afraid it's too loud for you. When you see this video, yellow, let me make it 0.1 from you can make it louder on your computer. So let me go back to the enemy base. I'm going to drag this sound here. And a location we want to play it in is again, just get the actual location. We can copy paste it. Or you could have just connected like this and you can make it look a bit better with the weather. We wrote notes, so that's up to you how you want to do it. Let's just do it like this for now. So now every time we call them, they are going to explode. This is looking a lot more interesting. So you can see how much effects and sound to the game. But this is a little bit bug and now this work we can fix by designing the Merlot bit better so we don't have this problem. And this was it. And actually, before I end the video, let me go ahead and put down the volume of the shooting. And I think we made it inside of the player, player base. And this is the rifle. If I click on the browser. And this is the impact, This is the firing. I'm going to make the fairing and the lower. I think it's too loud for you. This is fine. Okay, so now we have everything working. And then it explodes and they are spawning, and we have waves and so on. So the next thing we want to do is actually make the UI and it tells you prepare for wave 1 or prepare for wave 2 and so on.
60. Creating Spawn Wave UI: Now that we have the spawning working, Let's go ahead actually and create some UI for it. So to do this, let's go ahead and create a folder first. Let's right-click here and your folder, and let's call it UI. Inside of this folder, Let's right-click and do a user interface and Widget Blueprint. So this is how you create UI. This is a user-interface blueprint. So click on this. And here you can write WB just like we did with the ballgame. And here we can call it wave, wave number or wave. Yeah, let's call it wave and double-click kits. And here we just want to add a text saying this is where you have two or three or four. So going ahead and dragging this text out and drop it in here, I am going to call this repair or repair for weigh one. And this one is going to change dynamically so you don't really have to change this text. I just want to change it to preview it because we are going to make it encode instead. But I just want to preview it here. And what I want to do is write it in the middle though to make it in the middle here in the justification you can see you can change the location and I want to make it in the middle here. And the anchor point I wanted to be in the middle of the screen. So I'm going to change this anchor point to the middle here. And if you write that position 0, 0, you can see it's anchoring to this point appearance. Then what you need to do is play with the alignment. So zero-point, five-year. So now it's in the middle and then you can move it down with the Z or the y-value. Just like this. And I want to make the font a little bit bigger. So going inside of the fund, making it 36, maybe, position like this. I'm going to change the color like this. Prepare for wave 1. And this one we can actually, let's go over and the graph. And what do we want to do is this one needs to display every time we kill all the enemies, it says, for example, powerful way of two. So here inside of the code, let me delete all of this and the graph here. And let me make a custom event. And this one is going to be called wave. Wave display wave text. We could display where detect display wave text. Yeah, let's, let's do a display wave test. And this one, we're going to say right now we need, we need the text variable. Because let's go back to the designer. And if I click play here, we haven't edited to the viewport yet. But if I click play here, it will say prepare for your vine all the time. And I don't want to do that at first. I want to hide this text, so I want to change the visibility to hidden. And before I do that, I actually want to show you, show you this. So if we go back to the file, I click on my blueprints, the player controller. So remember we controlled the, the UI through the player controller in the last game. This is how I usually like to do it. I like to do the UI ends up inside of the player controller. So let's actually also do it inside of here. So here in the begin play, I want to create this UI. I'm going to drag out here and say create widgets. And what would you do you want to create? You want to create this wave. We just created the WB wave. And the owning players just declare controller. And we are already inside of the player controller, so you don't need to do anything here. And I want to right-click, I'm promote this to a variable so I have a reference of it, and I want to call it WB wave. So now I have a reference to this UI. So I'm going to click Save. And here instead of just doing Add to Viewport, so you can see if I add it to a viewport, so it's not enough just creating it. You have to add it to the, to the viewport to see it. And if I click Play, you can see it says prepare for a button. But it's going to say when all the time and not do anything else and this is not interesting. So what we want to do is we want to remove this at two viewport. So we only create this, this Widget Blueprint, and we have a reference to it and we don't add it to the viewport. And remember, if you don't add it to the viewport, you don't see it. So we just have a reference for it. And after this, I'm going to go inside of the game mode. And now I want to display it every time I start a new wave. And you can do this here before this timer, because you are going to run this code every time you run a new wave. So here I need a reference to the player controller, and I don't remember if he made an interface for it. Now we don't have it. So right-click here, make a Blueprint Interface and call it ends player controller. And double-click it and say it gets controller rough. And click and outputs. Search for the player controller and I think we call it PC cologne strike there it is. Object reference. And let's call this variable layer controller. Okay, so now we have this flow controller. Let's go and remember to go inside of the player controller in the Class Settings. And here, add it, add the player controller. And remember to double-click the gut like control our ref function and writing self. So now we can make a reference to this player controller. So let's go back to the game mode. Actually let me close all of this right now it's too much open and I think it's too confusing for some. So let's open this game mode. And this game mode here, we want to get a reference to the player controller. So writing good player controller. And we wanted to specifically use our own player controller. So saying gets player controller F. So remember it's not this one, It's not get Lera if it's good player controller ref. So we want to get a reference to it. And here in the player controller, we want to use, if I go back to the player controller, we want to get this variable because we want to display it every wave we are every time we run this code. So here I am going to say WB main because this is what we call the variable. And click on it. And I'm going to, I'm going to right-click and convert to a validated get just to make sure it's exists. So here, is it valid? If it is, go ahead and add it to the viewports. At two viewports, I'm going to add it to the viewport every time I spawn a new wave. Okay, so now you can see here if I play the game and essentially bugging out, because I don't see the text on the top and the enemy hasn't spawned either. And this is because we go back to the game mode. This is because this grid widget is being run at the same time as this game mode being, being run. So it doesn't register that this actually exists, and therefore it will be not valid. What we don't want, that we want it to be valid. So I'm going to delay the spawn, the writing delay. I want to delay the spine by 0.2 seconds. And let's go ahead and compile and save and click Play again to see if it works. I can see now it says prepare for a one. And if I call the enemy, it's going to say the same thing because we haven't really changed the text dynamically. Do going to say prepare for your one. And we don't want that. And we also got a warning saying that our viewport is already existing. So because it tried to add it to the viewport again when it spawned a new wave. And you also have to fix that as well. So adding to the viewport, and then it creates this timer. And here we actually want to display the text. So let's go ahead and inside of the blueprint we made the UI. And inside of this UI we want to change this dynamically. So going back to the graph and in the display text event here we want to actually enter designer, I forgot to do it. Click on the text and go down and change the visibility to a hidden because we want, we want it to be hidden at first. And then in the graph we can take this text because what you can see here, we don't have the text as a variable. So going back to the designer, clicking on this text, up here, you can click on this variable. We can compile and save. And if you go to the graph, you can see you can use this text as a variable now. And let's change the name so we know what it is. And I'm going to call it text. Wave will compile and save. And now in the graph, we can take this text wave and we can set the visibility to visible. So when we display the new text or the new way, we want to make this visible. And after that we want to say Format text. Because we want to make the text, we want to make this text dynamic. And the way we do it is we change the text to something here. And after that we are going to take this variable and say set text and do it like this. And then we're going to set this text. You can do it in two ways. So you can do it like this. Or just like in the previous game, the ball game, maybe you're wondering why didn't, why didn't you just click on the bind here and the text here, click on the bind and create a binding and just change the text and plug it in here and it's working. And let me delete it again. The reason is if you create a binding, so I will remove this binding right now. If you create a binding, a binding means that it runs every frame. So this is what a binding is. It runs every frame. It checks if the text is that actually changed or not. And we don't really want that. When we are playing the game, we only want to check if the wave has changed once we start a new wave. So this is not good for performance. If you bind everything, if you bind this, you bind this and then you have ten different groups. Control Z, if you have ten different texts here, you bind all of them and to check if the, I don't know, your stamina is running low or whatever you want to bind this shadow or the color of the text. Every time you bind it will check every frame. And this is not good for performance. So it's better to just set the text. This is a lot better performance and it will not do it every frame. So this is why I do it like this. This is a lot better for performance. So we're going to set the text to visible, and then we're going to format the text and say prepare for wave. And then we're going to write this curly brackets and a 0 in the brackets end. And if you click Enter, you can see we have a number here. We can plug in. And you can plug the wave number here because this is the only thing that's changing. It's saying prepare for wave. And then it's going to give us the number of the wave. And we already have a number of other ways. Remember Indie Game Mode, we made this variable called wave. So we want to use this. Therefore we are going to need to get access to the Game Mode. So I'm going to write gets game mode. And then that's Game Mode graph. Then we are going to say wave as we need the wave variable. And I'm going to plug this number inside of here. So I'm going to organize this a little bit. And now we set the text to this, this number. So it's going to say prepare for wave, and it's going to tell you this number. And I want to hide this text after some time because I don't want it to be on the screen all the time. So I'm going to delay it by some seconds. Let me load by three seconds. And after that I'm going to remove the texts. So taking this text and I can actually just drag out from this and say set the visibility and said divisibility to hidden again. So double-click to make a reroute node and make it look a little bit better. Just like this. Let's compile and save, and save here as well. So here when you spawn the enemy, you are going to display this text to the viewport. And I am going to delay this. So I'm going to display the text. So I am going to delayed by five seconds before I spawn a new wave. So here are delayed by five seconds and then remove this text or this widget from the, from the viewport. So I'm going to drag out from this and say remove paraffin if removed from parents. This is how we remove it from the viewport. And now I can double-click to make arrived rewrote node. So it doesn't look weird like this. And maybe we need to actually let me double-click this to make reroute, to be organized else you can see it, it gets messy very quickly. Now let's compile and save, and let's actually test the code. So if I click play, and that is just me being stupid, I forgot to actually run this event called display wave texts because we never displayed it here. So I added to the viewport. And from here, let me actually move all of this code. Let's make some space. So I'm going to also this over down, just like this. And here we're actually going to move this a little bit. And we are going to call this events. So we already have a reference to this WB wave, this Widget Blueprint. So we can call this event from here. And here we can say displayed wave text. So display with text. And now we have this event. And let me create a new reroute node here. I mean, just double-click and let me unconnected, connected here. Just like that. So now we are going to play this event. So good. Click on play to their says prepare for a one. I'm going to remove and after two seconds it will spawn. The enemy is somewhere in the map. I don't know where he's fond. I'm going to go. The enemies should say prepare for it to. Now says Prepare for wave 2 and 2 enemies will spawn. Therefore if three, okay, so now it's working. And let's actually remove this is bullets and a bullet lines because we already know it's working now. So under Blueprints, player, player base, and it's coming from the line trace. So here the line traced by channel, the debug mode, Let's make it none of compile and less play. And you can see you now we don't have any any aligns to look at.
61. Importing Custom Font: Now that we have finished our simple UI, so we made this Wave UI. And the only thing we did for it is this text. And now this is the only thing we need for the Wave UI. But what we can do is actually stylize it with customer funds and you can do that with any UI you have inside of your game. Though, you usually want to get custom UI or custom funds just to make your game more unique. Here you can see I have rebuttal, but it's actually not Roboto. I don't have anything. This is from my previous game that I created. So let's go ahead and download a custom fund that we can use here. And what you can do is I've already opened it inside of Google, tried to search for Google funds, and here we can find three funds. So under the Google funds, clicking on that. And inside of the URI can download any font you want for your games or all of these works. And what I usually do here in sort of categories is I remove these. I just like the, the san-serif and serif styles and the thickness. I wanted it to be very thick so it can be seen inside of the game. And maybe I can use, let's use this one month's cigarettes. Or maybe Tick 0 is cool or the Open Sans. You can choose whatever you want. I'm just going to use this one. And you can click on Download family. And when you do this, it's going to download this font so you can look at, so this is the one I've downloaded. I am going to extract it here on my desktop. And I'm just going to use this bold and black. I don't think I'm going to the other ones. I'm just extracting those two. And this one, if you open the engine again and you minimize it a bits. And here let's actually inside of the UI folder, let me actually make a new folder here. So let me make a, or actually instead of the UI, we can just important out of the UI folder. But if you want, you can make a new folder called texts and you can employ there. But I'm just going to drag those inside of here now. And then it's going to say, Would you like to create a new fund assets using these ones? And I'm just going to click Yes All then is going to create some fund assets for me automatically going to click on Save All. And this is very easy, that was it. So now we can go inside of this wave, click on this fund, and now you can select whatever you want to use. So this bold one, for example, you can see what it looks like. And this is the black one which is more, more ticker here. So I'm going to use this black one and let's actually increase the size to maybe 60, or maybe that's too much to 50. And this is what it will look like. So if I compile and click Play, now, this is where we're going to look like. Now it's still not looking good because it's not too visible. So what I can do here, so click on this text. And by the way, you can make this bigger just so it doesn't look too weird. And said the position of the x to 0, so it's in the middle again. And what you can do it for this one is actually you can add some shadows. So here inside of the shadow color, you can put the Alpha. So this is how the opacity. So clicking, setting it to one, then you are actually have a shuttle. If it is 0, you don't have a shadow. So clicking on one or writing one. And then the shadow offset, we can set it to 55. You can see here we have a shadow behind that sex. So maybe 66, and I don't want it to be that visible. Or maybe 0.5 down here are 0.3 is working as well. So now I can compile and click Play. And you can see it's more visible now. And maybe 66 too much. I can click on the text and rights for four. And this should be fine. If you want, you can always go ahead and add an outline here so you have some outline settings and you can see you can add an outline for your texts. So if you want an outline here, you can go ahead and apply that. But let's go without an outline. And it doesn't really matter. I'm not too worried about the design of the UI. You can design it however you want. But there I know we have some basic UI inside of the game. And you can see it's appearing every time we have a new wave.
62. Making the Enemy Chase the Player: Now we are ready to make the enemy chase the player. So right now our enemy is just standing still and not doing anything. So right now I want the enemy to chase the player. So what we want to do is inside of the blueprint folder, we can right-click and create a Blueprint Class. Arrived now we're going to create a, an AI controller so the AI can actually sense the player and then move to what the player. Now, you can't make an AI controller inside of here, you can only make it black controller for the player, but you can click on all classes. And inside of here you can search for AI controller. And you can see here we have an AI controller. You're going to select this one. Detour crowd AI controller is ongoing to adult click on it over this flex the leg. Let's call it AIC for AI controller and then clone strike. I'm trying to maintain the same naming convention as this one. What you want to do next is remember, we actually assign display controller inside of the world's settings. So we added this black controller to our own player or the character we're using. So we have to do the same for the enemy that will go inside of the enemies year folder and the enemy base. And inside of the enemy base we have something called a PI controller class. And the one we're going to select is our own AIC clone strikes. So this is our AI controller that will be used. So that is all we had to do. So now we can close this down and let's go inside of our AI controller that we created. Let's go inside of the event graph and let's delete this for now. So instead of add in some of the components, we have to add something called palm sensing. Here on sensing this one. So this is, this is the one that's going to sense our character, is going to find our character. It, when it finds the character, it's going to move towards the character. So just calling it points and points and sing, That's fine. And here inside of the settings for the points sensing all of these defaults are okay. We don't need to change anything except for this one. So the peripheral vision angle. So here we can write 180 and this basically means it's going to look 360, 360 degrees to see if there is a player inside of the map. And that is all we had to do for this pond sensing. So compiling, click on Save. And down here inside of the points sensing, you can see here we have some events that we can do. And the one we want to do is it's pretty cool. You can also do on here noise, so it hears a noise. But the thing we want to do is unseen upon. So when this AI, when the, when the grunt we have inside of the map, when it sees our ponds. So it CSR character. What do we want to do? Okay, so the thing we want to do is firstly, we want to check if this, This paan that the Grunt is seeing if it's a character, so are the players, sorry. So we could have a lot of points. So we could have a lot of points in our, in our scene. We could have MPC's, we could have whatever. The only thing we're interested to change is the player. So again, we have to say actor has tag and say player. So if, if it's the player you are seeing we can on a branch and we have to do another thing. So I'm going to create a new variable, and I'm going to call it player pawn. And the thing I want to do is I just want because of this pond sensing every time it looks at your player, so it looks at the character here, the player. It's going to create this variable all the time. But I don't want to set this variable all the time because imagine you have the AI and you have the player. And the AI looks at the player and sensors it. Then the AI is going to set this character all the time. And we don't want to set it all the time because once the character has been set or the player has been seen one time, it's going to store it at a variable so you don't have to set this all the time. This is not good for performance and also bad programming practice. So creating this Player Pawn variable. And let's change this type to pawn. And going to select this pawn here, an object reference. So now we have this play upon and we can get it out here. Click on Get. And let's right-click and click on promotes a variable or sorry, convert to validated gut. So now we can connect this and it's going to see if the player at this variable is not valid. Then go ahead and let's set this variable. So what I'm going to do is hold Alt and drag this out. And what we can do now is take this out and plug it inside of this variable. And now if it's true, plug this in as well. And now I can make a real rock node just so it looks less confusing. So I can put it up here. Okay, so what it's saying is just to explain it quickly so it's not too confusing. We're saying is if you have this variable because we just made it here, it's a random variable. If this variable is not valid, if it's not set to anything. So right now it's empty to begin with, when the AI haven't seen the player. If it's not valid, if it's empty, if that is true, go ahead and set this variable to whatever player you have seen right now. So this is one the enemy sees you for the first time. It knows that you are the player because you have the tag and it's going to set you inside of this variable. So next time, the AIC zoo, it's not going to do all of this because it's already set it, so it's going to be valid. And now it's actually not going to fire all of this code all the time. Okay, So the next thing we want to do is actually change the player. So now you have seen the player. We have set it inside of a variable, and now we want to chase the player. So now we have to make another, another event. And this one we have to make inside of the enemy base. So if I minimize this and I go inside of the enemies and any new base, I want to make an event here called Chase player. So let's go ahead and make it inside of our interface. The enemy base interphase. And I'm going to click on Add and function, going to call it chase layer. And let's compile and save. And let's go back here and the enemy base. Let's make this layer events. So selecting events. And now we're chasing the player. We have something called AI moved to. So if I drag this and write ai move, then we have this one ai moved to. So here we have to select the pond. So what is moving? It is the enemy. So this one enemy base. So basically describing self here. And the destination it's going to, we don't have to write anything here. The target actor is the player. But how do we get the player here? Because now we're inside of the enemy. And the way we do this, I think actually is the first time we add, add variables to events. So going back to the interface, the enemy base interface and this chess player event, we can actually add a variable now inside of the input. And here we can search for on and then selecting pawn object reference. And I'm just going to call it targets. This is the player, this is the target. So now pretty cool inside of the enemy base. Now, this event that we have made, you can see you, we actually have this, this variable here inside of the event. And I think it's the first time we actually add a variable to the event. And this is pretty cool because now you can actually move information through this event. Because now you can actually plug this target inside of this target. But now we have to specify the target. And remember inside of the AI ladder controller or AI controller here, we have to call this event called Chess player, because now it has set the variable for the player. Now we want to change the player, but right now we need, we need a reference to this enemy obese. So what we can do here is we have something called event on possess, though events on possess. And event on possess is basically the begin play. So it's basically the begin play, but this is for the AI, this is how they do it. So event on possesses basically begin place. So when this, when this AI is inside of the map, let's make, let's actually just do casting here. So cast to BP enemy base. And now we can just right-click here and promote this to a variable and call it enemy. So now we have, we have a reference to this enemy base. And basically we can now call, we can now call this event here. So let me go down here and drag out this enemy variable. And now you can say change splendor. And it's a message because it's a interphase function. Let's connect it here. And now you can see we have something called target now. So this is actually maybe it's a bit confusing because that one is also called target. But this one is the one we made and we can now actually plug this in. So the target is the player we have set, so the enemy sees you. It, it sets you inside of this variable and now you are the targets. So we have to plug this in here. And this information, the target here, is then being sent over to this event and then moving to this target. So we have now a connection. Now it knows what the target is. And this is pretty cool. That's a pretty cool way to do it. So you can add inputs to events and you can move information from 11 Blueprint class to another. So now we have this one called chess player. And now you have to set some acceptance radians. The radius and the acceptance radius is how far you are away before it sees you. So if it's very low, the player has to come very close to the, to the AI to be seen. But maybe let's try for our right to a 100 and see how it looks like. So I don't think we're missing anything unless we have a bug and it's always good to test. So let's click on Play and it should chase you down. If not, we have a bug and now we have a bug. And I think I know why. So if we go out, I probably forgot. So clicking on the enemies. And inside of the inner base. Inside of here we can click on class defaults. And hearing class defaults, we actually have to change this one here out to possess AI. So the air controller is not working. And because here, event on possess is never being played, because it's set to a place in world and we're not placing it in the world. So I'm going to select placed and world or spawned and we're actually spawning it. I'm going just to click on this, click on, Compile and Save. And now it should work. Okay, so now when I click Play and I run around, it's actually not working. You can see here the air is not chasing us and actually don't want to remove this from the video. I actually want to show you how you can debug these things. So now we have this error and where is it coming from? So now actually want to show you how, how you find these errors, because it's pretty important, you will get into those pretty often. So going back to the AI controller here, and inside of here we have to find the bug. So we can start here, an event on possess. So we can write print. And now it's going to print a string. So if it actually possesses correctly, it's going to print this string here. Clicking on play. And print string is so important to use when you debug to see where the error is. So remember to use the print string. And you can see here to the top left it's actually said hello, so it's possessing correctly. Okay, So this part of the code is working correctly, possesses correctly. Now, I never start from the beginning of the code because sometimes it's a waste of time. So you can actually start from the end of the code and see if it's actually working at the end because you're going to waste your time if you start from the beginning. So now let's see if it's actually going to send us. So if I go close, it's not really sensing the player. So something is wrong with this code. So if I go back, something is wrong inside of this code here. So you can always try to print string and see if it actually censuses here from the beginning. Now, now that we know it's not working. And let's wait for the, for the enemy. And when it's font you can see it says Hello a couple of times and it's actually sensing us. So it is working here. So something is wrong inside of this code. And we can always try to make a print string here after the player has tag and it's going to say true. So clicking on play and waiting for the enemy to spawn. And it should say hello if it's working. And you can see it. It never said hello. So something's actually wrong here inside of the code net. So this one, nothing is wrong with this, but something is wrong with this year. So this part of the code, because it's actually sensing us. So nothing is wrong here. And we might have forgotten to add the tag player to the player. So it never recognizes the player. And maybe I forgot. Let me actually see. So if I minimize this and I go inside of the player and the player base it in the class defaults if I search for tag. Yeah, actually I don't have a tag called player and maybe I forgot I haven't made this course for one to two months, so I don't really remember are now. But maybe I've deleted by mistake, maybe I've not actually made it. So searching for tag inside of the player base, inside of the class defaults. Here in the actor tags, you can click on the plus and write player. So just like the last game, and now we have the tag layer. So now it should actually recognize the player. And let's try to click on Save and click on Play and see what happens. So waiting for the enemy. And now it should work. It should move to the player. And you can see here it's actually moving to the player. So this enemy moved to me so that it's actually working now. And the thing we have to do, you can see when the enemy reaches the player, it stands still. And this is where we have to do the attacking out, so we're actually ready to do attacking. You can see the NMI is running after the player and when it reaches the player is standing still and it's supposed to attack. And after it attacks, it needs to sense again and move to the player again. So I think it's running a bit too fast right now. So what we can do is reduce the enemy, moving speed a little bit. And the way we do this inside of enemies, we can, we can do it over all for the enemies. But right now this movement, I don't think it's, it's I think it's specific for the ground. I don't think it's global movement. Imagine you have different enemies. We only need this discriminant movement to be slower. So going inside of the BP grunt, inside of the character movement. And here we can reduce the max walk speed. And maybe we want to make it too. Let's try 400 and see what it is like. We don't want to make it too slow and not too fast because maybe it's getting too easy or too difficult. So right now the enemy spawning and it should change the player. And now you can see it's chasing. And I think this speed is fine. It's, it's maybe a bit too fast still, but yeah, I think this is cool. You actually reduce the speed just a little bit because it's supposed to be easy to begin with and then it gets harder. So maybe you're reducing it to 300 and that is it. Remember to compile and save and do so in all of the others. And now we're ready to do the attacking.
63. Enemy Attacking: All right, so now we have the MPC chasing the player, and it is time to do some attacking for the MPC. And we have a lot to do so let's get going. So to begin with logo inside of BP, enemy base. Inside of here we made this event called event chess player. So the MPC or the AI is chasing the player and when it reaches the player, we have to attack. So now we actually want another event called attack. And remember we made and the interfaces we made the enemy base. So let's go in here, click on Add and add a new function. Let's call it attack player and Compile and Save. So over here, let's say at SAC player and click on this event. So now we can do that sack player. Let's call the event over here. So when the NPC moves to the ER, wouldn't the AI moves to the player? So here on success when you reach the player. So let's say attack player. And it's this one interface call because it's from the Blueprint Interface. Okay, so now we have this attack player. And here in the attack player we have to do some coding. And what we want to do is play an animation. Because when you're attacking the AI, the AI is attacking and he's playing an animation. So I'll show you something we haven't learned about yet. And it's called animation montage. And if you drag it out here and write montage, you can see this one called Les montage. And this is what we want to play. And it looks pretty complex, but it's actually very, very simple. I just have to explain to you and you're good to go here. So in the skeletal mesh components, so this is what is playing this month edge, and this is, this is the Enemy that's doing it. And so we need this Skeletal Mesh. And remember a static mesh is just a, a mesh. For example, if I minimize this, this box over here is a static mesh. So it's just, a mesh is simply just the model. This is what a meshes. Static Mesh. Just a mesh that is static, not moving at all. And then we have our skeletal mesh. And the Skeletal Mesh is simply a mesh, so a model that is animated and this is the our character. So if you hold the mouse over the character, you can see it's called a skeletal mesh components. So it's a skeletal mesh. It's a mesh that is animated. This is why it's called a skeletal mesh. So it needs to know Skeletal Mesh and it's just this mesh over here so you can click and drag and right here, like drop it on top of here. Or you can just right-click and say mesh. And you can see here get mesh. So this is our mesh. Next you have to play a certain montage, and we have to make an animation montage. And let me show you how to make one. So inside of the marketplace in, Let's see here at infinite, infinity blade adversaries, enemy was go down to master grants and inhere in the animations. So the one I want to choose, this one, the first one, the MLA attack Malaya here. So I'm going to double-click on this one. And you can see this is the attacking animation that we want. So we want to make this into an animation montage. And I can right-click here. And up here at the top you can see Create. And then you can create an anime one touch. And you crave that you can see you have a montage here. And what are usually called them is an M for animation montage. And I'm just going to call it at SAC, just like that. Now we have an animation montage and you can double-click it. And here in the animation montage, you can see we have some sort of a graph. Here. We can actually code or just notify the animation when you do damage and when you don't. So for example, you can see this is the animation and I want to do damage whenever the animation it is at this state here. So when he hits the player here, So over here to the left you can see we have a montage and we have different groups. And down here in notifies, this is where we want to be. You can see you can click on this and add, insert notify tracks. You can add more tracks if you're if you need that. But right now I'm just going to remove those. I just I just need this number one. And inside of this notify track number one, you can right-click and inside of add notify state. You can select this one called montage notify window. So we're creating that attack window. And you can see you have, you get some sort of a window you can drag here. So this is the animation when montage window. And let's go over to the place where you want to do damage. So I want to do damage just right here when he attacks. So I'm going to move this one. So this is the beginning over here. And the end when you finish the attack is somewhere over here. So I'm going to drag this one and place it over here. So this is that sack window and he attacks here. He does damage, and he ends the attack over here. Okay, so now we have created that and this is all that we needed. So we can click on Save. And we can give it a name here and notes to find name. We can just call it attack if we want to. And we can give it a color if we wanted to, That's up to you. We can see it changes color. And let's leave this one so I'm going to click on X to close it. And I'm going to go back and sort of blueprints enemy's, enemy, enemy base. And here in the notes of phi. So here we want to add our montage. So if you click this, you can see you don't have much to choose from, because this is the only animation montage that you have, and this is the one that we created. So you can click on this animation montage attack. And then you have to choose the playwright. And this is one that's fine. And 0 here and starting section and zeros. That is okay. So I want to make this into a variable and I will tell you why. So you can right-click and promote to variable and just call it attack at him. I'm just calling it attack animation. So this variable is very, very important that you make those into variables because now you have this attack montage. And if I minimize it, and I open migrant. And if I click on Open full blueprint editor. Now you can see this is a variable. Remember, all the variables that you make inside of the parent class will also be inherited in the children class. Remember the BP grant is a child of enemy base. So this variable will also be available here, just like is that the, is that Boolean and the health is available here as well. So now when you have different enemies here, so just imagine you have the grant, you have a spider, you have a golem, you have a skeleton. Each of them you can actually assign a different attack animation. So remember to make those into variables, because if you don't make it into a variable, you can't release set difference attack animations over here. But if you have them into variables, you can set, if you have ten different enemies, you can set a random attack animation for each of these different enemies. So very important to make those into a variable. So you can actually edit it and make it different in each enemy. Okay, so now we are attacking. And now what we want to do is on notify begin. This is if I actually go ahead and I go over to the marketplace folder. And now we can actually, instead of going in here, we can just search and him montage. So any Mondays what to call it and see, this is pretty cool to write prefixes so we can search quickly and I can go inside of here. So this is the notify window. This is where it starts. So this is the on notified beginning. And here we want to do something. So what we want to do is something called sphere overlap actors. So we, we are overlapping with actors. This is how we, how we detect that we are hitting something. We have a sphere that overlaps with our character. When the sphere overlaps, we have hit the character. And just to show you the process more visually, I can write Draw, Debug sphere. And now this sphere is just drawing as fear. And I can show you when we attack. So if I just choose a sphere at location here, and the location we have to make, we have to make something here. So clicking on Add and clicking on, let me write sphere. We need the triggers fear the collision sphere here. We'll select the collision sphere, and let's just call it a sphere. And here you can actually try to move it in front. Like where are the grantees attacking? So you have to choose where he is attacking. So maybe somewhere around here. And now we can take this sphere and say gets world location. And you just have to find the location so you can put it here so it knows where is he attacking. This is where the sphere will be. So here you can say instead of, if you don't know what it's called, it's called Get World Location. But if you don't know what it's called, just right location because you are trying to find a location. This is how I began when I when I just began doing blueprints, I just rewrote location. And you can see this, this is the only option you have. Get World Location it here and adding it here. And let's also do it here in the debug sphere. And the debug sphere. You can see here it's development only. So this is only here to help us. We are going to delete this in a second, but I just wanted to show you because it draws a sphere so you can see where this sphere is attacking. So the radius is 100, this is fine. Are multiple going to make the radius 100 here. And what is it going to overlap with? This is what object types mean. So you can drag from here and write mic array. Remember when it's a square like this and not a circle, it means this is an array and not a normal variable. So I'll make array and let's choose porn. Because remember our character, the player character that we have is a type of pond. So when it interacts with pawn, this is what we want to do. And this is fine. You don't have to do anything here and access to ignore, we don't really have anything. So now let us set the duration of this Draw Debug sphere so the sphere doesn't disappear instantly. So let, let us set it to five seconds for now, the thickness we can also set. So let, we can set it to five and see how thick that is. So clicking on compile and clicking on Save. Now this is set. And if you click Play now and try to see the animation, you're probably not going to see anything. And I'll explain why. So the GRAV-D comes here. You can see he actually attacks because he draws the sphere. What you can't see the animation and why is that? And this is probably inside of our animation blueprint because I don't remember we created this specific thing we need. So clicking on this animation blueprint for the grant. And sort of here inside of the animation graph. So if you click on the Animation graph here, and remember if you are inside of something specific, you can always click back up here. So here in the first, first window, we have to add something between the locomotion and between the output, output pose. So dragging out here and writing default, or actually just like you can write slot. And you can choose this one slot, default slot. And this one is needed to play animation montages. So if you don't have it, if you're not understanding why your animation montages are not playing even though the, it looks like they're working. It's because you don't have this slide default slot on. So remember to put this else, you will not be able to see your animation montages. So if I click on Play now and I wait for the enemy. Now, here's an attacking should work. I don't know where is it there? You can see that's hacking and now he's bugging a little bit. So you can see he did Ed jump and we can fix that. But he's ultimately working. So the animation montage is working. So if we go back inside of the blueprints and amines and enemy base here, inside of here, I want you to go inside of view part. And you can always try to adjust this, this one over here compared to where he's actually attacking. And what I want to do instead of clicking on play and, and waiting all the time, I actually want to remove this. So if I go and select the blueprint, and if I go in and the game mode, and let's just remove it temporarily. So I want to see where I created this logic. And it's actually over here inside of the spawn enemies. And I delayed by five seconds. I'm just going to remove it here just for now and connected. And what you want to do is sometimes you're maybe afraid of forgetting to connect it again. You can always select it and click on C to add a comment. And sometimes I do this and I do a red one. So I, I remember it. There is something here that I should remember. You can even write a comment that this should be reconnected. Ocular complaints, bonds are like instantly so I can actually just quicker and he's attacking and the sphere is right in front of them. And I think for us, if we go back to the enemies and any base, I think 100 is fine, but I just ultimately want to move this a little bit further because I think it's a bit too close. So maybe like this. And let's click Play ancestor for the last time. So this is right in the center of our character, and this is actually perfect if you want the location here, this is what it is, but you can try to move around and see where it fits best. So now that we know the attacking is correct, we can actually go ahead and remove this sphere that is drawing to the level because we don't really want to see it. And we can also play a sound when he is attacking. So I can move this a little bit. And I can say late sound at location. So we can select sound. I'm going to drag those a little bit down. And what is the location we want to play it in? Let's just choose the location of this sphere also. So connecting it here and making a reroute node that will clicking just like that and the sound we want to choose now, we don't have many sounds and this is not really a, a sound course or anything, but I just want to show you you can, you can go on YouTube and find your sounds. But remember when I'm making cause it's copyright everything and I can't really give it to you. So go inside YouTube if you want to find a hit sound. But ultimately, we're just going to use the knife sound here. There's one called the knife lower Q. And if you could play, you can hear the sound. I'm going to lower the bed. Maybe it's too loud. Peoria, I don't want it to sound annoying in this course. And I'm going back to the enemy base. Here, let's select the night. I believe it's called lower, this one, knife lower. Q. So already made into a sound huge as nice for us. And now when you click on Play, now is making us out cool. Another thing I want to do is, is I actually want to make the attacking animation a little bit quicker because I think it's way too slow. Going inside of the assets detail here in the montage, you can actually change the rate scale. This is how fast the animation is playing. So this is the normal rate. And if I write three, you can see it's playing way too fast. And I just want to write to, I think two is a good number. Let's click Play again and see how it place. Yeah, so now it's a bit, a bit better so he's attacking, but we have a buck, jumping buck and we have to fix that. So the problem we're seeing what the jumping when he, after he is attacking is basically if we go back to the enemies and the blueprint here inside of the local motion, we made this spawning. So spawning is basically where he's jumping here, jumping down from the sky. And what, what's ultimately happening is when he attacks, it's actually replaying this animation blueprint. So we're kind of spawning him again. So playing this animation again. And this might not work for this case. So we maybe we have to delete this spawning. So you can click on Delete, you can delete this pointing one and just connecting the idol. And what we want to do now instead of having the spawning play here in the animation blueprint, we can just play it as a separate animation inside of the, the blueprint class. So if we go back to the enemy base, and here, let's make a began play. We already have one actually. So here in the events begin play. Let's actually add this animation. So if we just take this mesh or it can just write Play Animation and it creates the mesh automatically for you. So if you write Play Animation and you can select this one, you can see it creates this mesh mesh variable for you. So taking this play animation and you have to select which animation you want to play. And I believe it's called something with drop-down. So by serif for dropdown, It's this one called exogamy Master grant dropped down. So clicking on that one and now you can compile and see what's happening. So if I click on play and you know, what I want to do actually is inside of the game mode, I'm going to increase the, the wave number. So click on wave, so we spawn a lot of them so we can see what's happening. When I tried to develop, I make it like this so I don't have to wait all the time and waste time. So click on Play. You can see what's happening. The rubbing down from the sky. But they're moving instantly. And now you can see there are animations bugged. And this is because if we go back to the enemies here, the enemy base, if we go back to the enemy base, it is now making this drop animation, but we don't want him to move right away. So we're going to add a delay. And I found out, I found out that 1.3 seconds is a good number here. You can always test out and see what's a good number. And after we play the animation, remember this mesh is currently running on a Animation Blueprint. So if I go to the grunt and in the mesh you can see it's running on this use animation blueprint. This is the blueprint we're running on. So you have to remember to assign this again. So right now is only playing in animation. And then you have to break out from here and say Set animation mode. Like this. Because if you go back to the measure, this one is called animation mode. So we want to set this animation mode to use animation blueprint. This is what we want ultimately. And now it should work. But again, we have to like right now he's chasing the player right away and we don't want that. So you can see it's dropping fine. And then it's walking is correct. But they're dropping and then they're facing that player right away. But we want, we want them to drop first so they're not sliding on the ground. So remember we created the taste player inside of the AI controller. So click on that one. You can see this one called chess player. So this is what we made here with the pond sensing. And we don't want to change the player right away. Let's delayed a little bit. So delaying it by 1.3 again, you'll lay 1.3 seconds, just like this. And now it should work. So if we click Play, and now they're moving. So you can see the drop first before they actually, before they actually move over to us and attack. So now we have a little bug. You can see they're jittering away like when we were rotating. A ton of generating away. And another bug is when they're attacking, they're actually not moving anymore. So they're standing still. So let's fix first that they are not attacking again. So clicking on enemy's enemy base, we did the attacking down here. So the play montage. We have to do something when the montage is actually complete. So we have to chase the player again. So dragging out here and saying Chase player. So it's this one here. And let's select chess player. Listen like the interface call here. So we are going to chase the player again after the animation is finished. And remember to select which player to chase again else this will be very confused because the next time it's going to attack. If you leave this be if you don't have anything here connected, it's not going to know what to attack. So remember to connect this again. So it can actually break from here. And you can connect it down here. Or another thing if you want to make it more clean, this attack player, you can actually add an input of pawn here. So if you go back to the interface, if I have it open, I don't. So if I go to the blueprint interfaces and EMI base, and I click on the attack player here I can make a variable clicking down here on the input, actually not output. And the input, I can make a pon, variable object reference. And I can just call it targets, Compile and Save. And in the Embase you can see now we have this target and let us connect this target over here. So now it's a bit more clean. And I can double-click it to make it make it look a bit more clean here, just like this. So it's not too confusing like that. And now I can actually drag this target over to here. So I can double-click it and put it up here. Just like this. So this is, you can do it like this or it can actually drag this over to here, that's up to you, but this might be a bit more cleaner to do. So now, the enemies actually going to attack again after it's, had attacked us for the first time. You can see they're attacking and it's actually going after us again. Okay, so now it's working. But you can see when they are moving around, they're jittering, they're shaking. The enemy is shaking and it's not because they're afraid, it's because we have a bug. You can see here, they're kind of bugging out when they're moving. And we have to fix this. It's inside of the enemies and enemy base. And so if here in the class defaults, we have this one called use controller rotation you are. And what's ultimately happening is it's actually getting moved or controlled by two different things. Is getting controlled by the your and it's gone getting controlled by what the rotation of the enemy is. So if you disable this rotation, your, if you disable it, and you compile and save. And let's go back to the character movement. And inside of the movement, Let's go down. And here, if I can find it. This one called Orient Rotation to movement. So selecting that, and this should fix the problem. So if we click on Play now, and now, let's drop down or walk around. Now you can see they're not jittering, they are not afraid anymore, and they're moving correctly. And how it should be.
64. Applying Damage to Player: Okay, So now the, the attacking animation is done and the NBC or the AI is attacking. Now it can do some damage on the player. So going back to the enemy base, it opens on my second Manchuria. So if I bring it up here, this is the interface. And we did this a tag player. So now we want to apply some damage. And you have done this before. So if you, if you want to try yourself, you can do so. And here we want to do it together. So here on the sphere overlap actors. So we did this one. Remember we, we overlap the Po1 and when the point overlaps this sphere, it means that the on has been hit by the enemy. So here, the return value, if you hold your mouse over it, it says through if there was an overlap that passed the filters, false otherwise. So it is going to be true if the NMI or the AI is hitting the player. So I can actually drag out of this and click on B For branch. So now we can say if the, if there is an overlap with porn, so if the layer has been hit, we can do something with this. So we can do apply that edge. So every time the player is hit, we can apply damage. We don't want to do it like this. So if I remove this like this, we don't want to do it like this because this way we are always going to damage the player even if the player is not hit. And this is why we are actually adding this Boolean to check it. If there is actually an overlap and if there is an overlap with the pond. And it says there was an overlap that passed the filters. And right now the filter is this pond. So when the player is hit, we apply damage. And the damaged actor is the player. And we actually have a reference to the player over here. Remember we made this target here. So I can actually drag from this and put it inside of damaged actor. And to make it more clean, I can double-click it here and make care reroute node. And we have, we need to make a larger one here. Just like that. Maybe we can drag this further back like this. So it's more clean. And here in the base damage, how much damage do you want to do? And this one, you can set a damage here, a static number. But a better thing to do, we can actually make it into a variable. Because remember, if we have a lot of enemies, if we have different enemies, we want to do different damage for each enemy. So we don't want the spider, the grant, the skeleton, and so on all to do 25 damage. Maybe their skeleton is very weak and only does five damage. So we can right-click here and promote this to a variable and call it. We can call the enemy damage or the damage. I'm just going to call it damage. And I can drag it down here. So now this damage variable, since it is in the parent class, the child classes will also inherit to this variable. So if you go inside of the class defaults, we can actually choose how much damage this grunt does now. So maybe we want the brand to do with 25 damage. And if we make a new enemy, we can actually change this for the new enemy. So now the grantees doing 25 damage. And, and remember it, remember to change this L Sue, you will have 0 damaged by default. So changing it to 25. You can also choose the health of the grant if you want to. And now we have this applied damage. So what this apply damage done? It can play a sound that when the player is hit. So play sound at location. And the location we want to play the sound in is basically the location of the sphere here. So we're going to drag from this re-wrap node and I'm going to connect it to a dislocation over here. And I'm going to move this a little bit down. Also, this one and this one. So it's a bit more clean. I can double-click here and make it like this. And let me put this down just like that. So now we are going to play a sound and what's under, we want to play it. Now, I am improvising a bit on the sounds because we don't have many. So I'm going inside of the EPS and the weapons and not this one actually. Inside of the military weapon, dark and inside of sounds. I'm going to go in sort of shotgun. And inside of here, I'm going to choose this one called shotgun impact body. And I'm going to reduce the sound just for this course. So it's not annoying for you. Maybe 0.25. And so this sound I'm actually going to use. So if I go back and open my, I think I close as my base. So going here, opening NMI NMI base. Just like this, I'm just going to search for it. Shot gun impacts. This one, shotgun impact, body. Q I believe it was this one, yeah. Okay. So we're playing a sound now when the player is hit, and I also want to spawn some effects. So it's a bit more interesting. So spawn effects play emitter or not, Laplace spawn in meter, rather at location. So spawning a VFX, so visual effect at a location. And now we could set the location to this sphere. So the, the, the VFX, the visual effects will, will appear at this location of this sphere here. But sometimes the player can be a bit far away from the sphere and it looks a bit too cheap. And it's better to find the location of the player and actually play the effects from the player. So to do this, we don't have a variable for the player. So we are going to say gets player character just like this. And we already made an interface function. An interface function. Remember we said Get Player ref. This is the one we made. And we can connect this. And as the player, we can say get actor location. And now we have the location of the player very easily. And now we can connect it. And now we have to play an effect. Now, the effect I want to play is some Grenada effect, and it's just some smoke. So if I go back here and find inside of the military weapon dark in effects, and I want to use, Let's try this grenade muzzle flash. So I can drag this grenade muzzle flash, and I can drag it inside of here. You can search for it here. Actually it's, it's over here. It's very easy to find, or you can drag it and drop it on top of this. So now it's there. And I for the one to make the scale of it that little bit, little bit larger. So to, to, to tonality effect is double as the mean size and everything else is fine. Now let us click Play and see what, what it looks like. So then in responding, yeah, so now it's making a sound hitting the flare. The last thing we want to do is we want to apply this damage to the upper layer. So we want to go inside of blueprints, inside of player and in the player base. Now we need to make a new event called any damage. Event, any damage, because now we are applying the damage. Here. We are applying damage. And now when we apply the damage, it will fire this event over here. So I can write the print string so you can see it. We're going to make this in the next lesson. But now you can see it's saying hello every time I'm actually getting his. Alright, so now we have this done, and now let's get over and make the health for the player.
65. Player Health: Let us now add some health for the player. So now we can go inside of the player base. And here we actually made this and in damage event. So now let us make some health. So creating a variable here, looking on the Plus, calling it health. And we can change the type to float because it's a numeric value we want. And this health, we can set the default health for the player is 100. And now we can drag it out here and get help. And we can say minus. And we can minus the health which is 100, would, would the damage of the grunt? And remember the damage for the grunt? If I go back here and the enemies grunt, the damage for the ground is 25. So if, if the player is hit by the grunt, it's going to say 100 minus 25. And then we have to set it. So holding Alt and dragging it. And now we can set it, then new health will be 75 because 100 minus 25 equals 75. And if the player is hit to this second time, now the, the health is 75 minus 25, then it's going to be 50. So this is how, how you do it. So you have the health variable u minus the damage of it, and then you set it again to this new value. Okay, So now we have the health done. And if you want to see it working correctly, we can actually just writing and string and we can print the value of this help so we can see the value dropping. And you can click on play. And if we are getting here, you can see it's going down and being 0. Now the helper is going to, He's going to minus numbers and maybe you don't really want that. Sometimes it can get bugged if it does that. And this is why we can use a node called Clam. So if I right-click here and drived clamp, and you have to select the one for the float. And this is because our health variable is of type float, so it's not an integer. So it would make most sense to select this one with the float. And I can disconnect this and just move it a little bit here. So now the Health which is 100 minus 25 will be 75. And this value can actually here. And the minimum value for this here, for this value, health value, the minimum is 0. We don't want to drop the health below 0. And the maximum you choose that maybe your game you're, you're player can have 200 and health are only 100. Maybe you can have 500, that's up to you. But right now, our player only have 100 at maximum, so we can just put it at 100. And now we can set this value here. So what's going to happen here is the player is getting damaged and is getting damaged by 25 over time. And when the player has 0 health and is getting damaged, again, never going below 0 anymore. So it's going to be 0 all the time. So now I can compile, click, Save and click on play. And actually I have to print out the value I forgot. So printing out like this. And now we can print out this value and see what happens. So clicking on play. And I'm getting damaged. And you can see it's saying 0 all the time. So now I can't fall below, below 0 in the health. Okay, So that was it for the health. The next one we can do is actually working on the death of the player.
66. Player Death: Okay, so now we can create the player in death. So now what we want to go inside of the player and player base, and here with this, any damage and we made the hell. And now let us say here 1D health is 0. So if it is equal, now I can select this equal. If it is equal to 0, you can click on B to make a branch. And if this equals to 0, we want the player to die. So we want to make a new event called death. And let's go over to the Blueprint Interface for the player base. And here we want to make a new function called layer that Let's compile and save. And over here let's call layer and death. And it's an interface call here. And now let's actually make the event here. So Player death. Now we make the event. So when the, when the health of 0, it's going to launch at this event. So we're, we're actually going to code the death, death functionality inside of here. So first, I want to make it Boolean and making this Boolean called B is dead. So just like we did here in the enemy base, if I go back to enemies and enemy base, remember we made this Boolean is dead. And it's always nice to have a Boolean like this. So this is for the player and we can drag it out and connected and set it to true. So initially, it is false by default because the player is alive and when the player dies, we can set it to true. Is that. So right now we're not using it for anything, but we are going to in a bit. But this is always nice to have and you can control things when the player is that. Okay, So from here, when the player is that we actually want to play an animation. So I'm going to say drag out here and say Play Animation and choosing this one for the mesh. Now I can drag this down and now we can play an animation. And remember if I go back to the Assets folder that I have and the characters animations, we have these retargeted animations that we actually retargeted in the beginning of this course. And we have this one called death. So we can actually use this one. And if I go back to my blueprint, can minimize this a bit and you can actually search for it. But you can also take this and drop this on top of it and it will apply. So now we are playing a death animation. And remember to turn off the collision because when you're dead, you don't need to collide with anything. You want to disable this collision. So dragging out of this mesh and saying Set collision. So this Set Collision Enabled, I want to set it to no collision, taking this Capsule Component. And we also want to disable this collision for this one. So now we have disabled all the collisions. And next I want to take the character movement and I want to disable the movement so the player can not, or the, the, the player can upload, press a, W, D, and S and move around. So we are disabling all movement. And I'm going to double-click here to make a reroute node. So now we have this functionality down and let us click on Play and see what happens. So I minimize here and you're getting hit. So now you're dying. There is still smashing you, even your dad, and you're dying over and over because they're tired of view. Yeah, I've been shooting them all course. And now they're going to kill you multiple times. Okay, so now this is, this has finished and let us fix the, the enemy killing you multiple times. And this is because we haven't told the enemy you want to stop attacking. And now we can actually use this dead boolean that we made. So inside of the enemy base. Remember we made this one called chess player. And their AI will move to you and when they are close to you, they will attack you. So over here we actually want to tell the, the AI that it should only attack if the player is alive. You can use this. We can use this boolean to do so. So we, we don't really have a variable for the character. We don't have a reference, but I can say git player character. And we made an interface, gets player wrath for this one, we made an interface function. And here we can say is that. So now we can actually use this boolean here. And now just for readability, I like to write nuts. And then making this branch over here. Just like this. So now it's saying if the player is not dead, then attack. But if the player is that don't do anything. That is what it's saying right now. If I organize this a little bit, and now it should work. If we say then click on Play. You can see when they're attacking you now. Now they're attacking you and they're going to stop whenever you're dead.
67. Weapon Reloading: All right. It is now time to do some real loading for the weapon that we have. Surette Now we are we can shoot unlimited ammo and we don't really want to shoot unlimited time, so let's do some reloading. So this is very simple because you're already done most of the things. So if we go back to blueprints inside of player and the player base. And here in the player base we made this fire weapon event. And here we found the weapon. We made it at the beginning of the course. And for this one, we actually want to check if the player has enough ammo to fire the weapon. So you can try doing it yourself if you want to. I think you can do that from what we have learned so far. And if not, let us do it together right now. So to start with making the ammo and reloading, we have to make a new variable called ammo. And this time it has to be an integer because MO is a numeric value and we don't really need decimal places, so integers, the right one. And now we can take this ammo variable and we can say minus minus. So minus minus, it says One from the specified value, then set it. So every time we invited the weapon, it's actually going to say minus1 on this variable. So we're going to subtract one bullet every time. And we can click on this ammo variable, compile and save. And let's say less than the default value to 15. So the weapon has 15 bullets by default when we start the game. So now we can make a print string, so you can see what it looks like. Can Save Print String and connect this value here so we can print it out to the screen. And it's always good to make a print string so you can actually see what you're doing during development. So I can click on play. And every time I shoot, I'm going down in bullets. But now you can see you can actually go in minus numbers. And we don't want to go and minus numbers. So we have to fix that. And the way we do this, just like before, we have to use a clamp so it can drag over this and seek lab and this one. And you can set the maximum value to 15 because we have a maximum of 15 bullets. And you can set the minimum to 0 so it never goes below 0. Now we have to check if the player has enough bullets to shoot. So we can say, if this amount here is, if it is larger than 0, then go ahead and shoot just like that. So you have to connect it here. So if the player has more bullets than 1000, the player can shoot. But if you have 0 or less, you cannot do anything. So I can try to play here and I can show 15 times. And now you can see I'm clicking but I can't shoot them. And this is working. Okay, so this is working now and we have to make the reloading now. And to do the reloading, you can go ahead and write the hierarchy. But this is bad practice. Again, remember what I said from the beginning of the course? It is if you hard-coded values like this from the keyboard, the player will not be able to change this value in the Settings menu during the game. So just like if you do the W key for running forward, the player cannot change this W key to something else and the Settings menu. So it's a bad practice to hard-code the keyboard keys like this. It's better to do it through the project settings, just, just like what we did with the movement. So I'm going to edit and clicking on project settings. Inside of here we have this input and we actually did that movement here also the fire weapon here. So let us do a new one and let us say a reload. Clicking on this button and clicking on the R key on the keyboard, we'll assign it automatically. And now we can go back to the player base. And we can say reload and Osiris one action event keys that would just make. And this is the reloading. So now we want to reload and reload. We want to set the ammo bad 215. So this is very easy. You just dragging this out and setting this to 15. Just like this. So this is actually all that is doing. And also want to play an animation. It's going to look stupid if we don't play anything. So we need to play an animation montage. So I can take out this mesh and say, and M montage and play this montage here. And I can put it up here and connected. So now we have to play an animation montage. And actually I want to play it when it's complete. So when you finish putting the magazine inside of the weapon, it's going to set the animal to 15, just like this. Okay, so we have to play an animation montage, so we have to make one for the reloading. And if I go back to the animations, to the assets, characters animations, we have this one called Reload rifle hip. So I can right-click this one and say Create, create any montage. Just like this and we can call it a daemon reload. Now, I can go back to my blueprint here and I can search for it. And we don't have to search much because we don't have many. So this one, any montage reload. And I can click on Save here. And remember just like for the grunt, the animation montage is not going to show. Now I'm clicking R and I'm actually reloading. But it nothing happens. And remember this is because we have to go inside of the, the player here and inside of the animation blueprints. And inside of here go inside the animation graph. And in the animation graph, we have to put this slot here. Floods default slot. And if you don't have that, you will not be seeing your animation montages. So you have to connect this. And if you click Play now, you can see it's reloading. The problem now is if I walk around and reload, It's going to slide. So we want to blend the running animation and the shooting animation together. And the way we do this, it's very simple. So here in the animation montage or India and the Animation Blueprint, sorry. But the player, we want to use something called a pure right blend. You see something called layered blend per bone. So clicking on that one, you can blend two poses together. So if I disconnect this here, I want to blend this base pose. So this is our running animation. This is the default local motion that we have. And let me connect it here. And the second thing we want to learn to blend is if I copy this and paste it here and connect it here. So I want to, I want to blend the running animation together with this running and reloading animation. So the way we do this is it's blending per bone. So you have to choose over here. If I drag it out here in the layer setup, you click this arrow here, and you click this index. And now you can click on this plus. And here you have to select a bone name. So from where do you want to blend? And maybe you're asking how do I know the bot name? How do I know that? And the way you know that is if you go inside of the assets characters and you click on your ischium machine. So this is the machine that we have inside of here. You can actually see these bones. So if you click on them, you can see where you are. And it's actually up here. If if this doesn't appear for you, you have a assets details panel up here and a skeleton three. And in this Skeleton Tree that you go up, maybe I actually don't want this skeleton here. You will also be able to see it. So clicking on these bones, you can see the bones of the character. And you want to choose a bone where you want to blend this animation. And you want to blend it. You can see here this one's called spine one, and this one is called spine two. And this is actually the one we want to blend it from. So you can, you can choose your own spine that you want to blend it from wherever it looks good. But basically the upper body is where the reloading is happening and the upper body is from here. So this is maybe too high up. So going with spite to, it's going to reload the end. Like it's going to look the best here, I believe. So. We can always try it out and see if it if it looks good or not. So we have to select this bone called spine 0, 2. Now if I go back to the Animation Blueprint and I click on this one. Now we can in the bot name we can write bone, our spine surgeries buying 0, 2, and the blend depth we want to set to one. And the mesh space rotation blends. So the rotation, we want to blend that as well. And that verse actually it's, so let's, let's try it out looking on Play. And now when I choose, I can click on Reload. And you can see is reloading while I'm running and it's actually looking pretty decent. Okay, so now that is working and the last thing we can do is actually add a sound effect. Now if I go back to player, player base, now we can add a sound with bacteria for the reloading and for the sun effect instead of doing each year. So you can always come in here and say play sound that location, and you can do the reloading sound, but you can also make it more specific and you can do this through the animation montage. So if I go back here and click on assets, characters, animations, and clicking on this animation montage. Just like the attacking animation for the grant, we can actually make the reload sound from here instead of playing the sound from here. So if we did this through code, the sound, what would play from here actually? And we don't want that. We want the magazine to be heard. When he's pulling it out here. And what we can do here is we can always make a notify window. So we can say on 9, 25 begin, you can play the sound. What we can also do something else. So we can right-click here, do a add notify, and then we can say play sound. So now I can actually click on this and play the sound we want. And if we go back to minimize this, and we go back to military weapon dark and sounds. We have the rifle that we use, and here we can use the sum. So what we can do here is this reload. So I'm going to click on it and minimize or lower the volume. There's like this. And I'm going to use this reloaded, well reload, Insert. And I'm minimum or lowering the volume again. Just like this. So I'm going to use these two and play the sound actually yellows. Let's use both of them. So let me open back my animation montage. So if I click on the sound here and I just minimize it a little bit so I can see what the arrival sound was called. So if I go back to rifle, I can use this reload cube to remove it from the removed from the magazine from the weapon. So I can drag this and put it inside of the sound here. Now can hear is actually, you can actually hear it. And now we want to play another sound, one he's putting this magazine inside of the weapon here so I can right-click here and click Add notes or file play sound. And clicking on this again, now I can actually drag this, reload Insert here. So now let's hear it. Okay, So another really the best sounding sounds that we have, but it's working. And maybe we want to do it here actually, maybe it's too early, just like this. Just like that. So this is how you can do it and you can actually do walking. Enemies are walking, sounds like when you hitting the floor, when the player is walking. You can also do that as well by adding sounds. So when he's on his footsteps are hitting the ground, you can add a note and notify and add up play a sound so he's hitting the ground. So we can do that like this as well. But I don't think we will add sound or put footsteps for this game because we're always adding some music and it will not be heard. So this is how you do the reloading. And we can try to click on the X here and save everything. And now we can try to click on Play. If I'm hearing. And I don't have more bullets and I can click on our OK, so everything is working now and I can shoot again. And I can't do it anymore. I can click on R. Okay, so this is working out. And that was all we had to do for the reloading.
68. Designing the Main UI: Okay, So we're basically finished with the game. And later on let's try to clean the code and maybe add something for the game that we are missing. So for example, in-game music. But for now we're basically finished with the basics of the game. And now let us do some UI. So the first UI we are going to do is the main UI. So for the player health of the ammo and so on. So you can see it on the screen, because right now we only have a print string. And a print string. You cannot really see like for the player when you release the game, the player, the print string is only for development so the player can not see it. So now we're going to add some UI so you can actually see that you're held, you can see your ammo and so on. Okay, and so to do so, let's go back to the UI folder that we made. And here, Let's right-click and go inside of the user interface and create a widget blueprint. And let's call it WB made. So this is the main UI that we will have. So now let's go design it. Double-click on it, and here in the designer, you can. Now what we want to do first is we need a border or the player, so a portraits. And then we need the Health Bar, and we need the name of the player. Now I have already uploaded some assets for you in the and under website so you can actually download these assets. And what we want to do is let's minimize this Widget Blueprint. And let me open my folder and let us just import everything. So click on this and all the way to here. I think the star we get the star is from the previous game, so we don't really need it. And let us just make a new folder here called assets. Let's drop everything inside of here. So I'm going to drag those and dropping them in salad here. Just like this. So what we want to do inside of the Widget Blueprint that we have open. We want to use this image as the portrait or this one actually for the robots. So what we want to do is use an image here. So using an image and this one we can change. But remember you have to think of the UI, like what, what are you trying to create? So we're trying to create this border. We're trying to create the name of the character. And below is the Health Bar. And if you need these assets together, you can't really just come in here and put the image and then you have the text as the name. There's now they're going to be separate elements. And imagine later on if you want to change your UI, you are going to change the placement of these. So you don't want to change the placement of this and then you have to change the placement is and then the placement of the Health Bar, it's going to take you a long time. You're going to waste a lot of time. This is why we can actually put it inside of horizontal boxes and vertical boxes. So if I try with the horizontal box, so if I place it inside of here. So now we have this horizontal box we can put elements inside of. So we can start with the image. So if I search for image and I put it here on the horizontal box and see now we have the image. And then I can put, now, you can, for example, put text and you can see what it looks like. Now it's actually putting the text, for example, the robot name, this side of the player name here beside the portrait. So now you're actually only have to move this horizontal box to move everything together instead of moving each element when you're trying to adjust things. Now, we need a name and a health bar just beneath each other. And instead of just putting a texture, we have to put a vertical box first. So putting a vertical bugs on top of the horizontal box. So now you can see this is the vertical box actually inside of the horizontal box. And now we can put a name on top and the Health Bar at the bottom. So adding a text to this vertical, bugs like this, we can search for progress and add this progress bar. And we can drop it on top of the vertical bugs here as well. So now you can see we have these elements, but it's not looking good because we haven't really designed them. So if you click on this vertical box here, you can actually click on Fill. So now it's going to fill the whole vertical box here. So this is the size of it. So if you click on Auto, it's going to only fill this here to click on Phil's going to put here the same you can actually do with the image. So you can click on it and click on Fill if you want to know they're going to divide this horizontal box into half. So half of the image and half is this vertical box. And you can try it away. This, this is pretty difficult like when you, when you're not used to working with the UI. It's pretty difficult sometimes to realize that you have to use auto here or click on Fill. Or the image just should be also and not fill and so on. But let's try to insert to the images and we can actually get, it will get easier. Then these blocks here. So clicking on this image first, I'm going to click on this brush. And here we can actually add the image. So if I click on this, yeah, we have too many things, so it's better just to drag it. So I'm going to drag this robot image on top up here, just like this. And now we have this. Now you can see this is the image size and no, and I edit the size. It's not really changing anything. And this is because we were using film. If I youth auto, you can see what it looks like now. And now you can actually change the size. So let's use auto for this one. So ultimately you can just adjust this image here and you can see here from the effect like on the horizontal box. And if I scale it now, It's going to scale with this, with this year. So it's going to scale the image. And this is because you have vertical alignment. If I click on top here and I actually reduce the size, you can see it's actually reducing the size. But if you have this vertical alignment on fill here vertically, it doesn't really matter what size you change here. So remember, these are very important. The size, if it's filled or not, or if it's vertically or horizontally aligning. So this is very important to play with. And I think it's okay for me to vertically align here. So if I reset this and I just reduce this to something, and let me just reduce the size of this horizontal box. So I'm going to push it up here and just ultimately tried to play with how large this is going to be. So maybe something like this. And accordingly, I can actually click on the image here and reduce the x size. And I just want to make it look good so it's not stretchy or anything. So just like this. Okay, so now we have to play with the text here and let's call it Mr. robot. I don't know, very creative name. And we can actually change this font here to this Montserrat that we used before. So here, mr. Robot. And what we can do with this now is you can see it's, it's, it's very close to this image, so we want to push the text a bit away. So clicking on this vesicle bugs, you have something called padding up here. And this padding, you can think of, where do you want to push it from? So I want to push it, push it from the left. So I'm going here to the left and writing ten for example, we can see it's washed away. And sometimes I like to see things without these dashed lines so I can see them better. So I'm going to click on this here. This enables or disables the dashed lines. So you can see it like this. And I think I'm going to push it further away. So maybe it's onesie. 20 is better for me just like this. And I can click on this progress bar. Now we have to set this progress bar to something. And actually for this case, let's, let's add a shadow. Maybe it's not visible inside of the game. So I'm going to hear in the shadow upset. We can actually, before we do that, let's apply the shadow. So here in the shadow color, we have this Alpha, and this is how visible and invisible it is. So 0 is invisible. And if you write one, the shadows visible. And you can see it's very, very slight. And we can actually make the, make it bigger by changing the shadow offset to 33, for example, you can see now we have shadow. So now I have Mr robot and you can always add an alignment, so an outline. So this outline settings here, you can change the size to one, for example. Now we have this text and then you can click on this progress bar. And let's do something with this. First, we have to click on the style here, and let's add an image and a background image. And the background image, I ultimately want it to be this dark color. So I'm going to drag this inside of the, this one here. And now it is correct. Now can see the color is wrong even though you have set up correctly. And if you go down here and the progress bar, so if you scroll down, you have this fill, color and opacity. And I'm just going to click on this arrow, so it's actually going to be white again, I don't want it to be I don't want it to be blue. So why is fine for me? Because if you color it with different colors, it's going to look wrong here. So having it the default white color here. And now we can set the fill image and the marquee image. So this, these are the loading in the progress bar. And basically the health for me is red. So I'm going to drag this inside of the this fill image here and inside of the marquee image, just like this. And now you can see if I go back to what we find here, the percent, if I increase it, you can now see It's actually increasing and decreasing the health. Now this is pretty cool. We have a loading bar now are our progress bar rather. Now you can see the color is still a bit wrong. So this is very dark. This is not the same color as this one. So we have to change that and this is basically the color again. So clicking on this tint, you can see this is the background image that we have and the tenders black and we don't want that, we want it to be default whites. So I'm going to increase this year and make it white. And I can see you now we have the correct color actually. So this is looking a bit too huge. We don't want it to be that big here. So I'm going to click on this alignment here so you can see if you change the alignment, it's going to change. And basically also have to change the size of the image. So here in the Y, maybe if you're at 50 and you also have to do so down for these ones. And you can see it decreases. Our 50 is 2, you'd still, so maybe I want, if I go back here, maybe let's go back to 25. 25 would be fine. So I'm going to change everything to 25-year, just like this. And when I want to do now is make this one a little bit larger because this is very small. So clicking on this progress bar, I can click on this horizontal alignment. I can actually fill it to this whole area just like that. And we can move it down if you want to. You can also move it at the bottom here if you want to. But just remember if you're moving it to the bottom, you can see nothing's happening. This is because you have to click on Fill. So very important to play around with the size here, the fill and these alignments. Let's actually put the whole thing in the middle. So clicking on the vertical box, instead of clicking on this vertical alignment, I'm going to click on the middle here, so everything is in the middle. And we can always push these two away from each other so I can click on the text. And here in the padding at the bottom. So I wanted to wish it away from the bottom. I'm going to write 20 or 10, 15. Yeah, this is looking a lot better. So we're going to use this year. And now you can see the percentages working and this is looking good. All right, so this was the main characters image here, and maybe it's too huge. We have to test it in the game, but this is fine for now. So next we have to do the UI for the enemy. So again, you can use a horizontal box, and this is very simple. We don't need a health bar. We're going to use this horizontal box. And by the way, if you want to change the names here, so it's more visible or more organized for you. You can click on this horizontal box and you can change the name up here, maybe HB for horizontal bugs, and you can just call it player. So now you can see what it is. And for this one you can call it HB enemy. And for this enemies horizontal box, I want to put it here at the other side of the screen here. And again, we want to add an image for the portraits. And we want to add some text. Just like this. I actually want to switch them. Switch them here so the image is to the right and the text is to the left. And again, we want to click on this brush and add this image here, the 4k image. And the next one, this one, this text is going, this is going to be dynamic. So this is going to tell you how many enemies you have in the map. So let us say 15 by four. Now, this is going to change dynamically. So right now I just write a number to visualize what it looks like right now. Okay, So this is looking a bit, a bit weird. So let's actually clicking on fill here. So click on Fill and we can click on the horizontal box and actually play around with it. So something like this. And I can just adjust the image here just like this. And you can always set it beside the layers in age and you can actually try to make them the same size here. So if I increase it just like this, and it's like this, okay, this is looking fine. So we just want to make something very, very simple. So something like this. And I want to make the text. So this text here is is fine. It's, it's 2004 and size this one is 24 as well. We can put it in the middle here and the center alignment vertically. And we can change the text to Montserrat bold. We can add some shadow. So 33, just like before putting the Alpha to one. And here we can an outline. So the outline could be one here. And now we have this text. Now we can change, we can push it away here so I can click on the text. And in the padding to the right, we want to push it away from the rights. So I can write 20. Just like this. You can see it pushes this image away, it's fine. Actually, I'll also want to change the size of it. I think it's too small. Maybe 40, just like this. And we can try to we should away just like this again, just resize the horizontal box again. So something like this. Now we have the number and the image. Okay, so this is fine for now. Remember we're going to add the functionality in the next lesson. Right now we're just designing. And the last thing we want to do is actually the ammo and reloading. So down here at the bottom, I want the ammo to display. And what I basically want a background image. And I want the icon bullet icon, and I want the amount of bullets. I want to search for an overlay. And this is how you deal with background images. You put an overlay like this. I'm going to drag this overlay from here and drag it down to the bottom here so I can see it just like this. You put an overlay and then you put an image on top of it. And then overlay is basically, you can. Lei, lei images and items on top of each other. That's just what it means. And this image, I want to fill the whole overlay. So I'm going to click on this horizontal alignment and vertical alignment. Now it's filling the whole overlay. I can change this image here, the background image to this black color or this dark button. But in looking thing. So changing it here, putting the image on top of here. Now you can see this is the background for it. And what I can do with this is if I just resize it and make it look a little bit better. Now, what I can do is put the icon on top of here. We want the bullet icon and we want the amount of bullets. So we want a horizontal box. So searching for a horizontal, dropping it on top of the overlay. Now we can search for image, dropping it on top of the horizontal box. And we also want the text on top of the horizontal box, just like this. And again, for the horizontal box, we actually can do the vertical and horizontal alignment just like this. Now we can do, we can click on the image and insert the icon here. The icon bullets on top of this image here. And for this text, we can change it again. Two months arrived in bold. Just like this, can actually change this text to say, for example, eight out of 15. And we will change this dynamically later on. Right now I just want to write it so I can see it visually. And this is the amount of bullets that you have and the amount of bullets that is in your magazine in total, like what you started with. And this icon. Now, right now it's filling horizontally and vertically, and I don't want that. So I'm going to click on these two here. And now we can adjust these sizes here. So you can adjust the size and see what's looking good for you. And I don't want something too large. So something like this here. And this one as well. You can put it in the middle and you can add some padding to the left. So saying 15 for example. So it's not too close to the icon here. And now you can click on this horizontal box. And actually instead of filling horizontally and vertically, you can put it now in the middle of this year. So we are putting it in the middle of this overlay. Now I can resize this overlay and try to make it look good. Now let's add some shadow here. I think it's going to look a bit better. So in the shadow color running one here, and I can write 22, so just some slight color. And also an overlay or an outline. Writing one here. So something like this. And you can see the icon is looking a bit off here. So this is what you have to do in Photoshop. You have to add shadows and so on. But this is fine for now for us. And if you want to stylize your UI, for example, I can just show you an example. If you want to stylize it a bit, maybe it's looking a bit boring in the background. And this overlay, remember you can put stuff on top of each other so I can add another image here on the overlay. And instead of putting it here in the bottom, I can actually put it here on top, just below or just above the horizontal box. And I can fill it horizontally and actually align it at the bottom here. And I can add this red square to it. And now I can reduce the size in the y, so I can reduce it. And action actually just do a small line here. So this is just a small, cool, stylized thing. I can just have it as my UI just like this. And I can move this overlay and actually try to resize it. And however you like it, just like this. I think this is looking fine now. So this is the menu I we have. We have the player and the hell, we have the amount of enemies that are inside of the level. And we have the amount of bullets for when you shoot.
69. Main UI Functionality: All right, so now that we are finished with the main UI, let's go ahead and code the functionality inside of it. So what we want to do, Let's go back to the UI and as accurate assets and the UI will click on the WB main. So this is the main UI that we design. And inside of here. And let's start with the Health Bar. So we're going to code this health bar, and actually I want to change the name of it so we know what it is. So I'm going to I usually call it Prague or progress bars, but this is just my naming convention. You can do it however you want to. Prague and I'm just going to call it health or player health is like this. And I'm going to go inside of the graph. So in the graph, this is where we actually code the functionality. So this is known for you. This is just like the player control our game mode or whatever Blueprint class that we have. This is where we code the functionality. So I'm going to hover on all of these, select them and click on Delete just to remove them. And you can see you have some variables for the items that you have created. And basically these images, we don't really want them as variables because we're not going to use them. So if you want to clean your code or clean, clean your project, you can click on these images and you can see on the top it says is variable and these ones are never going to change in the game. So I'm going to remove this is variable and this background here. So you have some cleanup work when you're doing the project, I'm going to click on this icon as well. And a compound save. And you can go back and it's a bit more clean to look at. So what you basically want to do is if you take out this progress bar and put it here, the variable. The thing you want to do, if you click on the progress bar, you basically want to change that this percent. So we want to change this percent depending on how much help the player has. So right now I'm going to set it to 0 or actually to 100. By default, though this is the parasol 1 and this is the percent. So if I go here and say if I drag out from this and say percent, you can say it says Set percent, this is what we basically want to do. And I want to make a new event here. I couldn't make a new Blueprint Interface just for the main menu, but I don't want to, it's going to be too many Blueprint Interfaces and actually never make them for the menus. So here I can just make a custom events and we can call it sets. Player health goes like this. And we can connect it. And we basically want an input here. If I click on it, I want to add an input. And let's call it help. And I want to be, I want it to be a float here. And I can connect it here in the Health. So it's going to display the help. And what we basically want to do now is we want to set the PLOS health wherever the player is getting damaged. So if I minimize this and I can actually click on the player and the player base. Remember, in the pleural space, actually let's write this down. This looks a bit messy and we need a lesson, actually just too cleanup. So we made this one called any damage. And here the players getting hits and damaged. So this is the new health value that we set and actually want to display this health about value in the menu. But first let us add the menu to the screen, so the main, main UI. So I like to add my menus through the player controller here. So clicking on the player controller, and inside of the event graph, we have this begin play, and we're all really add this Wave UI. So I actually also want to add the main UI. So here saying creates widgets. And inside of here we can select the WB main. And I can right-click and promote to a variable, call it WB main. And I can add it to the view port right away. So I can see and drag from this and say to viewport. Viewport just like this. And if I compile and save and click on Play, can now see you. We have the main UI inside of it screen, and now we have some bugs. You can see it's not aligning correctly and this is always good to add it to the screen so we can see what it looks like. And we can fix this pretty quickly. So if I go back to the UI folder down here, clicking on the main UI, and I go back to the designer. I can actually click on this enemy and horizontal box. And we have actually to change this anchor. So this is what I forgot. I have to change this anchor to this side of the screen. Now, I can actually show you how important these anchors are. Because it's here where the UI should be, like when you minimize the screen and change the size. And for this one, the anchor should be down here. Just like this, I can compile and click Play and you can actually see now they are aligning correctly. So very important to set the anchors correctly. Now the UI is displaying and everything is looking fine. The sizes. Okay? Now what we want to do is go back to the player here, player base. Now we want to set the percentage here in the graph. We want to set this percentage, so set player health inside of the WB main. Now we have a reference to this. Now inside of the player controller, we just created this. So what I need to do inside of the player base here, I want to make a begin play if we don't have one already and we don't want to save begin play. And here we can say it gets player controller. And with this one, we can say gets player controller href. We already made this Blueprint Interface some lessons ago. And we can connect this. And from here we can actually get access to this WB main. So here I can just right-click this plaque control law and promote this to a variable. And I can call it player controller, just like this. And now we have a reference to this controller. So this is now very easy. We can go down here, take this flow controller, and we can now use the WB main, get this WB main. And from here we can actually call this event of a euro settler health. So we can say sets player health just like this. And let me remove or not removed, but move this over here. And we have to connect this first through the code. And we can connect this health value inside of here as well. So something like this. And I can actually put it up here to make it look better and try to organize it as best as you can. So something like this. So now we are actually setting this health value. Now remember if you go back to the WB main here, and you go down to the progress bar here. And you go down to the percent. Remember that the percent is going from 0 to one, It's not going from 0 to 100. So this is something that you have to think about because right now your health is 100. And this means it is one here on the, on the bar. So we need to divide the number this held by 100 because when you have 100, health is actually 1 and not 100. So here, let's go back to the graph here. And in the health, I want to divide it by 100 before we actually put it inside of the percent here, just like this. And now if I save here and click on play and I see what's happening. You can see you when we were getting hit, now we're losing 25 health, losing again. And now I'm dead. So now it's actually working as it's supposed to. Next, we want to count the amount of enemies in the level. And remember, I can actually go inside of the blueprints and inside of the game mode. Inside of here we made this variable called NME poets, and it's actually adding all of the enemies. We made it some time ago. You can refer back if you don't remember it. But we basically made an array that gathers all the amount of enemies we have in the level. So basically we need the length of this variable. So if I go back to my UI and main UI here, I can click on this number. And this one you can actually just call it TXT, NME amounts. And remember to take this is variable because it's not a variable as default. So click on this component Save, and here in the graphic and now see it as a variable. Let's make a new event and custom event. Let's call it set NME amounts. And here we want to use this text variable it can take down here. And if you write text, you can see a couple of things that you can do. And basically we want to set the text, so setText like this and connected. And we basically want to set it to the amount of enemies. What we can do here is we can basically add a new input, just like what we did here. Another cool thing that you can do is you can actually drag this and put it on top of the event. And you can actually see it. Ultimate automatically creates a variable for you. And let's call its enemy amounts. If I can spell just like this. And we want to call this event through the enemy base. So if I go back to the enemy and any base over here, we have this one called removed upon, because every time you kill upon the number of enemies here, it is going to decrease by one and we want to put it inside of the Remove button. So inside of here, we need a reference to the player controller. So I'm just going to add it up here, actually, just right after, after the game modes, I'm going to move this a little bit. And instead of here saying gets layer controller, and then gets layer. Controller ref, just like this. And here we want to right-click promotes a variable, call it lab on polar. And now we have a reference to the player controller. And I can move this a bit closer. And what we can do now that we have a reference to what I can do now is go down to the Remove bond. And here I can take the player controller and I can take the reference to the main UI. And from here, I can now call the event called set it ME amount. So over here, I'm going to say set in ME amount. I'm going to actually just move everything down so we have more space to work with. Just like this, moving everything down. And I can move this up here. And now we have more space to work with. And I can push this, but further away. And now we can set the enemy amount and what is then amount? It is basically the length of this variable here, this array. So I can take this length and actually put it inside of here. And it's going to automatically convert the integer to a text and put it through this information. Now, I can try to click on Play and see what happens. So we can play. Now, I'm basically saying 15. And I think Tololwa. Now it's saying 14. 13 and on debt because they smashed me. And I believe it's a bit bug from the beginning. Modify, change the number here. So if I go to main and I change this number here, I changes to, let's say 12. Okay, see now saying 12. And if I should one socialising 14 now, and this is not correct because remember from the beginning we're actually not setting the amount of the amount of pons here, the enemy ponds, because we're only setting it when we kill one. So we have to do it from the beginning as well. So inside of the game mode, when we spawned these enemies, we actually want to, we want to add it over here where we add the enemies. So remember to do that here as well. So I can go up here and the begin play and do the same thing, get player controller. So you can see we're doing the same thing again and again. And we have to do that to set up the code. But once it's set up, we can actually use it a lot quicker than before. So saying player controller here, having this variable, now we can use this variable down here, taking this black controller, having a reference to the main UI. And from here we can say the set enemy amount. So sets NME amounts. I can drag this down here and I can set it here. I can move this a bit further away. So just like this, and again, we use the length of it and we can drag this length and put it inside of this amount. And we have to move this a bit further away so it's not stacked on top of each other. Just like this. Let's organize it in a bit when you say it's correct. So click on compile and we can click on Play. See it's now adding the amount of enemies. And a bug I can see is if I click on Play, you can actually see it saying 0 and I click on play, actually not 0. It's saying 12, the amount that we actually set, if I click on Play, we can see it says 12 before it counts. So this is a small bug that we have and we can just go inside of the main here and clicking on this number and writing 0 to begin with. But now another bug that we have, you can see the image is kind of being pushed when the counter is going on. So what's ultimately happening is if we go back to the WB main and click on this number, It's actually because it's changing this number and it's pushing this image all the time, that it's changing, just like this. And we don't really want to do that. And we can align this, this image here, the horizontal alignment to the right. And now we can click on this fill. And here you can see now if we resize this is not going to push the image unless it's very close at which is, we can just resize it a bit further away, just like this. And you can actually put this right to 0 and out. So the text, the text padding. So now you can see we can actually just change the number and it will not affect this image. And let's set that back to 0. Let's put it maybe a bit closer. And if we compile and click on play here, you can see that now it's counting without bugging the image here. Okay, so the last thing we are missing is the amount of ammo down here. So clicking on this text, I can change the name to TXT and low, just like this, and Compile and Save. And just like before, let's go back to the graph. Let's make a custom events and let's call it said ammo. And here we can take out this variables so we haven't made it into a variable. So if I click on it and click on S variable, I can click on the graph, check out this ammo here. And I can say set text just like before. So setText. And basically here we want to set how many bullets you have right now and how many bullets you have in total. And to do this, we have to use something called format text. Format text because we want the text to change dynamically. We don't want it to be static just like this year. And we can't really do it like this one because this is one number only and this is, this is very easy to work with. But now we have actually two numbers. We have this one and this one to change dynamically. So we have to use a format text. And in this one, for the thing that is changing dynamically, you have to write a curly brackets writing 0 and then writing the curly bracket closing it. And then you have to write the text for whatever you want to write. And now I just want this slash here because I want, I want this slice here. And then I want the dynamic text again here. Because I can, I can just go in there right 15, like a static text. But maybe it would have another weapon and we can actually make it dynamic. So making this color brackets again, I can write one here instead of 0. And now we can see we now have two variables We can add. So if whatever variable I add here will be displayed here, and whatever variable I add here will be displayed here. Now I can connect this to the text like this. And now we can actually add these to the event. So for the event, the MO is basically an integer. So I'm going to create new variables here. And the one is going to be called current ammo, and the other one is going to be called max AML. And we'll have to change these into an integer. So if I connect this to the current M0 and I can link this to the max m l just like this. So the current MOs going to be displayed here and the maximum is going to be, to be displayed here. So what I can do now is I have to call this max at this set MO somewhere. And I have to do that in the player base because in the IP layer base, remember we made this ammo variable. And if I go here, we have this variable that we made called ammo. And actually let's call this one current M0. So I'm going to change the name of this one. Let's call it current M0. And we also need one called max M0 goes like this. And we can change to an integer and the max MO is 15, and the current M0, we can also start with 15 to begin with. So the maximum here, we can actually drag this integer now and put it here. So calling it max ammo and the minimum is 0. So what we can do now is we can actually drag this here. Before we do this check over here, we can drag this and we need to call this this set ammo event from the main UI. Now we already have a reference to the player controller. We made that. So we can actually drag this and say main. And now we can say set ammo, set them off. And we can actually use this. And let's connect it over here. So connecting it. And now we can say what is the current AML? The current ammo Is this MOU have right here. And the maximum ammo is just this MR. we have right here. So now it's looking correct. And let me organize it a little bit so it's not too messy here. Just like this. So if I compile, save and I can click on Play, you can see right now it's saying 815 because we haven't set the initial ammo. But if I click, you can say sexual correct. It's correct now. And I can hit 0 and now I can click on Arch reload. And now I can see when I reload, It's not showing anything but when I filled it's showing so we have to fix that. So if I go back to the player, player base in here, India, begin play. We actually have to set the AML as well. So here I can take this, copy this, and paste it here. And I can connect it just like that. Put in the maximum ammo and the current demo. So we have to check for that, right when we begin to game. And we also have to do so when we reload. So inside of the reloading, we said this, this animal here. So we can copy this over here and paste it down here. And what we can do is connected and in the current MO, you can connect it here and in the maximal anaerobic and connected here. So now it should work as supposed to. So if I click Save and click on play, it says 15 out of 15 as it's supposed to. And right now I have 0 and if I reload, it's going back to 15. So now it's working as it's supposed to.
70. Designing the Game Over UI: For now we are ready to create the game over UI. And for this one, go ahead in the UI folder and let's right-click and make a new Widget Blueprint. Let's call it w, be game over. And now I can double-click it. And what I basically want to do for the GameOver UI is basically have a text saying you've died at wave 13, for example, and then have a button beneath it saying return to main menu. So very simple stuff. Now, since we need a text and a button beneath it, we basically need a vertical bugs. So searching for vertical box, I can add it here. And now we can find a text. And now we can, we're tempted to just put a button down here, because if I just drag it down so you can actually see it better visually. So if I drag this vesicle bugged down here, and now we need a button down here beneath the texts, but this button also have text on top of it. So actually we need an overlay before we add the button. So now that we have the overlay, we can add the button like this on top of the overlay, and then we can put the text on top of the sphere. So now we have a button and a text on top of each other. And this button, we can click on it. You can see it's very small right now. And this is because we need to fill it horizontally and vertically. And now when I remove these dashed lines so we can see it better because you have a button and we have a text on top of it. Okay, So the design we can focus on in a bit, but now let's start with this text here. For example, you have died at wave 13. And this will be a dynamic text depending on what wave you have reached. So right now it's just there for us visually. And we can change the text to Montserrat bold. We can change the size to maybe 13 instead of 24. And we can add a shadow. So down here in the shadow color, we can put the Alpha to one. And in the y here, shadow offset x and y, we can put them to three so the shadow is more visible. And we can put the outline size here. We can put it to one, just like this. So now we have this text. And next we need this button over here. So I can make this larger, just like this. And for this button, if I click on it now, you can see here now we can add the style of the button. So the normal style of the button, I actually want to go back to the UI and assets. And I want to use this blue button over here. So blue, blue square button. So I can put it on top of here. And now you can see it's, it's a bit of a different color and this is happening, happened to us before the progress bar. And this is because the color here is wrong. So the tint here, I actually want it to be fully, fully white here. And another thing you can see, it's looking very weird here still. And this is because it's drawing it as a rounded box. You can try to choose box instead or choosing a border or image. But right now, let's choose a box and let's set the margin to 0.2. Now we can see it's looking more correctly now. And it's still very huge. And this is because it's actually filling both horizontally and vertically. You can try to put it in the middle if you wanted to. And you can resize this, this button here. So to something you're satisfied with it. So maybe something like this. And if you want to make this button, button shadow less, you can basically increase and decrease this margin. And the more you decrease it, the less it will be. So something like this actually looks, looks good. So this is the button and we can actually align this text in the middle as well. So I can align it horizontally in the middle. And for this text, I can also put it in the middle, vertically and horizontally. So it's in the middle of this button. So now you can try to play around with how large you want this button to be. And something like this would be fine. But let's see how big this text will be. So if we're right here, return to main menu, something like this. And we can change this to Montserrat bold. We can maybe decrease the size of this to 18. Yeah, 18 is fine. And I want to put a shadow just like before putting this to 22, maybe not 33 or 34 years. Let's try that. Now that's too much. So 22 and the shadow offset and the outline can be one just like before. And actually we can change the shadow to be 0.5 instead. 0.81 is the only one working. Okay, so this is fine for now. And what we can do is now I want to resize the button just a little bit more, something like this. So now we have this button and we can push this overlay away from this text. So here in the padding from the top, we can push it from the top, maybe 20 pixels like this. Just like this. And now we have this box and you can see another thing you can do if you want it to be more dynamic. So you can see it's dynamic this way. So when you resize it this way is dynamic, but when you resize it this way, it's not dynamic. So that you can actually do that. And I like that even more than, than only being decide. So I usually try to make all of my UI dynamic. And this is because you have to align it here vertically at the bottom. So this overlay, and then you have to click on Fill. So now you can see it's actually dynamic here as well as here. And what I usually do instead of two, I click on this overlay and I actually remove this padding. So I don't like using this padding if I can actually get away with it. So you can try to resize this box now. And you can see, you can actually do this without the padding now. So I like doing it this way. And how do we place it in the middle of the screen? So we have to place this anchor clicking on this anchor clicking in the middle. And if you're, if you're right here at the position 0, 0. Now you can see it's actually anchoring to this, this pivot point over here. And this is because the alignment here, you have to play with the alignments. So this is the x-axis and it has to be 0.5 and the y has to be 0.5 as well. So now this will align it in the middle of this box. So now it's in the very middle of the screen. If you want, you can always click on the text and give it a small color if you want to make it a bit more to this, to the shoe, I just like this maybe. And I'm clicking on OK, and now we have this button. And another thing is you can click on this text up here and maybe you can make it a bit more reddish. And now we have our game over UI.
71. Game Over UI Functionality: Now we're ready to add some functionality to this UI that we have created. And basically let's go over to the graph. And before we do this, let's actually click on this text here, and let's call it text wave. And this one, let's click on the button and call it button main menu. And this one we can call text main menu. So now we have a bit of an organization here. So compiling, saving and clicking on this, you've died UI text and clicking on this is variable because we want it to be a variable. Over here in the graph, are in the ER, in the graph. We can actually delete these, these events. And we can take our Wave UI and click on setText. And again, we have to use a format text for this one. So let's make a custom events and let's call it game over wave for example. And we can set this text. And what we can do with this is we can write the format text. We can connect this text here. And now what we want to say is I basically want to copy my text here and paste it here. So you have died at wave 13. And instead of writing 13, we can write the curly brackets, writing 0 and writing this ending, curly brackets, clicking on interior. You can see this now. And this one is basically the text. So if I click on this custom event and I click on Create inputs and set it to text. And I call it variance wave. Just like this. And I can drop it here. And basically remember, we don't have a number of the current wave and I'll actually show you, Let's actually work with it first so you can see what's going on. So now we have, we have this here and we need to set this game over wave somewhere in the code. Now we could go ahead and go back to our game mode. Remember in the game mode, we have, this is actually the player controller and the game mode. So going inside of the game mode, we have this wave counter here. So we can use this one to actually access the information. And we could just set it here, the wave counter, and we could set the code here. But this is also bad practice because we don't really want to set text. We want, we don't want to set this text every time you have a new wave, we only need to see it when you have died. So this is why I actually want to do it when the player is dead. So here, when we have Player death, here, it makes more sense to do it here because this code is only run once when the player is that we don't want to run this code all the time and set it even though you're not going to need it. So it's better to do it here when the player is going to die. Okay, so let's do it here. And first, let's go over to the player controller and actually add this here. So creates widgets. And let's create the GameOver came over here. And let's promote it to a variable and call it WB game over. And we don't really need to add it to the viewport because we only need to add it when the player is dead. So let's go over to the player base. And here we already have a player controller reference. So here at the end I actually want to take it and say WB game over. And now we can access our, we go back here. Now we can access the game over wave. Over here. I'm going to say game over wave, just like this. And basically we also need a reference to the game mode because we actually need wave counter here. So if I go to the game mode, we need this wave counter variable. So actually I want to create it up here. So after the player controller and, and before the ammo, I want to say get Game Mode and get Game Mode graph. And here we can connect it and then promote this to a variable and call it. Game mode. Goes like this. Now I can connect the code and now we have a reference to the game mode. So basically done here, what we want to do is say, gets game mode. This one, this is the variable, or it could just have dragged it from here. And here you can say wave. So we want the wave variable and the wave variable. You can plug it in here, but this is actually going to be there. There will be a small bug, we have to say minus one. Because remember over here in the wave, in the game mode, here every time we spawned an amine. So this is the current wave we are spawning enemies. We are going to say here at the end, we are going to say the wave counter. And the wave counter is going to say plus, plus. So even though we are at wave 1, we're actually counting this up and setting it to wave two. So in wave one, we are spawning enemies. And at the end of this enemy spawner, we are seeing plus 1. So this wave is actually going to be two because an exam we spawn, we are ready to spawn waves for level 2 and Monday on this bond has finished for wave 2. It's actually going to set this variable to Wave 3 and just store it there until we have killed all the enemies. And then it's going to spawn enemies for week three. So basically it's actually saying Wave 2. So we have to say minus1 if it needs to be correct here. So I'm going to subtract one from it here. And basically that's what all what I want to do. And just connect it here. And it's going to make it into a text instead of an integer. And now we have this, said this correctly. And then we have to add this to the viewport. So dragging from this and say Add to Viewport, because now we will actually want to display it. But before we displayed, we actually also have to remove the main UI from the viewport because we don't want to spawn this GameOver UI and the main UI. So what I can do is I can try to make it like this. Shut up a bit. And here I can also say this main UI, cigarettes main UI and say remove from parents, removed from parents. And we can remove this main UI before we add this game over UI, looks like this. So it's not too confusing. So we're removing the main UI before we putting the game over UI on top here. And we can basically click on Play and see what happens. So playing here, and I'm playing killing, I'm going to die. I can see now we actually have the GameOver UI. But now you will realize that you can't, you don't have a mouse to click on anything and you can fix that. So going back to the UR, the code here, the player base, here we want to, from the player controller, there is something. If I go back to the player controller in the class defaults and see something called show mouse cursor. And this is actually what we want to do. So if I check out from this player controller, or actually, I'll take it here again, so it's not getting too messy. I'm taking the plaque control or reference. I'm saying show my mouse. So this one set show mouse cursor. And I want to show the mouse cursor just like this. And this is actually everything that we had to do. And we're also having another box. So if I click on Play, I can see that's me running around. I'm getting smashed to death. And now you can see, I can actually see my mouse and I can click on this here. You can see that the button is bugging out a little bit. And I actually, I can also show it in C and shook my weapon when I'm dead until I don't have MR. can probably reload this and I can shoot. So we also have to check that you can't shoot when you're dead. And the other thing is this button bugging out. So let's go over and fix the button first. So in the UI and the GameOver and the designer, So this button over here, we have to apply the same thing to the hovered impressed, this is the problem here. So go, going over to the assets and just dragging in and the Hoover image and in depressed image. I can blend like this. And I can remove the tint just like before, both the Hubbard and oppressed click on the tender, removing it. And basically when you hover the mouse over it, I want to make it a bit darker so you can see you're hovering. And when you're pressed here, I want to make it a little bit more dark. They had this over and click effect. Okay, So this is all we had to do and we actually also have to adjust this image size. I can rifle care copy, and I can right-click and paste it on top of this hovered. And this pressed just like this. So another bug here with the button. So if I click on play and they kill me, I'll try to teach you something new here. So we can see, I can hover over this button. But when I hover over the text, It's not actually reacting. It's only around this text. And this is another work. We can just fix it in a bit. So clicking on the game over here. So the bug here is undetected. So for you click on the text and you go down here. It is because of this visibility, it's called visible. If you click on this one, none hit testable. So this means that it doesn't like this. Sex doesn't really matter. We don't really need to click on this text. This text is just there, are asthmatic. This is what none hit testable means. So you can see I can actually over above this text here, just like this. Now it's, it's working correctly. Now it's saying that this game over widget that we add to the viewport is already on the screen. The last thing we want to fix as actually the player shooting. So let's just do that here before we forget it. And it's basically over here in the fire. So if I go up here and we have this fire event, and what we want to do is just check if the player is dead or not. So we have already had this debt Boolean and we can say branch. So if the player is that if it is true, don't do anything but just for readability, I like writing nuts. So if the player is not dead, we can go ahead and shoot. Just like this. Everything should work if I click on Play. And now killing me. You can see I can't actually shoot the weapon. And another thing I'm realizing, when you hover this box, there is a minimal black border around it, and I don't want that. And we actually have to change those two boxes just like the normal one here. So I'm going to change this round bugs into a box and this round bugs and Toolbox, and this is for the hovered and pressed state. So I'm going to change this margin. I can just copy it right with copy and paste it on top of these margins, just like that. And now it should be fixed and everything should be working as it's supposed to. So now when we are getting killed, you can see everything's working and the buttons looking fine. And maybe I need to make it full screen so you can see what's happening. So when I was working and we can click on return to main menu, but right now we don't have a main menu and will basically add this MainMenu button. Once we have created a main menu.
72. Creating the Main Menu Background: All right, so this is a more interesting lesson. Here we are actually going to design the main menu. So I want to make a 3D background before we add any buttons. And just to do it a bit quicker, Let's go over to maps. And basically the main menu is its own map. So we are actually making the main menu outside of this map. This is how it's usually done. So we can right-click this mindmap. We can actually just duplicate it because I want this environment here. So you can right-click duplicate it and call it Map main menu. And basically we have this main menu, can double-click it, you can save selected. And from this main menu, we don't really need this navigation. So click on this navigation bounds volume, we can remove that. And basically everything is okay. So this one recast Nav mesh. We can delete that as well. And basically everything else is fine. And what we want to do is just a small cinematic scene. So we want the character. So let's take this player here, this, this machine. So I can place this guy here and the level. And I can, instead of using the Animation Blueprint, I can actually use an animation asset. So we can actually choose our own animation for what we actually want to do with them. And basically what I want to do with him is in the assets here in the character animations and in their reload rifle like and put it here inside of this animation. And you can see here this is then the initial position. And it can basically change this initial position. So you can see, you can kind of make a cinematic scene out of this. And basically, I just want him to look like this. So looking pretty cool and the background. And here let's try to create a cinematic camera. So basically I can go here in the create, in cinematic. And we can create this one called sign camera actor. So we want to create this. I don't know where it is, It's down here. So we can drag it's just move it around so we can have it here. And we can basically rotate it 90 degrees like this. And actually what you can do, or let's, let's try to first adjusted like this. And what you can do is right-click on it and click on pilot. So piloting means you go inside of the camera. I can actually just control it like this so you can write to move it well your keyboard. And if you want something to be very specific, can actually change the values over here. So you can see, you can also drag and change the values over here. So basically I want the buttons to be here to the left. So I want the character to be mostly to the right here. So something like this. And we actually want them to be close up here. And what you basically can do actually, I want to change this digital film to a DSLR because a DSLR makes a better blur effect tied to keep adjusting until I'm satisfied with it. And I think something like this. We don't have to make it super hardcore. We can just make it like this. And now I'm satisfied. And basically what you can do is you can click on this here, the manual focus. You can try to change it and see where you, where you want to focus. But before doing this, you can actually click on this Draw Debug, because when you decrease it, you can see actually where it's focusing. And you basically want to focus on this character here. So dragging this over here just like this. And now I can remove this debug. And you can see it's actually focusing on this character now. So if I click on G to remove all these icons and lines and see this is what it's looking like right now and it's looking pretty cool. And you can click on F 11 to see what it looks like in full screen. So this is our background. And you can basically, if you want to, you can add something also in the background so you can click on the player at him here and the background. Just like this. And again, you can use a custom animation and you can click on the assets character animations. And you could click on this jug. So he's running to somewhere. Just like that. And basically you can use this as your main UI screen. So this is the main menu and basically we just want the buttons to be displayed here. Okay, so now we can inject this camera. And if you are afraid of moving this camera, because now it's correct and perfect. You can right-click this camera in the transform. You can click on Lock actor movement. So now you can't really drag it by mistake. You can't move it by mistake here. So this is pretty cool. And basically in the edit, in the project settings, we can now go inside of maps and modes. And in the editor Startup Map, you can start up in the main map like this is the fighting map, this is the game map. But the game Default Map. You want the player to start in the main menu. So you have to select the Map main menu for the game Default.
73. Designing the Main Menu UI: Yeah, now we are ready to create the buttons for the main menu and here we can right click inside of the folder and create in the user interfaces which it blueprint, let's call it main menu. Now let's go in here and this one is going to be pretty quick And instead of here we basically want to buttons, we want a button to start the game and we want a button to quit the game. So basically first we need a vertical box to put these buttons and then we need an overlay because the buttons have text on top of them. So we need a button and the text. So this overlay here, I can actually take this vertical box, make it larger, drag it down and let us put a button on top of it and let us put a text on top of this button. So basically I can actually copy this, but let's style as one button and then we can actually copy this button. Now we can change the anchor point of this vertical box because I wanted to be in the middle here, to the left, just like this and we can adjust the position later on. So firstly I am clicking on this button here and I am filling it vertically and horizontally. So I can see the whole button here and just like what we did before. Let's go over to the assets here and for the start game button, I wanted to be blue like this. So I can drag it inside of the the normal state here. The Harvard state and the pressed state. So now we have this button and I'm going to change all of these colors here. The tints white and white like this and white like this year, just like that. And for the Hobart state I'm going to make it a little bit darker. So when we hover the mouse over it, it's going to be darker. And when you press it it's going to be even darker here. So we have this over and press effect Now again, I'm going to change the Rounded box to a box and writing 0.4 here, I'm going to copy this margin and paste it on top of the margin here. So let's change this one to a box. Also This one as well. And let's face the margin here for it as well. 0.4 and 0.4. Okay, so now we can actually adjust the size of this button, I don't think it should be that large. So basically what we can do is we can adjust the X. R D, Y. Sorry, so we can adjust the Y. Here. And for this text, I can also put it in the middle, so clicking on the text, I can center it vertically and horizontally and I can change It two months, are that bold? And this one? Think we can reduce the size 2 18. And let us try to write it with capital letters. So I'm going to say start game like this. And basically we can change the shadow offset to two and two and right one in the alpha. So we can actually see the shadow here and for the outline settings, I'm just going to write one. So now we can get it a little bit better and you can always change the color here just to make it match a little bit better than before and just like before clicking on the text and going down, remember to change the visibility to non hit testable. So we can actually click through this text and now you can click on this button and try to adjust the size however you want it. So this button size here and I think this one is fine. So what you can do is right click and copy this, paste it on top of the Harvard and also pasted on top of this breast state. Now what you can do instead of recreating this button first, let's actually rename this. So I'm going to call it button dot gain and the text, I'm going to call text, start game and you can now right click and duplicate this overly. So now you have two buttons and for this second button I can call it button quits. And this one is text quits. And now you can click on this text and change it here on the top, you can change the text to quit just like that or quit game or exit game. That's up to you. Maybe want to write quit game, that's more explanatory and what you want to do here, I actually want to change the color so I wanted to be this red one. So I can drag and drop here on top of this red image. So just making a bit larger backing on dropping this on this image here, on all States like this. And then I have to adjust the size and I can click on the second button here and I can copy the size of it. I want to I want it to be the exact same size. So clicking on this button and I can paste this size on top of all of these states, just like that. Now I have two buttons and what you basically can do here is again we want to make it dynamically so We could go in here and clicking on the petting on the top and writing maybe 40. And you can see it's it's a part like this and it's looking fine. But remember I like I like my ui being dynamic. So removing this petty, I just want to attach this button here. I want to align it vertically here at the bottom and clicking on Phil so now it's at the bottom and what you can do is clicking on the vertical box and now you can actually just adjust the sizing through this vertical box. So now I'm just zooming out and trying to see what it looks like and something like this would look cool. Now we want this button to be in the middle here, so writing 00 in this position, you can see it anchors here. So basically in the Y-axis we want this to be 0.5 and now it's perfectly in the middle of the screen. Now let's push it a bit away from this this border here. So I'm going to move the exposition here and just move it to the side, so it's fairly out here and now this is all that we have to do for the main menu.
74. Main Menu UI Functionality: Let us now create the functionality of the main UI. And now if we go into the blueprints, basically here in the maps, we created a new map for the main menu. And basically what we need to do, we actually need a separate game mode and a separate layer controller. Because when you make a main menu, it actually has its own game, Game Mode and player controller. So let's write, right-click here and go to Blueprint Class. Click on Layer Controller. And let's call it PC MainMenu. Let's also right-click look on Blueprint Class and clicking on the Game Mode and calling a GM main menu. Now what we have to do, Let's save here. And if we go to the Project Settings here and we go inside of the maps and modes. Basically, we actually need to change this default Game Mode. Now it's actually the main menu and not this GM strike here. So if I click on the main menu and GM main menu, and here we need to change the player controller as well to PC main menu and the Default Pawn you want to have. We actually don't want any pond. So I'm going to click on none because we don't have any character in the main menu. Okay, So now that's finished. I'm going to save. And also you want to make sure that your are inside of the museum and inside of the maps. And you double-click this main menu. So you're inside of here. Just make sure you're not inside of the map. Mean sometimes you can make a mistake and think this is the main menu. But double-click this main menu so you're inside of here, and this is what we actually designed previously. So inside of this main menu, you can click on the world settings. And over here, you can change the game mode here. So we can change it to GM main menu. And just make sure that player controller is PC main menu and the default porn is none. And what you want to do now is basically when we click Play, you can see now we're inside of nothingness. But if we click on play and we can fix this later here, when we click Play, I'm just going to move the camera speed just a bit up so I can move quickly in this level. So what we want here when we click Play, we actually want to view this camera. So we want to view through this camera so we can see the background of our menu. And the way we do this, remember, if you want something specific for a level, you can actually coded instead of making a blueprint class, you can code it inside of the Level Blueprint. So I'm going to open that up. And inside of here we can delete this event sick, and we will use this event begin place. So what happens when you begin playing this level here? So what we want to use here is set view target with Blend. And you can right-click and say sets view targets. And now you can't see it here. What you have to remove this context-sensitive. And when you do that, you can see this function here. So clicking on that function, I'm going to right-click and put on context-sensitive again just in case I forget. And what do you want to do next is you want to click on this camera here on the level. Because remember where you're, when you're inside of the Level Blueprint, you can actually create references to items inside of the level if you click on them. So clicking on this camera, I can go inside of the loop Level Blueprint again. I can right-click and while I have this context-sensitive on, I can create a reference to my camera. So I can now connect this here. And I can connect my camera as the new targets. And this target over here is basically the player control loss. I can drag out and say gets layer controller, just like this. And now it's going to, to look into the camera when I began playing the game. So if I click on Play now, you can see it's actually looking to this camera. And now we have to fix this. And you can see when I stop, it's actually giving me errors. And the reason why is giving, giving me Eros is because I am actually using the escape machine here. If I go to blueprints and player, I basically placed these ones here and the level and we're using those. And remember, these ones actually are child's of player base. And it's trying to run this code here. It's trying to run this code and the same error, I don't have said AML. And this has become, because we're using a different player controller. This controller is not the one we're using the main menu. So what we have to do now basically is we can go inside of a player here and we can rightfully this bp player base. And let's duplicate this one. And let me call it EPA, bp player. I actually I'm calling in VNP machine main menu. So this one, we're only using it for the purpose of the main menu. So I can drag it out and place it in the level and something cool so you don't have to redo the work. You can click on this character. You can copy this location. So right-clicking Copy. You can click on the second character and you can right-click and. And paste this character on top of it and clicking again on this old character, you can even copy their rotation. You can click on this new character, paste in the rotation and you can see they're standing in the same place. So now in the World Outliner, I can click on this machine so I can select it quickly. And I can just click on Delete, and that is it. So now we have this, this player here or this machine here. We can again, just like before, use the not an animation blueprint, but an animation assets. And I can go out over to my animations and put this reload animation just like this. And I believe this initial position was at 0.5. And we can remove this line here. So now you can see he does not have any weapons and we need to add a weapon to him. So if I go back to player and this one BP machine main menu we just made, I'm going to delete all of this code. We don't really need any code for this one. But leading the code, you can delete all of these variables. That is fine. Just like this, even delete this function here. And you can also in the Class Settings, you can actually remove this interface. So click on Yes, We don't want any interface. And just like this, so Compile and Save. And now it's giving you an error. I want to see what it is. It's actually inside of this good player f function. I can delete that one as well, Compile and Save. And now it is clean. So what we want to do here is inside of this weapon here I can click it and I can select my, I think what's called KA for some reason, k 47 new y. So now he has the weapon and we can compile and save closer down. And now it's working just like before. So we have to do the same thing for this guy over here. I can delete him and I can just paste in this main menu character rotated 90 degrees and change this to an animation asset instead. And now I can go into my animations and select this jog animation. And just giving him a little bit of a jog here. And just move them around. Click on this camera to see what it looks like. And I want to move them a little bit forward just like that. So you can even click on this character here. So going back to player and main menu here, you can even remove this camera if you want to because you're not really needing this camera, so you can remove this as well. We move this camera and the weapon we need so everything is looking fine. So when you click Play now you can see actually this is playing, so I have to click on it and remove this plane here. Now, when you click player, this is actually working. The camera is working as well. And also, most importantly, we are not getting any errors whatsoever if we click on escape and quit this here. So everything's working with this main menu. So let us add it to the screen. And basically, for this main menu, we made these, these game mode and player controller. So remember I want to make the menu inside of the player controller. So double-clicking on this one. And in the Event Graph, we can delete the event sick and they begin play. We can say create widgets. And I just want to create the main menu. So selecting the WB main menu. And from here we can promote it to a variable seeing WB main menu. And here we can say Add to Viewport because we just want to add it to the viewport right away when we enter the main menu. So when I click Play now, you can see we actually have the main menu and our fire make it fullscreen so it's looking correct. Now we have this main menu. Now we need to show them mouse cursor. And I can go back to the lab controller here. And basically what we can do, instead of putting it inside of the code, you can actually just go inside of the class settings, actually the default class defaults. And here you can take the show mouse cursor, just like this. So now if we click on Play, you can see, you can actually see the cursor here and I can select buttons. Okay, So let us code some functionality into those buttons. And, and this is very simple. We don't really have much going on here. So if I go back to the UI and I double-click my main menu that I created. I can click on this Quit button. And if I scroll all the way down here, I can click on this unclicked, clicking on the plus, it makes an event for you. I can even delete these ones. We don't really need them for now. So unclick, what do you want to do when you click on button? So I can actually just write quits and there is actually something called Quit game. Next one I want to do is when I click on this Start game here, I want to open the game level. So what I can do is go down again, clicking on this unclicked. And what you want to do here is basically say Open level. And it can open level by name. So this is how you, how you move to the next level so you can open a level. And the level that we want to open, if you go into the maps, we want to open this called Map main. So here in the level name you can write Map main. And now if I compile and save and I click on Play, click on this button. You can see that we are actually inside of the map main and we are playing the game. Okay, So remember we actually made the GameOver UI. So we made this skim over u i, but we never finished this return to main menu because we didn't have a main menu. And basically what we want to do with this one, if you click on this and you scroll down and click on the plus for the unclicked. Here we actually want to say Open level. And you basically want to open the main menu. So mad, main menu, I think that's what we call it. So if I go back and you have to have to call it this specific thing here. So all the thing you have in caps, you have to writing cap, so you have to write all the symbols and so on. So calling it exactly what it's called here. So saving, and now it should work. So if I click on play, I start the game. And I'm inside of here, and let us get killed and see what happens. Now I can click on return to main menu. And now we are back to our main menu. So now we have a very small bug saying the game over. This is the Widget Blueprint was already added to the screen. So we're adding this to the viewport, but we were never removing it. And this is then saying, I've already added it to the screen. Why do I have to do it again? So this you can actually fix. Remember we made this inside of the player and in the player base. So basically in here when the player dies, we are adding this game over. So in this one we're adding it to the viewport, but were never removing it. And basically we can actually remove this over here. So actually in the graph, when I open this level, just, just before I open it, I can actually remove it from the viewports. And what I can see here is dragged out and say Remove from view, removed from parents, not from viewport, removed from parents. And what I want to remove is basically cell. So I don't need a target because we're already inside of the came over. So I basically want to remove it from the parent and then open this level here. So if I click on Play now, and let's close this down, I click on play, and I click on this Start Game. And let's play and let it die. And I'm dead. And I can click on this return to main menu. And now if I click on escape, you can see we're not getting this bug anymore.
75. UI Sound Effects: Okay, so let's now add some sound effects for the buttons in the UI. So let's go back here to the UI, and let's begin here from the beginning. So the game over one here. Remember we have one button here. So clicking on this button, you can actually, if you scroll down now, you could go in the graph and say that when you click this button, you can play a sound. So play sound. And so far we have been using play sound at location. And this is when you want to spawn a sound at a certain location. For example, if an enemies attacking you, you want to spawn that sound as the players who are the enemies attacking. But if you simply want a sound, like a sound from this UI, it is sufficient just to say play sound and you play a 2D sound. So this is for the UI, but we couldn't make one here and place the sound here. But what we actually can do, Unreal Engine has already coded in functionality here. So if you click on the button and you can, you can go down here, can actually see something called pressed sound and Harvard sounds. So we can actually add sounds in here instead of putting it inside of the code. So you can put it inside of the code, but I don't think it's good practice. I mean, why why would you when when they're literally have it placed here, basically, I have imported some sounds here. So in the course material you will find all, find all of these sounds. Now here we can basically minimize these. And I don't believe we have an audio or audio folder here, and I don't think so. So what you can do is right-click this content folder, click on New, and I'm just calling it audio. And inside of this audio folder, I can open my course materials folder. And here let's see what we are going to use. So we're going to use this clone strike music, the main menu music. This one is a speed ball music we used before. And the button click button over the depth, we're going to add it later. The new wave, the hotel is not something we're using here. That was the old game, the ballgame. And the star is for the ballgame. So this ones who are going to use and you can drag those down inside of the audio. And right now for the main menu where we basically want to do or not main menu. So basically the UI, we want to click on this button hover, right-click on it. And here you can create a sound cue. So create queue and call it SC for sound cue. And you can call it button folder. And let's make another sound cue. So this button clicked on the button click, you can right-click create queue and call it button click. It goes like that. So we're going to use this so can hear what they sound like. And you can click on the UI, open the game over UI again. And now what you can do is actually click on this button and you can go down to press down Hoover sound and end a Hoover sound. You can write Wilbur, and we should see the sound cue we just made. And it can do the same here. If you say click, you can choose this one button click that we just made. Now, now this is working. Basically, you have to do this with all of the UI. So going in the main menu, we don't have buttons. So going out of this, going in the main menu, click on this button. And the same thing here. If you right-click liking this, right over, selecting this and doing the same thing, maybe you can copy them actually, you can actually copy it here. Atheist. And with this one we can just search over Alice, select this. Okay, so this is working as well now. And in the wave we don't really have anything here. So this was actually all of the UI buttons that we could add because we don't really have more buttons that, that makes sound here.
76. Game Music: So let us now add some music to the game. And to begin with, I actually have something called. So if we go over to the audio that we imported, actually have this one called MainMenu music and it might be too loud. Be careful. Yeah, So this main menu music I want to use so it can right-click and create a queue again. And this one called Sun Q main menu. And we can just call it underscore music. I just want to know that this is actually music and not a sound effect conduct like this. And for this course I just want to lower the volume so it's not too loud. Or you just like this, this is, this is sounding fine. And what you can do here, I actually made it blue bubble. Now this was not loop bubble initially, I just downloaded some copyright-free music from YouTube. And what you can do is you can click on it and you can actually select this one called looping. So now it's actually looping forever. And I made it work inside of Premiere Pro. I just made it looping. So now you can actually hear this forever. So the next thing is this one, m clone strikes. So this is the clone track music. This one here I can right-click create sound cue and SC, and we can call it a clone strike music. Yes, like the assignee can double-click. And for the sake of this course, again, I'm going to lower the volume. So your ear is not getting blasted. Maybe 0.3. And you can even, you can, you can make the volume higher on your computer, that's fine. And again, you can click on loop bubble because it's actually, I made it loop forever, just like that. And now we can actually play the sound here. So you can either do it in the game mode or the player controller, or the open and the Level Blueprint and do it from here. So basically since it's specific for this level, I can actually just open this level blueprints. Or it's also not wrong if you want to go inside of the game mode here and actually just play it from the beginning, start here, but it's up to you. That's, nothing is wrong here. So going into the Level Blueprint, I'm just going to play it from here. So I'm going to say play sound 2D. And from here I can just select my, I can say music and I can select my main menu music. Now this is working if you click on play. And the next thing I want to do is I want to go into Maps, open the main map here. And again, in the blueprints Level Blueprints, I can say play sound 2D, and I can search for music and play my cologne, strike music. So if I play it from here, this one is working as well.
77. Finalizing the Game: All right, so now we are almost finished and we are almost at the finish line, but we still have to do very small things that will make the game even more awesome. And it's always these small details that you make in the end that will make your game even better and better. So let us add these final things. And what I think we should do is we should add a wave sound effect. So when you change the wave, there is a sound effect. And basically this is inside of the game mode. So if we go in the game mode here, blueprint and inside of the game mode for the clone strike. So basically we have this enemy spawner, the spawn enemy. And we can always, you can see here we're actually displaying the Wave UI. We can always play this sound over here. So before we can play it, obviously we have to go inside of the audio. And the one we're going to use is called New Wave. So we can right-click and create a sound cue, call it New Wave, and I can play it. So this sound, we are going to place some helicopter sound and we're going to play it. Let me see where it makes the most sense. And we can actually just play it here. So here we can say play sound to D Just like that because we don't really want to play it at a certain location and it's just a 2D sound. And we can search for a new wave and we can select it from here. Next, we want to put back our delay here. So remember we unconnected this delay because we actually wanted to try the game without the delay. So we didn't wait five seconds every time we tried a new mechanic. So I am going to reconnect it and delete this one here and put together the code, put down this ugly, this auxiliary or AV node, it just like this. And next we want to click on this wave and let us put it back to wave number one here. So, so the next thing we can do is we can play a sound effect when the player dies. And I have something funny if you haven't already figured it out. I have downloaded the Metal Gear death sound. I think we can do something fun with this. So let's right-click and create a sound cue of this and call it sc depth. I'm going to lower the volume. I believe it's very high, so I'm going to lower it to zero-point three. So this muscle, your sound. We can make it louder. Just like that. And I want to play this sound whenever our player dice. So I can go into blueprints, click on player and open this player base here. And if we go down to this death here, we can basically after disabling the collision and the movement. And here we have this game over UI. Before I wanted to display this UI, I actually want to play the sound here, so I am going to move it a bit away. And here I'm going to say play sound 2D. So basically the same thing we're doing over and over again. And here I'm going to search for death. And now this def sound is going to play. But basically what I want to do here, I actually want to delay this UI because I want to play the sound effect. And after that, we can show the UI. And I believe if we tried to delay it by five seconds and C are six seconds and see what if it feels natural because I want the death sound to play before we show the UI. And the last thing we want to do, we actually have a bug when reloading in the game because remember, we checked that the player is not that when we're shooting. So when we are dead, we can't shoot the weapon. And we actually have to do the same here. Or when we reload because actually we can reload while, while we're dead. So I'm actually going to copy this and I can show you how we clean it up in the next lesson here. So now, now it's saying if you are not dead, you can actually reload. So if you're a note that you can't reload. Now, another book we have here is wild. You are reloading. You can actually fire their weapon. So we can actually fire their weapon. You can click on mouse one too far weapon wildly you are reloading, and we don't want to do that. That looks a bit silly. So let's go over here and make a new boolean. And let's call it B is reloading. Now we can take this reloading at first, it will be false. And now when we click on the reload and it looks here, it checks, is the PLR dead, know the player is not dead. So over here after this check here, we can put this reloading here, just like that. And now the player is reloading. So in the player isn't reloading. We can go up here and say, we can take this here and say nuts. So 1D layer is not that. And we can drag out of this and say, and when the player is not dead and the player is not reloading, then we can shoot. So we have two checks here that we have to do before we shoot. And basically we can now disconnect this and we can connect this and instead. And over here we have, at sometime we'll have to set this false because after you've finished reloading, you are not reloading anymore. So it is after this play, this montage has finished, you said DMO, you set this ammo. And then at the end, I am going to take this and set the reloading to false. And basically what we want to do also here, another book you can see here is the player can actually spam the reloading. And we don't want the player to span the reloading. So basically, we want to take this year just like this, so it can actually copy this whole thing. And let's delete this here, and let's put it here. So wonder PLR is not dead and the player is not reloading already. Then we can go ahead and click on Reload. This way the player do not have the potential to just click our older time and just keep spamming that reload animation. So now this one fixes it. Okay, so the last bug that we have, I believe it's the last one. I tried the game a few times for about 15, 30 minutes. And one of the bugs is a weird bug. And here, if we go back to the enemies and in the enemy base. So basically here in the base, we have this attack player and basically this box out. So if this is getting played right before, if the grunt, the AI, and the AI is actually attacking you at the same time that you're killing the SE II. This one is going to play and it's actually going to hit U, even though the AIs that taught you want to do is just take this one and say, if the runt is not dead, then he can attack you. So taking this and writing B and checking if the grant is not dead. So if the ground is not dead, you can go ahead and attack you. So I'm actually going to test out the game. So if we click on Play, now, we play this music and I can click on Start. And we have this wave sound effect. We have them music playing, We have the AI and it's counting one. And if I tell him, we go to week two, okay, so I'm going to let them kill me here. So now he's going to kill me. And words that also was the snakes and the fact and you've guided with two. And this is actually with two and we can return to the main menu. And here we are. And we can quit the game if you want to play it again. If you wish to.
78. Cleaning up the Code: Okay, so now we are finished with the game and it's very important to clean up your code because you can imagine if you don't clean up your code after, let's say one month, two months, three months, you're not going to know what you have done. If you don't comment anything. Also, if you hire another programmer and he needs to work alongside, alongside you, is probably not going to know what you have done if you don't comment anything. And also if your, if your code is not clean, it's very hard to read and also for yourself. So very, very important, even though we have finished again, very important that you clean your code. So let us begin from them, from the beginning. Let's begin from the game mode for the clone strike. So I'm going to double-click it here. And I usually just start from the top. So we have this begin play. We have the delay, and we have the enemies spawn and the player controller here reference. So what I would like to do is actually move this player controller to this part here from the beginning, because I don't want to delay before I create this reference, it doesn't make sense. It makes sense to delay or the respond, but not for making this reference. That doesn't make any sense. And what I usually do is I comment my code so you can over all of the select all of this, click on C to make a comment. So remember to click on C. And here you can, for example, right? But we can play, I write, I like writing begin play. Yes, wanting, I'm just going to say spawning enemy. Just like that. You can call it creating player, controller reference or creating references. What I usually use the begin play for is creating references to stuff just like the player controller. Now you have created a comment and now it's also easy to move around if you want to. And this is looking a lot clean now. And it can also, if you click on this here, you can change the color here. So if you want to begin play to be a specific color, you can do so. And you heard this called show bubble when zoomed. So it can take a ticket here. So you can see this bubble when you're zoomed out. And then you can untick it if you don't want to see it just like that. Now I'm just going to let it be and I'm just going to let the ball will be here. The next one is the spawn enemy. And replaying a sound here, we're referring to the player controller. And this player controller, we don't actually need to refer to it now because we already have this set player controller. So I'm going to delete this. And we can actually just use this reference here. So I'm going to hold Control, drag it out and just connected down here. And that's actually all we had to do. So I can move this closer now. Just like that. Now we are adding this to the viewport. We're displaying the wave text, delaying and deleting. Yeah, so this is fine. And I'm going to come into it and say spawn enemies, timer, displaying Wave, UI. Just like that. And you can call it whatever you want. So right now I'm just improvising the quickest thing I can think of. And down here we have the Enemies spawners. So the enemy spawners bonding the enemies through this timer here. And what we want to do here, this code over here from get actor of class, you're responding, responding these grunts here, this is the spawn enemy logic. And what I want to do is I'm actually just going to select all of these here. I'm going to right-click. And here you can say collapse to function. So you're going to make a function. So Calypso function and you can see you they are inside of a function. And this one you can just call, for example, spawn, enemy upon. Something like that are spawned grunt, that's up to you. And this one value here. If you click on it, you can double-click this function now and you can see all of these are inside a function. So if I move this return note away so we can see what it looks like. And I move this away from this one. This is inside of a function now. So this is the input node. This is where the function starts and you have your code and this is the returned node. So this is the beginning and this is the end, this is the returned node. So now you have a function and sexually looking clean. Now you don't need that long code inside of your main graph. If you just make it into a function, it also appears here to the left. And if you want to create a new function, you can just click on this plus sign here and you can create your own function. And when you want to end it, you can write a return and you can add this return node. And you can have your code in between here. Now clicking on this return node and your input here, you can make different variables for them and you can create political stuff. So I'm going to leave this function here. So now we have this inside of a function and we call spawn enemy pond, and the returned node, I don't want it to be called. Return value doesn't make any sense for us. It doesn't give us any value. This one I'm just going to call enemy, enemy upon. Maybe there's like that. And if upon, and it makes more sense to have this name. A return value. So this is the enemy porn that we have here. And the end of Upon, we're setting it to a variable called enemy porn. So if I move all of this closer now, just like that. And here we are adding the pons to the array. So I'm going to move this are actually going to move these here, Ls. Let me move these and see what happens. So I'm going to move these, this one. I can move back. Now I can, I can just take these two here. Now I can click on see and say add NME on to array. And this one we can just come in here and say display or a set, set, enemy allowance, or the UI for example. And that was a bad name, but you can call it whatever. But we're basically setting the, the number in the UI how many enemies you have spawned. And we can move this logic here. So this, these two here, they do not belong here. So we can move them. I can hold Control and select those. And we can move them out of here. And this one, I can just put it here because there's no much space. And this one is actually just checking how many you have spawned. Just like that, because we're having this wave counter. So we're stopping the contrary. You are not spawning anymore. We have this now. And down here you can say, add one to the way the variable. And I'm just going to click on this. So click on Control selecting all these comments. I'm going to remove the bubbles and actually going to select all of it. Now click on C and saying spawn, NME logic, just like that. So now they're all in this master, master comments, seeing spawn in immune logic. And I can even give it a color, something like that if I want to. And now it's looking a lot more clean than what we had before. Now what we can close this down, but you can also, you can clean it up further. Actually, what you can do is here to the left you have these, these variables you have created. If you click on a variable, you can see here to there, to there, right? You have categories and here you can actually give it, give it one. So here, right now is just called default. You can make your own if you double-click here and you can just write references for example. And you can see it makes a category here seeing references. So now we can actually add all the references together. And this is how you clean up your variables as well. Example you can click on the enemy pond and I can just call it NME properties for example. And it can just take this enemy upon as well, drag it up and put it inside of enemy properties. So now we can see the enemy properties and inside of here. And you have all of your other variables. So you can put these into, into categories as well. Now let's compile and save this one and let's close it down. And let's go over to the player controller. Here we are. We are making a reference to the player pawn. Then we are creating all of these widgets. I'm actually going to select all of these widgets here. And I am going to right-click and click on collapse to function. And I'm just going to call it create widgets, just like that. And now we have this one. And here I'm just going to say Begin Play, create on reference, and create widgets like that. Now that is clean as well. And down here we have the player movements. So I'm going to make a comment and say, Yeah, you can give it a better name, but I'm just giving it one quickly so I don't make the video take forever. And here you can just say fire weapon when pressing on mouse key. Does like that. So now this is looking clean as well. And again, you can clean these here. For example, I clicking on this one, you can just call it user interface or blueprint widget or user interface widget or wherever you want to call it. And you can drag these inside of it just like that. And that is looking clean. And now we can put this one in a layer. Robert cheese, or actually this is a reference, so it's barrack calling it references. And you can put it inside of here, just like that. So now it's very clean as well, so I can compile and save here and inside of the player base, I'm just going to quickly look if we have something critical that we need to change. And else I don't want to make this video too long, but I'm just seeing if we can learn something new here. And over here, for example, this fire weapon, we're checking if the player is dead and if the player is reloading. And if not, you can go ahead and shoot the weapon. So basically you can make this a bit smaller and not the biggest change, but you can make it smaller and maybe more clean. By this one is dead, is not dead. You can right-click it and collapse it into a function. And you can call it is alive or example. Because if you're not dead, you're alive basically. So it's alive and you don't need this as this function here, I'm going to teach you something new called pure. So if you click, if you click on the function and you click on this pure, pure meaning, meaning that you don't really want to connect it through these pins here. And why don't you want to connect it through these pins? This is because you're not setting anything, any new information. Now if you are setting new information just like we are doing here, this is setting new information. We are not really setting any information in this function. If you go inside of this function now that we collapsed, we're just checking if the player is dead or not. So we're just taking this Boolean if it's true or false. So we're not really setting it to true or setting it to false. So we don't really need to connect it through here. And if you have functions like that, you can click on pure and pure meaning if you now compile and save, it's working. And pure just means you don't really need these pins. You just want the information here and you can use it. So this is what pure means and you should make your functions pure so they don't connect through here. If you don't set anything. So if you just want some information, you can go ahead and do that. Now, for example, with this one, if I had to set this to pure, I couldn't because you are actually setting information here. But over here you're not really setting information. You're just taking some information and want to check something. Just like with this one is reloading. I can just collect labs. This to a function and call it is not reloading. And I can click on Your here. And just like that. Another thing is you have something called const. So if you click on this arrow here, you can click on this const and basically this constant, what it means. It means that this information here that we have inside of here, it can come from another source. So for example, let's say, let's say this was inside of the player controller. So I had to take the flow controller and I can actually connected through here. And this is the function that, that it had it. So we don't really want to do that because this is just a function that belongs to this here, so it doesn't make any sense. So I'm going to remove this cons, but just so you know, you can add targets to these pure functions are pure RREF functions. You can add targets basically if they come from other blueprints, just like what we do here. We take this and we call this from other blueprints. So let's remove it. It doesn't make sense in this case. So now the code is all. It's more smaller and it's a bit better to understand self-assemble. And the parent is alive and upload is not reloading. You can go ahead and fire their weapon. So you can do that and you can actually go ahead and replace this site. You can delete these actually. And the reason why I didn't just take all of this and make it into a function is because sometimes you need this is not dead alone. And I don't want to make more functions than necessary. I'm going to delete this and just connect. This is alive and is not reloading. It was like that. So you can make it a lot cleaner like this and you can replace it down. Here. I think we made summer yeah, I think it was actually in the enemies, so it wasn't a tear. Or I saw before I finish this lesson, I actually want to show you this is a project I've been working on just for fun. You can see these are all the animations that I have. And this is just basically an multiplayer FPS game. And this isn't Unreal Engine 4 because multiplier is not implemented yet in Unreal Engine five at this time, I'm recording this video. So I didn't want to show you how you clean your code as well. So you can see from a bigger project how nice it is if you have cleaned your code. So you can see if I go inside of the player base, inside of here, just like what we did. I am, I am referring to this game mode. I'm setting it as a reference. I'm creating a player controller. And we have this layer movement. So you can see I have commented all of these things out there. Things I have not commented out over here. And you can see I'm working on some grenade slot and release light and so on. And these ones, I haven't finished yet, so I haven't really commented anything. I'm just still working here. But basically all the things that are finished, for example, the player movement. You can see I've commented everything and it's so nice. I haven't been in this project for about six months or nine months because I have had so many things to do and I have I wanted to make courses and my real life. So I haven't been here for almost a year and it's so easy to understand what I get in here, their own eyes, it's the walking here, so I can go here and see the walking and see what I've done. And I can go here and see this is the line trees like we're, we're shooting. But in this, in this case, we use it in shooting for shooting inside of our, our example. But you can also use line traces to pick up items. So actually this is done. For example, if I click on play here, I'm basically giving a line trace to detect what weapon is underground. And you can actually do that. We'll line traces, so it's pretty cool. So when it hits the weapon, it's going to do some stuff. But basically remember to, remember to comment your code, do whatever you can to clean it up. You can see here I've put in it, I've even put the functions inside of, inside of these categories. So clicking on the functions, you can actually add them two categories as well of these functions. And this one's on rubs this multiplayer, I can't really add them into categories. So this is why they're out here. And basically, these are all of the, all of the variables. And you can see how messy it can get if you have all of these variables and this, I haven't even started the game. I still very buggy and I'm still at the beginning of development. So you can see here, we have so many components here and this is just the beginning. And you can imagine if you develop a one-year, how messy this is going to be. So basically, just clean your code and it's going to get very messy if you don't do so.
 Pixel Helmet, Game Developer & Publisher