Transcripts
1. Course Promo Video: In this course,
we're going to learn how to use Unreal Engine Five to design and script a side
scrolling Mario style game. My name is Greg Andro. For the past 20 years, I've worked as both
a professional game designer and teacher. Over the years, I've
taught thousands of satisfied students the
yard of game design, both online and in the
physical classroom. In this one, we'll learn
how to create pickups, moving platforms,
bouncy platforms, interactive blocks, enemies, power ups, pipes, checkpoints, responses, level
settings, a Hud, main menu, Paz menu, and more. Just about everything
you need to get started to make any
gaming project. This course is for everyone from the young aspiring game designer to the season industry
professional, and anyone in between. We'll start from
the very beginning, assuming you know nothing. By the end, this course will serve as a valuable resource. You can reference
time and time again, see what you're capable
of learning and creating. I challenge you to
give this course a try and see if it
isn't the best bang for the buck educational
experience you've ever had. See you inside.
2. Create Project: All right, we're going to
get started here by creating a brand new project inside
of the Epic Games launcher. Now it should be noted in
the Epic Games Launcher, we have the Unreal
Engine option selected. Over on the left, and
across the top here, we've got the library
tab selected. So that's where I am within the Epic Games launcher now to access different
versions of the engine, or to add a new
version of the engine, you can click on this yellow
plus button right here. As of today's date, I've got 5.21 That is the latest
version of the engine. However, note that
in the future, Unreal always has newer, latest, and greatest versions of the engine you can use
to make this project. Just use whatever is
the latest version, but I'm going to be using 5.21 to be creating this project. Now to create our project, I'm going to click this
Launch button. And eventually, you
should be presented with this Unreal
Project browser window. So long as you did not already have an
existing project and you were not already loading that last project upon start up, basically, you didn't have
this box checked currently. In here you can see
my existing projects. Underneath my recent project
that I've worked within, we're going to be making
a gaming project. So let's go ahead
and select games. Over here, you get to choose the type of project template you would like to start with. For this, we're
going to be using the third person template to help get us
started so that we're controlling a third
person character. This is going to be
a blueprint project. Our target platform is
going to be desktop. We want to keep everything
as is right here, tracing. We're not going to
really be focusing on any of that kind of
stuff for this project. You can check that or not, but in the interest
of making sure our projects load up
in a timely manner, I'm going to leave that
off project location. Where do you want this
stored on your computer? I'm going to leave mine in my one drive and
I'm going to have my project name Platformer. Now you can't have
any spaces in here. Underscores will just do. But if you do add a
space, it'll yell at you. And once you've got
your project name and your location games, third person, let's go
ahead and click Create. Now, once that has finished up, eventually you
should be presented with a window such as this. Welcome to Unreal Engine. You should see the name of your project up here
in the upper right. There it is, platform. And I'm just going to do
a couple of things here for quality of life purposes. I'm going to come under a window here in the far upper left, clicking on window, and I'm
going to load a layout. I want to do the UE
four classic layout. That is the one I prefer and I think it's best for
beginners as well. Upon clicking this, the
editor is going to restart. And what it did is it presented this content browser
right down here. We're going to be talking
about different parts of the editor throughout
this entire project. But the content browser is
essentially your drawer of goodies that you can use to construct your level right here, this is our starter level. The name of our starter
level is third person map. We will be creating our own, but that is what you are
presented with a starter level. Now something else
I'd like to do right away is go ahead and
create some folders down here in our
content browser that are going to be specific
to this project. I'm just going to bring
this up a little bit. You can grab these Windows. Just put my mouse right here. And I'm going to collapse
where it says Starter Content. I'm going to click on
my Content folder, right click on
this, and I'm going to create a new folder. I'm going to go ahead and call this Platformer and press Enter. Then I'm going to right
click on my Platform folder. And I'm going to create
a couple more folders. Right click new folder, this first one is going
to be called audio. I'm going to right click
again on the platform folder, New folder, and
I'm going to write click again on my
platform folder and I'm going to call
this one Textures. Now personally I like
to have my folders easily identifiable as to
which folder I'm working with. So I'm going to write click
on my platform or folder and I'm going to add a color for
this By going to set color, I'll do something like an obnoxious green color
because it'll really stand out. Now I want to add some
content to these folders. Now, added to this project, some content folder, textures, fonts and audios folder
in zip file fashion. I have these over in my download section right now just to show
you this process. These are the folders that
I'm talking about now, these are zipped folders. To extract the goodies inside, all you would have to do
is right click on any of these and just
choose Extract All. Once you do this, zipped up folder begins to look like this. Folder inside of. Here's where you're going
to find the goodies. I'll start with textures here. I'm just going to hold down control and mouse wheel down so I can left click and drag. I'm just going to
highlight all of these, now I'm going to left click
and drag all of these, all 31 of these, into my Textures folder. Once you see that plus button, you can release and it'll start to add all those.
It'll import them all. We're going to be using those
throughout the project. Then I'm going to do
the same for my fonts. Have my fonts folder selected. Right now you can see
the pathway right here. Alternatively, I can go to platformer and I can just drop them right
into that folder. I'm going to go back here
into Downloads Fonts. I'm going to highlight all of these left click and
drag them into fonts. It's going to say, would
you like to create a new font asset for all these? We're just going to say yes, let's apply to all,
and click yes. Okay. Then I'm going to go
back to my platform or folder. Once again, I'm going to
go back to my audio files. Double click in here.
I'm going to find some audio related
to this project. There's a bunch of audio files, we may add more as
we go along here. And who knows, we may not
even use all of these, but this will get us started. Left click and drag this
into the audio folder. And you'll notice for all
of these different files, there's an asterisk
next to all of them that shows that they
are not yet saved. To save all these,
all we need to do here is click this save, all they'll say, do you want to save all of these assets you just added? We're
going to say yes. Then just as a
good measure here, we're going to save our project. If we come under file, we can do a file
save all as well. Now our project is all
saved and we're good to go. Now just to circle back on things we have created
our platform or project. If I was to return
back to the Epic games launcher and then come back into the Unreal
library section. We can now see that we have our platform project right here, albeit without any
thumbnail image. But to get back
into your project, say we were to close
that back out, all we would need to do is come under Unreal Engine
Library and you could double click on this to
relaunch your project. All right guys, that's going
to do it for this video. We will see you in the next one.
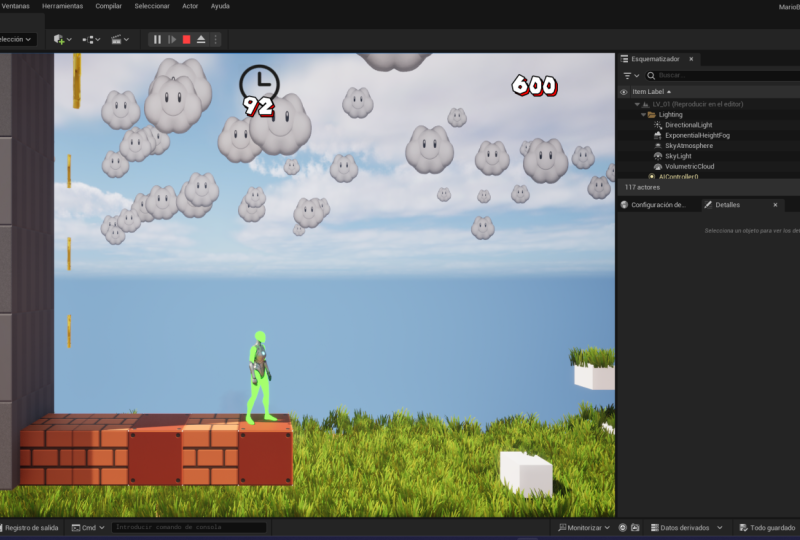
3. Create Level: Okay, we're going
to get started with our project here by
creating a brand new level, as well as setting up the side scroller camera
for our character. So let's take care
of the level first. And we can create a brand
new level instead of our default third
person map by coming in the far upper left
where it says file. We're going to choose
a new level control plus n will get
you there as well. That hot key combination here. We've got a couple of
templates that we can choose. I'm going to choose
this basic new level. I'm going to select
that because I want to have a sky background. And I'm going to create,
now the moment I do this, we're going to swap out
of our third person map and into an Untitled level. Now it's called Untitled
because we haven't saved it. We haven't given it a name. We can save our level by clicking on this disc
icon right here. It's going to ask us a location where we would like
to save this level. Well, let's come under
our platform folder. I'm just going to
expand that out. I'm going to click on
where it says platform. We're going to create
a brand new folder. I'm going to call this Levels. With my platform levels
directory selected, I'm going to call this level, I'm just going to
call it LV underscore 01 for level one, go
ahead and click Save. And the moment we do this, you can now see in the upper left, this is now known as
level underscore 01. Now something else
I would like to do right away is set up my project so that
if I was to close out unreal here and
then open it back up, say tomorrow, that it
would automatically default to opening up
this level once again. Now the way it stands, it is currently going to open
up that third person map. If we were to close out the
engine and open it up again, where can we change that? Well, in our project
Settings is where we can choose which map is
opened up by default. When we open up the editor, a couple of places to access
your project settings. One is in the far
upper right here, and I'll just kind of zoom
up on that momentarily. That's right there.
Also, you can access it by coming under your Window
menu, Right up here. Let me just exit out
of there. Go too. Sorry, not window. I meant edit. We want to come
under Edit and we want to choose Project Settings, not Window. And here we go. We've got our project settings, and if I come under
Maps and Modes, let me just dock
Project settings along the top here. Maps and modes. Here we've got our
editor start up map. It's currently mapped to
our third person map. Let's go ahead and swap
that out to B. I'm just going to scroll on
up to level 01. Now there's no save
button or anything here, so you can just
close out of this. And that'll make it
so that when you try to open up your
project tomorrow, it'll open up to
level one by default. All right, the next thing I want to take care
of is to reshape our level a little
bit here so that it's more of a squished platform. Right now, this is very
squarish in nature. So what I want to do is
I want to change from my perspective view here
to a top down view. And what I'm going to
actually do right now is click on this button
in the upper right, right here, it's kind
of got the grid icon. I want to access
my top view here. Now my top view is in a
wireframe style view. And I'm just going to click
right here to maximize this. And then zoom on out
with my scroll wheel. If I was to select this
purple thing right here, that's that giant
platform that we see back in our
perspective view. So if I was to minimize
that momentarily. Here's that giant
platform I'm talking about now when we are working on this side scroller
level from a top down view. I want this to essentially
flow from left to right. So all I'm going to do is
I'm just going to squish this platform to be a little
bit thinner and longer. What you can do is with
your platform selected, if you hit the space bar, you toggle between movement mode, movement mode, rotation mode, rotation mode, and scale mode. And all three of
these buttons will swap you right up here at
the top of your Viewport. I like to use a Spacebar
to toggle between these. Now I'm going to go to scale mode and I'm going to
grab this green handle here. And I'm just going to squish this on down,
something like this. I'm not going to be
super precise with it then with my red handle, I'm just going to elongate
this a little bit. Essentially, we want to
have our players start over here and then move to the right. This is from a top down view. Now let's minimize
our top down view. Go right here, we'll go
to our perspective view. I want to leave this in the
four paneled view right now. You can see from a
top down view that, that green handle
is pointed down. So that means in my
perspective view, in order to sort of match
this top down view, I'm just going to hold down the right mouse
button and use W, S, and D to sort of
go in this angle right here that
somewhat matches what I see over in the top panel. Okay, so that's the way
we're going to work. I'm going to full
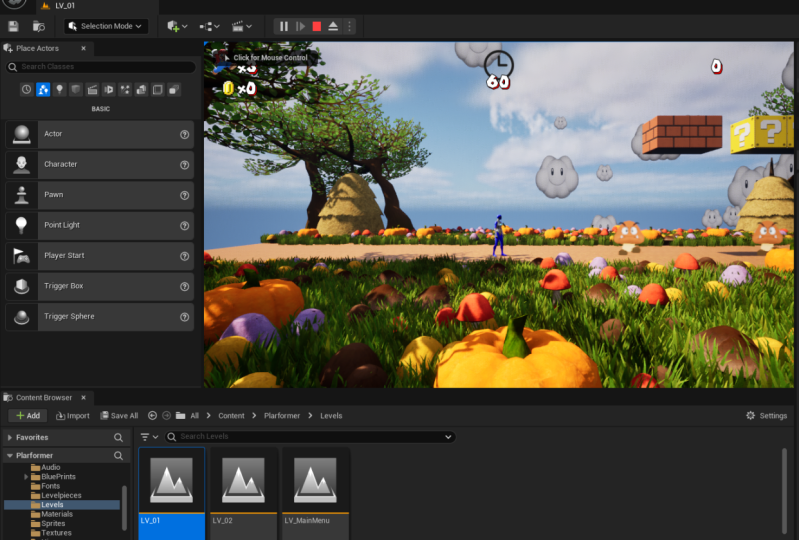
screen this now. And now what I want to do is I want to place what is known as a player start actor
off to the left here. To signify the spot where I
want my player to spawn in, Once we click the play button. In order to do that, we
need a player start actor. This can be found in
the place actors panel. Now if you don't have the
place actors panel right here, maybe you exited it,
something like that. You can come right here, You got the place actors panel. And with this tab
selected the basic tab, you can find a
player start actor. Just go ahead and drag
this into our view part. I'm just going to hit the key to bring on my movement tool. And if I bring it up
into the air like this, I can press the end key, that's the END key
located next to your delete key to snap
it on down to the ground. Now I'm going to be
quite specific about where I want this
placed in the Y plane. That's the green plane
right here over in my details panel
where I can find all the various details
related to my selected actor. I'm going to set the y location, the green location
there to zero. So I'm just going to select it, press zero and then press Enter. And watch what happens
to my players. Start actor, it's going
to jump to that location. That's going to be
good enough for now. Now if I move up onto
my players start actor, I can see this blue
arrow right here, that is, that indicates
the direction our character is going to be facing when they
spawn into the level. Now if I was to click the green play button right up here, you can see that my character has spawned in at
about that location. Now I'm just holding down the right mouse button
and panning around it. In fact, once you've
clicked in the viewport, if you just move
your mouse around, you're going to be able to pan the camera
around like this. Now for a side
scroller platform, this is not ideal for a side scroller
platformer style game. We want the camera move back
and we want the camera sort, locked in this sort side view. So that's what we're going to be taking care of next year.
4. Player Camera Setup: Now when we spawn into
the game, just then, we spawn in as the third person character at
our players start location. Now the reason we spawn in as
a third person character is because that is the default
character that we are using. For this particular template. We are using the third
person template. Now this can be found inside
of our project settings, and you can access
your Project Settings in the upper right, right here, where
it says Settings. If I click on Settings and I
go to my Project Settings, we have a section along the left hand side known
as maps and modes. And if I select that, we can
find our default pawn class, that is the character
class, if you will, that we are controlling
in our game as the third person character. And we can navigate
to this asset by clicking on this folder
icon right here. That'll browse to that asset
in the content browser. I will do so by left
clicking on it. And you can see where
this asset resides in the folders in the all content third person
blueprints folder. Now we're going to do some
work inside of here to start adjusting our
character camera. So let's double click
on this to open it up. Upon opening this up, we are defaulted to this
event graph tab right here. This is where all the script, where all the code related
to this character resides. We're going to ignore
this right now and jump over to our Viewport tab. In our Viewport tab, we can see all the different components
that make up this blueprint. We've got our character model, that's represented by
this mesh component. We've also got this camera. This is the lens through which we are currently
viewing our character. Our camera is currently
attached to a camera, boom. What is actually known as
a spring arm component. We can tell this
attaching relationship anytime we see this indentation. Right now, the follow camera is attached to our camera, boom. Now what we want
to do here is make some modifications
to our camera, boom. Our spring arm component. You can think of this spring arm component known as our camera. Boom, that's the name of this component as
a selfie stick. Currently, what we want
to do is we want to pull this selfie stick back. Now remember, our camera
is attached to our camera. Boom. Here currently
the arm length, the length of our self
stick is 300 unreal units. We want to lengthen
this a little bit. I've got some values in mind
here for various parameters. We're going to set
this to be 1,500 and upon pressing Enter, we're going to see
that our camera is now way back there now, We don't want to have our
camera behind our character, we want it off to the side here. So we're going to
uncheck a couple of boxes right here under
the camera settings. We're going to uncheck inherit
pitch and inherit yaw. Currently, if we were
to play our game, let me just jump back in
and play really quick. I'm going to click
in my Viewport. You can see I'm way
behind our character now because I set that
selfie stick way back. I'm clicking in
my viewport and I can change the yaw
of our camera. That's the left and right, as well as the pitch,
the up and down. And I don't want to do
that. I want to have the camera essentially
locked right over here. I'm going to press escape,
jump on out of here. And I'm going to uncheck
inherit pitch and inherit ya. Now if I have to jump
back in and play, and I'm clicked
within my viewport, I can't actually modify the
position of our camera. We're locking it in place. Next, I want to bring this
camera off to the side. I don't want it trailing behind. What I'm going to do
is I'm going to change the rotation of our camera. Boom. Right here in the
rotation, the z rotation. I want to set this to be
negative 90. Press Enter. And you can see now it jumps the camera way over here,
sort of that side view. So now if I click Play and
I click in my Viewport, you can see that it now
tracks our character. Now our W, AS and D controls are going
to be a little wonky. In fact, they're going
to be a little bit backwards. Don't worry. We're going to fix that
here in just a moment. But there's a couple of
other camera settings I want to take care of
since we're already here. One thing I want to do is I want to enable some camera leg. So once again, with
our camera boom, that spring arm
component selected, we want to check this box
for enable camera leg. Now typically you don't
want a leggy camera, but if it's too tight in
following our character, it can be a little bit jarring. So this is going to soften the cameras motion
just a little bit. Notice that once
we turn this on, it's going to enable a
camera leg speed value. I'm going to leave
this at ten right now, but as we go throughout
this course, know that you can play
around with this to have more or less camera leg And one other check box I want to uncheck is this collision test. Now currently it's
checked on and I'm going to leave it on for
just a moment to show you what this does. I'm going to jump back
to my level really quickly and you don't have to follow
along with this part. I'm just going to demonstrate.
I'm going to bring in a cube dragon,
drop that in here. And I'm simply going to press the Space bar a couple
times and sort of create this sort of a foreground
blocker, if you will. So we're going to
have our character running left or right here and our camera is going to be blocked from viewing
our character here. With this do collision check. Do collision test. Checked on if I was to click play and I'm going to press
the WK to move forward. Watch what happens
to our camera. It's going to jump
in front like that. That's a little jarring. If you don't want that effect, what we can do is with that
camera, boom, selected. Let's uncheck that so
that when we do play, the camera is now just
going to go like that. It's not going to jump
in front of that wall. That's going to be
useful in case we build any foreground sort of decorations while
we build our level. All right, let's go ahead
and save this asset. And that's going to do
it all for this video. In the next video,
we're going to build in some customization to our camera so you can sort
of make it what you will, customize it to your liking.
We'll see you there.
5. Player Custom Camera: Welcome back
everyone. Now that we have our side scrolling
camera in place, let's customize it a little bit. I'm going to dive back into my third person character
blueprint right here. Here's the pathway for that
in case you jump down out, Third person blueprint,
third person character. And we're going to start off here by adding some variables. Variables hold the data that we can access within scripts. And I'm going to add a couple of different types
of variables here, starting with coming
under variables, hitting this plus button. We're going to add
one called can adjust camera in real time. Then I'm going to add
another variable, and I'm going to call this one Camera Distance from Player. I'm going to change this
from a Boolean variable, which holds true and
false data, to a float. A float is a number
with a decimal, 0.2 different types of variables we're
going to be adding. In this one, I'm going
to add another variable, and this is going to be
called camera X offset. Now what we can do
here is we can right click this variable and we could choose to
create a new one. But I'm just going to
duplicate this one. Control plus D is the
hot key for that. This one is going to
be called Y offset. And that's why I chose
to duplicate it. Because I'm just going to
be changing a little bit of the text here with
that selected, I'm going to do control
D to duplicate that. And this will be
called Z offset. We're going to be able
to offset this in any of the different
directions, Y or Z. And then I will duplicate
this control plus D, although I'm going to
overwrite this entire name. It's going to be called
camera leg speed. All right, and with all
of these variables, I'm going to click on
these eyeball icons. Now what this does is
for each of these, when we click this eyeball icon, and currently I've got
camera leg speed as my selected variable over
in the details panel. Checking that eyeball on makes this variable be
instance editable. Likewise, if I was
to click this off, you're going to see that
that eyeball is now closed. Two different ways to make your variables be
instance editable, click this on, or
click on the eyeball. So if I click this back on, that eyeball is back on. What does that even mean? Well, what that means is that
this variable will now be available to us to edit when we are back
within the editor. And we'll take a look at
that here in just a moment. Now I'm going to be using these variables within a script. I'm going to write
here in just a moment. But before I do that, I want to give these variables
a default value. And before I can do that, as we see over in
the details panel, I need to compile our blueprint before I can
give it a default value. So let's come in the upper left here and compile our blueprint. Starting off with our
topmost variable, this can we adjust the
camera in real time? I'm going to leave
that as unchecked. For camera distance from player, I'm going to set this to
be 1,500 You'll notice that that value
is going to match our camera booms,
target arm length. Selecting our variable again, I'm going to go
with camera offset. We're going to set that to
be zero camera Y offset. I will leave that as
zero camera offset. I'm going to set this to 150. And then camera leg speed, I'm going to set this to ten. Now you'll notice my
camera leg speed here, the value of ten, That's going
to match my camera, boom. This spring arm component, it's going to match this value right here. Camera leg speed. And I did want to offset my camera in the Z
direction by 150. So you're going to see that in play here in just a moment. Okay, with those
variables in place, let's jump on out
of our Viewport tab into our event graph and put some of these
variables to use. Now I want to do every frame, I want to update the position
of our camera every frame. So I'm going to
use an event tick. Hold down control and mouse wheel up to zoom
in on the graph here. Right mouse button will
pan around this graft. Right clicking, I'm going
to type in events tick. Now this fires off every frame. And what I'm going to
do is I'm going to drag out here and bring
in a branch node. The first thing we're
going to do before we continue beyond here is
to check a condition. The condition I want to check is can adjust the
camera in real time. I can drag and
drop this right on the condition pin to
automatically hook it up like so. If this is true, we want to do something
to our spring arm. I'm going to bring in our
spring arm component, which is called camera, Boom. We're going to drag
this in to get it. I'm going to drag off of the
true branch here and type in set relative location. I want to do this
for my camera, boom. And you can see here
in parentheses, it shows camera boom. So if I was to bring
in this function node, check this out, it would bring in my camera,
boom, right away. Now, I had already
brought that in. I just wanted to show
that you could do that. But I will delete this out. Didn't have to. I could have
deleted this gut as well. And we're going to hook
this in as the target. This is what we want
to update every frame. Just going to move
this all up here. I just left click and
drag these all up here. Now I want to set a
new location for this. Every frame I'm going to drag backwards off of this
new location and type in make vector. We want to be able
to update the X, y, and Z position of this. Every frame I'm going to drag in the camera
X offset into the X, the camera Y offset into the Y, and the offset into the Z. You can move those. How you want to organize this, all nice. Now we're going to continue
the flow of execution here. Doing more than just setting
the position of our camera. Boom. Here I'm going to bring
in our camera leg speed. If I drag this in and release
I can get it or set it, I want to get that information contained within that variable. Then I'm going to
drag out of here in, actually I'm not going
to drag in there. I'm going to drag in
our camera, boom. We're going to drag
out of here and type in camera leg speed. We want to set our
camera leg speed. So what we're essentially
saying here is, hey, our camera, boom. We want to be able to update our camera leg speed with
whatever value is in here. So we're communicating. We're basically saying
hey camera, boom. Instead of having
this default of ten, let's make it whatever
this value is. Currently it's ten. But we'll
be able to adjust that. Let's keep this flow
of execution going. Then the next thing
I want to do is I want to drag out
of my camera, Boom. One more time. And I want to
bring in target arm length. I want to be able to set our target arm
length once again. If I was to select our
camera boom component here, this spring arm component, we've got this
target arm length. It's currently set to 1,500 We're going to keep that flow of execution going right in here. And I can update this every frame by plugging in our camera. Where is it camera
distance from player, right into that input. This is going to be
our final script. I'm just going to
frame this up Next, I'm going to left click and drag a marquee selection
around all this type, the C key to bring in a
comet box and I'm going to call this allows you to temporarily customize your camera
settings during play. All right, let's go
ahead and compile our blueprint to make sure our
code here is looking good. Now I'm going to go
ahead and play here. But I want to return back
to my main map here, my main level editor. And note that I am. I just clicked on
these three dots playing in my selected viewport. And the reason I'm doing
this is because now I'm playing is over in the outliner. What you will see is in this
yellowish orangish font, we have our third
person character. This shows a spawned in Asset
once we played our game. Anything in Orange
Hears just spawned in. Once we played our game. I can now select our
third person character in the details panel. You're going to notice
something down below. We have a category in the
all section called default. And here's all those
variables that we just created and exposed
to our level editor. That's what that
instance editible, checkbox, that eyeball
icon has done. It has made all these variables here accessible in the editor. And now what we can do is update our camera position here live while we are
playing the game. Now remember our third
person character, we are currently gated
to advance beyond here. Only if we can adjust camera position in real time
if this variable is true, and by default we
have this is false. So I'm going to
check this on first because otherwise none of these edits right down
here would do anything. I'm going to check
this on and what you're going to see is immediately
the camera shifted up. And now we could modify
any of these values, such as camera
distance from player, just going to left
click and drag. And once I release, you can see it updates that. I could set this to be
something like 500 press Enter, update it like so this
is updating it live. Clicking on this
back button will return it back to
its default value. You can really get a sense for how much customization we have for this particular camera. Try setting the camera
Z offset to 400, pressing Enter, you shift it up. A lot of customization here for how you want to set this up, Y, let's go ahead
and set that to 200, press Enter, et cetera. Set this to 222, press Enter. You can
shift it that way. Lot of fine customization. However, you'll notice
that once you stop playing here and go back to your blueprints and click
on your various variables, none of those values
actually updated. They're all the same as what
we'd set them by default. Now the reason I label
this allows you to temporarily customize
your camera settings is because if you're changing
your camera settings here and say you
like some change, let me just like my third
person character, once again, you want the distance to be 1,000 What you need
to do is remember these values or copy these
values so that once you stop playing your game and go back to your
third person character, you can put in a
new default value. So just to clarify once again, when you're playing
your game and you're updating any of the values
associated with your camera, that is only temporary until
you stop playing your game. And once you stop
playing your game, if you like those values, you must update those
here within the editor itself for those changes
to take place permanently. Al right, there we go. We have a nice customized camera,
make it what you want. That'll do it off
for this video. We will see you in the next one.
6. Player Movement: All right, welcome
back everyone. In this video, our
goal is to fine tune the basics of how
our player character moves within our game. For this, we're going
to be working inside of our BP third person character. So double click on that
asset to open it up. And I just want to make
some adjustments to our camera input script and
our movement input script. Now wire camera input script. Well, if I was to jump
in and play right now, I'm not touching my
mouse at all and I use the Wkey and the S key. Obviously, these
controls are not right, and I'm using W, S, and D, they're not right,
but my character is moving solidly in one
direction or another. However, if I was
to bump my mouse, and I'm just going to bump
my mouse here a little bit, I'm moving it from
right to left, and now I'm using those keys. You can see it's kind of putting me off kilter a little bit, running at an angle. What's happening right now is this camera input script is affecting the direction
of our character. Because this is still
hooked up to fix this, all we need to do is just
kill out this script. I could delete out
this whole thing. However, I'm just going
to hold down the Alt key, Ol, and then left click and that's going
to snip that wire. Now if I was to
jump in and play, and I use those W, S and D keys, no matter how much
I move my mouse, my character is going to move solidly in one
direction or another. Now obviously they're not
moving in the right direction. That is going to be
for us to fix next. For that, we're going
to come on down to our movement input section. Now we've currently got two
types of inputs set up, one for left, right,
and forward backwards. However, this is a little
misleading in that our forward backward
script right here is actually what we want to use for going left and right. This bit of script right here, we are going to kill out. And this is because we're going
to simply be caring about our character moving left
and right along the X axis. And we don't have to worry about them moving in all directions, We don't have to worry
about that Y axis. So we're going to kill this out. We're going to kill
this out as well. A couple of these re route
nodes right down here. And this is a little
bit of hackery, but I'll do my best to describe exactly what
we're aiming to do here. We only care about how we
are moving along the x axis. I left this intentionally
hooked up for a reason. Now when we are within a game, we've got our left control
stick on a joystick, for example, we can think of our left thumbstick being
divided into two axes. This is the Y axis,
right up here. It goes straight up and down, and this is the X axis. Now again, we only
care about the X axis. Our character is going to
run from left to right. And that's what we care about
from this input action. How we are inputting, and how we are outputting our characters movement
based on our input. This is going to move in
the negative x direction, and this is going to move in
the positive x direction. We want our forward vector here, our characters forward facing direction based on
its z rotation. That is, if you were
to draw straight down line through
your character, our forward vector
is going to be our character facing forward. Now we want the x value
of our input here to be the actual direction
that our character moves. We're going to be
modifying our script such that when we trigger this action using our a and
D keys on the keyboard. Or conversely, if you have
a controller hooked up, we're going to be
reading in the x value, that is the a and D key, or left and right
on a thumbstick. We're going to be,
are we going in a positive or
negative direction? And the direction we want
to send our character is going to be based on our
characters forward vector. Essentially, what
direction are they facing. With this modification
right here, This is not actually going
to be forward and backwards, I guess it is, relative to
our characters location. But in terms of how we're
going to be facing, going left and right,
I'm going to label this now as our new left, right. When our X value is negative, meaning we're pressing the key or left on the left thumbstick, we're going to go left on the screen and when
the X value being output by the D key or right on the
thumbstick is positive, we're going to
move our character right clicking play here. You can now see that
when I press the key, I'm moving to the left, the D
key is moving to the right. And I also do have a
controller hooked up, so I'm just pressing
left on the left on the left thumbstick and right on the left thumbstick here to
show that that is working. Next I want to show where
you can go to fiddle with some of your characters
movement parameters. And those can be
adjusted inside of your character movement
component that lives inside of your BP,
third person character. A lot of parameters
can be adjusted with this component selected
over in the details panel. We're not going to
adjust all of them, but we're going to adjust a few. And I'll talk about some of the more primary ones that a lot of designers
are concerned with. Now the first one that I want to adjust is going
to be way on down. I'm just going to grab
this slider here. We are looking for
inner movement. Now we only want our character
to move along the X plane, coming back to our level here. Once again, if I was to
go into a top down view, this is a top down
view of our level. We're going to be moving
along the X axis. Here's our little
cheat down here, the X axis, from left to right. We do not want to move into the foreground or background
along the Y axis, the up and down axis, in order to ensure that even
when we bump into things, we cannot get off of
our x line there. What I'm going to do is I'm going to say
constrained a plane. Yes. And I want to constrain
our plane along the y axis. I do not want to be able
to move along the y axis. Now when I do this,
it's going to set this value to one automatically. This is essentially saying you cannot move at all
in the Y axis. You can move in the X axis
that's left and right, as well as the Z axis
that's up and down. Jumping up, perhaps,
moving down. All right, so that's
all well and good. The next thing I want to change is our characters
rotation settings. And for this I am looking
for right up here, character movement
rotation settings. This rotation rate
is going to set the rate at which our
character turns around. If I was to click
play right now, and I was to do the key, or the key, you can
see that I don't turn around super fast and I want to turn around
quicker than that. So I'm going to set
my rotation rate here to be a high value
along the Z axis of 2,500 The z axis is that the facing direction
of our character. Imagine a straight line
down through our character. So we want to rotate around that axis faster at that rate, 2,500 So now if I was to
click play, press the key. You can see how quickly
I turned around there, the D key, et cetera. So fiddle with that
to your liking. Make sure that you also have orient rotation to
movement checked on. If that is not checked on, If that is not checked on
and you're pressing A and D, you're going to have
this kind of effect. So make sure that orient rotation to
movement is also checked. And now lastly, I want to adjust the rate at which
my character moves, essentially how fast they go. And that can be done
controlled with a parameter called
max walk speed. It's here in the character
movement walking section. Don't let the word
walk fool you. This is essentially how
fast your character can go. By default it is 600. I'm going to set mine up to 1,000 but set it to your liking. So now if I have to
jump in and play, you can see how
fast and I'm moving now my character doesn't
seem to slide at all, right? Now when I turn around, they stop on a dime and I want a little bit
of slide there. So what I'm going to
do is I'm going to adjust my ground friction
setting right here. That's set to eight.
A lower value is going to have less friction. I'm going to set it to two. So now when I jump
in and play and I move right and then
adjust to go left, you can see he doesn't
exactly stop on a dime. There's just a little
bit of slide there. Fiddle with that to
your liking as well. Another one you may
want to consider adjusting is called
acceleration. I'm going to leave mine
as is for right now, but you can find that one under Character Movement General
Settings Max Acceleration. That's obviously how
quickly your character is going to get up to speed
when they are stopped. All right guys, that's gonna
do it off for this one, for our player movement. We'll see you all
in the next one.
7. Player Jump: Welcome back everyone.
In this video our goal is to adjust some of the jump characteristics of our player character.
Let's dive right in. Let's go inside of our BP, third person character.
Inside of here. We're going to start once
again with in the event graph. And if we scroll on down, I'm just going to use
the right mouse button. We find our jump input section of script that should have
been here by default. Now I currently have things set up like
such when we jump, that is the space
bar will fire off this event and
make our character jump via this jump function. We will in fact jump. And if we do that, and I jump it in play and
hold down the space bar, and I hold it down, you can see our character
continues to jump. And that's not
necessarily what we want. The button on an
Xbox controller, which I'm holding
down right now. If you have that plugged
in, we'll do that as well. I want to make this
so that my character only jumps when we
press that button down. Not if I hold it down,
he continues to jump. An easy way to fix that
is we only want to jump when we start holding down the space
bar or the button. I'm simply going to change
this from triggered because we are constantly
triggering this jump event. When we hold down the button or the spacebar on a controller, I'm going to move
this wire by holding down the control left click, and moving this to started. Now if I play, I hold down the spacebar,
my character jumps. But in order to jump again, I have to release and
then press it again. That'll fix that issue. Next, all I want to
do is adjust a few of our characters jumping
parameters there properties. And again, this can be adjusted inside of our character
movement component. The first thing I want to adjust is the height of our jump. And this is a little
bit misleading. This can be changed with
our jump Z velocity. There's no just straight
up jump parameter. This is the guy
right here that's controlling how high our
character is jumping. It's currently set
to 700 for me, I'm going to change this
to 1,500 And now if I jump it in play and I press that space
bar, you can see it. I jump a lot higher. However, the way it jump feels is not just related
to that singular property. You can see it's a
little bit floaty, and so I want to have it
a little bit snappier in terms of my character coming back down to the
ground more quickly. This can be adjusted inside of our character
movement component by adjusting our effect to gravity. This gravity scale property
right up here minus currently set to 1.75 I want
to increase it, have the effect of gravity
be greater on my character, with a value of 2.5 If
I jump in and play, I'm going to have this result. I jump a little bit higher, but I'm being snapped down a
little bit quicker as well. So adjust that to your liking. Now, something else
I also want to fiddle with is if I jump
up in the air and then I'm using the A and D keys to try to control myself
while in the air. Currently, I have very
little control and I usually like it when I have a
little bit more air control that can be adjusted via an air control parameter that is below our jump z velocity. There's jump Z,
there's air control. I'm going to set
that to a value of 1.0 Now if I jump in and play, I jump, I'm trying to course correct a little bit with A and D while
I'm in the air. Have a little bit more control, fiddle with, That's to
your liking as well. Now there are some other jump related parameters that are not within our character
movement component that I'm not personally
going to adjust. But I did want to make you aware of can be found within
your class defaults. These are parameters related
to our character class. If I scroll on down,
scroll on down. In fact, I'm just
going to type in jump into the details panel. Here, up we've got two that you're going
to want to know about. One is jump max count. If I was to change this to say three and then
jump in and play, you can see now I can go 123
and I can only do three. That's the way I can
get a triple jump, double jump, quintuple
jump implemented. Now your character
is not going to play another jump animation. If you increase this
number beyond one, just know that that would take some more specialized set up. But that's how you can create double jumps or triple
jumps, et cetera. That's within the class
defaults searching for jump. Another one you may want
to know about is called jump max hold time
currently set to zero, but if you want a little bit
of a rocket boost effect, I'm going to set this up to a
value of one 1 second here. Now if I was to
jump in and play, and I'm going to
press the Space Bar, and then hold it down. So here we go, pressing it, it gives me a little bit of
a rocket booty type effect. I'm just going to tap it
right now. So that's a tap. But if I hold it, it's going to give me a
little bit of a boost. So if you want a little bit of an extra boost when you jump, you can adjust that
jump max hold time. I don't want that effect, so I'm going to set that back to zero. Once again, that was all within class defaults of our
third person character. I'm happy with all
this. I'm going to compile and save here.
And there you go. We've just adjusted some
character jump parameters. We'll see you all
in the next video.
8. Player Jump FX: Welcome back. Well, now that we've got our character jumping, let's add a sound
effect and a visual, a particle effect,
to accompany it. Now to grab a particle effect, I'm going to come to our
epic games launcher. Unreal Engine selected
along the left hand side. Marketplace Selected along the top here in the marketplace, I'm going to do a search
for infinity blade. Now after it thinks
a little bit here, I'm going to be looking for
infinity blade effects. Now this is a little bit
of an older add on pack, but it's got a
specific visual effect in here that is going to
accompany our characters. Jump like some dust
emanating from his feet. To add this content
pack, all I've got to do is click to add this project. And select which project
I'd like to add. This is going to be
my platform project. There it is. Select that,
click Add To Project. Now it's going to
add those files, those particle effects,
to our project. I can close out of here. And then come back
to Unreal Engine. This will take a little while, depending on your computer. Then eventually in
your content browser, you should see the Infinity
Blade Effects Pack appear. If you dig inside of here, here's all the various effects that live inside
of these folders. I'm going to be searching
for a particular one called Sentinel, just typed in Senti. It's going to be
this guy right here. This leap launch trail. It's a dust particle that will trail off from
our characters feet. Again, infinity blade
effects is selected. That's the one I'm going to be using here in just a little bit. All right, with that
content pack added, what I want to do
next is dive into our third person
character blueprint. Come under third
person blueprints. I'm going to clear
out my search here. Double click on third
person character and I want to select my mesh. Now the reason I'm
selecting my mesh here is because over
in the details panel, I want to select the
skeletal mesh asset associated with this
double click right here on the Sumnil image to open that up and the first
thing I would like to do is add a socket
to a given bone. Over on the left hand side here I've got a
skeleton tree and this shows all the
different bones that exists on our skeleton here. Character, I'm going to choose our pelvis
bone that's right in the middle and then I'm
going to right click on this and we're going to
choose to add a socket. Now we can name this socket. It's just named
it pelvis socket. But you can press F two on that. And I'm just going to call this VFX short and press Enter. With this selected,
I can position it. I'm going to press the Space
bar here in my viewport. I'm just going to
right click here to activate this viewport, Press the Spacebar, and then
you can move it up or down. Now the reason I attached this socket to the
pelvis is because I wanted this particular socket to be straight down
from the pelvis, not attached to any
particular foot. And I'm not going to be
super particular about this, but I'm going to place
it right about there. That's pretty good. Okay, you can find tune
that to your liking. All right, next
here along the top I've got this little
running man kind of icon. I'm going to select this
and this is going to give me access to the various, let me just dock this new
tab along the top here. The various animations that
our character can play. Currently we are playing this M, M jump animation when
our character jumps up. Now I want to pause this because this is a little
bit distracting to me. So I can pause this animation
by clicking right here. I want to draw your attention
to this area right here. We want to add what is
known as a notify to play a sound effect and a particle effect at a given
point within this animation. Now we can scrub this
back and forth like so. To time this to
where we want this within this particular
jumping animation. Now I want to play this
sound effect visual effect right near the beginning. I'm going to position this
right about at the start here. You don't have to be perfect. Right down here. I'm going to click right where
it has this one track. I'm going to right click and
I'm going to add a Notify. Now, we'll add that particle
effect in just a little bit, but I want to add a sound first. Let's play a sound here
in this flyout menu. Now you can see we've
added this place down, Notify you can
left click on this and drag it around to be at a different point
within the animation. With this selected over
in our details panel, we can associate a
sound with this. This will fire off when we
play and hit that point within the animation over here in the sound section of
the details panel. Make sure you've got
that notify selected. I'm going to type in Mario jump. Got Mario big jump,
or Mario jump. I'm just going to
choose Mario jump here. We imported these sound acts at the very beginning
of the course. If you did not do that, go back to the very
beginning of the course and import those files, Then I'm just going to move my slider here a
little bit further. You can hear that sound
effect go off there. And I'm going to right click, and I'm going to
add another notify. Let me just go right about here. Right click, Add, Notify. We're going to add
a particle effect and we're going to select
our particle effect. And over in the details
panel type in Su, and it's this leap launch trail. That's what I want to play now. We're not quite done yet
with our visual effect, our particle effect
notify selected here. Over in the details panel, we have to associate what
socket this is to go with. And we can find that by going
back to our skeleton tree. Remember it's called VFX. So if you simply type in VFX and it's finding all
the different sockets here, there we go, Slot it in for VFX. Let's go ahead and save this. Jump back to our level
editor and play. And I'm just going to press
the Spacebar one time. After I click into the viewport, I see my particle. I didn't hear any sound effect. Now if you don't see any particle or
don't hear any sound, sometimes that's
a matter of just adjusting the placement of
these within the timeline. If you place these too
close to the front, sometimes you don't hear the sound effect you're hoping to hear or see the visual effect
that you're looking to see. I'm just going to try moving the Mario sound effect
here over a little bit. I'm going to re save this. Let's try this once again now with some further
fiddling of those notifies within our MM jump animation
between camera cuts here. I found that if I played my audio frame three with
my particle soon to follow, they're overlapping
here a little bit, I got them both to
trigger just fine. Now if you jump in and play, you can both see that
particle effect as well as hear that sound effect. All right guys, that's going
to do it off for this one. See when the next one.
9. 2D Snap Setting Layers: Welcome back. In the
not too distant future here we're going to be creating some platforms and some blocks. And we're going to be
populating our level. Now the thing of it all is, is we want to place these
platforms and bricks that we're going to create within the
line of our character. Now to help facilitate
the ease of this, we want to make it so
that whenever we drag these blocks and
platforms into our level, that they automatically go along the players
path of travel. If I was to place a cube
from my place actors panel, for example, into my level, you can see that
I place that one there and this one back here, but they're not necessarily
in line with my character. I want to make it
so that when I drag a platform or a
block into my level, it is exactly at the depth
that I want it to be. Over these next two videos, we're going to enable
some settings to make this process a lot easier. Trust me, this will
pay off down the road. We're going to get
started off enabling and setting some two
snap setting layers. In order to do this,
we're going to jump into our Project Settings, which is in the far
upper right here. Settings, Project Settings. And in our Project Settings, along the left hand side, we want to scroll
down until we get to where it says two D
here under the editor. Now what we want to
be able to do here is set up some snap layers. So first we need to enable
them simply in enabling them, if I was to jump back to
my level editor here, we can see that we now have this right here
within our window, a two D snap setting, as well as the ability
to set a given depth. Right now, we only have
foreground as our depth. This will all make sense in
just a little bit more time, but let's dive back into
our project settings. With this enabled, I want
to set some snap layers. I'm going to click this
drop down and I'm going to create more than just
three indices here. In fact, I want to set five, so I'm going to click this plus button a couple more times, then I'm going to
expand these all. I just right click
right here to bring on this little menu to expand all. Okay, The first
level that I want to set right here is going
to be called Foreground. But in parentheses I'm
going to put extreme. And I'm going to set
this to a depth of 1,000 And this will all make
sense here in a little bit. As opposed to me telling
you what it's going to do. I'm going to show you
what it's going to do. This next one, indice one. I'm going to call this
simply foreground. I'm going to set this depth
to be 500 indic two here. I'm going to set this to be main and I'm going to
leave the depth at zero, indic three, I'm
going to call back. I'm going to set the
depth to be negative 500. Then I'm going to set my
last one into four here to be back extreme. And we're going to
set the depth here to be negative 1,000 Right, with all those set, I don't have to
save anything here. I do want to ensure that my snap axis is
along the y axis. Now y, y axis. Let's jump out of here, go back to our level. The reason why I
want to set it to our y axis is
because if I was to change our perspective view here from perspective to
a top down view, zooming on out, Here's
where my players start. Actor is right here.
We're going to be moving along this line
of travel right here. I want to ensure that we're
setting our depth layers along this y axis right here. All right, let's jump back
to our perspective viewport. And now, if I was to drag a
simple cube into our level, it's going to appear as if
nothing actually happened. Mr. Wonder I thought you
said that these would snap to a given
depth. Well, that is. Because let me just delete
these out of here because I do not have my two D snap
settings actually turned on. Right up here at the upper
right of my viewport. Actually, I have to click this on Now when I place
this within my level, no matter where I kind of
move this within the level, you can see it is snapping it to my currently selected level
which is foreground extreme. They're all within
the same depth, if you will, Perfectly in line. You saw me set up
several layers of depth there in my
project settings. Foreground extreme. Change it to default. Let
me go back to foreground. Here are foreground,
extreme background, this should say main background
and background extreme. How do I change those
back in my level editor? Well, if I was to
click right here where it says
foreground extreme, you can see I can choose
foreground, background. All those different layers
that I just set up. If I was to say
background extreme. Now when I place a
cube into my level, you can see it's
going to put it at that depth, that, that depth. If I was to change
this to be main, it's going to be right
in my path of travel. If I was to set this to be background extreme, not
background extreme. I wanted to go
foreground extreme. It is going to put it
at that level of depth, which is going to make laying out our level with blocks and platforms and props
all the more easy. All right guys, that is going to do it all for this video. We will see you in the next one.
10. 2D Translation Widget: Welcome back everyone.
Well, in the last video, we enabled some two snap layers
in our project settings. And those can be seen in our viewport here
in the upper right, we've got our two
snap layer set up. And if I click
right here, here's the various layers
that we set up. And by the way, you can go to this section of
the Project Settings, where we set those up
by clicking right here. We clicked right here,
Go under Edit Layers, then it'll jump you to
the proper section, the two D section of
our project settings, where we set up
those snap layers. Now we want to do something
else in here and that is to enable our two D combined
translate and rotate widget. That's the object, the goal
of this particular video, this works very nicely in conjunction with
these snap layers. I'm just going to check
this on right here. Again, this can also be found in your project Settings
two D section. And what this is
going to do, jumping back to our level editor, this is going to add
another button if you will. Right up here in our Viewport. It just added this which allows us to select
and translate or rotate objects in two D. Now why would we ever
even want to select this? Well, let me show
off this scenario. We place a cube in our level, and right now I've got this
snapped to my main level. And you could come
across a situation where you're trying to
move it around your level, and maybe accidentally you move it along the y axis and now it's no longer in our main path to travel
like we meant it to be. Is there a way to
safeguard against that? Yes, there is. If we were to select this option
that we just enabled. Now, when we select
a given object, our translation rotation widget looks a little bit different. Now we can only move it up, or in this case left and right. We can also rotate it
by simply clicking on this green arrow and then
moving it around like so. Now you can see it is
snapping when I rotate it. This is respecting our
angular snap settings, or rotational snap settings. So if I want to move it
smoothly, rotate it smoothly, I can just turn that
off and now grab that green arrow and
rotate it smoothly. Likewise, I can still turn on my movement snap
settings here. It's moving right now
in increments of 100, but this is just to
safeguard against us moving it back
within the y axis. Once again, here in
our project settings, Project Settings, in
the two D section, we just enabled our two
D combined translate and rotate widget by
checking that on, There's no say, button
or anything here. This just makes this
button come available in our viewport so that
when we select an object, we can move it in just our
various axes or rotate it like so by grabbing
that green arrow. That'll be a real handy trick down the road as we are placing blocks and platforms in other
objects within our level. All right guys, that's going
to do it off for this one. See you in the next one.
11. Jump Through Platform (Part #1): Welcome back everyone.
In this video, our goal is to create a platform our player can jump
or fall through. And just to show
you what I mean, I'm going to click
the play button here. I added a platform
between videos. And if I try to jump through this platform, I can't
currently do it. And if I was on the top side, I can't currently drop
down through it as well. So we're going to make
a platform that we can jump through and
also drop through. So to do this, we're going
to create a blueprint. And we're going to
create a new folder down here in our content browser
where we're going to put various blueprints
we create throughout this course with
your platform folder selected. Let's
right click on this. We're going to add a new folder. We're simply going to
name it Blueprints. With this directory selected, you can see our
path right up here. We're going to right click
in some empty space, create a new blueprint class. We want to choose
the actor class, because this is an
object that we're going to be placing
within our world. Choose this top one. Then it's going to prompt us
to give it a name. We're going to call this
BP Underscore Platform. Underscore. I'll call jump
through, just like that. Then let's go ahead and double click on this guy to open it up. Now, just a quick tip here. I don't like it when my new assets open up in a
separate window like this. I like it when they open up automatically across
the top here. So I'm going to exit out here. Come under edit
Editor Preferences. In our editor
preferences right here. If we come under asset
editor open location, it should be on the front page, if you will, of your
editor preferences. I'm going to change
this to main window. I can close out here then. And then when I
double click on this, it's going to open this
up right along the top. Now if you ever see
something that says, this is a data only blueprints, we can click right up here to open our full
blueprint editor. Now this is the view
that we want to see. Now by default it opened
up to our event graph tab. This is where we're
going to be doing the coding for this blueprint. I want to jump over to our
viewport to start with because we're going to be
adding some components that we want to be able to see. All right, now the
first component I want to add over here in our upper left under the components panel
is a static mesh. Although I could choose a
static mesh of any type, I'm going to simply
choose a cube. So I'm going to
use the cube here, but know that once we add this, we can give us a name. I'm just going to
call this platform. We could change this from being a cube to some
other static mesh. I mean, you could make this look like the chair if
you really wanted to or any other static
mesh that you wanted to. But the cube is going
to work well for us because we're
going to size and shape this into a platform that this is going to
look pretty bland, but again, you can jazz up
to your heart's content. I'm going to change the scale
here to be three in the X, in the Y, I'm also going
to change this to five. Then in the Z, I'm going to change this to
be 0.2 a little bit thinner. Okay, Then I'm going to
add some collision on the top and bottom
sides of this platform. Okay, so I'm going to come
up under the ad component. Once again, what I
want to do is scroll down and I want to
add box collisions. So go ahead and select this. It's going to prompt me to
give this a name right away, and I'm going to
call this collision. Now note that this
indentation right here and I can click on this
triangle to show or hide. This shows an attaching
relationship. Right now, this box collider is attached to my platform mesh. If I was to move the platform, the collision, the box
collider would come with it. However, I could move this independently of the
platform itself. I'm going to resize this with this collision top component selected in the details panel. I'm going to change the scale. I'm just going to hit this
back arrow right here. It's inheriting this relative
scale from the platform. That's why it has these
particular scale values. I'm going to set this
back to be 11.1 and I'm going to set my location
here to be a Z value of 100. Now you can see it is up above. I'm going to change
the box extents here. This is the size, the extents of this box. Instead of the default value of 302-30-2302 I've got
some values in mind. I'm going to go 50 by 50 by 50. Now what we should have
is a box collider that rests right on the top here as the name
suggests, collision top. Now we're going to add another one of these
on the bottom. So what we're going
to do is we're going to right click on
our Collision top. We're simply going
to duplicate it, and I'm going to call this
one Collision Bottom. The only thing I'm
going to do with this one is change the value, the Z value of our location from 100 to negative 100.
And then press Enter. We have one on the top and
we have one on the bottom. Now something I
should have done with our collision top
before I duplicated it, because then it would have duplicated the
properties as well, is to set one parameter
over in our details panel. I'll set it on our
bottom here first. Since I've got that selected
over in the Details panel, we want to come under
the collision section and we want to change the
collision preset here. Click this little drop down. By default it's set to
overlap all dynamic. What I want to do is
change this to be custom. And that's going to change
all of the collision channels or rather illuminate
them so that we can change them
to our liking. I'm going to set
it to ignore for everything except we're going to make it so that our pawn, our character is considered
a pawn object type. We're going to set
this to overlap, and you're going to see
why here in a little bit up above here, we've got custom
collision preset. We're ignoring collision
every other object type except the pawn, that
is our character. We're going to
detect an overlap. So we want to do
this not only for collision bottom but
also for collision top. Like collision top, we're
going to change collision preset to be custom. We're going to set it to ignore collisions with every
other object type, except we're going to detect
an overlap from the pawn.
12. Jump Through Platform (Part #2): All right, let's hop out of our Viewport tab and into our event graph so
that we can add some script enabling
our character to jump through the bottom
side of the platform. And I'm going to select our collision component right here. We're going to
right click on this and we're going to add an event. What we want to do is
we want to detect when our character overlapping that collision bottom component. That's going to add
this node on component begin overlap and the name of the component right
here, collision bottom. We're going to hold
down control and mouse wheel in to
zoom up on this. I'm going to add another
event right away as well. We want to detect when we both begin overlap that
collision bottom, as well as when we end overlapping
that collision bottom. So we can add
another event here. By selecting our
collision bottom, I could right click
and add an event. But I want to show
another way to add events for various
components as well. With collision bottom selected. Scroll down the details panel, here you can find a list
of various events as well. I'm going to do end overlap. We're going to add this
node to our graph as well. And I'm going to
position them like so. Okay. What I want to
do is detect when the other actor that overlaps that collision
bottom component. We want to do something when it is our player character that is the other actor
that's overlapping or ending overlapping
that collision bottom. So I'm going to write click
at some empty space and do get player character. This is going to return our player character that
we're playing as. And I'm going to drag
out of other actor here of our begin overlap. And we're going to type in the equal sign and
we're going to see if the other actor that overlapped that collision bottom
is equal to that is, is it our player character? If it is, we're going to
bring in a branch node. I'm going to hold
down the B as in branch left click to
bring in a branch node. And that's going to be our
condition that we're going to check upon something overlapping
our collision bottom. We're going to check, was it the other actor?
Were they equal? If it was true, we're going to bring in our platform component, Drag, and drop this into
your graph like so. Then what we're going to
tell our platform to do, drag off this is type in
set collision enabled. Put this in like so, and we want to set our collision for our platform to be no collision. Now just to back up and show you exactly what the heck
is happening here, if I select our platform
and scroll on down, our platform has some
collision settings as well. Right now it's set to block all dynamic and it's set to block every
type of object type, including our pawn.
It's going to block it. What we're saying here upon beginning overlap is if it's our player that's
overlapping it, we're going to tell this
platform to have no collision. It's essentially toggling
this collision preset from block all dynamic
to no collision. And you can see that
when it's set to no collision here it is, disabling our
collision altogether, ignoring the fact that
down here doesn't look like it's allowing our
pawn to pass through. So long as this is set to collision enabled,
no collision, it will in fact allow our character to
pass right on through. I'm going to reset
this by clicking on this value right here and go
back to block all dynamic. Now continuing forward here, I'm just going to
copy this node. This node and this node. I'm holding down control
to select those three. We're going to do control C
to copy control V to paste. I'm going to wire
these in like so, if our player character is
equal to the other actor. When we're ending our overlap, the platform is going to
be the target down here. We're going to set
our collision here to be collision enabled. That is essentially going
to turn the collision back on when we end overlapping
the collision bottom. All right, with all this done, you can pause the video here
if you need to see all this. I'm going to left click and
drag around all of these. I'm going to tap the C key. C is in comment, and I'm
going to call this my jump up through platform,
platform, script. Let's press the compile button
right up here just to make sure our code is looking
good and it does look good. Then let's go ahead
and save this as well. Let's drag one of these
into our level and see if we can jump up through
our platform. Here we go. Going back to our level,
I'm going to delete out this temporary cube
that I size up. I'm going to place
this into my level. You can see it's going
to place it right in my main level, right here. Because I've got my two D
snap settings on right now. I'm just going to click right here to go directly to my
movement in rotational widget. Move it up a little bit
above my character. Like. So I click
play, I try to jump. And there we go, we can jump right up through it. Okay. Next we need a
way of tracking to see if our player is on
top of the platform. So that then we can input
something on our controller or keyboard to make our player drop down
through the platform. Again, to do this we're going to jump back into our platform. Jump through
Blueprint once again. I'm going to click and move
down here a little ways. I want to do something when our players colliding with
this top collider right here, I'm going to be flipping a
Boolean variable on and off. Let's come under my blueprint
panel, under Variables. We're going to click
this plus button here. And we're going to create
a brand new variable called is on top of platform question mark. A Boolean variable holds
true or false information. And if I compile right here, we can see with this selected
by default it is unchecked. Meaning by default it
is going to be false. Now we're going to
be making use of this Boolean variable
in just a little bit, but what we're going to do is
go back to our event graph. We're going to select
our collision top. I'm going to right click. We're going to add to event for when we begin overlapping this. And we're also going
to right click on collision top again
at event overlap. This is going to
look in many ways similar to what we
have right up above. In fact, I'm going to steal some nodes from up above here. I'm going to hold down
control and left click, left click, left click, left click, and left click. We've got those five
selected right here. I'm going to right click
on this and I'm going to duplicate the control. D would do the same, but here I'm going to
duplicate them. I'm going to move these
all control Z there. I actually had one of these
selected down here as well. Control click those five. I'm going to do control
D to duplicate. And let's move those right
into position down here. Hooking them up like so. All we're going to do with
this script is we're going to toggle this bullion variable on or off. We want to set it. If I drag this into
my graph and release, it's going to say,
do you want to get this value or do
you want to set it? We want to set the value of this variable when we are
overlapping that collision. We want to set this to be true, we are on top of the platform. Conversely, if we left
click and drag this in set when we have ended colliding with that
collision top collision volume, we want to say nope, we are not on top of this platform anymore. This script is going
to be good for the next section
that we're going to be writing here script wise, so left click and
drag, tap the C key. And we're going to put this
comment as set bull in for detecting if player is
on top of the platform. All right, let's go ahead and compile and save
this right away. All right, next what we
want to do is go back to our main editor here and we're going to come
under third person and we're going to
come under input. This is the new
input action system implemented in Unreal, and we are going to add
a new input action. Now I'm going to
be building off of this existing system so that we don't have to
reinvent the wheel. In fact, I'm going to click
into this actions folder. Here are some input actions that are firing off
some input events, like our jump event. And I'm going to click in
some empty space here. And we're going to
come under input. We're going to add
a new input action. When we do, I'm going to rename this IA for input
action underscore. I'm going to call
it player down. I'm going to double click on
this asset to open it up. What we are doing here is
defining an input action. Now I'm not going to get into the nuts and bolts of
all of this right now, because this whole system
is rather extensive. We're going to leave
our value type as a bull for right now. Essentially did it
happen or did it not? Now under triggers,
we're going to click this plus button
and what we want to do is click in this
little drop down. And we're simply going to
check if a given input was pressed down that is
set to do digital bull. Click Save right here. And that's all well and good. Next what we're going
to do is we are going to jump back to our
main level editor here. And we're going to hop
back up one folder. So we're currently in third
person input actions. We're going to go back
to this input folder. I can also get to it by
clicking right here. And we're going to double
click on this I MC default. And this is where all the various input action
mappings are set up on our third person character for our third person
character to use. Now here's our list of mappings. Currently our jump
action is mapped to the space bar or gamepad
face button bottom. That's the button
Xbox controller. I'm going to roll that back up. We're going to add a new mapping right here by clicking
on this plus button. Once we do that, we
added this entry, click this drop down. We're going to add this new
input, action player down. Now what we need to
do is to map this to given inputs on a
keyboard or controller. What I'm going to do is click on this little keyboard icon. And as soon as I do this, it's going to turn
this orangish color. I'm just going to press
the key on the keyboard. And in doing so it's going to
slot that in as the input. Now that's great for a keyboard. I'm also going to do this
on a controller as well. I'm going to click
this plus button. It's going to add this
entry right here. We can roll up the rest of
these entries right here. Just clicking on these
arrows right here. I'm going to press on
this keyboard icon. Now all I'm going to do is
I'm going to press down on the left thumbstick of a
controller I have hooked up. This is going to
check if my game pad, left thumbstick, has some kind
of input along the y axis. That is my left thumbstick
up or down essentially. All right, we're going
to save this as well. Now just to drive home
that these are the inputs that our character is
using, IMC default. If I jump into my third person character,
you don't have to do this. I'm just showing you. Go back to my event graph tab within here. This is our input
mapping context. And here's our IMC default asset that our third person
character is using. Just let you know where
this all comes into play. This is all on our
third person character. All right, now with
all this done, let's go back to
our BP platform. Jump through, we're going to go on down here a little bit. Mouse wheel down,
right click down. I'm going to right click in some empty space and I'm going to type in Player down. Here's my input action
event for player down. This is this event
that I just created. It'll be triggered by pressing the S key or down on
my left thumbstick. What I want to do
is I want to check the value of this Boolean. Are we on top of the
platform or are we not? If I drag and drop
this into our graph, I want to get it this time. We want to get the contents of that variable I'm going
to drag out of here and bring in a branch node when
we start to input this, that is we initially press the S key or down on
our left thumbstick, we are going to
tell our platform. Let's talk to our
platform here by dragging in a reference to
our platform mesh. We're going to talk
to that platform, then we're going to
drag out of this and type in set collision enabled right down here. The new type is going
to be no collision. We're essentially saying we press S or down on
our left thumbstick. We're going to check, are
we on top of the platform? If it's true, we're
going to tell that collision to go by by. Let's left click and drag, tap the C key and
call this our allow player to drop down
through platform script. Let's compile this, make
sure it's good to go and save then Moment of truth. We're going to play this but you're going to
notice a problem. I'm playing clicking
in the Viewport, I'm going to press the
Basebar to jump through it. I'm going to tap the SK. It doesn't seem to work. That is because we're
missing one more thing. Here's the thing inside of
an actor class blueprint. These input actions are not
going to work by default. They would work by default inside of a third
person character, but not an actor
class blueprint. So how do we get this to
recognize inputs such as this? Well, we have to go into our class defaults of our
jump through platform. Down here in the details
panel where it says input, we're going to change auto, receive input from
disabled to player zero. That is essentially us,
the player character. Let's compile this one more
time. Jump back in and play. Now I'm jumping through
and if I tap the S key, I will drop down through it. Let's test this on the
controller as well. Jumping up, pressing down
on my left thumbstick. And there it seems
to work just fine. And there you have it guys, a jump through platform
as I like to call it. That'll Dude, off for this one. We'll see you in the next one.
13. Moving Platform: Welcome. In this video we're going to be making
a moving platform. So let's get right to it now. To get started here,
we're going to be inheriting from our BP platform, jump through that we
created in the last video just to make things a little
bit quicker and easier. So find that platform, we're going to right click
on it and we're going to create a child blueprint
class from this. When we do this, it's going to prompt us to give it a name. So I'm just going to call
this BP platform mover. Then I'm going to double
click on this to open it up. Now because we made this a child of our jump through platform, we can see that
that's the parent class in the upper right here. That means that it
already comes with all of the components that were already set up in our platform. Jump through. Also it's going to have the same
script inside as well. If we go to the event graft, we're going to see
that this script is all inheriting
from the parent. So this is already set up
to be jump through able. We can jump through
this platform. However, it doesn't move
like we'd like it to. So that's what we're going to
be tackling in this video. Now, just to make this a little bit easier for us to identify a mover platform from a
static jump through platform. I'm going to go back
to our viewport here and I'm going to
select our platform. And I'm just going to change the material
associated with this. You can change this to
some Mario material or anything of that nature. Just to make this super obvious, I'm going to type in blue
here under the materials. I'm going to change it
to this light blue. And then I'm going
to drag one of these into our level as well, so we can easily identify
this as a platform. All right, let's jump back into our platform mover blueprint. Let's create a couple
of variables to get us started here over
in the my blueprint panel. First variable we're
going to create is LOC. That's lo for location start. This is going to be
a vector variable. It's going to determine
the starting point of our mover platform here. And then I'm going to
right click on this and I'm going to duplicate
this control. Plus D is a hot key. This is going to
be called Lo end the ending points with our
location, end selected. There's a couple of check
boxes I'm going to check here. The first is Instance Editable. When we check that, it's also going to click on this eyeball. They do the same thing, essentially doing one does
the other, et cetera. And we're also going to
show the three D widget. Now I'm going to check
this and then I'm going to compile my blueprint so that I can give us a default value. Over in the details panel, I'm going to change
my local end Z value to be 200 by default. Now the reason I did
this is because now if I check out this blueprint
within our level editor here, we can see that
with it selected, I see this loc end diamond. This is the three D widget that I just enabled here
in our platform mover by having this
variable selected and selecting instance editable
and show three D widget. The reason it's located
200 unreal units above the base of our platform here is because I
set that to be 200. Notice over in the
details panel, this location end is also exposed here in
the Details panel. I could change the location of this by simply clicking
on it and dragging. And you're seeing as I do this, it's also altering that
Z location right here. This is going to define the end point of our
platforms movements. It's going to start here,
it's going to end there. This location start point is going to be our relative
starting point, basically, right about there. All right, with that all done, we're going to go
into our event graph and start building
out the script. Right click, drag over to
some empty graph here, and then right click
in some empty space. And we're going to seek
out a time line node. We're going to name this time line node Platform movements A timeline node
allows us to change the value of a
variable over time. This node is special
in that we can double click on it to edit a timeline. I'm going to double click
on this, and when I do, I've opened up a new tab right here we can add a track,
which I will do now. Clicking on this
Plus Track button, we want to add a Flow track. That is, we're going to
change a decimal value over time and you're going
to see why we're going to do this in just a little bit. I'm prompted to name this track, so I'm going to
call it movement. I'm going to leave the
length at 5 seconds, but now I need to. Add some what are called key frames to our
time line here. Now I can right click in here and drag this back and forth. Use a scroll wheel
to zoom in and out. But I'm going to add
some key frames. That is some points in time
where I want to define not only a time value
but a value value. I'm going to right click,
we're going to add a key to our timeline,
that's at blue. Right clicking will do that. Or if you hold down the shift key and then left
click, that'll do it as well. I just wanted to add
three points here. It doesn't matter where
you put them for now, because we are going to
be selecting each of these and then inputting
a time in a value. Select your first one here.
I'm going to set the time to be zero and the
value to be zero, the start of our timeline. Essentially, I'm going to select this last one, this
last one right here. I'm going to set the time to be five and the value to be zero. Now I realize it just jumped off the edge of the graph here,
Don't worry about that. And then I'm going to
select our middle one here. I'm going to set the time to be 2.5 and I'm going to set
the value to be one. Now if I zoom out here, I can see all three
of these key frames, these three dots, I'm
going to simply left click and drag around all of them
to select all of them. And then I'm going to select these arrows to frame these up, these arrows right here. Now this is going to represent the movement of our
platform over time. If you think of the way
I say a door opens, it opens and eases to a close. We want our platform
to ease into one movement and then ease out to the next movement
from side to side. Not so rigid, if you will. With all these selected,
I'm going to right click and set my key
interpolation to auto. And that's going to create this smooth curve
where we're going to ease into one side of our
movement and then ease out. Okay, what does this do here? Well, this is going to give us, going back to our
event graph tab here, a movement output,
a float output, where we are going
to be outputting the changing value
of this variable. Now note the value that
this is going to output is going to change over the
course of 5 seconds. Here it's going to be starting
out at a value of zero. Then over the course
of two a 2 seconds, it's going to go up
to a value of one, then it's going to
go back to zero. Now the reason we're
going to be going 0-1 to zero is because we're going to use this to drive
the motion of our platform. Let's bring in a reference
to our platform right here from the components panel. We're going to drag that in. What we want to do is
drag out of this in say, set relative location. We're going to change
the relative location of our platform over time. Now we need to feed
this a new location. How are we going
to determine that? Well, there's a node that
we can use called p vector. I'm going to write, click
at some empty space and type in P vector. What we're going
to do is plug in the movement output of our
timeline into the alpha. And then we're going to plug in the start location vector into the A and the location
end vector into the B. Then I'll describe
how this all works. If you look at the
header, I'm just mousing over the
header of this node. It says that we're going
to linearly interpolate between the location
and the location, those vector locations
based on the alpha value. Here's how it works.
When that alpha value, that movement float,
is a value of zero, we're going to be all the way at our starting location as it transitions from a value
of zero to a value of one. We're going to be moving
progressively to our location. We're going to be
going from a to B to a to B based on this
changing value, going 0-1 to zero to one. That's going to be where we update our platform's
new location. We're going to update our
platform's new location. Now we're going to be looping through this and how are
we going to be doing that? Well, we're going to be doing
that by going back into our platform movement timeline. Here. Right up here, we've got a button where we can loop through this time line. We're going to start
out at our A location, our starting location, moving to our B location when
this is a value of one. Back to our A location when
this is a value of zero. And then starting it over again. And then starting
it over again over the course of 5 seconds.
That's how that works. Another nice feature
of the timeline is it has this button right
up here, Autoplay. We're going to turn
this on temporarily. When we go to our event graph, we can see that that icon
is right here as well. Autoplay in loop, We don't actually have to plug in an event node to
make this all work. I'm going to compile and save. Now if I jump into my level, I'm going to play this and you're going to
notice that this is going to move from here
to our location end. I just jumped it a
little bit there. Let me just move
this down. Going to have a little bit
of movement here. Over the course of 2.5 seconds. It's going to move
up there and then it's going to move back down. I jump in and play, stuttering a little bit there in the video, but it's actually moving quite
smoothly in front of me. There is our movements. Sorry for the poor
video quality there. Okay, so that's nice. But what if I wanted to move this end location far, far away? I mean, then the platform is going to be
moving crazy fast. Is there a way that
I can customize this timeline in such a way that I can alter the play rates? Yes, there is. This is our
temporary set up right here. What I'm going to
do is go back into our platform mover and we're going to tell our platform
movement node here. Just double clicking on that
to not autoplay anymore. But instead we're going to grab a reference to our
platform movements. Once we've created
this time line, our reference to it
is right here in our variable section of
the my blueprint panel. We're going to drag this
in, we're going to get it, and then we're going to
drag out of this and type in set play rate. This is going to allow us to customize a play rate
for this platform. Let's plug this into the
play of our timeline. Now, I could hard code in
a play rate right here. In fact, I'll do that 1.0 But I want to make this
unique for every instance, every copy of our
platform mover. What I can do here is
right click on this pin. We can promote this
to a variable. And in doing so,
a new variable is hooked up automatically
of the float type, and I'm going to
call this play rate. The one thing I do
want to do with this variable selected
is I want to click on this eyeball icon to make
this instance editable. Now when I compile and I come
back to my level editor, I can see with my platform
mover selected that play rate value is right here for me to customize
for each instance, each copy of this
blueprint in my level. Now I do need to do
one more thing here in order to get this
to actually play. Because I unhooked up the auto play from our
platform movement. I need something to
actually fire this off, to tell our platform
to actually move. For that, I'm just going to drag over this event begin play here. If you did not inherit from your BP platform jump through, you could simply have
an event begin play. But because this is inheriting from our
jump through platform, all we need to do is
extend this out like so. Again, if you're not
inheriting from a jump through platform an event begin play plugged into here.
We'll do you just fine. That is going to be
your final set up, your final script right here. If you want to pause the video here, you can check that out. Let's go ahead and compile this and jump back
to our level editor. Now you can see I'm
just going to Alt, left click and drag to bring in another
reference to this. I could make it so that
this particular platform goes up, say that high. Maybe it's going to go at
an angle like that as well. But I'm going to change the
play rate of this to be 0.05 Something crazy slow. Maybe this platform,
I'm going to change the location to go over here. And I'm going to
change that to be 0.1 Now I've got them
both going pretty slow. If I was to jump in and play, in fact, I'm not going
to jump in and play. I'm going to simulate my game by clicking these three dots. Simulating will run the game without me actually
controlling a character. So here we go. You'll see
these moving in the viewport. And there they're moving. This one is moving quite
slowly on the left hand side. And on the right it's
actually moving as well, but they're moving crazy slow. But the point is, for
any of these platforms, you can determine
an ending location as well as the play
rate at which it goes. You can make it go crazy
fast, crazy, slow. Your choice. All right guys, that's going to do
to offer this one. We will see you in the next one.
14. Launch Platform (Part #1): Welcome back everyone.
In this video we are going to create
a launcher platform. This is going to be
one that springs our player up into the air
when they land atop it. So let's get right to it now. If you have not already imported those textures that we did in the beginning
of the course, do that now because
we're going to be making use of some of those
in this video. We're going to make this
launcher platform kind of look like a giant
mushroom of sorts. So that's our visual goal here. Once you have imported
those and I'm inside of my platformers
Textures folder, I'm going to make a
couple of materials. And if I scroll down here, the ones that I'm going to be using for this are going to be this T Mushroom One as
well as this Dirt one. Now I have both
of them selected. I held down control,
selected those. I'm going to then right click on one of these
and we're going to create materials
out of these. Now in doing that, we're going to create two
different materials. Here they are, you can see
that they are materials by the label right here
on their thumbnail image. I will just leave them
with their current names. I'm going to save those. Save all to save those assets, we'll be making use of those
in just a little bit here. Next what we're going to do
is we're going to go back to our blueprints folder
and we're going to create a brand new
blueprint from scratch by right clicking in some empty
space blueprint class. This is going to
be an actor class, and we're going to call this
one BP underscore platform. Underscore launcher. All right, and then
let's go ahead and double click on
this to open it up. All right, first things first, we're going to get started by adding some components
to our blueprint. Coming under the
Components panel, clicking the Ad button. The first one we're
going to be adding is an instanced static mesh. This one right here, we're going to be making use
of that one in a little bit, but let's just go ahead
and add that for now. I'm going to name this, we'll call this trunk. This is going to be used
to represent the trunk, if you will, of our mushroom
shaped platform here. Then I'm going to select my
default scene root component. Once again, to add
another component, this one is going to be simply
a static mesh component. I will call this
for Mushroom Top. Then I'm going to attach a component to my
Mushroom Top here. With that guy selected,
I'm going to click Add. Then I'm going to
add a box collider. Box collision right here. And we're going to call
that collision bottom. All right, with those
all in place here, I'm now going to
set the details. So starting off with our
instant static mesh here, over in the details panel, I'm going to slot
in a static mesh and I want to slot
in a cylinder shape. I'm going to type
in silinilindrf. I can spell it
correctly. There we go. Now there's multiple
cylinders in here, the one that I am
going to be using. And you can see in the tool tip the pathway for it as well
as the approximate size. It is this one right here from the engine basic shapes pathway. It is approximate size
of 100 by 100 by 100. Choose that one, so you
ensure that you have the exact same Esme
and you're going to see that populate in
a little time here. You don't see anything
in the viewpoint yet, but you will see this being put to use in a
little bit of time. We're also going to
apply a material to this and this is going to
have our dirt material. If you just type in dirt, it is this material. Dirt one matt, that's that
dirt material we just created. Now for the location of this, I'm going to set the Z
location to be 50, 80, 50. Press Enter. And you can see it's going to be placed at this point roughly
right about here. And I know you don't
see anything yet, but we will be generating
some pieces of trunk, if you will, when we get to adding some script
to this blueprint. Right next, let's select
our Mushroom top. What I want to do for the
shape of this come under the static mesh portion of the details panel with
Mushroom Top selected. I want to choose
underscore wide capsule. It's in the starter
content Shapes folder. Then I'm going to add
the material of it, of that mushroom one
material we just created. It's going to have a look to it. And then I'm going to
change the Z location for this to 80 as well. Pop it up a little
bit. Okay. Next I'm going to choose our
collision bottom component. This box right there
for details for this, we're going to set
the box shape to be 5,050.50 right here. We're also going to change
the z location to be 35, 35. Moving it up here a little bit, hanging out the bottom of our mushroom top
there a little bit. Then we're going to go on down into the collision presets area. Collision presets,
it's currently set to overlap all dynamic. I'm going to change it to be custom and we're going to set all of our
boxes here to ignore. So click right here to
set them all to ignore, except we're going to set
our pond to be overlap. We're going to
make this platform be passed through a bowl, so our player can jump through the bottom and then
spring off the top. That's essentially how
that's going to work. So these are going to be our collision settings
for that collision. Bottom up at the top here. I'm also going to change the box extent for the
Z. It's currently 50. I think I'm going
to set that to 60, a little bit thicker like that. Yeah, that's about
right. With that done, let's go ahead and save. Okay, Next we're going to add some variables down here
in the my blueprint panel. And these variables are going to allow us to highly customize the look and shape of this mushroom
platform because it certainly doesn't look
like much right now. So clicking right here, the
plus button for variables, the first one is
going to be called mush top, underscore skate. Whoops, underscore
scale, Underscore x. This is going to be
a float variable. I'm going to check this box, for instance,
Editable right away. I'll go ahead and compile this. I want to set a default value
of this for one right away, a scale of 1.0 basically meaning
100% of its normal size. With this created, I'm
going to right click on it. I'm going to duplicate that. And I'm going to
call this scale Y. It's going to have
hit and compile here. It's going to have all these
same settings instance editable with that
same default value. I'm going to do control plus D to duplicate this variable. This is going to
be mushtpscale z. And once again, if you compile, you can see that it also
has a default value of one, also set to instance editable. This next one we are
going to create, clicking this plus
for the variable, this is going to be
called the velocity. This is going to
control the velocity of our launch when we
bounce off the platform. This is going to be
a vector variable. We're going to set this to be
instance editable as well. If I compile this,
we're going to set our launch velocity
by default to be 2,500 But we will be able to
change this per instance, per copy of this blueprint in editor due to that checkbox. We're going to add one
more variable here, clicking this plus button. This one is going to be called, let's just call it
trunk endpoints. Our mushroom trunk endpoint. We're going to be using this to determine the endpoint
of our mushroom trunk. We're going to have a
trunk that's extending out of here that we're going to be building in a
little bit of time. Let's go ahead and compile this instance edible. We
want this checked. We also want this show three D widget to
be checked as well. So we can drag out the endpoint. We'll leave values
at 0.00 right now. All right, next we're
going to jump over to the construction script
tab of our blueprints. Now the construction
script tab is going to look a lot like our
event graph tab, where you can place some
script to make things happen. However, unlike an event graph tab that runs
script at run time, the construction script
runs at design time. This is great for building
out a blueprint such as this. That's going to allow us to
highly customized things. I'll show you what I mean here. First thing I need to do
is I need to bring in a reference to our
mushroom top here. Let's drag and drop
that into our graph. With that, we can talk to it, we can change some
properties about it. I'm going to drag out of this
and type in set world scale three D for our scale. I'm going to drag backwards
and type in make vector. Now with this we can plug
in our mushroom scale, x, y, and z as we change these
values in the editor. Whenever we change any of
these values in the editor, it's going to fire off
the script and actually adjust the size of
our mushroom top. Right here. That
guy right there. Okay, continuing forward, I'm going to plug this
into a four loop node. Now you've got each
loop nodes for each with break we want
a simple four loop. This guy right here under
flow control four loop, We're going to be using
this four loop to determine how many
essentially sections of trunk that we want to add to the base of our
mushroom launcher here. To do this I'm going to
bring in my trunk endpoint. We're going to get it,
I'm going to drag out of this and type
in vector length. We're going to get the
length of this vector, essentially, how long is
this endpoint going to be? We'll run through an
example of this math here in a little bit Now, because our trunk
is essentially 100, remember we got our
mush trunk right here. And these are
essentially going to be in increments of 100. That whole size of the cylinder
was 100 by 100. By 100. We're going to divide this, bring in a divide node
by the number 100. Now this is going to
spit out a float value. We want to convert this
into an integer value. What I'm going to do is I'm
going to drag out up here and type in truncate. It's going to round this to
the nearest hole number. We're going to plug this
into our last index. Now what a four loop node does, it's going to, when it gets to this node, loop through this, however many times
we specify here, starting with index zero
and going to a last index. If it is 0-9 it would
loop through this. That is to execute
this ten times 012-345-6789 That
equals ten times. What do we want to do ten times? Well, what we want to do
is we want to bring in our trunk, drag that in, and then we're going to pull off of this and say
we're going to add an instance of that mush trunk. One instance, that is one copy, if you will, of this cylinder. Now we need to specify where
we want this instance to go. Now again, this cylinder
is in the shape of a stem. So imagine if you're stacking these things on top
of one another, it is essentially going to make a stem like looking thing. We're going to be
specifying where these go by plugging into this
instance transform. So I'm going to drag
backwards off of this and type in transform. And a transform
consists of location, rotation, and scale data. We really are only
going to be concerning ourselves with this
locational data. We're going to pull backwards
off of here and type in make vector like. So let me give a little
bit more space here. What we're going to do
for determining where these trunks are going
to go is we're going to drag off of this index and I'm going
to do a multiply node. We're going to multiply
this by a float value. We could make this an
integer value, In fact, I'll keep this an integer
value actually, no. I'm going to right
click on this. I'm going to turn
this output Pin into that's going to change
this into a float as well. The reason I'm going
to convert this into a float is
because I need to plug this in as a float
to the make vector node. I'm going to plug this into
the Z value and I'm going to multiply this index
by negative 100. You'll see why here
in a little bit. To run through a math example, Seeing is going to
be believing and make this make a lot more sense. All right, I'm going to compile this blueprint and then I'm
going to jump into my level. Right now, our launch
platform looks odd, but we'll be able to
highly customize it. Now I've got on my two D snap setting set to my
main level right here. I'm just going to drag one
of these out here now. In fact, I'm going to place
it up here a little ways. Now check this out. Our top doesn't look like much, but over in the details panel, we expose all these variables. Mush top scale, must y, mush top scale, z, et cetera. We'll make use of those here in just a little bit because
if we scale those, you can see how it is altering
the size of our platform. Our top, this value right here is being applied back here in our
construction script. Whenever we edit these values, it is immediately
firing off this script. Whenever we make any change to any of the values
associated with this script, this script will run and thus adjust the size
of our mushroom top. That's how this
script fires off. During design time when anything about our
blueprint here is changing. Now note, if I go into my level and I was to
find my endpoint here, this three D widget, you can see I've got it
selected right down here. Watch what happens
as I pull this down. Every hundred units
that I go down, we're adding a piece of trunk. So this is going to make it
so that we can make these short or long, et cetera. So I'm going to set
my trunk endpoint here to a solid number. Let's go something
like negative 200, a nice round value, just like that, Negative 200. There we go. Now
let's jump back to our construction
script and run through it with this value negative
200 as an example. Here we are in our
platform launcher. All of our scaling of the mushroom top is determined
right here by whatever we set these two in our editor that's setting the
mushroom top world scale. But now we're considering
ourselves with this fore loop. Our trunk endpoint is
currently set to negative 200, our vector length is 200. Now 200/100 equals two. Our first index is
going to be zero. Our last index is
going to be 2012. Meaning this loop
body is going to fire off three times 012. And every time it fires
off it is going to spit out the index zero, then one, then two. The first time it fires
off the index is zero. We're going to multiply that by negative 100, which is zero. And it's going to
place a version of that must trunk
at that location. The second time it fires off, it's going to spit
out the index of 11 times negative 100 is
going to equal negative 100. And so we're going
to place another section, our mush trunk, down at negative 100 from
where it is located. The next time through, our index is going to be 22 times negative 100
is negative 200. And thus it is going to place another section of trunk
down below the previous one, offset by 100 unreal units. We can see that here with
12.3 sections of trunk. Now it's built in
such a way that we can't go up the
opposite direction. And in fact, if you did drag
this up the other direction, it would still build out the trunk in the
other direction. The negative direction,
if you will. But I'm fine with
it just like this. Now, I do recommend
that you leave your top X and Y
scale to be the same. In fact, we could have
made this just one value, otherwise you can have
some weird looking effects like this where it gets
really stretched out. But I wanted to give you the
power to customize that, how you want it is what it is. Now you can also see that as we are scaling our mushroom top, our collider along the bottom here is scaling along with it. That is pretty nice. I'm going to set
this whole blueprint down a little bit because
I want our player to be able to try to jump up through the bottom of
the platform here.
15. Launch Platform (Part #2): Now we won't be able to jump up through it yet
because we haven't added any script to make it so that we
can jump through it. So let's do that next. Let's go back into our
BP platform launcher. This time we're going to go
over to our event graph. Because we want this script
to run during run time. I'm going to move over
to the right here, some empty space, and we want to select our
collision bottom. We're going to right
click on this, add an event for
beginning overlap. Let's go ahead and right
click on it again. Add an event for end
overlap as well. Now what we're going to do is
we're going to find out who was the other actor that
went underneath it. We can do like we did before, we can write click at
some empty space and do get player character. So we can find out if the other actor is equal
to our player character. So we'll copy this and bring this down here
for the end overlap. Both of these are going
to plug into a branch. So I'm going to hold down
the B key and left click, that's going to be our
condition that we're going to be checking against like. So then what we want to do is we want to talk to our
top, our mushroom top. Drag in a reference to that, we're going to drag
off this and then type in set collision enabled. When we are beginning to collide with that
collision bottom, we want to set this
to no collision like we have right
here down here. We're going to copy
and paste this. We can plug in that
same reference and if it's true that we
are ending that overlap, we want to turn the
collision back on, which is going to be
collision enabled like so. All right, so let's go
ahead and compile and save this and see if we can jump through the bottom of
our mushroom platform here. Our very slow moving platform. And yes, indeed, we can go right up through
the bottom of it. However, we do not
get launched yet. So let's go ahead
and fix that up. Next to launch our character, we're going to want to detect
when our character lands on top of our mushroom top
component over here. So we want an event
associated with that. Let's right click on
our mush top component. We're going to add an event. And what we want to do is
add on component hit when we hit this component that's going to add
this event down here. I'm just going to navigate
down here a little bit, create a whole new
section of script. Now we don't want
this to fire off or we don't want to continue
any execution here. If anything hits
our mushroom top, only if it is our character. So I'm going to drag
out of our other actor. I'm going to put
in the equal sign. And once again we're
going to check if this is equal to or get player character node, if the other actor is
our player character, if that's equal to
our player character, we're going to bring
in a branch node, hold down, and left click. If that is all true, we're going to want to
do something one time. I can right click and do
a search for a once node. However, I'm going to hold
down the key and left click and that's going
to bring in a once node. What I want to do one time
is drag out of our get player character here
and do a search for a node called launch character. This is a function associated
with the character, so you must drag out of your get player character in
this case in order to immediately plug that in as your target and to
find this function. So we just want to launch
our character one time. What is going to be
our launch velocity? Well, if I select my launch
velocity right over here, we can see that we store
this in a variable. I'm going to drag and drop this on top of this pin like so. And currently we've set this to 2,500 But we have made
this instance editable, so we can customize this for each instance of our
platform launcher. Now I want to fire this off, not only when our character
hits this mushroom top, but when they land down upon it. We don't want to just
do this whenever they hit the side of
our mushroom top. To check for that, we want to drag out of our non component hit right here and we're going to break
open this hit result. This pin right here has a lot
of information to give us. We can extract that information via a break hit result node. I'm going to expand
this down so we can see all the different things related to this hit that we
can find out about. What we are looking
for for this one is we want to drag out of
the impact normal. That is essentially
what direction are we impacting
this mushroom top, I'm going to drag out of here
and I'm going to bring in a vector equal to vector node. We'll do not exactly
equal vector. Actually, no, we do want an
equal vector. Sorry, my bad. Vector equal to vector. It's got the triple
equal sign for this. We are going to bring in a
z value of negative one. That is, essentially,
are we impacting this going in the
downward direction? Negative, meaning downward
in the z direction. Okay, We actually want to check this as a
condition as well. Instead of plugging this
into another branch node. What I can do here
is I can drag off of the result of this checking to see if our other
actor is equal to. The player character can
drag off this and bring in an node the boolean. So we're going to check to
see if the other actor that hit our mushroom top
is our character. And we're going to check
if our impacting of that mushroom top is in
the downward direction. So our flow is going
to be like this. We're checking to see if both
of those things are equal. And if that's true,
then one time we're going to launch
the character. Now this should be
all well and good, but I want to add a little bit of possess
to this as well. I want to add an emitter
little particle effect. And then I also want
to make the top of the mushroom sort of look like it's
bouncing by having a little animation
effect to it as well. So what I'm going to do is drag off my launch
character here and bring in a node called
Spawn Emitter at location. Now this is to play an
older particle effect, a cascade particle effect. And the reason I'm
going to seek out this, instead of a spawn system at location which
would play a Niagara, a newer particle system
effect is because there's one in mind that I have from that infinity blade effect pack. So long story short, you
could spawn emitter for an older cascade emitter or
you could spawn system et, location for a niagara
particle effect. The one I have in mind here is called skill underscore launch. Rather that's skill leap launch. Skill leap base launch. Skill leap base launch
that guy right there. Now I need to specify a location that this is
going to spawn in at. For that, I'm going to use our impact point
from our hit result, we can drag this all the
way over into our location. I'm just going to double
click on this wire to add in a little reroute node to make
this look a little cleaner. I think I will go ahead and set the scale of this particle to be three times its
usual size as well. Just to make it a little
bit more prominent. Easy to see. Okay. And then
next what I want to do, and I'm just going to hold down the right mouse button and slide on over to the right here, is I'm going to bring in a
timeline node, right click. Do a search for a time line. Add timeline right down here. And it's going to prompt
me to give us a name. I'm going to call this
my mush top time line. And I'm going to plug this
in to our play from Start. Now, this node right here, I'm going to double click
within to create a timeline. This is going to
serve as the scale multiplier for our scale X, Y, and z, for our mushroom
top values right over here. In fact, I'm going to bring all three of these
in right away, top scale x. I'm going
to get it in fun. Fact, if you hold
down the control key, left click and drag,
you'll bring in a getter version of these
right away. Like so. I'm going to multiply
each of these values. So I can drag out of this and type in the multiply
symbol right away. I'm going to multiply
all of these. We're going to need a
unique copy for all these. Control C control V by some multiplier
that we are about to spit out of our time line. Create and spit out
of our time line. Let's double click on our
time line right away. What I want to do here
is add a new float. This is going to be called
our scale multiplier. We're going to create
a little bit of an animation here
that's going to last three tenths
of a second long. I'm just going to hold
down the control key and scroll in here to
zoom up a little bit. And hold down the rice
right mouse button to put this back
into view like so. All right, I'm going to
add four key frames here. So I'm going to hold down the
shift key and go as such, 123.4 roughly in that
zigzaggi pattern. You can get those key frames by right clicking and adding
a key frame as well. Shifting and left clicking
will get them as well. Okay, with those in place, I'm going to now
select each of these individually and add a time. For this first one,
it's going to be zero and the value
is going to be one. I can click on these arrows
to put that into view. I'm going to zoom on
back here a little bit. I'm going to select
my second key frame. Now the second one, I'm going to add a time of
0.1 and a value of 0.8 Again, these are going to
be scale values. The second one I'm going
to select is going to be a time of 0.2 and a value of 1.3 Then this last
one is going to be a time of 0.3 and a value
of one if it jumped it. All off screen, you
can zoom on back. I'm going to left click, drag to highlight all of those.
They're all in blue. Now I can click these
arrows to frame them up, so you can see this zigzaggi pattern that I was going for. Okay, so what we've
just done is we've added a float track
called scale multiplier. I'm going to jump out of
our timeline here again, this three tenths of
a second time line. Now this scale multiplier
is output from our timeline over the course
of three tenths of a second. It is going to be
multiplying or it is going to be spitting
out a float value. That is going to be going from, it is going to be going
1-2 0.8 to 1.3 to one. Changing that value over time. That is the value that we're
going to multiply against our mushroom top
scale x, y, and z. Now we're going to plug all
of these into a vector node. So I'm going to right
click in some empty space, type in make vector. We're going to
plug these in like so to make a single
vector value x, y, and z. The reason we're doing
this is so that we can bring in our mushroom
top components. So we're going to get that. Then drag out of
that and type in set relative scale three D. This is going
to be our new x, y, and z value for
our mushroom top. As this updates over the
course of 0.3 seconds, we're going to be
changing the multipliers associated with our
mushroom top size, creating a little bit
of a bouncing effect. All right, now before
we test this out, we are going to do
one more thing. Currently is this whole
tree top bouncing launching is only set to happen one time. What we want to do is reset this by some means so
that it can happen again. So to do that I'm going to right click and add a custom events. Right click, custom event. I'm going to name this
reset launcher in all caps. I'm going to plug
this into reset. Now what I need
to do is call for this reset launcher at the
very end of my script here, just to try to get
this a little bit more into view like so. I'm going to drag
off the end of here, I'm going to bring
in a delay delay. And we're just going to delay by two tenths of a second
before we reset that. Now I can drag off
of here and type in reset launch there. It's going to, it's going to call this custom
event right here to enable me to land on
top of my mushroom once again and reset that
whole bouncing effect. All right, so trying to
put this all into view, that is what we have
for our final script. If you need to pause
the video here, let's go ahead and
compile this and save Now let's give this
a play. Here we go. Okay, I'm going to go through the underside of my mushroom
here, land atop it. Bounce, there we
go, bounce again, playing that particle effect. And that's pretty great.
Now just to show you, we can make these
all a little unique. I'm just going to click
on my Mushroom here. I'm just going to hold
down the Alt key, left click, and drag. And now with this
instance of the mushroom, all I'm going to do is change my launch velocity,
that variable, so instead of this one
launching me at this value, I'm going to change
it to simply 500. So this second one is not going to launch me nearly as much. So if I jump back
in and play here, see this first one's
going to launch me a lot. And then the second one, just a little bit, you can see it is allowing
me one time again. It is resetting that
launch so that I can jump on it again and
again and again. So that's how we can make a highly customizable
launch platform. It's got an animation, it's got customizing how
high we're launching off. Pretty cool indeed, guys, that's gonna do it
off for this one. We will see you in the next one.
16. Coin Pickup Components: Welcome. Over the course of
the next few videos here we are going to be building
out a coin pick up. But before we do that, I
want to make sure that you have imported in some of the textures and
audio files that you should have imported at the
very beginning of the course. Because in this video we're going to be dealing with some of these coin textures. We're going to be turning
a couple of these into materials as well as we are going to be referencing
this coin audio right here. So if you haven't imported these at the start
of the project, please do so now. All right. With that done, I'm
going to actually start off in my Textures
folder over here. Now I have two different
versions of the coin. If you want to have a newer
coin or the retro coin, what I want to do is
I want to select one, then hold down control
and select the second. And with both of
those highlighted, I'm going to right
click and I'm going to convert these into materials. And you can see
there's one right there and one right there. What I'm going to
do next is with my Platform folder
selected here, platform. I'm going to add
a new folder and I'm going to call
this materials. I'm actually going to drag these materials inside
of that folder. Currently I've got this guy
right here, left click, and drag that over into
materials, say move here. And I've also got a couple
of the other materials in here from the launch
platform as well. So I'm going to pull this
up, holding down control, I'm going to select those are the three other ones
you can tell because they've got these sphere icons. And I'm going to
left click and drag these into the Materials
folder as well. We're going to move them
here, Then I'm going to go into my materials folder and
these two coin materials. I'm just going to open
up because there's some slight adjustments that I want to make inside
each of these. I'm going to jump into
the other one as well, the retro coin, depending on which one you're
going to be using. Now what I want to do
here is first of all I'm going to have a different
shape here in my viewer. Down here along
the bottom you can set a different preview mesh. I'm going to simply choose the cube even though it's
going to be on all side. Then I'm going to
hold down left click. You could see that
I'm going to make this invisible on
each side as well. You can see the
background with it. So clicking the cube icon there, and obviously that
looks terrible, but we're going to fix that out. Okay, so what we need to
do here is we're going to select our master
material node here. And over in the left hand side
where it says blend mode, we're going to train that. Transition that over to
translucent. Train that. Then we're going to
plug in this a pin into the opacity pin of our
master material node. Now I can see it is translucent. We see just that coin. We do want to make this
two sided as well. Your changes are thus to change the blend mode to translucent and set this to be two sided. You can go ahead and say
that and then do the same for the retro coin as well. We're changing that blend
mode to translucent. Changing it to be two sided. Make sure you plug in this a, the alpha value into the opacity of the master
material node like so. Click safe and we can
close out of there. When finished with that done, I'm going to transition over to our blueprints folder here
in our content browser. I'm going to right click
in some empty space, new blueprint class. We're going to base this on an actor class because we're going to place
this in our world. And I'm going to call this
BP pick underscore coin, then go ahead, double
click on this to open it up in the components panel, there's going to be a couple of components that we
would like to add. The first is going to be a
sphere collision component. Now when you click here, don't get confused and
click Sphere right away. This is a static mess. You got to scroll on down and we're looking for
sphere collision. I'm going to let this
have the name sphere. However, in the details
panel over here, I'm going to change the
sphere radius to be 75. Now we're going to use
this to be the volume, the trigger volume
that we check against, to see if we should
collect this coin or not. Now with this sphere
collision selected, we're going to add
another component and this one we are going to add a cylinder so you
can simply type in cylinder and there is
a basic shape cylinder. Go ahead and select that. Over in the details panel. There's a few things
I want to modify. Essentially, I'm going to be
tilting this on its side and squishing it down so
that it looks coin like. Got some settings I have predetermined ahead
of time the rotation. I'm going to set the x
rotation to negative 70. We are going to set the y
rotation to negative 90, and we're going to set the
z rotation to negative 20. Then I'm going to change
the scale as well, because this would be a
rather fat looking coin. 20.75 in the x. And I'm going to tab over
and do 0.75 in the Y. And for the Z, I'm going to
do 0.07 and then press Enter. It squishes it down. That looks coin like. As you can see, I've got
a fairly generous volume around it for which
to collect this. I'm also going to slap a
material on this right away. If you select this drop
down in type in coin, you've got either option
to choose from here. I've got the retro coin
or the newer age coin. I guess I'll go with
the Retro for now, but you can see this is going to print it
off on both sides. Yeah, we've got a little
bit of a gap in there, but I'm going to live
with that for now. That's fine. Now, something
else I want to do right away is this mesh does
have collision on it. If I scroll down into
the collision section, it is said to block
all dynamics. I don't want the player to
collide with this at all. I want them simply to pick it up when they overlap
this trigger volume. Now you might think like, hey, once we overlap this
trigger volume, we're going to make this
thing go by by anyway. So what does it even matter
if this has collision on it? Well, we're going
to be able to shoot some fireballs later on
and we don't necessarily want some fireballs colliding against this particular mesh. So we're just going to
disable some collision. And we can do that
by coming under collision presets and just
changing this to no collision. And that'll fix that. All right, we want to add one
more component here up in the components panel. We're going to click Add
In, Type in Rotting. And if you select this, this is not attached to
any particular component. Rather it's applied to our
entire blueprint here. This is going to make
it so that this coin spins around and it's going to spin around at the rotation rate set in your details panel. Currently, it's set
to a z rotation to rotate around the z axis, a value of 180. And that's going
to be pretty good. And if you want to preview this, you can just simply press this Simulate button and you can see roughly
what it looks like. That is pretty good. Again, if you don't like the
look of that there coin, you could change it to
the other coin model. The new coin model. Heck, I
might go with that instead. That looks maybe a
little bit better. Yeah, we'll go with
that. All right, go ahead and save this out. That's all we wanted to
accomplish in this video. More work to be done in
the next video where we begin to do some scripting.
We'll see you there.
17. Coin Pickup Script #1: All right, with our blueprint
coin pick up here, created. Let's go ahead and
add one to our level. And you can see I've got
my two D snap settings on currently set
to our main level, that is our main path to travel. If I drag and drop one of
these into our level like so, right now we've
got this right in front of where our
character spawns in. If I was to jump in and play, just drag this on
screen it right away, you can see that it's spinning. However, nothing happens when
our character overlaps it. Let's add some script to make it so that something happens. And to do that we're going to double click on our BP coin, pick up, jump back in here. And we're going to right click
on our sphere component. Because we want
something to happen when our character
overlaps this sphere. To add an event for
overlapping this, we're going to right
click on this component, add event on component,
begin overlap. That's going to jump us from our viewport to our
event graph tab. And we want to check to
see if the other actor, the other thing that overlapped that sphere component
is our character. We can do like before
and right click and do a get player character
node, get player character. We can see if the
other actor is equal to our player character. I'm going to hold down
the key left click, and bring in a branch node. This is a completely
valid set up. We're checking to see
if the other actor is our player character
and if it is, we can do stuff. Now just to show off another
way that this could be done, I'm going to hold
down the Alt key, left click to break that. I could drag out of the other
actor here and do a cat to BP underscore third
person character. Now jumping back to our
content browser here, our third person
blueprints folder, This is the actual
character that we are controlling within
the game right now, another set up you
could do for checking to see if we are
overlapping that coin with this particular
character class is to do it just like this. If it's true, we can
continue out of here. If this was false, the cast would fail and we could
continue out of here. Either method would
do just fine. I'm going to delete out
this cast to for right now and just go
with this method. What we want to do is if it's true that we have
overlapped that sphere, I'm going to drag out of our
true branch and type in. So two Da2d sound is one that is not being played
at a given world location. It's just essentially great for playing some audio that
you hear out loud. Here's where I'm going to
slot in our coin sounds. If you click that drop
down, just type in coin, you're going to find
that coin Sound that's playing the sound effect. Let's play a visual
effect as well. I'm going to drag out
of here and type in spawn emitter at location. Emitter uses the older cascade
particle effect system. Alternatively, you could do
a spawn system at location, which is the Niagara
particle effects. Now the reason I'm going to use this is because in
our starred content, we have access currently, as of today's date to the
explosion particle effect. I've got this
underscore explosion. Now we do need to specify which location we would
like this to play at. Currently, it is
going to play at the 000 location in my world. But this is simple.
If I right click, get some empty space I can
do get actor location. This node right here,
the target is ourselves. So essentially saying,
let's play this at the location of this
actor for the scale. You could scale this up in size, I'm going to leave it as 11.1 but you could make a giant
explosion if you wanted to. Then last but not least, we're going to continue the
flow of execution and type in destroy actor which
will destroy our Led. Meaning this BP coin pick up after we've
played the sound and after we've played that
particular particle effect. Let's go ahead and compile. This says our script looks
good. Let's save it as well. And now let's see if we
can actually pick this up. Here we are playing,
hear a sound, see a visual and it
is destroyed again. No scoring involved
yet. That is to come. But guys, that'll de
off for this one. See you in the next one.
18. Player Controller: All right, welcome
back everyone. Well, in the last video, we created some very basic
script to pick up our coin. However, you'll notice that
it's not really complete. Like we didn't add
to a coin total or get any points or
anything of that sort. And that's because we need
to take some time out now to create something known as a
player controller blueprint. Now a player controller
blueprint is a very foundational blueprint that is found in real projects. And this is a super
useful blueprint for doing things
like storing points, you, the user, for storing
coins for you, the user lives. It can be used to pause
and unpause the game, obeying the wish
of you, the user. It can be used to show the
Hud for again, you, the user, the player controller
serves this sort of one to one
relationship between you, the user, and the character
you are controlling. For every character that
you're controlling, there is one player
controller blueprint. All right, so Mr. Wonder, this player controller
blueprint, how do we create one? Well, down here in our
blueprints folder, blueprints in platformer, we're going to be
adding another folder. I'm going to be right
clicking in some empty space. We're going to add a new folder. And I'm going to call
this framework because the blueprint we're
going to be adding is referred to as a class
of framework blueprints. These are very foundational, important blueprints found
in many unreal projects. I'm going to dive into
this folder now and you can see where we are within
our folder structure. Then I'm going to right click
over here, Blueprint class. Here we want to use this Player
Controller parent class. And it says a player
controller is an actor responsible
for controlling a pawn. That is a character
used by the player. I'm going to call this BP
Underscore Player Controller. Now with this created, we need to access our
project settings and tell our project to use this
player controller blueprint. We can access our
project settings right up here in
the upper right. We've got set project settings over here in maps and modes. Along the left hand side, choose that you can find this
player controller class. Over on the right we
can pick this drop down instead of the
default player controller. Let's use the one
that we custom made. Now we're going to be storing
a lot of different sorts of functions and variables inside of our BP player controller. So we want to make
sure that our project is going to be using this, essentially our BP player
controller is going to be attaching itself to our
third person character here. They're going to be
working in tandem throughout the course
of this project. All right, with that, let's jump back to our project itself. Let's choose to save all. That is literally all we wanted to accomplish
in this video. If you get a dialogue like this, just save all guys that's going to do
it all for this one. We'll see you in the next one.
19. Coin Pickup Script #2: All right, welcome everyone. In this video we're going to be adding some script inside of our BP player controller
for totaling up our coins. So let's jump right to it. Once again, this is the
Pathway Content Platformer, Blueprint Framework, where I have this BP Player Controller. Let's double click on
this to open it up. If you ever see this saying
it's a data only blueprint, you can click right up here to open the full blueprint editor. Now inside of this blueprint, we're not going to be doing any work inside of the viewport. There's going to be
nothing to see here. This is all going to be
done in the event graph. This is going to
be the powerhouse, if you will, to run some
script in our game. That's going to be critical.
And the reason why we're going to be housing
this script inside of our player controller
is because unlike a character that can die, a player controller is going to persist throughout
our play session. All right, the first thing
I want to do here is add a couple of variables in
the My blueprint panel, clicking on this plus
variable button. The first one is going
to be called coins. The variable type here is
going to be an integer. Inches are meaning whole numbers because we're not going
to have tenths of a coin. Then I'm going to
write, click on this, I am going to duplicate this, and I'm going to call
this one coins in lives. All right, let's go ahead
and compile this right away so we can add some
default values for this. For a default number of lives
over in the details panel, I'll set it to three for coins. I will set our default value. Well, let's leave it at zero. We're not going to start
off with any coins. Okay, then find some empty
area within your graph here. You have a lot of it. I'm
going to click and drag. And I'm going to add a
custom event right away. Right click, type
in custom event. Now custom event is
one that you get to name and it only fires off
when you manually call it. So we're going to
create the custom event here and we're going to be
calling it in a little bit. I'm going to call
this custom event a coin because that's what this bit of
script is going to do. Then with this node selected, let me just zoom on up here. Holding down the
control key and zooming in over in the details panel, I'm going to add an input. So click this plus
button right over here. And the input is going to
be called coins to add, and we're going to make
this integer like so. Now this is always a
little misleading. We're calling this
an input and this is appearing on the output
side of this node. You'll see why this
is called an input just a little bit
because when we call for this custom event, we're going to get to input into that node the number of
coins we wish to add. Okay, so here's how our script is going to flow when
this gets called. We're going to be feeding
it some amount of coins to add and we're going to drag out of this and
type in the plus button. And we're going to
bring in an ad node, however many coins
we're looking to add. We're going to add
to our total here. Our total number of coins is going to be stored
in this variable, so we can drag and drop
this right on this pin. So we're going to input
some amount of coins, add it to our total, and we want to make this
essentially our new total. However, I want to do
some checking here. First, we're going
to check if this is greater than or equal
to the number 100, because we're going to
award an extra life if you exceed that value of 100. I'm going to drag out of this is going to give us the
result of this math. And we're going to
bring in a greater than equal to n greater equal. Then I'm going to
drag out of this and bring this into a branch node. So we're going to say if our total here is greater
than or equal to 100, we're going to do something. If that's true, then
we're going to do something different
if that is false. Now if it is false that we have not gotten to
a value of 100, what we're going to do is
drag out of here this total. We're going to bring
in a clamp node. We're going to clamp an integer, we're going to clamp
it between a value of 0.100 Then we're going to have this flow
into a coin setter. Here's how it works.
When we drag in our coins variable, we
drag it in like this, we can get it which we did before or we can set
it in this case, we're going to set it,
plug this in like, so we're going to have this come out of the false branch like so. Now just to talk through exactly what this current
bit of script is doing. We're going to be feeding in
some amount of coins to add. We're then going to
be adding that to our existing number of coins. We're going to add
those together. Find out if that number is
greater than or equal to 100. If it is false that it is not greater than
or equal to 100, we're going to ensure that this total right here is a value 0-100 We're ensuring that by setting it to a min or maximum 100, it is
somewhere in here. And then we're going
to set that as our updated coin value. So if we were to collect
one coin, we'd take one. It added to our current
total which is zero. That total is going to be one. It's not going to be greater
than or equal to 100. So we'll flow out of
this false branch and our updated
total will be one. Okay, next we're going to
handle what happens if we have reached this
100 coin threshold. So let's move this down
here a little bit. We're going to drag out of this ad node once again when
we add these two together. And this time we're going to
bring in a subtract node, so just put in a minus symbol. And that'll bring us
operator subtract node here. We're going to subtract 100, notice we've got ad node here. Subtract node right here. And then we're also
going to bring in another clamp integer node. I'm going to select this, going to do control D to
duplicate that right away. And I'm going to take
the output of this math, plug it into our value. I will leave the min
and max as follows. Again ensuring that we are
within that threshold. That's just to prevent any
wonky math from taking place. Then once again, I'm going
to set my coin total. Now watch, this is
another handy trick. You can drag out
your coins variable here and if you want to bring in a setter
version of this, you can just drop it on
an output pin like this. And it's going to bring
in a setter like so. This is going to flow all the
way from our true branch. Now essentially what
we're saying here is if, say we had 99 coins right here, and we were to add one, that would equal 100. So what would happen is
right here we would say yes, it is greater than or in
this case equal to 100, so we'd flow out of
this true branch. And then what we would do
is if this is then 100, we would subtract 100, essentially resetting our
coin total back to zero, and then that's going to be our newly reflected coin total. What we're doing here
is every 100 coins we are looking to add a life. So let's add a life, shall we? I'm going to hold down
control and just scroll wheel back a little bit just to give myself a little
bit more room, I'm going to bring in
our lives variable. Now drag and drop it in
here. We're going to get it. And then I'm going
to drag out of this and type in increments. Now this node acts like a
getter and setter, all in one. We don't actually have to set our number of lives
like we did here. What this will do
is it'll take in our number of lives,
in this case three. And it's just going
to add right onto it. So I do not have to go like this to add on to
our number of lives. It'll just do it automatically. So this is going to get
our number of lives and this increment is going to
set it to the updated value. Of course, we have to
make sure our flow of execution actually
flows into it. Like so. Then it would be nice if we actually played some kind a sound with this as well. So I'm going to drag off of
this type in play Sound two D. I'm just going to bring
on our options down here. The sound that I want to play
is our one up sound here. You can adjust the volume
of the sound as well. I'll leave it at
one, but you can set that up or down if you like. I'm going to left click and drag around this
entire script here, tap the key and I'll call
this my a coins script. In the details panel, you
can set a common color. I usually like to set
these to something like black because it
adds a nice contrast. Let's go ahead and
compile this to make sure our
script is all good. Save this. Now this
is all well and good, except there is nothing to actually fire off this
ad coin script yet. Remember with a custom event, you have to manually tell
it when to fire off. So that's where the next portion of this is going to come in. Again, make sure you have
compiled and saved here. Next we're going to be jumping
into our BP, pick up coin. So find your way over
inside of this blueprint. What we're going to
do is firstly we're going to come back down
to this little bit of script in a
little bit of time. But I'm going to delete
out these two nodes. Event tick, event
actor, begin, overlap. And I want to drag off of
event begin play here. What I want to do is I want
to create a reference to our BP player controller
so that I can then call that Add
coins custom event. To do that I'm going to write
click into empty space and type in Get Player controller. What we're then going to do
is drag off this and type in cast two BP player controller. Like. So this is us
basically saying, okay, upon beginning play, we want to find out if
the BP player controller, the one that we set in
our project settings, is the one we're in fact using. Then what we can do here is
right click on this pin, right click, and we can
promote this to a variable. In doing that, what you'll notice is in my blueprint panel, you have just now created a player controller
variable that is going to store your BP
Player controller. I'm just going to shorten
the name here, right click. I'm going to rename this
as my Player Controller, so we can left click and drag
around this tap the key. This is going to be my
script where I am creating a reference to my
Player Controller that we're using
in this project. I'm going to set that
to be black right away. Black like my soul. Okay, and then we're
going to scooch on down to this area of our blueprint. And we're going to implement a little bit more
script down here. So let's go ahead and nudge this on over, left click drag. So what we're going to do is bring in a reference to our player controller,
left click drag. We want to get this now because we have a reference
to our player controller, we can call that ad
coins custom event that exists inside of
our player controller. Let's jump back to our BP, pick up coin and out of
our player controller, let's type in coins. I should really call this ad
coins. In fact I'll do that. I'm going to click on my
ad coins custom event here in the details. Going to update
this to add coins. Let's compile this and save. And now you can see
back in my BP pick up coins that has been
updated as well. So note that this
node is going to be calling this customer event. It's going to be
telling it to fire off. Now notice that we
added this input, our coins to add here back
in our BP pick up coin. We can see that this is now on the input side of this node. If it's true that our player or our player character is
overlapping that sphere, we're going to wire this in. So do not miss this right here. Make sure out of the true
branch you're wiring this in. So now we have to tell us how many coins
do we want to add? I'm going to write
click on this variable, but first check out this trick. I'm going to put in the
number one into this field. Then I'm going to write,
click on this pin. We're going to promote
this to a variable. Look over in our my
blueprint panel. This is now called coins to add. It has that same
name, coins to add. If I compile our blueprint, you can see that it is
going to carry over that default value that we
had inside of that box. Now here's another little bonus. Let's go ahead and
check this box for our coins to add variable
to instance Editable. Now what this is going to do
is it's going to allow us to customize how many coins
each coin is worth. So if we wanted
to, we could make a single coin worth one coin, five coins, ten
coins, et cetera. It'll be highly
customizable like that. All right, this is going
to be our script here. Let's go ahead and left click, drag, tap that C keep, it's going to be called
our coin pick up script. I'm going to click right here. Click okay. Zoom on
out here a little bit. You can pause the video
here if you need to. Let's go ahead and
compile and save this. Now let's check to see
if this actually works. I'm going to go back to my
main level editor here. Now note that with my coins
selected here in my level, I'm going to hold down Alt, left click and drag. And I'll put another
coin back over here. I can have this coin
right here be worth, look at my Details
panel set to one. I can make this one on the left. I can make this be worth
100 if I wanted to, in order to actually see this number being put out to
the screen, our coin total. Let's actually
temporarily adjust our player controller script. We'll eventually
spit this out to our screen via a more
official looking Hud. But what we can do is right
click in some empty space. I'm going to bring in a
print string node again. Eventually I'm going
to get rid of this, but let's do this. Whenever we collect a coin, I'll put this at the very end. We'll actually have this
off of the false branch. In the true branch, essentially, I'm going to plug both
of these in here. I'm going to break off of this
and put in an append node. Again, this is all temporary. So we can see this spit
out to the screen. I'm going to put in
coins, base space. Then inside of our B value, I will just put in our coin. Drag this out here, coins, We're going to get it,
plug it into here. It's going to convert it
from an integer to a string. Let's go ahead and compile this. Save and play. Now you'll see I'm going
to collect our first coin here in the upper
left of the viewport, it says coins one again. Look at the extreme upper
left of my play window here. Now say coins one again, because we wrapped around, we went 1-101 Just to
further demonstrate this, I'll break out a couple more
coins holding down Alt, left clicking and dragging
like So let's play again. I've got look in the upper
left of my Viewport 123. Now this one is worth 100, so I should loop back to three. All right, and there we have it. We have finished our coin
pickup script and we've made it highly customizable so
that for each instance, each copy of our coin, we've made it so
that we can adjust the amount of coins
each one is worth. And if you wanted to do that and make it a little bit
more clear visually, you could set it to
be worth ten coins. You could select in
your details panel, the cylinder mesh that is
representing our coin. You could change
out the material to be a different material,
maybe a different coin. Perhaps you could
set the scale for the entire pickup to
be bigger overall. So you could set
it to a value of like three overall,
something like that. And with that locked, if
you set one value to three, it sets them all to three. So there you go guys, that's going to do
it off for this one. We will see you in the next one.
20. Coin Pickup Sound Concurrency: Welcome. In this video, our goal is to create a sound concurrency asset and then make use of it in
our coin pickup script to limit our coin pickup
audio from getting blown out whenever picking up a
ton of coins at a time. Now, I've got an example set up here where my
player is going to spawn in way up here and drop down to collect
a ton of coins. So I'm going to expose the
problem for you all right now. Not great, right?
So to fix this, we're going to be creating
this sound concurrency asset, and I'm going to be
doing this within my platformer audio
folder right there. I did a dry run before
recording this video. I am recording this video well after the course
has been recorded. And I'm going to right
click and create a brand new sound
concurrency asset by clicking coming under
audio sound concurrency. I'm gonna get rid of this
alert from Dell here. And then I'm going to
rename this right away. If I select it and press F two, I will call this
one coin underscore Cc and if I double click on this asset
or with it selected, just simply press the space bar. You'll see a few parameters
associated with this asset. Now, essentially,
what this asset allows us to do is
to set some rules regarding this sort
of scenario where we may have a whole bunch of sounds trying to
play at one time. And just to show you
where we are going to eventually slot this
sound asset in, I'm going to go back
to my level here. And I'm going to open
up my coin blueprint. I could select one here in
my level or in the outliner, I can see I've got a bunch of coins right down here as well. You can simply click on
Edit BP Coin Pickup. And where we are going
to slot this in is in our play sound TD function. This is our coin pickup script. If you click on this dropdown, right here, it'll
expose more parameters. And one of those is a
concurrency setting. I'm going to go ahead and
slot this in right away, even though we haven't made
any changes whatsoever to our coin concurrency asset
here. Go to select this. There's the one that I created prior to shooting this video. I'm going to slot in
the coin concurrency. That we're working on. So it's already slotted
in. Now let's jump back to our coin
concurrency asset. Inside of here, you have some parameters that you
can fiddle with. Max count is the number of concurrent sounds
that can play at a time. I'm going to limit
this down to three, and I've arrived at that number through some play testing. So three is pretty good for this scenario. Resolution rule. This is for what happens when our Max count has been reached, and you've got
various options here. And as you mouse
over each of these, it'll tell you
exactly what it does. For testing this out, I
like stop the oldest. So essentially, if I breach
that number of three, I'm going to stop
the oldest sound that I triggered and
I'll start a new. And this re trigger time, I'm going to leave it alone, but feel free to fiddle
with this, as well. Once again, the tool tip tells you exactly
what this does. This is the amount
of time to wait in seconds between different
sounds to play. I'm going to go
ahead and save this. And with this already slotted
into my BP pickup coin, I'm going to go
ahead and compile. Script is all good here.
Save this as well, jump back into my level. And if I click Play, you're going to hear a
vastly different experience. Now you don't get
that audio cacapone if you will, upon playing. Alright, guys, that'll do to offer this one. We'll
see you in the next one.
21. Fire Bar (Part #1): Welcome. Over the course of
the next few videos here, we're going to be
creating this guy, our very first
hazard, a fire bar. And we're going to make it in a highly customizable
way so that we can determine when this is
placed in our level editor, how long we want
this fire bar to be, how fast it spins, which direction it spins,
All that kind of good stuff. So let's hop right to it. All right here and Unreal in my platform blueprint folder. I'm going to right click
in some empty space. I'm going to choose
blueprint class. This is going to be an
actor class blueprint because it is going to be
one we place in the world. And I will call this BP
underscore fire bar. Let's go ahead and double
click on this to open it up. And we're going to add a couple
of components right away. The first one I'm
going to type in, box, is going to be a
box collision component. I'll leave this as
the name of box. And I'm not going to worry about the extents of this right
now because we're going to be calculating this
dynamically via some construction script that we write here down the road. Next, I'm going to select
our default scene route, once again because
this next component I want attached to the
default scene route, essentially the center
point here, not the box. This is going to be
instance static mesh, not the hierarchical
instant static mesh. The instant static mesh, I will actually,
let's just leave it. Instant static mesh is fine. We could call it ball or
something of that sort, but with this selected
over in the details panel, I'm going to change our
static mesh to a sphere. Clicking on this
drop down sphere, I want one that is
called simply sphere. This guy right here at
the one that is 100, right there in the
middle, it says approximate size
100 by 100 by 100. It is in the engine
basic shapes folder. You can see that
path at the top. That's the one I'm looking for. Then for material,
anything for this will do. Although I do want something
that looks a little flamy, I'm going to do a search for M. Underscore Fire underscore 03. It is this one right
here that comes from the infinity
blade effects pack. Again, the material
doesn't really matter, but I want something that
looks a little flamy. We'll add that on as well. Now we don't see any of these
instance static meshes yet. Although we will populate
our Fireball here dynamically via the construction script
in just a little bit. Now there is one more component
I want to add up here. But before I do that, I forgot one thing I want to change about our instance
static mesh here, scrolled down in
the details panel under the collision settings and where it says collision preset. I'm going to change
this from block all dynamic to no collision. The reason being is
we're going to have our box be the thing
that we check collision against any of these instance spheres that are going to
be making up this fire bar. I don't want anything
to collide with that. It's all going to be done
through our box collider. All right, Next I'm going to add one more component up here in the upper left and this is going to be our rot movement
component. Rotating movement. This is going to
be the component, it's not attached to anything. It's just blueprint specific
here that is going to rotate our fire arm
one way or another. I'm going to set the
rotation rate over in the details panel to
have a rotation rate of 50 in the Y. I'm going
to set it to zero in. All right, next we're
going to create a couple of variables here and we're going to
click this plus button. And the first one I
want is going to be called Flame Ball number. This is going to be an integer. And this is going
to determine how many of these flame balls are going to make up our
arm bar or fire bar here. I'm also going to, in the details panel, change
a couple of things. I want to make this
instance editable, so we can change the
number of these in editor. Then I also want to set a category for this
so that we have these few variables
that I'm going to create within a category
in our variable section. If I click in here, I can simply overwrite where
it says default. And I'm going to call this,
I'll call bar customization. There we go. There we go. Now you can see over in
our variable section, we have a category called
bar customization. And a flame ball
number is contained within that category.
With this one selected. I'm going to control D
on it to duplicate it. This one's going to be
called ball distance. Apart. I want this to be
instance editable as well. We'll set some default
values here in a little bit. I'm going to add one
more variable here. This one is going to
be called Flame Ball. This is going to
determine the size of each of those flame balls. I'm going to set this
to be a vector variable so we can determine the x, y, and z size of this. I'm going to set it to
be instance editable. And check here in our category, you can see it's
not actually listed in our category of
bar customization. But over in the details
panel I can specify bar customization by clicking on that drop down and now
it's in that category. Last variable here we're
going to add is going to be called rotation rate. This is going to be a rotator. In the details panel,
I will check this. Make an instance
editable as well, so we can customize
the rate of rotation. And I'll set this to the bar customization category as well. Let's go ahead and compile
this so that we can set some default values for
my flame ball number. I'm going to set
this, we'll say five. We're going to have a
flame bar consisting of five by default distance apart. I'll set this to be 60, 60 because that's a value I
pre determined ahead of time, the flame ball size. I'm going to set this to
be 0.5 across the board. Once again, I predetermine
this ahead of time. The rotation rate,
I'm going to have this match the rotation
rate that I had on my rotating movement
here of 50 in the Y. I'm going to set that to be 50 in the Y as
well for that variable. All right, let's
go ahead and save this right away so we
don't lose any work here. And then let's jump on over
to our construction script. We're going to be putting
some script here in our construction script
because this is going to change up the look of
our Fireball during design time prior to the
game actually running. We got some cool things
that we're going to be doing right in this section. The first thing I want
to do is bring in our flame ball number, drag and drop this in here. We're going to get this. We are going to drag out of
this and subtract this. Bring in a subtract node. We're going to subtract
this by the number one. And you'll see why here
in just a little bit. Because we're going to be
plugging the output of this into a four loop node. We're going to type in
four loop, not four loop. With break just four loop, I actually want this plugged
into the last index. I'm going to hold down
control left click, and drag this down
into our last index. The reason I'm subtracting
this by one is because we're starting off this loop
with the number zero. So we're going to
loop through this, we want to actually add five flame balls,
the number five. If we're starting
counting at zero, we need to subtract one, thus making the output of
this four to go 01234. That's how many times we're
going to loop through this. Technically five
times, but starting at the number zero, okay? Off of this loop body, I'm going to bring
in a sequence node holding down the S key
and left clicking. We're going to bring in a
sequence because there's several things we're
going to do here. I'm going to add
another pin right away. The first thing I'm going to
do is I'm going to drag off of this index and bring
in a multiply node. Every time we loop through this, it's going to spit
out the index number here, 0123, et cetera. And I want to
multiply this versus our flame ball distance apart. We can drag and drop this
right on here like so. Now the output of this,
we're going to be plugging ultimately into
a make vector node. We're going to come back to
this in just a little bit, but this first bit of
script is we're going to be adding instances
of our flame ball. I'm going to drag in our
instance static meshed. This was these spherical
flame balls, if you will. I'm going to drag out of
here and type in a instance. Now we could have
just done this. Now it's going to add another
copy of this instance, static mesh, which I don't need. I'm going to delete
out that one. That's just another copy. Ultimately, the sequence node
is going to plug into here. The sequence node is
going to allow us to do several things all at
pretty much the same time, sequentially, but
for our purposes, almost the exact same time. Now we're going to be specifying where to add an instance. Let's drag backwards
off of this and type in transform, make transform. This is going to
specify a location, a rotation, and scale. Now for the scale,
we can simply plug in our flame ball size. That's going to be
our scale For each of these instance static meshes. I'm going to double click on this wire just to bring
in a reroute node. Make this look a little
cleaner now for our location. I'm going to drag backwards
off of this and type in make vector Because a location
consists of x, y, and z data. Really, I just want to
specify the distance apart here in the direction,
the z direction. I'm going to plug this directly
into my Z and it's going to convert the integer value that is going to output
here into a float, because this node needs
a float input like so. Try to clean this
up a little bit. Okay, that's going
to be the first part of our script here. Okay, this is going to left
click and drag, tap a sky. I'm going to say add
instances of flame ball. Okay, that's the first thing that
we're going to be doing. I'll try to frame this up, so if you want to pause
the video here, you can see what that's doing. Okay, so if I was to
drag a copy of this, I'm just going to compile
and save this right away. I'm just going to drag
a copy of this fire bar into our level, okay? And actually, you know what, let me do this the proper way. I'm going to set this to
be on my main level here. Make sure my two D
snapping is on. Okay. So you can see roughly
what it looks like there. So in the details panel, I could specify a
number of flame balls. And you can see it's going to extend it upward,
which is pretty great. Now setting the flame
ball distance apart, I could set that as well. You're going to see
how dynamically we can make this.
That's pretty cool. We can even change
the flame ball size. If I wanted to, I could
change this to be one and 1.1 It's going to make
it a little bit bigger. Now, this rotation rate is
not going to do anything yet, but let me just set these
all back to the default. You'll notice here that when I change this, this is
all well and good, but we're going to
be checking against the collision here,
this collision box. And that's not extending to match my number of flame balls. That's going to be our
next bit of script here. Let's jump back into
our BP fire bar. What we're going to do is
we're going to drag off of this result right here and we're going to bring
in a divide node. Divide, and we're going to
divide this by the number two. This is going to be used
for some of our math to adjust the size of
our box component here. Let's go ahead and bring in box right here, our box component. And then let's drag off this
and we're going to type in set box extent. Essentially what we're
looking to do here is change our box extent parameters
right here via script. Okay, bring in that. We're also going to
drag off this type in set relative location. The box is going to be our
target for both of these. Okay, as for our box location, I'm going to drag backwards
off of the new location and type in make vector. So I'm going to take the result of this math right here and
plug it into our value. Let's make sure that we hook
in this sequence node right away to actually make this
bit of script fire off. Now it doesn't really matter if we plug this in here first, but we want both of
these to fire off. Make sure it doesn't matter
if you hook this one in first or that one, Okay. Then we also want to specify a make vector
for our box extent. Let's type in make vector here. We're going to
take the result of this same math we can grab
out of the same output. We're going to plug
this into our Z, and we're going to change our
X to a hard coated value of ten and a Y of 50. Let's go ahead and compile
and say this once again. Now if we look back
in our level editor, you'll see that this bit of script is actually going to
extend out our collision box. You can see it kind of cutting
through all of the balls there dynamically so that
if I was to increase, say, the flame ball number here, you can see that that box
is adjusting as well. Now again, I'm going
to keep this thin, but if I kind of whip
around this angle, you can see I'm making this
a little bit thicker from this travel view so
that it won't miss our player when it tries to
collide with our player. Okay, one more bit
of script we've got to do in our BP Fireball. Jump back in there. What we're going to do is
customize our rate of rotation. Let me just left click all these nodes
holding down control. I'm just going to
pull to the side, hit the C key here and I'll call this box extent sizing like. So move that over here. Okay, so let's bring in our
rotating movement component. We're going to drag that in. We're going to drag off of this, we're going to type
in set rotation rate. Essentially what we're
looking to do with this rotating movement
component is we want to manually adjust
our rotation rate. Now currently we have our
rotation rate variable. Let's drag and drop
this right into this node set is the
exact same value, but because we've made this
variable instance editable, we can adjust this per
instance of this flame bar. That's going to be pretty great, so we're going to left
click highlight that. And I'm going to call this my
allow custom rotation rate in our final script is going
to look something like this. I'll try to frame
it all up like so. All right, let's go ahead
and compile this and save. Let's bring in a couple
of these flame bars here. I'll hold on Alt, left click and drag for
the second one here. I'm just going to make
the number of flames ten. I'll change the rotation rate. Let's go at negative 100. So it'll be going in
the opposite direction, and it's going to be going
a little bit faster. Now if I was to
jump in and play, you can see we've
got two flame bars spinning in opposite directions. They don't actually do
anything to me yet, but they are spinning
as intended. They are spinning
at different rates, they are different
lengths, et cetera. So we've got a
pretty great start to our flame bar blueprint. Now more work to be done here as we actually make
this affect our player. But guys that's going to
do it all for this one. We'll see you in the next one.
22. Fire Bar (Part #2): All right, welcome
back everyone. Now we've got our BP fire
bar and it spins around, but it doesn't actually
damage our players. So part two here is
going to address that. We're going to create some
script to damage our player. For this, we're
going to dive into our third person folder here. Third person blueprints our
BP, third person character. Let's go ahead and double click on this guy to open it up. The first thing I want
to do is select my Me. I'm going to go into my
Viewport tab so that we can actually
see our character. And I'm going to change
our characters material over here in the details panel
here we've got materials, we've got an element
zero and element one. These correspond to
different aspects of this code of paint. The visuals of our Me
one is for the logo in the middle and the rest is for essentially this suit
of armor, if you will. I'm going to change out
element zero here to be blue. An sharing blue, something
straight blue like that. Okay, what we're going to be doing here is upon our
character getting damaged, we're going to simply
swap out this material. Just a simple visual switch
to help indicate that yes, our player has been damaged. All right, next
we're going to go to our event graph and we're
going to add a custom event. We're going to right click
in some empty space, type in add a custom event. And we're going to call
this one a Just hit Points. And with this selected
over in the details panel, we're going to add one input, clicking on this plus button. And we're going to call
this Hit Points Modifier. And I'm going to change
this from a bullion to an integer that
is a whole number. Next we're going to
create a variable, in the details panel over
here, create a variable. This is going to simply
be called hit points. I'm going to change the
type here to be an integer, this is going to
be a whole number. I'm going to compile
my blueprint here, and I'm going to change
the default value to be 22 Hit points for
us to start with. All right, we're going to create some script here and
we're going to do some things based on the number of hit points our character has. So let's move this
over to the side here. We're going to drag off of our adjust hit points
customer event. And we're going to bring
in a sequence node. A sequence node because we're going to be doing a couple of things off of this custom event when it eventually gets called. All right, the first thing
we're going to do is we're going to drag out of
our hit points modifier and whatever number
we eventually pass through this calling
of this custom event. We're going to add this, we're going to add
this to our hit points that our player is
currently going to have. Drag and drop that
right on there. We're then going to take this resulting math and
we're going to clamp this. We're going to
clamp this integer between a value of zero and a max of two to ensure that our math here never goes
outside of this bounds. We're then going to set this
back into our hit points. We're going to set
our hit points. If I drag and drop my hit
points onto this return value, it'll bring in a setter. We will do this off of our
then zero pin like so. Okay, then what we're going
to do is we're going to drag off of this and we're going to bring in
an equals node. We're going to find if our
hit points is equal to zero. And I'm going to
bring in a branch, like if our hit points is equal to zero, we're
going to do something. And if it's not equal to zero, we're going to do
something else. If it is equal to zero, then all we want to do is drag off of the true
branch and type in destroy actor with the
target being ourselves. Basically, once you've reached zero hitpoints,
destroy yourself. You're done. Bye bye. Now, if we have not
reached zero hit points, what we want to do is
we want to change our, our mesh is material. This material associated
with this mesh. Okay, notice that this
is on element zero. This blue element zero. Our arms and legs here. Okay? So we're going to drag
in a reference to our mesh. Drag and drop that I'm
going to drag out of here. And I'm going to type
in set material. If it is false that
our hit points is not, we're going to change element zero of our mesh, element zero. We're going to change
the material of that to be some other color. Now what other color is
going to be dependent upon how many hip points that
we ultimately have left. We're going to use a
select node for this, and this is one of
the coolest nodes in all of blueprint scripting. I'm going to drag
backwards off of this and type in Select. Here is how this
node is going to work based upon
some index number, in this case, our
number of hitpoints. We're going to plug
this right into here. We're going to choose
a different material. If this is going to be zero, we're going to
change our option. If this is zero to be red. I'm going to type in anum red to find a straight red material. If our incoming index, the number of hit points is one, we're going to change
this to an sharing green. We're going to add one more
pin here in option two. If our amount of hip points
is two, it's going to choose, it's going to
output the material associated with option two here. And this is going to
be our anum blue. Based upon whatever
this incoming index is, we're going to output the
associated option 01 or two. If the index is zero, it's going to output this anum into this material to change
our message material. If it's one, it's going
to output this one. If the index is two, it's going to output the
material associated with that. Pretty cool. Next let's deal with some of
the sound effects associated with gaining
or losing a hit point. So what we're going to do
is we're going to circle back here to our hit
points modifier. And we're going to
drag out of this, I'm going to bring in
a greater than node. We're going to say if this
incoming hit points modifier is greater than zero, if that's the case, we're going to bring in another branch. So we're going to make sure that our then one
pain off of the sequence, snakes right down here. If this is true,
we're going to play a sound to drag off of
here and type in play. Sound Two D. The sound that we're going to
play for this is going to be a power up sound. Click this, drop down, type
in power up, Mario power up. You can click on
this and you can adjust the volume if you want. I'm going to collapse that. Okay. If this is false that
it is not greater than zero, we're going to plug this into another branch that we're
going to be making use of. Okay, come right back up here that if we
gained a hit point, essentially we're
going to play a power up sound drag out of here, once again, the
Hitpoints modifier. And we're going to bring
in a less than node. We're going to say if
it is less than zero, meaning we've gotten hit, we're subtracting a hit point. Essentially, we're going to plug this into an And
node and Boolean. We're also going to check
another condition here. If both of these are true, we're going to take
our hitpoints, drag these in, we're
going to get them, then we're going to
drag out of here and type in not equal, not equal to zero. And then we're going to plug
this into our branch node. Then we're going to drag out of our true branch here and
bring in another play. Sound to D. For this, there it is, Mario Warp.
Let's go with that. Now essentially what
this bit of script is saying right down here is if
we have lost a hit point, meaning it's less than zero, we've lost a hit points in our current amount of
hitpoints is not zero, meaning we have at least
one hip point left. If both of these are true, we're going to play this sort of negative sort
of sound effect, this Mario Warp Sound. Let me just go ahead
and jump to that. And the way I jump
to that is I just clicked on this magnifying
glass right there. It's going to browse
to that asset, and here it is, so you can
see what that sounds like. Okay, let me just zoom
back here a little bit. I'm going to try to
frame this all up. Make sure you've looked at
all these nodes carefully. Making sure you've got
the proper values in the proper fields like so
easy to make a mistake here. So go through this carefully then let's go ahead and
compile this script. And save it. Let's
go ahead and left click and drag around
all these nodes as well. I'm going to tap the C key so we can add a
comment for this. And I'm going to call this
my Hit Points modify script. And I'll compile and
save that once again. Okay, this is all well
and good, but once again, this custom event, it needs
to be told when to fire off. So let's jump into our fire bar blueprints to
do a little bit more work. Now I can navigate
that by going to our blueprints folder and
double clicking on it like so. However, you can also access
it here in the Outliner. If you've placed
it in your level, click on edit, BP, fire bar, either one will do. That'll open it right up. Now what we want to do is start off in the
variable section, we're going to add a
few more variables. Click this plus button. First one we are going to
add is going to be called Points, Adjustments to Player. And you can see
with every change our construction
script fires off, because it will fire
off with any change. We're going to make
this an integer. We're going to add
another one right away. This is going to be called
player hit velocity. This is going to be a vector. Then the third one we're
going to add is going to be called hit down. You'll see what all these are used for in just a little bit. I'm going to change this
to be a float value. I'm going to compile
this right away. So then I can add some
default values for this, our hit point adjustment. Let's start with that
guy. We're going to set this to be negative one. Essentially, when you get hit, you're going to lose a hit
point here, negative one. Okay, For our player hit velocity. Let's go
ahead and select that. I'm going to make this
instance edible in case I want to change this
in the editor. And I'm going to
change the player hit velocity to be 500. Essentially it's going to pop the player up just a little
bit when they get hit. That's the idea there,
is they get hit and it pops the player up
just a little bit. Then this last one,
our hit, cool down, I'm going to change it
to be 1.0 and that's going to be essentially
1.0 seconds. All right, Again, with
any change, again, you saw my construction
script firing off. Because that's when the
construction script fires off at design time. Whenever any changes
made to your blueprint, I'm going to jump out of here
and go to our event graph because this is where we want
run time script to fire. Now what we want to do
is we want something to happen when we overlap this box. You remember our box is
this box right here it is, invisible box that we can't
see while we're playing our game with us. Right clicking on
this component, we can go to add an
event on Begin overlap. That's going to jump us
back to the event graph. What we want to do
is check to see if the other actor was
our player character. From here you could cast to
third person BP third person. You could add this node like so and then continue
script out this way. However, I'm going to go
a different method in case I ever want to change out
which character I'm using. I'm going to drag out of
the other actor type in the equals sign and I'm
going to see if this is simply equal to our get
player character node. That way it doesn't
really matter what character blueprint I'm using that is going to
reflect my player character. Okay, what do I want to
do if this is equal? I'm going to bring this
into a branch node. If those are equal, this is
true that they are equal. I'm going to drag out
of here in Do once. What do I want to do once? Well, what I want to do is I
want to adjust the amount of hit points that our
player is going to have. Now once again in our BP, third person character, I have this custom event called
the just hit points. So I'd like to call
for this to happen. Now I just made a mistake here trying to go
at this approach. Because if I was to
drag out of this, get player character and
type in adjust hit points, I'm not going to be
able to find it so I can actually do this method, also access this adjust
hit points custom event. So in this case I'm
going to have to drag out of my
other actor cast to my BP third person
character because my third person character
is the one that has this hit points custom
event inside of it. There you saw me
making a mistake in real time and me adjusting
it in real time. Okay, This is what I want to do. Once I want to call
this custom event, I'm going to double click on this to bring in a re rot node. Now I'm going to adjust this by. My hip point adjustment
to player variable. I'm going to plug that in. Then I'm going to
drag out of here once again and type in
character movement. Now this is a component, this character movement
component that lives on my third
person character, this character
movement component. Now within here, there is a parameter for velocity.
I'm going to search for it. Velocity, velocity, that will update as our character is moving
throughout the level. I want to adjust the
characters velocity. If I drag out of here, I can type in set velocity. It'll bring in a
setter node like this. The amount that I would like to adjust that velocity
is going to be determined by our player hit velocity
variable right here. You can plug that in like so. Then the last thing
I want to do here is I want to bring
in a delay node. I'm going to drag off of here. Bring in a delay node. I'm going to delay by our
hit cool down amount. Putting this node on up
and this one on down. So this currently has
a value of 1 second. I'm going to make this so
that we then loop this back into resetting our once node. So essentially there's going
to be a 1 second pause between when our fireball can damage the
player to call this, adjust hip points to pop
our player up a little bit, and when it can do it
again so that this doesn't happen like every hundredths
of a second sort of thing. All right, with this, we're
going to left click and drag. I'm going to tap the C key. I'm going to call
this hit by fire bar. I'm going to compile this
script, I'm going to save. And then I'm going
to jump in and play. Let's see what happens. All right, our character
is currently blue. They have two hit points. I'm going to get hit one time, I put my character
up a little bit, they changed to one hit
point represented by Green. I'm going to get hit
again, bam, dead. That is your view when you
are dead. Don't worry. We're going to change the
death sequence later on. But that indicates
a player death. Now if you're getting
an error like this, this makes perfect sense. Because what is happening here, it's saying it is trying to access our set velocity,
but it access none. What happened here, back in our third person character here, is we were trying to
adjust our hit points. And remember this is getting
called from our fire bar. We were trying to adjust to hit points and that set
us down to zero. So by the time we're trying
to adjust the velocity, our character has
already gone bye bye via this bit of
script right up here. So our character is destroyed. It's trying to get
to here saying hey, adjust to velocity, can't do it. So how could you
fix this? Well, you could try swapping
the order here. So let's try to do
that here quickly. We're going to pop
the player up first. I'll try to untangle
these wires in just a little bit so that we have a set up that's
going to look something a little bit more like this. I can actually delete this out, this can plug right
into there like so. All right, if I compile again, and let's try that and
see if we get that error. Hit in second hit, we are dead. I'm going to hit escape and we no longer get that
error because we are now killing the player
after we adjust that velocity. All right guys,
there you have it? That's going to dude
off for this one C when the next one.
23. HUD Layout: Welcome. So now that
we're getting to a point in our project where we've
got some things to collect, like coins, we've got some lives that we could lose or gain. Let's add a Hud to our
game, a heads up display. So if you're unfamiliar
with what a Hud is, it's this kind of information
that is displayed on the screen while
you are playing and while we're not going to
be creating this exactly, it's going to be
something like this. And you're going to get to
fine tune this to your liking. But just to give you
a sneak peek as to essentially what we're going
to be looking to create. All right, back here in
Unreal, let's get started. We're going to create
a brand new folder over in our platform or folder. So let's right click on
this add new folder. Let's call this inside
of our UI folder, we're going to create
a brand new asset by right clicking and under
the user interface option. In this flyout menu, we're going to choose a widget blueprint. Now widget blueprints are
assets that you want to create to create game
Hud or menu screens. You only have one
parent class option here that is in the
common section, so choose that
under user widget, we're going to be
prompted to give a name. I'll make this a
little bit bigger. Holding down control
and scrolling up. I'm going to call
this WBP for Widget, Blueprint, underscore, hud. And then let's double click
on this to open it up. Now what you see in front
of you in this blank space, I'm just going to hold down the right mouse button and
sort of pan this around. This is our designer view. This is what we're
going to actually see and use to create
our Hud layout. Now currently, we don't have any widgets here occupying
our designer tab. So let's go ahead
and change that. By adding our first widget
in the palette panel, we can find a whole
list of widgets. And you can expand any
of these categories to find a whole variety of extras. Now I've got a whole
separate course that goes into great
depth about all this. I'm not going to go into
super detail about all this, I'm going to just do what
we need to do and move on. But a character UI course in Unreal is the
name of that course. If you want to go
into depth as to how to learn how to
use all this stuff. The first widget
I'm going to add to our designer tab here is
called a canvas panel. Now a canvas panel, and I can add one of these
by simply dragging and dropping it into
our designer view. Here is essentially a
tack board of sorts. So if you are familiar
with the tack board, you can pin things to it. And that is essentially
how this is going to work. We're going to pin,
we're going to add other widgets to go on top of this on top
of our tack board. Now currently our scale
here is 16 by nine, which we can see
in the lower left. But if you wanted to
change your device, your screen size right here, this is how you do
that for phones, tablets, laptops, et cetera. I'm going to leave this
unchanged because I like that 16 by
nine aspect ratio. Now you'll notice
that after I added this canvas panel
to our design view, it added it to our
hierarchy as well. Our canvas panel is going to
be our base component here. We're going to be
adding stuff to it. Let's clear out of
our canvas panel and add our second widget here. And that is going to be an image right here under
the common section. I'm going to simply
drag and drop an image into our designer view. I'm going to place it somewhere
in the upper left here. This little flower
icon, if you will. This is going to show the
anchor point for this widget. So it's going to try to keep this image widget anchor to the upper left portion
of the screen. Now I'm going to go ahead
and rename this right away. And I can do that by selecting right here and pressing two. Alternatively, with this widget selected in the details panel, you could change it
right up at the top. Call this. This is going to
be a little image of Mario. And just a little bit, Let me
add my second widget here. My second widget is going
to be a text widget. Not a rich text, but simply. I'm going to place
it right about here. Once again, I'm going
to rename this, I'm going to rename my
character X widget. This is simply going to be a
multiplication type symbol, so that's why I'm
calling it character x. Then I'm going to go ahead and bring in another text widget. And I'm going to drag and
drop it right about here. I'm not too finicky
about the placement because I'm going to be adjusting that here
in a little bit. And I'm going to be calling
this clicking two on this, my character live widget. Now I'm going to select my first character
image, widget here. And I'm going to go
into the details panel and change something. The first thing I'm
going to change is the exact location of this. I'm going to zoom up
on this by holding down control and using
my scroll wheel. Right mouse button
to pan around. Over in the details panel, I've got my anchor point set
to the upper left anchor. That's what it is by default. So this position x
and y are going to be relative to this anchor point. The position x I'm going to
set here is going to be 24. And the position y is
going to be 24 as well. The positive x direction
is going to be to the right and the positive y direction is going to
be down from that. Okay, next I'm going
to set an image under the appearance
brush image section. I can choose an image by
clicking this drop down. And I've got underscore super. I want to choose this,
Super Mario jumping. Now, you should have imported this texture at the very
beginning of the core. So that's where I
am getting this, obviously put in
whatever image you want. If you're playing
along at home though, I'm going to increase the
size of this image from 32, 32 to be 80, 80. That's going to up
it a little bit. Now you didn't really see
anything change here. However, if I change
this size to content, it is actually going to increase the size of this to adjust
for that image size. Still a little stretch here, you could fine tune
that to your liking. But I'm going to say
good enough for now. Next, for my character
X component here, this text widget, I'm going to change a few
things about this. Firstly, starting
with the X position, I'm going to be changing
this to be one oh two, in the y position to be 60. I'm going to change
the text of this from text block to simply
be a lowercase x. This is going to act as
my multiplication symbol. Press enter on that
to see that change. And then I'm going
to come down to the appearance font section, because I want to change
out the font family. I don't want Roboto here. Instead I want this
new Supermarrio font. And this was a font that we imported early on in the course. That's where you can find that. I included some other fonts within that import
earlier on in the course. So you can change
that out. You can explore some of these
other font types as well. But I like this new Super
Mario font pretty nice. Okay, I'm also going to
change the size of it here. I'm going to change it to be 30, and then I'm going to
add an outline to it. Let me zoom up on this because the outline is a little
bit tough to see. But the outline settings, I'm going to change
that to be two, and I can see a little bit of a black outline around
it that looks very nice. And I'll also click this
size to content box. And what this is going
to do, it's going to change this sort of a selector here to wrap
nicely around it, like so. All right, next I'm
going to choose my character lives component. I could select it
here in my hierarchy, or I can select it here
within my design review. Either way, we'll select
it for the X position. For this, I'm going
to change this to be 130 and the y position, I'm going to change this to 32. What I am going to
do then is change the font family to
the new Super Mario. I'm going to change the size
to be 50, a lot bigger. That's going to
drop it down here. I'm going to add an
outline to this as well. Outline size will
set this to two. Now, instead of this
saying text block, I'm going to change to
a value of 99 for now. Because this is meant to
represent our number of lives, this is just a
placeholder value. Eventually we're going to bind this VS Code to actually have represent how many lives our
character is going to have. Now something else I want
to do here is I want to add a little bit of a
drop shadow to this. I can add a drop shadow
to this by coming under my shadow color setting, under the appearance
section here. I'm going to click this
color bar right here. And I'm going to
change the R value, That is the red value to one. The value, this is the
alpha value to one as well. The value, the alpha value goes 1-00 means you can't see it. One means that it
is fully opaque. Somewhere in between,
like 0.5 would mean something like you can
partially see through it. You could fiddle
with that, but I like this reddish color. Currently, we don't really see anything here because we have to adjust our drop shadow offset. So I'm going to set this
to be four in the X, then five in the Y, and now you can see a little
bit of a drop shadow there. Now this is a nice little touch, we can apply outline to drop shadow by checking this
box. So check this. In doing this, we just added a black outline around
that shadow as well. Now also, in order to wrap this selector here
around our value here, I'm just going to check
this size to content. So it's, whoops, there we go. It's going to adjust it
for the size of our font. And that looks pretty nice. All right, next to take a
little bit of a shortcut, I'm going to select all
three of these widgets. So I'm going to hold
down control select. I've got all three of
them selected here. I'm going to right
click on them. I'm going to copy them all. Then I'm going to
select my canvas panel, and then right click. And then I'm going
to paste them once. And then I'm going to select
my canvas panel again, and I'm going to
paste them twice. Essentially I've got image text. Actually I want to
re order these. I'm going to take my lives here and I'm going to drop this. If you drag and drop it, you can move it on down
like to reorder it. I'm not going to worry
about being perfect with these for now. They're all jumbled up. But we're going to reposition
these in just a little bit here just to re order
all that I've done here. We got that guy, let me
just drag this right there. And I've got one more of these. I'm going to drag
this down like so. Okay, so we've got
two text image two text image two text. Okay, let's go ahead and
start renaming these. And I'm going to start with
this image right here. It's currently off the
side of the Hud here, because this, our canvas
panel represents the screen. Currently, this is
off to the side. I'm going to rename
this hitting two on it instead of
character image. This is going to be coin image for this particular component. I'm going to anchor this in
the upper left, that's fine. But I'm going to change the
position x to this to be 52 and the position y to be 120. Essentially, this is
going to be down a little bit below Mario here. I'm going to change the
image from our Mario jumping to underscore coin. For this, I'm going to use the retro coin because why
not? Something like that. I am going to adjust
the size here to be 50.50 something like that. I say that's pretty good. Next, down below,
instead of character X, just to keep our
names straight here, I'm going to hit two on this. And this is going to
be called coin X. And to adjust the
position of this, going to go with
an x position of 12 and a y position of 124. Because I have the rest of these parameters all
created and set the font, the outline, et cetera, Before I duplicated it, it transferred it
over to this as well. So that's why I set all these settings
before I duplicated it, because in duplicating it, then all of these settings
come along for the ride. Pretty nice, right. Next I'm going to select our character live image,
this duplicated one. I'm going to rename this
instead of character Lives, I'm going to call
this coins value. This is going to
be the number of coins that we are holding. I'm going to change the
position x to be 130, the position Y to be 100. All these settings I'm
going to be happy with, and sure we'll leave that. Instead of 99, let's
change it to zero because by default we are going to start off
with zero coins. All right, our next image here, let's rename this from
character image two, hitting two on that timer image. With this guy selected. I'm going to change
the anchor points. I'm just going to zoom on
out here a little bit. I'm going to change the
anchor in the details panel to be this upper
middle, like so. And then I'm going to
change the position x to be zero and the position y. I'm going to set this
down just a little bit, I don't know, Let's go
24. Something like that. And now you can see because
the position x is zero, it is essentially lining up
with that upper corner there. I'm going to change
the alignment here to be 0.5 in the x. And that's going to essentially split the difference
for where this widget should be located relative
to that anchor point. Obviously, I don't want
this image of Mario. So I'm going to change this
to be underscore timer. Once again, this is
a texture that we imported at the
beginning of the course. It's a sort of clock
looking thing. And I'll change the image
size here to be 100.100 like, so we'll call that pretty good. Next I'm going to select my
character X. Zooming on out. Currently it's way over there. I'm going to change this
to be, you know what? In fact, I'm going to
delete this one out. The reason I'm going to
delete this one out is because I want to have
these parameters, this shading for my
time value as well. So I'm going to take this and I'm going to duplicate that. I can just right click
on it and duplicate it. Control D will do
the same thing. Now I've got two of these.
I'm going to select this one right up here
and rename it right away. Pressing two, this is
going to be called text. I'll just call this my timer
value, something like that. I'm going to change
the position of this to have an anchor of this
upper middle right up there. Now, because I've got that, I'm going to change the x
position to be zero as well. Set that back to zero, the alignment in the x, I'm going to split
the difference, 0.5 so it's going to center
that in the y position. I can click in here and I can drag this up or
down a little bit. I'm just going to set
it right about there. I'll, I'll set a hard value of something like 60,
maybe something like that. We'll go 80 down a
little bit lower. There we go. We can fine
tune that to our liking. Okay, last but not least, we've got this last text which it currently
says Character Lives. We're going to change that
to simply say points, pressing F two on this, changing it to points, I'm going to anchor this
to the upper right. Changing the anchor to
upper right like so. I now need to change
the relative position. The relative exposition is
going to be negative 240. So you can see over here, this is our anchor point. And this is the offset
relative to that anchor point, negative 240 for the position. Why? I'll set that to 32. Setting it down a little bit. Then I am going to simply change the text
here from 99999999, So that's going to
represent our score. So once again, this is
going to be our Hud. Go ahead and save this. Fine tune, this your liking. You don't have to have
this exact layout, but this is the layout
that I'm going to go for. All right, so we've got our
Hud layout created next. We need to actually display
this on the screen. So that's what's to come
next. We'll see you there.
24. HUD Display: Welcome back everyone. In
this video we're going to get our sweet looking hood right
here added to our viewport. So let's get right to it back here in our
main level editor, we're going to be using our BP player controller
blueprint that we created back when we were working on our collectible coin. We're going to be using
this from which to call our widget to be created
and added to our viewport. Let's double click on
this to open it up. If you've forgot the
pathway where this was, that's where you can find it. The reason we're
going to be using this blueprint is because a player controller
blueprint is going to persist whether your
character is alive or not. So this is a great spot to
house this type of code. As you remember earlier on when we were
working on our coin, this is where we're
actually doing the math to add our coins together.
Right up top here. Let's, you should have an
event begin play up here. By default, if you accidentally deleted
it out like I did, you can bring it back
by right clicking and typing in Begin, Play. There's Event, Begin, Play. This event is going to fire off when you fire up the game, what we want to do
is drag out of this and create a widget. And the widget that we
would like to create is our BP hud that we just created. Now, it's not enough
to just create it. We need to take this
return value here, drag out and say
add to Viewport. And this is a function
that's actually going to add our Hud to our screen. I'm going to tap the C key after I left click
and drag around that. And I'll say hud viewport, like I'm going to change the comment color
here to be in black. And then I'll compile
and save just to make sure that my code here is good to go. And
it looks like it is. Now if I jump into play, you can see our Hud is
displayed within our viewport. Now nothing in here works
like if I collect a coin, it's not going to
increment my coin total. If I was to lose a life, nothing is going to
change here as well. But that is to come. Now that we've got
our Hud up on screen, we can actually bind our various values
here, two variables. So that it can actually reflect
how many lives we have, how many coins we
have, et cetera. And we're going to
get started on that in the next video.
See you there.
25. HUD Bindings: All right, now that we've got our Hud showing up in our game, it is time for us to bind some variables to these
various text widgets here. Because right now, these
are all placeholder values. They don't actually
update, they don't change, they don't do any of
that kind of stuff. So let's go ahead and fix that. And for this, we're going
to be doing a little bit of work inside of our BP
Player controller. So if you've forgot
where that is, this is the pathway, double click on
that to open it up. Currently we have two
variables inside of here, a coins variable and a lives variable to hold their respective
data, coins and lives. We're going to create
a couple more here, so I'm going to simply right
click on our lives here. And I'm going to duplicate this. And I'm going to duplicate
this because I want these next two variables
to be integers as well. This one is simply
going to be points. If I hit control D with that variable
already highlighted, that'll duplicate it as well. This one is going to
be called level time. Now if I compile
my blueprint here, I can set default values over in the details
panel for all of these. For level time, I'll set
this to be 500 for points, I'll have that be
zero for lives. Let me actually change it is at three, let's
keep it at three. And coins, we'll have
that at zero as well. Okay, very important here, you must compile this blueprint for this next step to work. So compile and save your
BP player controller here. Our next step is we're
going to be doing some work inside of our BP huts. If you forgot where that is, it's in your platform I folder. All right, going inside of here, we're now going to be
jumping outside of our designer tab
here in the upper right over to the graph tab. Now the graph tab is
where you can add some scripts to your
widget blueprint here. We're going to be
doing something off of event construct here. This is already here by default. Just going to pull this
over. I'm going to left click and drag and delete
these two guys out. You can think of
event construct is the event begin play of
your widget blueprint. And what we're going
to be doing here is off of event construct, we're going to create a
reference to our blueprint. Because our player
controller blueprint holds these variables, we want to be able to access
this variable data inside of our player controller
and point it to our various text widgets
here inside of our Ud. First, we need to
create a reference to our player controller.
How do we do that? Well, if we right click
at some empty space here, we can type in get
player controller. And if we drag off of this, we can do a cast two
BP player controller. So essentially what
we're checking here is, hey, is this the
player controller? Is this the one we're actually
using within our project? And yes, is the one
that we have set up to be used within our
project settings. Just to review that quickly, it maps and modes under
player controller class. This is the Player controller
that our project is using here in our W
BP underscore hood, we're basically asking the
question on begin play here. Is this the player
controller we are using? And if it is, we would like
to create a reference to it. Now the way we can do that is to right click right here on this blueprint and promote
this to a variable. In doing that, we've added a variable over in the
My blueprint panel. I will simply shorten this to be Player Controller. Like so. Then I can left click and drag around all this
script. Hit the C key. I'll call this my create
reference to Player Controller. I'll set the comet color
here to black as well. Now why is this important? Once again, we're
trying to extract this variable data from our BP player controller
back here in our BP Hud. We're going to jump out of
here into our designer view. Now I can select these
various text widgets here, starting with our
lives right here, character lives, that guy. Then over in the details
panel where it shows text 99, we can bind this to a variable. Now if I click on this, I can now find my
player controller. And now I can point to the proper variable that lives inside of our
player controller. For this, I want
to choose lives. Now you're not going
to see it update here, but when we play our game, you will see our lives variable from inside of our player
controller reflected here. Now let's do this
with our various text widgets for our coins. Select your coins value
here in the text area. Let's bind this to our player
controller coins variable. Right up here is going to be our time value selecting that. We're going to bind this to
player controller level time. Then last but not least, right up here in the upper
right I've got my points. Let's come over here to the details panel and we're going to bind this to our player
controller points. All right, make sure you
compile and save this. Now I'm going to play our
game. And here we go. Now look up in the upper left, we now have three
lives, zero coins, 500 for our time, and our score is
currently zero as well. Now I'm going to go ahead
and collect some coins. But before I do this, I wanted to point out that inside of our BP
player controller, we have this script
where we are going to increment how many
coins that we have. We can delete out this now because this was
all placeholder to display how many coins we had on the screen
before we had our hood. So this you can go
ahead and delete out, but through this bit of script, we're going to be incrementing
the amount of coins. And if we get more
than 100 coins, we're going to be incrementing
the amount of lives. So those should update as
we collect some coins. Remember this custom
event inside of our BP player controller
for adding coins. This is being called from
inside of our BP pick up coin when we overlap our sphere
in our coin script. We're going to be calling this ad coins custom event that belongs inside of
our player controller, thus incrementing our coins. And if we get enough coins, we're going to be
incrementing our lives. Let's see that at work.
Clicking Play here. Now I don't have my lives set
up to be incremented yet. If I am hit and I die, however, I did set up some coins ahead of time,
that one is worth one. You saw the increment
in the upper left. This coin is going to
be worth another 13. Now I set up these big
coins ahead of time. These are each worth 50, so I've got 53 coins. This next one that I collect
should put me up to 103, which should wrap
around my coin counter. So now you see I've got
three coins and four lives, because that one was worth
51, is going to be worth 50. So we've got
535-45-5506, et cetera. So you see my lives
is working and my coins are working
our level time and our points don't work yet. But throughout the
course we're going to increment those as well. However, note that
the variables in the player controller
are actually hooked up to those values so that
when we do increment them, they will update as well. Just to show you once
again here in the level, I did create some duplicates of this coin and I made
these bigger ones, selecting one here
in my level editor, I made it in the
details panel worth 50. So that's why those
were worth 50. I also sized them
up a little bit, these smaller ones
I made worth one, just so I could show off the incrementing
of lives as well. All right, well,
there we have it. We now have some hud bindings that I'll do it
all for this one. See you in the next one.
26. Blueprint Function Library: All right, we're going to be
turning our attention now to creating some
interactive blocks. And we're going to be starting
off in a little bit of an interesting spot by creating something known as a
blueprint function library. Now, a blueprint function
library allows us to create general use functions that can be accessed from any blueprint. We're going to be using
that in this case to create a block hit effect
function that we can then call from any of the
various blocks that we create. Also, because this is
good general knowledge to demonstrate here in Un rail. All right, so come down to your content platform
blueprints folder. I'm going to write. Click in some empty space
here and I'm going to create a blueprint blueprint
function library. Go ahead and select that.
We're going to call this our BP underscore
Underscore library. And then I'm going
to double click on this to open
it up right away. All right, inside of here,
it is already prompting me to create a new function. Now I'm going to call
this very first function, Play block interact X. Let's rename that here, Play block interact,
X, short for effects. Then over in the details panel, I want to add some inputs. So I'm going to add 123.4 and I'm going to name
them as follows. This first one is just
going to be called FX, which is going to be
short for sound effect. I'm going to change the
type here in a little bit, but I'll rename
all of them first. This next one is going to
be effects In parentheses, I'm going to put Niagara, because that is the name of the particle system
that Unreal uses. Now in Unreal engine Five, I'm also going to
use another field here called V effect
underscore particle, just to give you access to cascade particle effects
if you so choose. That is the older
particle system. And then this last one, I'm going to put VFX location, the location of our
visual effects. Now we need to set the types associated for each of these. For sound effect, click
on this drop down. I'm looking for a sound base that's going to be the type of input sound base object
reference for Niagara. I'm going to click
on this and in the search bar I'm going
to type in Niagara. Niagara system object reference. Niagara system
object reference for V effect particle.
Click that drop down. I'm going to do search for
system object type di, particle system
object reference. Don't get fooled with the
structure particle system, it's particle system
object reference then effect location, this is simply going
to be a vector x, y, and z location. With that, let's go
ahead and build out the functionality
that we want to have happen when this play block interact effect
function gets called. Off of this execution pin, I'm going to bring in a
play Sound two D node. The sound that I'm
going to want to play is going to be
passed in through here. Then I'm going to drag
off here and type in spawn system at location. This is going to be
our Niagara system, so we need to specify location where this would spawn in so we could plug this
into the location. Then I'm going to drag off in
spawn emitter at location. This is the older
cascade particle system, so I'm just going to
plug this into there. Double click on
this node just to bring in a re route
node like so. And the location can
plug into here as well. I'm going to double click
on that line as well. Okay, so this is going to be our very first function that is going to exist here in
our BP function library. Let's go ahead and
compile and save this. And now we've created
a function that can be used inside
of any blueprint. We will be using
this in a lot of our block blueprints
coming up guys. That'll do it off for this one. See when the next one.
27. Blueprint Interface: In this video, we're
going to create something known as a
blueprint interface. Now again, this is another asset that we're going to
be added to help aid in the upcoming blocks that we're going to be
adding to our level. This is a little bit
of a difficult concept to explain beforehand. So what we're going
to do now is simply create this asset and
then as we go along, we're going to explain
exactly how it works. So we're going to
right click inside of our content platform blueprints
folder, right click. And under the
blueprint category, we're going to choose
blueprint interface. And we're going to call this B I BPI for blueprint interface. Underscore, I'll
call this platform. Then we're going to double click on this asset to open it up. Now all we can do here
is create a function. This is going to be an empty
function that can be called from within other blueprints and customized to our liking. All we need to do here is create a simple function that is named. We're going to name this
particular function it Block. Now once again, there is no functionality to create here inside of a
blueprint interface. You simply create
a named function, in this case hip block. And we get to then
customize this function inside of whatever blueprint
this interface is added to. And we'll do that a
little bit later on here. But we've got this groundwork
done and out of the way, make sure you compile
this and save guys. That's all we wanted
to do in this video. A little bit more
prep work to go in the next few videos, but
we'll see you there.
28. Points Display Widget BP: Welcome back. In this video, our goal is to create a
widget blueprint that will be used to display a point
amount in a game when we, for example, interact
with a block. So a little bit more
prep work to do here, but it will pay off
dividends in the long run. So we're going to
get all this stuff done ahead of time so that we don't have to go back and redo a whole bunch of things. Later on, we're going to
be creating this asset inside of our platform I folder. We're going to right
click in some empty space under user interface. We're going to come
under Widget, blueprint. And we're going to choose this user Widget as our parent class. And we're going to rename
this BP Underscore Points. Okay, then let's go ahead double click on
this to open it up. And we're just going
to add a couple of widgets here in our designer view over in the palette area. The first one we're
going to be searching for is an overlay. And we can either drag
and drop it down here in our hierarchy or right
here in our design view. Then what we're going to
add on top of this is a simple text widget. Go ahead and drag and drop this down on top of the overlay. With this set up,
our text widget is simply attached to
our overlay widget. We're simply using
the overlay widget as something to
attach our text to. Now let's go ahead and customize some of the details
for our text widget. Here, I'm checking
out my notes here. What I'm going to
do is I'm going to change the text widget to simply read text
underscore points, just giving it a new name. I am going to check this
box for is variable, meaning that we can update this actual value in the future. As for the alignment for this, I'm going to set the horizontal
and vertical alignments to be right smack dab in
the middle of this overlay. So I'll change the text here from text
block to be points. Even though this is
just a placeholder we're going to be updating this. We will change the font family here to be our Super Mario font. New Super Mario font. I'm going to change the
size here to be 50. I will have an outline
size of two as well. And then let's go ahead and
compile and save this widget. All right guys, that's all we wanted to
accomplish for this. One more work to do here, but we've got a good
starting point for displaying some points
within our game as well.
29. Points Display Widget Anim: Welcome. In this video, our goal is to
create an animation. So that when our points widget, blueprint here is
spawned into the game, it'll animate into existence in a cool eye catching fashion. The idea being that when we interact with one of the blocks that we're
going to create, this is going to
sort of float up and display however many points
we make a block worth. All right, to
create an animation here inside of our
widget blueprint. And if you've forgot
where that is, it is currently located
in this folder. Bp points is what we call it. We need to bring on
the animation window. Where can we find this window? At the top of our
interface here window, we can find animations
right here. Click that on. So in
this animation window, we need to create
a named animation. And then set some key
frames along this timeline. So let's create our
first named animation. So clicking on this
plus animation button, I'm going to call this
Points Underscore animation. And then with this
animation selected, go ahead and click on it. We need to add a track. So we can add a
track by clicking this plus Track button right here in this little
fly out menu. We've got all named widgets. And what we want to animate
is our text points, not the overlay slot. The text points right here. So go ahead and click on that. Next what we want to do is click on this Plus button right
here for plus track. It's going to bring on
this little fly on menu. And we want to add
a transform track. Click on this, it's going to bring on this set of options. I'm going to click
on this drop down triangle Transform
consists of translation, rotation, scale, and shear parameters that
we can possibly alter. What we want to do here is
change the translation. So I'm going to click this open. We're going to make
this float up. We're also going to change the scale of this
text over time. We want this to not only float up when it is spawn
into existence, but also to scale up as well. Okay, now that we've
got these revealed, we can add some key frames
to our timeline here. Now, key frames
allow us to specify a given value at a
given point in time. First of all, down
your timeline here, if you hold down the
right mouse button, you can pan your time
line back and forth. If you hold down the control key and use your mouse wheel, you can stretch or squish it. This green line represents the beginning of your timeline. This red line
represents the end. And you've got this
little time scrubber here to drag back and forth. Now if you put your mouse
cursor right about here, you can see you've got these
two kind of collapse bars. This is where you can
specify the beginning and end of your timeline here. So I'm just going to
drag this one out to the right and I'm going
to drag it out to about, and you can see in the blue
there, how many seconds? I'm going to go about 0.95 seconds and I'm going
to zoom on up here. And you can see
right away that it sets some key frames right here, these red dots represent
some key frames. I want to manually set these. Just to show you this
process, I'm going to left click and drag right about here. And then I'm going to delete
those to get rid of them. Those red dots represent times and values for given
properties here. Okay, so the first
thing I want to alter here is my y translation. That's the up and down of this points value
to add a key frame. Firstly, I'm going to take my timeline scrubber here and put it in the appropriate spot. I'm going to start off at
the zero second mark and I'm going to be altering this Y
property, the up and down. So to add a keyframe here, I can click on this plus button. Tiny plus button right there. And with that I can
specify a value. I've got my timeline
scrubber right over it. It is set to zero right now. But I could also right click on this and set the property. There's my time
zero, my value zero. So I could set it
that way as well. A value associated with
the time for this. I want the time and the
value to both be zero, okay? And I'm going to work
in this fashion. I'm going to drag
my time line slider out now to 0.2 seconds. I'm going to add another key
frame for the translation y. Clicking on this
tiny plus button here, I can specify a value
either by plugging it in here or I can write. Click on this and
go to Properties. And I'm going to set
the value for this to be negative 200. And then press Enter.
You're going to see this immediately move
the word points up. Okay, Next I'm going to take
my time line slider here, and I'm going to slide it over 2.45 And I'm going
to add another key. If I right click on this, I can see the time is set to 2.45 and the value is
set to negative 200. I'm actually going to drop this down just a little bit
from negative 200. I'll go something
like maybe negative 150 so we can get this effect. And you can see when
I drag this over, it's going to pop it up and
then bring it back down. Maybe I'll alter this over time. If I click my Play button here, I can get an idea as to how this is going to
play out over time. Something like that. Pop on up, so you can obviously customize
that to your liking. Okay, next I'm going to adjust the scale of
our points here. So I'm going to click on
my timeline slider again. I'm going to drag
this all the way back to the zero second mark. Now I want to adjust the scale, x and y both evenly. Instead of clicking on
both the plus button here for the x and the y. If I click the plus button, right on the scale
line right there, I will add keys to both
the x and y values. For both of these. I'm going
to start out with a value, and I'm just right
clicking here. A time of zero and
the value of zero, essentially it's going
to be infinitely small. We can't see it. And
I'll do that for both of these here, right click. Set that value to
zero here as well. Then I'm going to move my
time line slider over to the 0.2 second mark right
here on the scale line. I'm going to click
this plus button. If I highlight both
of these values, I just left click and dragged
around both of these. I'm going to right click.
And unfortunately, I can't set the value for
both of these at a time. I thought I might
be able to there. Unfortunately, I'm
going to have to right click on each
of these properties. For this the value
is going to be 1.5 So I'm going to
set the text to be 1.5 times as large right
click properties 1.5 And you can see
that when I set this to 1.5 it shows that value of
1.5 right here as well. Okay, moving along, I'm
going to adjust my timeline. Slider out to the 0.45 seconds
mark on the scale line. Here I'm going to click on
this tiny, tiny plus button. It's going to add key
frames for the X, Y. For this, I'm going to
set the property to be 11 for the y value as well. Next I'm going to drag
out my time line to the 0.85 second line scale. Clicking this plus button
to add key frames, markers in our time line
for the 0.85 second mark. If I write, click
on each of these, the property is
currently set to one, which is what I want it. Then last but not least, I'm going to drag out my
time line slider here to the 0.95 the end of
our timeline Here. I'm going to click
on this scale again. It's going to add key frames for the X and Y. I'm going to write, click on my X key here. I'm going to set the
property to zero, the value of zero time
0.95 and here we're going to set that property
value to zero as well. So now if I was to play this, you're going to see it's going to have this
kind of effect. We're going to float
up, kind of blare out and then sink down and go
away. All right, cool. Now we've created a widget
animation that can be called, that is told to play
whenever we tell it to play. And hint, hint, wake, wink. We are going to tell
this to play when we interact with a block and we earn some points
with this all done, let's go ahead and
compile and save guys. That's gonna do it
off for this one. See you in the next one.
30. Points Display Actor Class BP: Welcome back everyone. In this video we
are going to create an actor class
blueprint that will spawn into the game whenever we interact with
one of our blocks. That in turn is going to
tell this widget blueprint, our points here to
show in the game. And we're also going to call our points animation
to play as well. To facilitate all this, we
need an actor blueprint. Okay, let's go ahead, jump back to our main level editor here. We're going to be creating
this asset inside of our platform blueprint folder over here in some empty space. Go ahead and right
click Blueprint class. We're going to choose
an actor class because this is going to
be spawned into the game. And we're going to call
this BP Underscore Points. Not to be confused with Widget. Blueprint Underscore Points. Okay, go ahead and
double click on this. To open it up, we
just need to add a single component here
in the components panel. Click Add. We're going to
add a widget component. Not widget interaction,
but simply a widget. I'll keep that name of widget With this component selected. Over in the details panel, we can specify a widget class. And here in this dropdown, we can choose our W P points. Go ahead and select
that. You'll note right away in our viewport, it shows that the text
points once again, we're going to be changing
this text dynamically. How many points would
we like to add? Well, we're going to
add a variable for that in the my blueprint panel under
the Variable section. Click this plus button. We're going to call this to Add. We're going to make
this an integer. We can change it here or
in the details panel, variable type, I'll change it to simply an integer
with this selected. I'm going to go ahead
and compile right away. I'm going to go over
in the details panel. I'll make this
instance editable. And I will also check
this expose on spawn. This will make it so that when this given actor is
spawned into the game, that we will be able to have
this particular variable exposed and easy for us to change to make
it easily editable. So we need both of these
check boxes checked. We will leave the default
value here set to zero. Okay. Next we're going
to add some scripts, and for this we're going to
go inside of our event graph. We want to do something
off of event begin play, which already exists out here. So let's go ahead and
left click and drag. Get rid of these two guys. Here's event begin Play. If you accidentally delete this, you can hold down the key
and left click to get it, or right click and do a search for event begin.
Play. You'll find it. We're going to want to bring in our widget component here. Let's left click
and drag this in. The reason we're going to want to bring this
in is because we want to see if this widget is, in fact our P points. To do this we're going
to drag out of here, type in cast two BP. In fact, we can't
cast to it just yet. I need to drag out of
here and get the widget. Get widget. We're
essentially saying, we want to get
this widget class. If I type in get widget, widget, we already bring
in another copy of that. We only need this out of our widget you drag out of
here, type in get widget. You want this node right here. So that we can then drag
out of here and do a cast. Two BP points. Now this whole set up is
necessary in order for us to extract some information from
our widget blueprint here. By casting to it, we're
going to be able to specifically call for our
points animation here to play. In fact, that's going to
be our next step here. So go back into your BP points. We're going to drag out
of our BP points and type in points animation. We want to get points animation. That's that animation
that we just created. The reason we're getting
this is because we are going to drag
out of here and type in play animation.
Play animation. And in doing this, it's
going to plug this in as the animation
that we want to play. Now for the target, we want this to be our widget,
blueprint point. We'll plug that into the target. This note is cool right here. This play animation?
No, because we can specify not only the
number of loops, which in this case we just
wanted to play one time. We can also specify the
play mode, forward, reverse, or ping pong, as
well as the playback speed. So if you're not happy
with your animation speed, you can adjust it
right here as well. I'm going to leave
these all unchanged. Okay, Next I want to customize the actual point value that
is displayed right now. All I've got is this text
Points that says points. So I want to be able to adjust the actual text value associated with this over
here in the details panel. So how can we do that? Well,
here in our BP points. We can drag out of our
cast two BP points and do a search for points. We want to get our text points. This is specifically talking to this text widget right here. With this, we want to alter our text contents by dragging out of here I
can type in set text. I want to set text. We, we're essentially
saying here is we want to alter this text value associated
with this text widget. I'm just going to
zoom out here a little bit by holding
down control. We'll tuck this in like, so I'm going to bring this
out over here like this. I double click on this to
bring in a reroute node. Like the actual
text that I want to display here is going to be determined by
this points to add. If I bring in this into our
graph, I'm going to get it. I can try plugging this
integer into this text. It's going to convert it
from an integer into text. It'll bring in that guy as
well when you try to do that. Now it'll display zero
instead of points. Now something else
we want to do here, scooching over a little
bit to the side here, is we want to destroy this actor after we
spawn it into the game. A real easy way that we can
determine when to destroy this is to determine when is
the end of our animation. Once our animation is finished, let's go ahead and destroy it. What I can do here
is drag out of my points animation like so. Type in get end time, that'll give us the
end time in seconds. Then I can drag out of
here and plug this into a delay node flow control delay. Just going to keep this
flow of execution down this white wire going
from this setting of text down into
our delay node. And once this is complete, we are then going to right
click destroy actor. The target here is self
meaning this BP points. Remember, this BP
points is going to destroy this
display right here. Now I know this says
points right here, but when we spawn
this into the game, what it's going
to do is actually display our points
to add right here. Currently it's zero, but we're going to be
able to change this dynamically when we tell this BP's points to
spawn into our game. With this all done, let's go ahead and compile
and save again. Once we tell this to
spawn into our game, when we interact with the block, we're going to find out is this our WBP points that
we are dealing with. It is in fact going to be the one that
we are dealing with. The reason we are casting
to it is so that we can extract the points
animation that we created. Tell it to play also to modify the text that is
contained within it, we're going to alter it, that text to be the number
of points to add. Then after our points animation
has finished playing, we're going to get the time
which is 0.95 seconds. We're going to delay
by that amount before we destroy the actor. We're going to wait
almost a second before we destroy this point's display. And this is all going
to come together very nicely in just a
short amount of time. Here guys, that's gonna
do it all for this one. See you in the next one.
31. Add Points Function: All right, so we've got several points related things
all put together in preparation for putting our blocks together and
scoring some points. However, there's one key
thing we are still missing, and that is actually
adding points together when we actually
score some points. Currently, we've got
our points variable. It's currently bound to this text widget
here in our WBPud. This variable exists inside
of our player controller. So we're going to
dive into there next. Going back to our
main level editor, let's double click on
our player controller. Inside of here, we are doing a little addition to
add up our coins, but we are not adding
up points at all yet. Currently it's just a variable that's hanging out here and this variable is bound
inside of our WBP Hud. Let's go ahead and do
a little math here. Right click in some empty space, we're going to seek
out a custom event. We're going to call
this simply Add Points. With this custom event selected.
Let me just zoom on up. Holding down control and zooming in Over in the details panel, I'm going to add one input. Clicking on this plus button, I will call this points
two points to add, not just points,
two points to add, we will make it an integer and our math here is going
to be super simple. We're eventually going
to feed this some points and it's
going to output it here whenever this
customer event is called. And we're going to add
this dragging out, clicking on the Add button to our current amount of points, Drag and drop this on here. And then we're going to set
this as our new points value. Simply drag and drop your
points on this output, that'll bring in a setter. And there you go.
This is going to be critical for our
blocks moving forward. So make sure you
compile and save. You can left click and
drag around all this. We'll call this our ad points
script color this black. And guys that is going to
do it all for this one. Compiling and saving.
One more time. We will see you in
the next video.
32. Block Base: Welcome. Now, as you know
from past Mario games, there are a variety of
interactive blocks within them. We're going to start creating our blocks starting
with a base block. Now this is going to
be a parent block of sorts where we put together
all the base components, variables, scripts, et cetera. And then we're going to create child blocks from
this parent base. So this is going to be
kind of the groundwork to set us up for all of the other blocks that are
to come they're going to inherit from this parent
that we're about to create. Now before we get started
with all of this, make sure that you have
imported these textures and these audio files from way earlier at the very
start of the course, because we are
going to be making use of them throughout
this video. Now to get started
here, I'm going to come into my platform textures folder and I'm going
to make materials out of three different
textures Here. We've got our block use. I'm going to use
this question block, although I've got a couple of varieties here that
you can choose from. But it doesn't matter
which one you choose, I'm going to choose this block, question one, and then I'm going to choose this
block breakable. So I'm just holding
down control. So I have all three
of these selected. Then I'm going to right click on any of those that
I have selected, and I'm going to create a
material out of each of those. Okay, so now it added
three separate materials, 12.3 and just to organize these, I'm going to drag all three of these into my materials
folder, like so. I'm going to move them
here. Let me just jump into my Materials folder
after this is completed, just to make sure that they are there and it looks like they are 12.3 Next we are going
to create a blueprint. So go into your platformer
blueprint folder, we're going to write. Click in some empty
space blueprint class. This is going to
be an actor class blueprint for the name. We'll go with BP
underscore block. Underscore base. Then let's double click
on this guy to open it up in the components
panel at the very top, we're going to add a component. We're going to add
a cube component. I will leave this
name as cube with this component selected
over in the details panel, I'm going to slot
in our material. I'm going to type
in the word block. I've got my block breakable, that's going to be my
default material here. Next we're going to come to my blueprint panel and
create some variables. Once again, because this is
going to be our base block, our child blocks that are
going to inherit from this parent are going to inherit
these variables as well. I'm going to click right here. The first variable that we're
going to add is going to be called Finished interacting. I'd like to put a question
mark at the end of a bullion variable.
That will be a bullion. Second one I'm going to
create here is going to be called coins to add, this will be an integer. Next one, I'm going to add that, I'll right click and duplicate
is going to be points. Next one, clicking on the plus button is
going to be called Interact X. I'm going to put
in parentheses, Niagara. I'm going to change the type
here to be a Niagara system. Niagara system object
reference. Licking. Another variable on
this is going to be interact x and in parentheses, this is going to
be particle again. Niagara is the newer
particle system, but we're going to be
able to choose between the newer and older
particle system just to give you some
flexibility here. Under the type we're going
to choose particle system, it's particle system
object reference under the object types there. Next we are going to add
Interact X, that's sound effect. For this one, it's going
to be a sound base, sound based object reference. This top one here, The
last but not least, we're going to click on
this and this is going to be called Interact Material. This type is going to be simply coming under the
object types category. Object reference.
Okay, then let's compile this right away and
give us some default values. Click on Compile
at the very top. Here our finish interacting, we can leave that as false. That's perfectly fine
for our coins to add. This is how many coins
we would like to add. At all for interacting
with this block. I'm going to make this
instance editable so that we can change this per
instance of a block. Should we choose, I will
leave this as zero now. You know what? I'll
set it to one for now. But of course we can
update that as we want point, I'll select that. We're going to make this
instance edible as well. Meaning we can update this when a block that inherits from this parent is
placed in our level. I'll set the points
to be ten by default. For Interact V effects
the Niagara particle, I'm going to choose
simple explosion. For the Interact V
effect particle, I'm going to breakable
underscore pot. This comes from that infinity blade effects pack that I added. Now again, you can choose
anything you want for these. This is just what I'm
choosing to go with. This is just the default
for the Interact. I'm going to make
the Interact x a coin last but not least
for our Interact material. I'm going to have this be my block used so
that we interact. This block for some of them
that are not breakable, we're going to swap to
that given material. All right, with all that done, we're going to go over to our event graph
and we're going to add a little bit of script. First thing we're going
to do here is delete out these two nodes
off of our event. Begin play. We're going to right click in
some empty space. We're going to type in
get player controller. Then we're going to cast this
to our player controller. Cast to Player controller, our BP Player controller. We're going to have this set up right clicking on this pin, promoting this to a variable. We're going to create a reference to our
Player controller. And I'm just going to
shorten the name to player Controller because
we want our child blocks, the blocks that are eventually
going to inherit from this base block to have a reference to
our player controller. Left click drag. I'll call this to
player Controller. Remember our player
controller blueprint is the powerhouse blueprint
that we're using to do things like add
coins together. That'll be important
down the road here. All right, next what
we want to do is detect when our block is hit. So essentially what we
want to do is detect when our block is hit from
the underside here, Okay, with our cube
component selected. Just going to right
click and go to some empty space here. Going to right click at
event for component hit. Now off of the other actor, we can bring in an equal symbol. And we're going to
check to see if the other actor is equal to O. And you've seen me
do this before. Get player character. If it is our player character
that hits this block, we're going to do some stuff. But what we need to
do is also detect how in what fashion
hit this cube. We only want something to truly happen when we hit the
underside of this block. Now thankfully, when
we hit this cube, we can extract some information about that hit right
out of this pin. So if I drag out here, I can type in break,
hit Result like so. This node will allow us to extract some
information from it. Clicking on this
down arrow here, we can see all the
information it contains. In particular, we are
interested in this impact normal output I'm going to drag out of this and type
in break vector. Essentially, this is going
to allow us to detect in what direction we
hit this brick. We want to find out
if the z direction, the up and down
direction is equal to now an impact of value
one in the z direction. We're essentially
checking to see did we hit this
from the underside. Negative one would
be the top side, positive one off the
impact normal here. This flat surface is going to detect if we hit it
from the underside. We want to find out if both
of these things are true. If it was a player
character that hit this cube and if we hit it
from the underside direction. Since we want to find out
if both of them are true, drag out of either one
of these red pins. Type in the word and we're
going to bring in an Boolean. We want to find out if
this and this are true. If they are both true, we're
going to plug this into a branch node like so. If they are both true, what we want to
do is we want to, backing up here inside of
our blueprint interface, we want to call this
function hit block. It's only called hit block. If I drag out of the
true branch here, I'm going to type in hit block and you see this
hit block message. Now if you click on this, that I'll bring in
this node that's got this little envelope icon
for the target here. You can just drag
backwards and type in self because the target
is going to be ourself. We want to get a
reference to ourself, and this is going to be
our hit block script. Now what we're going
to be doing here as well is we want to add
this BPI platform, this blueprint interface
to this blueprint. To do that, we're
going to come under class settings and over in
the right hand section here, we've got a section for interfaces implemented
interfaces. And this is where we can
add our BP I platform. Now this is going
to be important because we want our blocks that inherit from this
base to have this as well. Now the magic of this set up will become apparent
as we create some child blocks from
this BP block base. In our child blocks,
we're only going to need to call a hit block event. And then we can do things
specific to those blocks, thus avoiding having to rinse and repeat this section
of code right here. All right, with
all of this done, let's go ahead and
compile and save guys. That's going to do
it off for this one. We will see you in the next one.
33. Block Breakable: Welcome, In this video
our goal is to create a child block that inherits the base functionality
of our parents, our BP block base here. We'll then customize
our child block to break upon being hit. Now before we get started
with any of this, I'm going to create
another folder inside of our content browser. Here, specifically for bricks. And I'm going to do this
within the blueprints folder, right, clicking on
blueprints over here. I'm going to do new folder and I'm going to simply
call this blocks. And then right away I'm
going to click back in my blueprints folder
and I'm going to drag this block base into
my blocks folder. And if you drop it
on here, you can move it right in there like so. Okay, so now I am
in this directory, my blocks folder, I'm going to create a child of
this base block. And we can do that
by right clicking Create a Child blueprint class. It's going to prompt
us to give this name. So I'll call this BP block
underscore Breakable. This is going to be
a breakable block. All right, let's go ahead and double click on
this to open it up. A lot of things are going to be coming together in this video. Now, for starters,
I want to point out how things have
been inherited. In the upper right, we can see our parent class
is BP block base. Over in the components panel, we can see that we have
inherited this cube component. If I go into class settings, I can see that we have
inherited our BPI platform, our blueprint
interface platform. And over here on
the left hand side the my blueprint panel. We can see inside of our
blueprint interface, we have this hit block function. Now just to circle back
here, my blueprint folder. Here's my BPI platform in which we have that
function called hit block. I also want to point out
that we have inherited our variables that we set up within our parent block here. Now if you don't see
these down here, if you click on this gear icon, you've got this checkbox for
showing inherited variables. If it's off, you're
not going to see the inherited variables
with it on, you will see. Let me expand out the
variables category once again. Those variables that we have set up within our parents,
our base block. And the reason we
wanted to do that is because we have these
defaults, if you will. But we can customize
these for the children. And in particular, one of the things I know
we're going to want to adjust for this block breakable
is our sound effect here. By default we have this Interact sound effect that's set up as a variable and our value in here is currently
a coin sound effect. For this, I'm going to
want to change it to a breakable, a brick break. So let's change it to the
brick break Sound right away. Okay, now let's jump
over to our event graph. And we're going to
add some script to customize what we want to have happen when we
interact with this block. So I'm going to jump over
to our event graph here. Now you can see we've got
this event begin play. And it's linked to
parent begin play. Now this is worth noting here, because if I go to our
BP block base here, and I can navigate to where this is in the content browser, or I can open the parent. Let's open the parent.
Here's the parent, our BP block base. We're basically
ensuring that upon beginning play here
in our breakable, that all of this code is coming along for
the ride as well. All right, back here in our BP block breakable,
this is good. We're going to leave
this all. I'm just going to left click and drag, and we're going to
delete this out. Now what I want to do
is I want to bring in an event for our hit
block, our interface here. So if I right click in
some empty space and type in hit block, I can add an event for
hitting the block. Now this event is going to trigger when our block
is interacted with. Now remember our BP block base contains all of the script
for when we interact. We hit the bottom
side of this cube. We ended off this
interaction script with calling for this hit block. Now once we reach this
point in our script, it is going to tell this
hit block event here in our child to fire off and then make some
customized script occur. So we don't have
to repeat all of this script here that is already done for
us in the parent. This call here is
good enough to then pass this functionality
along here in our child. Okay, what do we want
to do off of this? Well, we want several things to happen when we hit this block. And because we want
several things to happen, I'm going to bring
in a sequence note. Now, sequence note is
just really useful for organizing several things that we'd like to have happen. We'd like to have something
happen here, then here. And then in fact,
we're going to add a third pin by clicking here. So we're going to have three
distinct things happening. This is a really nice, neat and orderly way to
make this happen. Okay? The first thing I'd
like to do here is to play some block
interact effects. And if you remember back
here in our content browser, we created this BP
function library. And inside of here, we set up this function for playing the block
interact effects. This is going to come
into play right now here, inside of our BP
block breakable. If we click, we can search for play block interact effects, and we can see that
this function lives in our BP function library. We can now access that in here
inside of this blueprint. Now all we have to do
is plug in what kind of sound and visual effects
we want to have play. This is going to
be fairly simple. We're just going to
plug this N zero into our play block
Interact Effects. I'm going to double click on this wire to bring in a
little bit of a reroute. Note for organizational purposes now we can slot in
our sound effect, our Interact sound effect which
is currently brick break, drag and drop it right on this sound effect pin
for our visual effect. Again, I'm giving you
two options here. The newer Niagara
Particle effect system or the older particle
effect system. For this, I'm going to bring in my older Interact VX particle. It's this breakable pot. I'm just going to plug
this right into there. Note that this is an either or. That's the way this is
intended to be set up. You could do both, but just go with one for the VFX location. What I'm going to do is I'm
going to right click and type in get actor location. The target here is
self meaning wherever this BP block breakable
is located in the world. Now I'm going to offset
this a little bit. I could play this at the
center point of this block, but where I want to
spawn this is actually a little bit above in the z axis. So I'm going to
drag out of here, put in a plus symbol. I'm going to bring in
an ad operator here. And I'm simply going to
add 50 in the z axis, just to spawn this
up a little bit above the exact
location of this block, breakable through
trial and error. I learned that that
is pretty good. Okay, I'm just going
to scooch this bit of script up
here a little bit. I'll move this parent up
here a little bit like so. And that's going to be our
first bit of script here, playing this block interact X. Okay, the next thing
I want to do is spawn in our BP points. We want to spawn in
some points and also add some points by
spawning in some points. We set up this B P
points actor right here. We want to spawn
this into the game, have this display the
proper amount of points. This act, BP points
is what we're aiming to spawn in here in our
BP block breakable. The way we can do this
is drag off of this. Then one pin we will
spawn actor from class. This is a node that
we want to bring in. Here is where we can spawn under class BP underscore points. Now we have to give
a spawn transform as in where we want
this to spawn in. If we click we can say
get actor transform. Transform consists of location, rotation, and scale data. Our target here is self meaning
this BP block breakable. We're getting the
location and scale and rotation of this
particular block. That's where we're
going to spawn it in, in this node we've got
this points to add input. The reason that this
exists is because here in our BP points that we set up, we created this variable
called points to add Over in the details panel, we said expose on spawn
by checking this box, making this instance edible. Expose on spawn, checking
these two boxes. This is made it so that when we are trying to spawn this actor, this variable is made
available to us. And we can customize
it from here inside of our BP
block breakable. So here's what we can do. We can plug in our points
into our points to add and we can determine how many points we
want this to be when we break this block apart, I'll leave this
at ten right now. Okay, next. What we also
want to do is we want to bring a reference to
our player controller. And we have a reference to our player controller
because that was inherited here in our list
of inherited variables. Player controller, we're
going to drag that in. We're going to get it
and then we're going to drag off of this and we're going to type in add points. Now I'm going to open up
our player controller here in just a little bit. You are only going to
find this add points if you drag out of your
player controller reference. Back in our BP
Player controller, we created this custom
event called add points. The reason that we
were able to call this add points is because this all existed in
our player controller. When we're calling this in our BP block breakable,
we're saying hey, player controller fire
off that custom event add points so that we can
add however many points. We feed this to our
current amount of points and then set this
as our new points amount. Remember, this points
variable here, inside of our player controller, is bound to our hud
here in our ud, our points variable in our player controller
is bound here, so it's going to reflect
that here in our hud. Pretty sweet. And see how
this is all coming together. Of course, we need to tell us how many points we want to add because this is going to be fed through that custom events. So if I double click on this Add points right
here, our points to add, it's going to flow through here, through here, and add it to our current existing
amount of points. So that's why we
added this input, our points to add so that
here in our block breakable, we can plug in how many
points we would like to add. And we're just going to drag and drop our points
on top of this. Now I could have just drug out of here and
plug that in here as well. It doesn't matter if
you have multiples of these variable getters or if you drag them out
of the same one, it's going to do the same thing. Okay, so now we're playing
some interact effects. We are spawning a
points display, as well as actually adding the
amount of points together. The last thing we need to do is simply to destroy this actor. So if I drag off of my then two, I can type in destroy actor. And we want to make sure that this is the last
thing that we do. So that when we hit this block, we're going to play the effects, we're going to spawn
in our points display and actually add some
points together. This has to be the
last thing that we do, because if we made this the
first thing that we did, none of this other
stuff would happen. Okay, there is our
finalized script, so let's go ahead and
compile and save it. And it looks like our script
is all good to go next. Let's just drag and drop a breakable block
into our level here, somewhere near my players start. Just for testing purposes, I've got my two D snap settings on to the
main level here, so let's find our blocks. I'm just going to
drag this in like, so I'll bring in a couple
instances like so. And let's jump in and play. Now I could see my
points display there was actually displaying in a
non camera facing way. What I can do here
is jump into my B P points and select my
widget component here. I'm just going to rotate this so that it is facing the camera. Currently, it's
displaying like that. So all I need to do here
is simply rotate it. I'm just going to
press the Spacebar. Rotate. Actually, let me set my increments on my
snap settings here. We're going to rotate this face the camera. I'm
going to save that. And now if I jump in and play and I interact
with those blocks, I got to watch out for
that fire bar there. I can destroy that block. I see the points actually being displayed in the upper right. You can see in the
Hud that because each of those blocks were
worth ten points each, I now have 20 total points. So everything seems to
be working as design. All right guys, that's going
to do it all for this one. We will see you in the next one.
34. Block Coin: All right, so here's the deal. As you can see from this
classic Mario footage, Mario is interacting
with various blocks. And with some of the blocks
he's interacting with, like the one right now, a coin is spawning up out of it. Now our goal in this video is to create an actor
class blueprint of a block coin that's
going to spawn out of various blocks when
Mario interacts with it. Okay, to get started
here, back in our editor, I'm going to do this in the content platform
blueprint block folder. I'm going to write click
New Blueprint class. This is going to be an actor
class because we're going to be spawning this
into the game. And I'm going to call this BP underscore block score coin. No, again, this is going to be different from our coin pick up. Let me press Enter here in
that this is going to be one that spawns into the world
and it's going to do the, the spinny thing when we
interact with various blocks. Let's double click
on this right away. To open it up in the
components panel, we're just going to
add one component. It's going to be a static mesh. I will call this coin over
in the details panel. Got several things
I want to set. The first is a static mesh. I'm going to set this
to be a cylinder. I'm going to choose this
cylinder right here. I'm also going to rotate
it on its side right away, so I'm going to set the
rotation to B. I've got some settings picked out
ahead of time, negative 70. The y is going to
be negative 90, the z is going to
be negative 20. For the scale, I'm going
to set this to be 0.750 0.75 and then 0.07
something really thin. And because I had my
scale lock settings on, whenever I change one
of those parameters, it changes all of them. So if I unlock it, I can
set these all individually. So that was 0.75 in the x
and 0.75 in the y. I do want 0.75 in the z to make it nice and skinny
there in the z direction. All right, also what
I want to do is set a material right here. I'm going to type in coin. I'll set this to the
newer coin material, although it doesn't really
matter too much which one I choose down in
the collision section, I'm going to change
my collision preset here to be no collision
because I want to ensure that there's no chance that anybody can collide with this like an enemy that
we create down the road. Al right, with all of that done, let's move along into
our event graph. And we're going to create
in some empty space here. Right, click a timeline. Timeline. Because there are several things that we
want to change over time. So I'm going to add a timeline. I will call this my coin, An time line holding
down control, mouse wheeling up
to zoom up on this. I'm going to double
click on this to open it up in our time line
tab right here, I'm going to add two
tracks right away. Clicking on track, I'm
going to press it one time. We're going to add
a float track. And I'm going to call
this first one movement. This is going to determine the movement of our
coin over time. Then I'm going to add another
track here, a float track. And this one is going to
be called rotation because we're going to want to rotate our coin over time.
How much time? Well, we're going to
set our timeline length here to be 0.4 seconds. All right, and now working
in our movement time line, first I'm going to
right click and kind of pan this
over to the middle, Zoom up a little bit
using my scroll wheel, I'm going to hold down
the shift key and I'm going to click
three times 123. Now, it doesn't really
matter where I click, because I'm going
to manually set a time in a value
for each of these, or this last keyframe that
I've got selected right here, I'm going to set the time
to 0.4 and the value 2200 or now you can see it
jumped it off the screen here. That's fine. For this next one, I'm going to set the time to be 0.25 and the value to be 300. And for this very
first key frame, I'm going to set the time to be zero and the
value to be zero. Now if I was to click on
my arrows right here, Zoo Line out a little bit. I can highlight all of these keyframes by left
clicking and dragging. And what I want to do is with
all of them highlighted, I'm going to right click on any of them. They're
all highlighted. When they're blue, I'm
going to right click on it. And I'm going to set the
key interpolation to auto. What this is going to
do is it's going to smooth out this
curved line here. Instead of this being a
straight line, straight line, it's going to make it a
smooth curvy line like so. Now with all these highlighted, I'm going to click on
the arrows once again. And you can see that curve a
little bit more accurately. Now, this curve is
meant to change a float value over time to determine the
movement of our coin. So essentially going from
its starting position up into the air and then
back down a little bit. Okay, next we're going to alter our rotation settings because we want this coin
when it spawns in. Not only to just go up in the air and then drop
back down a little bit, but also to spin around as well. For this, we're going to
need just two keyframes. So I'm going to hold down the shift key and left
click this first one I'm going to set to a time of
zero and a value of zero. And then I'm just going to
right click anywhere in here, we're going to add another key, That's another way you can
add a keyframe for this one, I'm going to set the time to be 0.4 essentially the end
of our timeline here. And the value hitting tab jumping over to that
value field I'm going to set to be 720,
essentially two spins. I'm going to click
these arrows here to bring each of these
key frames into view. I'm fine with a
straight line here. I don't need to
curve this at all. My coin is going to
be moving up into the air and then dropping
back down a little bit. And then it's also going to
be doing two full rotations, 720 degrees over the course
of 0.4 seconds here. All right, now let's jump
back to our event graph here, out of our coin timeline. And you can see we now have two output pins to float
values from our float tracks. So this will be
outputting the value of each float over time. It's going to be
changing over 0.4 seconds for movement
and rotation. We need to back up
here a little bit. And we're going to
bring our event begin. Play towards the
front of this graph. This node should have
existed when you first created this blueprint. If it doesn't, you
can right click and do a search for event Begin. Play. What we're going to do off of Event Begin Play is we're going to reach into our variables in the
my blueprint panel. Come under components
and you should now find this coin anum component that is talking to this
time line coin anum. We're going to drag this out, drop it, and get it. The reason we're
going to get this out is because we're
going to drag off of this and type in set play rate. Currently this timeline
is 0.4 seconds long. And I'm going to
set the rates to be 1.0 You can think of this
like a percentage field, 0.5 would be half its
normal play rate. So I'm just going to be playing
this at its usual rate. Note however, that if you wanted to change the rate at
which this is played, changing this number right here would allow you to
change the pace at which this plays without having to adjust the
timeline itself. Now I could plug this into
play or play from start. I'm going to go with
play from start, because I want this
to play from start. Whenever this particular
blueprint begins, play. Now this is going to
fire off begin Play whenever we spawn
this into our game. Then go over to the right here. Bring in a reference to my coin from the
components panel, because I want to adjust the location and the
rotation of this over time. Left click and drag. What I'm going to do then is drag out of this
and type in set. And I want to change
the relative location and rotation of that over time. I want to change the relative in relation to the location of this coin over time as we
update our values over time. Here I want to update
where our coin lives. I'm going to drag
backwards off of our new location here
and type in make vector. Because a location
consists of an x, y and z. And I only want to
change one of these, I'm going to copy this. Node control C
control V control D. Could have just duplicated
that straight away. Sorry, I don't want to
make vector for this one. I want to make
this new rotation. I'm going to write click this is going to plug into
our new rotation. Now this is, we're going to take our float values and plug
them into a specific field. Again, I only want to move
my coin up in the Z axis. As we change our
value over time, we're going to update our
z location of the coin, the up and down
location of the coin. And remember here
in our timeline, we're going to be going
from our initial position up 300 unreal units and then back down at the very end to 200 unreal units
for our rotation. I'm going to take
the rotation here, and we want to rotate
it along the z axis. That's going to be
spinning it kind of like a top as it goes
up into the air. And again here in our timeline, we're going to be
rotating at 720 degrees. That's two fold revolutions
over 0.4 seconds. And that is a fine script
for just moving our coin, but I want to add a
little bit of jazz here. So what I'm going to do is
drag off of our finish pin. When this animation
finishes playing, I'm going to drag off of here in spawn emitter at location. Spawn system at location is the name of the
node you would want to use if you want to use
a Niagara particle system. This is the older
particle system. What I want to do is I want
to spawn in an emitter known as underscore lot
pick up right here. This one exists in the
infinity blade EffX pack. What we would then
need to do is drag in a reference to our
coin, drag off of here, and say get world location
and plug this in here. So essentially as we're updating the location
of our coin, once we finish with
this timeline, it is going to spawn
a particle effect, kind of this particle effect at our coins updated
world location, just to kind of have
that coin explode into a blaze of glory. All right, with
that, let's go ahead and compile and save. That's going to ensure
our script is good to go. We can now make
use of this going forward for several of
our blocks to come. Guys that's going to do
it all for this one. See you in the next one.
35. Block Coin: All right, so here's the deal. As you can see from this
classic Mario footage, Mario is interacting
with various blocks. And with some of the blocks
he's interacting with, like the one right now, a coin is spawning up out of it. Now our goal in this video is to create an actor
class blueprint of a block coin that's
going to spawn out of various blocks when
Mario interacts with it. Okay, to get started
here, back in our editor, I'm going to do this in the content platform
blueprint blocks folder. I'm going to right click
New Blueprint class. This is going to be an actor
class because we're going to be spawning this
into the game. I'm going to call this BP
Underscore blocks coin. Now again this is going to be different from our coin pick up. Let me press Enter here in
that this is going to be one that spawns into the world
and it's going to do the, the spinny thing when we
interact with various blocks. Let's double click
on this right away. To open it up in the
components panel, we're just going to
add one component. It's going to be a static mesh. I will call this coin over
in the details panel. Got several things
I want to set. The first is a static mesh. I'm going to set this
to be a cylinder. I'm going to choose this
cylinder right here. I'm also going to rotate
it on its side right away, so I'm going to set
the rotation to, I've got some
settings picked out ahead of time, negative 70. The y is going to
be negative 90, the z is going to
be negative 20. For the scale, I'm
going to set this to be 0.750 0.75 and then 0.07 something really thin because I had my scale
lock settings on. Whenever I change one
of those parameters, it changes all of them. If I unlock it, I can set
these all individually. So that was 0.75 in the x
and 0.75 in the y. I do want 0.75 in the Z to make it nice and skinny
there in the z direction. All right, also what
I want to do is set a material right here. I'm going to type in coin. I'll set this to the
newer coin material, although it doesn't really
matter too much which one I choose down in
the collision section, I'm going to change
my collision preset here to be no collision
because I want to ensure that there's no chance
that anybody can collide with this like an enemy that
we create down the road. Alright, with all of that done, let's move along into
our event graph. And we're going to create
in some empty space here, right click a time line. Time line because there are several things that we
want to change over time. So I'm going to add a time line. I will call this my coin, an time line holding down control mouse wheeling
up to zoom up on this. I'm going to double click
on this to open it up. In our time line tab right here, I'm going to add two
tracks right away. Clicking on track. I'm
going to press it one time. We're going to add
a float track. And I'm going to call
this first one movement. This is going to determine the movement of our
coin over time. And then I'm going to add another track here,
a float track. And this one is
going to be called rotation because
we're going to want to rotate our coin over time. How much time? Well,
we're going to set our time line length
here to be 0.4 seconds. All right, and now working in our time line first we're going to right click and pan
this over to the middle. Zoom up a little bit
using my scroll wheel. I'm going to hold down
the shift key and I'm going to click
three times 123. Now it doesn't really
matter where I click, because I'm going
to manually set a time in a value for each of these or this last keyframe that I've got
selected right here. I'm going to set the time to be 0.4 and the value to be 200. Now you can see it jumped
it off the screen here. That's fine. For this next one, I'm going to set the time to be 0.25 in the value to be 300. For this very first key frame, I'm going to set the time to be zero and the
value to be zero. Now if I was to click on
my arrows right here, Zoo line out a little bit. I can highlight all of these keyframes by left
clicking and dragging. What I want to do is with
all of them highlighted, I'm going to right
click on any of them. They're all highlighted.
When they're blue, I'm going to
right click on it. And I'm going to set the
key interpolation to auto. What this is going to
do is it's going to smooth out this
curved line here. Instead of this being a
straight line, straight line, it's going to make it a
smooth curvy line like so. Now with all these highlighted, I'm going to click on
the arrows once again. And you can see that curve a
little bit more accurately. Now this curve is
meant to change a float value over time to determine the
movement of our coin, essentially going
from its starting position up into the air. And then back down a little bit. Okay, next we're going to alter our rotation settings because we want this coin
when it spawns in. Not only to just go up in the air and then drop
back down a little bit, but also to spin around as well. For this we're going to
need just two key frames. I'm going to hold down the
shift key and left click. This first one I'm
going to set to a time of zero and a value of zero. And then I'm just going to
right click anywhere in here. We're going to add another key. That's another way you can
add a keyframe for this one, I'm going to set the time to be 0.4 essentially the end
of our timeline here. And the value hitting tab jumping over to that
value field I'm going to set to be 720,
essentially two spins. I'm going to click
these arrows here to bring each of these
key frames into view. And I'm fine with a
straight line here. I don't need to
curve this at all. My coin is going to
be moving up into the air and then dropping
back down a little bit. And then it's also going to
be doing two full rotations, 720 degrees over the course
of 0.4 seconds here. All right, now let's
jump back to our event graph here out of
our coin time line. And you can see we now
have two output pins, two float values from
our float tracks. So this will be
outputting the value of each float over time. It's going to be
changing over 0.4 seconds for movement
and rotation. We need to back up
here a little bit. And we're going to
bring our event begin. Play towards the
front of this graph. This node should have
existed when you first created this blueprint. If it doesn't, you
can right click and do a search for
event Begin Play. What we're going
to do off of event Begin Play is we're going to reach into our variables
in the my blueprint panel. Come under components
and you should now find this coin anum component that is talking to this
timeline coin anum. We're going to drag this out, drop it, and get it. And the reason we're
going to get this out is because we're
going to drag off of this and type in set play rate. Currently this timeline
is 0.4 seconds long. And I'm going to
set the rate to be 1.0 You can think of this
like a percentage field, 0.5 would be half its
normal play rate. So I'm just going to be playing
this at its usual rate. Note however, that if you wanted to change the rate at
which this is played, changing this number right here would allow you to
change the pace at which this plays without having to adjust the
timeline itself. Now I could plug this into play. Play. I'm going to go
with play from start, because I want this
to play from start Whenever this particular
blueprint begins, Play. Now this is going to
fire off Begin play whenever we spawn
this into our game. Then go over to the right here. Bring in a reference to my coin from the
components panel, because I want to adjust the location and the
rotation of this over time. Left click and drag. What I'm going to do then is drag out of this
and type in set. And I want to change
the relative location and rotation of that over time. I want to change the relative in relation to the location of this coin over time as we
update our values over time. Here I want to update
where our coin lives. I'm going to drag
backwards off of our new location here and type in vector because a location
consists of an x, y, and z. And I only want to change one of these and I'm
going to copy this. Node control C control V control D. Could have just
duplicated that straight away. Sorry, I don't want to
make vector for this one. I want to make rotator
for this new rotation. I'm going to write
click rotator. This is going to plug
into our new rotation. Now this is we're going to take our float values and plug
them into a specific field. Again, I only want to move
my coin up in the z axis. As we change our
value over time, we're going to update our
z location of the coin, the up and down
location of the coin. And remember here
in our timeline, we're going to be going
from our initial position up 300 unreal units and then back down at the very end to 200 unreal units
for our rotation. I'm going to take
the rotation here, and we want to rotate
it along the Z axis. That's going to be
spinning it like a top as it goes
up into the air. Again, here in our timeline, we're going to be
rotating at 720 degrees. That's two fold revolutions
over 0.4 seconds. And that is a fine script
for just moving our coin, but I want to add a
little bit of jazz here. So what I'm going to do is
drag off of our finish pin. When this animation
finishes playing, I'm going to drag off of here in spawn emitter at location. Spawn system at location is
the name of the node you would want to use if you want to use a Niagara particle system. This is the older
particle system. What I want to do is
I want to spawn in an emitter known as
underscore lute. Pick up right here. This one exists in the
infinity blade Ef X pack. What we would then need to do is drag in a reference to our coin, drag off of here, and
say get world location. And plug this in to here. Essentially, as we're updating
the location of our coin, once we finish with
this timeline, it is going to spawn
a particle effect of this poof particle effect at our coins updated
world location. Finally, before we
end this video, a couple of things
we need to clean up. I almost forgot, after our spawn emitter
at location here, we need to destroy the actor itself via this function node. You can get one of these
by right clicking in some empty space in
typing and destroy actor. The idea being that
after we spawn this BP block coin
into the game, and we have finished
with the coin animation, we need to get rid
of it to destroy it, otherwise it's just going
to hang out in the world. Lastly, our coin mesh here. I forgot that we had set our
rotation here to be negative 70 and negative 90 in the
X and Y respectively. We need to set these as our starting rotators for the X and y in this make rotator node. If we don't do that, this
coin is not going to spin along the axis
like we intended to. So make sure that
you set your x and y to negative 70 and negative 90 to match up with our
initial coin rotation guys, that's gonna do it
off for this one. We will see you in the next one.
36. Block Fake Breakable (Coin Inside): In this video, we are going to create a fake breakable block. That is a block that's
going to look breakable, like our BP block, breakable that we've
already created. However, when our character
interacts with it, it's going to spawn
in our BP block coin. Our player is going to earn some points and add
to their coin total. And that block is
not going to be fully destroyed, it's
going to stick around. And our player can
use it as a platform. All right, let's go
ahead and get started. Here we are going to right click on our BP block breakable. And we're going to create a duplicate of this to
help save some time. We're going to call this BP block fake Underscore Breakable. And then I'll press
enter on that. Let's double click on
this to open it up. Now as we can see, this inherits from our BP
block base that is our parent. As we can also see, we have also copied over
all of the code that belonged to our BP
block breakable. Here is our block
breakable and all of that, because we created
a duplicate of it, is present in our
fake breakable. This is going to save us
a little bit of time, although we are going to
be making some edits here. All right, the first
thing we're going to do is move up this bit
of script right here. I'm going to take our
block interact, FX. We've got to left click
and drag around this. I'm going to tap the
key and then I'm going to put zero parentheses. This is going to be
our play, Whoops, play FX type script. I'm going to comment
color this black over in the details panel here just to add a little
bit more contrast. This is just to help
keep things a little bit more neat and orderly. Now we do want to play this block interact effects
when we hit this block. However, I'm going to extend our functionality
here a little bit. What we want to
do in addition to playing some block
interact effects, is we want to change the material associated
with our cubes. I'm going to drag and
drop this into our graph. I'm going to drag out of here
and type in set Material. There it is. Set Material. We'll zoom on up by holding down control and
scroll wheeling in. We want to change the
material of this block when we interact with it
to our Interact material. Remember, we inherited all these variables from our parent, our BP block base. And they are exposed right here, show
inherited variables. If you don't have
that checkbox on, I'm going to drag and drop this onto our material
input right here. We're essentially saying that when we interact
with this block, we're going to
change the material associated with our cube
here with our block. That guy, we're going to
change that to this material, this block used look. It's no longer going to
have this brick look. It's going to have a
solid brown a look to it. Okay, So that's going
to be coming off of the then zero pin of
our sequence node. Next I'm going to
left click and drag around this tap the key. I'm going to call
this our points. Actually, I'll do the
01 to show that this is coming off the one sequence. How about just one? This is
going to be our add points. We're going to be spawning in that points widget
and adding them. We're going to color
this black as well. Now what's great about this is that we can modify how many points we
give for this block, currently it is set to ten, but let's make this 100. We can alter that by selecting
our variable right here, or you can select the actual variable
within the graph itself. I'm going to set this to be 100. So something else
I'm going to do, since I just modified
this points variable, I'm also going to
scooch back up here. And we're going to modify the sound effect associated with interacting
with this block. Currently it's set
to brick break. When we interact with this,
we're going to actually be spawning in a coin.
So let's change this. Clicking on this drop down, I'm going to type in
coin to a sound effect. Okay, coming on down
a little further. I'm going to add some
more pins right here. And I'm going to delete out
this destroy actor because we are not going to be destroying this brick. Delete that out. Let's add a few more pins here, 12 by clicking on that button. The next thing we're going to
do is spawn another actor, right click spawn
actor from class. What I want to spawn in
here is our BP block coin. Bp underscore block coin. Let's plug this in
right away off of our, then to pin now we have to
give this a transform that is a location in a rotation where we're going to
be spawning this in. So if I right click
in some empty space, get transform, this will get the location and rotation of our fake block wherever
it's at in the world. We're going to plug
that in like so. Then we're going to bring in our Player Controller reference
drag and drop that in. We're going to get it
drag off of here and we're going to add coins. Here is where we get to actually add the coins to our total. How many coins would
we like to add? Well, we've got this
variable right over here. Currently, it is
defaulted to one. You could actually
make this worth ten coins if you wanted to one shot worth ten coins. I'm going to leave it at one and simply plug this in like so. Now I'm going to drag
around this bit of script. Left click, drag, take. I'm going to call this add coins bit of script coloring
this black as well. I wanted to point
something out here, is that remember inside of our player controller
is where we created our ad coin script. And this is going to
call that custom event. In fact, here's a little
tip to know that if we double click on this
ad coins right here, it's going to open up
our player controller and jump us to where
this custom event is. This is the custom
event that we are calling from our fake
block, breakable, and this is where
the addition of the coins is actually
taking place. Now note here we are plugging
in our coins to add. This is going to feed into this call and this
coins to add is going to be output right
here in our custom event. So we're feeding in
the number one here. And here in our custom
event it is passing it out here to add
to our coin total. So just wanted to
make that clear. Okay, the next thing I want
to do is I want to add a little animation to our
block so that when we hit it, it's going to bump
up into the air a little bit and
then drop back down. Because remember, this block is not going to be destroyed. To facilitate this
block animation, I'm going to bring
in a timeline. So let's right click
in some empty space. Bring in a time line, right clicking,
searching for time. A timeline is at
the very bottom. And I'm going to call
this my block Anum. All right, let's just frame
this up a little bit more. I'm going to bring our sequence node down a little bit more. So when we eventually
plug this in, now this block anum, we can double click
on this in order to create some anum tracks here. Double click on this. We want to add one movement track here. It's going to be of
the float variety, so let's click on this
Plus Track button. It's going to be a float track. We're going to call
this movement. Our track here is going to be three tenths
of a second long. So I'm going to change
our length right here to be 0.3 seconds. This block animation is
going to be pretty fast. I'm going to hold down control
and scroll. Wheel on up. Then I'm going to right
click and pan over so I can see our 0.3 second
time line here. Now I'm going to
add three points, three key frames
to our graph here. I'm going to right click, I'm
going to add a key frame. This first one I'm
going to set to a time of zero and a value of zero. Essentially saying
in the beginning our movement is going to be right where it's at right now. I'm going to right click again. Right about here. We're going to add another key, and we're going to say at
the point 1 second mark, our value is going to be 50. Now it's going to jump
it off the top here, but if I click this
vertical arrow here, it's going to put it into view. I'm basically saying in
one tenth of a second, jump up our block
50 unreal units. Then I'm going to right
click right again down here. We're going to add another key, and I'm going to say at the 0.3 second mark the end
of our timeline here, our value is going
to be zero once again now I'm going to highlight
both of these keyframes. I've got that one
selected right there, holding down control, going to left click,
this one right here. Then you can right click
on either one of these. And I'm going to set the key interpolation here to be auto. And what this is going
to do is it's going to make this curvy. So we're going to shoot up that block in a
tenth of a second, very rapidly, in
a linear fashion. And then we're going
to ease it back down. It's going to happen quickly, but it's going to be
easing it back down. If you left click and
drag to highlight all of these points like so all
of them are selected. You can click both of these
arrows to frame it up and get a little bit better visual as to what that's
going to look like. Okay, now jumping out of our timeline and back
to our event graph, we can see our movement
pin is now exposed. And we can use this
for our script to adjust the location of
our cube, our block here. So I'm going to bring
in a reference to our cube here, our
block component. Let's drag out of this and
type in set relative location. We are going to be
changing the location of our block here relative to
where it currently exists. If we drag backwards off
of the new location, we can type in make
vector to expose the x, y, and z in a fashion like this. Now we only want
to move this up in the direction that is the
up and down direction, Not forward and back left and right to finish off our script. Here we come off of
our sequence pin. We're going to plug this
into play from start. As this updates over the 0.3 seconds that we've
set up in our timeline, we're going to be
updating the location, the relative location
of our cube. All right, with that
done, let's left click, drag, tap that key. This is going to be
called our block. Um, we're going to color
this black as well. Now we can actually
compile this and save it. Our scripts looking good and we can test this out in our level, but there's going
to be a problem, which we'll fix up
here in just a moment. But just to see what this
is going to look like, I've got my two D snap settings
onto my main level here. Let me just bring this guy in. I'll bring in a couple
of them right away. So there's one holding down Alt, left click, and drag to bring
in a duplicate like so. Here we go, going to jump in and play and check our coin total. And our points, we should be
getting both. So here we go. I got one coin, I've
got 100 points. That's all well and good, You got to go with the second one. I've now got two
coins and 200 points. But here's a couple of problems. I can just keep
interacting with it. So that's obviously not desired, so more script is needed. All right, so what have
we got to do to fix this? Well, we're going
to jump back into our fake block breakable. We're going to do a
little bit of work in the very beginning of this. And then we're also going to include something off
of this, then four pin. So add a little bit
of space between our event hit block and
our sequence node here. Now what we want is only this
sequence to essentially do what it's going to
do the first time we hit this block the second time, we just kind of want to
play a bank sound effect, a brick bump sound effect. So we can facilitate all this
by bringing in our finish interacting Boolean that we had set up back in our block base. Again, this is all
inherited from our BP block base that
we set up long ago. Again, this is how
we are showing those inherited
variables right there. We're going to bring this
in, we're going to get it. By default, this boolean
is set to false. We're going to drag out of here and bring in a branch node. We're going to
rewire this like so. We're going to left
click and drag. And we're going to say that if this condition which starts
off as false is false, we're then going to do all
this block interaction like you just saw me do. However, if this is true, we're going to drag off
of the true branch. We're going to play Sound two D. And instead what we're going
to do is we're going to play a bump sound effect. Mario brick, bump, kind
of a balk sound effect. Okay? So this is
all well and good. However, this begs the question, if this is starting
off as false, every time we hit this block, we should essentially
be going out of this branch and doing
all this stuff, right? When is this ever going
to get flipped to true? Well, that's where
we're going to be building off of this. Then four pin, we're going
to hold down the Alt key, left click and drag. By holding down the Alt key, you'll immediately bring in
a setter of this variable. And if we drag off of
the then four pin, we'll say that
this is flipped to true after we interact
with it the first time. So we can tuck this down here, so essentially what's going on is the first time
we hit this block, we're going to say, hey, we finished interacting with it. Nope, it is false. So we're going to do all of this stuff. We're going to play
those effects. We're going to add those points. We're going to add those coins. We're going to play
that block animation. Oh yeah, and by the way, we're going to change
this variable now to true so that the second time
that we hit this block, this will evaluate to true. And instead we will
just fire out of this branch where we
just play that sound. Let's compile this and
save and give this a try. Now I'm interacting with
this block one time, We get 100 points, we get one coin and I
interact with it again. The block doesn't go up here. That balk sound
effect. Jump on this. It's still interactable in terms of I can go on top of it. Everything is working
now as expected. All right. Job. Well done. Now, just to frame
this all up in case you wanted to
pause the video and take a screenshot or gaze at the work that
we've done here. This is the upper
part of our script. Just moving on down, this is the lower
portion of the script. The mid portion of the script, if you will, And then coming back down to
the very bottom. All right guys, we have done some fine work here and in fact, this is setting us
up really well for the next brick that we
are going to make guys, that'll do it off for this one. We will see you in the next one.
37. Block ? (Coin Inside): Welcome. In this video, our goal is to create a question block that when our character
interacts with it, it yields a coin. Now, the good news
here is this is going to be the
shortest video ever, because essentially we are going to be creating
a duplicate of our fake breakable block and
just changing one material. So go ahead and right
click on your block, fake breakable. Let's
duplicate this. We're going to rename
this BP block Q, underscore coin like. So. We're going to double
click on this to open it up. We are quite
literally going to be keeping all of this
script the same. The only thing that we are going to be changing
is over here. I'll select our Viewport tab, then select our Cube. We're going to change the
material associated with this so that it's got our block. Question one, Matt. We can say this right away. Now if we wanted to, you could change how many
coins this is worth. I'm going to leave this at one. The only reason we're creating this block is a
because it's easy and it gives a little bit more
visual variety in the level. In many Mario games there are question blocks that
yield a single coin, that's why we're
going to add it. Let's give this a try,
jumping in and playing. As you can see, we
can interact with it, changes the material,
we get 100 points. We get one coin done, done, guys, that is going
to do it all for this one. See you in the next one.
38. Block Invisible Coin: Welcome back everyone.
In this video, we are going to create a block that's going to
start off invisible. However, if our player character finds and interacts with it, that is to hit it
from the bottom side, they will make it visible
and they will get a coin. The good news here is
we can duplicate a lot of what we have created here
to give us a head start. Our BP block Q coin here.
Right click on this guy. We're going to duplicate this. And I will call this BP block
invisible underscore coin. Let's double click on this
to open it up right away. A lot of this code
is going to be good. In fact, all of it
is going to be good. We're going to be adding
a little bit to it. But I want to start
off in our viewport. Now, this will start off
invisible to the player. However, the designer
will be able to see this when working
in the level editor. In fact, let me just drag and drop this into our
level right now. Now the problem here is
if you're the designer, this block is going to look identical to our Q coin block. So all I want to do here
is I just want to add a different visual
to this block just to make it stand
out to the designer that this is invisible,
some indication. Now, prior to
shooting this video, I went into my Textures folder. I right clicked on our block, question two, and I created
a material from it. Then after I created
that material, I simply dragged and dropped it. And I moved it to our
materials folder. And you can see that right here, I'm going to be applying this to our cube here in this BP block, invisible so that we've got
some visible difference. All right, selecting our cube over in the details
panel under materials, we'll change to
the block question two just to make that
look a little different. Great, now with our cube
component selected, we're going to add one
more component here. We're going to add a
box seeking out box. I'm looking for box collision, add this component, press
Enter to keep that box name. With this selected over
in the details panel, I want to have some box extense. It's going to be
100 by 50 by 100. So we're going to create this
invisible box around it. And I want to set it
up in the z direction. I'm going to set this to be 51. And the reason I'm setting this up is because I want
to make it so that it is barely piercing through
the bottom of the block. The bottom of the block
is actually exposed. The idea here is that
our player will be able to hit and collide
with the underside. However, if they jump into this from a top angle
or jump like this, they're going to
collide with this box and turn off the
collision of this. Thus being able to
not interact with it. This box is going to be
able to be used by us, the designer, to turn off and on the collision for this block. Okay, for that, we're going to jump over to our event graph. Now with our box components selected the box,
the invisible box. We're going to right click
on this. We're going to add an event for when we
begin to overlap it. Let's bring that down
a little bit lower. Then we're going to
right click on the box again and we want
to add an event for when we end
overlapping that. Now make sure that you are
talking to your box component. It says in parentheses
right here. Box box, not the cube. We want to be overlapping
and end overlapping the box. We're going to right click in some empty space here
and we're going to type in get player character. Then I'm going to right click
into some empty space and I'm going to type
in the equal sign. And I'm going to bring
in a couple of equals nodes control D that
to duplicate that. And I'm going to
hook this in like so other actor to get
player character. Other actor to get
player character. Then I'm going to bring
in some branch nodes by holding down
the B key and left clicking 1.2 All right, our code is going to be like so if it is our
player character, if our player character is the other actor that
overlap that box, we want to talk
to our cube here, the actual block
we want to talk to that drag that into
our event graph. We want to set
collision enabled only. We want to disable the collision by leaving this new
type to no collision. The idea here being
that if it was the player character that was the other actor that
overlap that box. If that's true, we're going to tell our cube to
turn off collision. Meaning our character
is going to pass right through it with
this node selected. Do control D to duplicate it. Conversely, we're going to say, make sure you hook in your
cube right down here, that if it was our
player character, if you use the other actor that ended overlapping that box, if that's true, we're
going to tell our cube. To essentially turn
its collision back on. Collision enabled right there. Collision enabled
query in physics. Let's left click and drag
around this tap that C key and I'll carl this, our toggle block
collision script. And I'll color this black right away in the details panel
selecting that color bar. All right, let's go ahead and compile and save
this right away. And once again here
in our level editor, we see this block. My character is going to spawn right to the left
of it, so to speak. Let's play this. If we can see it right now, if I hit the underside,
I can collide with it. However, if I was to
play that again and this time I'm going to pass
through the top side of it, I'm going to cut right
through the bottom, can collide at the bottom, but I'd pass through
or pass through it if I approach it from a side
or from the top like so. Okay, so a couple of
things to fix up here. Let's go back into our BP block. Invisible coin, I'm going to
find our event begin play, which is going to
exist right up here. Remember this block ultimately inherits from our block base. So that's why this bit of
script right here exists. We're going to build
off of this by bringing in our cube like so. We're going to drag
off of this and type in set visibility. We can extend this script here. We're saying hey cube. Upon beginning play, you are
not going to be visible. So if I was to
compile and say this, now if I was to
go into my level, we can see it here
in the level editor. But once I begin play, I can't see that cube. Okay, I can interact
with it yet, but we can't see it
from the get go. A little bit more
work to do here. Let's jump back into
our script here. We're going to scroll on back. We're going to add
another pin to our sequence node here
off of event hit block. Let's add one more pin. And I'm going to
take this finish interacting which was off
of the then four pin. I'm just going to move this
down to the then five pin. Holding down control
left click and drag. I can move this wire
down to then five. Let me just move my sequence
node down here a little bit because I'm going to be adding some script right down here. Now down here I'm going to
bring a reference to my cube. Once again, drag and
drop that in here. We're going to drag
off this and type in set visibility only. This time we're going
to check this box. Let's wire this in off of
the then four pin like so. Our idea being is when
we hit the block, we're going to tell our
cube to be visible, we're going to be able
to see it once again. Something else we'd
also like to do here is once we've
hit that block, and it's now in the game
where the player sees it. We're going to tell
our box collider here, drag and drop this
interior graph. We're going to tell
that to be destroyed, type in destroyer component because once we have
revealed that hidden block, we don't want to be able to
pass through it anymore. Let's left click and drag
off this tap the seat key, I'll call this our four pin
turn visibility on like. So let's go ahead and turn this block to create a
little bit more contrast. So that's going to be
our script right there. I'll move our sequence node
roughly back into position. Let's go ahead and
compile and say this. And go back to our
level editor here. I'm going to move this
block right above our character's head so we
know where it's going to be. I'm going to click play.
Now if I was to jump, you can see the block has been revealed and now I can
collide with it per usual. That's all well and good if I try to hit the
under side again, no more coins, that's good. Now let's try to approach
this from the side. So I'm going to select this, I'm going to try
to approach this from a side angle, somewhere
right around here. You can see we just pass right through it as if
nothing is there. However, if I was to hit
it from the bottom side, we are able to interact with it. There we have it guys. We've got an invisible coin block
that'll de off for this one. We will see you in the next one.
39. Block Coin Box: In this video, we are going
to create a coin box. And if you're not
sure what that is, it's going to be a block that looks like a regular
breakable block, but right there it is, it's
going to have coins inside. And eventually it will
time out and turn into a solid block,
just like that. That's what we're in for.
To get started here, we're going to come in our
blueprints blocks folder. I'm going to right click
on our BP block coin. We're going to duplicate
this right away. And I'm going to call this
asset BP block coin box. And then with that highlighted, we can just press
the space bar or double click on it to open
it up with it highlighted. I like to do the Spacebar
to open it up right away. What I'm going to
do is change out the material associated
with our cube. If I select our
viewport, our cube, I want this to look like it's a breakable block over
in the details panel. I'm going to come under
materials and I'll change it to block material underscore
breakable right there. And then I'm going
to add a couple of variables over in the my
blueprint panel as well. The first variable that we're
going to create is going to be called timer amount. This is going to determine how much time we have to collect as many coins as possible before it turns
into a solid block. I'm going to change the
type here to a float. And I'm also going to click on this little eyeball icon right here to make this
instance editable. So note that when we
click on that eyeball, it also checks this box. So those are one of
the same checking this box turns on this eyeball. Clicking on this eyeball
checks that box. Next, I'm going to
create another variable. This one is going to be
called has timer expired. Question mark. This is going
to be a Boolean variable. Let's go ahead and compile
this right away so we can set some default values.
Has Tim er expired. I'm going to leave that as
false for time or amount. I'm going to set that to a
value of 5.0 to get started. Next we're going to jump on
over to the event graph. And we're going to modify our
script here a little bit. What I want to do
is, for starters, under this then zero
section of script, I'm going to cut this wire right here where we're
setting the material. I'm going to hold down the
Alt key and left click. And I'm going to
move this towards the front of our script. We're going to be adding some script towards
the front here. If you want to create some space between that sequence node
and our event, hit block. I'm going to place
this somewhere down in here more to come on that
in just a little bit. Then what I'm going to do
is I'm going to unhook our, finish interacting at
the very bottom here. So I'm going to hold
down the Alt key and left click. Unhook that. Then I'm going to shift all
these wires down a little bit because I want a new
then zero bit of script. So I'm going to hold down
control and I'm just going to put this one down,
our add points. I'm actually going to snip
this wire holding down Alt and left clicking this. Well actually I'm not going to shift the position
of all this. I should have just
moved that down. I'm just going to hold
down the control key. I'll move down or add coins. I'll plug this in like so, although this play effects, I'm going to shift this down. Holding down control
left clicking. We're going to shove
that down as well. Now I know all of my numbers
here are off a little bit. I can adjust those in due time. Maybe I'll do that at
the end of the video. But I'm just going to shift
all this down for the time being because I want to build
off of the then zero pin. We want to essentially set a timer off of our then zero pin because we only want
to be allowed to interact with this block
for a set amount of time. So what we're going to do
here is bring in a once node, hold down the key
and left click, that'll bring you
in a once node. And then what I
want to do off of this is I'm going to
drag off and type in set timer by event,
that guy right here. And I'm going to add
a custom event node. So right click event, I'm going to call
this timer expired. So what I want to do is plug
this into our custom events. We can drag backwards off of our set time or by
event, plug it in here. Our time is going to be determined by this
time or amount. I can drag and drop
this right on here. So, and then off of
our timer expired, what I want to do is I want
to set our has timer expired. We can drag this
in and say set it. I want to check this on to true. Essentially what's
going to happen is the first time that we
interact with this block, we're going to come
through here one time. We are going to set a timer. After this amount of time, 5 seconds or whatever we
set this to, has expired. It will fire off
this customer event. And that is going to flip our Hes timer expired
bullion to true. Let's left click and
drag tap at C key. This is going to be our
new zero pin script, set block interaction time. And I'll color this
black as well. And now just in the
interest of time, I'm not going to adjust all
of these numbers right here. That's just optional just to help indicate
that that's coming off of the then one or
then two pin, et cetera. However, I am going to
scroll on down and find my finished finished
interacting setter down here. I'm going to move this
up towards the front of our script as well
because we're going to be changing our focus to the beginning portion
of this script. As you recall, what
we're doing at the very beginning is
upon hitting this block, we're trying to find out if
we have finished interacting, which this bullion down
here turns into true. By default this is false. So we just interact
with our block. We want to build off
of this false branch. So I'm going to break
this wire holding down the alt and left key. And I'm going to bring in our
haz timer expired bullion. So I'm going to hold down
control and left click. And if we hold down control and left click and drag it in, that'll bring in a setter. I'm going to then drag off of this and bring in a branch node. We're going to work like so. By default this is
going to be false. So the first time
we hit this block, we're going to say, hey, we have not finished
interacting. Let's find out if the
timer has expired. Off of this, we are going to do once hold down the
key and left click. We're going to do something
one time if it's true, if it is false that we have
not had the timer expire, I'm going to plug this all the
way into our sequence node and I'm going to
bring in a couple of reroute nodes right away. Double clicking on that wire. We'll bring in some
reroute nodes. Now if it is true, after we have hit
this block the first time and this timer has expired, thus turning this
bullion to true. If that is true, we want
something to happen one time. Well, what do we
want to have happen? Well, we actually want a
couple things to happen here. I'm going to bring
the sequence node, hold down the S key
and left click. The first thing
that we're going to do is set our material here. We want to set our material to look like it's been used now. Our cube here is what we are
setting the material for. The Interact material we want to set to this used
block like we have. This is the first thing
we're going to do. And then we're also
going to set this to finish interacting
right after this, After we've changed
that material, we're going to then say, hey, we have finished interacting
here, we're all done. So go ahead and change
this variable now to true. The next time our character
tries to interact with it, it's just going to play that
bank brick bump. Sound. Okay. The first
thing we want to do, the second thing
we want to do is simply continue
onto our sequence. In fact, it doesn't just in the interests of
organization here. I'm going to take our then zero pin and plug that in here. This I can plug in
down here like so. And we'll just try
to tidy this up so our revised script is
going to look like, so first time we hit our block, we're going to find out have
we finished interacting. By default, that is
going to be false. So then we're going to come
to our branch and find out, hey, has the timer expired? By default, it's
going to be false, meaning we're just
going to interact with this our first time. Upon our first interaction, we are one time going to
be setting this timer. So the clock is ticking, in this case 5 seconds. We're going to do then
all of this stuff immediately after
this timer gets set. So all this stuff is
immediately going to follow. Then after 5 seconds,
this becomes true. Thus, if we try to
hit the block after the time has expired,
if it is true, we're going to do once set our material to be
this used block, we're essentially going
to allow one more bump, one more interaction,
and then we're going to flip this true, thus making it so that the
next time we try to hit it, we will just bump into
that and play that sound. Let's go ahead and compile this. Let's drag this into our
level and see if this works. And then I'll frame up this
bit of script on camera for you all so you can
revise if you need to. Here's going to be our coin box. Now you'll notice, let me
just bring in two these. I'm going to Alt and
drag in a second. So both of these are coin boxes over in the details panel. I can customize the amount of time that this coin box
is going to stay active. So I'll set this second one, this far left one
here to 10 seconds. And I'll say each time
I interact with it, it's going to add
five coins instead of one and instead of 100
points for each coin, I'm going to set it to be 500. So this first coin box, fairly normal
default parameters. The second one is going to be
a little bit more extreme. Let's go ahead and
give this a play. All right, our normal
coin box is going to stay alive for 5 seconds here, 12. You can see it's incrementing one coin at a time,
100 points at a time. After 5 seconds can't
interact with it anymore. This one's going to stay
alive for 10 seconds. Here we go. We're each worth 500 points, and as you can see, it is
adding five coins at a time. After 10 seconds,
this will time out. There we have it. We have a
highly customizable coin box. Let's just go ahead and put
this on screen once again, so you can pause the video
here if you need to. That is the initial
bit of script. Then coming off of our
sequence node here, we've got our new then zero pin. Make sure you got that
box checked right here. Time amount set to some
default value and all of this is going to be the
rest as it was before. All right guys, that is going
to do it all for this one. We will see you in the next one.
40. Block Fire Flower #1: Over the course of the next
few videos here we are going to work on giving our
character flower power. But we need to start
off by creating a block that when
interacted with, actually spawns a fire flower. So that's what we're
going to focus on over the course of
these next two videos. And then we're going
to focus on giving our players some fireballs
to shoot block first, then the ability to
actually shoot fireballs. Let's get right to it back
here in our content browser. We're going to take a
shortcut once again by creating a duplicate
of our B block Q coin. You can right click on
it to duplicate it or Control plus D will
duplicate it as well. Either method will do just fine. I'll call this BP
block fire flower. Then per usual we're going to double click on
this to open it up. We're going to
start off by adding a couple of components here. Let me go to my Viewport tab. And I want to make sure
that these components are attached to our cube
here, our block. Let's select our
cube here first. The first one I'm
going to add is going to be a box collider. And that's going to be found
right here, a box collision. So go ahead and select that. I'll call this box
Underscore Flower. And then with that selected, let's go ahead and set
the box extent right away so I have a value in mind. It's going to be 40 by 40 by 40. I'm going to press Enter there. I'm also going to make
the line thickness. I'm going to set that to five, just to make this
a little bit more prominent and easy to see. Now we don't see anything
yet because this is buried inside of our cube. But the idea here is that when we hit the underside
of this cube, this is actually going
to move up like so. Now attached to this component, I want to add a static mesh. So make sure you've got your
box flour here selected. Let's add a static
mesh component. This one we can simply
call me underscore flour. And with this selected, our static mesh is
going to be a plane. We're just simply going
to use a two D card. Let's choose this plane
right down here for the material we
actually need to create that material back here
in our content browser. Let's go back to our
Textures folder. I have one in here for our four, there it is,
underscore Fire Flour. If we right click on this, we can convert this
into a material. Let's go ahead and
leave that name. So I'm just going
to press Enter. And then I'm going
to move this over to my Materials folder by dragging
and dropping it in here. We'll say move it
here. Then let's go into our Materials folder. I'm going to double click on this right away to open
it up because there's a few modifications I want
to make inside of here. I want to change the blend mode from opaque to translucent. What that's going to do
is it's going to make this opacity pin become
available to us. And we're going to
want to take this a value and plug it
into the opacity. And in doing so, let me just put this instead on a sphere. I'm going to put it on
say, a box like that. So now we can see
how it's actually going to appear to
the player in game. We're only going to
project this on a plane, so it's going to look like that. That's going to be pretty good. What we can do here as well. I'm going to select our
master material node. We can check the two
sided check box as well. We shouldn't need
that because this is only going to be facing one way. But that'll make it so that
it's easy for us to see it, no matter which way
is facing the player. Let's go ahead and save here. Then we can go ahead and
close this back out. And then let's dive
back into our BP block. Fire flower with our
mesh flower selected. We're going to be
putting this on a plane. Let's go to our materials
and if I type in fire flour like so there
is our fire flower. Now also I want
to make sure that this card that's going to be popping up out of here
is facing our player. Now just to show you
what I'm talking about, I'm going to select
my box flour. Once we hit the bottom side, once again this is going
to rise up like this. But notice our mesh is not facing the player
with that selected. I'm going to go over to the
rotation setting thing. And I'm going to set
my x rotation to be 90 so that it's going
to be facing the player like so You can see how this is going to work when
we interact with this block is simply going
to rise up like this. And we're going to be using this box to actually detect when our character is
overlapping this so that we collect the flour. Now, one more thing I need to do here with our mesh flour. Go back and select that. We got that rotation set to 90. We've set the material. There's one more
thing we need to do. We need to set the collision preset here to be no collision. We don't want anything to
collide with that no collision. Once again, we're
simply going to be using this box
flour to check that if we've overlapped that
flour, thus collecting it. All right, with all that done, let's go over to our event graph and modify our script
here a little bit. Some of this we're
going to get to keep some of it we are going to get rid of now, we are not going to be
adding any coins here. So we can just get rid
of this bit of script. Left click and drag,
and we can delete that out, adding some points. We're going to be doing
this a little bit later, not in this portion
of the script. So I'm just going
to snip this wire holding down Alt, left clicking. And I'm just going to drag
this off to the side for the time being for our play X. The one thing I want
to change about this is going to be our
Interact sound effect. Currently it's set to coin, I'm going to set this
to item and then I'm going to move
on down and see what modifications we can
make with our block anum. Okay, for starters here, this is going to be all good except I want to add a
little bit of script. After we finish this
block animation, I want to add a little bit of
a glowing particle effect. So what I'm going to do
is I'm going to bring in a reference to our mesh
flower drag and drop that in. We're going to drag
off this and say get world location like so. And we are going
to plug this into a spawn emitter at location. Spawn emitter at location. Again, this is going to be using the older particle system. Spawn system at location would be to use a Niagara
particle effect. Now the reason why
I'm going to be choosing this is because I have a specific particle
effect in mind. And if I click right here, that's going to come from
our infinity blade pack. This is going to be underscore Dead Man's, Dead Man's Lute. I'm going to play this off
of our finish here like so. And then what I'm also
going to do is I'm going to promote
this to a variable, so it's going to
spawn that emitter. I'm going to right click
on this return value. And we are going to promote this to a variable because
later on we're going to want to destroy this once we collect
the fire flower. So once I've clicked, right click promotes a variable,
I get to name this. I'm going to call this
my power up glow. That sounds like a fine name. And once again, we are going to use this to destroy it later on. Now this is all going to be
for our block animation, our block moving
up into the air. I'm just going to hold
down control left click. And I'm going to move this
up to our then one pin. In fact, I'll re
label this as such. Now I need to work on
our flower animation. So this is the block kind of being bumped up into the air. But what about the
flower actually springing up out of the block? Right now it is buried
inside of the block. We need something to
spring this up out of it. This next part in
our event graph is going to be built
down below our block. Animation like. So I am just going to right click in some empty space
and bring in a time line. We're going to add a time line. I will call this my an flow. An flower anum. Let me zoom up on this
using my scroll wheel. Inside of this, we're going to double click on this time line. We've got our new tab up here. We're going to add
a float track. Clicking on plus track, I'm going to call this movement. And I'm going to add two
key frames to our track. Here, again, a couple
ways you can add them. You can add them by holding
down the shift key, Shift key, and left clicking. Or alternatively,
you can right click in some empty space
and you can add a key. Either way, we'll do for
our first key frame, I'm just going to
select it instead. A time of zero and
a value of zero. Then for our second key frame, I'm going to select that
and I'm going to set the time of 0.5 So this is
going to take half a second, and I'm going to set
the value to be 100. I can frame these all up by
clicking these arrows, Y 100. Well, if I go to
my Viewport and I select my mesh flower
here, check this out. I'm going to be changing
the location here. 100 unreal units is
ultimately what we want to do to spring this
up out of the block. We're going to be moving it
up 100 in that Z direction. Okay, let's make sure that we
set our time line length to actually be half
a second as well right now to match
our last keyframe. So I'll set this 2.5 And going
back into our event graph, let's hook this in off
of our sequence node. We'll do it off of
our then two pin. We're going to play this. What we want to do is we
want to talk to our four. Our mesh flour, our mesh flour. Let's do the box flour we need
to move up the box flower. This is worth noting, while we want the mesh
flour itself to go up 100, this is going to come
along for the ride. When we move up the box flower, it's important that we move
the box flower because we're eventually going to
be checking to see if for overlapping
this collider. The box flower is
the thing that we actually want to move on up. The mesh flour card
comes up along for the ride back
in our event graph. Let's drag in our box flower like so. We're
going to get that. I'm going to right click
on this and I'm going to convert this to a validated get, meaning we're only going to
do this movement if it is validated that this box flower
is actually in existence. We're going to
destroy this out when we eventually collect it here. We're essentially saying like, does this component even exist? And what we're going
to do is when we update our timeline here
over half a second, we're only going
to do something if this box flower
component does exist. If it does not exist and it's not going to exist
after we collect it, we're not going to do anything. What we do want to
do if it does exist. So we're going to drag off of this and we're
going to say set relative location is
relative location. So now the new location we're going to drag backwards off
of here and type in make, there it is, make vector. We only want to move this
up in the Z direction. Our movement here, once again, our timeline is specifying
that over half a second it's going to go up
100 unreal units. This is going to
be our animation, left click, drag the key. This is coming off
of our two pin flow. Um, we'll color this
black right away. Okay, that's all
looking well and good. Then lastly, we're
just going to move up our finish interacting
setter right here. We can actually eliminate
this then four pin. So I'm just going to hold down the control key, left click. Move it up to the
then three pin. Right clicking on
that, I'm going to remove that execution pin. That's going to be part one
of our fire flower here. A little bit more work
to do. We're going to be adding points eventually, but our final script is
going to look like this. Let's try to frame this
up portions at a time. There is essentially
the top portion and then moving on down for
the two and then three. This is going to be
our bottom portion. Let's go ahead and compile this. We will save now. We need to play test this. Once again, we're
not going to be able to collect the fire flower yet, but we should see
the fire flower pop up out of the block
once we interact with it. Here we go. Going back to our blocks,
we've got our block, fire flow, let's put that
in position right here. Jumping in and playing. All right, interacting
with the block, the flower does rise up, we see that glowy particle. Obviously we cannot
collect it yet. But we've got our initial
bit of script done. Jobo done guys.
Let's move along to part number two and finish
this off. We'll see you there.
41. Block Fire Flower #2: Welcome. In the last video, we created a block blueprint
that is going to spawn a fire flower out of it when our character
interacts with it. However, we did not script in the functionality for
collecting said fire flower. So that's what we're going to be doing in part number two. Go ahead and double
click back on your BP block Fire flower
to dive back in here. The first thing I
want to do is I want to add a new component in here. And this is going to simply
be a point in space. I've got my default scene
root selected here. I'm going to add a component. This is going to be
an arrow component. If I go to the viewpoint, this is simply this red
arrow right over here. I do want to change the location
of this and I'm going to set the z location to be 150. My only use for this
component, again, the user will not see this arrow when
they're playing the game, is to surface a point in space where I want a point
value to spawn in. All right, with all of this, let's select our box flower, that is this box collider
component that's buried inside. I'm going to right
click on this. I'm going to add
an event for when our character begins
to overlap this. This is going to jump us
back to our event graph. What we want to do is
check to see if it is our character that's
doing the overlapping. Once again, let's bring
in an equal sign. I'll drag backwards out of this. Get player character like so you could also cast to your character instead of
doing this kind of set up. But I've been doing this
throughout either we'll do, we're going to bring in
a branch node like that. If it is our player character that is doing the overlapping, I'm going to bring
in a sequence node because there's a couple of
things that I'd like to do. Holding down the S key, I'm going to left click,
bring in a sequence node. Then I'm going to
zoom on back here. And I'm going to move this
bit of script right over here where I drug over our
add points section of script. Now the first thing I
want to do is I want to add some points for
collecting a fire flower. So I'm just going to move
this up into position. Zoom on up a little bit, frame this like so off
of our then zero pin, we're going to add some points that we'll click to add a
little reroute node there. I do need to specify, I'm going to put
a zero in there. Where exactly I want
this to spawn in. Well, I added this arrow
component for that reason. So I'm going to
drag and drop this onto our get transform. And you can see that's
actually not going to work because this
is not an actor. I got to delete that out. Let's drag and drop
our arrow in here. And I'm going to drag
out of here and type in get world transform. So this is a scene component
as opposed to an actor. That's the spot where I want
to spawn in our points. Now because this
is a fire flower, I get to specify how many
points I'd like for this to be. Instead of 100, I'm going to
make this worth 1,000 Again, you can customize that for
this particular variable. That shall now add some points. The second thing I want to do
is destroy some components. I will bring in my box flower. Let's drag and drop
that into the graph. I'm going to drag out of this
and type in de a component. Now I don't want to
destroy the entire actor. I want the block to hang out. I don't want this entire
thing to go away. But there are a few components I want to destroy off of this. I want to destroy my box flower, that is the trigger
box by the way. I also want to destroy
our mesh flower. I'm going to drag
that in here and we can plug both of these into
this destroy component. And I also want to destroy
our power up glow once again. We made a reference
to that right over here in our
block animation. We right clicked on this and
promoted that to a variable. And we did that so that
we could then destroy it once the character
collects that fire flower, otherwise that glow is
going to hang out there. And once again, here's where we are destroying that box flower. So the first time this is going to be valid
and the player is going to see this
relative location of our box flower rise on up. But the second time after it's collected it's not
going to be valid, so there's going to be
nothing to move on up. Destroy the box flower,
the mesh flower, and our power up glow
all three of those. I'll simply select all
these and tap that C key. I will call this my destroy
the lock components. Script color is black as well. We've got this framed up on
screen for all pretty well. Let's go ahead and
compile and save this Now let's go ahead and
test this back in our level. Now we should see when
we play our game, we should see the flower
rising up out of this. And now we should be able
to collect it like so now nothing actually
happens yet. We don't actually gain any
flower power, if you will. So that's to come next video. More work to be done giving
our character flower power.
42. Fire Flower Player Transformation: In this video, our goal
is to create script, notifying our character that they've gotten a fire flower, so that the character
can react accordingly. Now this bit of
script is going to transform the player upon
collecting the fire flower. A lot of work to get
done in this one. Let's hop right to it
and not waste any time. I'm going to start
off here in my BP, third person
character blueprint. So I'm just going to select it. Press the Spacebar
to open it up. And inside of here I
want to get started. Let's go to our Viewport first. And we're going to select
our capsule component. That is our main component here with which other things are attached to this indentation shows an attaching relationship. I'm going to scale
this down right away. And I can scale this
uniformly over in the details panel by clicking
on this little lock button. And then press 0.75
Then pressing Nor, to just shrink our
character overall. By default, we want
our character, our playable character, to
start off at a smaller size. Now I'm also going to set our capsule half height
and capsule radius here to be slightly different. I'm going to set our capsule
half height to be 96. And we'll set our capsule
radius here to be 34 something a little
bit skinnier like that, a little bit taller, just to give a little bit more
forgiveness there. All right, next
let's go inside of our event graph and we're going
to create a custom event. So pan over, right mouse button. I'm going to right
click, type in custom events, add custom event. I'm going to call this
got flower power. Now again, custom events
have to be manually called, so we're going to have
to call this eventually. But now we've already
got this in place. So that is all well and good. Next we're going to
create two variables. Clicking over in the my blueprint
panel, the plus button. First one is going to be
called player scale small. This is going to be a vector. Then I'm going to add
another one called has Fire flower and this
is going to be a Boolean. All right, if I compile these, I do want to have this has Fire flower bullion
that is going to be false by default our
player scale small, I want that to be one all
the way across the board. Okay, next what I want to do is I want to create a
category that these live in. Over in the category section of the details panel, we
can create a category. So I'm going to call this
my Player Health category. Player Health pressing Enter. So now you can see we've added a category called
Player Health over in the My blueprint panel and Player Scale
Small is in there. I'm going to also put has
fire flower in there as well. With that selected category
is going to be Player health. All right, next what I
want to do is I want to create a time line
that is going to control the growth of our character when they
collect the fire flower. It's going to be this
sort of shrinking and growing very rapidly,
sort of effect. So I'm going to right
click in some empty space, type in time line. And I'm going to name this
our growth time line. And this is probably going to be the gnarliest time line we
put together in this course. I'm going to double click
on this to open it up. We're going to add
a float track. Track. Float track,
and I'll call this our Growth multiplier. Now I'm going to set
the length of this to be 0.8 seconds. Then I'm going to set
keys every 0.05 seconds. I'm going to try to do this in a relatively
organized manner, and then we'll actually set the keys and values for
these as we go along. I'm just going to hold
down control and scroll. Well in, just to expand out our timeline here
a little bit more. So our first key, right click,
we're going to add a key. This first key is going
to be set to a time of zero and a value of 0.9. Can bring these in like so. Our next one I'm going
to place down here, right click Add key. This is going to be
a time of 0.05 and a value of 0.65 Again, this is going to be
a scale multiplier. You might have to
click these arrows to constantly put these in
view and scroll in and out. Our next one I'm going
to click Add a Key. This one is going
to be 0.1 seconds. The value is going to be 0.9
The next one, right click, add key, 0.15 and the
value is going to be 0.65 So you can see
this sea sawing effect. Next one, I'm going to right
click right about here. We're going to add a key. This is going to be 0.2
seconds and a value of 0.9 Then one more,
down low here, right click, add a key, 0.25
and a value of 0.65 Okay, now we're going to step
it up a little bit. We're going to have
some lower growth and mid growth and high growth. This next one, I'm going
to click right about here, Right click Add Key. It's going to be
a time of 0.3 and a value of 1.1 Next one, I'm going to click right
about here, Right click. It's going to be 0.35 for the time and the
value is going to be 0.65 These lower portions of
our saw blade here are essentially going to be 0.65 Scroll wheeling
back a little bit, I'm going to click right
about here, Add key. This one is going
to be 0.4 seconds, 1.1 Right click Add key, 0.45 0.65 for the
value. Right click. Add another key. This is
going to be 0.5 seconds and 1.1 We're going to add another
one, right about here. Right click, 0.55 is the time, 0.65 is the value. Then we've got a few
more to go here. Right clicking.
Panning this over. I'm going to right click right about here. We're
going to add a key. This one is going to
be at 0.6 seconds, the value is going to be 1.3 We're going to
click Add a key, 0.650 0.65 Right
click Add a key, 0.7 and 1.3 Right click Add key, This is going to be 0.75
and 0.65 for the value. Then last one least we're almost there guys, add this key, this is going to be
0.8 and a value of 1.3 So I'm going to highlight
all of these scroll, scroll, wheeling back
left click and drag. All my points here
are highlighted and we can frame
them up like so. Now you've got a seesaw
pattern that looks like that. So all of these bottom
key frames have a value of 0.65 I've set these all 0.5
seconds apart there. You can watch the
time. You're kind of seeing the pattern here, so All right, I think
you have it from there. All right, so jumping out of here and back to
our event graph. So we've got our
got flower power. What I want to do is,
after we call this, and we'll worry about
the call for this later, is I want to set our
has fire flower. So I'm going to drag in
our has fire flower. I'm going to set it and
we're going to say, yeah, we now have
the fire flower, so we're going to
turn that to true. Let's go ahead and
play a sound right after play Sound two D, and our sound here is
going to be our power up Sound Power up like so. Then we want to
adjust hit points, because if we do have
the fire flower, we're essentially going
to be adding a hit point. So if I just right click and
type in adjust hit points, and if you forgot where
this comes into play here, let me just zoo
out a little bit. We'll wire this in. We'll come back to this in just a second. I'm going to double
click on this. That's going to jump us over to calling this custom event, this modification
of our hit points. This whole bit of script that we did earlier
in the course. So let's make it a call over to this to modify our hit points. Now I need to jump back to this fire flower script
that we're working upon, because when we get
the fire flower, we want to adjust our hit
points up one right here. Hit points modifier,
let's add a one so that, that value of one gets passed along through here
into this equation. Okay, so after this, we adjust the hip points upon
getting our fire flower. This is where we're going
to bring in our timeline. Let's play from start to ensure that we always
start from the beginning. Note we have this
growth multiplier. We're going to be
using this to multiply against our player scale small. So I'm going to
hold down control, left click and drag. This is a value of one
across the board here, so we're going to use this to multiply against our
growth multiplier. I'm going to right click
in some empty space type in the multiplication
key to bring in a multiply operator and we're going to multiply
our growth multiplier. Which is oscillating down and up and down and
up and down and up. The values of this keep
changing rapidly over time. We're going to multiply that by ones across the board here. Now we're going to
use this to scale up our mesh by our mesh. I'm talking about, if I
go to our viewpoint here, this actual three D
mannequin mesh right here. Let's go back to
our event graph and I'm going to bring in a
reference to our mesh. We're going to drag
off this and type in set relative scale three D. So as our timeline
is updating here, we are going to be modifying the scale of our mesh through this bit of
math right here. Now this may beg the question, why are we scaling our mesh instead of
our capsule component? Because if we scale
our capsule component, everything else would
come along for the ride. Why not just do it that way? Well, the reason for
this is because if we do scale that,
instead of our mesh, our spring arm and
our camera set up right here is going to
do some weird stuff. So we're going to go this approach and then we're going to manually modify the size
of our capsule component. So that's to come here
in just a little bit. And in fact, we'll take
care of that off of the finished pin
of our timeline. Here I'm going to drag
off of our direction. This can give us
the direction of our timeline to
drag off of here. And I'm going to type in
switch on timeline direction. Now we've got a forward
and backwards direction that our timeline can play in off of this finish pin
plug into here like so, we want to bring in a reference
to our capsule component. Now drag that in, what we want to do is
drag off this and type in set capsule half height. And then I'm also going to
drag off of this and type in set capsule radius. When we finished playing our timeline in the
forward direction, we want to set our
capsule height because our mesh is essentially
going to be bigger. We need our capsule
height that is surrounding our character here
to adjust in size as well. We're going to set our capsule
half height to be 120. Whoops, 120. We are going to set our
radius here to be 40. Make sure you wire
this in like so. So that's, we're
playing it forward and essentially we've grown in size. Something else I
want to do here is I want to bring in
another reference to our mesh. Drag
this in like so. We're going to drag off this
and type in set location. We're actually going
to manually adjust the position of our mesh as well to fit nicely inside of this resized
capsule component. So I've figured out all
these values through some trial narratives
to save us some time. And I'm going to set
our new location here to be negative 90. Okay, so this is going
to be coming off of the time line.
Forward direction. Okay. Now if we're to play
this time line backwards, meaning we got hit, we want to essentially
reverse these effects. So what I'm going
to do is I'm going to hold down control and make sure I select these
nodes right here, 1,234.5 Let me just re
highlight those again. I'm going to hit control
D to duplicate those all. And I'm going to
put another set of them off of this
backwards direction. If we're essentially playing
this timeline backwards, meaning we have gotten hit, I want to reset our
capsule component back to its normal size. And our half height
was 96 by default. Our radius was 34 by default. And our location
here was by default, roughly negative 8,060.86
That's what I have in my notes. Anyways, that is this bit of script coming off of the finished portion
of our timeline. Now obviously nothing will play this timeline here in reverse unless we have some
event that tells it to. What I'm going to
do is I'm going to click pan over a little bit. I'm going to right click again. Custom events. We want to call this
Player Damaged. So we have a custom event
called Player Damage. We're going to plug this
into reverse from end, so we have to manually tell
this when we want to call it. Now with this now in place, we can go to our adjust hit point script and modify
things a little bit. So I'm going to double click on this to go to this
bit of script. Our adjustment of the hit points way down here in the
extreme lower right. If you want to interpret
all this you can, but essentially this is
where we're getting damaged. Where we're getting hit here, we're going to set our
fire flower bullion, let's drag this on top
of this pin like so. That'll bring in a
setter automatically. We're going to set
this back to false. And we're also going to
drag off of this and type in player damaged. Making a call to that
custom event that we just created and plugged into
the reverse of timeline. So when we essentially
lose a hip point, we're going to flip this has fire flower to false
and we're going to call this custom event to play our timeline in reverse. All right, almost done here. Now we need to call this got
flower power custom event. Let's go ahead and
compile and save here. Very important we compile
and save and now we need to call this from our
fire blueprint. So let's open up our
fire flower block. Blueprint, Where is our
fire flower? There it is. Let's double click on
that. Go inside of there. What we want to do is call
it somewhere in here. Now currently we're checking
if it's our player character that's doing the overlapping and then collecting the fire
flower and all that jazz. That's all well and good,
but we actually need to access this got flower
power custom event. And this set up right here
is not going to do it. This is enough to
detect an overlap. But we want to check if it is our third person character
that's doing the overlapping. The reason for that is we need our third person character in order to call this custom event. We'll just delete these three
on out here, 12.3 Instead, we will drag off
of our other actor like so and we will cast
to third person character. And the reason we're going
to go with this set up is because we can now
drag out of here and type in got flower
power making that call over to our third
person character. And then we can plug this
into our sequence node. Okay, let's go ahead and give us the try, compile and save. And going back to our
level editor here, I'm going to jump into play. You'll notice that I
am smaller by default, so let's go ahead
and interact with the block and jump on up. You can see I have
grown in size and the collision for my larger
size appears to be intact. Now let's go ahead and get hit. Let's see if this
goes in reverse. Upon getting damaged,
we have shrunk back down and it looks like our capital component has
shrunk back down as well. It appears everything
is working as intended. Let's just frame up
our final script inside of our BP third
person character. If you want to check
it over once again, true power up hip poin
modifier set to one. And then here's where
we are adjusting our character's
growth size and also modifying the capsule
components size and also our meshes location within that
capsule component. All right guys, that's going
to do it off for this one. See you in the next one.
43. Fireball Blueprint: All right, now
that we can gather the fire flower and
our player transforms, the next step for
us is to make it so that the player can shoot
out some fireballs. And to do that we need to
create a fireball blueprint. That's what we're going to
accomplish in this video. And we're going to
actually start off here inside of our project settings, we're going to create something known as a collision channel. And that's going to
be used inside of our Fireball blueprint
way in the upper right. We've got this settings, We're going to click
on this drop down. We want to access our
project settings. Inside of our project settings, we're going to access
the collision section over here on the left hand side. Now right here where it
says object channels. We're going to create
a new object channel. Right here, clicking on this, we're going to be
prompted to give a name. I'm going to call this Fireball and I'm going to leave the
default response as block. And I'll click Accept. Now we're going to put that to
use here in just a bit, but for now we can close out
of our project settings. That's all we needed
to do here was to create a new
collision channel. Click out of here or new
object channel rather. Let's go into our platform
blueprints folder and we're going to
find some empty space. I'm going to hold down
control and scroll wheel back to find
some empty space here. Right click Blueprint class. This is going to
be an actor class. Blueprint. I will call this
BP underscore Fireball. And with that selected,
I'm going to tap the space bar right
here to open it up. First thing I want to add
here is a sphere component, so I'm going to click under Ad, and I will choose
the sphere component right underneath a static mesh. And I'll leave this
named as sphere. Now I'm actually going to make this my root component
for projectiles. You want to make whatever
it is you want to project. In this case, this
is going to be a projectile root component, so I'm going to drag
and drop this on top of my default
scene root like so. And that's going to
make it the new root. Now over in the Details panel, and I've got to expand my
Details panel back out. There are some
settings that I want to change here for stars. I'm going to change
the material for this under my Material section. I'm going to click
this drop down. And I have one inside of
that infinity blade of X pack called lava
underscore hot. It's going to be this
M flowing lava hot. And that's just
going to give it a, a fireballs look about
it, pretty cool. And then down below
in the details panel, we've got our collision section. And for collision presets, I'm going to expand
this out right here. I'm going to change
this to be custom. And then I'm going to
change our object type here to be a Fireball. Now the reason that this
exists is because we just set this up inside of
our project settings. I'm going to set
this to Fireball. Now this is labeled as
a Fireball object type, and now we can set
collision settings for various object types. Now I'm going to set this to be block for the majority of these. However, I'm going
to set this to ignore some trace channels here. I'm also going to
set this to ignore the pawn which is us,
our player character. And also I'm going to set this
to ignore other fireballs. This is going to be important
because we're going to be able to shoot
multiple fireballs out and we don't want them to be able to bounce
off of each other. So that's going to be important
for that right there. So just to review
collision preset, set this to custom, you want to have your object type
set to Fireball. We just created that in
our project settings. And then for the
collision responses, make sure you have it
set up as follows. Next, I'm going to add
another component here. This looks kind of fire balish, but I'm going to add
a particle system as well. Click Add. And what I'm looking for
is I'm going to type in particle and I'm going to add a cascade particle
system component. This is an older
particle system. The newer versions of
Unreal used Niagara. But I know that
this given particle that I'm about to slide in over here exist inside of our
started content here. I'm going to go with
that particle system. You can choose any particle
of your choosing for me. I'm going to come over here
with this component selected. And where it says
particles template, I'm going to choose
underscore fire. Once again, this exists inside
my starter content pack. You can try out any
of these other ones, but I'm going to go at this one. So now it's going to have
this sort of a look about it. Now, just to make this look
a little bit more dangerous, if you will, I'm going to set
the custom time dilation. This is essentially
the play rate of this times ten because
once we shoot this out, we want to ensure that our
flames aren't lagging too bad. Behind this particle system
is attached to this sphere. And by setting our
play right here, our custom time dilation to ten, it's going to make it look
like it is constantly on fire. Okay, one more component to add here in the upper left add, we are looking for projectile
movement component. And this is what's actually
going to be able to make this fireball move in our environment is this
projectile movement component. With this selected, there
are several properties I want to alter over
in the details panel. The initial and max speed. This is how fast it's going to go initially and then maximally. I'm going to set these to 2,500 respectively.
For both of them. I'm also going to should bounce right here because I do want this to bounce
off the ground. So check that checkbox. Then I'm also going
to come on down, there's a bounciness and
there's a friction setting. I'm going to set
the bounciness to 0.5 and the friction to be zero. So we can see that
these properties right here have been changed. That's what that
little back arrow feel free to play with those as we get these spawning
into our game. All right, and last but not
least up here we've got our class Defaults
button that determines some properties about this
actor class blueprint. I'm going to scroll
way down towards them, not exactly towards the bottom. Here it is, Initial Lifespan. We can actually set the lifespan of this actor right here. Again, a default value of zero. As you can see from the tooltip means it's going
to live forever. I'm going to set this to be 2.0 meaning after 2 seconds this would automatically
be destroyed. With that, I'm going to go
ahead and save this blueprint. That's all we wanted to
accomplish in this one. Over the next two videos, we're going to make it
so that we can shoot out this fireball.
We'll see you there.
44. Shoot Fireballs (Basic): Well, now that we have a
Fireball blueprint created, let's work towards having
our players shoot it out. For this, we're going
to be working inside of our blueprints folder. Select your BP, third person
character with it selected. Tap the Spacebar to open it up. And I'm going to come
to our Viewpoort tab right away because
we're going to be adding a component in here that I would like
for you all to see. Now I'm going to
select our me here. And the reason I'm selecting
this is because I want to attach another
component to our mesh. So long as this is selected
first and we add a component. And I'm going to click Add, I'm going to add an
arrow component. So this component is now
attached to our mesh. Currently it is at their feet, but I'm going to be altering the position here in just a bit. I'm going to rename this
my Fire Ball Spawn Points, because that's what we're
going to be using this for. Whoops, I forgot the
on spawn point there. With this selected,
I'm going to set some details over in the details panel
under the Y location. I'm going to set that 240. Just going to shove it out in front of our character
a little bit. The z location, I'm going
to move up to 135 like so. And then I'm going to
rotate this rotation, the y rotation, I've
got to negative 30. And the z rotation, I'm going to set this to be 90. Essentially, we're going to have our arrow component pointed
in this downward direction. It's attached to our mesh two. When we turn our character
around in our level, this arrow is going to
pivot around as well. Now this is not only
indicating the spawn point, it's going to spawn
in right here. When we tap a key, it's going to spawn a fireball. It's also going to spawn
it off in this direction. So just know if
you want to alter the trajectory of your fireball, you can fiddle with
this angle as well. Okay, next we're going to dive back in our
content browser, and we're going to use the input system that came along with our third
person character. This was introduced in
recent versions of Unreal. And we're going to come under
our actions folder here. And what we need to add is
a new input action asset. Now we can do that by right clicking in
the content browser. Here in this directory, I'm going to come under input, and we're going to
add input action. And I'm going to name this underscore shot,
underscore Fireball. And then if I press the
Spacebar to open this up, you can see that our input is going to be of the Boolean
type, like did it happen? Did it not? This is
all well and good. Let's go ahead and save this. And then I'm going to dive
back into the content browser. In our input folder here
we've got this IMC, underscore default, these are the input
mappings that we have. And I'm going to select this and press the Spacebar as well. Mc default, that's short
for input mapping context. I'm going to press the
Spacebar here to open this up. And I now need to slot in our input action of shooting
Fireball inside of here. So I'm going to click
this plus mapping. I'm going to slot in our newly created
underscore Fireball or shoot Fireball rather. Shot Fireball. Now I also have to
decide which button or buttons I would like
to map to this action. A couple of things we
can do here is if you select this keyboard like so, you can now any key on your
keyboard to map it to that. So if I was to tap the F key, you can see it's now going
to map it right there. So the F key is going to
make this input happen. I'm also going to press
button one more time, and for those of you with
a controller out there, we can set it to a controller as well if you simply
select this keyboard. And I have a controller
hooked up and I'm going to press the X button on
my Xbox controller, that is the left face button. You can see how it automatically maps it there as well,
pressing the key, or in my case, my
Xbox controller, to the X button that I'll call for this input to fire off. Let's go ahead and
save this right away. Now, if you don't recall
from earlier in the course, where the heck is all
of this being used? Well, inside of our BP
third person character, inside of our event graph. Here, I got to find it. Right up towards the
top here is where our input mapping context is associated with our BP
third person character. It's through this function
right here, this IMC default. This is where it's telling
our third person character to use this collection of
actions so to speak. All right, I'm just
going to collapse this. Make sure that saved
you can close this out as well as your IA
shoot fireball. Okay, let's make the first pass of our shooting of
the fireball happen. I'm just going to find
some empty space here and I've got my got
flower power right here. In fact, I'm going to left click and drag around all this. Tap the C key and type in got. Flower power. Just so
I can easily identify that bit of script,
make that black. And then right below that I'll do my shooting
of the fireball. So I'm just going to
hold down control and zoom one up a little bit. Right clicking in
some empty space. I'm just going to type in shoot, there is my input
action event for shooting of the fireball.
I'm going to bring that in. What I want to have happen is
when we start that action, I'm going to bring a branch
out and I want to find out if expand out in my blueprint panel under
the player health section. I want to find out if we
have the fire flower. I'm going to drag and drop
this On top of our condition, we only want to
be able to spawn, that is to shoot out fireballs if we have the fire flower. Now if I right click on my fire flower right
here, this bullion, I can find references to this within this graph
and check this out. If you double click
on any of these, you can see where when we get the fire flow, the flower power, when this custom event
is being called, we're flipping that to true. That's how you can
find out where various variables
are being used. You can just simply
double click on them after you have right clicked on them
and find the reference. Okay, so we're
going to ask, does our player have the fire flower? If that is true, we are going to
drag out of here in Spawn Actor from class. Well, we just created
a Fireball blueprint, so I'm going to click on
here, type in Fireball. My BP Fireball would be
a little bit weird to spawn in a fire bar and now I need to tell us where
do I want it to spawn in? Well, we just created a
Fireball spawn point. Let's go ahead and drag
in this component. So drag off of here and
type in get transform. We want to get the
world transformation, world transform right here. Get world transform wherever this is located in the world. At the time, we press the F key, and then let's also play a
sound off of this as well. So I'm just going to drag off
of here and type in sound. You could play a sound at
a location or two D Sound. I guess I will play a sound at the location
of our character. I can right click it some
empty space and type in get actor location. That's going to be
the location of our third person
character. For the sound. I've got a Fireball. All right, so there's going
to be our basic script here. Let's go ahead and
compile and save. And then jump back to
our level editor here. Now before I click play, I'm actually going to expose a problem with this right off
the bat, which we will fix. But I'm going to go into my
blueprints folder and I'm going to place a few coins in the pathway of my character, Ensuring I've got my two D snap settings on
to the main level. I'm going to place a coin here. I'll place one up above as well, because I am trying to
expose the problem. All right, let's
jump in and play and see if once I have
the fire flower, I can shoot out a fireball. All right, in the game here, tapping the F key, see if we can shoot off a
fireball right from the gecko. I cannot. Let's go
ahead and collect the fire flower transformed. I'm going to tap the F key now. Obviously, that
fireball is a little bit big and we could see
a problem right here, which I was expecting
that problem. Let me just come on down.
Whoops. We died there. Let's go ahead and
jump back in and play. You saw that first problem. It's colliding against the, with our invisible coin. So we'll have to deal with
that in just a moment. But trying to fall down here, you're also going to find
that it's going to collide against the collision volume
around your coin as well. So a couple of issues
here to clean up. Issue number one that
we're going to clean up is our fireballs colliding
against some things we don't want it to
collide against like this trigger box right here and this trigger
volume right here. And we can do this
by coming inside of our settings, project settings. And we were just in here a moment ago under the
collision section. We're going to come under our various presets
right down here. So I just click this
preset right here. And there's a few of
these I want to edit. The first of these being
overlap all dynamic. If you select this overlap all dynamic and then click Edit, you can see its
current responses to these various
collide collisions. Right now, our Fireball, anything labeled as a fireball
like our BP fireball, is set to block. This is set to block
a Fireball response. I'm going to set that to ignore. Once again, inside
of our BP fireball, we can see that our sphere is
set to be a fireball type. Coming back inside of
our project setting, we wanted to overlap
all dynamic, we wanted to swap that. We're also going to
come in to overlap all and we're going
to edit this. This is also set to
block our Fireball. Let's set that to
ignore and accept it. We're also going to
select our preset. We're going to it
this. And we're going to set this to
ignore and click Accept. We need to do I
because our BP points widget component uses
the UI collision preset. Now you might need
to do this for other object types
further on the course. So just know that
if your Fireball is colliding against things it shouldn't be colliding against. To come back here inside
of your project settings, come under the collision section and to change some
of your collision preset settings in here
like I just did with that. Let's go ahead back in our
level, clicking that key. It's not gliding there. Next, let's try to adjust
the size of our fireball. So let's go back into
our fireball blueprint with our sphere selected here. Let's go up top here
where we got our scale. I'm going to
uniformly scale this, so make sure we've got
our lock set here. You can toggle this on and off. This will make it so
that changing one of these parameters
will change the rest. I'm going to set this
2.3 Let's try that. So it's going to be a
little bit smaller. Then if we go back
into our level, jump in and play. Let's see what we've got here. Okay, let's see. I'm going to press the key. It's no longer colliding
against that block. So that's pretty good, and it does not seem to be colliding
against our coins as well. So obviously you can toggle your Fireball
size to your liking. I'm going to leave that
as it is for right now. But guys, that is
going to do it all for this basic version of
shooting out our fireball. In our next video,
we're going to add some rules to accentuate it even more. We'll
see you there.
45. Shoot Fireballs (Advanced): All right, welcome everyone. In this video, we
are going to take our fireballs to the next level by implementing some rules. And by that I mean
we're going to restrict the number of live fireballs
we have at a time. We're also going to restrict the number of bounces
the fireball can make. We're going to spawn some visual effects when our fireball bounces two times
back here and unreal, we're going to be doing
some work inside of our BP fireball as well as
our third person character. So you might want to
get both of those open. We're going to start off in our BP third person character, and we're going
to create a brand new variable right away. This is going to restrict the number of live
fireballs at a time. So right word says
variables here. Click this plus button and
we will create one that is called live fireballs. And I'm going to change
this to an integer. This is going to keep track of how many live fireballs
we have at a time. I'll compile here,
we'll start off with the default value of zero. Now come and find your current
Fireball shooting script. Because we're going
to modify this, and in particular we're going
to take these three nodes, pull them off to
the side over here. We're going to create
a gap right in here. So give yourself
some space like so. And we're going to
modify it as such. After we shoot a fireball here, if we have the fire flower, we're going to drag
off the true branch. And now we are going to
get all actors of class. And we're going to get all
actors of our Fireball class. We'll just type in Fireball. And then what we're going
to do is we're going to right click on this
out actors pin. And we're going to promote
this to a variable. We're going to call this
our Fireballs array. And we're going to hook this in like so what
this is going to do is every time we
shoot out a fireball, it is essentially going
to then find out, hey, how many fireballs do we
have existing in the world? And we're going to be
storing that in our list. Now the reason we're
going to be doing this is because we're going to
drag out of this pin. And we're going to find out
the length of our array, the length of our list,
how many fireballs exist on this list. And the reason we're going to do that is because we're going to set our number
of live fireballs. So down here in the
my blueprint panel, find your live fireballs
array and we can simply drag and drop this on
this outpin like so. If we were, for example, to rapidly shoot out two fireballs by
pressing the Fkey twice, Bang, bang, we would come here. Do we have the Fireball
Yes. Or Fire Flower? Yes. Okay. There are two
fireballs existing in the world. We're going to add
those to our list. Those two are out there. That
is going to be the length. This variable will have
the number two inside. Now this is going to be valuable because we're going
to then drag out of here and bring in a node. We're going to find out live
fireballs is less than two. Only if we have less
than two live fireballs are we going to allow
the spawning of another. I'm going to plug
this into a branch like our script will be as such. And I'm going to just highlight this middle portion right here. Tap the Sea Key and
this is going to be my restrict number of
live Fireballs script. This is going to be optional, but I'd like to
have this in here and if you play Mario games, they actually do this a thing. I'll color this maybe some dark blue,
something like that. Just to zoom on up on
what we have here, this is going to be our script. If you want to pause a video at any moment
here to view this, make sure you got
that number two. And this is a less
than node right here. Okay, let's go ahead
and compile this quickly and then we can
test this out right away. So I'll just jump in and play. So now I'm going to Sam on
my F key here, see how many. So you can see I only have
two live fireballs at a time, and those have to die out before I'm able to
spawn some new ones. Next, we're going to restrict the number of bounces
a fireball can make. And for this we're going to
go inside of our BP fireball. Inside of here,
we're going to add a variable click right there. This is going to be called our. Fireball bounce counter, this is also going
to be an integer. If I compile this right away, I do want to leave this at
a default value of zero. Next, let's come under
our list of components. So we're going to right click
on our projectile movement. We're going to add an event, and we're going to add an
event on projectile bounce. When we do this, we're going to jump on over
to our event graph. Every time our
projectile bounces, it will fire out of here. What we're going to
do here is bring in our Fireball bounce counter. I'm going to hold down
control left click and drag. And then if I drag out of this I can bring in an
increment node. And what this is going to
do is it is going to add one to our variable here and then it's going to
set it right back in here. We don't have to worry
about setting our Fireball bounce counter
on the other end of this. This special increment node is going to simply find out
what's the value of this. It's going to add it
and then it's going to set it right back in here. Now out of this out pin I'm
going to drag out and I'm going to bring in a
greater than or equal to, if it's greater than or
equal to the number two. I'm going to plug this
into a branch node holding down B and left
clicking brings in a branch far Fireball
bounce counter is greater than or equal to two. I'm going to spawn
emitter at location. Spawn emitter, the
emitter that I would, I like to use the explosion
for just about everything. It's also in the
starter content, so that's why I use the P
underscore explosion A. Again, you can do spawn system at location for a
Niagara particle. I do need to feed
this a location. So what I'm going to
do is I'm going to get the location of our sphere here. We're going to drag this in like so we're going to drag
out of here type and get world location wherever this
is located in the world. That's where we're going
to spawn this explosion. Of course, it's nice to have a little bit of a sound as well. What I will do is after we
spawn emitterate location, I'm going to drag
off of here and type in spawn sound attached. I can simply take
our return value and attach to the
component like so. And that's going to
spawn in. I need to slot in an explosion sound here. I will simply use
the explosion cue. Then at the very end of this
I will simply drag and say, destroy what actor ourselves,
meaning this fireball. All right, so I'm
going to try to frame this all up so
you can check this out. Make sure that
you've got that two. This is a greater than or
equal to explosion explosion. For an easier time testing this, I'm going to select our
projectile movement. And temporarily I'm going
to lower our speed here, because right now
we're not going to see this bounce two times. Let me just change this to
something like 500, 500. I'll change that back here eventually, probably
between videos. So I'm going to compile this, we will play here. How many times it bounces? 12, boom. 12. It's automatically
being destroyed, seeing those effects and
whatnot on that second bounce. All right, before I
forget, I'm going to set my speed back up here to 2,500.2500 But again, you can fiddle with
that to your liking. Okay, the next thing I want
to do here is check if our fireball is hitting a
mostly vertical surface, and if it is, we're going
to instantly explode that. As opposed to waiting for our fireball to bounce
twice and then explode. Now to do this, I'm going to
drag my projectile bounce over a little bit more and we can break out
our impact result. And we can do that
by dragging out here and typing in
break, Hit Result. So I'm going to expand this, do. What I want to do is I
want to find our normal. We're going to drag out of
this, I'm going to type into vector, get get abs. Then I'm going to
take this and I'm going to break this out. We're going to
break this vector. We're going to find
out the z from this. And we're going to drag
this into a less than node, and we're going to find
out if this is less than 0.9 And we'll run through some example scenarios
here in just a little bit. I'm going to hold down
the B key and left click to bring in
a branch like so. And I'm going to drag
this in like so. Okay. What we're then going
to do is find out what number is being
output here by simply bringing in a
temporary print string note. So I'm going to right
click in some empty space. Type in print string. This is just going to
be a temporary note. I'm going to temporarily
plug the true, the false, into this, and I'm
going to take this Z value. And plug it directly into here. Just so you can see this number being spit out to the screen. Now I am going to place a surface right down here and then shoot
a fireball into it. In fact, I'll place
it along the top here just so we can
see some values that are spit off when we
are shooting our fireball. So I'm just going to
bring in a cube here. I am simply going to a
little bit like this. I'm going to rotate a
little bit like that. I will move it down a
little bit like this. I'm going to shoot off
of a surface like this. Okay? Jumping in and playing. All right, so here we go. You get this fireball.
You're going to want to look up by the Mario icon in the far upper of this number printed
out to the screen. So here we go, 0.5 0.5 0.5 Okay, so you kind of get an idea of the values being spit out here. Let me just turn off my
angular snap settings. Rotate this a little bit more, okay, let me angle it like that. 0.7 0.7 0.7 Angling it now to be a little bit
more vertical like that. Here we go. It's, the first number is 0.178 And then it's getting a value of one as it's bouncing
off that flat surface. Absolute value is going
to ensure that we don't have a negative
number there. And what we are essentially
wanting to do here, I'm going to just destroy
out these nodes, is this. I want to increment
our bounce counter. I'm actually going to pull this back a little
bit like this, and I'm actually going to
bring this down a little bit. If this evaluates to true, I want to immediately
spawn these effects in. Okay, we don't even want to increment that bounce counter. Okay, let me just
drop this down. I'm going to frame this
up as best I can like. So let's go ahead
and compile this. And then test is out jumping
back to my level, playing. So you're going to see, going to shoot this mostly vertical. It's going to destroy it right away without waiting
for a second bounce. I'm going to tilt
this a little bit more like that. Let's try that. We're going to destroy
that right away. If I was to simply, I shouldn't say mostly vertical, I should say somewhat vertical. So now we're not
going to worry about a slightly tilted
environment at all. This is going to
allow it to bounce, but so long as we have a slightly angled
surface like that, it is going to destroy
it right away. It's not going to wait
for a second bounce. All right, one more
thing we're going to fix up with our fireballs. Before I forget, I forgot to address our
invisible block here. Here's the current problem. If I jump back in and play and I'm going to get
our fire flower. And you can see that
I have invisible blocks right down here. If I tap that F key, you can see that it is colliding against that
invisible block yet, so we have to address
that problem. So we're going to dive into our invisible block, blueprint. You can select any of
these invisible blocks. I can edit the invisible
block by going right there. The current problem is I'm going to zoom up where
we are beginning play. Right here, our cube. Currently, if I
select our cube and go into the collision settings, you can see we added the
fireball and it is set to block the fireball here
off of event begin play. What we can do is
drag off of our cube, type in set collision response to channel this node right here. We're going to wire this in. We're going to set
the channel to be Fireball and then we're going
to set the new response. Make sure that that
is set to ignore. Go ahead and compile
and save that. Then if I jump in
and play and let me move my fire bar out
of the way here, I actually just have a block
there in the fire bars, just looking like it's resting inside of it that way it shouldn't hit me anymore. Okay. I'm going to
jump in and play here. Get that fire flower tapping. And you can see it's
no longer colliding with that invisible block. Let me get this. Let's see if I can shoot
a fireball off of this. You can see now the
problem is it is going right through that block
after I interact with it. So I have to make sure that
I turn that collision back on once we've revealed
that invisible block. To do that, I'm going
to go back into my BP block, invisible coin. And we will say that after we have finished
interacting with this, I'm going to go back down where we are turning
our invisibility on. Let's put it in this
area right here. I'm just going to pull this on over to bring our cube over. I'm going to type
in, actually I'll just steal that
node from up here. It was called set collision
response to channel. I'm just going to
copy that node. We're going to bring
it right back on down here and I'm going
to paste that node. We're going to sneak
that in right here. Make sure you plug in
your Cube as a target. And this time we will say after
we've interacted with it, we are not going to ignore
the Fireball anymore, Instead we are
going to block it. So go ahead and compile and
say that, let's try this. Once again, jumping
back in and playing. You can see it's passing
right through there, hitting that other block, not going to interact
with this block. Now if I try to
shoot this block, it is interacting with it and
colliding where it should. All right, we now have
an advanced version of the Fireball guys that is going to do
it all for this one. See you in the next one.
46. Base Block Components & Functions: Over the course of
the next few videos. Here we are going to be
putting together a block. And what a block does for those that are not
familiar is it turns regular blocks into coins for
a limited amount of time. Once the timer expires, those blocks that turned into coins turn back into blocks. In order for us to achieve
this back in the engine here, we're going to make
some modifications to our BP base block. Go ahead and select that, Then press Space Bar to open that up. Inside of here, we are going to add a couple of components. Let me go back to my
viewport view here. Let's add a component.
The first one is going to be a child. If we type in child, it's going to be a child actor then attached to
our child actor. So make sure you
have this selected. We're going to add
sphere collision. And we can find that down here under the
collision section. Sphere collision, I will
call this my coin collider. With our coin collider selected, I'm going to change
the sphere radius. I'm just going to make it
a little bit bigger to 35. It is buried on the inside
of our block right now, which we want it to,
we don't want it to be exposed on the
outside of our block. And our child actor over
in the details panel, we can slot in a
child actor class. We're going to leave
this blank for now. Now inside of the
blueprints that, we do want to expose a coin
when the block is hit, we'll set this to be
BP, pick up coin, but we're not going
to do it here inside of this parent blueprint. Next we're going to
create a couple of functions here inside
of our BP block base. And these are going to
serve to turn on and off the various effects when
we interact with our block. So right over here in the my blueprint panel under functions, we're going to click
on this plus button. This first one we
will call block. On the second one we will call
clicking this plus button. Once again, I will
call it block off. Simple enough. With
each of these created, we've added some tabs across the top here for
our various functions. I'm going to start
with my block on, so make sure that
that is selected. The functionality that I
want to add here is I'm going to drag in a
reference to our cubes. You can drag and drop
that in as follows. Then I'm going to drag
off of this and type in set visibility when
our block is on, we've interacted with our block, I'm going to turn our
cube visibility off. So we're going to
leave that unchecked. Then I'm going to drag out
of our cube once again here. And I'm going to type in
set collision enabled. So we're going to set
our collision for this cube to have no collision
because the blocks on, we don't want to be able
to collide with the cube. Then what we want
to be able to do is bring the reference
to our child actor. Then we're going to drag off of this type in set visibility. We are turn on the visibility of
our child actor for our block of function. I'm going to left click in drag to copy these nodes control C. I'll now go into my block off function just
to save some time here. I'm going to click
in here and then do control V to paste all this. This is going to be mostly
similar except we just need to flip all these
various settings here, so when our block is off, we want to make sure that
our cube is turned back on. We also want to
make sure that we have re enabled the collision. So for this we're going to do collision enabled
query in physics. And then the child actor, we want to make that invisible once the block has
been turned off. Once that timer has expired. All right, next
we're going to add a little bit more script
here with our coin collider. We're going to right
click on this. We're going to add an event, and we're going to
do Begin Overlap. And when we do, we're going to jump back to our
event graph here. I'm going to zoom on
back and I'm going to find some empty
space to put this. I'll put this way down here. Let's zoom back up on that. And then what I'm going to
do is I'm going to drag off of the other actor
pin and type in the equals symbol and we're
going to find out if this is equal to our get
player character. If it is equal I'm going to plug this into a branch note holding
down B and left clicking. If that is equal, we are simply going
to the actor actor, meaning this block itself. This is going to
ensure that if you collect the block coin inside, basically it is block time. That coin has been exposed, then the block itself
is going to be destroyed and thus
won't come back. Once the block time has expired, I'm going to left click
and drag around this tap, the C key type in block, block coin inside is collected. And I will turn
this black as well. And guys, that's all we wanted
to accomplish in this one. So I'm just going to
compile this and save. And with that we
have laid some of the groundwork for our P block. That'll do it off for this one. See you in the next one.
47. Child Block Tag & Child Actor: Welcome back everyone.
In this video, our goal is to add a tag and set a child actor
class within blocks. We'd like to have
turned into coins. When our block is active, you get to choose which blocks
you want to set this in. I'm only going to set
two of our blocks, our block breakable and
our fake breakable, to have coins inside when we eventually interact
with our block. But note that you can set this
for other blocks as well. If I open these
two up right now, I'm just going to hit the Spacebar to make
them both open up. What we can see is
that in each of these, the block breakable and
the fake breakable, they have now inherited
the child actor and the coin collider components that we set up in
our block base. So setting those up in our block base, the
children of it, including our block breakable and fake breakable.
They both have them. Okay. For both of
these, I'm going to come in and set
the child actor, so this is my fake breakable. I will set it in first
the child actor, I'm going to set
this to my coin, pick up BP, pick up coin. And then I'll do the
same inside of my block. Breakable child actor,
child actor, class coin. And we're going to set
it to the pick up coin. Then for each of these,
I'm going to come under the class defaults. Click on Class Defaults
at the very top, and we're going to
add a tag for this. And you'll see
where the tag comes into play a little bit
down the road here, but it's going to allow us to. And then I'm just going to
go in the details panel here and search for tag. Allow us to add a tag in here by clicking
this plus button. And I'll create one
called simply block. Just like so I'm going to hit control C here after
I've highlighted that. And then over in my
BP fake Breakable, I will select class defaults, search for tag, create a tag. I'm just going to highlight this and control V to pay Sap. And this is a label
essentially that we are associating with
each of these blocks. Again, we're going
to be making use of this down the road for any block that we want to
have having a coin inside, make sure that you also
add this tag as well. So I'm just going to
do these two blocks, but again, if you want to
add it to other blocks, you can make sure that
after you've done this, you've done the whole
Compile and save thing. And that's going to do it
all for this one guys. We will see you in the next one.
48. Camera Shake Blueprint: Welcome back everyone.
In this video our goal is to create a camera shake
blueprint that can be played when we interact
with our block. So a little bit more
prep work before we get to creating our
block blueprint itself. We're going to put this inside
of our blueprints folder. Right click, it's
some empty space. This is going to be a
blueprint class For this, we're not going to choose any of these top common parent classes. We're going to come
under all classes in your search bar here. Do a search for camera shake. What you're looking for
here is camera shake, base. Go ahead and select that. And then we're going to
choose select right here. Let's name this right away. Bp underscore camera shake. And then let's go ahead
and press the Spacebar on this to open it
up inside of here, we're going to set
some shake settings in the details panel where it says camera shake pattern,
root shake pattern. We're going to click on this
and choose wave oscillator. Now we're going to
expand this out and we've got a lot of ways
that we can shake this. I'm going to shake this
rotationally wise. You can shake it by shaking
the actual location as well, but what I'm going to do is
come under the rotation, the pitch, the yaw, and the role for each of these. I'm just going to set the
frequency to be five. So then under the
timing category, this is going to determine the duration in the
blend in and out time. I'm going to set the
duration to be 0.3 The blend in time 0.1 and the
blend out time will be 0.2 That's going to be our shake setting
something short and sweep that we are going to call to play when we
stomp on our block, guys, that's literally all that we want to do in this one. Go ahead, compile and say if we are finished
with this one, see you in the next one.
49. Force Feedback Asset: Welcome. I thought it would be nice to have a little
force feedback. That is controller rumble
when we stop on our block. So for those of you that have a controller hooked up to
your computer stick around. This video is for you. If you are only intending on
playing a keyboard mouse, feel free to skip over this one. As our goal is to create a
custom force feedback asset. Since this is sort
of a one off asset, I'm not going to create a whole separate folder over here. You could do that,
but I'm going to have this asset live in our
blocks folder here. And to get started, I'm going to write click at some empty space. We're going to come
under Input and we're going to create a
force feedback effect. Clicking on that, we just
need to give a name. I will call mine for feedback. And then I'll just press the
Spacebar to open this up. Inside of here, we're
going to click on our Channel Details here
and expand out our index. And we're going to
find a curve editor. And just like you saw previously in this course with
our various timelines, we're going to add a
couple of key frames to our timelines to defind
some forest feedback. I'm just going to right click in some empty space here
to add our first key. With that selected,
I'm going to add a time value of zero
and a value of zero. And then I'm going to
right click again. We're going to add another key. This time I'm going to add
a time value of 0.2 So our shake is going to last
for only 0.2 seconds, and this time our value
is going to be ten. We can bring these
both into view here by clicking on these
arrows, like so, if you want to make your jolt last a longer amount of time, you can obviously fiddle
with the time value. And if you want to
have a greater jolt, you can set your value to be higher or a smaller value
if you want less of a jolt. And right up here you've got your actuators that you can effect within
your controller. Currently, I'm going to leave
this to their defaults, the left large, small, right large, and small as well. We're just going
to save this out. And with this done, we now have a forced feedback asset
that we can make use of inside of our upcoming
P block blueprint guys that's going to do
it off for this one. See you in the next one.
50. P-Block Materials & Sounds: Welcome. In this
video we're just going to ensure that
we have all audio and texture and material assets in place before we
go ahead and create our block blueprint as you can see in our pause video here. This is what a block
is going to look like. It's got this bluish
looking switch on the top and it's got this
silverish looking base. Just to make sure that
we've got all these in place before we make
our block blueprint, let's go ahead and review what we've got in our
content browser. Back here in our
content browser, I'm in our audio
folder and I've got this swamp Sound that
we're going to be making use of inside of our block. Make sure you've got
that. Then inside of our Textures folder, make sure that you have
access to the block, the block breakable, as
well as one of these coins. Now, we should have
already dealt with the block breakable
and the coin, but we have not turned this
block into a material. That's going to be
our next step here. I'm going to right
click on this. We're going to create
a material from this. I'm going to leave
this default name. I'm just going to
press Enter here. And then I'm going
to move this inside of our Materials folder. So I'm going to drag and drop it from our Textures
folder here, inside of our Materials folder. We're going to move it here. And then I'm going
to jump on over to our Materials folder, Select that, then I'm going to hit the Space
bar to open it up. Now inside of here, there are
a few things that I want to adjust over in our
details panel. Under blend mode, I
want to change this from opaque to translucent. I also want to check
this box for two sided. Now, once I did make our
blend mode here, translucent, I also just made
this opacity input available on our master
material node here. What we want to do is
take our alpha value from our texture and plug
this into the opacity. Before I do that, I'm going
to change our preview here. It's currently on our sphere. I'm going to change it over to a cube so you can kind of
see what this looks like. And obviously that
looks terrible, right? However, once we plug this
value into the opacity, our alpha into the opacity, it's going to make it look a lot nicer by getting rid
of those streaks. Once we're seeing this in game, we're just going to
see one side of this. It's as if it's on a plane. Something more like that. So I just selected a plane here to see what
it's going to look like. Great, this is all
well and good. So go ahead and click Save. We can exit out of here then. And now we're going to want to create one brand new material. Because when we
stop on this block, we want a sort of squished
version of this to show. And so we essentially
want sort of a look for this block that's going to
maintain some of the blue, but we won't see any letter
and it's going to look like a sliver of blue since we've
stepped on the switch. So go ahead and
close out of here. And back in our
materials folder. I'm going to right click
in some empty space. We're going to create
a brand new material by coming right up here, I will. This underscore block. Underscore underscore blue. Let's go ahead and press the
Spacebar to open that up. Now I'm just going
to add a color here. By holding down the
three key number three and left clicking. That's going to bring in a
constant three vector node. I'm going to plug this into our emissive color
right down here. I want this to be a
little bit glowy. Once again, I held
down the three key and left click to get that node. What this is good for
is you can simply slot in a color value by coming
under the Details panel. You could click
on this color bar and choose one like that. However, I do have some hard values that I'd
like to punch in, so I'm going to leave the
R, the red value, at zero. The value I'm going to be
0.5 And the value I'm going to set to one to create a color that looks
something like this. And we're going to call
that good for now. We're going to be
able to make use of this in just a
little bit of time. So I'm going to go
ahead and click Save, and then we can
close out of here. After that's finished saving, we are now in pretty
good shape to begin creating our block
blueprint guys, that's going to do
it all for this one, win the next one.
51. P-Block Blueprint: Welcome. In this
video our goal is to create an actor
class blueprint for our P block that we can
interact with that'll turn other blocks into coins
for a set amount of time. In this video, we're
just going to put together our block blueprint. In the next one, we'll
actually implement the scripting to make all of
that functionality happen. Now to get started
here, I want to move my BP camera shake that we created in the lead
up to this video. I'm going to move this
over to our Blocks folder. Just going to drag and drop this over in our Blocks folder.
We'll move it here. Then I'm going to go inside
of my blocks folder. In fact, I'm going to create a separate block
folder inside of here. So I'm going to click
on my block folder, new folder, I'm just
going to call this block. Then I'll go into
my block folder. I'm going to select
my camera shake and my force
feedback, those two. And I'm going to drag and
drop those inside of there. We're going to move those here inside of our block folder. I'm going to click, we're going to create
a new Blueprint class. This is going to
be an Actor class, and I shall call this BP
score block underscore. Then let's go ahead and hit the Spacebar here to open it up. Inside of here, I believe we have six components
we're going to add. All of these will be attached
to our default scene. Root. This icon right here, ensure that all of these are attached to the
default scene route. This first one, if we add, it's automatically going
to be attached to that. So this is going to be
a plane right here. I will call this one block underscore in
the details panel. I'm going to set some
settings for this right away. The material that I'm going
to set for this is going to be our block
underscore material, This one with the icon on it. I'm also going to rotate it
and move it a little bit, so my rotation here
is going to be 90. It's going to flip
it up like that. I'm going to set the
location to be 50. It's going to move it
up here a little bit. Then down in the details
panel underneath collision, I'm going to set the
collision preset for this to be no collision, I don't want to be able
to collide with this. Next, I'm going to select our
default scene route so that the next component
that I add is going to be attached to this.
We're going to go to add. This is going to be
block collision, so I'm going to scroll on
down or box collision, not block collision,
box collision. I'll simply leave
this name as box. And with this selected
over in the details panel, I'm going to set my
box extent here. I'm going to set that
to be 42 by 42 by 100. Once again, I've determined all these values ahead of time. The collision preset
for this scrolling on down is going to be Block
all collision preset. Set this to block all. Next we're going to once again select our
default scene route. We're going to add a component. This is going to
be a static mesh. I will call this one
block underscore, underscore base,
underscore smashed. This is going to be a cylinder
over in the details panel. Do a search for a cylinder. And I'm going to do this one
in our engine, basic shapes. It's got that
approximate size of 100 by 100 by 100.
So we'll set that. I do want to set the
location for this, the z location to be
7.85 I'm going to set the scale of this to
be 0.92 in the X. I'm actually going to
have different values for all these unlock
your scale here. That way we can set unique
values into each field. It's going to be
0.92 by 0.92 with a 0.15 it's going to be something smashed,
looking like this. And I'm going to set
the material here to be a chrome ball,
something shiny here. This chrome ball should do just nicely down in the
rendering section. For this, we're going to turn
this visible checkbox off. What that's going to mean is we're not going
to be able to see this game until we
make it visible. Essentially what's
going to happen is once we step on this block switch, we're going to make
that reappear. Okay, next we're going to
select our default scene root. Once again we're going to
add another component here. This one is going to be a static mesh and this
one will be called block, underscore, underscore,
top, underscore, smashed. With this component selected, we're going to set the static
mesh to also be a cylinder. That same cylinder from the
engine basic shapes pathway. And if you don't have access
to your engine folder, you can click on this gear
icon and you can show engine content to ensure
that you're seeing that we're going to make
that our cylinder here. I do have a size here in mind. The scale of this is
going to be 0.85 by 0.85 by 0.1 something
smaller like that. Then I'm also going to
set the z value for this to be 20 up a little bit. I'm also going to
set the material for this right here to be
that one that we just created which is going to be block underscore,
this blue material. This is essentially going
to be what we're going to make our switch look like
after we stomp on it. This is to represent
the blue portion of this switch here. I'm also going to come under the rendering section where
it says visible here. I'm just going to
uncheck that for the time being, two
more to go here. So let's select our
default scene route. The next component
that we're going to add is going to
be box collision. Once again come
under box collision. This one I will call box
underscore two on that, box underscore smashed
with this guy selected. I'm going to set
the location to be 13 in the Z. I'm going to set the box extents right down
here to 42 by 100 by 13, something small like that. This is meant to represent the collision area after
we've smashed the block down. Also come on down under the
collision section and we're going to set the collision
preset for this to be block. One more component to add here, click the default scene route. Once again we're going to add, this one is going to be an audio component right
up at the top here, Audio. I will leave that name. No, actually I'll
change it to be Music. Let's change it to
be music instead. Music With this selected, over in the details panel, we're going to change
our sound right here to be our starter Music que. We scroll on down. We should find our starter background que. Something important we also
need to remember to do here is uncheck auto activate. Otherwise we're going to
hear this right away. Down under the details
panel right here. You've got this activation. It's auto activated, so we don't want this
to play right away. So let's uncheck that. And with that all done, let's go ahead and compile and save. Here we are done putting
together our components. In the next video, we're going
to add the script to make this functionality happen for our P block switch.
We'll see you there.
52. P-Block Script (Part #1): Welcome. In this video our
goal is to add variables and create script necessary to
turn tagged blocks into coins. When we interact with a P block. A lot of work to get
done in this one. Let's get right to it by
diving into our BP block. Inside of here, we're going
to add three variables over in the my blueprint panel by clicking on this plus button. This first one is going
to be called tag. The type is going to be a name. The second one is going
to be called blocks. This one is going to be
of the actor variety. Under the object types,
actor object reference. The third type that
we're going to create is going to
be a float variable. And we will call this
block time duration. Let's change that to a float. And then with these created, let's go ahead and compile and change up some
of the values here, as well as some of
the other settings. Starting with our
block time duration, I'm going to set our default
value to be 8.08 seconds. I'm also going to check this
box to be instance editable. So in the editor we can
override this if we'd like in the blocks variable. I'm simply going to change the variable type from
a single to an array. Essentially, we're
going to be storing an array of blocks. What array of blocks? We're going to be storing
an array of blocks, A share, a similar
tag for the tag. We're going to select that
and in the details panel, under default value, we're
going to put the tag of block. Now if this seems familiar, that's because this
tag block is the exact same that we put
in for various blocks. Here in our content browser. I added this to our block breakable as well as our
block fake breakable. If I just open up one of these
that I have my level here, I have a block breakable. We can see that if I go into the class default in
a search for tag, we added a tag called blocks. We're essentially
going to be searching for any blocks that
have that tag, and we're going to be
adding those that have that tag to this
array of blocks. All right, on with our script. What we're going to
do here is select our box component and we're going to write,
click on this. We're going to add
an event for when we hit this component. That's going to jump us over
to our event graph here. And we want to check
if the other actor is equal to our
player character. Going to click get
player character. Okay, so if this is true, let's plug this into a branch holding down the B key
and left clicking. If this is true, we're also going to detect if we hit
this in a certain manner. So actually we're going
to check to see if two things are true here.
Let me just disconnect this. Holding down the Alt
key and left clicking, we're going to extract some information about
our hitting of that box. And I can do this by dragging
out of our hit output pin. I've got this break hit result. I'm going to expand this out
and we're going to assess the impact normal drag out of here and type in
an equal symbol. We're going to check to
see if our impact of this box in the z direction
has a value of negative one. Essentially what we are checking here is when
we hit this box, did we impact this in
the down direction? Setting this value here, z value to negative one.
We'll check for that. We want to find out if
this is true as well. This is a tolerance value. I'm just going to set this
to a very small value. I'm just going to set it 2.01 and we're going to
check to see if both of these are true. I'm going to drag out here
and type in and I'm looking for an And bullion and I'm going to plug this
into the other side. And then we're going
to plug the output of this into our branch node. So we're essentially checking, hey, did something hit our box? Let's see, was it our
player character? Was that the other
actor that hit it? And oh, by the way,
did they hit it in a downward direction?
Did they stop on it? If both of those are true,
we want to do something. The first thing
we're going to do is launch the character. This is a function that is
specific to a character. So I'm going to drag out of our get player character and type in launch and you will find this function if you drag out of your get
player character. The reason we're going to do
this is we're just going to pop the character up a little
bit when they stomp on it. It's just going to pop them up in the Z direction a little bit. Going to set this to be 400
and I'm going to bring in a re route node here
so we don't have to disorganize of
a looking graph. Okay. Then right after this, what we're going to
do is we're going to plug this into a sequence node, holding down the S key
and left clicking. The reason I'm bringing in
a sequence note is because we want a variety of
things to happen here. Sequence note is going to
help us keep it organized. So I'm going to click
on this Ad pin a couple Times to add some
more output pins. Okay, the first thing
I want to do off of our then zero pin is I want to right click and I'm
going to play a sound. Play Sound two D, and the sound that
I want to play, clicking on this sound drop down is going to be
our thwamp sound. Then after this, I'm going
to drag out and type in spawn emitter at location. If you want to do
a Nagra particle, it would be spawn
system at location. The particle system
that I want to use here is called pot bake. This is from that
infinity blades pack that I added
earlier in the course. Now I need to feed this
a location, real simple. We can choose one of
our components here where we'd like this
to be generated from. I'm going to choose my
block based smash here, drag that in, we're going
to drag out of here and say get world location. The location of that
component is where we're going to spawn
in this emitter. What I also want to do, I want to play some
music right away. I'm going to drag in
our music component, Then I'm going to
drag off of here, Simply type in play. We want to play this from start, so I'm going to leave
that start time alone. That's the first
thing I want to do. Once we stop on our block left click and
drag, tap the key. I'm going to say
this is our block. Whoops, block X script. It's going to be good
enough color this black. Okay, that's well and organized. The second thing I want to do, coming down here a little bit, is I want to play
some camera shake and force feedback effects. For this, I'm going to
drag off and type in play World Camera shake inside
of my world camera shake. Let's click on this and we've
got our BP camera shake. By the way, before I forget, I forgot one thing when I created our world
camera shake blueprint. Let's go ahead and navigate
to this right away. That'll jump you
to where this is. I'm going to press the Spacebar to open up our camera shake. I'm going to open up the full
blueprint editor over on the right hand side under
our camera shake params, I forgot to add a rotation
amplitude multiplier, this is currently zero. Set this to be one and then
go ahead and save this. We're going to need that
in order to actually see the camera shake
that was under root, shake, rotation, rotation,
amplitude, multiplier. Set that to one. Going
back to our block, that is going to be
our camera shake. I need to specify an epicenter. I'm going to right click
get player character. We're going to drag
off of this type in get actor location. That's going to
be our epicenter, the inner and outer radius. We're going to set this
to 1,000.2 thousand. You can specify or
understand what exactly these specify by
going over the tool tips. Long story short,
through some testing, I found that this was
a good range given my camera settings for getting this world
camera shake to play. I'm going to leave the rest
of these parameters as is. That'll get our camera shaking. Next, I'm going to right
click, get player controller. Then if we drag out of
our player controller, this is just for you
controller people. A physical controller. I'm going to play for feedback. We're going to client
force feedback. That's the node
we're looking for. Again, if you're
playing with mouse and keyboard, you can omit this. But for those of you that
have a controller hooked up, this is kind of nice slot in
our force feedback asset. And there we go with
this bit of script. Just going to move
this on, over tap the key off of my one pin here. This is going to be called
my camera shake and force feedback script
color this black as well. All right, got that
bit of script done. Pause the video here
if you need to. Next we're going to bring our
sequence note on down here to build off of the
then two pin here. We're going to select
our two block meshes. I'm going to highlight both of those using control
and clicking on them. I'm going to drag
them down in here, so I have a reference to both. Then we can drag out of
either one of these and I can type in set visibility. And we can plug them
both into here. Plug this in as well here, we're going to make
these visible. We're essentially
going to be doing a little bit of
visual trickery here. We made these invisible
here in our viewport. If you remember down in
the rendering section, we made these invisible
essentially once we stop on this, we are going to
make these visible. Going back to our event graph, what we also want to do is
take our block and our box, these two components,
drag them in. If you drag off of either one, you can type int, we want to destroy
these two components. If I go back to our
viewpoint here, our block, we're essentially going to be
destroying that component. We're going to be destroying
our box collider here. Destroying those two out, and then making
these two show up. So it's a little bit of visual sleight of hand, if you will. Going to left click
and drag, tap the key. This is going to be our show. Let me pull this on over so you can see what I'm printing here. Show meshes and
destroy components. That's what we're doing
with this bit of script. Then we're going to
bring the sound down and build off of
our then three pin. This is where we start to detect which of our blocks has the tag. Let's bring in our variable here. We're going to get that. We're going to plug
this into a get all actors with function. What this is going
to do is return all actors that have this tag
with all of our out actors. We can store them in our list. We're going to store them
in this block array. So we can drag and
drop it right on here. Any blocks in our level
that have this block tag, it's going to find them all. It's going to store
them in this list. And then we are going
to drag off of here, bring in a four each loop
for each item in our list. Make sure you hook
that up as well. For each item in our list we're going to drag
out of here and cast to our B P block base. We're going to call
the function inside of our BP block, base block on. Let's just back up
here just a moment. I went over how some of our
blocks have this block tag. We're essentially
finding them all, restoring them in this list. What we are then doing is going through our list
here one at a time. And for each of those,
we're checking to see if it belongs
to the block base. Is that the parent
of our blocks here? Let me go and open
our block base here. Here's our block base. Inside of here, our block base. We created this block
on function that's going to turn off the
visibility of our block cube. It's going to hide
our block cube. It's going to turn off the
collision of our block cube. And it's also going to turn on the visibility
of the child actor. Now because we've got
our block breakable that inherits from
our BP block base, it's going to propagate
those effects on down to the children
of our BP block base. Once again, block
breakable inherits from our BP block base here, inside of our block P by saying, hey, let's find out if our array elements are of
this type BP block base. If they are, yeah, do this function right
here basically hide the block turn on the visibility of the child actor within. That's what's going on here. Get a left click and drag
around this tap the key. This is going to be my off
the three pin script to say find all with block tag and turn on function found in
the parent block. Parent block being
our BP block base. All right, we're going to
turn that block as well.
53. P-Block Script (Part #2): One more bit of script here. I got to add one more pen. This is going to be
an important one we're going to drag off of here. And we're going to
type in set timer by event off of this. We're going to drag backwards
off of this event pin. And we're going to bring
in a custom event. We're going to call this our block time over a custom event. And this is going to fire off
when our time expires here, our time is going
to be determined by this variable,
currently 8 seconds. Once we stop on this block, one of the things that we're going to do is
we're going to set a timer that's going
to be 8 seconds long. After that timer has finished, we're going to then fire
out of this custom event. That's how this works.
We're going to drag out of here and type
in four each loop. The loop that we're going to
go through is our blocks. Dragon drop that right on here. For each of our blocks, we are going to once
again cast to block base. We're going to then find out if that block in
the list is valid, is valid because we could have gotten the
coin inside of the block, thus destroying that
block altogether. If the block is still valid, meaning we have not
collected the coin inside, it still is around, it still
exists, it still is valid. We're then going to drag off
of here and say block off. We're going to call for any
block that still exists, we're going to call the
function called block off, which inside of our block base, what that's going to do is it's going to make our block mesh, our cube visible once again. It's going to turn the collision
for it on once again and it's going to make the
child inside not visible. Returning to BP block. We also want to do one more
thing off the end of this, and that is to
bring in our music. Then drag off of this and say, hey, stop playing that Music. Our music's going to play during the duration of
this block event, if you will, but we're going to turn it off after 8 seconds. We're going to left click
and drag, tap the C key. Let me just zoom on
out here a little bit. Pull this whole block on over. You can frame this up like
pause video if you need to. This is going to be my block
timer script. All right. Color that black as well.
A lot going on here. I know I went through that
very fast to try to fit this in my 20 minute
per video time limit. This is going to be
our final set up here. Obviously we need to
give this a test. So we've compiled our script. It looks good. We saved it. What I'm going to do now
is bring in our block. I'm going to drag and drop
this in to our level. I'm going to press the
key to snap it on down. Now note I've got three
blocks in my level 12.3 that do have a child
coin inside of them. When I stop on this, these three blocks, 12.3
will turn into coins. I'm going to collect
just these two, and I'm going to let the timer expire so that this one
turns back into a block. Before I do all this, I
want to point out that with our block added to
our level here, over in the details panel, you can see my block time
duration is currently exposed. So I could alter
this if I wanted to. I could override that
default setting. And if you had a second
instance of this, if I held down Alt, left click, and dragged, I could set this
to be a different value. They don't both have
to be 8 seconds long. You can change them to
whatever you want them to be. Let's go ahead and give
us a quick play here. Once I stomp on this block. Music Changes. I see these
blocks turned into coins. I'll collect these
two right away. I'm going to let the timer
expire on that last one, you can see I can step on the new block switch that looks like it's
been smashed down. This one has in fact been
turned back into a block. Let's make sure that
these are in fact invisible and they are, I can still interact
with this one again and then collect the
coin inside, et cetera. Okay, that is all well and good.
54. P Block Bug Fixes (Part #1): In game development, things never go 100% according to plan. And so too have things gone a little bit awry
with our block. We've got a few bugs
that we need to clean up before we
continue forward. And you can actually see one of the bugs right here in our
perspective view port. And that is, we've
got our child actor, our coin embedded
inside of these blocks extending beyond our block.
So that's a problem. And let me just jump
in and play here and expose a few problems going on just to show off
that first one of those child actor coins
extending beyond, I actually went on
top of those blocks. You can see in the upper left, I'm actually collecting
these coins. That's not as desired. Another problem here is that
as I stop on this P block, that's not actually the music that I wanted to
have play either. So several issues here to clean
up before we continue on. Okay, let's jump
into our BP block. A few things I want
to clean up in here. This first one is mainly cosmetic because
it functions fine. Our box component here
that you can see, I've got in my viewport, it's actually
extending underneath the floor a little bit too. That's really not necessary. So all I'm going to
do here is change my box extent z in
the details panel. I'm going to change that to 50, but then I'm also
going to bump it up 50 in the z direction. That's essentially going
to give us the same result without it awkwardly kind
of sticking down through. So that's issue number one. I wanted to just clean up. The second one I wanted
to clean up is our music our audio component called Music Over in the details panel, I set this accidentally to
starter background cue. I actually got the
starter part right, but what I wanted to slot
in here was starter Music. I've got this starter music cue. That's what it should have been. So make sure you go
ahead and clean that up. Now, another bug
that I found through bug testing is in
our event graph, coming off of our then four
pin of our sequence node. This block timer, I have it so that when the
time duration is over, block time is over. We're checking to see what actors still exists
in our blocks array. And if they're still valid, we're turning off the
block effects right here. And this is jumping over
to our BP block base. I just double click
on that to jump on over there, and that's fine. But if there are no blocks valid any longer
within that list, the music doesn't actually stop. So what I want to actually
do here is make it so that no matter if there are
any blocks in this list, if there are blocks that
are valid or not valid, I want to stop the music. Where this would occur
is if I was to stop on our block here and
then collect coins, 12.3 if I had
collected them all. What would happen then is
when block time had expired, the music would continue on by hooking this up off
of is not valid as well. We're ensuring that this music is going to stop no matter what, so make sure you get that
implemented as well. With that, I'm going
to compile and safe. Next, I'm going to go ahead
and address the issue of our child actor coin kind of extending beyond
our block here. Now the problem
with this is inside of our BP pick up coin, we've got a sphere
radius here of 75, which is way larger
than it needs to be. And it is the reason that
we are able to pick up this coin when it is slotted in as a child actor for
some of our blocks here. Let me go ahead and
select our block breakable over here and here. Inside of our block breakable, which inherits from
our block base, our child actor is said to
be our BP pick up coin. In order to prevent
this whole issue, what we need to do is make it so that our radius
for our BP pick up coin which is slotted in as a child actor is
just much tighter. So let's go ahead and do that. That's going to
be simple enough. Instead of 75, I'm going
to change it to 30, which is going to seem
a little bit too tight. But it's really not because the capsule component
surrounding our character sticks
out a little bit. So this is going
to be pretty good. Now remember our cylinder here itself that we
turned on its side, that has no collision
associated with it, so we don't have to worry
about bumping into that. So a sphere here of 30, that's going to be
a decent radius. Now go ahead and
compile and save this. I want this radius to also match our BP block coin
collider radius. Now if you forgot our coin
collider radius inside of our BP block is going to be used to destroy the whole actor. Now the only way we're going
to be able to actually ever overlap this is if
we've hit the P block, and thus we've hidden
the actual block itself and we've overlapped
the middle portion. So let's go ahead
and set this coin collider sphere radius
here to be 30 as well. If we left it at 35, what would happen is
we'd overlap this before we'd overlap the coin itself. Meaning we'd destroy the block before we'd be able
to pick up the coin. By setting these to be
even both of them at 30. That means we will simultaneously
pick up the coin inside as well as destroy the
entire block itself. All right, let's go ahead
and compile and save this. So now if we jump in and play, I will run across the top
first just to make sure we can't overlap and pick up those coins buried inside
some of those blocks. And that looks all
well and good then let's go ahead and stop
on our block here. I'm going to have that
right. Music Plan. I'm just going to collect
a couple of the coins here after the
timer has expired. Nothing to collide with here. I should still be able
to collide with this and everything seems to
be back in working order. Music Has gone off as well.
55. P Block Bug Fixes (Part #2): All right, a few more things we're going to fix up here that are tangentially
related to our block. Some of you have already
noticed, no doubt, that we can still break our blocks even when
we're small like that. And that's not
really as designed. We want to make
it so that we can only break our blocks
when we are big. Now this is going to come
into play here as well, because we're going to add some script to our
breakable blocks to make it so that we can only
break them when we are big. And after we add this
initial bit of script, you're going to notice
some other problems related to our block system. With that all said,
let's jump into our breakable block and add a bit of script
inside of here. We're going to add a little
bit of script between our event hit block and
our sequence node here. And thankfully, we're
going to be able to take a shortcut
for some of this. But this first part we
need to write fresh. So I'm going to hold down
control and zoom on up. The first thing I want to do is right click in some empty space. We're going to get
player character, and then we're going to drag out of this and we are going to cast two third person character. Now the reason we're
going to be doing this, let's wire this through like so, is because inside of our
third person character, we have a variable
called hit points. So let's drag out of here
and type in hit points. We're going to get that value and then we're going
to evaluate it. So I'm going to drag
out of here and say if our hit points is greater
than or equal to two. Now I'm not intending for us
to go above two hit points, zero hit points, you're dead. One hit point, you're small. Two hit points, you're large, you have fire flower power. But we're going to say
if you're above that, you know if you wanted
to add a third, fourth, fifth hit
point, you could. So I'm going to hold
down the B key and left click and we're going to wire
this in as our condition. So if our hit points is
greater than or equal to two, we're going to then
say that, yes, indeed, if you are big,
we're going to break the block and do all
this kind of stuff. That's all well and
good. However, what if we only have one hit points, so we are not greater than or equal to two? What
do we do then? What we want to build off
of this false branch. So the first thing
we're going to do is create a little
extra space here. And I'm going to
pull this on down. And then I'm going to jump
into my content browser and I'm going to steal some code inside of our BP block coins. So go ahead and dive on in
here and we're going to steal this block anum set of
scripts left click and drag, control C, go back into
our block breakable. And I'm going to control V as well off of
our false branch. We're going to play this
block animation timeline. But before we actually do this, I want to bring in a
sound here as well. Let's drag off our false
branch type in play. Sound Two D, I'm going to say
we're going to play the brick bump Sound. Then we're going to play
our timeline from start. This time line is
simply going to make it so that we raise our, our cube component up in the
Z direction a little bit. We're going to bump
into it as opposed to destroying it to
coincide with that. We're also going to play
this sound here as well. I'll say player is small, don't destroy the block. Okay, so we're going to add
that little bit of script here that's going to be off
of the false branch here. Make sure you have
compiled and saved and something else that I want
to do while we're in here. This is just going to be
for visual sake as well. I'm going to come up here, I actually want to change out the V effects associated with
this breaking of our block. I actually found one that I
like a little bit better. And for this, we're not actually going to need this offset here. So I'm going to get
rid of this and I'm going to plug this
into here like so. And the V effect particle
that I want to play, I could set it in here as well. However, I'm going to
be doing some work in a little bit in
our BP block base, so we can set it in there. And then it'll propagate this change down to
this child block. So I'm actually going to open up our BP block base
here right away, because we're going
to need it in just a moment's time
here. Let's open that up. And here inside of
my BP block base, I'm going to select my
Interact VFX particle. And here we're going to
change our particle in the details panel to be mixed. That I've got this mixed set, tall one, I like that
one quite a lot. So notice we set it
here in our block base. If I was to compile and save and now jump back to our
BP block breakable, which is a child of
our BP block base. We can see that change
has now propagated. All right, so with this,
we should be able to test out whether this block
is breakable or not. And then we'll deal with some of the block ramifications of
what we've just done here. So I'm going to click play. Can I break this brick? No, I can't. Now you see
the block ramifications. I can see that coin inside. We'll deal with that
in just a little bit. However, let's try now. Again, if I am a little now, we're going to have
a little bit more of an explosive effect when
I break this brick. And that is looking
well and good. All right, next let's
deal with that issue of seeing that coin on the
inside of our block here. Now the reason we
were seeing that coin is inside of our BP block base. We've got our child
actor right over here. This is where we
actually slotted in the coin inside of
our child actors. Let me just go over to BP
block breakable child actor. You can see that's
where we're slotting in our BP pick up coin. But back here in our base, our BP block base and again, our block breakable inherits
from our BP block base. Go ahead and select
your child actor. And in the details panel, we want to ensure that by
default this is not visible. I forgot to uncheck
this box right here. Now, in addition to that, I also want to make it so that our child actor is attached
to our cube itself. So then when we balk up
our BP block breakable, when we're small,
our child actor in the coin collider are going
to be balked up as well. They're going to move up
when we hit the cube, So I'm going to
left click and drag this right on top of our cube. And so now you see our
relationship as such. We've got our cube,
that is our block here, the child actor is
attached to that inside. And then our coin collider, which we're using
to actually destroy this entire block if we overlap, that is attached to
our child actor. So let's go ahead
and compile and save this sort of
relationship right here. This being attached to this,
which is attached to this, we should also see reflected
in our BP block breakable, now that we've compiled and
saved in our base there, and it is, let's go ahead and save our block
breakable as well. Now if I jump back
into my level, let's go ahead and play here. Note I am small, I'm going to jump straight up. I bark that up. I do not
see the coin on the inside. That is as intended. Great. I'm going to
stop on my block here. Now. I do see the coins.
I can collect them. I will leave that one uncollected
until the timer time's out and I can bunk right
back into that again. So some more bugs fixed up. One more thing I should mention, after we made that
particle change inside of our BP
block base here, once we made that change
and we compiled and say that change did propagate down to all the child blocks, which I realize you may not want to have in your
various child blocks. So if you did set this
here in your block base, what you're going to
want to do is go back through your various
child blocks, like your invisible coin, your BP, Q coin, et cetera. And if you open them up and you come under
class defaults, you can just clear out this
interact VFX particle so that you don't have
that huge sort of breaking effect playing. Also, I forgot to mention
inside of our BP block, fake breakable,
you might want to eliminate this offset that
we had going inside of here. I have done that
between takes here, so you might want to
eliminate that as well. Here I am okay with that. Interact VFX Particle. But I just thought
I would throw those in before we wrap up this video.
56. P Block Bug Fixes (Part #3): All right, we've got one more block related issue to clean up, and that is with our
invisible blocks here. And as you can see,
I've got two of them placed right next to
these breakable bricks. And if I jump in and play, obviously you're not
going to be able to see them from the get go. And in fact, you can
interact with them like I'll do with one of these right
now. The issue comes in. However, when I approach one of these invisible blocks
from the top side, like so I fall down
through it and then try to interact
with it. I can't. What's going on here?
Well, if I was to go back into my BP block base, this is the blueprint from which all other
blocks are derived. You may have recalled
that we added a child actor in a coin collider inside
of our base block. And this had to
do with RP block. Now what's happening inside
of our BP block base, from which all of our other
blocks derive some code from, is that if we were to
overlap that coin collider, this guy right here, we're going to
destroy the actor, meaning the entire brick. What's happening is
when we are passing through the top side of
our invisible coin block, here, let me just open
up this blueprint. There's our invisible coin block when we're passing
through the top of it, and it's all invisible, we are actually
overlapping this coin collider that is
inside of this box, thus destroying the actor. If we fall down through the top, we actually destroy the actor, meaning we can't
interact with it again. How do we fix all
this? Well, the fix is actually quite easy. So make sure you come inside of your BP block, invisible coin. Find that in your
content browser. We're going to head
on over to the event graph off of this event. Begin play. We were setting the visibility of our
cube to be invisible. We're just going to back up
these two nodes right here. In fact, I'll bring these
up a little bit higher. I'm going to put in a sequence node right after
these first two, so I'm going to hold down
the S key and left click. And we're going to do two
things off of event beginplay. First thing we'll continue
to do is hiding our cube, the block, so that it
appears invisible. The second thing I'm
going to do, however, is I'm going to bring
in a reference to our coin that is
essentially our child actor here, our coin collider. Let's bring that in as well. We got both of those references. We're just going to drag
off of one of these and say destroy component for this. We can essentially
destroy both of these components because
we're not looking to transform this invisible
brick into a coin. When we stop on the block, we're going to left click and
drag around these that key. And I'll say if you have block functionality
implemented on, if you have the block
functionality implemented, does this code actually
matter to you? If you have not yet
implemented that, then this would not matter. So let's go ahead and
compile this and save. And jump in and play once again, just to show you there are my invisible
blocks right there. I'm going to spawn
in right there. So as you can see,
I can interact with one of these from
the bottom, like so. However, now when I drop down
through it from the top, it's not actually going
to destroy that block. So now if I were to jump up, I can still interact with
that invisible block. So that is how you
fix up that issue. All right guys. That'll
do it all for this one. See you in the next one.
57. Goomba Blueprint: Now that we've got
some blocks in place, let's create our
very first nation, a goomba for this, we're going to use a flip. Both in Unreal, we're
going to give it some basic functionality for either moving left and right, rather mindlessly
patrolling the L or seeking out the player. We're also going
to make it so that our gumbs can be destroyed. Either we're stopping for shooting a fireball
at the strike. Let's go ahead and get started. Now, back here in Unreal, you should have these
eight different Goomba images that we imported
way earlier in the course. And these should exist inside
of your Textures folder. Now what we're going to
do next is I'm going to left click on my
platformer folder, I'm going to right click
and I'm going to create a new folder simply
called sprites. Then I'm going to go back
to my Textures folder, and I'm going to select all
eight of these textures. And if I hold down the shift key after I've selected
the first one here, I can then select the eighth one to select all of
them In between, then I can right click
on any of these. And in doing so,
I can come under Sprite Actions, Create Sprite. Now in doing that, we will have created eight sprite assets. I'm going to simply
take all of these and you can see they're all
highlighted right now. And I'm going to
left click and drag them into this sprite folder, the sprites folder rather
we're going to move them here. And then if we go inside
of our sprite folder, you can see they all
exist right here. Next what we're going
to do is make sure that we have all eight
of them selected. Again, I'll select
the first one, hold down shift, and
select the last. Then I can right click, and I want to
create a flip book. I'm simply going to
call this Goomba. Now I'm sure most of you are familiar with what
a flip book is, but if I simply double click on this asset to open it
up down at the bottom, you can essentially see I've got all eight different sprites in this timeline and it's
rapidly playing through them. Over on the right hand side where we've got
our details panel, you can see I can expand
out our key frames here. If I right click on this, I can expand all these. You can see all of these
different sprites. And it's showing that
it is playing all eight of these sprites
in rapid succession. Now you could slow this
down or speed it up by adjusting this frames per
second value right here. So if I was to set, this
is something like three, and press Enter, argumbas going to appear like they're
walking a lot more slowly. This works like a
children's flip book. If I speed this up by setting
this is something like 30, it's going to appear like
Argumba is walking much faster. I'm going to set this back
to its default value of 15, but that's essentially
what a flip book is. It's a bunch of images
played in rapid succession. We're going to be using this
in our enemy asset here, our enemy blueprint to make it look like Argumba is walking. Go ahead and say this
and close out back here. Eat our level editor. I'm going to go inside of my blueprint folder and I'm going to find
some empty space. I'm going to right click, I'm going to create a
new blueprint class. This is going to be a
character class because I want this enemy to
be moving around. So this is going to
give us the ability for it to move it around character. And I'm going to
choose BP underscore, but as the name
with this selected, I'm just going to press the
Space bar here to open it up. And over in the
components panel we're going to begin adding
some components. So what I'll do
first is I'll add the components in the right
attaching relationship. And then I'm going
to go back and set the details for each. Okay, so the first
one I am going to is going to be attached to
my capsule component here. I'm going to click Add. This is going to be
Sphere Collision, and I'm going to call this
my player detect range. Then I'm going to select my
capsule component again, and I'm going to attach
another one to it. I'm going to click Add. I'm going to add some
more sphere collision. This one I'm going
to call collider. I'm going to have
different colliders the player detect
range and this one called Collider for different
reasons and you'll see what they're for and in a
little bit of time here. Okay, with our collider
component here selected, I'm going to add
type in flip book. We are going to add a
two D paper flip book. I'll simply leave the paper
flip book name. That's fine. Then I'm going to
select our collider once again because I want another
component attached to our collider. Click Add. This is going to
be Box Collision, Box Collision, right here. This is going to
be our Stomp box. We're going to be using
this to detect when our, our player character
has stopped on Argumba. All right, let's go ahead
and start adjusting some of the details for these
various components. I'm going to start off with my capsule collision component. That's this sort of capsule
shaped looking thing. I'm going to set the
capsule half height to be 55 and the radius to be 45. Now note this component specifies that this is
going to be pawn type. I'm going to scroll down
to the collision area. The collision preset here
is going to be pawn. So you can see that
even though this is set up as a pawn collision preset, its object type is
known as a pawn. And what's going to
result here is that other objects labeled as
pawn would collide with it. Meaning that if we were to have multiples of these gumbas, they would essentially
collide with one another. Which I don't want them to do. I want them to be able to
pass through each other. What I'm actually going
to do here is change our collision preset from pawn to custom and then adjust some of our
collision channels here. I'm going to make it
so that everything is going to start off as ignore, but then I'm going to set for our world static
and world dynamic. I'm going to set
this to block so that this gumba doesn't
fall through the world. Make sure that this
is your collision set up for your
capsule component. Custom object type is pawn, and then these various
channel settings right here. Next I'm going to select
our player detect range the sphere radius. For this I'm going
to set rather large. I'm going to set this to 2000. And we're simply going to
be using this to detect when our player character
has entered in this radius. So then the gumba can start to move in some way,
shape, or form. You can set that
to what you want, but mine is going to be
rather big to start with. Okay. Next, I'm going to
select our collider component. That one is this tiny
radius right in here. For this, I'm going to set the sphere radius to be
a little bit bigger. I'm going to set it to be 55, a little bit bigger like that. And then in the
collision presets, I'm going to expand
this down as well. I'm going to change this to be custom instead of overlap
ball, it's going to be custom. I'm going to set
this to block for everything except I'm going
to change it so that pawns, anything labeled as a pawn
object type can be overlapped. We'll detect if a player, the player which is also a pawn type overlaps
to determine if you, the player dies or
loses some health. Also note that this
particular component is going to block a fireball. We're going to use
this to detect if a fireball hits this component, because it's set to
block a fireball to determine if the gumba
should be destroyed. Next, let's set our
paper flip book. Go ahead and select
that component. Over in the details panel, we have an area where we can
slot in a source flip book. Click that. We've got
our Goomba flip book. It's going to start
off rather large, so let's go ahead
and scale it down. Click on that lock button
to scale this uniformly. I'm going to set this to
be 0.25 across the board, so that's going to fit
within there rather nicely. I'm also going to come down and set the collision for this to be no collision
collision collision preset. We're going to set this
to be no collision. We are not going to be checking against this for any
sort of collisions. That's what our various
other colliders are going to be here for next, let's click on our stop box. And with this selected
over in the Details panel, I'm going to set the box extent
to be 40 by 100 by three, something kind of
thin like that. And then I'm going to move
it up in the Z direction. I'm going to change
that to be 60 so it rests atop Argumba's
head like that. And then I need to come on
down under the collision. You know what, actually,
before I come on down under the collision preset, I'm going to set
the line thickness to be a little bit
thicker as well. I'll set that to be
something like three, just to make that a little
bit more obvious that that's going to be
our stop box area. Okay, then with that selected, come on down under the
collision section. We're going to change
the collision preset here to be custom. And for this we're going to
set this to block all for everything except we're
going to ignore fireballs, so we don't want fireballs to just magically
collide against this. We're fine with it
passing through here. We're going to be checking
this other collider to see if that is being
hit by a fireball. Our stop box is going
to be strictly to see if a pawn is going to
be stopping atop it. And we're going
to actually check eventually, through some script, if our character
is falling down on this in the Z direction. Okay, one more thing
that I want to adjust here is going to be found in our character
movement component. This came along automatically by having this as a character
class blueprint. This is the magic component
that is going to determine much of the movement
characteristics about this character
class blueprint. If I come down below
in the details panel, I'm eventually going to find this planer movement section. I want to restrict our goombas
movement to a given plane. So I'm going to
select right here, and I want to ensure
that we have constrained our plane to the y axis. Note that once I set this to Y, it's going to set our plane constraint to one in the y axis. What this is essentially
going to do is prohibit our gumba from moving
in the y axis. However, it is
permitted to move in the x axis and the z axis. Now I'll help constrain means it cannot move in
that given axis. So let me compile this
and save it right away. And place one of
these in our level. I've got my main two D snapping
set in my viewport here. Let me just go ahead and drag
and drop in a Goomba like. So. Tap the key to snap
them on down to the ground. So you can see the Y plane is denoted by our
green arrow here. So we're essentially
saying you cannot move along this green axis. You can move along
the x red axis, or the z blue axis, but not along the Y. Alright, we're off to a pretty
good start here. So with that all done, make sure you have saved everything. You can come under file
and save all guys. That'll do it off for this one, win the next one.
58. Goomba Damages Player: All right, welcome
back. In this video, our goal is to make it so that our Goomba can
damage the player. Now, because this is going
to be a short video, I'm going to show you really
quickly how you can set your own thumbnail
image here as well. Because right now our BP Goomba just has this face as
a thumbnail image. If you right click on this asset and you go to asset actions, you can capture a thumbnail. So you can see, I already have my gumba kind of framed
up in my viewport here. I'm just going to tap the G
key to hide all those icons. Gkey can show or hide
all those editor icons. I'm going to right
click on this. We're going to go to Act Actions
and capture a thumbnail. So there we have a
nice thumbnail image. Let me go ahead
and jump inside of our Goomba now by selecting it and
hitting this space bar. And now let's work on making
it so that our gumba can damage our player inside
of our Goomba blueprint. We're going to add a variable over in the My
Blueprint section. Click the plus
variable button here. I will call this health to subtract and I'm going
to make this an integer. If I compile this over
in the details panel, I'm going to set the value
for this to be negative one. And you'll see y negative
one in just a second here. Then what I'm going to
do is I'm going to right click on our collider
component, this guy right here. Let's zoom up on it so you can see which one
I'm talking about. So we want to make it so
that our character is going to be damaged when they
run into our gumba. We're going to be using this
collider component for that. Right click on this at event
for beginning overlap. That's going to jump us
over to our event graph. We can check if our other actor is our
third person character. So drag out of here and type in third person character we want to cast to our
third person character. Because inside of our
third person character, if you remember from
earlier in the course, we created a custom event that was called
adjust hip points. Here is where we can call that custom event
and then we can plug in how many hip
points we want to modify and we've got our health to subtract intoger right here. It's got a value
of negative one. So we can plug this
right in like so. Now just to make this clear exactly what is happening here, I'm going to double click on our adjusted hit
points call here. Once again, this
is a custom event that lives inside of our
third person character. And if I double click on this, it'll open up my third person character
blueprint and jump me right to where this
custom event exists. Now you can see that back
in my BP Goomba blueprint, we are passing through
our hit points being modified here
in our BP Goomba. Here we are saying our
hit point modifier, we want to pass through
the value of negative one. Negative one is going
to flow through to this custom event and then down through here to be adjusted from our characters
current hit point amount. If our character
has two hit points, if we pass through a negative 12 plus a negative one is
obviously going to be one. That's how that works. All right, with that,
let's go ahead and compile our Goomba
Blueprint here. Save, let me just
left click and drag. I'll do a comment box around
this Goomba Damages player. And then we'll jump in in
play tests here quickly. Now before I do that, I want to jump over to my BP third person
character and make sure I've got everything straightened
out in here by that. What I want to ensure is
that I look at my viewpoint. Currently my character
is small and they've got this blue coloration and blue
material applied to them. I want to make sure that
our current hit point value also corresponds to this. So I'm going to set my
hit points right here. It's currently defaulted to two. I actually want to
default this to one. When we have one hit
point, I want to be blue. Let me jump over back
to my event graph here, where we are adjusting
our hit points, which we will be calling
this customer event. I want to make sure that
our materials that we are swapping to based
on the amount of hit points that we
have, make sense. Again, by default, we're
going to have one hit point. I want to make sure that when this hit point index is one, our material here is
actually going to be blue. I want it to be blue. And
we have one hit point. And I want to make
it sure that when our hit point value here is two, that we're actually
going to be green. And I'm sharing
green and I think that's the only spot where we were adjusting the material. It seems to be. Okay. So let's go ahead and
compile and save this. And now I'm going
to jump it in play. I'm blue right now before
I run into this goomba. I'm actually going to
collect this fire flower here. Jumping on up. I'm blue with one hit point, and I've got two hit points. I'm green, that's great. Let's run into our goomba here. Nothing changes. Obviously,
that's a problem. Now the reason for this
issue is because currently we're not running
into that collider, we're running into
this Stomp platform. And it's hard to see
from this angle, but if I go from our
player's perspective, we can see that our gumbas
a little bit off of our center line here when we placed our gumba into our level. And let me just try
placing a new one. It is currently placing it at a wide depth of negative 63, which is not what we wanted to, even with our snap settings on. I'm not sure why is doing that. Let me just delete that out. But I'm going to set this
to be zero in the Y. That way our gumba should be
in line with our character. So now when I jump in and play, we'll start off collecting
that fire flower, Al, right? And let's run into
our goomba here. I lose a hip point and technically
we are dead right now. So that seems to be
in working order. Alright, got everything
cleaned up there guys, that'll do it off of this one. See when the next one.
59. Destroy Goomba via Stomp: Welcome. In this video, our goal is to make it so that our goomba can be
destroyed with a stomp. So let's jump right to it. I'm going to select our goomba
here on our level control, plus E to open up our blueprint. The first thing I'm going
to do is add a variable. Now this is going to
be an integer variable that's going to
hold a point value. So I'm just going to
select our existing health to subtract integer variable. I'm going to do control
plus D to duplicate that. And I'm simply going to call
this points. Press Enter. Then I'll compile this, and I'll say a stomp or
destroying our Guba in general is going to be worth 200 points over here in
the details panel. Sweet. The next thing
I want to do is I want to find some empty space
here in our graph. I'm going to do something
off of Event Begin Play. So I'm going to left click
and drag around these two. Get rid of that right below Event Begin Play.
I'm going to right click. We're going to get
player controller. And we are going to drag off
of here and we're going to cast to controller our
BP Player controller. And the reason we're
going to be doing this is so that we can create a reference to our
player controller here upon beginning play. So I'm just going to
write click on this pin. We're going to promote
this to a variable. I will simply shorten the
name to be Player Controller. And that'll do it
for this script. So left click and drag, tap the C key and I'll
call this my F to Player Controller script and
color this black like I do. Now my reasoning for adding this Player controller reference is because we're
going to want to call our ad points custom event inside of our Player controller in a little bit of time here. But first of all, let's worry about creating our interaction, our stop interaction script. So for this, let's go
back to our Viewpoort so that we can see what the
heck we're dealing with here. We created this
Stomp box collider. That's what we called it anyway, is right atop our goombas head. And we called it Stomp box. This is some box collision
that we just squished on down. We're going to right
click on this component, and then we're going
to add an event for when we hit this component. Upon doing that,
it's going to jump us over to our event graph. And I'll just pull this
down a little bit. And what we want to do is
off of our other actor pin, we want to make sure that it is our player character that
is doing the stomping. So we can do equals
and then we can drag off of this get
player character. Alternatively, you
could do a cast to your third person
character here as well. To do a check, I'm going to drag off of this and
bring in a branch node. I'm going to hook up the
condition automatically. But there's actually
two conditions that we're going to
want to check here. Checking to see that it
is the player character that did the stomping is one. But the other thing we
want to do is figure out which direction that we are
hitting this stomp box in. We want to only
continue forward if we're dropping down on
top of our stop box here. For that we can break
out our hit here, drag out of there
break hit result. We're going to expand
this down like so. We're going to pull out of
our impact normal right here. And then we're going to bring in an equals node for
our tolerance here. You can set this to
be something small, like 0.1 This is just essentially how much
forgiveness do you want to have in terms of how
direct our dropping down in the Z is? For our Z, we want to
check if we're dropping down atop it as opposed to
hitting it from the underside. For this, we're going to add
in a value of negative one. A value of negative one is going to check if
we are dropping down in the z axis,
dropping down a top it. And this is just giving it a
little bit of forgiveness. So this is a second condition
that we want to check against because we've got two conditions that we
want to check against. I'm going to right click and
bring in an and Bullull. There we go. And bullion, if our player is the first thing we want
to check and checking to see if we are
dropping down a top. It is the second thing
I want to check, if both of these are true, that's going to be our
ultimate condition. We're going to check if
this and that are true. What we want to do is then
bring in a sequence node, hold down the S key
and left click. That'll get you a sequence node. And then I'm going to
add another pin to this so that we can organize
our upcoming scripts here. Nice and neat, but
that's going to be the initial part right here, Okay, Off of our then zero pin, we've got multiple things
that we're going to be doing. So I'm just going to pan
on over here a little bit. The first thing I'm
going to do is drag off of here and type in play. Sound We'll play a two D sound, and the sound that I want to
play is going to be Swish. Okay, The second
thing I want to do is I want to take our
collider component. So I'm going to drag
this into our graph. Now if you're not sure what
the collider component is here in our viewport, it is that thing that
is currently damaging. Player. We're checking to see if our player runs into that. And it actually
extends a little bit beyond the side of
our stomp box here. As designed, what we want to do is we want to then drag
off of our collider. We want to set
collision enabled. It's going to bring in another copy of our collider right here. You can delete out one of these. What we want to do is change
that to be no collision, we no longer want to be able
to collide against that. The next thing we want to
do is we want to bring in our stop box component.
We're going to drag that in. We are going to destroy that component Once we've
stopped upon our gumbo here, let's go ahead and just
destroy all that stop box. We don't need it anymore.
The next thing we're going to do is bring in
our paper flip book, drag that guy in and
we're going to set the world scale of this
set world scale three D, essentially we're going
to squish this on down. So I've got some
hard coated values I'm just going to punch in here. I'm going to set this to be
0.25 by 0.25 by 0.1 Now, we may adjust that at
some point in the future, but we're going to try
that as our squish value. Now, in addition to squishing
down our flip book, we also want to move it
down in the z direction. Because if we were
to just squish it, it would squish it from both
the upper and lower bounds. And it would look like it was floating in space,
which I don't want. We're going to drag off
of our paper flip book here and we're going
to add world offset. And we're going
to move it down a little bit in the z axis, how much I'm going to go with
a Z value of negative 35. Again, we may adjust that,
but let's start with that. Then, the last thing I
want to be able to do is disable the movement
of this goomba. Now, right now, our
gumbas not moving, but we will get our gumba moving here in
a little bit of time. And I want to ensure that
once we stop upon it, that it can no longer move, even though our gumbas
not moving right now. We're going to
make it so that we guarantee that they
have stopped movement as soon as we stop upon them dragging off our
character movement component, you can find this function for disabling the movement like. So that's the first bit of script that we want to do here. I'm going to drag
around all this. Left click, tap the key. So I'll say off of our zero pin, this is going to be our ME ha ha squish X. I'll color
that black right away. The next thing I'd
like to do is come under the then one portion
of our sequence here. Let me zoom on up
by holding down control and using
that scroll wheel. I am going to right click. We're going to get actor. This is going to be
where we're going to do some points work here. We're going to be
using our actor transform because we're going to right click and
spawn actor from class. We're going to need
our actor transform, our gumbos transform, to tell our points, our BP points to spawn in. You remember this from earlier, our BP points now once again
in our P points blueprint. I'm just going to navigate
to it by browsing to it. Here it is, down in our
content browser, BP points, we made it so that this
points to add variable that lives within here is
exposed on spawn. That is making it
so that here in our BP when we are
spawning this, that point value is
going to be exposed. So that we can customize
it wherever we like here. Inside of our Goomba, we
want to add 200 points. So let's drag and drop our
variable to our points add. We'll just adjust this as so. So that's going to spawn
that display into the game. This is just the
display portion. Now we need to actually add the points to our
player controller. So for this we've got our
player controller reference. Drag that in, we're
going to get that. Then we're going to
drag off of this and type in add points. Once again, we've got
that custom event inside of our player
controller called Add Points. And here we can also slide in how many points
do you want to add? Well, we've got a variable for
that you could drag off of this and plug that in like so that would be entirely valid. However, I'm just
going to drag in a fresh one just for
organizational purposes. So now, once again, once we've stomped
upon our Goomba here, and we've verified
that this is true, our character is
stomping on them, and we're stomping on in
a downward direction. We're going to be
adding these points. And if I double click
on this right here, this calling of the add points, it's going to jump us
out of our BP Goomba to where this custom event actually lives inside of
our BP player controller. So this is where
the actual adding of points is going to happen. And remember once
again in our Hud, our Hud is bound to this
points variable here, inside of our
player controllers. So that will be updated as
well back here in Argumba. I'm going to left click
and drag around these. I'm going to tap that C
key and I'll call this my show Add points script and color it black like my soul. All right, one more bit
of script here to add. Let's move our sequence node
on down a little bit more. Hold down the control
key and zoom on up. This last bit of script, we are going to destroy
Argumba in a blaze of glory. So we're going to
drag off of here, we're going to bring
in a delay node. And we're going to delay
for half a second, 0.5 is going to be good. Then we are going to right
click and type in Interact. Now I have this function
that we created within our blueprint library
earlier on in the course. It was meant for
block interactions, but we can use it here inside of our Goomba as well. Let's
just bring this in. It's asking us to slot in a sound effect in
some visual effects, as well as a visual effect
location for our sound effect. Let's just hard code
this to be an explosion. I'll use the explosion que. Let's also just hard code
in a particle effect, I'm going to type
in flame explode. This is one that also exists in the infinity
blade effects pack. Now for our V effect location, I'm going to choose the location of our collider right here. And then I'm going to
pull off of this in say get world location. We're going to use the location
of our collider here as a spot where we're
going to spawn in those visual effects. Then once all of this is done, I'm going to drag off
of this and type in destroy actor like so. Left click, drag, tap that
key I should do to destroy. So there we go, coloring that black as well. Now this is going to
look pretty good here, so let's zoom out a little bit. Your final script will
look something like that. Let's go ahead and
compile and save. And now let's actually
check to see if upon playing our game we can stomp
on our gumba. Here we go. All right, obviously the gumba
is not mobile right now, but stomping upon him, a few hundred appears Guba
got squished. Guba died. Everything seemed to be
working as intended there. And also, I just want to as well to make sure that if we were to run into the side of it, we're actually going to
collide and die with it first before hitting
that stomp box. If we approach it
from the side, yep. Should die just like that. But if I jump back in and play, I should be able to
stop on him once again. Watch how he gets
squished down there, and he lives for half a second before he fully gets destroyed. So we get to appreciate
the squishing effect. Excellent. Now if you just want to see these
scripts one more time, I'm going to highlight each portion here if you
want to pause the video. This is an equals node that
is a negative one off of the then zero pin no
collision for the collider. We're using that collider to spawn particle
effects down below. This is our squish sound effect. 0.25 0.25 0.1 negative 35. And the Z for the world offset show add points spawning
in our BP points. We created our points
variable to plug in a Z amount of points to add
that's currently set to 200. And then finally we're
playing our destroy effects. After half a second, we've
got half a second there. We're using the location
of our collider from which to spawn a particle effect, a sound effect, and then
destroying the actor. All right guys, that's going
to dude off for this one. We'll see you in the next one.
60. Destroy Goomba via Fireball: Welcome. Now that we can destroy our goomba by stomping on it, let's make it so
that we can destroy our goomba by shooting
fireballs at it. So I'm going to
select my gumba right here in my Viewport control. Plus E is a hot key for
opening that up right away. And I'm going to jump over to my Viewport tab and select
my collider component. And let me just o up on this. You can also tap the key to focus in on it after
you have it selected. Let's take a look, once
again, as a reminder, with our collider selected
in the components panel, how we had the collision for this set up in the
details panel, we set it up so that this
collider would block fireballs. Again, our fireball blueprint is labeled as a
fireball object type. Now we did this intentionally
so that we can detect hits for when fireballs
hit this collider. So what we're going to do is right click on our
collider component. We're going to add an event for when another
component hits this. We're going to be jumped out of our viewport into
our event graph. I'm going to right click
and pan on down here. Here is our On component,
hit the collider. And what we want to check
is if the other actor that hits this is our BP fireball, we're going to cast
to BP fireball, not fire bar fire ball. So just be careful with that. Then what we want to do is after this fireball hits that clatter, we want to destroy
the fireball itself. I'm going to drag off of
my BP fireball and say destroy actor that will
destroy the fireball. And then we're going to
bring in a sequence note. So I'm going to hold
down the SK left click. And we're going to
do several things off of our sequence node. The first thing I want
to do is add points, just as if we were
to stop on it. So I'm going to cheat
and come up here and grab all of our
show add points. I'm just going to left click
and drag around all this. Hit control C, I'm
going to copy that. Then I'm going to use the right mouse button to come
back down here, left clicking right about here. And then control V
to paste all that. Wrap my sequence node
in there as well. So that's going to be a
little bit of a shortcut. Nothing else to change
with this script, although I'm going
to just change the comment to have
a zero in front. So that's the first
thing we want to do, is to show and add points. I'm going to double
click on this wire to bring in the reroute node. And then the second
thing I want to do, and once again we can steal
some code from up top, is my play destroy effects. I want most of this, although I don't want
to do this delay here. So I'm going to select all this, I'm going to do control C, then I'm going to left
click right here. And then control V to paces. I'm just going to get
rid of this delay too, because I want the fireball
to destroy it immediately. And I'll change this
comment box as well. At our colliders location, we're going to have
that explosion play. That flame explode particle. And then we're going to destroy the actor itself,
meaning Argumba. With this all in place, I'm going to go ahead
and compile and save. And let's jump in and
play. Here we go. I'm going to collect
my fire flowers. All right, And then
shooting off a fireball. And hopefully, well, we
got to hit him first. Boom goes up in
flames immediately. So that is working as intended. Excellent. We've now
made it so that we can shoot our Umba and
destroy him once again. There's the beginning
part of our script. We're casting to the fireball. Destroying the fireball. And then off of
our sequence node. Here we are showing and
adding some points. Once again, this add
points function. This calls this custom event in the player controller itself. And then we're going to
play those destroy effects. We got rid of that delay node from the Stomp bit
of script up above. All right guys, that's going
to do it all for this one. We will see you in the next one.
61. Goomba Patroller (Part #1): Alright, so now
we've gotten it so that our Goomba can damage us, the player, and we can
destroy the Goomba. Now let's get our Goomba
moving around our level. And we're going to
start off by giving it a basic patrol behavior. And this is going to
involve us once again, diving within our
Goomba blueprint. So you can select it
and another means of opening it up is here in our
outliner with it selected, go to edit BP Gumba
we're going to start off by creating
some variables over in the M blueprint panel. So under the variable section, click this plus button. This first one,
I'm going to call speed We're going to
change this to a float, and this is going to be used to determine how fast we
want our Goomba moving. The second variable I want to make here is going
to be called flip book. Play rate multiplier. Now, depending on how fast our Goomba is
going to be moving, we may want to adjust how fast
our flip book is playing. So we're going to have a
script setup so that we're going to essentially
read in the speed of our Goomba and
adjusting the play rate of our flip book so that
our Goomba here can be stopping his feet either
faster or slower. And then I'm going to add
one more variable here. This is going to be
called move left. This is going to be a bullion. It's going to be
used to determine if we want our Guba to be moving left originally when
they begin to patrol here. Now, I'm going to compile
so that I can set some default value
some default values. There's actually a
few other check boxes that I'm going to want
to check as well. Let's start off with our speed. I'm going to set this to
a default value of 200, and I'm also going to check this box for instance editable. When I check this,
you're also going to see this ball icon, come on. They do the same thing, basically making this
variable instance editable. What this means is
after you compile, Here in your level editor, you've got a Goomba selected. You can now see that property
in the level editor. Under our default, if I just search for default,
I will find it. Okay. There is default speed. Let me just ex out of there. All right, jumping back
into our Gumbo blueprint, our flip book play
rate multiplier. We're going to actually calculate what this
value should be. So it's fine that
I leave this as a value of zero for now
because through some script, we're actually going
to by default, have a value in here. And then our move
left boolean here. I'm going to say, yes, we do want to move left by default. So let's go ahead
and check that. And let's make this
instance editable as well so that this property is
also exposed in the editor. Go ahead and compile and save. Next, let's jump over to our
construction script tab. Now, construction script
is where you can set up some script that you want
to run during design time. This is useful for setting
some parameters that you may want to have within your blueprint before the
game actually starts running. And we're going to use
it for that purpose. The first thing I'm going
to do is I'm going to bring in our character
movement component. Now, our character
movement component determines a lot of things
about how our character moves, including a very
important property here called Max Walk Speed. This guy right here inside of the character
movement component called Max Walk Speed determines how fast your character
class can move. Now, I want to essentially
override that. And the way I can
override that is by dragging in our character
movement component. Once we've got our component, then we can talk to and edit any of these different
properties in our details panel. So I'm going to drag
out of here and type in set Max Walk speeds. So here we go. Drag out of here. Set Max Walk speed. And you'll notice that
our max walk speed is a float value, and we're essentially
going to override our default max walk speed
by our speed variable here. So essentially, here during design time, we're going to say, Hey, I know you have this
default walk speed of 600. But, oh, yeah, before the game even runs, we're going
to override that. We're going to change
your speed to be whatever is contained within this
float variable. All right. Once again, I mentioned before that we're going to be
using this flip book play rate multiplier here in
this construction script, and we're going to auto
calculate this value. Now, the way we're going
to do that is we're going to drag out of our
max walk speed, and we're going to divide And we're going
to divide by 100. 100? Well, it's because it's a value that I
determined ahead of time, worked out pretty nicely. And we're going to take
the result of this, and we're going to clamp it. We're going to clamp float. We're going to ensure
that this value that's output via this math is
always going to stay between 0.1 and a
maximum of three. And this, we are going to plug into our flip book
play rate multiplier. Drag and drop this
into your graph. We want to set this. So this is where
we are going to be setting our flip book
play rate multiplier. I mentioned it was not going
to stay at a value of zero. So the result of this math, we're going to plug
in there as our flip book play rate multiplier. And so if we were
to take this value, our speed value of 200
and divide it by 100, that would equal to that
would be within this range. And so that would be our flip
book play rate multiplier.
62. Goomba Patroller (Part #2): So now we've calculated our flip book play
rate multiplier, but we're not actually
using it yet and for that we need to jump
over to our event graph. Now here inside of
our event graft, we're going to add
some script to detect when our player is within range. We're only going to have
our player begin to patrol when our
player is in range. Now let me go to
our viewport here. I'm going to o on back
here a little bit and I've got this giant radius
around my Guba. I call this our
player detect range. So this is what we're
going to use to detect if the player
character is within range. If they are in range, then we're going to get
this guy moving. So let's go ahead and right click on our player
detect range. We're going to add an event for when we begin to overlap that. It's going to jump us over to our event graph, which is great. And while we're
here, let's bring in an end overlap
right away as well. Right click on your
player detect range. We're going to add an
event for end overlapping. For this we're going
to detect if it is our player that
is the one that's doing the overlapping
or ending the overlap. So I can right click, I'm going to get
player character. If our other actor is equal
to the player character, you could also alternatively do a cast two third
person character here. This is just the method
that I'm using to check that it is our
playable character. I'm going to duplicate
this control D to duplicate that other act. So I'm going to bring in two
branch notes holding down B, left click, left click, like. So We're going to say that if it is true that our player
character is overlapping, that player detect range. We're going to plug this
essentially into a gate node. To open the gate, we're essentially going to
be checking every frame whether or not our player is
within this range or not. For that, we're going
to need a tick node. If I write Click in
some empty space, I'm going to bring in a
tick node event Tick, this fires off
every single frame. And then I'm going
to write click in some empty space and
bring in a gate node. In fact, if you
hold down the G key and left click you'll bring
in a gate node as well. Every frame we're going
to enter into our gate, you can think of this gate
as an actual iron gate. And you're going to
be pause here at this gate until the gate
is told to be open. Now we're going to open
this gate and thus advance beyond this point only if our player is overlapping
that player detect range. However, we're going
to close this gate if our player has ended
overlapping that range. You're seeing how this
is going to work. Every frame we're
essentially at the gate. We're not going to advance
beyond here though, unless our players overlap
that detect range. And we are going to
advance beyond this gate. If we have overlapped
that detect range, we're going to close that gate. Meaning we are not
going to advance beyond here if we've ended
overlapping that range. So what do we want to do if we're going beyond
the gate here? Well, we want to right
click and we're going to add movement inputs. This node which
targets our pawn, which a character is a pawn, can automatically move
our character here. Now, what direction do
we want to move them? Well, we're going to
choose a direction to move our Guba here,
left or right, depending on this
bullion right here. Now we're going to drag out of our move left bullion and bring in a select node right here. Depending on what our
return value is here. We're going to back drag off
of our world direction here. This is a vector x, y, and z. We're going to be
able to state what our return value is here
based on our bullion. If this is true, we're going to set our x
value to negative one. Essentially, that is
going to be moving left in this direction
in the level editor. However, if move left, if this Boolean is false, we'll output this as
our world direction, setting the x value to one. You're seeing how
this is working here, depending on the value
of this Boolean. If it's true, we're going
to output this set of values as our world direction
for moving our Goomba here. If this is false,
we're going to choose this set of parameters
as our world direction. A little bit more to go here, we just need to now. Bring in our flip
book, play rate, multiplier, drag
and drop that in. We're going to get
that. And also our paper flip book
component itself. Let's drag in our
paper flip book. Now we're going to drag
off our flip book and say set play rate. What's the rate that we
want our paper flip book? This is just for the
visual aspect itself. Well, we want to play it
at this rate right here. Again, this is all auto calculated here in our
construction script. If we were to
increase the speed of our Goomba to say 300, it'd be 300/100 which
would be three. Our flip play rate multiplier would be increased to reflect our increase in speed. That's going to be
our script right here to move the Guba in
a given direction. I'm going to left click off of this and drag tap the C key. And I will call this my Bomba. In a given direction only if player is in range, then I'll color this black. It's hit okay. Now I'm going to compile here just to make sure our script is looking good. And it is, I'm going
to click Save. Now if you see my set
up here in the level, I just revise things
a little bit between videos to shorten up the
length of this video. I set my player start actor
way over to the left here. I've just extended out
my level a little bit and I've put them
outside of the range. Guba here. Goombas detect
range is right here. Now let's look over
in the details panel. If I type in default
into the search area, now I'm going to scroll on down. And here at the very bottom, you can see I've got my
speed value set to be 200 and my move left is checked. Once my player is
overlapping this radius, he should begin to move left. Now, there's going to be
a problem with this yet, but let's go ahead and jump
in and play and test it out. All right, in my level I'm
going to be overlapping this range here comes Mr. Gumba. Now, the problem that
you're going to notice here is that he doesn't have any means
of turning back around. He's just going to keep moving left until he falls
off the cliff. Is there any way to get him
so that he moves right? Well, in fact there is. We're going to jump back
into our goomba blueprint. And the way we're
going to do this is detect if our
goomba hits something. And if they do hit something
while moving left, we're just going to
shoot them off in the other direction by
toggling this move left bull. For this we're going to scroll on down here in our event
graph a little bit. And we're going to come and grab our capsule component
right up at the top here. Let me just jump to
my viewpoint so you can see where our
capsule component is. I'm going to right
click in here and tap the key to jump up on it. So we're going to be using
this component right here, we're going to detect
a hit on that guy. Fun fact, in addition
to right clicking and adding an event using the right click menu with
a component selected. You can also drag way down in
the details panel like so. And you can find a
list of events here. I'm going to find on
component, hit right here, Click this plus button and
that'll jump me right here. So what I'm going to do
is break out my hit here. Holding down control,
zooming on up, dragging off. We're going to break our hit
result. Expand this out. We're going to use our
impact normal right here. Drag off this type
in the equal sign. We're going to add in a
little bit of tolerance here. We're going to do 0.1
And we're going to say that if we impact something
in this direction, I'm going to set
our x value to be 1.0 We're then going to drag off of this and plug
this into a branch node. But I also want to make
sure that we do this one time so that this doesn't
register multiple hits. I'm going to hold down
the key and left click. And we're going to say that if our Goomba here
hits something, while we are going to one time toggle or move left, going to drag this in,
we're going to set it. I'm actually going to bring
in a duplicate of this right away because our set up is
going to look like this. I'm also going to bring in a
flip flop node right here. Flip flop. And we're going to go like this, we're going to go like this. And I'll translate this for you all here in
just a little bit. Make sure with this bottom move, Left setter, you check this box. Leave this one at
the top, unchecked. Then after this, we're going
to bring in a delay node. So I'm going to hold
down the key and left click, bring in a delay. We're going to plug
both of these in here. I'm going to have a delay
of say half a second. We're going to say
after half a second we're then going to
reset this once. And I hate these
criss crossing wires, so I'm just going to double
click on this a couple times to bring this around. We'll go up and over like that. This will essentially be our script for toggling
our move left bullion. I forgot one thing right in here off of
our impact normal. I'm just going to snip
this wire holding down the Alt key and left clicking. I want to get the
absolute value here. Drag off of impact normal, we're going to type in
vector, get get Abs. We're going to take the
output of this and plug it into the top like so no matter which
direction we're going, left or right,
we're going to get the absolute value of
that impact normal. We're going to say, hey, is
that equal to x value of one? If that is true the first time, we're going to check move left the second time and then we're going to delay
for half a second. We're going to reset this.
Then they hit it again. We're going to turn it back on. Hit something else again.
We're going to turn it off. Hit something again, turn
it back on, et cetera. I'm going to left click and drag around all this, tap the C key, this is going to be
called my detect Goomba hits something and change
direction if it does. All right, let's
color this black and then let's test this out. Compile this and
save To test this, I'm simply going to
drag in a block. It can be any block here, but I'll just do a
block breakable. I'll tap that key to
snap it to the floor. And actually I'll move it
up a little bit so it's not sticking through
the floor. There we go. All right. Jumping
in and playing. I'm not currently in
the detect range. It's moving left. It's
going to hit that block, it's going to shoot
it right now. Let's see if it'll actually move our Guba back
the other way. I'll just move my Guba a
little bit more this way. Move myself a little
bit out of the way, and I'm going to bring in
a second one right there. Here we go. In the
dissect range, goma hits a block, goes the other direction, hits a block, goes the
other direction. So that's going to be
a real simple patrol. And once again, we can
customize our Gumba here by determining what's going to be their default direction. I've got my Gumba selected, just typed in default here to
see my exposed parameters. I'm going to change the
speed this time to be 300. And I'll say this time I do
not want them to move left, so once I overlap this range, he's going to actually
start off moving right. So let's go ahead
and give us a play quickly, Started
off moving right. As you can see,
he's moving faster, his flip book is moving faster. And so we've got highly
customizable gumbas, you can change those
values for any instance. All right guys,
that is going to do it all for our Gumba patroller. We'll see you all
in the next video.
63. Goomba Seeker: Welcome back. Well we have a goomba that can
patrol in our level. Let's make a version that is a little bit
more aggressive, one that can seek
out our player. To do this, we're
going to dive back inside of our BP Goomba. Go ahead and double
click on that. We're going to start
off by creating another variable over in
the variable section, clicking on this plus button, I'm going to create one
that is is seeker enemy. I'm going to compile right away and I will make this
instance editable, meaning that I can adjust this when we have our
Goomba in the level. And I'm also going
to say that by default it is not
a secret enemy. We'll have it as a
patroller by default. But if we want to flip this
on to being a secret enemy, we can do so with this
boolean variable now created. We can come under our existing
bit of script right here. And we're just going to add
some script right up in here to evaluate that variable. So I'm going to hold
down control and left click and we're going to drag
this in right about here. And then I'm going
to drag out of here and plug this into
a branch node. And we're going to
adjust our flow out of this gate
so that instead of automatically moving our player in some patrol fashion
left or right, we're going to evaluate, is this a seeker enemy? Now if it is false that
this is not a seeker enemy, we're just simply going to
do the patrolling movement. However, if it's true, what we're going to do is we're going to right click
in some empty space. We're going to get controller, the pawn, get controller. We're also going to
right click and get player character out of
our controller here. I'm going to drag out and
type in simple move to actor. Who do we want to be
controlling here? The controller of
our Goomba here, that's going to be
our controller and the goal is our
player character. Now instead of diving
into some behavior trees, which is the right way to get enemies moving
about your level, This is a real simple
means of having some real simple
AI, if you will. We'll say if it is
a secret enemy, we're simply going to move our goomba here to
target our player. That's going to be the
goal. That's simple enough. Something else we want
to do here is come under the class default of our gumba. What we're going to do in here is expand this out a little bit. We're going to type in controller and we
want to uncheck this, use controller rotation ya. If this is checked on, what essentially
would happen is if our gumba was set
to be a seeker, it would turn and
try to go after you. We don't want our goomba
to turn in any way. We want them to stay oriented, kind of facing the camera here. So by unchecking that, we're essentially going
to ensure that we do not rotate our character at all. Now if we were to try to jump in and test this
out by compiling, saving and going to our
level editor and saying that Argumba here is a
seeker enemy note, I am searching by my
default category. The reason all these variables exist under default, by the way, is because all these variables that are set to be
instance editable, let me clear out the
details panel here. The category therein
is called default. I'm going to set it
to be a seeker enemy. In doing so, this
whole move left doesn't actually do anything,
it doesn't really matter. Consider this, grade out. What we're going to do
now is test this out. And as soon as my
player overlapses, the Guba is going
to start seeking out my player, supposedly. Although you're going to
notice an issue, hey, I seem to be in range but Gumba isn't coming
after me. What's going on? Well, in order to make this simple move to
actor node work, we need to add
something known as a navigation mesh to our level. To do that, we need
to jump back to our level editor here and
in the place actors panel. And if you don't have the
place actors panel on, you can get it by coming here, selecting place actors panel, and type in nav. We want to add
something known as a nav mesh bounds volume. And what this
essentially does is it specifies an area of space where you can have
enemies like argumba here, where they can navigate. Once you bring this in, it's
going to be rather small. I'm going to make this way
bigger than it needs to be. And I can do that by having it selected over in
the details panel. And I want to find my
brush settings here. Where I can define a size
of this given volume. I'm going to make
this huge in my, I'm going to make this to be 40,000 something huge like that. Way bigger than I
needed to be something to cover all this swath of land. I'm going to set the y value here to be something way
wider than I needed to be. So I'll set it to be
something like 2000. And I'm going to set the
z to be something like 5,000 in case I build
this level up vertically, something huge like that. It's essentially wrapped around my entire play space here. Now in order to
actually see where this navigation
mesh is covering, you can tap the
key P, as in Paul. And anything in the green
here is essentially identified as space
that can be navigated. The key can toggle
that on or off. Additionally, if you go
under the Show option here, you can see navigation is
shown or hide by that key. You can click it on or off
using this method as well. Now you may notice some
areas that are not covered by our green
navigation mesh here. Like around our blocks on the ground and even
around the Goomba itself, Those designate areas
where our enemy, our Guba here, can't go. I want to tighten up
that space a little bit, so I got a little bit of a trick here inside
of my goomba. Let's dive back into
our goomba here. And I'm going to select
four different components. And I'm going to go to my
viewport here just so you can see which
components these are. I'm going to select my
capsule component and then I'm going to hold
down the control key and do my player detect range, my collider and my stop box. All four of those, those are
various collision volumes. Then in the details panel, I'm going to do a search for ever I've got this checkbox
for N ever effect navigation. I want to uncheck this. Now if I save this and
go back to my level, you can see that this
space is tightened up underneath our gumba. This will make it
so that when our gumba moves back and forth, it is not going to stop in an area where it first
started out. All right? So with all of that,
make sure you've got your gumba selected
in your level. In your default parameters here that you have
exposed to the editor. You have checked
that it is a seeker. Note that when it is a seeker, this move left doesn't
really matter. I'm going to jump in and play. Now when my character
overlaps at detect range, Argumba will now seek out. The player doesn't look
much different right now, but notice how he's being very aggressive
in how he seeks me out. Even if I come up here, you'll seek me out as well. Now you'll notice he's basically stopping and moving on a dime. And that's because
in argumbascript, we are essentially evaluating every tick whether or
not it's a secret enemy. And if it is true, we're moving
to our player character. Now if you don't want it
to be quite so aggressive, what you could do is you could come under your class defaults. Let's clear out our
search for the Ken ever. And you can adjust
your tick rate. Currently this is ticking. That's firing off every frame. But you could set this
to be something like say 0.25 so every
quarter second. Now, you got to be
careful with this. And I'll show you an issue
if you go this route. Because right now we're setting
our tick interval to be a quarter of a second for
all of our goombas here. So now if I was to
jump in a play, this may make our seeker enemy move a little bit more
realistically so that they don't pursue our player quite so
on a dime, if you will. There's a little bit
of a pause there. However. The issue with this is if you go and you
make your gumba, not a seeker, and then
you jump in and play. Now it's just a
regular patroller, he's not going to
move very well. I either recommend not adjusting your tick rate here in your
class default of your gumba, or if you do want to
have a Sekumba that does have a more
modified tick interval, maybe half a second, maybe every second, that
you create a duplicate of this goumba that is
dedicated to being solely a seeker and not
a patroller at all. So that way you can have a more modified tick rate for that. With that, go ahead
and compile and save, and guys that's going
to do it all for creating a seeker
version of our Goomba. Here. We'll see you
all in the next video.
64. Warp Pipe Blueprint: Welcome. Over the course
of the next few videos, we're going to be
working on putting together a warp pipe blueprint. And this blueprint is going
to be highly customizable in that we're going
to be able to set how tall we want
to make our pipe, We're going to be able
to set where we warp to. We're going to be
able to interact with the pipe going down through it. And additionally, we're
going to be able to interact with this pipe by going
up through it as well. Now to get started back here in our working version
of the project, we're just going to create the green material that's
going to go on our pipe as well as put together the actor class blueprint
for the pipe itself. We'll finish off by
adding the components necessary for this pipe and
setting the details for it. And that's as far as we're
going to get in this one. Firstly, to create
the green material, I'm going to start here in my content platform
Materials folder. I'm going to right click
in some empty space. We're going to create
a brand new material. I'm going to call this
M, Underscore Green. And then I'm just
going to hit the space bar on this to open it up. This will be a really
basic material. The first node that
I'm going to look to add is called a
constant three node. We can get one of
these by holding down the three key
and left clicking. And this is going to
allow us to plug into our master material node right here and give it a base color. With this node selected
over in the details panel, you can set an R, G, B, that is a red,
green, or blue value. You could choose
this color picker right here to pick a color. However, I'm just going to
set a green value of one. Press Enter. Now this
is a flat green color, and I want mine to look a
little bit more metallic. We've got this metallic input on the master material node, and if we plug in a value 0-1 we can specify how
metallic we want this to be. For this, I'm going to
add a constant one node holding down the one key and left clicking I can
add one of these. I'm going to plug this
into the metallic input. Here in this node I'm going
to specify a value of one. And you can see over
in the previewer here, it's looking a little
bit more metallic. Now, I also want to change the roughness of this
to add to this effect. Holding down the one key again, I'm going to left
click, I'm going to plug this value
into the roughness. And you can see by plugging
in a value of zero, we've made this super, super smooth and thus super
shiny and reflective. I don't want it to be
quite this reflective, so I'm going to set
the value here to be 0.5 instead, somewhat rough. That's going to be the look
of our pipe right there. Green. A value of
one in metallic, a value of 0.5 in the roughness. Let's go ahead and save that and then we can
close out of here. Next, I'm going to select our blueprints folder down
in the content browser. And we're going to create
our war pipe blueprint simply right click in some
empty space blueprint class. This is going to be an
actor class blueprint. I will name this BP
underscore Warp Pipe. Then with this I will double
click on it to open it up. Inside of here I'm going to add all of the components necessary. And then I'm going
to go back and set the details for
each, for this part. Adding the components, note the attaching
relationship because that will be important. I'm going to leave my
default scene root out here. That is this icon right here. All the components that
I'm going to add are going to be attached to this. The first one that I'm going
to add is going to be known as an instanced static mesh, not the hierarchical one, the instance static mesh. And I'm going to
call this one body. Now with this,
we're going to set a static mesh that is going
to be cylindrical in shape. And we're going to add sections
of these through script. Depending on how tall or
stubby we want our pipe to be. Once again, I'll add
these details later. The second component
that I want to add, I want to also add to
our default scene root. We're going to attach it to
that. We're going to add one. This is going to be a
simple static mesh and I will call this one pipe top. This is going to
be the top part of our pipe that's going to
be a little bit wider. Now with our pipe top selected, we're going to attach
two components to this. Make sure you've
got that selected. The first one we're going to add here is going to
be a static mesh and I will call
this pipe inside. This is going to be for the
inside look of our pipe, essentially coloring it black. That's what that's
going to be for. Let's go ahead and select
our pipe top again because this next component is
going to be attached to the pipe top as well
and thus indented. This same depth. This is going
to be capsule collision, right here under the
collision category, we're going to call
this simply collision. Okay, we've got two more
components I want to add here. Both of these are
going to be added to the default scene route. Make sure you have
this selected. The first one we're
going to add is going to be known as a billboard. This is simply
going to be an icon that's going to represent
a point in space. So go ahead and select this. You're going to see a dragon
head icon appear here. This is going to be
called our Warp in point. And then I'm going to add one more and it's going to
be at the same depth. Select your default scene route. I'm going to add, and I'm
going to type in Billboard, this is going to be
our Warp O point. These icons are going to
simply represent a point in space where we're going
to be instructing our character to warp in from, or warp out from. Okay, with our
components in place, let's go ahead and set
the details for each. I will start off
with my pipe body, make sure you have
that selected. I'm going to set the
location for this, the z location to be five. And I'm going to set
the scale right away, even before I set my
static mess year. In fact, let me go ahead and set the mesh first so
you can actually see some of these changes. The mess year, we're
going to use a cylinder and we're going to
choose this cylinder from the engine
basic shapes path. You can see at the top
of that tool tip there. With this now implemented, we're going to set the scale. I'm going to set
the scale to 2.252 0.25 And then we're going
to set 0.1 for the Z scale. I'm going to check this lock
button or unlock it rather. So that when I change
one of these values, they're not all going to
change at the same time, and this is going
to be 0.1 I also misspoke there because this
is an instance static mesh. We're not going to
see any of these added to our
viewport right away. These guys are going to be added through our
construction scripts, so you won't see
anything here just yet, but wait for it
in future videos. Also, what I want
to do is I want to change our material
here to be green. Because this is
going to be green, is going to be our
material here. This is going to be the
length of our pipe, the pipe body itself. All right. With that all done, we're going to move
along to our pipe top. Go ahead and select
that for this. We're also going to add a
cylinder type in cylinder. Once again it's going to be from the engine basic shapes pack. I'm going to set this
to be green as well. That same material M, underscore green because
this is a static mesh. We will see this in our viewport
over in the scale area. I'm going to set the scale to
be 2.75 in the x and the y. Let me zoom on back
here a little bit. In my viewport, the
z is going to be 0.5 for the z location. I'm going to set this to be 35. It's going to be up
there a little bit next for our pipe inside. Let's go ahead and select that. This is also going to be a
cylinder for the static mesh. Same from the
engine. Basic shapes pack our material here, I'm going to set it
to something black. If you type in
black lit material, you'll find a good
shade of flat black. I'm going to set the location
for this in the Z to be 25.5 so it's going to be just
peaking out a little bit. Now you're seeing some
fighting here for the scale. Let's set our scale
down to 0.8 for the x, 0.8 for the y, and our z is going to be
0.5 Now when I do this, you're going to have
this kind of look. So it's going to look like
the inside of a pipe. Pretty clever, huh? All right, Next we've got our collision,
our capsule collision. Go ahead and select that. What we're going to do here is change the location of this. The Z location is
going to be 80. We're starting to see it peer above the top of our pipe here. We need to make this
bigger as well. The half height, I'm going
to set this to be 300. The capsule radius here
is going to be set to 40. And we're going to
be using this to check when our character is above the pipe or if
this pipe is inverted, whether or not the character
is overlapping this. So we can check to see if
the character is pressing a button to thus interact with the pipe and
warp them away. Also, we need to come under
the collision section. Come under the collision preset. We're going to set
this to be custom. We are going to
ignore everything. We are going to accept
overlaps by the pawn, that is to say when our
character is overlapping this, we will recognize it right next. Let's go ahead and select
our warp in point. Once again, this is
going to specify a point that we're
going to begin warping. For this, I'm going to set our z location here in the Z.
I'm going to set it to 70. It's going to place it right about there, right
above our pipe. We may fiddle with this, but I'm going to leave
it at 70 for now. For our O point, that's going to be down
below a little bit. So I'm going to set the Z
for this to be negative 35. Again, we may fiddle
with that, but that's going to be a good
starting point, So when you warp in, we're going to use
that as a warp point. When we warp out,
we're going to use that as a beginner
warp out point. All right, and with
that, that is going to give us a pretty good
start for our pipe. Obviously a lot more
work to be done here. Scripting wise, for sure. Go ahead and save this and
we'll call this video. We will see you
when, the next one.
65. Warp Pipe Construction Script: Welcome. We're going
to continue forward with our BP war pipe here. And our next step is going to be to add some script inside of our construction script to make our pipe highly customizable. To make it so that we can make the body of the pipe the length
of the pipe if you will. As tall or as stubby
as we'd like. Now the good news here
is we're going to be able to borrow some script from our Mushroom platform that we created
earlier in the course. So let's jump right to it. First step here is we're
going to create a variable. Clicking on that plus button. I'm going to call this
my pipe end point. Make sure that this
is a vector variable so you can select right there
and change it to vector. Then I'm going to go ahead
and compile right away. Because I want to set
a default value for this in the Z. I want to set
this to be negative 100. And then I'm going
to check these boxes to make this instance editable, as well as to show
the three D widget. Now what this is going to do is let me go ahead and
compile and save here. And drag this war pipe
into my level somewhere. For the time being, I'm
going to place it right near my player start. Now with this in our level, we can see we've got
this pipe endpoint, this variable, it's now exposed to the editor, we
can see right here. And so I could change
this value here within the editor, up or down. Let me set that back to default. Or I can actually click
on this three D widget itself and move that
up or down as well. Let me go ahead
and set that back to its default of negative 100. Now we're going to be
using that value of this variable inside of
our construction script. So let's dive back
into our war pipe, to our construction script tab. Inside our construction script, we essentially want to add
some script that's going to add some sections of
our pipe body here. And this is going to do
this by adding portions of our cylinder here inside of our pipe body
instance static mesh. Now if this is
sounding a little bit familiar because we have done
something similar to this, in fact identical to this inside of our BP
platform launcher. Now we're going to be able
to take a little bit of a shortcut here by stealing
some script inside of here. But just let me remind you what we did
earlier in the course. By dragging one of these
out into our level, inside of our BP
platform launcher, we added a variable
called trunk endpoint. This was a vector
variable and we made it instance editable and made it so that it has
this three D widget. And by modifying it here
in the level editor, we are actually
adding sections of our platform launcher stem. We're going to
have that same set up here inside of our pipe. We're essentially going
to be able to select this diamond for our
pipe endpoint variable. We're going to drag
it down and then our construction script
is just going to fill in some sections of pipe. Same method here, inside
of my platform launcher. I'm going to simply open up this blueprint by clicking
over in the Outliner. We're going to edit that inside of the construction script
of our platform launcher. I'm going to steal some
script inside of here. I'm going to click and
drag right about here. And then I'm going
to hold down control and get our four loop as well. We're going to be looking
to steal these nodes. 1,234,567.8, With those selected
do control C to copy. Let's go to our war pipe
construction script. I'm going to left click and
then control V to pace. The reason that this
is going to work almost identically well will work identically is because
in our BP platform launcher, we have this instance
static mesh for the trunk. And lo and behold, look at the mesh that we were
looking at there. It was the same cylinder
that we have for our instant static mesh
here in our warp pipe. Our pipe body is going to be
using that cylinder as well. Now one thing I do need to update here in order
to make this script work exactly the same is notice here in our BP
platform launcher, this mush trunk stem, I have the scale for
the Z set to one. Let me go back and revise
this in our war pipe. I'm going to change the
Z scale to one as well, so that this bit of
script is going to work identically back here
in our BP war pipe. This is going to be a revision
from the previous video. I'm going to change
my pipe body Z scale. Make sure that this is
unlocked so you can change the Z scale
independently to one. All right, With
that now all I need to do is I need to
take my pipe endpoint. I'm going to plug that
into my vector length. I'm going to drop that on there. I'm going to hook up my
construction script so that this can run during
design time here. Whenever we make any
change to this blueprint, it's going to update it in our
level editor here as well. And then we need to plug in
what instance we want to add. This is going to
be our pipe body. We're going to drag
this in like so. This math should
all be the same. Dividing by 100 there, multiplying by negative
100 right here. Let's go ahead and compile this, make sure that it's all looking good. We're going to save this. And now back in
our level editor, we can see that we've added
some sections of our pipe. Now if I grab this endpoint
here and extend it down, you can see that whenever I move it in extra 100 unreal units, it's going to add
a section of pipe. Highly customizable
indeed. And again, this works during design time. Not while the game is running, but during design time. All right, so that's
all we wanted to accomplish in this
portion of our war pipe. Plenty more work to do, but now we've got a
construction script constructed that'll add pieces of our pipe body so that we can make
it stubby long. However big we want
to make it guys, that's going to do
it off for this one. We will see you in the next one.
66. Warp Pipe Inputs: All right, so now that our pipe is looking pretty good visually via the components
that we've added and the construction script
that we have created, It's time for us to
turn our attention to the Warp pipe script itself. That is our player
actually interacting with this war pipe to get them to warp to some other
area of the level. Now to make this happen, we need a proper input. And before we get started
on that discussion, it's time for a little
bit of review about how our inputs are structured
within our project. Now as you know, we are controlling our third
person character in our project and inside of
our third person character. This script had already existed. This is adding an
input mapping context. This is what's determining
all the inputs that are relative to this
particular character, the inputs that this
character can use. Now I have this asset IMC default open
along the top here. Inside of this asset, we can see the various
input mappings that have been added
to this IMC default. One of these being
shooting the Fireball, which we added earlier. Also, we added one
for a player down, and we use this one inside of our BP platform, jump through. We made it so that when
this action is triggered, we can fall through
our platform. And we made it so
that this action is triggered by the S key, as well as pushing down in the y axis of our
left thumbstick. Now to make our war
pipe interaction work, we're actually going to use this player down input
that we created. However, we're going to be
modifying things a little bit, so that's where we're
going to pick things up. Now if you forgot where
this athot exists, you can find it here in our third person
input actions folder. And this is where we created our A player down input action. Now if you don't have this asset from earlier in the course, the way we created
this was to right click in some empty
space under input. This was an input action. We call it IA player down. We're going to open
this back up because we're going to make some
modifications to this. So currently inside of our
IA player down input action, we set the value type
to be a digital boule. That did it happen
or did it not? We're going to change this slightly by coming under
the trigger section. Currently it is
set to just down. Are we actually pushing down? In our case, the IMC
default for example, are we pushing down say the SQ. Did it happen or did it not? Now we're going to be
changing this slightly so that this value type remains
the same digital bool. Did it happen, did it not? However, we're going
to be changing the in the index from down to hold. We're going to be
checking if we're holding down a given button. Now if we expand this out
a little bit further, we're going to
change our hold to time threshold to
be 0.2 seconds. And our actuation threshold
is going to be one, essentially all the way by
setting this to a 1.0 value. We're essentially
wanting to find out is our left
thumbstick pushed all the way down for
at least 0.2 seconds? That's essentially what
we're saying here. We're also going to
check this box for is one shot that's going to make it so that in order for
it to register again, we have to essentially release the left thumbstick in order
to trigger it once again. So with all this in place, digital bool hold 0.21 shot
actuation threshold of one. Go ahead and save this and
back in our IMC default, we've currently got
our player down input action mapping
set to the S key. However, I'm going to
change this game pad, left thumbstick, y axis. I'm going to click
on this drop down. And in the gamepad
section, again, this is just for you
gamepad players. I'm going to change it to
Gamepad left, thumbstick down. So these two are going to trigger that A
player down event. Both in our jump through
platform like it's doing now, but also within our war pipe, which is where we're going
to use it in the next video. Now we want to create actually one more player mapping
here in action mapping. We've got this player down
back in our content browser. Let's go ahead and
duplicate this. And we can duplicate this by either right clicking on
it and choosing duplicate, Or Control plus D
will duplicate that. And I'm going to set
this to be a player up. Now the reason I'm adding a player up here is simply
because I want to be able to go down a
pipe as well as to go up through a pipe as well. Now if I open this up, I want to ensure that this has the exact same settings
as our player down. So it's set to digital bull and the triggers are set
to hold 0.2 seconds. I do want this to be
set to one shot in the actuation threshold is
going to be one as well. Let me just double check
back here on my player down, we've got digital Bull hold 0.21 Digital bool hold 0.21 shot in 1.0 That's
all looking good, so go ahead and
save this as well. Now I also need to add this
particular input action inside of our input mapping
context, that IMC default. And if you've forgot where
that IMC default was, once again back here in
our content browser. These existed in the third
person series of folders, and you can find this one in the input folder, IMC default. So I'm going to
open that back up. I've got to open it
across the top here. Now to add this IA player up to our list of possible
input actions, we need to click on
this tiny plus button. It's going to add
it right down here. Now I have to actually slot
in this empty input action. So I'll do a search
for up like so. Now I need to figure out which
buttons or inputs I want to be able to trigger that
input action event player up. Well I'm going to do
a keyboard event for W. If I click right here
on this keyboard icon. With that in orange, I can now just press the Wkey and it'll automatically
map it to that. I'll click this plus
button once more, and it'll allow me to
add another input. Instead of clicking
on the keyboard this time I'm going
to actually click next to the keyboard and
I'm going to go gamepad. I'm looking for gamepad,
left thumbstick up. Those will be my two mappings to fire off that input
action event. With that, let's go ahead
and save our input mapping. Context default here
and now we are going to be in position where we can
add these particular events. Our player down
and our player up within our warp
pipe event graph. So that's all to come in. The next video,
we'll see you there.
67. Warp Pipe Script #1: All right, so in our
last video we modified our input action
player down asset. And we also duplicated
that and created an IA player up input action. Then we made sure that
both of these were slotted inside of our IMC default. This is our input
mapping context so that we've got our
IA player down here mapped to a couple
inputs as well as our player up map
to a couple inputs. A keyboard and a controller. Now we're going to
be making use of these inside of our BP war pipe. So find your way on over here, I'm going to left click, drag out a marquee
selection and delete out these existing events within our event graph of our war pipe. And we're going to add our
two new events right here. Our player down in,
our player up to get us started with our
initial pipe interaction. So I'm going to right
click in some empty space. We're going to do a
search for player up and we're looking for
enhanced action events. Look for the one with
this arrow type icon. And then we're going to right
click and I'm going to do a search for player down. Again, the enhanced action
events that arrow icon one. Let's put this like so. Okay, so we're going to be using a couple of variables
and a gate node and some overlaps to detect if
our player is actually in a position to interact
with our war pipe. Now, before I go any further
here using these events, let's go ahead and
create a couple of these variables in the my blueprint panel that
we're going to need. So coming under the
variables plus section, we're going to add
a variable for can interact with question. This will be a bullion. Essentially we're going to
be using this variable to ask ourselves to ask each individual pipe that
we place out on the level, can we actually
interact with it? There may be some
pipes that we're just placing out there for
decorative purposes. There is no intent
for the player to actually interact with this, so this is a way for
us to flag that, yep, this is a war pipe that we actually want to
warp our players. The other ones are
just going to be decorative with this
variable selected here. I'm just going to do control
plus D to duplicate it. And this one is also
going to be a bullion. However, this one is going
to be called is pipe. It's going to be
a question mark. And this is essentially
asking the question, is this a pipe that
we want to go down versus is it a pipe
that we want to go up? So this is going to
be used to determine our players animation when they are interacting
with the pipe. Are they going to go
down through it or are they going to go up through it? Now let's go ahead
and compile these. So we can set some
defaults for these. This can interact, we want
to leave it as false. Let's say by default all of our pipes we're going to say
we cannot interact with it. We can check it on though, if we check it on in the editor. So make sure that you check this box, for
instance, editable, so that when we do have our
pipe selected in our level, we can check this box on for any particular
instance of it. Four is down pipe bullion, we will check this on by default and we will also say
is instance editable. So back in the
editor once again we can also modify these variables. Now if I was to go ahead
and compile and save this and select my war pipe
back in my level, now you can see that
these two variables are available to me
within the level editor, I can check or uncheck
that Ken interact or is down pipe checkbox, okay, Jumping back to our war pipe
when our player presses up. We want to check a
few things to see if they're true before
we even move on. And what we want to check
to see if it is true or not is can we interact
with the pipe? So let's drag this
out into our graph. Can we interact with the pipe? We also want to check to see
if it is not a down pipe. I'm going to bring in my is down pipe. We're
going to get this. I'm going to drag
out of this and say I'm looking for a Boolean. That node right there. Now I want to check if both
of these are true. For this, I can right click in some empty space and
bring in an node. I'm looking for an Boolean. I'm going to plug this can Interact into the
top and then is down pipe into the
second input here. And we're going to be
plugging the output of this into a branch node holding down the B key
and left clicking. We're going to
plug this in like, so we're going to
fire out of here. Or we only care when
it fires out of here when we've started this Input. Action long story short
here with our player up. Input action. This will fire out of that started pin
back here in our war pipe. It's going to fire out of
here, out of this started pin. As soon as these
conditions are met, we've held down either
the WK on our keyboard or the left thumbstick in
the upward position all the way for at
least 0.2 seconds. If we've met those conditions, we're then going to be
asking the question, hey, can we even interact
with this pipe And oh, by the way, is this
not a down pipe? If that is true, we want
to enter into a gate. I'm going to drag out of here
and type in a gate search. I'm looking for a gate node. We're going to
enter into a gate. Essentially we are approaching
a hard gate and we want to find out if the gate
is open or if it's closed. Now if the gate is open and
think of a physical gate, if it's open, we're going to do whatever script
comes beyond here. If the gate is closed however, we are not going to
advance beyond here. Now before we get to the
opening or closing of the gate, let's handle our
player down input. Now to save a little time, I'm going to copy
these nodes up here. So I'm going to left click
and drag get these four. I'm also going to
hold down control and left click and grab this
fifth node right here. So with those selected,
I will do control plus D to duplicate them and
bring them right down here. Now this is going to
be largely the same, however for the
player down input I do not need this knot node. That's a lot of knots.
So I'm going to delete this out for this. We're going to say that
when we are pressing down, that is the S key
on our keyboard, or our left thumb stick is down. Once that has started, we're going to then check, can we interact with it and
is it in fact a down pipe? This one we do want to find out, is it actually a down pipe? And if that is true, that
we can interact with it, and it is a down pipe, a pipe that we can go down. We also want to
enter into a gate. So we're essentially whether we are trying to go up
a pipe or down a pipe. This is our way of
approaching the gate to see if an interaction
is even possible. Now to find out if an
interaction is even possible, we want to find out
if we are actually in a position to
go down that pipe. And for that we're going to be using our collision
overlap right here. Now let me just jump over
to our viewport very quickly and zoom on back. We've got this collision, this capsule collision component we're
essentially wanting to check has our player even
above the pipe like this. If they are, if they're
within this area, we're going to say yeah,
the gate is open. Go ahead. However, if our player is not
overlapping this collision, we're essentially going
to say, nope, sorry. You can't advance at all beyond this gate node. So no can do. Can't go down the war pipe with this collision node selected
here in our components. Let's right click in
some empty space. We're going to add
an event for when we begin to overlap that. Now once I click on this, it's going to place this
node right down here. And let me just move my gait down here and frame
it up like so. So what I want to find out for on component begin overlap. We want to find out hey, is it our player that is
overlapping this? So once again I can right
click at some empty space. I could do a get
player character and we could do this whole
equal thing out of here. However, I want to find
out specifically if it is our third person character that's doing the
overlapping here. Because if it is, I
want to actually save a reference to our
third person character for later on in the script. So instead, this
time I'm going to pull out of my other actor
pin and I'm going to do a cast to third
person character. So if it is the third
person character that is doing the overlapping
of this collision, we're going to plug this into
our open of the gate notes, so we're going to say, yeah,
the gate is open. Proceed. You may go beyond here so long
as you have either pressed up or down depending on what type of pipe we're
trying to interact with. Okay, then let's
also right click on our collision component
up here again at event, for ending an overlap. Here too, we can also bring in our third
person character cast. Note I'm going to do control
D with that selected. Move this into position like so. We're going to say if you
have ended that overlap, meaning you are not within
that collision area, we're going to close
that gates and by default we're going to
start with the gate closed. Essentially, this is going
to be the very start of our pipe interaction script because this is a
little bit tall. I'll try to frame it like cell. Try to get this
top part in place. If you want to pause
the video here, you can see we've got
our variables over here, player up, player down. Those are both going to feed into the enter part of the gate. And the open and
close is going to be determined by if we are actually overlapping this
collision component or not. Now none of this will work whatsoever if we
don't go inside of our class defaults here inside
of our war pipe and change this parameter right down
here in the input section. Right now, this war pipe will not recognize either
of these events. Even if we were to do like, the W or S key on our keyboard is not going
to recognize these at all. And that's because inside
of our class defaults, an actor class
blueprint will not recognize any
inputs unless under the input category
you change the auto receive input from
disabled to player zero. In our case, because this
is a single player game, all we need to do is
check if player zero, that is our loan player, is inputting any sort of inputs, the WK, the S key, or maybe up or down on
the left thumbstick. Okay, with that all done,
make sure you compile to make sure that our existing
script here is looking good. Let's go ahead and say that, and that's going to give
us our starting point for our war pipe interaction. Lots more work to do, but we'll continue on within
the next video. We'll see you there.
68. Warp Pipe Script #2: Welcome back here in
our BP war pipe when our character is overlapping
the proper collision volume. And when we have input
the proper input, thus advancing us
beyond the gate. We need to move our character up through the pipe or
down through the pipe, depending on which direction we want to interact with the pipe. And to do that, we're going to need a reference
to our character. So the first thing I'm going
to do is zoom up here. And when we have advanced
beyond the gate, we need to create a
reference to our character. I'm going to write, click
on this pin right here. We're going to promote
this to variable. That's going to create
a variable over here. I'm going to name
this my player. And we are going to need this reference in order
to tell our player to move through a pipe in
either direction, up or down. Okay, after we have done this, the next thing we want to do
is we want to make sure that our player doesn't
input any other inputs. Because once our character
is moving through that pipe, we don't want to try to jump or shoot a fireball or
anything of that sort. In order to do that,
we're going to click Type in, get player controller. And then we're going to
drag out of this and type in disable input. Now note that when we do this, this is going to plug the
output value of our get player controller node here into the target. This is
actually incorrect. What we want to do is move this down to the player controller. So if I hold down the
control key here, I can move this down into
the player controller pin. And the target here, I
want to be my player. So essentially we're
saying hey player, you can't input any actions while we're going to be
moving through our pipe. With that, the next
thing I want to do is I want to ask a question. I want to bring in a branch node holding down the B key
and left clicking. And the question
I want to ask is, is this a down pipe that we're going to
be traveling through? Because depending on
if we're going to be going down through a pipe
or up through a pipe, we want to play
different sorts of character animations to show them going down through
it or up through it. So drag and drop this
onto our condition. So then what we're going to do is off of the true branch, we'll
build off of there. First we're going to bring
in a sequence notes. So I'm going to hold down
the S key and left click. Because there's
going to be a couple of things I want to happen. If it is a pipe that
we are headed down. The first thing I want to
do is add a timeline here. Because I want to manipulate a variable over time,
a float variable, in order to move my player a certain amount within the z direction to go
down through the pipe. Let's add a timeline.
By right clicking, I'm going to search
for time line. It's going to be
way at the bottom. If I just put in the
word time there, I'm going to call
this time line. Let's see, we'll call it into, let's not capslock
that into down pipe. And then I'm going to double
click on this to open it up. And inside of here I'm
going to add a float track. So click on the Track button. We're going to add
a float track. I will simply call
this movements. And I'm going to
change the length of our timeline here
to be 1 second. Because I want to move our character in the Z direction over the course of 1 second. I need to add a couple
of key frames here. So I'm going to hold
down the shift key and then left click once and twice. The first key, I'm
going to select and set the time to be zero and
the value to be zero. And then the second key frame,
I'm going to select that, I'm going to set the
time to be one and the value to be negative 200. Now after I've hit Enter, I can press on these arrow
keys to frame this up. This is kind of a
visual representation as to what's going
to happen here. We're going to be moving
our character down 200 unreal units over
the course of 1 second. With this track added, we can
go back to our event graph. And now we can see this
movement output right here. Again, if this is a down pipe, if that's true that we are interacting with a
pipe that is labeled, yes, it is a down pipe. We're going to play
from start right here. Then we're going to bring in
a reference to our player. Let's drag and drop this. We're going to get that, we're going to drag out of my player. And we are going to say set relative location and rotation
for the capsule component. This one right here, it's
going to bring in two nodes, our capsule component reference, as well as this set relative
location and rotation. As this timeline is updating, we want to send our player to a new location. What location? Well, let's drag backwards
off of this new location type in make vector so that we can
split this out into the x, y, z components of this. Then what I'm going to do
is I'm going to bring in a reference to our point, this component right here. Let's drag this into our graph. And just to go to our viewpoint, this is our warp point. This dragon head right here. This is essentially going to
be the starting point from which our character is
going to be warping. Okay, let's drag out
of here, type in, get world location, then we're going to drag out of here and type in break vector. This is outputting the X, y, and Z location, the
location of our warp point. We're breaking that
out into its x, y, and z components. When we're warping our player, we want to keep the x the same and we want to
keep the y the same. However, the z value is
what we want to change. We want to take our z value from our warp point and we want
to drag out of there, put in the plus key, bring in an add node. What do we want to
add on to that? What do we want to add
on this bit of movement? Again, this is going
to change the value of this by negative 200 over
the course of 1 second. That's going to be
our new z value. Let's frame this up
a little bit better. Like so it's going
to be like that. And then I'm going to left
click and drag tap the key. And this is going to be our
enter down pipe script. I'll color this
black right away. So I'm going to move it
on up here a little bit. If it is a down pipe, if it is a pipe labeled as
a down pipe in our editor, if that is true, this
is how we're going to move our character down
through that pipe. Now again, we have to worry
about them, you know, exiting out of the pipe, but we'll worry about that
in just a little bit. Now, the second thing
I want to have happen, if they are going down
through the pipe, this is essentially
going to be moving our player is I want to play
a sound effect as well. So that's why we have this
sequence node right here. I'm going to drag off this, bring in a delay
node, delay node. And I'm going to
leave this value of 0.2 And then I'm going to drag off of this and bring
in a Sound two D node. For this, I'm going to
do a search for pipe. Nope, it's not pipe. I
think I called it Warp. Warp. That's the one I want
to input, essentially. We're also going to play
this sound effect as well. In fact, I'll left click around this tapkey and I'll call this our warp X like so. Okay, I'm going to color
this black as well, just to make that
nice and clear. Now, we're not done yet here when we have
finished with this, when this timeline
has finished up here. After a second, I want something
else to have happened. For that, I'm going to borrow
these two nodes right here. I'm going to select
my delayed node, my Play Sound Two D,
and I'm going to do a Control D with both
of those selected. I'm going to move
those right over here off of our finished
pin right here. I'm going to plug into
this delay node and I'm going to change our duration
here to be 0.4 seconds. That's going to be pretty good, 0.4 Then I want to play
this warp sound again. Essentially, when we have finished going
through this pipe, we're going to be playing
that sound effect again. So essentially sound
effect to go in. And then when we finished, before we warp out, we show our character kind
of coming out of the pipe. We're going to play that
sound effect again. Now there's going to
be one more node, actually two more nodes
that we're going to add. Right here. I'm going
to add a branch node, so holding down the B
key and left clicking. I'm going to plug
into this as well. And we're going to check
another condition. And the condition we're going
to be checking here is if our player is going to exit
rising up out of a pipe. Or if they're going to
fall out of a pipe, that's going to determine
how we manipulate our character rising up out of a pipe or falling
down from a pipe. So for this we're going to
need a Boolean variable. Let me go ahead and select
this existing one over in my blueprints panel
control D to copy that. And I will call this one
exits rising up out of pipe. I want this exposed as well. And I will go ahead and compile this and I'll say
yes by default, we'll leave that as true. This will be our condition
that we're going to check. And again, we're
going to be using this branch to determine if our character is
going to be rising up out of a pipe or falling
down through it. So that's to come
here in a little bit, but what I'm going to do is drag around this bit of script, tap that C key and this
will be named our weight a bit before exiting
out of pipe script. All right, so we got that
in place, excellence. So I'll just frame this up
here so you can see what is coming off of
our branch node, then our sequence node. So if it is true that our player is going
down through the pipe, this is going to be the timeline to make our player
go down through it. Now the bad news is
we essentially have three more sections just like
this to add to the script. But the good news is we've built out this section of the
script and we're going to be able to reuse most of it for the last bit
of this blueprint. So we're going to call
it a video right here. So go ahead and
compile and save. And in the next one we will
handle going up through a pipe and then also exiting out of the pipe as well.
We'll see you there.
69. Warp Pipe Script #3: Welcome now, before we
continue on with our script, I just want to test this
out within our level. And I just want you
to pay attention to our various variables that we
have exposed to the editor. We've got this one for, is it a down pipe? Meaning are we supposed
to go down it? And if so, in which direction are we supposed to
go down the pipe? We're going to have
that checked on. In addition, we're also
going to have this can Interact boolean checked
on as well in our editor. Now if you remember
our Interact, we're checking to see
if that's true or not. To see if any of these
inputs are even valid. If we can even get
beyond this point. Pipe selected in your level. Here we've got is the down
pipe already checked. But we do not have
can interact check. So I'm going to go
ahead and check this. And this should make
it so that when we press down on our keypad, I'm going to press the S key. That's going to be our down key. We're going to advance beyond the initial part of the script here because this is going to trigger can interact
is going to be true. And then because
this is a down pipe, we are going to go
down this pipe. We will actually
trigger this bit of script right up here
and right here. This won't really come
into play just yet, but with this all done, we should actually see our character move
down into the pipe. So let's give this a try. Jumping in and
playing. All right, jumping up atop our pipe. And if I press the S
key on the keyboard, you can see my
character goes down. But they have nowhere
to go to yet. So that's what we're going to be fixing up in this next part. Okay, First, let's address
this part right over here. When we are done finishing
our into the down pipe, we're going to wait a little bit before we exit out of a pipe. And we're going to
ask the question, are we going to exit
rising up out of a pipe or are we going to
fall down from a pipe? So let's add some bit of
script right over here. Let's make it so that we exit rising up out of a pipe first. Once again, I can steal a lot of the code that we've done
here, save a bunch of time. So I'm going to hit left click and hit control
C right there. Then I'm going to move over here and do control V to paste control D would just duplicate that straight away instead of copying and pasting. And what I'm going to
do is I'm going to hook up out of this
branch right here. Are we going to be exiting, rising up out of the pipe? If this is true, I'm gonna plug this into play
from start now. We're not done yet. Here we have a few
things to switch up. For starters, I want to get
rid of this warp in point. That's not the location that
I want to be starting from. For this, I want to be starting at a given set of coordinates that we specify a
warp to locale. And we're going to need
a new variable for this. It's going to be a
vector variable, so I'm going to select my existing vector variable
here in my blueprint panel. Going to do control
D to duplicate that. And I will call this
warp to locale. And if I compile
this right away, this is going to be set
to a default value. Let me go ahead and set it
to zero across the board. I do want to make sure that
this is instance editable because we're going to be
setting this in our level. I don't need to show
the three D widget here, so I'm going
to get rid of that. So that's going to be
our variable here. We're going to be starting
from a given locale that we eventually specify
we have not yet. We're going to plug that into
this break vector like so. Now our timeline here needs
to be fixed up as well. Because instead of
entering a down pipe, let me just go ahead
and switch out this title of our
comment box here. We're going to exit
rising up out of a pipe. And because we're
going to be exiting by rising up out of a pipe
with this bit of script, we need to change
up our timeline so that our key frame right here, our second key frame, isn't going down 200. Instead it's going
to be going up 200. So all we need to
do here is with that last keyframe selected, get rid of that negative sign. It's going to be
plus 200 like so. That is the direction
we want to move is up. Now once we have eventually finished moving up
and out of this pipe, we need to enable our
characters controls again. Because if you remember
at the very beginning of this script we
disabled our input. Let's go ahead and select our
get player controller here. And we're going to
hit control D to duplicate that because we're
going to need that again. I'm going to move
that all the way over here trying to find your way
throughout this landscape. And I'm going to
drag out of here the get player controller
and type in enable input. Now once again this is not
plugged into the proper input. I need the player controller to be plugged into the
player controller input. So I'm going to hold
down control left click, and make sure that that is in the player controller input. Right here for the target.
I want to right click and type in get player character, that's going to be our
target when we have finished rising up
out of the pipe. When we have finished
rising up out of the pipe. We're going to enable our input. Once again, let's left click
and drag around this tap, that C key and this
is going to be called enable user control again. All right. Now color this
black right away as well. Okay, so now we have
covered the scenarios where we are going
to be checking, is it a down pipe, is it a pipe that we're going
to go down and are we going to exit rising up out of a pipe? So now we need to deal
with the other situations. That is us going up through a pipe and coming
down through a pipe. So for that we're going
to be able to steal some more of this code down over in this section we want to handle what will
happen if it is false, if it is not a down pipe. Instead, we're going to be
going up through a pipe. Once again, we're going to need another sequence note here. So I'm going to hold
down the S key and left click if this is
false right here. The first thing we're
still going to want to do is play some warp effects. We can plug that
in here like so. But now we want to move
up through the pipe. Now if you remember right
here what we just did, we altered this timeline so that instead
of us going down, we're going to be going
up 200 unreal units. We can actually left
click and drag. We're going to copy
this bit of script. With that copied, I'm just
going to come on down here. Control C, control
V to paste it, I got to do control C, control V to paste that right
down here. There we go. We're going to plug this
into play from start. In the interest of time, I'm not going to rename these timelines, although I should, once again, this time line right up here, we are going to be rising
up 200 unreal units, which is what we want. Coming back to our
event graph though, we do not want to have our
variable warp to locality, the one that we read in here. We're going to come right on up. This is going to be
similar to this and that our point is what
we want to use. I'm going to steal these
two nodes right there. I'm going to hit control
C. I'm going to move on down right here, do control V, and that is going to be our starting point that
we're going to start from, and then we're going
to rise up by adding 200 to our players movement. Okay, that is all well and good. We need to also make
sure that here we had our finish plugged into waiting a minute before
we exit out of the pipe. Here too, we need to take our finish and
plug it into here. Let's change this
comment box right here. This is going to be enter up pipe just to make things
a little bit more clear. Just to zoom on out
here a little bit. You can see what our script
is currently looking like. As you can guess, we need another section of
script to go right here. Now this is going to be exiting, falling down from a pipe. Now, because we're going to
be falling down from a pipe, you might have guessed already. We can borrow from this bit of script because this timeline
right here is going to send us down 200 unreal
units. Left, click, drag. I'm going to hit control
C here to copy that. I'm going to move on down, just so I'm going to be moving down into this
section right here. I'm going to do
control V to paste. Let me just rename this
section right away. This is going to be our exits out of pipe here. We're asking the
question, are we going to exit rising up out
of the pipe here? We're saying no, this is false. We're going to exit falling
down out of a pipe. Plug the false into the play
from start our timeline. Once again here is
going to show us moving down 200 unreal units. Great. Going back
to our event graph. Once again here though,
we're not going to be falling down from
our warp point. We're going to delete this out. Instead, we're going to be using this variable
right up here. Warp two vector. Okay, so plug in our
warp two locale. That's the one we want. Then
don't forget right here, out of our finished pin, we also need to enable
our user control. Once again, a lot of code
here, a lot of wires. So let me just
back on up to show the overall look of this script. You essentially,
you've got four blocks of moving our character,
entering the downpipe, entering an up pipe, exiting, rising up out of a pipe, and exiting, falling
down from a pipe. We're disabling the
control right here. And then at the very end, we are enabling the
control right here. All right, with all that done, let's go ahead and
compile and save. Now if I was to go into my level editor here,
here is my pipe. I have got it selected
over in the details panel. I have set it so I
can interact with it. Now note my warp two locale
is currently set 2000. In the next video, I'm going
to show you how to work with setting a proper
warp two locale. But we can test
this out right now. So I'm going to go
ahead and click Play. I'm a press the S key
to go on down and it's going to warp me to the
000 location in my level. So it just warped me to
wherever that was in my level. And you can see I'm now
back ready to play, which obviously doesn't look
good, warping to nowhere. But in the next video, I'm going to show you how to work with these pipes and how to
set a warp to locale, how this is all meant to work. All right guys, that's going
to de off for this one. We'll see you in the next one.
70. Warp Pipe Hookups: Welcome back everyone.
Well, now that we have our massive BP war
pipe script in place, I thought I would be good and
proper form to show you how exactly to work with this when you're back
in the level editor. Now between videos here, I did add a second
version of our pipe so that I can show off
various interactions. Now note I do have a pipe
selected here in my level. This is the one from before. I do in the details panel, have the Ken Interact
bullion set to true. This is a down pipe, meaning it's one I'm
intending to go down. And I've also got
this check where I intend to exit rising
up out of a pipe. I'm intending to rise up out of this second pipe right here. Now my warp two locale, I need to specify
something for that. Now in order to put in
the proper coordinate. What I can do here
is select this pipe. And down in the details panel, you can see all of my
various components that make up my second war pipe. If you don't see these, it's because this may be
collapse right here. You can see how I'm
kind of peeling this back to reveal all
the components. What I want to do is I want to select the warp out points. That point it's kind of buried
within the pipe itself. Now what I want to
do is I want to get the world location of
this warp out point. With this selected, you can see the relative location
of this is negative 35. However I want the world
location for that. I can select this
drop down and I want it changes to be
the world location. So right now, these are
the world coordinates for this particular component. For this pipe, I want to
copy these coordinates. And to do this I
can simply right click right here, say copy. Now I've got these
coordinates copied. Now I'm going to come back to
our first pipe, select it, and I can pace those coordinates right here in our warp
two locale variable. So I'm going to
right click right here and we're going
to pace those. So now we're telling
this pipe that hey, we want to be able to
interact with you. You are a pipe that
we want to go down. We are going to rise up out
of our target pipe and oh, by the way, this is
the target location. I want you to warp to
With all this in place, let's go ahead and
test this out. Jumping in and playing. And we're going to
jump on up here. I'm going to tap down on my left thumbstick on my
controller going down, and we are coming right on up. Now, if I was to try to interact with this
pipe right here, I'm going to, you know,
tap the S key, the W key. My left thumb stick down up, you see, I can't
interact with it. However, I could
continue to loop around. This time I'm going to
press S on the keyboard down and coming up
and there we go. All right, so now we covered
that classic scenario of having a player go down through a pipe and then rise
up out of a pipe. Let's switch things
up a little bit here. This time we're going to
show going down through a pipe and then
falling out of a pipe. So for this, we're going to
select our initial pipe here. We're going to say yes,
we can interact with it. It is a pipe that we
are going to go down. That's what this question is
asking. Is it a down pipe? Yes, we're going to be
going down that pipe. Are we going to be exiting, rising up out of a pipe? No, we are not. Instead, we're going to be
falling down out of a pipe. So just to show where this would trigger
within our graph, exit rising up out
of pipe is false. So that means here
in our script, when we get to this point, when we exit rising
up out of pipe. If this is false, we're
going to go down through here and we're going to exit falling down through the pipe. Okay, in order to
make this happen, I've got to set that
warp two locale. Here's my initial pipe, the one I'm going to
be interacting with. I need to set that
warp two locale. So I'm going to pick
my target pipe. This guy right here
in the details panel. I'm going to find my warp
out point component. There it is. Once again I need to
find the world location. I'm going to select
my location here, change it to the world location. I'm going to right click.
We're going to copy that. And I'm going to go back to my interactive pipe, select it. I'm going to paste those for my warp two locale right here. Paste. Okay, let's go ahead
and test this scenario. Jumping in and
playing. I'm going to jump atop my pipe right here. I'm going to press the
S key on my keyboard, going down and coming out. Now if I try to interact
with this pipe, I'm pressing the keys, I get close to this. I'm not going up through
this because this pipe right here is not interactive as
you can see right here. So let's try to make this
a two way street now. Let's try to make
this so that I can actually interact with
this guy as well. And when I try going
up through this pipe, I'm actually going to
come up out of this. Let's reverse the directions
if you will for this. I'm going to make this pipe
right here interactive. So I'm going to go
ahead and check that box. Is this a down pipe? No, it is not. I'm saying this is not a pipe
that we go down, we're going to be
going up through it. Where this comes into play, the is down pipe is way towards the beginning of
this script is down pipe. If this is false,
we're going to be coming down through here. We're going to be entering
up through the pipe. Okay, so we're saying
this is not a down pipe, we're going to be
going up through it. Are we going to be exiting, rising up out of the pipe? Yes. It is our intention to exit rising up out of this
pipe right here. So I will leave that check down. However, I do need to set a
warp two locale for this. I'm going to select this pipe, I'm going to select that
warp out point again, it's buried there in
my pipe somewhere. I'm going to find
the world location for that. I'm going
to right click. I'm going to copy. Then
I'm going to select my interactive pipe right
here, selecting that. I'm going to paste those
as my warp two locale. Now I've essentially set up
a two way street here where I can go down through
this pipe and come out. And likewise, I can go up through this pipe and
come out that way. Let's go ahead and
give it a test. Okay, I'll do my original
interaction here. Going down, I'm using
the keypad here, so I just did the S key there. Now I'm going to jump up and when I'm towards the
peak of my jump, I'm going to press the WK. I'm going up through that
pipe and coming on out, down and up and up. And there we have it guys. We have completed our
interactive war pipe. Just be sure that
whenever you set these war pipes
within your level, you do set that warp to locale. That'll do it off
for this one guys. We'll see you in the next one.
71. Game Mode Blueprint: Welcome back everyone.
Over the course of the next few videos here, we're going to be
putting together a checkpoint blueprint. And this checkpoint blueprint
is going to be such that when we overlap
a checkpoint, we're going to see a flag go up. A little bit of particle
effects go off. It's going to save our
location so that if we die, we're going to respawn at
that, their checkpoint. So that's what's in store over the course of the
next few videos here. All right, back here in our working version of the project, we're going to start
off by talking about our third person game
mode, Blueprint. Unbeknownst to you right now. This third person game
blueprint is specified in our project setting as the game mode blueprint
that our project is using. Now I have our project settings
open along the top here, but just to show you
how to get to this, if you come under settings
in the far upper right, project settings, that's
how you can open that up. I want to draw your attention to this Maps in modes option. So right here, our
default game mode, the game mode blueprint
that our project is using is our third
person game mode. Now this game mode
blueprint determines these other blueprints
that our project is using. And it's specifying things
like what pawn we are using, that is our third
person character, as well as our
player controller. Those are two biggies. Now we're talking about the Gamo blueprint
because this is where we're going to house
our respawn script. Because this is a blueprint
used by our project. It makes sense to house it here. Now I'm going to
jump over to our BP, third person, Gamo blueprint. I can find it right here by
clicking on this folder. It is also here in your content third person
blueprint folder. Double click on
that to open it up. The first thing I'm going to
do is I'm going to create a brand new variable inside
of the my blueprint panel, clicking this plus variable
button to spawn transform. As you may have guessed,
this is going to be the transform variety. Now it's very important
to compile and save here. We don't have to set a
default spawn transform yet, because that's going to come in. Our very next step here, all we need to do is create this variable and then
compile and save it. Now the reason we
want to compile and save it is so that we can set this variable inside of
our character blueprint. Jump on over to your third
person character blueprint. And if you've forgot
where that is, here's where it's located
in your content browser. Bp, third person character. Now inside of here, we're going to jump over
to our event graph. And we are going to right
click in some empty space. Type in in play. You can see it's
already being used here for setting our input
mapping context. You can only have one of
these within this blueprint. We could extend our script
here if we wanted to. However, just to make this
a little bit cleaner, what I'm going to
do is I'm going to bring in a sequence node, hold down the S key
and left click. And I'm going to wire
this up through here. And I'm going to wire
this down through here. I'm going to use this area right here to re use the
event begin play. Make this look a
little bit cleaner. Now what I'm going to
do is I'm going to right click at some
empty space and type in get game mode. And which game mode
do I want to get? I'm going to drag out
of here and type in third person cast to our
third person game mode. Now the reason I am doing this is because in our
third person game mode, we just created a variable
called spawn transform. And now I want to be
able to set that. So if I drag out of
this pin right here, I can type in set
spawn transform. So essentially we're
reaching inside of this third person game
mode and we're saying, hey, you've got a variable named spawn transform
inside of you. I want to be able to set that. What do I want to
set that as well? I want to set it to our actors transform our third
person characters. So if I right click
at some empty space, I'm going to type in get
actor transform like so. Essentially this is going to set our spawn transform
variable that's located within our game mode
to be the location of where our character
initially spawns in. To make that clear,
I'm going to left click and drag around this tap. The C key in my comment
box will be set our characters default
spawn transform upon beginning play like so. All right, there's one
more thing I want to do here before we
call this video wrap. And that is we want to
create a new variable here inside of our third
person character. So I'm going to click this
plus button right here. And I'm going to call
this our Respawn size. And I'm going to set
our respawn size here, the type to be a vector. If I compile, I'm going to set the values for this over in the details panel to be
0.75 across the board. 0.7 5.0 0.75 Now you
may be wondering, wait, why do I want to
respawn at this size? Again, I'm going to be
using this variable to determine our characters
respawn size. The reason I'm setting
it to these values is because our capsule
components some videos ago. We set our default scale here to be 0.75 across the board. So we essentially are matching
that with this variable. All right, we now have our
initial checkpoint work done in out of the way. Let's go ahead and
compile and say this. We are now in a
position to create the checkpoint after
class blueprint as well. That's to come next video.
We'll see you there.
72. Checkpoint Blueprint: All right, welcome back.
A little sneak peek here of what we're aiming to put
together in this video. That is our
checkpoint blueprint. We're going to get as
far as putting together our components and setting
the details for that. And then we'll
call that a video. But just wanted to
show you what we're aiming for in this one. Now it's also important to note that as we go through this, you don't have to
make yours look exactly as mine looks here. You can play around with
the visuals a little bit back here in our working
version of the course, I'm going to create our
new actor class blueprint here inside of our
platform blueprint folder. I'm going to right
click over here in some empty space
blueprint class. This will be an actor
class and I will name this BP underscore checkpoint. Let's go ahead and
hit the space bar here to open it up
with that selected. Inside of our
checkpoint blueprint, we can see our default scene
route, This icon right here. We're going to proceed by adding the necessary
components and then we're going to go back and set the details for
each component. The first component we're
going to be looking to add here is going to
be a box collider. Simply seek out a box collider, I will name this box. That name is going to be fine. We're going to be using
this to detect when our player overlaps
this box in order to set and save a spawn point a place within the world
that we want to respawn. All right, attached to our box. So make sure that you
have this guy selected. We're going to add
another component. This one is going to be a static mesh and this is going to be our flag pivot point, like so. Now I'm going to add several
more static meshes here. So with this selected, I'm going to right
click on this. We're going to duplicate
this right away. You can see the hot key command
for duplicating this one. I'm going to call my flag bas, press enter there with
this highlighted in blue. Once again I can do control
D. This one is going to be called Arm. Then with that highlighted, I'll do control D again. And this one is going to
be called simply flag. Now I want my flag to be
attached to my flag arm. So I'm going to
left click and drag this on top of my flag arm, so you can see that attaching relationship via that
indentation right there. Okay, Next I'm going to go
back and select my box, because I want to add
one more component here. Clicking Add, this is going
to be an arrow component. And this one I'm going to
rename my Respawn transform. Essentially, this is just
going to define a point in space where we are going
to re spawn the player. All right, with all of
our components in place, let's go ahead and set
the details for each. And I'll just go right
down the list here. Starting with our box, I'm
going to set the box extent, that is, how big is
this box going to be? X value is going to be 200, the y value is going to be 200, the z is going to be 500. And I'm going to
zoom on back here to show you that this is size
up a little bit larger. I'll set the line
thickness here to be five, just so that this
box is going to be easier to see when we
place it in our level. And now I'm going
to move this up in the z direction as
well, in the location. I'm going to set that
to 500. Set it on up. And this isn't going to seem very much of a
difference right now. But I'm going to also change our rotation here in
the z to be 90 as well. Now again, it's not going to look like much, but
in rotating this, it's going to rotate all of the attached components as well. And we're going to need that
for the coming components. Now it's also important
to note here that you can extend your
box to be taller. And you might want to do that at the very end of this
because we just need to ensure that the player passes through this
checkpoint area. In order to guarantee that
they pass through this, you may want to have this
extend way up into the sky. Okay, so with that done,
let's move along to our flag pivot
point. Select that. I'm going to set the
static mesh right away. Clicking in this drop down material sphere is
what I'm looking for. This static mesh should exist within your
starter content. You can see that in the
tool tip right there. Material itself,
dealer's choice. You can decide whatever
you want this to be. But I'm going to set
mine to be basic floor. This is the material that exists in the starter content as well. And with that all done, I'm
going to scale this down. I want to scale it down
uniformly in the x, y, and z. So making sure I've
got this lock check, I'm going to do 0.5 in
the X and press Enter. And because this is
locked, it's going to propagate that change
to the Y and the Z. It's going to make that
a little bit smaller. Then I'm going to move the location of this
down in the Z direction, I'm going to set this
to negative 400. Then in the x direction, I'm going to set that
to negative 200. That's just going to push it
on back there a little bit. Okay, next I'm going to select
our flag base for this. I'm going to have that
same static match. It's going to be
material, sphere, sphere. The material I will
apply to this one is also a basic wall, Although I want it to be. Yeah, this white
looking wall, The size. Let's set the scale for this. I'm going to unlock
my scale because I'm not going to do this
uniformly in the X, I'm going to go 0.5, In
the y I'm going to go two. And in the z I'm going
to go two as well. Then for the location, I'm going to set the z
location to be negative 500. Setting that down in the x, I'm going to push it on
back to negative 200. So you can see I've
got this base that's essentially going to be cutting through the floor a little bit. The bottom part you're
not going to see, and this is going to be
essentially our pivot point. The flag is going to pivot up from that point right there. Okay, so with that done,
let's go ahead and select our flag arm
component Next. The static mesh
that we're going to add for this one is going to be called S M underscore
pillar frame. Again, I'm using this
static mesh because it is found in the
starter content. You don't have to use
this one exactly simply. I'm using it because it
looks like an arm of sorts. Now, I am going to
be fiddling with the scale and location
of this as well. You could change
out the material, I'll leave the material
at that right now. But you could change that
to be whatever you want. Scale. I'm going to
go 0.5 in the x, thin it up a little bit, I'll leave the y and z
1.1 for the location. I'm going to set the z
location down to negative 390, down like so in the x. I need to push
that back a little bit, so I'm going to go
negative two oh five for the x rotation. I'm going to set the x
rotation to be negative 90. And then press Enter there to
have this flipped on down. Next, let's grab
our flag component right here and set
the details for that. For the static mess here, I'm going to click right
here and I'm going to choose a shape underscore quad pyramid. I'm choosing this one again because it's in
the Stargard content. We're going to have
a triangle shape. The material here,
again, dealer's choice. However, I am going to
choose vertex color. I'm going to choose
this green one. This is found in
the engine content. If you don't see this once again, you could click in here. Click this gear icon, make sure that you've got
engine content turned on. That's where that material
lives or the location of this. I'm going to set the
Z location to be 350 out towards the
end of our arm there. Set the X location to be ten, the Y location to
be negative ten. Once again, I determined all these parameters
ahead of time. The scale I'm going to
ensure is unlocked. I'm going to set this
to be 0.2 1.2 longer. Like that, I will set
the rotation here to be negative 90 in the x. So you can see that
flag is turned down. When this eventually flips up, the flag arm is going to flip up and because the flag
is attached to the flag arm, it's going to come
along for the ride. All right, last but not least, we've got our Respawn transform. Again, this is going to
define a point in space where we want our
character to respawn. For this, I'm going to
set the location to be negative 400 in the Z, for the rotation, I'm
going to set that to negative 90 in the Z as well. So it's a little bit tough to see because I've
got it selected, so let me actually
click off of it. But there is our arrow
component right there. The base of this arrow component is essentially where
we're going to be telling our player to
respawn in it. Right there. Okay, so with all that done, I'm going to go
ahead and save this. And let's go ahead and drop
one of these at our level. Just so we get an idea of
what this is going to look like here in my content browser. We're dragging this on out. I'm going to lift
it up in the air, tap that N key, slap it
on down to the ground. So that's essentially what
it's going to look like. And you can see our player
is going to be on the path to overlap that when
they navigate our level. All right, we are
off to a good start. Here we are in position to begin our checkpoint scripting.
73. Checkpoint Script: All right, welcome
back. In this video we are going to create
the script to make our flag flip up when our character overlaps this
trigger box right here. As well as to set our characters respawn point within our
game mode blueprint. In order to do this
we need to select our box component and we need to create
an event for this. We could do that by right
clicking, adding an event. But I'd like to show off
different methods of doing things with this
component selected. Come in the details panel. Scroll all the way down, We've got a list of events
that we can add. Let's do on component
begin, Overlap. Click this plus button. That's going to jump us
over to our event graph. Okay? We want to check to see who the other actor is here. We could drag out of here and do an equals get player character. However, I'm just
going to simply drag out of this
and I'm going to do a cast to third
person character, that is the character
that we are controlling. This is a simple check
to make sure that it is our third person character
that's overlapping that box. If it is, what we're
going to do is we are then going to
get a game mode. Right click, get game mode. We need to find out
which game mode. So we're going to drag
out of this and cast to game mode specifically our third person
game mode like so. And if it is true that our
third person character is overlapping that box, we're going to reach inside
of our game o blueprint. And we are going to
set spawn transform. Remember we've got
that variable inside of here called spawn transform. We're going to set
it in here. And what are we going to set it to? Well, we're going to set this
to our Respawn transform. I put transform not transform. Let's hit two on this, create or fix up that name. To transform, we're
going to drag this in. We're going to get a reference
to our respawn transform. That is this arrow
component right down here in our viewport. We're getting a
reference to that. Then we're going to drag
out of here and type in get world transform, get
world transform. So we're essentially
saying, hey, the world transform of our respawn point right
there for our checkpoint. We're going to set that
as our spawn transform as soon as we overlap that box with our third person character. All right, that's
all well and good. After we have done that,
we are going to do once. I'm going to hold
down the key and left click to bring
in a once node. What do we want to do one time? Well, we want to play in animation of our flag
here flipping up. In order to do this, I'm
going to use a timeline. So go back to our event graph. I'm going to right click and
search for a time line node. I'm going to simply
name this rotate flag. Let's get rid of our del
command update here. Once we have done
this, we're going to play this from start. Now our time line here. We're going to jump
inside of here. We're going to set
this to be very short. It's going to be
tenth of a second, 0.1 is going to be the
length of our timeline. Here we're going to
add a float track. So click track, Add float track. I'll simply call this
flag alpha over time. You'll see why I'm calling
it that just a little bit. It's going to make a
little bit more sense when I show what node
to plug this in. Now here in our timeline, I'm going to right click
and I'm going to add a key. And then I'm going
to right click again and add a second key. Now I'm going to select
my first key here. With that first key selected, I'm going to set the
time to be zero, the value to be zero as well. For my second key right here, I'm going to set the time to be 0.1 and the value to be one. It's going to jump
it off the top here. So I'm going to click these
two arrows to frame it on up. My first one is set to 0.0
My second key frame is set to a time of 0.1 which
matches the length of my timeline and
a value of one. Now the reason we set this as we did is because
here in our event graph, our flag alpha over time is now being output by our timeline. We're going to use this
output to plug into a right click Lp rotator node. Now the way this node
works is when A is zero, we're going to be
100% at one rotation. When B is one, we're going to be at another
rotation, alpha is zero. We're going to be
all the way at A. When alpha is one, we're going to be
all the way at B. And somewhere in
between we're going to be at a 45 degree angle. So what we're going to
be using this for is to determine the rotation
of our flag arm. Here let me just show you essentially what
we're going to be aiming to do in our viewport. We've got this flag arm and this is what we're going
to be rotating. Let me just bring in
our rotation here by. Pressing the rotate. Our
rotation for this flag arm, our A rotation is going to be the rotation that we see
right here in our viewport. Now our rotation is going to
be all the way up like this. When our alpha value is one, we're going to be at
this position here. Now when our alpha value is at 0.5 we're essentially going to be splitting the difference. So it's going to
be at a 45 degree angle When alpha is zero, we are here when alpha is one. We are here when alpha is 0.5 We're halfway
in between there. That's how that's
going to work, right? Let's go back into
our event graph now. Is we need a couple
of variables to hold our various
desired rotations. For this I'm going to write,
click on our value here. We're going to promote
this to a variable. It's going to create a
rotator variable type. Now I need to give us a
name better than a. I will call this flag rotate. Start with this selected. I'll go ahead and do control
D. To duplicate this, I'll do my flag arm rotate end. And I'm going to plug
this into the value. Now I need to compile
this in order to set a default value here. Now obviously right now
both of these are set to 00.0 Now if I go to my viewport and I take my flag arm and I
rotate this up like so, you can see that
my rotation values are zeros across the board. When it is down like this, my rotation values are negative 900.0 I'm going to copy these values right
here, Right click copy. I want this to be
my starting value. I'm going to come
down here under flag arm. Rotate, start. I'm going to right click and pay sills values right in here because my desired
end rotation is going to be 00.0 I'm going
to leave that as such. Going back to my
event graph here, I need to tell my flag arm, let's drag and drop
a reference to this into our graph that that is the item that
I want to rotate. So I'm going to drag
out of this and type in set relative rotation. As our time line is updating, we are going to update the
rotation of our flag arm. What rotation do we
want to set it to? Well, we want to start here
when our alpha is at zero. At the beginning
of our timeline, the alpha is at zero. And then over the
course of 0.1 seconds, this output value
is going to change 0-1 when we're at zero. It's going to be this rotation. When we are at one, meaning the end of
this time line, we're going to be
at that rotation. And that's going to
happen over the course of 0.1 seconds. That's going to be our script
to make our flag rotate up. Then what we need to do is
we want to add some flash, some effects for when we
finish this flag rotation. We're going to build off of
this finished pin right here. For this I'm going to
drag off to a play. Sound Two D. I'll just
bring this on down off of this finish so you can see
where that wire is going to be going for the play. Sound again, Dealer's choice. Here, I'm going to
do Enter Simulate. This is a sound that should
exist in your engine content. So you could click this gear on, make sure you've
got engine content, but that's what I'm
going to choose. And then I'm going to drag off of here and I'm going to do spawn system at location. System is a Niagara
particle system. Now for my template here, I'm going to choose
this radial burst that exists in that particular
pathway right there. You could do a spawn emitter
at location as well. Now for this particular
particle, it's pretty generic. It's not super flashy. So I'm going to scale
it up super huge to be 101010 in the scale. Now I need to feed
this location. I do have a location
in mine I'm going to drag in Respawn transform. I'm going to drag off of here. I'm going to say
get world location. I actually want to offset
this a little bit. I'm going to pull off of this, tap the plus button
so I can add to this. And I'm going to offset this
by 200 in the z direction. That'll be the location
where to spawn this system. I'm going to left click and drag around this tap the C key. I'm going to have this say
this is my play FX and VX. And then right up
here, this is where we are doing the rotation
of our flag itself. I'll leave that uncommented, but I'll change this
comment box here to black. All right, so I'm going
to try to frame this up here in a couple of views. So I'll go all the way up
to the once right here in case you want to pause video here to see what we've built. Once again, this is
our box right there. This spawn transform. We got this by grabbing out here and searching
for spawn transform. That's a variable
that lives inside of our third person game mode. Then here is the second
part of our script. In case you want to
pause the video here, we'll just focus on
this upper part, the rotation of the
flag right here, going from 00 to 0.11
Then off of this, once we have finished, these are the effects that we're going to play right there. Okay, obviously this is not
going to work in full yet. We still have to work on re, spawning the character itself and getting that
script all working. But at the very least we should
be able to compile this, overlap this particular
box with our character and see if the flag flips up and
see if we see some effects. And see some effects, and here's some
effects. So here we go. I'm going to jump in and play. Got my checkpoint there, try to overlap this. And here we go, flag flips up, we see a little there,
here, a little jazz. And that seems to be
working as intended. I'll try to overlap
this once again. You can see we're only
doing that effect once. And that is all well and good. All right guys, we are in a good position
now to be working on our Respawn script that's to come next inside
of our game mode, Blueprint. We'll see you there.
74. Game Mode Respawn Script: Welcome back. Now that we have a checkpoint blueprint
in which we are setting a spawn transform variable inside of our game
mode blueprint. Let's go ahead and dive
inside of our third person game mode itself in order to
set up our Respawn script. For this, we're going to dive
into our content browser. And I'm going to start off in
my third person game mode. But I'm going to
open up my third person character
right away as well. Because I'm going to point
out something within our third person character
blueprint along the way. So go ahead and open
up both of those back here in our BP
third person game mode. We're going to start off
in the event graph by right clicking and seeking
out a Begin play node. Once again, this is going to
fire off when we begin play. And what do I want to
do off of Begin Play? Well, I'm going to
click, I'm going to get player character. And I'm going to drag
out of this node. And we're going to cast to
third person character. And you're going to see
why here in just a moment. Now I'm going to
transition out of here in my game mode blueprint over
to my third person character. Now inside of our third
person character, if you click on this gear icon
in the my blueprint panel, I'm showing inherited variables. I'm showing all these
various things right here. If I turn this off, you're
not going to see any event dispatchers down here with this on showing
inherited variables. I'm drawing your
attention down to this event dispatcher section. The reason I'm drawing your
attention down here is if we come under
event dispatch game, we have this event
dispatcher for when our character is destroyed. When our character is destroyed, we can call for
something else to happen in another blueprint
using an event dispatcher. I didn't create this
particular event dispatcher. This comes along with our
character class parents. The reason I'm pointing
this out is because this does exist inside of our
third person character. We can make something happen
inside of other blueprints. When our third person character
is destroyed, they die. Now I'm going to jump back into our third person game mode. I'm going to drag out of our
SBP third person character, and I'm going to
search for destroyed. And I'm going to bring
in a sign on destroyed. This is going to
bring in two nodes. What this brings in
is a custom event. And I'll leave this custom
event at its current name destroyed event as well
as this bind node. Essentially what we are doing here is upon beginning play, we are essentially reaching inside of our third person
character and saying, hey, when you are destroyed, we're going to listen out
for when that happens. When that happens, we're then going to fire
out of this pin. This event, begin play
and binding this event to this undestroyed event for our third person
character is basically saying listen out for this for when this happens in our
third person character. And when it does happens, then this baby off right here. We can use that for
our desired respawn. If we drag off this,
we can simply search for spawn actor from class. The actor that we would like to respond is essentially
ourselves, another third person character. Here under class, I'm going
to type in third person, I'm looking for third
person character, of course, I need to specify where would I like to respond? Well, guess what. In the side of this third person game mode, we created this spawn transform to plug this into our spawn
transform right here. Take note we are
populating the values of this variable from inside
of our BP checkpoint. When we overlap this box, this is where we are
actually setting the coordinates for
our spawn transform. We're setting it to
the Respawn transform, our checkpoint here. Great. Let's go back into
our third person game mode. That's all well and good, but this would only work
the first time. And we want to make this so that this Respawn system can work if we die again
and again and again. And there's also a
few other things we need to take care of as well, The first being our
third person character. When they do spawn in, we want to ensure that
their size is small. We want them to be at this 0.75 scale for our capsule component. In order to ensure this
back here in our game mode, I'm going to drag out of this return value
after we have respawn, a third person character. And I'm going to type
in capsule component. We're going to get
the capsule component and then I'm going
to drag out of here. And I'm also going to
find respawn size, our respawn size variable that exists inside of our third
person character as well. We're talking this
variable right here, which is set to 0.75
across the board. Now what we're going to
do is we're going to drag out of our capsule
component and I'm going to say set World scale three D. And then I'm going to
plug in our response size, which is set to 0.75
across the board, in order to make it so that
our Caple component is guaranteed to be 0.75
across the board. Essentially our character is
going to be that small size. Okay. So that's the first
thing we need to do. The next thing we need to do is make sure
that we actually, we actually gain possession, some control over
this character. To do that, I'm going to write
click at some empty space. Get player controller is the first note I'm
going to seek out. Then I'm going to drag out
of this and type in possess. With this possess function, we need to specify not
only the controller, but also which pawn do
we want to possess. Well, we can just
simply drag out of our third person character
here that we are spawning. Plug it into our pawn here. And then I'm just going
to double click on this wire a couple
times just to bring in a couple of reroute nodes to make this look all
nice and neat. Okay, this is all well and good, but just take a look
at our current set up. This will only work
the first time. So upon beginning play, we're basically saying, hey, listen out for when our third person character is destroyed. And when they are destroyed,
we will in fact spawn a third person character
and we will possess them. However, if we die, we don't have any
way of listening out for this event to
happen once again. So how do we remedy
that situation? Well, what we can
do here is right click in some empty
space right up here. I'm going to type
in custom events. I'm going to call this Respawn, and I'm going to plug this in the exact same spot as
our event begin Play. Basically saying hey, let's
listen out once again for that destroyed event dispatcher in our third person character. At the very end
of this, after we have created that
respawn custom event, we can drag out of here
and type in respawn. Essentially what we
are doing here is upon beginning play the
first time we're listening out for
that event destroyed. And in fact this will
then fire off in spawn in a new third person character
that we can then control. Then we're essentially saying, oh yeah, last thing. Let's listen out for
that undestroyed event to happen once again. So that we can always
listen out for when our character is destroyed
so we can respawn them. Okay, let's go ahead and
compile this and save. And let me just
frame this up here in case you want to
screenshot this. See exactly what we did. We're going to jump in and
play here in just a moment. But to really test this out, I need to make sure that we
have some means of killing ourselves back here
in our level editor. Let me make sure we've got a couple of flame
arms over here. So that should get us dead soon enough jumping in and playing. All right, I'm going to cross over this checkpoint right here. We have set our respawn point. Let me go ahead and
run into a flame arm. Here I have died
and as you can see, I respond back exactly
where I was meant to, seems to be working
as desired job. Well done guys. We now have a checkpoint and response
system in place. See you all in the next video.
75. Player Death Sequence #1: All right, welcome
back everyone. In the course of the
next few videos, we're going to be
working on creating a player death sequence. That is going to be this where our player is going to
get tossed up into the air, fall through the world,
respond at the checkpoint. We're also going to be
working on creating an instant death hazard in this segment of
the course as well. So that we can fall
down a pit like this, die and then also resp
back at that checkpoint. But we're going to
start off creating that player death sequence. All right, back here in our working version of the project, we're going to start off
by putting some script inside of our BP third
person character. So find your way to the third
person blueprints folder. There's our BP third
person character. Double click on that
guy to open it up and find your way on
over to the event graph. We got a lot of script
in here already. I'm just going to zoom on
out with that scroll wheel and I'll find some empty space maybe perhaps in this region. I'm going to zoom on up
and I'm going to start off by creating a custom
event. Right click. We're going to type
in custom event and we're going to call
this custom event. Let me zoom up even more. Holding down control
and zooming in. I will call this player dies. When this custom
event gets called, we're going to play
a death sequence. Now I don't want to have
to wait until I run into an enemy or fall down in a pit to initiate this event. I want to be able to
trigger this in editor. So with this custom event selected over in
the details panel over here I've got this
checkbox called Call in Editor, whereby if I check this, I will make it so that
I can manually call for this custom event to fire off
while I'm playing the game. We'll get to that
in a little bit. That's just a real easy way that's going to allow us to test this functionality
without having to run into that enemy or
falling down a pip. Okay, the next thing
we're going to do here is we're going
to create a function. We can create a function over
in the my blueprint panel. Functions click on this plus
button to create a function. And we're going to create a
function called destroy a x. When we created this function, we opened up a new tab right
up along the top here, in which we can add
the functionality desired inside of here. The first thing I'm
going to do when this function gets called is I'm going to drag off of
here and type in play. Sound Two D, the sound that we're going
to play is the Mario did. Sound I'll do Mario die. Then after this,
we're going to right click get player character. If we've died, we don't want to have inputs be
registered anymore. So I'm also going to right click and get player controller, get player character,
get player controller. And if I drag out of my
get player controller, I'm going to type
in disable input. Now note that if you did
what I just did here, it's going to automatically
plug it into the target. We actually want
to move this get player controller down to this player controller
input to hold down control and left click. And make sure that you plug this into the player
controller and the get player character in as the
target. Okay, so play. Sound We're going to
disable the input. The next thing we're
going to do is drag off of here and we're going to spawn emitter at location. Again, you can do spawn
system at location if it's a Niagara particle system
that you'd like to spawn. For this I'm going to use the old explosion found
in the starter content. But again, dealer's choice here, you can add whatever you want. I'm going to scale this up to make myself go out
in a blaze of glory, scaling it up to 3.3
across the board. I need to feed this a location. Where would I like to
spawn this explosion? Well, I can drag out of
my get player character get get actor location. That will be the location where I want to spawn in
this particle effect. Okay, we're not done yet,
so I'm going to hold down my right mouse button and just
pan on over a little bit. The next thing I want
to do is bring in a reference to my character
movement component. Going to left click and drag. And then I'm going
to drag out of this and type in deactivate. Essentially, if I die, I want to immediately stop. And this is going to ensure that all movement has stopped. In addition to this, I want
to bring in a reference to my capsule component up
here. Drag and drop this. Then we're going to drag
out of this and we are going to set collision. The node is called Set
Collision enabled. I want to make sure that
this is set to no collision so that my character will
just fall through everything. Then I'm going to
bring in my mess Re that is the actual mannequin
itself. Drag that in. Then I'm going to drag
off this and I'm going to type in animation. So for this I can slot in
a new animation to play. If I click this drop down, there is a fall loop. You can see the
directory right there. It's in the game, characters, mannequins animations,
many. That's. See what that looks like?
If I click on that, it's kind of this, you know, hey I'm falling sort of thing. I thought that one
would be pretty good. But again, dealer's choice here, you can choose whichever
animation you want to play. You can set this to be
looping, if you like. And so that will be our function that we're going to be calling
here in just a little bit. So all this functionality
is now stored within one function that
if we call this function, will essentially
be calling lots of other functions to happen.
Kind of handy, I think. Okay, next in our, my blueprint panel here, we are going to create our own event dispatcher,
right down here. So click on this plus button
and we're going to name this R starts death sequence. All right, so that is created in our event dispatcher
area, way down here. Now with an event dispatcher, you call the event, and then any other blueprints
that are listening out for this event can
respond accordingly. So in this way, the
receiving blueprints that are listening out for
when this event happens, they're kind of akin to
subscribers who are waiting to be notified when their
favorite celebrity or athlete sends out a tweet, subscribing blueprints,
who are listening out for this event to occur can
then react accordingly. That is, they can perform
their own bit of script in response to this event
that just occurred. Now this is going
to come into play in a little bit when we notify our block to listen out for
when this event occurs. Okay, with this, player starts death sequence event
dispatcher in place. We can now go back
to our event graph. Essentially jump on out
of this function tab and we can start building off of our player dies, custom event. So the first thing I'm
going to do is when our player does die,
when this is called, we're going to tell
our destroy actor FX, this function right
here to get called. The next thing that we're
going to do is we are going to drag in our
event dispatcher here, left click, drag it on in. And then you're going to
get this little sub menu. We want to call this
Event Dispatcher. It's going to have
this little envelope icon like so again, that is essentially going
to send out a Tweet for any other blueprints
that are listening out for this given event. All right, and then what
we want to do here, just holding down the
right mouse button and panting on
over a little bit, is I'm going to right click
in some empty space here. And I am going to
get actor transform. Which actor will, essentially
our third person character. We want to know where this actor is located and rotated
within the world. And the reason I
want to get this is because I want to right click on this return value and I'm going to promote this to a variable. This variable is going to be called start death transform. Now we're going to be using this a little bit later on
in this script here after we create a timeline from which to begin our
death sequence. That falling down effect. Okay, the next thing we're going to do is bring in
a reference to our mesh. Again, that's going to
be our mannequin here. Drag and drop that in from
the components panel. And then we're going to drag
off of this and we are going to detach from components. This is essentially going
to detach this mesh from the greater capsule components of the third person
character so that it can fall on down for
these various rules. We're going to change
all these to keep world. And that's going to
be the initial part of our death sequence script. Right here we are far
from finished here. We need to add a timeline next. But we're going to
call this video and then continue
on in part two. You can go ahead and
compile and save to make sure that you saved
your progress here. And then we'll see
you all in the next video where we
finish this off.
76. Player Death Sequence #2: Welcome back for part two of
our player death sequence. Let's dive back into our third person
character blueprint. This is where we left off in the last video with our detached
from component function. Now we're going to
add a time line, right click in some empty space. We're going to add a
time line, add timeline. I'm going to name this time
line my death animation. And I'll hook this
up right away. I will play this from start. It doesn't really matter how we're going to have
this all hooked up. If it's player play from start,
we'll do play from Start. Then let's double click
on this to open it. Then we've just opened up a
new tab across the top here so that we can customize our animation here,
our time line. This is going to
be a float track. So let's go ahead and
add a float track. I will name this movement. I'm going to set my
overall length here to be 1.5 seconds. Then I'm going to add
three key frames. So I'm going to hold down
the shift key and left click once twice and three times
in that pattern right there. And then I'll go ahead and set the values for
each of these. I'll select this first one, the time is going to be zero and the value is
going to be zero. The second one here
I will select, the time is going to be 0.5 seconds and the value
is going to be 500. And then I'm going to
select my last key frame, right here in the time is
going to be 1.5 seconds and the value is going to be
negative 1,000 Again, it's going to jump these
way off the graph. So if you click
these arrow keys, you should frame
these up like so. I'm just using the scroll
wheel to zoom on back. Now, this is a little
bit of a harsh graph. It's ****, ****. I want this to be curved, so I can curve this
by left clicking and dragging around all
of these various points. And then I can right click on any point and just do
auto interpolation. That's going to create this
smooth sort of curve like so. Now this is meant to be
our meshes animation. So essentially being tossed up into the air and
then falling down. After we've added this track, we can hop on out of our death animation, our
timeline right here. Go back to our event graph. We now see this movement output. And essentially we're
going to be using this movement output to add. We're going to do
an operator's add to a given z location. We're going to now bring in a reference to our
start death transform. Bringing this in, we're
going to get this. Remember earlier on in the
script here, when we die, we're essentially going to
get our current location when we die and save
this to a variable. And the reason we're saving this set of coordinates,
if you will, inside of this variable
is so that we can use it here for a starting position from which to begin
this death animation out of this start
death transform. I'm going to drag
out and say break. The reason we're breaking this
open is because we really only care about the
location information. So I'm going to left click
and drag out of here, we're going to break
this vector into its x, y, and z components. Essentially going to
be adding the Z of our start depth transform to the value output
from our timeline. Once again, our timeline
is going to be changing. This value being output
from zero up to 500, half a second in
and then down to negative 1,000 at 1.5 seconds. It's going to be
altering this value over 1.5 seconds as we
just mentioned here. Okay, all of this is going to be necessary because
we're going to be ultimately using
this to plug into a set relative location
and rotation node. We want to set the
relative location and rotation of our mesh here. Let's drag that into our graph. There's our mesh.
Drag out of here. Set relative location and rotation as we
update our timeline. Right here. We're going
to flow into there. And the new location we're
going to drag out of here, we're going to make a vector. Make vector. We're going to maintain the x and y values from our starting position. That's all fine. We only want
to change the z position. The output of this
math right here, that is going to
essentially send our mesh up into the air and then
drop back down like so. Now after this bit
of script here, I'm going to bring
in a delay node. I'm going to delay
for 2.5 seconds. 2.5 then what I'm going to do is drag off of
here and say actor. Meaning our third
person character. Now, why 2.5 seconds? Well, through some testing, I essentially found that that
was about enough time to ensure that our player has
fallen off the screen. So this is essentially
going to be our script. And I'll just try
to work backwards here so you can pause
the video where needed so you can see everything that
we've put together here. In just a little bit here, we can go ahead and try to manually call this custom event. Let's go ahead and compile and save here just to make sure everything is looking good. To test this out, I'm going to jump back to my
level editor here. I'm going to click on these three dots here in
the level editor. And I'm going to switch
from a new editor play window to my
selected viewport. Now the reason I'm
going to do this is because now I can be
playing in my viewport, but I also see my
outliner as well. Any actors in this
yellowish orange color. They were auto generated
here upon beginning play. They didn't exist until
we played the game. This is going to allow me to select my third
person character. And you can see I could
click in here and move around to get my
mouse cursor back. It's just shift and
one that'll bring my mouse cursor back
with that selected. If you search for player down in your details panel here as you just saw
that I had before, I can find my player dies. Custom event is now here exposed in the editor
for me to call. This is great for
testing purposes, so all I need to do is click
on this and you're going to see my player play
that death sequence. Great for testing. Here we go. So keep an eye on this
character as I click on this. There we go. Character flies
up, goes on down, and it is working as
intended. That is great. But now let's make
this actually work within a relevant script because that was just
for testing purposes. Now if we dive back into our third person
character and we find our script for
adjusting hit points. And I'm going to go under my find results
panel right here. I could just find it here by
looking around in my graph. But just to show off different
things you can do here, up at the top I've got window, I've got find results turned on. And so if I just type in adjust, hit Points and then press Enter, you can see the results I get. And if I just double
click on that, I can find my adjust
Hit Points script. It's going to jump me
to that custom event. Now what I want to do
is I want to come up in this portion of my graph. Now what we were doing here is we were just destroying our, our third person character, essentially straight away when they ran out of hit points. What I want to do is I want
to get rid of this right up here at the very top of this true branch.
Delete that out. Instead I can call this destroy
actor FX function rather. I'm sorry, that's not
what we want to do. We want to call our
player dies custom event. Let me just drag off of here, type in player dies. This is going to call
that custom event essentially once we have
run out of hit points. When that is true, if I
double click on this, it's going to jump
me to where we're going to kick off
this custom event. And inside of our
destroy actor function, we're going to do all
of these effects. I just double click on that
node and then jumping back. We're going to go through
this bit of script. Eventually we're
going to make use of this Event Dispatcher, player starts death sequence. We're going to detach our mesh. We're going to play
that death animation. We're going to fly up into
the air and back down. And then after those 2.5
seconds have elapsed, then we are going to destroy our actor meeting our
third person character. Let's go ahead and
compile this and save and test this out. And this again should happen
when we run into, say, a gumba enemy, or our firearm
hazard either will do. Let me just run into
my gumba up here. Boom, I am dead. I'm
running out hit points. In fact, I have responded
at my checkpoint. Great, everything is working
as intended job. Well done. We now have a player
death sequence intact. We'll see you all
in the next video.
77. Death Sequence & the P-Block: All right, over the course
of the last two videos, we put together this player die script so that our player
could play a death sequence. And this was all done inside of our third person character. As part of the script,
we also included an event dispatcher call called player death
start sequence. So that we could message any other blueprints that needed to know that our
player has died. Now inside of any
other blueprint, we can then respond accordingly. Have something happen that we
would like to have happen. This is just sending
out the message. Now we need to set up in another blueprint reception of that message and a
response accordingly. And we actually want to set
this up inside of our block. I've got a block set up in my level and as you know
when you stop on this, it's going to turn some of
my blocks here into coins. And what we need to do is
message over to our block that, yeah, the player has died. So that we can swap
these blocks that have been turned into coins
back into blocks. Once our player has died, once again you can
open up your block by selecting it in your level
and then in the Outliner, just clicking right there. Or you can find it down
in your content browser. We've got it at this location. With that opened up, we're going to modify our
script a little bit. In the beginning, we're
essentially firing off all of this
script right here, when we've detected
that our player has hit the box component. Now we need to change this up a little bit because
we need to identify if it is the third
person character and not just any character
that is hitting this box. And the reason we're
going to be doing that is because out of this we need to find this event Dispatcher
player starts death sequence. Okay, so let's modify our P block script
here a little bit. I'm just going to
move this back. I'm going to get rid of
get player character, this equal signed and this node I also get rid of
this re route node as well. Right in between here I'm going to drag out of
my other actor pin and we will cast to
third person character. And I'm just going to
rewire this as such. I'm going to hold down control, left click wire this through my casting to the third
person character. We'll plug this into the branch for our
condition for our branch. I'm just going to
take this directly out of our hit result here, finding out if our character
is landing on top of that. And that'll be plugged
into our branch. Now we need a target for
our launch character. So let's make sure that we take our third person character
and plug it into there. So now out of our third
person character, we're going to drag out
of here and I'm going to do a search for
that event dispatcher, it was called player death, player starts death sequence. Now I'm going to choose
this option right here. Assigned player starts
death sequence. And it's going to bring in two nodes which is what I want. It's going to bring
in this bind node as well as this custom event. And I'll just leave
this custom event as is where I'm going to hook these up off of our sequence node. We're going to add
another pin right here. Click to add another pin
off of the then five pin. I'm going to plug
this into here. So essentially what
we're saying here is when our third
person character has stopped on this box and
our block is in block mode, it's turn those
blocks into coins. We're going to be listening
out for if our player has died and if our player has died here in our third
person character. If this bit of script
is kicked off, it's going to message any
other blueprints that are listening out for it via
this call right here. This is essentially
our listening out for it right here with
this set up right here, binding it to that player
starts death sequence. We're listening out for it and as soon as our player dies, we will then fire out of here. All right, now this is
where I'm going to take these two nodes and bring it on down towards our block
timer script right here. I'll try to zoom on up and frame this in a
little bit better. Now essentially when
our block time is over, what we are doing is
we're taking all of our blocks that have
been turned into coins, and we're simply just
turning them back. Now we want to do the same
thing when our character dies. We essentially want
to turn all of our blocks back to the
way they once were. To do this, all we need to
do is take a wire out of our player starts death sequence and we're going to
plug it into this. Same for each loop
right up here. Again, this is all
within our block script at the very bottom, like so. Okay, with all that
done, let's go ahead and compile and save. And let's test this out by
going to our level here. I'm going to click Play. So what I'm going to do here, I am going to overlap
our checkpoint, and I'm going to jump
on this block here. You should see some of these
blocks turn into coins. I'll try to avoid
my flame arms here. As you've seen they turn into
coins, I'm going to die. Now you can see they have turned back instantly
into blocks, which is exactly what I
wanted to have happen. There you have it inside
of our third person character via this player starts death sequence
that we are calling. When our player dies, custom event fires off. We're essentially messaging out to any subscribers if you will. Any other blueprints that are listening out for our player starts death sequence
event dispatcher. And for those that are listening
out like our block here, it'll then fire out of
this custom event and make whatever is attached
to it fire off as well. All right guys, that's going
to do it all for this video. We will see you in the next one.
78. Update Player Lives: All right, now that we have a player death sequence in hand, let's go ahead and
fix up our Hud. Because as you can see
in the upper left, I've got three
Marios supposedly. However, when I currently die, that number does not change. So we're going to fix
that in this one. In order to do that,
we're going to be working inside of our player
controller blueprint. So find that in your platform
blueprint framework folder, there is our B P
player controller. We've done some work
inside of there. Let's do some more
by diving inside. We're going to add a brand
new script inside of here. I'm going to hold down
control and zoom on out. This is going to be our
adjust live script. I'm going to come on down under my Add points and I'm
going to zoom on up. I'm going to write click
in some empty space. I'm going to add
in a custom event. I'm going to call this one Adjust Lives with this
customer event selected. I'm going to add an input
over in the Details panel. Click this plus button and the input that I'm
going to add is going to be called Lives to
add or subtract. And I'm going to change the
type from Boolean to Integer. What I will do is I will drag off of here and
bring in an add node. And the other input
that I'm going to plug in here is going to be lives
we're starting off with, in my case, three lives. When we call this custom event, we're going to be
able to determine how many lives we'd like
to add or subtract, and then we're going to add
it to our number of lives. Then what I want to do is I
want to drag out of here, and I'm going to
clamp this number, we're going to
clamp this integer. And I'll keep this
between a value of 0.100 This is going to
clamp me to 100 lives. You don't have to do
this if you don't want, but I'd like to cap
it to 100 lives and then I'm going to
drag out my lives. I'm going to put it on
this return value to bring in a setter version of
our lives variable. I'll take our adjust lives, custom event, and
flow it into there. So next what I'm going to do is just zoom on
out a little bit. I'm going to drag
out of this out, this will output the
number of lives. I'm going to type
in the equal symbol to bring in an equals node. And I'll say if our number
of lives equals zero, I'm going to then plug
this into a branch node. So I'll hold down and left click to bring
in a branch node. If this is true that our
lives has sunk down to zero, then what I'm going to do is
drag off of here and type in open level by name. Now I currently have
one level, LV 01. I could simply,
when I run out of lives open this level
all over again. I'm going to be working
ahead here a little bit. Know that, I know the
editor is going to throw some errors when we eventually
get this to trigger, when we run out of lives. Eventually, we're
going to create a main menu in this course. And I'm going to
name that main menu LV, underscore Main Menu. Now I don't want to
bog down this video by creating that whole main menu
that's to come later on. But just know that
I'm working ahead here and we will eventually
create a main menu. And this will make us go to our main menu level
that we have set up. All right, so let's
just frame this up. I'm going to left click
and drag tap that C key. And this is going to be
our adjust lives script. I'll get rid of that
space in between there and color this black. I like the black comment boxes because it makes
the wires pop out. So that's going to be our
adjust live script right there. Once again, we'll make
that work later on. Okay, with this customer
event now in place, it's called adjust lives. I'm going to go up
to my ad coin script inside of this same blueprint,
my player controller. And here's our ad coin script. And what I was doing
at the very end here is I was bringing
in a reference to our lives and adding to this to make it so that
when we have 100 coins, we're going to get
an extra life. Well now with our adjust
lives custom event in place, all I need to do is call
this customer event and simply input the number one to adjust our
number of lives. So I can just delete these two nodes out right
there in our ad coin script. I'm going to nuke them out. And I will now pull out of my coins setter here and
type in adjust lives. So again, this is going to call this custom event right here. I can just put in
that hard number lives to add or subtract. I'm going to add
positive one lives and then I'll play this Sound. So note that by putting
the number one right here, this number is going to flow
through the custom event. In fact, if I double click
on this node right here, it's going to show the custom
event that this calls. So that number one is going
to flow through here, be added to our number of
lives, it's going to clamp it. And it's going to do all
this jazz right here. All right, with this all done, make sure that you compile and say very important
that you compile here. Because we need to
compile in order to find our adjust lives call within our third person
character blueprint. That is where we
are headed next. So find your third person
character blueprint. Find this player dies script. Towards the very end, we've got this delay
and this destroy actor. Well we're going to
separate our destroy actor. Move this on over to
the right because we're going to inject a little
bit of script right here. We're going to right click
in some empty space, get player controller. And then out of this,
we are going to cast to our player controller, our custom made
player controller. We're going to
flow through here. And the reason we are
doing this is so that we can reach inside of our
player controller blueprint and call our adjust
lives custom event. Because this is part of the
player die script lives. To add or subtract, well I
want to subtract one life, so put in negative
one right there. And then we can destroy
the actor once again. If I was to double click
on this adjust lives call, it's going to jump me over to
my BP player controller and show where that number of negative one is going to flow
through this custom event. Do this math and do this
whole bit of script. All right, one more
consideration for us to address, and this is going
to involve us going inside of our game
mode, Blueprints. I'm going to go to third
person blueprints, third person game mode. By the way, it's up
to you if you want to drag both of these blueprints inside of your platform
or frameworks folder, that's up to you. These are considered
framework blueprints as well. I opted not to create
a separate character in game mode for this
project, but you could have. I'm going to dive
inside of my BP, third person game mode. And right now we are currently responding, the
player, no matter what, no matter if they
have three lives, two lives, one life,
or zero lives. We need to check
to make sure that our player is not out of lives. Before we respond them, we don't want to respond to them if they are out of lives. So in order to adjust this
bit of respond script, what I'm going to do
is right about here, I'm going to right click
in some empty space. Get player controller,
as you may have guessed. We're going to pull off of here. We're going to cast to
our BP player controller. Now I can change, I can convert this node by right clicking on it
and converting it to a pure cast in order to get rid of these execution
in and out pins. You really only ever
want to do this if you know that your cast here
is not going to fail. And I know it's not going to in this case because
I'm not going to be using any other player
controllers convert to pure cast, it's going to get rid of
those execution pins like so. Then what I can do is drag out of my SBP player controller, I can get our lives
variable out of this. I can drag out, see if zero lives, if we do have greater
than zero lives, then I want to respond. I'm going to hold down
the B key and left click when are on. I need to move all this bit
of script on over here. And I'm essentially going
to be moving this up into play when our character
is destroyed. When our character is destroyed, I want to flow through
here and ask the question, hey, do we have greater
than zero lives? And if we do have greater
than zero lives, then great, go ahead and respawn
the character. Otherwise do not. So this is all within our
third person game mode. Go ahead and compile
and save this. Now before we play
the game here, I want to point out that
in our Hud blueprint. Hud widget blueprint,
which is found in the UI folder, our WBP Hud. Earlier in the course, in our graph tab, not the designer tab, but in the graph tab, we added this bit of script to create a reference to
our player controller. I simply right clicked on
this and promoted this to a variable to create a reference to our
player controller. In doing that, that
allowed us to then bind this widget right here, this text widget, to our player
Controller live variable. That was done through here, player controller, and we just mapped it to our lives variable. Now that we're
updating our lives variable via some script
that we added in this video, we should see this
number change. But just wanted
to point this all out, a little bit of review, showing that we have in fact
actually mapped our lives variable from our
player controller to this particular widget. All right, let's go
in to our level, and let's jump in and play. Currently starting off
with three lives there. So let me just run
into our gumba. Here, there we are,
down to two lives. Let's try running into
the flame arm bar here. Did again down to one live. And let's dive via Goomba once
again down to zero lives. Now you saw it just
reset back there and if I escape it's going to
do that for the time being. Despite the fact that we have
in our Player controller, we're trying to set ourselves
back to the main menu. So know that eventually in
time we are going to create another level called LV,
Underscore Main Menu. And it'll kick us back to the main menu once we
have run out of lies. All right guys, but that is going to do it all
for this video. We now have our number of lives incrementing correctly
within our Hud Jobbledne. See you in the next one.
79. Instant Death Hazard: All right, welcome
back to everyone. Now that we have a
player death sequence in place and our player live
system is working in our Hud, all that jazz, we're going to
create an int death hazard. And this is going to be useful
in a number of use cases. You can place this
actor that we're about to create
over some spikes, over say, a pit of
lava or even void. And the purpose of this
is going to be able to so that upon our player
touching it like this, they're going to instantly
die and respond. All right, back here in our working version
of the project, I'm going to come in my
platform blueprints folder. I'm going to right click over
here in some empty space. Blueprint class. This will
be an actor class blueprint. It's going to be one
that we're going to place within our world. And I'm going to
go ahead and name this new blueprint BP
underscore in death. All right, and with
that selected, we could ignore this
server unavailable. This source control
message right here. I'm going to double click
on my BP into death. And with this open,
we're going to add a single component coming
under the components panel. We're going to add
box collision. And I'll just name
this my Depth Volume. And with this selected,
I'm just going to give this a default value. So I'm going to set the
box extents to be 400 by, say 400 by 50, 50. And I'm going to set my
line thickness here to be three, something like that. We will be able to change this size once we get
this into our level, but that's going to give us
a pretty good default value. Okay, with this in place, I'm going to right click on my death volume component here. Right click. We're
going to add an event for when we begin to overlap it. That's going to jump us out of our viewport and over
to the event graph. Now when something overlaps
this death volume, we're going to find out
who the other actor is. We're going to cast to our third person character inside of our third
person character. We're going to drag out of
here and type in player dies. We're going to call
this custom events. So a real simple script and I'm just going to drag around this
tap the C key, this is going to be call. Here dies custom events
inside of our character BP. So anytime you
write some script, you're going to
want to make sure you compile this to make sure that it does not find
any errors and it doesn't. I'm going to go ahead
and save this now. Let's go ahead and place
one of these in our level and just show how to work
with this in general. So I'm going to go back
to my level editor here. Here's my BP in death. I don't really have any pits
here or anything like that, so I'm just going to kind of
drag this off the edge here. So here we go. I'm
just dragging this in. I've got my two D snap settings set to my main level here. And I'm going to put on my
snap settings right here, increments of say 50. I'll just move this
on over like so. Now again, if you're
doing the Pit of Doom, you probably don't want
to place this kind of level with your
main playable levels. So I'm just going to
set this down a little bit so you can see
this default size. But note that with
this actor selected, over in the details panel, you can select the
death volume component. Now if you don't see this,
it might be because you need to peel this
back a little bit. You can select your death
volume component and you can resize it right here. So if you want to make that
x value a little bit bigger, you know we want to set
it to 1,000 You can go ahead and do that like so. Okay, so I'm just going
to jump in and play here, and then just jump off the edge and see if this all works. Here we go. All right, jumping off the
ledge here and boom, we die just as intended. So once again, inside
of our BP into death, we're just checking
to see if it is our third person character
that overlaps that volume. And if it is, we drug out here to call this player
dies custom event. And you can double
click on this. And what this will do is
it'll actually open up our third person character
and show you which custom event it is
intending to call. So once again, a
couple of use cases for this instant death hazard. You can place it in
a pit like this. You could place
this over something that looks spiky, a lava pit. Lots of possible use cases
for it throughout your level. All right guys, that's gonna
do it all for this one. We will see you in the next one.
80. Flag Pole Blueprint: Welcome back everyone. In this video we are going
to work on creating and implementing a Mario style
end of level flagpole. And this is going to
function in such a way that when our character
jumps on the flagpole, they're going to write it down. They're going to spring off, we're going to see
some fireworks and it's just going to
be an all out good time. Now, this is going to be one of the more complicated
blueprints that we put together throughout
this course. I'm just giving you
a sneak peek as to what this is ultimately
going to look like. Here is the finished blueprint. Visually what we're going
to be putting together. So quite a few components,
a lot of variables, and a good amount of script to boot here.
A lot of script. But we're going to
break this out over the course of
several videos here. And we will get this done, I promise it's not going
to be all too bad. All right, back here in our working version of the project, come under your
platform Textures folder and make sure that you have this block used
in Mario flag texture. These are some assets that were imported way earlier
in the course. So if you haven't
already done so, make sure that you have
imported these because we are going to be using these within
our flagpole blueprint. Now with these textures, we need to turn these into material assets use within
our flagpole blueprint. Now I've already done
this ahead of the video. But just to show how to convert these textures into materials, you could simply right click on it and then create
material from them. When you do, you're going to see these material assets generated inside of your Textures folder. And then all I did
is I moved these. I would literally left
click and drag these into my Materials folder like this
in order to move it there. Now I don't actually want to
move the texture file here, but that's how you can move different assets in
between folders. So just to show you, inside of my Materials folder, here's where I've got
my Mario flag material in my T block used material. Just to open one of
these up quickly, all it is is a texture
sample being plugged into the base color of our
master material. Note here. Now in addition to
these two materials, also make sure that you have the audio four Mario Flagpole, that guy right there,
as well as Mario Jump. Now you should already
have that again, all of these audio files were imported way earlier
in the course. So if you haven't
already imported these, please make sure that you do. Okay. Now, before we go ahead and create our
flagpole blueprint, I'm actually going
to jump inside of our third person folder here. Go inside of our blueprints, find our third person character. I want to make sure that we
don't forget this depth. I'm going to double click on
our third person character. Open it up, and I want to add another component to our
third person character. I'm going to select
our capsule component because I want to attach
to our capsule component. Let me go to the viewport
here. Capsule component. I'm going to add an
arrow component. Arrow. And I'm going to name
this flag attach point. This is going to be used to determine where we should attach our character to
the flag pole in order for our character
to ride down it. So with this component selected over in
the details panel, I'm going to set the
X location to be 40 and the Z location
to be negative 55. And I just arrived at these numbers through a
lot of trial and error. So 40 and negative 55 is we're going to have
our flag attached point. Okay, make sure you have
compiled and saved this. Then we can close out of
our third person character. Now let's go back to our
platform blueprints folder. And within here we're going to right click in some empty space. We're going to create
a new blueprint class. This is going to be an
actor class blueprint. And we're going to
name this asset BP. Underscore, end of
level flag. All right. Then with that selected,
you can double click on it or press the Space
bar to open it up. And what I'm going to do
here is I'm going to add all my components and
then I'm going to go back and set the
details for each. So let me go ahead and
add the first one. This is going to be
a trigger volume. Well actually it's going to
be called trigger volume. What I actually want is a box
collision, box collision. Box collision component, and I'm going to call
it trigger volume. You're going to be
using this to determine when to trigger the
whole flag sequence. Now I'm going to add all
of these components are going to be attached to
my default scene root. Between each
additional component, make sure that you've
gone ahead and selected your
default scene root, because all of these
components need to be in a straight line down and not
attached to anything else. Next one I'm going to ad here is going to be a static
mesh component. This one is simply going
to be called flag. And I'm going to select my default scene root
component again. This one is going to
be called flag pole. Whoops, I'm trying
to add a flag pole. I need to add a
static mesh component and then call it flag pole. Okay, select default scene root. Again, add, this is going to be a
static meshed component. This one is going to
be called flag base. Now with one of these selected, again just showing off different
ways you can do things, Control D will duplicate that, so it's automatically going to attach it to my
default scene root. This one is going
to be flag top. A next component,
I'm going to select my default scene
root, click Add. This one is going to be
a billboard component. Billboard, It's going to
have this Dragon Head icon. I'm going to call this
my flag end point. This is where I want the flag to end up when it's
gone down the flagpole. All right, Select default scene. Once again we're going to add, this is going to be
another box collider, box collision, and I'm going to call this
my fireworks area. This is essentially
the area from which I'm going to be spawning
some fireworks. If we end our level time within a given digit
ending in a seven, like 87 seconds will spawn seven fireworks,
that kind of thing. We're going to add
three more components here. Default scene route. I'm going to add, they're all going to be arrow components, so I'm going to
choose first one. I'm going to call
player End point. This is where our
player is going to end up with this selected. I'm going to do control D. This one is going to be
called Player Explode Point. Whoops, accidentally
controls that two on that. This is going to be my
player Explode point because after they
jump off the flagpole, we're going to have them
jump off to the middle of the fireworks
area and explode. Just because it's fun
with this select that. I'm going to do Control D
again to duplicate that. And this one is going to be called my players start point. I've got a players start point, a player end point, a player explode point. It doesn't really matter
how these are ordered, it doesn't matter at all. So if your ordering is a little bit different than
mine, it doesn't matter. All that matters is all
of these are in line, that they are attached to
the default scene route. Now if you have something
accidentally set like this, let me just go ahead
and drag and drop this little indentation here. This is currently
attached to that. To undo that, you could simply drag and drop it
back on top of it, and that'll unattach it to what it was
previously attached to. Setting up the
details for each of these components in our
list of components. I'm going to start off
with the flag here. I'm not going to go in order, but I will touch upon
all of these in due time with our flag component selected over in
the details panel. Our static mesh is going to be a plane and I'm going to be seeking out this one in the engine basic shapes
path in the details panel. I'm going to set
the material right away to be our Mario flag. Just type in Mario, there's
our Mario flag. Pretty sweet. Now I need to adjust
the location, rotation and scale
this a little bit. So let's go with
the location first. I'm going to set the
x location to be 85, the z to be 845. It's jumping it way up here. Let me zoom on back
here in my viewport, holding down the
right mouse button, S and D, I'm going
to set the rotation, the x rotation to be 90. Then I'm going to
set the scale here. It's going to be facing
this way like that. The scale to be 1.5 like so. All right, great. Next
the flag pole component. With this selected, I'm going to go sliding a static mesh of a cylinder cylinder and I'm going to choose the
engine, basic shapes cylinder. That guy right
there. The material, I will just do basic
underscore wall, this is in the starter
content, again, it's a flag pole, so you can decide what you want
this to look like. The location, I'm going to
set this to be 500 in the Z. The scale I'm going to set
to be 0.2 by 0.2 by eight. Now again, I got all this by unlocking the scale settings. If you have this
locked, whatever you set one of these
two and press center, it's going to set them
to all unlock it. To set these individually. That's coming along
pretty good so far. Next let's do the flag
base with that selected, over in the details
panel, the static mesh. I'm going to choose A, this is going to be my engine, basic shapes cube like that. For the material I'm going
to slot in that block us. I think that looks pretty good. Again, dealer's choice here, you can make that
whatever you want. I am going to change the z
location for this to be 50, so it's essentially
going to look like the flag pole is
embedded within that. That's looking pretty good. All right, then
let's do the flag top top of the flag pole there. We're going to choose
a static message. That's going to be a
shape underscore Sphere, that's going to be in
the starter content. We're going to set the
material for this is going to be underscore cube three
material instance, this is in Engine VR
Editor, Basic shapes. Again, you don't have to
have exactly as I have. I think that looks pretty nice. So I'm going to set the location
for this to be 8905895. At the top here in the scale I'm going to set to be
0.5 across the board, so I'm going to lock the scale, and then I'm going to
set 0.5 press Enter, and that's looking pretty
good up at the top. Okay. Next I'm going to
do the flag endpoint, this billboard component, okay? I'm going to set this
to be a location, 150 in the Z, and then I'm going to set the
location in the X to be 85. And then I'm going to set
the rotation of this to be 90 in the X as well.
Press in or there. It's not visually going to make much of a difference here, but it will matter because we are going to be using
this as our flag endpoint. This has to be rotated
in the same manner as our flag. That's
going to be important. 90 there for our flag. We need to make sure that
our end point rotation is going to be the same there, just to double check with that. Okay. Next up we're going
to have our fireworks area. So make sure you select that. And I'm going to zoom on
back here a little bit my viewport because I'm going to have it be a little
bit over here. I'm holding down both on my left and right mouse
button to pan like this. So I'm going to set this
point to be at a location of 850 in the x 700 in the Z. The box extent I'm going to
set to be 500 by 200 by 300. I'm essentially going to
be using this shape to define an area in which
fireworks can spawn. I'll also set the line
thickness here to be five, just to make this a little
bit more prominent. Then I'm also going to
set collision preset here to be no collision. I don't want anything possible
to collide with this. You know, I don't want
to have it so that if our character is way over
here or anything like that, they're trying to
shoot fireballs, then anything could
possibly collide with this. So we're just turning
that off for everything. Okay, next we're going
to select our player Endpoint that guy right there. And for this we're going
to simply set a location. So I'm going to zoom on up towards the base
of our flag here. Player end point, it's going
to be negative 25 in the X, it's going to be 30 in the Y. For the Z, it's going to be
190 in front of the flagpool, but down near the
bottom right there. Okay, our player explode point. We're going to select that
arrow component Next, it's going to be somewhere
over in this region, so I'm going to
select my location. X is going to be 850 and
the Z is going to be 500. That's essentially going to be somewhere right about there. I determined. That's all right, Players start point at the top. We're going to select
that arrow component. The x location is going
to be negative 25, The y is going to be 30, and that z is going to be 845. So no matter where they're going to
interact with this flag, we're going to ensure that they snap to that point right there. That's where
they're going to start. They're going to
end up down here to kind ride it on
down the flagpole. Now the one thing I
don't have yet set here is our trigger volume. Let's go ahead and select that. Now over in the details panel with our trigger
volume selected, I'm going to come under
a collision preset here. And I'm going to simply
set this to be custom. And I'm going to ignore
collisions with everything, everything except I want our pawn to be able
to overlap this. We need to detect when our
pawn is overlapping this. And I want this trigger
volume to be very tall, to extend up high into the sky. So that if our player like
jumps over the flagpole, they're actually going to
snap down to this point. And then write it on down. Okay, for this I'm going to
set the Z location to be 1,000 I'm going to set
the x location to be 30. That's going to kind of put
it roughly in line with our flagpole right
here, so Okay. And then I'm going to
set the box extent. I'm going to set
that extent to be 1,000 It's going to
extend on down like so, right through the
middle of our flagpole, you can see it reaches
way up high into the sky. And I'm also going
to make this a little bit wider as well, even though our character
should never get offline. Just for my own sanity sake, I'm going to set the y extent
to be something like 200. That should be pretty good. Now if I was to jump out of this perspective view
and view this from say, a right view, I'm going to
go ahead and click on this. You can see if I zoom on
back essentially where this trigger volume lies in
relation to our flagpole. Now I'm probably
going to nudge it on over just a little bit more just to ensure that our character doesn't
hit this flagpole. Again, I could move it
here in the details panel. Let me just turn off
my snap settings here. I'm going to move it to
say right about there. I'm going to set
that x location. Let's try ten instead. But who knows, maybe we'll fiddle with that
at the very end. Actually, they don't
want our character to collide at the top of the
flagpole at all either. So I'm going to set that
to something like five, just to nudge it on
out a little bit more. All right, with
that, I'm going to jump back to my
perspective view. That's all we wanted to
accomplish in this one. Let's go ahead and
compile and save, and then let's go ahead and drag this out into our viewport. And yeah, between
camera cuts here, I actually did cheat and it
did places out in my level, so you can see what it's
going to look like when you place it out into your level. Something like that is what
it's going to look like. Player is going to
interact with it. They're going to ride
down this flagpole and then they're going to end
up at this explode point. So that is all going to
be done via scripting. A lot more work to be done, but we're off to a good start. See you all in the next video.
81. Flag Pole Script #1: Welcome back. In this video we're going to add the variables and begin to script our end
level flagpole sequence. Let's dive back into our
BP, end of level flag. First thing I'm going to do over in the my blueprints panel is create the variables
that we're going to use for this massive script. That is to come clicking on
this plus variable button. The first one I'm going
to create is going to be called start point. It's going to be a vector
variable and it's going to be used to determine the
starting point of our flag here. We are ideally going to start it at the top if our
player lands at the top. However, if our player lands
at about the midpoint, we're going to automatically have our flag start
at that point. It's essentially going to warp to that point and
then ride on down. Okay, with that one selected, I'm going to do control
D to duplicate it. And this one is going to
be called firework locale. This is going to be
used to determine the area in which we are going to be spawning our fireworks. Spoiler alert, it's going
to be in this range. Next one I'm going to
create, I'm going to click on the plus
variables button. This one is going to be
called my character. The type here is
going to be my BP, third person character,
the object reference. Let me just expand
this out so you can read that a little
bit more clearly. Next variable we're
going to create is going to be called
my controller. This one is going to be mapped
to our Player controller. It's going to be
Player controller. Our BP, Player controller, that's the one that we created. Object reference, that's
our choice there. Next one we're going
to create is going to be called Firework Points. It's going to be an integer. And this is going
to hold how many points each firework is worth. If we get a fireworks
show with this selected, I'm going to do control
D to duplicate it. This one is going to be called
Firework special Number. Now the way that this
is meant to work is if our timer ends
with a given number, say it ends with 87 seconds. If it ends with
the number seven, we're going to fire off
a fireworks display. This is essentially
meant to hold the final digit of the time
remaining on your timer. Okay, with all these created, go ahead and compile so that we can begin to add
some default values. Okay, our flag point
start is going to have zeros across the board,
that's going to be fine. Firework Local is going to have zeros across the board,
that's going to be fine. My character is going to
be set to null right now. That's also going to be fine. My controller is also going to be set to null. That's
going to be fine. We will populate
these variables in our script, our firework points. We're going to set that
to be 500. You know what? We will set this to be
instance editable so that if we want to change this while we are in
the editor itself, we can go ahead and do that. Then our firework
show special number, I'm going to set
that to be seven. Once again, I will also check this instance editable
checkbox that if we want to change
this when we are in editor, we can
do that as well. Okay, with all of this in place, we're going to jump over
to our event graph. We're going to build off
of this event Begin Play. Let's get rid of these other
two nodes that are out here. Left click and drag. Delete
off of Event Begin Play. What I'm going to
do is right click, we're going to get
player controller and then we are going to cast
two player controller, our BP player controller. We want to do this
upon beginning play. And then what we want to
do is we want to say this into our player controller
variable right here. So we can just drag and drop this right on top of this pin. And that'll bring in
a set of version. So it is going to populate this variable with our
B P player controller. It is not enough simply to create this variable and
set it to that type. This is actually
going to specify in the value section when we're setting it here as the actual player controller that we are using
within the game. So I'm going to left click in dragger on this tap the C key. This is going to be Ref to player controller
Ref as in reference. I'm going to go ahead
and set that black. Now the next thing
I'm going to do is I'm going to come down under our Event Dispatchers section in the my blueprint panel.
I'm going to click this. To add an Event dispatcher. And I'm going to call
this level complete. Now this is going to be used
to send out a message to other blueprints that
need to know that our player character
has finished the level. All right, with
all of that done, let's begin to create
our massive script. The first thing we're going
to do is check an overlap for our trigger volume and once again our trigger
volume in our viewport, that's going to be this
giant volume right here. We're going to check to see if our player is overlapping that. Now we can add an
overlap event for this. By selecting it, we could right click and add
an event that way. However, just because I like to
show off different things, I'm going to select
it, come way on down to the bottom of
my details panel. Here's various events
associated with that component. We've got on component
begin overlap. I'm going to click
this plus button. It's going to jump us
to our event graph tab. We're going to just bring
this on down a little bit. Give myself a little
bit more room here. Off of this, we're going to find out who the other actor is. We will cast two third
person character. All right, if it is a third person character that's doing the
overlapping here, we're going to populate our, my character variable here. Currently this is null,
meaning it's empty. We're going to plug this, so just drop it on this pin. And that's going
to wire it in like so upon overlapping that. We're going to populate this variable with our
third person character. Once again, it's not enough
just to set that type. This is going to set
the actual instance of our third person character that we are controlling in the game. Okay, right after this, just going to move over
to the right here. I'm going to right click
get player controller. And what we want to do immediately
after interacting with that trigger volume is we
want to disable input. Now again, this is going to
plug it into the wrong pin. We actually want to plug
our player controller into the player
controller input. So I'm going to hold
down control left click. We're going to plug this
down at the bottom. Very important. Don't
miss that for the target, we're going to plug
in our character. Okay, next one I'm going to
do is bring in a once node. I can do this by holding down
the key and left clicking. And I want to ensure
that everything that is to follow we're only going to do once to
prevent any issues. The first thing I'm going to
do one time is I'm going to call our level Complete
Event Dispatcher. We can drag this in like so we've got a sub menu
here we want to call this. So it's got the
little envelope icon. So it's going to send a
message out to anyone that is listening for
this event that hey, our level has been completed. All right, so with
that bit of script, I'm going to put a
comment box around this. I want to do a good job of commenting every section
that we've got here. C key, I'm going to say this is my detect player lapping flag pole trigger volume. I'm also disabling input
and messaging other BP's. That level is
complete, all right? And I feel like it's
pretty important that I do a good job commenting
all this stuff here. So that when we eventually zoom on out and see what we did, you can kind of identify
the various sections. So that's going to be
section number one here. You can pause the
video if needed to see essentially
what we've done here. We're going to end
it with that call to our level complete event
dispatcher messaging that out. Okay, the next bit
of script that I'd like to add beyond
this is to set the location of our
starting location of our flag when our player
crosses the trigger volume. Now just to go to
our viewpoint here, essentially what we
want to do is if our character crosses
this trigger volume, either at the very top
of our flag or above, we want our flag
to start its ride down the flagpole
from that location. However, if our character
crosses this flagpole, say here or lower, we want this flag to start its ride down at that location, either in the middle
or at the bottom, or wherever our player
cross this trigger volume, we're going to
instantly work the flag there and then write it
on down the flagpole. All right, to do
this we're going to jump on over to the event graph. And once again we're
going to be building this off of the end of our
call level complete. First thing we need to do is bring a reference
to our character. So left click and drag. We're going to get this, we're
going to drag out of here, we're going to find
the flag attach point. Now between camera cuts here, I opened up my third
person character. Now the reason I did this
is to remind you that inside of our third person
character blueprint, I have a flag attached point. We just added this in
the previous video. It is an arrow
component and it's located right there
on our character. That is essentially
what I'm referencing right here in my BP,
end of level flag. We're grabbing that component
within our character. Now what I want it for is I want to find out
its world location. Get world location, okay. So we're going to
find out the world location of where that's at. Then we're going
to break this out. Break that out into its
x, y, z components. All right, We're
also going to want to grab our flag here. Whoops, I just double click on it to jump us over
to the viewport. Let's left click
and drag that in. Then we also, we want to get the world location in breaking this vector
for this as well. So I'm just going to
duplicate these two nodes. Control D, just to take a
little bit of a shortcut here. We're going to plug
that in like so. Now the reason we are breaking
these out into their x, y, and z components here
is because we want to compare the z height of our
flag attach point here. We're going to compare that by finding out if it's greater than the location of our flag. Is our flag attached
point on our character? Is that greater
than, in this case, is it higher than our flags
location within the world? We're going to take the output of this and plug
it into a branch. So I'm going to hold down
the B key and left click. That's going to be the
condition we are evaluating. Once again, we're
building off of the call level complete. Let's wire that in like so. Okay, if this is true, what I want to do is I want
to set my flag start point. Come under your variables here. I'm going to hold
down the Alt key, left click and drag to bring in a setter version of
our flag start point. We're going to set the starting coordinates
for our flag here. To do that we're going
to drag backwards off of this and type in make vector. And we're going to make our vector by essentially
maintaining the x, y, and z location of our flag. Basically, if our player here attaches
themselves to the flag, they've basically flown
to the top or above. We're essentially
saying here, yeah, let's start our flag at this point on its ride down
at the very top where it is. By default, that's essentially
what we're saying here. Now if this evaluates to false, what we're going to do is
copy this node right here. I'm just going to do control
D to copy this variable. We're going to
flow into here and I'll clean up my script here. Just a little bit like so for this I'm going
to also make a vector. So I'm going to hit control
D to copy that node. For this, what I want to
do is I want to maintain the x and y of our
current flag position. However, the Z location
I want to have come from our characters
flag attach point. Essentially again,
what I'm saying here is if our flag
attached point is higher than our flag when we cross that
trigger volume, we're going to set our
flag starting point at wherever our flag
is starting at, right now, if that's falso, we're going to set our
flag starting point to be the z height of our
characters flag attached point. So that's what's
happening there. Now we're only populating
this variable, this flag start point variable. What we need to do
is actually use it. So what I'm going to do is bring in a reference to our flag here. Drag and drop that,
drag out here. And type in set world location. Set world location right there. And I'm going to duplicate this node with its
selected control. D will duplicate it. We'll bring a copy of it down
here as well. Wire that. We can use this flag reference in both of these nodes
there and there. Here we're going to
set the location. This is immediately going to set our flags location to wherever
these coordinates are. All right, with that, I'm going
to go ahead and click and drag around this bit of
script left click and drag, tap that key and I'll zoom on back a little
bit for the comments. This is going to be our move two locale where player
crossed trigger volume. And we're going to
color it black to add a little bit of nice contrast. Okay, with all that done, I'm going to frame
that up once again. It's coming off of our
call level complete. Let's compile this to
make sure our script is looking all well
and good. And save it. And guys, we're going to call
that a video right here. More work to be done for sure, but we're off to a
pretty good start. We'll see you in the next video.
82. Flag Pole Script #2: All right, before we continue
on with our flag script, I just wanted to jump in and play and show you
what we have so far. We've made it so that
when our character interacts with the end
of level flag pole, we're essentially setting
that flag to begin its eventual ride down the pole wherever our character
overlaps that trigger volume. More work to do here
inside of our BP, end of level flag and
just to kind of frame where we're going to be
building off of this script. Next we're going to
be building off of this set world
location node first. So let's right click and kind of pan on down
into this region. Zooming on up several
things I want to do. The first is to ensure my character is going to
be facing the flagpole. And we're going to
add a little bit of an offset to ensure
that our character is in front of the
flagpole before they begin the ride on down. So we're also going to set
our characters animation to a given pose when they ride
on down the flagpole as well. We're going to start
off by bringing in a reference to our character
left click and drag. We're going to get that
and then we are going to drag off this and get
our capsule component. The capsule component is that main component
inside of our character, which other components
are attached to. And we're going to drag off of this capsule
components and say set world rotation once again. I said we're going to
be building off of this set world location from this bit of
script right here. Why this through here Like so. Now we want to feed
this a rotation. We want to set our
characters rotation to what? While we're going to get our
player endpoint component, just to go to the
viewpoint here. This component is
right down here. It is an arrow component. That guy right
there. We're going to grab our player
endpoint component here. We're going to drag
off of this and say get world rotation. That is going to be the
rotation that we're going to guarantee that our character
is facing in that direction, basically facing the
flagpole. All right. The next thing I want
to do is ensure that our character is in front of
the flagpole. A tiny bit. To do this I'm going
to drag off of my character's capsule
component and type in ad local offset wire this in
like so the delta location, the difference in
location is I'm just going to set
the Y to be 30. Y 30. While I came to that by
doing some trial and error. Next I want to make
it so that when our character overlaps
that trigger volume, they don't fall down right away, like you just saw at the very
beginning of this video. Rather they freeze. They float in midair. To do that, I'm going to drag
off of my character here. Bring into my character
movement component, yet the character movement
component off of this. I'm going to drag out and
say set gravity scale. We're going to set our
gravity scale to be zero and I'm going to
wire this in like so. Now just to show you what
the heck I'm doing here, I'm going to go back into my third person
character once again. We're using our third
person character within this project here. If I grab my character
movement component, this is the component that
I'm talking to here in my end of level flag sequence. My character character
movement component. Within this component, the
character movement component, you have a scale value
that currently set to 2.5 Now here in my end of level flag, I'm
basically saying, hey, let's set the gravity scale
for our character to zero so that they're going to
essentially float in midair, freeze in midair when they
cross that trigger volume. All right, so I'm just going
to bring this down like, so maybe bring in a re
route node here too just to show this flow a
little bit better. Okay, the next thing I want to do is I'm going to continue to drag off of my character
movement here. And I'm going to
type in deactivate. And that's going
to do as it says, it's going to deactivate
our character from moving. By the way, quick tip here. If you want to straighten
out your wires, like maybe these are a
little bit off kilter, I can simply highlight
these two and tap the key. The e is in quiet to
straighten out those wires. Moving along, going over a
little bit to the right here, I'm going to bring
in another reference to my character so that I don't have to keep pulling off of this and have
overlapping wires. And actually I did not mean to bring in that route component.
Let me just control Z. That okay, this is
what we've got so far. I'm going to bring
in another reference to my character, Drag and drop. And I just held out
the control key while I drag and drop that. To get a getter for
that, I'm going to drag off this and type in mesh. I'm going to get the mesh. And once again, jumping back into my third person character, I'm saying I want this
component right here, my mannequin mesh right here. I want to get this mesh because I want to
drag out of here and in animation I want my mesh to play
a given animation. I do have one in mind
that I'd like it to play. If I select right here, new animation to play. I'm going to type in
M, M, underscore run, underscore not N M,
underscore, run forward. And as you can see in the path, this is in the game character Mannequins Animation
many folder. If you click on this it'll browse that asset within
the content browser. In fact, I'm going to
do that right now, clicking on this
magnifying glass, here it is, right down here. This animation. Now it's
playing this animation. I'm just going to pause
it right down here. Now I want this
to essentially be frozen in time at a given
point within the animation. I essentially want this
to freeze it about the 1.9 second mark, somewhere roughly
towards the very end. The reason being is because
at about this point our character's hand is out at this point
in the animation. So I wanted to look
like our character is grabbing the flagpole
and writing it down in order to have our
character play this animation. At this point I can actually go back into my end of level
flag here and I can drag out of our mesh
like so and type in set my animation position here. I'm playing the animation. And with this function
I'm setting the position, the position in time. So I'm going to set this to 1.9 like you just saw me set here. In the run forward, I went to the 1.9 second mark. I'm essentially
wanting that pose to play and I'm going to wire
this in like all right, so zooming, I'm back here a little bit is
this bit of script. I'm going to click
and drag around this. I shall call this set character and play anim bit
of script like so. Frame that up for all
here a little bit better. And now before we
call this video, I'm going to come up towards the top of
this bit of script. We're removing the flag pole to the locale where the player
across the trigger volume. I'm going to build off of
this set world location. Note a little bit
because what we want to do is we want to set the player locale if they
jump over the flagpole. So in order to do this,
I'm going to bring in a reference to my character. Once again, my
character drag it in. I'm going to get the character I'm going to drag off of here. Once again, get that
capsule component. We're going to get
the capsule component we're going to drag off of here. We're going to say
set world location. And I will wire this in like so. What's the location that
I want to set for this? Well, I'm going to get our
player start top point. What I'm going to
say was my player start point right here. Just to show you where this
is within our viewpoint, the players start point is
going to be right there. So if they jump
over the flagpole, we're going to say player, you're going to start at
that point right there. We're going to grab
that. Players start point, drag it in. We're going to drag off this
and say world location. We're going to get the
world location of that, the world location of that
is where we are going to set our characters location. What we then need
to do is simply wire the end of this into here, setting our world rotation. Just backing up a little bit, so you can see where this
is all positioned within the greater scheme of
our blueprint script. Here, I'm going to zoom
up on this little bit. Right here I can put
a comment around it, tap that key, and I'm
going to call this my set player locale. If they jump over the flag pole, just to make that
clear from a distance, what the heck is happening here. All right, with
all that in place, of course we should compile
our script and save. And let's jump back
into our level just to give us a play
the first time here. I'm going to ensure
that I do not jump over the top of my flag
pole. So here we go. Jumping in and plan, just going to overlap
this trigger volume. As you can see, we now freeze in place and we probably need to nudge over our character
a little bit to make it look like they are
grabbing the flagpole. So to do that, we can adjust our character's
location a little bit. They're offset a little bit, but in the interest of time, I'm going to live
with that for now. Now we need to test
out the scenario of our character trying to jump over the top of the flagpole. To help with this, I'm
going to set one of my launcher platforms
right in front here. Let me go ahead and
select my launcher. I'm just going to scale up the top of the launcher
here a little bit. I'm not going to
be precise, just need to make this bouncing
enough so that we fly up into the air and
we end up our flagpole. So let's just give us a try
jumping in and playing. You can see it
warped our character down to the very top
of our flagpole. And that's exactly what we
want to have happen there. All right, so obviously
more work to be done making our character
ride down the flagpole, jump off of it, and explode
in a blaze of glory. But now we've got our character freezing at the right
point along the flagpole, playing the right animation, looking like they're
kind of grabbing out of the flagpole
a little bit. As well as deactivating
our characters movement. Guys, that's gonna do
it all for this video. We will see you in the next one.
83. Flag Pole Script #3: Welcome back. Our
next step here is to make it so that our
flag and our character both animate down the flagpole when our character has
overlapped this trigger volume. So let's dive right back into our flag blueprint now
from a 10,000 foot view. This is all the script we
currently have in place. Inside of our BP,
end of level flag, you notice that we have
certain segments of our script commented sections
of our script to help us identify what the
heck is happening and where. Now I thought I would mention
this while we are here, that if you come
under the window menu and turn on bookmarks, you can double click on any of your comment nodes right down here to jump to that section of script F to player character. Just double click
on that. And it'll zoom up on that
section of script, set character position
and play anum. That section of script
will be highlighted, so that's a real great way to navigate around
your blueprint. Now we're going to start by building off of
this set position, node off of this set characters and play an section of script. So I'm going to zoom
up right down here. And before we animate our and our character
down the flagpole, we're going to bring in a delay. So I'm going to right click,
bring in a delay node. We're going to delay
for 1 second Here, let me zoom line up
a little bit more. Once again we're building off of this set position function. We're going to
delay for 1 second. And then what we're
going to do is we're going to play a sound. Play Sound Two D, this is going to
be our flagpole. Sound. So we're going to delay for 1 second before
we initiate this sound. And then after this, we're going to do a couple of things. Because I want to do a couple of things essentially
at the same time, I'm going to bring
in a sequence node. And I'm going to do
this by holding down the key and left clicking, That'll bring in
a sequence node. And I'm just going to put
a comment box around this really quick left
click and drag key. I'm going to call
this my pause before playing and moving down the
pole section of script. Just a slight pause before
we play this sound. And then do a couple
of things here. I'll color black as well. Just to create a little
bit more contrast between my wires there, Let's get our character
animating down the flag pole. In order to do this,
I'm going to bring in a reference to my
character here. So I'm going to hold
down control left click. That'll get my character. Then I'm going to drag
off of my character and type in capsule component. I'm going to get the capsule component because once again, the capsule component, if I go inside of my BP, third
person character, that is the main component of
which all other components that are added
inside of this are attached to our
capsule component. That is essentially our
root component here. I want to get that and
the reason I want to get our capsule component back
here in our end of level flag is so that I can drag
off of this and type in move component two. We're going to move
that component. And by moving that component, all the other components
in our character are going to come along with it. Let's plug this
directly into move. I'll bring in a re route node just to tidy this
up a little bit. Now where do we want
to move this to? Well, we want to move this
to our player endpoint. So let's drag this in and get that just to show where this is in our Viewport
player endpoint. I've just clicked on it here. You can see that it's
right down about there. That's essentially the
point that we want to move our character down to back
in our event graph here. We're going to move this over to the side here, our
player endpoint. Let's drag out of here,
get world location. That's going to be the location
that we want to go to. And then we're going
to drag off of it again and type in get world rotation like so. Now we get to specify
over what amount of time is all this
going to happen. Right here, you can
specify a time. I'm going to make
this be 1 second. That's going to
get our character moving down the flag pole. So let me just left click and drag around this
tap, that C key, I'll say animate
character down the pole. Color that black as well. You can imagine
we're going to do something similar for our flag. I'm just going to move
this up here a little bit. That's going to be the first
thing we're going to be doing of our sequence
node right here. The next thing we're
going to be doing off of our sequence node is
grabbing a reference to our, our flag, obviously
being this right there. That's our flag component. We're going to drag
and drop this in. We're going to drag off of here. We're also going to bring
in a component two. We're going to plug
this in like so, into the input pin. Now where do we want
to animate this? Well, we want to move
this to our endpoint. We've got a component specific
to this flag endpoint. If you forgot where this is, going back to our
Viewport tab here. This dragon head right here.
This is our flag endpoint. So it's going to go like this
from here down to there. Drag out of our flag
endpoint and we are going to get relative location. This is the location
relative to our target. And then we're going to drag
off this and we're going to type in relative rotation. So again, we're going to
specify 1 second right here. Okay, so this is going to
be animating our flag. Left click and drag
around this tap, that key and this is going to be animate flag down the pole. Hello, this black. And then let's go ahead
and compile and save. And let's jump in and play and take a look at what we've got. All right, jump up here,
flag animates down. Our character animates down. Now eventually our character is going to hop on off and explode. But that is essentially what we wanted to have happen so far. Now one thing I'm not exactly thrilled with here is
that our character, if you notice and
watch carefully. Right now, it looks
like they're sort of grabbing the flagpole, but when they started it looked like they were
a little offset. So let me just do
this again now. Watch our characters hand. At the very beginning here, they're kind of in
front of that flagpole. And then they sort of
animate down to it. Our flag is working just fine, but our character
not quite so much. So the way that we can fix this is essentially to go back
into our viewpoint here and make sure that our trigger
right here is going to be essentially right in line
with that player endpoint. So if I was to go into
a side view here, let's go to the left view. Now let's go to the right view. The right view is the one
we want and I got to select our trigger volume right there. It looks like it's
in line right there. But apparently that's not
going to be great visually. So I'm just going to bump over my trigger volume
a little bit more. However I want to turn off
my snap settings here. I'm going to go right
about in the middle like I thought I
wanted to have it. Now I could foresee a problem with setting my trigger
volume right here and that is that my character
could bump into the actual flagpole and possibly even the
flagpole top itself. But let me just go ahead and
compile this and save and play now let's see how my character reacts
to the flagpole. You can see right now they
aren't actually overlapping that trigger volume
because our character is bumping into the
flagpole itself. So how do we remedy that? Well, what we can do is actually turn off the collision for our flagpole as well as our
flagpole top here as well. We want to ensure
that our character does not bump into these. They instead can pass through it so that they hit
that trigger volume. With both of these selected, all I'm going to do is
I'm going to go into the collision presets and
turn on no collision, no collision for our flagpole
as well as a flag top. I'm going to compile. Save this again. Jump back into play. Now if I was to jump, I'm going to essentially hit that there. That's pretty good. Looks like our
character animated down that flagpole as intended, without our character colliding
with the flagpole itself. So adjust that trigger
volume as you desire. Again, I've got it kind of right down the middle of
my flagpole right there. If you want to see
the actual location, that's where I've
currently got the location set N. Then if you do that, make sure you just turn off your flag top and
your flag poles. Collision. And we
did that by coming under a collision
preset. No collision. Alright that, we're going
to wrap up this video. Still more work to be done. We'll see you all
in the next one.
84. Flag Pole Script #4: All right, continuing forward
with our end of level flag, let's hop back in so that
we can explode the player, our players currently
riding the flag on down. Let's make it so
that they'll hop off and explode right about there. To jump back into our
end of level flag, I'm going to show off how
you could simply right click on the asset
in your level. Here we can edit BP,
end of level flag. Clicking on that
will do just fine. Also control easy hotkey
combination for getting back in. Now this is currently our
script from a 10,000 foot view. I'm going to right
click and zoom on up to where we were animating our
character down the pole. So let's come right
in that region again. It's off of our
sequence right here. The first thing we're
going to do is bring in another reference
to our character right over in the
my blueprint panel. Let's bring in another
reference to our character holding down control
and left click. We'll get my character. And then I'm going to
drag off of this and type in get mesh. I want to get that mannequin mesh from inside
of our character. That mesh component. I'm going to then
drag off this and type in play animation. There's a specific
animation that I'd like to play and it's going to be M, M, Underscore J. Ump. And we're going to
hook this in off of the end of this
move component two, after we've animated the
character down the pole. So just showing where that's
going to be coming in. Now just browsing to this
animation right here, by clicking on this
magnifying glass icon, it's going to look like this. Like our character
is crouched down. So essentially what
we're going to be doing is our player is going
to be at the end. The flagpole at the
bottom, if you will. And they're just
going to pause for just a brief moment of time. And that's where I'm going to jump back into my script here. And I'm going to
say, we're going to delay here for 0.3 seconds. So I'm going to hold down the
key for delay, left click. That'll bring in a delay node. So I've got my character
playing this animation, that crouching while
they're jumping. And then we're going
to delay for 0.3 seconds y 0.3 because, well that's what my play testing determined was pretty good. I'm going to left click
and drag around these, Tap the key and this is
going to be my player at bottom of flagpole
script repping. I'll say in parentheses, jump. They're not really
going to be jumping, we're going to be moving them, but it's going to look
like they're jumping off. Once again, I'll color
this black as well. Okay. Next let's make our player actually jump off the flag pole. So we're going to
right mouth button and just pan on over. We're going to be building
off of this delay node. Once again, we're going
to be bringing in a reference to our character. I'm going to hold down control, left click, and drag.
There is my character. I'm going to pull off
of this one more time and I'm going to get
the mish, Get ish. We are also going to play another animation,
drag play animation. And what this is going to be, let's hook this in right away, the execution wire, so
that this function, this play animation
function will happen. Now the animation that I want
to play here is going to be called fall loop. It's going to be in that same
series of folders there. You can see the pathway here, Fall Loop, just to show you what this is
going to look like, it's going to look like our character is kind of perpetually stuck in this loop.
Something like that. While they're animating
from the bottom of the flagpole to
our explode point, they're going to essentially be playing that animation
right there. You could set this to
looping if you like. I mean this is all going
to be relatively quick. That's dealer's
choice right there. And then what I'm going
to do is I'm going to drag off of my
character here again. And we're going to get the
capsule components once again. The capsule component is that main root component
of our character, of which every other
component is, is attached. So if we move the
capsule component, we're going to move
everything else. Now the reason
we're doing this is because we're going to
drag off of this and we're going to say move component to. We're going to move
this component, make sure you wire this
in like so to were. Well, we want to move it
to our exploding point. Now let me just jump to
our viewpoint right here. We have this player
explode point. And I've selected it over
my components panel. That is essentially
this arrow component right here within this box right there is
where we're going to be moving our players
capsule component to. Let's bring in our
player explode. Point that component
right there. We're going to drag off this, we're going to get
world location. And that's going to be
the target location for our capsule component. Then we're also
going to drag off of this and we'll say get world rotation once again, you get to decide over how much amount of time this transition is
going to happen, from where our character
is squatting at the bottom of the fly pole
to this dealer's choice. I'm going to set this to half
a second, so 0.5 seconds. Let's put a comic box
around this left click, drag, tap that key, and I'll say a player
jumping off flag pole. We will color this black as
well. Just zoom one out. Currently we've got two blocks of script right here that we have written in this
particular video. All right, now let's explode
the players, shall we? So to do this, we're going to
move on over to the right. Once again, we want to get the character in
the capsule component. Once again, I'm going
to take a short cut. Here. I'm going to highlight these two nodes by controlling
and left clicking. I'll do control D to duplicate them both and
bring them on over here. What I want to do
is I want to drag off of my capsule
component here. I want to yet the world location of
our capsule component. And the reason I want to get the world location of
my capsule component is because that is where I am
going to dragging off of here, spawn emitter at location. Once again, spawning
an emitter is going to spawn the older
style of particles. Now the reason I'm
spawning an older style of particles is because
if I click right here, our explosion particle currently within our started content, that is the legacy, the older cascade
particle system. We have it available to us
in the started content. If you have a newer
style explosion available to you via the
Niagara particle system, you could choose to spawn
system at location, that's how you can spawn
a Niagara particle. We have to plug this
in as the location where we're going to spawn
in that particle effect. I'm also going to scale up this explosion to make
it a little bit bigger. So I'll set it to be
twos across the board. I'm also going to be using this world location as the place that I want
to play a sound. Yeah, you can play a sound
at a given location. So I'm going to drag
off of here and type in play sound at location. So of course if we've got
a visual for an explosion, we probably want a sound effect
for an explosion as well. We've got this explosion. What this will do is it's
going to randomize which of these two given sound waves
it plays very similar, but you could choose either
of these sound waves itself. This is going to play the
raw sound wave itself. A sound cue offers a little
bit more flexibility, can offer randomization
stuff of that nature. So I'm going to
choose sound cue. Now one more thing I'm
going to do here is I'm not actually going to
destroy the player, I'm just going to
hide the player. So I'm going to drag out of my capsule component
one more time. And I'm going to type
in the set visibility. I don't want to
destroy the player and lose a life or
anything like that. So I'm going to set visibility, make sure you wire in
this execution wire. And we're going to leave this new visibility
here unchecked. Meaning we're not going to see our character by
exploding our player. We're not actually getting rid, we're not destroying our player. It's all a little bit
of sleight a hand just hiding them,
making them invisible. Alright, tapping that C key. I'm going to call this my
Explode the Players script. We'll color this black as well. All right, let's go ahead
and compile this and save. Let's jump in and play
and see how this looks. All right, I'll hop over that. Just jump on the fly
pool, write it on down, pause, hop off, and our
character did not explode there. So that's obviously a problem. Let's go see what's wrong. Well, and there
we would have it. I do have our capsule
component hitting, but I need to also propagate
it to the children. That is all the other components that are going to
be attached to it. So if I check this box, let's jump back in
and play and hop in. We write it on down, boom, gone is our character
in a blaze of glory. How satisfying indeed. So yes, please make
sure you remember to check that box for propagate
to children as well. All right, so in
this video we added these three sections of script to our end
of level flagpole. And we built this off of our animate character
down the flagpole. So just to zoom up a
little bit on each bit of script in case you want
to pause the video here. That was our player at the
bottom of the flagpole, prepping to jump, player
jumping off the flagpole. And then last but not least, we have exploding our player. All right, a little
bit more to go, but that'll wrap up this video. We will see you in the next one.
85. Flag Pole Script #5: All right, let's
finish off our end of level flag by right
clicking on it. I will edit it. Control plus E will jump it right
back in there. Once again, this is what
our script looks like from a 10,000 foot
zoomed out view. We're going to be continuing on way at the bottom right here, so I'm going to right click. Zoom on up. We will build off of this set visibility node. Now our goal here is going
to be to play a fireworks show only if our end of level time ends with
a certain digit. Now I got this idea from playing the very first Super Mario
Brothers back on the Nintendo. And I believe if I'm
remembering correctly, if you finished with a level
time having a digit of six, so like 86 seconds, you'd get a fireworks display consisting of six fireworks. So that is essentially
what we're going for here. Just a little extra jazz. Now what I want to do here
is I want to find out if our fireworks special
show number, in my case, I've got an integer variable
set to the value of seven, we're going to drag this out, so if our time
essentially is going to end with the level of seven, let's get this variable we want to play
fireworks display. So here I'm bringing in a reference to essentially
our number seven here. So now I want to find out if
our level time is going to be ending with the number
seven. So how do I do that? Well, I got to bring in a
reference to my controller, my BP player controller. So I'm going to hold down
control, left click and drag. Then I'm going to drag
out of my controller here and type in level time. We're going to get
our level time. Now this is an integer
variable that lives inside of our BP
player controller. So let me just hop over to
that blueprint quickly. There is my level
time integer variable inside of there
currently set to 500. Let's jump back to our
end of level flag. Okay, And what we want
to do is find out the right most digit of that. Now to do this we're
going to right click it some empty space and type
in right under the string. Click on right to bring
in a function node here. And what we're going to do
is we're going to plug in our integer here into
this string input. This is going to convert our level time from an
integer into a string. By converting this
into a string, we have access to more functions like this function right here to extract some very specific
information about it. In this case, we just
want to find out what is the last digit
of our level time. Now to do this, if
I mouse over this, it's going to say it's going
to return the string to the right of the
specified location. Counting backwards
from the right. If I set my count here to one, it'll essentially
give me the last one digit counting from
the right of our time. If we end with a
level time of say, 87, it'll spit out the
number seven here. And we're going to compare that against our fireworks
special show. To compare these
two, I'm going to right click in some empty space and bring in an equals operator. Our fireworks special
show will be, well, we're plugging
it into the top. Our return value here from our function is going to be
plugged into the bottom. It's going to turn that into
a string input right away. And then what we're
going to do is bring in a branch note to hold down the B key s and branch
and left click. That's going to be our
condition that we're checking here to see if these
are essentially equal. Once again, we're
going to be continuing on with our explode the player. To keep the flow of
execution going, you must take your set
visibility output pin here and plug it
into the branch. And so with that I'm going to left click around these nodes. Drag out, tap that C key
to bring in the comic box. And this is going
to be my check if last digit of time remaining equals the fireworks
show number, Okay? And I'll color
this black to make that easier for
you to see if you want to pause the
video right here. So that's just us checking to see if the last
digit of the time remaining is equal to the desired fireworks
show special number. If this is true, we're going to
continue off of this. The true branch, I'm going
to bring in a delay node. Hold down the D key and
left click we're going to delay for just a half
a second, 0.5 seconds. Then we're going to do something a certain
number of times. We're going to right click
and bring in a node. We want to do something
n number of times. This being whatever value is plugged into this,
what do we want to do? N number of times? Well, how many times
do we want to do it? Well, we're going to do it,
our fireworks special show number in our case seven times. What do we want to have
happen seven times? Well, we're going to
spawn some fireworks now. I'm going to move over here, we're going to right
click and we're going to spawn emitter at location. I'm not going to hook
this in just yet, but I will plug in or specify
my emitter template here. And this is going to be
underscore spark burst. This guy right here, it's in the infinity blade effects pack. Underscore spark burst. Now, where do I want the location of these
fireworks to play? Well, if I go into
my viewport here, I set up this whole
box area right here. In fact, I called
it fireworks area. I just wanted to spawn randomly
somewhere in this area. With this component
selected in my event graph. I'm going to bring in
my fireworks area. I'm going to drag
it right there. Let's zoom on out
here a little bit. That's my fireworks area. I'm going to drag
out of this and I'm going to say get world location. Get world location like. So I'm also going to drag out
of here in type in extent, get the box extent, basically get me this area where our fireworks display area is. Then I'm going to right click
in some empty space in type in random point in bounding box. So I'm going to get the center of our
fireworks area right here. And then for the box extent, that's going to be plugged
into our half size, and essentially this
is going to pick out a point within our
fireworks area. That's going to be
the location that I want to spawn our fireworks. Now, I'm not just going to
plug this directly into here. What I want to do
instead is have this be set as our
firework locale. Because I want to do
this n number of times, so that every time
our firework local, whenever this fires off
number of times, in our case, seven times it is going to be choosing a different locale. Every time I'm going to take our firework locale
here and I'm going to plug it right on top of the return value
to bring in a setter. And now my setup is
going to be like, so every time we
fire out of here, we're going to set a new
randomized fireworks locale. And that's going to
be the locale that we spawn a spark burst,
essentially some fireworks. Now, once again,
if you want to use the Niagara Particle system, this would be spawn
systemt location. This particular particle
is a little bit small, so I'm going to jack up the
size of it by increasing my scale here to ten
across the board. Now it's pretty lame to have a particle effect
without some sound. So let's go ahead and play
some sound after this as well. So dragging off of here, we're going to play
sound at location. What do we want
for a sound here? Well, I actually thought the
Mario Swamp sound actually sounds pretty good
for this explosion. Didn't sound right. I actually thought that sounded
pretty good. The location of the sound. Well, I can once again
use my fireworks locale. Wherever our fireworks
locality is determined, we'll use that as the location
for our sound to play at. Then what I'm also going
to do is I want to spawn some points in as well. Let's drag out of here
and I'm going to type in saw Act from class because it would be cool to have a
little bonus points for earning some fireworks if you will for our class here, I'm going to put in our
BP underscore points that we created
earlier in the course. And of course we have to specify where this is going to spawn. I can just drag backwards off of the spawn transform
and type in make transform like so for
the fireworks locale. I could just plug that in as the location to spawn
this points widget, which is going to
be pretty cool. Now, how many points do we
want to add for each firework? Well, I mean, we
get to choose here. We've got our fireworks
points variable. I've currently set
this to be 500, so let's go ahead and
just plug this in, that's why we created that guy. Then what we're
also going to do is bring in my controller, which is referring to our player controller
dragging that in. We're going to get that, then we're going to drag out of this and type in add points. We're going to add points, and I'm going to jump to
this in just a second. How many points would
we like to add? Well, we can add the number
of our fireworks points. Essentially, what we're
doing here is we're going to display points every time
a fireworks goes off. In addition to
that, we're calling this add points inside of our BP player controller.
What's this doing once again? Well, if I just
double click on this, it'll jump me to my
BP player controller. And it shows that we're going
to call this custom event. And we're going to pass through the number of points
that we have plugged in, right here, in this case 500. It's going to pass that through. 500 plus our current
point total. And that's going to make
our new point total. Once again, our points value is associated with our points
display inside of our Ud, so that should be fine in Dandy. All right, let's zoom on out and show once again
what we have here. I will left click and
drag around all of this, that key, and I will
call this my play. Fire Works, awarding player extra
points for time completion. Now if you're really savvy here, you may have noticed that
I need to do something yet Let me change my
color here to black. We're currently
allowing this to pass through number of times
to spawn a new firework. However, we would currently
be passing through one time, but we don't have a means of essentially firing this off
seven times like we'd like. What we need to do
here is we need to create a custom event. Right up here. Custom event, and I'm going to simply
call this more fireworks. And I'm going to plug
this into our delay. And the reason we're going
to do this is because if this once again
evaluates to true, we're going to say, hey, let's
delay for half a second. Then we're going to
spawn in a firework. Now it says due end time. So the first time we
pass through it's going to do all this code, but then at the very
end here we need to our more fireworks, custom events that
we just created. So essentially what
this is going to do, I just double clicked on it. It's going to loop us back to this custom event so that
we can delay half a second. Again, come through our D N, in this case a second time, allowing us to spawn in
a new set of fireworks. And this is going to repeat
until we reach our limit, in this case of seven, in which case it won't pass
beyond this point any longer. All right, let's go ahead
and compile our script here, save it, make sure
it's all looking good. That's what we have
built out in this. One little bit, hard to see, so maybe I'll have to frame
it up in two shots here. Okay, there, and
right over here. And now let's jump into
play and give us a test. All right, here we go. Try to
reach up high for this one. Oh, and of course, I did not set my level time, I didn't game the system here. Currently, my time
is set to 500. Once again, we're
going to increment our time very soon in
the upcoming videos, but I'm going to have
to hard code our time just to make sure that this
is working as intended. So I'm going to take my BP
player controller here. I'm going to set my
level time here to be. Let's go 47, so it is ending
with the number seven. Okay, let's go ahead
and save this. Let's go back in and play
my game. And here we go. Once again, it's ending with
the last digit of seven. We got seven fireworks
each, adding 500 points. You saw those points
increment and added to my total in the upper right and that is working as intended. Well done guys. We have an end
of level flagpole now onto some level settings where we're
going to make things like our level timer actually
work. We'll see you there.
86. Level Settings Blueprint: Welcome over the course of
the next few videos here, things are really going
to come together as we implement a level
settings blueprint. Now this is going to be a
highly customizable blueprint that we're going to be able
to place within our level. And it's going to
determine things for us such as what level
music we want to play, what kind of time
limit that we want to implement in this
specific level. As well as modifying
when to play music, indicating that
our level time is about to run out, block time. Music All that kind of jazz. So good stuff is going to
be implemented in this one. And this one is going to tie
into some other blueprints that we've created throughout
the course as well. So prior to doing this
whole section of videos, make sure that you
have completed the checkpoint blueprint, the hud widget,
blueprint, and the block. Because they will all tie in with this system that we're
about to create here. All right, to get us
started, once again, we're going to be creating
an actor class blueprint. And we'll do so inside
of our blueprint folder. So first step is to come on down inside of here. We're
going to right click. We're going to create
a new blueprint class of the actor parent
class variety. And I will name this. And where did it put it? Inside of here. There it
is, Right down there. Hitting F two to rename this, I will call this BP. Underscore level settings. All right, with that selected, I'm going to hit the
Spacebar to open it up. The goal in this
one is just to get the component and
variables in place and then we will script in
the next video or video. Let's bring in the components that we're going
to want for this. The first component
that we're going to ad, we're going to add a bunch
of audio components here. The audio component is right
up at the top of your ads. This first one I'm going to be calling level music component. Next one I'm going to add
is an audio component. And it doesn't really matter
that they're attached here. But if it drives you nuts that they're attaching
to one another, you can just drag
and drop it on top of the existing audio component. This next one is
going to be called Time Running Out Warning. I'll select my Default Senior. Once again, add
another one audio. This one is going to be
called time expired. The default senor once
again going to click Add. These are all going
to be invisible components in our game itself. By the way, this one is going to be called Level Complete. Whoops. And I typed
in Level Complete. I just want to add
an audio component and call it Level complete. Okay, let's go ahead and set the settings for each
of these right away, starting with our level. Music Let's go ahead
and select that. Over in the details panel where it says Sound We're
going to slot in. Music I'm looking
for Mario level. Music We want to scroll on down. This is very important where
it says auto activate. We're going to choose not
to auto activate that. Okay, next let's select
our Time running out. Once again, we will immediately
uncheck auto activate. But for the sound itself, we're going to slot in Mario time running out warning
then for time expired, let's go ahead and
select that component. Make sure you uncheck
auto activate right away. For the sound, we're going
to choose expired Mario. Time expired. Then for level complete, you're
going to select that. Also make sure that auto
activate is not checked. Otherwise it's going to
play right from the get go in the sound
here we're going to choose is level cleared,
Mario, level cleared. All right, so we've got four
different pieces of music, if you will, associated
with our level settings. And they are all set to be not activated at the beginning. Let's come on down and
create some variables. Next, under my blueprint panel, variables, clicking
the plus button. This first one is going to be
called time limit current. This will be an integer. We're going to be
making use of all of these with some script. I'm going to select this and with that
selected control D, because I want another integer, this one is going to be
called Time Limit Max. With this selected, I'll do control D because I
want another integer. And this one is going
to be called Time Running Out Warning,
this is going to hold. This is the exact same
as my component up here. I'll call this my
Running Out warning, the V, the variable version. Then I'm going to add
another variable. This is going to be
called time play rate. This is going to be a float. Then last but not least, I'm going to add
another variable and this is going to
be called my level. Music For this, I'm going to set the type to be sound wave. We're going to choose
object type sound wave, object reference. Now once again we're
going to be making use of all of those in
some script upcoming. Let's go ahead and compile
here so that we can set some default values
for each of these. So go ahead and compile. That'll allow us to set
some default values for a time limit current. I'm going to set that to
zero for our time limit max. I'll also set that to zero. Note that these values do
not need to be set here. This max value will get
set in the level editor and this is going
to be passed onto the current value
variable using script. We're eventually going
to create something I do want to do though with
the time limit max is I want to make sure
that I set this to be instance editable so that we can edit this within
the level editor. Next for a time
running out warning, this is the time limit with which you want
to play kind of that ditty warning
the player that, hey, you're about
to run out of time. So with this we
also want to expose this to make this
instance editible. So we can edit that from
the editor if we want to. And we'll set this to be 50. But once again, dealer's choice. I'm going to warn
the player with about 50 seconds left that, hey, you're about
to run out of time. My play rate, I will
set this to be 1.0 meaning 100% its usual rate. So this is going to be
used to determine how fast we're actually
going to be ticking seconds off of our clock. In fact, not all Mario games actually decrement time
per actual real world. Second, sometimes they
incremental faster than that. I suppose we could make this
instance editable as well. I could check this box here, but also clicking on
this little eyeball icon will do the exact same. Just showing that off
ticking that or clicking that eyeball does the
same thing for level. Music Here we're also going to make this instance editable, meaning that if we were to place our level settings actor
here in a level two, level three, level
four, et cetera, we could actually change out the default level Music
For now I'm going to set this to be level Music one. And now if we compile
these and save, we could go ahead and
place one of these guys. You only need one of these. The way that this is going to be designed inside of our level, so I'm going to just drag
and drop this on my two D, my main layer here. Sure, Let me just turn on
my snap settings as well. I'm going to drop it
right about here. And then let me just
kind of put it up in the air sort of
above everything. So note this is just a
collection of icons. It's a bunch of, you know, audio icons kind of overlapping the default scene
root icon right here. And what I really
wanted to show off is that in the
details panel here. Now we're going to be
able to get to customize various things about this
specific level, level one. So note that if
you create a level two, level three, et cetera, you could drag one of these into a level
two, level three, et cetera, and customize it
for that specific level. Right here from
the level editor, the player will not see
these icons at all. The reason we are
creating this as an actor class blueprint to
be placed in the level is because it's going
to be a really convenient way for this to communicate with other
blueprints in our level as well. Okay, so we're off to
a good start here. More work to be done, especially on the scripting end of things. But we've got our BP
level settings put together along with
the components and the variables that are going
to be needed going forward. All right guys, that'll
do it off for this one. See you in the next one.
87. Level Settings Script #1: All right, welcome back.
In this video our goals to create script within
our level settings, actor class blueprint here. That's going to run our
game timer as well as play relevant audio
components depending on the game's situation. Let's dive right back in here
by double clicking on this, or by having it selected
and pressing the space bar. We're going to jump on over
to our event graph here. And you should see three
nodes here graded out. We're going to
eliminate these two. Event tick and event
begin overlap. However, we will make
use of event begin play. If you don't see this
already out here, you can right click in some empty space
and search for it. And what we're going
to do off of event begin play is bring
in a sequence node. I'm going to hold down the S key and left click to bring
in a sequence node. And the reason I'm
bringing this in is because when I like to do several things in this
case off of begin play, I'd like to segment
them off into their own sort of
separate scripts just for organizational
purposes. Now I'm going to be
doing five things here. So I'm going to add
some more pins. And we're probably
going to break this out over the course of a couple videos just to
keep things more brief. Now, before we build off
of this then zero pin, I'm actually going to create
a custom event right here, right clicking Custom event. And we're going to call
this player respond. Because while we want several things to happen
upon beginning play, we're also going to want
to reset these things that are happening upon
our player responding. So we're going to be calling this custom event here
in just a little bit. But let's go ahead
and get this hooked up to the sequence node as well. Okay, next what we want to do building off of
our then zero pin, is we want to bring in a
reference to our game mode. So let's right click
get game mode. We're going to drag off
this and we're going to cast two, our game mode. Which game mode are we using? We're using our third
person game mode. And once again, this
is the one inside of our third person
blueprint folder. We're making use of this
third person game mode. And let me just go ahead
and open this up right away because within here we
have some Respawn script. And this is essentially
going to be a sort of connecting
blueprint to our level settings
here as we'll see in just a little bit off
of our then zero pin. Let's go ahead and plug
this into here right away. And just bringing these
up on a little higher. Now, before we
continue with this, we need to actually
jump into our BP, third person gay mode. We're going to add an event
dispatcher inside of here. Coming down the my
blueprint panel. Click on this plus button
to add an event dispatcher. And we're going to call
this player Respawn. With this created, we're
actually going to create a call for this at the very end of our Respawn script here. Inside of our third person game. Modes come at the very end. And we're going to drag this in and we're going to call this. Now this is going to
send out a message to any other blueprints that
are listening for this. And then those
listening blueprints can respond accordingly. So with this added, this
event Dispatcher player respond and then included here this call at the
end of our script. Let's go ahead and
compile and save. Very important you
compile and save here. So that now inside of
our level settings, we can drag out of this BP, third person game
mode and search for player, that event dispatcher. Now we want to assign
player respawn. This is going to
bring in two nodes. Watch how this works. We're going to bind
this custom event to that event dispatcher
so that when this is called here in
our level settings, we're listening out for it. This is what this
whole set up is for, is listening out for when that players custom
event gets called. And when that is called we're going to then fire out
of this custom event. This is essentially
waiting for this player respond event dispatcher
to get called. And the moment that
this gets called then and only then will this
custom event fire off. All we're going to be doing
off of this is bringing in our level music component right up in our list of
components. Drag that in. And then we're going to
drag off of this and type in set pitch multiplier. And we're going
to set this to be 1.0 essentially the desired pitch that we want this to be. Now this is important
to do upon responding, so that we ensure that our level music is
playing at this pitch. Because we're going to
be modifying this pitch, you know we're
running out of time. Then we're also going to finish
off this bit of script by making a call back to
this custom event, also called player respond.
So don't get confused. This players custom
event is different from this players event dispatcher that lives inside of our
third person game mode. So we're going to
drag off of this and type in player respond, call that function,
player respond, and if I double click on this, this will verify that it's just going to call that custom event. At the very beginning
of this script. Let's go ahead and left
click and drag around these nodes and tap the Ckey around them so
that we can comment this. I will call this
my Listens out for player respond event dispatcher in our game mode and resets our level
settings upon death. Once again, I will
color this black just to create a
sharper contrast. So that's what we have so far. Maybe I'll move this
on over a little bit just to frame this up
a little bit better. Okay, the second
thing we're going to do off of our
sequence note here, let's just bring our
sequence note on down, is I'm going to right click in some empty space
and I'm going to say get player controller. Then I will drag
out of here we will cast to player controller, our BP player controller. The reason we are
doing this is because we want to extract some
information from it. Rather we want to set a
variable inside of it. But before we do that, I'm going to right click
on this pin right here. And we're going to promote
this to a variable. I will simply call this
my Player controller Ref. We're going to be making use of this player controller again. Let's just go ahead and promote that to a variable right away. There are player controllers
stored in that variable. And now what I want to
do is I want to drag off our player
controller and I want to set level time once again inside of our
player controller. Let's jump over to our
player controller, That's in my platform
blueprints framework, Player controller. I've got this level time
variable right here, currently set back to 500. I set it back to 500 and I
want to be able to set this. Now once again this variable is bound to our level time
display in our hood. And here inside of
our level settings, we're saying we
want to be able to customize what this value is. Essentially, our level
settings is going to pass a new number to this
variable right here. Now what do I want
to set this as well? I've got my time limit max. I'm just going to go ahead
and plug this into here now with my BP level setting
selected here in my level. Whatever I have set as my time limit max down
here in the details panel. So let me just go ahead
and set this to 300. That would go ahead and
pass that along through our level settings here to the level time within
our player controller. And to prove that, if
I went ahead and just clicked play right
now you can see at the very top we now
see the value of 300 as opposed to 500 because
here in our level settings, I'm passing along a
new time limit to that variable that lives inside
of our player controller. Now one more thing I want to
do here is I want to take our time limit current and I'm going to
drag and drop this. And place this at the very end. I'm just going to drag and
drop it on this pin right here to set our time limit current. Now you may be wondering
why we are doing this now. Well, that is because
this is going to be a variable that
we are going to be increment or rather decrementing via a timer further
on down here. So all we're doing
here is taking our max time limit and then we're setting it
to this variable mapped to our actual Hud. And then we're also setting
it in here as well, because this is the
variable that we are going to be decrementing
via a timer. A little bit further down here. All right, with that
done, let's go ahead and left click and drag around
this bit of script. I'm just going to zoom on
out here a little bit. Tap that key and I'll call this my F two player controller and set level time variable
script I should also say, which is bound to our Hud,
that's a good reminder. And then go ahead and
changes to be black as well. Okay, so this is going to
be our initial set up here. We have more work to do, but I'm going to call this a
video right here so as not to overwhelm and keep this
in more bite sized chunks. But if you want to
pause the video here, you can see what we've
built out thus far. Go ahead and compile and
make sure your script is looking good so far and save. See you all in the next one.
88. Level Settings Script #2: Welcome back everyone.
Continuing forward with our BP level
setting script. I'm going to click right
over here in the outliner. Edit BP level settings to hop right back in
and continue on. All right, I'm going
to move on down. We're going to build off of
our sequence node once again, this time building off
of the then two pin. So what I want to do with
this section is script is to set the audio that's going
to be playing in our level. For this we're going to
bring in a reference to our level music component. Let's go ahead and drag this in. If we drag off of this we
can type in set Sound. Let's go ahead and wire
this in right away. Now currently I
have this defaulted to the music that's going to be playing in this
variable right here, our level Music Let's go
ahead and drop this in now. Once again, we made this level Music variable
instance editable, meaning that back here in our level editor with our
BP level setting selected, we can actually
modify the level. Music Right here, currently it's defaulted to Mario level. Music But if you wanted
to change it per level, all you got to do is drag and drop the settings
into your level. And then you can modify it to be whatever you want right here. And then via script, this is where it's actually
going to take whatever we set in that level editor with
this instance editable. And it's going to set that is the new level music component
what we want to play. All right, with this, what we're going to do then is bring in a little
bit of a delay node. Hold down the D key
and left click. I don't want this Music to
play it right right away, so I'm just going to delay
it by 34 of a second, 0.75 And then I'll bring in another reference to
our level music component. To drag and drop that in, we'll simply say that, hey, now that you've
been populated with whatever music we have set
inside of that variable, now let's go ahead
and play that music. And obviously you can
specify start time is zero, is just going to play
it from the beginning. Left click and
drag tap that key. I will call this my sets Audio to populate our level
music components. Now some of you may be asking yourself
the question of, hey, this level music component, we actually set a default
sound right here. Do we need to do
that? No, we didn't. We could have left this blank because we're
essentially overriding this level music component with the actual level music that
is plugged in right here. All right, let's
go ahead and set this whole comment
box here to be black. And then let's work on the most gnarly section of
our script here. Just moving our
sequence node on down, I'm going to bring in
a retriggerable delay. And I'll explain why here
in just a little bit, but this isn't going to make
sense right out of the gate. So I'm going to
plug this in like so I'm going to set this to be 1.0 and then I'm
going to right click it to empty space and type
in set timer by event. And then what we're going
to do is we're going to drag backwards off
of this event. We're going to bring
in a custom event, and I will call this
my run level timer. It's going to be easier for
me to bring these all in and then explain how this
is all meant to work. After I bring in the
relevant nodes and have a little bit of stuff set
up here for a time here, I'm going to plug in the
time play rate like so. And then I'm going
to set this to be looping, so check that box. Make sure you check that box. Okay, so essentially, upon
us beginning the game, all these bits of script up
above are going to fire, and then we're going
to come down to O. Then three, we're
going to wait for 1 second and then we're
going to start our timer. Now this is going to fire off, in this case every time increment which currently
I have set to be one. So that's what
this time here is, determining how long to wait before executing the delegate. That is this custom
event right here. Now, because this is looping, it'll keep firing off, in this case every second. Now the reason I
have this set to a retriggerable delay as
opposed to a normal delay, is in the event our character dies and then this needs
to start all over again. The way a retriggerable
delay works as opposed to a regular delay
is once this hits, it's going to start
counting down, In my case, 1 second. And during the process of
counting down 1 second, if we were to say die and
all this starts over again, it would set this delay
back to a second again. So if while in the process of counting down this
gets executed again, it's going to once
again set this back to a second before then
doing all this. Okay, what we're going to also want to do off of our sets timer by event node is we're going
to promote this right here. We're going to right
click promote, And we're going to
call this our level. Timer that is now saved
in variable fashion. And essentially, we are doing
that so that we can clear this timer when we
run out of time. We'll see that at play
here in a little bit. Okay, what do I want to do after our run level Timer,
custom event here. Well, I'm going to
bring in a branch, so hold down the B
key and left click. And we want to
evaluate a condition. Now our condition that we're
going to want to evaluate is our time limit current.
Let's drag that in. We're going to get
that once again. Up above we were setting our time limit current to start off being whatever our
time limit max is. And again, this is set
via the level editor. Currently time level max is 300. We're basically saying, hey, whatever our default value here is here in the
level settings, we're setting that to be 300. That's passing through
to our level time, This is mapped to our hood. And then we're also
populating our time limit current with that
same value of 300. In this case, we're taking
that value and we're going to find out if this
is equal to zero. If this is equal to zero, what we essentially want to do is clear out our
level timer here. All I need to do is
drag out here and type in clear and invalidate
timer by handle. Now automatically,
whenever I do this, it's actually going to
plug it in right up here. What we can actually do is
snip this wire right here. I'm just going to hold down
the Alt key in, left click. We can leave this plug in. However, off of the
true branch right here, I can just plug that in like so. Now if this is false that our time limit current
is not yet zero, what we're going to
do is we're simply going to decorment, this time limit current. The way I can do this is
drag out here and type in decrement decorment int
what this is going to do. It's going to take this value which currently
we have set to be 300 by way of this
time limit, max 300. It's going to then
subtract that value, 299300 minus 1299. Then it's going
to set that value back here in this variable. So this act, this
decrement acts as a way for us to immediately subtract one from this specified value, and then it sets it
right back in here. So that's kind of handy now
because I also want this to be reflected in our
Hud because again, this variable is only local here inside of our
level settings here. We don't have this
exposed anywhere else. I'm going to bring in our
controller reference, we're going to grab this,
we're going to get that. Then I'm going to drag
out of here and type in set level time. We're essentially
going to pass that on through to our level
time variable inside of our player controller
because this is the variable that is
mapped to our Hud. Okay, something
else I want to do. If our time limit current
is not equal to zero yet, I actually want to do
another comparison. Beyond here. I'm
going to hold down the B key and left click. So key and left click. And this time I
want to compare if our time limit current is equal to, is equal to what? Well, our time running
out warning variable. Now currently I have
this set to be 50. But once again, you can override this default variable here
in the level settings. I also have it set
to 50 there as well. It's 50 regardless, but
we're going to find out if our time limit
current is basically down to the 52nd mark. If it is, we're going to plug it into
our branch right here. We're going to
bring in our level music component like so. Then we're going to
drag out of this and type in set pause. So we're essentially going
to pause this Music. Make sure you check this box
for setting it to be paused. Then what we're going to do is take our time
running out, Warning. Music That is going to be this
piece of music right here, Mario, time running out. We're going to take this
component, drag it on out here, and we're going to type in play to bring in
the play function. We're essentially pausing
our level of music so that we can play the time
running out Warning. Now I'm just going to move
up above here a little bit because if our time
limit has run out, if this has evaluated to true, we are going to clear
out this level timer. But there's still
some more stuff I want to do off of this. So I'm going to be
building off of this clear and invalidate
timer by handle node. And what I want to do off of this is bring in our
level music component, once again drag that in. We're also going to drag in
our time running out warning, both of these in case
either of them is playing. And what I want to do is drag out of here in type in stop, we essentially want to
stop any and all music here if in fact our
time limit has run out. And just in addition
to stopping the music, I also want our character to
die if they run out of time. So to do that I'm going
to right click in some empty space type and
get player character. And we're going to cast to
our third person character. Inside of here, I'm going
to drag out and type in player dies once again. If I was to double
click on this, what this is going to
do is it's going to show that we're going to call this custom event inside of our BP third person character to do all of our death effects. That's our character of
being thrown up into the air and then falling
through the world. All right, so that script
was a little bit gnarly. There it all is. Try to fit it on screen. Coming off of our
sequence node here, okay? And then I'm going
to left click and drag around all of this. Tap that C key, I promise that was the worst. And we will type in run the
timer and play appropriate. Music Depending
on the situation, we're going to change
that comet color. It's a black right away. Okay, and looking
at my notes here, I actually see that I'm missing a little bit of
script down here, but this video is getting
a little bit long. So let me just go ahead
and compile and say this. We'll call this a video
and pick it up and finish this off in the next
one, see there.
89. Level Settings Script #3: Welcome back. Let's
go ahead and finish off our BP level setting script. And I mentioned at the
end of the last video that I missed my notes, I had some more script
that needed to go down here off of our
then three script. So let's go ahead
and address that. What we were going to be doing is pausing our current level. Music We're going to play our
Time Running Out Warning. Music But what we need to
do is make sure that we actually set our level Music to pick back up again
after this play. So what we're going to
do is bring in a delay. Hold down the D key
and left click. I'm going to set this
delay to be 2.8 seconds. Now, why 2.8 seconds? Well, because that's
about how long it takes for our time running out. Warning ditty to play after
we wait for 2.8 seconds. What I'm then going
to do is bring in our music component once again. Then we simply need
to drag out of here one more time, type in set, only this time we're going to leave this unchecked
saying yeah, we don't essentially
want to pause. Then we're going
to set our pitch. Multiplier, dragging out of
our level music component. Set multiplier, we are
going to set this to be 1.05 This is going to make it sound like our music is being rushed a
little bit like hey, time is running out and
then, oh yeah, by the way, when we pick the level
Music back up again, let's play it at a higher,
more rushed pitch. Now this is also the reason
why this set up right here, that when we die at
the very beginning, this is why we did this bit of script at the very beginning. Setting our level
music component to that pitch multiplier of one, essentially setting
it back to one regardless of what the music
was at when they died. All right, last bit of script
that we need to put here. Coming way on down under
our then four sequence pin. What we're going to do is we're going to write Click into space. We're going to get
the player character and as you may have guessed, we are going to drag out of
here and we are going to cast to our third
person character. We're going to wire
that in like so. And the reason we are doing this is because
we're going to drag off of our third
person character. We are going to call
our death sequence. We've got our assigned player
starts death sequence. It's going to bring
in two nodes, so once again this player
starts death sequence. If I was to go into my
third person character, which I have a tab for, right up at the top, we created an event dispatcher called
Player Starts Death Sequence. If I right click on this
and find references, I can find where this
is being called here inside of our third
person character. And there it is in our
player dies script. It's being called right
there when this is called, any other blueprints that
are listening out for this. And that's what this
whole set up here inside of our P level
settings is doing. This is essentially listening out for that sequence
to be called. When that calls, we'll
then fire out of this. This is our way of
essentially subscribing to the third person
character player starts death
sequence, call that. When this happens,
we know inside of our BP level
settings like hey, that happened, let's go
ahead and fire out of here. Well, what do we want
to do? Well, we're going to bring in our
level music component. Let's get that. We're
also going to get our time running out warning,
we're going to get that. We want to make sure that that stops drag off of
either one of these. And type in stop, stop all music here, wire that in, like so. Then also our level
timer right here. Let's drag this in. We're going to get that
we immediately want to clear and invalidate
timer player dies. We always want to make sure
that we clear that timer. All right, with all
that script in here, let's go ahead left click and drag around this
tap, that C key. This will be Stop. Any Music Music If
player has died, then also just to note that
this event dispatcher is called in our third person character BP. Always good to leave
notes for yourself. At a 10,000 foot view, you can see what is. Let's go ahead and
compile this in save. Let's take a 10,000 foot view of what we
have going on here. That was our then four script, if you want to pause
the video right there, but from a 10,000 foot view, this is what we all
have put together. And this is why, once again, I'd like to have
a sequence node. Because we can see at a glance here when I pull
it back like this, how we're doing different
segments of script. It's essentially
all happening in very rapid succession,
one right after another. But I'd like to segment it out like this for readability sake. Okay, let's go ahead
and test this out Now to help facilitate the playing of our
time running out, what I'm going to
do is I'm going to hop back into our level here with my level settings
blueprint selected. Over in the details
panel. I'm going to set my time limit max to
be say, 55 seconds. So that we're going to
hit that time running out warning rather quickly. And then what I'll do is I'll
test this out by dying and responding and seeing how everything works.
Fingers crossed. Here we go. Timer
is at 55 seconds. It's decormenting as intended.
Time is running out. Our music is playing
a little bit more. Rush's Go ahead and Die. Here we run into my
flame arms. There we go. Oh, hey, time stopped
at 36 seconds. And when we respond,
we're back in 55 seconds and the timer
picks right back up again. Hey, not too shabby guys. We have a level setting
system in place. And once again, what makes
this so magical is you can place within any level
that you create. And then you can customize the settings here from
the details panel. All right guys, that's going
to do it all for this one. We will see you in the next one.
90. Level Settings & the P Block: Welcome. In this one
we're going to deal with our level settings
conflicting with our block. Now let me go ahead and
jump in and play and show you exactly what
is happening right now. Currently, our
level settings are determining things
like our level. Music However, when
I stop on the block, you see now we've
got a whole cluster of Do going on. And
we don't want that. We need to deal with
the situation of, hey, when our player
stops on the block, we're playing just the block. Music We're going to pause
the level Music temporarily. And then when the
block time ends, we're going to end the block. Music And just
pick up our level. Music Once again, how do
we deal with that issue? Well, as you may have expected, we're going to dive
into our BPP block. There it is, There is the
location where we have it currently in our
project. Inside of here. The first thing we're
going to do is create a brand new variable down in
the my blueprint section. Click on this plus
button and I'm going to call this Level Settings. And then for the
type we're going to click where it
currently says bullion. Click that little drop down. We're going to search for
our BP level settings. Remember we created an
actor class blueprint called BP level setting. So let's set this to
be that object type. Bp level settings the
object reference. Now when I go ahead
and compile here, you'll notice that our
default value here is null. There is nothing inside of here, even though this is a type. So this is how we're
going to deal with populating this
particular variable. Check this box, for
instance, editible, then go ahead and compile
and save this once again. Now back in our
level editor with your block selected check right over here in
the details panel, We can slot in a
level settings actor. Now we only have
one level settings blueprint in our level
because we only need one. But if I select this drop down, you can see it'll
allow me to pick the loan level settings actor in our level which
we want to do. So make sure that you have
gone ahead and done that. Now something that is very
important to mention here is if you have other instances
of a block in your level, so let me just go ahead and
drag another one of these in. It doesn't really
matter where I place it because I'm going
to delete it out. But for every P
block in your level, you will have to do this, okay, in order for us to do the whole music switcher
O appropriately. So make sure for every
instance of the block in your level that you do set
that level settings variable. Let me just go ahead and delete
this one out. All right. Now let me jump back
into my block here. If we zoom on out, what we're going to do
is build off of this, then zero bit of
script currently. This is our block effects. Let's just build off
the end of this. That'll be a nice
convenient spot for this. Currently, we were
playing some music when we stomp on the block,
that is our block. Music When we're
playing our block. Music Here, what we want to do is bring in our
level settings. We get that, then we can
drag out of here and we can get the level music component. So we're going to get the
level music component, that is this component that lives inside of our
BP level settings. We're going to get that and
then we're going to drag out of here and type in set paused. Make sure you wire
this in like so. And that you check this box,
we're basically saying, hey level Music that's playing
in our level settings. Let's pause you when
we stop on the block. Now obviously, if we are pausing this music upon
stopping on the block, we need to unpause it. I'm going to highlight these
three nodes right here. I'm just going to do
control C to copy them. Then I'm going to
come on down towards my block timer script
inside of here. At the very end when block
time is over and we're setting all the blocks back to normal and we're
stopping our block. Music We're going to
build off the end of this control V to paste those nodes that
we just copied like so. And of course the only
thing we need to do here is uncheck this basically, hey, continue on level. Music All right,
so with this done, let's go ahead and
compile and save, and then jump in and play. Okay, we hear our level Music. Now as soon as I
stop on this block, our level music should pause. And it does. And then when our
block time has ended here, I think I've got that
set to 8 seconds block, music ends, and our level
music picks right back up. And thus, now we have made our BP level settings play
nice with our BP block. That's part of the
reason as well, that we created an
actor class blueprint that we could place for
our level settings in our level so that it could talk nicely with our BPP block. Here we used a method here called direct blueprint
communication. In which inside
of my BP block P, I created a variable of
the level settings type, and then I made an
instance editable. And then inside of
my level editor, I am associating my
BP level settings directly with this
particular block job. Well done, alright.
That'll do it off for this one C when the next one.
91. Level Settings & the Flag Pole: Welcome back everyone.
Now that we've got our level settings and our
block blueprints playing nice in this one we need to ensure
that our level settings and our end of level flag
blueprints play nice. Because what
currently happens is once I end the level by
jumping on our flag gear, the music just continues on. Our timer keeps going, it's just a hot mess. So we're going to be dealing
with that in this one. For this, we're going
to be starting off in our BP level setting. Let's make sure you open that. We're going to start
off by creating a variable inside of here. Click this plus button and
we're going to call this our end of level leg
variable. For the type. We're going to set this
to our end of level leg, our BP, end of level flag, the object reference,
that blueprint. Okay, just like you saw me do in the last video where I made that variable
instance edible, I'm going to make this one
instance edible as well. So we could do that by clicking this checkbox over in
the Details panel. However, clicking on
this eyeball as well, we'll make that instance
editable as well. Let me go ahead
and compile this. So you can currently see that the default value of this
end of level flag is empty. However, if I go inside of my level editor and I
select my level settings, let me just jump
to it by searching for level settings
here in my outliner. And if I double click on this, that'll just jump me
to where this is at my level with this BP level
setting selected in my level. Look down in the details panel. We now have exposed this
end of level flag variable. It's currently set to none. Now I could select this and then choose
my end of level flag, because I've only got one here. But just to show off a
different method of doing this, I'm going to fly over to
my end of level flag. And I could also, with my
BP level setting selected, click this little
ey dropper icon. So I'm going to
do that. And then move my mouse cursor
into the viewport. And now I can manually select my end of
level flag as well. Either way you can
populate that variable. Now essentially what we want to have happen here
is we want to have our BP level settings
respond to our level flag, informing it that it
has been completed. So for this we're
going to open up our end level flag blueprint. Let me just go ahead
and select this. I'll clear out of my level
search in the outliner. I'm going to open
up this blueprint. And now if you recall,
inside of our end of level flag we have this level
complete event dispatcher. What we're going to do
in our level settings is listen out for whenever
this gets called. Now if you forgot
where this is getting called in our end of level flag, I'm just going to
write click on this. We're going to find reference
for when this is called. And if I double click on
this in the find results, you can see that we're
calling this level complete way towards the
beginning of this script. So yes, we did add this event Dispatcher for a
purpose and this is that purpose so that our level settings can listen out for this and then
respond accordingly. All right, to set all that up inside of our BP level settings, let's hop on over there. Let's add another pin
right at the bottom here. Let me just go ahead and drag this sequence note way down
towards the bottom here. Okay? And what we're going
to do is bring in our end of level flag and we're going
to hold down control in left click to bring
in a getter there. And then I'm going
to pull off of this type in level complete. There is our event dispatcher, let's bring in the
assign level complete. It'll bring in two nodes. Let's hook this in the five pin. Essentially, this
whole set up is making it so that
we are listening out for this complete event to be called from our
end of level flag. When this is called
our BP level settings, which is now listen, this is what this
whole set up is for. Once this happens, it'll then fire off of this custom event. Okay, so what do
we want to do when we've been informed here in
our level settings that, hey, we've interacted with
that end of level flagpole, we are deeming the
level complete. Well, we want to bring in our level music component
like so let's also bring in our time running out warning in case that is playing as
well because it could be. Then we're going to
drag off either one of these and say stop. We're going to stop
both of these musics in case either of them is going on. The next thing we're
going to do is bring in our level timer here. We're going to get that.
And then we're going to drag off of this and type in Pause Timer by handle. We're just going to
pause it immediately. Pause in that timer, then just moving over to the
right here a little bit. I'm going to bring
in a delay node by holding down the D key
and left clicking. We'll delay for say 3 seconds.
That sounds about right. Then I'm going to bring in
my level complete component. This is going to be our
level cleared type. Music We're going
to drag that in. We're going to tell
this to activate like. So. Then we're
going to decorment, the time remaining when
our level is complete. Now to do this, I'm going to
bring in another delay note. So I'm going to hold down
the D key and left click. And I'm going to be building
a little bit of a loop here, circular loop of code. I'm going to set
this time duration for our delay,
Something really small, like 0.05 Then what I'm going to do is bring in our player controller reference. We're going to get that holding down control and left clicking. We'll get that out of this. I want to get our level
time. Get our level time. Then we're going to
pull out of this and type in decrement. We're going to plug this in like so we're going to
delay very briefly, then we're going to find out
however much time we have. We're going to decrement it by one and then it's going
to get set back in here. That's what this
decrement in node does. It subtracts one and then it essentially sets it
right back in here. Now we're also going
to then compare this value versus
a greater node. Bring in a branch by
holding down the B key and left clicking if this is zero or I should say if this
is greater than zero. What we want to do is drag off of our player controller
reference right here. We're going to call add points. We got this call
function add points, and I'll double click on that
here in just a little bit. If our level time is
greater than zero, we're going to add some points. How many points do
you want to add? Well, let's add 50
points for each second, essentially remaining
on our timer when we complete the level. Then in addition to this, let's play a little sound as well. So dragging off of
this, we will play so two D for the sound here
I'm going to do camera, this is in the engine VR sounds. I pathway just to have a little sound to accompany
each incrementing of points. Then what I'm going
to do is I'm going to circle this all the
way back around. Just zooming on out
here a little bit. Left click and drag. Loop
this back around to my delay. And if I double click on
this wire a few times, I can bring in some
re round nodes just to make this
look a little bit cleaner like so this whole
bit of script right here, I'm going to left click and
drag around, tap that key. This is going to be my
decramentime remaining when level is complete
and award points. Let's fill this black
right away as well. If you want to pause
the video right here, you can see essentially what
this is all set up to do. Then moving over to
the left a little bit, you can see that bit of script, this all coming off of
the then five pin here, inside of our BP level settings. All right, with that,
let's go ahead and compile to make sure
our script looks good. And save now in
play testing here we want to make sure
that our level music stops when we
complete the level. And we also want to ensure that our level timer counts down and we get points for however
much time is left. Jumping in and playing here, hey, we've got our
level. Music Playing. Let's go ahead and
complete the level. The level Music should stop
and we should start to hear the level complete.
Music Kick in. And we should also see
our timer stop and then eventually
start counting down. Here we go. Timer
stop, level complete. Music We're counting down, We're getting 50 points
for each amount of time, or each second that we
had left on the clock. And that is a nice
little bonus indeed. We have now made it so that our end of level flag is working nicely with our BP level
settings. Job well done guys. Make sure to file and save all. Occasionally, just to make
sure you've saved all of your hard work,
that'll do it all. For this one C,
win the next one.
92. Flag Pole & the P Block: All right, before we move on, we're going to clean up
one more issue related to our block and our end level flag not playing nice together. This isn't necessarily
level settings related, however it is related to the other blueprints that we've been dealing with here recently. I'm going to show off the issue and then we'll go
ahead and fix it. The issue is if I was to stop on a block and we're
near the end of the level, you're going to notice
that the coins change. However, once I interact with
the end of level flagpole, the coins just continue on. We need to have our end of level flagpole with our block in order to stop that block. Music And revert
the block effect the moment that we interact
with that flagpole. Let's go ahead and
get on with this. We're going to
start off inside of our block block rather we're going to create
a new variable. This one is going
to be called level. This time I'm going to
set the variable type to end of level flag
the object type BP, end of level flag,
object reference. And just like we did before, we're going to make
this instance edible by either clicking on this
checkbox right here, or by clicking this
eyeball icon open. Let's go ahead and
compile and save this. And now if I go back into my level and I've
selected my block, I can associate our end of
level flag with this block. Great. Now, once again, you're going to want to
do this for any instance of your block that you
may have in your level. Okay. Now what we
can do here is go inside of our BP
block and we can have this blueprint listen out for our level complete
event dispatcher that we'd set up in
our end of level flag. Now once again our
end of level flag has this event dispatcher level complete that is getting called. So all we need to do
is make sure that our block is listening out for that inside of our
block zooming on out. I'm going to bring our
sequence node way down here. Never mind those cross wires. We're going to add one
more pin down here. For this, we're going
to bring in our end of level flag reference
right down here. Let's hold down the control
key and left click. That's going to bring in
our end of level flag. We're going to drag
off this type in level complete To assign
our level complete, it's going to bring
in the two nodes. Let's wire this in right away. So once again with this set up, we are having our
BP block P here. Listen out for this level
complete event dispatcher going on in our
end of level flag. As soon as that happens
we're going to fire out of this custom event
associated with that. Now the good news is, is we actually just want to plug this into the code coming off
of our then four pin. So let me just note
that this is all coming off of the then
six pin right here. I'm going to move our
sequence node back up into place so as not to have too
many criss crossing wires. Okay, And we're
essentially wanting to plug this in and
don't screw it up. A lot of people screw this
up by plugging in this wire. We want this level complete
event to hook right in to this four loop,
our block timer. So note that we've
got three things at this point in the course flowing into this four, each loop. This block timer,
this is going to be returning the blocks back to normal and shutting
off that block. Music Whenever
block time is done. So essentially what we're doing here is we're
listening out for that level complete event dispatcher inside of
the end of level flag. And as soon as that happens, we're just connecting
in with this block time over bit of script to set all
the blocks back to normal. Stopping the music. Once again, this right here, this wire is what is hooking
into the for each loop. Go ahead and compile this. Let's go ahead and save. And then of course, being good designers, we're
going to test this out. Okay, we're going to
stop on this block, We're going to see these
bricks changing in the coins, and we're going to
hear that block. Music Okay, and as soon as we touch
this end of level flagpole, they all switch back. Those blocks turned back
into blocks that block. Music Immediately ends. Job well done guys. That is gonna do it
all for this one. See you in the next one.
93. Level Transition: Welcome back. In this video, we are going to show
how to transition from one level to another once
we've completed the level. So that we aren't just tuck
staring at our screen. Once all of the points
have been tabulated, we're actually
going to be able to transfer over our points
that we've accrued, our number of lives that
we currently have and our number of coins
to the second, third, fourth, whatever
level we transition to next. Now just to review where we
currently are with things, earlier in the
course, we created a player controller blueprint. And inside of our player
controller blueprint, which you can find
here at this pathway, we did some adding of coins, some adding of points, some adding or
subtracting of lives. That's right down here, and restoring that in
these variables. Now what we need
to do is when we transition from one
level to another, we need to pass this
information onto another type of
blueprint that we're going to create here
in just a little bit. And then we're going to pass
that information back to our player controller
so that we actually have maintained and carried over our values from the previous
level to our new level. Now to do this we're going to go inside of our project settings. You can access that here in the upper right settings,
Project settings. Inside of here, we're going
to go to Maps and modes. And we've got our various framework blueprints
right up here. But we've also got
this special one, a game instance blueprint
right down here. Now this is a special type of blueprint that does
not get its values, its variable values reset so long as your game
keeps on running. So you can go from level one, level two, level
three, et cetera, and any variable data
contained inside of there can carry over from
one level to another. I'm going to create a
new game instance class here simply by clicking
on this plus button here. And it's going to ask me,
where do I want to save it? Let's go into our
platform blueprints. I'll put this in my framework of blueprint folder and I'll go to BP underscore game
instance as a name. And I'm going to save this. And now you see back in
my project settings, it has been slotted in. This will be the game
instance blueprint that we will use here. I've got it open and what
you can see over here is I've got my blueprint
panel in which I can create some
variables to store the information from our
BP player controller. We're essentially going
to be doing some passing here the variable data inside
of our player controller. When we end the
level, we're going to pass this data coins, lives, and points over
to our game instance. Then we're going to pass it back again here inside of
our BP game instance. Let's create those
three variables. First one is going to be coins. I will set this to an integer with this selected I will
do control D to duplicate. I'll call this next one points also an integer
control D. Again, this one is going to be lives. And if I compile this, we can see we've got 00.0
as the default values. Actually, I'm going to change
our lives to be three by default to match what we currently have by default
in our player controller. And you're going to see y
here in just a little bit. Okay, next thing I'm going to do is go back to our level here. And I want to go inside
of our BP level settings. And I can find that in
my blueprints folder. My BP level settings, Where is that? Here it is. Bp level settings. I'm going to jump inside
of this blueprint and I'm going to create a
brand new variable. So I'm going to click
on this plus button. And I'm going to call
this level to go two. And I'm going to change
this to be a name, and you'll see y here
in a little bit. I'll also make this
instance Editible. If you click on that
little eyeball icon, it checks that box right
there. I'll compile this. Currently, this is set to none, but we'll populate this
in just a little bit. All right, let's go
ahead and say this and jump back to our level. Now I've got my level setting
somewhere here in my level. I can actually see, I've got it right here
in my viewport. But if I just typed in
level in my Outliner, that would help me
whittle it down. There's my BP level settings and now we can see we've
got this level to go, variable expos
currently set to none. Now we actually want to slot
in another level to go to. So for this I'm going
to go to my levels folder and I want to
create a level two, another level to go to. So I'm simply going to
right click on this. I'm going to duplicate this, and let me just go ahead
and save this right away. Eventually I'll
probably want to hop into level two and make
some modifications to it, but I'm going to slot this in as LV over in my details panels. My level to go to is
LV underscore 02. Yeah, I'm going to
need to make this look a little bit
visually different. Otherwise it's
going to seem like We didn't really
change levels at all. Okay, the next thing we
need to do here is hop inside of our BP level settings. And we're going to be
building some script off of the very end of this script. So come off of the
then five portion of your sequence node, we've got this level
complete type script. We've got this decrementing of the time when the
level is complete. We're going to be
building off of this false branch right here. Now this is where we're going
to be doing some passing off of variable data
from one blueprint, our player controller to our
game instance blueprint. So I'm going to start off by right clicking in
some empty space. We're going to get player
controller off of this. I'm going to drag off and cast to our BP player controller. That is the player
controller that we are using in this project set up
in our project settings. Bp player controller
right there. Now, I don't, I don't want to actually wire an
execution pin through this. I know that this is
the player controller. My project is using
what I can do here to prevent myself from
having to wire through here. I'm just going to right click
on this and convert this to a pure cast that eliminate
that execution pin in and out. With this I can then drag out
of here and get my coins. Get coins. We're going to extract this variable data
from our player controller. Getting the coins, we're
going to get points. We are going to get lives. We're going to pass
this data onto our game instance Blueprint. How do we do that? Right click
in some empty space here. I'm going to say
get game instance. We're going to drag off of this. And we created one
called BP game instance. Here too. I can right
click on this node. Let me just zoom up
here a little bit. Right click. We're going to
convert this to a pure cast. Now instead of
getting that data, we're going to set that data. Drag out set coins. Let me just move this
on down a little bit. All three of these. There we go. And we're going to set points and we are
going to set lives. So what do we want to
set those values to? What we want to set them to? Whatever currently exists inside of our player controller. So we're going to plug
in our coins here, our points to here, and our lives to here. We're passing that data from
one blueprint to another. Now we have to wire in an execution wire through
these various setter nodes. So we can do that off
of this false branch. So we're going to
go like this, right here, here, and here. And we're not quite done yet. We're going to be
building off of here. We're going to
actually be telling our game what level we
want to go to next. Do that, we're going to add a
little bit of a delay here. So I'm going to hold down
the D key and left click, we'll add a delay
and I'll hard code a delay of say 2 seconds. Then just building off
to the right here, there's a node called
Open level by name. And here's where we can plug in the level name as specified
by this variable. So I'm just going to drag and drop this right on top of there. And you can see
the default value over here in the
details panel is none. I'm going to go ahead and
compile this right away. But remember we set this
to be instance editable. So here in our level
editor level settings, we've got that
selected right here. We are specifying that
this variable is to be populated with
LV underscore two, that level right there. Okay, but we are not done yet. We actually have to work within our game mode blueprint to
finish off our set up here. So I'm going to go to our third
person blueprints folder. We're using our BP, third person game mode. So I'm going to go
ahead and open this up. This is where we've got some
response script going on. I'm going to find
some empty space, maybe down below a little bit. Let me zoom on up
and I'm going to create a brand new custom event. Right clicking a
custom event search. And we're going to
call this custom event carry over game stats. Okay, now what we're going to be doing here is in this
particular blueprint, we're going to be
passing our data from our game instance back to
our player controller. Essentially, whenever we open up a brand new level level two, our game mode blueprint is
going to start up fresh. Our Begin play is
going to happen. And what we're going to
be doing off of E Begin Play right up here, is we're eventually
going to call for this custom event to fire off. And in doing that we're going to tell all the variables inside of our game instance to then transfer back to our
player controller. Let's go ahead and set
that up. I'm going to right click in
some empty space here, get game instance. We're going to drag
off here and cast to our B P game instance. Once again, I'm going to
right click on this and convert this to a pure cast. Actually no, I'm not going to convert this to a pure cast. I'll leave it as an
impure cast to wire these execution wires
through just to show that you could do
this either way here. And then I'm going
to drag off and we are going to get coins, we're going to get lives, we are going to get points. We need to transfer all this over to our player controller. Right click, get
player controller. We're going to drag off of this, we're going to cast two
BP player controller. I'll convert this one to a
pure cast by right clicking. Convert to pure cast like so. Then we're going to drag off of this and we are
going to set coins, Move this on up, set
lives, You guessed it. We are going to set
points like so, make sure you get all
these wires going from there to there to there. And do not forget to
transfer that data from your game instance back to
your player controller. Once again, your
game mode blueprint. If I click on Class Defaults, your game blueprint determines what player controller you are going to be using our
BP player controller. So we're passing all
that data back to our BP player controller. Okay, I'm going to left click
and drag around all this, tap that C key and my
comment will be, Trends, game stats from game instance BP back to player controller BP. Great, excellent. I'll change my comic color here
to black as well. Now we need to actually call for this custom event
because this will not be called and none of this
transferring of data will take place unless we
call the customer event. Alright, so to do that
we just need to come on up where we currently have
our event begin play. We've got our various
response script. I'm just going to back
this up a little bit. Like so, I'm going to add a
sequence note holding down the S key and left clicking.
I'll wire like so. And I will wire like so. And all I will do off of
this then zero pin is I will call that custom event
called carry over game stats. So this is going
to make this call. If I double click on this, it's going to call this right here. I could have, if I wanted
to have a really ugly wire, instead of having
this whole set up, our custom event
being called by this, I could have simply drug a
wire all the way down here, and that would work the same. But I like my code to look
a little bit more clean. Something else I want to mention here before we test this out, let's go ahead and
compile and save. Once again, know that our game
mode blueprint is going to fire off whenever
we begin our level. Now something that I
went back and did, or I caught myself when we
created our game instance, is I set my lives to
be three by default. And the reason I did that is because inside of our game
mode, this event begin. Play is going to be called
even for level number one. And so this is going
to be called this carrying over of
the game status. So I want to ensure that our
lives being three coming from our game instance
is actually getting passed along to our player
controller as well. All right, one more thing I want to do before I test this out. I need to jump out of level
one here and actually go to level two to make it look a little bit visually
different so that you can see that things are
actually happening. So I'm just going to double
click on level two here. It's going to say,
hey, do you want to save everything that
you've changed so far? Let's save Selected. And this is just an extra save as it's coming up for
some reason. There we go. And I'll save my level
two here as well. Save that. Okay, let's
go to level two. I'm going to double click
on this to open it up. I'm going to uncheck these
auto settings right here. Let's go ahead and save that. And here we are in level two. There is going to be
my players start, which I put right near the end. So let me just delete out some assets here.
We're going to delete. Delete. Delete. Delete, delete. So we're going to have a
very barren spot where we spawn in for level two here. That's going to be
our visual difference between level one and level two. Let's go ahead and save
level two then I'm going to hop back to level
one by going under file, recent levels, level one, I'm going to not save
these temporary assets. Here we go. Here we are, back in level one. Let's go ahead and
give this a play. Okay, and before I actually
complete the level, I should score some points. I've got some coins here. Okay, there I've got
three lives, four coins. And let's see how many
points we end up with. Three lives, four coins, and a few thousand points
here, 4,500 points. So let's see if that data
transfers over to level two. Here we are level
two and you can see we've got three lives, four coins and 4,500 points. That system is working in deed. All right guys. That is going
to do it all for this one. See you in the next one.
94. Clouds: Welcome back. Well, up to
this point in the course, we have focused pretty
much exclusively on the core gameplay of
our Mario level here, which is important
to nail down first. But at some point, once you've got enough gameplay
elements in place, you can turn your attention towards dressing up your level. So that's what we're going to be focusing on in this section. And we're going to
start off by adding some random clouds to
our background here. And I'm not talking about these beautiful unreal
clouds up in the sky. I'm talking about these
more Mario centric clouds. Now if I just tap the G key, I'm going to show
you essentially what we're going to
be building here. What I have is a box, a volume if you will, in which we are randomly
spawning these various clouds. And these are all random
sizes and we can choose how many we would like to
have encompass the space. It's going to be a very flexible blueprint
that is going to allow us to add clouds in whatever region of our
sky that we'd like. So that's what's in
store for this one. Okay, back here in our working
version of the project, I'm going to import a
couple of textures that were not in the
original texture pack, although I'm going
to go back and make these available in the
original texture pack. Those viewing this course at a later date should find
them already in here. But originally I did
not have these in here, so I'm going to go
ahead and bring them into my content browser. Also, depending on where you
are viewing this course, I may attach these
particular textures that I'm about to mention right
here to this video as well. So long story short, you
need to make sure that you import these two textures. I've got a cloud one
and a cloud two. I'm only going to make
use of one of these, but I'm going to give
you two just so you can pick and choose which one
of these you want to add. Dragging these into my
Textures folder, there we go. I've got kind of this NES
version of the cloud. I'm going to be using this
version of the cloud. First things first,
I need to transform whichever texture I want to
use here into a material. In fact, I'll turn both
of these into material, so selecting both of these, holding down control, I can
then write, click on it, and create materials
from these textures. So let's go ahead and do that. Here are my two materials
it just created. I'm going to drag and drop these material assets,
which you can see there, materials because they're
labeled at the bottom, into my Materials folder. I'm going to move
them here and then I'm going to go find
my one cloud material, my T cloud one. That's the one I want to
work with in my project. But again, if you want
that old school NES Cloud, you can use that one as well. We just need to double
click on this to open it up and make a couple
of changes here. For starters, here
in my preview, I'm going to place this
cloud not on a sphere. You've got these little icons
down in this preview here. So if you were to choose
to put it on a plane, you can see essentially what
this is going to look like. Now you see that weird streaking going on in the background.
Don't worry about that. We're going to fix this
up in just a little bit here because we're
going to select our master material node
in the blend mode section. We're going to change this
from opaque to masks. Now what that's going
to allow us to do is then plug our value here, the alpha value of this secture, into the opacity mask input. And that's going to get rid of those weird streaking
effects in the back. Now I intend to only have these clouds viewable from essentially this
sort of an angle. But if I fly around to the back, notice that you can't see it. So this is going to be
completely optional. If you wanted to make
a two sided material here with your master
material nodes selected, you could check on this
box for two sided. And that'll make
it so that you can see these from both sides. Just FYI, All right, with this I'm going to go
ahead and save this out and then go ahead and close it down back here in
my level editor. I'm going to go to the
blueprints folder and I'm going to create
a new actor class, blueprint, by right
clicking blueprint class. It'll be an actor class because this is
going to be one that we're going to
place in our level, and I will simply call
it BP underscore clouds. With that selected,
I'm going to tap the Space Bar to open it up. And I'm just going to add
two components in here. The first component
that I'm going to add is going to be
a box collider, scrolling on down box collision. And I'm going to call
this my spawn area. This is essentially
going to define the area in which I want
to spawn some clouds. Now with this selected, I'm not actually going to
determine the box extents yet. I'm going to determine those
in our construction script. But I'm going to set our line thickness to be a little
bit thicker so that this area is easier to see once we have this
place in our level. So line thickness here, I'm
going to change that to 20, which is going to look
super bulky for now. But once we expand out
our spawn area here, it's going to be much easier
to see when it's huge. Next I'm going to select our default scene
root component. That's this component
right here. That little icon once again, because I want to add
another component, attached another
component to that. And that is going to
be typing in instance, in instance static mesh. With this selected, I'm
going to call this Clouds. And then over in
the Details panel, I'm going to slot in as
our static mesh. A plane. I'm going to choose this plane. This is going to be from the
engine basic shapes folder. And then for the material that's going to be that
material that I was just working on here, cloud one. Now we don't see anything in
here yet because we're going to spawn instances of this
via our construction script, which is to come in
just a little bit. But I need to make this
facing our camera setup. And in order to do this, and I determine this through
some trial and error here, our rotation here in the x, we need to change that to
be 90 so that these planes with the cloud image on it
will be facing our camera. Something else I'm
going to do right away here is in
the details panel. I'm just going to
type in shadow and turn this off from
casting shadows. That'll save our
performance a little bit, as well as prevent
any weird shadows from being cast from our cloud. So that's optional, but
I'd like to do that. Okay, next up we're going
to add some variables which are going to be used once again in our construction script. This is all going to be done
in the construction script, which is script
that's going to be run during design time, not during run time.
Clicking our variables. The first one we're going
to add here is going to be called instances to spawn. This is how many cloud
instances that we want. This will be an integer. The next one that
I'm going to add, clicking on this plus
variable button, is going to be called
spawn extent X. This is going to be a float. This is going to determine, along with the two other variables that are
to follow here, the size of our spawn area. You'll see that in here
in just a little bit. With that selected,
I'm just going to do control D to duplicate
it a couple times. Going back and renaming this. This one is going to be called spawn extent Y and this one will be
called spawn extent Z. All right, Next one
we're going to add here, hitting control D to duplicate
this is going to be called scale min and then
control D on that. This one is going to be called
scale max and this is just going to determine
a min and max size. And we're going to
randomize between this to spawn in our
cloud instances that. All right, with this, let's go ahead and compile so that we can set some default values
here instances to spawn. I'm going to set this to be 25, that's going to be a pretty
good starting value. Check this box, for
instance, edible. That'll make it so that we
can edit this property, this variable from the
level editor spawn extent x. I'll just set this to, we'll say 5,000 right
from the get go. I will also make this
instance editable, spawn extent Y, also
instance edible. Let's set this to, I don't know, 1,000 And then spawn extent z. How high do we want this
to reach up into the air? We'll say 2000 also making this instance
editable scale min. I will also make this
instance editable. And we'll say the
scale in will be three times the size
of the plane scale. X will set this to be ten times the size of
our normal plane here. And we'll also set this
to be instance edible. Note that all these
eyeballs are checked on, meaning these are instance
edible meaning that we can edit these from
the level editor, which we will in a little bit. Let's go ahead and go over
to our construction script. This is where we're going
to put all the script to determine how many
clouds we want to spawn in, The size of our spawn area, and the size of our
clouds as well. So first let's determine
the size of our spawn area. So we've got this spawn area, let's drag that into our graph. Let me just zoom one
up here a little bit. We're going to drag off of that and then we're
going to type int, Let's set the box extent now just to hammer home essentially
what we are doing here, we added this spawn
area component. This is a box trigger, we're essentially wanting
to set the extents, these X, Y, and Z extents
that are defaulted to 32. Now the way we can do that is drag backwards off
of here and type in make vector that'll
split it out into its x, y, and z components. And we've got variables
that are going to determine the X, Y, and Z. So let's drag and drop
these appropriately on the proper pins like so. Now our spawn areas, box extents right here are
not 302-30-2302 but they are rather 5,000
by 1,000 by 2000. But once again, we
will be able to edit these from
the level editor, so we can change these
within the level editor. Next, we want to work towards spawning instances
of our clouds here, so let's drag in our clouds. And we are going to
want to drag off of this and add an instance. Now the question becomes, how many of these instances
do we want to spawn in? And then where do we
want to spawn these in? For this, we're going to be
making use of a four loop, right between here, right click
and bring in a four loop. A simple four loop
will do the trick. So we're going to flow
like this and like this. This is how this
is going to work. We're going to set our
first index here to be one, so that we're going
to be starting counting with the number one. And our last index
is going to be determined by the number
of instances to spawn. So we're going to put
this on the last index. So the way this works is
during design time here, whenever we pop this
into our level, it's going to set the box extent and then we're going to hit
this four loop. And so essentially
we're going to do this, the loop body here 25 times, starting from the number one, then going to 234, all the way up to
our last index, 25. We're going to add
in, add an instance, add an instance starting
at the number one, going through the number 25. Executing this again and
again, and again and again. So now we need to tell this
where do we want to spawn in? So for this we're going to drag backwards off of our
instance transform. We are going to type in make transform for the location
of our clouds here. What we're going
to do is bring in our spawn area like so. Then we are going to
drag out of this, get the box extent. Then I'm going to drag
off of this and type in random point in bounding box. By default it plugs into our, that's not actually the center
point that we want here. We want our box extent to be plugged into the
bottom pin here, the half size for the
center of our bounding box. We can simply drag
off of our spawn area here and type in get relative location like so. Essentially saying here,
we want some point within our bounding box
of our spawn area here, some point within there, that's where we should
spawn locationally, an instance of our cloud. Now for the scale, we've got a scale in. I'm going to hold down control, drag that in a scale max. Holding down control,
getting that we want some random value between
our min and our max. And for this I'm
going to right click float in range is what we're looking for every time we spawn in an
instance of our cloud. We're also going to spawn
it in at a random scale. Here, I'm just going to
simply plug this into here. It's going to convert
our float value into a vector if it chooses, say, the value of four, because that is between
the min and max. It'll set that scale of four
to be uniform across the x, y, and z that make
up the scale vector. That's going to be our
final script right here. Let's go ahead and
compile this save, then let's go to our
level editor and bring one of these
into our level. All right, dragging our
clouds on out here. Before I do that, actually
I want to set this. I've got my two D snap
settings turned on currently. That's what that blue
right there means. I'll set this into my
extreme back layer, and in fact, I might even want
to place it beyond there. But I'll start there. So my extreme back layer, once again, by clicking on this, I can go to Edit Layers. I can see that the extreme background layer
is going to be set to negative 1,000 in the y axis. So let's go ahead
and drag this in. And you can see as
I'm moving it around, anytime you make any
change to this blueprint, it's going to run that
construction script. That's why I keep seeing this
differing random pattern. Because each time I move
it a little bit it's going to re run that
construction script. Okay. And there I've
placed it within my level, obviously not a great
placement from the gecko. You can see where
this is spawning cloud instances within
that bounding box area. So let me just move
this on back a little bit because I wasn't
really happy with that. Okay, so now you can see how with this selected
in the details panel, I can specify a
number of instances. I can change any of these
different properties. So I'll set the number
of instances to be 100, which is probably
going to be crazy. I can alter the spawn X extent, make that way wider like, so I can alter the Y extent, make that a little
bit taller like, so the Z extent, I can change that
as well and make it a little bit taller. Sorry, Y makes it,
you know, wider, in our case, Z makes it
taller. And so there you go. You can just position
this accordingly so you can have some
clouds in the sky. Fiddle with that to your liking. But now we've got a
random cloud generator. Pretty sweet indeed. All right guys,
that's gonna do it all for this one.
Here is that script. Once again, if you want
to pause the video here, we'll see you in the next one.
95. Level Pieces: Welcome. In this video
we're going to learn how to create these
larger brick pieces here, as these comprise the bulk of our level and
probably many levels. Now the reason I'm
going to show this off is because these need
to be constructed in such a way so that when you place one of these
materials on it like this, dirt, it's not going
to look stretched. And just to hammer
home this point, if I was to create
it in the way that people probably think
this is created, let me just zoom on
over a little bit. I'm going to place a simple
static mesh cube out here. And I'm just going to scale it up to be some giant size like. So this is the way that many people think that
this could be created. One of these giant bricks. I'm just going to place
a dirt material on this. We've got our dirt material
from our folders here. Now you can see it looks
very stretched here. Whereas over here it does not look stretched,
It looks tiled. So that's what we're
going to learn how to create in this one. How to make a larger
block piece like this that doesn't have a
stretched material over it. This is essentially
going to result in us making our own static meshes. So we'll show how
to do that back in our working version
of the course. So with my work in
progress level, you can see I've got
this giant platform selected here in my viewport.
Over in the outliner. This floor piece is
a static mesh actor. So if I was to apply our
dirt to this dirt material, it's going to look
very stretched. And once again, that's
not what we want. I'm going to delete
this out, bye bye. And we're going to
replace this with a geometry brush up here in
the place actor's panel. And if you don't see the place actor's panel, click right here. Place actor's panel. We're going to go to
geometry brushes. We're going to add a box brush. I'm simply going
to drag this in. Let me do this on
my main level here, and I'm not going to
be too particular about where this is placed
for the time being. Then over in the details panel, instead of scaling this by using my scaling
tool like this, I'm going to instead set the brush size in
the details panel. How long do I want to make this? Well, I guess I'm going to set the x value to be something like 20,000 something
super long like that, y. I'll set this to be
something like 2000. The z, I will set that
to be something like, I don't know, 5,000 or 500. Let's go.
Something like that. Once again, I will nudge this down just a
little bit here, Try to make our play base
like we had it before. I'll fine tune that
in just a little bit. Okay, so now what
I need to do is I need to convert this box brush, this is known as a brush actor, into a static mesh. Now the way that this can
be done is coming under the brush settings advanced, we've got the ability to turn
this into a static mesh. Once again that was
brush settings advance, create a static mesh. So I'm going to do
that. In doing so, it's going to ask me which folder I would
like to say this in. So let me go into my
platformer folder. I will right click on this, create a new folder. And I will just call this
level Pieces level underscore. I'll call it level
underscore meshes. And I will simply call this
my piece underscore one. That's going to be
good enough for me create the static mesh. Now this is going to turn this
into a static mesh actor. Now if I was to apply
my material to this, let's go ahead and
search for dirt. It will apply it on there in a tiled, nice looking fashion. Now, there's going to be another problem with
this currently, as is to demonstrate this. I'm just going to move
this on down a little bit to ensure that
I've got my player start actor in place that looks right about
the right level. Okay. My players
start actor, okay? And the problem is going
to be this jumping in and playing is that my character is going to be falling
right through the world. And the reason for that
is because once we create a static mesh
from a box brush, it does not have
collision on it. So to fix that, I'm
going to go to where this static mesh now resides
in my content browser. And I can do that
with it selected. Clicking on this
folder right here, it's going to show me where this exists in my content browser. I'm going to double click
on this to open it up. But before I do that, notice
in this tooltip, in orange, it says collision Primsero that is showing that there is no collision applied to this. We're going to manually
apply some collision. I'm going to double click
on this to open it up. And just zooming on back here under the
collision section, we can add different
types of collision. Now because this is
a simple box shape, all I need to do
coming under collision is to add a simple
box collision. In doing this I'm
going to add it. You're going to now
see this green outline surrounding this mesh. Collision is now being
applied to this. That's what that
green outline is. Now something else to
note here is I could, with this static mesh now
added to my content browser, I could add a second
version of this. Let me just go ahead
and place one in here. Now note that this
version does not have my material
automatically applied to it. And maybe I want to reuse this in other places in my level. So what I can do here is back
in my static mesh editor, which I've got open,
Right here is slot in a default material
in the details panel. And that can be done
by clicking right here, just clicking Dirt. Now if I save this asset, it'll save this as the default material
for this static mesh. And also it's got a
collision applied to it, just showing if I was to bring a second version of this in, it's going to have that material automatically applied to it. And now if I jump in and play, my character will actually collide with the
ground as usual. So that is how you can go about
creating some customized, static meshed floor pieces. That'll do it all for this one. See you in the next one.
96. Level Props & Camera Tuning: All right. So even
though we have some giant meshes that have a nice looking
material on them, it still is looking
pretty bland out here. So let's go ahead and populate level here
with some foliage, and I'm going to show you a real quick and easy method
of doing this. And then you can kind of take that concept and roll
with it from there. But to get started here,
I'm going to go to the Epic Games launcher
and I'm going to show you a nice pack to add
onto your project here that can help enhance
the look quickly and easily. So here in the Epic
Games launcher, I've got Unreal
Engine selected along the left hand side
in the marketplace. If you do a search for
Advanced Village pack, this is the pack
that I am going to add to my Unreal Engine project. Now it's going to show the current supported
engine versions. Note that if your engine
version is not supported here, there is a way that you
can still add this. Let's go to Add to
Project in here. If you don't see your project, you can click on
this little checkbox here to show all
existing projects. And then you got to
scroll down and find whichever project
that you want to add. This content pack two for me, that's going to be
this platform one. Now it's going to say, hey, assets aren't compatible
with this version, so just select the
latest version. This is what you should
do if it's showing that that asset pack is incompatible with
your latest version, you can still add it. Just select the latest version. For me it's going to be 5.3 And then I'm going to
click Add to Project. Now in doing this, you're going to see this
little progress bar as all this content is being
added to your project. So I'm going to pause the video here, and then when
we're finished, I'll show you where this content now lives in your
content browser. Okay, so that content pack
has finished installing. And here in my content browser, I can see that I've got this new folder called
Advance Village pack. And what I'm going to
do here is I'm going to sort by static meshes. So if you don't have a static mesh filter existing over here, you can turn that or make that available rather by clicking right here for static meshes, because I want to
find these props. So I'm going to turn
on this filter. And now you can see
all these different, these props that you can
place out in your level. Now I want to place a bunch of grass kind of atop
my surface here. So the way that I can do that is select in this
search bar right here. I'm going to do a
search for grass, that's going to find
some grass patches. I like this grass patch v one. And then I'm going to change
the editor mode here from selection mode in the far
upper left to foliage mode. Shift plus three hot
key to get you here. Okay, In foliage mode, you can place any static
meshes quickly and easily. It doesn't just have to be grass or trees or rocks
or anything like that. So right here it's going
to say drop foliage here. Essentially you can drop any
static mesh into this area. I'm going to drop
this left click drag. We're going to drop it
right up in here like. So what I like to do
is I like to change this view from thumbnail
view to list view. We could play some other
ones here as well. In fact, let me search and see if there's any
trees in this pack. I want something that
looks relatively nice. I guess we'll go with one of these trees right here maybe. Is there a pine
tree? Let's see if there's a pine
tree type in pine. Now we'll just go with
the regular tree, okay? This guy will do just fine
drag and drop that in here. The way that this works is with anything that is checked here in your list of foliage. So long as you've got
your paint tool selected, you can left click and add
instances to your level. Now obviously in doing that, which I just did,
that looks terrible. That's way too dense. I don't like it. I could
do control Z to undo this, but what I'm going
to do instead is hold down shift
in left click in, holding down shift
in left clicking, I'm going to be swapping to this Erase tool and it'll erase whatever
I have selected here. So holding down shift, you can see my Erase
tool is now selected. So now I left click and I'm
going to erase that foliage. Now once again, you saw that was way too dense and in fact, I don't want to add trees
and grass at the same time, So I'm going to have
just grass turned on. And now what I can do is
I can select my grass. And just by select
my grass down below, I can set all kinds of
properties regarding how I want this grass
to appear in my level, including how dense it is. Let me just set this density
way down, right here. I'm going to go to
something like point. Actually let me
just set it to one. For now it was set to 100, so now if I was to left click, you can see how sparse
that's going to be. That's too dense. So
let's try it back at 100. And try again, left click, so you can see how
dense it is there. I think I'm going to set
this up to say, 200. Now I can set all kinds
of other properties around here as well,
including a scale. This is another common one
you may want to fiddle with. If I was to left
click right now, all the instances of my grass are going to be
the exact same height, which maybe you want,
maybe you don't. I want to have a
little variety here. So I'm just going to do
control Z to undo that. And I'll set my mint scale to be 0.5 and my Mac scale to be two. So I've got a little
bit of variation in grass sites and now you
can see what that does. All right, some other things
you may want to adjust here. Scrolling on down
random pitch angle. This one really
shows with trees. In fact, let me turn on a tree. Now I've just got
my trees selected. With this selected, I can alter the properties
for my trees. Let me just set my density way down to something like one. What random pitch
angle is going to do is random the angle at
which the tree grows. Right now it's growing
straight up. Do control Z. If I do random pitch angle
of say up to 20 degrees, that'll make it so that my trees could be slightly tilted. It's going to pick randomly, so I'm just clicking around so you can see that one's
pretty straight up, that one's tilted to
the side, et cetera. Just gives you a little bit
of variety right there. Okay, So I'm going
to start off with grass just having my
grass selected here. My properties pertaining to
my grass that I can adjust. I'm going to go ahead
and left click and drag. Now I could go like this to paint grass all over my level. However, I could also
increase my brush size here to give me a bigger bubble brush to
paint all across my level. So let me just do that quickly. I'm just holding
down left click. Now, this may be what
you want, maybe not, but I'd like to
have a little bit of grass or rather dirt, in this main pathway so that it's easier to identify
my linear path of travel. So I'm going to
set my brush size something like maybe say 300. And now if I was to just
go into say, this view, hold down shift in left click, I can erase some foliage
along my main path of travel. So you can imagine how
you could stretch that all the way through down
the path like this. Holding down shift,
just like that. Okay, now let's just say I wanted to add some
trees to my level. Now I could use the bubble
brush to add some trees. However, I'm going
to select my tree, so I only want trees. You're going to
unselect my grass. I'm also going to change
the scale here to be 0.2 up to 0.8 some
variety there. I'm going to have random
pitch angle up to 20 degrees. Now once again, I could bubble brush and add
multiples of these. However, you can also
use this single mode. In choosing this single mode, you are in single instance mode. Now you've got this tiny, tiny bubble brush right there. Wherever you click,
you will spawn a tree. This is a real quick and
easy way to populate your level with some
foliage or any other mesh. It doesn't have to be trees, it does not have to be grass. So there's a quick
technique as to how you can decorate your level. Now you may find instances
like this where you don't want grass at my block. The reason it applied on top of this block is because
right here I've got my various filters as to what is considered a valid tar. To place a Pon static
meshes is one of these. If I want to erase this off
of my static mesh here, I need to select my grass. In this case I'll go out
of single instance mode. And now just holding
down the shift key, I can left click and
I've erased that. Now if I don't want it to be allowed to even go
atop this static mesh, I would just uncheck static
mesh to disallow that. Now, this floor is currently considered
a static mesh piece, but this is how you can
determine what is valid to paint upon landscape
landscape actors, which we have not talked
about in this course. Static meshes? Yes.
Even other foliage. All right, so there
is a quick primer guise as to how you can add a bunch of foliage
or props to your level. I'd like to use the
foliage tool to quickly and easily add
meshes of any kind. It doesn't have to be grass,
it doesn't have to be trees. It could be fences, houses,
crates, barrels, whatever. I want to add one quick
addendum to this video. Because after we've
got these level pieces in here and you go ahead
and play your level, you might have something
that now looks like this. Where maybe your camera
is way set down. You don't want to side of
your level once again, this is where you
can go back into your third person character
and adjust the camera. If you remember from way
earlier in the course, we actually have the
ability to set some temporary camera setting
right here within our level. I just want to point
out a couple of things. I'm currently playing within
the selected viewport, then while I'm playing in
the selected viewport, I can come under my
outliner and I can choose my spawn in
third person character. With this selected under
the general category, we have exposed these variables from
earlier in the course. To adjust the camera
in real time, I'm going to act and
activating this, it's going to enable
all these settings. So now I can try to adjust my camera offset to
make that what I want. Maybe something like 300
in the Z is what you want. Maybe 400. I'm just going to keep shifting
it up. I like 400. Now once I exit out of here, I'm going to hit escape. That is only a temporary
setting I had right there. Again, that all comes via this script inside of my
third person character. We were adjusting our camera Z offset when this
was set to be true. If I was to go back in and play, it's going to revert it back
to its old camera settings. How do we deal with
that camera adjustment? Well, again, I like that Z 400. This is affecting my camera. Boom. So if I go insect
my camera boom component, let me just go to my
viewport and show where my camera boom component
is. It's that red line. All right, If I was to set
my camera boom component up in the Z location to be 400, it's going to set
that up like so I saved that and now if
I jump back into play, it'll keep that change. So that's how that
is meant to work. Just wanted to add that
addendum here to this video. Please have a nice field of view water playing.
See in the next one.
97. Main Menu Level: Welcome. Over the course
of the next few videos, we are going to create this, a main menu for our game that's going to have a
single button on it, and when we click
on it, it simply launches the level back here. In our working version
of the project, we're going to start off by
creating a brand new level. We're actually going to start off in this brand new level. And in that brand new level, we're going to
generate a widget, blueprint our main menu. And then from that main menu, by clicking on that
let's go button. We will transition from our main menu level
to this level. So let's go ahead and create
this brand new level. Coming up under file
at the very top. New level control is the hot key for
creating a new level. You'll bring on this
little new level picker, We're going to create
an empty level, so go ahead and select that,
and then click Create. We are within our
new empty level, it's currently untitled. Let's go ahead and save this. We can click right
here to save it. It'll prompt us where we
would like to save this. Let's go on our
platform levels folder. And I will simply call this
LV underscore Main Menu. And then let's go ahead
and save this right away. So now we've got our
main menu level. The only other thing I'd
like to accomplish in this video is coming
up under our settings. Let's come under our Project
settings and inside of here, let me just dock
this across the top, I'm going to come under maps and modes and right here for
our editor start up map, we're going to
change this from LV one to our main menu level. Let me just type in main there. What this is going to do is the next time we open up unreal, it'll automatically open up
to this main menu level. So we're adding a little
bit of friction here, jumping into our game by starting off in our
main menu level. And then again
from there we will transition to our LV one. Okay, that's all I want to
accomplish in this one. You don't have to save anything here in your project settings. It's just going to
remember that the next time you open
up the editor. That'll do it off for this one. See win the next one.
98. Main Menu Layout: All right, now that we've got our main menu level in this one, our goal is to create a widget
blueprint that's going to serve as the user interface
for our game's main menu, essentially our
main menu layout. Now before we really
get diving into this, make sure that you have imported
all of those fonts from way earlier in the course that should be all imported because we're going to be
making use of those. Also, make sure that
you have imported all the textures that are
attached to this course, as well as we will be making
use of some of these. All right, with that, let's
go inside of our U I folder. We're going to right click
in some empty space. We will choose user
interface widget, blueprint. And we're going to choose this user widget as the parent class at
the very top here. Let's go ahead and
give us a name. I will call this BP
underscore Main Menu. And then with that selected, we can just tap the
Spacebar to open it up. Okay, over on the left
hand side we've got various widgets that we can
add to make up our main menu. This is the designer
area, right here. Down here is going to
show the hierarchy, the relationship of several
widgets to one another. And then over in
the details panel, we can set various
properties for each of the widgets that we add. The widgets that I want to start off with here is a canvas panel. So I'm just going to
type in canvas panel, I'm going to drag that in. That's essentially going to
act as a sort of cork board, if you will, The tack
board that we're going to pin other widgets to. So that's the first
one. The second one is going to be an image. So I'm just going to
slap that in here like so you can see down
here in the hierarchy. It is attached to
our canvas panel. I'm going to go ahead and
rename this one right away so I don't get confused
with my next image. So selecting that two, this is going to be image
underscore background and I'm going to set the
details for these afterward. But the next one
I'm going to add is also going to be attached
to my canvas panel. Let's just drag in
another image like so, renaming this by
pressing F two on it. This will be my image,
underscore title. By the way, with any of
these widgets selected, you can rename it by doing F two or in the details
panel right up at the top. You can rename it there as well. Next, I'm going to bring in
a button widget right here. My button is going to go
somewhere around this vicinity. So let's just drag and
drop it right there. I'll rename this button,
underscore Play. And then I'm going
to drag some text to go on top of my button. So I could drag
and drop it right here on top of my button
Play in the hierarchy, or I could slap it right
on top of button here. In the designer view, that indentation shows that attaching relationship
and I will simply rename this
underscore play. All right, next,
let's go ahead and set the details
for each of these. First, I will select
my image background currently right there
in the details panel. I'm going to set the anchor
for this, be full screen. That's going to set my anchor point all the
way around like this. Now, to actually have
this go full screen, I've got to undo
my offsets here. So let me just click
these back buttons, right right, right
there, and right there. We've got this offset right
here still set to 100. Let's go ahead and
set that to zero. In the offset bottom, it's going to be zero as well. Our anchor is going to
be this full screen one. And then our offsets
are going to be zero across the board and that'll
truly make it full screen. Now I want to actually
set an image back here, so under the appearance brush
section coming under image, I'm going to search for
main menu and I've got this texture that we can put in the background,
It's pretty nice. Next our image title, currently this white box. Let's go ahead and set
the anchor for this to be this upper right one
that is going to try to keep this title in the upper
right of our play window. Should we try to resize our play window for
the position x, I'm going to set this to be
negative 700, the position Y. I'm going to set
that to be zero. And you can see
this moving around. As I'm updating these size, I'm going to set
that to be 700 and the size I'm going
to set to be 400. Now why did I choose
that size right there? Well, it's because my
brush image right here, I'm going to choose to
be my Super Mario text. This one right here. And that fits in just nicely. Once again, note that
these positions, these are relative
to the anchor point, because the anchor points
in the upper right here, this position x, that is
relative to that anchor point. All right, next let's
choose our button, play and set some
parameters related to that. I'm going to try
an anchor that's right here along the
right hand side anchor. I'll try this box right
here, kind of that, right? Box for the position x. I'm
going to choose negative 115. I determined all
these ahead of time, the position y. I'm going
to set that to be 256. I'm going to set that to be 450, the size y. I'm going
to set that to be 130. Now it looks like it's
going to be overflowing off the edge of my screen
here. But check this out. I'm going to set
the alignment for this to be one in the X, one in the y. Once again, if you do
0.5 for each of these, that's going to be splitting the difference relative to your anchor point and
your offsets here. Setting this to 1.1, is going to set it to the
extremes for that positioning. All right, for the style
I'm going to come under. Actually, we'll come
back to the style here in just a little
bit. Let's do this. Color endopacity, appearance,
color endopacityI'm. Set the background color and the background
color for this, I'm going to set a red value
of 0.2 a value of zero, a B value of zero, and the value that is
the alpha value of one. So yeah, I'll go with that
with my color scheme. For the appearance style. We can now set the style of this button for various states. The normal state, the hover state when you're
hovering over it. The press state when you click
on it, that sort of thing. So let's start off
with our normal style. How does this button
going to look normally? Well, I want to draw
as a rounded box. That's going to be
all well and good. The outline settings that I want to set for
this are going to be 444.4 across the board. However, my width here is
going to be set to seven, then the rounding type, and this is where it's
really going to stylize it. I'm going to set to
half height radius, that's going to give
it this rounded look right there, which I like. That's how the button is
going to look normally. Now let's set it for how
it's going to look under the hovered state when
we're mousing over it. Once again come under
the outline settings because if we don't change these outline settings to match, what's going to happen is it's going to start off
looking like this, but then it's going to
go back to its sort of boxy look when
we hover over it, which we don't want, the width here is going to
be set to seven. Once again, the rounding
type is going to be set to half height
radius, the outline. However, I'm going to set
to a yellowish color, so let's go yellow,
something like that. I'll set it to be
semi transparent. Maybe 0.5 value for the. Let's click okay.
There, dealer's choice with what you want to set that to when you're hovering over it. All right, and then
for our press state, that's going to be
when we click on it, come under the outline
settings once again. I'll set that width to seven. The rounding type is going
to be half height radius, the outline, I guess I'll leave that at this
sort of whitish color. That's going to be
fine. And, you know, just to differentiate
this a little bit, I guess I'll set my width here for when we press
on it to be ten, just making that a
little bit thicker. And then down below here, we've got this pressed Sound and we've got this hover Sound. Nice that they've got
these fields here. So we can automatically slide in some sound effects for when
we hover over this button, as well as when we
press on this button. So let's do the hovered first. I'm going to set that to
be the grab, V, R, grab. And for the press Sound
for when we click on this, I'm going to set
this to be my coin. Sound All right, next
let's set our text. Let's change out the
text style here. First of all, we're
going to come under the padding section, expanding that out a little bit. And I'm going to set
the padding for this. Actually, you know
what, I'll come back to the padding here
just a little bit. Let's set the font style first. But actually, even
before we do that, let's go ahead and
set the actual text. And I'll change this to, let's go exclamation point. Let's get rid of
where it says text block right there.
Delete that on out. Let's go the font family. I'm going to set this to
be my Super Mario font. I'll set it to my Super Mario or 256 font dealer's choice as to what you want
to set that to. The size here, let's
increase the size. I'll go to, let's try
45, something like that. And the outline size. Let's change our outline size. So we are outlining our
text here a little bit. I'll change that to be six. You can set an outline color
with that right there. I will leave it at black. Now this doesn't look very
centered within my button, so that's why I'm going
to go back and fix, so we can do that via these padding options
at the very top here. Once again, I expanded that out. I'm going to set my
left padding to zero. And watch how that text kind of nudges around as we
update these values. The top padding set that to ten, The right padding, I'm
going to set that to zero. In the bottom, I will set
that to zero as well, and that looks
decently centered. Alright, with that, we have
a decent main menu layout. Let's go ahead and compile
this and save guys. That's all we wanted to
accomplish in this one. See you in the next one.
99. Main Menu Script: All right, in this one
we are going to add some script to get our
main menu displaying. And also to make our main menu interactive so that we can
launch our very first level. So here I am in my LV Main menu. This blank empty level. We're going to come into
our level blueprint. And I just clicked right up
there, Open level blueprint. And we're going to
be working off of this existing event. Begin Play. So I'm going to get rid
of Event tick right here. If you don't see Event
Begin play out here, you could simply right
click and find Event begin. Play off of this, I'm going to bring
in a sequence node, hold down the S key
and left click. We're going to do
three distinct things off of beginning play here. So I'll click that Add pin
button to add another. The first thing I want
to do is drag off of this and type in create widget, Create widgets to the
name of the node. Here we can slot in the widget
that we'd like to create, That's going to be
our BP main menu. Now it's not enough to
simply create the widget, we actually have to tell it
to be added to our viewport. So to do this, we can
drag off of here and say Add to Viewport. If I can actually spell Add to Viewport correctly,
there it is. Add to Viewport. This widget creates the main menu widget. And this one is telling that widget to be
added to our viewport. The next thing I'm going to
do is right click and type in get player controller. And off of this I'm going
to drag off of this and say show mouse cursor. We're going to set
show mouse cursor. We're going to check this
on to make that true, this is going to make
our mouse cursor appear so that we can click
on that Lets Go button. Now something I should
point out here, how did I even know that
this property existed? Well, let me go to my
framework blueprint, my BP Player controller, and inside of here my
BP Player controller, if I go to class defaults
over on the right hand side, I can type in mouse at the very top mouse and there
it is, show mouse cursor. That is one of the
default properties of a player controller. By default, we are not
showing the mouse cursor, but what we're essentially
saying there in our main menu script
here, is that, hey, whatever player
controller we're using, we want to make
sure that we show the mouse cursor so that we can interact with
our main menu here. Okay, the last thing
I want to do is I simply want to play a
little bit of music. So I'm going to drag
off this and say Sound to To D. Sound is not localized to any particular
spot within your level. It doesn't have an X, Y, and Z location from
which it's playing from. And for this, you can slot
in any music you like. I will simply put in Starter Music This is some music that is in the
Starter Content folder. Again, you can put
anything here, but I'll just have a little
bit of music playing. So that's going to
be our final script for when we play this level. Let's go ahead and compile here, make sure our script
looks good, and save. Now if I was to play, my main menu will
appear on the screen. But you're going to see a few things that
are problematic. One is we see our
Hud on the screen, which we don't want to see. Number two is I can't
actually interact with this. You can see that that button hover effect
going into effect. And in fact, I can click on it, but nothing actually happens. I don't get taken
to another level. So let's fix up both
of those issues, starting with our
Hud being displayed. Now the reason our Hud
is being displayed, if I go back to my main
level editor here. Let's go to our settings And inside of our
project settings, if we go to maps and modes, you can see that our
default game mode for this project is our
third person game mode. Now if I go to this
particular asset, there it is in my
started content or my third person
blueprints folder. And I open this up, this is the blueprint that determines other blueprints our
project is using, such as our player controller
and our default pawn class. Now again, I'm in
the class defaults of our third person game mode. So our game mode determines these other blueprints that our project is using
most prominently, the player class and
our default pawn class. Note that these are the
exact same that we can find here in our project
settings third person game mode, that is determining
our pawn class. And our player controller. Now our player controller, which I have opened right here, this is what is adding
the Hud to the viewport. So right now when we are playing our game and we load up
in our main menu level, our project is applying this third person game
mode to this level. And that in turn is
determining that our player controller
is being used as well as this
default pawn class. Because our player
controller is being used, that is what is
displaying our hood. We simply don't want that
to show. So what can we do? Well, there is a
very simple solution here and that is to simply create a brand new game mode for just this particular
level to use. So essentially, I can
override the game mode from our project settings right
here in this particular level. Our level main menu. And I can do that via
the World Settings. Now if you don't see
this World Settings tab, if you come under Settings, you can go to World
Settings alternatively. Window World Settings,
that can also turn on this panel with our World
Settings right over here. We can override our game mode being used for just this world. Just this level, world and level are used
interchangeably here. So I'll go ahead and create
a brand new game mode. And I can do that, I could write click in some empty space
here in the content browser. But I can also do it straight away from this
World Settings tab. So I'll go to game mode. Click this plus button
right here to create a brand new game mode blueprint. And I'll simply choose a
place I'd like to say this. Let me go and say this into my Blueprints Frameworks folder. And I'm going to call this
my BP game mode Main menu. Then I'll click Save.
Once again it is the Gamo blueprint that's
going to determine all the other various blueprints
that we're using here. Now our player
controller class was defaulted to simply
player controller. This is different from
our project settings, which is using our customized
player controller. So this one is not using
our BP player controller. As you can see, it's just the
default player controller. We don't have any
code inside of here. So now if I was to
simply play our game, we don't see the Hud anymore
on screen because we created a brand new game mode that is not utilizing our custom
made player controller. That is telling our Hud
to appear on the screen. We are overriding
the game mode from our project settings so
that problems fixed. Next, let's go ahead
and make it so that our main menu interface
is actually functional. To do that, we're
going to go into our platform UI folder. Find our main menu, double click on that to open it up if you don't
already have it open. And here we're
going to go over to the graph tab over on
the right hand side. The graph tab is where
you can go to write some script that is specific to this particular
widget, blueprint. Now it's got some event nodes
here we could build off of. But I don't actually
want any of these, so I'm just going
to delete them out. Now note over in the my blueprint panel
we have button play. This is referencing
that button widget back in our designer tab, our button play right here. Note that with this widget
selected in the details panel, this check box was automatically
checked for is variable. That is enabling
this to appear under the variable section in
the my blueprint panel. Now with this
selected, we can add an event for this
particular widget. And we do want to add
one for on click. So we've got this plus
button right here. If you click this, it'll add an event for when we
click on that button. That is, we select it with
our mouse cursor here. So what do we want to
do? Well, I'm going to add a slight bit of
a delay because I don't want to jump into our level immediately
after clicking this. So I'm going to hold down
the D key and left click. I'm simply going to delay for, we'll say half a second. And then I'm going to drag off this type in open level by name. And what's the level
that I want to open up? Well, if I go back to
my levels right here, that is the level
I want to open up. Lv, underscore one. If
I right click on that, rename it, I'm just going to
hit control C to copy that. Then go into my
main menu widget. Go in here, control
V to paste that. That is all the script we need to actually make
that functional. Let me just click save here. Now if I was to
jump in and play. All right, all of our
script is worked in there. Even little background music. If I click on my Lets button, we have a small delay. And then into our game we go. All right, so now we have
a functional main menu. Once again, we set up an empty level inside
of our empty level. We went into the level
blueprint and set up some script to display our main menu to show
the mouse cursor. We're also playing a little
bit of background music. And then we also set it up
so that we are overriding our game mode blueprint
here in the world setting so that our game
hood is not showing. And then lastly, in
our main menu widget, we simply added a little bit of script for our button here, because our button is
set to be a variable. With that, we simply add an
event for when we click it. We're going to delay and
then we're going to open up the appropriate level job. Well done guys.
Let's go ahead and file save all that'll,
do it off for this one. We will see you in the next one.
100. Main Menu Widget Anims: Welcome back. In this video, we are going to add a
little bit of jazz to our main menu by showing how
to animate various widgets. Now the concept shown for our main menu could be
applied to your hut as well. Let's get right to it. So to animate any of the
elements in your main menu here, that is to scale it, to rotate it, to
have it fade in. Any of that kind of stuff, we need to bring on our
animations window that can be done here inside
of our WBP main menu. Go ahead and click
window at the top. And right here we've got this animations window
that is not on. Let's turn it on. That'll put an animation panel
at the very bottom. Okay. The way this is
going to work is we're going to create a
named animation. We're going to tell
various elements of our screen here to animate
and then via some script, we're going to tell
this animation to play. So let's create our
named animation by clicking on this green
plus animation button. I will simply call this
intro press Enter. Now with this
animation selected, essentially what I
want to do is have our play button start off
the edge of the screen here. And then animate on
that, is to slide on in. So make sure you've
got that selected, because I want this to
start off the screen, I'm going to set a new
relative position x here. So I'm going to set
this from negative 115 to 600 and press Enter. How did I arrive at that number? Well, that was just
through a lot of trial and error prior to
shooting this video. So 600, it's going to start off the edge
of my screen here. Now note any property about
this button widget that we would like to change over
time via our animation. Here you can see that denoted in the details panel with this little diamond with
the plus button on it. So we can add key frames for
these various properties. And there's more down here
that you can change as well. You can add those
to your time line by simply clicking on these. So I want to change the position x here of
my button over time. So I'm going to go ahead
and click right here. Add a key frame for this
property in my animation. So there it is. I
just clicked on that. And now we can see our button, our canvas panel
slot, our offsets. Now this is where things
get a little bit tricky. Button play, button play, canvas panel slot, Canvas
panel slot offsets. Okay, these are all
considered offsets, but not we clicked on
something called position X, but down here that is
technically our left offset. So there's a little bit
of a discrepancy between the labeling of these that can
confuse a lot of students. So note that that's the property that I
want to change here. It's currently at
a value of 600. That is going to be associated with our left offset right here. Okay, so at the zero second
mark in our timeline, this is where we want to
start our buttons position. Now if I kind of mouse
right down here, I can see as I mouse down here, I've got these two sort of clapboards denoting
the beginning and end of my animation. I want to pull this right one over to the right sum like so. Okay. And as you can see, this red line is going
along for the ride as well. This is going to denote
the end of my animation. So you can simply drag
that back and forth to make your animation longer
or shorter in duration. By the way, scroll wheel, holding down control
in the scroll wheel will shrink or expand
your time line. If you hold down the
right mouse button, you can pan left and right. Just some basic navigation note that once we pulled this back, we could see our lone
key frame there at the zero second mark
for our left offset. Again, that is our position x. Now I'm going to want this
animation to be fairly quick. So I'm going to pull the
end of this time line to the 0.25 second mark. Then I'm going to hold
down control and scroll wheel in just to expand
this out a little bit more. Now essentially I want this
button to move over in this direction over the
course of a quarter second. So I'm going to move my
time line slider all the way to the 0.25 second mark. And then I need to determine where I want to move this to. Well, I have determined a value that I'd like to have for
this is negative 115. So I can literally click right
here where it says left. I clicked where it
showed the number 600. I'm going to put in negative
115 and press Enter. So that's going to essentially denote the end of my animation. So now if I was to scrub
this back and forth, you can see how that's
going to move it over the course of
a quarter second. In fact, if I put my
time line slider right back at the beginning
here and then click Play, you can see how that's
going to slide on in. Now note that's going to be the only property
that I'm looking to change here with my button over the course of 0.25 seconds. But you could adjust
other properties with your button here as well. The color and opacity, the background color, all
those kinds of things. For some of these other
properties that you could possibly expand upon, you might have to click on some of these drop down triangles. So we could change the pivot, the shear angle, the scale,
all that kind of stuff. Could be done in this
same intro animation. All right, so we have
a named animation. And we are telling our button to do something in this
named animation. Now how do we actually
get this to trigger? Well, for this we need
to go to our graph tab, right up here.
Let's go over here. We've got this script
for click button, click on button,
launch new level. Now we want to add some script that's going to play
that animation. We had an event construct
out here before. Event construct is like the event begin play of
a widget, blueprint. I'm going to right click
and bring that back. And I'll just type in
there is event construct. That's the one we are
looking for Off of this, I'm going to delay
for just a short bit. So I'm going to hold down
the D key and left click, bring in a delay node. I'm going to delay
for 2 seconds. Then I'm also going to accompany this animation that I'm
about to play with a sound. I'll do a sound two D. The
sound I'd like to play is going to be called drop drop item from content browser that is
in the engine VR folders. If you don't see this, you can click this gear
icon right here. Make sure you show
engine content. That'll give you
access to that guy. Then what I want to do
is I want to bring in my animation so that I can talk to it and tell
it to play Well, in my designer tab, I've got
this animation called Intro. But over here in my graph
I don't see it anywhere. So how do I reference that? We right under the
variable section, if I come under animations, there is the name of that
animation that I just created. Intro, that is talking about this intro
animation right here. Let's bring that into our graph. Drag and drop it, we're
going to get that. And then if we drag off this, we can say play animation. And now we've got a lot of
control over this animation. From this function, we can tell it what time in the
animation we wanted to play. Let's play it from the beginning.
So we'll leave that at 0 seconds. Number
of loops to play. You can have this
play multiple loops. You could play this forward,
you could play backwards, or ping ponging it
back and forth. And you can also adjust the playback speed
right from here, so if you aren't happy
with that quarter second, you can extend it by having
a slower playback speed. Or speed it up. Okay, so that's going to be our
script for playing this animation 2 seconds after our main menu
comes into view. So let's go ahead and
compile that and save. Now if we play, check this
out, we see our main menu. But 2 seconds later, boom, there slides on our button. Okay, now I actually want to
add another animation here. Because I want to
make it so that when we hover over our button, it actually scales up
in size a little bit. So let's go ahead and add
another animation for this. Once again, I could go back to the designer tab and I'm going to create an
entirely new animation. So I'm going to click
on this plus animation and I'm going to call this my scale play button animation. Yeah, first I need to make
sure I select my animation. Then what is the thing
that I want to talk to? Once again, I'm going to be
scaling our play button, even though it's off the side
of the screen right here. It doesn't matter because
the intro animation is what's going to slide it on. I simply want to talk to this now what do I want
to change about this? I want to change
the scale for this. I'm going to scroll on
down in the details panel. I'm looking for the
render transform scale. Now I can expand
this out to scale just the x or the Y
aspect of this button, but I want to scale them both. If I simply come under
transform scale, click on this right here. That's going to
add a key frame to this down here in my time line. Let's expand this out scale. Now, if I was to come
down here in my timeline, I can see those two clapboards. I'm just going to
expand this out to about a tenth of a second here. That might be too short. Let me hold down
control and zoom on up. Okay, so over the
tenth of a second, and I can see those
two key frames right here for the scale
X and the scale Y. Now what I'm going to
do is I'm going to move my time line slider to the
tenth of a second mark. I'm going to add more
key frames for this. I could do it for X
and Y independently, but if I click this tiny, tiny plus button
where it says scale, that's going to add two
more key frames right at this marked time for
the x and the y value. I'm going to set
those both to be 1.11 0.1 Now as I'm changing these to 1.1 you can see how it's
scaling the button up. So you can see how this
is going to scale it up over the course of
this animation playing. Okay, once again, how
do I get this to play? Well, I'm going to go
back to my graph tab. Let's come on down here. I've got my button selected,
so check this out. I've got some events. When
we hover over the button, that is our mouse is over it, as well as when we uncover the button, our mouse
is not over it. So let's add events
for both of these. There's the first,
let me add in hover. There's our two events. I'm going to bring in
our new animation here, the scaling of the play
button. Let's get that. I'm going to drag off this
and type in play animation. When we hover over the button, we're going to have
to create a little bit of space down here. When we hover over the button, we want to play this
animation forward. Let me go ahead and
select this and do control D to duplicate that. When we uncover the button, make sure you plug this in as the animation to play
right down here as well. When we uncover the button, that is we are not
mousing on it. We want to set the
play mode in reverse. That is going to
be simple enough. Hover forward, hovered, reverse. Let's go ahead and compile
this and save and play. So 2 seconds in, our buttons
are going to slide in. Now when I mouse over, this button gets bigger. Unhover, it goes back
to its usual size. We can click on it,
launch the game, and there we go we have
some widget animations. Job well done guys. That's going to dude
off for this one. See you in the next one.
101. Main Menu Controller Interaction: All right, welcome
back everyone. Well, we now have a
functioning main menu. And we can click on
this let's go button once it slides into view in
order to launch our game. But as some of you have
undoubtedly noticed, we can't interact with this
button with a controller. So if you have a
physical, you know, Xbox controller hooked
up to your computer, you can't actually launch the game by pressing the button. So I thought I'd add one
more video here to show how we can interact with our
main menu with a controller. So first of all, make sure
you have a controller, like an Xbox controller, hooked up to your computer, and this is how we
can make that happen. Here I am inside of
my WBP main menu. I'm going to transition from our designer view over
to our graph view. What we need to do at the end of our event
construct here, this is where we're
delaying for 2 seconds. Then we're going to play a sound and animate on our intro widget. We're going to add two
nodes at the very end here. The first one we're
going to add is a reference to our play button. So let's go ahead and
drag and drop this in. We're going to get that, then we're going to drag off of
this and we're going to bring in a function
known as Set Focus. Set focus. Make sure we
wire this in like so. Now if I press the play button, you're going to
notice something. Now when our button slides in, we see this blue box
around our let's go button that is showing
that our controller now has focus on this button. And if I was to
press the button, I've got an Xbox
controller hooked up. It'll actually allow
me to click on that button and then
launch into the game. Now obviously you don't want to see that blue outline there when you're actually in an official shipped
version of the game. So how do we get rid of that? Well, to do that we're going to jump into
our project setting. So going back to my
main level editor here, I can access the
Project settings by coming under the Settings
option right here, Project Settings, or
by coming under Edit. Project Settings inside of here. Just do a search
for Render Focus. Currently we've got
this Render Focus rule, which is set to always. And that's what's making
that blue outline appear around this button when it animates on showing
that it has focus. So if I was to go back
into my project settings and changes from
always to say never, and then I'll jump
back in and play. Now on my button
slide into view. I don't see that blue outline, although I can still
press the button on my connected Xbox controller
and launch the game. Very good with that, Let's go ahead and
save this asset. I'm going to right
click on this and save. And guys that's going to
do it off for this one. We will see you in the next one.
102. Pause Menu Layout: Well, now that we've got a main menu created
for our game, wouldn't it be nice if
we created a pause menu? I think it would be. So
let's get right to it. I'm going to start off in
my U I folder right here. And once again, I'm going to right click in some empty space. User interface
widget, blueprint. We're going to choose this
widget right up at the top. And I will call this
new widget blueprint asset BP underscore menu. And then let's double click on this to open
it up right away. Now inside of here,
there's just going to be a few widgets that
we're going to add. Once again, we're going
to be starting off with a canvas panel. Canvas panel is going to
act like a tack board, a cork board with which
to pin other widgets too. So canvas panel is going
to be the first one. The second one we're going
to add here is going to be known as background blur. So we're going to be
essentially blurring out our game when we are overlaying our game
with our Paws menu. So I could drag that atop my canvas panel like so. Or
I could drag it out here. Let me just drag it on top
of my canvas panel here just to show another
way of doing things. I will go ahead and select our background
blur right away. And I'll go ahead and set an anchor for this over
in the details panel. This is going to be this
full screen anchor. Now these offsets are all going to be relative
to our full screen, because we want this
to be full screen. We don't want this
offset at all. We want offsets in left, right, top, bottom
to all be zero. So set offsets to be
zero all the way around. And now we've got
a background blur for our entire screen. Now for the amount of blur that is controlled by this
blur strength right here, you can fiddle with this once we get this showing up in our game. I found that a blur strength of five tends to be
just about right. Okay, Next I'm going to add
a button to our screen here. So coming under
the palette panel, let's drag a button
right on out here. And you can see that it attached it to my
background blur, which I didn't actually want. And it filled up my entire
screen because of it. So what I'm going to do is I'm going to drag and drop this back on top of my
canvas panel here. You see that outlined? And now I've essentially
nudged my button back on over, It's no longer attached
to my background blur. With this, I'm going
to go ahead and set some details for it right away. For starters, I
will name this in the details panel,
my Continue button. We're just going to
have one button that says Continue in our pause menu. Now we've changed the name
of that widget, the anchor. I will set the anchor to
be this middle square one. And that means the
position offsets are going to be relative
to that anchor. I'm going to set the
position x to be zero. The position y to be zero. And now if I zoom up on this, you can see how it's
kind of aligned to this upper left corner of
the button. Check this out. If I set my x
alignment here to be 0.5 it's essentially going
to half that x alignment. And same with the y
alignment right here. If I set that to be 0.5 as well, that's going to have
the y alignment, the up down alignment. So that's going to
be pretty good. Now I'm going to set the button
size right here in the X to be 450 in the Y. I'm going to set that to be 130. If I zoom on back, you get a sense as
to how big that button is going to
be on the screen. All right, next
let's go ahead and set our style for our button. This is going to be very
similar to what we set for our main menu here,
style normal. I'm going to set our width
here to be seven under style. With the rounding type, I'm going to change to
that half height radius. That's going to give it this pill shape that
I kind of like. That's going to be
my normal style. So the button, what it looks
like normally without us hovering over it or without us clicking on it. So I'm
going to collapse that. Now let's set the hover
state for this button. For this, once again
I'm going to set the width to be seven. The rounding type is also
going to be half height, radius, and the outline. I'm going to click right here. We're going to set this to
kind of that yellowish color. And I'll set the value, the alpha value to be 0.5 so that's going to be
halfway transparent like, so I'll go with that, that's looking pretty good. So that's going to be
our ver button style. Then let's go ahead and set
our pressed style for this. I'm going to set the width to
be ten, that rounding type. I'm going to set to half
height radius once again. And I'll leave that color. So I'll only be changing really the width here
of that outline. And then down below,
we've got our press. Sound And our hover.
Sound For hover. Sound Let's go ahead and
set this to our grab, grab, underscore VR, grab Q. Once again, that is in
the engine V R editor. Sound So if you don't have
access to that pathway, clicking on this gear icon showing engine content
should get you there. But there it is. My V R grab
cue I want for the hover. Sound The press Sound
I want is my coin. Mario coin. Oh, and
I almost forgot. I do want to set a
background color for this. So scrobling on down here with our continued
button selected, there's our background color. I wanted something kind of maroonish, something like that. Maybe a little bit darker, something like that
is pretty good. Not get to obsess
over it for now. Click Okay, Now we want to set some text on
top of this button. We can do that by dragging
here our text widget. I could drag it on top of this button or down
here in the hierarchy. If I drag down here
under the hierarchy, once I see continue button has been surrounded by
that blue outline, I can drag and drop this
right on top of this. And I can select this text
widget in the Details panel, I will call it
underscore Continue. If I scroll up in
the Details panel, the text right away, I
can set that to read. Continue. And for
the font family, again, I don't
like Roboto there. That's a little bit boring. So this is where those imported fonts
really come in handy. I'm going to set that to
my Mario 256 font style, kind of like that. I will set the font size
to be 45, my outline size, I'm going to set that to six, so I've got a little bit of
a black outline around that. I might have set that reddish color to be a little
bit too dark. It's a little bit hard
to see that outline. And again, if you want to
adjust your outline color, you can click right
there and adjust that. Then I want to nudge
this down in this button a little bit because
it's a little bit in towards the top of this. So I can nudge that by coming
under this padding section, right up at the top
of the details panel. I'm going to expand this out and for this I'm going to
set the left to be, I'm going to tab on
down to the top. I'm going to set that to be ten. And then for the right
and for the bottom. Al right. And I think that's
going to look pretty good. Yeah, that's decent
enough for me. With that, we will go
ahead and save it. We now have our
pause menu layout. In the next video,
we'll go ahead and create the input and
the script needed to get this to display on screen and make it interactable.
We'll see you there.
103. Pause Menu Script: Welcome back. In this video, our goal is to make it so that
we can pause our game and interact with our pause menu so that we can unpause the game. To do this, we're
going to start off by going to our third
person folder. Inside of here, we're going
to go in the input folder, we're going to create
an input action that is going to be responsible
for pausing our game. Let's go inside of
third person input. Let's go into our actions
folder inside of here. And I'm going to hold
down control and scroll. Wheel back to decrease the size of these
thumbnail images. That's a hot tip for
you right there. Can hold down
control and scroll. Wheel up and down to shrink
and enlarge those thumbnails. And I'm going to right
click in some empty space. We're going to come under
Input in our input menu. We're going to come
under Input Action. Now we're going to call
this a underscore pause. And then we're going
to double click on this guy to open it up. All right, so inside this asset, we are defining some
things about how this input action is
going to be triggered, as well as when it
can be triggered. So first of all,
let's set how this is going to be triggered
under the triggers area. Let's go ahead and move this over just a little bit so you can see what's associated with what our value type
is going to be, digital boole like
did it happen, did it not? Triggers right here. Let's click this plus button
and in our index zero, we're going to expand this down. And we want to trigger something when we press a given button. And it says right
here, it's going to trigger fires only once when input exceeds the
actuation threshold. Do we want to find out when a given button has been pressed? Now, this is very key. Don't miss this step. We want this to trigger also
when the game is pause. If you do not check this box, then when we go to
unpause the game, it will not work. Digital bull pressed for
the trigger and then trigger when pause set to
true, go ahead and save that. Now the next thing
we need to do is come back into our
character blueprint. This is a little bit of a review under our BP, third
person character. By scroll on back
and scroll back on up where we've got
our event begin. Play here. And right now we're splitting out
our event begin. Play for a sequence node. Right here is where we
have our mapping context. And this is what's
determining what inputs all work in our
game and which ones don't. And currently we are using this IMC default asset inside
of our character blueprint. Now I can navigate to
this by clicking on this magnifying glass.
And once again it's here. Inside of our third
person folders. And if I double
click on this asset, this may look familiar from
earlier in the course. This is where we are
essentially slotting in our various created
input actions. And then we are associating
buttons with them. So for example, when
we are pressing the key on our keyboard or
our gamepad face button left, that is what is initiating
our shot Fireball event. Okay, so we need to add a new mapping here
for our IA pause. We can do that by clicking
right up here under Mappings, this tiny plus button. For whatever reason, it expands
all these out once again, which is a little bit annoying, but it just created
this entry right here. So this is where we can slot
in our A pause, There it is. Now once again it does this thing where it
expands them all out. Again, we can associate some buttons with that
to pause the game. I want to make it so that
the key on our keyboard, as well as what would
be sort of that start button on a game pad, that those will pause the game, to set keys that can
initiate this event. I'm going to click
on this keyboard, that's going to turn it orange. Now I can just tap a
key on my keyboard. So I'm going to press the
key and there's the key. And then I'm going
to add another one for my controller input
to pause the game. So I'm going to click
this one more time. And of course it does
this annoying thing where it expands all these
categories open. And now I can slot in a second
input to pause the game. So I'm going to click
on this, now I've got an Xbox controller
hooked up to this. I'm going to press that
button that's right next to the X button on my
Xbox controller. So it's going to be known
as Gamepad Special. Right. That was
what was initially known as the Start button on
more traditional game pads. Okay, with these now associated, we can go ahead and save
this out and close it down. We can also close out of our BP, third person character as well. And also our Input Action
Pause asset as well. Okay, now to pause our game, I actually want to put
this script inside of our player controller blueprint because our character can die. We just want to put this
in a blueprint that's going to persist whether
our player is dead or not. So let's go ahead and find our player controller blueprint. And once again, if
you're not sure what player controller
blueprint you are using, you can find that in your Project Settings
by coming under Settings Project Settings
under Maps and Modes. We've got our default
game mode right there. And this is our Player Controller class BP
Player Controller. We can navigate to it right
there in the content browser. There it is in our platform
blueprint framework folder. Let's double click on
that guy to open it up. I'm going to scroll
wheel on back and find some empty space here. And I'll come right
on over here. So we need to find that input action event,
or that pause. So I'm going to right click
in some empty space and type in a underscore pause. And this is the one
I'm looking for, enhanced action event, A pause. It's got that arrow icon right next to it.
And there we go. This is talking to
our pause event that we just set up in our
input mapping context. So what do we want
to have happen? Well, when we start
by pressing the key, we'll fire out of this pin. I'm going to run this
through a branch node. You're going to see Y
here in just a bit. We're going to run
this through a branch. And the condition that we're
going to check here is whether or not we are
showing the mouse cursor. So I'm going to right click
in some empty space and type in show mouse cursor. We're going to get that now the showing of the mouse cursor. I'm just going to plug this
into the branch right away. This is a Boolean that exists here inside of our
player controller parent class. If I go to class
defaults and over in the details panel I
type in mouse cursor, There is my show
mouse cursor Boolean. So I'm going to be checking to see if we are
showing this or not. Now, the first
time we press say, the key, we will not be
showing the mouse cursor. It is false by default. So what do we want to do? So building off of
this false branch, we're going to create a widget. Well, which widget would
we like to create? Our pause menu. Obviously,
WBP pause menu. Now it's not enough
to create it. We also have to tell it
to add to the viewport. But before I do
that, I'm going to right click on this
pin right here. And I'm going to promote
our pause menu to a variable it just
created this setter. And over here in our, my Blueprint variable section, it's asking us to give
our variable a name. So I'll call this my pause menu. And then what I'm going to do is I'm going to take the output of this and say Add to Viewport. This is what's
actually going to add the pause menu to the Viewport. And then at the
very end of this, I'm going to drag off and
type in show mouse cursor. And this time I want to
set show mouse cursor. And here I'm going
to set it to true. So here's the idea. The first time we go
to pause our game, say by pressing the
key on our keyboard, by default it's
going to be false. So we're going to
run through here, we're going to show
our pause menu. And then we're
going to say, yeah, we are now showing
the pause menu, so that if we try to
press the key again, we're going to then fire
out of the true branch. Thus, we're only going to end up creating one
of these pause menu. We're not going to accidentally create a second instance of it. All right, but we're
not finished yet. After we show toggle this set, show mouse cursor to true. What I want to do is I
want to play a sound. So play a sound, two D, clicking on this drop down, I'm going to type in pause. I've got this Mario
pause sound effect. And then this is
the real kicker. I'm going to drag off this
and type in game pause. There is a function
for set game pause and this is what's actually
going to pause the game. Once you check that box, very important, You
check that box. Okay, great. So that will
actually pause the game. How do we pause it
with that same input? Well, remember this is going
to flip this to true the first time we press the key or that start
button on our controller. So the second time we
try to press this, again, we're going to run
through the true branch. So what we can do
here is bring in a reference to our pause menu.
We're going to get that. Remember we created that
pause menu right here. And then we're going
to drag off this and say Remove Parents. Remove from Parent. This is essentially going to remove that pause
menu from the screen. This is how you remove a
given widget from the screen. You get a reference
to it, and you tell it to be removed from parent. Once it's removed,
what I want to do, I type in show mouse cursor once again and we're going to say no, we're no longer showing
our mouse cursor. So the next time we
press the key again, it'll evaluate default so
we can recreate it again. Let's also play sound
to D. Play Sound Tot. We'll play that same pause Sound because we're unpausing
our game right here. And then we will drag
out set set game pause, and this time make sure
that it is unchecked. So that's going to
be our final pause and unpause script right there. If you want to pause the video right here
to evaluate that, trying to frame that
up as best I can. All right, let's go
ahead and compile and save this right away. And just give us a quick test. So jumping in and playing. All right, so here I am.
I'm just going to tap that key on my keyboard key. I see the pause menu show up. I'm going to tap the key again. Pause. Great. I'm going to
try it on my controller here. So I'm going to press that, what is known as
the Start button on the classic controller
that's pausing it. Pause it by the way, you can even mix and
match that time. I pause on my
controller and I press the key on my keyboard
to pause the game. Now that's all well and good. However, currently this
button is not interactive. Let's make this
interactive as well. So that we can also un pause the game by clicking
on Continuum. All right, to do that
we're going to hop out of our BP player controller. We're going to go back
to our BP pause menu. We're going to go
over to the graph tab over on the right hand side, right over in the my
blueprint variable section, there is a reference to
our continue button. All we need to do is come on down under the details panel
where it says on click. Let's add an event for this.
So I'm going to click on this plus button and
simply drag off of this, we're going to say
remove from Parents. This will essentially remove ourselves from the screen
if we're on the screen. And then we're going
to right click, get player controller. I'm going to drag off of
this and say mouse cursor. I'm going to set
show mouse cursor. We're going to ensure
that our mouse cursor is no longer seen. We will then play Sound two D. I'm sure you can
guess which sound we would like to play that pause. Sound And then to finish
this off set game pause. We will set that to that I
was going to say untrue, which also equates to false. So make sure that that is false. Let's compile this and save it. And then jumping in and playing. I will tap that key
on my keyboard. My mouse cursor is up. I can now click on
this Continue button. Continue. And it un pauses the game and away we go. Pause. Unpause. Job. Well done guys. We have a functioning
pause menu, guys, that'll do it
all for this one. See you in the next one.
104. BONUS - Player Sprint: All right, welcome back. A bonus video for you all on this one, I'm going to show
you how you can add a sprint mechanic to your game. And to start off with,
I'm going to be in my third person input
actions folder. This directory right here, and we're going to create
a new input action. Let's go ahead and right
click in some empty space. We're going to come under
input input action. That's the asset we're
looking to create. A underscore sprint is what
I'm going to call this guy. And there's nothing inside
of here I need to set, so I'm going to click
on this and save now I need to add this event inside of my input mapping context. And once again, to understand what input mapping
context we are using, we can go inside of our
character blueprint. There's my BP, third
person character. That's the one I'm
using for this course in here off of your
event begin play. And I've got a sequence
to note right up there. We've got our mapping context. This is the list of input events that our
game is using currently. And if I click on this
browsers and content browser, I can see it is this one
right here, my IMC default. So I'm going to double click
on this to open it up. And now I need to add that a
sprint event inside of here. To do that, I need
to click under this plus button for Mappings. That's going to create this
entry right down here. And now all I need to do
is just slot in my sprint, that input action
I just created. Now all I need to do,
and for whatever reason it keeps doing this
sort of weird effect, I need to associate
some buttons for this. So how do I want to make
my character sprint? Well, I will click on
this keyboard and I'll say the left shift
key will do that. I'm going to click
on this again. It's going to do
this weird thing, and I'm going to click
on this keyboard. And I'll say the right shift
key can do this as well. And then for controller
users out there, I'm going to click on this
plus button one more time. And I will also say
that if I hold down, I'll say it's the X key on my Xbox controller that is known as Gamepad
face button left. That that'll trigger
this as well. Okay, with this added to my input mapping
context asset here, let's go ahead and save that. And now we can go back inside of our third person character. And I'm going to zoom
back on in here. And I think I will put this bit of script that
I'm about to write. It's going to be pretty short. I'll put it right next
to my jump input here. So I'm just going to pan
over here a little bit. I'm going to click in
some empty space and do a search for a sprint. It's that one with the
arrow right next to it. There's my action event, zooming up on this a little bit. What I want to do
is I want to talk to my character
movement component. Because our character
movement component within here is our max walk speed that's currently set to be 1,000 This is what's determining how
fast our character can go. I'm going to drag this in,
then I'm going to drag off of this and say set walk speed. I'm going to want to set
this to a new speed when we start initiating
this action as well. Let me just do control plus
D to duplicate this node, as well as when we
complete this action. That is in our case, holding down one of
the shift keys or the X button on our
Xbox controller. What do I want the
new max walk speed to be when I
initiate this event? Well, I think I'll set
it and this is actually going to involve me resetting
my default movement speed. Currently my default max
walk speed is set to be 1,000 I'm going to set
this to be something like, we'll say 650 when
I am not sprinting. And then I'll say
when I am sprinting, I'm going to set this to be, we'll say 1,200 Then because I set this back to 650 by default on my character
movement component, I'll say that when we
are not sprinting, when we've completed holding
down our sprint button, that's the X button
on an Xbox controller or the left or right shift key. I'm going to set this
back to that 650 value. That should do it. So
let's go ahead and compile here to make sure that our script is looking good. And save then jumping
in and playing. Let's give this a play. And if I just move
back and forth, now I'm going at a slower speed. Now if I hold down
the shift key, you can see that
I'm motoring along. And if I release this shift key, I go back to a slower speed. That is how we can add a
sprint mechanic to our game. Hope you guys like
that one guys. That'll do it off for this one. See you win the next one.
105. BONUS - Fire Flower Time Dilation: All right, another bonus
video for all here. I want to make it so that when our character collects
the fire flower, but there's a little
bit of a slowdown in time as opposed
to our character just running through
that fire flower and immediately just
getting bigger. I want to sell that effect a little bit better.
So how can we do that? Well, for this we
can use something called global time dilation. That's a way to slow down time. This can be done in our third person
character, blueprint. If you forgot where that is, third person blueprints, there's our third
person character. Let's open this guy
up inside of here. I want to go to the
section of script where our character collected
the fire flower. This got flower power. Now what we're going
to do is as soon as this custom
event is triggered, we're going to drag off of
here and we're going to set global time dilation. And again, this is what
can slow down time. A value of 0.0 would
mean time is stopped. 1.0 means 100% our usual time. A value of 0.5 would mean cutting our flow
of time in half. I'm going to set our
time dilation here to be 0.2 and then we're going to
do all this stuff right here. When we are done with the whole character growth
effect, this is important. I want to set our
global time dilation to be back to the
usual flow of time. So what I can do here is
off of this finish pin, I'm going to drag off and say
set global time dilation. Yeah, make sure it is
coming off the finished of our timeline and then going into our switch on
timeline direction. Here we're going to set our
time back to the usual time, which is going to be 1.0
That's all well and good. There's one more thing I want to do is that here inside
of our time line, I'm going to double
click on this node. Inside of here, we've got
these buttons along the top. And this one right here
is ignore time dilation. So we want to ignore time dilation while this
effect is going on. So I'm going to turn this on, and when it's on and
it will be blue here, then we can test this
whole effect out. So let me just go back to
our event graph once again, at the very beginning of
getting the flower power, we're going to slow down time. We're going to
ignore that effect for our characters growth. And then once this
timeline is finished, we're going to set that time
back to its usual flow. Let's compile this and save, And jump in and play. And here we go. I'm
going to hold down the shift key to use
my new sprint powers. And let me just stomp
on this goomba here. Get rid of him really quick. Al right, and now watch what happens when I
collect this fire flower. A little bit of a
slow time and then back to our usual flow of time. All right guys, that's gonna
do it off for this one. We'll see you in the next one.
 Greg Wondra, Unreal Authorized Instructor