Transcripts
1. Mini Map Promo / Primer: Welcome. In this beginner
game development course, you'll learn how to
create and display a mini-map in
Unreal Engine five. No coating or Unreal
Engine experience needed. Hi, my name is Greg sandra, a 12-year industry veteran
who has been teaching game development using
Unreal since 2016. By the end of this course, you'll have a highly
customizable minimap. They can be implemented in just about any project type
you can think of. First or third person racing
top-down, you name it. This course is for everyone from the youngest Byron game designer
to the season industry. We start from the
very beginning, assuming you know nothing. But by the end of this course will serve as a
valuable resource. You can reference
time and again. So come on, join the thousands of satisfied
students who have started their game development
journey with me in this simple to follow and
implement course.
2. Mini Map Assets: Alright, we're gonna get
started here by creating a brand new project inside of the Epic Games launch or just so any newbies out there
can follow along. Those of you that are veterans
of the engine can feel free to add this to
an existing project. Also, those of you that
are veterans can feel free to jump ahead
in this video to the point where you see
that I've got the engine open for newbies out there
in the Epic Games launcher, you're going to come under
Unreal Engine library. You want to launch the latest
version of the engine, which as of today is a 5.1. Clicking this Launch button, you will eventually be presented with a screen that
looks like this. This is the Unreal
Project Browser. We want to choose games
along the left-hand side. Now we get to decide what type
of template we would like. Now, truth be told you could really choose just
about any of these. First and third person,
our most common, I'm going to start off
with a third-person. I'll add some
first-person content. But this should work with
top-down vehicle is well, pretty much any projects. So we're gonna go
third-person blueprint. All these settings
are just fine. I'm going to call my
project name mini map and we will create you can
also set a project location. Where do you want to
save your project files? And wallah, here we are
in Unreal Engine five. I am going to be using the third person map
for this course. However, any map
will do just fine. We're gonna get
started here down in the Content Browser by creating a brand new folder
because we're gonna be importing some acids
here in just a second. So I'm going to right-click
on my content folder. I'm going to create
a brand new folder. I will call this a mini map. Press Enter. And inside of this empty folder, I've got some files here
that I have downloaded. You should be able to find these downloaded acids
attached to the course. There's just three of them. I'm going to extract
this folder right here. Yes, we will extract
it right there. And the three files that
we're gonna be looking to import our three PNG files. So to import these, I'm simply going to select them. Select, I'm going to hold down Shift select to select them all. And I'm going to drag
and drop them from File Explorer down here into
my Content Browser folder. Wallah, there they are. Import is done. Now this one is looking
a little ugly here. So those of you that
have some ADD, whatever, it's really driving me crazy, you can click on this, change the texture
group here to be UI. Save that out. And suddenly everything
will be better. Alright, let's go
ahead and save these. All right away, save them. We will be using those assets in a little
while to create our minimap, but we also need to create another asset here
in our folder. So I'm going to right-click
in and right-click menu. I'm going to come
under the texture is option and then the
little fly-out menu, I want to create a render target asset and you'll see what that's used for
here in just a moment. It render target. I'm gonna give this a name
right away and call this R t, short for render target
underscore, mini map. Target. Target gets, there we go. And the reason we created that asset is because
we're going to be associating that with a
scene captured two ds it, we're gonna be adding
it next to our level. Now to find this scene
captured 2D asset, I'm going to come under
my place actors panel. Now I have this open by default because I set up my
editor that way. However, if you don't see
this place actors panel, you can get it by
coming under here. Place actors panel that
will bring this on. And then in my little
search bar right here, I'm going to search for scene. And there is a
scene captured 2D. I'm going to drag this in. I'm going to fine tune the placement here in
just a little bit. However, I am going to place
it close to my players. Start actor, that controller
icon with the flag there. Now before I place any of this, I'm going to simply come into a top-down view
of my level here, because we're going
to choose that. I'm going to choose this
top orthographic view because I want this up
top here to be north, north, east, south, west. It makes sense in my mind
to frame it that way. So what I'm gonna be doing
is I'm going to rotate my players start actor so that he's gonna be facing
North at blue arrow indicates the direction that our character is going to
spawn in and be facing it. So that's gonna be north for me. Because I'm going to have a mini-map that's
gonna be facing north. Doesn't really matter
where I places. However, I do want my
render target here, my scene capture 2D. Rather, not my render target, to be placed directly above
this and pointing down edit. Now, I'm gonna go back to
my perspective view here. I'm going to raise this up, but I'm also going
to pivot it around. So it's gonna be pivoted
like this and like this. And I want to place
this directly above where my player is
going to be spawning in it. Now in order to get
these coordinates right, I wanna make sure
that my x values align with my players
start actor here. So for the x and
y and z location, That's what I've got for
my player start actor. I'm simply going to
right-click on this and copy these coordinates for
the player start actor. I'm going to select my
scene captured 2D and a momentarily I'm going to paste them so they will
be the exact same. So it is directly on top
of my players start actor. And then I'm going to add
some to my z-axis so that it is looking down currently
instead of value of about 92. So I'm going to add, I
will say 2,592 to 2,592. So it's gonna be facing
straight down There it is. Now we created a render
target asset right here. We're going to be associating
that with our scene, capture a 2D actors. So note that this is selected. And what I can do
now is with that selected in the Details panel is looking for a texture target. Let's drag and drop
our minimap target, our render target
right on top of that. And now it is
associated with that. So essentially what
is going to be happening here is
anything or seeing capture 2D sees it's going to be rendering that to
our texture targets. That's the layman's
version of it. Alright, next, in our
minimap folder here, I'm going to right-click
and create another asset. This is going to be a material. We're going to call this m
underscore many map targets. Then we're going to
double-click on this to open it up right away. Do a little work inside of here. I'm going to dock
this along the top. And width are a master material
node selected over here. Over along the left-hand side, I'm going to change
the material domains to be user-interface. Then I'm also going to change the blend mode right
here to be masked. You'll see why here
in just a second. Alright, then I'm
going to be adding to texture sample nodes. So to get a texture sample note, I could right-click and search
for a texture sample node. However, I'm going
to hold down the T, T's and texture and left-click
once, left-click twice. And now I need to associate
some textures inside of here. Or this first
texture sample node, I'm going to be associating
our render target. So if I click this
drop-down menu, I just searched
for RT underscore. There is our render target. I'm going to plug this
into the final color. And for the texture
sample down here, I'm going to be associating are imported t underscore mini map. Like so. Now what I'm gonna be doing is taking the a value out of this, the alpha value and plugging
this into the opacity mask. Currently, our material
looks like this. It is rendering what that
scene capture 2D sees and is simply pasting it right here on this cube
shaped object right? Now, what this extra sample
is going to do is we're going to mask it with
this texture sample. Imagine this is like
a piece of paper and this white area is the cutout
area that is essentially going to be laying this
piece of paper on top of this so that all we see is what we see through
this Whitehall. And you're going to see
this here in just a moment. Once I plugged this a value
into the opacity mask. There we go. Next, we're going to save
this and close this out. We're off to a
pretty good start. You're creating our minimap. In the next video, we're
going to be creating a mini-map Widget Blueprint
will see you there.
3. Mini Map Widget Blueprint: Alright, welcome
back. In this video or goals to create a mini-map Widget Blueprint
that we ultimately want to display in game. So here in our minimap folder, let's go ahead and right-click. We want to create a
user interface widget, blueprint asset. In this dialog box is asking
us to pick a route with it. We're going to choose
a user widget. Let's give this a name. We will call this WB P for Widget Blueprint
underscore Min Ni map. Then I'm gonna go ahead
and double-click on this right away to open it up. Duck it along the top here. I'm just going to be adding three widgets to our
designer view here. The first I'm going to
add is a canvas panel. It canvas panel I like
to think of as like a giant cork board that you can pin other various widgets
to drag and drop it here. And then we're going to
add two image widgets. Those are found in
the common section. So I'm just going
to simply drag and drop one here on top
of our canvas panel. Again, it's kinda like
a giant cork board, so we're just kind of tacking it right onto that
giant cork board. Now right away, I'm going to
set some details for this. So with this widget selected
over in the Details panel, I'm going to call this image underscore mini map material. Always a good idea to name
them something sensical. Now I'm going to set the
anchor point that is which portion of the screen I would like to try
anchoring it to. Currently it's in
this upper left area of this little flowery icon. I'm going to set the
anchor points to be this upper right
corner, like so. And then that is
important because these positional
coordinates are going to be relative to that anchor point. Position x here is going
to be negative 35. The position y we're
going to set to be 35, going to set the size for
the x and the y to be 35350. Now it's still off the
edge of the screen here, this canvas panel area
represents the screen. Now that's all going
to change here when I set the alignment, the alignment here
to be one instead. So if I set this to be 0.5, that would essentially
split the difference between where it was. One is going to essentially
justify it right over there. Okay, so I want the superior, the upper right
portion of the screen. That's all well and good. Now I also want to set under the appearance brush section. I want to set that material I just created in the last video. That was my material
named M underscore, mini map, target, wallah, that looks pretty good, right? I'd like to add a border
around this as well. So what I'm gonna
do is I'm going to create essentially a
duplicate of this image. I can right-click on
this and duplicate it. Now I'm going to rename this something a little
bit more sensical. So I'm going to call
this a mini-map regime because we're going
to add a frame around this. Let's see what do I have
for sitting through this? I'm going to set the anchor for this to also be the
upper right leg. So we're going to set the
position x to be zero. Position y is also
going to be zero. The size is going to
be for 20 by 420. Your alignment here
is gonna be 1.0. However, the image I'm
going to change to be t underscore mini map frame. Why lasts something like that? Alright, so that's all I wanted
to achieve in this video. Let's go ahead and save this out right away and then we
can close this out. In the next video, we're
gonna go ahead and get that mini-map displaying,
will see you there.
4. Mini Map Display: Welcome back everybody.
In this video, our goal is to get our minimap
displaying on the screen. Now, before we dive into this, I noticed in our last video
that our minimap was not oriented right inside
of our w BP minimap. I made some adjustments
to our scene captured 2D between videos
here so that it would be reflected properly
inside of our Minimap. If you look at our
level here are players. Start actor is placed
right about here with our blue arrow pointed north. So this was the top
part of our map. If we're looking
kinda like this, we've got this mini ramp
in this cylinder here. So I wanted that to be reflected here in our
mini-maps so that, that was the top part
that we saw right there. Now to do that, go ahead and select your
scene captured 2D and make sure that your
rotational values match mine. That was a little bit off. So I've got negative 45 and
negative 90 and negative 45. So that should be
reflected properly. Alright, let's go ahead and get this minimap displaying
in our screen. So to do this, we're gonna do this inside of our
level blueprint. The Level Blueprint is
where you can write script specific to this level. So to do that, I'm going
to come right here. Click right up here,
open Level Blueprint. And inside of here you're
going to see some nodes. By default, I'm gonna be
working with just a couple of event knows that I
deleted prior to this video. Those are Event Begin Play. You can bring that
on by holding down the P key and left-click
if you got rid of it. And all I'm gonna do offer
this is drying out and type in create widget. This will create the widget
object we're looking for. Specifically, we are looking
for the minimap widget. And then if we drag off of
this return value here, we can then type in
Add to Viewport. And this is what is
actually going to make this appear in our game. So if I was to click
Play right now, boom, there it is. And it looks like that is being reflected
properly right up here. However, if I was
to move around, you're going to
notice a problem. And that is that we're not really following
our character too well, like we can run our character right off as
mini-map and that's, that's not very helpful at all. So we needed to write a little
bit more script to update the position of
our scene captured 2D to be following our
player character around. So to do this, we're going to right-click and do this
off of event tick, tick fires off, reframe. And now I need a reference
to my scene captured 2D. So I'm going to come
back here into my level. I'm going to select
our scene captured 2D, either in the outliner
or in your level itself, easier for me to select it
here and my outliner with this selected here in my Level Blueprint, I'm
going to hold down the R. R is in reference, left-click. And what I wanna do is I want to drag off
of this and type in set actor locally cation. We want to update our actors
location every frame. Now what do we want
to update this to? Well, we want to update it to the position of our character
only offset a little bit. So I'm going to right-click
and some empty space type in git player character. We're going to drag
off of this and we're gonna get actor location. Now, if I was to just plug
this straight away and here this is going to bring about
a little bit of a problem. So if I click Play right there, you can see we're
essentially right in the middle of our character and that's not helpful at all, right, so we want to
offset that a little bit. So I'm going to break
this wire by holding down the Alt key and left clicking. And I'm going to
drag off this and bringing a plus button. We want to add a
little offset to this. Now, I know that I placed
my scene captured 2D, roughly 2,500 above my
player start actor. That was really more representative
than anything because we're gonna be
truly setting that offset here in our script. I place it right above to
approximate the location. But about 2,500 above our player started
actors where I truly want to be placing this. So right here, we're going
to add 2,500 in the z-axis, not offsetting our
X or Y at all. So now if I plug that into the new location of
our scene capture 2D, I'm going to compile
this just to make sure our script is good to go. You could pause the video
here to review the script. And now if I click Play, you can see my character
very tiny right there. It is facing north. And as I move around, you can see the mini-map
is updating as well. It's following our character. Great. In the next video, we are going to begin creating some enemy and
Player icon widgets. So we'll see you
in the next video.
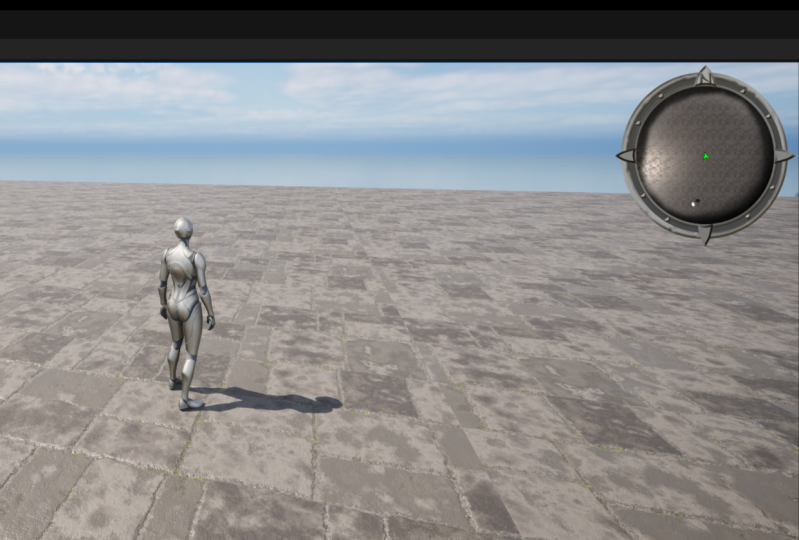
5. Player & Enemy Icon Widget Blueprints: Welcome. This is what we've currently got going
on at the moment. We do have a functional
minimap in the upper-right. And we can in fact see our
ThirdPersonCharacter running around that mini-map
from a top down view. And this is fine if
that's all you want. However, many mini-maps
represent things using icons. So let's make some icons that will eventually
appear within the minimap. Now, we're gonna be adding
icons for our player. And we'll add some for a quote-unquote enemy
character as well, even though our enemy is not
going to be doing anything. But this system
will be extendable. The way of that we're
gonna go about doing this. So you can add icons
for treasure chests, for doors, for waypoints, just about anything
that you can think of. In this video, our goal
is simply going to be to create the widget blueprints for the enemy and player icons. And then the next video, we'll get them to actually
appear in that mini-map. Alright, so what do we need
to do to get started here? Come on down to your content browser in
your minimap fuller, I'm going to right-click. We're going to go under User
Interface, Widget Blueprint. And we're going to choose the user class,
user widget class. And I'm going to call this
WB P underscore player icon. And I'm going to double-click on this right away to open this up, I'll dock it right
along the top here. And I'm simply going
to add a canvas panel. I'll do a search for
canvas panel that is under the panel
category here, drag and drop it. And then I'm going to exit
out here and I'm going to add an image drag and drop that
right down here as well. And I'm going to call my
image image underscore icon. And then in our brush area, I'm going to simply slot in
our t underscore player icon. Now I need to size this and position this a little
bit more accurately here. So let's jump back up to the top of the
Details panel here. Let's set our anchor
to be the smack dab, middle of the screen here, this middle square, if you will. And that's gonna be important
because our position is going to be relative
to that anchor points. I'm going to set the
exposition to be zero and the y
position to be zero. I'm going to set the
size to be 200.200. I thought that seemed
like a pretty good value. Now, as we get these icons appearing
within our mini-maps, note that these two, the size x and size, Why are some parameters you may want to
fiddle around with to change the size of that icon when it does
appear in our minimap. Just thought I'd
throw that out there. Alignment, we're
gonna go 0.5 and 0.52 halves these
it in the x and y, the x and the y, so that it appears smack dab in the middle of our
canvas panel here. Now because this icon is meant
to represent our player, I'm going to give this icon a tint right here under
the appearance section. Click on this color bar, and I'm gonna change this to
some prominent green color. We'll go straight 1010
for the RGB value. That'll be fine with me. Green for the good guy, right? Then let's go ahead
and save this. And now jump back to our third-person map tab here to jump back to
the content browser. And now super simple
to make an enemy icon, all we need to do is right-click
on our WPP player icon. We're going to duplicate it. Control plus d is
the hotkey for that. And I'm simply going to
call this W BP enemy icon. I'm going to double-click
on this to open it up. Now, we do have a
canvas panel and an icon widget already here because we duplicated this
from the player icon. The only thing that I'm
going to change this, I'm going to select
our image here. And instead of this being green, we're gonna change this to red. Let's change our r value to one. And the G and B all
the way down straight red because red equals
bad guy, right? Alright, go ahead
and save this out. And that is all we wanted
to accomplish in this one. So in the next video,
we're going to get these to display within our minimap. See you there.
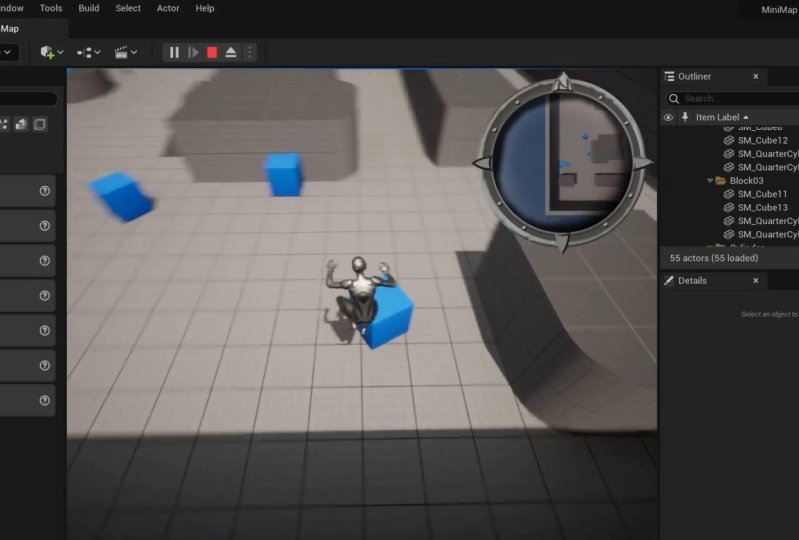
6. Player & Enemy Icon Display: Alright, welcome back.
In the last video, we created some icons for our player and our enemy,
those widget blueprints. In this video, our
goal is to simply get those displaying
in our minimap. Now to do this, we're
going to jump out of our minimap folder and into
our third person folder, specifically the
Blueprints folder within that third person folder, double-click under BP
ThirdPersonCharacter, that is the character
we have been controlling in our level here. Now, inside of here,
all we need to do, I'm going to select my
viewport tab up here is add a single component. Now, our capsule component
is the root component. And so with this
components selected, we want to add a widget
component to it. Now, it's important
to note that I selected are capsule
component here first because a common mistake that
I see students making when they are trying to add components within a blueprint, is that the component will
be added to that is attached to any other component that
they have selected first. So I want to make note here that the widget component that
we just added here is indented one layer under our capsule components
to show that it is attached to our
counseling component. Now this is going to
be important because obviously as we move our
character about the level, that character is
going to not only move but rotate as well by attaching this
widget component right here to our
Capsule Component, it will ensure that that moves
and rotates along with it. Alright, with this widget
components selected over in the Details panel
under widget class, we want to slot in
our W bp player icon that is going to associate that icon Widget Blueprint
with our character. Now a couple of other things I want to change here
is I want to change the rotation of this so that this widget is
going to be facing our scene captured
2D so that it's essentially flat when
we're looking down at it. And in order to do this, we need to change our
rotation here to be 180 by 90 by zero. Now I determined
this ahead of time. So if you're wondering
how I got those values, it was simply a trial and error. Okay, and with that, we're not finished here. Scroll down until
you find a section called rendering right here, because there's a couple
of things we need to change in here as well. We're going to change
the blend mode of this from masked to transparent. Now this will make it so that our widget class or our icon here will not cast a
shadow in our Minimap, which is something that
you don't want it, It's a little bit weird
if it's casting a shadow. Something else we wanna
do is come on into the rendering advanced section. And in here we're looking for visible in seeing
capture only where the visible and
seen capture only visible there it is visible
in scene capture only. What this will do is
it will ensure that the icon does show
up in our scene. Capture 2D are mini-map, but will not show up
in the game itself. Alright, let's go ahead and save this and play and try this out. And I am expecting
something else to be a problem yet that we're
going to need to fix up next. But let's just see
what we have going on. Right now. You can see a green arrow
in our minimap there. Are seeing capture 2D
is rather far away. So I think I'm going to change either the size of
that arrow or the, how far away are
seeing capture 2D is. But you can see we are now
represented by green arrow. And as I rotate, it rotates along with it. Now it's very hard to see from our minimap here because that seemed capture
is way up high. But our player's head
is actually appearing as a dot through
that green arrow. So I actually want to hide out our character from
our minimap here. Now the way that we can hide out our character mesh right here is by coming under
our event graph. And we're going to add
a little bit of script. I'm going to find
some empty space. I'm just holding down the
right mouse button right now, I'm going to zoom in
with the scroll wheel. I'm going to hold
down the P key, P as in Paul. Left-click. And I'm trying to add
an event begin play, but that hotkey is not working. So let me just right-click
and do Event Begin Play. And that's because
it's already hooked up to our add input mapping. That's fine. I am going to simply bring
in a sequence note here in order to have a couple of things execute off of our
event begin play. So I'm gonna hold
down the S key. And that brings in a sequence. So, so often begin play, we can do all this input mapping that is new and
Unreal Engine 5.1. And then what also I can
do off of our event begin play is bringing a
reference to our mesh. That is our mannequin
right here. If I select mesh, you can see that that's what
we're talking about. And I'm simply going to drag
out of here to talk to it. And I'm going to say set
hidden in scene capture. And I want to check
this box as a yep, we want to hide you out as well. Well, let's compile this to make sure our script is
still good to go. Let's save this and let's play. Now, you can see I'm only represented by that green arrow. You can't see that dot there. But just to really
hammer home this point, let me just change
our scripting here in our level blueprint. Where are we? We're adjusting our scene
capture 2D is offset by 2,500. I'm going to change
this down to 2000 here. And that should bring us
a little bit closer down. Now if I click Play,
you can see that's probably a little bit
better, something like that. There's our green arrow. And now if I was to drop
this down even more, e.g. sake, I'll say 1,000. And in our ThirdPersonCharacter, I'm going to uncheck
this temporarily. You could see what
would happen is our characters essentially
cutting through that arrow, which is no good. So I'm going to set this back, compile and save that. And in a third person map, I'm going to set this
back to say a Z offset of about 2000 and compile
and save that. Alright, so that is
all well and good. That is working for
our player character. Let's add an enemy. Alright, so to do this,
I'm gonna do this very cheaply, if you will. I'm going to right-click on our
ThirdPersonCharacter here. We're going to simply duplicate this and
I'm going to call this guy BP, third-person enemy. And now, because we duplicated all of this from
our ThirdPersonCharacter, all we need to do is firstly, drag-and-drop our enemy
into our level here. And I'm going to bring a
couple in, rotate one. That way. I'm going to hold down Alt, left-click and drag. And I'll bring in
another that way. Like so. Now all I need to do is go
into our enemy blueprint here. We'll open it up. And we have duplicated
this code for setting our mesh to be hidden in the scene
capture, the minimap. All we need to do is
go into our widget. Instead of having this
represented by a player icon, we simply need to choose
this to be the enemy icon. The red widget blueprints, the red arrow Widget Blueprint. So if I go ahead and click
Play now, in my Minimap, you can see I'm represented by the green arrow and the
enemy there is located, are represented by
the red arrows. Now if you can imagine
if your enemies had some logic in there
roaming around the level, they would spin around
and rotate along with the character as well as
follow the character as well. Now I did make mention
here that this sort of approach to a mini-map
is easily extendable. This can be made so
that not just icons for character class components
appear in your mini-map, but for any Blueprint, really, any actor
class blueprint. Let's show an example here. So in my Minimap folder, I'm going to simply duplicate my player icon,
right-click duplicate. I will call this
W BP, the goods. And we'll double-click
on this to open it up. And let's just simply change
this to a color like yellow, like this is some treasure icon. Right? Click. Okay, save. Let's go back to
our level tab here. Let's come under our starter
content folder, blueprints. And I'm going to say our
blueprint effect fire. Let's say that this is meant to represent something
awesome in our level. I mean, all it is is
some flame, right? Come to the flame. Alright, I'm going to add a
widget components to this. And with that widget
components selected, coming over to the
Details panel, I'm going to change our
widget class here to be WPP. And I'm going to change
the rotation of this to be 180 by 90, by zero. There we go, like so, so it's
gonna be facing skyward. I'm not going to
worry about hiding out the flame or anything here. Let's just simply save this. We're going to drag
and drop a few of these in our level like so. And I know I'm not
doing the, you know, I'm not hiding this
out and not making these transparent or
anything like that. And doing some of
the other settings I was in my character
class blueprints. Let's go ahead and play here. Now I know that they
were showing up green just a moment ago,
but you can see it. Our minimap now that they
are showing is yellow. So yellow equals treasure. Red equals bad guy, green equals good guy. And there we have it. A fine looking minimap indeed, and not too difficult
to pull off. See you next time guys.
 Greg Wondra, Unreal Authorized Instructor