Transcripts
1. Course Trailer: One of the most popular genres in modern gaming is the shooter. Trust me, I google this cenotes legit within the shooter genre comes at plethora of sub-genres. Looters like Destiny, military-like battlefield and Call of Duty, C5a, halo arena, like Overwatch, survival Horror, Resident Evil. The list really does go on and on. This class aims to teach you the fundamentals of advanced first-person shooter mechanics, enabling you to create any shooter game of your choosing. Hi, my name's Tim, but some of you may know me better as timber for my YouTube channel with over 130 thousand subscribers outside of making YouTube videos on my favorite games, I currently work for Epic Games, the makers of the Unreal Engine on the popular battle royale game Fortnite. In this course, we will start with a completely blank template to transforming it into a robust first-person shooter, we will create six fully customizable weapons each but their own sounds, animations, reload times, bullet spreads, recoil intensity, impact effects, ammo pickups and more. I will show you how to mimic game, such as Call of Duty, using invisible line traces to generate dynamic hit events, other weapons will mimic more realistic titles such as battlefield, that shoot actual projectiles out of our guns, allowing us to customize our bullet speed and gravitational force. We will cover how to blow things up with grenade and rocket launchers. We're even going to make an enemy class that dynamically response to damage depending on the body part we hit festival. Every asset used in this course is 100% free, as we will be using Unreal Engine 4, the same game engine used to create these popular AAA titles. While this class can be taken by anyone, I recommend it for those with at least some Unreal Engine coding experience, as most of our work will be done scripting in blueprints. So if you want to take your unreal skills to the next level, or you simply want to learn how popular shooter games are created. Follow me and I will guide you through the process step-by-step. In Unreal Engine four.
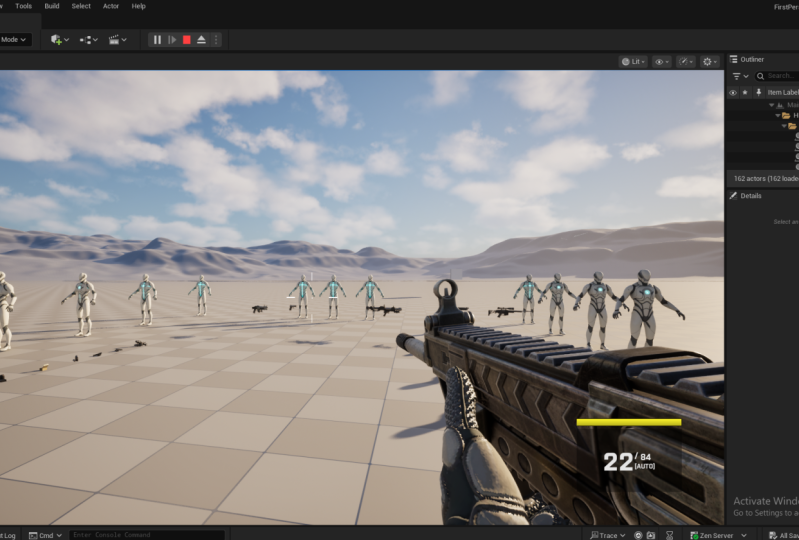
2. Introduction & Project Overview: Hello everyone and welcome to this class on Unreal Engine 4, where we're going to be building a first person shooter. My name's Tim. I'll be walking you through all the cool and awesome stuff that we're gonna do in this class. So I'm going to try to keep this first video pretty straightforward and just take a little bit of time to go over in a more detailed manner who this class is best suited for. And then when take some time to overview the final project that we're going to be building. So pretty much anybody who wants to can take this class, I do recommend it for people who are more of an intermediate level. So if you have taken the previous course that I made on action adventure games, then you should be fine stepping into this. When I say intermediate, I don't mean somebody that knows an extreme amount of things. I don't want to push people away from taking this class if they've never touch Unreal Engine before. But you just have to know that like I'm expecting you to know very basic stuff. Just not gonna be taken the time to explain what the differences between like a float and an integer going to be creating a lot of variables in this class. And I'm not going to be taken the time to overview like where things are located in the engine and what a blueprint is. And just like the very basic beginner type stuff. So if you are worried about that, you can go ahead and take the other classes that I've made. But if you feel pretty comfortable with that stuff or you just don't care, then you are in the right place. I am not going to be the type of person that's just going to be dragging out a bunch of nodes and just says Do this, do that, do that, and then boom, this thing works like I really do want people to learn and understand what it is that I'm doing. So I am going to be thorough and meticulous as best that I can so that you can understand what it is that we're actually doing so that you can create something on your own because you know, that is the point, isn't it? So hmm. Just thought I'd get that out there before we get started. But if you do have any questions, feel free to leave them in the discussion and I will do my very best to answer them as quickly as I can. So yeah. So let's go ahead and take some time. I'm going to open up the project that we have. This is going to be pretty much exactly what your project will look like when everything is all set and done. So I'm gonna go ahead and click Play and we'll see what we got here. So right away you'll notice we have some enemies over here. We have a very basic kind of minimap that trick tracks. We can see traces. Traces tracks. Who cares, where our player is moving around the map. It's nothing special, but it'll give you an idea of like how to do that type of thing. Over here we have two different types of surfaces that I'll explain why they're there in a moment. Back here we have our weapon locker. We have six different weapons are going to be making, three of which are hit scans. They're going to be drawing out in these invisible lines. It's similar to like a game like Call of Duty, where the hit of the bullet to the surface is instantaneous. And then our last three over here, the sniper rifle, grenade launcher, and rocket. Those are gonna be projectile's. We're actually going to spawn a blueprint that as a projectile that has a movement component to it, it's going to shoot out of that guns barrel and we're going to see what that hits. And so we can do cool things with that. We can apply different speeds and different gravity to create different arcs and explosions and cool stuff like that to do some radius damage. The pistol is semiautomatic. The rifle is going to have some recoil to it and be an automatic variant in the shotgun is going to shoot a spread. So if we walk up to any one of these weapons and hit the E key, we will equip it and you can see our current ammo or reserve ammo and then also the fire type. And then you see this stamina bar also show up in the bottom right. And then we have our crosshairs, which dynamically set to the player moving and sprinting. So it's all animated. I'll beautiful. So the order in which these weapons are picked up, it actually doesn't matter, but whatever order you do pick them up in, we'll sort of bind them to that key. So we picked up the pistol first. So if I hit one, we'll switch back to the pistil and I've hit two will go to the assault rifle here. Then three will be our shotgun. Fours are sniper rifle, five is our grenade launcher, and six is our rocket. And all of them have their cool little sounds and everything like that. So if I go ahead and switch back to the epistle so you can kinda see the bullet spread. Think pistol to feel like the cross hairs to rocket. Rocket doesn't have good hip fire. And hip fire is something that we're going to be doing and actually matters. I'll explain that to seconds. So over to our ammo types, we have an AML variant per each weapon. If I walk up to it and hit E, won't do anything unless you pick up the correct answer. So this is the pistol ammo. And if you look at our reserves, the 144 now becomes 16 eight. And I can't interact with any of these other ones, but I switched the assault rifle. I can pick up this one, the shotgun. This one. You get the point. Okay. Moving on to our different surface types. So a way to illustrate this in the hit scan at projectile's show you. So if I shoot this out into the sky, the epistles hit Scan. You're seeing, you're seeing some effects, but nothing's actually happening. I can go ahead and reload our gun to. But if I switch to something like the sniper rifle and I hit firewall, actually, if you look at the barrel, actually saw something come out of that. Again, it's very apparent of you used the grenade launcher. Can see a much more drastic arc there. So what we're gonna be doing is we're going to have different impact effects depending on different surfaces. So we have metal, which are mannequin men are of a metal variant because we're lacking in the FX department here. Just give a demonstration and then we have stone, so a couple of different effects. So if I were to shoot this, you notice some bullet holes go into it like that. And we're going to customize the sizes of those. And you'll see some little metal flickers. And then we have different it's a little bit hard to see with the pistol. But yeah. So if I switch to our assault rifle, couple of things we'll do with that is if I just hold down the trigger and I'm not aiming, will have some recoil That's moving the gun upward and the bullets are kind of randomly spreading. But if I were to aim in not controller recoil and actually only reload here for a second. So I can demonstrate this. I'm aiming and the bullets land exactly where it is that we're aiming. So we'll have realistic hip fire added to that, then the shotgun, if we shoot that, we will get a spread. Like that. Pretty cool. Lastly, I'll show, I think I showed the stamina bar how that goes down for running. Let go. And then it goes back up like magic. Wow. Last but not least, we have our enemies. So all of our enemies are the same. And what we're going to do is recreating hit markers. And we're going to have different types of HIT markers depending on whether it is a normal hit or a kill hit. And then we have different physical materials assigned to these enemies here. It's going to detect different amounts of damage depending on where we hit them. So the head is going to do the most. We're going to Yeah, The heads can do the most. Then we have the body, the legs, the arms. So if I were hit him in the chest, 2015512, and then the head is kinda cool because if we hit him in the head will get a yellow number like that and then he has a 100 health. So he might die here. And we should get a read hit marker like that. And then we have a rag doll physics that are applied to these. So we're going to actually shoot out a little bit of an impulse depending on where we hit them. So if I have 20, 40, 60, 80. So if I were to shoot him like in the arm, it moves back with the arm. And then different gun select that pistol doesn't have a whole lot of force, but our shock and does have a lot of force. So if I hit him here, he was flying backward. We get them in the back, wheels flying forward. So all of that is dictated by where we're hitting these enemies. Sniper rifle, we can aim in with a scope. There we go. And then last but not least, we have some grenade launcher and the rocket to impact damage. So you're going to see many damaged numbers and like a cone of it, like that to get some cool explosions, some bigger impact effects and all that. So that's pretty much the project. That's what we're going to be making. This. What I wanted to create with this was essentially like a really, really great template. So the way that we're constructing this, as you'll see, that when everything is said and done, you will have a really, really robust, advanced system of weapons and pickups and different physical materials so that you can easily swap in your own GAN meshes and your own guns sound effects if you want to be able to make it what you want. So while there is art, I guess in this class, like we do with sound effects and we do have some art. Most of what we're going to be doing is going to be using blueprints and scripting in the Event Graph. So I wanted to get all that foundational knowledge there so that if you did want to put this in your portfolio, you can make this easily into like a futuristic shooter by swapping out the meshes. The sound effects, like I said, are you can make it into survival zombie type game. You can make these guys aliens or zombie their army men or whatever. You can adjust the amount of ammo and the types of the amount of damage that they do. We're gonna make all of that very easily accessible. And the reason that I did that was because I wanted to provide a foundation, like I said, so that you can make this into the type of game that you want to make it so that everybody's project at the very end won't look like the same. So you'll all have this, but then you'll have the knowledge to very easily edit this and make it into something beautiful that you want because there are so many different types of shooters out there. So I wanted to provide that base for you. So hopefully that sounds interesting and fun, cool. And if it does, I will join you in the next video. So thank you guys for taking this class. I really do appreciate it whether you are a returner or this is your first time. In let's get started in the next video.
3. Download & Install: Hello everyone and welcome back to another Unreal Engine 4 video. This one is going to be really short, sweet. And to the point I'm going to do is just briefly talk about how you can install Unreal Engine 4 under your computer if you don't already have it. So if you open up a browser of your choice and head to Unreal Engine.com or whatever. This, I'm in the United States. So whatever it is for you, head on over here and you'll get some information about the engine in all of this cool stuff, some games that were made with it. All of that great, cool epic Games stuff that they got going on here. Just go on ahead and click on Download. You're going to want to just get the nice creators license, which is absolutely free. Hit download, and then follow the steps to do that. By doing this, you should also have the Epic Games launcher installed on your computer. So if we open that up and you have an account on it, you're going to go down to this Unreal Engine tab and then go on to the library. Then you should see here this is Engine versions that you're going to hit the Plus. And then you're going to select which one you want. The one that we're going to be using for this project is 4.26.2 or 4.26.2, I guess it's what it's technically called. Technically speaking, you can use whichever one you want. If you want to use this four-point 27, or if you want to be real crazy and do Unreal Engine five, I guess, Go ahead. I would advise you use 4.26.2 because that is what I'm going to be using. That's like the latest version that is like not an early access things. So it's going to be the most stable. And while there aren't, like typically a lot of huge differences between Unreal Engine versions. As you make this, you might run into a couple of those little types of things. You might find something that I'm doing is just a little bit different in your version. So if you want to play it safe and you want to play it smart and not take any risks, then download for 0.26.2 otherwise, best of luck to you. But once he get that done, we'll be ready. In the next video, we're going to start creating our project and adding some content files. So I will see you there.
4. Setting Up Our Project: Everyone and welcome back to another video on Unreal Engine 4. Now that we have the engine hopefully downloaded, we can start to create our projects. So that is what we are going to do in this one. Okay, So in your epic Games launcher, go ahead and click Launch next to your whatever engine version that you have. And then after a second of initializing and loading, this menu is going to open up. We're going to click on game because we'd be making games. Hit next. And we are going to be working in a blank project. And unreal does have a first-person templates. And while that's all well and good, pretty much all of the code that Epic has in there we won't use anyway. So by using a blank project, we're going to have to do a couple of steps in this video and the next one that we wouldn't normally have to do. But in doing it this way, we can have everything and more personalized the way that we want it. It's just going to work out better for us. Okay, trust me. So go ahead and click on Blank Project. Find a place on your computer that you want to save this project. And I'm going to call this FPS. What should I call it? Class project. That's looking pretty good to me. All right. And then go ahead and when you're ready, given it a name, go ahead and click on Create project. With our project open. If you did it correctly, you should see these two weird, funky looking chairs with this very expensive glass thing sitting on a table. Why this is the default engine thing. I have no idea, But it is. We can go ahead and click on this little button here to show all of our folders. The whopping, one of them, the starter content that should have been enabled automatically. And we are going to start by setting a couple of things up. So let's go ahead and right-click on content and make a new folder and we'll call this FPS. Oh, shoot. Fps game. Could like maneuver around my microphone. Hold on a sec. Okay. Underneath that folder, Let's right-click there and call this blueprints there as well. They're right. And then underneath again we're going to make another one called character. So FPS game blueprints character. And if you're like me, you like to set things as colors. So I'm going to hold down shift and select all of them. Gonna go to set color in. I'm going to make my folders red. Let's do it like that, okay? And if you were smart, unlike me, you would have dragged this and saved it appears we can always use it later. Okay, in our Blueprints folder, Let's right-click and open space. Go to Blueprint class, which is ridiculously hard for me to say for whatever reason. And we're going to make a game mode based game mode base, as it says right here, this tool tip defines the game being played, its rules scoring other facets of the game. We are not going to be putting whole bunch of data in here, but we are creating this was called BP underscored game mode base. And let's right-click. Make another class here, player controller, BP underscore player controller. And then last but not least, let's click it again. And then underneath all classes is dropdown menu. Let's search for HUD, right, should be good doing something with the HUD. So let's go BP underscore HUD. Well, we can do is we can hit the Save All button. It'll get rid of these little asterix there. So all of our things are now saved. Then inside of our character folder we're going to make our character. So once again, Blueprint Class character and we'll call this bp player. It Control-S. To just say that really quick, I do that a lot. Yeah. So two ways we can go about doing this. We can either double-click on Demode base or we can do what I like to do, which is settings, project settings. Then underneath project here there's this tab, you're saying maps and modes. You click on that. So we'll drop down under selected game mode. You see we have all these little default things that are grayed out. This is why we mainly created a game mode base so that we can slot in our character as our default upon. We don't do that, then it doesn't matter whatever scripting but near the game will not register this as the character that we want to play us. So let's slot in BP Game Mode base for Default Pawn. Let's put in bp player and our HUD class, dp HUD and player controller class bp, player controller, game state player state spectator game instance can create those if we want, but we won't really be utilizing them. So the default ones should be just fine and dandy. One other thing that I want to do before I end this video is on this little drop-down menu right here, on a right-click in advanced settings underneath play, this is just personal preference. I like to select game gets mouse control. This allows it to that whenever I hit play, I don't have to click inside of the window every single time there's automatically enters into the game. And then underneath that same drop-down, I like it a new editor window, rather than playing in this thing. So if you notice if we hit Play, you have music. Well, it's not really music. It's atmospheric sound, I suppose. And hitting the keys are hitting the mouse, moving the mouse, it doesn't do anything right now because we have not added that script yet. So if you were to do it the old-fashioned way and use one of the templates and only you can move right away. But in the blank template, you can't do that. So in the next video, we are going to allow our player to start looking around, moving around. And yeah, we'll do some lattes tough. So right now it's just some basic framework stuff, but it is good to know how to do this. So that's what we will be doing in the next video. So I hope to see you there.
5. Making Our Character Move: Hello everyone and welcome back to another video. In the last one, we created our project. And in this video we are going to allow our player to look around and move so that we're just not this weird, immovable. I do not even know what you want to call it. So to start this out, pretty simple, Let's go to Settings. Project settings already have it open here. And then underneath engine, you're going to want to select input. And you'll see these bindings for action mappings in access mappings. We want to create several of these. So let's start in, do this in a strange order because actually map he says on top, Let's click the plus sign. And let's type in jump. Underneath this. Just type in space bar. That's all we wanna do there. Underneath access mappings we want to create 41234. You have to hit this little triangle to see them. We're going to create one called a mouse X. And clicking on it might dropped on all of them like I just did for me. Mouse Y is another one I want to have move forward and move right. For move forward and move right. You want to hit this little plus to make sure that there are two of them. Mousex, mouse white and leaves one. So for mouse X, we'd want to make that mouseX pretty crazy stuff for mouse. Why? It's not mouseY, It's mouse was okay for move forward. He wanted to make it W and S. And right, you want to make it D and a. Okay? But one thing you might notice is these little scale things here. So for why we don't play inverted or not weird, we're gonna make it negative one for move forward for S, since S would be backward and we're making one for forward, we want to make that negative one. Same thing for a. A would be left is the opposite of right. So we want it to be negative one as our scale. That's all set up and willing good. So you can technically exit on out of there. The next thing that we want to do is an either blueprints you want open up our player controller. Right? You'll see this word camera. Ignore the camera, delete the default nodes there. And what we're gonna do is we're going to call upon those two mouse input. So I made, so we'll type in mouse X. You want to click the axis event. That's what we just created. And a mouse, Why not you? There we go. From mouse X, we want to add your inputs. If I can spell, there we go. And the axis value is going to be that value. Now if you wanted to change this by a variable, you could do a little multiplication here and said to a variable, change your sensitivity settings that way. That might not have made sense what I just said. But don't worry about it. It's not important. For mouse why you want to add pitch plug-in axis value to value. Let's go ahead and select the whole thing. Hit C to make a comment box and we'll just call this mouse inputs. Like that. I don't like the bubbles and I'll make it read like we did before. There we go. And that's all we want to do. Next to compile this drop-down, go ahead and hit Save on compile and do on success only. That means that whenever you hit Compile it will also save. Hey, compile, save a reasonably good to know these little things. Trust me, people. Like Control S right there. Next up is our HUD. We're going to head over to the Event Graph in here. And we're gonna do event drawn receive HUD. See what this does in a second. Out of the execution wire you want to do draw a rectangle, draw rect or whatever. And then out of size x, plot an asterisk, do multiplication for an int or a float. And then copy paste it and do it for size. Why? You want to plug this in for screen x size x green x size. Why screen? Why? We're going to multiply this by 0.5. What we're doing here is we're drawing a little rectangle on our screen. Said that color and make it white. And we'll make it two by two, W and HR width and height. So not pretty straightforward there. 0.5 is she taking the size of the screen in the x and the y and it's cutting in half. So just to demonstrate this, if I hit Play, you'll now see I can move it. I can look around for one thing and you'll see a little dot there that's going to be helpful for us when we make our radical. You can see the center of the screen. So the controller and the wheter, all good. The last thing that we wanna do is we want to allow our player to move with W, a, S, and D. And we want it to be able to jump. So let's open up our player. I think all these settings actually go ahead and use controller rotation. Yeah, uncheck that with the VP. Play yourself. Undo that. Actually, I'm going to make a new event graph and I'm going to call it and movements. If you wanted to add a new event graph, you just hit this little plus on new graph. The reason I'm doing that is just for organizational purposes, I want to put all of my sort of movement components, jumping, sprinting, moving in one event graphs so that there's just not like one conglomerate of events all in one graph. I like to stay organized. It's important. So right-click and we're now going to call move forward, not the function, but the axis event that we created. And as you can probably guess, we wanted the same thing for move, right? Okay. Out of move 40, want to add a movement input. And we want to do the same thing at copy paste that from move right in the axis values and the skill value just like before. But out of World direction, we want to get the forward, forward, forward. Why? Well, I spelled that wrong. Most of the forward vector for forward and then World direction out of right. I'm going to get the right vector. Drawing out of any one of these rotators. You want to make a rotator. This bottom one right here, actually plugged it into both. And I'm not going to go over in detail what the heck is happening right here, because this is what's normally set up by default. So it's really not that crazy. What we're doing here. We're just kind of setting up like if you made like a third-person project or first-person project, this script is already in here by default. So out of maker rotator and drag out of anywhere in se break the rotator a WHO, the old law control on any node and click you can actually grab it and plug it into some other ones. So we want the xi's to be connected. And out of this rotation, we want to get control rotation. We're getting rotation of our controller there. I believe that is correct. So let's highlight the whole thing. Hit C and it'll say WASD movement. There we go. That last but not least, let's do our thing for the jump. So we have action event jump. So what we want on pressed, these are already built-in, so epic makes it very nice and easy for us. Press you wanted to jump in, then released is stop jumping. And then let's comment box around that. And we'll say action, event or whatever. Sure. Whatever you want to call it, whatever makes it easy, whatever floats your boat, let's say Compile and Save. And so now when we hit play, we can look around. You can move forward, backward, right, left, and we can jump up and down. So now we are a character that can move and stuff. Okay, so here's the script. If you need to see it again, just pause or do whatever you need to do. There it is. But yeah, that should be it. So in the next video, we have our character setup. We're going to start adding some content packs. And then once we do that, we will start actually doing some cool stuff like adding the guns and creating our character and give them arms and stuff like that. So hopefully you guys are looking forward to that and I will see you in the next video.
6. Adding Content Packs: Hello everyone, Welcome back to another video. In the last one, we set up some character movements and very basic stuff. And in this one we're going to start adding our content packs to the game. There is only one, or technically, I suppose, whichever way you look at it. So let's go ahead and add into the Epic Game Store under the Unreal Engine. And let's move from our library tab over to the marketplace. Done. Okay? And then enter search products. You want to type in military weapons. Silver should see this. Military weapons silver pack. I believe this particular maker has a couple futuristic ones. And like a military weapon, black or like a different kind. But the silver is the one that has the necessary weapons that were going to be using. You can feel free to use some different ones, but just know. You gotta use them at your own risk. If you want to stay true to knowing what works, I will just use this. But, you know, you can do whatever you want. It's up to you. So in this military weapons silver packet we're gonna do is we're going to add to your project. And you'll notice that it doesn't say there's any compatible ones. Rest assured, we will work around the Soviet. You click on this and able to call it a button. And you'll show all projects. Go ahead and navigate to our FPS class project or whatever you named it. And it'll say that it's not compatible with 4.26. But it is, I assure you, because technically you saw in the demonstration that it was. So let's go ahead and select on for point 2 1, which is the last engine version that it was compatible with. The Engine versions don't change that much to the point where it will really screw up the weapons, they still work. And 4.26, even though they're like, like not technically compatible or whatever. So go ahead and select that and then add two project. And if you look over here, it will add it to the project and it worked just fine. So that works. The other thing we wanna do is head over to the Learn tab, which I honestly did not know existed until after like a year of using Unreal. And the Learn tab has a whole bunch of these really cool demos and different games like an RPG and vehicle game and some, some art landscapes and just some cool stuff here. You're going to want to select on a shooter game right here. Now this one can not be added to a project. It is its own file, so you will need to create a project and installed somewhere on your computer. Rest assured, whenever we're done with this video, you delete it. We only need a couple of folders from there, so go ahead and create that project. Now I went ahead and took the liberty of actually opening this project up. This is not something that you have to do by any means, but this is a pretty cool project to look around and have some fun. And we're going to be using some of the assets from here, but not all of them. So a couple of different things that you can do at this point. If you click on content, right-click and say show in Explorer, you your Windows Explorer. I don't want to call Internet Explorer. I don't even know what a hectare your folders. Okay, we'll open up in this content browser and you'll see how these folders correlate with these folders. And that's what we want. You can do it that way. Or in the Epic Games Launcher, you'll see shooter game will show up under my projects. You right-click on that. You can show, showing the folder that way. And then you just click underneath content and then it's the same exact thing. What we wanna do is we want to grab animations, hold down control characters, affects Ozone, sounds. Right-click and hit Copy. Now if these are, if these both these projects, The Shooter game and the one that we created are in the same folder like they are for me, which is here. You can go ahead and just go underneath content and just paste them right there. But if you have an issue finding where that is, you just go to your project. Same thing, content, show in Explorer and there it is. And then I'm going to right-click and hit paste. And you'll see how they're showing up right there. Now this might take a little bit of a second, but I'm going to actually make a new folder. And we're going to call this shooter game. And I want to take those animations, characters, effects, and sounds probably should have done this the other way around. But here we are going to drag this into shooter game. That might take a bit of a second to do. Oh, did instantaneously. If you do that within the engine, it'll probably take a second if you do it in the File Explorer, it's like bam, instant. The only reason I did that is just so these things are nice and organized. You might notice that these are the Cray copies. That might, that'll probably go. And quite honestly, because if I go and read the content, see how it's not there. So this product needs to be refreshed. If a poses down, open it back up, it'll be fine. Okay, so that's all we wanted to do in this video. We've added our content packs. I'll actually the last thing we need to do go to Add Import, go to Add feature content pack. And then we're going to need to grab the third person, a blueprint feature because we need the mannequin man. Literally the only thing that we need. Adding this one might screw with our input mappings a little bit, but we can always just close them down. We'll have to see. So let's just add this to the project. And then there that shows up. Please tell me this still works. It does help. Thank goodness gracious. Because I think if you go into it, might've added, yeah, so it added some of their other inputs, which is not what we see is get rid of them. Yeah, and all works. It's all good. So that's gonna do it for this video. Thank you for watching, and I'll see you in the next one.
7. Creating the First Person Character: Hello everyone and welcome back to another video. In this one, we are going to be continuing on and we will be setting up our first-person character. So if you have our project open, go ahead and under FPS game character, Let's open up the blueprint of bp player. Drag it across the top if it already isn't. And we're going to be messing around in the viewport. So with our character selected, we're going to add a components and we're going to add a camera. And we can just keep this with the name camera. Then underneath camera with its selected, we're going to create a child on that camera. And we want to slot in a skeletal mesh. And we can call this player arms. Okay, So with cameras selected, there's a couple of things that we want to do. We want to check Use Pawn Control rotation. That is one thing that we want to do. Sorry, I'm just referring to my notes to make sure that I'm not missing anything. I think it's actually 0 for the camera on the Z, we want to set that to 75. So location z, 75. Then on the player arms, the skeletal mesh that we're going to slot in is this hero F PP right here. It's going to spawn in up there. Now what we can do with this little magnifying glass, it'll open up where this asset is within our content browser here. And what we can do is we can drag this and then drag that into our character folder so that we can see it here. And then we can hit F2 and we can rename it player arms. So it's the same asset. But now it's an R folder and we can access things with it. So with our player ARM selected, one thing that we want to do really quickly is search bounds scale. We want to change this to two. The reason we're changing this to two instead of one is that if you don't change it to two, it's going to interact with the camera funny. And depending on where you're looking, if you're looking straight up or straight down, the mesh will actually disappear. So that's just a little weird setting that you want to make sure that you do. So for the arms, the location, I'm just going to give you these numbers so you have to fiddle with it yourself. I already graded all this for you. X is going to be negative ten, z is going to be negative 1, 50. And then the z rotation is going to be negative 90. So facing, turned on my camera speed a little bit, it's facing forward. You got the arms like right on the camera like that. That looks pretty good. The last thing we want to do with the arms is make sure that we don't have a shadow because we don't have a whole body. So it will hop in and play and show you this. It looks little freaky and we don't want freaky. So let's just uncheck cast shadow underneath the lighting again with player ARM selected compile. And then there we go. We look normal. We can't see the arms right now. Okay. A couple other things I want to do in this video before we move forward underneath the Character Movement Component, this is just my personal preference here. Let me find it. Max walk speed is at 600. I'm going to set that to be 750. Like the character walks a little bit slow by default. And I think that's it. So if you'll notice the material that is on these arms coming out screwed up by transferring it over. So what we're gonna do is we're going to remake it. We're going to make it exactly how it was originally. So Let's right-click on FPS games select new folder and we'll create a new folder called materials. And I'm going to set that to our red color, whatever color that you have. And then over here, you're going to right-click and go to materials and textures are going to just go material right there. We're going to go M for material underscore layer farms already. And then we're going to open up player arms. Believe you can do this. Nice. Okay, so if you hold down T and click, you can get texture samples. And for this texture sample, what I wanna do is we want to plug one into Base Color 1 into metallic. And it's going to be errors, but don't worry. And then the other one into normal. With that setup, you're going to right click and you're going to search a constant. It's going to be just this little thing with a little number in there. And we're going to put this into roughness. And since I'm a perfectionist, we're going to make sure that all of these are in order like that. For our roughness value, we're just going to make it something like 0.3 or something like that. And then for this texture samples, so we have some textures that exist. Within this previous project, the shooter game is where we're pulling these materials from. So this material, if we open this up, It's all kinds of screwed up in here. As you could probably see. That's what we're trying to recreate. So we're going to have to use some of these textures that exist, these ones that still function. We're going to use those. So that sap one that we want is you can just do FPS underscore d in FPS underscore M for the metallic. And then for our normal, you can probably guess it's going to be FPS underscore N for normal, then you should get a preview to show up. So this roughness of it actually says, so it doesn't. So if I set this one, you can see how there's like no super rough, no shine whatsoever. Said zeros can be really glossy. So I live around the 0.3 range if you want to make a point or maybe you like it real shiny and just wanted to 0.1.2. That's fine too. I'll stick with 0.2. So there's our material. You can click Apply. That's all we're gonna be doing there in save it. And then we're going to apply that. So it's called player arms. And there we go. So it fits perfectly. Prepare the last thing that we wanna do in our character folder. So we're going to right-click and we're going to go to Animation, Animation Blueprint. So in animation, blueprint is a blueprint that can connect to Skeletal Mesh and it will control essentially what animations you want to play one. So we're just gonna go ahead and do this right away in actually. Before we do this, let's do one other thing. So before I mentioned I like copy these arms. I want to make a new skeleton. So I'm actually going to take this hero FTP skeleton and copy paste that. So we can find that we go into shooter game characters here, FTP in this skeleton. So let's go ahead and move that into our character folder. And then we'll name it like player, player skeleton. Why not? So it should be kinda messed up right now. Hopefully it's still able to work. One thing that we can do to check and see if it does work as we click on one of our animations. And then let's do one where they're actually going to use. So rifle idle is one of them that we're actually going to use. So it's going to be like cannot find skeleton, would you like to choose a new one? So I'll say yes. And we'd have right there player skeleton and it'll retarget it to that skeleton. And it aids us and doesn't want to work. Devil of copy and pasting, ruining assets. Okay. Give me a second. I'll figure this out. That Lubeck. Okay, so I think I remembered how I did this before. So if you click, double-click on our skeletal mesh is actually going to prompt you to ask you to create a new skeleton, and that is what we want to do. So it's going to have all this stuff already pre-set up in here. And it's going to essentially assign this mesh to this skeleton, which as we want. And so it named it player arms skeleton. So I'm actually going to delete this. Hopefully the computer does not hate me for doing that and forced deleting it. We're good. Let's give it a name list player underscores skeleton. And then now if we were to go back into our shooter game animations, and we would do something like rifle equip. And it would say cannot find skeleton. Would you like to choose new? And I'll say Yeah. And then we'll choose our player skeleton. And the animation works just fine. So eight, so now we have 12. So we just have to manually, when at whichever animation of these that we want to use, we'll just have to manually click on it, add it to the skeleton, and so it'll show up over here in our asset browser. So we can do that for rifle idle. I'm just going to do that because that is going to be our main animation right there. Pretty good. Okay, So back in the character, we can now create what we wanted to create in the first place, which is Blueprint. No animation, animation blueprint. And then we'll put this on our player skeleton, the one that we just created. And we'll call this player underscore Anim VP. And we don't need to actually do anything in here right now. What we're gonna do is we're just going to assign it, use animation blueprint with the arms selected. And we want player in and BP. So it's not actually going to do anything right now. But now that is, functionality is now wired up in our character folder. So that is all I have for this video. I believe. I don't think there's anything else that I left out. Just check in the notes and it looks like we're good. So that's gonna do it for this video. In the next one, we're going to continue on and start animating our character. So he's already from we start putting guns in the hands. So I will see you there.
8. Animating Our Character: Hey everyone, welcome back to another episode in our Unreal Engine 4 series, making a first-person shooter. In the last video, we started creating our character. We gave him some arms, created a material for that. And this one to prevent him from just standing there awkwardly in the oppose all the time. We're going to be doing some work in this animation blueprint to give him some movement. Okay, so the first thing that I wanna do is open up our player in MBP. And if you haven't worked in an animation blueprint before, essentially a Animation Blueprint is a blueprint that links up with a certain skeleton and part of a certain character. So if I were to go on my skeletal mesh, on my players arms, which are these things. You can see that the mesh or the animation has an animation blueprint associated with it. And it is this one that we created in the last video. So whatever we do in here will be outputted here and our character. So anything that we plug into this output pose is going to be outputted to our character. Animation. Blueprint has an animation graph and an Event Graph. The event graph is essentially just a graph that links variables that will create two variables found within this blueprint. That'll make more sense when we actually do it. And then the animation graph is where we actually implement the rules that will decide which animations to play when. That's kind of the best way I can explain it right now. But it'll make more sense when we actually start putting some stuff in here. So what we wanna do first is we want to create an animation blend space. So with our character folder open, Let's right-click in empty space and go to animation and blend space, not displace 1D. And we're going to use our player skeleton, which is right here, the one that we created. And let's call this Idle run. So I don't run is a very common type of blend space. Blend spaces allow you to place multiple animations within them. And then you can change a surgery which animation you're playing based on a certain axis value. So in this case, our name is going to be speed. And what we're gonna be doing in this blend space is we're going to be transitioning from an idle pose to a walking pose. And that is going to be dictated by our speed. For grid divisions are okay, or maximum axis value, we're going to make 600. If you remember in the last video, we set our character movement to 750. So if we are going 600 and above, I want to switch between two different animations. So rifle idle is the first one that we want to grab. And we're going to drag this at 0 right here. This green dial is what we can see to kind of move between. You can see the speed value changing right there in the preview value right there. And we're going to need to grab another animation because these weren't default. We'll create a new skeleton in the last video. So it's going to shoot a game animations, first-person player animations right here. And you want to do not erode your rifle? Or should this be like our rifled? Run him a quip fire. Am I blind here it is. Ftp or rifled run. Double-click on that. Could not find skeleton. So we're going to assign it to our player skeleton and a retarget. And you can see there it is moving there ahead and hit Save. We can pause it. We can mess with the sounds of that later. Okay. And I think I exit out of our blend space. It's awkward. So I'm going to open that back on up. Then I'm going to take our rifle random and drag that at 600. So now you can see if our speeds increasing, you can see that animation changing from the idle 1 to the running one or the walking one and whatever you wanna call it. So we're going to hit Save. That is looking good. And now let's go into our animation. Blueprint, event blueprint of DNA. Okay? So in some empty space in the event graph, we're going to search for an event, events. Blue prints initialize animation. This is the equivalent of an event begin play. For animation Blueprints. What we wanna do is right-click and say, Get Owning actor. Sometimes you say get player character, Get Player Pawn. Sometimes it doesn't matter. But we're going to cast to rbp. Not be 0. Bp player. Whatever the object is, it just sometimes just further. This is the only time we're not really going to be using casting or getting the character. Let's right-click on bp player and promote this to a variable and we'll call this player. So all this did was we created a reference, reference to player. So that now what we can do is we can pull this out. You can get it. And then any sort of variable that is found within here or function or whatever we can just pull out of there. So creating references to things is something that we're going to be doing a lot will mainly be creating references to our player. Okay, so now down here, event Blueprint update animation. I'm going to call out a sequence node. Not actually going to be doing anything out of the sequence just yet. But just for future reference out of then one will say is valid with the question mark. And plug that into try, Get Pawn Owner. And is valid node is essentially just a way to it's kind of given the computer common sense. So if if something I actually don't even know how to explain it, but it's saying like, it'll make sense, we'll be using this in the next video as well. And I'll explain it in more detail there because it'll be a lot easier to explain kinda what it does there. Okay, now, let's head on over to our Anim graph. And we're going to right-click and we're going to look up a add a new state machine. And I want to click on this and rename this. And we'll call this player movement and will for the time being, let's just put this right into the output pose directly. If you double-click on a state machine, you'll see this entry bubble. And what you can do is drag out and you can add States. We're not going to be maximum then a conduit states or whatever. So let's drag out and let's add a state and we'll call this Idle run. So if you're unfamiliar with state machines, these states are where you will plug your animations in and then you can create transitions from sub I added a different state. These things essentially are conditions that need to be true or false to transition between different animations. Like I said, a lot of this stuff makes sense like when you're actually doing it. So let's double-click on Idle run. And what we wanna do is we want to grab our blend space named Idle run and plug that into the output pose. And what you'll notice with this one is that it has a speed variable. So if we were to do this, but see we have our name for speed. So that's what it's grabbing right here. So right now it's set to 0. And we don't want that always be set as 0 because if it's always set at 0, and we will always be right there. So we want to link this up to our characters speed. So let's right-click here promotes to a variable and we'll just call that speed. And that's all that we need to do in there. So now if we go back to the Event Graph out of try Get Pawn Owner, we're going to get velocity, the velocity of our character. And we want to get vector length. And then we want to take our speed and set that. We want the SEC amount of that is valid branch. So what this is doing right here, this first part is it's getting the velocity of our character, getting the length of that vector. And then setting that to this variable that we created called speed, which is setup in here to control which animations that we're running. So for this common box, I'm just going to say sets, walking into idle animation, something like that. So it should look like this. And then that labor movement I'll run, we only have one state right now doing that. So have you compile, we have him in idle. And if you hit Play, you can see that we have some arms here. Actually, we don't have a lot of real estate, so temporarily I'm just going to fill down Alt, make oh gosh it and that way I think set to ten. Hold on. Alternate. Make a copy of something, just give myself some room to walk. Now if I hit Play. So you can see I'm now idle. And then when I move him doing the walking animation, we're not actually holding any sort of weapons, so it's a little bit hard to see. But that is how that works. Probably gonna redo this environment and between videos. The last thing that we can do here is that if you actually go here and go to rifle Run, you'll see that we have these little notifies. And you can right-click anywhere and add a notify inside of an animation and play like a particle effect or a sound or anything. These sounds are actually kind of busted here, so it's placed down, it's not actually implemented. So like we can, but whatever sound that we want in here. And then whenever this animation plays in crosses over there, it'll actually play whatever sound that we slot in there. So I believe that because we got the sounds over here that we have footstep sounds, grass, metal tile, and I think that they're kind of busted up like that. So man, grass, mental tile and we got fully run. Okay. So okay, so copy-pasting the stuff over, kind of screw this up. So what we'll do here, so just follow where I am. Shooter game sounds right here. Fully run. Open this up and we're just going to slot these things in near the sound wave. So we got fully run one through 10. So one. I'll give you a second to do this and then come back. Okay, Now that all of our run waves are now properly put back into this randomizer and outputted. This sound cue should actually work. So inside of our rifle run animation, play sound, and then we go to sound cue. See you actually hear it. I'm gonna make the volume of the player one. I wanted to be a little bit lower. And then we'll do the same thing right here. Set to one. It save. So now I got rid of my lord. What am I doing? So now whenever we walk, you should hear some footsteps. And I fall right off the map, but you can kind of see it has that ambient sound. Hear me actually get rid of that senior. That sounds much better. Footsteps, better soundscapes come up to him. Okay. And if you don't feel like that's in the right spot, you can move these around to different locations and preview it in here. Like that. But yeah, that's, that's how we can add just basic walking into our game. So in the next video, we're going to continue on and actually start putting some weapons in these hands. So I hope to see you there.
9. Equipping Our Loadout (Part 1): Hey everyone and welcome back to another video. In the last one, we set up some basic player movement, getting our character to look like they are walking in between videos, I did a couple of things. I went over to geometry. I drag a box in here so that we have a little bit more room here. If you're curious what I did. I set x to 2500, y to 2500, and z to 100. And if you go into our orthographic view, I made it nice and centered here. If you have things that are off of the grid. So like I have my snap settings to on 100. So like if I were to just kinda like move this over here, a 100, see how it's not in the grid. If you have that issue, just hit Control and it will then snap to whatever grid size that you're using. If I can undo that some of the rebuild anything, okay. That's what I did. And then if you have like your player equals like a bad size or he's just like up in the air. If you hit the End key, end is next to delete, by the way, hill then hit the ground. So Control N snaps it to the grid, whatever grid settings. And but something like on the ground. Fun facts to know about Unreal Engine. Okay, so now with that done, we're going to continue on. I would also make sure to name your things. I named this floor and put it into folders. Organize your life. You will thank me later. So in this video, what we're gonna do is we're going to start writing the code that's going to allow us to put weapons in our player's hands. Immediately. This is going to be one of the most complicated scripts in the game. In the game. I guess I really actually made sense in the class. That's what I meant to say. It's not, you know, it's not super complicated issues very long. And the flow of consciousness of this home, There's a lot of nodes since we have six weapons, There's a lot of copy pasting. So it can be easy to get lost or, you know, just kinda get confused like where all the data's getting pulled from, you'll see. But I'm gonna try to walk you through it step-by-step so you don't get super confused. Okay, first thing that we wanna do is you're going to right-click on FPS game, create a new folder, and I'll call this data right-click and FPS gaming and create a new folder. And I'll call this weapons. I'm going to set both of those two are nice red color. Instead of our data folder, what you wanna do is we're gonna create an enumeration. Right-click, go to Blueprint. Enumeration. And enumeration is a list of named values. It's really not more complicated than that. It's just think of it like a list. So yo E underscore, load out. So we're going to name this one. You double-click and open that up. We're going to create to enumerate tours 12. And then we're going to call one no weapon. And then this other one has weapon. Save it. Close. It is beautiful. So I could write to click again, make another one enumeration, we'll call this E underscore and a weapon type. Open that one. We're gonna have six integrators here. So 3, 4, 5, 6. And if you're really, really smart, you'll probably know we have six weapons, so we're going to slot the names and of our weapons. I'm going to call a serif auto or iPhone because it's easier for me to type couple less letters. And I play a lot of destiny. So that's why I've named it that what we got sniper rifle. We've got oh, my gosh, a grenade launcher. And then Wrong kid launcher. My fingers hit wrong keys all the time. Say, cool. Now what we wanna do? If you don't already go to your character folder, open up your player, and we're going to create our very first variable. So click on variable and we're going to call this load out. And we're going to set this to be of type load out. So now if you look, we have the enumeration that we just created right there, set to a variable and liquid, we have both our options here. So we can do is like we can drag this out and we can do what's known as switched on. So now we can run different events depending on whatever that integration is set S at any given time. That's how animations work. All right. What we're gonna do now is we're going to create our very first weapon. Now, the way we're doing this is we're going to have one weapon base as the parent. Or pretty much all of our script is going to, our general script is going to lie. And then we're going to create six children blueprints that are going to inherits all of the data from the parent, the base, with some slight tweaks and deviations to it. So. We're gonna go ahead and create the base. So let's right-click and go to blueprint. And we're going to use an actor, which is an object that can be Plays respond to the world that does not receive any sort of input or anything. And we'll call this weapon. I was gonna make a joke there, but I've decided against it. Okay, on our weapon base, Let's add a components and we want to add a gel, my gosh, a skeletal mesh, and we'll call this weapon mesh. We're not going to slot it as anything. The only thing we wanna do with this mesh is makes sure doesn't cast a shadow. Because our hands-on casts a shadow. We don't want the gun in our hands to cast a shadow. And we're not setting it to anything because this is just the base. So you don't need to. The next thing we wanna do is run a create two variables. The first one is going to be of type weapon called weapon type, sorry. And we're gonna make it of type, weapon type. So you see right here I've got all of our weapons. The other one we're gonna do is going to be called sockets name. And we're going to make this of type name. The default value for this is going to be b, lowercase b underscore. Is it right weapon? Beliefs. So, right weapon. You don't have to actually do this. Well, you have to type this NB, don't have to do it. I'm going to show you right here. So if you go to our skeletal, Skeletal Mesh on our player arms, there is a socket here called B, right weapon. So this is essentially, we're going to create different sockets for different weapons because they're all different sizes. And so we want the socket to be a little bit different so we don't have issues with the gun clipping through the hand that much. But the default value is going to be this right weapon. And we're setting that to be a name because that's the socket that we are going to eventually code too, gets our weapons to attach to. And this is, since this is a variable, we can dynamically set it depending on whichever weapon that we have. Okay, the next thing that we wanna do is in our player is some open space and our Event Graph is where we're going to be putting all of our events. We're going to create a custom events and we'll call this pick up. Now if you know anything about custom events, you know that you need to write a script that actually calls that event. This event is going to be called within our, if you remember in the first video. And we had the weapons floating up and down, we're going to call this event in those blueprints. So this is just a custom event sitting here for now. Little sneak preview for the future. I suppose we're going to add an input of a new parameter. And we're going to call this weapon spawn. And we're going to make this of type weapon base. And we're gonna make this a class reference. In this course, we're going to be using both class references and object references. The main difference between them is that a class reference is going to refer to the entire class. So it will refer to Weapon Base, this blueprint, and it'll also refer to all of its children. Everything. An object reference is an instance object of type. So that would be referring to like the assault rifle specifically, are the pistol specifically, we want refer to all of the classes. So we're going to get a class reference. And that's actually all that we want to do right now. Um, because we're gonna plug a function into this. So let's go ahead and create that function. And we'll call this spawn weapons. And we want this to have an input is well of type weapon base and we'll call this weapon. The reason that we want this to have an input is if we go back to our event graph and we call this event spawn weapon, what do you know it's asking for a weapon? Because we made this input. If I go ahead and delete this input and it Compile and Save. It's gone. And we got no, yeah, nothing to plug this into. You end up in a plug this data into. And that's depressing. So we want to create an input to pass the data along through like such. And that's beautiful. I think it's beautiful. Now this script is going to be extremely stupidly long. And to prevent us from dragging out of this node literally like 20 times, I'm going to promote this to a variable. And I'm gonna put this to a local variable. The difference between a variable and a local variable if you're unfamiliar, is that a local variable is a variable that it's mainly done just to keep things a little bit more organized. A local variable. For one thing, they can only be created within functions. So if I go anywhere else, I can't create a local variable in my Event Graph can only exist within functions, and they only exist within this specific function. So I know that I'm not going to use this variable anywhere else in my script. So might as well make it a local variable so that if I go anywhere else, I don't have to see it because I don't need it. The next variable that we create is going to be used within other events. So we're gonna make it a normal variable. And we'll call this is first slot filled. And anything that starts with an a is and the question mark is typically a Boolean. So let's go ahead and drag that Boolean out. Now, what you can do is you can plug this into a branch and do the true-false thing I like to do is say not. So it saying is the first slot and not filled in, then we can plot our branch and plug that in like that. So without the knot is essentially just switches what true and false would be. So is the first slot. If the first slot is not already filled, you want to spawn an actor from class. What class do we want that to be? Well, what we can do, we have three options. We can plug in our class. From here. From here, we created a local variable, so might as well, all those three things mean the same exact thing. And this data, this variable, is the same thing as this variable, and it all equals this blueprint. So we want to spawn something from a weapon base. The spawn transform. We want to get actor transform. The actor being self. Self the player. To do, to do that over a little bit. Okay? And then what we wanna do is this return value now turned into from a class reference to an object reference. Let's right-click promote to a variable. And we're going to call this weapon slot 0, 1, like such. And then we wanna take R is weapon is first slot filled and we're going to say true it is filled. This will prevent this script running through this branch more than once. Next thing we wanna do is we want to attach actor to component. The thing that we want to the target that we wanted to attach his weapons Slot 1, whatever weapons in weapons slot one. The parent is going to be the arms. So we want to attach this actor weapon Slot 1, 2 our arms. And it's gonna be like, well, what's socket Do you want? Well, I already told you it's that right weapon. That's why we have this variable. So since this return value and this is all of weapon base, we can access its variables. So let's say get socket name and plug that in for the name. So that's why we created this variable. And we can access. I hate it when it does that, when it's not a perfectly lined up. Okay? So we can access this variable because this return value is you can see Weapon Base. So we have the weapon base, so you get its variables. And that beautiful. Now we want to create another variable and we'll call this current weapon. The current weapon is going to be a variable of type weapon base object is going to be one specific one. We're going to set weapons slot one to the current weapon. The current weapon is essentially just whatever weapon is in our hands. So if we have weapons slot one currently equipped, weapon slot one is the current weapon. We switch to the secondary weapon. Weapon slot t2 will be the current weapon. And then what we wanna do is we want to add a return note. So you want to return this data. So we can just grab this and add it right there. And now it adds a weapon base object type there. We could have just hit new parameter and then that way, but we're fancy. Name that return weapon. It's now be a compile. Let me go back here. Now we're returning data. So this data starts out over here. It's going in through here and it's running through all of this. And then it is outputting right there. And it's all type weapon base. That's how that works. But we have more than just one weapon. We do. We have six. So this is where it gets a little bit ridiculous. Out of the false branch. You then want to ask if weapons slot t2 is not filled. So let's copy and paste this. And then let's create new variable. Actually, I was going to hit Control W on this one. And we'll say is second, I should honestly name them like this. Quantum. Make it easier on the eyes is first. Slot filled. I'm going to drag second slot and pop it on there. So now if the first slot is filled and it's going to be like, Well is the second slot filled? And then it's going to run through this same line of code again. If the second slot is not filled, well then we're going to spawn an actor. We're going to put it in our hands. And we're going to set that to be weapon slot 2. And then we're gonna say is the weapons is second slot film. Yes, it is. We're going to have to do this one through six. So I'm going to skip ahead. I'm gonna do third slot, fourth, fifth. You get the point all the way through six. Then I'll come back and show you. Okay, So if you are finished, hopefully that little test, a little task wasn't too difficult. If it wasn't going to show you exactly what should be. So first slot, first slot, weapon, slot 1, second slot, second slot, seconds lot weapons like 2, 3, 3, 3, 4, 4, 4, 5, 5, 5, 6, 6, 6. So that's this huge conglomeration of a, of a function here. What we'll do is we'll comment boxes around this thing will say spawns, weapon, actor in player's hands, and assigns can even see it in slot 0. I think I actually spell everything right there. Okay, So that's what this is doing essentially. And we're returning that value every single time. So this is how we are going to spawn our weapons. So if we go back to our event graph, what we want to do here after this is we want to make another custom event. So customers come work with me. Oh my gosh. Why can't I do things? Okay. We're going to make one called equip weapon like that. And then we're going to call equipped weapon like that. On equip weapon, we're going to make an inputs of called weapon and we're gonna make it of weapon base object. So now we can plug those in like that. So for the time being, I'm going to cut this video off here. There's going to be a two parter because like I said, it's pretty complicated. This of when this event runs, which we don't have any whom that happens here that runs it. We're going to spawn a certain weapon. So if our first slot, let's just say it's the effort. We don't have any weapons. If the first slot is not filled, we're going to spawn an actor of type weapon base. We're going to assign that to the first slot. I'm going to set that. I'm going to say our first slots now film so that if we interact with another weapon, it's gonna go down here. And then down there, down there, they're down there. We're going to attach this actor, this weapon to our players arms at that socket name. We're going to set that as our current weapon. And then we're going to return that value to then do more stuff to actually equip that weapon. Because what we need to do is we need to actually run some of those weapons switching animations in the sounds. And we need to actually have the weapon mesh appear in our hands. There's nothing that's actually making the mesh appear. And then also when we switch making that other mesh disappear. So that's what we're going to do in the next video. And I hope to see you there.
10. Equipping Our Loadout (Part 2): Everyone, welcome back to another video. And the last one, we started this very long script that's going to allow us to equip, show and switch between our weapons. Like I said, this class is a lot of event graph stuff. This is one of the heavier ones. Once we're done with this part, we're going to work on creating our weapons. And there'll be more exciting stuff going on, but we gotta get all this back-end stuff done first so that our game actually functions. Okay? So where we left off, we have our weapon pickup are spawn weapon function and then our equip weapon event. What we're gonna do is we're going to start building off of this equip weapon event. The first thing that we wanna do is we want to pull out a branch 0, also little tidbit in between videos. I took all of our variables of the weapon slots and I created a category. So all you gotta do to create a category is have a variable selected and type in a category. And then I'll create one. And then you can drag them around, put them in correct order. So now you don't have to have this super long list of variables everywhere, makes it easier on your life. But what we're gonna do is we're gonna create a new variable. Recall is switching weapon. And this is going to be a Boolean. So you want to check before we can equip a weapon, we want to make sure that we are not already switching weapons. Okay? If we are not currently, if we're not already switching a weapon, then we want to make another check. And we'll say is reloading. This is a Boolean, yes. Okay. We're going to see if we are reloading and I reloading script doesn't exist this yet, but it will eventually. This part of it is essentially here. So that if we are reloading a weapon and we try to switch, that reload will actually cancel. It won't continue through while the other weapon mesh and data appears. So if we are reloading, we want to turn reloading off. If we aren't reloading, then we just want to say, Well, we are switching a weapon. And we want to connect these two like that. If we are reloading, now we're not reloading, and then we can start switching the weapon. If we aren't reloading, then it'll just say that we are switching a weapon. Well, we wanna do here is we want to create another function to run. This function is going to exist to show our weapon meshes or and hide the one that we currently have equipped. So we will accurately name this hide and show weapon mesh. We can go ahead and close that down. We can go ahead and drag this out and put it right there. Even though there's no script in it. The first thing that we wanna do when it comes to hide and show weapon mesh is, well, we want to pass in that data from before. So we have are automatically set it to Weapon Base object and we'll just name this weapon. All right, and just like before, I want to promote this to a local variable because this is going to be a hairy, hairy function. Local current weapon. Now if you remember, I talked about is valid before and that's where this is going to come back. So if we get our weapon slots, Let's get a weapon slot, one of the first one that we want to ask, open slot 1. If weapons thought one is valid, we want to set, this might not even show up unless I have, oh, it does set actor hidden in game. The actor that we want to set hint and game is weapon slot 1, and we want to make it hidden. So true means invisible. That means visible. The reason that this is valid thing exists, okay. When it comes to this script, is that if you run hide and show weapon mesh, when weapon slot one doesn't exist, it will get confused. So is valid is kind of like common sense for computers. So it'll recognize like, okay, you're saying to make weapons slot one invisible but I don't I don't see anything in weapons Slot 1. There's no data in this variable currently. So I'm just going to carry on my way. All right, so now we want to ask that again for weapons slot 2, 3, 4, 5, and 6. The same exact thing. So we can copy and paste. Not valid. So if it isn't valid, then is going to ask about weapons slot two. If it is valid, it's going to set that actor hidden game and then it's just going to continue on the script like that. So this is what it should look like. And then we want to put weapon slot 2 in like that. So this is valid thing mainly exist because we're going to want to make weapons thought one visible, right? But it's going to continue one and it's going to look at weapons lot to the first weapon that we pick up. When we pick up our first weapon, there won't be anything in slots 23456. So is valid is going to be able to determine that this isn't even bowed. So it's just it's just a way to prevent errors. That was like a very long way of explaining that, I guess. So let's copy and paste these two and do the same exact things until we have six of them. Can hit a little reroute nodes to make it not ugly. So we got 1, 2, 3, 4, at least need two more for 5 and 6. Like I said, this isn't super complicated, it's just long because you have to check for you now, I'm being nice. I'm giving you guys six weapons over here. Okay. So we've got weapons out. One weapon slat too. Well, it's not three. Open slot for Cinco says, oh, cool. Okay, what this is doing? Let's come back from this whole thing. And we'll say hides, currently equipped weapon mesh. So if you don't have this here, you'll equipment new weapon, and it'll function properly. Let's say let's say that you have the assault rifle, right? And then you switch to the pistil. The pistol will work properly, but you will see the pistol mesh or the sorrowful still mesh and it'll be overlapping. The assault rifle. So this is just hiding all of these meshes so that they don't overlap. But what we wanna do is we want to make sure that our new one actually shows up. So this is where this gets even more ridiculous. So out of set actor, hidden and Game want to plot a branch. And we want to do this whether it's valid or not. So both of those are going to connect like that. I might want this a little bit further down because it's going to be big. And then what I want to do is out of this branch, I want to take our local current weapon. So remember, local current will happen is this right here, which will get dragged into here, which also equals this, which I'll also equals this, which also equals this, which also equals this, which is this. That's how this can get confusing. Okay? So if our, if our current weapon equals weapons slot 1, and if you remember, in spawned weapon, we are setting weapon slot one to current weapon. If we switch to weapons, lot to that becomes the current weapon. So if our current weapon equals weapons slot one, you might be able to guess what we want it to do. We want to take weapons slot 1, and we want to set actor in Endgame. And we want to leave that unchecked. We want that to show up. We want weapons that one, whatever that weapon is, to become unhidden, to show up. In other words, so what we're gonna do is now we need to copy, paste this five more times. I know, I know people. That's crazy. So there you go. 123456. All that you wanna do here is just slot in weapons thought to open slot 2. So that equals weapons slot. So if it, if it doesn't equal 0 and slot 1, it's going to run down. It's going to say, Well it does it evolve in slot two? If it does, it's going to show it. If it doesn't, it's going to be like, Okay, well does it, it will opens up three, so on and so forth. Three. Coding is monotonous when he gets to be like this and you have so many weapons to check. All right, so now I have that highlight, that whole thing. Comment shows lately equipped weapon mesh. Boom, like that. Okay. Rest assured. This function and this function are the longest ones will ever create. Okay? You can close out, never look back. Let's plug weapon into weapon right here. Just to make sure that data is getting passed through properly. Let's look like a pretty straight line unreal. Oh my gosh. And what we wanna do is we want to take that load out and we want to set it to has weapon. We now have a weapon. Then we're going to pull out a delay node. And we're going to delay for point. Oh gosh, 33 seconds. I'm add a comment here for you. And say allows time. For weapon switch animation. If this doesn't exist, this little delay, then the weapon animation, this code will run so fast that you won't actually see the weapons switching animation. Now we're eventually going to set up point 33 was a good time that I find where it looked pretty good. Weapons is weapon is switching weapon. We're not switching the weapon. And then let's make another boolean right away. Call this can shoot, can we shoot our gun? We can. Okay, it'll be default false. When we start to creating other events in input actions to shoot, we will be turning this on and off because we don't want to be able to shoot our gun. And we're like reloading and doing other things. So we'll say URI enables shooting. And after, or you can't shoot while. Switching leptons want to be able to shoot a gun when you're switching between them will be weird. Okay? So that is all that we want to do there. Cool. Okay, So now, like I said before, our weapon pickups are going to run this weapon pickup event. But what if we already have all of our weapons and we just want to switch between them. Glad you asked. That's when we would have just run equip weapon. But we want to bind those two are keys one through six. So now we're going to do that. So let's go ahead and I'm going to create a new event graph for this, and I'm going to call this action mappings. What I wanna do here is I want to go One, 23, give me a fall of five and you guessed it, 2100 and just kidding, It's six. Alright. Dude, do put these in semi okay. Positions. Spacing them out a lot. Okay, so we've got 1, 2, 3, 4, 5, 6 right there. For one, pull it in. And if a branch as unrelated to call it. And we're going to say is weapon slot filled? If our weapons slot is filled, then we want to do another check just to be extra safe. We want to make sure that our current weapon is equal to weapons Slot 1 equal 0. O, wait, sorry, is not equal. I was like wait, that didn't sound quite right out of my mouth. Okay. If current, okay. This thing right here allow disables like so if you have weapons slot one checked or you have open slot 1 equipped, you don't want to. If he hit the one key again, and this isn't here. You'll just keep running this switching animation. You'll switch to the same weapon over and over again. This is disabling the ability to switch to the weapon that you already have. So if that, if the current weapon isn't already one, meaning that if n equals 2, 3, 4 and you're trying to switch to one, then we want to call her event equip weapon. And the weapon that we want to spawn in this case is weapon slot 1. And then we're going to set that as the current weapon. The reason that we're setting this as the current weapon is because this spawn weapon function will only run the first time that you interact with that weapon. So I have the little floating weapon spawning that actor into the world for the first time. I'm putting, setting all of the locations of it into my hand and all that stuff. I'm setting that as the current weapon. But now let's say I have all six weapons. They're already all spawned. And I just want to switch between them. So now we just need to run the equipped weapon, which shows and hides the match. And also does the little animation. That's all what we wanna do. So that's why we want to, nothing's actually setting that as the current weapon. And since we created this input here, we can set it to be anything specifically. We always want the one key to be weapons thought one. So let's go ahead and copy and paste this whole entire thing and do the same thing for 2, 3, 4, 5, and 6. These are a little bit close to each other. So I'm going to give you a second to do all of this for weapons slots two through six. So I'll see you in a second. Okay. Now, with all that done, you should have first 11 to 2 second 333444. Just make sure all these are the correct numbers here. And then let's comment box around the whole thing. And we'll say key findings to equip weapons after they've ben and initially picked up. So like I've been saying, all of this as back-end stuff. It might not be totally making sense at this point, but when we actually add the weapon meshes, when we actually do the animations to put them in our hands. All of this will all of a sudden or could beautifully and you'll be like, Oh my gosh, this is amazing. Okay, So thank you for bearing with me through this. In the next video, we're going to start by creating our weapon pickups so that we will have something to actually run this event. And then when we can run that event, we can then start creating, um, our animations to actually hold the weapons in, readjust the arms because it's a little broken with the assets that we have. And then we can put the guns in their hands. And then once we have all of that setup, it'll be beautiful. And then we can add some cool functionality to the weapons, actually get them to work. So hope you guys are still in join our way through this. You learned some stuff that he for watching and I'll see you in the next one.
11. Creating Weapon Pick Ups: Hello everybody and welcome back to another video on Unreal Engine for making this first person shooter. In the last couple of videos, we did a lot of copy paste type of scripting, getting our weapons to both appear and hide, just gonna say appear and reappear, but they didn't really make any sense. So in this video, we are going to continue on with that functionality, creates some blueprints to actually give us something to pick up and run the event that we made. So first thing that we wanna do is on our weapon base, we're actually going to make all of our children whatever edits that we make within the weapon base, it will be automatically applied to all the children, whether or not we make them now or later. So we're just going to make them now and you'll see why we're doing that now in a second. So let's right-click on Weapon Base, create Child Blueprint. And I'm going to call this Pistol Pistol underscore weapon. We're just going to keep doing this for all six. So our two rifle and we have a shotgun. You have a sniper rifle? We have a grenade launcher. Why do I forget? Okay. Rocket launcher. Welcome. Okay. I have the underscore weapons that they are linked to Weapon Base or just for nomenclature reasons. Because we will be creating like auto rival impact, effect and auto arrival, this and that sort of thing. All we wanna do so far, Let's open up our weapon. The only thing that we have, we can click on here and say show inherited variables. That's what we want. So we want to be able to see our weapon type and our socket name. So let's go ahead and actually do this one by one. Sock a name. Let's name. This is still underscore socket and we will create that. You know what? No, I take that back. Let's do that later because it's not created yet, so it might give us an error. Sorry about that. For weapon type though, we can set this to be pistol. And for the weapon mesh, we want this to be our click too soon or pistol. There we go. There it is. Exit out of there. We're gonna be doing a lot more editing in here. Later on. Weapon type, auto rifle, weapon mash. It's called assault rifle. We go shotgun. Make this of type shotgun. And let's go ahead and not Schwartz gun, shot gun. And we go as our shotgun. Sniper rifle. Sniper rifle. We got two more. Actually not even going to make this a bigger window here. Who cares? Grenade launcher and rockets slotting in the meshes right now, even though there's no functionality added, just so that way you can visually see them when we need to. Okay, the next thing that we wanna do is we want to create our weapon pickups. So if you you know, I'll show you I have the other projects still open right here. So if I go and hit Play, we're going to be creating these things that we can then pick up and interact with like that. That's great. These things, goals, movie on over there. With our FPS game folder selected, let's create a new folder and we'll call it interact a bowl. And then within that folder I want to create a folder called weapons. Because we're also in our interactable folder going to make M0, that's also going to be interactable. For now, let's stick to weapons. Right-click. So we got a class of an actor and call it a weapon. Pick up, base. Let's open this up and you can drag this along the top because we're going to be doing a few different things in here. So right away, lights with our scene route. Just keep that. Who cares? Let's make a skipping a step. Skeletal Mesh, and we'll call this weapon mesh. And then this is a little bit strange, but we're going to add a static mesh and we'll call this invisible box. And then let's also add a component of rotating movement. And we're going to set the z to be like 130. The higher it is, the faster it's going to go. Z means it's going to sway. Kind of like you can, you can, you can mess with that if you'd like it to do some crazy rotating. But for the sake of this, we're going to keep it rather simple. This invisible box is a little bit strange. The reason that we have an invisible box, because the way that we're interacting with this is through a line trace in some of the meshes like the pistol are very small. And so when I was screwing around with this, I found that it doesn't always hit or work that great because the mesh itself is so small. So this box being invisible means that we will always hit with something else, just give us a bigger radius, then we can hit the E key and interact with even though you can't actually see it. So with this box, what I wanna do is we are going to make it invisible and hidden in game. So unchecked, visible and check hidden game. The scale, Let's lock it and you make it 0.55 of its size. And for the static mesh, we just want the basic one m cube. Since we do have it set to be invisible, you won't actually see it even in the viewports right here. But there it is. It's invisible. But now it's all set up. And we can go ahead to our Event Graph. We don't actually, we need event taken, we need Event Begin Play. If you got rid of them, you can always just call them back. Let's get our player character out of here. Let's cast to be, wait a second. While networking. It should work. Weird, maybe out of just cast to API player. And my spelling things wrong. Why does this thing hate us? Hold on a second here. Okay, so I encountered something I've literally never encountered before my life when I find a solution to it. So if you aren't able to cast to the bp player out of get player character. Go on ahead over to our bp player. Right here on the self. Scroll on down to pawn and auto possess player, go to player 0, compile that. You hit play. Everything is still working. And now out of our get player character, we can cast to it. Now it's thin. Go to the player, which is what I was always expecting to happen. So that was very strange. But alas, we will move on with the right-click and promote this to a variable and call it player. One thing you notice about me is I am very perfectionist, so I am always going to comment box, even the simplest of scripts so that I know what all of this is doing here. So yeah, we just got a variable for the player so that we can reference all of its functions and variables and all that stuff. In here, we're going to create a custom event and we're going to call this pick up. I actually sort of pick out what's going on, interacted with weapon. Okay, just to keep it. So we're going to create a binding that's gonna be called interactive. So let us keep it nice and similar. Strike at our player. If you hold down Control, it'll automatically get it. And then we want to get the event of a weapon weapon pickup already. So if you remember from the last video, two videos ago, weapon pickup is this event that starts off the spawning the weapon, brings it into the world for the first time and then equips it. And since we have this input here, when we call it, It's going to ask which one do you want to spot? And you can see it's asking, now, since this was a class reference, it's, it's getting all of them. So now we have the auto rifle, grenade launcher, pistol. We can spawn any one of these. What we wanna do is we want to promote this to a variable and we can keep the name weapon to spawn. I just don't really want the spaces and it's like that. Okay? After this, we want to pull out a do once node. So we only wanna do this once and we're gonna play a sound today. And then once we play the sound, we want to destroy the actor. So we're going to destroy this pickup. Once we play a sound, I want to promote this sounds uw variable two, and we'll call it pick-up sound. Like that. I believe that's it. So we gotta do in here for our weapon pickups. Actually, you know what? I'm going to be cool. And we're going to add one more thing for flare. But before we do that, let's comment and I'll say runs event in bp player that we know the script. Now you're probably saying to yourself, Well Tim, this is a custom event itself will what is going to call this event. And you'd be right in wondering that. And we will create, this is what we will. We will create an action mapping to the 0x0 in the Iike is what is going to activate this event, which will then activate this event. And that will function in that event. And it'll just be one huge long thing. So before now saying, well, this is like hard. It's really not that hard, it's just very complicated. And so there's a lot of blueprints that are talking to each other to get this sort of thing to happen. If you notice that though, I had the weapons bobbing up and down. So we're gonna do that now. So out of event tick, if you're unfamiliar, so Event Begin Play and event tick, our President Eddie blueprint. If you're familiar with like coding, Event Begin Play is the equivalent to void Start. It runs whenever this blueprint exists, whenever it's called into the world. So that can be perhaps like the second you hit play. Or it can be whenever, you know, in this case, whenever you spawn this weapon. When the weapon is spawned, that eventing and play will run. Event tick runs Once every single frame. So event tick is better for like what you're going to see here when we're, if you're changing certain values, you want the game to be constantly checking for that. So you'd run it as an event tick. We're gonna do is we're going to add a timeline and we'll call this Bob. For bob up and down. Awesome. Let's double-click on Bob. Okay, Let's open up the old Bob. And I'm gonna make this last 2.5 seconds. We want this to loop. We wanted to constantly bow up and down. We're going to adding vector track of vector is x, y, and z. And we can lock and get rid of x and y. We only want to mess with z. So let's go ahead and if you hold down Shift, you will add keyframes. So we're gonna have four of those. The first one is going to be time 0, value of 0. Second one is going to be time of 0.75 and it's going to have a value of, let me just refer to my notes. It's going to have a value of 0.5. This third one is going to be 1.75. Oh gosh, they overlapped. The last one put at time 2.5. Okay? Third one is time 1.75, value of negative 0.5. And then this last one is time of 2.5, value of 0 again. So it's gonna go up and then down. Now this is a little bit jagged. So if we highlight all of them, right-click and hit Auto, now it's going to create a more smooth line like that. And that's exactly what we want. So we can close out Bob, and now we have a new track. And actually, sorry, we didn't name this new track. We can give it a name coming out. Okay, Cool. Let's just call this hover or something. Now we can truly exit out. Out of the update. We want to add actor and local offset and the location we want to be that value. So it's updated. So it's not, it's not it's not running this ad act or law offset. When this finishes, it's running it as an update, so it's constantly running it. And it's this events running every second. And the location is updating with this value like that. So let's go ahead and comment box this as well and say hovers up and down for style. Okay, So we've done so much stuff for like functionality. So here we go. There's some style for you. All right, I promised, and make it look cool. Okay. So we're going to be done in the weapon, pick a base. That's all that we want to do. So we want to start making children to this as well. So let's create a Child Blueprint class and call this pistol weapon pickup. And I'm gonna go ahead and skip ahead. I trust that you know how to right-click and create Child Blueprint class for all six of our weapons. So go ahead and do that and I'll join you in a second. Alright, now with that done, you should have all six. We should have seven blueprints and your total, because one is the base. And what we want to do is just simply open one of these up. And let's go to our weapon mesh and let's do the sole rifle. So what we want are out there like that. Oh, one thing I forgot to do. Apologies is the weapon mesh. I want to be up in the air, so said to be like 150 perhaps. So the value that I had it in the other project is 110, had to go back and check what that number was. So now this is actually going to be hovering above the ground and you notice it is automatically updated here like that. The other thing that I did was I made the y negative 20. So it steps it back a little bit. So that makes this up here just a little bit more centered with our scene roots right there. You can replace the scenery it by just dragging that over. But then if you do that, then you won't be able to move it upward because then this will be the center of everything. It'll be the root. Okay? So the other things that we wanna do in all these blueprints, it's weapon to spawn. We want to set it as the auto rifle. And the pick-up sound is we can begin slot the sense since we set this to be a variable. And there's one called rifle raise, like that. And that's the one that we want. If you feel like it's too loud or too quiet, you can always go underneath pick-up sound. And you can make this like 1.5 or something like that if you want or you can make quieter. It's really up to you. But that's what we wanna do in all of these. So you can go ahead. Once again, I trust you, I'll show you one more time that you can do the rest of them. Give you a little bit of a task here, weapon to spawn. We want to make that the pistol in like these don't have really anything in there yet, but like I said, the functionality will work once at all. It's all set up the weapon mesh. Let's make it at the pistol. So there it is. And the pick-up sound, these all are called rays. So you'll see pistol rays and you want to use the queue that the sounds slightly different every single time. So go ahead and try to do the rest of the weapons, and I will come back in a second. So I apologize again. There's one thing that I forgot to mention. So in the weapon pickup base, make sure in the base so that this applies to all of the children. Go to the invisible box and uncheck the lock and make the y value of 1 before it was 0.5 and that's a cube. We want this to be more rectangular because our weapons are pretty long. We want that to encapsulate the entire weapon. So just make it 0.51.5. And then you can make this invisible again and compile and save it. And then that will be applied to all the rest of them. With that, then we can place our weapon pickups into the world. So let's put the pistil, the auto rifle or shotgun. Oh gosh the shotgun. Know why the shock on lower. Weird. And then we go, this library fall. Maybe just the angle I was dropping in the map must have thought I was placing it lower beneath the ground. Grenade launcher and rocket launcher. So now we have all of our weapons. If I go in and hit Play, you can see they're doing there Bob and, and even thing, maybe a little bit too high still, you can lower that, just change the Z value on the parent there. And then that should fix that. And you can always tune this Abby, make them spin faster, whatever you want to your liking. The final thing we wanna do in this video is actually allow us to be able to interact with these weapons. So let's go into our settings, project settings. Let's go into inputs and let's create a new action mapping. And let's call this interact. And we're going to bind this to our Iike. If we find it. Somebody ease and the alphabet most common letter. Okay, so we want to be in the bp player, in the character. And we want this to be in our action mappings so we can find some space around here. And let's call upon interact. Now, here's some things that we wanna do when we interact. We want to draw a line trace by channel. A line trace is the same thing that we're gonna be doing when we shoot our hit Scan weapons. It's going to draw an invisible line out into the world, but we need to give it a start point and an end point. So let's take our camera component and let's get the world location. So the location of the camera. And we also want to get the forward vector. So the camera's location and the vector that is pointing out straight forward. We're going to multiply that forward vector by a low value. Yes. And this is going to be how far out into the world we wanted to shoot. In this case, let's set it to be something like 200. And then we're going to add these together like that. It hates me. Wait. I thought this was a float. Wait a second. I just had vector a plus vector. And we go vector plus a vector and make that our endpoint. And then our start point is going to be the location of the camera. Okay, so what we are doing here is we are getting the location of our camera component. This right here. We're going to be getting its location. We're going to be getting whatever the direction is forward from that, we're going to be multiplying that 200 units out. So that would be the distance of like here, like starting from here out to here. And then we're going to be adding those two things together to get our endpoint. And then our start point is just the camera's location. All right? And so out of the return value, we want to get an if statement. Because we only want, so if you see true, if there was a hit false otherwise, so we only wanted this line trace to do anything if we actually hit something. For right now we're going to pull out a sequence, even though we're only doing one thing because we want to interact with multiple things. So this is just for the future. And then out of then one, we want to cast to our weapon, pick up base. And then out of our outfit, we're going to break This hit results. And then the Hit Actor is what we're going to plug in to our object. So what brake hit result is essentially doing is it's drawing this line, trace it, seeing, okay, what did this hit? There's all these options for things that can hit. In this case, we're looking for an actor to be hit by this invisible line. And the actor that we want to see if we're hitting is our weapon pickup face. And then if our weapon pickup base is hit and let me just go back to that so you can see if our web me pick up base is hit. We want to run this interacted with weapon. Interacted with weapon. And then if you remember, interacted with weapon, runs weapon pickup, which runs spawn weapon, which then equips a weapon. And there you go. You are now a coding genius. Congratulations. Now if we were to hop in and play and walk up to any weapon and interact with it. You'll notice that we get that sound effect. It disappears and all of that. But we don't actually get to see it in our hands, although it is in our hands, the weapon sockets are a little bit screwed up, so it's actually pointing straight downward and we can't actually see it, but we do have it equipped at this time. So we can do a little bit of a debugging thing to make sure that this works and we'll do that now. So anywhere in our event graph, this is going to be temporary. Just hit seven out of pressed. Let's do a print string. And then let's get the current weapon, drag that out and plug that into that. So now whenever we hit seven, it's going to output to the screen through text what our current weapons. So now if we happen in play, and I were to interact with the assault rifle and I hit seven. We have the auto rifle weapon as the current weapon. Now the pistol and the shot down the sniper. And if I had seven should be the sniper. It that should be grenade. There, the rocket. Now, let's try switching between weapons. So they hit one. That was the pistol, I think Rizzi, sorrowful that we picked up. So hit one and now hit seven. So auto rifle, the second weapon we picked it was the Epistles of it too. And now seven, since the pistol, so it is switching between the weapons. It is doing everything that we want to do. It is working perfectly. Now all we have to do is give us a way to see it actually happened on screen. That's what we're gonna do in the next video and hope to see you there.
12. Making Our Own Weapon Animations: Hi everyone, Welcome back to another video. In the last episode, we created our weapon pickups and all of our weapons switching functionality seems to work. In this video, we are going to be back in the Animation Blueprint so that we can actually see it happened. Hm, instead of just computationally happening in the background. So let's go ahead and do that. Now, the first thing that we wanna do is go to our player arms skeleton located in our character folder. And as I said before, we have this right weapon socket. Off of this socket, we want to right-click and we want to add a socket. Okay, We hit F2 on here. We can give this a specific name. In this case, we're going to call this pistol socket. Let's right-click again at a socket and we're going to add one for every single weapons. So auto rifle sockets, so on and so forth, and add a sockets, shotgun sockets. And then I trust you, I believe you can do the final three TO I'll be back in a second. Okay, now that we have all of our sockets in place, I'm first and foremost in a perfect world, we would have an animator that would make animations that would perfectly hold every single one of our weapons. And then we could just slot those animations in. We do not have that luxury. This pack only comes with, comes with two. It's only has one for a launcher, but the launcher is not the correct launcher and the rifle is not the correct rifle. So what we have to do, we have to do this, the sort of workaround way of translating bones around and creating our own sockets. So that's why we're doing this. If you add a bunch of animations, you will not have to do this just for the record. So what we wanna do, if you remember, if in our bp player, in our spawn weapon, we attach our weapon to the players arms based on the name of a certain socket. And by default that is right weapon, which is this one. Well, we're going to be changing that up so it actually fits in the hand properly. So what we wanna do is we wanna go to our weapons. And in each weapon, we want to change this socket name to the one that we created. So auto rifle socket is what we want. Grenade launcher, make sure it's spelled correctly otherwise. The game way to work. Pistol sockets. Yeah. Match them up with these and spell them correctly. As I said. Unlike me who's awful at spelling apparently, are almost done. Just one more. All right, and then the base just keep the same as that default. One. Next thing we're gonna do is we're going to change these values so that it actually fits correctly. Something that we can do. It said I can show you, which is kinda cool. So under preview scene setting, preview controller, Let's go to US specific animation and we want to use a rifle idle. So, oh gosh, that was way too fast. You probably wanted to be like two or one in here. So we have our pistil socket right there. Underneath our pistil socket, if you right-click, you can add a preview asset and we can actually add our pistil right there. And so you see, right now, That's why we couldn't see our gun when we would interact with it in the last video, like I said, it was pointed straight downward. So we need to make a few edits to this clearly. So go on over to our Details panel. If you don't see the details panel, just go to window details and it will show up. And you'll see here's our name. The bone name is the right weapon. We want to change the settings. So I already did all this for you because I'm such a nice person. This should line up relatively well, but you can do it by hand by like moving it around and all of that. But the locations that I have are negative 0.71. For the x, the y is 0.6, z is 9.3. The rotation is negative 90. The y is 0, z is 0. And that'll look really nice. Now, what we will do in the Animation Blueprint is we will make it this arm disappear and we will move actually the fingers in a good location. But we might, for other weapons, we will be altering kind of where this other shoulder is and stuff. If you want to, you can right-click on here and remove all attached assets and now the pistol will disappear. But you can see now how the pistol sockets in a different location than the right weapon. So let's go ahead to the auto rifle and we'll do that now. So sorry, I'm just checking what the socket was. On the other project. The relative location is negative 1.5, the y is 1.5, the z is 7.6 and the rotation is negative 90. So if you wanted to see what this looks like at PU assets. So rifle. So there you go. Now he's actually really told them that a, that a crazy thing. Let's do the shotgun next. Preview assets. I'm just doing this for fun nowadays. I think it's cool. So see how that looks really stupid. You actually see a move around. If I Preview acid there, it's kinda cool. Relative location is negative 1.17. The y is going to be 2.06, some very really specific numbers here, and then 10.2 and then negative 90. And there you go. There's that and see the fingers clipping through here. So we will fix that in the image, a blueprint and the hand isn't quite up there enough. But we just want the socket we mainly are focusing on is it in this hand, the thumb and these fingers? Is that looking like it's in his poem? That's what we are mostly worried about right here because that is the root, that's the attachment point that we're setting via those blueprints. Sniper rifle is next. Let me go. Now for this sniper rifle, what do we get? The sniper rifle is a negative 0.53. The y is 0. There is 0.87 and the z is 12.9. And then the rotation as always is going to be negative 90. And that looks pretty good right there. As far as this hand, remember we're just focusing these fingers. Grenade launcher, app preview asset, grenade. Know that there are an aid launcher. Hey, Kanzi, click in. X is negative 0.42, y is 1.46, z is 10, and then negative 90. So there you go. It's a nice login grenade launcher in there. Finally, we got our rockets. And then so for the rocket we have x of negative 0.72, y of negative 2.36, z of 13, and then negative 90. So if you want, you can fiddle with it. These numbers work. I did it by hand and now I'm just telling you what the numbers ended up being, but that should all work and then you can just remove this assets and get out of our skeleton. Now if you go into our character and go into the Player Animation Blueprint in the Event Graph, we are going to want to do something out of our other sequence node. Finally, I know. So let's do that now. Da-da, da-da, da-da, da-da. So if you remember, let's actually first plot a branch. If you remember, we created a reference to our player and we have a load out. And so we want to get that variable in here. So let's check if it equals something. If this has a weapon, plug that in there. I'm just trying to like make sure that's not look super ridiculous. Oh gosh. Can probably rewrite this a little bit. There we go and look bad. Okay, So we only want animations to play. If we have a weapon, we don't want our hands is facing outward like this and we don't have a weapon. So if we do have a weapon, let's go ahead and create a new variable. And we'll call this current weapon. And we're going to make this of type load out. All right. We're going to set this to be something. So this is equal to. The current weapon in this blueprint is equal to load out in this blueprint. But we want these two blueprints to be able to talk to each other and make those make a current weapon in this blueprint equal the same thing as load out in this one. So let's go to player. Let's get our load out. And then let's also, oh, actually, I'm sorry. I did it backwards. Instead of making it load out, make it a weapon type. I apologize about that. Yeah. Change variable type. It'll be like it's fine. So we've got a player and let's get the current weapon. So we're going to get the current weapons type and then we're going to get weapon type. Get weapon type and then set that. So let's highlight this and say links. Current weapon in weapon base with Anime Blueprint. So what this is doing here, and you'll see why we're doing this in a second. We are taking this variable and our weapon based the weapon type. And if you remember, in all of the children, we set that to be something. And essentially what we're doing is we're saying whatever the current weapon is, whatever the whatever the current weapons Weapon type is. So pistol, assault rifle, we want to set that to be equal to the variable found within this animation blueprint. Okay? Now if we go back to the animation graph, we're going to unlink this player movement because we want to do some crazy funky things. So we're going to drag it here and we're going to say cash. We're going to cache this pose and we will call it the same name, player movement. What caching poses does essentially is it takes all this data and then puts it into a new name. So if you notice like these only go in one direction, here or here, they're not like nodes that have outputs and inputs on both sides. So now what I can do is I can call upon US cashflows, player movement, and I can sort of continue on the branch to do that, save that as a cash pose and then plug that into something else. So that's what we're gonna be doing. So let's highlight on this and say state machine in state machine controlling players movement. So this is like our first step, so to speak. But we want to make changes to these animations based off of different weapons. So admittedly, this will be a little bit confusing. But if we hold our weapons, like I said, these animations don't perfectly line up. So we will need to make some modifications to some of our bones in sockets in our skeleton. Going to have to move these around to make it look like our guys actually holding the weapons. Because the, there are all of different sizes and we don't have our own animations. So let's take this cash pose player movement. And let's right-click in some open space and say Transform, Transform, modify bone right here. And it's plugged these in. You're gonna get a sort of a little conversion node like this. Okay? This first one is going to be for the pistol. I want to grab two of these and plug them into each other. And then I want to drag out of here and I want to cache. I'll component to local, okay, Sure game. And now we can cache. And then we will save this as pistol pose. Okay. For the bone to modify, We want to get the left shoulder bone be left shoulder. And we want to translate this. So let's this little exposes pen and let's uncheck that. In uncheck that we only wanna do translation. We're not rotating or changing the scale of anything. Instead of ignore, Let's add to existing. And we want to make x negative two, y negative 34, and z negative ten. Like that. Then the other thing that we wanna do is we want to also screw with the right shoulder. Because if you remember, the right shoulder a little screwed up too. As you will see, we want to rotate this. So let's unexposed the translation and unexposed the scale. We don't want to use those. We just want the rotation, the rotation we're going to add to existing. And then we're going to set this to be negative 10. And the x like that highlight this whole thing. And we'll say translating. Animation or pistol Coase. We are low budget. We don't got a bunch of fancy animations. We could just plug in. For all of our weapons. We have to translate to the bones by hand to make them actually look like they do something. So we could actually probably copy and paste this. And we'll translate pistol for auto rifle. Because we still have no animations. Okay? Instead of pistol pose, Let's make it auto rifle pose. Okay. Capitalize what? It's really doing it to me. Okay. Thank goodness. All right. We have a couple of different ones. We have the left shoulder that we want to be negative 20 and z. And that's actually the only thing that we want to translate here when it comes to our auto rifle. Just a little bit of shoulder movement there to move it down and over a little bit. Copy and paste again. And we'll do this for our shot gun. Actually, because we need to them. So let's copy paste this one instead, the pistol. And let's do this shotgun. And I'll stop making jokes. Right here. For cache name shall compose. Left shoulder for the shotgun is going to be negative two, y of 0 and z of three. And then the other bone that we want is we want to start messing with the index. So we want right-hand index one. So like if you notice before, how like the index finger overlap the trigger a little bit, That's what we're fixing here. So we want to take the translation or sorry, no, the rotation. We just want to make this z of 20 and then these other ones. So 000 20. Same thing for the sniper rifle. The left shoulder for the sniper rifle is going to be negative one. And then negative two in the y. And then seven for the left shoulder. And then this is going to stay the same because the fingers so screwed up the same way. Oh, I've got to change this to sniper rifle pose like that. In man for we're now at our grenade launcher. Grenade launcher pose. For the grenade launcher, we want 000 and and I mean, the only good thing is that the same sort of sockets, a left shoulder, and the index of the ones that we have to change. They're not really change like a lot of this other stuff. But yeah, it is pretty tedious nevertheless. And then last but not least, rocket launcher, rocket, rocket launcher pose. And then for the rocket launcher, translation is going to be negative 0.5 and the x, y is 0, and then z is 5. And then that is all of that. So we have all of these blended poses here. You can pause if you get a little bit lost, you need to see the numbers again. And then what we're going to do is one last thing before we get this all up and working. So we want to grab our current weapon. And we want to blend poses. Hopes that other one. Oh gosh, blend. Blend poses by this enumeration. Where is it? When poses by weapon type? Yeah. Okay. This is correct. Okay. We want to blend poses by weapon type and then we want to add pins for all of these elements here, which is all of our weapons here. Boom. And then, which is pretty cool. We can just grab. So for our default pose, Let's just use player movement. For our pistil, we want to use the pistol hose, just this, and then the auto rifle pose, and then the shark compose. And then the sniper rifle cached pose. In then the grenade launcher pose, then the rocket launcher pose. Okay? And so if we do this, it still won't work because we're not actually outputting anything. So we can do is let's go ahead and just cash this again and call this weapon pose. And now let's grab weapons pose. Oh my gosh, game. Work with me and sometimes it hates like using cash poses. Sometimes, yeah, they really search for that sucker. So now you can see that's updating and we're in pistol pose because I guess it must just be pistol by default. A default value of that enumeration is pistol. So you can see it's actually flowing through, it's running through here. Where are we going to Weapon Base. Watch this magic. If I saved it to the auto rifle. Come on. Okay. It doesn't want to update. That's awkward. Well, in spirit, it worked. Oh, wait. There. So you can see how his hands are actually moving. Sees finger, how that moved a little bit much that grenade. You've got the pistol pose. Right there. We're translating these bones. Taking the auto rifle, shot gun, sniper, the grenade, heed, the rocket launcher, and all of that. And so that value of current weapon is going to be linked up to whichever weapon that we have equipped in the game. And so What's happening that Anim graph is that we're controlling our Idle run or caching that into here. And we're taking that data and we're transforming some of the locations of this based on whatever weapon that we have set by this enumeration and that's being outputted out to the screen. So if we did have actually animations, we would just take like rifle run and then just drag that in here. But making this whole step unnecessary. But like I said, we don't have animations. So this is the way that we have to do it. Now one thing that I forgot to mention that is pretty important is that inside of our bp player, um, when we are attaching the actors two components, instead of the default which is keep relative and weld simulated bodies, we want to make sure that these are all set to snap to target and we want to uncheck, well the simulated bodies. So let's go ahead and do that. That's just a small setting that's going to cause a bit of an issue within our script and essentially cause it not to work, which is not good. No blend will do that. And then if we go here and turn around, we have our pistil for rifle, which I think there's an issue with that animation. Shotgun looks good. Sniper rifle looks good. In a lot of really good. And the Racket looks good. We can switch between these now. See that the current mesh is disappearing, the new one is appearing, and the animation is working properly. See the hands moving around to where the guns aren't. You'd actually see that pretty well, especially like that to something like that. So that is all working well and good. Let's go ahead and fix the assault rifle, and then we'll be done with this video. So as a little tidbit, just as a cool little tip, if you want to actually see what's incorrect here, you can hit the semicolon button on your computer. On to the right of L, you can enter what's known as the debug cam and we can detach from our player. We can see that we have an issue with our left shoulder. So our right arm is in is in the correct location, but our left arm is way too far back. And just, just, just not doing that. Great. So gotta fix that. So awkwardly enough, I found out that you probably might not have even had this problem because if I go into my auto rifle weapon, I have it set to be a pistol. So it's doing the pistol animation. If you've run a preview these assets, you can always just switch this in here. And then you can see like if I were to do something crazy like 40, you can see that happen in real time To their hand move up like that. She's kind of cool. Like that. I compile or go back to its default value and then it'll be done. So if I hit play, this might have just been a me problem. There you go. Now our auto rifle is the one being held, and that is also in slot one, so we can pick these up and whatever order that we want. So slot one was the sorrowful pistol, shotgun, grenade, one of those hyper. There we go. So there's a functionality we can actually do anything, but it all works. We are holding our weapons and we can pick them up and it's looking all nice and good. So we're making some great progress here. I hope you are enjoying the class so far and I hope to see you in the next one.
13. Switching Between Weapons Animation: Hi everybody and welcome back to another video. In the last episode, we added some animations so that we can actually visually see ourself switched between our different weapon blueprints. In between videos, I did a couple of really small things in our weapon pick up base, I made the height of our weapon. Mattea was 110, animated 75. This is just personal preference. For me. I feel like they're in a better height now. And then in our player Anime Blueprint, I added this section that says translates bones to hold a different weapons just so that people can see what this part does. Okay, What we're gonna do in this video is going to, we're going to move away from the world of heavy coding and translating all of these bones and doing this crazy stuff. And we are going to add some flair to our project because currently right now if you hit the button, it just kind of awkwardly automatically transitions instantaneously between the weapons we want to actually animate something in plays out. So let's go ahead and do that now. So if you are in our player Anime Blueprint, That's awesome. Go over to our player movement state machine and open that up. And we are going to drag out and we're going to add a state, and we're going to call this switching weapon. And I want to drag a transition to and back. So we want to be able to go from our idle to our switching weapon and then from our switching weapon animation back to our idol walking one. In order to set this up, we need to do a couple of things. So first and foremost, if you remember, if I go to just to basically buy graph is close down. If you go to this equip weapon event that is random, we first pick up a weapon and when we switch between them every single time, you will know that within there we have this variable that says is switching weapon. When this event is run or ran, English is hard, this variable turns true and then after 0.33 seconds, it'll turn false. And we said that it allows time for a weapon switch animation to occur. So it's not instantaneously going from true to false. It allows time for this innovation to occur. So that's what we're gonna do now. So first things first, let's go to our Event Graph and or an blueprint. And let's create a new variable and call this is switching weapon. And I'll make this a Boolean. And all we wanna do it, this is we want to set this to be equal to the same variable that's found within our player. Get is switching weapon. Plug that into that. So now we have a boolean that is in our Anime Blueprint that is set to equal at all times to the value of the one found in our player. So let's do this. And it says, say very little for switching weapon enriched. So pretty straightforward, right? This so far. And we'll add this off the branch of other, other stuff. You might, if you compile like me, you'll probably get a couple of little issues here. That's just because in our enum graph, we don't actually have any animations here. So we're going to have to go ahead and add 11 that we want to add is in our shooter game. Let's go to Shooter game animations, FTP animations, and we want to get rifle equip. So rifle equipped looks like this and we have a broken sound in here. So the one that we want is called, it is called a quip, I believe, SR, SR, sound queue AR clip, and it's busted. So let's equip it anyway. Volume multiplier, we can stay at one for now and said this magnifying glass to actually find this. And let's go ahead and fix it. So search a clip, Clip 1, and then equipped to write n equals 3. So now we say that we put in a queue. And now it works. And I can hear it like that. Pretty straightforward. This one now works. So let's go back to our Anime Blueprint, animation graph player movement, open up switching weapon. It's got our asset browser. And we have rifle equipped here. If you didn't have rifle equipped, are ready, just it'll probably say it's not configured to this skeleton hit Yes, and then select player skeleton and then it will show up over here because player skeleton is the skeleton right here that we created to be attached to this, our character and our character's animation blueprint. Now we need to do is I need to create some states, I mean, until the game. Okay, When do you want to switch to this animation? And what do you wanna switch back to this one? It's very, very simple. We just want to say, Well, are we switching a weapon? If we are switching a weapon, we wanna go from Idle Run 2 switching weapon. And then if we are not switching a weapon, we want to go back. And I'll let should compile and save. So now if we go up here and we pick up a weapon, we should see it animate and inanimate again and anatomy it again. And it's animated. Know that. And we can switch now. Again, the Santa Fe complete waste, it's kinda weird. But it's only sometimes white. That is very strange and will be something around with this animation. Let's see what the promise, okay, I think the problem was persistent because I had the animation file open because now I'm not getting that error. It's working just fine. So who moved the gun out of frame? It'll switch so quickly, you can't even really tell that it's kinda glitching out. Also, another thing that we can check is I have currently weapons Slot 1 equipped, which is the PESTLE currently if I'm hitting one, it's not doing anything. If you remember, we added this script in here to ensure that. So if our current weapon is the same thing as the weapon slot that we have equip. We're not going to run anything. So we can't equip, reacquaint the weapon that we already have. So one doesn't work and two doesn't work, doesn't work for his work 56. And since we have those is valid nodes. Find them, my goodness. Oh my God, easy to get lost in. So he says we have these is valid knows if I were to get rid of those is valid nodes right here. And I'm doing this and then I hit 2, 3, 4, 5 or 6. It will get confused. That sense that we have those. It'll just travel on down to the next one. It won't get confused. And everything works perfectly. So that is all well and good. We are going to just continuing on, add some functionality to these weapons and make them look and sound and feel really awesome. So we'll do that in the next video and I'll see you there.
14. Dynamic Crosshairs: Everyone and welcome back to another video in Unreal Engine 4. It is a brand new day, at least it is for me. So we're going to start this day off right by plane. Some epic first-person shooter music that really set the tone, I believe. So. What we're gonna do in this video and in the next set of videos is we are going to be using the user-interface, making some widgets, some UMG, the hood, whatever you want to call it. So we're going to start this off by creating a new folder in our FPS game and call this UI. Feel free to call it UMG on real motion graphics widgets, whatever you want to call it, I'm going to call it UI. Inside of here, we're going to create two widgets. If you're unfamiliar with what widgets are there, such just like 2D planes, where you can put your HUD and other 2D assets. So we have HUD and then we have cross here. This video, we're going to be making our dynamic cross hairs that will be moving depending spreading out and moving in titer, depending on how fast our characters moving. Before we open up our cross here, what we wanna do is you want to create two new variables, one inside of our character. And then we're going to want to create one inside of our weapon. So inside of our character, we're going to create a Boolean and call it is aiming. This is going to be used in several scripts within the character, where we will fire off different events depending on whether we are aiming, aiming down site or not. The reason we're making it now is because it has some functionality within our cross her widget. The other blueprint we want to open up his weapon base and let's create a new variable and college and bullets spread. Going to make this, I've typed floats. This variable is going to set it to default value of 350. What this variable is gonna do is it's going to be in control of a calculation that dictates how much our bullets are spreading when we're hip firing because we don't want to be totally perfectly accurate. And so this number is going to directly correlate with how far apart are cross hairs are by default. So let's open up across here. And you will see our default 16 by 9 screen size on Fill Screen up here we're going to make this custom and it's automatically, or by default going to set it to be a 100 by a 100. And that's totally fine with me. I'm going to rename our canvas panel by selecting it and hitting F2 and call this cross here canvas. And I'm going to search up a size box, drop that on the canvas. And then I'm going to drag an image and put that on the size box. So you should have a hierarchy that looks like this, where the image is a child to the size box and the size boxes, child to the canvas panel. The size box, we're going to name that top cross here in the image will just name this top fill image. Now by default, images will be set to variables. You can think, you can uncheck that. I don't think I'll be using it, but we do want our cross here to be a variable. With our top crosshair selected. We want to anchor this to the top. I want to make sure our positions are both at 030. Sizes are fine. The x, we're going to make it 0.5 in the alignment. We're going to make sure we click on Size to content, which is going to size this fill image two, these numbers, and we're going to have a width and a height override. And let's make it 1.5 and 20. So now we have our little top Crosshair image right there. Let's go ahead and hit Control W to copy paste this are duplicated and we'll make this one called bottom crosshair. And bottom hit Caps Lock, bottom fill image and the bottom cross hair. Let's go ahead and set this to be anchored at the bottom. And we're making this little flower is down here. Now, let's reset our positions, make sure that they're all at 0. And then I believe the why of this will be one and we'll keep the 0.5 alignment for the bottom. Let's go ahead and make the left one. Now, we've got left crosshair and left Phil image. For the left. I'm going to anchor it to the left. I'm going to reset our positions to be 00. And we're, we're gonna do is we're just going to invert the width and height. So the width will be 20 and the height will be 1.5. And I need to move this over a little bit. So let's make the alignment 0. Yeah. And probably 0.5. That looks good. Yeah, left cross their alignment 0 and the 0.5 in the y. Last but not least, we have the right. So we'll do right, crosshair and right. Phil image. Let's anchor this to the right-hand side. Let's note the size. Its position of 0. Alignment will be x of 1 and y of 0.5. And there we go. Now we ever cross hairs like that. And since we already have this white point in the center of the screen, we don't really need actually put a white dot in the center. For the remainder of the video. We're going to be in the Event Graph and we're going to actually make these cross hairs move around. And the best way to do that is we're going to create a couple of functions that will probably be pretty ugly. So whenever code it becomes ugly, you just stick that bad boy in a function. So that's what we're gonna do. Create a new function and name this move cross hairs or something like that. For this function, we want to give this an inputs of a floats and we'll just call this targets because it is a target value that we're going to be moving toward. And let's promote this to a local variable and call it local Target. Because this script is going to be pretty long. In this direction. I went ahead and hit Alt to break this pin because we're gonna be doing some math, everybody's favorite subject. So at a target, let's add a float plus a float. And let's promote this to a variable and let's call it bullets spread. We're going to link this bullet spread has variable up to our bullet spread variable that we created in the Weapon Base. So this plug-in, the result of that math into our local targets. So it's just passing this, adding it to a value and then setting that as the new value. This is the time where we take out across here. So let's grab our top cross-hair. If you hold down Control, it'll automatically get it. If not, it'll ask you if you want to get it or set it out of here. Let's set render translation. And then out of the translation we're going to right-click and split the Struck pencil will get in an x and a y value. And what we wanna do out of here is we want to get the translation or get transformed, sorry. And then we're going to split this two additional times. So let's split it and then split the translation again. So we now we get an x and y. Plug that in like that. Let's plug the x directly in because we don't want to change it. But for the y, here we go, we're going to interpret too. The return value of this will go into our y, but we need to fill in these. So our target is going to be our local Target. Delta time is going to, we're going to get the world Delta seconds, which is just like the time of within the game, returns the frame delta time in seconds adjusted by time dilation. Time dilation is like if you speed, speed up time or slit on time, this is just like the time occurring in the world. Then interrupt speed. Let's promote this to a variable and we'll call it interrupt speed. And let's make it like, Oh, you can compile first and make it 30. So what is all this doing? So our top cross hair, we want this to move up and down, right? So that's in the y plane. X is this way. Why is this way? So we're keeping the acts exactly the same when we would be moving or whatever. But we want to change the y which is up and down. Interrupt or interpolation is essentially a moving from one value to another over a certain period of time at a certain speed. So we have our current value, which is this y-value that's already set in. And then we're going to have our target value, which is going to be where it's going to move to target value. Remember, is this, and it's going to be adjusted by whatever that bullet spread value that we set in our weapons. It's going to move there over just delta time is always just like the world's time. You pretty much always pulled this node out. And then interpolation speed is just set up to you how fast you want it to move from point a to point B. And so I said 30 is fine. And so that is how that works. That's kind of what that is doing right there. Try to make this. Now it looks super ugly, but it's kind of a funky little script. So let's comment box this and say top. Crosshair movements, something like that. So what we wanna do now is we want to do this for all of our other crosshairs. So let's copy and paste it. And all these are just gonna have slight variations. So let's do the bottom one next. Let's drag bottom over top. It'll replace it. The only thing that we wanna do is the bottom is going to move in the opposite direction as the top would. So let's just multiply this by an integer, by another floats flow times floats. Plug that in as the target, and let's multiply this by negative 1. So that'll just invert that number for us. Sorry, the script is kind of ugly. And then we'll call this bottom bottom crossfire moment. And if you couldn't already guess for our left and our right, what we wanna do is we want to just invert the x and the y, because now we'll be moving on the x plane instead of the y plane. So let's go ahead and grab as a lift cross hair. And the left will just be the local Target. But instead of x and y, Let's break these pins right here. Let's plug the x into our current and then return the x and then just directly plug in the y. So will the left cross hair movement I spelled something. Yeah, 30. And then last but not least, for the right one. Let's name this rights. And all we wanna do for the rights is out of local targets flow times floats, multiply it by negative 1 to invert whatever that other value is. And then bada bing, bada, boom. Now we've got all of that setup. Looking pretty good. With that done, we can go into our event graph and actually call this function into life. So we are going to need, we don't need preconstructed will need Event Construct and event tick. So out of a van construct, which is the widget variant of a vamping in play. So it's like whenever this widget is created, this will run. What we want to do is we're going to get our player character. And then we're going to cast to said player character, the bp player. And then let's set this to a variable called player. Yeah, that's our reference to our player. So now we have the player as a variable in this blueprint here. And then we want to create a custom event right away. And we'll call this crosshair update. Then. We're going to want to run this event off of the event construct right away. So in the crosser update what we wanna do it, Let's get the reference to our player, and then let's get our load out. And remember I told you before about enums and being able to switch them on and off and run different events depending on what it said as well. That's what we're gonna do right now. So let's switch on our enumeration like such. And what I want to do is if we don't have a weapon. So, okay, let's do this. So go to cross your Canvas. Make sure that's set to a variable. Then grab it, get it, and then let's go set visibility and copy and paste that. So we have two of them, plug it into the target. So if we don't have a weapon, and we do have a weapon, if we have a weapon, we want our cross hairs to be visible. If we don't, let's set it to be collapsed. Like that. Here we go. So we only want our cross. There's this show up if we actually have a weapon. So this top script is done. Let's move on to the bottom and we want to do some other things. After we have this show up, Let's go ahead and get the current weapon. And then let's get the bullet spread from set weapon. So we're getting whatever value. So like if I were to go in our weapon bays, right, we have bullet spread said to 350. But I can go in our auto rifle and now I have see that bullet spread and I can set this to be something, some other number and I can change that on a weapon the weapon basis. So what this cross here is doing is it's getting that value. So now we're gonna do some math. Okay, let's do some division flute divided by float. And let's divide that number by 50. And I'll put a comma here and say at counts for bullet spread. Okay, you have to get too caught up on the math and the values. This is just stuff that I did in testing, figured out that worked. Then we're going to multiply this by negative one. So you make sure that it's moving in the correct direction. And then the murmur that bullet spread HUD. I'm going to set that value as that math. So revolt spread HUD is in our move Crosshairs function. Like that, bold spread HUD, we're adding that to whatever our current target is. Okay, after this, what we wanna do is you want to set a timer by event. Timers are slightly different from timelines. We want to make sure that this loops and we want to run this timer every 0.01 seconds, so it's moving rapid pace. And out of the event, we're going to create a custom event. And we'll name this move across here. Or, Ooh, that's also a name that we already used. Let's name that move cross here and let's name this how gosh, moving across here. Actually, let's call it translate. Crosshairs is That's what we're doing. We're actually translating them. There we go. That actually makes more sense. Okay? This is what we actually want to move them around. Okay. It's all looking good to me. I don't move cross here. Let's add a branch because we want to be able to know is our player actually moving. So let's get our player. Let's get our Character Movement Component. There we go. Character movement components is this, controls all these thing. So we changed the walk speed before. You can make yourself jump higher, jump seven times, do budget, whole bunch of different stuff. So we're grabbing that component and there's something built in called is falling. Plug that into the branch because you want to check if we are falling or not. If we are falling, Let's go ahead and do trans late cross hairs. And the target that we want is let's create this to a variable and call it falling target. So this will be the number that we set it to if we're falling. And let's make this negative 60. So remember on Translate crosshairs, we added this input here. So now it's asking for a target of a float value. So what we're doing here is we're saying, okay, if we're falling, start this out as negative 60 and then we're adding that to the bold spread and then setting that as this value. And this value is what our target value will be to move that crosshair to cross the screen. So you don't, like I said, you have to get too caught up on the math here. But that is making it, making that number of a bullet spread. Move across the screen in a way that doesn't look stupid. They ridiculous. So if we are not falling, we want to pull out another branch and we want to see, okay, we're not falling, but how fast are we moving? So scrapped the player. Let's get our players or velocity. Let's get the forward vector after the vector length, actually the length of the vector of us moving. And if this is greater than, one, will check to see if it's greater than one. Because if it's greater than one, that means that we're moving. So if it's greater than one, AKA we are moving, then we'll do our moving. None are moving. Translate, translate, cross here, event. And the target for this one is going to be feel length of our vector. And we're going to multiply this by negative one. So the inverse of that. And then we're going to do some division, divide that by 25, and then that will be our target for when we're moving. And then if we're not moving, let's run that again, trans late crosshairs. And our target is going to be 0 because we don't want them to move anywhere. So this is if caret character is walking, character is standing still, and this one, if character is falling. So we want that to be really big if we're jumping. So that's the biggest one. Biggest value are totally smallest value because it's negative numbers, right? Okay, So there is all of our script right there. Cross her update all of that. Okay, the last thing that we wanna do in here is weight. Do we even, okay, yeah, we're good. So ativan tick, we want to check this every single second. This is where the is Amy thing comes in. It's grabbed the player and we'll say is aiming. Okay? Because if we're aiming down sites, we don't want our cross here show up, right? So let's grab the crosshair Canvas again. And let's do set visibility again. Copy paste. Okay. Let's set this to be collapsed and then set this to be visible. And then the last thing that we want to check is we want to get the player and then get the load out again. And then we want to switch that out again. So if we are not aiming and we have a weapon, then we'll set to be visible. If we are if we are aiming, we'll set that to be collapsed. Which is like you can't see it. The reason that we want to put this additional step in here is that if you don't have a weapon, but you hit the right mouse button, it'll it'll make it show up still, even when you don't have a weapon. So it'll kinda go to the game out a little bit like that. So let's move this down. Comma box removes crosshair. When Amy down site. We don't want to see it more even doubt cite Scott that in that case. So if we hit Play, it doesn't do anything because we need to do a couple of other really, really easy things. So now let's go to our main HUD. Drag that out, and then we want to search our crosshair and drop it on the canvas panel. It's going to show up, look and really stupid. So let's go ahead and anchor that to the center of the screen. Set it to be 0. In 0. Let's set it to be size two content. That's actually really small. I'll set it to be 100 and by a 100 and not size it to the content that's looking much better in an alignment for x is 0.5 and alignment for y is 0.5. So there we go, There it is right there. And finally, let's go to our player, and let's go to our event graph and we should find events begin play. And let's create our widget. We need to actually create it to add to the screen. Let's add the main HUD. Let's go ahead and promote this to a variable and call it main HUD so that we can use it later. And then let's add to the viewport. And then we'll say creates main hood. This is what's actually making the HUD show up on the screen. So now if we happened in play, you won't see anything in if I'm trying to aim. Well, we don't have aimed functionality, but it's not doing anything. Pick up a weapon. Now we have our cross hairs here and they are not moving, which is what we just, we just love to see that happen after we spent all that time coding. Don't you just love it? So let's go ahead and fix that. Okay, So as it turns out, I missed a pretty crucial extra step that we need to do. So in our player, in our event graph on this equip weapon event, Let's go ahead and grab the reference to the main how'd that we made and grab our crosshair. And then what we wanna do is we want to run crosshair update. When we equip a weapon. It's actually not running in less, we do that. So that should work now. And then the other thing that we want to do now that are cross hair is enabled is we want to run across her update every single time that we reacquainted a weapon and switch between them, just as sort of like a fail-safe, making sure that all of that is actually working. So I'm just going to go ahead and copy this, go to Action Mappings paste. And then I'm going to plug every single one of these nodes into here just to make sure that we keep running that event whenever we switch a weapon like this, drag that out there now. So now if I go in, hit save. One other thing, I also forgot to switch this one to the right cross here. But if you were smart, you didn't make that mistake. So let's go over here. It's weapon. And now if we jump, moves, comes back. It's moving around the screen. That always going to be the same size right now. But you can see our crosshairs are moving. And then if you think they're moving too much or not at all, you can adjust some of the math, some of those numbers within. Then here. Some of this math in some of this math will keep the negative one, but like divide by a different number, divided by a different number, set this as a different number, and that will give you slightly different results. So you can go ahead and play around with that to your liking. But other than that, everything's functioning, everything's looking good. So I'll see you the next one.
15. Creating the Main HUD: Hey everyone and welcome back to another video. In the last one, we created some dynamic crosshairs. And in this one we're going to continue on by making our main HUD and making our weapon information in certain stuff like that. So just like in the last video, we're going to start out by making a couple of variables. These ones are going to exist within our weapon base. Let's go ahead and make three of them. So the first two we're going to be integers. One of them we want to make as current ammo. And of type integer. We're going to make another one called current total. And then another one that is called what do we want to call it? Let's call it ammo type, and we'll make this of type text. It's compile so we can edit these. So for current ammo, that's going to be the current amount of AMO that we have in our magazine at any given time. So for default value, let's make that something like maybe like 30. Then for our current total ammo, Let's give us a lot of ammo and say like 244 or something. And for the ammo type, we're going to make something like Racket space, auto space, brackets, something along the lines of that. All right, and so just like before, if we open up our auto rifle, for example, we now have those variables. And we can change these independently. Grenade launcher, shinier, you can change them in and all of that, however you would like already. So now let's go back to our UI folder and let's create a new widgets. And let's call this weapon info. And let's open that up for this one. What do we going to start out with? Let's go ahead. Is this is kind of a big hierarchy, this thing. So let's go to full screen and let's go to desired. Already. The first thing that we want to grab is a vertical box. Let's drag that on top of our canvas panel and we can we replace the canvas panel 0? Now we wanted to do, Okay, maybe I'm kind of like trying to get rid of the canvas panel. A. We can't wait a second. Okay, let's delete. I can just delete the canvas panel. There we go. Okay, let's rename this main box. We want everything to be centered around this box, not a random canvas panel. The reason is that if we have the size box and it has different parameters here where we just want everything to be created on this box. The first thing that we want to do is create a not a statement of our, What's it called? Progress bar? It's going to be called stamina bar by us. Okay? On the stamina bar, we're not actually going to do anything with it yet, but we're going to keep these how they are. I'm left to right is fine. We can change some of the Fill Color and Opacity. That looks fine for now. Let's just keep it, Let's just keep that for now. Next we want to do an overlay and we're going to put the overlay on the main box. And we'll keep that as an overlay and see how it's underneath it like that. So we have this vertical box, the main box, the standard of ours on top, and then the overlay is beneath and we can move them like that and they move in the hierarchy, but we want the overlay beneath. Let's go ahead and do a background blur. Going to put that on top of the overlay. So that lives within said overlay. And then for our background blurry, Let's go ahead and make it a fill like that. So it's filling up the entire thing, the blur strength. Let's set that to be something like 1. So you can see that in there. It's kinda hard to see right now because everything so small. But I mean, that is a thing. Next we want an image and the image is going to live on the overlay like that. And let's just call this background. This is going to fill up everything is well, for color and opacity. Let's make it black. And then for our a value, let's make this 0.35, something like that. So it's creating this blurry kind of black image right here. Moving along in our image size. If you don't see this under appearance, just open up brush. We're going to set this to be 250 by 150. And then since it's stamina bar is so close, Let's select my stamina bar. And then on the Bottom padding, Let's do something like 10 maybe. So there is a little bit separated. And we can actually see like we'll just make that like SharePoint 75 or something like that just so we can see that and we can mess with the colors and different stuff like that. Later. Moving along, let's do a horizontal box. Put that on our overlay, and we'll name this ammo count box or something like that. Let's do padding to the left of negative six. Wait no, to the top negative 6. And then I want to make this kinda centered in here like that. I mean that 0. Now neg negative six because there was some weird things with the text that made it look better in that way. The next thing that we want to do though, is we want to make a text and put that inside of our box. And then for our text, what we want to do is, oh, I see. Let's make the text have negative six and then the ammo count. That's the one that had negative six. That's why Who's the text that looks a little bit strange for our default value for a text. Let's just do 0, 0 for color and opacity. I just do like a little bit of like if you just see this line right here, just put it about right there. There'll be like point 77 for everything like that. It's kinda what I like for the size underneath font size to 64. I don't think we need any sort of shadows or anything like that. So that is looking pretty good. One thing that we do want to do is import a specific font. So let's go ahead and do that now really quickly. So if you haven't already, you can go ahead and download the project files, the course files wherever they're called, on whichever website you are currently viewing this course on, you should see three folders inside of this project files, audio fonts and icons. What we wanna do is in our FPS game, Let's create a new folder and call something fonts. And let's set a color to red. Let's open this up, open up fonts and you'll see paresis peri step bold and semi bold. Let's just drag and drop both of those in there. Just said yes to all. And it's going to create four different assets. One thing that we can do to make this a little bit more pleasurable to look at, is if you click on one of these, you'll see it shows up really small. Go ahead and make this font size like 100, and it'll make it bigger by default. And see that for both of them, something like that. And just save that asset like that. Now, back inside of our weapon info on the text under fonts. Let's do this semi bold one and said now we have this looking thing right there. And my just rename this text too. Current ammo text. Look in good. Inside of our horizontal box, we want to create another vertical box. So let's put that on top of the horizontal one. And we can just we can just keep that name. That's fine. And this is where it gets a little awkward because now inside of that vertical box, we want to put a horizontal box. So we got a whole bunch of different boxes. So let's get back our text and put that on this horizontal box. And let's name this reserve ammo text. Once again, what we want to do here is we want to let me just check my notes really quickly. Oh, I see. I see. I see. What we want to set this as is just a little slash like that. We're going to set this to be the same color. Kinda this line up with this line, it'll be close enough. We don't need to be super perfect here. And plus it's all personal preference for the font. Let's set it to be 20. And we're going to do the semi bold once again. And this should be, I believe it should be left aligned. No, let's make it top aligned and centered. And then that will be looking good. Let's just copy and paste this text. And then I'll put one right beside it. And we'll just say reserve ammo text. Yet another, both colors are available, what's called reserve. Let's just call this. Slash text. And then this won't be reserve ammo text. Let's set this to be zeros 0000 by default. And then let's make this centered and top. That is correct. All of this should be right. 20. Yeah. Yeah, I think looks good. Okay. The last thing we need to do is we need to create one more text. And we want this to be on the vertical box. So now it'll put it underneath like that. Okay, and then this is where we're going to put our kind of fire type. So let's center this one too, and bottom align it. We don't need to put any padding. The color once again, that's sort of like off-white little gray color that I think looks all right, Let's do semi bold. You can always master this stuff however you please. The size of this is going to be 15. The default value. Let's set that to be brackets space, auto and all caps, bracket Enter. So it sets it kind of like that. And these actually aren't centered. Interesting. Probably like one little setting that I still got to redo. It might be with this vertical box. That looks better like that. With these do not look quite correct. They probably this probably has some sort of padding. Let me just check here real quickly, figure out what's causing that and not line up how I wanted to. Ok, so everything is actually the same, but on this slash, do it's actually a slash and then Spacebar and then hit Enter and it'll separate it and it'll be more centered. Now, the other thing is I want to separate these a little bit more from each other. So one thing that we can do is we can create some left padding of like fine for maybe six or something like that. And then those numbers are going to be a little bit more separated. Now, in the render transform for our stamina bar, we're going to make this 1.5 release. I'm going to if that's a pretty good number and then you can slot in whatever colors that you would like. You can make it red, you know, and i'll I'll make it red. I'll make it that red color. And then a style for the fill image. You can get different, different colors in here as well. You can make that red and blue and that will actually give it like a different tint. So yeah, there's a lot of things you can do with the different stamina bar and different options like that. So you can make that look however you'd like to. Okay, So just as a recap, I'm going to show you everything. So we have a main box. And if you have any sort of thing that looks weird, I'll just scroll through all of the settings. Like I said, a lot of this is just personal preference however you want it to look. But these are all of the settings that I have currently. The overlays like that, background blur like this. So you can just feel free to pause if you would like to copy me, or feel free to just do your own thing, because it really, really doesn't matter. This is just making it look the way I kind of tried to replicate it battlefield a little bit by the fonts and things like that. You can do whatever you'd like to do. There is no right or wrong answer. You can just put two texts numbers on the screen if you don't want it to look fancy. And the stamina markers, those are the only two things that we're really putting functionality on. The only script that will exist in this video is binding some of these things. So now that we've gotten through all of that, we're going to bind some stuff to these numbers. We, these are the variables that we created at the beginning of the video. So let's go ahead and do that now. So in the event graph, let's go ahead and get the player character event graph of our same exact weapon info. If you weren't aware, cast to the player, promote to a variable, name it player. Like, such. As we've been doing many times now. But it never gets old. You always want to make references to our nice bilayer so we can keep pulling data out of it like that. Okay, The next thing we're gonna do is we're going to create some bindings. So let's go back to our designer. The first one that we wanna do is get this current ammo text. And then for our text, Let's go to bind and create a binding. It's going to automatically create a function. And we'll just call this get current ammo, because the name that it comes up with is absolutely atrocious. So let's go ahead and grab our player. And then we want to get that load out. And then we want to say equals, equals has a weapon. So we only want to have this script run if we have a weapon once again, because we don't want the game to get confused. So if we have a weapon than we can do what we are about to do. So out of our player, Let's get our current weapon. Whatever the current weapon is in our hands. And let's get the current AML from that weapon, that variable we created the beginning of the video. And if you plug this in and I'll make a little conversion node, and it will do just that. So that's all we gotta do for that. Back to our designer. Let's go ahead and click on Reserve ammo texts and let's create a binding for that. Let's change this atrocious looking name to get Reserve ammo. And then it's going to be, it's actually going to be the same exact thing. So what we can do is we can get all of this scripts to copy it and paste it in here. Plug it in, plug it in. Just like that. But instead of current ammo, we want to get current. Total ammo sets are bigger ammo. In. Then the last thing we wanna do is get this Auto Text bind to create binding. And we didn't actually change the name and that's okay, Let's say get fired type or something like that. And then it's going to be largely the same exact thing that we want to do. Yeah, I keep switching between he's incorrect things. Let's copy that again. Paste it again. We only want to run this if we actually have a weapon, it's actually doesn't it? This and then we'll get the fire and that fire type or gets what did we name that am outside. It should it should be fired type. O will say get ammo type and then that should just plugging directly like that. It will only run if we have the weapon. And so yeah, that is looking all well and good. So now back in our main HUD, we want to create this. Let's grab a weapon Info, drop it onto the canvas panel. Its size to content. Let's go ahead and anchor this to the bottom right. Let's say, think that is a pretty, pretty decent spot. Right? And the position x, Let's do negative 350, position y, negative two hundred and fifty, a hundred and 3000 and 0. All of that is fine. I think that'll think it's fine, actually. That looks pretty good. The last thing that we wanna do here is we want to only have this show up if we have a weapon, which is the usual. So we're going to have to create a reference to our player once again. So let's go ahead and do that really quick. Um, I'm just going to skip ahead because we've done this so many times. I don't know, wasting more time. So see you in a second. Okay, now that we've created a reference to our player, Let's drag that reference out to get our load out again and switch it on again. This is what we did kind of in the last video with the other the crosshairs. And then what we wanna do is let's get weapon info and let's set visibility. Copy paste. We have a weapon, it's visible. If we don't have a weapon, it's collapsed. Plug both those targets in like that. And that should be all that we need to do right there. Bone. So what we can now do is we can go into these different weapons right here. And I want you to go ahead and take some time and put in how much AML do you want the weapon? A half. And how much and what do you want to have total. So change those numbers around and then I'll see you in a second. Okay. So hopefully that wasn't too hard. All you had to do is open up the weapons and change the current animal in the current total ML. So now fit everything correctly when we hop in and play, we equip a weapon, it has whatever those numbers are, and then we switch to the different weapon. And in the other weapon and the other weapon, the other weapon and the other weapon. It will now change whatever we have for the current ammo, the current total ammo, and then our burst. So I just said single auto for automatic spread for the shotgun in the rest of them just say single, those numbers are changing. So if you would like to move those numbers around or make any sort of edits to the visual style of that. Feel free to mess around in the widgets and do that, but the functionality of that is still there. That's the main thing that I wanted to show how to do. So yeah, that is all set up. So thank you for watching and I'll see you in the next video.
16. Sprinting Functionality: Hey everyone and welcome back to another video. Today we are going to continue on with working in our HUD. In the last one, we added different ammo numbers. And while that is all working, one thing that isn't working is the stamina bar. So first things first, we have to actually add a sprinting functionality before we can actually link that up. That's what we're gonna do right now. So to start out, let's open up our character and we're going to go into our movement graph. That's what we're going to be putting this. So we have our walking jumping in now we're going to add our sprinting. Actually before we do anything, we need to add that to our inputs. So let's go into our settings, Project Settings, and then inputs underneath engine. And let's create a new action mapping and call this sprint. And let's set that to our left shift key. So now when we go into our movement graph, we can call upon sprint like that. And we can start doing some things. First things first, we want to pull out some branches because there's certain things that we, well, we don't want to be able to be able to sprint if we're doing some of these things. So let's plot is aiming and say is not aiming because I just like to run into the true branch a lot. So if we are not aiming, then we're going to make another check. And we're going to say, Well are we are reloading. This part is optional. Some games allow you to reload while you're sprinting. Those one that we're making will not. So I'll just put optional disables, sprinting well while reloading. So if you want your game to be able to, if you want to be able to sprint and reloaded the same time, you can remove that part. It's up to you. Some games have a like you can interrupt the sprint or interrupt the railroad by spreading all that's up to you. But we definitely do not want to be able to Sprint Hall we're aiming that would look ridiculous. We're going to pull out one more branch here. And we're actually going to store this inside of a macro. Macro is different from function a little bit in that it's, it doesn't have these execution wires. So you can have inputs and outputs, but it doesn't have to have a white execution wire. It can output this type of data. So we're going to plug this into a, we're going to return a condition, a Boolean. So let's create a macro and let's call this are, we exhausted question mark. So when it comes to our game, we have the stamina bar. And so if the stamina bar runs out, we won't be able to sprint until it reloads to a certain value. So let's create some more variables and we'll say is exhausted. Question mark. And let's create another variable and call this energy level. And we'll make this of type float. So let's go ahead and let's grab out is exhausted in say, not just makes it more coherent for me, personal preference. And let's grab our energy level. And let's say if this is greater than or equal to, point to, what we can do is you can pull this out and say, and remove those. And then let's pull the, plug this on the output and overturn that. And we can just keep the name return value. So what this macro is doing is it's checking to see if both of these conditions are true. Both of them, you can do one or the other by pulling out or, but in this case we want both of these to be true. So in order to sprint, what this is essentially saying is that we cannot be exhausted, will turn that is exhausted variable on when energy level equals 0. And the reason that I'm setting this to point to is because I want the stamina bar to refill 20% of the way up before we can sprint again. Because then what will happen is that the stamina bar will go up like 1% and there'll be able to sprint again. And you'll only be able to be only be able to sprint for like 0.5 seconds before it runs out again. So I want that I want to give it time for that to refill little bit before we can start sprinting again. So let's go back to our movement and we can actually pull out this macro and do it like that. Now the reason that we created this into a macro, so technically speaking, we could have just done it like this. It means the same exact thing. But by storing this data in a macro. For one thing, it's a lot cleaner, seeing it that way opposed to this way. In number two, we can now pull this out a bunch of different times and use it a bunch of different times. Whereas this we'd have to copy paste this long script every single time. So that's probably a pretty big tip. I remember when I first started learning how to do this, I really got caught up on like okay, like I have to use a function here are blue paint, a Blueprint Interface or Event Dispatcher are like all these different things. And I gotta put this in a macro. A lot of those things exist just for convenience. So like storing in a macro, like I said, it saves space and it allows you to use it more than once without trying to find it and copy pasting this, this long piece of code. But plugging this in here and doing that in using the macro does the same exact thing. So a lot of that just comes down to personal preference. In, as you get more experienced in scripting, you try to do things that are more efficient. So I'm sure even in here, like you can accomplish the same thing. I'm trying to accomplish multiple different ways and you might be able to find a way that's technically speaking more efficient than my way. And that's okay. But this is a way that I know how to do it and it works. So that's what we're gonna do. Okay? So if all the of these conditions are true, all right. We were not exhausted, we're not reloading and we're not aiming, then we can start sprinting. And once again, we're gonna do this inside of a function. Not because it's super complicated, but because we can then call upon it every single time. All right, so in start sprint, we want to check one thing. Let's get the character movement components and we'll say is falling. And once again, we'll say not cuz I like it that way. I don't like going out of the false branch by default. Like going out of true because it keeps the lines nice and straight. So if we're not falling, aka if we're in the air, I don't want to be able to sprint when we're in the air. That would be very unrealistic. Okay, So then what we wanna do is let's grab the Character Movement Component again. And let's get, let's set max walk speed, this value in here. And let's promote this to a variable and we'll call this sprint speed. And by default I'm gonna make this one hundred, one hundred, ten hundred. So our default max walk speed is 750 in I'm setting it to be 10000. And then we have this, or maybe we don't. Okay, let's create a new variable and say is sprinting that we made that already as we didn't. And it's a Boolean. And we'll set this to be true. Compile and Save, and it's all we have to do. So once again, let me just reiterate this. I can do this and we can make it look like that. Okay? Or I can just get start sprint. And it'll look like that. So we can do it like this every single time or we can store that data in a function and just do it like that. So we don't have to get this big, ugly code every time we got much space that saves. And then we don't have to copy paste this every time we can just keep calling the function. So that is a big tip. Okay? Don't get caught up on like always use an event is batteries making a function in Lego and try to understand all this up. It is, it is for convenience factor. Okay, so hopefully that makes sense. Cool. So now we are sprinting. What we wanna do now is we want to get our load out. Because you want to have two different things happened depending on if we have a weapon or not. So let's switch on or load out. Because we still wanna be able to split this sprint. If we don't have a weapon. Okay? If we don't have a weapon, we're going to pull out a timeline and we'll call this stamina. Okay? If we have a weapon, we want to stop shooting our gun. Because when you run, you know what? I'm actually going to leave this part out here for now. And then I'll show you what it looks like without it. I think that'll be pretty cool actually. So we have this stamina thing, we'll, we'll save this for later. Alright. Can make a note or something like that. I don't know what we'll figure it out. Okay, in the stamina bar, Let's open this up and let's make this 10 seconds long. It's be able to run for 10 seconds and create a Float Track. And we'll call this stamina amount or something like that. Okay, Let's go ahead and create two keyframes. First will be at time 0 and a value of one. And the second one will be at a time of 10 all the way in a value of 0. So if we click on these little things, you can actually see that moving from that value to that value. So it's moving from a 100% of itself to 0% of itself over the course of 10 seconds. We want this to play in that play from start, because if we played from start, it would restart it every time. And we want this value to move up and down. Like constantly. So if we write here we sprint a little bit, it's going down, then we stop and then it'll come back up. And then we reached the end. It'll do this and it'll come back up a little bit and go back down. If we hit play from start every time we hit Shift, it would start back up here and give us a new ten seconds, which is not what we want to happen. So cool Cuckoo, cuckoo. So we have our timeline. Out of the update. Let's set our energy level, this variable that we created. Let's set that to the standard amount. So now those are directly correlated, pulling out of here. And let's say equals if our energy level equals 0, AKA if we run out a lot, if, and then this is going to come out of the finished. Let's rewrite this a little bit like that. Okay, so now if our, if we run out, we're going to run an event called exhausted. So now on the other side of your timelines have a whole bunch of cool things. We're going to create two custom events. We're going to call one movement stopped and other custom event and call this exhausted. So if our energy level equals 0, we're going to run this event exhausted. Cool. Let's do movement stopped first. If movement is stopped first things first we're gonna say, we're gonna ask if we're exhausted or we exhausted. People wanna do two different things based on whether or not we're exhausted. All right? If we are, if we're not exhausted, sorry. And plot a sequence. And what we want to do is we want to 0, we actually have to create this. So we created a start sprint. We also need to create a stop sprint. So let's do that. No, create a function, call it stop sprint. And this is going to be a rather simple. Let's just get the character movement components. Let's set max, walk speed. And let's just, let's actually promote this to a variable so we can, so if, if you would like to change it to something else, you can do that very easily. So max walk speed is 750. So the default was 600, but we said is 750. And so it'll keep resetting it to 750. So this way you don't have to go into the function in like retype it in manual. You can just change the variable and it'll dynamically set for you every single time. So what makes variables nice? And we want to turn this is sprinting off, and it's all we wanna do for stop sprint. Let's go back here. So now if we're not exhausted, Let's go ahead and stop sprint. All right, and then this is going to plug into stop. It's going to stop the timeline in its tracks where it is. It's gonna say hold your horses over there. Then we want to have a delay. Okay? And we want this to pause. So let's promote this to a variable and we'll say stamina region. Pause and we'll set this to be like two seconds. Okay, so what movements stopped is doing here? It's going to check, are we exhausted? If we're not exhausted, aka if this number is still above 0, AKA if we're still somewhere in here and we're not here, then what's going to happen is we're going to stop our sprint. We're going to set our max walk speed back to normal. Then we're going to wait for two seconds. And then this thing is gonna go in reverse. So say we're sprinting, we're sprinting, we're sprinting, we're sprinting, we're sprinting or stem is going down, then we stop spinning. It's going to stop right here. Wait two seconds. And then it's going to throw it in reverse and go back up and give us some statement back. That's what movements stopped is doing. Now if we are exhausted, all right, then we're going to set is exhausted to be true. So now this has nothing to run out of. It's not going to run this, it's gonna run this. What we wanna do is we still want to stop sprint. We want to set our movement back to normal. And then what we wanna do is want to make a delay. And we're going to have a different timer depending on if we're exhausted. So its promises a very variable. We'll say exhausted timer. And are exhausted timer. So we're huffing and puffing instead of two seconds, Let's wait like five seconds. And then we will turn is exhausted. Back off. We've waited are five seconds, we've got our breath. Okay? And then we're going to reverse from the end. So instead of just reverse, so like this can get reversed at any point. This event is only going to run right here if this equals 0. So we want this to make sure that it's reversing from the end, which is right here. Value, our stamina is at 0. So bada, bing, bada, boom, that's how we do it. That's everything. That's beautiful. The only other thing we gotta do is we got to make sure that we cannot shoot our gun if we're sprinting. Because otherwise a little shoot off away to the left. And it'll look really, really stupid. But for the time being, I kinda wanna showcase that because I think it would look hilarious. And it's kinda fun to like show bugs and to show like how you have to be so specific with computers. Just think of everything to cause things not to be ridiculous. So the last thing that we wanna do is we just want to go into our UI folder. And let's go into our weapon info. And let's select on our stamina bar. So we want to, we want to actually correlate this. And let's go to the percentage right here. And let's create a binding. And let's say gets, gets stamina is a fine enough name. And all we wanna do this and be really easy to get the player. Let's get our energy level and employ that in bada bing, bada, boom. Mr. worldwide stepped into the room. There we go. That's all we had to do. Okay. So let's go over here now for this works. Oh gosh. Oh, you know, I've gotten ahead of myself. Forgot one thing. Does go ahead and do that now. So this is what happens when I try to purposely glitch out the game end up reckon myself is what's happening right now is since we can only see the stamina bar if we have a weapon and we don't have anything that happens when we have a weapon. So for the time being, just make sure both of those go into play and then make sure energy level is set to one. I never I don't think I ever said that. This is moving in percentages. Okay. So don't set it to be a 100 or whatever, set it to be one. So now what happens? We walk over to a weapon and we pick it up. And I have print strings to show the speed. So you'll see like a 1000. And our thing is going down like that. Looking pretty great. But if you notice, we pick our hands off and we hit Shift again, there's no way to stop from being exhausted, but you saw up there set of 750. So what I wanna do is we can plug released and put movements stopped in there. But I want to be cool in professional looking because a lot of games have it where you don't have to hold down shift the entire time. You can just tap on it and that's personally what I prefer. So that is what we're going to do. We're just going to have a tap Sprint button. And then once you lift your fingers off the keys, you'll stop spinning. But first and foremost, let's go ahead and comment box this and say sprint with three Jan or 18. Stamina, bar, like that. Okay, like that. Feel free to make any edits like with this part or whatever. If you, if you like, having to hold down sprint and then releasing it, like I said, you can do this and the disco movement stopped. And then that will work when you release the key. But I don't like that. I don't like holding down the key the whole time. I like tapping it and then letting go. And then they're letting go of w. Like how a lot of games work, toggle sprint. So let's do that now. So lets you run an event tick. Okay, And what we're gonna do is we're going to make a macro for this. And if this macro is true, then we'll run movement stopped. What does this fancy schmancy macro that you say? Well, I'll show you. So let's go ahead and create that. And we'll say, have we stopped moving? Like that. What we wanna do here is we want to get our player controller. And then we want to check is inputs key down. And the key that we're looking for is w. If w is not being pressed down and we are sprinting still, then this will return like that. So we have to be sprinting, which is initiated by hitting Shift. So that's one of our parameters. And then for this to return true, we also need to not have the W key down. Alright, so let's go into this. Have we stopped moving? It doesn't want to drop it in for whatever foot there we go. There it is like that. And then we'll comment box, just this one little part. And we'll just, we'll come at this and say connected to timeline. So movement stop. We'll then check if we're exhausted or several, Stop the Spread. It'll do all that for us. Coming back. So we'll say checks to see if W key is released while sprinting. So if we're sprinting, but we let go of w, which is what naturally happens. We'll stop sprinting. So let's go ahead and do this now. Our key and now we're sprinting were spinning and my, my pinky is not on shift right now. I let go of w and it stops. And then it goes back up. And then I'm sprinting again, hit shown shift. It's a toggle. Here we go. Like that. And so if I keep doing it and then it runs out, it's going to run that exhausted and 750 and I'm hitting it again. It's not sprinting. Not sprinting. It's not sprinting. It gets to 20 percent and then it lets me do it again. So it went up a little bit further before I was able to do again. So all that functions great. All the functionality is correct in, in-place. So here's our script for this. And then our script for this lesson we're going to add is one extra thing right here later on. But yeah, that's everything. So in the next video, we're actually going to add an animation to make it look like our characters sprinting. And then we will have all of that correctly set up. So I'll see you there.
17. Adding Sprinting Animations: Hey everyone and welcome back. In the last video, we added some functionality to allow our character to sprint around the map. But we implemented it in a way where he can only sprint for a certain period of time before he gets exhausted and then slows back down. And then we link that up with our stamina bar. We have a couple of different parameters in here. We made it like a more toggle type of sprint where we can just tap the key and then once we let go, we stop walking. Our character will stop sprinting. Those types of little things are up to you. And we also implemented it in a way where You can't you can't sprint if you're currently reloading, which again, personal preference, but that's how we built it. Feel free as you get more confident in your scripting skills to make it however, you would like him fit to your personal preferences. So what we're gonna do in this video, this one's going to be pretty short. All we're gonna do is we're going to link our is sprinting Boolean, which is set to be true right here at my get rid of these print strings actually set true right here and we start sprint. And then when we stop sprint, it is set to be false. We're going to link that up to our Anim graph so that we can do a running animation. So that'll be pretty cool. So it turns on right here and then stops right here. So let's go ahead and do that now. So all we need to do is go into our character. Let's do player and I'm blueprint. Let's go to our event graph. And then outside of this, then one with our other player references, let's drag in player and we'll go Gets is sprinting. And let's promote this to a variable and we'll keep it the same name is sprinting. To make it coherent to us. You know the drill by now, we're gonna variable for sprinting animation. So we know what all these things do. An async comment box part from each other. That looks nice. So now let's go back into our player movement. So go to the Anim graph over here, find our player movement state machine and we're going to add a new state. I'm going to drag switching weapon like over here, because this new state is going to connect to both of these. We want to create transitions for both because we can sprint if we switch a weapon while we're switching weapons, that's fine. Okay, So we want to add nodes going there and back for both of them. So they're back and they're going to have the same exact rules. So if we're idle and we want to head over to sprinting, let's just check will are we sprinting? If we are sprinting, we're going to run this animation. If we are not sprinting, then we want to go back to our Idle Run Animation. Same thing goes for here, so forth, switching a weapon. And we start sprinting. You're just going to say, Well, are we sprinting? And then if you wanna go on the way back, sprinting. Not sprinting. To simple as that. Last thing we need to do is just make sure that it's actually animation for here and we don't have one-character skeleton. So let's go to a shooter game. Animations, FTP, and it's called a roadie run. It's the one rifle roadie run right here. Sine to the new skeleton player skeleton for open this up, this is also going to have broken sounds. So if you remember how to do that from previous videos, actually, we should probably have that one in here run. Well, there you go. And we can make this a little bit louder, like maybe like 1.5. The footsteps are a little bit louder for running. So sure. So now it sounds like this. Pretty cool. So now we should see that wrote Iran right here, plug that in like that, compile and that should be everything. Normally feel like I forget something but I think that's everything. So let's pick up the gun. And now same thing had Sprint. And there we go. Now we're running. And then we let go. W o, SMS, weird going on there. When we stop sprinting, What the heck is going on. Okay. So I figured out the problem instead of his sprinting and this one we're going to use is switching weapon. All right, so on the way here is switching weapon to is sprinting. We're going to say is not switching weapon. We can transition from switching weapon to sprinting if we're not switching a weapon. And we can transition from the sprinting animation to this switching weapon animation. If we are switching a weapon. So now this should work. There we go. The only other thing we have is jumping animations. So it is running through the air. So this video isn't too long. Let's just go ahead and add the jumping animations right now so we don't look stupid. So let's create some new states at a state and we'll call this jump, start. Another state, jump loop, and then a final one. Jump and go. And these, unlike the other ones, that they're not moving oh my gosh. Over though. They're not moving from forward and back. These moving like a little triangle like that. I don't know if we did we get is in air. We did not. Okay. That is one variable that we definitely need. Yeah, okay, So in our urban graph, let's go ahead and try Get Pawn Owner. And then let's get our movements components of that pond, which is going to be our player. And we'll say is falling. And then what's promote this to a variable in college is in air. And hit the wrong key there. Go. Something like that. I ended up controls, jumping animation. Bada bing, bada, boom. Go. Salary of that. Yeah, it's going to hate us for a second, but rest assured what we find. So let's do this if we're in air. So we'll transition from the run to the jump start, to transition from the, we have to slot these innovations in no way. Yeah, we do. Okay, so let's go ahead and do this first because it'll get confused if we don't. So let's just type in a jump in the same folder and we have JumpStart. We want the rifle one Jump, Start loop and end, such as assignees to our player skeleton. That and then we can slot in our sounds. They actually have jumping sounds. But you, you know, you should know how to do that by now. So I trust you. There's your homework for the day. If you want to do that. Jump blues players skeleton retarget there. And then rifle a jump N? Yes. Yes, yes, retarget? Yes. Okay. So now let's plug these in. Jumpstart. I'll go with Jump Start. Loop will go with jump, loop and jump and we'll go with, you guessed it, jump end. Okay. Now need to make transitions between these. So what we're going to search his time, remaining, time remaining in our Jump Start Animation. And we'll say is less than 0.1. So if there's less than 0.1 seconds left in this jumping start animation, we're going to move to the jump loop animation. Okay? And then to move to jump, and we're going to say, are we not in air? So we will have the jump loop, Innovation, keep looping until we're not in the air anymore. And then we'll be able to transition back from jump and to idle. If there is, let's say, less than 0.25 left in our jump animation. And then what we wanna do is we want to be able to go to jump from sprinting as well. And then that's going to have the same parameter of just being like, Well, are we in the IR file and save? And now we happen in play. And we are done. And there's something strange going on with that. But for the time being, let's just sprint. It's working. And then we jump. He does the jumping and then he's still sprinting even after the jump. And if I let go, he just laughed. So all that works perfectly, working good. I might try to figure out if there's something weird going on with equipping the weapon. And if there is, I will get back to you on that. Sometimes there's errors in my program that might not be persisting in yours, but I will fix mine just in case I told you something that is a little bit faulty, but yeah, thank you for watching. And I will see you in the next lesson.
18. Making Ammo Pick Ups: Hi everybody and welcome back to another video. In the last video, we started finishing up most of the animations that we're going to need for our character's movement. And in this one we're going to continue on by adding a couple more pickups. This time, we're going to add some functionality to be able to pick up additional ammunition. So we're going to do that before we get into that though. At least for me in the last video, I got an issue where if I picked up a weapon, the character does this weird jittering where it kind of moves the gun from right to left awkwardly if you didn't see it, I'll do it again. Is that weird sort of kick right there. And it does it every time you switch weapons. Now I went ahead and I compared this script to the previous project. And the previous project was the same exact thing as this one, at least to my knowledge and I wasn't getting that issue. If you are getting that issue, you can ignore this part, but if you are, you can go into the Player Animation Blueprint and the Anim graph player movement and that state machine. And you can actually just remove this top transition from switching weapon to sprint. What that will do is that if you are sprinting and then you switch a weapon, or if you're switching weapons and you're still spinning, instead of traveling from here to here, it'll go here, then to idle and then back to sprint. So now if I happened in play and I pick up a gun, you won't get that issue. And you'll still be able to run and switch weapons at the same time. So do the weapon switch and then go back to the sprint immediately. So all of that works just fine. So potentially this transition was redundant because it's going to go here to the ureter here anyway. So that out the way, I think that's the only kind of issue that was had there. But what we're gonna do is we are going to create some blueprints to add some weapon or some ammo pickups. So underneath interactable, let's create a new folder and call it ammo. And I'll set it to our color. Then inside of the animal folder, Let's make a blueprint class of type Actor. And let's call this ammo pick up base. How is get confused with pickups? One or two words. It's it's one word if you're referring to like a truck, but it's too if you're saying Pick up to 240 phonics, you all, okay? What we're gonna do is we're going to add two different static meshes here. So a static mesh, the first one will be AML mesh. And we can drag this onto our scene route and make this one the default. And then underneath here, let's make another static mesh. And we'll call this one hit Inbox. So these textures are small as well, these meshes or small as well. So we're going to do the same thing we did with the weapons were there's this invisible box right there for our ammo mesh. This is going to be a parent, so we don't need a slot anything in. But I'm going to lock this and make it 2.5 times the size because these are very small. Okay, so then for our hidden box, let's go ahead and slot in just the one m cube is going to be pretty big. So let's go ahead and we can keep it locked and make it half of its size, 0.5. And then we're going to set this to be invisible and hidden in game. All the collision, everything should, should work just fine for the most part, I think that's all we need to do. Let's go ahead and actually head back out here and into our data folder. And we're going to create a new enumeration that we'll use for this blueprints. Let's go blueprints enumeration then go E, and let's name this ammo type. All right, and then we're going to create six enumerators. So 1, 2, 3, 4, 5, 6. And we'll call this pistol ammo. So we're going to just name each one the weapon and then the ammo. So auto rifle, animal, shot gun. Because the way I'm creating it is you won't be able to interact with a certain kind of ammo unless you have that current weapon equipped. That's why we're creating this a sniper rifle Anno. So we want to give the way, give the game away to identify what ammo. This is grenade launcher or what AML we're trying to interact with in sync that up with whatever weapon we have equipped. And finally, rockets, launch enamel. Goal. Then our MO pickup base. Let's create a variable, variable and we'll call it ammo type. And we'll make it of type, animal type like that. Good. Okay, Now in the event graph, Let's do some stuff in here. Under the beginning play. Let's create a reference to our player. Let's cast to the player and promote it to a variable that you should be very well versed in. Casting. And making references here. By now, should be a pro at it. Do this. And also knowing why we do this. Okay, now let's create a custom event. And we'll call this pick up ammo. This is going to run when we try to pick up ammo. And what we wanna do is I want to create an event or a function, sorry, that's going to check whether or not our current weapon is equal to the type of ammo that we're interacting with. The easiest way to do this. In my opinion, without making everything too complicated is we're going to do this inside of the weapon base. So let's go to weapons and go to weapon base. This will get a little bit hairy and we do need to organize these after a certain point. Okay? So let's create some new variables. And we'll call, these will all be integers and we'll call them pistol. Pick up amount of type int. And that we want to create a bunch of these, one for each weapon. So auto is that now I'll rifle pickup amount is to be kind of ugly names shot gun. And he controlled WT is to duplicate it quickly. Sniper, rifle, gray launcher, and then finally rocket launcher. Pick them up. Well, these are going to be in charge of, let's just say it's put in a category now, Emma. And I will just drag all these in here. I don't like how it's doing that. I want to put them in the right order. So pistol and then auto rifles and shotguns, Sniper. Okay, good. Cool. So we can do is we can set these three different numbers of how much ammo do you wanna pick up? Based on like when you pick up a center for the pistol just, let's just say 24 bullets for now. The auto rifle, 60, the shotgun. Let's do 16. I'm trying to remember what I put. Trendy like to magazines for each of them, to rockets. And you can change those to your liking. All right, now what we wanna do is let's create a function. We'll call it ammo. Pick up. Like that. Alright. Let's yeah, let's make an input and call his MO type. And we'll make it of type, AMO type, like that. Let's drag it here and switch it on. So now you should see all of our pistil ammo, this and that. So if this is set to be one of these things, it'll run one of these executions. Okay? So all of these are going to be the same, which is Larry slight variations. So out of pistol ammo, Let's pull out a branch. And let's say skip the weapon type. And we'll say equals so far current weapon. The weapon if our weapon type, which is also like the current weapon, that equals the pistol, then what we wanna do here is we want to grab current total ammo. Look at the set. We want to take the pistol pickup amount and the current total ammo. And we want to add these together and then set that as the new current total AMA. So let's say we have like, Oh gosh, this is actually quite a bit of math. Let's just say for easy math sake, we have 10 bullets in reserve. 10 is our current total ammo. Total ammo being 360 in this case. And we had a set to 24, so 10 plus 24, that will then set that to be 34. Math is power. Okay? And then let's make an extra check on this, okay? With this selected and let's add an output, and let's make it a Boolean. And then we'll just have this say true or we can have it say success if you want to be cool. Right? So like was this successful? If it goes through this branch, was it successful? Yes. It will return true. If it comes out of here, then it will say No, it returned false. Oh sheesh, we should that's unchecked. Ok. And then we'll say adds pistol ammo. If her here adds ammo. If this still is picking up Pistol ammo. Like that. Okay, Seeing it a look at that script like that. So now all we need to do from here on out is we need to do the same exact thing for auto rifle shock on all of our different weapons. It'll look exactly the same as this. All we need to change is R. So for auto rifle will do change it to auto rifled pickup amount and for the weapon titles which had a rifle. So I'm going to give you a little task. I'm going to do this myself. I'm going to give you some time to fill in the rest of this function on your own. So I will cut forward a little bit, get back to you. So have fun with that, and I'll see you in a second with the answers. All right, So this is what the final function should look like. So if ammo type is set to pistol at around this one on a rifle down one and so on, so forth. So we had to change, like I said, pixel Picker, male amount, current total pistol or rifle, auto rifle, shot gun, shot gun, sniper snipers, grenade, grenade, rockets, rocket, and then yeah, all of that will run. I have a typo here. Okay, cool. So now all we gotta do is let's go back into our pickup base and let's drag out the player and let's get the current weapon. Remember the current weapon is a reference to this weapon base here. So since we have that out, we can now call ammo pickups, this function that we just created. And we'll pick up and call that. And it's going to be asking for an ammo type, right? Because we put this in, put in here. So it's asking for one. We continually slot this is anything but we created this variable, remember? So let's plug that in. So the reason why I had it that set as an input is so that we can plug this variable in. So when we make the children to this, we can set this dynamically on the children so that this value will always change and then run the different parts coming out of that enumeration. And then out of our success. So let's say if, so, if this returns true, meaning that you get one of these success things, then what we wanna do is let's play a sound to D. Let's promote this to a variable and we'll call this pick, pick up sound. So we can dynamically set this in the children as well. And then let's destroy the actor like that. And then we'll just come in boxes to say adds MO amounts in Weapon Base. Just so we can remember what that does and where it is. Sitting like that. So that's all works. So there we go. That's all we have to do in our pickup base now. All we have to do is make the children. So MO and we'll pick a base, Create Child Blueprint class and we'll call this pistol ammo pickups. And what does keep on doing this for all of them. All right, so if this is done correctly, you just right-click on AML, pick a base gray Child Blueprint, and then we rename them all rifle, grenade, pistol, rocket shotgun, and sniper rifle. So now you have to do is open up one of them, any one of them. For our ammo mesh. Let's look up assault rifle pick up. And we get these sort of magazines here like that for the ammo type. Let's set that to auto rifle ammo and the pick-up sound, we should have a pickup. See there's these right here rifle and we'll pick up cue like that. If you don't like the volume of that, you just go in here and change the volume multipliers so you can make it whatever you want to or whatever you want to, your personal preference. And then it will apply to all of them. So that's all you have to do for one of them. So yeah, just go ahead. Slot in. I think I sound okay. Pick up like that and we'll type grenade sound. Grenade launcher am a pickup. You want to make sure you have the QRS because then it'll have like multiple different sounds. At least it should. That's typically how queues work. So yeah, just go ahead and fill in the rest of those and I'll be back to you in a second. Okay, now that we have slotted in our correct sounds and meshes and set that enumeration to be the correct thing. We can drag and drop these in so we can put it. I don't know why that sometimes does that. It's kinda weird. Just hit end and it'll go into its correct spot if it's weirdly somewhere else. I'm also not putting these in the correct location right now, but oh, well, it's okay. Like that. So now we should have our different hiccups, but there is no way to interact with them as of right now. So let's go ahead and fix that. So in our character in the and even graph where we put this, we have one called Action Mappings. Yes. So we have this line trace and I can do this, make this persistent tray now. So you can actually see this line trace and hit the E key. You'll actually see that's 200 sets. How far this is going out to actually interact with one of these. So you'll see this little square and it's red and then turns green to show that I actually hit something, actually interact with something. Snow hits it, look straight down on the ground, you'll get a hit right there, but it's hitting the ground. It's not adding anything of value to us. Okay, So that's kinda cool. Now if we were to have like a ton of things binded to this, to this interact. We would probably have some sort of and Event Dispatcher that we would just keep calling. But we only have two things in this project that we need to interact with. So that's why it's just done this way. So what we want to do is let's get our load out in, let's switch it on. And this is going to come out of that. Then we only want to be able to interact with ammo if we have a weapon. So like can't grab ammo without weapons, that sort of thing. And it's, but if we have a weapon we want to cast to recall it. Ammo, pick up base. Once again, this is going to come out of the head actor. Like that's that's, that's an okay spot. And then as the pika base, we want to run the event that we created. This one, pick up ammo. We want to actually run that. So we'll call it pick up ammo and then it's slots it in like that for us. So we can comment box, this whole thing quite honestly because this script is now done. And we'll put draws a line trace to check if trying to interact with MO or weapon pickups. Somebody like that. Yeah. Just make sure I spell everything correctly because I couldn't really see where I was typing. Okay, So that's what the script looks like that we just added this, this, this, so pretty self-explanatory there. Now if we come out here and I try to interact with any of this stuff, nothing's going to work. Even though we are getting green hits and we don't get an error, it's just running out of there. But let's say I pick up the shotgun and these three weapons. So the pistol. Oh gosh, which one's which? That's the epistle M0. So by interact with this, it doesn't do anything, but if I interact with this, it did the math, it disappeared. All of that. If I switch to the auto rifle, can't interact with this one or this one, or this one or this one or whatever. But I can't interact with that one. And then the shotgun can't do anything to anything but this one. Oh, I have the pistol grip. There we go. I got a little scared of resilience. I was like did I do the settings one? See, I can actually see those line traces now, what is kinda cool? Yeah, That is everything to do with our ammo pickups. It's how you do it. So cool. We're going to keep on rolling on key bad and some new features to the game. And then we'll finally, it's going to be really soon and we're going to actually start shooting these guns and doing some cool stuff with them. So I hope you enjoyed this video and I'll see you in the next one.
19. Shooting Hit Scan Weapons: Hello everyone and welcome back to another video. In this one, we're going to start adding some functionality to be able to shoot our hit Scan weapons. And between videos, I did a couple of just really small things. I added some texts renders out into the world. To do that, all you need to do is go into place actors and you can pull a text render out. You can rotate it. However you'd like. You can change the fonts, even though I don't think it'll work because it doesn't have a text material. Yeah. You can align it to the center, change the color or whatever you wanna do, and type in whatever you want it to say. So yeah, I but our weapon locker and then it will pick up. So I made it black and size 30, and I gave it a name and put it into a folder. And I also put our ammunition in the correct order and put that into a folder because they didn't call me organization station in high school for nothing. Actually, I called that. Moving on though, let's shoot some guns. So first thing we wanna do is in our data folder, right-click and go to blueprint and then go to enumeration. We're gonna go ie fired type. And as I said at the very beginning of the first video, we have two different types of weapons. The first one is called a hit scan, and the other one is a projectile. So if you remember, a hit Scan weapon is going to work with a line trace. A line trace being I don't think I debug this yet. So it's going to be the same type of thing where it draws an invisible line out into the world. And it's going to be an instantaneous looking for what it hits. So we'll get results like that with the hit scan, a projectile is going to be similar to if you were to just use the first-person template that comes with Unreal. That gun has a little yellow ball that comes out of it and it's actually a projectile. And the differences between projectiles and hit Scan, hit Scan, It's going to be an instantaneous hit. It's going to be a perfect straight line where as a projectile, we can set different speeds to it and have it be impacted by gravity. So our pistol or rifle and shotgun, those are gonna be hit scans and then the sniper rifle, grenade and Rocket are going to be projectile's. So in this video, we're going to start our script to be able to add functionality to the hits cantos, good, say reject. Ho. So yeah, let's go into our weapons folder and open up our weapon base. This is where all of our script is going to live. Alright? The first thing that we want to do here is let's go ahead and create a function and we'll call it start shooting. What we wanna do is we want to add an input to this and call it fire type In, make it of type, fire type, like that. Coming out of here, we want to make a sequence. And just like at other times in the class, we're going to add something out of the 1000. But for the sake of right now, what I wanna do is go out at that, then one pin and then we'll add this script later. That's where we're going to be controlling, actually decreasing the amount of bullets that we have and then doing some reloading stuff. But at a fire type, Let's switch that on and plug that into the then one pin like that, can reroute that node like that. Alrighty, So out of hits scan, what we wanna do is we want to call a different type of function. So not a whole lot added to this just yet, but we're going to have to create a new function. So let's call this Calculate hit or calculate a line trace. Let's call it that. And then this is going to have three different inputs. So let's add three inputs here. The first one is going to be a camera component. Second one is going to be a, a weapon mesh. And the third one is going to be a weapon socket. The camera is going to be of type. Someone could just camera component object. There we go. And then this one is going to be a scene components. Seeing component, object reference. Seeing component is like these things. Anything in our component like any of these components are considered a sink component. And then this one's going to be a name. Alright? What we can do here is let's pull out a sequence to undo a couple of different things. And we're going to promote all of these to local variables. Local camera, local weapon mesh, and local weapons socket, not sucker. Socket. Alright, and then let's just do this out of the, then the 0. And this is a little bit ugly. So let's maybe move all of this upward a little bit. And then add some reroute nodes like that maybe makes it a little bit off. It's tragic. I got to switch these two. Oh my goodness. This is just kind of an awkward first part of the script. For sure. To set all of these and Unreal do it and then not giving me the straight lines, which is an awful fate. Okay. But he gets the job done, yell, it gets the job done. So out of then one, Let's align trace for objects. Instead of by channel. We're going to do it for objects because we want to. So like line, if I were doing line trace by channel, you'll notice that it's missing this object types. So we only want our line trace to interact with a couple of different object types. So with this line trace by channel, it's just we don't have that option essentially in simplified terms. That's why we're using that one. All right, so what we want to do, similar to how we did this in the character, if you remember, took the camera component, god's location and did some math here, we want to do something similar. So let's grab our local camera component, which if you remember, is an input. So if I were to go here and I were to pull this out and say Calculate line trace. It's not going to be asking for that data because it's inputs. Okay? So local camera, we're going to get the world transform. And we want to split this struck pins that we can get a rotation, a location in a scale. Or I can use the scale, but we will use the rotation and the location. So the location of our camera is going to be our start point. So that's nice and easy there. But we're going to do several different things off of this endpoint. So let's actually start with the rotation and we'll get the forward vector. So the rotation of our camera straight out from that point is what we're getting. And then we're going to multiply this vector times float. I believe it as a float. Yes, UCS is k. So this is actually how far out into the world our line traits is going to go. So the other ones to 200. So let's make this something pretty vague, like 10 thousand distance line trace travels and if you want, okay. So like let's say you want to give a certain weapon more range then a different one. All you have to do is promote this to a variable. And then the line trace will go as far. So if you'd like a shotgun, it's hitting something from like, you know, across the map or something ridiculous. You can do that prefer simplicity sake right now. Well, let's just keep it like that. And we're going to vector plus a float compatible with. We might need to vector plus vector. Vector plus vector. Yeah, okay. Okay. Mathematics. So, yeah, this goes in here and then that goes in there. So what we're doing is we're taking location of our camera as a start point and then we're adding 10 thousand to that point. Now, normally, we would just add that into the endpoint and we'd be done in life would be good. But we like to make things more complicated because if you remember, we have this bullet spread thing going on here. So we don't want our line traces to be absolutely perfectly straight if we're not aiming down the sites. So how do we accomplish that effect? Well, let's do that right now. Okay? So out a vector, Let's break set a vector r, right? And then what we're going to do is let's grab our bullet spread, whatever that is set as default 350. And then let's multiply that by another float, and let's multiply that by negative one. Okay? And then what we wanna do here is we'll get a random float within a range. So. This node is going to be the minimum, and then this node is going to be the maximum. So, so our bold spread is 350. All right? The minimum value that this randomization can pump out is negative 350 and the maximum it can be as 300, 50. So OK, really enough though we need to get this for the x, the y, and the z. So we need to do this to other times. So we can plug one in for the x, one for y, and one for the z. So let's plug in the value of this and do all of the minimums in the value of this into all of the maximums, which yes, is, this is an abomination looking thing, but it's the best we can do. Okay, out of here, Let's add float, float, and we want to do that for x, y, and z. So I wanna make sure that we're randomizing this in all the locations x, y, and z. And then the return values will go into the bottom of that. Alright, this can get very ugly very fast. Trying to tame all these nodes here. Okay? And then add a here. We're going to make this a vector because we broke it. Now I gotta make it back into a vector again. All these float values into a vector again. And then last but not least, we need to actually check, okay? We only wanna do this if we're not aiming right? We only want this bullet spread to be randomly firing off like if we are Amy, we want it to be this perfect line, right? So guess what we need to do is out of a vague big and play, we need to get a reference to our player because they don't think we have one yet. So let's get the player character cast to the player, to variable and we'll call Player. I won't make it look beautiful just to save some time. I'll do that in between videos. Yeah, It's not liking me because for this, okay. So out of the return value of this, Let's get a select note like this. And actually that didn't pull up the way I wanted to. Let's get, let's try do it this way. Player, Let's get is aiming. And then let's make a select. Out of that. Ha-ha, there we go. That's what we want. So now it's grabbing the true and false. So if is aiming is true, then we just want to grab that. We just want to grab the perfect line. This the, the rotation of our cameras forward vector plus 10000 units out into the world. Want that to be perfect. But if we're not Amy, we want to do this little bullet spread math. So we want to plug that into the false. And then the return value of that's going to be our endpoint. In their complex. Not really. And I kind of sort of get out of here. Let's, let's make an array because we want to have multiple objects to interact with. The two that we want to interact with our world static and roll that dynamic. So these are the things that our line traces going to intersect. So if you go out into the world and you look at this and well, if you were to go into the collision settings of something, so maybe if I just grab this out of this Pollyanna son by default. So if I were to take this and Collision Presets and artists say this is Wars world, that ECUA, world dynamic there. Oh, I might need to. Or is it? Oh, there we go. This is what I'm looking for. A world dynamic, world static. So there's different things in the world that would be considered dynamic and static. I probably didn't need to explain that, but these are the object types we want. Object types we want are aligned to intersect with. But then we also want to ignore some actors. So let's get the player character. And I don't think this will plug in straight away. Okay, It just made an array. So we can add more things to this that we want this to ignore. Right? Out of this out hit. We want to, can we just do this? No, we can't. So let's add another pin. Let's add a return node out of this. And then let's make an outputs and make this hit result. And we'll call it hit result. And then plug that in like that. All right. That is the ugliest thing I've ever seen in my life. All right, so now we have our Calculate line trace thing here. So really quickly go over this. So we're setting the prompt me. We didn't even need to do the weapon mentioned the socket, set those as variables because we didn't actually use them. I thought we would potentially we only use the camera on or whatever. It's really not that big a deal to have them or not have them. It is what it is. So when we draw this line trace, we're getting the position of a camera. We have not specified what that camera is. Just yet. We're getting its location and setting that as our start point. And then what we're doing is we are taking the rotation of the camera, the forward vector from that camera, plus 10000, adding that together. And then if we are aiming, our weapon will return that as the end point. If we're not aiming, then we have break, broken that vector up into x, y, and z. We've randomized that number in between negative 315, 350, or whatever number that we said is this bowl as this bolt spread here. Then we're adding those two values together back up, making that into a vector again because we broke it and made it into floats. And then making that the endpoint. And we want our line trace to interact with world static and dynamic objects and ignore our player. We don't want it to interact with our player. All right, so now we have that function sitting out and about like that. And this part will be pretty easy. So let's grab the player and let's grab the camera. That's on the player. And that's going to be our camera. So we grab this, their camera for the weapon mesh. Well, let's just grab the weapon mesh from our base. That is nothing but it's set as other things in the the children. And then the weapons socket. Baba, baba, baba. So if I show you this, if we go to the weapons in a skeletal mesh, we want this is called muzzle flash. This is what we're grabbing. They're all called the muzzle flash. All right, so I don't need you the spammer promoted to a variable and we'll call it weapon socket, hence the name variable. And why is it not? Letting me? Ok, So it's up here. Okay. That was like, Well, we'll set that to be muzzle flash. I don't think we'll ever need to change that, but just in case he had a different weapon that you were to add to this project later on. You can now change that by a variable. So yeah, that's pretty cool. Okay, And then we're gonna do different things. It's returning whatever this hits so you can break it just to show you, we do all these different things but the hit result, the hits of the line, alright, and we're returning that value so that we can do cool things with that afterwards, which is exactly what we're gonna do, is we want to always do the cool things. All right, So all that set up looking pretty good so far. All right, So there are a few different things that we're going to add to all these scripts. But just to show you that this is working, Let's go ahead and just set it up as sort of a debugging thing really quickly. So let's go into our settings, project settings, and input. Create New Action Mapping and call it shoot, shoot, shoot, shoot. We call it fire. These are the I'm going to call it fire. I feel like shoot is just like manage shoot. Left mouse button. So we want to shoot. It's normally how it goes. All right, so in our event graph, let's go ahead and create an event. And we'll, we'll call this one fire hose that. So we're going to add things to this to make sure that we actually have ammo in a whole bunch of other things like that. Make sure that we're not like we actually can shoot our weapon. You know, uh, we can do that lecture right now because we created that variable. But it'll always be true, right? So let's just set that to be true for now. So we see that this works. Okay? Then let's get the current weapon. All right. And then we want to get the fire type. What what did we name that? Or do we not actually set that as a hole down a second or weight? Weapon type where it starts shooting is fired type of type var to 0. Okay, We put it in the input. We didn't actually make it a variable. So let's make that biotype. Okay, so now it has an actual variable of type flyer, type of hits scanner projectile. And that's important because we need to make sure that we set that in all of our children eventually too, so that it knows if it's a hit Scan weapon or a projectile type weapon. All right, so now let's get the fire type. That. So nice to us now. And we want to run start shooting. The target is going to be the current weapon and it's going to run out of the true branch and kind of jerry-rigged together right now, admittedly. But it should work. The last thing to do is go to Action Mappings and let's search for fire, the action event. And then let's just go run fire like that. So hopefully, my gosh, I've done it. Okay, we wanna make sure that we have this persistent, alright, And probably want to check that we actually have a weapon. So before we do this, let's go ahead and get the load out because that's what caused those areas errors. Errors. It's good, Leia kid. Okay. Pressed. Has weapon fire and we can see those lines. Right. Because it was set to be a persistent. Okay. Excellent. So no lines, no ears. Pretty good. So silica get that. So we're shooting right now and you can see those lines going out, boom, boom, boom, boom. And I go way out there. And if it's Seguin, see it's hitting stuff because it has the little line. And then these ones and I'm shooting out, don't do anything. So obviously the ammo isn't going down. We don't have any recoil. Whole bunch of stuff that we need to add. But there we go. I mean, our, our gun is shooting. We are drawing these line traces out into the world, which is exactly what we want to do. It is checking that you'd see that distance there. If I just draw one like that, you'd actually see. So from there to there, That's how Fargo. So like if you want to change that, if you don't want the shock and have that much range, go ahead and set that 10 thousand a year variable and then you can change that. And all the children say, I'm not a crazy like light show going on over here. Yeah. That looks kinda cool. See a o, you can see how it actually, I'm going to jump off them out. You can see how it actually keeps going through the green. So it's still goes through even though it hits something. Cool. That looks so yeah, all of that works. Yeah, that's everything. That's everything for this video. So we're going to keep adding stuff to this and making it more robust. We want to add the sounds and the effects and be able to reload and make sure that their ammo count actually goes down. And then also make the specific weapon weapons function, how they do make that assault rifle automatic and the shotgun is spread and all that stuff. But this is the baseline for what all of our projectile weapons are going to do, which is shoot out. And so now we have guns shooting, shooting with air quotes. So that will be pretty cool. So I hope you guys enjoyed this video and I'll see you next one.
20. Reloading Functionality (Part 1): Hi everyone and welcome back to another video. In these next few videos, we are going to be adding, reloading to our game. So in this video, this is mainly going to be the math behind it. So getting our current ammo to decrease whenever reshoot or gun in a game to understand like if we have 0 bullets in the magazine to automatically reload and just do different stuff like that. And then in future videos, we're going to actually add sound effects and an animation and in those types of things. So to get started in this one, we're going to go inside of our weapon base and we're going to create a decent amount of functions here. And between videos, There's a couple of things I did. I mainly just added comment boxes around things and made some of the stuff look a little bit nicer. So here's our Calculate line trace from the last video. So here's our bullet spread. Actors aligned truces going to hit the ones that will ignore. So just some added stuff. I got rid of those other two local variables because I don't think we're going to use them, but we do need them as inputs. We just don't need to set them as variables. And then I ended up getting rid of this weapon sockets variable. Because for my project at least every single socket is going to be muzzle flash. But if you want to use different weapons meshes that I'm using in the future. You definitely would want to set that as a variable so that any child of this weapon base, you'll be able to dynamically set that every single time. But I manually put it in. I think that's it. Other than that, I put some of our variables into different categories to keep them organized. Um, and like I said, if you can set this to be a variable if you'd like to as well. I just didn't because for simplicity sake, every line trace weapons going to be that distance for now. Okay? So I think that's everything. And yeah, we can get started. So let's start out by creating a function and we'll call this reload calculation. This will be controlling the math that we're doing here. For this, we're going to need a couple more variables to add to this OData, which is what I named it. So let's add a variable and we'll call this. So we don't have the CF magazine size. This is going to be of type integer. All these will be integers. So you have magazine size. And then we need one called bullet difference. Think that's it. We can drag those into category if you don't want to use categories, certainly don't have to. Just like if you open up a child, if you haven't been categories and they will show up into these little categories. If you don't do this, then that'll just be, they'll just be like one really, really long section there. So yes, let's get started out. So magazine size, this variable should always equal the current ammo. So our default is 30, so let's just set this to be 30. This is whatever just the size of our magazine is. This number's not going to change. The current ammo is going to change. But this is the total. So our magazine size, Let's get that. And let's get our current ML. And we're going to subtract these. And then we're going to set this as the bullet difference. Okay? The way I'm not going to create this whole function then just explain kind of what it does after the fact. Pulling out a bullet difference. We want to get a less than or equal to integer. And we want to get the current total AMA. And then let's pull out to branch here. Okay? Trying to just think of like when and how to explain what this is exactly doing. Well, let's just go, yeah, let's just go out in the true branch for now. And let's set not current ammo. And we're going to set that immediately for the true and the false. Excuse me. So scrap magazine size and plugged it into current ammo up here. And then we're gonna get our current total ammo. And the bullet difference. We're going to subtract these. Then we're going to set that as the new current total ammo. Like this. It looks pretty good. Okay, and then if this outcome is false, we want to grab the current ammo. The current total ammo. And we're going to add them together. And then we're going to set this as our current ML, like such. And then we want to set our current total ammo to be 0. Okay, so what is all this doing? All right, so here comes the math. So stick with me for a second here. So we have our magazine size. Let's say, let's just use 30 is 30. So our magazine is 30 and our current ammo is also 30. For the time being, let's say we shoot to round or five rounds, shoot off five rounds. So that means that this is 30 and this is 25. Subtract that this, and then this equals five. If five is less than or equal to the current total ammo, then we're going to do different things. So this current total ammo is a very large number. So more often than not, we're going to run this and I'll just say runs when there is reserve ammo. So more often than not, this function is going or this this isn't going to be true most of the time because our bullet difference is going to be relatively low numbers. The biggest number that this can be, as it would be 30, 30 minus 0. So the biggest disk could be, would be 30. So this is only going to run to the bottom if we run out of reserve AMA. Okay, So let's just follow along the true branch for now. So we got this equals 55 is less than or equal to 244. So we're gonna run up here. And our magazine size, which is 30, is going to be set as the current ammo. So in other words, this turn into 25. We're setting it back to the size of our magazine, which would be 30. And then we're taking our current total ammo, which is 244. We're subtracting it from the bullet difference, which in this case was five. We shut off five rounds and we're setting that as the new current total. So that would be 239. So what this is doing is it is taking, it's updating the big number. So 12 in this case would be the current and also the magazine size. So it's taking that number, it's setting that back to the magazine size, which is always going to be 12 in this case. And then it's just subtracting whatever that bullet difference was, how many rounds we shot off from that back-end. Small number 144. Now, let's say that we like run out of ammo or we don't have a lot of ammo in reserve. In this case. We're just going to do that math. So we're gonna take our current ammo. We're going to add it to the current total. Set that as our current because it won't equal the magazine size anymore because it won't have a full magazine to give us back. And then it's going to set the current total animal to 0 because we don't have any in the reserve. So this will run when reserve amount is lower than ammo magazine. So this is the math it'll do when there's like when you're running extremely low and ammo essentially. All right, cool. Now we're gonna do a couple of different checks. So let's create a new function and we'll say is MAG, full or empty, like that, something like that. And let's pull out a branch out of here. And then let's grab our current ammo and our magazine size. And then we're going to check out these equal each other. Because we don't want to reload our gun if our magazine is completely full. So I don't know if we went and created this yet, but in our character, let's go here and do we have a can reload? We don't. Okay, So let's create a can reload. This should be a Boolean. They could already was. Colors are hard for me. Okay, then let's grab our player reference and let's set can reload to be false. Because we don't want to reload. So we can say like this, Abel's reload. If magazine is full or reserves are empty. We don't want to, we haven't actually put this can reload anywhere yet, but we will eventually. And if it's false, we won't be able to do that action event that we're going to set up. All right, and then we go to, we want a return note here. So we'll return the result of this. We can just call this term value or something like that. And then plug the result of this into there. So we will return the value of this function. If it's false, we want to pull out another. If we want to say, let's grab our current tonal ammo and we want to make sure or check to see if this equals 0. Alright, so if our current total M0 equals 0, we've run out of reserve ammo. Then we're going to say that we cannot reload. We don't want to we can't we don't want to reload anything. And we won't be able to reload if we don't have anything in the reserve, essentially. So this is like an extra fail-safe here because there will be times where like the current ammo and equals a magazine size, right? You have you've run out of bullets in your current total. This equal 0, but you have 30 and 30. So you can't reload. But let's say that you have like five bullets left and on the reserve. So this will run through the false branch. And then this just ensures that you still can't reload because you don't want to be able to pull ammo from, from nothing essentially. But if you, if this doesn't equal 0, if these don't equal each other hand, this doesn't equal 0. I know this can get kind of confusing. Canon. We're going to set can reload again. And we're gonna say yes, we can reload. And then we're going to return that as well like that. And then we'll say enables reload. Magazine is empty, but ammo is left in reserve. So yeah, we can reload if we have reserve ammo. All of that should work just fine. So there's that function right there. Got a couple more to go. Let's create another function and say, do we have M0? Question mark? This is going to be an easy one. And this is actually less with the reloading and just more with the being able to shoot argon. So let's get our current AMA. And let's just say greater than return. We'll say has AML, it's just the name of that and return that value. So all this one is doing is occurs or allows shoots events to occur if player has. So if our current animal equals 0, we don't want to be able to shoot. That should be pretty straightforward. That one. Okay. And then we want to do one more check to see if there's ammunition left. So let's go ahead and do that now. So let's create one more function. I believe this is the last one. And we'll call this is their ammo. And we go typing. So HOD, and this is going to be really similar to the last one. So we'll get the current, current total ammo this time, and we'll say greater than 0. And let's return a Boolean and say is there ammo left like that plugin that result like that will return this. And then this one will just say like checks to see if there is ammo in reserves. So you won't want to be able to reload if there's no ammo and our reserve. So this will return true if we, if our current I'll label it's greater than 0. Okay? So we've got all those things done. So now all of these functions are created. So now we can start doing some stuff and actually making this work. So let's go and do that. All right, so let's head back to our start shooting function in our weapon base. And admittedly, there are a lot of steps to this. So it's gonna take a little bit of time before we get this thing totally working, but our functions are set up in place. So when we shoot, one thing that we wanna do is let's grab the current ammo and let's subtract one from that and then set that as the new current amble like that. So look something like that. And we can just say subtracts 1 bullets when firing weapon. So that's pretty straightforward right there. But we want our game to be able to distinguish and reload automatically. We run out of bullets and also disable shooting. So let's get our kernel mode again. And we will see less than or equal to 0. The reason I have a less than and not just equal to zeros because. It's like an extra fail safe that you can have there. Just in case something weird happens in your bullets go to negative one. It'll still run this off. And we want to create a new event to automatically reload our gun when we run out of ammo. So let's go into our event graph and create this event. And we'll create a custom event and we'll say auto, reload on empty. All right, and then we can just go right back here and we can go to true. We can say auto reload on empty. So that's all set up. You can highlight this thing and we'll say it ought to match it. Loads when mag runs out. Something like that. Works just fine. So now we can do that. So now our goal is going to automatically reload and we run out of ammo and we've got to set that up, that event. So let's go ahead and start doing that. So when I did this, initially, I recognize this weird issue that would happen. So what we're going to do, we don't really have working reloading animations and we want to be able to set them for a specific times. So what we're going to end up doing is we are going to have the weapon pull down out of the screen and then come back up. One thing that I realized is that when you shoot the last round of the sniper rifle, in particular, the weapon starts getting pulled down too quickly where your shot will miss essentially. So your crosshairs will be lined up, you'll shoot. But the gun will start moving down the second that the current bolts equals 0, so that it will start screwing you up. So we have to put in an extra little fail-safe for that. So let's go ahead and grab the weapon type and say equals. And we'll check to see if we're holding the cyber rifle and then pull it in. If you want to do something slightly different. If we have the sniper rifle, essentially, we can just say like Snowbird causes issues. So goofy like that. I mainly I'm putting these comments here for you guys so you can kinda look back at disrupting, kind of understand exactly what all this is doing after the fact. So if we are using the sniper, we don't want to destroy it, but we want to do a delay. And all we need is like 0.3 seconds. And this will make it less noticeable. And then we want to do a reload event. But once again, we haven't created that reload event. So let's go ahead back into our character and our player. And let's go ahead and create that right now. You know what? After looking at that, I think I'm going to save that for another video. So I don't want to make this one to super long because this next reloading part is going to be a little bit lengthy. So I'm going to say that for the next one. So hope you enjoyed this video. We are moving along in this series. And yeah, I hope you're enjoying it and I'll see in the next one.
21. Reloading Functionality (Part 2): Hello everyone and welcome back to another video. In the last one, we started adding reloading functionality to our game men. In this one we're just going to be continuing that. So let's go ahead and get started. So where we picked up, we want to create a actual reload event instead of our player to run for when we run out of bullets, when we are shooting our weapon. And then we're going to call this reload event many different times. So we have to go in and create it. So let's make a custom event and call this reload like that. So now that it at least exists, we can call it into the world. So I'm going to head back to our weapon base. And I am going to grab our player and I'm going to say reload. So even though there's nothing actually inside this event yet, I am going to just hook it up. And then I'm going to want to do this. Well, we're not holding the sniper rifle. We want to be able to reload. And we can just come in boxes and say, Yeah, automatically calls reload event or something like that. And we'll add one more thing to this eventually. But for the time being, that looks good to me. And taught it's going up. Can not find the function 0, compile. Think about all that, fixed that problem. Before. One other thing that we want to do before is we're going to finish this fire event because we, in our weapon based, we created some of these functions before, but we didn't actually plug them in. And they have more to do with the firing than the actual reloading. Alright, so out of this true branch, we're going to make another if statement. And we want to get the current weapon and we want to call Do we have ammo and got to change one thing really quickly. So back in our weapon base for do we have ammo and is their ammo left? What we're going to do is we're going to click on Peer. We're going to make these pure functions. And by making them pure functions here, I'll make one NOP here, and then the other one will be peer. So if I pull out, do we have ammo? See how it doesn't have an execution wire anymore. And we'll say it's their ammo left. So this is a pure function and this is what's known as a not pure function. This is like, just like what a normal function would look like as execution, execution wires. So when you do it like this, it kind of works more like a macro or you can just plug that straight in and it doesn't need to have these white execution wires. So we want to make both of since these are just checking like, you know, it's just returning true or false based on a couple of variables. We're going to make these pure. So just like a different way of doing it. So yeah, we'll check before we can shoot. We're going to say can we shoot? We can. And we're going to be like, okay, well, do we have ammo? If we have ammo and our magazine, then we will go ahead and we will shoot, our weapons, start shooting, which was this event here. Or function I guess. Use those words interchangeably. Sometimes. If we don't have ammo, then we're going to check, do we have M0 left? Is there any ammo at all? Okay. If if we do have ammo left with, we're going to call that reload this event. If we don't, then we're going to play a 2D sound. And there's one called dry fire. And these might be boasted to. Let's just slot in dry fire one for now. All right. And then we can say reloads weapon if there is reserved ammo. Yeah. I was gonna say some about the DRI firewall or Earth-like place. So this dry fire is just like if you have literally 00:00 AM a left, it will do that. So this is like the final place it can go is here. Because remember, if you remember, is there MLF is checking if we have ammo totally, just like in general in the reserve. So if we have ammo, if our current ammo is greater than that, then we can shoot our gun. But if this number equals 0, there's no bullets currently in our magazine, but we still have reserves. It'll reload. If we don't have ammo, that our first big number equals 0, our current bullets. And the smaller one, our reserves, then it'll just be like you don't have any MO, left, period. Life sucks for you. Go find some more. Alright? Now what we're gonna do is we're going to make this reload event and this is going to be pretty lengthy. So I'm going to drag this down and Sue some open space, drag out a wire. And as usual, we want to do a check. And I'm going to store this in a macro and say, can we reload? Typically I use macros when I have multiple Booleans that I want to check at the same exact time. Typically when I use like an AND or an OR. First thing we're going to be like, are we not reloading? And we have switching weapons. And not switching weapon. And we're gonna say or here. And then return that value. Show what this macro is saying. It'll return true if we are not reloading or not switching weapons. So I don't want to be able to reload if we are already reloading or if we are currently in the middle of switching weapons. And switching weapons only lasts like for like 0.3 seconds. It's a very quick animation, but I don't want to awkwardly interrupt that because that would be weird. So let's drag can we reload and plug that macro in? All right, and then out of the true branch, so we're not reloading are ready, we're not switching weapons. We're going to do three different things. So do we have is reloading? We want to set that to be true. Can shoot. We want to set this to be false. We don't want to be able to shoot while we're doing this. And is aiming. Also false? Don't want to be able to aim more. We're doing this. The other thing that we want to check is we want to get as sprinting. And we'll say not. And we'll say branch. And we'll check. If we're not sprinting while we're doing this. Then we want to get the Character Movement Component. We want to set our max walk speed to whatever our max walk speed is, I set it to 750. So what this is doing here is this is this is speeding that player up if they reload while they're aiming. So what we're going to do eventually is when we aim down sites of our weapon, our character is going to slow down. They will not move at 750 speed. So if we're not sprinting currently, we want to just reset. This is just resetting our speed back to its default. Alright, and then we'll deal with this then to later. That's actually a specific one that we're going to do for shotguns. Because shot guns we want to have reloading work a little bit differently because it's individual pellets. Alright, now let's pull out a timeline and we'll just call this weapon what pulled down. And we're going to play this from the start every single time. Let's open it up at a Float Track. We'll call this pull-down. Want this to last point to five seconds. We'll add two key frames. The first one B at time 0, value of 0. The second one will be at time 0.5 and a value of one. So it'll look like that in then. What we wanna do is we want to make these auto. So it's just a little bit smoother like that. Alright, again, you don't want this to loop or anything. Close tone out of this and keep that open. Okay. So out of the updates, we want to check if we're reloading and it's coming out the update if it didn't already mentioned that. So are they update if we're reloading, then we want to actually promote this to a variable and we'll call this pull down timer. So we're essentially just setting that 0.5 as like a variable and just making sure that we're reloading while it's happening. When this finishes. So it finishes that 0.5 seconds, we're going to hit a delay. In this delay is going to be promoted in. This is going to be known as reload. Oh, actually, take that back. Don't put real-time in here. Let's go into the weapon base and let's make reload time. Because we want to be able to apply this variable to our child blueprints. So make that a float and then let's grab current weapon. The current weapons reload time. Whoa, not what we want. Okay. And we'll set that as the delay. Like that. And you can make this default time like 1.5 seconds or whatever you want. That's gonna be your default reload time. When this is done, we want to make another timeline and we'll call this weapon pull up. It's going to pull our weapon. So this is going to move our weapon downward. And is he going to pull our weapon back upward? We want this to always play from start. You hold down control and grabbed the note if you aren't familiar how to do that. Okay. And this is going to be the exact opposite of the other ones. So we'll call this pull up. And two keyframes, 0.5 seconds. This one is going to be times 0 value of one. The second one is going to be time of 0.5 and the value of 0, it's going to be the inverse of the other one. And we're going to auto, do this as well. So it's moving from that other value, the 100 percent of itself. And going back to the original, Cool, Cool, We're moving along here out of the, we're going to grab this and grab two more of them and pull that out of the updates as well as out of the finished, just to make sure that we are still reloading. And then this is going to be we can just put pull down timer in here again, like that. You don't need to do it. Even though it's pulled down, timer still work for them. Pull up, it's fine. And then here's what we wanna do. Now. We want to get our current weapon again and we want to reload calculation. So you remember this is what's doing the math. Math for bullets. Open this up. This is this function. So it's doing the math for us. And it's doing it when we're when we're done with pulling the weapon down, pulling it back up. And then all we need to do is take is reloading and set that to false. We're not reloading anymore. And take can shoot and say, yes, you can shoot your gun now. So that is all that is doing right there. And then for a couple of little pieces of flair here, we can go into our weapon base and add a variable and we'll call this reload start sound. And we'll make this of type sound. Do we want to make it a sound cue? I guess it depends where we slot that in as right. Let me just check quickly what I did that before my notes and I'll get back to in a second and what type of variable that I did. Okay, So I actually made this is sound wave. So sound wave, object reference, reload, start sound. And then we'll make a reload and sound. Oh gosh, don't want that apostrophe. Alright, and so these can be slotted in as whatever. So now back in our player here, out of, for this pull down timer, Let's do it. Do once node, like this. And then let's play a 2D sound, will have that sound would be the current weapon. And get reloaded sound and plug that in as the sound like that. Feel free to change the volume. How do you like? Then we'll have a delay node. Will have its delay for like a second. And then we're going to reset our du once. The reason that we're doing it this way is just to make sure that sound isn't play more than once. Because like sometimes you can get caught and these timers and make this really weird spamming type sound, which is just very awkward every time. And then coming out of then tails is do it out of here. Let's Plays sound. 2d, curl up in. And we get the reload start sound. And then do it like that. Alright, so here is our reload events all finished up like this. We're going to reload, we're going to make sure that we aren't switching a weapon or are currently reloading. It's going to stay well like this spam of it. And we're going to say we are reloading, we can't shoot, can't aim. We're going to set our walks you back to normal, going to play a sound. Then we're going to run this little animation that will set up in a future video. We'll link that up in our Animation Blueprint. Then we'll do that for, we'll keep the weapon down there for the reload time. Whenever we slot that in, it will pull the weapon back up. We'll do the math for our bullets. And then we'll say We're not reloading anymore. We can shoot and then we'll play that sound. All right, so that works out. Great. We can comment box like this section or something and we'll say controls. Animations for we'll just say for reloading, be generic about it. Like that. Only like the common backs, certain parts of the script that It's like don't really might not know what it does or something like that. So yeah, that all looks good. We only have like one more thing to do. So let's do that now let's go to our project settings. And let's actually create an input for this action mapping. Call it a reload, and make it bind it to the R key. Typical first-person shooter things. Then in our player action mappings, Let's go ahead and go underneath, reload, view, the action event reload. And let's do a couple of things here. So let's grab the load out as per usual and switch it on. So only want to be able to do this if we actually have a gun to prevent bugs. Because if I hit R and I don't have a weapon, it's going to get confused. So let's get the current weapon. This is where some of our functions are gonna come into place, is a mag, full or empty. And if you're a member as weapon, if you remember, we have a return value. So is our magazine full or empty? It's doing this. Turning. This variable can reload on and off. So if we can reload, the next thing we want to check is, are we sprinting? There we go. If we try to reload and we are sprinting, then we want to call movement stopped. If you remember, that slows our character back down to normal and starts the regeneration of our stamina for not sprinting. Then we will pull out another branch and we'll put movements stopped. We'll run that event, then we'll continue on that way. Then we'll get the current weapon. And we want to check if we're currently, uh, we haven't created that yet, have we? Hm, okay, well let's do that then. So let's create a new variable in our weapon basin. Call it is firing, make it a baleen. All right, and then I want to, want to make a new function. This is going to be the most pathetic function you ever seen your life. But we're going to call this stop shooting. And all we're gonna do in stop shooting is take is firing and make it false like that. Literally, that's it. And then inside of our start shooting out of this line trace just for now. Let's make, is firing true like that. So now back in our player, Let's get is firing. So we are firing. It's pulled a brain. But we already did. Awkward. Okay. So if we try to reload while we're firing our weapon, we don't want to keep shooting the gun while we're reloading, because then the math is going to get really confused. We're holding down the trigger of the automatic weapon or current bullets are going down, but it's also trying to do the math. So we want to be, we want to stop shooting like that. And then let's add of the false call, reload and then drag it in like that. So if we're yeah, so over firing will stop shooting before we can reload. If we're not firing, then it will just reload. So we can say stops gone from shooting during reload. So there's a whole lot of these weird little things you're like, Oh, shoot that all my gun to be firing while I'm trying to reload it. But these are the things when your script and you gotta think of everything. So we have what? Thinking of everything in this class, okay, I got to cover. The next thing to do is to head on into your weapon children. And you can slot in some sounds for the reload, start and end. And then you can set a reload time. And then make sure you just go in and make sure that your magazine size is not at 30, which is the default. Set it to whatever you have is your current ammo. And then if you hop in and play, you'll see that if I pick up the pistol, for example, and I shoot TCR ammo is going down. If I hit the R key, it's reloading and if I try to shoot, It's not letting me until it gets reset back to 12 and I can shoot. Then if I let this go back down to 0 and I'm trying to shoot so that letting me it's reloading automatically and it did all of that math for me like that. And then if I were to do something like, let's see, I set this to be 24. Let me just set this to be 12 or something like that. Then if I come over here, you've got a pistol and I'm shooting and I'm running out of ammo. So it's reloading right there. Now if I try to reload, It's not letting me reload because I've 0 and the reserve chute not letting me reload. Still not. And then I don't know, I can't reload nothing. I guess the only thing that happened that was where does that it played the reload sound. But that would be a quick and easy fix that we can just implement. By making sure by doing a check like that is their ammo left. We could add a branch or something like that right here and then right there doing that. But yeah, that should be rather easy to put in there and do. Interesting. Yeah. Okay. Well, I'll get that sorted out and I'll get back to you on that to find something that works. But yeah, that is reloading. In a nutshell. It all works. It's beautiful. So thank you for watching. I'll see you the next one.
22. Reloading Weapon Animation: Hello everybody and welcome back to another video. In this one we're going to be continuing on with our reloading functionality in being able to actually animate or weapon. So in between videos, I did a couple of things that hopefully you did as well. If not, take some time to do that now. So went into every single weapon and I set different sounds are used, the lower and the rays ones, I feel like that they sound better than the ones part of this pack that are actually called reload, but that's up to you. Actually change the bullet spread on these ones a little bit. These only matter. Actually. It actually it does matter. And other weapons was going to say it only matters on the hit scan 12. It doesn't matter at all of them. I said a reload time and then I made sure that the magazine size in the current Emma were the same thing. So now if we enter the game and pick up a weapon, shoot, reload. Different sounds and everything. Yeah, You get the idea. One thing that I wanted to show off, so remember in a previous video I talked about how when we sprint, we want to do something while we try to sprint, to troubleshoot while we're shooting. And I'm gonna demonstrate that now. So there's no bolts coming out. But VC, if I'm running and shooting, the gun is pointed to the left, but it's still shooting straight. So that's one thing that we want to fix. So if we go into the player and we go underneath, has a weapon, what we did before we created that stop shooting function. So let's go ahead. I put some of these into categories. Think I made one called a weapon, the current weapon and we made that stop shooting function last time. Plug that in there and then plug that into play. Like such. And then I might just kind of rerouted to all this around and move it a little bit. That maybe. Okay, so now we stop shooting. I don't this might not be all the steps for it. It wasn't oh, I think I know why. Hold on 1 second. Yeah. So one other thing we need to do is we need to go into our action mappings in our player and actually add some more to this. So let's go ahead and start by copy pasting this. We want to add something on the released just in general. But off of this start, I'm going to break this hint for now. So if we have a weapon, we want to do a couple of different checks. The first one is, we're gonna have to create a new variable for this and say Is weapon fire loading. This is something that we're going to add later on. We'll do not, so we'd go out of the true branch. This is going to allow us. So if you go in the game right now, may not work this plug-in. So if you notice right now we can shoot this weapon as fast as we can click. And the same thing goes with the sniper rifle. And same thing goes for the grenade. We want these to have actual fire rates so that this variable is going to be controlling that later on. To make sure that we can't just spam shoot every single one. But then we want to check if we are sprinting, renting. If we are sprinting, then first thing we wanna do is movement stopped, and then we can fire. We're not sprinting them, we'll just fire. Then. Let's do so when we release this is mainly for automatic weapons will be hold down the trigger for That's mainly what the stop shooting. What this is mainly for stop shooting, but we can just copy and paste that. Drag it underneath. And if we have a weapon, then we'll stop shooting stuff. She doesn't really do much of anything. They're mostly just works for automatic weapons are automatic weapon, but now if we happen to the game, this should work. Now, I'm sprinting and then I shoot. You can see how my gun faces back forward and my movement speed is reset to normal. All right. So now that is all fixed and well and good. So yeah. Now what we can do is we can go into our character's animation blueprint. We can actually animate this. So let's go into our event graph and we're going to want to create a couple more of these references here. So let's create one called pull down timer of type. And we'll call one is. And loading of a Boolean. And just like before with these other ones, we want to grab the player and we want to get that variable to pull down timer. And we want to set that as the pull down timer. Here. You remember we created this pull down timer. We set it right here, set this as a variable here, and then set that as the same variable here. I'm gonna make this longer. So I'm gonna put both of these in the same box. Okay. So let's go ahead and also get is we'll set these reloading, the one from here. And we'll get the player again. And get is reloading like that. Okay, so now we have those variables sync up from our player into our Anime Blueprint. Now we can go back into our animation graph. And then so we have a weapon pose. So let's delete weapon pose from the output because we're going to have to use this now. So let's go ahead and grab a weapon pose like that. And we're going to transform modify bone again. We want to just do rotation. Yeah. Yeah, yeah. So we want to underexpose the scale. We will keep the translation and the rotation. And we're going to split both of them like that. So we get a node that looks like this. This is going to add like a local the components automatically. Okay, and then let's go ahead and grab a weapon pose again. And we want to blend poses by a bool. And then this is going to plug into a new cash pose. And we'll call this a lot I'll pose, I'm just kinda what the random names at this point. And then we'll have load out pose the output. So just to go through an extra step here, we want this to plug in. A false will be a little bit. Then weapon pose is going to be true, correct. Then let's grab is reloading and say not reloading. Okay. So if, if we're not reloading, then we're just taking less essentially, which is what the innovations that we've been using. But if we are reloading that we want to transform, modify a bone, our alpha value is going to be our pull down timer. So that 0.5 seconds from moving from 0 to one and then one back to 0. And we're going to translate in the y of five rotate role and the x. That should be it. Oh, we actually have to want to do spine, spine 1. So removing the whole thing downward. So it's still not like me. Oh, let's make sure we do add to existing for both of these. That was the issue. Okay, cool. So now we can comment box this and let's say it moves down, well reloading. And it's going to keep it down there until our reloading timer runs out, which is dynamically set by us in the variable reload time. So that's what that is looking like. Now if we go in here and I grab my gun and I shoot it a couple times and then reload, moves it down, brings it back up. And I'm hitting our right now trying to reload. It's not doing that animation, it's not shooting. I run out of ammo student automatically. Bottom. There we go. That works perfect. So now we have a full reloading system in our game. It's doing all the math. It's, it's animating, doing things automatically for us when we run out. It's not allowing us to shoot an aim and we can even name in general right now, but it won't allow us to do certain stuff. Yeah. I don't see any issues with it right now. I think everything's working good, So yeah, in the next series of videos, we're going to keep on adding some more functionality or weapons and customizing them and doing some cool stuff. So I hope to see you there.
23. Shooting the Pistol: Hello everyone and welcome back to another video in this one, this one's actually probably going to be the shortest one yet. I think we'll see because we're actually going to be able to shoot our pistil. There. We're going to start setting up these weapons with some cool stuff. So let's go to our weapons folder and let's actually open up the pistol weapon. Open full blueprint editor. And we can delete these nodes. Now you should have in your viewport, your pistol right here as your weapon mesh. And you can set pistol pickup amount, the current ammo, and some of these things. But what we wanna do, we wanna just do two very easy things. We wanted to get event. Start shooting. We right-click on this and we're going to add call the parent function like that. So we're creating, we're linking this event to the one that exists in the parent right here. When we shoot this particular weapon, we want to, let's actually grab the weapon mesh. And we'll say Play Animation, the animation that we want to play. So these weapons came with animations. There's one called fire Pistol W. You can browse to that and open that up. So we get this noise. There is a little strange, but we get a little muzzle flash that you see the hammer moving like that. So that's animation is going to play like that. And then we want to get events reload weight. And we don't have to do this. And then reload calculation. Let's just do it just to be sure that it works on this weapon as intended. We might not need to do it like that, but I'm just going to add it to be safe. So now if we go in and play, we get our pistil. We shoot. Now we can actually shoot the gun. And it looks like it's shooting. It sounds like it should be noticed. You can see how those bullets are like now perfectly landing of the radical. And that's because our bullet spread is like that. If I were to go back in here and go to bullet spread and I'm at 250 of AI citizens than like 750, like something really large. Just to demonstrate this, yellows are landing all over the place. I want my spread of my pistol be pretty accurate. They are. That's how you should the PESTEL. That's all we gotta do in this video. So the next one, we're going to add a little bit more to the weapon base and add some recoil. Will do that. And then we'll move on to start being able to shoot the rest of the weapons, which are admittedly all going to be more complicated than this pistol. But this one was to show you how it's done. So thank you for watching. I'll see in the next one.
24. Adding Realistic Recoil: Hey everyone and welcome back to another video. In this video, we're going to be adding recoil to our weapons to give them a little bit of a weapon, kick, shoot them vertically up in the air while we're shooting, just to make them feel a little bit more realistic. So let's go ahead and do that. We're going to want to head into our weapon base, which I actually already have open apparently. And we'll just do this inside of our event graph. So let's get some open space. And we're going to create three custom events. One called Start recoil. We're going to have one called stop recoil and another one called reset recoil. So this one's gonna make the weapon kick upward. This isn't going to stop that from happening and this one's going to move the weapon back down for us. To make the game a little bit nicer to us. To be able to accomplish this. We have to use a timeline. So let's call this recoil. Sure. This is always going to play from the start. This stop recoil is going to be in stop and reset. It's going to be in reverse. And we can actually call this reverse recoil to make it more consistent with the names of the timeline for you like that. Let's go ahead and open up this timeline. This is going to be really, really quick. This one, it's going to be a float track, him, build his name. This alpha is going to be point 1, 0 seconds long. And then on this really short, then we want to have three keyframes. You'll set one of Time 0 and value of 0. The second one is going to be time of 0.02 in a value of one. And then this one is going to be time 0.1 in value 0. And as usual, we're going to set these to be auto for their key interpolation. So that's what our timeline should look like. We don't need a loop or do anything else so we can close out of it like that. Next thing that we want to do is we'll pull out of this direction. This is an enumeration that automatically came out of this timeline. We didn't actually that ourselves and we're going to switch it on. Then out of the update, we want to do this. And so this is getting a direction of forward or backward, or forward or backward. Okay, out of our timeline, let's go ahead and get the player character. And we want to add controller pitch input. Alright, so for forward, we want this to go into the pitch. And for backward we also want this to go into the pitch. We're going to set the speed different values. So let's drag out of here. And we're going to remember alert is linear interpolation. So it's moving from a to B over Alpha. So it's going from a to B over Alpha is like a certain period of time. So like you can learn two different numbers or worked with colors. So if you have a is like blue and B is red, can loop over like 1 second and it'll, instead of like flashing, it will sort of fade from one color to the next. So there's different ways you can use them. So alpha is going to be our alpha value, which is going to end up being 0.1 seconds. A is going to be left at 0 and B is going to be promoted to a variable. And we'll call this weapon kick. This is going to be like how much our weapon actually kicks up in the air every single 0.1 seconds. So if we compile this, oh gosh. Let's just set this to be negative 0.05 by default. So not a whole lot. Then this return value is going to be these values. Just for this one, for backward, we're going to multiply it by negative one. So, or yeah, I said negative one, just didn't type it. Wanted to be the inverse for backwards like that. And we need a plug that into the target because one or one that was giving me an error. All right, So that looks good. Let's go ahead and I'm just going to get the player character another reference to it. And then out of here, we're going to add controller, your input. So we're just gonna make this go up and down. We're also going to make a kind of rattle left to right a little bit. In for this value. Let's just go ahead and get a random float in range. And we'll make this. Negative point 15 to positive points 15, like that. You can feel free to increase or decrease, change these numbers to wherever you want by testing it out and making it to your liking. Now once we finish through this timeline, we're going to want to reverse recoil. So we're going to reverse it. We're going to send it on back. Like that. Gets the didn't really help me that much. That reroute node looks fine. We're going to reverse it. Then we're gonna have a read Trigger will delay. The difference between a delay in a retrievable delay is it says it right here. Perform an action with a retrievable delay, calling action while it is counting down, we'll reset the countdown to the duration. So the reason we want to read trigger a double one here is because if we're reversing, right, and this timer is going down, and it's still counting and we start shooting again. We want to set this delay back to what it was before. And we want to start moving back upward. Select, we want to go like boom, and then it'll start coming back in and we shoot again. We wanted to and be able to do that. So yeah, it can be read triggered and then we want to stop or recoil after 0.05 seconds. So this is like a really, really short time. Let's go ahead and comment boxes, whole thing. And we'll say it adds recoil effect to weapons like that. The last thing that we need to do is we need to, Let's start recoil event. That's going to be in start shooting. So after we calculate the line trace, let's just say start recoil like that. And then we'll say is firing like that. So now we might not be able to notice this too much, but we should see a little bit of, I guess, screen movement. If I just don't move the mouse right-click, see it's rattling the screen a little bit. It's moving up if I were to make this. So go into the pistol and let's make this some ridiculous number like negative makes you trying to remember if negatives make it worse or better and see. Yeah. So like negative two maybe has a little bit too ridiculous. Yeah, I see that. Bucket like a Bronco. So negative one would be a lot like negative 1 or it might be like your rocket launcher type of recoil. Like i'm, I'm, I'm not gonna move the mouse and it's gonna click. That's how much it's moving out like that. So 0.05 for like a pistol is pretty good, just has a little bit of recoil to it because you can shoot it so fast. Like that. See, yeah, you can feel free. And we, we can't really shoot these weapons yet. So it might be something to do for later. But I'm going to add this weapon kick into our weapon data. Yeah, so that's another variable that can be dynamically set depending on whichever weapon. I think the auto rifle was like negative 0.1. So that to give you an example. So yeah, so that recall is going to be happening whether you're aiming or not. So that's I got recoil, not super crazy complex where does adding some pitch in yaw inputs on our screen when we shoot the gun. So hope you guys enjoyed this video, found it helpful, found it informative. And I'll see you in the next one.
25. Shooting the Assault Rifle: Everyone and welcome back to another video. This one is probably going to be a lot of people's favorite, the one that they had been waiting for. Because we're going to be able to shoot our auto or assault rifles, rifle or whatever you wanna call it. We're going to be shoot an automatic weapon and you'd hold down the trigger and it will just bam, bam, bam, bam, bam, bam, bam. Okay. I know that's what you all want to see. So we're doing it here in this video. So does actually pretty simple to do. Let's go ahead and open up our auto rifle. And we can check our sounds and I'm gonna make our bullet spread like 100, something real time and 0.5 that socket, this and that and all that stuff. You can always edit that by just scrolling around through here with this selected or viewport should have the weapon. But now what we're gonna do is we're going to create some script. So just like before with the pistol, we want to get event start shooting. And we want to add call to the parent function. But we don't want to actually plug this in right away. We're going to create a new variable specific to this blueprint. And we'll say is auto rifle shooting? Is it shooting? This is going to check whether our auto rifle is firing because it's automatic. It's just an extra way to check. So on events start shooting, we're going to set this boolean to be true. And we wanna, we wanna do is we want to create a custom event and we'll call it auto rifle fire. And what we're gonna do is we're going to call that event here auto rifle fire. And then what we wanna do here is we're going to set a timer event. And this timer, the event on this timer is going to be this one that we just created right here. Like such. The we want to make this a looping and we're going to promote this time to a variable, and we'll call this auto rifle fire rate. So you can set this to be whatever you would personally like it to be. It says how fast your auto rifle is going to shoot. I'm going to do 0.1. The lower number it is, the faster it's going to go. So 0.05 will be twice as fast as this. If you did it like 1 second, it would be like boom, boom, boom, boom, boom. But if it was like 0.1, it's going to be like, you know, it's going to be doing that sort of effect. So for auto rifle fire, one thing that we want to check is we want to check is our auto rifle shooting. Finish shooting. And that's what we'll call our parent function for start shooting. So we'll plug that in like that. Alright, so now we have the parent event going off. And we want to play an animation on our weapon mesh. It automatically grabbed it for us. Very kind. And then this animation is called fire rifle. Fire rifle w. Alright, now coming out of here, I want to create an additional sort of check for us. So let's go ahead and get current bullets. Or current is it ammo? Get current AMA. And we'll say, is this less than or equal to 0? The reason I'm doing like a double-check on this one is because with the automatic firing, I found that sometimes it can just keep shooting for whatever reason. Even though we have that. This same kind of function running in the parent, it's still sometimes get stuck. So there's just an extra way to say we're going to stop shooting. And then we're going to, I've player reference that comes from our parent and say reload. Just to make sure it does that, which it has been doing that. But sometimes you can just get an extra step because sometimes it can get caught up in this fire right thing. Next thing we wanna do is we want to get an event stop shooting, which is also from the parent, which just turns that variable to false. We're going to make this false. And then what we're gonna do is we're gonna drag out of our timer and we're going to say clear and invalidate timer. I handle and I don't want those to be connecting one to connect like that. Yeah, it's kind of in a bad spot whichever way you cut it, but oh, well, whatever. So what is this doing will have this event where we start shooting. And we'll run this event that sets up a timer. And it's running this parents shooting event that we set up every 0.1 seconds or whatever we set the SAS, it's pulling that animation. Every time. If we run out of ammo, we're going to stop shooting a reload. And then when we let go of the trigger button, we stop shooting. Should stop shooting and clear the timer. So here's the moment of truth. See if this works, you might run into an error. There might be something missing in the character, but we'll see, wow, that actually were perfectly home I going. And we reached 0. And it will try to shoot. It's not working. You see the bullet spread going up. And that's working great. So we can still fire ones that we didn't pull it down and just spray everywhere. Like that. Maybe all these pretty red line that we were. All right. So that's how shooting the auto rifle. Think that's all we gotta do. So like just to show you if I were to change this fire rate to like 1 second, would be like a heavy machine gun. Cannot even like that. Sheesh ever made this really small, like 0.005? Probably more like an S, M, G or something. I'll didn't save. I was like, I swear. It's like, oh, yeah, anything you can play the animation that fast. All right. Break the game at that point. Okay. Yeah, That's the auto rifle. It works. It does its thing. S all we gotta do. So you can go ahead and you can also change the order. I put this the weapon kick to like negative 0.1 or something like that. And then with that, you can get more kick. Oh gosh, did this not set back to itself? Come on, game. Negative point. Oh my gosh, now I'm getting confused at my numbers. This is going to be 0.1. This is going to be negative 0.1 for the kick. Okay? Here we go. There we go. So you see how it's moving right and left little bit to say, well these aren't. So they're not, it's not moving perfectly straight up. It's zigzagging right and left. I'm not moving the mouse at all. And that's the results that we get. So pretty cool. Yeah. Hope you guys enjoyed this video. And yeah, I'll see you in the next one.
26. Shooting the Shotgun: Hello everybody and welcome back to another video. In the last lesson, we showed off how to make the assault rifle. And in this one we're going to move our attention to the shotgun. This is our final hit Scan weapon. This one like the other ones, is going to be pretty straightforward, pretty easy. Only a couple of steps. This video shouldn't be too long. So let's go ahead and open up our weapon base and our shotgun. Inside the weapon base, what we're gonna do is create a couple of variables. We're going to call this one pellet count, and we're gonna make this in integer. This is going to represent how many individual pellets you would like to shoot out of the shotgun. Essentially select how many individual line traces do you want there to be? It's probably the easiest way I can explain it. So what actually, you know, we'll set that in there. Yes, yes, yes, yes. And then we're going to have another variable and call this is shotgun. And this will be a Boolean, not to Medline. A Boolean. There we go. Now if we go to our shock and weapon, and we opened this editor up, we should see these weapons are these variables. We're going to set that to be eight. So what I'm gonna do, and then this is going to be a shotgun. These variables, I'm just going to put them into a category in this column. Shotgun, that our other and other weapons don't have to see them because they're only going to matter in this one. All right, so just like before, inside of our shock and Event Graph, Let's go to events, start shooting at called the parent. Plug it in, plug it in. And then we're going to grab the weapon mesh and play an animation. Remember these weapons came with animations. This weapon pack. That's how we get these fire shotgun. So if we didn't have these animations, we would have to either make them ourselves or do some crazy like spawn particle effect in sound at locations and essentially do them ourselves. So the fact that these weapons come with animations is extremely convenient. Um, so, yeah, there's a couple of things that I would like to do for some of these weapons, starting with the shotgun, because I don't want to be able to just bam, shooting this. So let's go into our character. And in the Event Graph, some open space, Let's make it a custom event and call this fire rate. I like this name. Cal. Fire rate calculate. Pretty cool. Pretty cool. Oh, you know what? That's awkward. Wow. Let's do that in the weapon base. I'm sorry, favorite weapon basically. Make a custom event in call it fire rate. By 3k. We could've done in the player technically as well. But whenever it's got the player and let's get is a weapon fire loading. Let's set it. Set this to be true. And then let's drag out a delay. And let's see, did we make and I think we made a fire rate. Yet. See, this is sometimes the bad thing of I'm actually putting these into we didn't. Okay. And then let's make one called fire rate and make it float. Plug that in. You don't need to set it as anything right now. Well, this set it within the blueprints. Grab this. So there'd be false. And just take these and save fire raged for non non Adam, Adam metadata can't speak for non automatic weapons z and prevent spamming, shooting these guns. So if you remember in our player, and that should be in one of our action mappings right here. We want to shoot is fire, is weapon fire loading. If it's not, then we can shoot are gone. So in this case, whatever our fire rate is set as it's going to turn that variable on and off. So we can't shoot. So we can't just like shoot as fast as we can click. So in the shotgun weapon, let's go ahead and call this event fire rate calculated for every weapon that we want this to affect. We need to call this event. So this is going to be called on the shotgun, the sniper rifle, and the grenade launcher. The only weapon said it's needed on the rest of them, the auto rifle, you just hold it down to the pixel. You can shoot as fast as you can click. And the rocket launcher only has one rocket in the magazine. So when you shoot it, it's just going to reload anyway. So you don't need to do it, It's redundant. So that is one thing I wanna do. There is another thing specific to the shotgun. There's a couple of things. So this video might be actually longer than I thought because there's a few different things I need to do with the shotgun. But let's go ahead and go back to the start shooting event right here. And then we're going to make a slight deviation on our hit scans like this. So I'm going to break this for now. I'm going to pull out a branch. And we're going to ask, is this a shotgun? Or we shoot a shock on here. And if we are, we want to do a for loop. So not for each loop, just a for loop. We go. So if you look, a for loop executes for each index starting from startIndex. So it's going to run through this harmony times you put in here, essentially. So out of loop body will plug that back in so that it will work. And then out of the false branch will just go straight there like that. So if it's not a shotgun ones just go straight there. If it is a shock and we're going to run through this loop, then we're gonna get a, gonna get our pellet count and we're going to subtract one from the pellet count. So it's going to go 8, 7, 6, 5, 4, 3 is going to run through all those still that equals 0, then it's going to run right through. And that's the only thing we need to do to get the pellets actually is this is shoots extra line traces. You know, once what that does there. Okay. The last thing that I wanted to do is for reloading the shotgun. There's some special things that I want to do, but to show you this right now if I just pick this up and I shoot, you can see how it your all those eight lines, 1, 2, 3, 4, 5, 6, 7, 8. It has insane range, but that's all right. Little hard to see. And what was the thing we did? Oh, yeah. So if I just keep clicking as fast as I can. Oh, shoot, it didn't work. Why didn't it work? Man? Was awkward. Sheesh, let me check that real quick. They then get back to you. All right, well, this is really awkward to figure that out and literally five seconds, so this fade transitions going to last like no time at all. I didn't ever even. And there is a time for this. So that's a little awkward. Trying to see what I sit as last time it was 1.2 seconds. Shotgun was 1.2 things. I also changed a couple of things like the bullets spread. I made like 1 thousand, so it's spread out a little bit more. You can make it like 1511 or 1200 or whatever you want to do the reload time. And then the weapon kick was a negative 0.1. And what that to kick a little bit more. So now we happen, we play and I hit this as far as I can. There we go. We get a much larger spread there. Remember if we're not aiming and we're going to, all these pallets are going to shoot perfectly straight. So right now it hits like that. See you probably want to hit the whole target. Yeah, we can't just spam shooting, so that does work. Okay, cool. Sometimes you just make silly mistakes like that. All right, the last thing that I want to do is I want to add something to our reload event. So if you go player events right here off of this play sound. What I wanted to do is I want to. So reloading a shotgun is we're going to work differently than other weapons because he reloading each individual pellets. So like what I want to accomplish here is if you just shoot one round, I want that reloaded be pretty quick, right? But if you empty your entire magazine, I want that reload to be longer. So I want the reload time to be set dynamically essentially, depending on how many bullets you have fired to leave time for, like inserting each individual pelicans. You're not putting in a whole magazine, you're just putting all the bullets in individually. So let's do that now. So out of this branch, this is our Event Graph reload event. Let's say if. And let's get the current weapon and we'll say is shotgun. So if this is a shot gun, we want to do some special stuff. If this is a shot gun, we want to. Do something, and we should probably do it in the weapon base. So let's create a function called this shotgun. Reload pellets. Right? And then let's get our magazine size and subtract. We want to subtract that from the current m, k. And then we want to multiply that not by an integer, by a float. Multiply that by our reload time. All right, and then we're going to set real-time like that. So unlike all of our other weapons, the reload time for our shotgun should be very, very short, right? So it's taken our magazine size, which is eight minus the current ammo, right? So let's say we shoot too. So cornetto is six, so it's eight minus 62. So if this is like 0.2, then you're gonna reload for 0.4. All right, I can even get the calculator out for you people. But if we empty, say we shoot seven. So this is 8 minus 1, which would be seven. And say a real-time is going to be point 2. So now our reload time is gonna be 1.4. If we, like I said, if we shoot one, so 1 to whatever synonyms, 8 minus 6 is 2. So then two times 0.2 is only 0.4. So the more pellets, the more rounds we have shot out, it's going to increase our reload time. So what we wanna do for our shotgun weapon for this real-time is we want to set it to be pretty low. So like set it to be like 0.3 or something like that. And for testing purposes I can show you this so it'll print a string. Alright, compile, and then go over here. And then let's get the current weapon again. And let's go ahead and call that event. What was it called? Shotgun reload pellets like that. So we'll run that event and then we'll have a delay of the will just get real time this way, gets reload time. And then once we're done with this, we want to set the reload time. We just want oh yeah, we just want the target. So we're going to hard set the reload time back to its default. Because what's going to end up happening is that this is kind of hard to explain what it's like. So like we reload, right? Our reload time's going to be set to like let's say it's 0.4. Well then now every single time oh, no to my engine crash. No. Responding. Oh, wow, it's back. Okay, so let's say I like this gets set to be like point do. Well in the next time we run through this, It's going to be or is set up. It's normally set to like 0.3, right? We do the math and then it gets set to like 1.2 or something like that we shot for round up. Well now the next time does this math, it's going to set that back to. It's going to be doing that math off of like the new reload time and not the original one that we had set in here, which is 0.3. So we just want these to match up. We just are resetting. So reset settings back to all time. So if you ever change this, you also need to change this. Alright? So I'll show you how this works. So we get a shot gun, we shoot. I reload. Since this 0.3, I shoot, shoot, shoot and say 0.66 a little bit longer. I empty this whole thing and reload. Now it's 2.1, can take a little longer. Alright, so yeah, that's a great, uh, like a cooler, more dynamic reloading system, I guess, for a shock on. So that's everything you need to know about the shotgun. It's all done now. It shoots, it reloads, it, spreads the the line traces. That does all the cool thing. So I hope you guys enjoyed this video, hope you guys are learning and enjoying everything. Let me know down below as always, if you have any questions, I'll get back to you. But yeah, if not, I'll see you the next one.
27. Creating Impact Effects: Everybody and welcome back to another video. In this video, what we're going to do is we're going to start making different impact effects depending on whatever our bullets interact with this. So as it stands right now, if I were to open up our weapon base and disable this line trace from drawing and see that our weapons shoot goods without the line trace. They don't actually look like they're going anywhere. So we're going to create different decals and sounds and effects to fire off depending on whatever we hit with our line traces. To give it some actually like it's hitting something essentially, right? So in order to achieve this, Let's go into Settings, in the project settings. And we're going to scroll down to physics right here, which is underneath engine. You'll see we have all these physical surface options, okay? And we're going to create quite a few of these physical surface options here to then be slotted into that. We can do different stuff with them. So even though we don't have our enemy created yet, we are going to slot these in right now. So we'll make one called head, Chest, arm, hand, leg, and foot. All right, and then let's make another one called stone. Now all of these body parts, we're lacking in the FX department. They're all going to be like a mega metal sound in a metal spark like affected them. And then the stone is going to be like more like rocks breaking off and sounding like that essentially. So that's all we need for that. Let's go back into our FPS game and create a new folder. And I'll actually already have a Materials folder. So we're going to create physical materials and we'll just keep them all in the Materials folder. So let's right-click and go underneath. Where is it? Materials? We're going to create a physical material which is blind. Why is it not in here? Sit under, oh, it's probably under physics, physical material. Okay. Click on physical material and then let's call this body head. I believe that's what I had or you know what let's call it weight body had. That doesn't make sense. Let's call it enemy head. All right, and let's just duplicate this and call it enemy chest. And the mean arm. Enemy hand, enemy, delay in, enemy foot, and then stone. Ok, and let's save the like that. It's open up any one of them. And so what you will see is we have a destructor will damage threshold scale. We are going to use this when it comes to our enemies. And this is actually going to control like our calculation. That's going to allow the head to do more damage than the chest to the chest to do more damage than the arms and the legs and so on and so forth. But for the time being, we just want to slot in our physical properties. So under surface type. So we created all these different, these are the things we created in the project settings. Go ahead and slot all of these into the appropriate one. So leg will set to be head, head. And this just lets the game assign a sort of physical material to the different physical names that we gave. So we can do later is we can take an object and we can give it a physical material. I don't think these even have one, that geometry, but the cube should have one. But you have the queue physical material override. So we have our physical materials here. So we can say like this is of this material and we can run off different events. So I set foot, chest, and then we have this arm. Yeah. All right. So now those are all slotted in. So now we can start creating different events based off of whatever it is that we're hitting. Okay, so let's go ahead and create a new folder. Will be, will actually create a new folder this time. Then we'll call it affects. And let's create a blueprint class of type Actor and call this impact of fact base. All right, Let's click this open. And in impact effect base, we just want to create a bunch different variables. So let's get one called Hitch results. And we'll make this a type hit results. And what we wanna do it, this hit result is we want to make this instance editable, which makes it this i means that this variable is now public and can be accessed and looked at by other blueprints. And we can kind of change it on the fly, so to speak. And then we also want to expose on spawn. So should this variable be exposed as a pin when spawning this blueprint? And we wanna say yes. And so what that's gonna do is it's going to expose it as a pin. So you're going to get to like when you spawn this blueprint, it's going to give you an option. This variable is going to become a pin, similar to how it is right here. And the line trace is kinda of like returning a value. It at least it'll show up looking similar to that. Right now we want to make different effects. So we'll just make one called stone FX. And we'll make this of type particle system an object reference, I believe is what we want. Yeah. Okay. We want to have stone and then we want to have body. We can call it enemy body, whatever you want to call it. In. Then the other thing that we want to create, a stone S fx. And this is going to be of type sound cue object again. And then we want to make this for the body as well. All right. And then we'll make one called Impact, the cow. And this will be of type D cow, is it? It's just probably isn't material. So lets go of type material. Object to reference like that. Okay. Then what we want is D cow size, that's going to be able to type float. D cow lifespan also going to be float. And then last but not least, we want Di Cao rotation. This is going to be of a rotator. Now there's going to be all of our variables in here. So this is a hit result that we're going to. So it's going to, essentially it's going to ask us a place to spawn a SYN packet effect, and we're just going to use this hit result variable to link it up with the hit result. That's why we're returning the hit result of the line trace is so that we can link it up with where we want our impact effect to spawn. So the reason that exists, these were a slot in our different effects or different sounds. You'll have a D cowl for like a bullet hole that we want to show up. And then we can, I made these variables so that we can customize the size, how long it lasts before it disappears, and are kind of randomized its rotation, depending on whichever weapon we're using because we want the pistol to create a smaller bullet hole than the rocket launcher, so to speak. Okay, so that's how we have to do for the viewport. Let's go into the Event Graph and we're gonna do everything off of it then to begin play. And sometimes it doesn't let you delete things, so you just gotta, gotta delete it and start over, right? So let's make a sequence here. And we're going to add quite a few pins. That many, that's four. Alright? And then out of here, what we wanna do is let's grab our hit result in. We want to break the hit result. So when you break it hit result, you get all these different options. What we're going to be looking for here is an impact point. So it's a vector location of the point that the line trace hit an object. And we want to get a physical material. We want the game to be able to see which physical material did this hit? All right. So we can keep this underneath out of blocking hit. Let's make an if statement here. Or branch. Blocking hit true if there was a blogging hit false, otherwise, this is just sort of like a fail-safe. So like if we shoot into the air and our line trace doesn't hit anything, the game will come back with an error because it'll say, you know, you're telling me to spawn some, some particle affected some sound at the hit location and I don't have a hit location. So if we have this blocking hit, it'll prevent that error from happening because it'll be like, Okay, this will only run if we actually hit something. Alright? So if we hit something we want to spawn in emitter. At location in emitter is a VFX effect. The location that we want them to spawn as the impact point of the hit result that we drew. Once again, we calculated the line trace. And then we want to get the physical material, which, which emitter do we want to spawn? There's so many. Well, we can customize that based on the physical material. So out of physical, physical material, Let's get service type like that, that's built-in physical surface type. And then we want to get a select node. And you can see now all of the different physio, I got rid of it. All of these here. You already know what I'm gonna say, Don't Jeff. All these different physical surfaces that we have here are now showing up in this select note and we're going to return that. So now it gives us an option to slot in whatever we want depending on whichever object that we hit. And that's why we created these as variables. So for body, Let's put that in for head, chest, arm, and leg, and foot. And then for stone, make that stone. And then we can make stone the default as well. That down to make it more visually appealing. Yeah. All right, so that's what we want. So we can say particle effects for different service types that it's got that. So now all we need to do is the same exact thing for the sound and the d count, right? So we can copy, paste most of this In, drag that into here. Like that. Sure. Give these a little bit of space. This will be sounds, sound effects. We want to keep everything the same. Instead, we wanna do play sound at location. The location is going to be the impact point. You can feel free to change. Oh, it's up to do it again. I can either select and then it'll become a sound. There we go. Then this makes sure that we have the stone and body sound effects pulled out. Chest, arm, hand, leg, foot, stone, default. Like that. Feel free to change the volume. You can make bender variable if you want. I'm good with that how it is. For this third one, what do we want to do is I'm going to randomize a rotation of the decals so it doesn't look exactly the same every single time. So we're going to want to grab the hit result in broken hit results again. But then out of the normal. Normal is if hidden world space for the object was swept. Impact normal for line test. So we're going to rotation from x vector. And we're going to, so we're getting a rotation and we're going to break the rotator. So now we have an X, Y, and Z. And then out and we're gonna get a random float in range like this. And let's make this go 360 degrees. So negative 180 and then positive 180. So we can go all the way around the circle. And then let's make a rotator. And then, yeah, this can plug into the x, the y, and the z. We will keep the same. So we're just changing the x. So eight that go into a circle so to speak. And then let's set that as the Dekalb rotation and then we can have that plugin like that. Yeah, that's fine. Okay. And we'll say Ran to Mises decals rotation. So that's going to give us some little randomization. So are all of our decals don't look exactly the same. And then last but not least, so you can copy and paste this whole thing again. Put that into the branch. Literally cleaner. And if the deleted select node. And then let's spawn D cow attached to that. It's going to ask for location still. So that's going to impact point. We can get rid of these. The D cow is going to be the same every single time. But we still want to make sure that we are slotting that in as well. Actually, we we might not need to anymore. But just for consistency's sake. Or if we ever wanted to edit this further, let's just do it how we've been doing the other ones. Let's keep whirled position and not whatever that was set as the rotation will be this variable or D cow rotation, the one that we made lifespan. Remember we made a DKA lifespan like that. And the default value, Let's set to be like ten. Just by default, that in case we forget to doesn't just immediately disappear. And then for D cow size, we set that as a variable 2. And then since this is a float, we're going to make it a vector x, y, z. Plug that in size. So there we go. Now we have that. So there's all this script that we need. Oh, you know what, these two as well need to get those actually. So hit component will be attached to component and hit bone name will be attached point name. That might give us areas that we didn't plug those in. So a lot of wires and this one, but it is what it is. So yeah, that's all we need to do for our impact effect. Okay. Now back in our weapon base, after we calculate this, we're going to break this hit result. All right? Before we start the recoil, we want to spawn an actor from class. The actor that we want to spawn is our impact affect base. Now remember I made this hit result expose on spawn. So you're going to see that pin show up when I slot this in. There it is. So the hit result is going to be this hit results to spawn transform. It's going to be the impact. Or let's, let's split the Struct Pin and then do it like that. We don't need to worry about the rotation and scale. Okay, so now we have that all in there. And you know what, I probably should make this into a variable, impact affect base. And then we'll make this of type impact affect base and class reference, and then drag that in instead. All right, so now we'll have multiple impacts, effects of the set by a variable. And then start recoil all of that. So that's good. That works. Now, what we can do, and since this is set to a variable, now if you go into any of our weapons or a rifle, you should see a slot for impact effect. And I probably shouldn't name it base. There might be confusing impact of fact. Compile Save. So now we have impact effects that we can slot in. So now if we go into our effects and we start making children, so I'll just show this as one. So our rifle impact effect. We click and open this up. You will see stone affects body in the different sounds, decals, size, lifespan, and we don't have to mess with the rotation. So for stone, I think there is one just called Stone. He can get a small medium or large. I'm just going to do medium for body. There's one called metal. Metal medium for stone. What was it called Rock. Are invited to spend impacts surface, rifle impacts, surface like that for the body. There might have been a metal hour. They're broken. Okay. Impact bullet metal. So it's slot that in and we'll fix that home, my goodness, that so many. So isn't there a bullet? Bullet metal? Oh my gosh. Game says I'm saying it's just not. We have impact body here. We just use those. That's kind of a nasty sound. So you have her body Let's do those ones probably aren't broken rifle and pack body. There we go. Impact D cow, this is something that we need to make. So let's go into shooter game filters and go click on material. Right here. So filters material should see it in here. Impact detail. Am impacted the cow. Let's drag that into our materials. So we have it, we open this up and it's going to be a little bit. But it's okay, we fix that. So this is going to be called bullet hole, hole to and this is going to be was there called millivolts. Distortion is what this one's called. Distortion one. Once we slot those in, reply, there we go. Should be fixed. Now. There we go. So now every impact kneecap. So I'll just call this well, at all that I know what it's called. At least. Got em bullet hole. It's maybe a size 10 for now, lifespan of eight seconds. Okay. So now if we demonstrate or actually auto rifle weapon needs to make sure we have our rifle impact effect assigned to it. Now if we go to our weapon and we walk up here, you can see that we ever bullet holes in the little default is, was the stone, right, right, right. Okay. But if I drag a cube out here, increases size a little bit. And I say that this is enemy chest or something like that, we should get a different effect. So these, and then to get the sparks now, you can kind of hear that fleshy sound. All right, so now we're having different impact effects. We go into the impact of fact and I can make this decals like 50 or something, makes his shotgun holes in the ground, which is ridiculous. We can also give different things. We got want, I think that these ones that come with the, there's some pretty cool ones actually, they come with the like shooter game, but I think they're all kind of broken to me like if I already something like explosion, the explosion might have to render something really quick, but there we go. So now it's like floating at that. Thanks. Yeah. Right. Pretty cool. Pretty cool. So that's how we do that. So the only other thing that we will have to do here, and I will do this as a little assignment, is going to leave the effects and create the child blueprint classes. So pistol, impact, effect or right. And then slot in your preferred decals size in lifespan in different effects that you want. You can make it all the same, or you can make it look crazy. And then all you have to do is go into the corresponding a weapon. Then under the self should see a place to put that impact effect in. And if you compile and save, that will then work. Okay? And you can, if you'd like, you can screw around with different effects. You can go into the project settings and make new ones. Are these all you'd have to do is create a new variable, like you'd have to slide it in, create a physical material for it, like I did the beginning. Then you'd click on this and then there should be a refresh node. And then you should have those extra ones that you created pop-up without deleting this. And then you can create new variables, plug him in, do a whole bunch of cool stuff, but that is how you make different impact effects based on whatever your line traces are hitting. So our weapon now looks a lot more professional. Like it's actually shooting and editing something. And it's changing depending on whichever surface we're hitting. So hope you guys enjoyed this video, found it helpful and informative. And I'll see you in the next one.
28. Damaging Enemies: Hi everybody and welcome back to another video. In this lesson, we're going to be continuing on in our first-person shooter. And we're going to be making some enemies that we can shoot and do some cool things with. So in between videos, did a couple of small things. I gave our grid material of concrete tile at a scale of two. And then I've put two different boxes here. One, I put this two times the size burnished steel and this other one is a cut stone. This is of our type stone and this is just any enemy chest, whatever you want to call it. So those are immediately videos I gave you the task of putting different impact defects in it all should've been relatively straightforward. The only ones that might have been a bit confusing where the grenade launcher in the rocket launcher, for these ones, all of the impacts are going to be grenade explosion in grenade explosion, and then rocket explosion and rocket explosion. Then I made these decals pretty large. That should be the only thing. And quite honestly, I mean these ones. So in the sniper rifle, it, it will work right now because all these weapons are set to be hit scan, but we will eventually be switching those over to be projectiles and will do different events for them in that way. But we will, we will be using those same impact effect. So it is good to slot them in now because they will work. But we need to add our enemies first just with how the projectile script and blueprints are set up. It'll make it easier doing it this way. So yeah, I think that is everything. So let's get started by creating a new folder and call it enemies. Since we're color inside of here. Let's go ahead and make a, a character. And we'll call this BP underscore enemy. Another thing that I want to do is create new folder and call this interfaces. Because we're going to be making a couple Blueprint Interfaces in this video. But let's start just by opening up our enemy here. So nothing too crazy here. The only thing we'll be doing is the mesh are going to make the mannequin. You can pick male or female wherever you'd like. Let's go ahead and rotate 90 degrees. Let's set the capsule heights to be 95 and we can keep 34, 0 we can do is we can go to the left or right mode. We can grab him and his move him down. I did probably change the snap settings. You just move this down to five, right there to negative 95. Rotate negative. So z location of negative 95 and rotation of negative 90 will set him up in the Capsule Component was as 95 as well. Switch back to perspective mode and here's our character. The wireframe doesn't matter as much. It doesn't need to be overlapping his arm because we will be hitting these were not intersecting with Capsule Component. This is just so that if we drag him out how to actually stand level with the ground like that. So yeah, that's all looking good. So let's go ahead and select our mannequin man and hit the browns. And then you should see for the male variant physics asset. And it's open this up. And so now we've got a bunch of these different pelvis, spine, all these different things. These are physical assets. So let's go ahead and slot these in so we can start with the head physical material override and let's make it enemy head. Just try to select everything. So like if this is just in the general area, we'll call this the chest, the spinal, call it the chess. We can probably delete some of these honestly, but we'll call it the chest upper arm, we'll call it arm, lower arm. I'll still just call that arm. And omega. And upper arm, lower arm gets like multiple ones called ARM. And these two are both going to be head guy. Right? And calf. Right? These two it was for all going to be leg and then foot ball and then football left and right are going to be minus said football are going to be foot. All right, So now all of these should have something, slot it in. Like that. Now if you remember, in a previous video I talked about the damage thresholds scale. So we go back into our materials and let's go with enemy arm. So if there's damage threshold skill. So what I want you to do is I want you to think about this. So if we set our weapon to be 25 damage right per bullet, if this is set to one, how this is eventually gonna be set up, that means that the bullet will do 25 select the head will set it as one. But think of this as like a multiplication number. So let's say I want, if I set this to be the arm to be like 0.5, right? Say our bullet does 25 damage. That means would be hit him in the arm. That bullet will do 12.5 damage. So we can go in and slightly censor the arm. I'll keep that at 0.5. The chest will be 0.8. So you can think of it as like what percentage? So if we hit him in the foot, it'll be 30 percent of whatever the total damage number normally is, the hand will make a point to handle and do that much damage. The head will be a 100 percent of the damage that we set in the leg will be like 0.7, little bit less than the chest, a little bit more than the arms? Yeah, that should be good. Okay. That's what's going to control the different amounts of damage video. It's gonna do a little bit of multiplication. You will see, you will see, okay. Out of event begin play. We want a reference to our character. No, we don't want to cast to ourself layer. That's and maybe in that instance for your use, Pon. Pon is the one that we're going to control select technically, these are both characters, but the pond to be the one that we are controlling. So you can use Get Player Pawn, I'm just used to using Git player character. We'll do the same thing for the most part, for most instances. And again, like this doesn't really matter. Okay, cool. So now what we are going to do, so we're going to make an interface. So let's go into our interfaces folder, right-click and go to print Blueprint Interface. So a Blueprint Interface is a collection of one or more functions name only no implementation that can be added to other blueprints. So how do I, it's like so an interface doesn't actually do anything. It's just a place where you can store several different functions. And then you can call those events column within multiple different blueprints. And you'll kind of see, it'll be one of those things that you'll see as we go along. So let's just call this enemy, take damage. Let's open this up and let's create a function and call it Enemy, take damage. I might change the default name. Let's just, let's call it BPI. Take damage, Blueprint Interface take damage. Because we want the enemy to take damage. We also wanted to take a radius damage or damage, and we're going to set both of those in here. So I have Enemy take damage. And then we want to have two inputs on this. We want to have one be called the weapons stats, and we're going to create that in a second. And then one called pitch result of type pitch result. Okay? And we have to make a struct for our weapons stats. So let's go into Data, right-click. And let's go blueprints, structure and call it s. Weapons stats. So a struct is slightly different from an enumeration. Enumeration is like a list. A structure or a struct is like a bucket of variables. So you can add a bunch of variables to this one little thing. So we're going to make one called damage, and this is going to be of type float. This will control how much damage are weapon does. And then for our ones that explode, we'll have a float for impact radius. And like I said, this would be only necessary when we feel like our grenade launcher in a rocket launcher. So we want to make this of type weapons deaths. You can see right there like that. Okay? So this is our interface. So now if we go in side of our enemy blueprint, we can call event enemy. And let me there we go. Enemy take damage because you don't need to put event. Oh, well that didn't work. Why isn't it working? I compile. Oh, I forgot the most obvious part. Okay. We need to actually add this interface to this blueprint. Okay? So under class setting, you'll see interfaces and we need to add one. And let's go ahead and add BPI, take damage. So now when we add this interface to this blueprint, we can now call enemy or event enemy take damage. So now we can have an event in this blueprint and you can see our little inputs here. And so whichever blueprint that we add, that interface too, we can call this event to run off of it. And it'll have these same output. So it's kind of helpful if you want to have like so like think of a game like fortnight. Okay, There's a lot of different things in Fortnite that take damage. You can destroy the buildings, the houses, the trees, and you can damage the players. So you can have an interface that has inputs of all different types of data that you'd want to pass through of different things that take damage. But like a tree will take damage differently than a part of a building wood. And differently then a player, they all have different amounts of Health and they all take different amounts of damage. So by using interfaces, you can create one interface and then you can customize essentially like those types of things on a more simple level, but you don't have to create a different event every single time. You can just call it the interface and then run that event off of the interface instead of making it for 1000 times. Alright, so let's create a variable and call this is dead. We want to check to see if our enemy is dead. Its first thing that we're gonna do. So you don't want it to take damage if we're dead. Okay? And in typical fashion we're going to run out of the true. If we're not dead, then we want to do some damage. Let's go ahead and let me show you this. So weapon stats and let's break weapon stats. And so now we have damage and impact radius, which was what was on our struct. Okay. But we want to be able to calculate how much damage that we want to do. So let's store that in a function. So we'll call this Coull late damage. And let's add some inputs here. We'll create a float called damage. And let's also pass in a hit results of type hit result of that. Let's go ahead and I'm just going to set this to a local variable so that I can use it later in the script. This one is going to be too long and we're going to add a return node. And this is going to be a float as well. And it will be, call it calculated damage. So this, this is what's actually going to calculate how much damage we do to our enemy. So let's break the hit result. All right, and then off of the physical material, we want to get the destructive will damage threshold scale. All right, so once again, like I said, if we go into materials and we go into our enemy hand are getting a physical material and then we're checking for this damage thresholds scale. So in this, in this chance, like I said, we're doing 30% of whatever we put in as the damage that our weapons gonna do. And we want to multiply this by our local damage. So like I said, if this is 25 or multiplying that by in this case, if we hit the hand would be like 0.3. And then we're setting that as our return, we're returning that number. So now back in our event graph, let's call calculate damage. So we want this damage would be passed in like that. So where we're going to assign this struct, weapon stats to each of our weapons on our base, right? So then we can individually in each blueprint like we've been doing many times on all of the children, will slot in how much damage we want this weapon to do. So I've been using the number 25. So our sorrow, our assault rifle does 25 damage. It's going to pass that. It's going to have that variable store 25, and it's weapon stats. It's going to take that data, it's going to pass it in. It's going to calculate it. It's like, okay, I hit the hand of this enemy. Right now. My assault rifle is 25 damage. But I hit the hand. So I'm taking 0.3 of that or whatever it was, and then I'm return 7.5 damage. All right, so that is how that's working. And then we want to pass in this hit result as well to make sure that we have well, we're hitting something because that would be awkward. And then what we wanna do is we want to update our enemies health. So we will want to create a new function for this and call this health open date. And let's make a flu and call this damage like that. And let's make this into a sequence because we'll do a couple of different small things here. We want to be able to check to see if our enemies dead, essentially. So Saturn would return. And we'll say is dead and make it a boolean. Right? So out of our damage applied, Let's go greater than or equal to. And then say branch, whoa, whoa, whoa, the rhonchi, their branch. That's more like it. Okay. And let's make a new variable and call this current health. It's going to be our enemies health type float. So if our damage applied is greater than or equal to our current health, so let's say our current health is 10 and our damage applied is 20. Okay? If this happens, then we want to set is dead or no, actually, let's create a local is dead. It might do the same thing. Whatever. This is, just how I did before. We'll set local is dead to be true. And then we will make sure that our health doesn't go beneath 0 by setting it to be 0. So this is what happens if they die. If they don't die, then we want to take the damage that we've applied. We want to subtract that. We want this to be on the bottom. Drag this over here. Sure. Now let's take the current health. So our current health is greater than the amount of damage. So our current health is 20. We're doing 10 damage and we want to subtract 20 from 10. And then set that as our new current health. And then out of then one, we want to check and see if we are dead. And we will plug in local is dead, like that. To check and see. So we created this variable local. We could have done it without that. Probably we could have just used that as dead. But it is what it is. We're setting the local as the same thing anyway. So it really doesn't matter. So that's what we're doing here. Then if we come out of here, then we want to do do our health updates. The damage applied is going to be the calculated damage. And then we're returning, this is dead. So we want to set is dead to whatever the output of this was. So if we run out of Health, we are dead or health of 0. Now, if the damage that we applied is less than the amount of health that we have them. We're just going to say, Well, we haven't set this to be true yet, so we're not dead. Okay? So we're setting up very well be that we're gonna do an if statement. Okay? And then if we, for the time being, let's just print a string and say, I'm David. All right? And then for not say I'm I'm still allow. All rights. And That should be all we kind of need. For now we'll add more to this later, some effects. But just for the sake of it, we can see if this works. Calculated damage. Why don't we also print a string here so you can actually see the damage that we are, what our health is at. So let's set that to be 100. By default, current health is a 100. And we'll see the subtraction occur and do all that. So the last thing that we need to do here is go into our weapon going or Weapon Base and we want to add that struct. So let's go weapon. Stats make it of type weapons stats. Alright, so now you can see those stats. So let's go into our that was already in the right folder, wasn't a pistol. And you should see weapon stats. Let's have this do 20 damage. We don't need to worry about impact radius because it doesn't do any of that yet. So now if we hop in and we play, and we pick a scone, and we shoot our guy. And it doesn't work. I must have forgotten one step. Oh, yeah, I know what it is. We need to actually call the head that we made here. So if we go into our weapon base, Let's go ahead and create a function in which we add which we add damage to our guy. So yeah, yeah, yeah. Okay. So sad, new function and call this add damage. Okay. Add damage is going to have an input of a IT result as per usual, because RNA will always want to pass through our hit results. We don't lose it. And then what we wanna do is we want to get, since we haven't added the interface, we want to get a message of enemy, take damage that interface. And so it's going to be asking for some stuff. So what's our weapons deaths? Well, it's whatever we plug into in our weapons. So now that data is being passed through, we want to break this hit result right here. Helped me hit result into the hit results so that it just drags on through like that. But we need to give this a target to hit like what's taking damage. In this case, it's going to be the Hit Actor, which is going at, which is our enemy. An actor or a dragon that on through like that. Okay, so this is like passes info through weapon to enemy. Taking damage says what's actually passing through the amount of damage that like our weapons do. And we've we add that yet? No, we haven't. Okay. So then coming out of here, we need to add damage like that and that's going to be asking for a hit results. And then that result is that. So just the same one. So now I hope to God should work because we have that 20 damage passing through. And it still is not. What is going on in my life. Wow. Wow. I say, okay, so I have figured out the issue. So if you remember when we calculated our, some of that, when we calculated our line trace, we have actors that we will hit in ones that we will ignore. So what we could do is we could add a pin in, add pond or something else because that's what this is. Default set S. What we wanna do, what we can do assumed go to the Mesh. And you'll have probably different settings in this. It'll probably say pawn or something like that. Go ahead and set it to custom. Make sure collision is enabled query and physics. And set the object type 2 world and dynamic if you do those three things on the mesh. So that's where physical objects are. And then you pick up the pistol and you'll walk on over here. Then you will get the impact effects. In all the math is going on. 30 is dead. And so he's not taken anymore damage. But he is he is a goner. And I believe this is working, so I don't have perfect game, but for him in the head should be 8650 to be some experience with that too. Tell right now at the math, I might've also screwed up. My impact effects are my materials seem like the head was the head is set to be there. Yeah. That will be harder to tell if the exact damage calculations and all that stuff is working it until we get the damage numbers on the HUD showing up. But if that's wrong, there'll be an easy thing to fix. It's probably a goofy mistake. Just like setting this to the wrong type or setting the wrong damaged threshold scale. Or maybe even on the physics body of the mannequin here. Maybe setting some of these things as the wrong ones or something like that. You never know. There's some goofy things that can happen, but that is working as intended though. So far. You can pick up our weapon so you can go in and go to the other hit Scan weapons right now. And you can assign different damage numbers underneath a weapon stats in between videos and see how much damage you wanna do. That'll probably take more fiddling with when we actually get the damage numbers and we get different things to happen when our enemy diets. But the time being you can screw around in there and have some fun. But yeah, I hope you guys enjoyed this video. Thank you for watching. You have questions, let me know and I'll see you in the next one.
29. Aiming Down Sights: Hey everyone. In this video, we are going to add the ability to aim down sight of our weapon. The main reason why I wanted to do that now instead of later, is because as it stands right now, we can't really tell exactly. I guess if we turned on different. Well, okay, look, there are some ways that we could do it. We could turn the line trace back on. We good look at the impact affects ago setup, but quite honestly, I feel like this feature is kind of long overdue. And if we are aiming, then our line traces are going to go perfectly straight out. We went up to worry about any sort of bullets, spread things. So let's go ahead and do that now. So inside of our character, we already have is aiming variable, but we want to create an input action for aiming. So let's go into our settings, Project Settings, Input. And let's make another one and call this aim. And we'll make it right mouse button like that. Back in our player, in our action mappings, Let's call upon aim. Right? So I don't want to be able to aim. All were reloading. That's first and foremost, let's get is reloading. And let's say not. Let's see if it'll put that on the pressed. Don't want to be able to reload while raining. Now, the way that we're going to do this is we're going to use an Event Dispatcher. All right? We don't necessarily have to, but I'm going to do it this way just to show you how to use Event Dispatcher. The first and foremost we want to set is aiming to be true here. If we press the button. And then if we release, we want this to be set back to false like that. So let's go ahead and create this Event Dispatcher. And we'll call this aim enter, and we'll call another one aim exit. So what you can do with an Event Dispatcher is if you drag it out, you can call you combined or assign. Believe all will be doing here is calling and binding it. So when you call in, so okay, let me explain this way. You can bind you can bind event dispatchers to multiple different events that exist within your game. So if I create a custom events and I say hi. So these little nodes, you can bind, event dispatchers, can connect them to that. That's what these little nodes or four. So what you can do is you will bind an event to an event dispatcher, and then you can call that Event Dispatcher. And whenever it's called, it will also call all of the other events that it is binded to. So when we click this, Let's call aim enter. Let's just tell the game that we have entered our aim. We want to call movements stopped. So if we aim, we want to not be sprinting. That is always a good thing to do. And then let's go ahead and get our load out. And that's weird. And switch it on. And copy paste. We wanna do this twice. Let's switch it on there. Then let's call him exit. When we're not aiming. And we can line this up actually, make it look kinda nice. Let's switch that on here as well. Okay, now let's get our character movement components because we want to check to make sure we want to set our walk speed, so set and max walk speed. And we want to do this for both of these. So the targets. And then for has weapon missed it as weapon. I like that. That looks fine. So if we aim our exit, if we exit our aim, we want to get max walk speed, that variable we set to 750. And then we can set this to be a variable too, but I'm just gonna set it to 250. This is going to be, you know, I'll be nice. Aiming, walk speed, this will be up at this movement. Max walk speed. Aiming walk speed will be 250. So you would like to present that to a variable. You can change that as well. And so I'll just slows player down when we don't want to be able to move at full speed while Amy won't look good. It also feel very hard to move around in a most games when you're aiming they slow year, Walk Speed down like this. So that's what we're doing there. Okay, So that's all we need to do within our character. The next thing that we need to do is we need to go inside of our weapon base. And let's go to the Event Graph. And let's go up to Event Begin Play right here. And we have this player reference here. So we can actually do this straight out of here. So let's bind event to aim entered. So here's our Event Dispatcher right here. And let's do it again. Bind Event to aim exit, like that. So now we can create a couple of events and bind them to this. So when this happens, these events will also happen. Alright, so let's create a custom events and call this weapon aim, enter. And Let's create a variable is aiming weapon. And we'll set that to be true. And then for AIM exits, let's do the same thing. We'll say weapon, aim exit. And these will be short events that is going to turn this boolean on and off. Okay? And we'll say fines aiming to ADS input action on the part. So what this is doing is it's binding these variables with these ones essentially. And there are other way, there are other ways you can do this, right? But I wanted to show you how to do it through an Event Dispatcher so you can create a much more complex line of code script, event or whatever out of here, in bind that to something and you can bind things multiple different times and like have like seven different events fire off all at the same time. Whenever you call an Event Dispatcher. An easy way that we could have done that is on our Interact script. We could have just created one of these called interact. And we can just call interact in our Interact action event and put action could just say, call him, call interactive. And we can have a bunch of different events binded to that in one of them could be an event that we could have like customer bad and call us interact or whatever, and then plug that in. And then we could bind that to an event dispatcher and then call it right here. It's a different way you could do things. Yeah, we're not gonna do it that way. So because we're too cool. One thing that I want to do here is auto reload on empty. I want to call weapon aim exit. This event, weapon aim exit. Oh, wow. That's like literally right there. Wait. Yeah. Yeah. In my head. Okay. Yeah. These are just weird order. Okay. So we're just recalling this event. So when we automatically reload on empty, we want to exit our aim. We don't want to still be aiming and reloading at the same time. So that is good to do. A lot of this is going to be in our sniper rifle. Because the sniper rifle aiming, since it's a scope, is going to work a little bit differently. So binding these in here will help us out when we create the sniper rifle. So you might not see a whole bunch of functionality with it right now, but it will come back later on. So the next thing that we need to do here is go inside of our anim blueprint on our character. Because we're going to use this cache pose and create a whole another thing and then cash that pose and then plug that into there. Bu for we do that. Well, we need to make sure that all of our things are said, all of our variables actually remembered. So we need to create three variables in our weapon base. So we'll call 11 X offset. All of these are going to be float spelling. So I have an x offsets, Y offsets, and a Z offset. And I'll put this in a category called aim. So let's do the x, y, and z offset first. So let's add those variables in here now. X offset of type float, y offset. Again floats and then Z offset. All right, and then we want to get is aiming. And that'll be a Boolean like that. All right, so let's go over here after is reloading. Let's go ahead and set is aiming to get the player reference and get is aiming at home. Even know, again, lazy with my common boxes. I know what this stuff does. But it's nice to have them separated still. Okay, the next thing we wanna do is set the player. Let's get their current weapon. And then let's get the X offset and then set that as X offset right here. Like this, like this, just like this. And then let's do that for the Y offset. Set, that is the Y offset. And then one last time, but the z offsets will set this. This is, I'll explain this later. What these numbers are doing will say offsets for whatever naming. So these variables is x, y, and z. We're going to customize per weapon to be able to dictate where we want to actually move the weapon to make it look like it is intersecting with the screen at the exact middle point right there. So now that we have our variable setup, we can now use them. So let's grab x and let's grab Hawaii. And let's grab z. And let's grab, is aiming. Want to grab all of them. We're going to start out with load outpost. So let's get it and broke it from there and grabbed it. And we want to, as per usual, we want to transform, modify bone. The bone we're going to modify is B spine one. Yet again. What we're gonna do is we're going to get rid of the scale and the rotation and we're going to split. I think I said that wrong. Get rid of the scale and the rotation and split the translation. And then we're going to plug x, y, and z in to those values there like that. Let's go ahead and gets a new animation. Let's go to a shooter game. Animations in there should be one call a rifle, AIM. Aim. Yes. So let's hit yes, it's going to play your skeleton read targets. I think this actually has like there is a sound effect that we can add in here. So if you want to, you can click here on Add notify and play sound and then slot the sound and you'd probably have to fix the sound file. We've got that added now. So let's go back to our anim blueprint and let's go rifle aim. And this is going to create a local debt component. So we're taking our rifle aim animation, and then we're going to offset this spine by different values that we will set because this rifle aim is not going to perfectly set up each weapon to be perfectly aiming in the center of the screen. So we're going to be able to set these numbers accordingly to make it look better. So then let's blend poses by bool. Let's plug this in for the true pose. If we are aiming, then yes, we want to do this. If we're not aiming, we're just going to use this load outposts that we have here from from the output of our reloading. So I got a little computer and my own script. Sneak this in here. Oh, okay, and then let's cache this pose and we'll say load out aiming puffs. I'm running out of names here. Yeah. Alright, and then let's get low load out aiming pose command. Oh my gosh. Oh my gosh. Sakes. And a half hours later. They might be right there at all time and his blind whatever. Okay. Yep. Let's go ahead and add offset to turn weapon. During aiming down the site or whatever you want to say there. Then we'll do our usual color. So that's going to do that. So now, what is it not like transform components to modify, selected? My gosh, how it made us, I hate how it always is default, ignore. Make sure you set it to add to existing. And then it will give you the air. So now if we come in and grab a weapon and we aim, you can see how it's not perfect. It's doing what it's supposed to be doing. But it's not clearly not in the right spot, right? But it is aiming. And you'll notice that that is like perfectly made our AutoML annuity damage but and see how that's perfectly showing up where we wanted to pose to the right. So it's doing the bold spread thing. And then it's aiming perfectly. It just looks stupid and ridiculous. So the next thing that we're going to do is I'm going to tell you what these values are for each weapon. And so that well, it doesn't look awful. So let's go ahead and do that now. I'm going to give them to you in rapid-fire action. All right, so for the auto rifle, you're going to have an X offset of 1.5. The y offset is going to be negative ten, and the Z offset is going to be 0.5. Compile and save that. We're going to do the pistol next product you don't. First X offset is 0.9. The Y offset is going to be 15. So it's going to push that forward quite a bit. And then the z offsets going to move it upwards, going to be 9.2, the shotguns next. And X offset is going to be 1.3. Y offset is going to be negative 0.5. And then last but not least, the Z offset is going to be seven. So halfway through immediately, let's just show this off. So we've got this weapon, this weapon, this weapon set. So now that looks, you can still see the white dot. We're going to make that disappear in a second. But that looks really, really good. I think then the shotgun also is like very accurate right there. So it's all working good. Let's go ahead and do the next one. This sniper rifles going to work a little bit differently so you actually don't have to worry about it at all. So yeah, don't worry about it. But for the grenade launcher, the X offset is going to be 0.5. Y is going to be left at 0, and then z is going to be 0.5 as well. And then finally, for our rocket launcher, the x is going to be a value of 1. Y is going to be left at 0 once again, and then z is going to be negative four. So with all that done, like I said, the sniper, dark sniper doesn't matter. But we have some clipping issues with the rocket launcher. But the grenade launcher looks, it looks good. This is also going to shoot an arc. The last thing that I think that we should do is we can go into our red, I put that blueprints into our HUD and we can, well, more product to edit, begin play, right? Get a reference to our character. Okay, and then we'll get an if statement out of here. And then we'll say, git is aiming. If we are not aiming. And we want to draw the rectangle. So we see the little line here and it goes away. So a little white dot disappears. Now, when we're aiming, just like the rest of the crosshairs do. So we can just use that as the radical. So you don't really want to see that white dot all time. So that's script that I made pretty ugly. I'll make it look beautiful in a second. And you can do that as well if you'd like. Otherwise it works, but that is how we aim in our game. And the bullet spread thing looked like it worked just fine. So that should be all well and good. So yeah, that is how you aim in video games going to wrap this video up. And I will see you in the next one.
30. ADS Camera Zoom: Hi everybody and welcome back to another video in the last lesson, if I can remember correct, because it's admittedly been a little while. Do you call it? We started adding aiming to the game. In this video, I want to add just one feature to that. So if we hop in our game and we grab a weapon, or I mean, any one of these honestly and resume or we aim. You notice that the cameras a little far back, that is a little bit hard to see. So what we can do is we can change our field of view. We can push this camera in a little bit if we're aiming or not, and make that look a little bit more dynamic. In the last video, I did encounter one issue and I solve that rather quickly when to our enemy. If you this is R calculate damage function that is called the Event Graph, right hill. So what you can do is you can pull out of this calculated damage like I didn't print a string. So every time you shoot a weapon, it'll give you that damage back. And silly mistake that I made was on this physics asset here. I made the head, think that it was a hand. So that's why I was pumping out small numbers, but do you see I have my pistol set to 20 and if I shoot, it does 201614610, and then four. So Zun for damage on the head before and that was awkward. It's not what we wanted. So an easy way to fix that if you are encountering something like that, Let's go ahead and select the enemy. You can go to that asset by hitting this button, open up our physics asset and just make sure that you check that these are correct. So what I did is I had a neck and head set to hand and not head because they look similar. So it was doing for damage before. So that's an easy way to fix that and make sure that and you have the right physics assets at. And so that was really the only issue that I wanted to make sure it was fixed. That might be another thing that you probably didn't even encounter. But I did. So let's just move on. So let's open up the weapon base and we're going to make one new variable. And we're going to call this not fire rate. I'm looking at fire rate right now. Field of view. We'll call it actually aim field of view because there's a variable built-in called field of view will make it a float. Then we want to open up our character components like this because we're going to need our camera. And we want to do this inside of a function. So let's create a new function and we'll call this aim field of view. We can give it the same name. First things first, let's go ahead and get is aiming. And we want to check to make sure if we're aiming or not. You only want this to happen if we're aiming. Let's go ahead and grab our camera. And we're going to actually get two of these to do something off the true and something off of the false. And so let's say sets field of view for both of these. So if you Gosh, I think we select on the camera and we go into, you can just search it up field of view set to 90. So we're going to change that. So it 90, the bigger the number, the further back it's going to look. So a lot of boilerplate, people that play PC games are like kinda make that field of view real wide, extra wide. And so that's the number that they're changing when you do that in your settings. So we want to push this camera in a little bit further and we're dynamically set that. Okay? So we're gonna need a camera again, and we're going to need to get that field of view variable, which is set to 90. Think you can maybe changed that. And we don't want this to just snap to this new one, new field of view. We want it to interpellate so we're going to get a F interrupt for float. Interpret I have described before what interpolation means. Then we're gonna get our current weapon. This is why I almost don't like putting things in categories because I got to like figure out, oh gosh, where did I put this? And we want to get that aim field of view. So our normal field of view is the current we want to move to the target, which is what we will set. So I store this variable in the weapon parents so that we can always keep calling back to that in dynamically change that depending on whichever one we have. For interrupt speed. Let's just set it to be 10. You can change this to whatever you want off your personal preference. Just know that if it is set to 0, it will snap there immediately, that we're going to get. World that Delta seconds for our delta time, it's pretty, pretty normal there. All right? And then we're going to copy and paste this. And so the only thing that we're going to do, well, let's go ahead and let's just set this to be a 90. So if you want to change your field of views default value, you can promote this to a variable by amines, but I'm not changing it from 90 SMS going to hard, set it back to 90. Okay, So this is essentially just running if we're not aiming. So the current is 90 and we're move into 90, where that's another way of saying we're not doing anything. And then we're going to return this one for the field of view. If we are aiming like, oh, it's beautiful. And then we can say changes, What's be fancy F0 v. If aiming weapon, the hahaha. Like such a beautiful like that, wonderful compile, save, do whatever you gotta do. Now let's go back to our up and base and we're going to be in the Event Graph if you're not already there. And let's just go into set open space. And we're going to want to run this off of event tick. If you remember, event tick is like void update. It runs every frame or every second will take place at the same time, I think Let's just say every frame, okay, Professional. Let's grab our player and we want to run this event. Every single frame. Aim field of view, we want to be checking, okay, are we aiming all the time? So we can change that field of view. So for default, for this field of view, let's actually set it to a default of 70. So just know the lower number you set it as. The further it's going to push inward, the more it's going to zoom like that. Just going to leave that there for now. So since this is set to 70, you should actually see this. So if I grab our auto rifle and you can see now at zooms in and zooms back out like that. And if you notice, you might have had some sort of clipping issue with the weapon and since the zooms the cameron, it'll actually fix that. So if I were to do something goofy like make it 30 and you wanted some sort of let's see, you got like a four times scope on your gun, then that's going to make it really doesn't look too bad. It's kinda cool in a way, but that is the effect that we're going for like that, but I'm going to set it to 70. I think that's a little bit less ridiculous. So you can go ahead and hop into any of these weapons and change this so you can make the pistol maybe zoom a little bit more. Our rocket launcher does that sort of weird clipping thing. I'll show you how to fix that, but just know it will require many steps. So if you go into the Project Settings and just I'm, I'm gonna just go to near type that in. You'll see near clipping plane. If you set this to be a lower number like five or something, that will probably get rid of that clipping that you're seeing. It will come with a trade-off, meaning that things, if I remember this correctly, things out in the distance aren't necessarily going to load as far out because the clipping plane is closer to the camera. So do you with that, as you would like, this is a free country I live in, can do it. You won't just know that if you change that setting, unlike many other settings in here, you're gonna have to close down your program and then open backup your Unreal Editor to actually see those changes. So it can be pretty tedious. And you will probably need to change your X, Y, and Z offsets as well. Because that might get, it's not going to get altered. It'll just like a look a little bit different if that clipping plane changes. So does some things keep in mind, but yeah, go ahead and go into the different weapons and see which type of zoom levels you want. Yeah, that all works. It's all looking good. So that's all I got for this video. Thanks for watching. I'll see you in the next one.
31. Adding Hit Markers: Hello everybody and welcome back to another video. In this one we're going to be continuing our enemy script. And we're going to be adding some hit markers to our enemy weapon. I don't even know what it is, which one it would technically be, what it's going to show up and we hit the enemy. So we're going to be adding off of if you don't already have our enemy open up for this event, enemy take damage. Instead of these silly print strings, we're going to actually do some cool stuff. All right, so let's start out by going into our UI folder and we're going to make a new widget and we can just call this hit markers. Now if you have downloaded the project files for this class, which you should've, we're going to use them here. So let's go underneath icons and we will have hit marker. This is for our Minimap, which we haven't graded yet. This is our sniper rifle. Let's just go ahead and just drag and drop all three of them. You can feel free to create another folder called textures, but I'm just going to place them all in UI. Now, these will show up looking pretty dang goofy. So we can fix that as if we open this up. And if we go down here to texture group, we set this to be UI. You can see it now fixes that, doesn't actually really change anything about it. It just makes the little thumbnail not look like straight garbage. So fun facts all around there is a way to mass do all of those all at the same time, but are not that professional. Okay, so let's these acids in here. Let's go ahead and go on our hit marker widgets. And we'll do some cool things now, unlike before, we actually want this to be of a like, perfect, we're not going to set this to be desired or customer anything because we do want this to show up at the center of our screen. Because if you think about it this way, well, hit markers should always be at the center of the screen because our bullets are shooting out of the center of the screen. So we don't need to really do anything super crazy with that. All right, so let's go ahead and add an image to our canvas panel. And we'll just call this marker. We can center this or anchor it to the center, say position 0, position y is 0. And we need to align it 0.5.5 in the x and the y. And let's go ahead and also hit size to content. Now we can slot in our hit marker thingy, and it is ginormous. So you can set this to be whatever value you want. I'm going to pick 60 by 60. So we'll do it like that. And that should be good. So there's our little marker. I made this in Photoshop. It's not the greatest, but it gets the job done. Now what we're gonna do is we are going to want to 0. It already is a variable. Well, unreal, jumping the gun on me there. We're going to create a couple of animations. We want to create two of them. We want to make one for one, we get a normal hit, and one for when we get a kill hit because we're fancy. Alright, so let's create one, call it normal, hit like that. And the only thing that we're going to screw with here as our transformed setting. So if you scroll on down to render transform, and we're going to want to do scale. Let's just click on this keyframe on the scale. And it'll open down this drop-down menu and we have our scale settings right here. So default, let's make this 0 by 0, right? Then at 0.2 fives relatively quickly, let's add two keyframes and make it 0.7 of its size at the full size. Okay. Actually, let's just make it the full size. All right, points 75. Let's set these keyframes again. So just hit these two buttons again so that it's still at that same size for that amount of time. And then at 1 second. Finally, let's just do this at two key frames and set it to be 0 and then 0 again. So now if we play back this animation, it'll just do that. So it comes up and then zoom back down like that all beautiful lake. Okay, now let's create another animation and call this death. For death hit. It's going to be very similar. So we're going to grab the scale yet again. Default or not default, but at 0 seconds, make it 0.25. I'm going to make this one a little bit bigger. So maybe like 1.2 by 1 to set that again at 0.75 seconds and then at 1 second, set it back to the 0. So now it's the same exact thing, just a little bit bigger. And the other thing that we want to change is we want to make sure this is red. So we can do this by going to hit marker and then going on color and opacity. And we can honestly just hit any one of these. I'm just going to hit R. And the only thing that we need to do is set all these values to be 0. So it should mean a is the opacity. So keep that at one. We want G and B to be set to 0. And we can just drag this out the whole time. Or I might be able to get rid of that one actually is just set to be read Omega. So now it's red. So you have just on the AR, make that one and then default, these should be set to be 0. And it's only on the deficit. So we go back to normal hit. It is white and death, but it is a little bigger and our colors, no, no work. Okay, well now the game hates me. Okay. Maybe we just set all of these. Oh, wait, before you went back to one, you then goof ball. Okay. Just set it as home. It doesn't really matter. Just like that. All right, There you go. So just set the keyframes for all of them and that should work. All right, now we're going to actually need to tell the game in the Event Graph, well, when you want to run this animation. So we're going to run off of event construct. And we want to make a new variable, and we'll call this is dead. And it would be a Boolean. And we want to expose this on spawn. And we can just go ahead and make it instance editable as well. Because why not? And what we're gonna do is we're going to link this up with the dead variable that exists within our enemy. That's why we are exposing it on spawns that when we create this widget in that blueprint, or this blueprint we can do is link up this value with, this value is so easy. Now, underneath Animations you should see our death had a normal head. So if is dead is true, Let's grab definite and say Play Animation like that. And all of this should be fine. The default, if it's not dead, we want to get the normal hit and play that animation. All right? And then I'm going to go ahead and hit a delay node here just to prevent these. And plug both of them in there. Just to prevent these from doing weird overlap and things are not even that prevent them from just giving it time for this animation actually play. One thing that you can do is you can get the end-time of these and plug that into a delay. I do that sometimes, but for the sake of this 1 second, it works just fine. So that's all we need to do. We can actually close out of our hit markers now in B, back in our enemy. Okay? So there's a few different things that we want to do. We don't have our damaged numbers created just yet. So we're going to need to do a couple of different things out of here. Yeah, I'm going to keep those print strings for now. Alright, and is put this true and just say I'm dead. So we want to have one for the false. All right, Then out of here we want to say, is it valid? And we'll plug something in here in a second, and we'll plug the false straight in here. These things will just get added to later with our damage numbers. Alright? Then off of is not valid. It doesn't really matter which one we do that. Let's create a widget. It doesn't matter which one we pull this out off right now. And then we're going to want to create our hit marker. So now we have this is dead variable. So let's grab is dead from this blueprint, it is the link that up. So now these two variables are now linked. Let's go ahead and right-click and promote this to a variable and call it hit marker, ref for reference or whatever. And then we want to add to viewport. All right, cool. Now we have this hit marker reference. Let's plug this into our input objects like that. Off of is valid. Let's, we probably can't do like that. Grab a hit marker reference and say Remove from parent, and then plug that in off of is valid, such as this, and then move that back onto the chain. So the reason that this little part exists, this will. So it's going to be asking you to like create the hit marker widget essentially, right? And your bullets or me shoot and pretty fast, especially with the auto rifle. So you will, it'll be telling the game with every hit to create a new hit marker. But the game I get, we'll get a little bit confused because it'll be like you're trying to create a widget before it's been removed from the screen. You're just creating it, creating and creating it without ever removing it. So it'll, it'll get confused. It'll give you just like some warnings or whatever. So this note in here pretty much says like, okay, if if the hit markers already on the screen, then remove it and then create a new one. So you could just say, for purposes just says removes previous marker if another hit occurs before the first, this peers, I don't know. Hopefully that makes sense. It's just like it's stopping the game from creating likes to hit markers at once. So removing one of them, it'll happen so quickly, you won't even notice it, but yeah, it's a thing. So this might now work as it is, even others parts of the script missing. So let's go over here. And let's shoot. And there we go. So notice we don't get him or her, so we hit nothing. But if we hit our guy, we're getting our hit marker to show up. And if you notice, we should kill him soon. There we go. There is the red one and Saddam did. Alright, and now they shouldn't show up anymore. They don't. So this will be apparent on the auto rifle. So the whole like removing from Parent thing. You can kind of see how like it didn't create like 4 thousand of them on the screen at the same time. It is really quick to see are very difficult to see, I guess. Right? There you go. There's hit markers, like something like the shot guns going to hit him with all these different spreads at once. So it only shows up with one hit marker instead of eight. Like that. All right, so all of that stuff should be working if your bullets aren't doing any damage. Just to make sure you go into the class and go to weapons stats and make sure you actually have damaged. Easy thing to miss. So yeah, cool. That's hit markers. Next video, we're going to do damage numbers and get rid of those ugly print strings and make this look fricking awesome. Okay, so I will see you there. Thank you for watching.
32. Adding Damage Numbers: Hey everyone and welcome back to another video. In the last lesson, we added hit markers to our game. And in this one we're going to be adding to our fancy pants CUI and adding some cool RPG like damaged numbers to the screen. So let's get started. Okay, let's go over to our interfaces folder. And let's add a new interface. So let's go to blueprints and Blueprint Interface. And let's call this, should keep the name same BPI underscore damage numbers. Now, what we could technically do this off of a custom event. But in our game. Okay, if you think about it, if you were to want to add to this, and you were to want to create a whole bunch of different enemies. Let's say doing an offer of an interface would be pretty easy because then you could just keep creating these events and these functions essentially that will be creating inside of here. So immediately could do it just by making an event. But that's not how we roll right here, okay? Because I wanted to create this project in a way that you can easily add an implement to it. So that's why we're doing it this way. So let's change the name of our default function and call this damage numbers. And we want to have three inputs on here. We want to have one be a float, one to be a vector, and then one to be a Boolean. And let's call the float damage. It's called the vector impact location. And let's call the Boolean is headshot like that. And it's all we need to do in there. All right, and then we can scroll down inside of our bp enemy. And let's go to our class settings and add this interface. So let's go BPI. Bpi damaged numbers, compile, and then we can go event damaged numbers. So now we have they're called right here and we can start doing some stuff off of it. But we don't have anything created. We don't have our damage numbers actually created yet, so we're going to have to do that first before we can run off of this. All right, so let's go into UI. Let's create a new widget and we'll call this damage numbers like that. And we can open this on up. All right, so the first thing we wanna do is let's go ahead and set this screen size to be desired in on our canvas panel. Let's put a size box. This size box, I'm just going to call it size box. I'm going to make this into a variable. And I'm going to set this to be 100 by 100. Like that and you get this anchor it. Oh gosh, anchoring it, screwed that up. I guess this really doesn't matter. Oh, we did. Well, that's awkward. Okay, well, negative 50, 50, 100, 100. It really doesn't matter. Okay. Let's just, I disliked seeing that thing in the center. Okay. Now let's add some text to our size box. But then on top of the size box. And we'll call this something like Oh, I didn't know it didn't okay. Damaged text. What is what is unreal to him? It's like not showing my It's split yet. Also making the edits. Okay, and let's go ahead and make damaged text variable. Let's align it in the center, like this. In, let's have it be a default text of like some number like 99 or something like that. Then we have our fonts added. We're going to make this one the bold font like this. We're going to make it of a size of, I don't really like it to be that big. Someone may get leg 18. Feel free to make this look. How ever you want. This is all this artsy, fancy pansy stuff for you that I'm doing right now. Okay, For a shadow offset, I want to add a little bit of a shadow. So we're going to do two by two. And for the shadow color, I'm actually going to make this show because our a value is set to be nothing right now. I'm going to make it like 0.5 over something like that. And you know, and I'm happy with it. You can change the justification or all these weird settings. But in a nutshell. That's what I want. Okay, so now we need to create an animation for this and call it damage applied or something like that. And we're going to give this an effect to sort of pop-in and then pop back out. All right, we're going to have it like zoom in, zoom back down, and then kind of float upward a little bit. Let me just think about what to do for a second here. The first thing I want to do is mess with the scale. So let's go ahead and make sure damaged text is selected and go down to scale. Let's get the X and the Y, and it might disappear. So we want this to be 0 at first. And then after like 0.25, Let's make it like 1.5 its size. All right, and then at 0.5, Let's make it add some keyframes may get its true size at 11. So it's doing like this sort of thing. And then that's it. It's actually I'll need to do for the scale. Okay. So that's cool. You know, I was thinking about like having it sort of fade in if you want it to kind of fade in here. I guess, like I said, I don't want to spend like a ridiculous amount of time on the widgets and like doing all of that because you're going to make it how you want to make it look anyway, all right. The only other thing that I wanna do is I want to mess with the translation in the x and y. So let's add some keyframes here like this. And then let's just go off to like 1.25. And I think we only need the yeah, we only need the y. So it can actually delete the x1's. And then let's set this to be move it maybe like negative 10. So now it will play in kind of like move up like that. Oh, we do need it to fade in and out. Yes. You need to get it to go away. All right. See how we will need to do that, okay? But we have our movement sort of thing down. Now let's go to our UI, since we added a shadow. So unreal works. You need to do this with the shadow color and just the normal color and opacity. So these two things are going to be the same thing, the same a values. So by default we can just make this 0. By the time we hit 0.25. Let's make it one set. The whole thing is loaded in at 1 second. Let's just add the keyframes again to make sure that these are set to be one. And then at 1.25, Let's make the a value 0. So now if we play back this whole animation, it does that. All right, I'm too crazy. Like I said, feel free to go crazy with adding keyframes in screwing around with a whole bunch of thing, anything with this label you can change. You can make a keyframe and change that value over time. Alright? But we're not going to waste a whole bunch of time on that. All right, so let's go off of Event Construct over here. And let's grab the damage text. Oh, you know what? We need to create a couple of variables in this. So let's make one and call it damage, and make it of float. And let's create one and say is headshots in make it a Boolean inlets instance editable and expose both of these on spawn. The reason we did that is because we need, we created them here and we just want to link those two things up eventually. Okay, so let's grab our damage. This is going to be what our current print string is doing. How much damage we're doing. One thing that we wanna do currently is if we, we don't want our numbers to show a decimal points. So with how the math works, it's possible that we could do like 7.5 damage or something like that. We don't want damaged numbers to show up as 7.5, even though it might, that might be more accurate. So we can do to floats is we can plot the Snowden, say floor. And what this will do is this whole prevent decimals. It'll, It's kind of like rounding down. Alright. So are damaged texts you want to set, setText, get this widget set text, and then plug this in like that. So it's going to add this little extra note here and then we'll plug that in. So what this is doing is we're making whatever this damage number is, which is nothing in this blueprint, but we will link it up to damage in here. And this value that's controlled in our web and blueprints, we'll link those two things up. We'll make sure that it doesn't show any decimal places. And then we will floor it as in get rid of the decimals because we want to see that. Okay, it now let's get our damaged text again. And I want to grab is headshot. So I want to change the color of the damage text if we get a head shot because that's kinda fun. So we can pull out a node that literally is called Select Color. Alright? And then out of the return value we can say make slate color like this. Then off of damage texts, let's say set color and opacity. And you'll see we have this new option for a slate color and we will drop that in there like that. All right, and so now all we need to do is have one for a and have one for B. Now, a is going to be if this is true. So I'm going to make this before I made it yellow and I already have this red color, so I'll just, I'll just make it red. Alright. And then I'll have non headshots be white or something like that. I like yellow, but I don't really feel like you can make that whatever color you'd like for your headshots. All right, the last thing we wanna do is we want to take our animation damage applied. And we want to play said animation. Alright, so we'll play your animation and then we want to have a delay. And then we want to remove this from parent, which is getting rid of the widget. The reason we have this delay node here is to prevent removing our widget from the screen before the animation plays. So this will run in like a one frame like instantaneously. So even though we will be technically playing the animation will also be removing the whole widget from the screen at the same time. So we need to have a delay. Will say get n time for our animation. So we'll just get the N time for that animation, which is 1.25 seconds. And then we'll delay for that amount of time before we remove our whole widget from the screen. All right, so that's all we need to do with this. So there we go. Now let's go back to our enemy. And let's go underneath this event here. Alright, and the first thing I wanna do is we want to create a widget. That widget we want to create is damaged numbers. And since we have those variables as exposing the spawn, we can now see them right here. So we'll just plug them in like that. Since all right. Now impact location, this is going to be the location will be want the numbers to actually show up. Now, we need to add some level of randomization to this. Because if you're shooting the gun, you're typically not moving it around enough. Select the numbers, the numbers will overlap. All right, let's just be simple here. So we need to add some sort of randomization to this location here. So let's start by getting the the controller of our character. And there's this really fancy paint the node called Project world location to widget position. It's going to be asking us for a location. So let's put that in there like that. And that's all we need for that. Now it has a screen position of a vector 2D structure. We're going to break this. So now we get an x and a y coordinate on our screen. All right, so now we have to do some fancy, fancy math. So for the x Add, going to want to add negative 100 to this. And then we're going to pull off this and add another float plus a float. So we're going to add this negative 102, a random float in range like this, um, and then I'm going to do negative 25 as the minimum and the maximum as one hundred and one hundred and fifty. Okay, then off of the y, we're going to want to add more floats. And this one is going to be plus negative 100 again. And then we're just going to, it's going to copy paste these two. This is controlling our x and our y random locations. The minimum for the y, which is up and down is going to be 050, like this. And then last but not least, we just need to add these two things together. Now, I spent a decent amount of time fiddling with these numbers. This is what I feel. It creates a good random spread to me in my opinion. So if you think about this math that we're adding negative 102. So the lowest number that this can be for our x, which is this back and forth, is negative 125 to positive 150. So like that's the most amount it can spread out in this way, the numbers. And then the, this can either be as low as negative 100 and negative 100 plus 0 is negative 100 or negative 50. So that's the most we can go in this direction. So you'll get this sort of cross-section like that. If you want to make the potential minimum number like negative 200, so you'd get a negative 100 plus potentially negative 100 and you can do that. But these are the numbers that I felt were decent enough. All right. So what we did, oh, actually don't want to add these together. We broke the vector. So now we want to make these floats back into a vector. And we want to make vector 2D like this. Because this is just a 2D plane on our widget here. And then we're going to set render translation. Why does know, do this to me? You we might need to get Let's go ahead and get our size box. There we go. Let's give me the goofy stupid name. That's why we needed to make this a variable. If you didn't, can't get this, just make it into a variable or select size box and just set the variable. It might work out of here. Now set, render. There we go. Set right, or translation. And the translation is that. So we're actually changing the location of our size box. And remember our text is a child of the size box. Wherever the size box goes, the number scale. Let's just plug that in like such, like that. And then we can pull out of here and say Add to Viewport. Plug that in. So kind of a goofy login script, not going to lie in between videos since I don't want to be this once you belong. So I'll probably add the common boxes and stuff in between them. Just kinda show you what I did. The last thing that we wanna do is you want to actually call this event. So right in here we have some goofy print strings. This is in our event and it may take damage. Okay? So we haven't added any sort of M enemy death type of thing. But we will do that in the next video. For our false branch mean that we're not dead. Okay, we want to call damaged numbers, which is this. Now we're calling it and it's asking for that information. Or and this should be rather simple. So damage, we want this to be not the damage from here. Alright, there'll be incorrect. We want to get the calculated damage, which is resetting that number based on whatever body part we hit, essentially with whatever weapon we're holding. All right. Let's take our hit result and we can pull it off up out of here, actually break it like that. For impact location, we want to plug that into impact normal. All right, and then the last thing we need is this is headshot. So let's grab our physical material and we'll get the surface type. Alright, and we have one named head. So we can do is we can say equals. And we'll say, does this equal the head? If it is, then it will be a headshot and that will return true. Alright, so that is all that we need to do for that. So if we hop in and we play, here is a moment of truth. So if we do this shoot, we have 16, the hedge be 20 and yellow or red. There we go. 1014600 before there we go. 16. I guess I just missed. And there we are. I'm dead. And it didn't pump out numbers I guess for the final death below. That's okay because it has the red hit markers that does it for us. Really. Know. What Why did that work? Did not work. We are far away. Maybe I'm just blind or something like that. That was very strange though. Is it not working from a certain distance? Well, let's go on down here. Okay. So admittedly, I have never seen that happen before. I have absolutely no idea why it's only showing within a certain radius like that. Because it's working the same exact way that the hit marker is. So it really shouldn't be happening. So it might be some sort of internal issue because that is just really strange. I have no idea. So if I if it might just be some weird glitch, it might be something with my settings. The script is exactly the same in this blueprint in the previous project. So I guess if you look at let me know if they are experiencing the same type of thing. But that's a very strange little thing. Because like I said, the hit markers work in the same exact way and it's still popping up no matter depending on the distance. So if I find some sort of solution to it, then I will let you know. Otherwise, I'm just going to keep the train moving forward because it might just be a weird, unreal sort of bug that doesn't have anything to do with us. Or it might be just be some weird setting, something that I altered that you're not even experiencing at all because it seems like all the bugs I've had so far just because of me, not because of anything else. So just be on my end. I mean, being a goof, like putting the wrong physical material on the head and stuff like that. But that's the video, that is how you do damage numbers. And then you so much for watching. And I'll see you in the next one.
33. Enemy Defeated Animation: Hey everyone and welcome back to another video. In between videos, I tried to look a little bit at what could be causing as a issue are damaged numbers. And if you look at our old project here, you see that this is exactly the same as before. Either that or I am blind. And if I enter in and shoot from far away, the numbers still shows up. So I'm not entirely sure if I'm being honest what is causing the issue. Sometimes the engine just heads bugs or issues or whatever that happens and it's possible, probably more likely that I have some issues. So if you are running into that same type of problem where the damage numbers are only showing up at a certain range. I really do apologize, but like I said, they hit markers are working in the script is exactly the same. So I'm not really sure. At the end of this whole class, I will probably append some sort of bug fix video where we just go in and fix some of the little problems that our project has, which is common place for literally every video game ever created as part of the process. That's why QA teams exist. Alright? But we're going to keep the train moving, all right? Because if you notice right now on our game, we get the cool red hit marker when our character bites the dust. All right, but it just says I'm dead and we want to do some cool stuff. We want to play some sounds. We want to do some rag doll physics, okay? And we want to add some impulses. All right, so let's do some cool physics stuff in this video. So once again, we're going to need a poll from our project files is to be the last. So when we have a folder called audio and it's only got one sound effect in here. So underneath FPS. I didn't say that right, FPS game. All right. Let's make one called audio. And this will be our only audio file honestly. But we can just drag and drop that in there. Unreal likes wave sounds. So this needs to be a wave and I'd like an MP3 or something if you ever want to add your own sounds to the game. This is actually a sound from the battlefield franchise if you get a head shot kill. But I think it's, it's kind of a cool sound in general. All right. Just a little, little added flare. Okay. I know I'm not big on the flair when it comes to the classes. I actually spent a lot of time on the flare, on my own free time, but we're talking about doing this information, alright, so i'm, I'm, I'm in the Event Graph for the classes. So there's, there's a little, little flare from me. Alright. So let's go ahead and replace this goofy print string with an actual event that will, that will run. Okay, so let's create a function and call this enemy death. Did I hit space? Have a tear? Much better. Alright, So for enemy death, Let's get two inputs. Yes, yes, yes, yes, yes, yes, yes. Okay. Let's call one of them, hit location, make this a vector. The reason that this exists is so that we can pass through a location to add an impulse. All right, to make our death animation, rag doll physics look awesome. All right, the other one we're going to get as a bone name and we'll make this a name. We want to tell the game which, which bone are we hitting on this character to apply that impulse to? All right, so there's, we're not actually adding animations, we're just adding physics impulses on the characters. Skeleton, which will obviously look cooler. So out of here, let's make a sequence or write a. And then we want to grab our mesh components of our enemy. And we want to say set simulate physics. All right, so this will, we check this on new simulation. This means for this part we are enable laying rag doll. Physics here where we're setting, we're simulating some physics on our mesh year. We're letting it go all willy nilly. All right, the next thing we want to do, an add a pin, is going to play a sound today. And the sound we want is going to be killed sound. One that I had you guys add right there. And then last but not least, we're going to grab our mesh again. And we're going to add an impulse at a location. So this is going to be driving a cool impulse here. All right, so it's going to be asking for a This a bone name and a location. Well, we got a bot name and we got a location. So we have done our homework, people. Alright, so that's all set up. And the last thing we need to do is we need to actually have an impulse. Now the cool way of doing this is making different weapons have different amount of impulses to the pistol will probably have a pretty low impulse. But the rocket launcher, we want a ginormous impulse to explode upon this enemy. So they go flying through the air and it'll be awesome. All right, but after we do this, Let's grab not you, that capsule components. And we want to destroy this component. This will just allow it so that we can walk over this character. And no sort of other events with them are going to be able to trigger now that the Capsule Component, this is gone. All right, so we're just destroying that component. If we destroyed the whole actor than this whole mesh and everything would disappear, which would be unfortunate. So in maybe other games, you'd have a delay node and then you destroy the whole actor. So they were just out of pop out of existence or whatever. Well, we're not gonna do that here. Okay, So let's grab a reference to our player. And we want to get actor location. So we're getting the location of the actor. And then we want to get actor location again. So this is the target, here is the player's, this is the player's location. And then this is a reference to the self. So now this is the location of our enemy. Alright, I want to get unit direction. So we're getting a vector from our player's location to our enemies location. Alright, and we're going to multiply this. So a vector times a float. Then the output of this is going to be our impulse. What we wanna do out of player is let's grab the current weapon and we need to create a variable in our current weapon or Weapon Base. In other words, and we'll call this kill impulse, make it a float. And let's set this to be default like 10 thousand. All right. Now let's go ahead and get kill impulse back in. And the enemy death function in that lives inside of our enemy and plug that in. So we're getting it. The player's location, a line of vector from that location to the enemy's location. All right, so in other words, that would be like the same exact thing. It's like our bullet trace in a way because we're hitting the actor, we're hitting our enemy. And we're going to multiply that by this impulse and then use that to make a vector of an impulse that it's asking for, like that. So this script is done. The last thing we need to do is coming off of this true branch here. I actually want this to pass over sada, true, Let's call enemy death and plug that in. So if our enemies dead, we're going to run this death enemy, this death event function, okay? If they're not dead, then we'll do the damage numbers. Alright? So it's gonna be asking for other things, location and, and all that stuff you can probably guess. So if we take this location, we add a little reroute node, then we don't have to pull up from here. We can pull out from here. So we're going to make impact normal. The hit results, they hit location and then bone name. This one has hit bone name as an option and just plug that in there, just pass that in or whatever. Got we got laser light, show all these different colored lines here. Alright, and so that is going to connect in like that RA. So what we can do to be fun about it or whatever it is, let's go ahead and let's change this shotgun weapon. It's gotta kill impulse and make this something crazy like 50 thousand. That looks like 50000. Yeah, okay. And let's hold down the Alt key and let's drag out some other enemies here. Alright, and I hit Play. And so the auto rifle is set to be at 10 thousand that a fault. So there we go. Full out on the ground there. If I were to hit him in the arm, let's say for the kill shot, he will fly back. The impulse will be put in that bone name at that location. So it'll shoot the impulse off on this arm like that. So it actually moves back there and figure out the shot gun. We can show that we have a higher kiloohm impulse. It's like five times as much that he might go flying. This might not be anything that is what I have it as by default in the other project. But let's see. The un, un fly in like that. This poor man. But he has, so that's how you add impulses and stuff. So the game, so now you can add more enemies and stuff. You'll get cool sounds and everything. So the epistle, this is probably too high. And miss. There he goes, again in from the back, goes flying that way. You can see how all this is coming together now. We have in the foot. All right, so bye, bye. Alright, so yeah, you see how it works there and I'm just having fun at this point. Okay? So that's, that's how you add kilojoules. We got our cool sound going. Everything is looking good as far as that thing goes. So there you go. Oh, you guys enjoyed this video. Feel free to go into your different we only have, you know, I mean, you can change these if you want Reno, but they don't actually do anything right now. That's what we'll be doing coming up as adding the projectile's. But if you want to change the pistol sorrowful and shot gun to be different kill impulses. That would be my guess. Okay. The default is 10 thousand. I feel like that's a pretty pretty decent amount for one of these weapons. So I just I feel like that's a pretty good realistic amount for like, you know, sorry, I'll type weapon. Alright, so that you can make it more for the shotgun. You have the shotgun be a lot, you know, the pistol be a little bit less whatever you wanna do. So hope you guys enjoyed this video. I'll see you the next one.
34. Shooting Projectiles (Part 1): Hello everyone and welcome back to another video. In this one we're going to be adding to a weapon base. And we're going to finally allow ourselves to shoot some projectiles. So we're pretty much all done with our hit Scan weapons. And now we need to move on to is the projectile's. All right, let's do it. So let's enter FPS game. Let's create a new folder and call this projectiles. And let's set a color. And let's make a new blueprint class of type Actor. And let's call it Projectile base. And let's open this up and drag it along across the top. Couple of things that we want to do, let's add a components of projectile movement, okay, this project, how movement has some different settings that we can manipulate in. We can change or will eventually be able to change for our initial speed. Let's make it something like 10 thousand and the max speed, also 10000. Projectile gravity scale one is pretty intense, so we'll make it like 0.2. We're going to be changing this depending on whichever weapon that we have. So like a grenade launcher is going to have the highest projectile gravity scale because it's going to be more of an arc towards our sniper rifle will probably have the least. It's also probably going to be the fastest. Okay. This should not bounce. We don't need to do anything like that. Off of the senior 2, we're going to make a get a sphere collision, and we'll call this collision. And let's go ahead and just and make that the new root. Why not? One thing that we want to do with this collision, I believe, let me just check really quick simulation, okay, so if we have this collision selected, alright me, just make sure, yeah, okay. So if I have this collision selected, we want to search event and we want to make sure that we have selected simulation generates hit events. This is a very important step because if you don't do this, every time you hit something with a projectile weapon, it will give you errors. All right? Because with how we created our impact base, that's going to be looking for a physical material that had hit. And so while a game will know that the projectile hits something, it, it'll just get confused. And it's not simulating a generate. It says it's not simulating a hit event. It won't think it hit anything and so it won't know what sound to play and what effect to spawn and different stuff like that. So just make sure you have that checked. See prevent errors. All right. Then we're gonna get a static mesh that will be a child to our collision and we'll just call this Projectile mesh. And we don't need to slot in anything for that right now or do anything. With that. I do not believe all of that should be fine for now. We'll probably make it a couple of changes to this eventually, but it is what it is. Okay? Let's create a couple of variables. Let's call this one is dealing radius damage. So this one will be set to be true for our grenade and rocket. They're going to be doing a radius of damage where the sniper rifle is just you hit something and that's what hit two. We also want to grab our weapons stats here, that structure that we created a weapon stats. And let's go ahead and make sure that this is, so we can link this up at the one in our weapon base. Let's make it instance editable. It's suppose on a spawn. And then last but not least, we want to secure have our impact effect. So let's get impact, affect base class reference, Compile and Save. All right, And that's all looking good. So let's create a reference to our player. And you probably already know this, but like we can just drag it out of here and do any of the leg anything that we want. I just always promote it to a variable so that we can just draw her like that. But pulling out of here and pulling into here is doing the same exact thing. We, you don't have to set this to a variable every single time. That's just kind of the way I roll. So I guess, uh, you probably already knew that, but I just want to make sure. Okay. I'm this projectile movement. It's right-click. Add an event and we want to do on projectile, stop. Alright, and you see right here it has an impact results. Already right here for us, that is created. Well, we wanna do. So this is an event that will run off when called, when projectile's come to a stop velocities below simulation threshold. All right, So it's essentially saying when this hits something and it's not set to be, should bounce. Okay, let's make a function and call this stop projectile. And let's have this, have an input of a hit result of type hit result. If you compile this and go back to the Event Graph, we can call this right away like that and then just plug in the hit results like such. So that's what our event graph should be looking like. It's all that we need to do. So now, let's go into stop projectile and we're gonna make a sequence. But couple of things happen simultaneously here. We want to check to see if we're dealing radius damage will do two different things. If we are, we want to run off a different function that we have not created yet. But for the time being, let's not do that. Let's create that later. So one thing that we want to do, Let's take the hit result in break it. All right, and then we want to get the hit actor. Then out of here we should say, Do we have it? We do. So out of Hit Actor we can get enemy take damage like that. Because that is one of the Zak torus that we can heat. This is our BBA, these gay, right? So we needed to grab some weapon stats. If you remember in here, if enemy take damage, it's asking for weapons stats. So we created a variable for weapons stats. So we can just plug that in. And if you remember, this weapon stat, okay, this is we go back to Weapon Base, right? And we're in start shooting. And we have this, we're calling this event and we're linking weapon stats. So these are the ones that live within the children of our weapon base. So that's getting passed in his weapon stats when it shows up here. And so now I'm linking the variable inside of here too, the one inside the weapon base. By doing that, that's just pass in all that data through. If you couldn't guess for HIT results, we'll just have it be that same exact result like that. So now we need to do a couple of artsy things. So are you know what? This should not plug in here. This should plug out of the false. If we're not dealing ready standards, then we'll just take damage. If we are, then we're going to create a different interface that has take radius damage, that will have some different things fire off. All right, so let's get our projectile mesh and let's say set hidden game. Plug that in. And we want to make this be a new hidden. So we've hit something, we want the mesh to disappear, we don't want to see it anymore. Then we're going to get the world transform. So the location of this in a transform, x, y, z. And we want to spawn an actor from a class. The actor that we want is our impact effect. And we will. So we made this to a variable. There we go. So like that, now we have a hit result that we need to pass through. So we'll do that and then reroute it like that. Let's have it set to always spawn, ignore collisions. We don't want that to potentially have some sort of issue. And then we're going to run out this node that says set lifespan. This is similar to destroying an actor like Here's the thing. You can't call delay nodes inside a function. So this is not a thing. So set the lifespan when it expires. Object B is true. So this is the equivalent of doing delay for 0.1 seconds and then Destroy Actor. So we're just setting the lifespan just because you can't put delays and functions. Okay, I don't make the rules. So we can come to box this. So we can say removes mesh, spawns, impact, effect, destroys act. That's what all this is doing. So there's more of the art level of scripting. And this is the function. This is what's doing the math and the things is what's tricking the player into thinking that, well, so things actually happening on screen. Oh, we need to pass in a transform. Oh, we just never connected that node. Silly me. Okay? So we need to do something now for if we're doing radius damage. All right, so let's do that. Let's create another one and call this explode projectile. All right. This is going to have a hit result too. And we'll call it hit results. All right. And I think we'll do this in probably another video, but let's just go ahead and call it z. We want I just want to get the sniper working first, but that is how it works. So you got to explode projectile and this will be a hit results. I just I guess it didn't change the name. I never compiled it. Can we all live lu you're okay. So master that. Exploding the projectile in a different video when we're dealing with our other. Thanks. Okay, so that's all that we want to do inside of our projectile base right now, we go back to our weapon base and go back to start shooting. What we want to do is we want to now do things for if we set our weapon to be a projectile, what we're going to do is we're gonna get calculated line trace and we're going to hit Control W. And we're going to just copy that. And we're going to say calculate reject out. Now what I did in here is I had a weapon mesh in a weapon socket in Calculate line trace. And the reason why that was and I was confused, why never used it? The reason was because I used to have the line trace and the project how within the same function. And I change that. So now they work in different forms. So these two things are actually useless for calculating the line trace. You can get rid of the weapon socket and the weapon mesh. You only need the camera. All right, and so it's gonna give you an error because it hates you. And then we can right-click on here and we can say refresh nodes and then just get rid of that. And that should still work perfectly fine. Still works fine. Okay. We didn't need it. All right, but we will need it inside of calculates. Projectile will need all three. Alright, we'll need the weapon mesh, the camera and the weapon socket. So these are going to be just, just ever so slightly. There's actually a lot of serifs. So instead of calculate projectile, you can actually just get rid of this stuff. Just get rid of most of it. Keep the return node. Get rid of this, get rid of drawLine, trace and all that. And we're just going to promote these two local variables. So we'll say local weapon mesh. So we'll actually be using these in here, unlike the other one that we made. And then weapon sockets. Remember that already exists. So what you mean It's in use? Oh my gosh. Yes. I want to delete it. Wait what? No, wait. Weapons socket. Oh my gosh. I'm so confused or sink component object. Oh my gosh, I'm just going to promote this to a local variable. Want to say, Oh, see, it doesn't exist. Okay? Sometimes that copy paste, it really does get you good. All right, so okay, we just kinda like on data what we did in the other one, the other blueprint there, so that that looks funky. All right. So we have our local camera or local weapon mesh in our local socket. Alright, so what we want to do, I'm going to hit Control and I'm gonna move this upward and get rid of this reroute node. And what we want instead of a hit result is we want to get a transform which is like similar to a location. So instead of hit results, Let's get projectile transform. And we'll call this a transform, because it's going to be asking us when we spawn our projectile's can be asking us where we need to do that. And let's promote this to a variable. And we'll call it object. I'll transform. All right? We don't need this to be set as anything right now. So you have all these cool fancy pansy coordinates. The reason we don't need this is because we want to set it right here. And we're going to now do some script to set this. So this is for our projectile. So let's go ahead and get our local weapon mesh and our local weapon socket. And we're going to say get socket location. It's going to be maybe drawing off one immediately. By default. Just delete that. So just get socket location. We plug in our local weapon mesh and our local weapons socket either set the variables because our weapon mesh always be changing. Okay? We want to make this into a transform, grab that one. All right, and so it's going to be asking us for a rotation and scale and everything. We don't care about set scale. But the return value of this is going to be our transform CINAHL. Let's get our local camera and we're going to get owner. And then we're going to cast to BP player. We can right-click on this and we can say convert to pure cast. And I hate that fallacy bias. All right, So now let's say gets control rotation and piping for rotation. So what this is doing right here is where we need to transform that you'll see in a second here to fire off our projectile. So we're getting the location of our weapons mesh and we're getting that socket name. Remember it was called muzzle flash. We're getting that. So that's what we're going to say. Our spawn point is that's our location of it, okay? But we need to get the rotation of our character. So we're getting the camera component on our character. We are doing we are casting to it. We might see, yes. So you can't. Okay. Yes. You need these notes. You need to get the casting thing. And I made it a pure cast so that we don't need to have the execution wires running through it. And then we're getting into control rotation of that camera. And then setting that making, making these to this location, this vector location in this road, rotation into a transform. So a vector is XYZ, a transformers like XYZ plus rotation plus scale. So it's even fancier. Alright, so we can close out of here. We can go into start shooting again. Alright, and then we can pull out a projectile. And we'll say calculates projectile, this function. It's going to be asking us for a lot of this data now. So now if we go into those few weapons and we say, these are projectile's or not hit scans. It will now run through this one right here. Okay? So now we want to pull out here and say spawn actor from class. You can see it's asking for a transform, so we just plug that right in. And then we want to get are 0. Let's set it to be a variable and we'll say projectile, and we'll make this up type projectile base. The reason that I'm making it into a variable and not just slotting it in is because in the children, in the sniper rifle, rocket and everything, we want to assign different projectile blueprints, similar to how we did the impact effects. We want to be able to dynamically set those depending whichever weapon we have. So, so if I just slotted it in like this, then it will always be the base. It won't, it won't change that via variable. And it's asking for weapons stats. So we're going to link that up with the variable that we had created inside of our weapon base. So if you remember, we made this variable and we expose it on spawns. So now when we spawn this, It's asking you for that. So now we're linking that data up, so it'll pass on through. Alright. Now, when ever this is overall we need to do is just plug that into the recoil to finish this wire here. And then let's go ahead and get these things plugged in. So we'll get the player will get the get the camera. Plugin the camera weapon mesh. Let's get the weapon mesh from here. And the weapons socket. We can make that into a variable, but like I said, all of these are called muzzle flash. So muzzle flash, hard inputted will always work. If you want to make it into a variable, go redhead. Be, you'd only need to make it to a variable. Technically speaking, if you wanted to add weapons that are different from the pack that we are using here. Finally, just make sure that says always spawn, ignore collisions just to avoid some issues. And then my comma boxes and say spawns, projectile. All right, the last thing I wanna do in this video so that we just have this setup here, is, let's go into our weapons. And for sniper rifle, Let's see, we now have a slot to sudden our projectile's, which is pretty cool. And we just wanna make sure this isn't set to hit skin, it's set to projectile. And we want to do that for the rocket Projectile and the grenade launcher projectile's. And now those three weapons will run down the other path. This isn't actually going to do anything. It might give us errors, but you can see how it's not shooting a line trace anymore and it is still doing that little weapon kick, little rattling thing. I haven't changed any of those numbers to make it something insane, but like it is running through and it's not giving us an error. There's just no event that's added right now to run when we actually hit anything with this. So we're going to do that in the next video. I'll see you for part 2. So thank you for watching. If you have any questions, let me know and I will see you in the next one.
35. Shooting Projectiles (Part 2): Hello everybody, Welcome back to another video. In this one we're going to be continuing our projectile script, finishing that up in this video. Now, unlike every other video so far, this one is not being recorded live. This is me from the future because something bad happened to the recording last time. So I have to go back and redo it. So there's going to be a little bit awkward. So I'm actually looking back at what I'm doing currently. So if you're looking at the screen right now, the thing that I'm explaining is one thing. I changed the variable to be a local variable because it's not needed outside of this function. But you wanna make sure that the returned node is out of the final sequence pin. If that's not the case in your game, in your project, then it won't be spawning in the correct location. So even though sequences are supposed to be happening simultaneously, you do want to make sure that you set that variable before you return it. So I went ahead and I'm slotted in a projectile base in my grenade launcher just to showcase that that's working and I've put just a random box in our projectile mesh for fun, just to show that all of that is working when you have the projectile's showing up in the correct location. And then I removed it. So if you want, you can go ahead and slot something in the mesh and then go into one of your weapons and put that in. So the next thing that I'm doing here is talking about a collision responses. And we're going to be creating a brand new collision response called the projectile or object type. In order to get our game to recognize that we are using a projectile because we want our game to me. We can set it adds just like world dynamic or something else. But what we can also do is create a new object channels. So we're going to call one name one projectile. So project's settings underneath engine, it's collision. We're going to create one called projectile. And the default response is going to be block. So when we create this now, it will show up as an option. And so we can now set that as an object type. So I think I do run into a bit of a problem here, if I remember correctly, I think I I go ahead and look for it. So it does show up along the bottom. So we can have our enemy make sure that that setting to block the projectile's. But we haven't actually gone into our Collision Presets to be able to set anything as a projectile. So I'm going to run into the issue here. We're looking around like main worries. I think it's somewhere. So it is two steps. You can add an object type, but it's a completely different thing to, to add it. To actually make it show up here in a preset. Because we want our projectile to be set as projectile so that our enemy that is set to always block the projectile. So this is not a 100% necessary step. You don't have to do this every single time. But by doing it this way, You do get to specify which objects you want to ignore, overlap, and block to run off different events in your game. So unreal comes with a decent amount of preset once. But you can always create your own to make things more specific and tailored to you. Okay, So I finally figured out that you need to also set it as a preset. So here we are in the same thing. So make sure you create an object channel name projectile in the project settings collision. One of my weight and for him probably EPA up and all over the place. But we wanna make sure that we also create one under the preset. So projectile. See, we wanna do, we want to enable collision for query and physics for this new object profile? And you can add a nice little description if you want. And then for this we're going to say ignore, ignore. Let's see what I'm doing here. Block, block. Ignore the pon command, Tim, yes, ignore the physics body and I think we ignore everything else. Yes, yes. So we're, we're ignoring everything, but we're going to block world static and World Dynamics. So if you remember our enemy type, the mesh which has the physics body on it. And it's where we slotted in our physical materials. We set that, I think I'm gonna go check in a second here we set that mesh. Come on to them, you could do it. So as you see here, we set the mesh to be world dynamic. So our projectile type. It's set to be projectile in our mesh is told to block anything that's called projectile. So that is essentially how that is working in our game. And we are upon, our character is set to be a pond, so we're going to ignore that, meaning that our bullets or projectile's aren't going to be hitting us. If you want to be able to blow yourself up with a rocket or something like that, you would make sure that pawn also blocks. But that's not something that we're going to be doing in this project. So on the collision in our projectile base, if you don't see it, just hit Compile and you're going to set it to be a projectile. Collision Presets under collision projectile, okay, with the collision sphere collision selected, okay? That is the actual object that's gonna be driving our event for projectile's stop. Now we're going to make some children off of this projectile base. We're going to make one for our sniper rifle, one for our grenade launcher, and one for our rocket launcher. So you guys know the drill by now, right-click on the base and then give it whatever name that you want. I'm doing projectile underscore and then the name of the weapon. I probably if I wanted to be consistent, I would have done that backwards. I would have done the name of the weapon and then underscore projectile like I've done everything else, but I decided to switch it up this time. Quite honestly, I probably forgot that I named them the other way around with everything else. But we're going to start the sniper rifle and then underneath projectile, we're going to slot in sniper rifle projectile. So this is actually in the weapon itself. So you want to go into each and every single one of the weapon, those three weapons, sniper rifle weapon, grenade launcher, weapon, rocket launch your weapon. And since we set that to be a variable, you want to make sure that they are set to be projectile not hit scan. And you wanna make sure that underneath projectile, it is set to be the proper projectile children that you should have just made just now. So for the sniper rifle projectile underneath the mesh, there is one called sniper rifle ammo, and it's this little bullet. And we're going to rotate this so that it faces forward and increase the size. So negative 90, it looks like in the y. And then I make this probably like six or so times the size. You can make it however big you want it to be. So I just make it big enough so that it kind of fits around our collision. But you can resize the collision just to know that if you resize the collision within the child, it will also shrink the mesh because the mesh is a child of that. We're going to change this speeds to be 12 thousand and the gravity scale to be 0.1. So there's not going to be a whole lot of drop off and this one's gonna go really fast. We want to make sure that is dealing radius damage for our sniper rifle is turned to be false. For weapons stats, I'm going to slot in a 100 damage, even though I believe that the variable controlling that exists within the weapon. I think that's all that matters. And then for impact effect, but sniper rifle impact effect, like I said, these ones, it might not matter as much. It you might not need to set it in here because it might be grabbing that information from the weapon blueprint. But you know, it's good practice. It doesn't do any harm to slot in the amounts of damage. And that impact effect in the projectile is well, can't do any harm. So a lot of this is just making sure that the variables are set to the correct type. A lot of times if you might have some sort of error, it might be that you don't have Projectile slotted in or the impact affects slotted in. You might have it sniper rifle. The sniper set to be a hit Scan when it's really should be a projectile. So if certain little things like that aren't working, the first thing that I would just do is to check your variables in your blueprints to make sure that there are actually set to be the correct things. Because when you have somebody weapons, it can get a little bit confusing. So we haven't fixed the scope. We'll do that in a later video. But if it should be shooting that bullets out of the front of the gun now and it should be pretty visible to see that. Now what I'm gonna do is I'm gonna shoot this guy. I'm gonna get an error when I close this down in a previous video, I think I mentioned to make sure that we change a certain sense for the physical materials not being able to be returned correctly. And this is the error that I was talking about. So I get a little bit confused here. I'm like, What the heck? So our damages and working, but it's weird. So it is still firing off a impact effect. It is still showing up a damaged number, even though the damage number is 0. And it is still showing you a hint marker as if we hit something but there is something wrong with it. So the last part of this video is going to be alive again. So hopefully you were able to bear through this part of the video. Once again, I apologize for this happening at is lost the audio have to rerecord this part, but the last minute or two of this video will be the live version again. And you will see me showing you the solution to this air. Okay, so let's go ahead and fast forward to that and move on with our lives. Okay. So more awkwardness going for me, okay, so you know what I told you. Eat a check on a certain variable C, you don't get errors so that the computer won't recognize which physical material you have. Well, I did the right thing and telling you that that was going to happen, but I didn't tell you which and tell you which one to turn on. So if I uncheck this right here, okay. I grab the sniper rifle, I pick it up, I shoot into the ground. Okay. Notice it's still the the d count, all of everything, but it'll say access none trying to read property, physical material and it'll show in our impact affect base how the emitter, the sound into detail is not working and you get an access none error. It means that it's trying to find something that isn't there. So in this case it's looking for a physical material that was hit in. It can't find it. So the computer is still doing something and most of the time it will still actually do the correct thing, but you're confusing it. So in the projectile base and you also noticed that the damaged numbers don't work if you don't do this. So in the collision of our projectile base, just search return. If true components sweeps return material of the results. I do not know why in God's name is not turned on by default. But you need to do this. So put return material on move, turn that on in your collision settings. So now if we shoot into the ground is still all works. But if we walk up to our enemy and we hit them at the correct sound and the damage numbers and all of that. And when we hit Escape, we don't get errors. Okay? That is a crucial step. I can't believe I ran to the same error again, but I mean, you do want I guess you do you want similarly generated fence too? I don't see why you wouldn't, but yeah. Okay. So cool. We got that fixed before we can move on with our lives now. Alright, so yeah, let's figure out where were we and all honesty, that might be where I can just end the video because I'm still hidden headshots on tank. In the next video, we'll fix the sniper rifle, that it actually do stuff and build that out. But yeah, I mean, right now we our shooting projectiles out of our gun, then I'll works fine. So we'll create the sniper rifle and then we'll move on to doing explosions, and then we'll pretty much be done. So we're in the homestretch here. Thank you guys for watching. I'll see you in the next one.
36. Shooting the Sniper Rifle: Hey everybody, welcome back to another video. In this one, we are going to be fixed in the sniper rifle because while currently we can equip it in, shoot it and everything, it doesn't make a sound and the scope is pretty Genki, so we're going to fix those things up in this video. Okay? But let's start out by setting up across here. So we have this texture of our cross hairs, but we need to add that to a widget. So let's right-click user interface, and we'll call this, it's called sniper cross hairs. And let's open this up. We can keep this at a Fill Screen and we just want to add an image. And we'll just call this cross hairs always remember F2 is to rename things and unreal and just like on your computer in general, let's anchor this image to fill the screen and set the offsets to 00. So now let's just filling our entire screen here. And let's just slot in our image for sniper cross hairs. And there we go. So this is another thing that I made in Photoshop. Admittedly, it is not perfect. It gets the job done though, for our purposes. This is not what we are professional over here. Okay. But it's not that professional. We can close out of that. We don't need to do anything with it, we just need that to exist. So let's go into our weapons folder and open up our sniper rifle weapon. Okay. If you don't have these things slotted in, we have impact, we have our damage or kill impulse we can make like 15000, make it pretty powerful. Projectile is separate file projectile. All of that should be slotted in. Yeah. Okay, so now let's go ahead and create some events. So we're going to have to grab start shooting. You. Events starts shooting like that. Let's add a call to the parent function. Then both plugged in there. And then off the weapon mesh. We've done this before we went to play an animation. Animation is going to be sniper fire, sniper rifle, sorry, animation. So now our sound and particle effects and all that stuff will work only shoot. And we also don't want this to be one of those that can be spam fired. So we'll do fire rate calculate. And then me just check really quick. The fire rate for this. Or would I have put this fire rates, set this to be 1 second. So a little bit faster firing then the shotgun. Okay? Now if you remember in our weapon base we have these weapon aim enter in weapon aim, exit. And these are binded to the input event that we have on our player, which is binded to the right mouse button. So we can actually call these events now, right? And these events that exist in our parent, since they're binded to the Event Dispatcher that exists in our player, will cause this to fire off when ever we enter our aim inside of the player. So that's kind of why we created them in this way. So let's get an event weapon aim enter, and let's get that call to the parent. Okay. So if I explain that good enough. So like these are binded to a mentor, these events that we're calling right here. And this event in our character, does our event dispatchers work? The action mappings aim and we're calling a mentor. So whenever we call this, all the other events that are binded to also happen. So this is one of them. Okay, so let's grab a reference to our player and let's get the current weapon. And we just want to make sure that the current weapon that we have is the sniper rifle. All right. Because we don't want this to happen every single time that we call a mentor. So let's get an if statement. So we didn't do this, otherwise it would. And that we can get a reference to self. Instead of having this equal like the load out equals sniper rifle weakness. Get a reference to ourselves in this blueprint because while ourselves is that sniper rifle, okay? So does the same thing. Because we don't want this stuff, that we don't want all of this stuff to happen if we don't have sniper rifle equipped. And we're going to create a widget. The widget, as you can probably guess, is going to be our sniper cross hairs. Alright, let's say is in viewport. Then we'll say, and then we'll say branch. And then we'll say out of here at the viewport. This isn't viewport thing. What this is doing is it's preventing. So I can say won't add across her twice. So it will only add our crosshair to the viewport if it's not currently there. All right. This will just prevent that sort of same kind of issue happening of like you'll get some sort of a warning or error saying widget already added to screen or something like that, and it won't show up. So that'll prevent that from happening. Next, when we have our cross hairs up, we want to set hidden in game. We want to get our weapon mesh and actually make it invisible. Okay? So this is why we didn't really worry about the Aiming F0 v and all that stuff because who cares? We're gonna just gonna make it invisible. We're also going to take our player character and didn't mean to do that and make our player character. Okay, never mind said actor hidden game. So the weapon messages hidden game, and then the character is Hit Actor in the game. So we're going to make our weapon in our character all invisible. Okay? And we want to get our player. And if you remember, we created the HUD and our players, we're going to get the main HUD. And we're going to set the visibility to be collapse. So we're going to get rid of the HUD as well. We don't want to see the HUD, we don't want to see our player and we don't want to see the mesh of the weapon anymore. So let's say hides weapon, player and Hod. While aiming. New York. Like that. While hiding. While Amy and the sniper rifle, these are things that were just hiding all of it. Alright, so now that's everything for a mentor. Next we want to get events, weapon aim, exit, and we're going to call the parent function as like that. Okay? And then we're going to check is valid. First thing we're going to check is valid is this cross hair thing. So this will prevent this from running. If this cross hair has an neomycin created. Because we're going to tell it to remove it from we're going to tell it to go away to remove from parent. So this is just checking like let's say we pick up the assault rifle and we aim exit, right? We, when we aim exit, it's going, the game is going to be like remove this widget from the screen and then the game will be confused. They'll be like, Well, we never even added it in the first place. So this is valid notice preventing errors for that sort of error from occurring. Removed from parent. So will only remove it if it's valid. In other words, if it was ever created in the first place. All right, then all we wanna do is we wanna take these same three things we want to uncheck our boxes, so bring it back, bring it back and make it visible. And then we'll just say shows weapon layer and all that stuff, all aiming sniper. All right, and so this is everything we need for a sniper rifle. So now if we go and grab the sniper, we pick this up and we aim. There we go. One thing we'll probably wanna do is change the zoom because that's a little bit hard to see right now. Aim field of view. And if you can totally with this however you want, how much you want this to zoom in because the sniper is supposed to Zoom. Yes, it's probably not even close. Let's make it something like 25. See what that looks like. There you go. I'll say still missed. So admittedly, my sniper rifle scope is not perfect. All right. I'm just gonna be the first one to admit that. It's not it's pretty close line up to the center of the screen. But I didn't Photoshop. So if you just came up a little bit, it'll always hit. Really should CIOs close. So yeah, it is a little bit wonky. But something that you can also do to fix that problem. All right, So little Jerry Reagan here. So if you go down and find the sniper rifle mesh, right? If you remember the skeletal mesh, if you remember this, okay. We're ejecting the bullet out of muzzle flash so you can do is you can take muzzle flash on here and just move it up a little bit. Maybe put it in line with this, perhaps like this and hit Save. And now your bullets actually going to inject a little bit higher because that socket was higher. And now and now we're hidden headshot flag is nobody's business. All Right, So despite my poor Photoshop and skills, if you move this up to like 20 to 22, seemed like a decent value. Stride 22. The muzzle flash socket on the sniper rifle. There you go. Now, now we're hitting our shots. So the pathway to get there as military weapons, silver weapons, and then grab the skeletal mesh of the sniper rifle, get muzzle flash, That's what we're injecting our bullets from. And move that up to a z value of 22. And then that will make this sniper more accurate with the cross hair that I created in Photoshop. All right, So that's everything for the sniper rifle, it is all created. So in the next couple of videos, we're going to work on a grenade launcher and rocket launcher and make things blow up and it'll be awesome. All right, so thanks for watching. Let me know if you have questions and hope to see you in the next one.
37. Making Things Go BOOM (Explosions!): Hey everybody and welcome back to another video. This one is going to be a fun one because we're going to blow some stuff up with our grenade launcher and rocket launcher. So let us waste no time and get to those Michael Bay ask explosions right now. All right, so let's go into our interfaces and let's go to BPI, take damage. We're going to add a new function inside of this already existing interface and we'll call this take radius damage. All right. Take radius damage is going to have two inputs. We're going to have one be a hit results because We always gotta write and the other one's going to be just like before enemy take damage, we want to get weapons stats. So let's get one of type weapon stats. Compile, Save, Close. Now let's go and open up our enemy is go into the Event Graph and we can scroll on down to where we have some open space and we want to call event take radius damage. Okay, so we already added this interface to those blueprints and now we can just keep on pulling functions that exist inside of there. Alright, so first things first, let's check and make sure that our character or enemy is not dead. Don't want to be able to do what we're gonna do if they're dead. Out of hit result. Going to break it out of weapons stats are kinda break that. We're going to start plugging some stuff in the air. To do this, let's create a new function and let's say count, queue, late, radius, damage. This is going to work a little bit different. Li then just calculate damaged it. So we're going to add three different inputs. One called damage. We're going to have one called impact radius, and then another one called impact points. And these are going to be float damages of float impact radius is also a float. Impact points is going to be a vector. All right. Let's set damage to a local variable just for organizational purposes. Like okay, let's go ahead and gets actor location. So we're getting the location of the enemy. Remember, target is self, it is this blueprint character. We're going to take the impact points and we're going to subtract these. So vector minus vector. All right? And then we're going to get the length of this vector. And then we're going to divide this by a float. Is a float. We wanna make sure this is on top and we're going to divide that by the impact radius. Alright, and then we're gonna do a subtraction here. And we're going to grab this on the bottom, and then we're going to make this one. So it's going to be 1 minus whatever the value of this math is. Math is it's getting the actor, the enemy's location. It's taking whatever this impact point vector is, it's getting the length of those two things, how far they are apart. Dividing it by whatever we set to be this radius, and then subtracting that. So like I said, most of the little math things in here, It's easy icon up on, on, but a lot of these numbers and these calculations are figured out just through testing. So the fact that this is a class means you don't have to go through the tedium of doing that. So let's do a float times a float. We're going to multiply that by our damage. All right? And then what we wanna do is we wanna do something called the clamping a float. The minimum we want to be 0. And the maximum we want to be able to do is whatever damages. So this is just saying like it this is preventing the damage that we apply to a greater than whatever we set the damages. So like if our rocket does 700 damage or something like that, We even if this calculation results in a number bigger than 700, it'll clamp, it'll stop it from going over 700. Alright, so let's add a return node and we'll say radius damage. Applied or are calculated radius damage or whatever. And this is going to be a float return plug-in. And there we go. That's that. So now we can go back on over to our event graph. And if we're not dead, we can calculate radius damage. We have all these inputs. So let's plug Damage into damage, impact radius into impact radius. And then our break hit result, there's going to be an impact point. You can see it right there. Impact point into impact point. Like that. My nodes are pretty close together in a, but that's okay. Okay. Next thing we wanna do is we want to run our health update. So the same one as the, as before that we used up here when we're calculating that damage. So we'll pass that in. All right, then we want to check and make sure if we're dead or not. And then a lot of this is going to be the same. If we are dead, then we want to run enemy death. All right? The hit location is going to be this impact point. Sets where the impulse will fire off and then we need to get a bone name. It, bone name into bone name. Collapse. Oh my gosh. It's a node party over here. Okay. Yeah, that's okay. For not dead. Then we want to run damage numbers k and we'll just plug that in like so. Impact location is going to still be impact point. Damage is still going to be the applied damage mixture. It's the applied damage after the the calculation occurs, not before. And then we don't need as headshot. One thing that a might've done incorrectly. Let me just comment boxes first and say enemy takes damage from explosives or something like that. One thing that I might have done incorrectly initially in the tape damage, the normal tissue damage. And make sure that yours looks like this. Make sure that true is going up to death and then going down to damage numbers. Then false is going into damage numbers and then damage numbers is leading to is valid. I might have had death going into here like that and then just skipping this. I'm not quite sure, but I might have done that if I did just make sure it looks, these four nodes look like that. In this event, enemy take damage, part of the script like that. Okay? But that's all we need to do in the enemy. So now all of that is setup. So what we need to do is now go back into our projectile, in our projectile base. And remember, we have this explode projectile function that's running in here. And so it doesn't do anything. So let's make it do something. So off of explode projectile, let's open up a sequence. Let's hit results. The drill, we're going to break it. We'd like to break things. And then what we'll do is get our weapon stats and we're going to break that. So you want to be able to get this impact radius. And we're going to do a node called out of 1000. It's going to be sphere overlap actors. So this is drawing a sphere. And it's going to overlap. Returns an array of actors that overlap the given sphere. So we're drawing a sphere and then it's returning with a bunch of actors that overlap that sphere. So how big's the sphere going to be? Well, it's going to be whatever we set to be our impact radius. What's the position of the sphere it's going to be, the impact point is going to be where our projectile hits something. Okay, so just like before we need to give it object types to overlap and then ones to ignore. So out of here, let's make an array. Array is just like an array of things, like multiple things, a list, I don't even know. An arrays like a normal word if we're going to want to check what is world dynamic and what it's pawn sets our enemy and then like other things in the world. So our enemies are enemies, world dynamic. Alright, so that's what it'll overlap. And then let's scrap the player and let's get the current weapon. All right, and then let's plug that into actors to ignore. And then I'll make its own little array. These are the actors that we don't want. We don't want our sphere to say it's overlapping with our weapon. All right, That wouldn't be good. I would create some confusion out of our OUT actors. We're going to do a for each loop or right, like in the execution. And then out of the loop body, we want to say take radius, damage. Weapons stats is going to be weapon stats in here. Hit result, you'd probably guess is going to be this hit result. Login it in, Bergen it in. And that's all we need to do. For the array element. We're going to plug them into Target though. All right, so the last thing is we want to spawn an actor from class and we want to do an explosion, but we haven't created that explosion effect, so we're going to have to create that now. So we can just keep it in projectiles. Let's create a blueprint class and actor and call this explosion impulse or something like that. It doesn't have to be super complex of a name. Alright, and then what we want to add to this is we want to add in man is it could be a radial force component. Just a radial force. Ok. And we'll call this explosion full. So this is going to be our big goal. All right. So for the radius, Let's make it like 400 in changes however you want. Impulse. So okay. So if you make the fall of constant impulse is a constant strength to make it linear, then there'll be impulse gets weaker the further from the origin. So that's what we want, that's more realistic of like a real explosion. It's most powerful at that impact at the center. And then if you hit him from the outside, it won't do as crazy of things. Object types to effect. Let's just do world dynamic and physics body. We can. Can we just get rid of these? We can get rid of these couple of ones because when I've been using them, impulse strength, we can set that to be like 3 thousand whatever you wanna do. And then in the event graph, all that we need to do is begin play. Let's grab our explosion force and say fire impulse. Okay, so whenever this blueprint is spawned into the world, they will fire off this impulse. Bada bing, bada, boom. All right, so now I'm back in our projectile base. We'd say always spawn, ignore collisions, which is pretty standard here when it comes to these things. And the class that we want is going to be explosion impulse. All right? And the spawn transform. Let's split it because we only care about its location. So you make that the impact point. And then that Is that. Okay. So that is that script. Stop projectile runs to hear that looks correct. So the only thing that we needed to do is you need to create those projectiles in our blueprints, we need to make sure that we're set to its radius damage. Okay. So let's go into our grenade launcher. One. All right, let's just use this as an example. So for our projectile mesh, I'm going to make this three times this. And I'm going to say grenade launcher ammo. And there we go. There it is. We can make it maybe four times the size, make it a little bit bigger. Whatever you wanted to. It really doesn't matter. And I'm going to add an extra component to this. And I'm going to search for a particle system and we'll call this trail effects like that. Because there's one called grenade trail. So it'll actually shoot out a little smokey type of effect, I guess you want to call it home. You'll see for our projectile movement, these are the settings that I had. I had 3500 for the initial and the maximum speeds. The gravity scale was pretty heavy and what the stuff arcs I'm going to set it to be two. And then is dealing radius damaging. Want to turn that on in this blueprint? The reason that is is because we want it to run out of explode projectile and not just like the normal take damage that the sniper rifles doing. So fingers crossed. Here we go. I got and we might not have slotted these in in our Blueprint. Let me just see. And we haven't, okay, so we haven't actually told the game what small. So for weapons stats. Actually, let's go ahead. I don't know if the stats even matter, but for the impact of fact, I think it does because we are spawning that and the projectile Bayes. So the stats probably matter in the weapon, but the impact effect matters here. So let's go ahead and do grenade launcher impact effect. And then let me just go back to my grenade launcher, a weapon. It's going to open this up. So for projectile, this is important. We want to slot in projectile grenade launcher, That's the project file we want to shoot out for its weapons stats. Let's just say the maximum value, it can be as like a 100 and, and let me check and see what I had before. Okay, So in the previous project I had the damage at a 150 Sophie hit, get hit right at the epicenter is going to do a lot of damage into the impact radius of that sphere. It's going to be 500. All right, so this won't actually play a sound when it ejects because we haven't actually built that up yet. But let's just see if that fires. There we go. It's shooting by shoot this thin. Really get to blow people up. Now the, the head impulse, that's an error that might show up sometimes don't worry about it. Just has to do with like destroying the capsule component and it's trying to interact with something. Don't worry about it. Okay. So was that the impulse or whatever kill impulse? That's something that we want to mess with a little bit. So let's make this like what, a 100 thousand, right. And send them flying. And I missed. All right. So yeah, that'll work. All right. So in the next video, we will finish off the rocket launcher and the grenade launcher and is build those up. Make sure that we're playing the animations and doing the last couple of things that we want to do it those two weapons, but yeah, that is that's everything set in stone, so yeah, I hope you guys enjoyed this video. We are nearing the end of this class. Pretty crazy. So, thank you so much for watching and I'll see you in the next one.
38. Shooting the Grenade and Rocket Launcher (Final): Hello everybody and welcome back to another video. This is probably going to be the last video of this main series. And what we're going to be doing in it is you're going to be finishing up our grenade launcher and our rocket. So creating this projectile and then adding a couple of things to the gray launcher that were missing from the last video. In-between, I just I've lined up our video or videos are enemies every 200 apart. So if you remember, select on something with your snap settings at a certain setting, hit Control End and it'll snap it to that grid, texts, renders and folders and stuff like that. Okay, so in this one that let's get started by opening up our grenade launcher weapon in our weapons folder. The thing that we wanted to do like most of the time, because we need to get event start shooting. And let's add a call to the parent function. Well, I like these, like these. And then we want to get the weapon mesh and we're going to play animation. All right? And the animation that we wanna play is fired grenade launcher like that. Alright? And then for this one, we also want to fire rates, calculates. You don't want to spam fire this one either. And the fire rate that we're going to have for here, we just see where that is. Fire rate. Set that to be 0.5. Alright, so that's all that we want to do. We can set these to be different numbers like 0.2, negative 0.25. Reload time can be 2.5, bullets spread can be 600. So I mean, some of these, I mean, this has to be projectile, this has to be grenade launcher. But some of these, the ammo, this is where things are getting to be fun. You know, where you can look at all these variables that we created and slot them in for whatever you want. You can mess around with different meshes. If you have different packs and different sound effects and you can easily slot this stuff in, change the kill impulse. The projectile should be the gradient launch a projectile impact effect should be that. Weapon stats. You can change the damage values. The weapon kick, reload times, all that stuff is now fully customizable for you. So if I enter into the game, so I'm not going spending too much time on it. And now we have our grenade launcher. I'll be a little bit too big of a radius, but like so now it gets into like testing the game where everything works and now it's just about making it look and feel and sound whoever you want it to. And so that was a big thing I wanted to do with this class was to set it up in that way where at this point all it comes down to is just changing up these variables and you get a completely different feeling game. And so your weapons can now start to look differently than mind, sound differently than mine. Have different amounts of KYC and bullets spread and recoil and just all that sort of stuff. All right. So to finish it off, Let's do the rocket launcher. And it's also get the rocket launcher projectile. And for a projectile mesh, Let's get rockets, ammo. And let's set this to be like, Oh, that's too big. Two times 2.52.5 times the size. It's a little bit bigger than the collision. We can set this to be like 1, 2, 0. That made everything but your hands up. Come onto him and children, you should know how this works. We want to make sure this is dealing radius damage, weapon stats don't matter, but the impact of fact, we want this to be a rocket launcher. Impact effect really says what I think, okay, human, you instead of you open this script just gets to be a long at this point. Projectile movement. Let's set this to be. So our sniper rifle was like twelve thousand and twelve thousand. So we can keep this to be at one hundred, ten hundred. We can make this 0.5 because I think the grenade is like too, so I want you to be 0.5, like I said, mess around with it, do whatever you want. You can have this thing, shoot a beach ball out and make a like a squeaky noise or a lion's roar. I don't care. You do whatever you want. It's just a matter of changing. So we can close out of the projectile now in the weapon. So we have our rocket launcher weapon. All we wanna do. All right, we just got one thing to do, event. Start shooting because IT pros of this. So this point, just plug in the fire types, grab the weapon mash and we want to lay in animation. I actually forgot to do one thing, but I'll do that assignment, fire a rocket. And we have that going. We have to worry about fire rate calculated at least I don't have to because I only have one round one rocket in my magazine at any given time. So whenever you shoot, just reloads automatically projectile's going to be rocket launch a projectile. I'm gonna open that backup, actually. Kill impulse. Let's set this to be 250 thousand or something. Just absolutely ridiculous. Damage will be 200 and impact radius would be 300. I'm just putting in random numbers at this point. Rocket launcher impact affect preload time b. Okay, That's fine. To have this be 750, so r. So that won't actually affect where the projectile's going, but it will affect the crosshairs. Okay, so it'll make it harder to hit fire aim because you won't cross here. Spreads can be a lot wider. Now, weapon kick, we probably want this to be like negative 0.5, probably like a lot. The closer it is to one the crazy it would be if it's like negative two. So the smaller the number, the more intensive will be essentially saved. To think of that, since it's negative numbers, It's like inverted. So negative 0.5 isn't that much, but like negative two is like fire rate doesn't matter. If I type projectile. Yeah. The only thing I wanna do is like with the grenade launcher. It's going to add a component. And I'm want to make sure do it on here of a, a particle system and we'll call this trail effects again. And then there's a rocket trail. I can launch a trail. Alright. Fingers crossed it, forget something. But yeah, we have this. Now we have this lag a little bit loading begun. See it's like arguing down. Oh, there we go. We've gotta kill. The sounds are a little unsinkable. The rocket is really loud and so you could, but if you listen closely, you can still kinda hear that kill impulse. If I shoot it right at the ground in front of them. Got only hit the one decision. Do that with all of them. But hopefully that's creating Oh, I might not have set the impact radius. This so actually did sit at weapon statuses impact radius. I just thought I'd end of this video is getting really random. And it is kind of messing around to this point. You can see that that hit to people hiring me the radius local list. It's not super big refi hitting the ground. Actually. Sooner they go? No. All right. Come down to him. Okay. Yeah. I think I think that's everything. That's all of our weapons we can pick up MO. Yeah, I think that is all that we have to do in this class for the time being. So we have She's pick up this weapon, this weapon. This weapon. I didn't change the bullet spread so you'd see the sniper rifle isn't that big. So I could probably make these a little bit bigger. You can see they're switching up a little bit. The Chicago is actually more than like all of them. Yeah, we can pick up our ammo. Pick up this. Yeah, you've got this whole project. Should be all work in now. Donkeys. This, got this. We got a little bit of that. We've got a little bit oh, I missed. We got a little bit of debt. Will be this. And a little bit for him. 360. Finish them off at the pistil. See now, now you can start having some fun. You can switch between the weapons and you can be African Pro over here. Okay. So yeah, guys, I think that is pretty much everything. So before we finish it off, I just want to go over a couple of things. So moving forward in this project, obviously there are certain things that are in first-person shooters that I did not include here at wanted to include the weapons. I want to include d, the ammo and the different impact defects. So like I said, it's very easily customizable to now make it whatever type of first-person shooter that you want. You can take this knowledge of how to draw the line traces and you can apply that to a third person shooter. It alert, it will work exactly the same way. You can add different service types. You can add AI to the enemies, a whole bunch of different things. So, yeah, so like now you can make the type of game you want, you can make it into like a Luder shooter, can make it into a zombie wave survival type of game. You can have shooting targets with a point system. You can make. A more standard military type shooter, which is kinda like what I did here. You can go ahead and create like a health system, add blood screens. We don't have a way of the player actually taking damage in this current project with that is something that can be added. You can make health pickups and different things like that. We can make the enemies drop ammo. So what we can do this would be really simple. Offer this enemy death. You could add an extra pin and you could have it spawn an actor from class. And you can have it spawn any one of these. You can pull out an array, right? And then you can have it be any one of these six possibilities you need. Maybe you can have an array of 10. So there's a chance that nothing drops from the enemy, something like that. We can put more, More UI features with the weapons in the pickups. Because right now in a real game, something would show up and you could actually interact with this. That was something that I didn't bother adding. We can give our game away to make that hand and disappear. So hopefully, you know enough about different animation blueprints with we're not holding a weapon. All you have to do is just change the animation or you can just, you can even run off an event tick and have the arm mesh if we don't have a weapon just set in Endgame and does have that invisible. So there's just like a couple like little small things that you can do. This project is not going to be super perfect. There are going to be little issues. One thing that I noticed that particular is that if you are switching weapons, so if I'm aiming and I switch weapons, it just actually just goes between them. It doesn't actually play the animation in the sound. So that's why QA teams exist. So there's certain things that aren't necessarily like bugs per se, but they're sort of immersion breaking things within the code that you can either try to alleviate. There's probably some things that I, quite honestly, I'm not even aware of, but such is life. That is kind of when making games is like there's so much time spent into different builds of games being created every single day and then having those builds updated and having a whole team of people play testing them to find some of these issues that maybe the computer won't recognize as an issue, but a human being playing the game would say, that's a little bit on natural to have it happened like that, right? We can also add more collisions settings to the game. So goddess have these working as a line traces, but these invisible boxes you can see they actually interact in, hit the default stone thing that we can't walk around them. That would be as simple as going into the project settings, going into collision and adding setting that box says a different type of object trace that our player can actually walk between, and that's something our line trace would, would ignore. Okay, so I'm trying to think of anything else. You could also make the game like the way you want it. Like I don't have with the way I have it set up. You can't reload. If you're sprinting. You can, you can change that if you want. You can modify, modify the script to your personal liking or whatever, depending on how this works and where you're watching it. If there are certain features that you want to see me specifically show you how to do if you're unaware of it. You are unable to find a tutorial on YouTube to build off this project or something on the unreal documentation, I would highly suggest that you you go ahead and try that if you want to search something that's like really, really specific. But if there are certain other features that you want to see added, just let me know and I can potentially add to this course, I'd have to think about if it's even possible you can add videos onto, like append them to the end. But yeah, if you made it all the way to the end of this class, thank you so much for watching. It means a lot to me that you will see this type of thing engaging. I hope you learned a lot the of this end project in our proud of it. And can either leave it be and be like, okay, I know how to do this and that was fun or you can start customizing it and adding your own things to it, your own features going into the marketplace and, and, and making these guys not like the mannequin man or something like that. So yeah. This project is an oyster so you can either use it as something like okay, I know how to do this and that was cool. Or you can keep ONE added onto it. And if you keep on adding onto it, I would love to see what you create from this. There'll be awesome. As always, you have any questions for me? Just just write it down in the discussion or shoot me an email or whatever. Thank you guys so much for watching this from beginning to end. It really does mean a lot to me. And I will see you in the next video slash class slash. I don't even know. All right. Good.
 Tim Lash, YouTuber & Game Design Instructor