Transcripts
1. Introduction: Hello. My name is Braden Messer. I am an artist, author,
YouTuber and today. I'm going to be the one that
teaches you how to draw. This is part three of a three part series
that I've made where I am taking you through and
I'm showing you step by step how to easily
draw portrait. I know the drawing a portrait
can be overwhelming, especially if you're new to it. So this class, just like Part one and Part
two are broken down into easily digestible
lessons where we focus on single aspects of
the portrait at a time. And then of course,
that all culminates into a beautiful
drawing at the end. So what to expect. We're going to start off by drawing the lumus head so that we can easily identify the direction of our
subjects face in space. Once the lumus head is drawn, we're then going to be placing the subject's ear
and then drawing the contour lines of
the hair so that we can make sure that our proportions are in line with what we want. Once those are placed, we're then going to be
switching to the SRO method, and I'm going to
show you how you can easily identify the planes of the eyes as we place
those on our lumus head. We're going to be
doing the exact same thing for the nose. Then the same thing
again for the lips. Once we have the
main facial features placed on the lumus head, then I'm going to show
you how we break down the O planes of the face so that we have a full blueprint of what our subjects
face looks like. We're then going
to be diving into value building via hatching. I'm going to show
you some really cool tricks in that regard. This portrait is going to have a little bit more
detail and is more challenging than the first
two parts of this series. That's intentional. If
this is your first class, then definitely make
sure you take part one and part two leading up to this. The hair is going to be
quite the challenge, but I have complete faith
that with one step at a time, we will unravel this
wonderful reference photos, detail and bring it
to full fruition. I know it's a lot.
But hopefully being broken down step by step into
those digestible lessons, it won't feel so out of reach, especially if you're newer
to the portrait space. If you find yourself liking
this class and enjoying the explanations and the
structure of the lessons, then I highly encourage you
to pick up a copy of my book. Drawing the portrait, step by step lessons for mastering classic techniques
for beginners, This book is broken down
in very much the same way. Of course, it's in book form. So I will provide a link in
the description of the class so that if you want to order a copy, you can
definitely do that. In order to get the
most out of this class, the way that I would do
it if I were you is I would sit down and I would watch the class in its entirety. Watch it. Really kind of just soak in everything that I'm doing and everything
that I'm teaching you. And then once you've done that, go through and watch
the class again, only this time, draw along with me and
create your project. That way you can get
a full immersion into the class and understand it and I believe that by
doing it this way, you will get the most out of it. Then once you have your project
and you've uploaded it, make sure you leave your
review of the class. That way, I can showcase
your project in my monthly newsletter that comes out the first half of
every single month. It's a great way
for you to not only promote yourself but your art as well amongst like minded artists here in the
Skillshare community. That's pretty much the short
and the suite of it all and I hope to see in class.
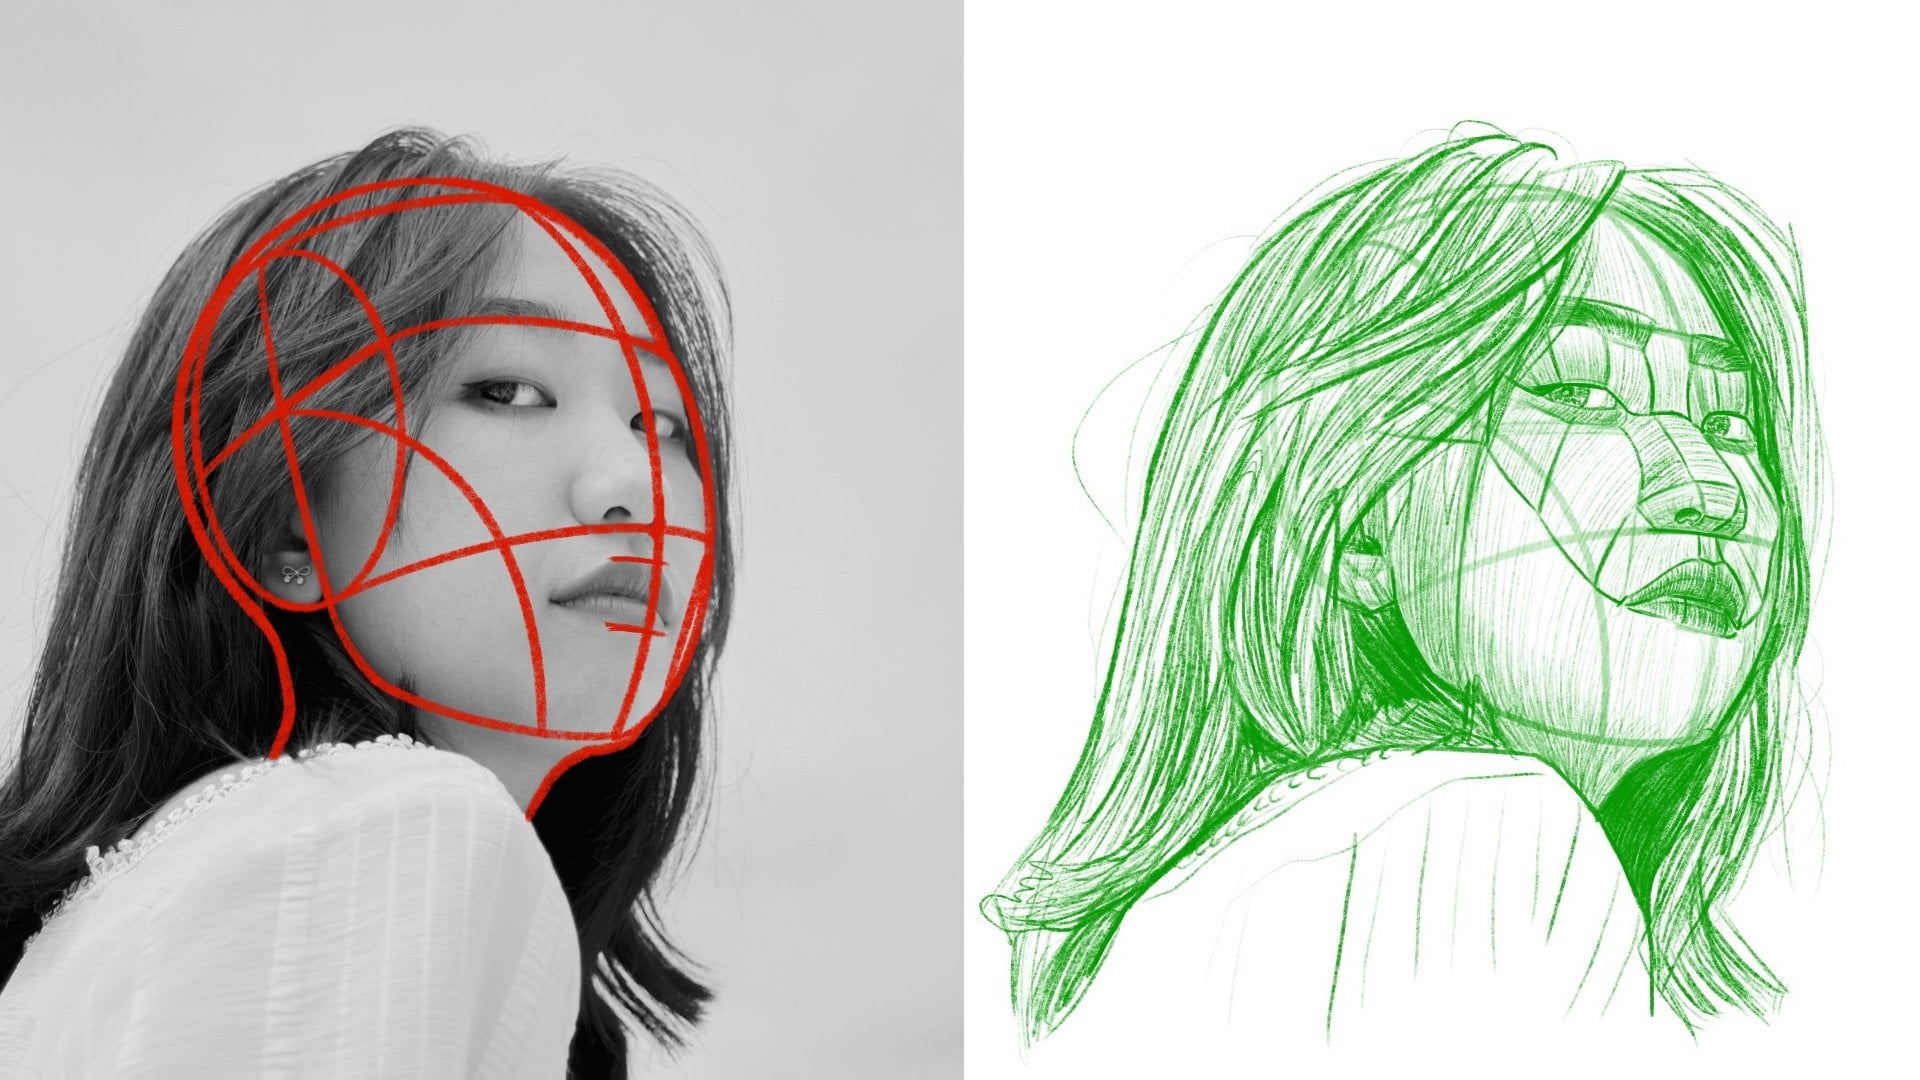
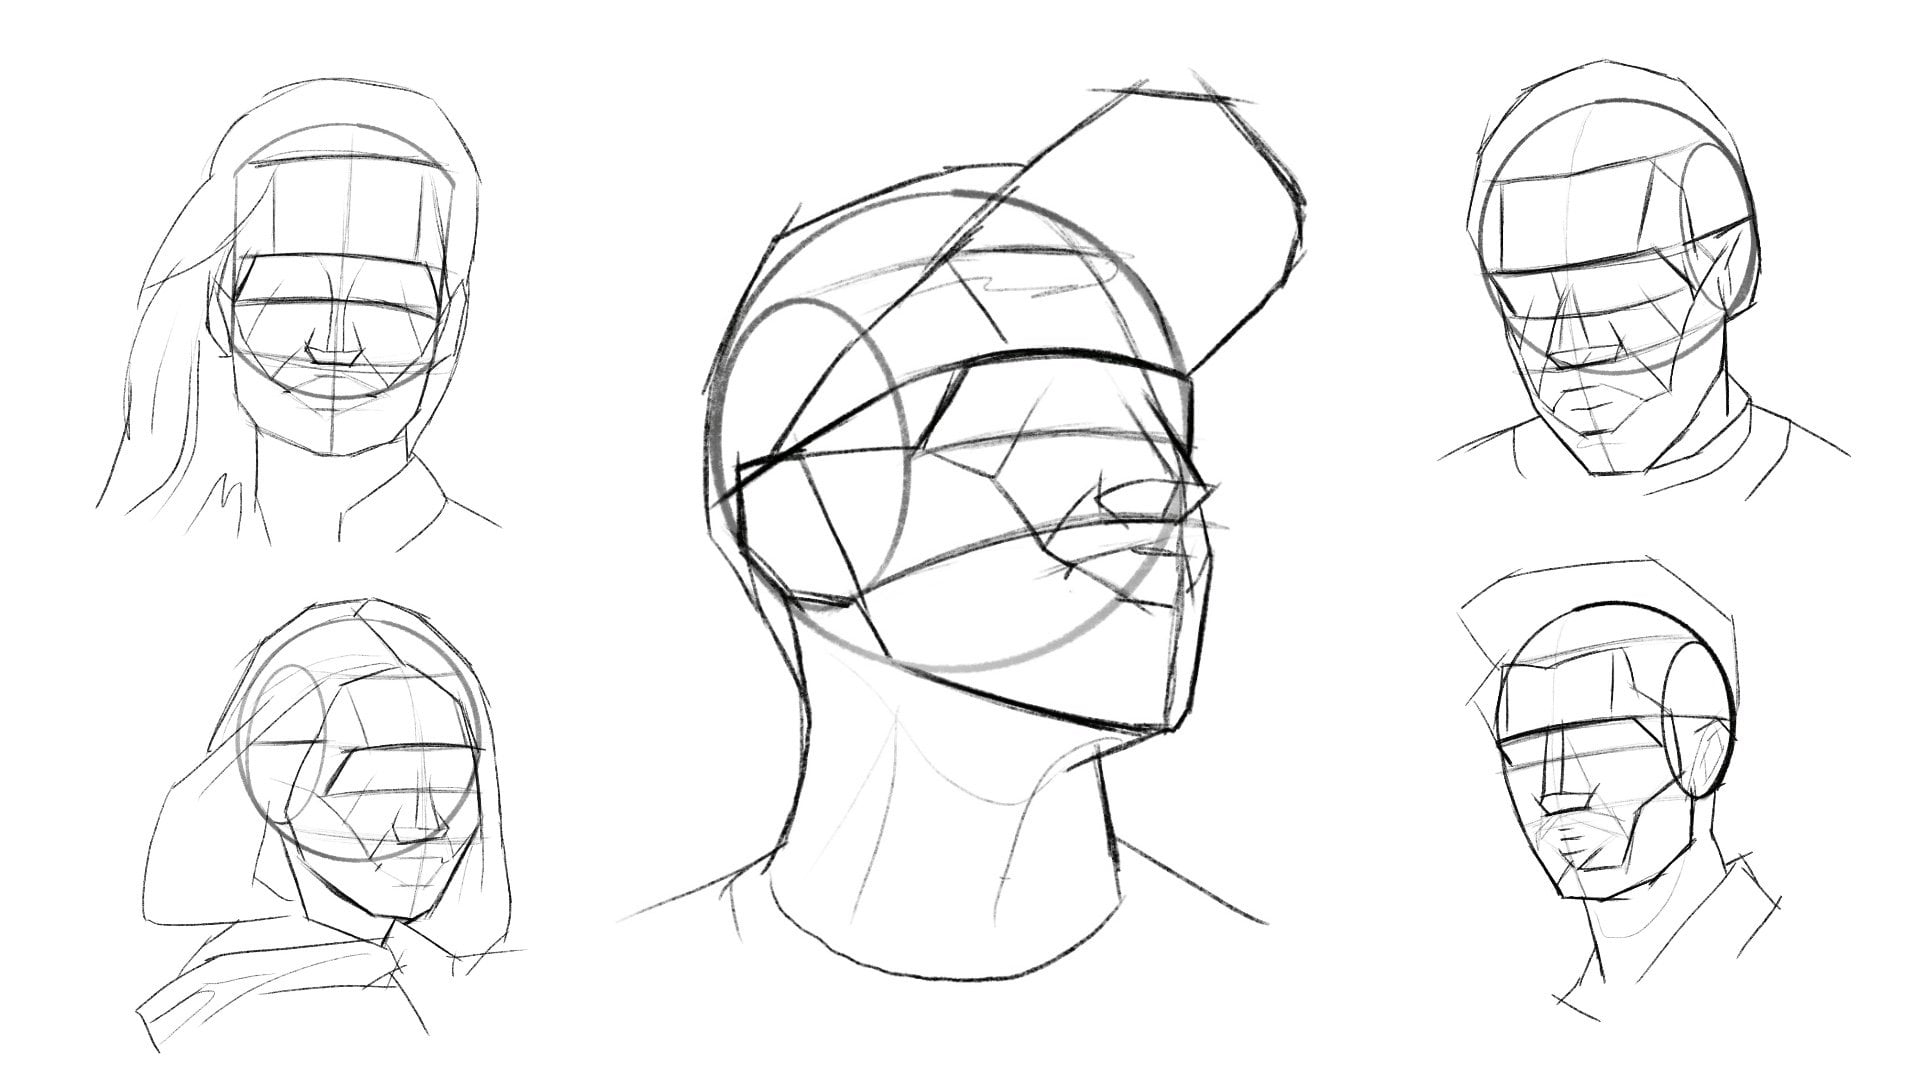
2. Drawing your Loomis Head: All right. Step number one on drawing our portrait is that
we need to draw a circle. Now, if you want a more
perfect circle like mine, you can use a compass tool. Or if you want to
draw your circle manually by all means.
You can do that as well. The circle doesn't
have to be perfect, so long as its height is
relative to its width. Then step number two, we're
going to place our side oval. Now, when you're placing this, I want you to look at the
reference and I want you to picture where the top of
that oval needs to be, needs to fall roughly in line with the
subject's hair line. Then the bottom of that
oval needs to align roughly with where the bottom of the subject's nose will be. Keep those two aspects in your
mind when you're drawing. And then we're going to
place our vertical axis and then our horizontal axis
within that side oval. Now, what this does is
this helps us visualize the direction in space
that the eyes are looking. That horizontal line
should always align with the angle of
the subject's eyes. Then we're going to
extend a line from the top of the oval
over for our hair line. We're going to extend
the horizontal axis line over for our brave line, and then we're going to
extend the bottom of the oval line over for the
bottom of our subjects nose. We've effectively split the
face into two sections, and then I'm going to show
you here how we can split the bottom of the face into the third section by
placing this right here. This is the center
line of the face. Then we're going to extend
this up on the far side. We're going to pull our vertical
axis line down and then connect that to the bottom
of the center line. We more or less have
the basic structure of the subjects head. Now, once we have this placed, what we're going to want to
do is we're going to want to take our eraser and we are going to erase this part of the initial circle because
we don't need it anymore. That's why we're erasing it. It is also a good
best practice to use a very light pressure control while you are drawing your head. Remember, The Loomis head
is the foundational step. This is how we're going
to get a sense of all of the other lines to
come in this drawing. Now, once we have this part
of the initial circle race, we're going to
extend the backside of the head down for our neck, the front side of our neck. Then I'm just going to place the top of the
shoulders so that we don't have a floating head on our paper. Then here why not? Let's go ahead and draw
in some lines to give that throat a little
bit more structure as it plugs into
the collar bones. Then here, we're referring to the reference photo and we want to place our anchor point. Now, this anchor
point is to signify the top of the upper
lip of our subject. This is more or less
a place holder, but it really gives
us a good sense of where those lips are going
to live on our limbus head. Now, once we have the top
anchor point established, we want to draw in the bottom anchor point and
the bottom anchor point, you guessed it gives us
a good sense of where the bottom of the lower
lip is going to live. Okay. Now, once we have both of these
anchor points placed, then what we're
going to do is we are going to place
our cheek play line. Now, what this does is this effectively elongates
the face for us. From a visual perspective, it just makes the
face look elongated, which is what we want. Then we just want to lightly erase our lomusd to make it look transparent so that we can start placing our features
on top of it. Let's move on to
the next lesson.
3. Placing your Ear & Hair Outlines: All right. So on this
one, I'm going to show you how to place the ear, and then I'm going to
show you how to draw in your contour lines for
the subject's hair. Okay. Now, when placing the ear, your ear will
always be placed in the bottom rear quadrant of the side oval of
your lomus head. So when I say rear, of course, I mean rear to the
front of the face. So just like this, We're going to look at the
reference photos ear, and you want to draw the
contour lines of the ear. Contour lines by definition are the outer edge of something. The outer edge of a face,
the outer edge of hair, the outer edge of the ear. Once you have the contour lines placed and you are happy with the proportions as far as from top to bottom
from side to side, you can then go inside of those contour
lines just like this, and you can start to
build these lines out. As a good best practice, make sure you use a nice light
pressure control that way. If you need to make any
adjustments, you can. I'm going to go ahead and place the earrings that our
subject has here. Then I'm just going
to go on and dress this up a little bit,
give it some character. Make the ear look a little
more dynamic. Why not? The hardest part is establishing those contour lines because the contour lines are
what dictate proportion. That's pretty good
for now for the ear. Now what we're doing is I'm referring to the
reference photo. And very lightly, I am placing the contour
lines of the hair. Now, it's very easy in this step to go ham and start going into the
detail work of the hair. I'm going to ask you to resist that temptation and just focus merely on
where the hair ends. Because detail work is great, but detail work comes later. Establish your contour lines, make sure that you're
happy with the proportions of the drawing first, and then you can spend
hours dressing it up and getting it all
fancy Shamans. But just like this, we're
pulling this over the top. Notice how her hair
because it is pulled back is very close to the scalp. It doesn't actually
go up too high, and so we're just going
to pull the hair back. Then right about here,
is where her bun begins. I'm going to stop
there because what I like to do is I like
to build the hair from each side roughly at
the same time because what this is doing is these lines right here
that I'm placing, I'm using my other lines
that I've drawn as a proportional gauge for how
far apart they need to be. How big or how little is that spread in order to be accurate
to the reference photo. I'm just going to go
lightly, just like this. Something like that. I'm just going to
bring that back down. And what I'm going to
do is I'm going to tie these two lines together. And what we have now is we have the contour
lines of the hair. All right. Now that we have
that and I'm happy with that. If you're happy with yours, then you can start to go in
and we can start to bring out the major lines that we
know that this bun has. Because she has her
hair braided and then her braided hair is wrapped
together to form the buns. Each one of those braids
is going to very much have its own dimension when
it comes time to detail. I have an entire
lesson further down in this class where we're going to focus solely on the braids. Don't stress out if you can't
detail yours right now. Trust the process,
trust the flow. And just make sure that your proportions are in line
with your expectations. Okay. Now what I'm doing is I'm going on the far side
of the face here. This is where I am
solidifying exactly where I want that far
side line to end. Notice how I'm not falling in line with
the Lumus head, right? I'm actually carving out the final lines of my subjects face from the
underlying lumus head. And this is why the Lumus head
is very much a mannequin. It's just a gauge. It's something that
you build off of, but it's not the answer to
all of your questions, right? Okay. But it's not a here all
end all, not by any means. So then you can take your
eraser and just erase that real quick and let's move
on to the next lesson. Okay.
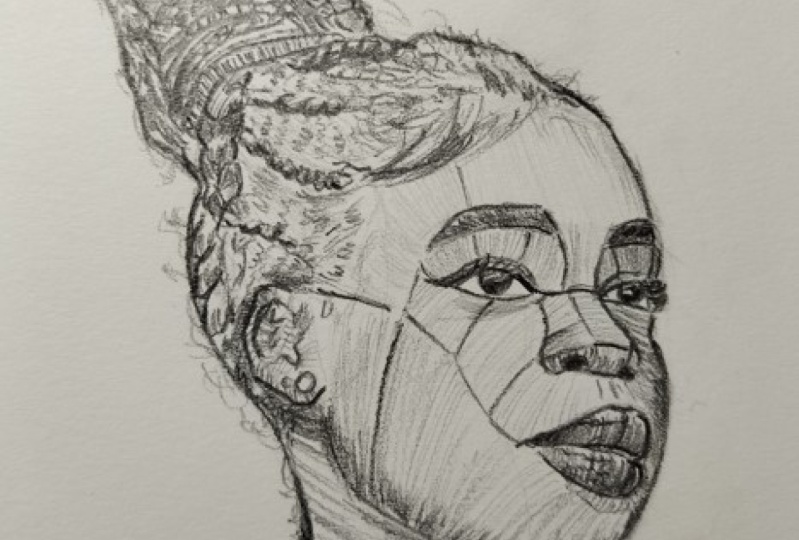
4. Draw the Eyes using the Asaro Method: All right. Notice how
in reference to we have switched from the Loomis
method to the ARO method, and this is how we're
going to place these eyes. The ARO method is where we are showcasing the
planes of the face. So right here. We want to place a
horizontal line, and that is the
bottom of the plane known as the nose bridge plane, which lives in
between both eyes. Horizontal line and then we're going to pull
these lines up. At a slight angle, we
want to make sure that we are adhering to the
curvature of the face. Then these vertical
lines plug in to the corner of the eyebrows. Now, when it comes
to the eyebrows, I want you to draw the basic two dimensional
shape of them. Again, contour lines. No detail. Let's get these contour
lines established, and then I will show you
how to detail this out and really bring the character of the individual
to the surface. All right? I like that one. So now we're going to do the exact same thing
for the other eyebrow. So we have the side right here. And then we're
just going to pull this over nice and light. Notice what the eyebrows
are falling in line with. The eyebrows are
falling in line with the brow line of the
underlying mis head, right? Both the Loomis method
and the ARO method were devised by two different
artists at two different times. But what I have done is I have taken both of these
methods and I have fused them together because overall the years that
I've been drawing, I have found that this is just
a very intuitive approach. Critics say that
it's very formulaic, but I will say if
you are a novice, then this is an
awesome route to take. Because it's very ABC 123. Then right here,
notice this line. This is the temple plane, refer to reference number two. Refer to the SRO head model, and you will see why we are placing this
plane where we are. The temple plane plugs into the second frame
line for the eyes. That eye lives
right about there, and then I'm going
to pull this over. Then this is going
to be a frame line. And then we're going to extend a frame line from
the temple plane. Then we have this
third frame line on the back end of the eye. Technically, there's
four frame lines, but if you look at it
from left to right, one, two, three, and then
the fourth frame line. Some artists won't put
that fourth one in there, but I like to just because
the more structure, the better in my opinion. Now what we're going
to do is we're going to go through
and we're going to connect all of those
frame lines together. What that brings
out is that brings out the framework for
the top of the eye. And then we have the bottom. There's no frame
line for the bottom. We're just going to
pull that line over, and this is where we can
really make sure that we nail the contour line
of the subject's eye. We're just going to connect that something just like this. Then of course, we
have the upper eyelid, where it folds into itself
because the eye is open, and so we want to make sure that we bring that
out, just like this. When you break down eyes
using the saro method, you actually start to understand how simple drawing eyes can be. At least the contour
lines of the eye. Yeah. So we have that. That's looking pretty good. I'm
happy with that. Then as far as the eyelashes, what I like to do is I like to go in just like
this and I like to give the eyelashes some
contra lanes of their own. Eventually, in a later lesson, we'll go through and I'll
show you how to bring out each individual eyelash. But for now, some basic contour lines,
we'll do the trick. And then she has
some eyeliner here. So we just want to
bring that out. Then we're going to
punch in the iris. She has a little
reflection in her eye. I'm going to punch that in. Then we're going to do the exact same thing on the far side. Frame Lne number one,
frame line number two, that is in line with
the temple plane line. You can barely see it,
it's on the edge there, and then we're going
to connect them, and then we're going
to bring this line over just like this. Yeah. And then, of course,
we have that fold for that upper eyelid. We're going to punch
that in right there. Okay. And then her eyelashes. I'm just going to outline that. Then I'm going to
give her an iris on this side as well with
a little light reflection. There's the contour
line for the eyelashes, then I'm just going to hatch a little bit underneath the eye. You make it look like it's
recessed a bit into the head. All right. Let's move
on to the next lesson.
5. Draw the Nose using the Asaro Method: For this one, I'm going to show you how to draw and
place the nose. We are going to use that
underlying lomus head and then right on
that nose line. We want to place a horizontal
line just like this. Then right about here is
the edge and we're going to pull up nice and light. Something just like
that. Bring this line over a bit because of the way her nose is and then
on the far side, we're going to bring this up. Then just like this. The nose is actually
fairly simple. There's really only about
five different planes, two of those being
the slope planes. I'll show you what those are, but we're just
going to pull this down on the far
side because again, we want to draw the
lines of the nose. That looks pretty good. And then right here, we're
going to bring this line over, and what this is is this is
the bottom plane of the nose, and make sure that you're conscious of the direction
that you're pulling. Notice I'm pulling in
a rounded fashion. I'm not pulling straight over. I'm pulling up and then down. And then you can go
back over the line. I pulled it from right to left. Now you can pull
it left to right and solidify that line
for the bottom plane. Okay. And if you have any questions about
how to structure the nose, refer to reference number two, that that is what's governing my placement
of these planes, okay? Now notice how the
SRO head model has that nose tip plane. That's what I'm placing
right here. Okay. And then it has that top plane. Now, this top plane
is what is referred to as the nose ridge plane. There's the bridge plane which exists between
the two eyes, and then there is
the ridge plane, which plugs into the bottom of the bridge plane and
then extends down. Then right about here, this is what they call the slope plane. You have the ridge plane at the top, like the
ridge of a mountain, and then you have the slope or that mountain slopes
down to the valleys. It's the exact same principle
here with the nodes. Then of course, we
have the nostrils so going to punch those in. And vo, that's pretty much it. The planes themselves with
the nose are fairly simple. So let's move on to
the next lesson. Okay.
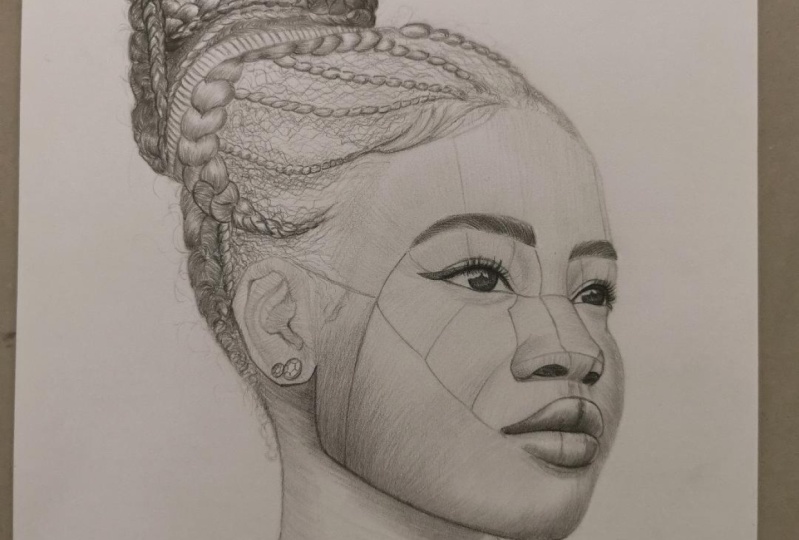
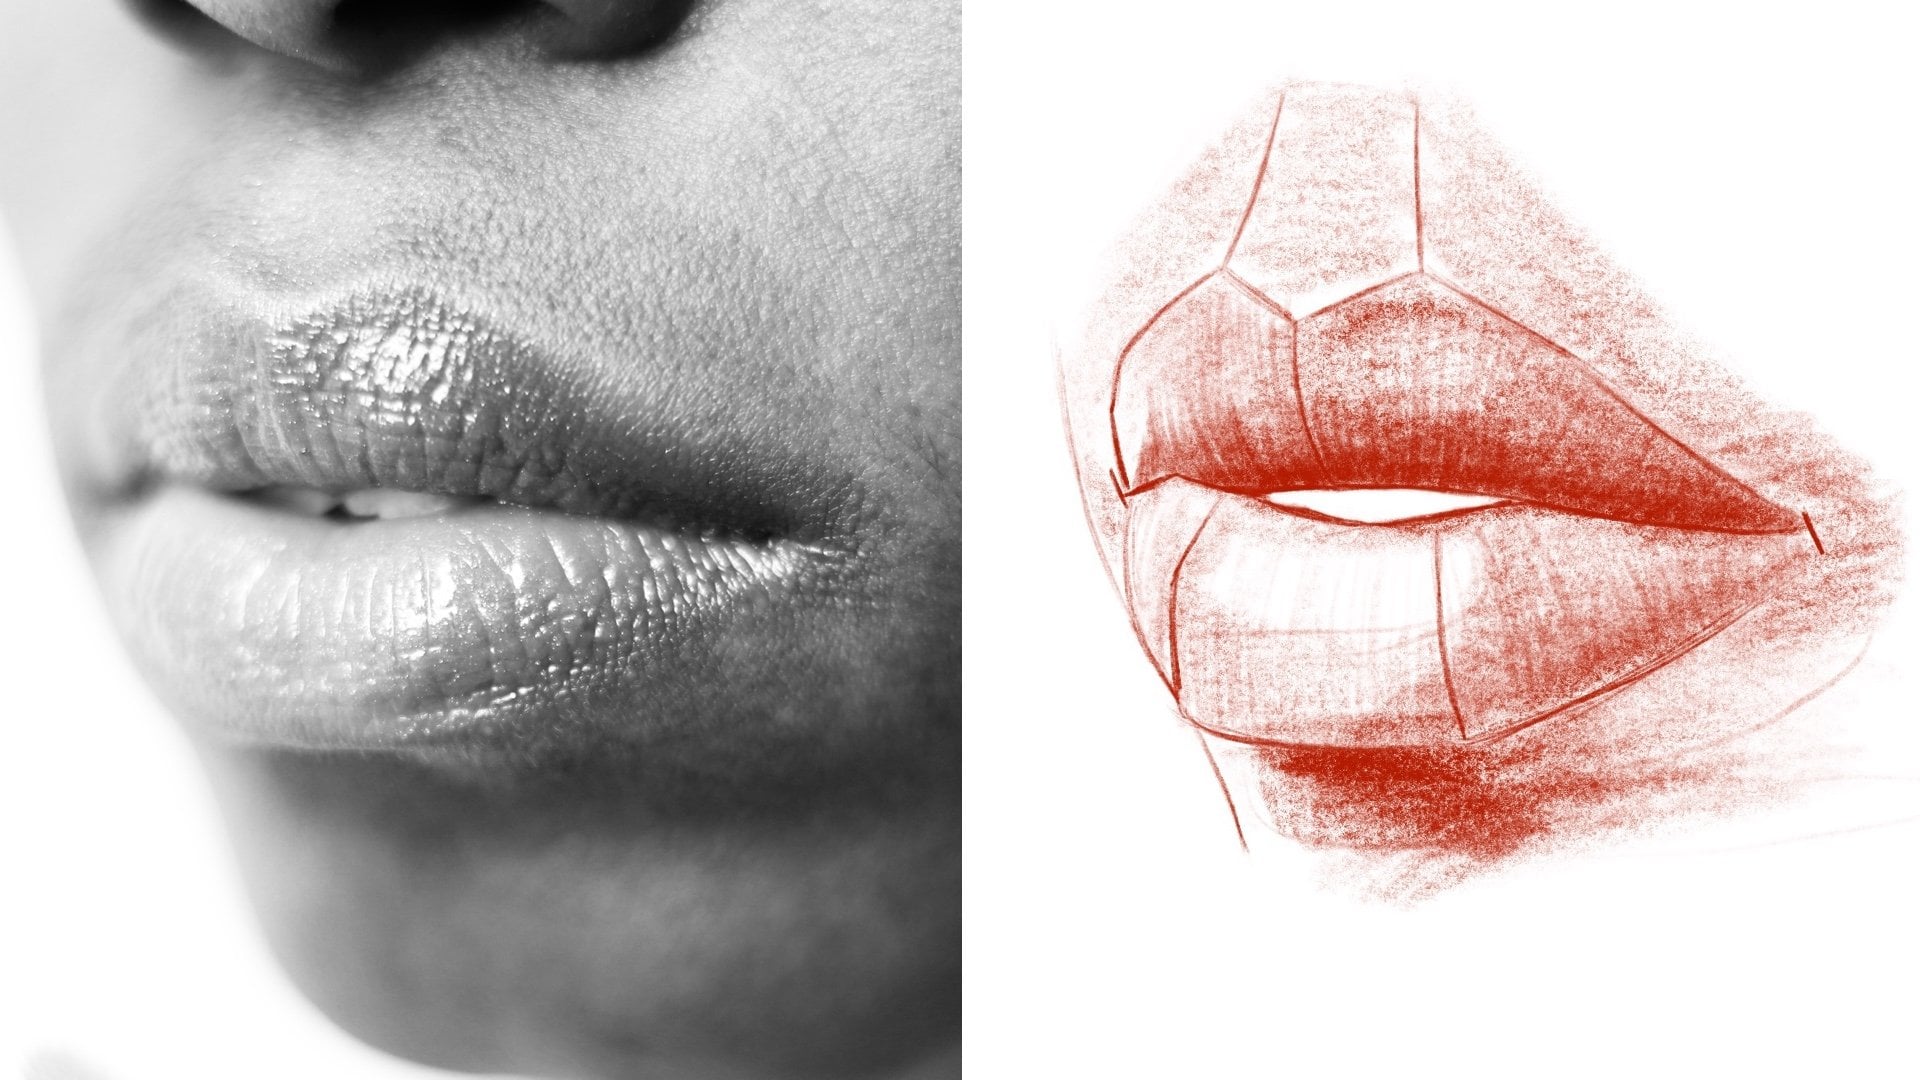
6. Draw the Mouth & Face Planes using the Asaro Method: All right. On this
one, I'm going to show you how to draw
the lips and then how to place your sorrow
planes for the face. Give that face some structure. The first line that we want
to place is right here. This is the filtrum. We have a line on the right. Then we have this line
right here on the left, and this brings out
that filtrum plane. Now, the filtrum extends from the bottom plane of the subject's
nose and it plugs right into a section of the upper lip that is
known as the cupid's bow. All right. And the
reason why they call it the Cupid's bone is because
it forms the top of a heart. Of course, people express
their love with a kiss, and so it only makes
sense that you would be shot by Cupid's
bone, fall in love. That's where that comes from. Then right here, we're going
to extend this line down. We're looking at the reference
photo and roughly in line with the tear duct of
the subject's right eye. Right about here is the corner
of the subject's mouth. Then we're going to
pull down from here. And then right about there is the corner of the other side
of the mouth, and of course, those fall roughly
in the middle of our top anchor point and our bottom anchor point that we established in lesson
one with our lumushad. Now what we're going
to do is very lightly. When it comes to lips, always
start off light because you can always go back through and bring out those thicker
line qualities. But it's nice and
light go up and follow the contour of the lips, we're going to plug that
line into the cupid's bow. Then her top lip has a roundness to it as we bring
it back to the far corner. We're going to bring that down. I would recommend using the overhand grip for this when it comes to how you
hold your pencil bit. If you don't like
the overhand grip, then by no means. Do
you need to use it? Do what's most comfortable. But now that we have
that top lip drawn, we're going to extend this
line from corner to corner. I notice how the line isn't
just a straight line, right? I kind of pulled it,
and then I lowered it, and then I hooked it into
the top of the lower lip. And now I'm bringing
that lower lip around just like this. But I would caution you when you're pulling
this line right here, don't pull it all the
way to the corner. Just as you pull it, lift up as you conclude your line with each
strike of the paper, and what that'll do is that
will thin the quality of that line and it'll just make that line look a
lot more dynamic, okay? Then we have a drop shadow underneath the lower
lip right here. Then there's a pretty
significant break in the shadow on the upper lip. I'm just going to
draw this line right here to bring that out. What that does that
makes that upper lip look a little bit more dynamic by having
that line in there. Now, that's pretty much it for those lines as far as the
contour lines are concerned. I refer to reference number two, the so head model. Right here, these
are the so planes. We're going to
extend this line off the corner of the mouth. Then we're going to bring it up. Notice how the line
is not straight. I am visualizing the contour of the face as I am
placing these so lines. I'm looking at reference
number two, yes, but I'm also looking at the original reference
reference number one, and I'm making sure that as I'm drawing those
lines that I am athering to the underlying form of my subjects face
because I want to sell it, like, you know, when it
comes to the drawing, the subtleness of
your lines, right? The way that they traverse the paper is of
utmost importance, and it's something
that can be very much overlooked if you don't
pay attention to it. But your viewer will
notice it, right? Because your viewer is looking at reference
number one and then looking at the drawing and making those
connections for themselves. And if these lines aren't contour to the face
appropriately, you risk it not looking
quite like the individual. But then just follow
these lines up, right? And then this last plane
extends all the way back to the top of our subjects
ear. All right? Something just like
that, effectively, what we've done is we have given that openness of the
face more structure. When you watch a
house being built, you have the framework of the walls that you see extended
off the foundation first. Our omishad is our foundation. The AsO planes are our wall framework for our
house, and then of course, the detail work is the siding and the
painting and the windows and the fancy doors and
all that kind of stuff. Then of course, we have
this AsO plane that extends down off that last
intersection. Okay. Now, when it comes to
the saro Head model, if you have one yourself,
you already know this, but for those that don't,
I'm just going to elaborate. The Asarro Head model, is formulated for any individual that you could
possibly encounter. The side that I'm showing
you in this class is the more simplistic softer
version of the ASO head model. If I was to grab that head model and turn it to the other side, you would notice
many more planes, and that's four different
facial features of subjects that the ASO
head model can apply to. But for sake of simplicity, I chose a reference that has
softer features so that you could learn the simple side
of the SRO head model first. I'll come out with classes in the future that have
the other side. But for now, let's
just keep it simple. I just wanted you to know that because the more
you know, right? And then here, I'm
just going in and I'm thinking up these lines
on that jaw line, right? I'm really bringing that out. So. All right. So let's move on to
the next lesson.
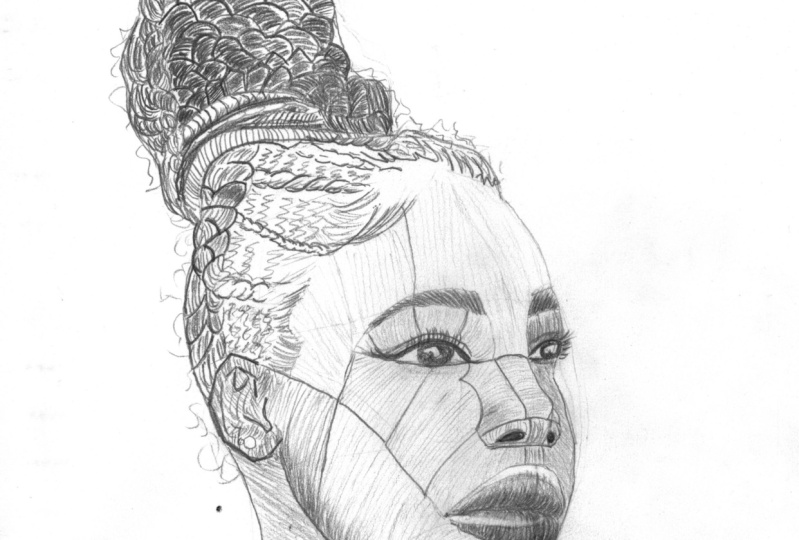
7. Initial Hatching & Value Building : Okay. So that is pretty much the framework that
we're working with. Now, when it comes to the face, I'm going to show
you how to hatch it and how to bring out more
of that underlying flow. Just like this, just
take your pencil very lightly and start
hatching the paper. Now, of course, hatching is
where we pull our lines in the same direction as the lines that have
come previously. What this does is this lowers
the value and it starts to give us some actual facial flow because we have the framework, but now it's like, how exactly do those
frames flow together, and that is what
hatching does for us. Just like this, nice and light. One of the cool things about drawing this way is
if you're a beginner, the ASRoplanes
really allow you to hatch your face in
sections, plane by plane. And then right here. What I'm going to do
is I'm going through, and I'm going to add
some detail work to these eyebrows
because why not? We're here. But I'm just pulling notice the direction
of the strikes, right? I'm referring to reference
number one and I'm looking at the way
those eyebrows flow, and I want to capture
that in my drawing. I'm just doing one
hatch at a time. If I'm going a little too fast, go ahead and pause the class, catch up to where
you're comfortable and then simply press play. That's the cool thing
about Skillshare is that all of these classes are
made with you in mind. This is all for you.
And then right here, notice how I'm going
to lower the value. I'm just going to go back over the hatch marks
that I just placed. This is simply
called hatching or sometimes people will
call it double hatching, but it's not cross hatching. Cross hatching is where
you cross the axis. If you pull a line vertical, you cross it horizontally
and vice versa. Double hatching or
simply hatching is where you hatch
on the same axis, effectively, you're
just layering it. Then if you want, you can go
ahead and a cool trick with hatching is you don't
necessarily have to press harder to
get a lower value. You just have to make sure that your lines are pinched
closer together. The farther your hatch
lines are spread out. The higher the value,
the more they're compressed or on top of each
other, the lower the value. Notice how underneath
the eyebrow, that value is inherently lower. Well, the reason why is because I'm hatching closer together. I'm actually hatching on top of hatch marks in some instances. And then notice how
I just filled in that contour line
for the eyelashes. Boom, we have our eyelashes. Yeah. Something just like that. But it's important when
you're drawing like this to make sure that you
are constantly referring to
reference number one. The reason why is
because reference number one has those
differences in value, so you can use that to your
advantage when drawing. Now, hatching is just like value building in
charcoal or in graphite. Start with a high value, a nice light pressure control, and then you can always go
back in and hatch on top of hatching or you can cross hatch if you prefer
that aesthetic. I like to hatch in these classes because
it is more simple. There are lots of
techniques that are far more involved that I'm not going to teach
you in this class. I don't want to start you
with something complex. I don't want to start you
with something simple. I don't want to
overwhelm you. Trust me, that's very easy to
get overwhelmed in the art world,
especially with drawing. We start busting out
all those fancy tricks. But just like this.
Notice the direction. I want to capture the
flow of my subjects face, and that's what I'm doing. Nice light poles. I'm going one Asarro
plane at a time. Now, you don't have to
go one plane at a time, like if you're a little bit more developed and you
have the confidence to hatch the whole thing and disregard the
planes, go ahead. But if you don't, or if you
just like to move a little slower by all means.
Draw just like this. M. But then every plane,
especially when it comes to the nose is going
to be a little different. Notice how the
direction that I'm pulling on this bottom plane is different from the direction that I pulled on
the slope plane, but yet the slope
plane direction plugged in nicely
to the cheek plane. It's this type of
subtleness that you will develop you practice
this technique. But then the ridge plane, just like this, we're just
pulling it straight across. I'm slightly changing the angle of those hatch marks so that I'm able to sell my viewer on the fact that that
nose is in fact round. And this ties in to
making your drawing, dimensional because From
a technical perspective, your drawing lives
in two D space. Now, it is true that
an actual piece of paper is three dimensional. But we have to remember
that the drawing only exists on one
side of that paper. So by definition, the drawing itself is only ever going
to be two dimensional. And what separates a really
good artist from, say, an amateur artist is that a really good artist
has learned the skills necessary to sell their
viewer on the fact that It looks three dimensional. They could reach out and
they could touch it, that it has volume
and all of that. But hopefully, as you're progressing through
these classes, you're developing those skills. I've seen some amazing
projects so far, right. Let's move on to the next lesson and we'll continue to hatch
out the rest of this face.
8. Continued Hatching & Value Building: All right. So in this
lesson, we're going to continue to hatch out
the rest of the face. And then I'm going to show you how you can double hatch and you can lower those values
in certain areas. Right here, beneath
that drop shadow. I'm just going to start
pulling these lines up and notice how I am starting from the bottom of the jaw line that we have
established and I'm pulling up. Now the reason why
I'm doing that is because when you
strike the paper, a lot of times, especially
when you're hatching, it'll leave these little dots, these little divots
in the paper in the middle of an area that
by rights should be smooth. This is just a good way, especially if you're still
very much developing your pressure control skills to ensure that that
doesn't happen. Okay. But the underlying form of the subject is still
very crucial here. When it comes to jaws
and you can refer to reference one to see this, jaws are very rounded
in most cases. Unless you're dealing with
a subject that has a beard, you really need to make sure that you
understand that fact. And that you adhere to it. Now, the cool thing about
hatching like this, and I'm going to show you
when I start double hatching this jaw line is
that smoothness will be brought out because when you actually look at
reference number one, the light source is
coming from the top, and so we do have
a much lower value immediately under the
subjects jaw line. I'll show you how to build
that up with our hatch marks. Okay. But then right here, we're just going to continue
to extend these lines. Now, you can either pull
up or you can pull down. But if you pull down, I would recommend
that you pull down from the saro frame
lines that we drew. That way, kind of like how I was mentioning with the jaw line. You know, you won't have those weird little divots
on the paper. Okay. Okay. Just pull them down
just like this. And remember, the farther away the lines are as
you strike the paper, the higher that value will be. By knowing that, you can very easily go through and
you can accentuate the value scale simply
with your hatch marks by how you spread them
out with each strike. Okay. Okay. Now what I'm going to do is I'm
going to place the SRO frame lines on the lips. Now, when it comes to
reference number two, you can see that top lip
is split into two planes, and then that bottom lip is
split into three planes. So with the jaw, now I'm starting from the
center of the lips and I'm pulling up something
just like this. That is forever in the back
of my mind when I'm ching. You don't ever want
to forget about it. And the cool thing is because hatching is such a
repetitive task. You know, keeping the contour
in the back of your mind, we'll solidify very quickly. Just because we do it so much in our drawings when
you draw this way. Something just like that. And then right here,
I'm going to bring out the reflection
in the lips to kind of like how I brought
out the reflection in the irses of the subject. I'm doing the exact same
thing with the lips. The thing that I like
about doing it this way is once I have those
reflections outlined, then I can go in and I can start to double hatch and I can
lower the value and I know exactly where that value break is because
when you look at it, those reflections for the upper and the lower lip are pretty
much completely white, they are a very,
very high value. And so we want to make
sure that we don't accidentally lower those values anymore than they already are with our initial contouring. Right here, this is
double hatching. See this right along the bottom of the
lip because that is where the least amount of light is cast across
the subject's face. That's not true in every single portrait drawing
that you will draw, but it is definitely
the majority. Yeah, those lips
are looking pretty good. I'm liking that. Remember, too, the more you
double hatch and really focus on those lower values and those shadows across
your portrait, the more your portrait is going
to jump off of the paper, the more dynamic
it's going to be. The one thing I will
say about making sure that you accentuate
the value scale is for critics when they look at drawings that have that
accentuation of value. What it says to them is it says that that
person that drew it. That artist is
extremely confident. They know exactly where to
place those low values. They know exactly where
those high values live. Then, of course, all the
total variations in between. It just screams confidence. Make sure that you
practice that. Then just how we double
hatched on the subjects lips, we're doing the exact same thing right along that jaw line. This will take some practice, especially if you're
new to hatching or maybe you've always
been curious about it. It is a wonderful trick. It's a technique
that really came to prominence during the high
Renaissance in Europe. But I'm sure hatching was
a thing even before that, but that's really when
you started to see it in mainstream art. Lots of masters, such as D vinci and Miknglo
even Raphael, they have lots of hatching in their journals and in their sketchbooks
that they kept. Divinci specifically was very, very famous for a lot
of his simple sketches. A lot of his sketches go for hundreds of
thousands of dollars. All they probably
were was just quick little sketch that
he did to start to comprehend whatever it was that he was drawing at the time. So hatching is good
because hatching forces your eye to look at the form of what
it is that you're drawing. And there are entire books on all sorts of different hatching
methods that you can use. Like I mentioned earlier, I'm keeping it very simple just because it's a whole world. It Hatching is its own thing. So Okay. All in good time. You'll learn it all
if you want to. Bam, we're just double
hatching along here. And notice notice
along that jaw line, how we have that double
hatch right along the line, and it's a very low value. And then we have a lighter
value right at the chin, and then it gets even lighter as we go to that drop shadow, that variation, that
total variation, that's what you can
bring out if you hatch your drawing the
correct way, right? I'm just going back through
on the far side underneath the eye to the right side of the nose and to the
right side of the lips. I'm just going
through and lowering those values because when you look at reference
number one, the far side of our subjects face is very
much of a lower value because of the way the light is casting across their face. So Okay, that's
looking pretty good. Now in the next lesson, we're going to go through
and we're going to continue to hatch
and we're going to continue to bring out the
character in our subject. Okay.
9. Hatching the Throat, Shoulders, & Hair: All right. On this one,
we're going to hatch out the throat and the
top of the shoulders. We're going to bust out that ear and get that all hatched, and then we're going
to start on the hair. We're not trying to
reinvent the wheel here. We are looking at
reference number one, and we are making
sure that we are adhering to that
underlying form. I would say play around
with your hatch marks too when it comes to the throat. So right here. Notice how you can change the
angle of your hatch marks, and you can do longer
pools if you want to Because the cool thing about changing the
angle of a hatch mark, especially when you're
dealing with a throat like this is that that
really showcases. There's definitely
a break between then of the subject and then
the far side of the neck. And so this is a way where you can bring that out and you can show how dynamic you can make that neck with
the way that you hatch it. Just like with most
things in life, there's a right way
and a wrong way. And then we're just going
to hatch this all the way up to the ear here. And All right. That's
looking pretty good. And then when it comes
to the shoulders, I'm not going to get too
crazy with the details. I'm just going to probably
do a nice single pass hatch all the way across the tops of the shoulders,
and that's it. Because we really
want the face and the hair to be the focal
points of the drawing. And you can literally steer where a viewer
will look based off of the amount of detail that you put in a specific area of the drawing or
don't put, right? I'm just going
through on her cheek, and I'm just putting in a
couple more hatch marks. That's another thing
with this method that I'm sure you've
probably noticed, especially if you've
taken some of my other classes or taken the first two parts of
the series is that you can go in and continue to dress up the drawing,
if you want. You can continue to lower
values more and more. But now what we're
doing is I'm just going through and I'm going to
start hatching out this ear. Notice how I'm doing it. I'm
just pulling this up over. I'm not doing a hatch
mark all the way through. I'm referring to the
reference photo. I'm really trying
to hatch and follow the flow of the ear and the ears are really good practice too. There's lots of
little changes in flow to capture the character of the ear that you're drawing. Okay. Now, you can pull a bit deeper on
the inside of the ear, but the outside of the
ear is fairly crucial as far as making sure that you don't pull it
all the way across. You just want to
pull it to where it curls over. That's it. So just like that. Then we're just going to fill in
this part of the ear. I don't want to lower
the value too much. Except in some of
these areas here. There we go. Okay. And then here what I'm going
to do is I want to start bringing out kind of the
boundaries of the there, right? The hair texture and this one is definitely going
to be a challenge, which is one of the
reasons why I chose it and made it part three. I figured with
this short series, you could draw part
one, draw part two, and then you would
be prepping ate a rock and roll for part three, which is definitely harder
than the first two. But then just like this,
what we want to do now? We have the contour of the hair. Now we want to use
those contour lines as a gauge for where we're
going to place these braids. Now, she has a main braid on this side right
here that goes up And so we want to start
drawing out that braid. Something just like this. The crucial part of drawing her braids accurately
is that you really need to take them one at a
time. One section at a time. Just focus on that section, get your contour lines,
and then just like this, go in and hatch it, make
sure that you're following the direction of the
braid in reference one. Then once you've hatch that one, move up, do the next one. Okay. Something just like this. Contour lines first and then
go back in and hatch it. Just like this. And by going slow, what you do is you immerse yourself in each
section of the hair, which is great because her hair is very
fabulous in this photo. And so when your viewer
looks at your drawing, their eye is immediately
going to go from the face to the hair, right? And that bun needs to be on point so that your viewer
can appreciate it. Then, obviously, that
showcases your skill. It shows, hey, check it out. This is what I do. I'm also going to
show you how you can go in and you can start to mess with the different line weight, it's on certain parts of the braids and the bun
and really make it pop, make it more dynamic. Okay. So we have these. And then notice where
that braid begins, I'm just kind punching
in nice and light. But the main focus of
the hatching and of the thicker line qualities
is in the braid as it thickens up and as it
moves toward the bun. Okay. And then we have
another one back here. Like I said, take your time. I chose this reference
for a reason and the reason was right
here for the hair. I wanted to give you
guys a challenge. And again, if I'm
going too fast, simply pause, catch up on your braids, and
then press play. No worries. I know how
challenging this can be. This was actually pretty
challenging for myself as well. But I like to challenge
myself. And you should, too. You should always be slightly uncomfortable in whatever it is that you're drawing
because that's how you know that
you're growing. That's how the human brain
works through neuroplasticity. It only creates new
networks if you learn something new and
you continue to use it. It reinforces those
neuropathways. That's one of the
reasons why when you see people that draw, lots of teachers
and instructors of all kinds say practice,
practice, practice. Because from a
biological perspective, you're forcing your
brain to build out those new neural
pathways through neuroplasticity and
then you're reinforcing those new neural
pathways so that they become solidified in your mind. It's challenging to do. But I have faith in you. I
know you can do it. All right, we're just going to continue
to build this out. And you can see how there
are different braids and how they all kind of come to a
head and they extend off. Something just like this. But try to draw like I am. There's a reason why I'm
drawing it this way, and it's because I want to focus on everything
that is going to have a more mid to thicker
line quality about it, then the hair
that's not braided. We're just going to use some
squiggly lines for the hair that's not braided because
I want the detail work. I want the viewer's eye to
go right to the braids, and that is where we're
going to really sock in our detail work so they
can appreciate it. Then we have these up here. Let's go nice and light with it. Nice light pressure
control throughout each braid and each
section of the hair. All right. Let's move
on to the next lesson. Okay.
10. Continued Hatching of the Hair: This is where we're going to continue to detail out the hair, and we're really going to sock in all the detail in that bun. We're just going to extend
this line just like this. Because what I want
to do is I want to bring out the
contour lines of each braid and then
go through and detail out those braids once I have
the contour lines in place. We're taking this
one braid at a time. We're taking it one
line at a time, because as you're drawing, simply focus on what's right in front of you.
Don't get overwhelmed. We have this one that
comes over the top. I don't know if this
is a braid so much as this might be the
hair tie itself. Okay. It is very much part
of the hair. Notice this. What I'm doing is I'm
going under the bottom of this braid and I'm thickening up the line quality
a little bit. This is a trick that you can actually use throughout
the hair and you can use it depending on what your aesthetic
is, what you like. But a good best practice for drawing braids like
this is obviously when you go in and you hatch and you bring out
the flow of the hair for the majority of the braid. But then you can go back
through and only hit one side. Typically, it's the bottom because of the way light
works across hair. But you can go
through and you can thicken up the quality on
the bottom of the braid and what'll happen is that'll make that braid look more dynamic and it'll make it look like there's more light on the top than
there is on the bottom, which, of course, in
this reference is true. It's a little trick
that you can use. Okay. All right. And then we
have this one here. So we're just going to kind of go back and notice
the flow, right? Notice the flow there. We're taking it one
wave at a time. Something just
like this. Cos up? Yeah. There we go. Because I'm bringing
out the flow that then I'm going
back through, and I'm dropping a
couple of hatch marks, still paying attention to
the way that it flows on the inside of the
braids contour, Okay. Then on the backside, we can kind of place some lines here. Okay. All right. I like that. Now, I'm going to pull this line over and connect it right there, more or less kind
of an intersection, so I'm going to pull it down. And then we got something. It was kind of like that. Right. Now this is where I'm
bringing out the conto lines. Just watch how I do it. I'm doing the same thing
over and over again. That one, looking pretty good. Now, I like that. So I'm going back through,
and I'm hatching them. And this does a
couple of things. I obviously lowers the value, but then it also brings out the dimension
of the hair, right? Because before the hatch marks,
it was just empty space. It didn't look like it had
volume, or now it does. All right, we got that. And now, what we're
going to do is we're just going to
extend this. Okay. Just like that. And then we have a smaller one. So what we're doing is
it's the exact same. It's just a lot smaller. There's different
sizes of the braids. And so we want to make sure
that we adhere to that. One line at a time, pulling up. And if it looks a little weird, don't worry about
that because as we fill in this entire bun, especially with
the bigger braids, these smaller braids
in this section of the base of the bun
will flow together. You'll see how it
all comes together. But then I'm just going through, and I'm thinking up the bottom. Because of the light source.
Notice how that braid is looking more and more like the reference photo,
which is what we want. Okay. Then just like that
first big braid, we're going to do the
exact same thing. The rest of this bun is fairly repetitive
because the braids are pretty much the same size
and the same length. The light that's
being cast across them makes all of them
look very similar. So simple rinse and repeat. Was they say where I come from, same song, same dance. Okay. Let's see now that we have that line
done coming down over the top. We're just plugging in. This is the most tedious part. This is where if you
have ADHD like me, it makes it a lot easier. Because you can just zone out and just sit there and
be like, All right, cool. Got that one. Got that one. Got that one. 20 minutes go by. Got that one. Got that one. There's nothing
else in the world. There's just what's
right in front of you. No place to be. But right here. If you want to, you can go ahead and you
can actually draw out your contour lines for each braid all the way up like this. If you're confident
in the proportions of the braid that
you're drawing, then you don't have to draw all of them if you
don't want to. If you're actually like that, I know that that's going
to look good, then yeah, by all means, Hatch, bring out that volume, tick
up the lines, if you will. A lot of it's
personal preference. I mean, I can teach
you the techniques, but that's one of the beautiful things that I love about art is that you
can take principle, and you can literally
make it your own. You can turn that into
whatever you will. But see now that we
have those braids. I'm going through, and
I'm going to hatch them. I'm going to bring out volume. I'm going to lower the value, and I'm going to detail them all with the use of just
some simple hatch marks. But this is where it's very, very important that you adhere to the flow of the braid
in the reference photo. You don't just go in
there and start just hatching one way because
you feel like it. Look at the reference
photo, make sure you honor the reference
photo, right? Because think of it like this. If this was a commission
piece and someone was paying you to draw this out and making sure that it looks like
the person in question, then you would want
to make sure that you captured that character, because that's what
they're paying for. They want that drawing
to look either like them or a loved one or, you
know, whoever it is. Clearly, it's someone
special to them. So you want to make sure
that you do your part. And you give them a really
nice drawing. Okay. We got lots of people
ask me, you know, why do you draw in blue
and green and red and, you know, all those
other colors. And I'll tell you. When I was in college, I always found psychology
very fascinating. And especially psychologies
that ties into art. One of the pieces of psychology that I learned about was
what they call color theory. And color theory as it
pertains to marketing. So according to theory, the color red when you see it
somewhere anywhere, really? It subconsciously
makes you salivate. It makes you hungry.
You don't even realize it on a subconscious
level as humans, we are attracted to that color, whether we know it or not. Even if we don't really
like it for maybe say our drapes in our
formal living room, we still subconsciously
are attracted to it. There's lots of theories as to why we're attracted
to the color red. One theory is that when
we were ancient mids, traversing the world that
red signified ripe fruit. And so we would see
something that was bright red and we'd reach out and we would eat it
because it would mean, you know, calories, which
back then was life. That was everything. Or say, for example, the
colors blue and green. The color blue in this
sketch is very soothing. As with green, they're
both very calming. Isn't it ironic that blue and green when you go out into the wilderness in
the wilds of the world, that those are the two most
common colors that you see, I mean, the sky is blue, the forests and the
plains are green. Okay. And that's where
we all come from. And I always thought that
that was very interesting. So as far as those three colors, that's one of the reasons why I use them in my
drawings and in my art. Anyway, Okay. Yes. So we
are focusing on this. We're getting right
up to the top now. This is actually
looking pretty good. But I'm really excited to
see your guys' projects when it comes to the
hair of this subject. I really want you to spend
a lot of time on it. If you have to go back through the lesson and watch it three or four or five times to
really don't even draw, sit there, relax, and
watch how I do it. You don't have to
draw along with me. Just watch it one or two times. Then when you're ready and you're like, Okay,
cool, I got this. This is what I want
to do, then go through watch it and draw it. Right? There's nothing
wrong with that. Remember, these
classes are for you. You can utilize them
however you will. That's what I would
do, especially when it comes to
this one because it is meant to be
more of a challenge. But I think that if you
used the class that way, that it would
definitely help you. Remember, we were talking
about neuroplasticity. We were talking about
building muscle memory. That is a perfect way to do it. Repetition pattern, seeing
something again and again, reinforcing that
understanding is paramount, especially when it comes to art and the visual
arts specifically. But then I'm just
going through now that we have most
of the braids done. And I'm just like I said,
little squiggly lines, right because I
don't want to put too much detail
outside of the braids. I really want those braids
to shine through. All right. Okay. Let's move on to the last lesson and we're going to
detail out everything. We're going to lower
some values in some places, and we're
going to finish it.
11. Final Detail Work: All right. The final lesson. As with any drawing, we have the majority
of our drawing done. But now we're going to go in here on the back
side of the head, and we're just going to
bring out those flyaways. Now, when it comes
to placing these, just go ahead and go in with your pencil and just very
lightly put in a squiggly, let your hand do
what it wants to do. The cool thing about
this is this is really going to bring out the
character of the hair. Then we're going to just sock
in the iris of the hair. Then I'm going to thicken up the line quality on the top,
where the eyelashes are. Remember how we drew the
outer contour line now. We can just use that
as a gauge and we can draw our eyelashes
right up to that line. We can do that on both sides. I'm going to fill this eye
in here on the far side. Okay. And that works going to sock in these nostrils. I mean, just look at that. Look at how much more dynamic the drawing already
looks, right? This is why detailing out your drawing is
always so important. Just going back
through the hair here, and I'm just going to
punch in some lines. But when it comes
to detailed work, it really depends on
the individual artist. You can go back
into lower values. You can also go back in and retrieve high values
with your eraser. Obviously, the more detail and the more time you
put into your drawing, the more dynamic it will be. There'll be more detail
to appreciate for a viewer versus if you just
do a really quick sketch, then obviously
there's going to be a lot less detail and not
nearly as much to appreciate. But then notice this
big braid here. I'm going through and I'm
thickening up the lines. Okay. And I'm just
bouncing around, guys. I'm just doing this, doing that. But one of the
things that I would probably recommend
that you do is like the last lesson for
the bun of the hair. How I said, just go
back through maybe watch it once or twice,
and just watch it. Don't draw with me, watch
it almost like a movie. That way, you can
really be like, okay, I see that because if
you actually approach these classes where
you watch them. It's like if you were sitting
there in a college class or a classroom of any kind
and you're trying to take notes while you're listening
to the instructor. They've actually done
studies where they've proven this where
if you just sit there and you don't take notes and you really try
to focus on what the instructor is
actually saying versus trying to just write
down what they're saying, you actually retain
more of the lesson that way and you
notice things that you wouldn't otherwise have noticed because you're
focusing on trying to write like how if you're drawing with me, you're
focusing on drawing. I would say maybe give it one watch through
where you watch it. Just watch it, and then go
back through and draw with me. Obviously, everyone's different. You don't have to do that
if you don't want to, but I think that it would be
a really good best practice. I think that you would
ascend to a higher level of being an artist if you
did it that way. Okay. Yeah. We can go back through and hatch
some of this stuff. Obviously, we just put the
detail into her earrings. That looks much more
dynamic that definitely pops compared to before where
it was just the circle. And then I'm just going
and I'm double hatching, throwing a hatch mark in the same direction over
the previous hatch marks. And what that is doing is that is lowering the value for us. Because when you look at
reference number one, the majority of the top of her cheek is a higher
value and it's ironic, and this is one of the
reasons why you know John Aaro was onto
something when he developed the Aro head model you can see when you look at reference number one and then you look at the drawing
where the ARO planes are from the ASO planes
across the face, and then the one that stems over the top of
the ear and down. When you look at
reference number one, that's where that light cast is definitely visible and
it's of a lower value. You can pull your lines up
from the ja line and you can lower that value all across
there if you want to. But that's one of
the reasons why the Asarro method is so amazing. And in fact, John Asarro when he originally developed that
method back in the 70s, it was actually
meant for painters. It wasn't meant for
people to draw. But I would say that
the visual arts are all inherently tied
together in some way. When you actually
look at some of the paintings that the masters
of the Renaissance did, they actually have trains
where they would take graphite and they would
draw the drawing first, and then they would paint
over the top of it, especially with oil
painting and whatnot, that's just layer upon
layer upon layer. And you would definitely
want to have some kind of framework so that you
could paint accurately. This is one of the reasons
why lots of people that criticize drawing this way, they obviously are of a
different interpretation. I wouldn't say
level. I would say interpretation
because some people are naturally just that gifted. They're able to
look at something and they can draw it and it looks incredible and they don't need any of this
framework in place. But that's not most people. And because of that, these methods have been
created so that you can really take an honest shot at drawing something
that you're proud of. That's the big thing. We don't do things that we don't like, or if we do, we're probably
getting paid for it. We tend to do things
that we enjoy. We like to do things
that make us happy, things that we can sit back and look at and be proud
of, make, You know what? I made that. It's
really special to me. It really showcases my
abilities for myself, and it's a confidence booster
for sure. Absolutely. So I hope that
this series across these three different
references that I showed you really allow you to walk
away and be like, man, I understand how to
approach a portrait drawing with so much more knowledge and techniques in my back
pocket than I did before. So But when it comes
to this drawing, you don't necessarily have to keep detailing it out like I am. I'm just going through and
I'm having a hyper focus on the shadows now here by
the corner of the mouth. I was shading on the far
side just a bit ago, and you just go through
and probably one of the single best
practices that I ever got from reading about
Leonardo Da vinci, who's my favorite artist. Personally, is that he
said when you're done or when you think
you're done. Walk away. And in some cases, Da
vinci was famous because there was a lot of pieces and commission work that
he never finished. In fact, he was so bad at not finishing commission
work that his father, when he was much younger in
his career had to draft up contracts with people saying that he would finish
the commission piece. But he would walk away from it. And then you would
come back to it a day, a week, a month later,
when you do that, when you give yourself
the ability to unplug for a second and
come back to your art, you can see things that you
simply couldn't see before. The saying is that
you were too close. Give that a try. I hope
you enjoyed this class. I hope you got a lot out of this little mini
series and stay happy, stay healthy, and remember,
never stop drawing.
 Messer Creations, Artist | Author | YouTuber