Transcripts
1. Class Introduction: What if you could cut
your editing time in half and let AI handle the
heavy lifting for you? Imagine finishing projects
faster than ever before. With professional
quality results, all thanks to the power of artificial intelligence
inside A Primer Pro. If you're looking to save
time, boost productivity, and unlock new creative
possibilities, you've come to the right
place. Hi, I'm Paul. And over the last decade, I've edited thousands of videos for clients and
personal projects. Today, video editing
is not just a hobby. It's our full time business, and it helped us reach over 100,000 students
in 180 countries, we've earned positive income, built a life of freedom, and all started with
learning Ad Pocro. These tools transform
our workflow, and now I want to help you experience the
same transformation. In this class, you've learned ten powerful AI tools inside Premier Pro that
you need to know to take full advantage of AI. A Premier Pro is not just for traditional editing anymore. It's embracing the
future with cutting edge AI tools that will elevate your efficiency and creativity. These AI tools have saved me countless hours with
just one click. Yes. It's amazing and
incredibly simple to use. I'll walk you through
ten game changing AI tools that will transform
how you edit videos. We're not just talking
about minor improvements. These AI features will completely change
your editing process. From automatically adjusting audio and generating captions with a single click to removing
backgrounds in seconds. These tools are
designed to save you hours of work while
boosting your creativity. And you don't need to be a tech expert to use these tools. I'll break everything
down into simple, easy to follow steps, showing you exactly how you use each AI tool
in a primer pro. You'll see firsthand how AI
can make editing faster, more efficient, and most
importantly more fun. Whether you're completely new to video editing or
have some experience, these tools will take your
editing to the next level. Here's what we'll
cover in the class. One, how to automatically
enhance your audio in seconds, effortless capture creation
with just one click, AI driven background removal that saves hours of manual work. Automating repetitive tasks that take forever and much more. AI in Premier Pro is the
future of video editing, and by the end of this class, you'll be using these
tools like a pro. Not only will you work faster, but you also create videos that look and sound
better than ever. Plus, you have the skies
that will make you more competitive in today's
fast paced digital world. Whether you're a small
business owner looking to create high quality
content for your brand, a freelancer editing
client projects, or someone building
an online presence, this class will equip you with the tools you
need to succeed. If you're ready to save time, boost your creativity and
embrace the future of editing with Adobe premium prose AI tools,
let's get started.
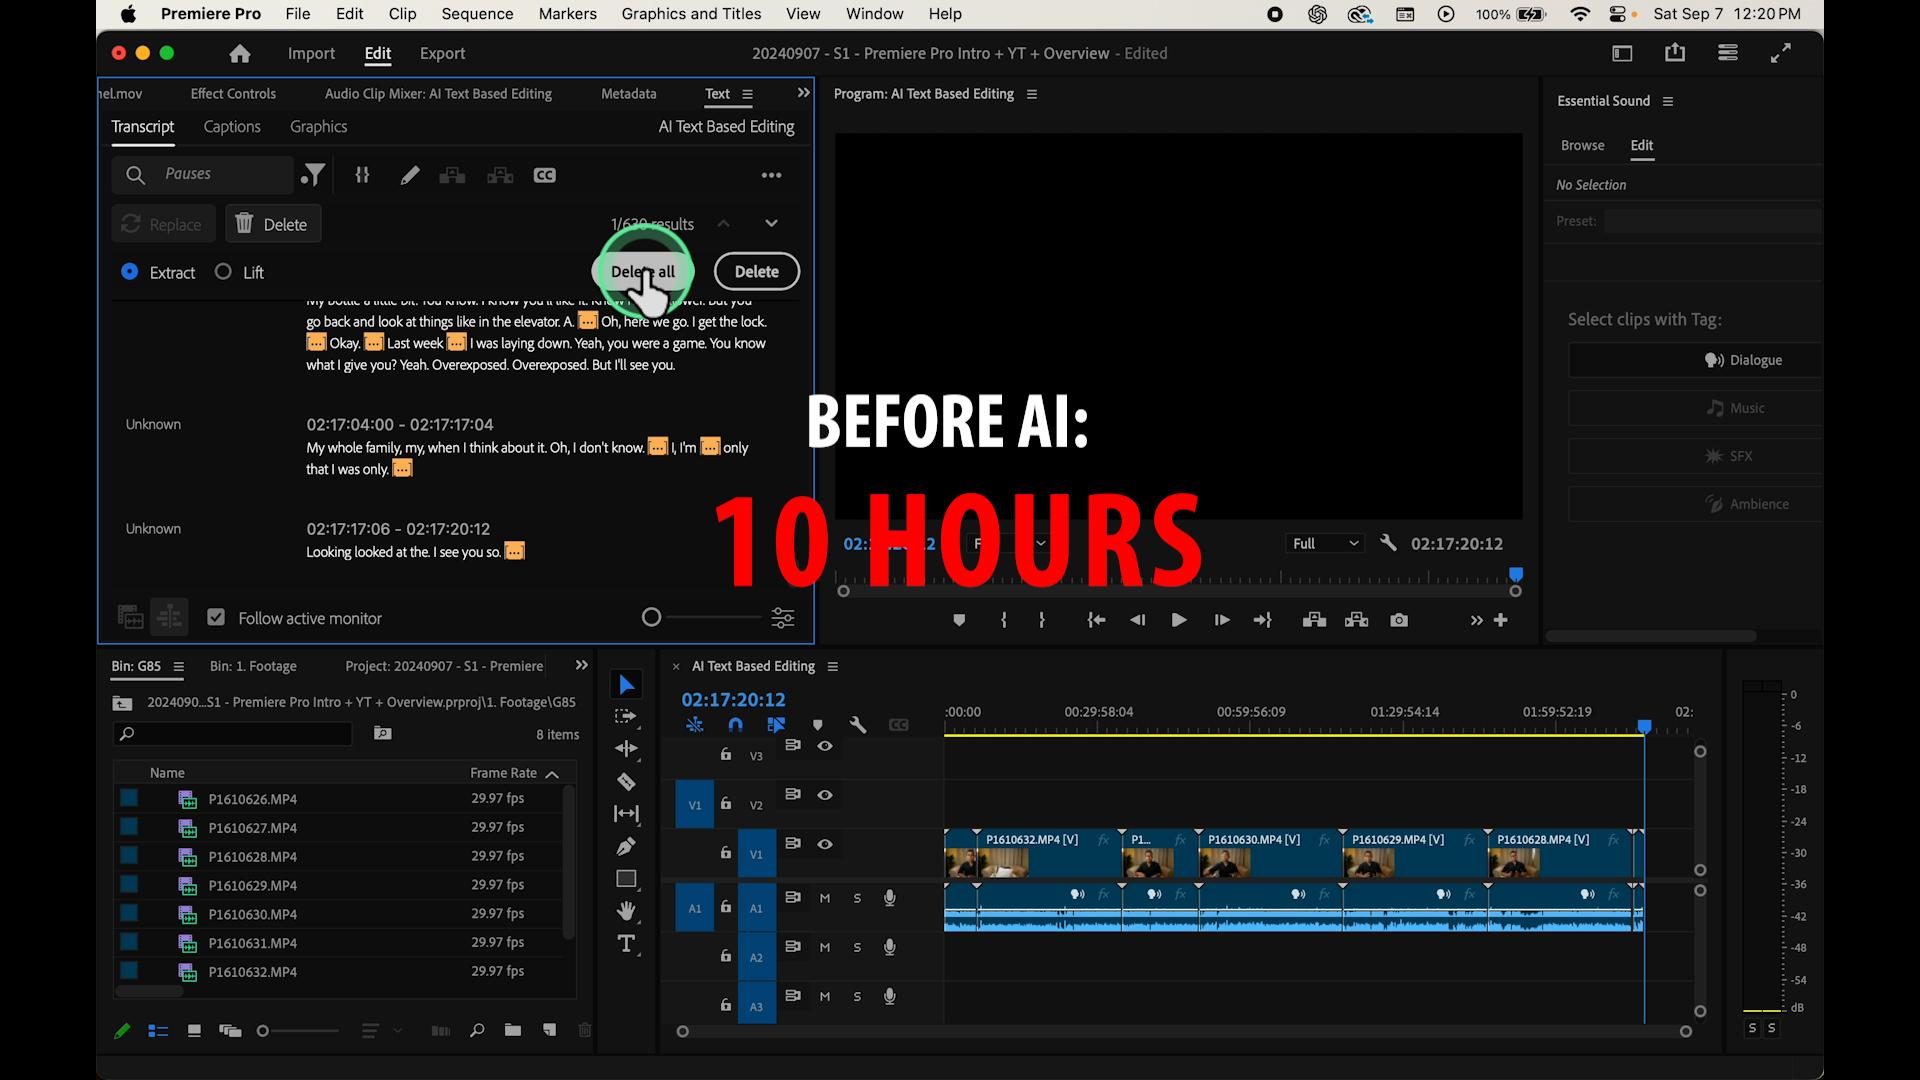
2. Upgrade Your Workflow: Enjoy 5X Faster Subtitles & Captions w/ Speech to Text: Today, we are going
to explore how you can upgrade your
workflow and enjoy creating subtiles
and captions five times faster using speech
to text technology. If you've ever felt
overwhelmed by the manual process of typing out subtiles, you are not alone. Study shows that traditional
captioning can take up to ten times the length
of the video to complete. But with speech to text, this task can be accomplished
in a fraction of the time. I used to spend hours typing
out captions for my videos. It was exhausting and
often led to burnout. Then I discovered speech
to text technology. At first, I was skeptical. But once I tried
it, I was amazed. Not only did it accurately
transcribe my spoken words, but it also allowed and
refined captions with ease. This shift transformed
my workflow, saving me countless hours and significantly
reducing my stress. I learned that embracing
technology can lead to incredible efficiencies and renewed enthusiasm
for my work. Now, let's define
some important terms. Speech to text
technology converts spoken words into written texts. Think of it as having
a virtual assistant that listen to your audio and types out
everything for you. This is crucial
for accessibility, search engine
optimization or SEO. And enhancing viewer engagement, whether you're a
content creator, educator, or business
professional, adding subtitles and
captions can make your content more accessible and engaging to a
broader audience. Here's how you can use
speech to text technology in Adobe Premier Pro to create subtitles and captions quickly. Start by opening
Adobe Premier Pro and creating a new project. Impute video files by
selecting file, then Import. Then enable automatic
transcription by going to Text panel. You can find it under
Window then text. Click on Transcribe to generate a transcript
of your video. The transcript will
appear in the text panel, where you can make any
necessary corrections. To add these captions
to your video, click on Create captions
within the text panel. This will place the subtitles directly onto your timeline. Sync perfectly with your audio. Now, you might face
some challenges such as inaccuracies in
the transcriptions or misidentified speakers. Well, I've encountered
these issues myself. Well, to solve this, I double check the
transcript for errors and use the edit speakers feature to correctly
label different voices. This ensures that
the final captions are accurate and professional. Remember. Technology
is here to assist us, but a human touch is often
needed to perfect the results. Now, I have a question for you. How would faster and more
efficient captioning impact your workflow and
audience engagement? Well, embrace this technology and transform your
editing process. As Steve Jobs once said, innovation distinguishes between
a leader and a follower. By adapting speech
to text technology, you're not only
improving your workflow, but also enhancing
the accessibility and quality of your content. To summarize, we've covered how speech to text
technology can revolutionize your subtitle
and caption creation process, making it faster
and more efficient. Stay tuned for the next lesson, where we'll dive deeper into advanced editing
techniques that will also further elevate your
video production skies. See there.
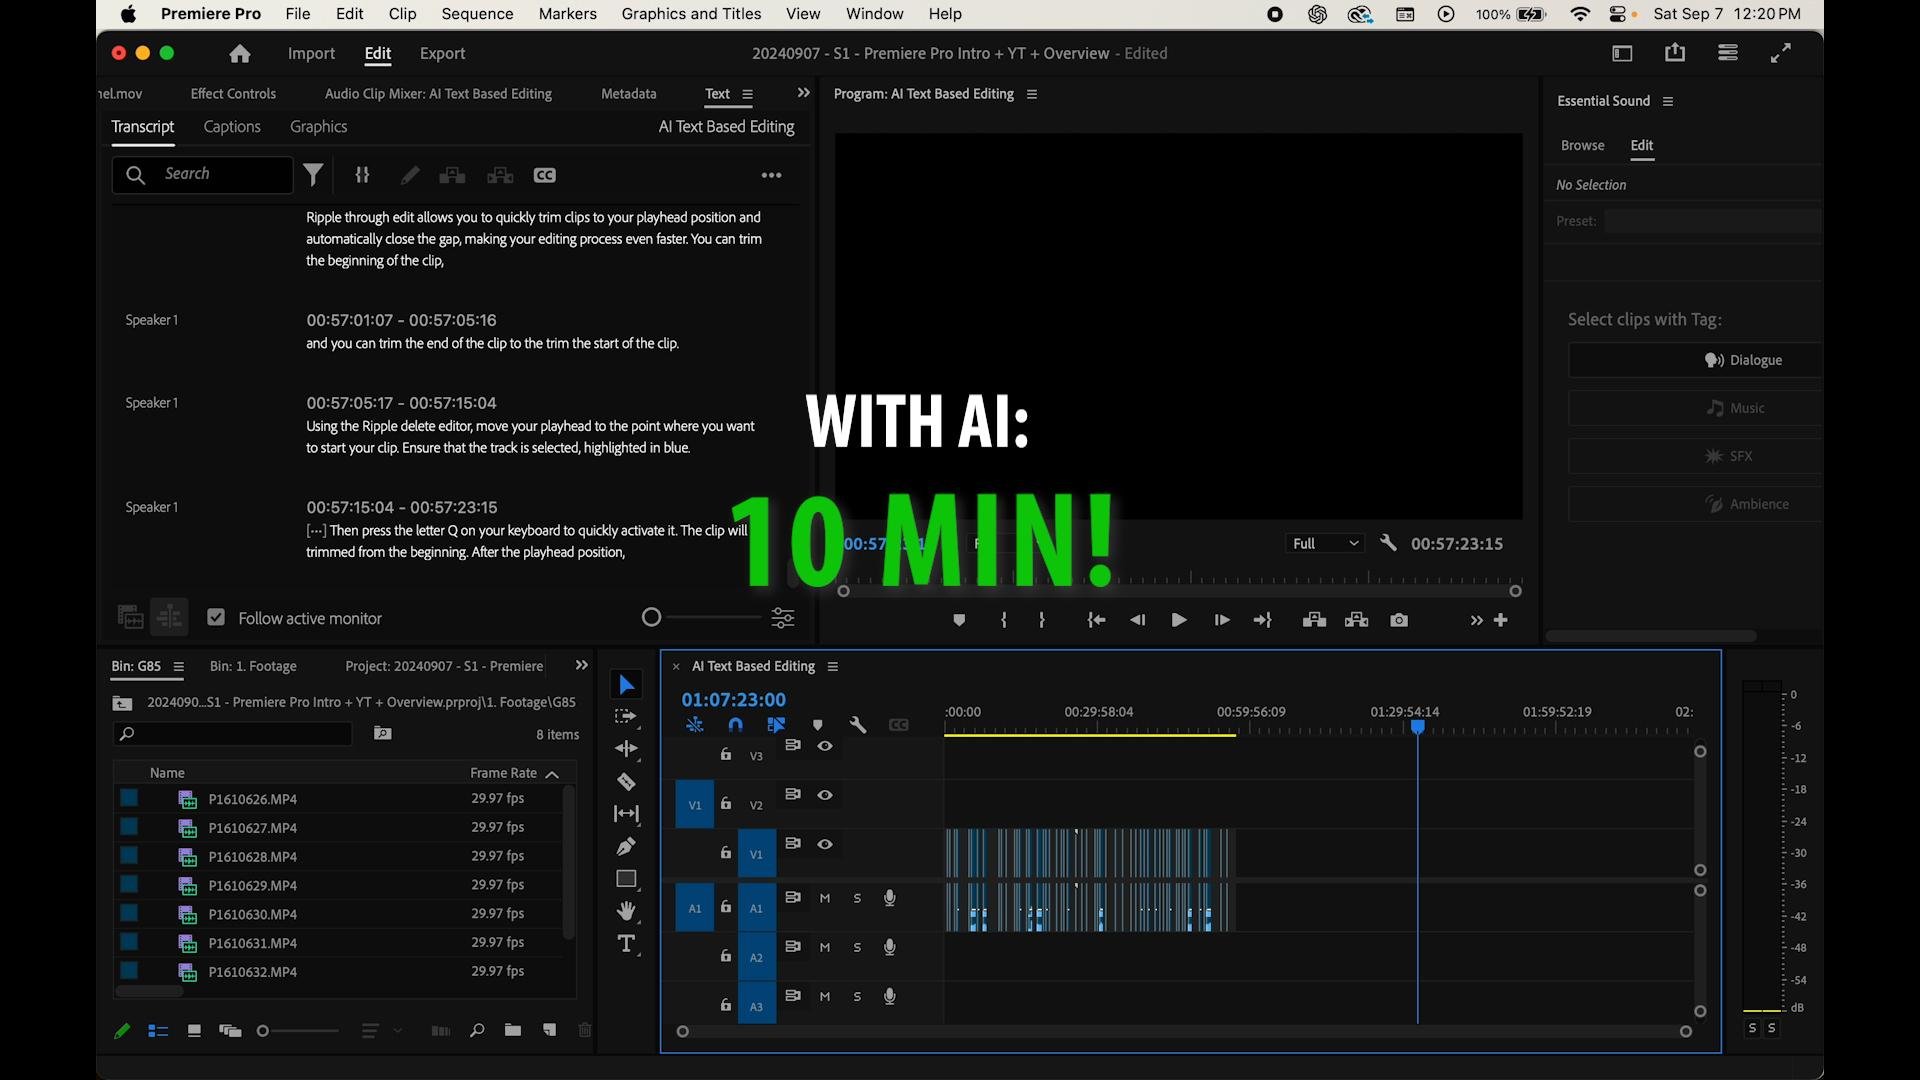
3. Effortless AI Editing: Create Rough Cuts in SECONDS with TEXT-BASED editing: Today, we're diving
into the world of effortless AI editing with text based editing
in a Premier Pro. Many of you may
feel frustrated by time consuming process of creating rough cuts
from hours of footage. Well, did you know that
traditional video editing can take up to 10 hours to edit
just 1 hour of footage? But with text based editing, you can create rough cuts
in a fraction of that time. Editing used to be a
daunting task for me. Spending hours sorting
through clips, making cuts, and aligning
sequences was exhausting. Then I discovered text based
editing in Premier Pro. At first, I was hesitant. But once I tried it, the transformation
was incredible. I felt like a burden was
lifted off my shoulders. Now, I can create
rough cuts in minutes, allowing me to focus on the
creative aspect of my work. This breakthrough has saved me countless hours and significantly boosted
my productivity. Text based editing works by transcribing your source
footage into text. Imagine you have a
transcript of your video, and you can cut, copy and
paste text to make edits. It's like editing a word
document, but for video. This method is crucial for
efficiency and accuracy. It's particularly useful
for content creators. Educators and anyone dealing with large amount
of video footage. By using text based editing, you can quickly assemble
your rough cut, saving time and reducing the complexity of
traditional editing. Let's walk through
the steps to use text based editing
in Ado Premier Pro. First, open Ado Premier Pro
and create a new project. Import your video files by
selecting file, then import. Then enable automatic
transcription by going to the text panel, under Window, then text. Click transcribe to generate
a transcript of your video. The transcript will
appear in the text panel. To create a rough cut, highlight the text you want to include in your sequence and
click Insert or Orite. Continue this process until all desired clips are
added to your timeline. This method is not
only efficient, but also ensures that
your edits are precise. You may encounter
challenges like transcriptions
error or difficulty navigating the text panel. I face these issues too. While to solve them, I always double check the
transcript for accuracy and familiarize myself with
the text panel's functions. This extra effort ensures that my edits are clean
and professional. Remember, Every new tool
comes with a learning curve, but the benefits far outweigh the initial challenges.
Now, consider this. How would text based editing change your approach
to video editing? Well, embrace this
innovative method and see how it revolutionize
your workflow. As Albert Einstein once said, the measure of intelligence
is the ability to change. By adapting text based editing, you're not only enhancing
your efficiency, but also opening up new
possibilities for creativity. To Saurise, we've explored how text based editing can simplify and speed up your
editing process. Stay tuned for your next lesson. See you there.
4. Automate Your Audio: AI Tags Your Audio for Quick Access to 4 Categories: Welcome to our lesson in audio
tagging in A Premiere Pro. If you've ever felt overwhelmed
trying to organize and edit audio in your
videos, you're not alone. Many of us have spent
countless hours manually tagging and
organizing audio clips. It can be tedious
and frustrating. Well, did you know that the
average video editor spends up to 40% of their time
just organizing audio? That's nearly half your
time, not being creative. But don't worry,
this new feature in Premier Pro will transform
how you handle audio, saving you time and letting you focus on the creative
aspect of your projects. When I first started
editing videos, I often felt frustrated with the manual process
of taking audio. I would spend hours
sorting through clips, labeling them as dialogue, music, or sound effects. It was studious and took
the fun out of editing. However, once I discovered the new audio tagging
feature in a Premier Pro, it was a game changer. This feature automatically
detects and tags audiotypes, freeing up my time to focus on the creative
parts of editing. My workflow became smoother and I enjoyed editing much more. You can experience this
transformation too. Audio tagging in
Premier Pro uses AI to identify and label
different types of audio in your timeline. Think of it like having a personal assistant
who understand your audio needs and organizes everything for you.
This is important. It streamline your workflow, reduces errors, and enhances
your editing efficiency. Everyone from
professional editors to hobbyist can benefit
from this feature. Whether you're editing a
short film, a YouTube video, or a podcast, automated audio tagging can
save you valuable time. To use this feature, first, make sure you have the latest
version of Adobe primi Pro. Open your project and import your audio clips
into the timeline. Go to the essential sound panel, which you can find on the
right side of the screen. You'll see an option
for auto tag. Well, click on it, and Premier Pro will
analyze your clips, automatically tagging
them as dialogue, music, ambience,
or sound effects. This process only
takes a few seconds. Once tagged, you can mix and edit your audio
more efficiently. This feature eliminates the
need for manual tagging, allowing you to jump straight
into the create process. You might encounter
some challenges such as clips being
tagged incorrectly. This happened to me with some ambient sounds that
were misidentified as music. If this happens, simply click on the M tag cliff and manually corrected using
the essential sound panel. Another common issue
is making sure your software is updated to
access the latest features. Always check for updates
before starting your project. Remember, these small
hurdles are easy to overcome and are part
of mastering new tools. Now, here are some
frequently asked questions. Question number one.
Can I manually adjust tags if the AI gets it wrong? Well, the answer is yes, you can manually adjust
any tags by selecting the clip and choosing the correct tag from the
essential sound panel? Number two, does this feature work with all audio formats? It works with most
standard audio formats? However, ensure your files are compatible with Premier Pro. Question number three.
Is this feature available in all
versions of Premier Pro? Well, make sure you
have the latest update of Premier Pro to
access this feature. Now, I have a question for you. How much time could you save by automating your audio
tagging process? Well, remember, the key to efficient editing is letting technology handle
the tedious task. So you can focus on creativity. To summarize, we've covered how audio tagging can
simplify your workflow, save you time and enhances
your creative process. If you have any questions,
please let me know. Until then, I'll see
you in the next lesson.
5. Enhance Your Speech: Get a Cinematic Sound in 3 Steps: Today, we're going to explore a really exciting feature in Premier Pro, called
enhanced Speech. This tool can make your voice recording sound
professional and cinematic. Even if your original audio has issues like
background noise, many of us have struggled with poor audio quality
in our projects, which can be really frustrating. You can might feel like your
hard work is not paying off because the audio
just is not clear enough, but don't worry,
I've been there too. And I've found a solution that I'm excited
to share with you. When I first started
working with video, I often face the
problem of bad audio. One time, I had a
fantastic video shot, but the audio was terrible. There was so much
background noise that could barely
hear the speaker. I felt defeated and wondered
if I had to redo everything. But then I discovered the enhanced speech
feature in Premier Pro. This tool saved my project and
taught me how to transform poor audio into
something that sounds like it was recorded in
a professional studio. It was a game changer for me, and I'm confident it
will be for you two. Now, to understand
enhanced speech, think of it as a smart assistant that cleans up your audio. It removes unwanted sounds
and focuses on your voice. Making it clear and crisp. This feature is especially
useful for anyone creating videos from YouTubers to corporate video producers. Who want their content
to sound professional? It's like having a
personal sound engineer at your fingertips. So let's go through the steps
to use enhanced speech. First, ensure you have the latest premiere pro version installed on your computer. Open the program and
create a new project. Drag your footage
into your project, and then go to top right corner to select
the audio workspace. Here, you'll see the
essential sound panel. Click on your audio clip, tag it as dialogue, and you'll see the
enhanced speech option. Click it and adjust the
mix amount to around seven or eight to avoid any potential
issues with word cutoffs. These settings keep the voice natural while reducing
background noise. After enhancing the speech, you can add additional effects
like parametic equalizer. The user and hard
limitter through the audio track mixer
to fine tune the audio. You'll find the buttons for these effects in the
audio track mixer panel. Now, you might encounter
some challenges, such as the AI, not picking up quieter words, especially if the mixed
amount is too high. I had a similar problem when
I first tried this tool. My audio sounded robotic because I set the
mixed amount to ten. I learned to adjust
it to a lower level, which balance clarity
and natural sound. Another issue might be the occasional
clipping of the audio, but you can fix this by adjusting the hard
limited settings. Remember, you can always tweak the settings until you get
the desired sound quality. Here are some common questions. First, can enhanced speech
work on all types of audio? Well, the answer is yes, but it works best on
spoken word recordings. Number two, what should I do if the enhanced audio
sounds unnatural? Well, try to lower
the mixed amount and add subtle effects
like equalizer. Number three, Can I use this
feature for live recordings? While it's designed
for post production, you can apply it to live recordings after
they are captured? Enhanced speech has truly transformed how I handle
audio in my videos. It's made my content sound professional without needing
expensive equipment. If you're facing doubts about achieving this level
of audio quality, remember that I started
with the same challenges. Consistent practice
and experimenting with the settings will
help you master this tool. Now, reflect on the time when poor audio quality
impacted your work. How would enhanced speech have helped you in that situation. Remember, the only way to do great work is to
love what you do. I hope this lesson
inspires you to improve your audio quality and take your projects to the next level. Stay tuned for our next
lesson on creating smooth Zooms,
transition, and Premier.
6. Automate Scene Detection: Add Cuts Automatically in just 3 Steps: Today, we're diving into the scene edit detection
tool in a W Premier Pro. I know many of you might
feel overwhelmed when faced with editing long
videos with multiple scenes. It's a common challenge and it can feel like a
never ending task. Did you know that a
typical ten minute video can have over 100 scene changes? Imagine the hour spent
manually cutting each clip. But don't worry,
I've been there, and I found a solution that
can save you tons of time. Not long ago, a client sent
me a single video file with what seemed like hundreds
of clips crammed into one. My initial reaction was panic. I thought I'd be spending days just slicing up this one video. Then I discovered the
scene edit detection tool in Adobe Premier Pro. This tool was a game
changer for me, and it can be for you too. It automatically
detects scene changes and cuts them up for you. This not only saved me a
significant amount of time, but also improve my efficiency. If I can transform a editing
process, you can too. Now, here's how the scene
edit detection tool works. Imagine you have
a big puzzle and this tool helps you cut
out each piece perfectly. The three option available are apply a cut at each
detected point, create a bin of sub clips
from each detected cut point, and create clip marker at
each detect cut point. The first option slices your video directly
in the timeline. The second option, which I
found incredibly useful, puts all your cut clips
into a separate bin. This makes it easy to organize and access in each
clip individually. The third options places a marker at each
detected cut point, giving you flexibility to decide later whether
you cut the clip. To use the scene
edit detection tool, start by selecting your clip. Then go to the top
of your screen, click clip, and select
scene edit detection. Choose your preferred option or even all three if it
suits your needs. You can find these ones in the Drap down menu under
clip on the main toolbar. If you encounter any issues like mis cuts or extra markers, remember, it's all part
of the learning curve. I face similar challenges,
but with practice, I learned to fine tune the
settings for better accuracy. Now, here are some common
questions to include. What if my scenes are
not detected correctly? Well, adjusting the detection
sensitivity often helps. Number two, can I undo the cuts? The answer is yes. You can use the undo functions or simply not apply the cut. Number three, what's the
best options to choose? Well, it depends on
your project needs. For example, creating a bin of sub clips is great for large projects with
multiple scenes. My adventure with
scene edit detection started with frustration, but ended in relief
and improve workflow. I encourage you
to give it a try. Think of the time you'll save in the efficiency you'll gain. Reflect on your current
editing process. How could distal make
your work easier? Remember? As the
famous code says, the key success is to start
before you are ready. To summarize, scene edit
detection in a premier pro can transform your
editing process by automatically detecting
and cutting scenes. Stay tuned for the next lesson, where we dive into advanced
editing techniques. Let's keep learning and
improving together. If you have any questions,
please let me know. Thank you for your
time, and I'll see you in the next lesson.
7. Simplify Your Color: Explore Auto Color for Easy Correction in 3 steps: Today, we're going to explore the new auto color
feature in Premier Pro. If you're a video editor, you know how challenging
color correction and color grading can be. It can be time
consuming and often requires a lot of
trial and error. A Dove's new auto color feature aims to simplify this process, making it faster and easier to achieve professional
looking results. Let's dive into how
this feature works. And I'll share my own experience with it to help you understand how transformative it can
be for your video projects. I remember when I first
started editing videos, I spent countless hours trying to get the
colors just right. It was first reading and often felt like I wasn't
making any progress. One day, I stumbled
upon a tutorial that introduced me to a basic
color correction technique, and it was very helpful. However, the process
was still time consuming and required a
lot of manual adjustments. With Adobe's new
auto color feature, this process is
streamlined significantly. It reminds me of
the feeling I had when I first discovered
those basic techniques, but with a lot more
efficiency and ease. Before we get into how
to use this feature, let's clarify what
color correction and color grading are. Think of the color correction as the foundation of your house. It's about making sure your
video looks natural and true to life by adjusting
the colors to match reality. Color grading on the other hand, it's like decorating your house, is about adding style
and mood to your video by applying different
color tones and looks. Both are crucial, but if your color correction
is not done properly, your color grading
will not look right. Now, let's go to
step by step on how to use the auto color
feature in Premier Pro. First, import your video
clip into the timeline. Click on the Color
panel and then look for the Lumetri
color section. Instead of manually
adjusting the settings, go to the setting stab and find the options for auto detect
log Video color space, click on it and
the software will automatically correct
the colors for you. You'll see your clip
transform instantly, showing more accurate
and vibrant colors. This saves a lot of time and ensures consistency
across all your clips. You might encounter a
few challenges such as the auto correction not being
perfect for every clip. I had a similar issue
when I first tried it. Some clips needed
minor adjustment after the auto correction. To address this, you can add an adjustment layer
above your clip and make small tweaks in the Dmitri color panel
to fine tune the look. For example, you can
adjust the temperature or contrast to better match
the mood you're aiming for. This combination of
auto correction and manual tweaks will give you
a polished final product. Now, here are the answer to three common questions
about this feature. First, does auto color work with all types of footage?
The answer is yes. It works with most
types of footage, but you may need minor
adjustments for specific looks. Second, can I use
this feature for all my projects?
Well, absolutely. It's designed to save
time on any project. Lastly, Will it affect my
computer's performance? Well, the feature is optimized to run smoothly on most systems. But having powerful
computer will always help with faster
processing times. Using the auto
coolor feature has significantly
improved my workflow. I feel more confident
in my editing because I know I can achieve professional
results quickly. It's been a relief to
spend less time on color correction and more uncreative aspect of my project. Reflect on your own editing
process and consider how this feature could help you save time and
enhance your videos. Remember, the secret of getting
ahead is getting started. To summarize, we've covered how the new auto color feature in Premier Pro can simplify your color
correction process, saving you time and
improving your workload. And if you have any questions,
please let me know. Thank you for your
time, and I'll see you in the next lesson.
8. Smoothly Blend Jump Cuts: Master Morph Cut for Seamless Transition in 3 Steps: Oh. Welcome to our lesson in how to blend jump cuts using the morph cut feature
in Adobe Premier Pro? I know that many of you may
have struggled with making smooth transition between
cuts in your videos. It can be frustrating when your content feels choppy
and unprofessional. Well, did you know that 80%
of viewers are likely to stop watching a video if they find the editing to be too jarring? But don't worry,
I've been there too. When I first started editing, my videos were full
of awkward jump cuts. It felt like I was putting so much effort into my content, only to have it look amateurish. In this lesson, I will
share how I solve this problem using Morph cut
and how you can do it too. When I first tried to fix
a jump cut, I felt stuck. My video felt disjointed, and I was worried my audience
would lose interest. I was determined to improve. One day, I discovered the Morph cut feature
in Primer Pro. Applying this effect
was a game changer. Suddenly, my
transitions were smooth and my videos look
much more polish. This not only boosted
my confidence, but also increased
viewer engagement. It's a simple yet powerful tool that can transform
your editing skills. What exactly is a morph cut? Well, think of it like
a digital magician that makes cuts between
video clips disappear. It's a special effect in a
premier pro that blends frames from each side of
the cut to make it look like there was
never a cut at all. This is crucial for creating
professional looking videos, especially for interviews or talking head videos where
jump cuts are common. If you're a content creator,
a digital marketer, or anyone who makes videos, mastering Morph cut can greatly enhance
your video quality. Here's how to do
it step by step. First, open your video
project in Premier Pro and locate the jump
cut you want to blend. Go to the effects panel
on the right side of your screen and type Morph
cut in the search bar. Drag and drop the Morph cut effect onto the cut
between your two clips. Premier Pro will start analyzing the frames to create
a smooth transition. This might take a few moments. Once it's done, play back the
video to see the results. If needed, you can fine
tune the effect by adjusting the duration of the
morph cut in the timeline. This way, you can ensure
the transition is seamless. Now, you might encounter some challenges like
the effect not working perfectly if the backgrounds of the clips are very
different. I face these too. Sometimes the morph
cut didn't blend well, and it look odd. Well, to solve this problem, I tried adjusting
the lighting and background of my clips to
make them more similar. Or I would use a different
transition effect if MorpCut was not suitable. Another solution
is to shoot with consistent lighting
and background in mind to make post
editing easier. Here are three frequently
asked questions. Number one. What if
MorpCut doesn't work? If the backgrounds
are too different, try a different transition or improve your shooting
conditions. Number two. Can I use Morph cut
on moving objects? Well, it works best on
stationary subjects. For moving subjects,
results may vary. Number three, how long
should the morph cut be? Well, you can adjust the
duration to make the transition as smooth as possible
without looking artificial. My personal experience
is to start with a short duration and
increase it if needed. Remember, everyone
starts somewhere. I felt frustrated, too, but learning and applying these techniques made
a huge difference. How about you?
Where can you apply MpcAT to enhance
your transitions? Remember, success is the sum of small efforts repeated
day in and day out. So keep practicing and
refining your skills. Summarize, we've covered the importance of
smooth transitions, how MRPCuT can solve
this problem and the step by step process to
apply it in Premier Pro. I hope you found this lesson. If you have any questions, please let me know. Thank you so much
for your time, and I'll see you in the next lesson.
9. Match Color Instantly: Get the Right Look Every Time with 3 Simple Steps: Today, we will learn how to steal any color grading looks in 60 seconds with this auto
match feature in a Primer pro. If you ever struggle with making your video looks professional,
you're not alone. Many of us spend hours trying to get the
perfect color grade, only to end up frustrated. Well, did you know
that nearly 70% of beginner video editors find co grading one of the
most challenging tasks? Well, I used to be
in that group, too. I remember feeling
overwhelmed every time I tried to match the look
of my favorite films. But then I discovered
a simple trick in adobe primer pro that
changed everything. This trick is the
color match feature in the Lumetr Color panel. Think of it like borrowing the
color palette from a movie you love and applying
it to your own footage. Imagine how much easier it
would be if you could just click a button and have your video look like
a Hollywood film. This still allows
you to do just that. For example, I once spent hours trying to match
the color grading of a sunset scene from a famous movie for
a personal project. After discovering this feature, I was able to achieve
the look in minutes, saving me time and
boosting my confidence. Now, let's get into the details. To use this feature, first, make sure you have
both your video clip and a reference frame. The reference frame
can be A image from a movie or video with
the color grade you want. In a Do Primer P,
open the project and go to a Lumitr Color panel. You'll find this under the
color wheels and match tools. Import your reference
frame and place it on your timeline somewhere
you're not working. Select your original clip. Go back to the Luri Color
panel and choose comparison. View under color match. This will split your program
monitor allowing you to see both the reference frame
and your clip side by side. Slide through the
timeline to find the exact frame
you want to match. Once you have it,
click Apply match. A Primer P will analyze
your clip and adjust the Mtons shadows and highlights to match
your reference frame. It's not always perfect, but it gives you a
strong starting point. From here, you can make
manual adjustments, increase shadows or highlights using the slider bars if needed. You can also go to the
basic correction tools for further tweaking. The buttons and sliders for
these adjustments are all located within the
Lumetri color panel on the right side of the screen. Some challenges you might encounter include the
reference frame not matching your clip size or the initial match
not being perfect. Don't worry, these
are common issues. For example, I once had a reference frame that was
much smaller than my clip. I scale it up and
still worked fine. If the colors don't
match perfectly, use the slider to fine tune the midtones, shadows
and highlights. It takes a bit of practice, but with time, you'll
get better at it. Now, to answer some
common questions, first, can you use
any reference frame? The answer is yes, as long as it has the
color grade you want. Second, will this feature
work on all types of footage? Well, it works best with well
lit high quality footage. Finally, do you need advanced
skills to use this feature? The answer is no.
It's designed to be user friendly and it's
perfect for beginners. Remember, everyone
starts somewhere. When I first tried
color grading, I was lost and frustrated. But by using tools like the Color match feature,
I gradually improved. Reflect on how you can apply this technique on
your own projects. One inspiring code
to keep in mind, the expert in anything
was once a beginner. To summarize, we've
covered how to use the color match feature
in adobe Primer pro to quickly and effectively match the color grading of any
reference frame to your video. Now, if you have any question, please let me know, and thank
you so much for your time. I'll see you in the next lesson.
10. Stay in Sync With AI Remix Tool: Make Any Song Any Length in 2 Seconds: Hello, everyone.
Welcome. Today, we're diving into a fantastic feature in Primer Pro that can transform your editing process.
The Remix tool. Imagine you've got
a video project, but your music
track doesn't quite fit the timing.
It's frustrating. I've been there too, spending
hours of adjusting fades and cuts just to sing
everything up perfectly. But with remix, it's like having a magic one
for your soundtrack. You can stretch or
compress any song to fit seamlessly into your project
without all the manual fuzz. Let me break it down for you. The remix tool
analyzes your music and automatically creates
cuts where needed, adjusting the track length
to match your video dursion. More tedious cross phase or
repetitive editing cycles. Just drag your check. Click
on the Remix tool icon. You'll find in the right here
on your screen and watch Spremi Pro dos the
rest. It's that simple. This feature is a game changer, especially if you
create tutorials, lugs, or any content where
music timing is crucial. Now, why is this tool important? Well, it saves you heaps
of time and efforts, allowing you to focus
more on crafting your content rather than
wrestling with audio edits. Anyone who edits videos, whether you use a beginner or season creator can benefit
from this feature. Imagine being able
to effortlessly adjust music length
for any video project. From short clips to
lengthy tutorials, it's a lifesaver for content creators looking to
streamline their workflow. Now, let's walk through
the steps together. First, open Premier Pro and import your video along
with a music track. Drag the track onto your
timeline where you need to fit. Hover over the remix tool icon located here on your screen, and drag the song to the
desired endpoint of your video. Premier Pro will
analyze the track and create cuts automatically, indicated by these
squiggly lines you'll see. Play it back, and viola, your music fits perfectly. Here's some possible challenges. Well, you might
encounter adjustment in the segment settings
to fine tune cuts. I have a fair share of tweaking to get the perfect
breathe, but trust me. Once you get the hang
of it, it's a breeze. For example, I once had to match a music track to a
short viral section. Using remix, I trimmed the
track effortlessly to fit, saving hours of manual editing. Now, let's address
some common questions. Can you customize the number
of cuts? The answer is yes. Simply navigate to
the customized option within the remix settings. It is easy to learn.
Well, absolutely. The interface is intuitive, and Adobe provides great
resources to get you started. Finally, does it work
with all types of music? Well, the answer is yes. From instruments
to complex tracks, remix adapts seamlessly.
How about you? How would saving time
on audio adjustments enhance your creativity and
productivity? Now, remember. Efficiency is doing
things right. Effectiveness is doing
the right things. The summarize, we've explored
Premier Pro Remix tool, a powerful addition to
your editing toolkit. Whether you're a
hobbyist or a pro, mastering this feature will elevate your content
creation game. Ready to give it a try, start remixing and see the
difference for yourself. If you have a question,
please let me know. Thank for your time and I'll
see you in the next lesson.
11. Smoothly Blend Voice and Music: Auto Ducking in 3 Simple Steps: This lesson, we're diving into a powerful tool for enhancing
your video content, automatic audio ducking
and premier pro. If you've ever struggled with balancing background
music and dialogue, in your YouTube videos,
you are not alone. It can be frustrating when your narration gets
drowned out by music or when abrupt shifts in audio levels distrut
viewer experience. Statistics shows that
effective audio management can increase viewer
attention by up to 30%. Making this skill crucial
for engaging content. I've been there
myself, facing moments where my narrations was
overshadowed by music. Distructing the
flow of my videos. However, learning to use audio docking transform
my editing process. Imagine seamlessly lowering
music levels when you speak and automatically
restoring them when you pause. This significantly elevate the professionalism
of your videos. Now, let's break down the
concept of audio docking. Well, it's like a virtual
sound engineer that adjusts music volume based
on dialogue presence. This ensures your voice remains clear without manually
adjusting each audio point, saving you time and
effort. Timing is key. Applying audio
docking when you want to maintain a dynamic
audio experience, especially in content with voice overs and
background music. Now, let's get practical. First, open a Primer
Pro and navigate to the essential sound panel
under the window menu. Select your dialogue
and music tracks, assign dialogue to dialogue
and music to music. Adjust the clip volumes
to your liking. Ensure both are audible. Next, activate audio docking
on your music track. Select this dialogue icon to dock against
the dialogue clip. Adjust the settings like
sensitivity and duration to fine tune how your music fades
in and out around dialog. Then click generate keyframes
to automate this process. No manual adjustments needed. Now, some challenges may arise, such as fine tuning sensitivity or adjusting
volume levels. Initially, I struggle with
finding the right balance. But experimenting with settings help me achieve
smooth transitions. Remember, practice
makes perfect. Trust your adjustments
and keep refining them. Frequently asked
questions include how to manage overlapping audio and whether this technique affects video export quality. Well, rest assured
audio dicking enhances, rather than detracts from your video quality by maintaining
clear audio dynamics. As you apply these techniques, you'll gain confidence
in delivering polished videos that
captivate your audience. Now, how might this technique enhances your next
content piece? Remember, opportunity
is missed by most people because it is dressed in overalls
and looks like work. Embrace the
opportunity to refine your video editing skills with audio docking
in Premiere Pro. To summarize, we've explored the art of Audio docking
in Premiere Pro, a game changer for managing
audio levels in your videos. Remember to practice
these steps and explore how they can transform your video
editing workflow.
12. Class Project: Now that you've learned about ten AI tools
inside Premier Pro, it's time to put them to work in a fun and creative
class project. Here's what you need to do. First, create a short
32nd to 1 minute video using at least three AI tools
we explored in this class. You could use AI tools like auto reframe to adjust
the aspect ratio, speech to text, to
generate captions, or the auto color tool
to enhance your footage. Next, play around with
different AI features and see how they can improve
your editing process, save time and add creative
elements to your video. Once you're happy
with the results, export your video and share
it in the project gallery. You can either pose a link to your video like from YouTube, VMo or any other platform or upload a screenshot or
photo of your work, even if it's still
a work in progress. I'd love to see it. So please share it with us. In project description, tell
us which AI tools you used, your experience, and how these tools help you speed
up or enhance your workflow. This project will help
you get comfortable with these powerful AI tools, so you can use them in all
your future editing projects. AI tools are here to
make your life easier, so I fun experimenting with them and feel free
to get creative. I'm excited to see how you
integrate these AI features into your video projects and how they elevate
your editing. In the next lesson, we will officially wrap up this
class. See you there.
13. Congrats on Completing the Class! Boost Your Editing Speed & What’s Next: And there you have it. You just learned ten
powerful EI tools inside a Primer Pro, that can save you time,
boost your creativity, and make video editing
more enjoyable. Whether it's speeding
up Ted tests, automating complex processes, or bringing your
creative ideas to life. These tools are now
at your fingertips. Now that you've unlocked the power of AI
in video editing, you are ready to take your
skills to next level. If you're looking
to dramatically improve your editing
speed and efficiency, I highly recommend checking
out my other class, ten tips to edit ten times
faster in Primer pro. In that class, I share
practical techniques and shortcuts to help you edit like AP up to ten times faster. Before you go, don't forget
to hit the follow button, so you'll be notified when
I publish my next class. If you want to stay updated with more tips or share
your work with me, be sure to connect with me on Skillshare and follow
me on Instagram. I'm excited to see how you'll put what you've
learned into practice. Wishing you all the best, and I hope to see you
in the next class.
 Paul Nene, Helping beginners take action