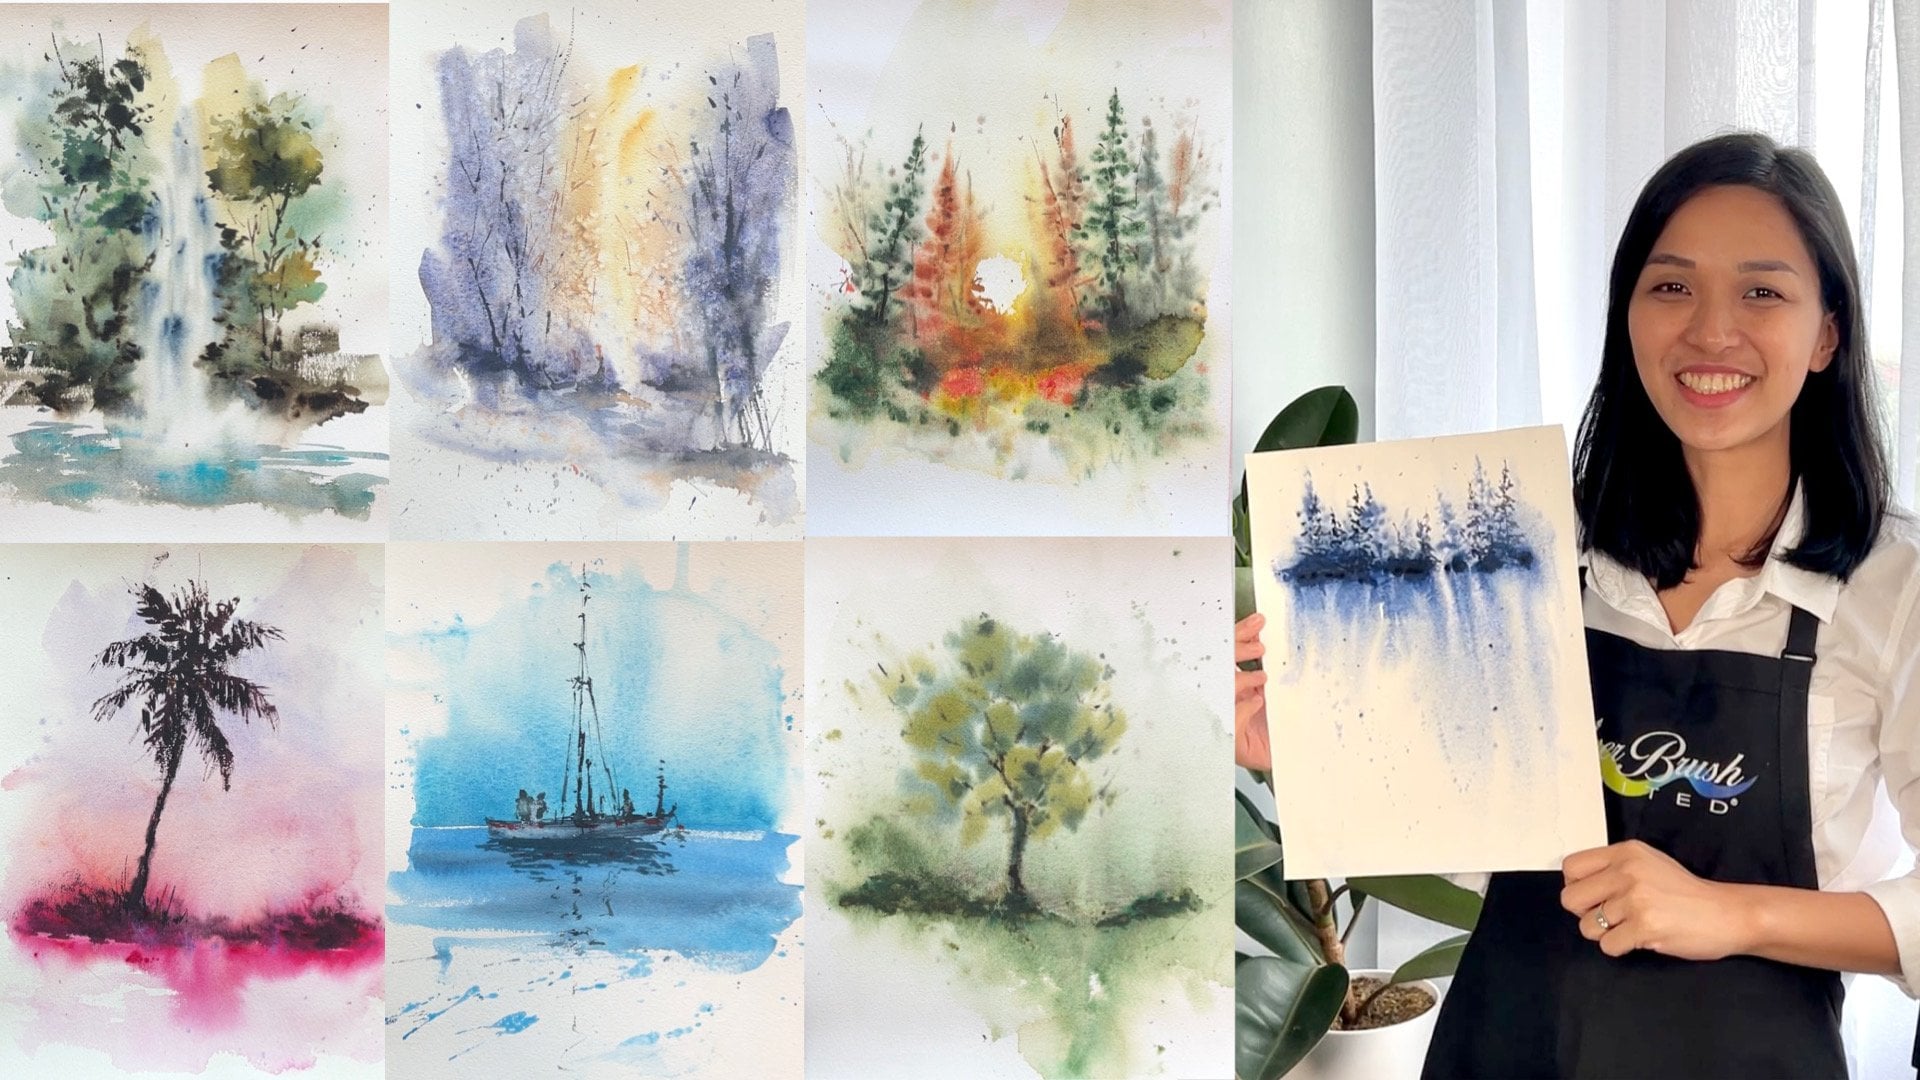
Transcripts
1. About The Class: Watercolor has a special way of allowing us to escape to a place where we could refresh ourselves from the daily routines of life and also to freely express who we are. That's the reason why I believe painting is for everyone. Hi. I'm Bianca Rayala and I'm a watercolor artist. My purpose is to inspire people to discover and pursue their creative passion. In this class, we're going to get rid of the fear of painting and bring out the artist in you. Through up-clear and simplified approach in watercolor painting, you will be able to create two stunning autumn paintings in a loose and expressive style. To get started, I will show you the materials and appropriate paper to use, how to select the right colors and build color harmony using a limited color palette. Then, I will teach you essential watercolor techniques such as wet and wet, dry and wet, layering and softening of edges and the use of masking fluid so you can achieve a harmonious balance between loose and tight strokes. For our first class project, I will show you how to paint a maple leaf against the stunning bouquet background. You will learn how to make light glow and how to depict the blurred or out of focus effect using expressive strokes and play of colors. Next, I will show you how to paint oak leaves floating on calm water using different watercolor techniques. Learn how to portray reflections and add texture by mastering watercolor consistency. Throughout the course, I will give you tips to take your artwork to a higher level. By the end of the class, you will have a better understanding of the behavior of watercolor and be ready to take your artworks to a higher level. I'm excited to see you create your own masterpieces. Let's get started.
2. Materials and Colors: Let's talk about the materials and the colors that we'll be using for the two projects. For me, choosing the right materials and understanding how they work has a huge impact on learning watercolors, and getting better results. Let's start with the paper. The watercolor paper that I always use is made of 100 percent cotton and 300 GSM. The difference of using 100 percent cotton versus cellulose paper is that cotton paper has the ability to hold much water and it takes time before it fully dries out. Having this important quality means you have more time to work when doing wet on wet technique. There are watercolor papers that are sold in blocks, sheets, or in sketch book format. This one is Baohong artist grade watercolor paper made from China. It has a good paper quality. Another great paper that I love using is Archer perfect sketch book. It is also made of 100 percent cotton and 300 GSM. I love this sketchbook because it can hold heavy washes and doesn't warp after painting. This is the sketchbook that I also use for most of my other classes. We will be dealing with a lot of water in these two projects, I do recommend that you use 100 percent cotton and 300 GSM you can properly execute the layering that we will do, especially on painting the bouquet. Cotton papers are a bit expensive as compared to cellulose paper, but they assure you that investing on this kind of paper will help you efficiently learn and understand the mind of water color. Now let's take a look at my brushes. All these brushes are from Silver Brush Limited. Different brushes have different hair types and varying water and pigment holding capacity. This is black velvet in one inch flat brush. I use it for wetting the paper and painting large areas. It holds a lot of water and has just the right snap because it is made of natural squirrel hair and synthetic fiber. The renaissance round brush is made of natural red sable. It has a great pigment holding capacity because it is made of natural hair, and it has good snap, which is the ability of the brush to get back in its shape after use. You'll see me using this brush most of the time for painting almost everything. Next, is the Manza fan brush made of synthetic mongoose hair, which I will be using on creating the blurry effects on the bouquet. You can use any synthetic fan brush to create those effects. Lastly, this is silver silk 88 ultra round brush, which is a synthetic brush with a really nice pointed tip for painting the details. Now for my paints, I will be using artist grade watercolors from Sri Lanka [inaudible]. I'll be using a very limited palette consisting of just 10 colors. These colors are yellow, orange, cadmium orange deep, burnt sienna, perylene red deep, perylene violet, neutral tint, olive green yellowish, indigo, cobalt blue light and rose madder. The great thing about Sri Lanka is that most of their paints are made with single pigment, which means the colors remain vibrant and clean even when mix with other colors. Since I prefer mixing different colors using a small group of colors to maintain color harmony in my painting, this single pigment quality makes it easy to prevent dull or muddy color mixtures. The next time you buy artist grade watercolors, always check the pigment component of the watercolor. That information can be found on the label. Choosing single pigment paints is very important and will greatly effect the transparency and vibrancy of your finished painting. The other essential materials that we'll be using are pencil, eraser, masking fluid for preserving white spots on the paper, an old brush for the masking fluid, and a regular water sprayer for adding extra moisture on the paper. You will also need two cups of water, an old towel or a tissue paper to clean and dry the brush. See you in the next video for some very important water color exercises.
3. Watercolor Exercises: Watercolor may look very difficult to work with because we're dealing with the components which are water and pigment. But when you truly understand how watercolor behaves, how to control the water consistency on your paper, how to deal with the moisture of paper and the right consistency of paints in your brush, you will definitely achieve better results. In this lesson, I'll share with you some important exercises for you to better understand this principle. These are the two projects that we'll be doing in the class. For our first-class project which is the maple leaf on bouquet background, you can see a very soft play off colors at the background. In the middle portion, you will see light, which is the unpainted portion of the paper, then gently transitions to soft yellow, orange, and green to portray the blur or out-of-focus effect. Notice that there are no hard edges formed between the transition of colors. Now to achieve that, the secret is to know the correct moisture level on your paper and the correct watercolor consistency on your brush. Let's do an exercise. I will pre-wet my paper with a generous amount of water. Next I load my brush with a very watery mix of paint. Now as I paint this kind of watercolor consistency to a very watery surface, you would see how the paint reacts on water. The paint creates uncontrollable blooms and just freely spreads out all over the wet surface. It is impossible to create soft define strokes when the surface is this wet. In watercolor terms, this is also called wet on wet technique. It is painting on a wet surface using a wet brush loaded with a very watery paint. Now let's try another exercise, but this time I will just moisten the paper. The paper doesn't have any puddle of water as compared to the first exercise that we did. Next, I get the perfect amount of paint on my brush and try painting over the moist surface. Notice the difference on the movement of paints on the surface. The stroke is defined and has soft edge. The pain didn't move so much, unlike on really wet surface. This is what we call dry on wet, dry brush applied on wet surface, but the level of wetness is just moist. Let's apply this principle in blending multiple colors. This is a good exercise in preparation to painting a bouquet background. I moisten again the paper once more and get a thick mix of yellow. Next I get the orange and connect the two colors. Now as I lay the color, I have flattened my round brush and remove the excess water in it by dabbing it on my towel, and then next I get green and connect it to orange. As I lay the colors, I want you to keep in mind that the mixture on the brush should be thick and the brush should not have excess water on it. By doing so, the three colors will transition smoothly without creating watercolor blooms. As long as the paper is still moist, there is no problem on adding more colors. You can still achieve the defined yet soft edge effect on your strokes. However, there will come a time that the paper will be running dry. That's the stage where the paper feels cold already. As you lay a paint on that kind of paper, you will definitely get hard edges, so always be sensitive on the level of moisture on your paper so that you would avoid unwanted hard edges on your painting. For example, here I get another dark color and connect it with green. Since the green color is still moist, the color transition is still soft. However, if I connect a color here on the yellow part, which is running dry already, you could clearly see a very defined hard edge between the yellow and red. As much as possible, we want to avoid this on painting the bouquet background, so be mindful of the level of moisture that your paper has when painting. Should you lost time and the paper ran dry, you can do the technique called softening of edges. So here I paint a red color on the dry paper. Next I get the clean damp brush and gently rub the edge to soften it. The brush should not have much water in it, and it should always be clean when you use it for softening of edges. If your brush has too much water in it, the tendency is the water in your brush will push or move the red pigment on the paper causing the watercolor blooms. Let's do the same exercise of softening the edge of a stroke over a painted surface. Here's a painted red and dried it using a heat gun. I get a black paint and paint over it and soften the edge with a clean damp brush. Notice that I repeatedly clean and dry my brush every after stroke. Now let's do another one on top, but this time I will soften it with a wet brush. Let's compare. The one below has a soft transition between the red and black. On the other hand, the one on top creates a hard distinct line between the red and black. I suggest that you practice these exercises so you can observe the behavior of your paper as to how long it stays wet or how quick it gets dry so you can adapt when painting. Let's start the first class project in the next video.
4. Project 1- Maple Leaf and Bokeh: Welcome to our first class project where we will be painting a red maple leaf on a bouquet background. In this project, we need to create a blurry auto-focus points of light at the background and the defined glowing maple leaf in the foreground to create a beautiful contrast between the two elements. You would also see a portion of the leaf being lighted by the sun, so we need to take note of that effect. Let's start with a pencil sketch. Instead of copying the reference as it is, I decided to set the leaf at a slight angle to enhance the composition. Drawing leaves may be tricky causing them to look awkward but what I do to simplify the drawing process is to identify first the points of the leaf. Next, I copy the angles from the reference to my paper just to get the identical and proportionate size of the leaf. I initially draw very light straight lines which will serve as my skeleton. Note also that the veins are intersecting on one point near the stem. Next, once your skeleton is ready, you can begin shaping the leaf by copying the reference. If you want to skip the drawing process, you can download a copy of the pencil sketch on the resource section and use it as your template for tracing. The resource section is found in the project in resources tab right below this video if you are using your laptop or computer. However, if you're using the Skillshare phone app, these downloadable resources are not visible. Other files you can see are the reference photo and a copy of the final painting. When you're happy with your leaf, I suggest erasing some lines and softening the sketch, especially on the part that will be lightened by the sun so the pencil marks won't show through after layering paints. Once we layer the sketch with paint, it will be impossible to erase the pencil marks. You can also sketch the veins and remember to connect them in one intersecting point below. This is our pencil sketch. Let's start painting the background on the next video.
5. Painting The Bokeh: If you look closely on the reference photo, you will see a very thin white outline around the leaf. This outline makes the leaf glow against the background. Now in watercolor, we achieve the glowing light by keeping the portion of the paper unpainted. In effect, to create the glowing outline around our leaf, we must protect the leaf from being stained when we paint the background using a masking fluid. Now when you apply masking fluid, you should use an old synthetic brush because the masking fluid destroys the bristles. Second, apply only a very thin layer. A thin layer is enough to fully protect your paper. You don't have to put thick coverage so that the drying time would be faster as well. Last step when applying masking fluid is too wet or wash your old brush using water with soap diluted in it so the masking fluid won't stick too much in the brush. Once you're done covering your leaf with masking fluid, let it dry completely before starting painting. Now that my paper is ready, we can begin painting the background. I taped my paper on a board to stretch it and to prevent it from buckling. I will also set my board at a slight angle so the pains would naturally flow down. Now I will wipe the upper half of the paper with a clean water. The level of wetness is not so wet, but just moist enough. If you remember our previous exercise, I want a controlled amount of water on my paper so the paints will not uncontrollably bleed on my paper. Now I get a creamy mix of yellow orange to paint the light. Notice that I left a part of the paper unpainted because that would be the brightest part of the light. As a lay the color, I remove the excess water from my brush and I lay the brush flat on the paper. Next, I get cadmium orange mix with a little branch Jana and yellow orange. My mixture and my brush are not loaded with much water. That's why the strokes are a bit defined yet soft. I create circular strokes of orange to portray the bouquet. Next, I will get olive green and paint over the surface making sure that the fragment is still moist. I still create this circular strokes regardless of the colors that I add. I referred to my reference photo to see which areas need to be light or dark. Now I get my fan brush and drag the colors down to create the blurred effect. Do this very lightly so you won't lift the color. Now I get the same orange mix, but I add a bit of red to get a darker tone. You should look at the reference photo and find the areas that appear darker, so you can apply appropriate dawns and create depth in the painting. The process is very repetitive. It is laying the colors in a circular motion, then using a fan brush to blur and blend the colors. If your paper runs dry already, like what happened when I painted this green on top, I stopped layering at the moment and then get my spray bottle to moisten the paper a bit. Since it is now moist again, I can continue adding colors. Just be careful to moisten the paper and not too much, so the paints will not move. When painting the bokeh background, you must learn to play with contrast. To do this, you have to squint your eye to see the dark and mid tones in the blurred background. Then to paint the mid and dark tones, you must increase the saturation of your mixtures. As I approach the lower part of the paper, I begin painting on the dry surface. I no longer pre-wet it with water because I need to paint a deep dark color on this fragment. Since watercolor tends to fade after drying, painting on a wet surface would cause the paint to be diluted and fade a lot more. In this lower fragment, I use indigo mixed with olive green and a bit of cadmium orange to get this thick dark green. I also splatter some orange just to add an effect. I continue painting the lower left side with dark colors using creamy and saturated paints. Don't be afraid of using dark colors. Light glow so much more in a very dark contrasting background. If your background is not too deep and dark, the maple leaf will not glow or pop out from the background. As I transition back to orange color, I make sure that the tonal value is darker than the oranges I place on the upper fragment. I complete the background with the same colors, mixing them in different ratio to create different hues. That is also the beauty of using a small color palette and a single pigment watercolor. We avoid creating muddy color mixes since the colors used belong to one family. As I paint the upper left portion with dark green, the paper has dried already. Again, I use a spray bottle to moisten the paper and to have a soft blend between green and yellow. I also take advantage of the moist fragments and add some more circular strokes to add texture on the bokeh. Just be careful not to overdo the process so you won't lose the glowing light that we initially set up. As long as the paper is still moist you can add more layers. But don't forget to remove the excess water from your brush to avoid the water in it from pushing the colors on your paper away. As a final touch on the backdrop, I'll splatter some drops of water for a nice effect. I will let this layer dry completely, then I'll proceed on painting the maple leaf.
6. Painting The Maple Leaf: My background is dry already and now I can carefully remove the masking fluid. Look at the defined outline of the leaf created by the masking fluid. As we paint the leaf, remember to leave a thin, unpainted gap that will serve as the highlight between the leaf and the background. I brush off some dirt and make sure that the area is clean before proceeding to painting. I will paint the base color of the leaf with yellow orange mixed with perylene red to create a beautiful orange color. I start from the top going down. Since there is a portion of the leaf that is lighted by the Sun, I will skip painting that area at the moment, as we will be using different color to portray that. Be mindful of the tonal values that the leaf has in order to create dimension in the leaf. To paint this lighted portion, I start with a light mix of yellow orange and then the previous orange mix that I have. While they are still wet, I get a wet tissue and lift the paint off by dragging the wet tissue from the outside going in. The stroke should be fast to show that light ray on the leaf. Next, I will paint a dark contrast using perylene red and perylene violet. Notice that I changed my brush into a synthetic one since I need a brush with a finer tip when adding these dark spots on the outline of the leaf. I use my other natural hair brush to softly spread the dark spots that I lay on the wet fragment. Now I create a dark orange mix still using the same colors. yellow orange, perylene red, and cadmium orange to continue painting the leaf. I always keep in mind to preserve a thin outline on specific parts of the leaf to avoid losing the light. Although using whitewash or paint is an option to paint the highlight, nothing still beats the glow that an unpainted paper can create. I painted the area around the lighted portion of the leaf with a darker color. Making it dark gives contrast to the light. Next, I create a warm orange mix and paint this middle portion of the leaf. If you look closely at the reference photo, you will see portions that are bright red-orange and portions that are dark red. These areas in bright red-orange are painted with the colors; cadmium orange, Berlin red, and yellow-orange. Those dark red portions are the fragments in shadow and I use Berlin red mixed with Berlin violet on those areas. It is important to take note of that so the leaf will not look flat and monotone. I build up the dimension by adding the dark spots while my base layer is still wet. This process of painting the leaf is done slowly and carefully because we somehow want to make it look semi-realistic and not too loose so it will really stand out over the loose and expressive background. I soften those edges with a clean damp brush to prevent having hard edge on the leaves since I will spend a bit more of time on this left side of the maple leaf. I use my synthetic brush to paint the dark spots and also the impression of veins. As you do this step, the brush should not have water in it, the paint has to be creamy and not watery so that it will be very visible on top of the base layer. We are almost halfway through. The process is the same. You just really have to be mindful of the areas that are in shadow and work really slowly. As I paint the veins, I don't outline the entire thing from one end to another. Suggestive strokes or broken lines are sufficient to show them. There could be different ways to paint the leaf. You could do it wet on wet or like this one, wet on dry. But regardless of the method you prefer to do, our ultimate goal should be to make the maple leaf look so defined that it would stand out against the blurred background. That I think is the secret to painting bouquet. We don't really have to be so realistic and try to paint exactly how it looks like in photograph. We portray the blur by simply creating a harmonious soft transition or play of colors at the background with light tones slowly transitioning to dark and the main focal point, which is the leaf that is so defined and looks almost realistic. I say almost realistic because I still love expressive paintings, and I'm not really into hyper realistic style of painting. Now that our leaf is almost done, we could almost see that it is indeed glowing and popping. I just need to add more dark spots to create extra texture on the leaf and paint the stem. The unpainted outline really creates a huge impact because it separates the leaf from the background. I will paint the stem in the middle part and still leave a white outline. I play with orange and red colors on this fragment and I just try to copy the color and the tone that I see on the reference. This is our final painting, see you in the next video, and let's paint our second class project.
7. Project 2: Oak Leaves on Water: I'm glad to see you again, as we paint our second class project. In this lesson, our plot would be beautiful oak leaves floating on calm waters. I provided the reference photos, copy of pencil sketch, and the final painting in the resource section of this class. You would see that there are two reference photos for this class project. One is our reference for painting the water and the reflection, while the other one is a reference for the oak leaves. We basically combine two pictures to make one painting. Let's start drawing. I start by identifying the position of the leaf. I will draw one leaf on a diagonal position in this area. I simply choose one leaf to copy from the separate reference photo. Unlike the maple leaf, oak leaves are much simpler to draw. I draw another small leaf on the right side, and another one that is partly covering the first leaf that I draw. I slightly adjusted the sketch and there is the long stems that I initially drew. I made them smaller to be more realistic. I also added some small random spots around to show small pieces of leaves in the water surface. Now, let's draw the outline for the reflection on water. To help you better understand this object, we will be painting some oak leaves floating on water. Around the leaves you would see a reflection of the sky on water, and a reflection of the tree partially covering the water. If you look at the reference photo, you will see some light blue spots around the leaves and in the dark reflection, which is basically the portion of the reflected sky. We don't have to copy everything or be too particular on where to put those light spots. What you just need to do is to create those light blue spots mostly around the leaves to separate it from the water fragment, and on some portions of the dark reflection to create interest. It's all about getting the essence of the photo in the reference and creating your own artwork. Also to avoid confusion when painting, I shaded the portions that are supposed to be dark in color. In my drawing, I place marks where I want to have those light blue spots on the lower right side of the paper to build up my composition. I finalize my sketch by adding some details like veins on my leaves, and I think our drawing is done. This our pencil sketch.
8. Painting The Oak Leaves: Let's start by painting the leaves, then the water, and lastly the reflection. I will pre-wet with clean water, the leaves fragment. I pre-wet not just the leaves, but also the small area around it. The level of wetness is just right to moisten the paper since I want a defined yet soft strokes. Now, I'm mixing yellow-orange and cadmium orange. My mixture is a bit thick and not watery. I paint over the leaf, painting the base color with this yellow-orange color. While it is still moist, I lay a thicker and more saturated orange color to create the texture of the oak leaf. Don't worry if you see the paints bleed beyond the leaf border, as we will define the shape of the leaves later on when we paint the water fragment. Now, I'll paint the other leaf using a green base color. I mix cobalt blue and yellow-orange to make green. When you practice mixing colors using the same color palette that we use rather than getting a premixed green, we maintain color harmony in our painting. Using the mixed green, I add a bit of olive to darken the tone a little bit. While this layer is still wet, I take the time to add texture and paint the veins on the leaves. Using a synthetic brush, I will define the orange leaf a little bit more by putting a bright outline and spreading the solid color using another brush. It is also similar to the softening off the edges techniques since the other brush that I use to soften the color is clean and damp. I go back to the green leaf and paint some soft details. For the folded leaf on the right, I slightly pre-wet it again since it got dry already. I mix some muted orange color using [inaudible] and cadmium orange and paint this inner part of the leaf and maybe add a bit of green color. For the folded portion of the leaf, I will paint it with a grayish tone. Again, don't worry if you feel that the leaves have not much defined shape because of the soft edge. We will define the edge later on as we paint the water. Let's wait for this layer to dry, and then we proceed on painting the water fragment.
9. Painting The Water: At this stage, the leaves are completely dry. Now I will paint these small random dots around the water surface with yellow-orange mixed with green. These are the impressions of tiny leaves on water. My paint consistency is still creamy. I also vary the color in some spots by adding orange. Let's splatter some orange for more random spots. I let this dry then I will start painting the water. As I paint the water I will skip or avoid painting over these yellow dots. I get the saturated color of cobalt blue to paint the clear blue portion of the water. My mix is flowy yet saturated. Notice that I don't paint over the yellow dots. Much better if you will also leave some small unpainted area around the yellow dots too. Since we are painting on dry paper, it is necessary to work a little bit fast so we can avoid creating hard edges on the water fragment. I mix a little bit of rose madder to my cobalt blue to create a bluish-purple mix as I paint the left side part of the water. Remember that this water fragment reflects the color of the sky. I continue painting the entire water surface and also apply negative painting to define the shape of the leaves. Negative painting is simply painting around the object to define its form or shape. As I paint the water fragment on the lower right, I mix a bit of olive green to my current blue mix to make the water look a little bit richer. I will splatter some clean water using my clean brush on the upper left fragment for extra effect. Let this layer dry, and then we will be painting the reflection next.
10. Painting The Reflection: Now that our water fragment is dry, I just love how the splatter effect here on the left side gave an atmospheric field on the painting. We can also proceed the painting, the reflection of the tree on the water. For the dark reflection, I will use cobalt blue, indigo, and olive green. The mixture should be very saturated, dark green tone and creamy so it won't look as light as the water fragment. I load my brush with pigment and start painting the edge of the reflection with the tip of my brush. I make the strokes very fluid, shaky and natural. I want you to dance your hand and feel the rhythm of your brush as you make the stroke so they won't look stiff. I said just also that you do this step in one goal and avoid layering another one on top of the previous stroke because it won't look nice. As I paint around the leaf, I darken those areas a little bit by adding some more indigo to my mix. In this way we control the shape of the leaf. Don't forget also to leave some spots unpainted to show light or the small portions of this sky reflection on water. As I do this light spots in the lower left corner, I just make quick strokes using my synthetic brush. To guide you when you mix your color for the reflection, try making a mix that is saturated but still transparent when you apply it on paper. If you will notice my mixture, you could see the blue undertone of the water fragment even after layering the color of their reflection. It is also very helpful if you use a brush with a pointed tip in making this fine shaky stroke. Another advice I can also give for you not to be overwhelmed on copying the reference photo is to understand the image. Understand where the dark spots and light spots are so we can apply the observation we got to our painting. Although we didn't copy the same leaves on the reference, but understanding that around the leaves we see dark shadows, then a hint of light next to it, we can apply the same principle on our own drawing. We do the same process of painting the refection, contouring the leaves, and preserving light using the same color mixtures. Again, the secret to having a good reflection is to paint it in one goal, and in one layer. Make the mixture saturated but not opaque. Keep the thin, wavy strokes fluid by dancing your brush and not being too rigid. We are almost done on painting the reflection. We would just need to add some more details on the leaves to finalize the painting, and then we're done. See you on the next video for final touches.
11. Enhancing The Painting: Now that the water and reflection fragments are already done, we will add some details and texture on the leaves to finalize the painting. I start on this folded leaf on the right. I add contrast on the tone on the inner leaf. The color and tone of the inner leaf should differ from the folded portion to show the dimension. Next, let's paint the green leaf. I'll be painting another darker layer of green and create the impression of the veins through negative painting. While the layer is still wet, I drop some spots of darker green using olive green and indigo to further highlight the veins. Let's move to the main orange leaf. I pre-read the upper portion of the leaf, then I make a mix of pearling red and pearling violet. On the moist surface of the leaf, I drop this dark red mix. My mix is creamy and I remove the excess water from my brush. I continue moistening the middle part of the leaf and do the same process. Now, since the green and orange leaves are overlapping, I need to make the green leaf to pop. I do this by darkening the orange part of the leaf around the green one. Now let's add the green veins using broken lines and suggestive strokes. Make this stroke soft enough and not too defined so it won't overpower the painting. This is our final painting of oak leaves floating on water.
12. Key Learnings And Class Project: Thank you so much for joining me till the end and I hope that you learned a lot from this class. I encourage you to spend time learning about your brushes, your paints, and even your paper because that would help you level up your watercolor game. Whenever you feel overwhelmed when painting a new subject, try to observe their reference photo, see how you can possibly portray the essence of the story in an expressive way. I'm sure you'll create something beautiful. I'm excited to see the paintings that he created, don't forget to share them in the project gallery of this class. I hope you had fun and always paint from the heart and paint to inspire. See you in my other classes.
 Bianca Rayala, Top Teacher | Watercolor Artist