Transcripts
1. Learn to Create Game Assets!: In this course,
you will learn how to create game assets for games, you get to make for low poly
acids from start to finish, which are a mass room, the rock, the tree,
and the house. The gay message creation
of workflow consists of the following steps. 3d modelling the
shape of an asset, unwrapping the
three-dimensional shape into a two-dimensional UV map, painting a texture on the
surface of the 3D model, and creating LOD versions of the model to optimize
it for our game. At the end of the course, all assets will be taken to the Unity game engine where
they are made game ready by adding the necessary
components for them and saving
them as brief apps. With these prefabs, you can start building your
own game world. The scores is best suited
for those who already have at least a little bit
of experience with Blender. However, if you are a beginner who is really
motivated to learn, this course is great
for you as well. Enroll in the course
and learn one of the most essential game
development skills today.
2. Game Asset Creation Workflow: Let's start off by going through the game asset creation workflow
with a simple 3D model. Press Shift a to add a
new cube to the 3D space. Let's pretend that the modeling
phase is now complete. The next phase is to
unwrap the shape of the 3D model into a
two-dimensional UV map. So go to the UV
Editing Workspace. Make sure you have selected the cube in the 3D
view port window. The UV editor window
on the left shows how the selected model is
wrapped into the UV map. Currently it doesn't display anything because you
are in object mode. Breast DAP to switch
to edit mode. By default, primitive
shapes success the cube are unwrapped
into the UV map correctly. Therefore, you don't
have to unwrap the cube, which means you can start
drawing on it right away. To draw a Dexter for it, go to the texture
paint workspace. The cube currently
has a pink color, which means that note Dexter
has been said for it. Before you can draw on the cube, you need to create
a new texture. First, make sure you are in the texture paint mode in
the upper left corner of the 3D viewport window
also makes sure that the first step of the
properties window on the right side of the
interface is open. The small Plus button to
create a new texture, select the Base Color
option named a texture, for example, cube texture. The default pied and wheat
of the dexter is 1000024. Big source. When
creating a Dexter, it's better to
create a large one, as it can always be
made smaller if needed. If you're a good texture that
turns out to be too small, enlarging it will only make the details in it look blurry. The extra follow a practice
called the power of two. Simply put, that exercise is recommended to be any of these. You can change the default
color from the color setting. The alpha setting
determines whether that the extra has transparency or not. In this example,
you don't need it. So de-select, it, leaves the remaining settings as
they are, and click, Okay. The cube turned
black according to the default color of the
texture you just created. Currently, the new
texture doesn't appear in the image editor
window open that they externalist to the left
of the New button. And select cube texture. You can zoom in and out in the 2D space with
the mouse wheel. The more hold down the middle mouse button
while moving the mouse. You are now ready to draw
the texture for the cube. You can draw either
directly on the texture in the image editor window
or on the surface of the 3D model in a
3D view both window. When drawing a Dexter, it's a good idea that
remember to save it often. Save that texture. Hover your mouse over the
image editor window and press Alt S. Save the
texture to your desktop. For example. They explorers created
in this course are saved in PNG format as this format doesn't lose its quality like
the JPEG format. The next time you saved that, the extra without it overrides the previous
version of it. When you make changes
to the texture, you will see that the image
text in the upper left corner of the image editor window
is followed by an asterisk. This means that the
texture has not been saved since
the last changes. When you save the texture,
the asterisk disappears. Remember that when
saving the texture, your mouse must be over
the image editor window. After saving the texture, it makes sense to
save the model. These can be done
with Control S. Save it in the same
location as the texture.
3. Basics of Texture Painting: Let's now go through the
basics of texture painting. The toolbar in the
image editor window contains tools for editing that extra tool can
be used for drawing. This often tool is used
the blur that Dexter. This mirror tool can be used
this mirror the Dexter. You can use the
clone tool to clone existing areas in the texture. The Cloud area of the
dexter is determined by the location of the 3D cursor
in the 3D view port window, the move the 3D cursor, hold down control and click
the left mouse button. With the fill tool, the whole texture or parts of it can be filled with
a specific color. Select the Draw tool. Let's get to know the
keyboard shortcuts for drawing textures. To open a small tool menu, click the right mouse
button from this menu, you can quickly change
the selected color. Among other things. The James, the size of the brush, click and move your mouse. You can adjust the strength
of the brush with Shift F. Move your mouse to
determine the strength. The copy an existing color in the texture of your mouse
over the color and press S. Right-click again to
open the tool menu, you can change the
blending mode with the options found in
the drop-down menu. E to change the stroke
method of the brush. Return to the
modeling workspace. Tab to enter object mode. In order to see that the extra on the surface
of the cube, you must change the
shading of the object. Press C to open the
shading mode menu. You are currently in solid mode. Select material preview.
4. Student Project: One of the most important
parts of learning is receiving feedback
from other people. This is why I encourage
you to add an image of your project to the
course's project gallery. The project can be one of the
models made in this course. A model you have made
outside of this class, or for example, a game
world you are working on. If you want, you can add multiple projects to
the project gallery. It would be great to
see what you have made. I will try to give
feedback on each project. You may also receive feedback
from other students. To add a project, go to the Projects and Resources tab and click the
Create Project button. After that, you will need
to upload an image of the project and fill in the required
information about it. Finally, click the Publish
button to publish the project. This is a great way to
support this course as it improves its
discoverability. If you decide to add a project, I would really appreciate it. Now let's start
creating game assets.
5. Mushroom 3D Modeling: Let's begin by creating
the first game assets, which is a marsh room. At this point, you
may want to download our list of Blender or
keyboard shortcuts. You can find it in the
resources of this course. The first phase is 3D modelling the shape
of the mushroom. But before starting that, it's a good idea to look for some inspiration with a
cougar or emits shirts. This may have a huge impact on the outcome of the
tree, the Model S, It's difficult, especially
for a beginner, to start doing anything
entirely on their own. Some images with the words
painted low poly mushroom. For example. This image shows you
some examples of what the geometry and texture of a
3D Marsh Room blow up like. Let's start by adding a
new cylinder which shift. By default, the cylinder
is not low poly. The simplify its geometry opened the Add Cylinder menu in the lower-left corner of
the 3D view port window. If you no longer see the menu, delete the existing cylinder
and create a new one. Changed the number of vertices
in the cylinder to eight. For example. Now you have a low
poly cylinder. You see in the upper-left
corner of the 3D view both window that you are
currently in object mode. To edit the geometry
of the cylinder, you must enter edit
mode with dab. Let's start by
shaping the cylinder, the resample, the
cap of a mushroom. Makes sure you have selected the entire student or
by pressing a scale, the cylinder or smaller with
S determines the size of it. Move your mouse and confirm the action with the
left mouse button. Next ad for a group guts to
the cylinder over your mouse, over it and press
Control R. Scroll the mouse wheel until you see four yellow circles
in the cylinder. You can also use the
page up and page down keys to change the
number of lobe guts. Click the left mouse button
to confirm the action. After that, you can slide them on the surface of the cylinder. Click the right mouse
button to cancel these action so that they stay
at their default position. Now select the entire
cylinder with a, scale it on the
c-axis by pressing S, C, make the cylinder flat
by moving your mouse. Firm the action with
the left mouse button. Let's make the top of
the cylinder pointy, press three to end
their face mode. Select the face on
top of the cylinder, whereas the keyboard shortcut M and select the Add
center option. This is how you can merge the selected
vertices in the one. Let's make the cap rounder. Go to the side view by
pressing numpad three. If you're a keyboard
doesn't have a numpad, you can switch to
the side view by clicking on the gadgets x-axis. Now in their vertice
mode, by pressing one, select the lavas loop cut by hovering your mouse over it and holding down Alt while selecting it with the
left mouse button. Scale it smaller with S. Leave the loop got above untouched and select
the one in the middle. Hold down Alt while selecting the loop cut with the
left mouse button. Scale it down with S. Select the loop got above this one and scale
it smaller with S. Do the same for the upper
most loop got as well. The top of the gap is
too sharp at the moment. Select the top vertices and bring it down slightly with G. See, the gap could
be a little thicker. Select the entire object with a and scale it on
the c-axis with S, C. Actually decide view or down the middle mouse button
while moving your mouse. Let's now add this dark, that is the leg of the
mushroom versus three. To end their face mode, select the face under the cap. Insert a new face inside
the selected face with I, move your mouse to determine
the size of the new phase. On firm the action with the left mouse button
return to the side view either by pressing numpad three or the x-axis
of the catch-up, press G to move the
selected face down a bit. Now extrude new geometry
from the selected face. With the new geometry, automatically moves
on the right axis, move your mouse down and confirmed the action with
the left mouse button. Now press S scale of the
selected face, slightly larger, extrude new geometry
again with E, movie or a mouse and a confirmed the action with the
left mouse button. Scale their face smaller with S. Once again, extrude
new geometry with e. Move your mouse down
and confirm the action. Scale, the selected
face smaller with S to make the bottom
of the stock round. The 3D model of the
mushroom is now complete. You can make final adjustments
to it if you need to. Step two, enter object mode of the assets made
in this course, we'll have a smooth
shading style. Currently you can
see the edges of the mushroom because
it uses flat shading. Click the right mouse
button to open a menu, select Shade Smooth to
change the shading style, the smooth press Control
S to save the model. It's a good idea.
The named approach it with a descriptive name, name it mushroom 01
number was added the name because you never know how many different mushrooms you end up making for
your game world. If at some point
you plan to make a second different
kinds of mushroom, you would obviously
name it mushroom 0 too.
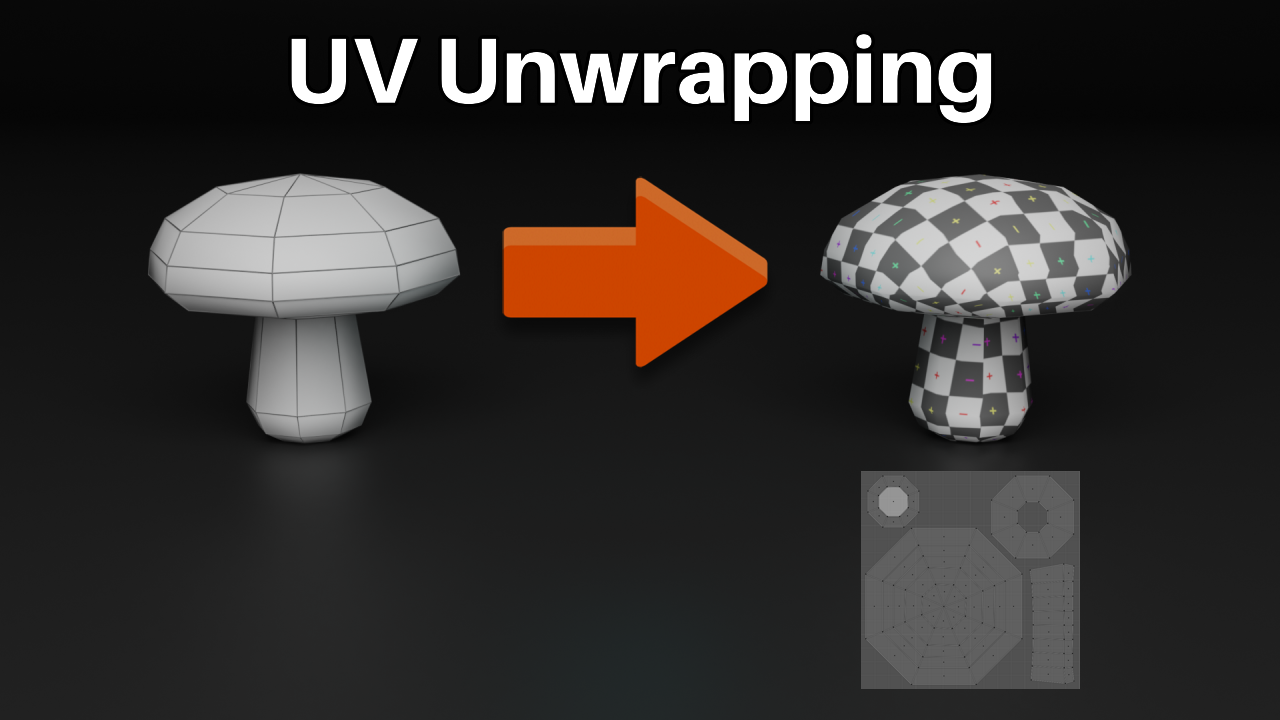
6. Mushroom UV Unwrapping: The next phase is to unwrap the three-dimensional
shape of the mushroom into a two-dimensional UV map so that a Dexter
can be drawn on it. Open the UV Editing Workspace. Enter edit mode with the app and select the
entire object with a mass room is currently unwrapped like
a default cylinder. It was at the beginning
of the previous lecture. There is also too much
empty space in the UV map. In order for the texture
of the mushroom, the log as good as possible, the object must be
unwrapped better. Breasts you, they'll all
be in the UV mapping menu. There are multiple options
to unwrap an object. Let's use the first option
called unwrap for these model. When you select that
option, nothing happens. When using this option, you have to add seems
to the model to define how the object
should be unwrapped. Make sure your mouse is over the 3D view port window and
press to enter edge mode. Select a loop got below
the gap by holding down Alt while selecting it with
the left mouse button. Breast due to open the UV mapping menu
and select mark seam, selected loop got turned red because it was marked as a siem. Select the entire object with a and open the UV
mapping menu with you. Unwrap the model with
the unwrapped option. Now there are two circles in the UV map that are
the parts above and below the seam logging at the 3D model and
the current UV map, it can be seen that the part above the seam be
swell and wrapped, but there are overlapping faces in the part below the seam. This can be confirmed by selecting the faces
of the object. Most of the time, an object's shouldn't have overlapping phases
in the UV map. Because then if you
draw on one of them, the other one will
also be affected. Let's add more seems to the mass room to get rid
of the overlapping phases. Make sure you are
in edge mode by pressing to select a loop cut between the cap and
the stock by holding down Alt while selecting
with the left mouse button, open the UV mapping
menu with you and mark the selected loop got SOC team with the
mark scheme option. Right after that, add a seam
to the bottom of the stock. Select the loop guard
in the middle of the lower part of the
stock by holding down Alt while clicking with the
left mouse button for SU and select mark seam. Let's now try to unwrap them. Model, select the entire
object with a breast you, and select the unwrapped option. There still seems to be
one slightly vague area in the UV map that turns out to be the top part of the stock. Let's add another
seem to the stock. Breast to enter edge mode. Select one of the upright
edges of the stock, then hold down Shift to select
a shorter edge below it. Rescue and select mark seam. Now you should have a seam
that starts from the middle horizontally and ends at
the lowest horizontal seem. Select the entire object again with a and unwrap it with you. The unwrapping part of this
phase is now complete. As you can see, unwrapping
a model which seems require some trial and error to make the
end result creates. The next part of this
phase is to fill in the empty space
of the UV map. You can select vertices, edges, and faces of the UV map in the same way as
the geometry of a 3D model. You can change the selection
mode with keys 123. In addition, you can also
select islands with the F4 key. The islands of the UV map are determined by the seams
you added earlier. You again Edit
islands by moving, rotating and scaling them. Let's modify the
island to feel as much of the UV map as possible. You can move the
selected Ireland with g. The rotate on Ireland breasts are the scale an island risks S. It's good to leave some
space outside the edges of the islands in case you need to draw a little bit
over the edges. The UV map is part
of the 3D model. So when you save the model, it's UV map is outsource saved. Press Control S to
save the model.
7. Mushroom Texture Painting: The next phase is to draw
a Dexter for the mushroom. It's a good idea to start
drawing the texture by first creating a base
color and larger details. Then moving on to
smaller details, you can draw well
with the mouse, but if you have a
drawing tablet, it can make the
drawing process more pearlescent with a tablet pen. It's possible to influence
the strength of the brush based on how hard the pin is
pressed against the tablet. This is something you
may want to consider if drawing textures
becomes your thing. The more time you
spend throwing, the more detailed
and finer that the extra you get in these videos. I'm not going to
spend too much time fine tuning the textures, but you can, if you want to, go to that extra
paint workspace, click the little plus button in the Properties window to
create a new texture. Select the Base Color option, name it mushroom texture. Turn off the Alpha setting
and click the Okay button. Select the texture
from the texture, at least in the
image editor window. Let's start by filling the
gap with the brown color. When you only want to affect their specific
area of the model, you must activate the paint
mask sitting with em. You can see the mask
setting activated in the upper-left corner of
the 3D viewport window. Currently the entire
mushroom is selected for the mask press Tab
to enter edit mode, and three to end
their face mode, to remove our selections
from the object, press up a, select only
the geometry of the gap, hover your mouse over it and
press L. This is how you can select areas of the object that are
separated by seems. Breast tap the return
to texture paint mode. With the paint mask setting, you again draw on
the object affecting only the areas you
selected in edit mode. Select the field tool from the toolbar in the
image editor window. Opened the Smile tool menu with right-click and
select a brown color. Click on the cap, the color it brown. Next, you should call off
the stock of the mushroom. To do this, you need to select the opposite areas of the
mushroom for the mask. A quick way to do this
is to press Control I. Now the mask prevents you
from coloring the cap, but lets you call or the stock. Use the right mouse button to
select a light gray color. Feel the stock with
the selected color. Deactivate the paint
mask sitting with m. Now that the base color has been created
for the mushroom, you can move on to drawing color variations
and details on it. Because the mushroom
is symmetrical on both the x and y-axis, you can use mirroring
to draw the texture. In the Properties window, expand the symmetry section, activate both the x and y setting selected throw tool and try to draw
something on the cap. When you draw something, it gets mirrored on
each side of the gap. This makes your work more
efficient because you only need to draw on one
side of the mushroom. Press control C to
undo the last action. Currently the mushroom
reflects slide, which makes it a
bit difficult to draw to eliminate
reflections on the object. Open the viewport shading menu in the upper-right corner of the 3D viewport
window and select the flat option for
the lighting setting. A couple of different
colors to the cap, then makes them
start by selecting the color of the gap by
hovering your mouse over it and pressing is right-click and change the
color to be a little darker. Use Shift F to have the
strength of the brush. Draw the darker color
all around the cap. Select the page scholar with the right mouse button and add
it around the cap as well. Select a new color with
the right mouse button. Jews a dark brown color. The mix, the existing colors. Now there are some color
variations in the cap. Let's now move on to the
stock of the mushroom. Select the current
white-collar of the stock with S. Make it a bit darker with
the right mouse button. Added a new color all
around the stock. Right-click and select a
slightly brownish color and add it on top
of the white color. Select a gray color with the right mouse button and mix the current colors with it. Smear the area in the CAP where the brown color or above meets
the gray color or below, select the smear tool. This reduces the angularity
of the mushroom. Let's now add dark thin
lines under the cap. Selected draw tool. Use f to reduce the brush size. To change the stroke method
of the brush to line, you can draw straight lines. Once you have added
enough lines, select the smear tool to
make them less noticeable. Press F. Do we increase
the brush size? Select the Draw tool, dark and both the bottom of the gap at the
bottom of the stock. Right-click and select
Multiply as the blending mode. Multiply blending mode can
be used to darken areas. The opposite of this is
the screen blending mode, which can be used the
light in certain areas. Press F2, we increase
the size of the brush. Use Shift F to
decrease its strength. Be sure the chance to
stroke method with E back to the default,
that is space. Now, draw several dark layers. You can smear the texture by
selecting the smear tool. If necessary,
breasts F determines the size and Shift F to
change its strength. There are clear lines
in the texture. You can also smear them. Extra of the mass
room is now complete. Hover your mouse over
the image editor window, press Alt S to save that the extra and Control
S to save the model. Go to the modelling workspace and press Tab to
enter object mode. Whereas C to James
to Shading mode of the object, the
material preview. Let's make some
changes to the model. Risk noun, bad three, the sweets to decide, view more of the object up so that it sits
on the green line. Breast G, C. Confirm the action with the
left mouse button. The exit, the side view, hold down the
middle mouse button while moving your mouse. Press Enter to open the side panel of the
3D view bought window. It's a good idea to raise
at the pivot point of most game assets before
taking them to unity. Currently, the pivot point of
the mushroom is in its cap. The pivot point is this
little yellow dots. It's lowercase and
values are displayed in the lowercase and
section of the side panel. You can reset the
location with control a, select the Location option. Now there'd be about
point is at 0. Next, you may want to
check that the size of the object is
somewhat realistic. Mushrooms are up to 12
centimetres or five inches high. This mushroom is currently
30 centimeters high. Scale of the mushroom
smaller until they see value in the
dimensions section of the side panel is around
0.12 meters or 0.4 feet. As you can see by default, the object scales according
to its pivot point. After scaling the model, it's a good idea to raise at
its scale values as well. Press Control a and
select the scale option. Now the location and rotation values of the
mushroom should be 0, its scale values should be one. Next, you should name the
model with a descriptive name. You can see in the
outliner window that the current name of the
model is still enter, double-click it and
rename it Marsh Room 01.
8. Mushroom LOD Versions: The final phase for
the mushroom is to create two other
versions of it, or the level of detail system in Unity makes sure you have
selected the object. Use Shift D to duplicate it. Right-click so that it stays in the same location as
the original object. You sift the once
again to duplicate it, click the right mouse button. Now the outliner window
should display three objects. For unity to automatically add the level of detail
component to the object, It's versions must
be named correctly. Double-click the top object
in the outliner window, add underscore LOD
0 after its name. This version is the
default version of the mushroom that will
have the most geometry. Makes sure you typed the
name correctly or Unity won't automatically add
the LOD component to it. The word LOD should be
written in capital letters. Double-click the object
at the top, again, rename it mass room 01,
underscore LOD one. There will be slightly
less geometry in this version than in
the default version. Now, double-click the remaining
object and name it mass room 01, underscore LOD two. Let's now make the LOD one
and LOD two versions simpler. Hide first two in the outliner window by clicking the eye
patterns next to them. Select Version one. You can easily reduce
the geometry in an object with the
modifier called decimate. Open the modifier
properties tab, click the Add Modifier dropdown
menu and select decimate. The modifier didn't do any
changes to the model yet. Open the overlays menu in
the upper right corner of the 3D view port window and activate the statistics setting. You can now see the drying
or count of the object from the upper left corner
of the 3D view port window. They're more drying
or the object has, the more detailed
it usually looks. But as the number of
triangles increases, so does the time it takes
to draw it in the game. There are currently 142
triangles in the mushroom, which is already a
very low number. However, it's good to
note that if there are ten mushrooms visit
ball at the same time, the device has to draw
1420 drying moles. While this isn't a
big number either, even small things
can add up pretty quickly if you don't
pay attention to them. Let's now adjust the values of the decimates
modifier to see how low the number of
triangles becomes, is that the ratio of value, the 0.5, the appearance of the
mushroom changed slightly. The number of triangles
in it changed. Also. When making LOD versions, you shouldn't lower at the geometric too much bigger Stan, diversion change in the
game will be noticeable. The goal is to make the version change as
smooth as possible. To accept the decimate modifier, leaked it down
pointing arrow button, and select the Apply option. Now hide version one
and unhide version to add the decimate modifier
to this version as well. These time set the
ratio of value to 0.25. The mass room
became very simple, but when viewed from afar, it probably won't be noticeable. Accept the modifier by
clicking the arrow button. Select Apply. Use of age to unhide all
versions of the object. Breast Control S to
save the object. Let's take the model
out of Blender now, navigate to File. Export, FBX. Select Desktop as
the file location. Because the access
in Blender are slightly different from
the axis in Unity, you will need to activate
the apply transform setting so that the model
behaves correctly in Unity. Click the export FBX button.
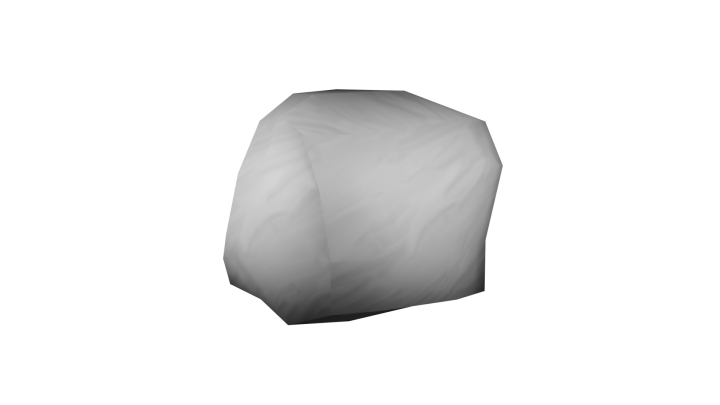
9. Rock Texture Painting: The next game assets
will be a rock. Let's start creating it by
first drawing each texture. Unlike the mushroom texture, Let's make this one seamless. When the texture is seamless, it will repeat
smoothly and tasks. It can be easily added. The several different
sized and saved variations of the object go to the
texture paint workspace. Because there is no model
in the 3D view port window, a new Dexter must be created
in the image editor window. Click the New button named
the texture rock texture. Disable the Alpha setting
and click the Okay button. You can enlarge the image
editor window if you wish. Since you are making
a seamless texture, it makes sense to activate
the setting that repeats that extra brace in the open the side panel of the
image editor window. Go to the View tab and activate
the repeat image setting. Now when you draw something, it repeats infinitely
on every side of it. However, you are
not quite a pole the draw across the
borders, as you should. Go back to the tool
tab and activate both the x and y-axis
from the tiling section. Breasts and to close
the side panel. Let's start by adding
the base color. Select the fill tool, right-click and select
a dark gray color. Now select the Draw tool, differentiates of gray on
top of the base color. Select a darker gray color
with the right mouse button. You shift. If do decrease
the process strength. You can select the
multiply blending mode with the right mouse
button to darken areas. If you are not satisfied with the current brush,
press control C, to undo the previous action, it may take awhile to
find the right shade. You can also reduce the
size of the price with f. When you want the lighter areas, you can select the
screen blending mode with the right mouse button. Finally, select this mirror tool and smear the colors together. When making a seamless texture, you should assume out
and check that that extra doesn't have
to clear repetition. When the texture is complete, breast out S to save it. Select the desktop as
the file location. Let's start the 3D
modelling face off the rock from an AMD
Blender project. So close this one. The project itself
doesn't need to be saved.
10. Rock 3D Modeling: Let's start 3D modelling
the rock from a cube. You shift a to add one. Press Tab to enter edit mode. Bring your mouse over the
cube and add two-loop gods. Do it with Control. R, The James, the
number of loop guts. Scroll the mouse wheel, one firm the action and right-click to cancel
the sliding of the gods. Do this operation on
each side of the cube. Breast Control R
to add a loop gut. Scroll the mouse wheel to
change the number of them. Got a firm the action and right-click to cancel the
sliding off the loop guts. Now that the cube has
a Beta of geometry, Let's make it look like a rock. Press a to select
the entire object. Right-click to open a menu. Select the smooth
vertices option. The cube became
slightly around her. Repeat this operation
a couple of times. Open the menu with the right mouse button and select the smooth
vertices option. Open their menu again with
the right mouse button, but this time, select the
randomized vertices option. These function see if it's
the vertices of the cube. Randomly. Repeat this
operation a couple of times. There arc is currently very sharp angled press O to activate the
proportional editing tool. You will know this,
the tool getting activated at the dub off
the 3D view port window. Make sure you are
in the vertex mode. Select one of the
vertices of the rock, pressed G to move the
selected vertices. You will notice
that the geometry around the vertice,
more sweat it. You guys scroll the mouse
wheel to determine how far the geometry
around it is effected. Shape the object by moving
random vertices which G, and scrolling the mouse wheel. When you are satisfied
with the result, turn off the proportional
editing tool with breast DAP to enter object mode to make the
objects shading smooth, right-click and
select Shade Smooth. Use Control S to save the model named their file
name of the object Brock 01. At this point, if you wish, you can make several rocks
that are different in size and shape and
name them Brock, Brock 03 and so on.
11. Rock UV Unwrapping: The next phase is to unwrap
the 3D shape of the rock into a UV map goal that
they UV Editing Workspace. Press Tab to enter edit mode and a to select
the entire object. Currently they're rock is unwrapped like a primitive cube. It should be unwrapped better so that the texture you drew earlier would look as good as possible on the surface
of the 3D model. Rescue the open the
UV mapping menu. Let's try the smart UV
project option on this model. Selecting this
option opens a menu from which you can change
the unwrapping settings. Click Okay to unwrap it
with the default settings. Smart UV project unwraps the model as the
program sees best. The unwrapped option you
used earlier is more like a manual way to unwrap a model
because they do with that. You had to add seems
to their model. With smart UV project or model
can be unwrapped faster, but the end result
is not always as good as a model unwrapped
with the unwrapped option. Let's now add the previously
made texture to the rock. To do this, you need to a
new material that the rock. Open the material
properties tab. Click the New button to
create a new material. First, change the shader used by the material from
the surface sitting. Select emission from the list. With the shader. You are able to
see that the extra better the texture for
the material leaked. This small yellow circle to
the right of the color text. Select Image Texture
from the list. Now click the Open button, locate the previously made
rock Dexter and select it. The Dexter opened automatically in the image editor window. Hover your mouse over the 3D
view both window breaths, see the change the shading
mode of the object, the material preview, and you stab the sweets to object mode. When you look at the
texture in the rock, you will notice that there are a little too clear lines in it. In addition to this, the rock appears to have a very low resolution texture because the details
in it is quite large. Let's try another
unwrapping method. Return to edit mode with tab and select the
entire object with a rescue and select
Cube projection. Now that the extra on the
model looks more detailed. This happened because the
cube projection method with the islands of the UV map
on top of each other. And now they cover a much
larger part of the texture. In the masterful Dexter
you made earlier, this would have been a problem. But in this model, it's not a problem
because the texture was not drawn directly on
the surface of the rock. If you still see two
clear lines in the rock, you can try the move and roles. They'd the islands in
the UV map suites to the modelling
workspace and press Tab to end their object mode. Use C to change the shading
mode to material preview. Breast numbered 32
suites to the side view. Rocks are often
partially underground, so I'll bring it
slightly upwards. Press G, C, move your mouse. And court affirmed the action
with the left mouse button. Hold down the middle mouse
button while moving the mouse, do we exit the side view? Breaths in Door by the side panel of the
3D view port window. First, reset the
location of the rock, press Control a, and
select location. The rock is currently
two meters high. Are the rocks of our sizes
can be found in nature. Let's steal scale this
one a bit smaller. Now raise it the optics
scale values with control a, select the scale option. The last step is to
rename the rock. Darpa look like its name
in the outliner window. Name these objects rock 01, underscore LOD B goes
in the next lecture, you will create the other
LOD versions for it. There'll be honest,
these game acid didn't end up
looking that great. But that doesn't matter
because it is more important that you will learn the
game asset creation workflow thoroughly. When you go through the
same phases enough times, they will stick in
your mind for sure. Use Control S to save the model.
12. Rock LOD Versions: The next phase is to make two simple versions of the
rock four unities LOD system. Make sure you have
selected the rock. Press Shift D to duplicate it. Click the right mouse button
to cancel moving the object. Duplicate it once
more with Shift. Right-click right after. Renamed the rocks in
the outliner window. The original rock is
already named correctly, so just add the correct number after the other two versions. Hide version 0. And to select Version one, open the modifier
properties tab and add a DC made modifier
to the model. Let's see what the
rock looks like when the ratio of value
is changed to 0.5, the rock looks good. So accept the modifier by clicking the down
pointing arrow button. Select the Apply option. Now hide version one and unhide version to make
sure you select it. Add the desi made modifier, set the ratio value, the 0.25, except the modifier. Unhide all the versions in the outliner window by clicking the I button
next to their names. Use Control S to save the model. Let's take the model
out of Blender, navigate the file, export FBX. Be sure to activate
the apply transform setting and click the
export FBX. Pardon.
13. Tree 3D Modeling: The next asset that will
be created is a tree. This is already a slightly
more challenging model. Let's start with the
trunk of the tree. Use Shift a to add
a new cylinder. Right after that, open
the Add Cylinder menu in the lower-left corner of
the 3D view port window. Make this cylinder
simpler by changing the number of
vertices in it to 16. Now press G, C, move this cylinder
on the c-axis. Hold down control to move
the cylinder up one unit. Confirm the action, then
release the control key. Use Control a, reset its pivot point by selecting
the location option. At this point, it's
a good idea to open the side panel of
this window within. First, scale the cylinder
smaller on all axes by pressing S. Now scale it bigger only
on the c-axis by pressing S, C, make the tree ten meters
or around 30 feet high. Keep an eye on the c-axis value of the
dimensions section. Now enter edit mode
with the verres three this face to face mode and select the face on
top of the cylinder. Scale it smaller so
that the cylinder begins to resemble
a trunk of a tree. Add a loop got in the
center of the trunk, hover your mouse over
it and press Control R. Confirm the action and slide the loop got to
the bottom of the trunk. Confirm the action. Now add a new loop
gut with control are confirmed the action and click the right
mouse button. Now go to the top view
with known bad seven. Activate the proportional
editing tool with breast one to make
sure you are inverted mode. Now select the
vertices at the top, breast G to move it up. Scroll the mouse wheel until the proportional
editing tool affects only the vertices near
the selected vertices. Now select the lowest vertice
and do the same for it. Move it away from the
center with g. Lastly, do the same for the word is on the left and the
one on the right. Select the outermost
vertices in the middle of these four vertices and move
them closer to the center. Scroll the mouse wheel. If you need to. Press O to turn off the
proportional editing tool, you can move the
outermost vertices closer to the center to make
the trunk less angular. Exit the top view, hold down the
middle mouse button while moving your mouse. Hold down Alt and select the second lowest loop
cut at the bottom. Breast, G, C. The more we
down scale it slightly larger with S breast step. To return to object mode, the tree trunk is now complete. Let's make the branches
of the tree from planes on which the branch texture
will be added later. Make sure you select
the tree trunk, press H to hide it. You shift a to add a new plane. Make the plane device S big S, then the two key for empty action there or
edit mode with that. And make sure you have selected
the entire object with a. Now move the plane
on the x-axis by two units so that its pivot point remains
on the edge of it, this g, x and hold down control for empty action and
release the control key. You can add some geometry to the branch so it's
not completely flat. Use Control R to add a new loop guard to the
center of the plane, or for empty action and click
the right mouse button. Now press G, C and
more with up slightly. Let's add another loop
guard to the blade so that there will be
four phases in it. Use control are confirmed the action and click
the right mouse button. Now press G to move
it up as well. Select the outermost edge of the plane while
holding down Alt. Move it up slightly with G, C. Now press Tab to
enter object mode. Best G, C to move the brands up. Press Alt H to unhide
the trunk object. Rotate the brands so that
it doesn't point upwards. Make sure you have only selected the branch object
by clicking on it. The branch should be
rotated on the y-axis. So breast are why currently the brands is too
far away from the trunk. Use it. Move that
branch in edit mode to keep the pivot
point in the center. Press Tab to enter edit mode. Make sure you have selected the entire object
with a move that brands are the x-axis so that it looks like it's at
that's to the trunk. So press G x step to
end their object mode. Now it's time to add
branches around the trunk. Duplicate the branch
by pressing Shift. Click the right mouse
button to cancel moving it. Rotate the new branch to the
other side of the trunk. To do that, press R, C. The brands moves
smoothly along the surface of the
trunk because it's pivot point is in
the center of it. Now press G, C to move the
selected branch down slightly. You see the duplicate
the branch, then click the
right mouse button. Breasts are, see the row data, new brands about 90 degrees. Move this one up
slightly by g, C. You shift the again to
duplicate a new branch. Rotate the object to the other
side of the trunk with our C. You can also move it to a different height with G C. Now select our four branches
by holding down Shift. While you select you shift the duplicate
the selected branches. Breast GC demo of the
new brands is up, rotate them with our C. You can select individual
branches and move them to different heights to
create some variation. You can make the
branches smaller the higher they are in the tree. Select the new branches
by holding down Shift. Scale them smaller with S. Use Shift D to duplicate
these branches. Breast GC the move them up, move and rotate them randomly, then scale them to be
a little bit smaller. Id and you've got the
hang of it by now. So keep adding new
brands as to the trunk. When you reach the
top of the trunk, you can move the branches
to about the same level. Now go to the top view
with number seven. Cover the top face of the trunk with the uppermost branches. Move the four
branches so that they completely cover the
top face of the trunk. Since you are in the top view, all you have to do is
press G. In this view, the brand says Don't move
on the c-axis at all, but only on the x and y-axis. The exit, the top view hold down the middle mouse button
while moving your mouse. 3d modelling of the
tree is now complete. You can find to need later
when you are able to see what it looks like
with the brands texture. Now combine all the
objects in the tree. Use a deselect all
of them and press Control J to join them together. The reason at all of
the transform values of the three breast control
and select all transforms. Right-click and change
the shading style off the object to smooth with
the shade smooth option. The last step is to name the
tree by their correct name. Double-click its name in the
outliner window and name it 301, underscore LOD. Save it as 301.
14. Tree Branch Texture Painting: Let's draw a branch
texture for the three in a new Blender project that
the extra is going to consist of a single branch
that can be unwrapped, the area branch of the tree. Click the New button to create the new texture,
name it, branch. The extra makes
the background of the texture transparent
over the color tool. And Jane sees a value to 0. Keep the Alpha
setting activated, and click the Okay button. This texture should also
be made in black and white so that it's color can
be changed freely in Unity. Make sure you have selected a white-collar with the
right mouse button. Us FDA reduce the
size of the brush. Draw the outline of
the following shape. Try to draw the
shape as close to the center of the
texture as possible. Now select the fill tool
and filling the branch. Select the twirl tool again and feel the small gap
around the shape. Right-click and change
the blending mode. Select the eraser alpha setting. With this blending mode, the existing colors in the texture can be
made transparent. Breasts and select line
as the stroke method. Draw lines on both
sides of the branch to create small details
for the texture. And change the stroke
method back to space. If necessary, increase the
size of the brass with f, make the lines less systematic. In addition, you can improve
the shape of the branch. Right-click and J's the
blending mode to multiply. Also make the color
a little darker. You can add color
variation to the branch. Use Shift F to change the
intensity of the brush. Save the texture with Alt S blows the project without saving.
15. Tree UV Unwrapping: Let's create a branch and
trunk material for the three. Breast tap to enter edit mode. Opened the material
properties tab, create a new material
with the new Byron. Currently the entire object uses this newly
created material. You can confirm this by
clicking the Select button. With this button,
you're going to select parts of the geometry that are currently using the
selected material used to de-select button, to de-select the parts of the geometry used
by these material. For the sake of clarity, renamed the material
by double-clicking on its name, name it trunk. Now create a new material by first clicking the
little plus button, then the new button
name it branches. Currently know about off the
object uses these material. You can confirm this by
clicking the Select button. In order for the brands as to be set to use these material, they must first be selected. The fastest way to select the branches is the first select the trunk by hovering your mouse over eighth
and pressing L. These keyboard
shortcut can be used to select individual
parts of an object. Now press Control I to
select the branches. Make sure you have selected
the branches material. Now click the sign
pattern to set these parts of the object
to use these material. Jst shader used by the material
from the surface sitting. Select the emission option so that the branches
don't reflect light. Now click the yellow
circle to the right of the color setting and
select image the extra, click the Open button and select the branch texture
you made earlier. Resi DJs, the shading mode,
the material preview, the branches are already
unwrapped correctly bought their rotation in
the UV map is incorrect. Hover your mouse over the UV editor window and
press a to select everything. Breasts are, then
hold down control and rotate the selected parts
90 degrees to the left, confirmed the action and
release the control key. Let's then modify the
UV map of the trunk. Make sure you have
selected all the branches. Hover your mouse over
the 3D view about window and press H to hide them. Select the trunk material
from the material least. Press a to select the
geometry of the trunk. When you look at the UV map, you can see that the trunk is unwrapped like a
primitive cylinder. That's good, but the faces
below and above it take up too much space compared to how little the player
is going to see them. Make sure your mouse is
over the UV editor window and press F4 to enter
Island mode in the UV map. Hold down shift and
select both circles. Press G, the move them out
of the UV map for a moment. Breast out a to D,
select everything. Now breast one to
enter a vertice mode. Hold down the left mouse button, and use the book selector to select all the
lowest worldly says. They attempt to the bottom
of the UV map, breast. Gee, why? Confirmed the action? Use Alt a duty
select everything. Now press for when
they're Island mode and hold down shift to
select the two circles. Scale them very small with S, breast G, the move them to
the corner of the UV map. Let's next draw
the trunk texture directly on the
surface of the trunk.
16. Tree Trunk Texture Painting: Move your mouse over the 3D view port window and press of age the
unhide everything. Make sure you have selected
the branches material from the material list and press the Select button to
select only the branches. Now go to the texture
paint workspace. Hover your mouse over
the 3D viewport window and press M to activate
the paint mask tool. Now press H to
hide the branches. Then press Control I to select
the trunk for the mask. Select the trunk material
from the material list. Now add a texture
to the material. Click the plus button in
the Properties window. Select the Base Color option, name it drunk the extra. James is default color to brown. There are enough the Alpha setting and click
the Okay button. Open the texture in the
image editor window. Leak the texture list next to the New button and select
the trunk texture. The trunk currently
reflects light. The fixed this, open the
viewport shading menu, and select flat as
the lighting option. Let's start by creating
a base color for the body with a couple of
different color variations. Click S over the trunk
to select each color. Now right-click and choose a slightly lighter brown color. Use shift if the decrease
the strength of the brush. And if the resize it. The current color
around the trunk. Now choose a slightly
greener color with the right mouse button. Draw these color
all over the trunk. Select the smear tool to
blend colors together. If this mirror tool doesn't work properly on your computer, try this mirror
smaller areas at once. If that doesn't help, either, you can mix the colors
with the draw tool and with a brown color in
the mix blending mode. Now add a darker color to
the bottom of the trunk. Select the Draw tool. Press F to increase
the size of the brush. You sift F to decrease
the strength. Blending mode to multiply
using the right mouse button. You see if the change
the strength of the brush to make the trunk
less dark as you go up. The extra is now complete. Hover your mouse over the image editor window and press Alt S to save the Dexter. Save the project as
well with control.
17. Tree LOD Versions: Now let's see what the
finished HDRI looks like. Do display all parts
of the object, press Alt H. Risks
see the change, the shading mode, the
material preview. There, object mode. With that, you can take a closer
look at the tree. It would be good to see
what their branches look like without
their black part. The dual of this material of the branches must be modified. Now for the first time, let's go to the
shading workspace. Open their material
properties tab. Select the branches material. Below the 3D viewport window, you will see the
shader editor window from which you can see the structure of the
selected material as nodes. Make sure your mouse is over
the shader editor window. Press Shift a to open a menu link certs to search
for a specific node. Transparent and select the
transparent BSD f option. Move the node over
the emission node. Now use Shift a again
to add another node, clique certs and type mix. Select the mix shader option. More way to the right of
the transparent note. Hold down the left mouse
button the more of the red material output
node to the right. Currently the added
nodes don't affect the material because
they are not connected. To denote system. Drag the mix shader node
over the line below it, the connect it to the system. Now pull a new line from
the green circle of the transparent node by holding down the
left mouse button, move it to the green
circle of the mix shader node to which the emission node is
currently connected. Now the emission node moved
to the lower green circle. Make sure the
transparent node is connected to the upper green
circle of the mixed sailor. Note, now hold down
the left mouse button. The ball align from
the gray circle of the image texture node to the gray circle of
the mix shader node. The final step is to change the blend mode setting
for the material. These can be changed either
material properties window, open the blend mode
drop-down menu, and select the Alpha clip option to make the branches
look as they should. The brand sticks are set
in the image texture node is best for the
emission shader. Shaders to determine
how, for example, lights affect the
surface of the material. This information is passed
to the mix shader node, which can be used to combine two shaders based
on its FAQ value. The fact value is obtained from the alpha value of
the image texture, which is the black area
of the brands texture. Now the mix shader
node knows which spots of the texture
should be transparent. Another shader is connected
to the mix shader node. The shader is called
transparent and can be used to make the
material transparent. The mix shader node combines
the two shaders based on the fact value making the black area of the
brands texture transparent. The result of the
mix shader node is passed with the
material output node, which stairs the material
bodies should look like. Rest API to enter object mode, use Alt a, the
de-select the object. It can be seen that the upper branches are not attached to the
top of the trunk. Select the object and press
Tab to enter edit mode. Use of de-select everything. Breaths three to n.
Their face mode. Hover your mouse one-by-one over the top four branches and
press L to select them. Now breasts, see
the move them down. Let's modify the lower
part of the trunk. Enter vertice mode with one. Select the four vertices above the lowest indented vertices
by holding down shift. Scale them slightly inwards with the three. Now looks good. If you wish, you can make further
changes to it, such as adding more
brands is to it. Let's start making
its LOD versions. Don't use the DSM-V
modifier this time, but to simplify its geometry, manually, make sure
you have selected the tree and that you
are in object mode. Press Shift D to duplicate it, right-click to
cancel, moving it. Duplicate its third
version, later, named the new LOD version with the correct name in
the outliner window. High diversion 0. And
make sure you select Version one Rest API to enter edit mode to better understand the geometry
of the tree breast C, to enter solid shading mode. To do enter edge mode, hold down Alt to select the middle lobe got off
one of the branches. Next, select the corresponding
lobe gut for all branches. Instead of selecting
them one-by-one, press Shift G, and
select phase angles. This is how you
are able to select similar parts of the object. However, you may
have accidentally selected some of the
faces of the trunk. Today's select them all
hold down shift while selecting them with
the left mouse button. Now that only the loop got in the middle of each
branch is selected, press X, dissolve
edges to delete them. This way you can remove
only the edges you selected without changing
the geometry around them. Let's now simplify the trunk. Breast to do enter edge mode. Select the innermost loop
guts hold down shift. While selecting with
the left mouse button. You can release the keys. In the meantime, as you rotate the view and hold
them down again, when it's time to
select a new loop cuts, press X and select
dissolve edges. Now the trunk is
a little simpler. Let's make the
last LOD verse and next best step to
enter object mode. Press Shift D to duplicate the tree and click the
right mouse button, rename the new tree,
the version two. Then hide version one. Make sure you select Version to press the app to
enter edit mode, to make sure you
are in edge mode, breast to select the edge
in the center of a branch. Press Shift G and
select phase angles. If you accidentally
selected unnecessary edges, hold down Shift
and deselect them. Now breast X, select,
Dissolve, etches. It's time to modify
the trunk of the tree. Select the loop guts
the right and left off the outermost loop
gods by holding down Shift Alt while selecting them with the left mouse button. Delete the selected loop
guts with x dissolve edges. The LOD versions are now
ready to enter object mode. Use of age the unhide them all. Let's export the tree. Navigate to File, export FBX. Make sure you activate the applied transform option and click the export FBX button.
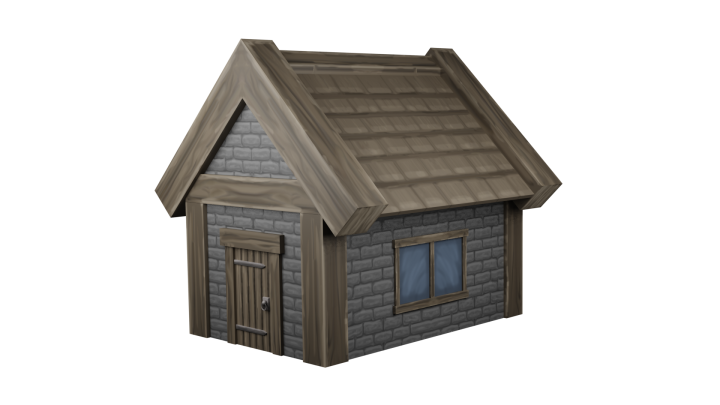
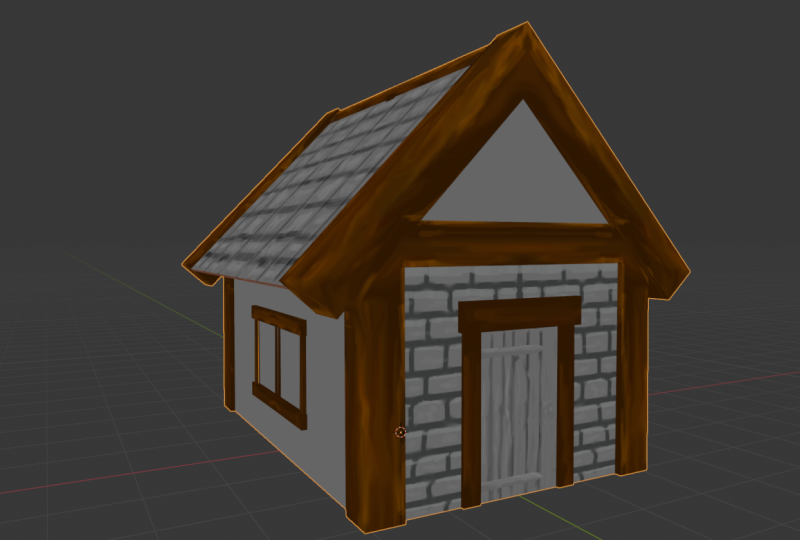
18. House 3D Modeling: Let's start making the last
game asset of the course, which is a house. This lecture is a long one. So prepare yourself for
some serious 3D modeling. I hope you will stick
around because in the end, it will all be worth it. First, add a new
cube with shift. Move it upwards so that it sits on top of the
create Paris G, C and hold down control. Reset its pivot point
with control. Location. Open the side panel with n. Let's change the dimension
values of the cube. Jamestown, x-axis value. Therefore, the y-axis
value, the Sikhs, and the c-axis value
the five suites to edit mode with the app at a horizontal loop
cut with control, our slide it slightly upwards
and confirmed the action. Make sure you are inverting
mode by pressing one, select only the two
uppermost vertices of this side of the cube. Select the first one, then holding down, shift, select the other one, breast M, and select
the Add center option, the merge them together. Now select only the
two uppermost vertices on the other side of the
cube by holding down Shift, press M and choose at center, selected to uppermost vertices
by holding down Shift, move them slightly
upwards with G, C. The basic shape of
the house is now ready. Let's continue by adding
smaller details to it, starting with the coroner
boards suites to object mode, we create a new cube which shift a suites to edit mode with the move the cube to one of
the corners of the house with Gy and g dx. Because you moved the
cube in edit mode, it's pivot point stayed at
the center of the 3D space. When the pivot
point is at the 0, you can Miro the object correctly to the other
side of any axis. Open the modifier
properties tab, open the drop-down menu, and under the Generate heading, select the mirror option. At the moment the cube is only mirrored on the x-axis because only the x-axis
option is selected in the modifier activate
the y-axis as well. Numbered seven, the
sweets to the top view, more of the cube to the
corner of the house. By pressing G alone. The cube moves only on the x and y-axis because you
are in the top view. At this point, it would be
great to see inside the house. Press C, D. James, the drawing
mode, the wireframe. Scale the cube smaller
with breast G, the more weight to the
corner of the house, again, squeezed
to the front view by pressing noun bad one. Whereas G, C and
more of the cube. So it sits on top of the create the selected
cube without a, make sure you are inverted
mode by pressing one. Now select only the upper most
vertices of the cube with the book selection tool by holding down the
left mouse button, move the selected word
he says upwards with GC suites to object mode, with dab and press C to
change the drawing mode, the solid exceed
the front view by holding down the
middle mouse button while moving your mouse. Ways to edit mode with the lab. Let's add more
blanks to the House. Select the whole corner
board with a duplicated, which shift the AD. Click the right mouse button, rotate it on the y-axis
by pressing R y. Hold down control and
confirm the action once you have rotated
it 90 degrees. At the moment the cube goes through the mirrored
version of it. To prevent this, activate the clipping setting from
the mirror modifier. Speeds to the front view
by pressing non bad one more the cube
to the same level as the end of the corner
board by pressing G, C. Next, move it on the x-axis towards
it's mirrored version. Gonna affirm the action once
the rightmost vertices are in the same position as the
edge of the corner board. De-select everything
without the moment the newest cube overlaps
with the coroner board. Select the corner
board by hovering your mouse over one
of its vertices, then press L Swedes to wireframe drawing mode
with C. Makes sure you are in the vertice mode by pressing one breast C to activate
the circle selection tool. Hover your mouse
over the allover and most vertices and click the middle mouse button
to D select them. Deactivate the circle
selection tool by pressing the
right mouse button. Move the selected vertices
downwards with G, C suites to object
mode. With that. And the solid drawing mode, we'd see exit the front view by holding down the
middle mouse button while moving your mouse. The next step is to add a blank to the side of the
house as well. Switch to edit mode with the de-select
everything without a hover your mouse over
one of the vertices of the blank and
press L to select it. Duplicate it with Shift D and click the right
mouse button. Move it on the y-axis with g y, so you are able to see it. You will notice
that the blank is attached to the
mirrored version of it. This is because the
mirror modifiers clipping setting is
still activated, deactivated because you
don't need it at the moment. Spreads to the top view
with non bad seven. Squeeze the wireframe
drawing mode with C. First, move the blank on
the y-axis with g, y, so that it is
inside the house. Now, move it on the
x-axis with g x. Now that the black is on
the side of the house, rotated 90 degrees with R. Because you are
in the top view, you can rotate an object on the c-axis by pressing R alone. Hold down control and
confirm the action. More of the blank to the
previously made blank with g. Now activate the clipping setting of the
mirror modifier because you will need the
more of these blank next to the mirrored
version of it. Make sure you are inverted
mode by pressing one breast, see, do activate the
circle selection tool. Hover your mouse
over the vertices that are next to the
previously made blank. Click the middle mouse
button to de-select them. Deactivate the circle
selection tool with the right mouse button. Move the selected vertices
on the y-axis by pressing G Suite's to object mode with the solid
drawing mode with C, exit the top view
by holding down the middle mouse button
while moving your mouse. Now the House has coroner
boards and horizontal blanks. You can apply the mirror
modifier by clicking the down pointing arrow button and choosing the Apply option. Use a to select both objects and join them together
with Control J. Let's start creating
the roof of the house. Ways to edit mode. With that. De-select everything
with a hover your mouse over one of the corner boards and
press L to select it. Duplicate it with Shift, and click the right
mouse button. If they're new, blank upwards
next to the roof with G, C. Make it a little bit bigger with S suites to front view by
pressing noun bad one, row that the roof blank
with R so that it is approximately at the
same angle as the roof. Breast, g, x the
morbid on the x-axis until it's uppermost vertices
are at the blue line. Move it slightly
downwards with G, C so that it overlaps with the rest of
the house a little bit. Suites to the wireframe
drawing mode with C. Make sure you are inverted
this mode by pressing one, de-select everything without a, press C to activate the circle selection
tool and select the leftmost vertices
of the rule of blank. Deactivate the circle
selection tool by clicking the
right mouse button. Slide the selected
vertices so that they are at the same
position as the blue line. The slide the selected
geometry, breast G twice. Move your mouse to
slide the vertices and corner firm the action with
the left mouse button. You can more the
other end of the roof blank further away
from the house by first switching
the face mode with three and selecting the face
at the end of the plank. Press G to move it. Suites to object mode with dab and the solid
drawing mode with C. Exit the front view
by holding down the middle mouse button
while moving your mouse. Let's now Miro the roof blank
due east side of the roof. To do this, you must first separate it from
the house object. Switch to edit mode with, de-select everything without and select only the rule of blank by hovering over it and pressing
L to separate an object, press P, separate the select that geometry by choosing
the selection option. Switch to object
mode with the tab. Select the roof blank, makes sure that
its pivot point is at the 0 of the 3D space, otherwise, mirroring
will not work correctly. Open the drop-down menu in
the modifier properties tab, select Miro, activate the y-axis
option from its settings. Apply the modifier by clicking the down pointing arrow and
selecting the Apply option. Joined the two objects together by first selecting them with a. After that, press Control J. Switch to edit mode
with de-select everything without
make sure you are in face mode by pressing Select both sides of the
roof by holding down Shift. Delete them by pressing X and
selecting the faces option. Let's recreate the rule
of using the roof planks. Let's add to loop guts,
tweets, roof blank, press Control R, and scroll your mouse wheel until there are two loop cuts in the blank. At the moment, there is a
little gap between the blanks. These can be fixed by merging the vertices of the blanks
that are close to each other. Select all roof blanks with L, breast m add selected
by distance option. At the bottom of the
interface is a message that says removed 0 vertices. This means you have to increase the value of the mirrors
by these standards action. To do this, open the murders
by distance menu from the lower-left corner of
the 3D view port window, you increase the value
of the Mertz distance setting by clicking the arrow
to the right of the field. By clicking the arrow, once you've managed to
merge vertices together, there is still a small
gap between the blanks. Increase the value once again by clicking the arrow to
the right of the field. Now 16 vertices were
merged together. At this point. Use it to remove any unnecessary faces that
are hidden inside the house. Suites to face mode by pressing three and the wire frame
drawing mode with C. Select the following phases
while holding down shift. The solid drawing mode with C, you are able to confirm that
these phases can't be seen. Delete them by pressing X and
selecting the faces option. Next, delete the
unnecessary edges of the house suites to
edge mode with two. Hold down shift and select
the following loop guts. Press X and select The
dissolve edges option. Use it also delete the unnecessary face on
the bottom of the house, squeezed to face
mode with three. Select it and press X. Select the faces option. Suites to edge mode with two, hold down shift and select the following
Tuesday loop guts. Slide them slightly upwards
by pressing G twice. From the action suites to face mode with three, hold down shift and select the two following faces that are on this side of the roof. Let's fill the space between
these two phases to make a new rule of these can be
done by pressing Control. Select the breach
edge loops option. Let's do the same thing to
the other side of the roof. First, de-select
everything with Alt. Select the two phases
while holding down Shift. Press Control. And Jews breach loops. Switch to wireframe
drawing mode with C, there is currently
an unnecessary face on top of the roof. Select it and delete
it by pressing X and juicy interfaces option suites to solid mode with C. Let's add a blank
on top of the roof. Start by adding a loop cut on both sides of the
roof with control, our slide deselect that loop, cut by pressing G twice. Slide it near the highest
point of the roof. Before you do the same
for the other loop, cut open the edge
slide menu from the lower left corner of the
3D view both window click the factor field and copy the
current value with Control C. Now select the other lobe
got while holding down Alt, breast G twice the slide
it a little bit upwards. You can now paste
the copied value to the slide menu by first clicking the
current value and then pressing Control V so
that this loop got most to the exact same height as the loop cut on
the other side. Switch to face mode with three selected two phases on top of the roof while
holding down, Shift. Delete them with x by
to seeing the faces option at one last lobe got to both rule of
blanks with Control R. Weights to face mode with three. Select the two following faces
while holding down Shift. Fill the space between
them by pressing control and selecting the
bridge is loops option. Do the same for the
other side of the roof, deselect everything
without hold down shift and choose the two phases. Press Control and
twos rich edge loops. To wire frame
drawing mode with C, There is again, one unnecessary phase
inside the New Geometry. Select it and delete it with x by choosing the phases option suites
to object mode with that, and to solid drawing mode, we'd see the house
is almost finished. However, it lacks two of
its essential features, which are the door. And the windows. Let's do the door next. Shift. And twos. Blaine, move it to the
front of the house with GY. Rotates it on the
x-axis by pressing R x. After that, press 90 so that
the door rotates 90 degrees. Confirm the action with
the left mouse button. Move the door up. One unit with GC, hold down control as you move
it and confirm the action. Sweets through the front view
by pressing noun bad one. Switch to wireframe
drawing mode with C, doors are usually around
two meters or six feet, five inches in height. The door is already
the right height, so let's modify it. Sweet. Only breast. Firm the action when you are satisfied with the
width of the door. Let's now add smaller
details to the door by first adding two metal parts that
hold the door together. Duplicate the door with Shift D, Gleick, the right mouse button. Scale the new blame on
the c-axis with S, C. Switch to edit mode with their job and the
vertice mode with one, select only the two vertices on the right side of the plane
by holding down Shift, move them to the left on
the x-axis with g, x. Add a loop cut with Control R and slide it
near the end of the plane. Select only the two
vertices at the end of the plane while
holding down Shift. Scale them the words
each other with NSC. Select the entire object with a switch to solid
drawing mode with C and exit the front view by holding down the
middle mouse button while moving your mouse. Extrude new geometry from the selected vertices
by pressing E, the new geometry automatically
moves on the right axis, make the part a little bit
thicker and confirm the action suites to object
mode with the app. Now, duplicate the
middle part with Shift, and click the right
mouse button. Move it upwards with G, C. Select the other metal part
and more of it downwards with G C. While holding down Shift, Jews are the parts of the door and joined them together
with Control J. Next, let's add a
handle to the door. Switch to edit mode with the
de-select everything without a and twos only the door with
duplicate it with Shift. And click the right
mouse button suites to the front view by
pressing numbered one to wireframe
drawing mode with C. Start by scaling
the new Blaine, smaller with S, breast G, and move it to the
right side of the door. Scale it a little bit
smaller on the C axis with G. Suite's the
solid drawing mode with C and exit the front view. Extrude new geometry from the
selected geometry with E, make the handle a little bit thicker and confirmed
the action. Scale, the selected geometry
a little bit smaller with S. You can also scale it smaller
on the x-axis with S. Suites to object mode with tap. Press Shift a and
twos, Ico sphere. Move it in the front
of the door with G Suite's to the front view
by pressing numpad one, scale it smaller
with S. Press G, and more the ego's fear in the middle of the
hand or if necessary, scale it's smaller with S. The ego's fear currently
has a flat shading style. So let's change that to
the smooth shading style. Brush the right
mouse button and to use the shade smooth option, exit the front view. The ecosphere on the
y-axis with g y, so that it overlaps with
the handle a little bit. Next, let's add
the handle itself. At the new torus with Shift, a perimeter shape contains a
lot of geometry by default. So let's make it a
little bit simpler. Makes sure that the ad
tourist menu is open. Jane's devalue of the major
segments setting to 12, and the minor segments to move the torus in
front of the door with G. Rotated 90 degrees on
the x-axis by pressing R x, breast 90 and corner affirmed the action weights
to the front view by pressing numpad one,
scale the thoracic, smaller with S, breast G and move it
underneath the eye goes sphere of the hand
or if necessary, scale the thorough smaller with the torus would look
better if it were thinner. Switch to edit
mode with the lab. Make sure you have selected the whole object
with a breast up. The modify the
thickness of the torus. Submits back to object mode with dab and exit the front view. Move the thorax on the
y-axis by pressing G. Jane's to shading style of
this object by pressing the right mouse button and to seem to shade smooth option, hold down, shift and choose
every part of the door. Now press Control J to
join them together. More. The door next to
the house, breast Gy. Select all the objects with a and tied them together
with Control J. The next step is to add
a frame around the door, Swedes to edit mode with
the de-select everything without a select one of the corner boards of
the house with L, duplicate it with Shift, and click the right
mouse button. Move it next to
the door with g x. Move it away from
the house with G Y. Sweets to the front view by pressing numpad one and the wire frame
drawing mode with C, scale, the object
smaller with S, breast G, and more of it so
that it sits on the red line. Activate the circle
selection tool with C and D, select the lower most vertices by pressing the
middle mouse button, deactivate the circle
selection tool with the right mouse button. Press G, C, and move
the selected vertices upwards so that the object is the same height as the door. Select the whole
object again with AL and duplicate it with Shift. Click the right mouse button, move the duplicated object to the other side of
the door with g x. Duplicate the object
once more with Shift. And click the right
mouse button, rotated 90 degrees by
pressing R followed by 90, gone firm the action. Scale, the selected
geometry bigger with S, G and move it on
top of the door. Press C to activate the
circle selection tool and click the
middle mouse button to select the leftmost vertices. Deactivate the circle
selection tool with the right mouse button. Move the selected vertices
left with G. Suite, the solid drawing mode with
C and exit the front view. Select the three objects with more of them next
to the house with Gy. De-select everything without a. You can see there
are no faces on the ends of the top
part of the frame. Suites to edge mode
with to hold down Alt and select the end of
the breast if the field, the selected area, do the same for the other
end of the part. Hold down Alt and select
the end of the breast F, the fail it suites
to object mode with the last thing to do is to add a window on
both sides of the house. A new plane with Shift, a switch to edit mode with more of the plane on the
side of the house with g x. The pivot point of the blame
should be at the center of the 3D space because it will be a mural node to the
other side of the house. Click the Add Modifier
dropdown menu and select the mirror modifier. Rotate the window on the y-axis by pressing R Y, press 90, gone firm D action submits
to the side view by pressing numpad three and the wireframe
drawing mode with C, G see more of that window to the middle of the
side wall of the house. Scale the window smaller
on the C axis with S, C suites to solid drawing mode with C and exit the side view. Move the window next
to the wall with g dx. Let's now add frames around it. Switch to object
mode with the tab. Select the house
object as switch to edit mode with de-select everything without a press L to select the frame of the door. Duplicate them with Shift, and click the right
mouse button. Move them on the x-axis with gx. Rotate him 90 degrees on
the c-axis with our See, Brest 90 gone for empty action. Scale them smaller with S. More of them next to the wall
of the house with g, x, y. Switch to the side view
by pressing non bed three and the wire frame
drawing mode with C, breast G, the move them to
their correct position. Do you select everything without a squeezed two vertices
mode with one, hold down the left
mouse button and select all the rightmost vertices
with the book selection tool, move the selected vertices
to the right with g y. De-select everything
without a hole down the left mouse button and select the lower most vertices
of the object. Move them down with G, C, D. Select everything with Alt. Select the object
on the top with L duplicated which shift, and click the right
mouse button. Move it below the window with G, C, breast out a to
deselect everything. Select one of the smaller
parts of the frame with L, duplicate it with Shift, and click the right
mouse button, pressed G, Y, and more of it to the
middle of the window. Suites to object mode with that. And the solid
drawing mode with C, exit the side view. If necessary, suite
spec to edit mode with dab and select all the
parts of the window frames. Move them closer
to the wall with G Suite's back to
object mode with, as you can see, the
frames of the window, he didn't get mirrored to
the other side of the house. This is because they are part of the house object that doesn't
have the mirror modifier. Switch to edit mode. With that, make sure you have selected the frames
of the window, separate them with B, and by choosing the
selection option suites to object mode with dab and select
the frames of the window. Hold down shift and
select the window object. Press Control J to
join them together. Now the frames are mirrored
to the other side. Apply the mirror
modifier by linking the down pointing arrow and
juicing the Apply option. Select all the objects with a and join them together
with Control J. The house is now complete. Rename it in the outliner
window with the name House 01. Save the model with
the same name.
19. House UV Unwrapping: The next step is to
interrupt the shape of the house in the UV map, with the exception of the door, the house is completely
symmetrical on both x and y-axis. This means that the space in the UV map can be
used efficiently. First, the house needs
to be split into one-quarter of its current size, after which the mirror modifier
should be added to it, which will make the
house hall again. Then the original
quarter of the house will be unwrapped into
the UV map so that the mirrored sides will all use the same islands of the
UV map, the original one. When you draw on
one-quarter of the house, the same changes will be applied that the
mirrored sides as well because they are coordinates are the
same in the UV map. This makes painting
that extra fast. And each phase of the house, we use as much space in
the UV map as possible, which increases the
quality of the texture. Make sure you are
in object mode. If the transform values of the object have not been reset, breast control a
select or transforms. Let's separate the door from the house object temporarily. Switch to edit mode with the de-select,
everything with Alt. Select it's part
of the door with L. Separate the selected geometry by pressing P and selecting
the selection option. Suites to object mode. Select the door and
hide it with age. An easy way to cut parts
of the house of Easter, use the Boolean modifier. Use this modifier. You must first add a shape
to the 3D space that will be used to cut
the decide object at a new cube with Shift a more with one unit
to the left with g, x, y holding down control. Next, move it one
unit on the y-axis with g y while
holding down Control. Switch to edit mode with DHAP and the wireframe
drawing mode with C. Make sure you are in face
mode by pressing three. Select the face on
the top of the cube. Press G, C, and move it upwards until it is higher
than the roof of the house. Suites to the top view by
pressing non-bird seven, select the lowermost
face of the cube and press G. The more width on the y-axis until it is
further away from the 0 of the 3D space
than DH of the House. Select the leftmost
face and more with to the left with g x. Select the upper most phase and extrude new geometric form it with e. Move the new geometry
over ds of the house. Now select the
right most phase of the just created geometry and extrude new geometry
from it with e suites to object
mode with the job and the solid drawing
mode with C. Exit the top view by holding down the middle mouse button
while moving your mouse. Now the cube objects
should cover the whole house except
for a one quarter of it. Select the house object, open the modifier drop-down
menu, and choose Boolean. Let's assign a shape that will
be used to cut the house. Activate the eye
dropper tool that is next to the field of
the object setting. Gleick on the cube
in the 3D space. Janes the solver settings
value to be fast. When you switch to
wireframe drawing mode, you should see
something like these. Apply the modifier. The cube has done its job, so you can select it
and delete it with x. When applying the
Boolean modifier, it may leave unnecessary
geometry in the object. These kind of geometry
should be deleted to prevent problems from
occurring in the future. Select the house and
sweets to edit mode with. Let's start off by deleting
any unnecessary edges. Suites to edge mode
with two geometry of your house will most likely be different than in the video. But in this case there are unnecessary edges in the window. Select all these edges
while holding down shift. Press X and Jews, etches the delete them. Next, let's see if there are any unnecessary vertices in the object squeezed to
vertice mode with one, select all unnecessary vertices
while holding down shift. Delete them by pressing X and choosing the dissolve
vertices option. Lastly, let's delete any
hidden faces of the object so they will not the space in the UV map suites to face mode. Select the following phases
while holding down shift. Delete them by pressing X and
choosing the faces option. At this point, you
should also delete hidden faces from
the door object. Switch to object mode
with the unhide the door without H. Select the door
as Swedes back to Edit Mode, which makes sure you
are in face mode by pressing Select the
following faces while holding down Shift. If needed, switch to wireframe
drawing mode with C. And choose faces. Switch to object mode with dab. Select the house object and add the mirror modifier to it. Open there modifiers, dropdown
menu and select Miro, activate the y-axis in
the modifiers settings. Finally, let's
unwrap the shape of the house and the
door into the UV map. Go to the UV Editing Workspace. Make sure your mouse is over
the 3D viewport window. Select both objects
with a suites to edit mode with the select
everything with a. Let's use the fast and easy
way to unwrap this object. Impress you, and select the
Smart UV project option. Change the value of the Ireland March in
setting the 0.05. So there will be some
space between the islands. Click the Okay button. As you can see by using the
smart UV project option, you got a lot of
islands in the UV map. The more islands in the UV map, the more seems we'll be
in the texture and the harder it will be the
world with the UV map. Even though this method
is not the most optimal, let's use it for now as it
still gets the job done.
20. House Texture Painting: Let's draw a texture
for the house. So I'll go to the
texture paint workspace. Create a new texture by clicking the plus button
on into Draw tab. Choose the base color option, name to Dexter house texture. These objects has larger
faces than the previous ones. So let's make this
texture twice as large. Add an asterisk after the width value and
type the number two. After that, press Enter. Do the same for
the height value, JN cd for the color of the
texture to be dark brown. De-select the Alpha setting
and click the Okay button. Select the new texture in
the image editor window. The new material should also be set through
their door object. Open the drop-down menu in the upper left corner of
the 3D view port window. Jews object mode. Select the Door Object. Go to the material
properties tab, open the material list next to the New button and choose
the material option. Now both objects used
the new material. The door temporarily by pressing
Select the house object. Open the drop-down menu
in the left corner of the 3D view port
window and choose the extra paint mode
before drawing anything, open the draw tab and
expand the options section. When dealing with larger
objects like this house, you should increase the
value of the bleed setting. When drawing a texture, the bleed value, as
the name implies, determines how far the color flows over the
edges of an island. It is important to have some
color outside DHS of Aedes, Ireland because unity uses
a technique called MIP map, which is basically a level of detail system for a Dexter's. It compresses the
texture and displays a lower resolution
version of it in objects that are far
away from the camera. If there is no color
outside the islands, players will see
visible seams in the object when logging
at it from far away. To prevent this issue, increased the value of the bleed setting
to be, for example, do any use it to keep in mind that if you
increase this value to match the painted cholera may flow over nearby islands. When watching this video, keep an eye on which
window my mouse is over when I'm using
keyboard shortcuts. Because if the mouse is
over the wrong window, the keyboard
shortcuts won't work. If blender Sweet says
to the wrong mode, when you press the Tab key, use the drop-down menu in the upper left corner of
the 3D view port window, the sweets to the desired mode. Swedes to edit
mode with the lab. Make sure you are in face
mode by pressing three. Let's start by painting
the walls of the house. So select them for the
mask by holding down Shift suites to the
extra paint mode by using the drop-down menu. Activate the mask tool
with m. From now on, make sure that the mask tool is activated when it should be. Now you can only draw to
the walls of the house. When drawing on the three faces you just selected in edit mode, the changes will be applied
to each wall of the house. Select the fill tool. Let's draw a wall that
consists of gray bricks. Click the right mouse button
and select a gray color. Fill the walls with
the selected color. You can see on the UV
map that they call or bleeds over DSS of the islands. Next, let's call off the roof. Switch to edit mode. We select only the three phases of the roof while
holding down Shift. Suites back to the texture
paint mode with the app. Click the right mouse button and select a grayish brown color. Then feel the roof
with that color. Go back to edit mode with in addition to
the roof of the house, select the walls
and the class of the window by
holding down shift. You should now have
selected the roof, the walls, and the
class of the window. Press Control I to
invert the selection. Now you have all
the Buddha and bots selected suites to the extra
paint mode with the app. Hover your mouse
over the roof in the UV map and press S
to select its color. Click the right
mouse button domain it a little bit darker
color with a Boolean. Parts of the house
speeds to edit mode with the tab and select only
the class of the window. Back to the texture paint mode. Click the right mouse button and select a dark blue color. Fill the glass with
the selected color. Suites to object mode
using the drop-down menu. Breast out the unhide, the door object, and
after that, select it. Breast DAP, the
Swedes do edit mode and de-select
everything without a. Use L to select the
frames of the door. Switch to the extra paint mode
using the drop-down menu, make sure that the mask
tool is activated. If it is not
activated, breaths M, hover your mouse over any
food and bars of the house in the UV map breaths S to
select that color field, the frames of the door
with the selected color. Switch to edit mode with
the select everything without a select only
the middle parts of the door with ALL switch to
the extra paint mode with select a dark gray color and
fill the middle box with it. Lastly, you need to call
out the door itself, select only the door and sweets back to
texture paint mode. With that, hover, your
mouse over the roof in the UV map and press S
to select each color, feel the door with
the selected color. The base color of the
house is now complete. Remember to save
the texture without S. Now it's time to draw
this smaller details. Let's start off with
the walls of the house. Swedes to object mode
and select the house. Go to edit mode with the tab, and select the three
phases of the walls. Wasted the extra paint mode. And activate the draw tool. When you draw the brick
pattern or one off the walls, you can quickly copy
and paste it to the rest of the wars
by using emits editing software like paint
dotnet speeds to the back view by holding down Control and pressing numpad one. Select the current
color of the wall with S. Let's start off by making
the outlines of the breaks. So click the right mouse button and select a darker color. Press the sweets, the
stroke method to lie. Decrease the size of the
brush with F. Start adding straight horizontal lines to the wall or down the
left mouse button. And after that, hold down
Alt to straighten the line. Next, add vertical lines
to every second row. Lastly, add vertical lines to the rows where they
don't already exist. Try to get the line
in the middle as close to the mirror
point as possible. If you want, you can use the smear tool to smear
the lines a little bit, decrease the strength
of the brush with sift. In closer to the wall. Select the tool,
press the sweets, the stroke method back to space. Select a lighter color with
the right mouse button. Decrease the strength
of the brush, which saved at the
selected color on top of each brick
to create a 3D effect. Now decrease the strength
of the brush with sift and add the lighter color to the center of the
breaks as well. Make the color a darker with
the right mouse button. Add the selected color to
the bottom of each brick. Increase the strength of
the brass with shift. Add this color to the middle
of each brick as well. First, decrease the strength
of the brush with sift. Select this mirror tool and decrease the strength of
the brush which sift, smear the brakes a little bit. Remember the change the stroke
method back to space with the first wall and it's
mirrored side are now complete. Use some emits
editing software to add the world Dexter
on every wall. Be sir, to save the
texture before doing it. If you edit it that they exert in an image editing software, you will need to set
the updated version of the Dexter to the material on the material properties tab. Click the little arrow next
to the base color setting. Click the Open button, and select the updated the XOR. Next, let's draw
a smaller details to the roof of the house. Switch to edit
mode with the app. Select the three phases of the roof by holding down shift. Switch to texture
paint mode with app. Select the Draw tool suites to the side view by
pressing noun bed three. Let's start off by adding the
outlines of the roof tiles. Press F to decrease
the size of the brush. Select the color
of the roof with S and change it a
little bit darker. Risky and choose the
line stroke method. Hold down the left mouse
button and then hold down Alt to strengthen the
line, horizontal lines. Now add vertical lines. You can select this mirror tool and smear the lines a bit. Increase the strength of
the brush, which saved. Next, add a lighter color to
the center of each style. Select the draw tool and select a lighter color with
the right mouse button. Press E and change the stroke
method back the space, increase the strength of
the price with shift. The next step is to add dark
TIN lines to each style. Decrease the size of
the brush with f. Select a darker color with
the right mouse button. Decrease the strength
of the brush with sift. Select the smear tool and smear the dark lines on each style. If needed, Janes, the
size of the Prius with f and its
strength with shift. Select the Draw tool. Let's add a darker color below each row to make the
tiles look more 3D. Click the right mouse button and select a multiply blending mode. Decrease the
strength with shift. Next, add lighter color to
the bottom of each style. Bleak the right mouse button, and select the screen
blending mode. You can still use
the smear tool on the dark lines, for example, the XOR of the roof
is now complete. Swedes to edit mode with that. Then suites to object mode
by using the drop-down menu. The next step is to draw on the board and boss of the house. Because both the House and the door have a food
and bots in them, you should apply the
mirror modifier. You can draw on both the House and the
door at the same time. The modifier properties tab
and apply their modifier. First, select only
the door object, then hold down Shift and
select the house object. Press Control J to join the door object to
the house object. Swedes to edit mode with the de-select
everything with alt. Press L to select all the
wooden planks of the house. Downshift and de-select all
the phases of the roof. Swedes to the extra paint
mode with a drop-down menu. Select the Draw tool. Let's start by adding some
light color to each blank. Select the current color
of the blanks with S and make it lighter with
the rightmost pattern. Increase the strength of
the brass with Shift F, and decrease its size with the right mouse button and make sure that
they're blending mode is set to the
default option mix. Next, select a darker color with the right mouse button and add that to each blank as well. Decrease the size of
the brass with f. Select the smear tool and smear the three colors together
to create a blank log. Increase the size
of the brush with f and its strength with shift. Blanks usually have
burnout edges. Select a troll tool and
change the blending mode the screen with the right
mouse button if needed, Janus, the size and
strength of the brush. Lighter color, also to
the end of the blanks. Again, select the smear tool and smear that just added colors. The blanks are now complete. The remaining parts of the house are the door, it's metal parts, and the class of the window
switch to edit mode with the select only the door suites back to
texture paint mode. With that, go to the front
view by pressing numb. But one, let's add a few dark
vertical lines to the door. Select the draw tool and decrease the size
of the brush with F. Jane's to stroke
method with E, B line. Select the current
color of the door with S and make it darker with
the right mouse button. Make sure the blending
mode is set to mix. Increase the strength of
the brush, which sift. Hold down the left mouse button, then the Alt key. Press E and change
the stroke method, the space, lighter and darker color that the
blanks of the door. Jane step blending
mode to the multiply and add dark color on the lines. Select a smear tool
and smear the colors. The door is now complete. Let's move on to the
metal parts of it. Switch to edit mode
with the selected door without a press L to
select the middle parts. Go back to texture
paint mode with the metal parts are small and
hardly noticeable objects. So let's draw details on
them quickly by adding some lighter and darker color to them using the draw tool. After doing this, smear
them with this mirror tool. Swedes to edit mode. With that. Now select only
one class of the windows. Go back to the texture
paint mode with that selected draw tool and a
lighter color to the class. Then add darker color
to each side of it. The whole house
is finally ready. Remember to save the
texture and the model. You get really make LOD versions
of the house because it consists mostly of symbol cubes
that can't be simplified. So let's export it
without LOD versions. Navigate to File. Export, FBX. Activate the applied transform
setting and click Export.
21. Importing Mushroom to Unity: Now that all four are
game assets are ready, let's start taking them. The unity track, the
mushroom FBX file and it's texture to your
unit projects assets folder. Drag the FBX file from the assets folder to
the hierarchy window. Let's look at the structure
of the mushroom object. In the hierarchy window. It has a root object and three child objects that
are It's LOD versions. Each child object has
three components. Transform, mess, feel
there, and miss render. Transform is a component
that controls the location, rotation, and size of an
object in the game world, among other things, the mess filter
includes a reference to the three-dimensional
shape that is passed to the Mesh Renderer component
for drawing the object. Mess Renderer includes
several different features related to drawing an object. They ruled object
of the mushroom has a component called LOD group, which Unity
automatically added to the object because
it detected that these objects are LOD versions because their name and
sweet the word Elodie. The LOD group component shows the tree LOD versions at the current location
of the camera. As you zoom in and out, you will notice that
the LOD version changes in both the inspector
and see and windows. By modifying the values of
the load group component, you can determine at what distance the
LOD version changes. The CT value of the
component means the distance at which the
object is not drawn at all. Because mushroom objects will be added all across the game world, it makes sense to make
a prefab from it. Brief app is so-called
blueprints of an object that already contains
the necessary changes, such as the components and
materials added to it. By modifying, for example, the mass room brief app. The changes will be made through every Marsh
Room in the world, as long as it is a
copy of the brief app, create a prefab by dragging the mouse rule object from the hierarchy window
to the Assets folder. After that, click the
original brief app button. You can now delete the mushroom that is in the game world by selecting it and pressing the Delete key in
the assets folder, you can now find
the brief app off the mushroom in addition
to the FBX file, brief app is distinguished
from the FBX file by the fact that there is no arrow that the
right of its icon. Double-clicking the
brief app opens a new window where
you can edit it. By default, the
object has a material with the texture you
drew for it earlier. However, you should create a new material because the
default one can't be modified. Hover your mouse over the assets folder and click
the right mouse button. Select Create Material. Name it mushroom material. Drag the mushroom texture from the assets folder to the
albedo field of the material. The smoothness value of the
material is 0.5 by default, which is why it reflects light. The assets made in this course are not supposed
to look realistic, so you can change the
smoothness value to 0. Next, select is LOD version of the mushroom object while
holding down control. Expand the materials list in
the Mesh Renderer component. Drag the mouse
rule material from the assets folder over
the default material. Most objects in the
game world should have a collision surface so the player can't just
walk through them. However, the mushroom is such a small object that it doesn't make sense to
add a collider to it. The last step is to
set the mushroom to be static because it is
a stationary object. In other words, it doesn't move. Select the Route object
in the hierarchy window, activate the static setting in the upper-right corner
of the inspector window. Now unity asks, Should the child objects also
be set to static? The chart objects, that is the LOD versions
should be static. So click the Yes James
children button. Static objects are
taken into account, for example, in the
static batching system, which combines static objects
of the world in the groups, speeding up their
drawing process. The prefab of the
classroom is now complete. Exceed the brief AP view
by clicking the arrow in the upper left corner
of the hierarchy window. You can now drag mushroom brief apps all around the world. If you are going to use baked lighting in
your game world, you should select
the FBX file of the mushroom and make sure
you are on the model that activate degenerate light map
UBS setting so that unity unwraps the shape of the object for the
use of light maps. After that, click
the Apply button. Live maps are
textures on widths. Unity builds
lighting information during the light baking process. The light map is then applied over that extra of an object, which makes the object look like it belongs to
the game world. If you are looking for
creative performance, usually use baked lighting
instead of real-time lighting.
22. Importing Rock to Unity: Let's take the next
asset to unity, which is the rock drag. It's FBX file and texture to your Unity
projects assets folder. Make a brief app from
it straightaway, drag the FBX file from the assets folder to
the hierarchy window. And then from the
hierarchy window back to the Assets folder. Click the original
brief app pattern, delete the rock left in
the hierarchy window, double-click the rock
brief API to modify. It. Starts by creating
a new material. Hover your mouse over the assets folder and click
the right mouse button. Choose Create Material,
name it rock material. Change its smoothness
value to 0. Drag the rock texture from the assets folder to the outbid
or field of the material. Hold down control and select each LOD version of the rock. Drag the new material
over the existing one in the Mesh Renderer
component there, OK, should have a
collision surface because it is a big object. If the object has LOD versions, it is enough that you add a
collider for the first one. Select the LOD version, click the Add
component pattern at the bottom of the
inspector window. So it's for mesh
collider and select it. By default, the most
collider component creates a collision surface
that is exactly the same as the
shape of the object. You don't need a precise
college and surface. So activate the components
convex setting, which simplifies the
collider a little bit. Now the player can't
walk through the rock, but they can, for example, jump on top of it. Because the rock is not
going to move in the game, it should be marked as static. Select the Route object. Activate this static setting, and click the Yes
James children button. Exit the brief AP view. You can now drag rocks
around the world. If you will use pegged
lighting in the environment, select the FBX file of the rock and activate
degenerate light map. You'll be sitting. After that. Click the Apply button.
23. Importing Tree to Unity: Next, let's take the
tree object to unity, drag it's FBX file and both the extroverts to
your Unity project. Mega prefab from it by dragging the FBX file to the
hierarchy window. And from there back
to the Assets folder, click the original
brief app button and delete the tree from
the hierarchy window. Double-click the tree brief app, because the tree has
two different textures, Let's create two
materials for it. Select the mushroom material
in the assets folder. Duplicate it twice
by pressing control the press F2 three
named the materials, named them drunk material
and branch material. Selected trunk material and
track the trunk texture, do its albedo field. After that, select
the branch material, interactive branch texture
to its albedo afield. Hold down control and select
the three LOD versions of the tree directed to new materials with the
Mesh Renderer component. As you can see, the
brands material doesn't look what it
should look like. First select the branch
texture and activate its alpha is transparency setting from the
inspector window. After that, click
the Apply button. Now select the brands material, open the rendering
mode drop-down menu, and select the cut-out option. Next, James to call or the brands by opening the
color selection tool. Because the texture
was thrown as white, you can now freely determine which color you want
the branches to be. If the branch at being
drawn as green in blender, you wouldn't be
able to change it. For example, bright orange. In the future when drawing
these kinds of textures, you might want to
draw them as white. Next, you should add a
collision surface for the trunk of the tree so that the player can't walk
through the three. Select the first LOD
version and click the Add component pattern
in the inspector window. The proper colleagues
and type for the trunk is the
capsule collider. By default, the co-leader covers both the trunk
and the branches, so it should be mortified. Switch to the side view
by clicking the x-axis of the catch it in the upper-right
corner of the CNN window. Jst view the order
graphic by clicking the white cube in the
middle of the catch it. Modify the radius setting
of the capsule collider so that it is as wide as the
port on part of the trunk. Because the tree won't
move in the world, you should mark it as static. Select the Route object, activate the static setting and click the Yes James
children pattern. Although the tree
is marked static, its branches can still be
made the move according to the wind by modifying the
shader of the branch material. Exit the prefab view. Drag three brief apps
around the game world. Select the FBX file of the tree and activate its generate
light map you'll be setting if you
are going to make an environment that
uses baked lighting.
24. Importing House to Unity: Let's take the last asset, the house, the unity, drag, it's FBX file and texture
to the Assets folder. Start by creating a
brief app from it. Drag the FBX file to
the hierarchy window, and from there back
to the Assets folder, leaked the original
brief app button and delete the house left
in the game world. Opened the house brief app. Create a material for
the house by selecting the mushroom material and
duplicating it with Control. D, raise F to the rename the
material house material. Drag the house texture
in the DRP though field of the selected
House material. Next, select the house
object and track the material that
the Mesh Renderer component of the house. At a collider to the house, click the Add Component button. The player, we most likely only collide with the
walls of the house. So choose Box Collider. At the moment the collision
surface is too wide, so suites to the front view
by clicking the C axis of the catch it in the upper-right corner
of the scene window. Jane's to view the
orthographic by clicking the white cube in the
middle of the catches. Adjust the x-value of the box
co-leaders size setting so that the collision surface is as wide as the bottom
part of the house. The house to be
static by clicking the static checkbox in
the inspector window, exit the prefab view. You can now drag house brief
apps around the game world. Once again, if you are going to use pegs lighting in the world, select the FBX file
of the house and activate the generate
light map UB setting. You can continue creating new game assets or start building your very
own game world, starting with these four assets.
25. The End: Congratulations on
completing the course. I hope you learned a lot. Please write this course
as it will help us a lot. Thank you.
 Mika Jäntti, Game Development | Coding | 3D Graphics