Transcripts
1. Introduction: Hi everyone, and welcome to my course on learning how to draw basic enemy faces. In my last video, I share tips on how to draw the facial features of a female and he may character. I hope you found the tips useful and put them into practice. The key to improving your drawing skills is really to keep observing and practicing. In this tutorial, I will be teaching you how to draw the enemy facial features of a mill enemy character. There are many different artistic styles when it comes to drawing manga and anime. And this is one of the foundations to starting to draw faces. This tutorial is beginner friendly and no prior drawing experience is needed. The tutorial is suitable for both traditional and digital mediums. If you are using a traditional medium, I recommend getting really a pencil, pen, and paper. If you want to explore the digital medium and are just starting out, I recommend getting a small tablet. For example, Welcome to get used in digital drawing. Or if you have a higher budget, the iPad procreate is also highly recommended for beginner and professional drawing. You will be able to apply the techniques to many types of enemy characters. And this will help you to enjoy the characters you love. I will be using Clip Studio Paint for this tutorial, but you can always use traditional drawing tools. I am currently using the Wacom into his comic template, which is a small and compact tablet income. So if the software Clip Studio Paint, although you have to purchase clips to do software, there are also many free digital drawing software such as many bang and sketch book. Finally, if you like my art, I would really appreciate it if you like, and follow my social media page. And let me know what other techniques you would like to learn. In this field. Some parts are speeded up while I'm doing the drawing. I'll be using a rough pencil sketch.
2. Pen Pressure Settings: When you first download your drawing software, you may need to set up your pen pressure settings. It is really important that you ensure that you are drawing with pen pressure. When I first started drawing, I had no idea. I was drawing with a pen pressure, which made it extremely difficult and frustrating, redraw. What is pen pressure? It is a setting that allows you to very heavy, light, thick, and thin strokes, allowing you to create beautiful and interesting linework. It is usually set up by default in a drawing software. Here I will show you how to adjust your pen pressure settings. Since I am using Clip Studio, I will demonstrate with the software. However, with any other digital drawing software, they should also be a similar pen pressure settings setup. Go to fall. In pen pressure settings. It will open up a dialogue box. Now, draw a continuous stroke on your tablet as how you would normally draw while being your lighten wheat with heavy and light pressure. The graph will appear to vary one when you finish drawing like so. The more variation, the better. Once you are satisfied. Quick check adjusted settings. Click Done. If you are not satisfied, you can continue to draw another continuous stroke with more variation in your line weight depending on your preference. And that's all. Now you should be able to draw with pen pressure. However, if you find that this is still not working, you may want to restart your software or reconnect your tablet driver.
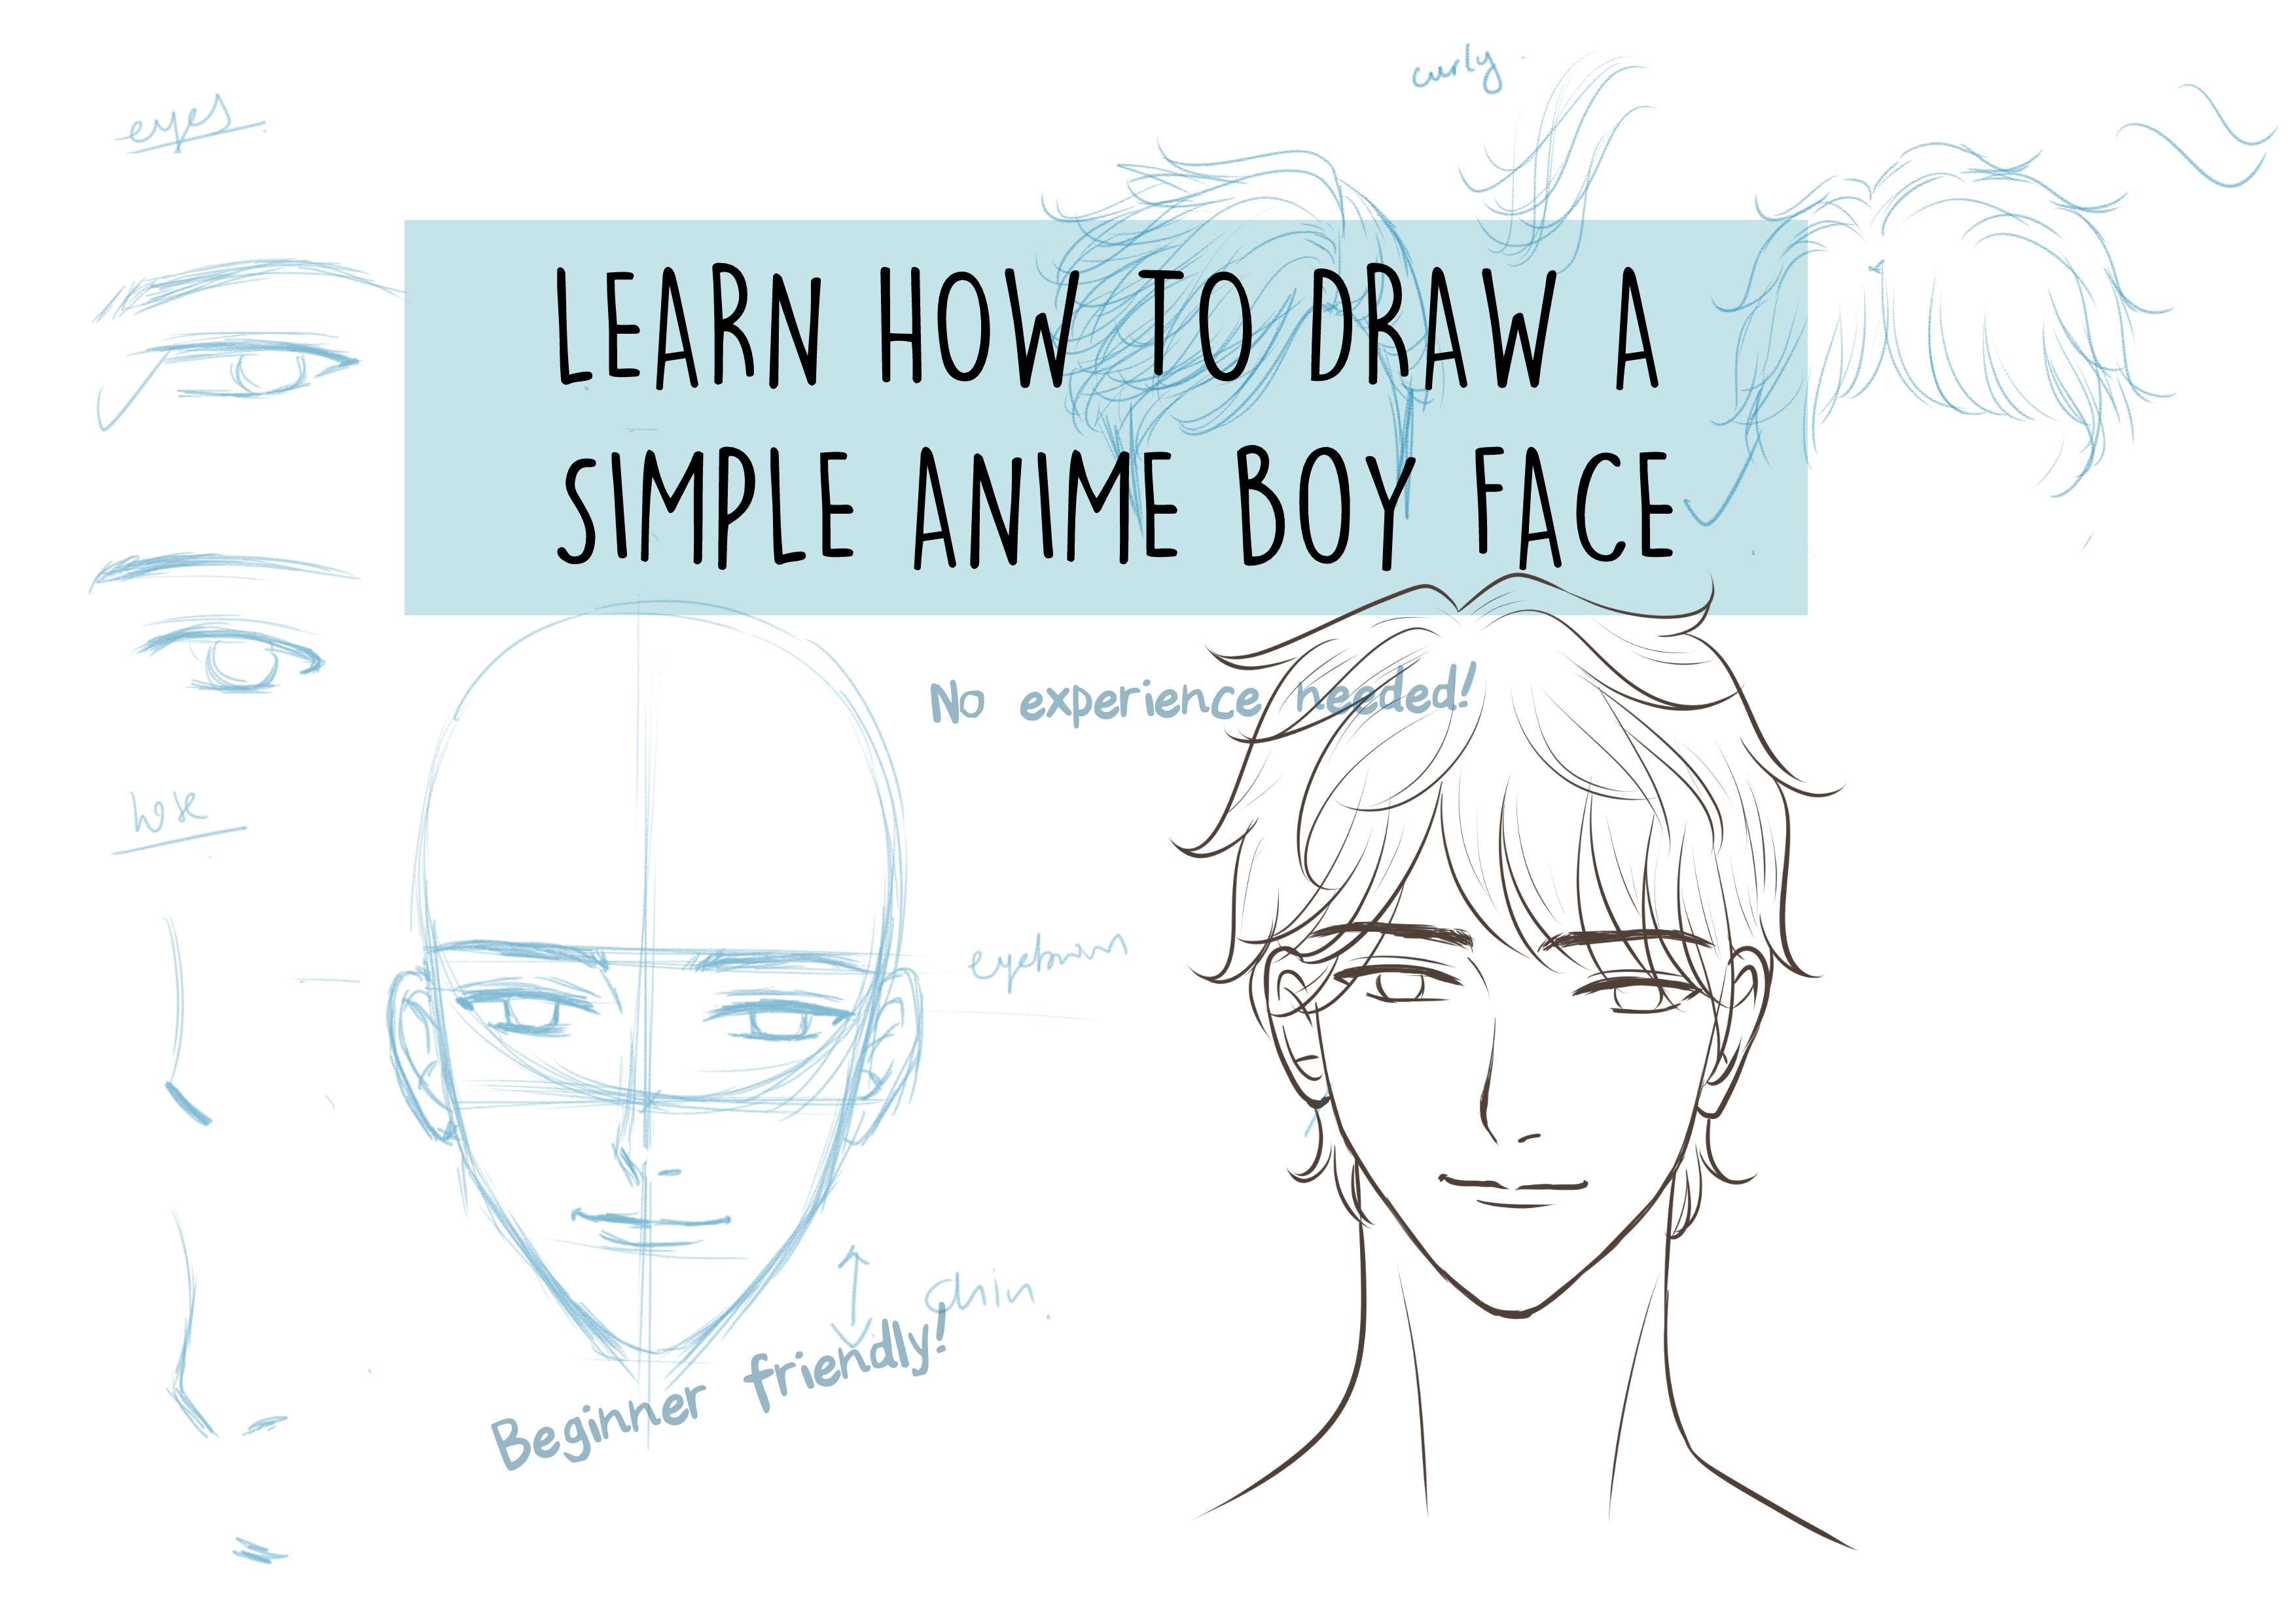
3. Head Structure, Ears, Eyes, Eyebrows, Nose, Lips: Start off with a basic circle for the head structure. On a triangular shape below the circle. For guys, the eugenic tend to have a longer and thinner jaw compared to goes. You can flip your canvas to make sure that the drawing is symmetrical. Use a mirror if you are using a traditional medium. On the horizontal and vertical lines to the face, mark out the top horizontal line where the years should be drought, the years at the side of the face. The top line is where the eyes will be. Mark out the location of the nodes on the face. Here are some options for guys. For ice, use short strokes to create an eyebrow that has a slight arc. Draw the eyes using a curve stroke. The shape of the eye. They tend to be straightened and goes and end on a sharper edge. The iris are usually smaller as well. For option 2, you can give the eyes a more rounded shape towards the end. This is normally used for acute, innocent look. I'll be choosing option while using the lines on the face as a guide for positioning the facial features. Draw the eyebrows on the top horizontal line. Then we marked out earlier. Then draw out the IE just below the eyebrow. And then draw the same for the other side. Do know that the examples I'm showing do not show any facial expressions. But you can feel free to experiment with the expressions of the character. Now you can draw out the nose. Here are some options. Nose should be positioned on the vertical line and somewhere below the each of the circle. For the lips, you can choose to draw a curve or straight. I'm going for a street need for this exercise. Draw out the blow the nose, and leave a space for the chin. I also like to add two curved lines at each of the lids.
4. Hairstyles and Neck: Now let's move on to hairstyles. You can always look up online which has thousand you'd like to start with where you are in the fringe parching to be used, short straight strokes to drop the shrinkage, leaving gaps between the hair. Think triangles when booting up the Hashim. Once you are done, Macau the space above the hip where the hair will start and use street drugs to build up the shape of the hair. For this example, the hair will flow in two opposite directions. Next is a curly hair look. Start again with the partying and use S wave strokes to draw the waves of hay starting from the party. Layers below each wavy look, keep adding S and C curve strokes, which will give the impression of layers. Draw segments and both sides of the hit. Finish off by adding a round look at the other side of the head to show that the hair is combed towards the back. Some hair strokes for this. It's okay to be messy for here is this will give it a rough look. Next is a hairstyle similar to the first look like using Kearney waste. This time. You see strokes to draw the fringe, leaving a gap in between the locks of hair. Strokes at the top of the hair line that goes in two opposite directions. You can also add linears of Head Start from the parking position. I'm going with this option for the hair. Let's go back to the drawing. I'm cleaning the sketch and positioning in the middle. Start drawing the hair by marking out the party. C strokes like what we did earlier. Then draw the fringe in the opposite direction. Remember to leave a gap in-between the fringe. Now, draw the hairline by using curved strokes that start at the head party. The hashtag curve outwards in two opposite directions. Make the strokes wavy for a more natural look. You can also add some Haley is inside the hair using the same strokes. For a messier handbook. Links, you can add the shape of the neck and you are almost done. Do also know the guys names are usually thicker and more muscular than girls. I'm also going to add some hair strings below the years.
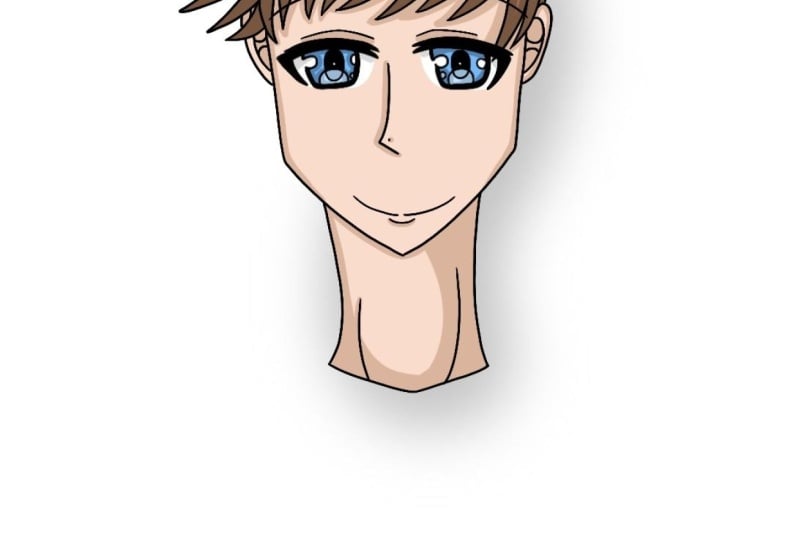
5. Inking the Sketch: Next, we'll ink our sketch. Create your outline layer and reduce the opacity of your sketch layer. Make sure you're drawing on the right layer. I'm using the mapping pen, but you can select any pen that you like. Remember, when drawing the outline, you should try to vary your line weight and create thick and thin strokes. This will really make a difference to your drawing. You can use thicker strokes when starting to draw from the tip and end the stroke with a thinner finish. I like to start by inking the facial features first. Notice how I am always undoing way strokes until I get the perfect line and sheep that I want. Since we are drawing digitally, it is perfectly okay to make mistakes and press Undo button. I'm also building up the outline with stroke, strokes towards a direction in order to create the shape that I want. When drawing details. You can also zoom into the specific area you are working on. Once you are more competent, you can use longer line strokes. But what I did for the ICE, long and smooth line work will give a more polished look to the drawing. Continue to outline the shape of your sketch. Four parts which have a slight shadow, such as the nose and mouth. You can add a thicker line stroke to create a shadow effect. This is one way to show light and shadow in the lineup. And you will notice that most Manga drawings use various language to create depth. The jaw is especially difficult to get right. I am using short curved strokes to boot up the shape of the jaw. It is important to try to be as accurate as possible when tracing the sketch. Thicker strokes to boot up the line weight of the jaw outline. When outlining the hair, use continuously strokes instead of short strokes to beat up the sheep. Continuous strokes will give the hair a sense of movement and flow, which is what we want here to look like. And as usual, you can always click Undo until you get what you are looking for. As you can see, the hair is drawn using only one line stroke. I'm also adding heavily use the top and the bottom using C strokes to create depth. Draw the outlines of the years and the hand below the years with swift strokes. Take your time to do this. Outline the neck and add two lines to show the neck muscles. Also draw some strands of hair in the direction of the headship. Like what I am doing to bring up more details. Once you done inking, you have a basic enemy boy face. Feel free to customize a character with different features.
6. Class Assignments and Final Thoughts: As you are probably aware, there are so many different ways to approach a human subject, be determining his facial features, hair style, quotes, and accessories. These are all very fun to do at the initial stage of designing a character. Here are some drawings of Mill enemy characters which I have drawn. As you can see, there are a variety of hairstyles and different accessories. For our class project, I would like you to try designing an original enemy character, also known as OSCE. Using the techniques learned. I know it seems daunting at first, but don't be afraid to experiment. You can even try out different Mao has dealt with and accessories. The more you practice, the better you will become. I recommend creating a Pinterest mood board and save your favorite photo inspirations. They can be really inspiring and used as visual references. For example, this is my MOOC bought on men's fashion. Once you've created your OCI, please share with me by posting your creations on the page. I would love to see them. I also encourage you to comment on other students projects that we honor students can also benefit from your questions. I will be more than happy to help you in your drawing journey. So feel free to reach out if you have any questions. You can also let me know the areas where I could improve to help you learn better or what you would like to see you next. Most importantly, just have fun and experiment. I hope you have enjoyed this tutorial and see you at my needs video.
 Veldymort Co, Hobby artist