Transcripts
1. Introduction: When I discovered how to create stylized transformation
of my illustrations, I was so excited to explore this expressive and engaging
form of digital art. If you love animation and want to take your
illustrations to the next level by animating
them in a more personal way, then this class is
perfect for you. Hi, I'm Loretta Sac and I'm an illustrator and animator
based in Bucharest, Romania. I have completed both art
school and art university, but my curiosity
lead me to learn and practice animation,
my animation style. I have had opportunity
to work with April for the lyrics
of Chad Smith video, the Washington Post, The New
York Times, and Bona Petite. It really brings me a
lot of joy to know that my work has been recognized and appreciated
around the world. I remember when I started
to experiment with frame by frame animation
without having any plan. That experiment gave me
more ideas and made me realize that frame by frame animation looks
really amazing. In this class, we will
start by working on planning the animation in
an existing illustration, what each element
will transform into. Then we will move on
creating a rough animation, cleaning it up, adding
other animating elements, applying colors,
exporting from procreate, and finally adding sound into the animation
in Premier Rush. All you need is too
beautiful illustration. It can be one
illustration as well. We will work on how each
element will transform. This class is great for a curious and ambitious beginner who already know how
to use procreate. And also for those who a basic understanding of
animation principles. To get started, you need to have procreate app installed
on your ipad. And premier rush for mixing
sound with the animation. If you're ready, meet
me in the next chapter of the class and
let's get started.
2. Class Orientation: I'm happy to have chosen
to join my class. This course took shape after I received a number
of questions over the Instagram about
my animation process and how long it takes to
create this kind of animation. While may seem difficult
with consistent practice, you will develop confidence and most importantly, patience. By the end of this class, your project is to create between three or 5
seconds of animation. To accomplish this, you should already have one or two
distinct illustrations, each containing more
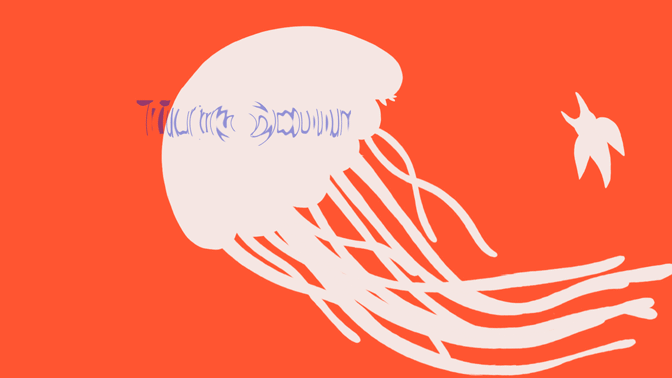
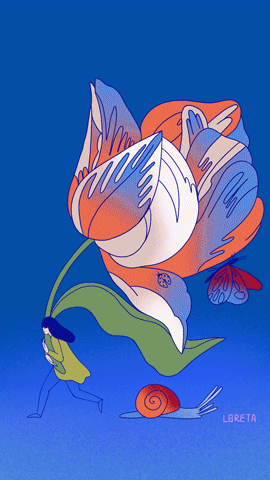
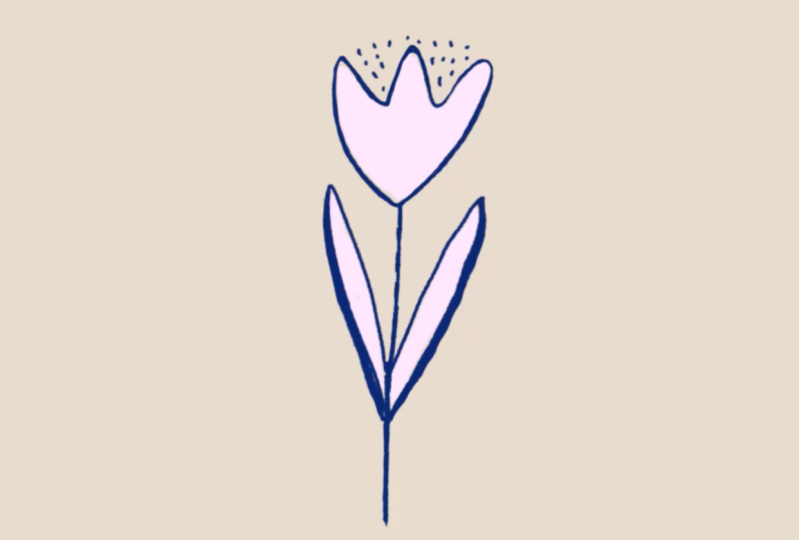
than one element. Let me show you why illustrations that I
will use for this class. First illustration
includes a girl that holds large flour along
with a button fly. And the sale and all this
will transform into a girl swimming with a large jellyfish and two other marine characters. In this class, we will transform only two characters from
these two illustrations. First one is the sal
and the second one is the flower that
transform into a jellyfish. We will start by creating
a rough animation, cleaning them, adding color, and exporting them
from procreate. And then mixing animation with
the sound in Premier dash. And finally, exporting the entire animation
from Premier Dash. For this class, you have
to know that I provided a procreate file with these two characters animated and with their transformation. This file will help
you understand how I animated these characters. It is ideal for
referencing while animating elements from
your own illustration. You can even practice coloring this animation using this file before working in
your own animation. Or you can use this
file to transform these two characters into other characters that you
have from your own portfolio. However, if you want to use your own illustration
for this project, it is absolutely fine. Remember to upload
your illustration or animation it to the project
gallery when you feel it is ready or you can upload your final
animation into Instagram, Youtube, or any other platform that supports a video file. And don't forget to tag me. Here are a few tips to keep
in mind through this class. Patient is gaining to practice. To add a personal touch
is important to have your own illustration or a sketch that you
want to animate. Create as many
poses as you like. Don't delete anything. Complete the anivationtill the end then if you don't like it, start over again till you are happy Osmbian progress after experimenting with
different approaches. Now let's go to the next
chapter where we'll discuss more about how
to plant our animation.
3. Planning the Animation: In this chapter, we
will discuss how to plan a transformation
animation. We will take a look at the composition I have
chosen for this class. From it we will see
how many possibilities can be for animating
one illustration. For this class, I choose this illustration tagore that holds a big flower in her hands, along with two other characters. But what I wanted to do with this illustration that
already has an animation, I wanted to take it to the next level where
all these elements are transforming into
a new characters and basically a new
composition and illustration. The second illustration is this one with the girl swimming along with the jellyfish along with two other
main characters. In this class, we will
animate only two characters. First one is the snail that transforms into the water snail. The second one will be
the most difficult one. And the rest of elements, you can animate
them by yourself. I really would love to
see your characters and your transformations
by exercising with the rest of the elements, and don't forget to add them
in the project gallery. Before I was coming up
with the second idea of transforming all these elements into the second illustration, I was asking myself if
there will be a new story? What will be the new story? What is the direction
I would love to explore what I imagine it will happen with all these elements into the next illustration
or the next story. Let's see how many ideas
and possibilities there are before starting to
animate the chosen story. The first idea was to transform the flower
into a jellyfish. And the girl will start to swim along with two
other marine characters. The second one was
the girl continues to walk the changing seasons accompanied by hard
flower that was transformed into a Christmas
tree covered by snow. The spring appears and the flower starts
to reappear again. Final idea was to go freestyle with all the elements from
this first composition. All of them are
interesting to try, but I feel like the
jellyfish were more complex and more
interesting to do. When selecting a subject to
illustrate and to animate, remember to keep the
original document and duplicated to have
layered composition. This helps you decide which
element will be animated by. That means keep your outline separate from your textures
and from your color elements. Please don't forget to have all your characters in
different layers as well. If you're animating your own illustration
from your portfolio, or if you choose to animate this illustration
from this class. Ask yourself in
what object or form you want to transform
these characters, how these objects or forms
or characters are moving. In real life, write at least three ideas
around your illustration or around the
existing illustration in this class and
then start to sketch. The choose one direction to be illustrated and animated
is are to go to the next chapter
where we will discuss about the importance of
hiding sterences. Video.
4. References for the Animation: Before we start animating our characters from
chosen illustration, it is important to gather
some references video first. This will help you
know where to start and prevent you
from feeling stuck and overwhelmed by thinking that maybe this project is too
difficult or unachievable. I usually collect a lot
of videos for shapes, characters, moving plants, or anything that I
want to animate. I film them myself
or I search them over the Internet in
different videos. Or Jeeves for the jellyfish
and for the snail. I have a few references
that I filmed them while I was in Valencia at the
oceanographic Center. The video shows a
graceful swimming of the jellyfish and other
marine characters. I will use this video
as a reference for the swimming part of each character where they
are not transforming. Knowing how these characters
are moving in real life will help me imagine how to
transform and to exaggerate, The shapes references
video are really important to keep you on
track with your project. Especially when you
don't know where to start from and you still want to push forward and
experiment with animation. The idea with experimentation
only came only after you pay attention and observe the
movement in reality. And then think about how to exaggerate each movement when
you want to animate them. But this depends on what you want to achieve with
your animation. You have to think about what
energy you want to have your characters and choose element if you are
still curious. Time to go to the next chapter, where I will share what tools I will use to start
animate my characters.
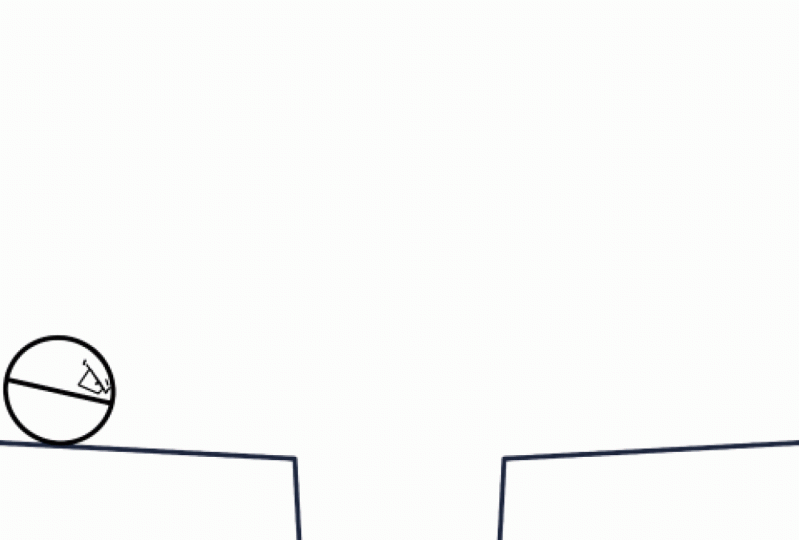
5. Tools and Settings: In this chapter, I will introduce
you to the tools that I will be using inappropriate
for this animation. I will use animation assist. I will activate it by
going to the action menu, choosing canvas
and activating by sliding this button from
the Animation assist. Animation Assist is a
user friendly interface for animators with essential
features like onion skin, instant playback,
different options for how this animation will be
played, and visual timeline. On the right, we
have our layer menu, where we can
organize our layers, seen as one frame. As you can see, the
timeline will automatically activate at the bottom where
we can play the animation. To set it up, I'll go to the timeline bar settings
and select loop. Then I'll set the frame rate to 12 or ten for the beginning. Remember that 24 frame per second is usually set for
animation production, meaning that there are
24 drawings per second. However, I prefer to use ten or 12 frame per second because it gives my
animation a smooth effect. Next, I'll set the
onion skin frame to one so that I can
see the first layer. While drawing the first skin, I'll set the onion
skin opacity to 26% and choose onion skin color that won't interfere
with my composition. As you can see, each group of layers appears in
different frames, even if they are from
the same composition. What I usually do is add
everything into a single group. Another thing I do is
set my background image. This helps me to have a starting
point for the animation. Or to see the elements
that are never animated, but need to be seen through
the entire animation. When I know what I will animate, I start by animating the most important element
in the composition. Usually it is a bigger one
that draws your attention. But it's not wrong if you choose to animate the
smallest element in your composition
and make it more visible or the center
of the animation. Now it is your turn. If you haven't activated
your animation, assist and adjust the
settings in the way you like. Now it's time to go to
the next chapter where we'll discuss about how
I organize my work.
6. Organizing the Work: Let's take a look on how
I will organize my work. Each step is saved
separately in a folder. In procreate, this means that I will create
a new composition, or I will duplicate
the composition, and then I will resize it for the new
composition created. I will change the name and I will start to create a
line work animation. Then I will duplicate the line work composition and I will then
clean the animation. Finally, I will duplicate the composition to start
coloring each element. This way, I want
to be sure that I have each step of my process saved in the same stock or folder when I created a new composition
and gave it a name. Before I create the composition, I want to make sure that my time lapse video is
set to a better quality. Since I plan to share
my process online too. I will do that by from the gallery tab plus button in the top
right of the screen. This will bring up
the new canvas menu. In the top right of that menu is an icon made of
two rectangles with a small plus symbol
tap to bring up the custom canvas screen
tap time line settings. From here you can tweak select resolution
of your video from 180 to full four K. Tweak recording quality settings
from low to lossless, which means larger file will, no loss of details. Hc is a new form of video compression for advanced
motion graphics creation. It is off by default
but can be toggled on. Then I will choose the size
of my new composition, which will be 180 on 1920. The resolution at 72 DPI. It is a size that I usually use, especially if I'm planning
to post it on Instagram, reel, Tiktok, or
Youtube stories. And then I will drop
each illustration from the previous composition
into the new composition. The font part will be to go
to the next chapter where we will start to draw our first
animation for the snail.
7. Rough Animation for the Snail: This chapter explains how I will animate our first character
from our composition. I will demonstrate an easy
animation of the snail. The remaining characters will
be animating by you later. Alternatively, you can choose to animate each element from your own composition and illustration in your
own unique style. To start, I will
focus on the snail. As it is a simple and easy
transformation animation, the snail transformed
into a water snail. For this animation, I
will look up again at my chosen references
video where fish are swimming and other
marine characters. Or I will search over the
Internet to see how a snail is moving or how water
snail is swimming. I will use the
references to animate both characters while they are not in the transformation
situation. To start this animation, I have the first frame and the last frame of the character from the
second illustration, and then again the first
frame with the snail. I know where to start
and where to end. Firstly, I will make the
snail shell disappear. Then I will make wings
similar to a fish. Wings appear on the water snail. These wings will grow from
the same body and then the water snail will swim till he disappears on the
left of the page, and then the snail appears
once again in the page. The first step is to add an intermediate layer that shows how this
transformation will look. After that, I will add another intermediate layer
from the second scene, where we see the snail
to the water snail. To do this, I will go to the Time Line menu and
click on Add Frame. As you can see, this will automatically add a frame
after the first frame. Then I will go to Settings
and activate the onion skin. Next, I will deselect
all other elements from the composition to focus
only on one character. I will choose a
dark blue color for the line and start creating the desired conduit for this
first in between layer. This is how a snail looks like, transformed into the water snail and how he reappears
in the composition. I'm really curious to know how your animation looks
for the snail. Let me know by adding a
preview in this class.
8. Rough Animation for the Jellyfish: Let's move to the
jellyfish animation. This is the most challenging
element in this composition. I will start by animating the largest element
from this illustration, which is the flower that
has to transform into the jellyfish and back
again into a flower. I will use the same technique
that I use for the snail, which is adding in between layer to start animating
this character. However, the transformation
process will be longer because this character has multiple elements that
needs to be animated. Some of them has
to disappear and other elements has to
reappear in the composition. Although completing
this animation may seem a bit difficult
and intimidating, there are few things
to keep in mind. Start by animating few elements. After completing the animation from the beginning to the end. Repeat the process, but this time from the
end to the beginning. By starting with
the main character, This will determinate
the duration of one entire animation. Since this character will be the first element
that the viewer see, it is important to establish
the tone of this animation, whether it will be faster
or slower transformation. The plan for the
flower is to gradually make each petal appear
as if they are falling. However, in reality, they
will slowly transform into the shape of jellyfish to create a
lupo, well animation. It is important to have a
plan from the beginning. This includes determinating
the transformation between the flower
and jellyfish. Then we will see the
jellyfish floating a bit. And then it will start to
reverse the transformation, which means transforming from
the jellyfish into flour. This is my rough animation with the flower that transforms into the jellyfish and back
again into the flower. But I feel like adding
more in between layers and make the
animation a bit smoother. In the next chapter,
we will discuss how to make this
animation a bit. Smooter.
9. Making the Animation Smoother: Currently this draft of
animation looks quite rough. I feel like it needs
more attention. And by that I mean I will
add more in between layers, especially for the part where the jellyfish swims
into the water and the flower has to be
floating a bit in the air. But I don't think
the snail needs any improvement as I really
like the way it is right now. But if you feel like adding more in between layers
for your characters, feel free to do so. In my case, the jellyfish
needs more attention. As I was mentioned already, I want to make the swimming
part of the jellyfish more sweater and the part where the flower is a little
bit in the wind. Also, I will pay attention
to the dose that appears on the jellyfish body because they have to appear
and then disappear. However, if you have a
different character or on the object and you
want to make them more dynamic and
you don't want to add any in between layers
to make them smoother, then this is perfectly fine. It is your decision how this character has
to be animated. I strongly advise
you to experiment. Next, I will start to
animate by adding more in between layers till I'm happy
with my smooth animation. In the case of the jellyfish, we have more than 20
layers that needs to be animated in the same time. But please be patient, because I worked on this
character more than four days. Sometimes having a small
break helps you come up with more ideas on how
to animate each element. This is how my animation for the jellyfish looks
at the moment. And I'm ready to go
to the next chapter where we'll discuss how to
clean up our animation.
10. Cleaning the Animation Up: I'm really happy that we succeeded by now with
the line animation. Now it is really
important to start cleaning each layer
of our animation. You may wonder what is
the best way to do that? Clean up animation is
the process of creating the final drawings that we
see in our final animation. It is not only about
cleaning the lines, it is also the part where we closely examine the
details of each frame. If you missed something such
as the shadows expressions, the animation flow, there
are a few possibilities. But we will start by revising each layer and reshaping the
lines that I don't like. Or maybe I forgot to
animate a tiny shape, or maybe a line is
missing from a shape. This happens often to
me when I'm in a rush. Or maybe I'm too absorbed
by what I love to do. If my layer is too messy, I will draw over each existing layer
because it is faster, especially if it is too messy. The tools here are so helpful
to make these revisions. Onion skin, which is a tool that helps me to see the shadows of the previous or above layer
onion skin is useful for checking if the shapes that are moving in the scene
are drawn correctly. Adjusting the frames per second. If you make this
animation too fluid and it looks like
it is too slow, you don't need to
delete any layer. You can see what it looks like. If you increase the
frame rate after that, decide if this is truly
necessary to delete some layers. The tip is to make a revision, and this is the moment when we can see if there
are missing layers. Or maybe we added too much animation in our loop and we want
to delete some layers. Now it is your turn
to start cleaning up your animation before
going to the next chapter, where we'll discuss how
to color our animation.
11. Coloring the Animation: Coloring is really
my favorite part of this process of
creating the animation. In this transformation
animation, I know that the color
will be changed along with the transformation
of each character. And it seems to me that it
plays such a fun part in the process by adding
color gradient textures. Of course, this all depends on the illustration
chosen for this class. As you see, I say the
first composition with all the color layers and
the last illustration with the jellyfish with
slightly different colors. By coloring this shape faster, we will start by duplicate some layers
and using the fill menu, or dropping the color
that the app allows. I will choose one color first and completed till the
end of the animation. And then the rest of
the colors for each petal of the flower that
transform into the jellyfish. As you see the gradient
part of the flower, the blue and orange met. I will select the shape with a free hand form selection tool. Then I will make this gradient with the
brush that I love. I know that this means
that each frame will be slightly different and that means there will
be an animation. I must say, I love the effect. And it adds like a texture that animates on each shape
by having this gradient. This is how it will help me make the transition of color
to the next shape. Then I will revise each layer to see if
I missed something. If adding color to one shape. Now that you know how I'm
planning to color each element, I will start doing this for all these elements
till I finish them. Some tips for coloring
in procreate. When you fill the layer, you can adjust the percentage of filling by dropping
the color into the shape. If it's too much, drag it
until it's right for you. If the color doesn't
fill the entire shape, just check each corner and use the brush to fill it.
The imperfection. When added textures or gradient to a shape,
use a clipping mask. Remember at the end to check if all the shapes
have been colored and make the revisions
for the layers that still have some
messy lines around. So this is how my final
animation looks with the color. I hope you are happy on how
your animation looks in full color with all the levels of the details that you wanted. After that, we can go to the next chapter where we'll start to export our animation.
12. Exporting from Procreate: Now that we have the
entire animation done, I think it is a huge achievement
because we worked hard. There are a few steps to be completed before we
can see it done. Procreate has a few
options to be taken in consideration when it comes to export your final animation. In the action menu, I go to the shared icon
and look at the part where it says share layers. Here there are four
different types of possibilities that we
can share for animation. I use Jeff when I want to
share a simple animation, have it like a sticker, or when I want to upload
it to my GP account. But when it comes to such a long animation we
created in this class, I don't recommend using a
G. I use PNG when I want to export an animation that
doesn't have any background and I want to add it
to a larger animation. Basically, I'll be compositing the animation into another app. P four is an ideal
video file format that I usually use
for my animations. Hash VC, which stands for
Highly Efficiency video coding. The hash VC format is primarily designed
for four K video. I will export MP four to my ipad when I want to share this animation in social media, and I will use HashVC
when I want to upload this animation
to Youtube or Vimeo. For this class, I recommend
it to be exported MP four. We are ready to go to the
next chapter where we will add sound into
our animation.
13. Adding Sound: The sound to me is quite
important and inspiring for the viewer as it creates
an emotional connection. There are few options when
it comes to adding sound. You can directly add the
sound to your social media. Post platforms like Instagram, Tiktok, and Youtube
allow you to do this. It is a great way to incorporate your favorite band
into your artwork. Alternatively, you
can search for your favorite sound
over the internet. Some artists sells their
sounds or you can create your own song by using
sound creation software. In this class, you have possibility to
download the sounds created by me and they are available in
the class resource. Please download them
if you are curious to mix the sound
with your animation. I'll open Premier Rush and click the button to
create a new project. This will take me
to my Covera role, where I will select the animation I exported
from Procreate. The composition is based on
the size of existing video. Once the composition
is completed, I'll add the sound by clicking
the plus button again from the corner of the app and selecting the
sound from my folder. Now we have everything in
one place, ready to mix. Premier Rush is an
easy to follow up. I choose this app because
I wanted to demonstrate how you can do everything
in a single device, such as ipad Pro. At the bottom of the app, there is a larger timeline where you already
have the video. I will also add the sound by
dropping it in the timeline. I enjoy experimenting
with the sound mixing, so this is how my
mix looks for now, however, I will continue
to make changes and try different options until I'm
satisfied for the sound. There are a few tips to
consider when planning. What feeling would you love
to have this animation? In my case, I want
to have a sound for the transformation part
of these two characters. At the beginning, I want to capture the mood of the Spring when all this is
transformed into the jellyfish and each
character starts to swim. I want to have the feeling
of swimming in the water. This is why I choose a
very peculiar sounds. Now it is your turn to mix
your illustration with the sound in the way that
suits your animation. Let's go to the next
chapter where we will export our final
animation with the sound.
14. Exporting from Premier Rush: I'm really excited to share
the final step of this class. When everything is
ready, I'll kick share. And then in the
Quick Settings menu, we can choose between Match
Automatic Frame rate. This means the video
will be exported with the frame rate from the
app exported before. In my case, this is
12 frames per second, 35 C with the same size, but the frame rate is faster
than in my composition. After that, you can choose
to export it on your ipod or directly
into the platform. We want to see this animation. After completing
this final step, feel free to celebrate by
sharing your animation in social media or adding a link here in the
Skillshare class. Before doing that, my
advice is exporting first your animation
and see it on your ipad every time when I
see my animation exported without
having any settings around makes me realize if the animation needs any
adjustments or improvement. For instance, if this mix of the sound gives me
the feeling that I want and deserves
to be shared with everyone or maybe
deserves to be improved. I would really love to see your final animation if you're
posted on social media. Don't forget to tag me. I'd really love to share your final version
of the animation. Alternatively, if you share
it in other social media, don't forget to add a link
here in Skillshare class. Other than that, enjoy
your final work. Let's go to the next
chapter where we'll discuss what we
accomplished by now.
15. Conclusion: Congratulations,
we really did it. We finally succeeded to create a transformation animation for our character from the
chosen illustration. Here is what we
accomplished in this class. We have selected
our illustration, we bras ideas and settled on one direction
for the animation. We discussed about the tools and settings that I will
use for this animation. We have chosen the
references video. We started to create our rough
animation for the snail. Then we learn how to create
a more complex animation, transformation for
the flower that transforms into the jellyfish and back again into a flower. Then we move on by digging up
our animation, coloring it. Then we export it
from procreate. And finally we
learned how to add Sound and how to export
it from Premier Rush. Through this animation
creative experience, it is really important to
celebrate your achievement. I can't wait to see your
transformation Animation. Please don't forget to share your final animation into
the project gallery. Now that you have seen how this transformation
animation works, don't forget that it
can be applied to any illustration
from your portfolio. Just make sure to ask yourself the right questions before
starting a new project. Even if your project
is more ambitious, don't forget to break it into
pieces that will help you manage your time and complete the animation in your
own personal way. Keep working with
curiosity and enthusiasm. And don't forget to take a
few breaks if you need them. Sometimes after
taking a few breaks, it will help you improve your ideas and you will
work with more enthusiasts. Thank you once again for
taking this class and I hope that this knowledge was
helpful and that you enjoy. Your feedback is
greatly appreciated. As it is my first class, it means a lot to me. Please let me know what can
I improve for my next idea. Thank you and see you
next time. Goodbye.
16. Bonus chapter: Create the animation in Procreate Dreams: Bonus chapter. Yea, I
said goodbye earlier, but I really wanted to do a special chapter
where I want to share five easy steps on
how you can create this animation in
Procreate dreams. Because this app is easy to use and you can do everything
in one single app, such as editing, animating,
and adding sound. So if you have been start
your Procreate Dreams, that's great. We
are ready to go. Let's get started. First step, creating the canvas
in Procreate Dreams. To start, I will open the
new app, Procreate Dreams, and I will click the plus button in the right corner of the app. Here we have five possibilities to choose the size
of our canvas. I will choose the
Harsh Death Social, because the purpose of this animation is to
share it as a real on Instagram Tube or even Tiktok as I already mentioned in
the previous chapters. Then I will click
on these three dots to choose my frame
rates and duration. Finally, we have
a longer duration with no restriction on layers. Here we have many
possibilities for frame rate. I will choose 12 and
duration 5 seconds from this part where we have
two icons, draw or empty. I will choose empty.
And this is done. We created our new canvass
and Procreate Dreams. Second step, import layered
illustration from Procreate. I will drop the
composition from Procreate directly into our new canvass
from Procreate Dreams. And as we see, there
will be a truck. When I will click with my
finger on the layer truck, I can select Group. And then we will see
this composition with three layers in the same
truck as I said in procreate, but the background it
is a different truck. What is the truck you may ask? Truck functions like layers, stacking content vertically
on the timeline. The visual content with this truck is displayed
on the stage. Content at the top of
the time line appears in the foreground of
the stage. Why? Content at the bottom
is the background. Step three, tools for animation. The new menu is located in the middle of the right
side of the page. This menu function
in different modes. Once we clicked on, we operate with a specific
mode from right to left. The menu includes when we
press on class button, it is the Add button, which allow us to add files. For example, I can add
procreate files from my folder or sound files
from this location. The next feature is
Drawing and Painting mode. This mode activates the
canvas similar to procreate. In the right corner, we'll find the menu for brushes, Much tool erase,
layers and colors. On the left side, we can adjust our brush size and opacity. I will use this for
my current animation. For example, the snail
that I want to animate, I would have my
first and last layer on the same different truck. I will use the flip mode
to draw frame by frame. This mode is excellent
because it's flexible. When I want to draw, the timeline is closing and then the flip mode is activated
on the canvas near me. And I can move it whatever
I want in the canvas. Let's not forget
about onion skin, which is here when you press over the
timing on the right. You can even change the
color for the onion skin, for the backward layer, or for the front layer. Also here, we can choose how many layers can see
while we are drawing. Next timeline. It, it is for the
editing video and sound and I will show
you later performing. It is a mode that anyone can activate and get start animated. Even if you don't know
how the animation works, it will instantly record your
movement or effect through every single touch and instantly respond
to the as it plays. Let's see how many
things we can do with truck layers as we
will work a with them. If you hold on the layer and drag it to make the
single layer longer, basically it sets the duration longer of the single frame. You can select or
hide the same truck. You can choose the blend
mode for one truck. You can rename this truck. You can cut it, and
basically you can edit if you have longer animator
or if you have a video, you can duplicate this truck. Finally, we can select a
multiple tracks and then group then step number
four, adding Sound. I will add sound by going to the plus button, which says Add. And then I will choose File. And then I will select the
sound and add them in here. And then I can edit my
song the way that I want. Step number five,
exporting the animation. To export, all you need to do is place over the name
of this canvas, choose Share, then
select the video. It will be exported automatically
and saved to your ipad. A few tips to keep in mind. I recommend you finish your entire illustration
first in procreate, because the app has
all the shortcuts that I love to have
at my disposal. Then if you missed something and you want to
add some details, you can still do them through procreate dreams if you decide to animate
your illustration, but I will use it when my
rough animation is done. If you can't find your
brushes through procreate, you can find them in procreate and drop them into the new app. Procreate Dreams, you can make one frame number if
you feel the light is to, you can add textures with the brush and then
use the stall. This is pretty much
what I wanted to share regarding procyinedrins and
what you can do in this app. I hope this chapter was useful and that you will
create from now on, magical animation bins. Goodbye.
 Loreta Isac, illustrator & animator