Transcripts
1. Introduction to Travel Journaling: I think for a moment about how many pictures
we take when we travel. Then think about how
many of those pictures we actually end up revisiting. So when we're scouring through thousands of digital images, most of them gets skipped. But what about all
those little things you documented throughout
your adventure? Those little things that made the trip really
memorable for you. Maybe it was an
interaction with a waiter at some hole in the wall
restaurant that ended up being a subtle joke or not so hilarious
moment where you tripped over your
own foot before you ever even reached
the cobblestone. You will definitely
laugh about later or that little Allie
D to or that you took that led you to a 50
square foot antique shop where you chatted with the
shop owner for an hour. It's these moments that we wouldn't think to
reference when we're just scrolling through
our digital photo top, which leads me to
travel journaling. This is a bite-sized class
that will take you on an adventure so that you can
document your own journey, exactly how you want
to capture it will be covering my favorite supplies so that you can have options, but still pack light, will be covering different
styles of travel journaling. This will spark your
imagination and keep your process feeling like you. We'll walk through
layouts together so that you can watch
them organically come together also to
give you permission to play and know how you
want to structure things, and then quick tips
to help your process. I'm Peggy Dean and
I am an artist, author and most
importantly educator. That is where my heart lies. There is nothing
in the world that brings me more joy than to facilitate creative
resources for anyone that wants to create. By the end of this class, I know that you are going
to be fully inspired for your very own travel
journal and it very well may turn into one of your
new cherished items. I can't wait to
get started and I will see you in
the first lesson.
2. Packing Supplies for the Journey: If you're anything like me, then you don't like
checking bags. You want to pack really light. So how can you bring all
of this stuff with you if you're flying or you
want to have a backup. If you're on a road trip, like let's say you just don't want to carry a lot of stuff. That's me in a
nutshell when it comes to leaving and going places, I don't want a bunch of stuff. I have to check check
around with me. I'm going to show you
exactly how I pack this tiny bag with this stuff. This is all that I bring. This is actually square so
it fits my square in stacks, which I don't
actually bring with me anymore because I
prefer the smaller one. I just don't have this
film to show you is fair. But what I'll do is depending
on how long the trip is, I'll bring this, which comes, these come with Tupac's. Or I will open it up
and I will only bring, only bring one of these
little foil packages with me, which actually makes
things a lot smaller. So that's usually
what this looks like, only with the right size. So here's how this works. I have my adhesive tape, I've got my washy tape. I have the pens that I need, so I usually pick out
a few Tombow colors. It looks like I
have 123456 here, which is actually a lot for me. I usually bring like two
or three, maybe four. I've got archival
ink for my ink, which these are the
monoline pigeon, the pigeon letters pens. And then I've got a fit on a spooky for smaller
brush lettering. Should I choose to do that? Which oftentimes I
just like to scribble. So I have my options here, but you can see I've
rubber banded them. I made them very small. And then I have my printer, my charger for the printer, and the actual travel journal. I also keep stickers in the
back flap of the journal so that I have those on
hand if I want to have any space filler other
than washi tape or marker. So what I do and the
bag is I put it, I put this part in first. It makes it a lot easier because if it has any
sort of rubber on it, it'll stick and trying to cram everything and you know
how a pack something, you just put in the
big items first. Alright. Then I put the chord in, usually shoved some
more toward the bottom. I put the printer in, I do it flat and
then I build up. So I have the tape. I have my I'll just pretend
that this is the right size. I'll have my film
right next to that. And then I have my washi tape. And then at the very
top, I place depends. And then I zip that closed
and that is the contents of my bag when I am
traveling and want to keep all these
memories on the go. Now, if you want a lot of options or you want
different options, that's what we're
about to go into next. So buckle up. I'm gonna give you
so many fun ideas. And then it's just
coming down to you to pick and choose what you
want to bring along.
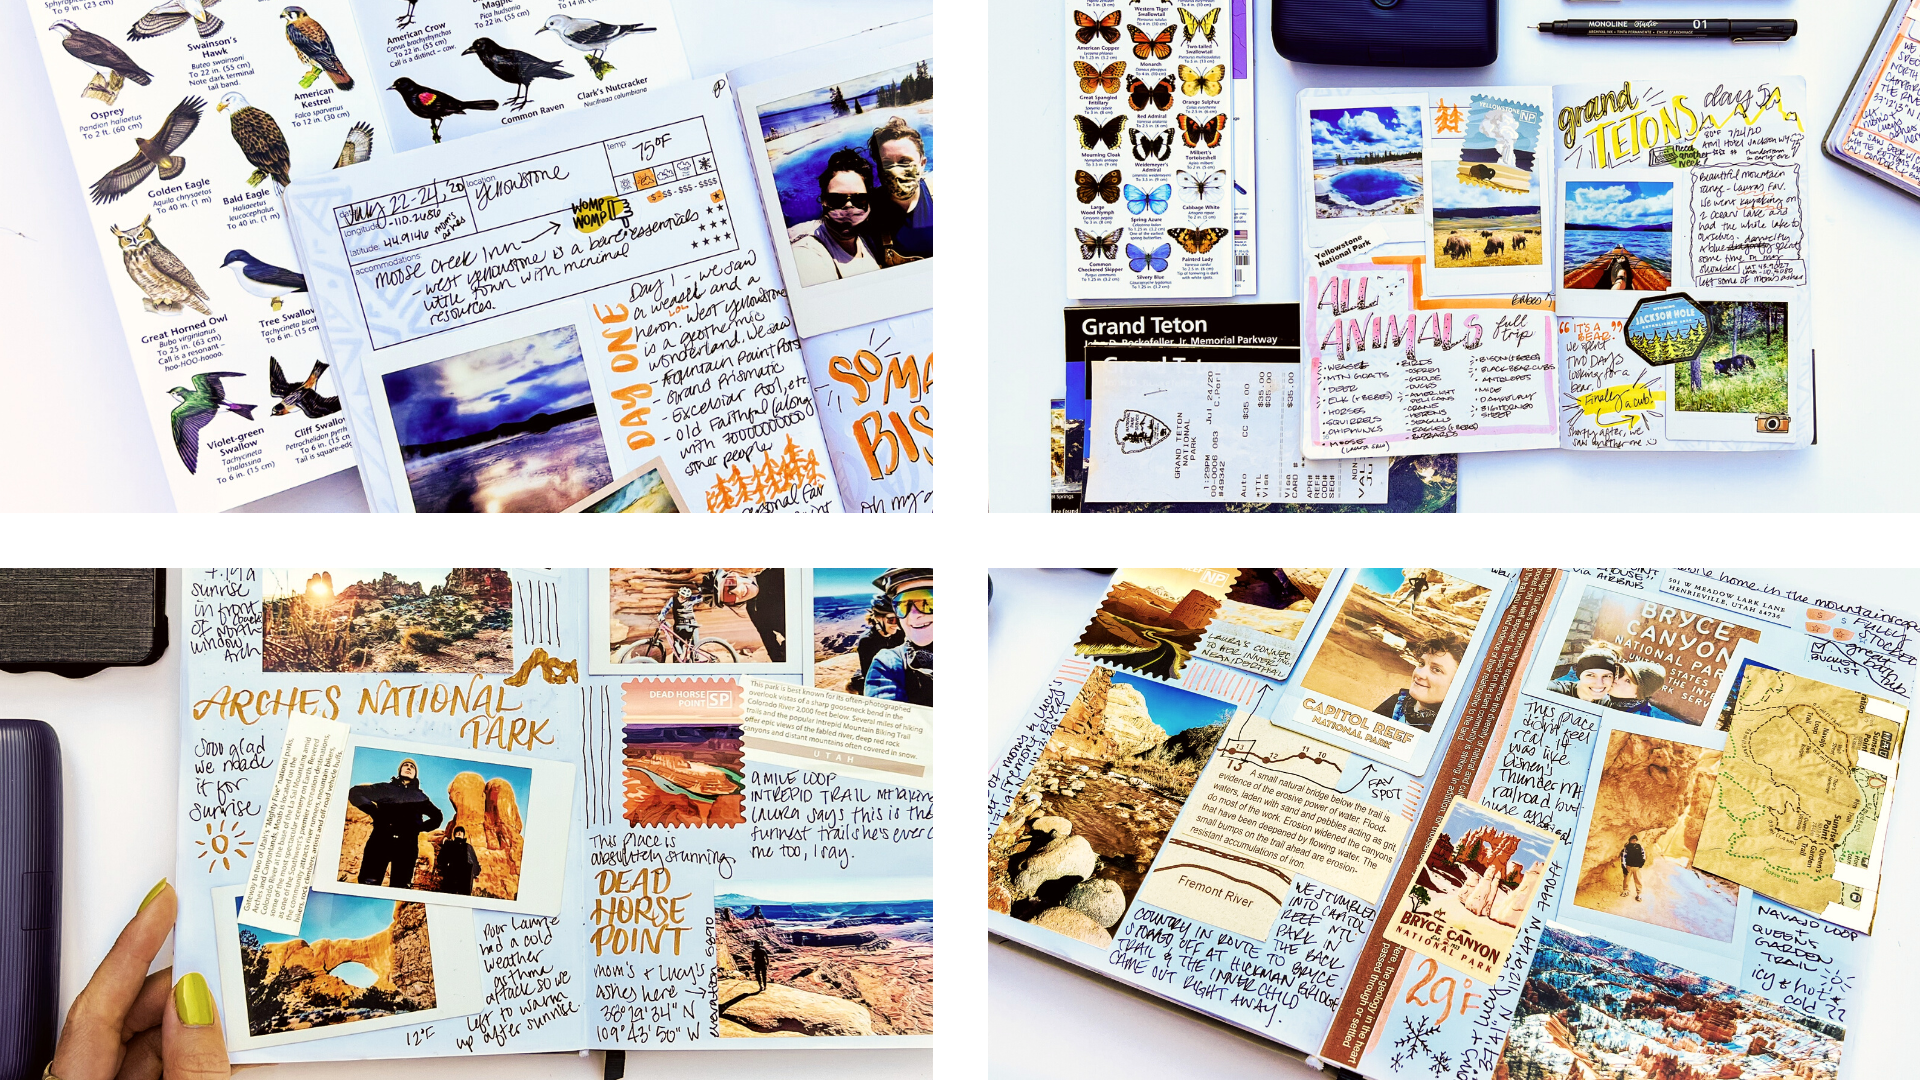
3. Travel Journaling Styles: The first thing
that I want to say is that there are not rules, they're not rules
to journaling when you are trying to
capture experiences. Don't worry, don't let
this overwhelm you. I'm just showing
you how different the variety is that you
can tap into and then maybe spark some ideas
for you along the way as you decide what you
want to do for yourself. So I'm going to show
you an order of how I actually started doing this
and then what it turned into. And you're actually going
to find that it went from way more structured
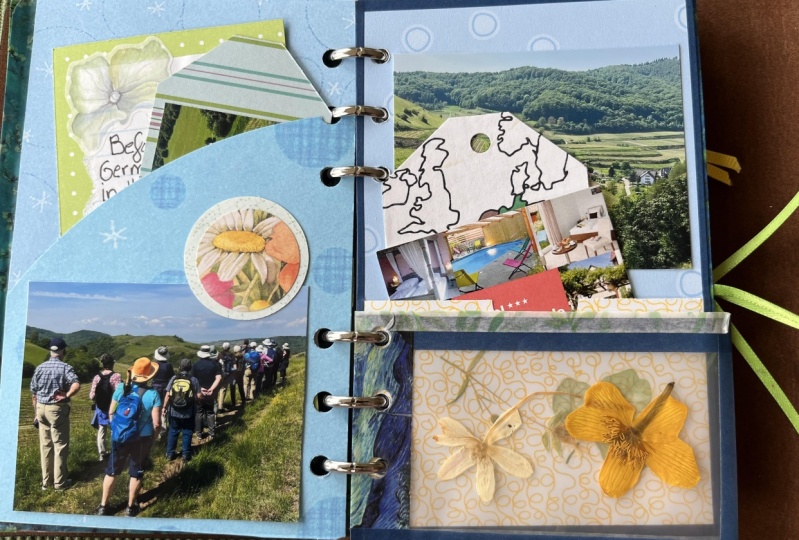
to weigh less structured, which is kinda interesting. I have these two
cloth scrapbooks that I don't do this anymore, but back in the day I did a ton of scrapbooking
and I loved it. This was actually the first
time that I documented or the first way rather that
I documented traveling. And so you can see if
you know, scrapbooking, then you know that there
are so many embellishments that you can do and little
ideas here and there. And the reason I
wanted to show you this first was because maybe you loved
scrapbooking and you can see kind of how you
can have a layout. This is just burned
paper edges with little fiber ART and these
little wooden pieces. And then I've got
this second I got a part two because there are so many pictures
I wanted to keep. Um, but, you know, experiences little things like this,
stickers and whatnot. But I have found over time that I actually
prefer to doodle these in. But back in the day, I really loved using all of the elements
and embellishments. And if you're a scrap worker, then you know, this
gets a little spendy. But it is a fun way to document
photos and experiences. Alright, the next
way that I want to show you is just from a mixed media book
that you put in. And so what I'm going to show you bookmark this and I
don't want it to slip. There we go. You can see that
these are very basic. They're based off of just
like quick doodles or like an urban sketch here to capture what it was
that I was seeing. So I had watercolor and ink and I just
wanted some kind of playful writing and so
I just went for it. Not all turned out great, but it's still, I mean, I remember this street. I remember capturing it,
which was really fun. So you can also do
something where it's a full spread and really
capture everything around. So you can see this one was
more focused on sketching, like the streets in the city and the buildings surrounding. This is similar, but it's
done only with paint. And this was when I
was in Hawaii and I just kept layering and
layering and layering. This was a garden that was the lowest in a hotel that
we stayed out in Mali. You can see items like this where I've
mentioned the Patio festival, but then I wanted to actually capture a full patio that I saw. It's sporadic, it doesn't have
a whole lot of direction, but that's totally okay because
as I flip through this, I know and I can remember exactly what it was that
I saw or experienced. The next one I want to
show you is very specific. And this is a really
special journey that I have taken myself on. And I usually don't
do anything with this style or journal
until I get home. Because what I do instead
is create collections. So let me explain. This book consists of pigment
that I find in nature. So that means raw elements
like rocks that I then grind up into pigment
and mole into paint. And so I take photographs, is aware of where it came from. I like to tape the
pigment Rob before I mole it to see how the color is raw versus how it
shows up with paint. And it's really just like a documentation of the places that I've collected
this pigment from. And then going into the different ways
that it translates. So I have location, what the landscape was like, what the forum was like. This was earth clay, this one was Iraq. The color that it is
rather color processed. It's transparency, it's a test. So I put a little cross and then painted over that to
see how transparent it was. Light fastness. This is where I do a
test where half of it is exposed to the sun for
awhile, the other half isn't. Notes on modeling. So this was, this is obviously
very, very specific. And you can have even
taken little samples like this and put them in regular travel journals that
are amongst other category, other topics as well. Just because it's
such a big part of what I loved to
do with foraging. So that's an option
that you can do. Obviously, your focus might
be a little bit different, maybe not on earth pigment, but on something that really
brings you a lot of joy, something that you do often for the places that you travel. And then finally,
I want to get into the main interests that I have. Now with how I like
to travel journal, which is, this is a wanderlust Passport
by Bobo design studio. She isn't a small business. She's an artist and
she loves traveling. The reason I love
these so much is because you've got
she puts in the date. This is the older version. I'll show you the newer version, but the date and your location, the temperature, the weather,
your accommodations. If you need it or not. And you can see that there
are a lot of notes and here's why I like
this style the most. It's so forgiving. I can put notes and
doodles anywhere. And at first glance it looks
really interesting and fun, but you can see my handwriting
is just a hot mess. I've got the things that I want to call out in a right pen. I have pictures that I've
printed out that, you know, are the key elements that I want to look
at from those trips. I don't like to put
too many pictures in. I am known to overuse
them for sure. I use too many pictures, but I'm okay with it. I've had some pages
really overlap. But the reason why is
because I like to just kinda see what it is
that I want to remember, But then write those notes of those really interesting or
hilarious memories over time. Here's another one
where we were in Vegas. So the things you'll notice, I have a strip of this. This was just the bag, but I thought, oh,
that's perfect. It's got the logo on there. There's a sticker
that says Area 15, which is a place we visited,
which is really fun. You can see my handwriting completely changed
for this trip. I've got stickers. I've got this omega access card because it was such a
highlight that day, which was really fun. So this is the idea and this is what I have
found that I liked the most because it is such
a scrap situation. You've got ticket stubs and you can do this
with anything. You don't have to have an
official like specific to what you're doing travel
journal because you can write this in a bullet journal,
anything like that. I just really loved this one. I love the way that
when it closes, it's just like this. It's just a nice memory
piece to carry around. And then I'll pull out the newer version just
so that you can see it. This is actually the pack that
I end up bringing with me. And this is the size that it is and the stuff
that I have in it. I make sure that
everything will fit, which means that I'm limited to supplies and I know a lot of people who bring a
lot more than that, but I I'm not that person. So this one is very similar, but the information
like the date and accommodations stretch
on a thinner part of the pages and then you
can add your little doodles. I like to choose two colors or three colors to represent
a trip as a whole, just because I think
it looks nice, but you definitely
don't have to do that. So just little memories. This is a tear out
from a pamphlets? Yeah. Just little little
experiences, little memories. This was from another
tear out from a pamphlet. So basically this has become my favorite way to
capture memories, doing it this way, having this spread, having these notes, having these little pictures
that really take me back to those moments and having accompanying bullet
points and whatnot. So I love this. We're going to get into
how you might set this up, how to think about
a layout or lack of layout and how you start because I know blank paper
is really intimidating, but I wanted to walk
you through all of those different versions so that you have
permission to know, hey, whatever I
have laying around, Cool, Hey, if I prefer
a bullet journal, cool. It doesn't matter what you use. It just matters that
you are keeping, keeping these memories in a way that you're really
going to connect with them. Because how many pictures do we take of things that we
never look at again? Or they just sit there and they're not some
that we highlight. And so that's where this really makes it a
fun experience.
4. Printing Photos On The Go - Option 1: When I was recently in London, I saw this view from our Airbnb and I
thought this was the perfect opportunity to take some footage to
walk you through how I print on location with
my in-stock sprinter. It's not something that I see
walked through too often, so I just want you to
know how easy it is. So first step, you
take your picture, then you will turn on
your end stocks printer. You want to make
sure that you have the right software because there are a couple of different ones depending on the
printer that you have. So you'll open that
software and then you can select which
picture you want. So you'll go to your gallery. It will pull up all of
your photos and then you can select the image is
that you want to print. And then you can see
you can pinch with your fingers to zoom
and move and scale. This also shows you at the top, your remaining film and the
battery of your printer, which is very helpful. And then after you press Print, you'll see that your in-stock
sprinter is responsive, prints your image on
the spot and then you'll just wait a moment
for it to develop. And then you will have your
beautiful photo ready to go in your travel journal
to keep that memory.
5. Printing Photos - Option 2: Okay, future Peggy is
popping in because while I created this class
with the end stacks printer, I also wanted to introduce the Polaroid because
it's new to me. And I also like this one a lot. And I wish that I could
say I have a favorite, but I think it just
depends on the aesthetic that you
are going for. The in-stock sprinters
do have that kind of retro vintage feel. I don't know, I love
that part of it, but then this new Polaroid, it is super, super new,
but it's new to me. It prints in really
vibrant color. So I'm going to walk you
through how this one works also so that you
have a clear idea. And I would say that these
two are my favorites. So Polaroid has its own
app for this, also, where you will pull up the photo that you want and then just simply press print as the
stacks work, so very basic. And then from there
it will load that up. And it goes through these
three cycles where it will print cyan and
magenta and yellow, and then it puts a
protective coat on it. And it lets you watch the full process on
your phone, on the app. And while that's happening, I'll also show you what's
happening with the printer. Real quick. You do have editing options that
are real basic, just like you do with
the other printer. So if you did want to
do that in the app, you can, I typically just do this before I even
start printing it. But now we are going through
the color passes and this is what you see on the phone and then
this is what you see. I will say that while
this is a longer process, it's still interesting
and fun to watch it happen because you get to
see the color being added. And if you're a color
nerd like I am, it just makes it a
little bit more fun. So basically the difference
is that Polaroid, the high print, this, this printer uses dye
sublimation technology. And then the stacks uses zinc, which is a zero ink,
one pass printing. But this is how your picture
is going to come out, so it's very crisp
and true to color. Whereas the end
stacks printer will have more of that
retro feel to it. So I personally like to use both of them
because I get two. Play with aesthetic more. So I say go for whatever
you liked the most. And these aren't
the only options, but it does make it fun. And then as a bonus, the
Polaroid film is sticker also, so you can peel that off
and stick it to something.
6. Layouts for Your Journal: Alright, so now I wanna go over some fun lettering techniques. If you want to do a
header of some kind, that's what we're
going to start with. You can't really see it here, but I've written out
the word adventure in pencil super lightly. I don't want it to come
through and bleed underneath my light color that I'm using
here with my brush pen. But I did want to have it be legible enough
tomorrows going, but I have a trick
for doing this, and I always like to count the amount of
letters that I use. So adventure is ADV
and T, U, R, E. So nine letters
and the middle of that word would make it
letting letter number five, which would be n.
And so it helps me because that's where I
can center it on my page. And the reason that I use pencil first is because
it lets me know, okay, This is the width
that I'm going to need to do everything in order to make it stretch the whole way. Or this is the spacing I need to have in-between
letters and what have you. And it's a really great trick that's helped me for
a long, long time. So hopefully you can take that one and put
it in your pocket. But from here, I start in
the middle and then I start to further stretch
out on either side. And once I've laid my word down, that's when I can start
erasing any marks that I see that are really stand out. And then I can continue
on or leave it as is. But you can always add effects to these letters
like drop shadows. For this one, I'm going to add adventure awaits and so
awaits has six letters. And if I was to sandwich
that in-between adventure, I'm going to create enough
slots for six and then figure out where if I
want this to stretch, also, where it should
lie within adventure. And so it's just a
little bit of math. And then I can mark off the places that those
letters should go. And obviously this doesn't
have to be perfect. But if you like having a guide, that helps a lot. And so from here, I
can just reference it loosely and place the a kind of underneath the D. And the trick that I use to make
sure that these are even is, see where the next
letter is going to go. And then my exit stroke, which is basically the
end tail of the a, and then this tail
of the W right here. Those are my spacing. So I'm not making the
letters super wide. I'm just changing the
spacing so that it all connects to approximately
the right spot. It doesn't have to be perfect. And that kinda makes it
have that nice stretch, which I think is really
fun and playful. And then I'll add these
longer tails on each side. So that's an easy header. And then we can go from there and get into kind of
like a layout plan. This isn't always what I do, but let's say you're not sure what photos you
want to use yet. So I'm just going to place the approximate size of one
of these and you can use any dummy film or another picture that you have and just kinda mark
off some areas. So let's say you want
to write notes already. That's when this comes in handy because then
you can at least preserve some spaces
to include photos. Maybe you don't have
your printer on you and you know that you want a certain amount of
photos on a spread, this is going to help with that. So basically, as I'm moving
these around and seeing, okay, this might be a good spot for this or I like how
this is laying out. Whatever it's loose ish, but then I can just create these squares where
these are going to lie and don't be
afraid to overlap. Also, that can be really fun to have these overlapping photos. So you can see right
here it would overlap. And then we can look at different ideas on
linework or line spacing. But this also adds a lot
of interests just doing like thick line dividers
are dashed dividers. But you can also use those thick lines
from your brush pen as basically little boxes
to write inside of. So I might write
down my location where I'm visiting,
the temperature. And just like key elements to include before I
start writing notes. And that just kinda
adds its own divider, a block, if you will, which is just easier
on the eyes to read as you're navigating
through your journal. But now let's take
a look at putting your photos in and positioning and then drawing around them. You could do this
with or without, but let's just assume
your pictures are ready. So you can lay them down
with adhesive, of course, but you could also get creative
and use some washi tape and then find whatever
information that you want. Around it basically,
that might look like details of all
the fun things, maybe some funny inside jokes or highlights that happened that
you don't want to forget. This is a great place
to write them because it's easy to look at like, oh, this is the big stuff
that happened, but it's less. You want to be able to remember
the little things too. So that's one of the things
I love about traveling. And then you can add those
in, in-between your notes. You can do some mark-making just like those broad
strokes that we did. But you could also just use
the side of a brush pen and create a box
with little marks. I do this a lot. I use just basic broad strokes, but then you can also use little marks that add interests. And then you can do like
additional section where you maybe put down something that kept coming
up during your trip that was really special or hilarious
or anything like that. And then you can always
find different areas. But then of course you don't have to fill this
all with nodes. Either you can fill it with
ticket stubs or any sort of memorabilia that was relevant that you actually
have those tangible. And then let's say
I added these notes in or their stickers or
whatever and there's a gap. You can highlight something
by just calling it out. Let's say this was
a particular place. Well, I'm going to write
this section divider down and maybe that's actually
the place that I went. So maybe it's like Tahoe or something and that's
my section divider. So you can use words
as a section divider. That's like in a different
color or a larger tip pen. Okay, so let's keep moving. I'm going to pretend
this as a new photo now. And let's say this one. I use just the adhesive. I don't have washy and
you can see that I've separated and made
a little frame where these photos would go. And I'm just doing
that with dots, just colorful dots, which
also is just as fun. So after that, then I can
write my notes in here. Or let's say now I
want to do if you're a letterer or if you
do calligraphy at all, or any special writing, you could do block lettering, anything that you want to just kind of add some interests. So I might call something
out in calligraphy and then write smaller underneath
it with more details. You can use different
colored pens for this too. I find that every single layout that I do is always different. I don't really have consistency, but some of you might
like consistency, which by all means do it, it's fine either way. Then you can add some doodles. So let's say it was super sunny or I went
somewhere really sunny, Maybe it was summer. And then I can do a splash down here where it's like kinda
like a water splash. Maybe. Below here. This photo is something that was really a funny
experience and I can just call that out
and pretty lettering. So basically, you see how this is coming together
and it's pretty effortless. I didn't do a whole lot, I
didn't plan out anything. It was just kind of like
an organic experience. And that is what I want
you to experience too. I want this to be really
fun and just kinda flowy. And then, you know
what if you hate the, the layout which does happen? Just give yourself a break. Keep going, and then
look at it later. I mean, really it's impossible
to love everything. So to let yourself go
on a journey of fun, doodle, capture your memories. But most of all, just let it happen.
7. Section Dividers: When it comes to our page setup, dividers are great
to have because we can concentrate
certain areas on the page so that
our eyes don't get confused with everything
that might be going on. So we're gonna go over just a page of
options that you can use to create separators
in your layouts. The first divider
is pretty simple, but really does the trick. It is these side slashes, they can be forward,
they can be backslashes. You've probably noticed
this video sped up a little bit and
that is because I don't think that
you want to watch me drawing lines so for so long. But I am wanting to give you
these beautiful swatches. So the second divider
is simple circles, and these can be
broader or smaller. I love doing little dots
for borders, boxes, etc. The next one are these small little
triangles which can be upside down
or right side up, but they make for
some added interests and little doodles. You can take that point
and simplify it by doing just a line
that is zigzag. And then you can get real simple again and just suit
do some dashes. Sometimes I like
to do these really close together where
there's two lines of dashes for
borders and whatnot. And then this one kind of always reminds me of a
little bird feet. And I love doing them just because it's like a little
burst, if you will, to emphasize corners or
doing a full separator. And then you can do the
same thing we did with triangles where their little
boxes are little squares. Obviously these work
great for checklists, but also if they're
small enough, they weren't good for
borders or tech separation. And I ran out of room here. But you can do something fancy where they
have little arches, little dots at the ends of them. It's like little flourish lines. And keeping wavy lines in there, you can always do a border. And for fun, z is I'm
going to add this divider that I did at first only
on a straight line. And these are essentially just little points at the
bottom where they come straight down and then make an inverted V and then come right back up and
then you fill those in. They can be a lot
larger than this, but for the sake of those, I just wanted to smush
them in here as a line. For those of us who love
florals of all kinds, which I think I can
speak for a lot of us. You can always add
these little leaves where they are just
little curves, little arches that come
off of a single line. And they work great as dividers because they're nice and thick, but still kinda elegant. They can also be pretty playful. You can carry that
kinda leaf shape into just a basic shape and
sit it on its side. Or it could be
straight up and down. But these little shapes that are hollow, you
can fill them in. But when they're hollow, they do make for really interesting. And simplifying again,
we've got our x's. I'm always a fan of doing x's. I think that they
are fun and kinda edgy and not just with edges, but when you turn any shape
on its side and shorten a line like these little
like they could be plus signs or crosses
or what have you. It totally changes the vibe
to change proportions angle. This one is one of my favorites. It's just straight up
and down lines but small and then longer
and then shorter and then longer and then
shorter and then longer end. I think it's fun because it just adds all that texture that I love to see inside
of my notebooks. And then speaking of
changing proportions, if you do little
dots or circles, you can do a
combination of both. Then there's always
the classic wave, which is a fun separation for anytime that you
are at the ocean or the coast or vacation. Another favorite of mine
as an imperfect line that has thick and thin areas. I think that it just
adds so much character. So don't be afraid to be
imperfect in these things. So I hope this fired
some ideas for you guys and I will
see you shortly.
8. Layers on Layers: Alright, so this looks like a hot mess and I realize that. But this is an opportunity
for you to get creative with the items that you
get when you're traveling. So this is just a I
mean, it's wrinkly. It's got a writhe in it. But this was tissue
paper that came with something that I
purchased as was this. And I just think that it will
make beautiful layering. This was a piece of the bag and then I've got some ribbon and then some twine as well. And then I grabbed these stickers because I
thought they were just so cute. So how could I not? I'm going to show you how
I would build this up to create a background
or even aside, embellishment to notes and
two photos and whatnot. So very, very simple. And I just want you
to know that you can work with what you have
which can be scrapped. So it's even got oil on it. Who knows? So you can cut this
or you can tear it. And I'm really fond
of the torn edges. I think they are just lovely. I also like it when there's a wrinkly texture so I
can tear it like so. I can also, if I
pulled toward myself, what this does is
it creates kind of a more like a thinner edge so that there's a lot more
fibers showing from the paper. I could also put it against a straight edge or a ruler to
fall into a straight line. It would just make it so that it still has that torn of that. But you get it started here. It's going to be a lot smoother. I did that way too fast and it did not go in a straight line. But as, you know, maybe ruler terrorists
and my forte. Alright, so I've
got this piece now. Is it perfect? No, Do I want it to me? I could, I could make
it a perfect rectangle, or I could just see what happens if you do this
type of embellishment. Yes, you can plan
out your layout, but I want to encourage
you just to dive in your very first part
and just lay it down and trust the process
and see what happens. Because it can be so fun so that I'm committed to there's
no turning back. Alright, so the next
layer I'm gonna do is this tissue paper and I'm going to bring it out a little bit. So since this is already
torn right here, I'll just tear this part
off and then continue on. Just the main areas. I will put adhesive
to the out. Oops. Be careful with tissue paper, the outline area or outer edges rather than
the very center, just to keep that down, if it helps to do glue
drops or however you wanna do that, it's fine. And I'll put this
kinda toward the top, but spilling out off
of that background. And now I will use this black. Since I like tearing
stuff so much, I'm going to have this also be torn and then maybe I'll keep that straight edge here
and that would be good. So again, be careful
with tissue. I'm just doing enough
to make it stick. Mod podge is fun for this too, if you want to get really into making sure
everything is super flat. But basically that's
the gist of it. And then what I
can do from there is take the photo that I want to use and plot for
that down, like so. And then I've got this really
interesting layered effect. I could even put it down
here and have more of that showing maybe
some embellishments. So I'll take I'm not
going to glue this. Oh, yes, I am. Yes, I am. Because I told you to
go with the process, so I am going to
do it and commit. So where do I want
this here, here, here. Let's just go with a
drop a little bit. Right here, it looks
good. Then I'll take this Twine and this ribbon
and do something with that. So I can cut this. And I don't know how much
I really want to cut. So maybe just a small amount. They can see kind of
what can happen here. Maybe I'll make that a little
bit shorter and just have it be small little section. I'll put that down. So let's see. Maybe on the edge
who I like that because it can be off the edge. I like putting it against
the dark because you can see the raw edge of the ribbon
who I like it right here. Actually. I have some of it on the dark background
and you can see that right edge and
I just think it has such a beautiful quality. And then lastly, I have this Twine and I could see if I could do
something with it. It's not going to stick to
well with this adhesive. But what I could do actually, it's cut it, lift this image up, and just kinda put it behind. And then. Put some adhesive to
put that down here, and then I have that twine. And if you want to free
the edges a little bit, that could be really fun. So this takes us into that scrapbooking
world a little bit. But look at how much
interests it adds. And then I can put
my notes here. And something that is a very interesting type of
photo down that rabbit hole. This is, I think it's the
cosmopolitan in Vegas, but every time that I go, there's a restaurant
that's called eg slit. It's so good. I think it's like brioche buns that they use or something, but oh my gosh, I just love it. So the sign is right outside of there because they have this little Alice in Wonderland theme which brings me to these mushrooms stickers. So I'm going to open these
up and see what we've got and see what might
be fun to add in here. Lots of really fun
and interesting ones. So this one's kind of
fun and different. I wouldn't think to add
green into it since I have this pink
thing that I like, how that makes it stand out, I don't know if
these are stickers. They might just be either
way. I've got adhesive. Let's see. Oh, that one's pretty
so I'll do this one. Then I can just tuck
it maybe right here. I love how it looks. A little bit faded. Blue. I'll have some tucked behind and then have it reach
out like that. Then I might add one
more smaller one like this guy, maybe too much. I liked the understated. So see how I'm just kinda
going with the process and seeing how I can really
bring this more interests. I think I actually
like it just as is. I don't think Oh,
wait, wait, wait, this one's good. Yeah,
that one's good. I just didn't want
to do too too much. I think I'll go layer
over the Twine two. So I can position that
the way I want it. And then just lay this over
and then laying it over has that effect where it
looks even more layered. So, okay, so now is when
I can write any notes, this is where it gets kinda
gone because I can have like an inside joke or I know this is outside
of eggs slot, which wouldn't
necessarily make sense at first glance for anybody else. But I can say God
and love, ****. And maybe that's all
that I write right here. And then I have a divider and then continue on with the
rest of what I wanna do. So just a fun way to make this a little
bit more elevated, maybe more scrap
bookie, maybe more. It just gives a different vibe
than having it be playful. So another option that is very beautiful and
I'm a big fan of.
9. Quick Tip: Fix Mistakes: This is a bonus
because I want to show you how you
can fix mistakes. I'm actually using this
journal for some swatches just because this is like more
of a mixed journal for me. So it's not like my
designated travel journal. Hence using as an
example for this one, but I made a mistake and
it's not a big deal. I usually go with it, but I messed the spacing up a few places and while I
don't care about that, I did grab the wrong color.
This isn't a big deal. It has nothing to do with
what we're learning, but I do want to show you how
you can fix this mistake. So if I was doing a travel
journal and I made a boo-boo, I wouldn't really
care that much, but if it bothers
you and if your aesthetic is really beautiful, you can use these. This is adhesive, but they have whiteout like this as well. So I could go over
that and then continue or rather than tear
this page out, let's say the back of the page. You've already done like all this beautiful
documentation. You can just glue these
two pages together. So all you need to do
is go along the border. This is a trick that I
learned from my friend Angie of Bobo design studio. And I just thought, gosh, why didn't I think
of that sooner? And I I swear by it. So I just go along the edges. I hit two spots in the middle. I guess I didn't even
need to go on that one, but this will make
sure it's extra stuck. And then I just fold it over and press down and then
you can see, no problem. So if you have something that is like you can't go back from, that is a way instead of
tearing the page out.
10. Your Class Project: Having a space to isolate
these moments has been incredibly rewarding
to my own travel process. And these journals
have become some of my most treasured
possessions. Remembering things that might have otherwise been forgotten, reflecting on moments with someone who I may
have traveled with, reminiscing about the
never-ending landscapes and wildlife and architecture. And the list goes on. Your project for this
class is to look through your photos and choose an experience that
you recently had, whether far away
or close to home. Instead of grabbing the
most obvious photo choices, take some time to select
a few images that dig a little deeper and highlight
some unique experiences. With those images in mind, create a spread in your travel journal and
document your memories. Be sure to upload your final
results also add notes about your process along with your favorite memory
from that experience. I can't wait to hear all
about your adventures. Remember, we're not striving
for perfection here. We are all about that
organic process, which is what makes it
so imperfectly perfect. And that alone is eye candy.
 Peggy Dean, Top Teacher | The Pigeon Letters