Transcripts
1. Course Intro + Welcome: Have you noticed that no matter how magical a moment
is that you've witnessed whether that's seen a tough sell order in a
diving selfie underwater, that the photo your
camera takes never quite mirrors the true colors and
beauty of the experience. That is why editing
software like Lightroom is so important. It's not really about
making something look perfect or idealistic
or too good to be true. But it's about being
able to bring back the true colors of the
underwater world in that moment and share the
emotion that you felt with viewers when I look at
your photo afterwards. Hello friends, and welcome
to this editing course. You'll learn how to transform your underwater GoPro
photos from average to awesome using Adobe
Lightroom Classic. In this course, I'll share
my five easy to follow steps for creating beautiful
underwater photos. And by the end of
it, you'll feel more equipped and skilled, encouraged them
inspired to share your own stunning
content that visually captures the magic of the underwater world from
your own unique perspective, you definitely don't need to be a professional photographer
to take this course. And you don't need to have had any previous Light room or editing experience
to get started, whether you're a beginner and
advanced content creator. This tutorial is
accessible for everyone. And I've designed the
course, especially to be super simple to
follow along with. So you can end up with
an amazing photo edit. It's not about being
super technical, but it's about learning the fundamental
Lightroom tools that you need to produce awesome
underwater content. If you're wondering who I am, well, let me tell you. My name is Mela gada and I'm a travel content creator
based in London. My photography and content
creation career first began in 2014 when I started my
travel blog, illumination. Since then, I've worked to produce visual and
written content for leading brands
and businesses in the tourism
industry and beyond. Back then, I mostly use my mobile phone before
eventually upgrading to professional camera
equipment and honing my editing skills using professional software
from the Adobe suite. As I continued on my
content creation career and began working with clients, I learned how to properly
edit my photos on Lightroom to produce much
more elevated content. I've always loved taking
underwater photos on my travels. And ever since I was a kid, I'd shoot with waterproof
disposable cameras whenever I went on a trip. But then one day, the almighty GoPro came
onto the market and changed the face of underwater
photography forever. For me at least, go pros and other
underwater action cameras have revolutionized
our ability to record our precious memories
and moments underwater and share them with
our nearest and dearest as a content creator, I've snapped what
I've thought was some great shots with
my trusty GoPro. But after editing
them in Lightroom, I've been able to make
them look even better. It's been really exciting that my photos have been able to inspire others to travel the world and start
diving or snorkeling. And I want to share that feeling with YouTube in this course, I'm going to share
my five easy to follow fundamental
editing techniques for transforming your
underwater photos on Lightroom from
average to awesome. So now let's dive into what
to expect in this course.
2. What you'll need: For this course, you'll need the Adobe Lightroom
classic desktop app plus an unedited underwater
photos to work with, either enroll or JPEG format. I'll also be editing on Mac, but it makes no difference
whether you add it on Mac or PC for this course, because the Lightroom
Desktop App functions in exactly the same
way on both machines. In this particular course, I'll be working with
a J peg photo because J peg has a default
format for GoPro cameras. And because the majority of beginner content creators
tend to shoot in JPEG format, of course, best practice is to shoot and edit in raw format. I'll be providing some
my own GoPro photos to use in the projects
and resources section. So you can edit along with me using those if you don't have any underwater
images to play with from your own travel archives. So feel free to use your own underwater images are the ones I've
provided down below, even though I'll be referring specifically to GoPro
images in this course, the tips and techniques I'll be sharing for editing on Lightroom are applicable to any
underwater images captured. Whether you're using a GoPro and other brand
of action camera, or whether you've used DSLR in waterproof housing to capture
the underwater world. So now let's dive into the
importance of editing.
3. Why editing is so important: Before we jump into editing, I just quickly want
to address from a technical standpoint why it's so important to edit your
photos before sharing them. Firstly, when you take
pictures, underwater, cameras like go pros typically
swallow up warmer colors, like oranges and reds. And you get stuck
with a cooler tones, light greens and blues
and maybe yellows. You can combat this
by using a red, orange, and magenta filter
on your GoPro lens. But if you're shooting
straight out of the camera without a filter, it's important that you
edit your photo and color corrector bring
back those reds, oranges and warmer
tones afterwards. Otherwise, your
subjects, humans, turtles, dolphins, or fish, will look washed out
rather than vibrance. Secondly, your image
will be affected by external conditions
out of your control, such as the weather, the
sun's coming in right now, some of the conditions
that might impact your photo include
whether it's a foggy day, sunny day, or overcast weather, the water is silty or murky. How far down you've dived, whether you're using
a torch or a light, whether you've added a red
filter onto your camera. And of course, if the water is still wavy or choppy, et cetera. So editing is really
important for restoring the true colors
and potential of an image. Lastly, editing helps you put your own creative
spin on your images. Lots of content
creators are known for having their own
unique editing style. Some travel influencers on
Instagram like to blow out their lights and make things
very exposed and white. Whereas other travel
content creators like to embrace shadows for
a more moody feel. This is why personal style
and taste comes into play and why editing
can be so exciting. Because it's all about how
you perceive the world and how you want to share that
creatively with your audience. Now let's jump into my tips for taking a great underwater photo.
4. Should you shoot in RAW or JPEG?: Let's briefly address image
formats and camera settings. If you're looking to create more professional content or print your images
and high resolution, I do recommend shooting
in both RAW and JPEG, which is an option on
Newark go pro models. Go pros offer dot
GPR files on GoPro, which is go pros own
version of raw images, which is based on Adobe's own widely
used dot DNG format, which is a raw image. If you do have a
new GoPro model, the hero fiber upwards, I do recommend changing your camera settings to
shoot in RAW and JPEG, because it will give
you much more options and flexibility with editing. Jpeg, or JPEG is the most
common image format used today, as it's widely compatible and it retains great image quality, plus it drastically reduces file size and makes
photos easier to share straight
out of the camera or go pros can save
photos as jpegs, which is simple and convenient as everyone can open a JPEG, but not everyone can
open raw images because they require particular
software such as library. However, JPEG images are
compressed and they don't offer as much flexibility
in editing as shooting in raw,
uncompressed files can, you can completely bring a photo back to life when
you shoot in raw, shooting in RAW typically provides better image
quality and gives you much more control
over elements like white balance and recovering details and shadows
or highlights. The downside of shooting in RAW is that the photos
aren't automatically shareable and you truly
need to take extra time and effort in processing them in an image editing app
like light room, the simplest option
is to shoot JPEG, which is the format
set by default. If you're a beginner, content
creator or photographer, than I really want you to work with what
you've already got. The simplest option is
just to shoot in JPEG, which is the GoPro
format set by default, although it is best
practice to shoot in RAW, the technical aspects aren't
as important, as I said, unless you are looking
to print your photos out or to start leveling up and delivering
professional content. So just let go of
needing to have the most technical specs or
settings and just have fun. So now I'm going to take you
through my super simple, easy to follow five-step
process for editing. Awesome underwater GoPro
photos on Adobe Lightroom. Please remember, you can go as fast or slow as you need to. You can pause or
rewind at anytime. Now let's get started.
5. Importing Your Photos to Lightroom: First I'm going to open up the Adobe Lightroom
classic desktop app here on my MacBook Pro. Once it's opened, if you haven't created a Lightroom
catalog already, you can create a
new one by going to File New Catalog and naming it to the
theme of your choice. I'll make one relevant
to this course. And then I'll click Create. Once your catalog is open, go to file import or click
the Import button down here. This is where you can choose
your underwater images to import and create
a new collection. Creating a collection
is an essential, but I do recommend
doing this for each batch of images you edit so that all your travel images are nicely organized within
your Lightroom catalog. Now that the images have been imported and appear
in your library, you can click onto
the develop section. Here in the image
preview ribbon, we can see all the photos
I've just imported. If I click through them, you can see I've lined
up a selection of GoPro photos to work
with from a trip to me, loss island in Greece. First off, let's choose
which photo to edit. I have a couple of
different options here. As we covered before, how clear your underwater
photos or footage comes out really does depend
on water conditions. And for example, here you can see I've got scratches
and water droplets on the dome plus my companions
fingers are on the lens. If I click onto this
photo, on the other hand, immediately feels a lot more immersive and gives me more
of an emotional feeling, more dynamic action with
the diving down movement. Plus, I just love how the water surface makes
this beautiful curve. Let's use this photo to edit. This is how it
looks right out of the camera, which
is pretty good. But of course, after following
these five simple steps, this photo is going to
look so much better. Let's jump into step one.
6. STEP 1 - Framing Your Subject: Step one is cropping your image and a
framing your subject. There are several reasons for why I recommend
cropping your image. First, first of all, the framing your image to just the part you want to
edit means that you won't spend time editing
unnecessary parts of the image that are
going to be cropped out anyway for
this walk-through, I'm gonna make sure I crop these water droplets out
because otherwise I'll spend so much extra time editing
the water droplets out when they wouldn't even have appeared in
the final image. Cropping your image
first, rather than lost, will really help
optimize their time and energy you spend on editing. Secondly, cropping your image first means that you can frame your subject and compose your photo in a way
that pleases the eye. I typically like to
follow the tried and tested rule of thirds
composition technique. Or since I tend to post most of my images
on social media, I'd like to send
to the subject as images with sentence subjects
tend to resonate quite well and help people
feel more immersed in the image and evoke more
of an emotional reaction. I'm going to click
here on the crop tool. I'll change the aspect
ratio to fall by five vertical for
posting on social media. And now what I can do
is take the corner of the crop box and I can drag it upwards until it flips
into a vertical position. The crop tool also displays
a rule of thirds grid, which is really helpful
for framing your subject. So I'm gonna go
ahead and position my subject in the bottom
center of the grid. Immediately, you can see how much of a difference that
framing the subject properly makes the composition
looks so much better because the eye is pulled into a
particular focal point. Before we move on, I just wanted to note that sometimes
Lightroom will automatically display your photo information
over your edit. If you find it distracting, you can simply tap
the I button on your keyboard to get rid
of it. I'll do that now. Now let's jump into step two.
7. STEP 2 - Bringing Back Clarity: Step two is di hazing
and clarifying. The hazing is a super-duper
important tool, especially when
you're working with underwater or GoPro images. Because when you're shooting underwater visibility you
can get very murky or salesy if you're not in crystal-clear water in
this particular location, which was a volcanic area and
may loss called cleft ago. There was a lot of limestone, chalk and sand rising up from the seabed and making
the water silty. So the Dehaze tool is
really important for making the image more punchy and
removing fog or haze. You can find the
Dehaze tool or slider. Here in the present section of the basic developed toolbar. Try not to go too far with the dehaze as it can
look over edited. I'll set it to about here, usually around plus 25 or 30. I'm just going to
quickly compare the original image with
the edited version. Simply tap the backward slash
button on your keyboard. Bear in mind that
when you dehaze, it will also work with the
upper part of the image. If you've done a half in, half out split-level
underwater photo. But I often find that
usually helps as sometimes the upper part of
the image can be a little bit overexposed. The Dehaze tool can really help tackle overexposure as well. Now let's jump into step three.
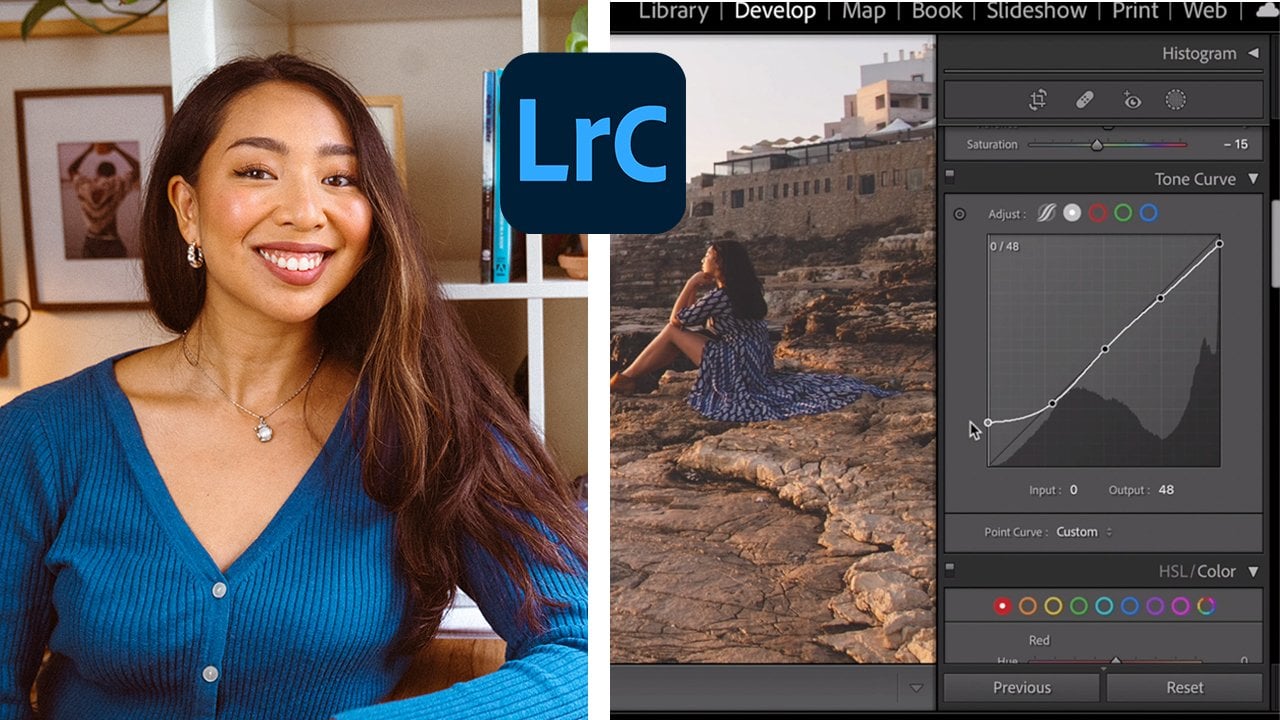
8. STEP 3 - Bringing Back Colour: Environment: Step three is color correcting the water
and the environment. This step is not
only the most fun, but also really helps
bring the image to life. We're going to color
correct two things. Firstly, the color of the
water and the environment. And secondly, the color of
your subject or skin tone, which we'll go
into in step four. As I said before, color
correction is super important. If you want to take
your underwater photos from average to awesome, because there are so many
different elements that can affect the photos
you take on the water. That means they'll need some
tweaking to look their best. Also, the deeper into
the water you go, the more you lose those
reds and oranges and warmer tones because
everything moves towards the cool color spectrum. Let's start color
correcting the water. Everywhere you go. Every place and
country and body of water has a different
look at different color. Sometimes it will be a
turquoise lagoon like this, and other times it will
be a navy blue ocean. Creativity comes into play here and you can decide
yourself what look, you're going for, something more natural or something more
impactful and saturated. To color correct water. You can scroll down here to the HSL color sliders section. Hsl stands for hue,
saturation and luminance. Click on color so that you can edit individually by color. Typically when you're
editing water, unless there's a
lot of greens and yellows and your actual image, you're probably going
to want to stick to the aqua and blue sliders. While doing the
color corrections, I'm going to work with
a side-by-side view of the before and after image so that I can compare
the original watercolor alongside the
adjustments I'm making. To do that, you can click on the before and after
icon down here. This particular area had more of a turquoise tinge to the water. And it might be nice to
keep it more turquoise that the dark blue shade on my flippers can stand out and
have a life of their own. However, it could also be nice to deepen the
shade of blue. So let's have a play around now. I am really liking the
darker dolphin blue, but then you don't
want to overdo it. And you do need to be careful
when working with blues about picking up or washing out the color of
the sky as well. Play around with what
feels good here. And we can always
change it later on when we do our final
touches in step five. Changing the luminance of
the water is important too. Because increasing luminance
really gives lift to darker shadows or
murkier conditions and really helps your
subject pop a bit more. I'm gonna play around
with the luminance and push it right up here. So it can really
emphasize the feeling of sunlight shining down on the
subject under the water. This is looking good to me. Now let's move into step for
making your subject pop.
9. STEP 4.1 - Enhancing Your Subject: Colour & Skin Tone: In step four, we'll be making our subject pop by color
correcting skin tone. Because shooting
underwater swallows up those warmer tones, Those red and orange colors, human skin tones
and the vibrancy of your subjects on the water will look very faded and washed out. For example, as you can
see here, if I zoom in, my skin tone is
looking a little bit yellow and even quite gray. And even though the color
of the water is beautiful, I do want to bring
back the natural reddish orange skin tone that I had when this
photo was taken. So to color correct skin tone. We can come back to the HSL sliders section and
click on color. I'll zoom in a little more
hair to assess the skin color. And luckily, my
hand is placed in a good position so there's
nothing to exposing here. Usually skin tones will
be coming up yellow with unusual straight out of the
camera without a red filter. Usually my skin comes
up very yellow. So I'm going to check if
that's accurate by just using this yellow hue slider and pushing it right up and
down to see if it picks up. Here you can see the color of my legs are changing slightly. So we'll be working
with a yellow slider. If I use the green
hue slider as well, you can see that my leg is
picking up in the greens. So we'll be working with the
yellow and green sliders. Nobody wants green skin
unless you're Shrek. So first things first, I'll drag the grades
over to the yellows. Then I'll go into the yellows
and I'm going to push the slide is more
towards orange. Now I'll zoom out
and I'm going to check that the other part
of the image hasn't been affected because
those HSL sliders affect the entire image, zooming out and
assessing the image so far, all looks okay. So here's where things
get more interesting, because now you can play with the saturation and the
luminance of each color. You can really work some magic here and tinker around to get a more or less accurate
representation of the subject skin color or true colors heading
into the yellows. I'm going to push
the saturation up. If you go too far,
it can start looking a bit odd and fake cell. Just fiddle around and see what works to bring back some color. Now I think I've gone
as far as I can to recover skin tone with
the HSL color sliders. So what I'm gonna do next
is mask over my subject for more editing control over a specific
part of the image. So let's jump into
step for part two.
10. STEP 4.2 - Enhancing Your Subject: Masking & DefinitionDefining Your Subject: Part 2 - Masking & Def: Part two of making your
subject pop is adding punch and clarity and
analysed color fixes. What I'm going to
do now is select my subject or mask over it
for deeper editing control. Making a specific
selections to part of an image or masking
an area of the image. Helps you edit or
fix a specific parts of the image without
affecting the rest of it. So you can head over here
to the masking tools. If you have an older
version of Lightroom, you may not have
this new future, but the updated version
of Lightroom has this amazing time-saving mask
tool called select subject, which uses AI to trace
over your subject. Sometimes it's buying on, sometimes it needs
to be tweaked. Selecting your subject
will really give you such better control over your coloring and help
make your subject pop. Let's click this
button. Will give it a second to
detect our subject. Now the mosque has popped up
and you can see that it's highlighted my body and also a little bit of the
upper part of the image. What you can do here is
click on the erase or minus, click on the Brush tool to
make the brush smaller, use the size slider right here. Or you can scroll up and
down using your mouse wheel, make sure you increase
the density to 100. And brush over the part of the image that you don't want
to be masked to erase it. I'm also going to
take the erase brush, make it smaller
and just clean up the steel space between
my arm and my body. I'll also add to the
mask by brushing over this section because it
didn't pick up automatically. I'll also add to the
mask by tracing over my flippers because the original mosque
didn't pick those up. Now that the subject is more
or less masked quite nicely, I'm going to hit
the OK button on my keyboard to hide the overlay. Or you can untick this
checkbox right here. Now that the subject is masked, what I'm gonna do is up the temperature just a little
bit to make it warmer. I'll up the tint a
little bit towards the pink just to bring back skin tone and balance
out the coolness. And then I'm going to add just
a little bit of clarity to help make the subject more
punchy and stand out more. If you find that the colors
are just not strong enough, you can then scroll down to
the color box function here. And you can select
a specific color to overlay onto your selection. If I click here, you can see this creates
more of a red tinge. But if I drop it
onto a paler orange, the skin looks
much more natural. I'm going to desaturate it just a little bit to make
it look more natural. If I zoom out here now and we do a quick before and after, just hitting the backward
slash button on your keyboard, you can see how color
correcting has really, really helped to bring back the subject's natural
skin tone and created so much more
magic in our image. You can also try tinkering
around with the contrast, the shadows and the
highlights to help out too. I love punching up clarity and sharpness so people can
really see what's going on. But it is easy to overdo it. I like some crisp
definition in my images, but you can go a bit too far. So make sure you
touch up your subject just enough that it gives
it some extra oomph. If I do a quick side-by-side
before and after, you can see how much
these small tweaks have already helped
to improve the image. Now let's move on to the
final step, step five.
11. STEP 5 - Adding Tones, Grain and Final Adjustments: Step five is adjusting
tones and final touches. Now this part of the edit is all about adding those
final touches and adjustments to your
underwater photo until you've achieved your
desired look and feel. If I look at the image, I feel like the lighting is very different between the upper and the lower parts
of the image. So if you find for some
reason that a section of your images underexposed
or overexposed, which means too
dark or too light. You can head back to
our mask tool and click on the Gradient filter. This tool allows you to adjust a particular section of
your image very easily. I'll choose a gradient
and I'm going to drag it over the lower part
of my image so I can edit the water
section as a whole without affecting the
upper part of the image. Once you're happy with
the gradient placement, you can tap to remove the overlay and start playing around with
the effect sliders. I'll up the shadows
just a little bit. I also want to try playing around with the upper
part of the image. So I'll go back into
the gradient filter, pull it down over the
top part of the image. Adjusted just a little bit. I think I'm going to desaturate the sky just a bit.
I'm happy with that. Say if you also wanted to add
some rich cinematic tones, then you can scroll
down to the tone curve. Using the tone curve tool gives you much greater control and flexibility over the curves to affect the tones
in your image, which is a really crucial part of developing your
editing style. The tone curve impacts your photo a lot more
than the light sliders. One of the most
popular curves for content creators is the S curve. So what you do is add
two dots and then you essentially pull them slightly to make a
little bit of an S. For glutton shadows, you can pull up the bottom
of the S curve, tails slightly, just to add more dimension and a
more cinematic feel. Working with the tone
curve requires a lot of subtlety and experimentation. As mentioned in the first
part of this course. Lots of travel influencers
on Instagram as light to blow out their lights
and overexpose. Whereas some travel
photographers loved to make the images much
darker and embrace shadow, unmute their highlights
for that moodier feel. This is why personal tastes and your own creative
style comes into play. And why editing can be
so fun and exciting. If you want to go
a step further, you can play with these
color grading sliders to which control your shadows,
highlights, and midtones. And they can infuse them
with specific colors. But I'm not going to touch those today as I don t think
that they're needed. Now lastly, if you want more of a vintage or a filmic look, you can scroll down here to the Effects section
and add some grain. I love grain. And
personally I always add just a touch for that
slightly more filmic look when I shoot my travel photos. But for this particular photo, I don't think the grain
effect suits it that much, so I won't be adding any
grain today, and that's it. We've officially finished five-step Lightroom
editing process. Now, let's jump into
how to export an image.
12. Exporting Your Final Image as JPEG: I'm very, very happy with how
this edit has turned out. Finally, I'm going to save
the image to my computer. To do this, you can
go to File Export. Here. You can change your filename. Scroll down to the settings, ensure the file is
exposing as a JPEG. And down here in the color
space makes sure it's sRGB so that your colors will
display perfectly across all devices
and on the internet, change the size if you want to. And click Export. Now our image has been
officially saved. Exciting stuff. Now let's look at our
beautiful before and after.
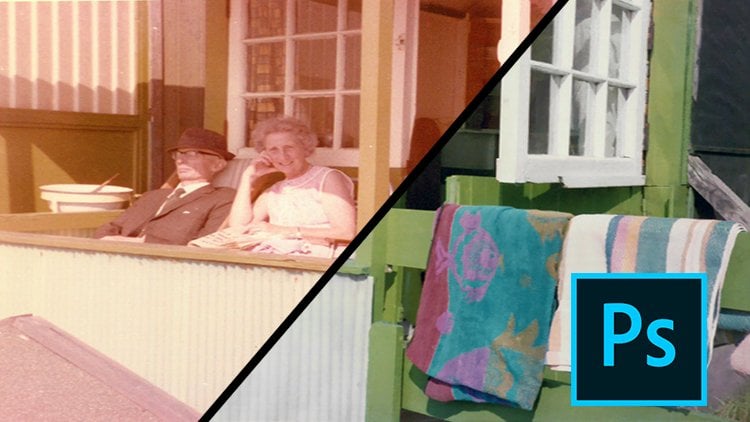
13. Transformation: Before & After!: So there we have it. If we look at the
before and after, we can already see what an immediate and impactful
difference that this simple five-step process
makes for transforming an underwater GoPro photo
from average to awesome. This course is aimed at beginners and entry-level
content creators, just to get your
photos out there quickly, easily and confidently. There's so much
more we could have done to edit these images, such as healing scratches
on the dome service, clear enough, water
droplets and so on. But I personally like the effect that the raw scratches provide.
14. Summing Up: I really hope that this course
has helped you feel more confident with editing
your travel photos, that this opens up
a whole new world of creativity. I remember. The better your
original photo is, the easier it'll be to edit. Editing is all about bringing back the magic of the moment. So taking the time to edit and finding enjoyment in the
creative process really helps you develop a certain
style and helps make your travel photography much
more unique and personal. The creative possibilities
truly are endless. Check out my other
Skillshare course, which is all about
how to transform your travel photos
using Lightroom Mobile. I've included a
cheeky little free, free set for you as well. I really hope you
enjoyed this class and that you are able
to learn something new. Remember to show
you a before and after photos in the
class projects. If you'd like to continue
adventuring with me, then you can find me
over on Instagram or YouTube at illumination. So keep creating
coupon adventuring. And I'll catch you
in the next course.
 Mel Legarda, Travel Blogger and Content Creator