Transcripts
1. Introduction: Have you ever wanted to capture the picture of your favorite handmade doll or a tiny creative message
in a way that's quick, fun, and deeply personal? Welcome to my new class. I Olga, a crochet designer. And today we're
merging two worlds the simplicity of a sketch
and the texture of yarn. As critters, we often get stuck and bored in
long complex projects. This class is your
creative momentum pill. We are not aiming for perfection or a
business ready product. Instead, we are going to play. We'll learn how to immortalize our characters or any tiny
idea in miniature portraits. You don't need to be an artist. Capturing the hair color or a favorite accessory
is more than enough to make recognizable. The magic happens when
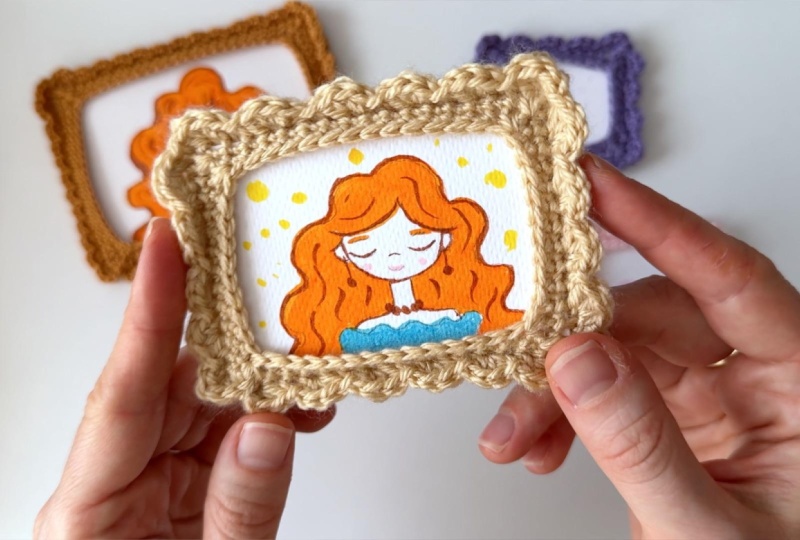
we create the frame. I'll show you a way to crochet frame that holds
your perfectly like a cozy case without sewing
or a single drop of glue. This project is a perfect
stache buster and beautiful way to create heartfelt gift tags or
cute mini postcards. If you are not familiar
with basic crochet skills, I recommend watching my beginner class first crochet
stitches for beginners. There, you will learn all
the necessary stitches and it will be much easier for
you to crochet this frame. By the end of this class, you'll have a finished
treasure and then you habit of quick,
joyful creating. Thus grab some paper, some yarn, a hook, and start this journey.
2. Class Project: The project for this
class is to create your own unique
miniature crochet frame with a small piece
of art inside. It is cued, fun, and very quick, so you can finish
it in one evening, and you will probably
want to make another one. Materials you will need. Any yarn from your
stache medium weight is best for practice. A crochet hook, choose the size that is recommended
on your yarn label, a sketchbook or regular
printed paper for practicing. Paper for the final art,
thick watercolor paper, thin cardboard, or just
regular printed paper folded a few times. Coloring tools, colored pencils, markers or paints, a pencil and eraser and stitch
marker. What we will do? We will practice
drawing and coloring simple primitive portraits
in your sketchbook. We will draw your
final character on your paper canvas and colo itin. Then we will build
a simple rectangle that fits the size
of your artwork. After that, we will crochet beautiful decorative
border around the frame, and finally, we will add several rounds with decreases to secure your artwork inside the frame without any
glue or sewing. Let's start.
3. Warm-up: First, let's warm
up and practice. Try to draw something
like a circle. The circle doesn't
need to be perfect, just a shape close to a circle. Let's draw another one. And another and one more. Now, I will show you
how I draw my dose. I will draw a slightly
bigger circle. In my mind, I divide
it in half vertically. This helps me draw the
neck right in the center. Then I at the shoulders. Now I divide our circle in half horizontally on the line between the top
and bottom halves, I draw the ears at the level
of the bottom of the ears. I draw a small nose in the center and a little
lower, I draw the mouth. I draw all of these
with simple lines, very primitive without
anatomical details. At the level of the ears, I draw half circles
for the eyes. Just like on my crocendos, I draw the pupils
like the square with slightly rounded corners
and a cross inside. I add the eyebrows
with simple lines. Now let's draw the hair. I start a little above our circle to make
the hair look fluffy. I make a wavy line of
the length I want, and on the right side, I add another wavy line. Here, I will add
another wavy line to show the top of the
shoulder dress, for example, and I close
the outline of the hair. Now I will erase the top
part of the head with an eraser and add the bends
with these simple lines. Let's draw one more
portrait for practice. I start with an
imperfect circle. I find the center
horizontal line and place the ears on it. I use them as a
guide for the nose. We had the mouth
just below the nose. You can try to make the smile
a bit bigger this time. The eyes are half circles. Then the pupils with crosses inside you can add simple eyeless if you
want and eyebrows. The most important
thing is to enjoy the process and draw
whatever comes to your mind. I add the neck, trying to
draw it in the center. I will add the hair
shorter this time, but using the same wavy lines. Here, I will change
this line a bit. I add the bends, and
raise the extra lines. Now, add the shoulders, and this time, let's make a
dress with straps like this. We can add simple accessories. You can invent any
accessories you like. And let's draw one more. The thing is this process is addictive and it's hard to stop. You can draw identical
portraits to practice, or you can draw different ones to try different hairstyles, accessories, and
facial expressions. Hairsty as usual with
the face, I at the neck. I like to draw a long neck. I mark the ears, nose and mouth. This time, I will
make the eyes closed. The hair is straight.
And I will add beans. I raise the extra lines. We can add a headband like this. And a simple dress. Remember that this
is a mini portrait, so we only draw the
head and shoulders. Practice as much as you need. In the next video, we will
color our practice portraits.
4. Adding Color: Let's color our sketches. I will give this
doll yellow hair. You can use your favorite tools, colored pencils,
markers, paints, or whatever you have at hand. The process of
coloring hair feels very meditative
and calming to me. Will colour the eyebrows with the same color, a pink dress. I will use the same color to add some blush and
outline the mouth. If you want, you can outline the eyes and the nose
with a different color. When I color the yes, I fill in three
quarters of the cross inside the eye and leave one
part white as a highlight. Everything is very simple. Let's move on to
the next portrait. I will color her hair red. I will make the dress
and accessories purple. I will outline the eyes. Red leaves. I will outline the nose
with brown, and this time, I will outline all the
contours with this color, the neck and shoulders. The hair. I will add a few lines
for hair texture. The face the ears, you can continue coloring all
your sketches for practice. In the next video, we will use our skills and draw a
real mini portrait.
5. Creating Your Final Art: I cut out a rectangle
like this from watercolor paper and I will fold it in half
for more density. Use thin cardboard
or any thick paper. You can even use regular
A four printed paper. If it is too thin, just fold the paper neatly several times. Then it will be thick
enough and will not bend when you insert it
into our crochet frame. This is the best
solution to start right away and not look for
any special thick paper. Since this is a mini portrait, the final size will
be very small. It can be a rectangle or
square, it doesn't matter. The main thing is to
place our drawing inside, keeping in mind that some space, about half a centimeter
or a quarter of an inch around the edge will be
covered by the crochet frame. I do not press hard
on the pencils, so I can easily erase
it if I need to. I start near the
center with the head. Then mark the ears, nose, mouth, eyes. And eyebrows, the
neck and shoulders. Piece of the dress. And the wavy hair, just loose wavy lines. The bends. Then I raise the extra lines
of the head. That's all. Maybe later, I will
add some accessories, but first I want to
color the picture. I color the hair, first
going along the outlines. Then filling in the color inside the eyebrows with
the same color. I will make the dress
blue, for example, I will outline the
eyes with brown. Pink for the lips, and I will outline the rest of the contours
with the same brown. No need to worry about
making a mistake. Just outline calmly. And with this exact color, I will add small bits earrings and a few lines
for hair texture. I'll outline the nose a bit too. I will leave it
as it is for now. Otherwise, our
inner perfectionist will never let us
finish this drawing. We can always at more
details later if you want. And now let's move on
to crochet the frame.
6. The Frame Base: I choose this pale
yellow acrylic yarn. For practice, you
can use any color. However, I recommend choosing a medium weight
yarn for practice, not too thick and not too thin. Once you feel confident, you can try working
with any yarn. Just follow the steps
I'm about to show you. I will use a 2.5 millimeters crochet hook as recommended
on the yarn label. I start crocheting
change stitches. I don't know exactly
how many I need yet. I made ten change stitches, and I tried against my portrait without
stretching the chain. I keep adding more chains
to test the length. Right now, this
looks like enough, but to be absolutely sure, I will crochet one row of single crochet and
measure it again. I make one turning chain and crochet one row of
single crochet. The piece curls a little
and is not very obedient. So we need to
straighten it out a bit and measure
the length again. If the length of this
row is about the same as the length of our rectangle plus or minus two
to 4 millimeters, then everything is okay, and we can continue. If the row is too short or too long by half a
centimeter or more, need to adjust the number
of change stitches or change to a larger
or smaller hook. So the length of the
row is good for me. I continue to crochet simple turning rows
of single crochet. I insert the hook under both loops of the stitch
from the previous row. At the end of the row, I make a turning chin
and turn my work. As I crochet, I test my
piece against the picture. The crochet rectangle should completely cover the picture. I can see that one more
row will be perfect. Here's my finished rectangle. You can see that it doesn't
cover the picture perfectly. We will fix this now
because I'm going to crochet an edge around three
sides of the rectangle. The fourth side where we just finished our row
is already done. This will add one more
row to the bottom. In each corner, I make
an extra stitch to turn. I just finished the row, so I crochet one
turning stitch into the corner and then start
working along the next edge, inserting the hook into
the edge of each row. We can clearly see
the row lines, so it's easy to count
the number of rows. Now, I'm at the corner
of the rectangle. I need to make a turning
stitch first and then the first stitch
on the next side. This means I crochet
two most stitches into the exact same point
as my west stitch. I'll mark this corner stitch with a stitch marker
just in case. Now, I crochet
single crochets into the edges of the rows until
I reach the next corner. I make an extra stitch
there for the turn. Then I crochet into the remaining loops of
the foundation chain. I reach the corner, make
an extra stitch there, and crochet along the last side into the edges of the rows, ending with a corner stitch. Let's move to the practice. I can see the alternating
edges of the rows. They look different, even odd. I can use them as a guide
so I don't get lost. Don't make extra stitches in
the same row and don't You can also count
your rows first if you didn't write down the
number while crochet. My first stitch is already done, and I crochet the next one. I keep making single crochets until I reach the corner
of the rectangle. In the corner, I make an
extra stitch for the churn, and now I move to the next side. I reach the corner again. I make an extra stitch to the turn and move
to the next side. We will finish our
edging at this point. You can hide the yarn tail
inside your stitches as you go or leave it free and hide it
with a needle at the end. I finish the edging
with the corner stitch. Next, we will continue
our work into this first stage of
the less straight row. Let's try our picture inside. Right now, the height
fits perfectly. The crochet fabric
can stretch slightly, so our frame will hold
the picture tightly. If your picture still sticks out past the edges of the rectangle, you can crochet around all four sides one more time
to make it a bit bigger. In the next video,
we will crochet the beautiful decorative
part of the frame Okay.
7. Crocheting the Decorative Edge: So we are going to crochet
the decorative edge itself. I will crochet using only the back loops of the stitches we made
around the rectangle. Later, we will use the front loops to create
the inner part of the frame, which will slightly
g the picture. I will show you one design
option for the edge, but you can create
your own combinations of stitches later. In the first stitch, I make
three half double crochets I will mark the front
loop of this first stitch with a marker so I don't lose
the beginning of our work. Then I skip one stitch
and in the next one, I make a slip stitch. I repeat this sequence
all the way around. Three have double
crochets in one stitch. Skip one stitch and make a
slip stitch in the next one, a very delicate frame. I like to test the
picture inside as I go. Let's continue. Three have
double crochets in one stitch. Skip one and a slip
stitch in the next. After the slip stitch, you don't skip anything. You start crocheting directly
into the very next stitch. Let's see how it looks. If you want a bigger
decorative edge, you can use double crochet, treble crochets, and so on. Remember to crochet only
into the back loops because we will need the front
loops for the next step. I'm crocheting until I
reach the starting point. If you don't have
enough stitches left to finish the exact pattern
sequence, don't worry. Just make a slip
stitch right before the beginning of the
row to finish it. Let's try the picture
inside one more time. In the next video, I will
show you how to make the inner part of the frame so the picture
doesn't fall out.
8. The Inner Part & Final Assembly: And to crochet the inner part, we will use the remaining
front loops and we will make decreases in the
corners of the rectangle. I do not count the
numbers of stitches. I do it by eye just
visually find the corner and the two loops to the
right and left of it. If it is easier for you, you can count all the
stitches to be precise. The first corner must
seem a bit tricky. Turn the work like this and now we will
crochet clockwise. I pick up the right front loop. It is marked with my
marker, pull up a loop. Then the corner loop, pull up another loop and
pick up the next front loop. Now I have four
loops on my hook. I bring the yarn over and pull it through all
the loops on the hook. The first corner
decrease is ready. I mark it with a marker. Now I crochet single crochets
until the next corner. I make three stitch
decrease in the corner. One, two, three, and put the
yarn through all of them. The second corner is ready. I crochet stitches
to the next corner. I make three stitch decrease
in the corner, one, two, three, and pull the
yarn through all of them. The third corner is ready. I crochet stitches
to the left corner. I make three stitch
decrease in the corner, one, two, three, and pull the yarn
through all of them. Left corner is ready. I crochet single crochet
along the left straight part. I crochet the second
two, less stitch. And we will use the
very last stitch in the first corner decrease
of the next row. I pick up the last loop of the current row and
pull up a loop. Then the first stitch
of the previous row, pull up a loop and
the next stitch after it, pull up a loop. I put the yarn through
all the loops on my hook. The first corner decrease
of the new roll is ready. I mark the beginning
of the roll, and let's try the
picture inside. Since the crochet fabric
is a bit stretching, we can easily pull
the frame over it like a case without
bending the paper. Cotton yarn also has this effect so you can try
it with different materials. One row is not enough to keep the picture
from falling out, so I will crochet one more
in a row with decreases. The previous decreases will
serve as our corner centers. They are easy to sing. We will make a decrease using the stitch
before the corner, the center of the corner, and the stitch after it. I crochet single crochets until I reach the
three corner stitches. Here I make a three
stitch decrease. I crochet stitches
to the next corner. I look for the previous decrease and make a new decrease
in the corner. I continue to crochet
stitches to the next corner. Here is the previous decrease. I make a decrease in the corner. And I crochet until the
second to less stitch. And let's try the
picture inside. Since the crochet fabric
is a bit stretching, we can easily pull
the frame over it like a foam case without
bending the paper. In my opinion, this is enough. The picture doesn't fall out of the frame, but at the same time, the frame is not too white, so it doesn't cover any
details of the drawing. If your picture is bigger and the frame doesn't
hold it well enough, you can crochet one more
roll with corner decreases. To finish the work, I
make a regular decrease. And a slip stitch.
I got the yarn. And hide the tail. First, I bring the
yard to the corner. And on the back side, I hide it between the stitches. The mini portrait is ready, and I can add some details
to fill the empty space. I can add some lush
to the checks, and I think that's enough. Now you can make many of these portraits with
different characters. Or instead of portrait, you can write some text or draw something
very, very simple. See you in the last video.
9. Wrapping Up & Next Steps: Congratulations on
finishing this class. We have completed our
project and you should now have your very own
unique miniature frame. Let's quickly look at
what we learned today. We started with a simple warm to overcome the fear
of at blank page. We learned how to draw and color a cute character using
very basic lines. Then we explored a glue
free way to build a frame, allowing the tension
of the yarn to hold our work perfectly. I want to remind you
that this project is, first of all, for
your own pleasure. It is a slow crafting
experience designed to give you a quick win and joyful
result in just one evening. But the possibilities
do not stop here. You can use these tiny
frames in so many ways. Create a personalized portrait as a heartfelt gift for friend. Make a unique
handmade gift tag or product label for your
own creative items, craft tiny artwork or family
photos for a dollhouse. Frame a simple type message, a quote or just a
small drawn heart. Now it is your turn
to inspire others. Please share your process, your sketches or your
final finished treasures in the project and
resources section. Since your work
helps other students feel confident enough to start their own
creative journey. If you enjoyed this class, please take a moment
to liver review. Your feedback helps
more students discover this course and create
their own cute projects. Thank you so much for
creating with me today, and I'll see you in
the next classes.
 Olga Bortniak, Crochet designer, dollmaker Olgamigurumi