Transcripts
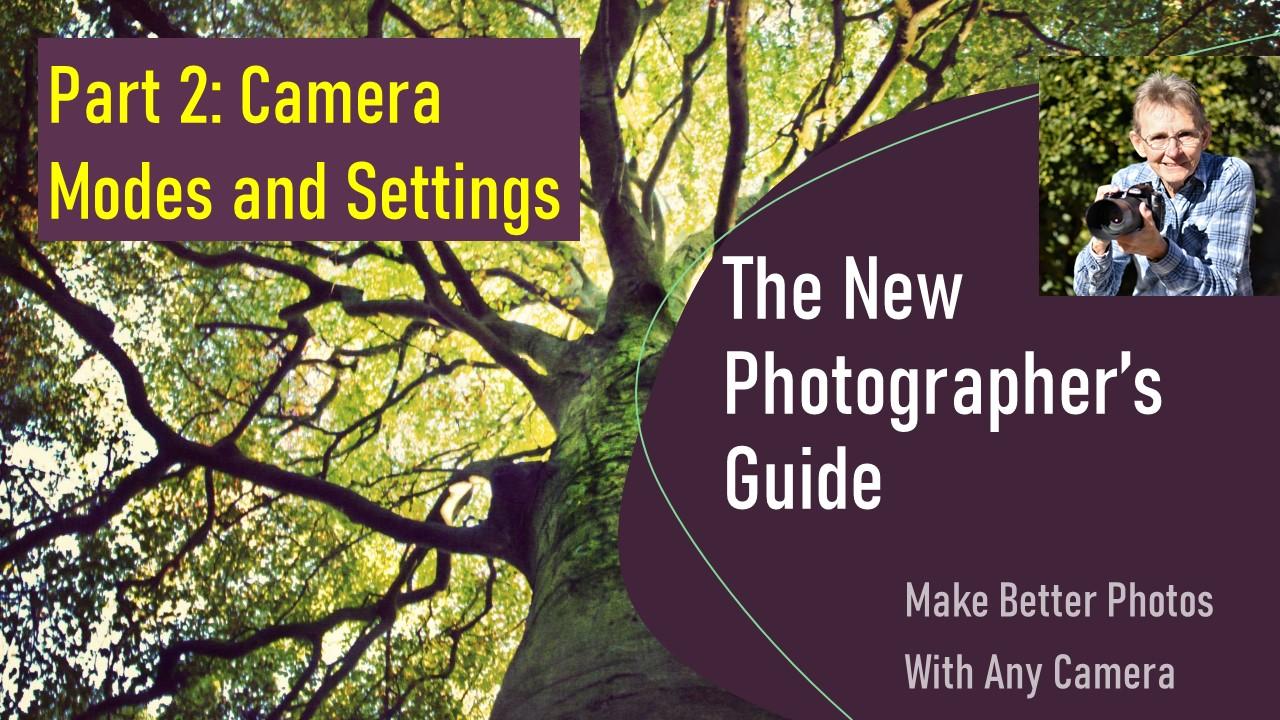
1. Introduction: Digital cameras are computers that take photographs, the dials in the switches and menus and everything can be a little intimidating and very frustrating and confusing at first. And to add to that, somebody along the line may have told you that now that you've got a DSLR or mirrorless camera or some of the higher end point and shoot cameras. That if you're shooting on automatic mode, that your pictures are not going to be as good or even worse anyway, I've told you that only real photographers use manual mode. Anything else is just not good enough. Well, I've got one word for that piece of advice. Nonsense. Composition and story are king. That's what makes photograph. The camera is a tool that can help you tell that story. And the technology that is available in digital cameras are a tremendous resource to bring your stories to life. I'm Sheila forager, owner of Earth and sky photography. I'm an event portrait nature photographer and I'm very excited to share with you tips and techniques and skills that I've learned along my photography journey. Best part about it is you don't need expensive gear in order to make better photographs. This is the second class in a four-part series designed for new photographers, especially beginners, who want to make better photographs using any camera, including your smartphone. In this class, we'll learn how the camera sees light, and we'll go over the auto mode to unlock the potential that it has as a powerful learning tool in your photography journey. Also, we'll be going over the modes that are common to all digital cameras, DSLRs, point-and-shoots and mirrorless cameras, program mode, aperture priority or shutter priority, manual mode. And although it's not a mode, a very important setting, exposure compensation. By the end of this class, you'll have a much better understanding of how your camera interprets light and which of the settings that you might use as a tool to help you better tell your story. This class is great for the family photographer, for hobbyists, and for those who need to use photographs in their work presentations, the skills you learn will be a foundation for greater learning as you build on your photography journey. Next up, we'll go over the class project. See you in a minute.
2. Class project: This class project is a collection of exercises and assignments that will help you to get a good experience with and practice using the different modes and settings on your camera. You can do all the exercises or you can just do one, whatever you want to do. You might find it beneficial to focus on just one project, one part of the project first, and to get comfortable with it, and then come back and do some of the others later. It's it's your time-frame. It's up to you what, what, how you learn, that's fine. Anyway, posture. Posture projects, post your examples, your, your even your questions, and I'll do my best to answer them. Okay, so here's the project. Take a photo and auto mode, then look in the metadata and replicate the photo in manual mode. Then post your comparisons. Shoot a photo in shutter priority, freezing the action. Then shoot one, blurring the action. Judah portrait or a subject you want to isolate from the background using a wide f-stop in aperture priority. Work toward a nice blurred background vocal. Play around with white balance settings, taking some photos with different settings. Explore how the different settings change the color of the light in your photo, thus changing the story. The photo tells. Experiment with scenes settings, for example, portrait, sports, food, or macro, backlit or landscape. Your camera may have some fun menus of selections. So try them all. Then compare the metadata embedded in the photograph and try to replicate that photo using manual or one of the other modes. Experiment with exposure compensation. Purposely created too bright or too dark image, then adjust the exposure using exposure compensation. So anyway, this should be a really fun project. It should give you a lot of options and ideas to experiment, lots of room to grow and learn along the way. So anyway, take your time with it, explore and have a good time. Alright, so the next lesson, we're going to get right into it and we're going to talk about how the camera sees light. See in a minute.
3. How the Camera Sees Light: A digital camera is a computer that is stuffed full of electronics and sensors that interpret light and record it. When light enters the camera through the lens. Electronic wizardry then converts all that digital stuff into your amazing photographs. While the camera is making these photographs in its electronic brain, it has to know three things about the light. One, it has to know how much light came in through the lens. It needs to know how long the light was shining on the sensor. And it needs to know how sensitive that sensor should be to collect the light. There are three factors in that balancing act, and it is called the exposure triangle. The exposure triangle is made up of aperture, shutter speed, and ISO. While cameras are quite remarkable, they don't have a human brain throughout the day or eyes adjust to a wide variety of lighting conditions, and we don't even notice it. Well, the camera can't do that. So we have to teach the computer what it is actually seeing. We do that with those three settings. First thing we're going to talk about is aperture. Aperture is the opening in the lens through which the light passes. It is expressed in f-stops. Let me show you. Aperture settings are incremental changes in opening size expressed as f-stops. On this lens. We have 2.8 all the way through to 20 to each of these increments changes the size of the opening. Note that the largest aperture and this lens is f2, 0.8. That's where the most amount of light can enter the lens. And on this particular lens, the smallest aperture is F22. That's where the least amount of light would be able to enter. Think of it like a fraction. The denominator in a fraction, the larger the number at the bottom of the fraction, the smaller the piece that you have. So you'd much rather have half Pi. Then a quarter of the pie. And a quarter of a Pi is better than an eighth of a pie. And an eighth of a pie is bigger than a 16th of a pie. See what I mean. Think of it. If you think of f-stops like that, then you won't be confused. Next, let's talk about shutter speed. Shutter speed is how long the shutter is open. The shutter is the curtain in front of the sensor or film that opens to expose an image or shorter, long it remains open, can be adjusted and is expressed in seconds or fractions of a second. Shutter speed is related to aperture. Since the larger the opening, the more light can enter, which requires less time for the shutter to be open. On the other end of the scale, a small opening lets in less light, so the shutter would need to be open longer. The last part of the exposure triangle is ISO. Camera manufacturers and photographers have adopted ISO to describe the sensitivity of the sensor in the camera. Sensor collects the light based on the aperture and shutter speed, then records the light is digital information that can be reassembled into an image. The electrical signal to the sensor can be increased or decreased, thus determining the sensor's sensitivity. What this means is that the photographer can increase the sensitivity in order to shoot photos in low-light conditions. I saw was expressed as a range of numbers from typically 100, 356, 1000 or more, with lower numbers representing less electrical energy to the sensor, and higher numbers representing more energy to the sensor. Boosting the ISO is a great way to shoot in low light. However, there are limitations. At some point, the sensor can no longer collect data, so digital noise becomes very noticeable, as you can see in this photograph, watches brain, odd colorations and just general digital artifacts are visible all throughout this photograph. You can reduce that to a point as many cameras have electronics onboard to reduce the noise. And there are also editing programs such as Lightroom and Photoshop that have noise reducing features. The best practice is to experiment with your camera, discover how far you can boost the ISO before you introduce noise to an intolerable level. Your cameras pretty good at interpreting the light most of the time. But when it's not, you may need to tell it what it's seeing. And within the camera there's a menu of options called white balance. In your camera's menu, you will find a file marked white balance. There's also a button on the camera marked white balance for quick access. Within white balance, you will find auto incandescent, fluorescent, direct sunlight, flash, cloudy, shade. And K for Kelvin. Kelvin is a temperature setting. And I'll go deeper into Kelvin values and light temperature in part 3 of this series, which will be specifically on light. Each of these settings tells the sensor what type of light it's trying to interpret. For example, incandescent Edison bulbs or old filament light bulbs cast a warm yellow glow on things. And in order for the camera to correct Lee interpret that light, you'll need to go into your cameras setting and choose incandescent. So you get that right below that you're looking for in the scene. If you leave the camera on auto, it might it'll try to wash everything out and it can take away the, the ambiance that you're trying to capture for your story. By now you've got a pretty good foundation of how you camera sees light. We've explained the exposure triangle, which is the relationship among aperture, shutter speed, and the ISO. We have looked at how the camera can interpret light and the different types of light that it is seeing. And that's a lot of information to digest. I know it is. And if you're feeling overwhelmed, I remember feeling overwhelmed and my photography journey as well. But remember, photography is a journey. It's an adventure. Enjoy the process and take it to the time. And we'll see you in a minute.
4. Auto Mode is Good: Many years ago, and I got my first DSLR camera. I was told by experts that I needed to shoot on manual mode because I'm not a real photography. I've heard, Oh, well, I had come from film cameras where I was used to setting the aperture ring on a 35 millimeter and setting the, the shutter speed. But the digital camera was just intimidating to me. It had all these menus that went several layers deep and it was very frustrating, very confusing. So I quickly reverted to the automatic mode, was working for an event production company and I needed to get the shot for fast-moving sports. Why am I telling you this? Well, I'm telling you this because a photograph is about composition and storytelling. And the mode that the photo is shot on hasn't anything to do with the composition and the story. Shooting in the full automatic mode. It gave me the confidence to get the shot. And I could focus on the event that I was ad and the athletes. Rather than fiddling around with trying to figure out what my camera was thinking. It's much more important to be in the moment than it is to be getting confused. And you put your camera back in the bag and you don't touch it. And here's a secret. Many professional photographers actually use the semi-automatic modes that are available on modern digital cameras. It's a tool to get the job done. I like automatic mode because it's, I kind of think of it as eight earn while you learn kinda program. And sometimes it can be the best choice. And here are some reasons why. First, automatic mode works. Most of the time. In auto mode, the cameras computers make all the exposure triangle decisions for ISO, shutter, and aperture based on available light. There's nothing wrong with letting the camera do the hard work, leaving you free to concentrate on composition and storytelling. Why did we have cameras to capture a moment? Family events, time with friends, those once in a lifetime moments are not the time to be fiddling around the dials and settings. Auto mode removes the stress and allows you to present and capture the moment. It's much better to be the hero who shot the photo of your toddlers first experience with a popsicle then, well, you know how it feels to miss the moment. And third, as I said earlier, I like to think of automobile as the earn while you learn mode, it can help you learned composition and storytelling without stressing about ruining the shot. Composition is key and you can capture a great image with any camera. Well composed photo is superior in all regards to a technically perfect exposure with no story to tell. If you're struggling with photography composition, check out my class on composition. The first in the series of the new photographers guide. What we're talking about, the automatic mode. I'd like to dive in a little deeper into some of the tools within the automatic mode. And these are settings that your camera has that can tell the camera about specific lighting conditions. And these are called scenes. Scenes are a quick way to tell your camera that you are planning to shoot a photo that requires different adjustments from the standard auto mode. Examples of scenes are portrait, landscape, kids running around, sports, close-ups. Night portraits, night landscape. Indoor party, beach or snow. Sunset, dusk and dawn. Pet Portraits, candlelight, blossoms, flowers, that sort of thing, and autumn colors and food. Some cameras will have the scenes options on a dial with little pictures. As you see here. These scenes settings till the camera to make specific adjustments to shutter, aperture or ISO. There's nothing wrong. Shooting in automatic mode. It's a great learning tool. It gives you the confidence to learn composition. It gives you the confidence to learn storytelling. And with the technology that's within the cameras, you have the opportunity to go in and look at the photos on your computer and learn what the camera was thinking when you took the photo on some of these automatic settings from here, next thing we'll do is we'll talk about program mode. See you in a minute.
5. Program Mode - Your Everyday Photo Mode: Program mode is a step up from full automatic mode. In program mode, the camera is making the decisions for shutter speed and aperture, keeping them in balance so that you have this perfectly exposed photograph. The nice thing about using program mode is you have the flexibility to make some adjustments. You can change the aperture usually by rolling the front dial. You can change the shutter by usually rolling the back dial and the ISO can be adjusted. There's either a button on the background, the top that you can make those adjustments. And the camera will always keep these adjustments in balance for the perfect exposure. So it's kinda like having a safety net. One very handy feature of priority mode is you can set your ISO wherever you want it, and then you make the adjustments to the shutter speed and your aperture. It doesn't affect the ISO. Whereas in automatic mode, all three of those were making were being changed according to the cameras interpretation of the available light and program mode is actually a really great mode to use for everyday photography. Why would you want to make adjustments if the camera is so good at making decisions in lighting, why would you want to make adjustments? The camera will come up with a perfectly exposed photograph. However, you may not always be happy with the results. The camera is still going to match the aperture and the shutter. You have the ability to decide which one of those features has priority. Is the aperture, something more that you want? Do you want that depth of field that we talked about in light? Or do you want to have the ability to freeze the action with the shutter? Alright, so grab the camera and we'll go through a couple of examples. Suppose you're going to shoot your kid's soccer game. Kids and soccer balls move fast. So you will need a fast shutter speed to freeze the action. Since this is an outdoor daytime game on a sunny day, you would leave the ISO at 100 or the lowest setting for your camera. You might also like to change the white balance to sunny, turned the rear dial to a fast shutter speeds such as 1 500th of a second. Look at how the aperture changes in response. If you keep turning the dial, you'll notice that there is a point at which you can no longer change anything. This is a safety net. The camera will do it's very best to deliver a well exposed image, but it won't let you crash. Scenario two. And indoor birthday party. You want to capture the homey atmosphere and the warm light of the candles on the cake. Flash is a definite no-go. Change the white balance to incandescent or fluorescent as applicable. Then increase the ISO to 400 using the button or menu option is applicable for your camera. Turned the front dial until you have a wide open or nearly wide open aperture. Say you have four or 5.6 on this camera, it's much lower than that. And the camera will select an appropriate shutter speed. For longer exposures, you may need a tripod or you can boost the ISO to maybe 800. When would you use program mode? Well, you would use program mode for everyday photography and as a learning tool for understanding the exposure triangle. With practice, you will begin to see the influence that ISO, shutter and aperture have amongst each other. On program mode, that camera will not let you crash and burn. You can make adjustments without sacrificing the shot and without becoming so confuse that you have absolutely no idea what went wrong. The next mode we're going to talk about is aperture priority. This is one of the semi-automatic modes that many professional photographers use. See you in a minute.
6. Aperture Priority - Depth of Field: Aperture priority mode allows you to adjust the aperture, usually by rolling the front dial on your camera. And the camera will pair up in appropriate shutter speed to go along with it. Oh, OK. We just talked about priority mode. And doesn't that do the same thing? Well, yeah, kinda. However, aperture priority allows you to open up your aperture all the way so that you can get depth of field. What is depth of field? Depth of field is the distance between objects in your photograph closest to the furthest that are reasonably in focus. In general, a larger F-stop grades a shallow depth of field, whereas a small F-stop would create a much greater depth of field. Let me show you. Here we have three willing subject. L number one is about six feet from the camera. I'll number two is 4.5 feet from the camera. And OWL number three is about three feet from the camera. I'm using a 50 millimeter lens, since it most closely approximates the perspective of the human eye. This will show how aperture effects parts of the image that are reasonably and focus the ALS won't be moved. And I have a tripod for the camera to ensure that it is in the same place each time. For this test, I'll be using three f-stops. If four, which is fairly large, if eight, which is kind of a middle large opening, and f 16, which is a really tiny f-stop. And then at the very end, I will show you the very shallow depth of field on F1 0.4, which is the largest f-stop that this 50 millimeter has. Let's begin our experiment with F for the aperture opening is rather large. And throughout this experiment, I'll always be focusing on the middle L. The middle row is sharp and in focus in this photo, however, the first L closest to the camera is out of focus, and so is the farthest L. When you want the blurry background called Bokeh, you would use a large aperture. This photo of a white crown sparrow is an example of Bokeh, and we shot at a 180 millimeters F4 on a 100 to 300 millimeter zoom. Now we'll look at medium-sized Aperture F8. At F8, the middle owl is in focus. The closest owl is sort of in-focus, and the farthest owl is out-of-focus. Note that the background doesn't have as much Bokeh at F8. And the foreground is also a bit less blurry. Now we'll look at f 16. This is a very small aperture. The focus is still on the middle owl. But notice how the other two wells are also reasonably and focus. A small F-stop gives the appearance of more of the image being in focus. An example for this application could be a landscape image such as this one. This was shot at F 14. Everything from the foreground to the distant mountains are reasonably and focus. Finally, here's an example of depth of field using the largest aperture for this lens. If 1.4. Notice how only the middle owl is sharp. This very shallow depth of field isolates the subject from everything else in the image. As illustrated in this photo of wildflowers. The bud below and the second flower, only an inch behind the subject flower, are nicely board isolating the main flower as subject. Shallow depth of field is preferred for portraits. It gives you that dreamy out-of-focus background that draws attention to your subject. Another time you might want shallow depth of field, surprisingly, is actually in a sporting event. In this photo of two runners, they are sharp and in focus and the background is blurred. All of the emphasis is on them. I used f 5.6, the widest aperture for the zoom lens. I was using it 300 millimeters to get the desired effect. Had I used a smaller f-stop, F11, for example, the trees would have been focused as well as the runners. It would have been a good photo. However, it would have lacked the impact of isolating the runners, the capture of the emotions that you see on their faces. So let's wrap up aperture priority mode. If you want to isolate your subject from the background, you would use a shallow depth of field, which can be accomplished by using a wide-open f-stop. You have to add for whatever your lens happens to have. If you want to have all of your scene reasonably in focus from the foreground all the way to the distance. You would use a greater depth of field, which would be accomplished by a smaller f-stop at 14, you have 16 or whatever your lens happens to have, though now we're off to explore another semi-automatic mode, shutter priority. See you in a minute.
7. Shutter Priority - Freeze or Blur: Shutter priority as a mode that allows you to set the shutter speed and the camera will select an appropriate aperture to go along with it. You would use shutter priority mode when you want to either freeze the action or you want to blur the action. Many professional photographers use shutter priority mode for shooting sports and other types of action. They can set the shutter for very fast amount of time, say one, one thousandth of a second or greater. And then the camera will pick out an appropriate aperture to go along with that. Shutter priority mode also works very well for nature photography, particularly when photographing births. The sun was very low in the winter sky. When I caught this flock of snow geese and flight, I set the ISO at 800 and a shutter at one thousandth of a second. The camera selected F8, a mid-sized aperture at 100 millimeters. I selected a very fast shutter, not only to freeze the geese and flight, but also to compensate for camera shake. Since I was shooting a very long, heavy zoom lens hand-held, as illustrated in the snow geese photograph. There are times when you would want to adjust the ISO. In shutter priority. I recommend always starting with ISO 100 and then making adjustments as necessary. The ISO will not affect the shutter speed, but it will have an influence on the aperture that the camera select. Freezing the action is one. Use for shutter priority. You can also use it to slow the reaction down. And the effect can really be quite dramatic. In this photo, the snow was really coming down. I wanted to blur this bowling snow, creating lines and swirls. I set the ISO at 800 and shutter at 1 sixth of a second. And the camera selected if 1.4 wide open aperture on this 50 millimeter lens, with the shutter open for 1 sixth of a second, I had to set the camera on a rock to steady it, and then set off the shutter using the cameras typer timer to avoid camera shake. The next couple of examples are not exclusively related to shutter priority. However, it isn't illustration of how you can use motion blur to tell a story with any camera. Here's a fun example of what can be done with a very slow shutter speed. This was shot with my drone, which has limited camera adjustments. The slowest shutter speed is two seconds. I sent the drawing up about 60 feet. Then Hubbard waiting for cars to pass. Just as the car frame, I pressed the shutter. The car headlights and tail lights blur very nicely, creating long streaks. Motion blur can be used to enhance the story. And you don't need a high-end camera to accomplish it. A great composition doesn't necessarily have to be in focus. Here's a pro tip. Don't delete any of your photos in the camera just because it may look a little bit blurry on your viewing screen, you might be dumping a really great story. Let me show you this photo of a friend's son jumping in a puddle was shot with a digital point-and-shoot. I saw the moment and grab the camera in my pocket and fired off a few shots. That point-and-shoot has no adjustments to much of anything. The camera picked out. If 4.9 and ISO and shutter speed of 160th of a second, resulting in the boys jump and splash being blurred. But I saw a story, a story that would not be as terming if the image was sharp. Shutter priority mode could become your go-to mode for all types of photographic situations. While we've covered quite a bit since we began our exploration, starting with full auto mode and progressing through the semi-automatic modes. Now we're ready to tackle the mode that a lot of photographers are afraid of. Manual mode, I promise it's not scary. It's easier than you think. See you in the next lesson.
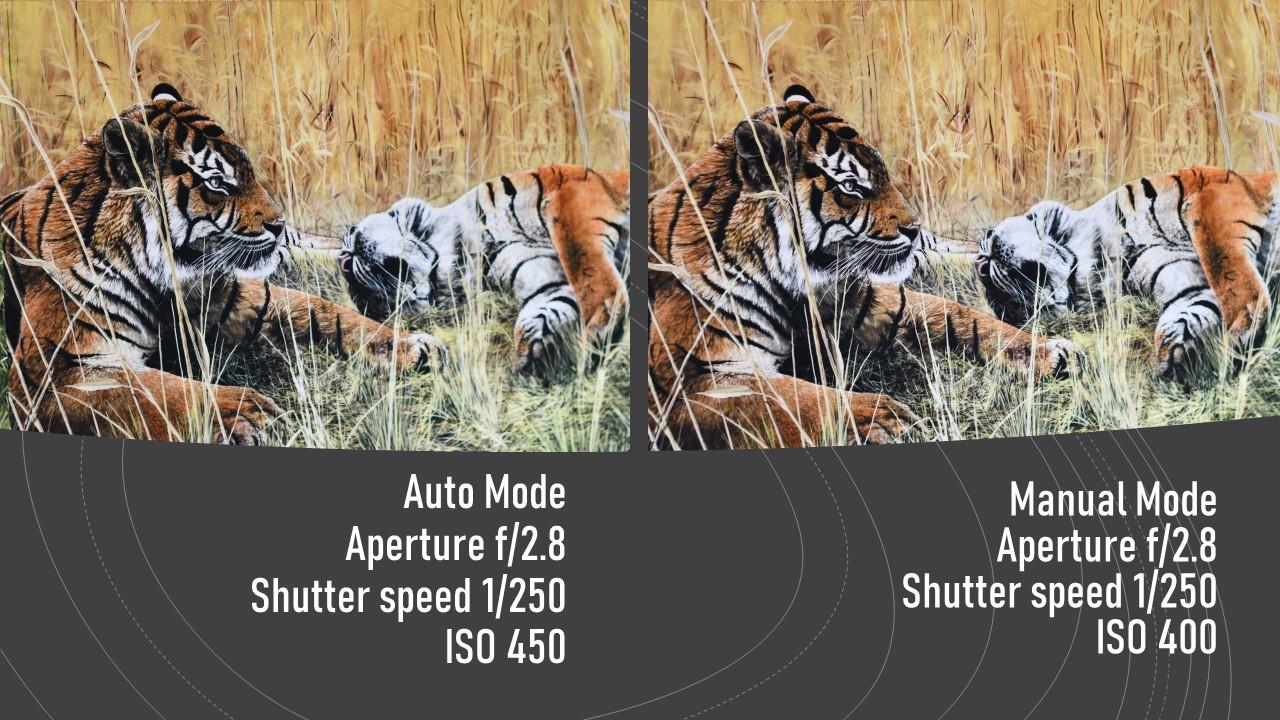
8. Manual Mode is Not Scary: By now you've got a pretty good understanding of the exposure triangle. How the camera sees like the relationship of aperture, shutter speed, and ISO. That's the dance. And in manual mode, you get to direct the dance. In manual mode, you have full control over all of the cameras, settings and functions. In general, aperture is controlled by the front dial. On most cameras. Shutter speed is controlled by the rear dial on most cameras. And the ISO is either going to be a button on the top or on the back. And then you press that button, hold it down, and then you turn the rear dial and that adjusts the ISIL. Alright, now we're going to do an exercise that will walk you through how to set your camera up. And for manual mode, grab your camera and set it to auto. Yes or no. Now, take a picture of anything, something that's not going to change. Upload your photo to your computer. Embedded in each digital photo file is data that will tell you the aperture, the shutter speed, and the ISO that photo was taken in. Let me show you open your pictures gallery and find the photo you want to examine. And then here's what you do. Right-click over the thumbnail and a menu pops up. Pc users will click on Properties, then details. Mac users right-click on the thumbnail, then click Get info. Now you can see all the settings, the size of the image, camera make and model, but most importantly, aperture, shutter speed, and ISO jot these settings down on auto mode. The camera selected F2 0.812150 of a second for shutter speed and ISO 450. Now you do the same on your photo and write the settings down. In the next picture. I had set my camera on manual and set the aperture to f 2.8 shutter speed at one 250th of a second. And I set the ISO to 400, since that was the closest option that I had available. As you can see, the two images are nearly identical. This is how you can use auto mode and the EXIF data to learn manual mode. The instructions for this exercise and few other details are in the resources section 1 of the class, project options involves duplicating a photo from auto, applying the settings to your camera in manual mode. Manual mode is not hard to learn, but it does require practice as you gain confidence. The important thing to remember is there has to be a balance between aperture, shutter speed, and ISO. Practice. And soon you'll be using manual mode often. And here's a pro tip. Just because you can, doesn't mean you should. Manual mode may not be the right tool for the job all the time. Many professional photographers use the semi-automatic modes of aperture priority and shutter priority because they are the right tool for the job. Use your cameras technology. Use the right tool for the job. There's another tool that we need to talk about. It's not a mode, but it is a very important setting that will help you. It's called exposure compensation, we'll talk about in the next lesson. See you in a minute.
9. Exposure Compensation - When the Camera Doesn't Get it Right: Photography is all about light. The very word photography means to write with light. In the days of film, photographers would often referred to the potential number of images on a roll of film has exposures. The reference being to the light entering the camera through the lens to expose the film to light. The same concept exists now with digital photography, only the light enters and exposes the sensor to light for a period of time. In the previous lesson on manual mode, I talked about the dance of the exposure triangle, the balance of setting that controls the cameras response to light. Sometimes a subtle adjustment needs to be made to the overall brightness of an image, and that is done with exposure compensation. Exposure compensation is when you need to make small changes to the overall brightness of an image located on your camera. There may be a little box that has a plus and a minus in it, or maybe a dial on the back of your camera. Those are the controls for exposure compensation. Your camera has an onboard light meter that will display what the camera thinks is correct exposure and show you whether you're too bright or too dark. There is a small meter at the bottom of the viewfinder screen inside of the camera that has a minus at one end and a plus on the other with a 0 in the middle. This is where you look to see what the cameras like meters thinking. Cameras are programmed to balance the light entering the sensor, resulting in a well exposed image. Most of the time, the exposure compensation allows you to override the camera's exposure settings. Decreasing or increasing. The exposures by 1 third stop increments. Cameras or program to balance the light entering the sensor for a well exposed image. Most of the time, when the camera gets confused is where the image is really, really bright like snow or sand, or really, really dark like a sunset or evening image. Chemical retry to resolve this issue by either underexposing are overexposing the scene. Exposure compensation can override the cameras onboard light meter, giving you the flexibility to properly expose a too bright or too dark image so that it looks more like it really did when you took the photo. Let me show you. I set the camera and program mode for this demonstration. In this photo of a white baseball against the wall that mid day, there are no changes to the exposure compensation. To my eye. It should be just a bit brighter. The exposure can be increased or decreased in 1 third stop increments. For this part of the demo, I'm increasing the exposure by one full stop each time. This one at plus one stop is quite a bit more bright and looks well exposed. While this one at two stops is overexposed and too bright. I moved the baseball to the shade and to my eye. This one is too dark there. 0 exposure compensation. I'm going to increase the exposure, but 1 third of a stop for each example. Here we see plus 1 third plus two-thirds and a full stop. The plus one stop is getting better, but it's still not exposed properly to my eye. For this demo, I skipped the smaller increments between 12. Here we have plus two stops of exposure compensation. To my eye. This looks like the true color, the shadow, and texture of the wall and the baseball. Exposure compensation can be adjusted in program aperture priority and shutter priority modes. It does not work in full auto mode, and it does not work in full manual mode. However, some cameras will allow you to adjust the exposure compensation in manual mode when Auto ISO is turned on. Okay, let's, let's tie all this together. In aperture priority mode, when you adjust the exposure compensation, you're making small adjustments to the shutter speed and the ISO and aperture stay the same. In shutter priority mode. When you make adjustments to the exposure compensation, you are leaving the shutter speed right where you left it, but you're making small adjustments to the aperture. And ISO stays the same. In program mode. When you adjust exposure compensation, both the aperture and the shutter speed will change. The ISO remains the same. On those cameras that have the option in manual mode with Auto ISO engaged. When you use exposure compensation, you're making adjustments to the to the ISIL. Be sure to refer to the class project and the resources section for exercises and more details on how to gain a greater understanding of exposure compensation. All right, I'll see you in a few minutes. We'll leave you with a few final thoughts and we'll wrap things up.
10. Final thoughts: Thank you for taking this class. I genuinely appreciate your time. We have covered a lot in this class. We've covered the modes that are common to all DSLR, mirrorless, and many point-and-shoot cameras, those being automatic mode, program mode, aperture priority or shutter priority, manual mode. And we've gone over a very important need to know setting exposure compensation. Before we close up this class, I'd like to leave you with a few thoughts. Be better today than you were yesterday. Photography is a journey. It's an adventure. Take it takes time to master the craft. And that's what makes it exciting. There's so much to learn and explore. Practice the things you have learned in this class and your skills and confidence will improve. Learn, apply, and repeat. You can do it. Take it a byte at a time. If you have questions or comments, please reach out to me and I'll do my best to respond. I also have a class on composition. The first in this four-part series of the new photographers guide. There'll be a class after this on lighting. Hope to see you soon. And again. Thank you for taking this class. See you soon.
 Sheila Foraker, Learn Skills - Make Better Photos