Transcripts
1. Intro: grits die aligns. They're one of the main cornerstones of calligraphy and yet especially modern Kliger feed. They often end up being tossed aside and replaced with dots. Why? Why did I fall victim to dad as well? When I first started out, I don't know. I just assume all the angles and lines felt intimidating and like a lot of work to produce . But they are not here to intimidate. Guidelines are your friend. They make an immense difference and learning calligraphy. Today, my mission is to take away to fears of clicker figure. It's and teach you how to tackle them. I'll guide you through different tools and methods to draw the perfect gripped by hand and teach you the quickest and most effective way to grid strong. Additionally, using illustrator Let's get started.
2. The Basics of Calligraphy Guidelines: all letters fallen to grid beat Han drone letters, digital phones or written calligraphy. Every letter can be put on in between lines. Between being a key word here reminded, Remember, just for the next lesson, all letters are assembled on the baseline. Lower case letters like E n or X fit between the baseline and the mean line. The area between a baseline and the mean line is your ex height. All letters with an A signing part like lower case G or P, end up at a D center line, also sometimes referred to as a P line. This area of the grid is called the D Center area, all letters that are told on X like an elk, A or B. And at D, a center line. The area of Buffy Exide is the a center area, sometimes also refer to as the cap I, too, since capital letters usually span from beast line to a center line, this is a calligraphy grid, and its most basic form. The distances between the lines usually follow a specific ratio that depends on the style of the letters. Commonly in script calligraphy, we follow ratios of 2 to 1 to two or 1.5 to 1 to 1.5 sometimes also described this 3223 which is my personal preference into re shoe I will be using in my examples, when talking about calligraphy scripts that are angled, a slut line becomes necessary. This Lange's from top to bottom and allows you to properly angle there your letters in copper plate and most of its modern derivations. The angle is somewhere around 55 degrees. The style I like also consists of letters death full in the middle between certain lines. This is why I personally like to add lines through the middle of each of the three areas to ensure my letters line up all the way.
3. How to use the Lines: Here's my issue of a lot of content. I see an instagram people of writing between their guidelines instead of on them. The main use of the line is to make sure the edge of your letter actually touches. You're lying. You do not want to place your letters more or less between the grid. When you're starting out, you want to make sure you get this is. Actually it's possible. This will ensure your letters look clean and tidy, and they are the same size. I know a lot of people. Absolutely. You want to do bouncy letters when they get into modern calligraphy? Believe me, adding Bounced a straight letters is a lot easier than having letters all over the place. Same goes for the slider letters. There's nothing that drives me personally more mad than seeing something like this. Angled slut lines and people of writing fully straight letters. Aslahn line is to show you the slant of your letters. This means all of your main lines of your script are going to be parallel to that slot line . So let's talk about how to use a jerry of a grid place all small letters in your X height. Respecting your slot line. Place all letters with a D center between your axe height and you're a center and the D center area, always respecting their slump lines on place all your capitals and letters with a centers between your ex hide and your ace in there area always respecting your slot line. And that's all the calligraphy talk I'll do in his class. I'll ask you to watch this class in my upcoming calligraphy class, so we deal a lot more calligraphy stuff or there that's not talk on how to produce these lines.
4. When to use what Guide: personally, I always use my printed lines with a light path, except when I can use them. The only time I can properly use my prepared black lines as if I am working on paper that is too thick or too dark so that it is no wait. I can see lines for it. If I do a regular practice, I will ease paperclips to clip my 60 ground practice paper on my line and won't use my light pad. If I'm working with thicker paper or card stock, I'll use my iPad when I use the thin paper to practice. I like to have a thicker card stock with the printed lines on them, so I have a bit more stability. However, if I use this same paper with a lie pad, the paper on which airlines air printed already absorbs a lot of the light, and we'll let enough life through to properly seed Alize for it to make sure I can use my life had with as many papers as possible, I will print my guidelines on translucent tracing paper to let as much light through. It's possible if even that doesn't help. I'll take out my drawing tools and research. And will you roll lines on the paper? I'm working on and pencil. Let's tackle the manual tools first and then jumping over to the computer.
5. Manual Tools pt. 1: Rulers: the ruler is one of the most important calligraphy tools, and the one talks about it. Accuracy is your friend. I personally felt like when I found a ruling ruler. My entire guideline life would change. It has not rolling. Rulers are nice because they allow you to easily draw parallel lines. And if you go with the bigger version, it also comes with a protractor. But whenever I am sitting at my desk with no camera filming my fancy looking ruling ruler, then I take out my geometric triangle triangle. A ruler or whatever it is when they're full thing is properly called in English. These triangles come in all different sizes and, yes, getting a 30 centimetre long one seriously changed my entire guideline life. Since it allows me to finally easily line across any four sized sheet. The's triangles come of a protractor to measure angles. They also lined horizontally, so drawing parla lines is a breeze. They save you having to use around protractor and the ruler and happened one of my favorite things next to compasses. Ever since I had my first geometry class
6. Manual Tools pt. 2: Pencils: the lines you're drawing will have to be erased. So when I first sort of drawing guidelines, I thought, Ah, harder pencil, like a six age would be perfect. Since it is a light, Um, it is a lighter shade than the softer pencils. However I find with harder pencils, it is much easier to invent to paper instead of coloring it. And even if the color left easily, markings might still be visible. However, if you go too soft like an eight B to graphite smudges easily and you end up having to every Starger areas my personal go to is somewhat in the mill. I like to use a softer pencil, integrates between to be and for be my personal favorite sort of black wings, which don't give you a Hartness rating. But I'd say two black and 60 to end up it around to be, too, for being mark as well as to get on their Swiss would pencils and once, by Tom Bow
7. Manual Tools pt. 3: Erasers: Once you've written your piece, you want to make sure it is fully dry before you Racing. Chances of smudging always exist, even if the ink feels dry to touch. Oftentimes the swells troops are thicker than you think. I recommend you never started racing before. At least 15 minutes have passed. Waiting a full hour is even better. In terms of real racing, there are only two erasers for me. Personally, I loved a tumble. Oh, dust catch For the generally racing, you want to make sure dough that you're very gentle with it since it can sometimes lift e ink again. This, um, eraser leaves only small amounts of peace behinds, which is great because cleaning race addressed sucks. My other is the former coastal notable rt razor. You want to erase with it by gently pressing down on your graphite, picking it back up and then repeating. This is a much attention gentler method over racing, and it will be a lot better if you're Incas a little fragile. I mostly use a combination of both erasers to clean up my work
8. Manual Construction: all erect. Once all the tools are gathered, let's look at how to actually construct your grid. First, you want to know your basic power matters. What is your ex hide and what ratio of a sinner to Exide to East Ender or you're working with? What is your stumbling? Once those numbers air sat, you can begin construction depending on a type of lettering. I do. I might completely leave the a Senate Authority center if the thing I am writing does not need it. However, usually old lines are necessary. If I am going to be placing words on a small card, I suffer, measuring the entire heightened in setting the margins at the top and bottom. In my example, I was working with 4.5 centimeter height and wanted 1/2 sending me to Merchant and each side that left me with 3.5 stunning years workers that free to 2 to 3 ratios. I divided the 35 centimeters millimeters by eight, which left me with an eight millimeter Exide and to 1.2, sending near each 40 a center and D center area. Once all the math was done, I drew my first line, five millimeter from the top and then the 2nd 5 millimeter from the bottom. Then from the first line, I went 1.3 centimeters in doing the same on the other side. When drawing my lines by hand, I will do a more minimal grid, leaving out the lines in between. Then, to make my slant, I picked a point towards the bottom. Since the protractor needs two more space than I have on my card, is placed a piece of paper behind my car to mark my 55 degree point. Then, without moving to two pieces of paper, I connected those two points and drew my slot line and then parallel lines of dad using the lines in a triangle to help me. Dan, all that was left was writing my text and then erasing.
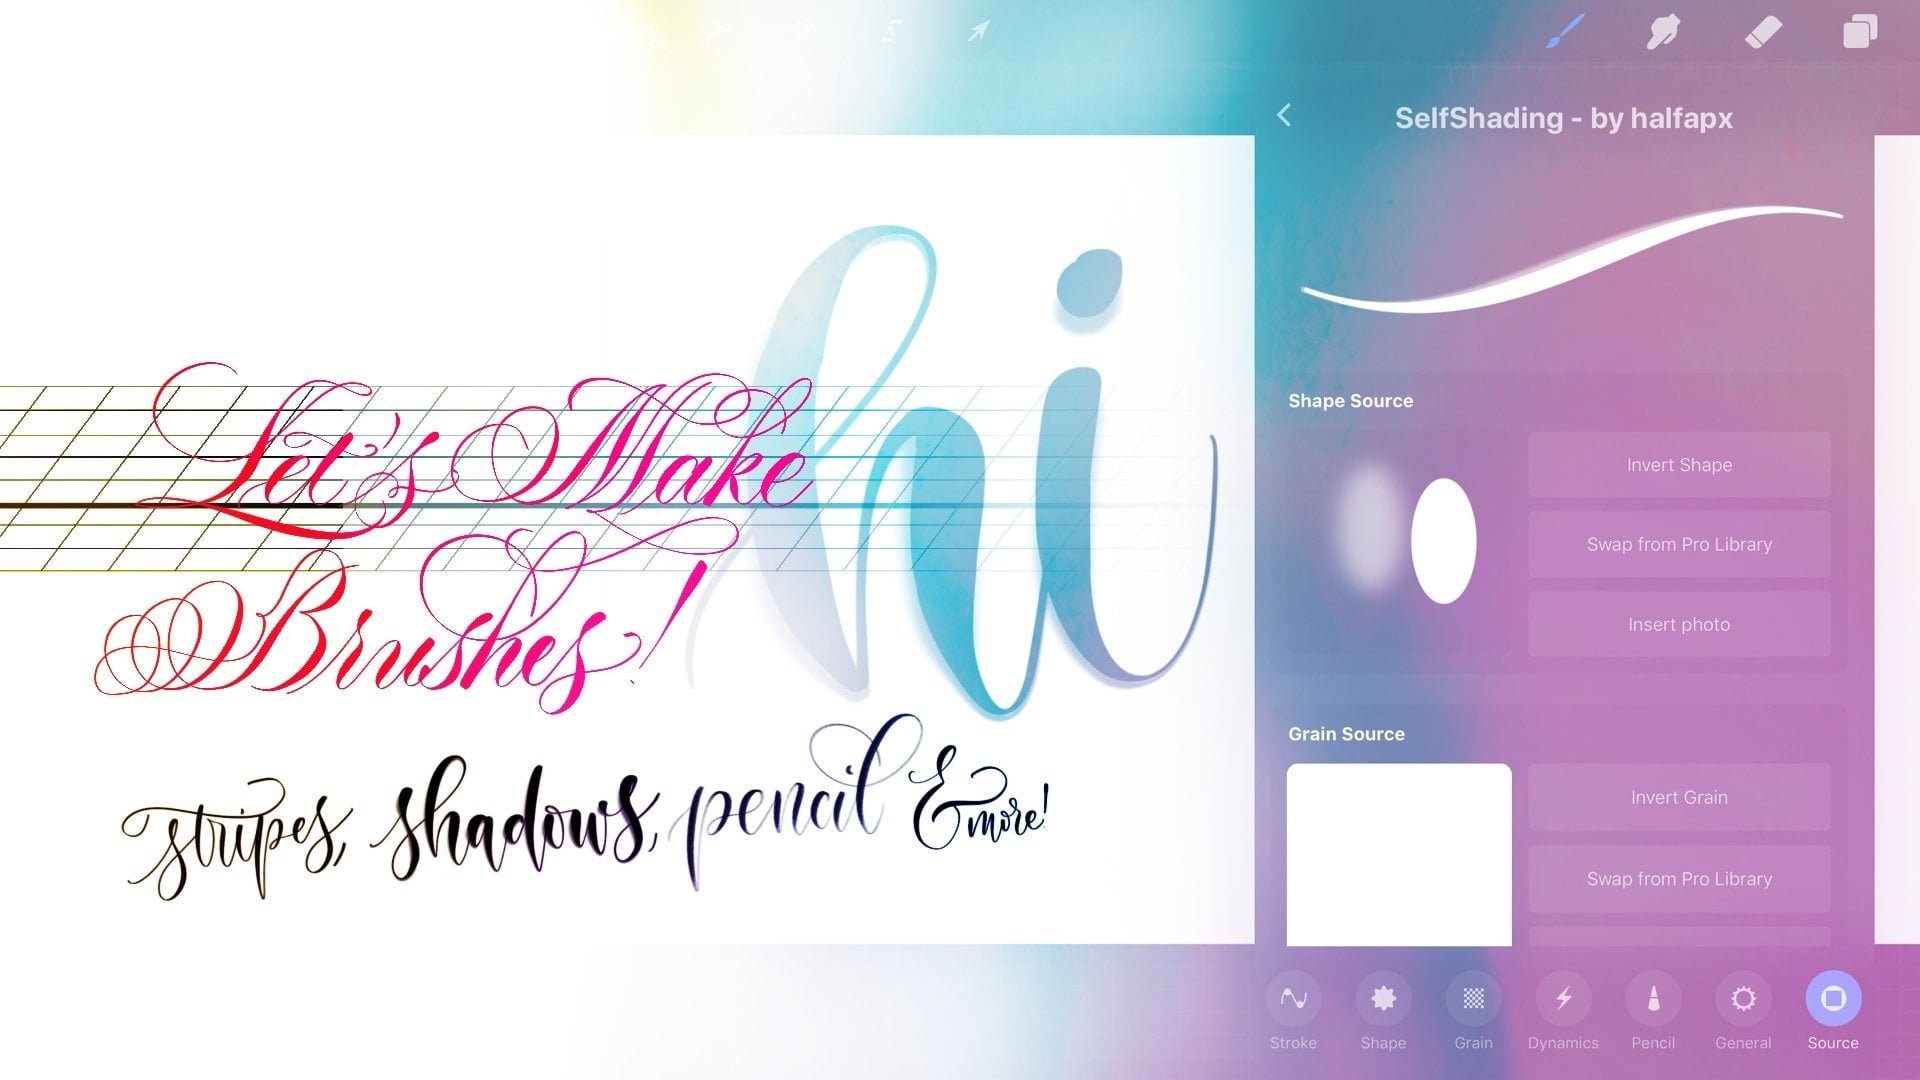
9. Digital Guidelines in Illustrator: all right now, once you know how to do a grids and can take out their skills for your special projects on darker, thick people, you can leave the manual methods behind a move on tour de focused lines that you can use all the time. If you don't have illustrator, I highly recommend creating views herbal guidelines with a Sharpie or using an online generator so you don't have to redraw the same Exide's all the time. If you have illustrator, you're in luck. Using Illustrator is a piece of cake. I have done that Britain tutorial off this method on my blogger as well. So if you prefer reading to watching, I'll link to post in a description. Let's get started. I served with an A four sheet in C n y que color mode of 300 dp I. I knew you wanted a 15 millimetre marginal art on all sites. Also, the slot lines will overlap the lines. So for a cleaner look I like to create to Marjorie masks, which are two white rectangles, dot frame lier will be on top off the grid, so you want to start by making a grid visible using Controller Command or Dan Drug Tourism Central and two vertical guides in cure are poured from the rulers and place them using the X and Y coordinates a talk creating new earlier and drag a straight horizontal line holding shift while doing so. Once you have that go to effect, distort and transform transform. I personally have a custom shortcut of shift control T Fred S and use this effect all the time and it makes the entire tutorial holo faster in a transformed panel at your X height, any vertical tap for me to this five millimeters increased three copies. Once that's done, copy using controller command, see and then control or command F to paste in place. It would be to make sure you have a default marital selected and then hit. Enter to openly move panel. You now want to move their copy half of your Exide up. So for me, that is negative. Do 0.5 millimeters on vertical, select that copy in your layers panel and opened the appearance window. Find a transform effect and add another copy to Ted to deadline for the proper line. Count of it free to 2 to 3 ratio I like to have those lines dashed, so I tweak the purists indie strokes panel. Then I noticed that you haven't killed your masking rectangles by. So do that. If you have forgotten to, I like to have my baseline thicker. Now you could go into object and expand the appearance of your lines and then make the baseline bowler. But since I like my layers to be as few as possible and to be able to easily change my backside, I creating new horizontal path for dot and put it over top. They also like to indicate my ex height off the bold vertical line, which makes it easier to find a cart. Police. Three light pat. Then it's time for this lot line. Draw a horizontal line, then hit Shift F Age to open transform panel and add your slant. For me, it's 55 degrees Done. Adjust e height of your slant line so it matches the A center in the D center line. Then apply this same transformer fact with it before leaving as much space between the lines as you like. I think slat lines are very are very personal thing. Some people like a lot like me. Others preferred him to be more sports. Don't apply the same transform effect to the entire lier and full of page. Once you're done with that, I like to add a date line as well as information on ratio angle and X height at the top. I will also sometimes lower the capacity of the entire grid paper if I intend on printing my lines to directly right on if I want to use them with a lie pad and will make them black .
10. Outro: on. That's it. I hope you guys. So how easy it is to me guidelines. And as your class project, I'd love to see some of the guys you create. That's all for now. I hope to see you soon in my upcoming calligraphy class.
 Myriam Frisano, halfapx | Calligrapher & Frontend Dev