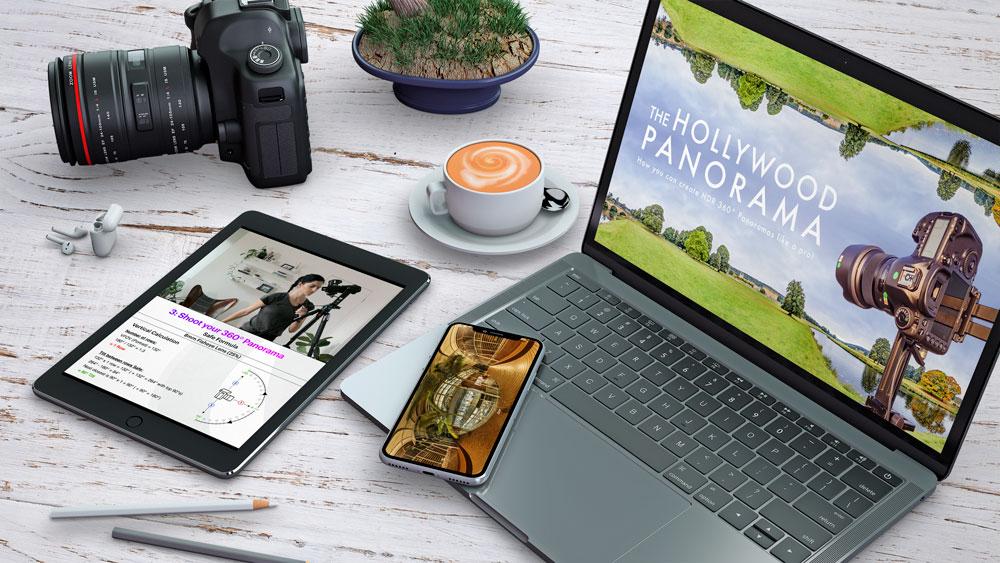
Transcripts
1. Introduction: If you've ever wanted
to learn how to shoot high dynamic range
360 panoramas. This is the masterclass. I'm Este Heyns, and I'm a VFX texture photographer
and data wrangler. I work for studios like
Marvel, Legendary, DC, Netflix. As part of my job, I shoot these HDR panoramas
on a daily basis. This course is a look behind the smoke and mirrors
of Hollywood at the exact workflow used in
VFX blockbusters like Thor, Love and Thunder,
Godzilla versus Kong, Aquaman, Black Widow,
and so many more. You'll learn the exact
step-by-step process on creating the
highest-quality HDR. 360° panoramas, so that your work is a cut
above the rest. This course covers everything from core photography principles, preparation, shooting,
processing, and application. And that includes what
camera settings to use, how to find your nodal point, how to find your
shooting angle formula, in-depth hands-on
walkthroughs, on shooting your panoramas, processing,
and application. That is merging your HDR, stitching your panoramas, tone mapping,
removing the tripod. Then application. We cover 3D
image-based lighting, virtual reality, virtual tours, and so much more. This is for any photographer
looking to upgrade their skill set or potentially
open opportunities into other industries. And best of all, you'll
be able to do all of this with whatever
gear you already have. You can shoot it on any camera, any lens, any tripod. You just need a panoramic head. Plus, you'll learn how to do all of this with free software. So there really is
nothing standing in your way of creating
epic 360 panoramas. To tell you the truth. I wish I had some
sort of guide or source of information
when I was starting out, never mind a
step-by-step workflow. And that's why I
created this course. I wanted to share this
knowledge in a way that's easy to digest and apply. So by the end of this course, you'll be able to shoot the highest quality
HDR 360 panoramas. And you'll be able to do
it efficiently and with a guaranteed stitch
every single time. So upload your
completed panoramas to our project gallery. Tell us what camera
and lens you shot on, what formulas you used
and how you processed. I can't wait to see
what you create. If you're pumped. Let's get into it
and start shooting.
2. Myth-Busting: Welcome to the
Hollywood panorama, the exact workflow used
in Hollywood today to create high dynamic
range 360 panoramas. Let's start by busting some myths. I think is really
important that we tackle some of these
misconceptions out there. Just so we go into this
with the right mindset. First, one being that you
need expensive equipment to shoot 360° panoramas. That is simply not true. You can shoot 360's on just about anything these days. Cheaper devices like
the Ricoh Theta shoots 360's quite easily and
a multitude of other devices. The difference being
we want to shoot high-quality 360 panoramas and that you can do with any camera. You can do it on a full-frame. You can do it on aps-c. It really doesn't matter. And you can do it on
multiple different lenses. That is in fact how we
get higher resolution 360's is by
using different lenses. So the fact that you
need expensive equipment not true. You can shoot it
with whatever you have. And then brings us to
the second part of this, which is the misconception
that you'd need an 8mm lens to
shoot 360 panoramas. That also is not true. In fact, we rarely use an 8mm to shoot 360° panoramas in
the film industry, we only ever use it HDRI's, which is to replicate
onset lighting. But when shooting 360 panoramas to use for image-based lighting, texturing your environments, and a multitude of other
things. Clean plates. We use a full-frame
body at either 24mm, 35mm or 50mm. So you can use any lens
that you already have. Primes are ideal, but a
Zoom will do just fine. So again, can shoot it on
any camera and any lens. Another misconception
out there is that you need
expensive software. Again, is also not true. I'll show you how to do
the entire process with free software. From merging your HDR to stitching
your panoramas, to applying them in 3D image-based lighting,
all with free software. Another big one is the idea
that it takes years to learn how to shoot high
dynamic range 360 panoramas. That is not true because you can really learn all of these
basic skills in a day. I've taught people how to
do this in a single day. And finally, the
idea that it's very complicated and convoluted
to shoot 360 panoramas. This course, this workflow
will prove the opposite. The way we shoot things
are preparation. The way we process
things makes it so simple that
anybody can do it. So ultimately, I
think what we want to convey is that if you can shoot high-quality 360 panoramas with whatever gear you have with free software that you can
learn to do it rather quickly, to perfect it, you're
going to have to practice, of course, to improve
on your skills. But ultimately, you can
go out there and shoot high dynamic range 360 panoramas the moment you
complete this course. So let's jump right in and
have a look at the workflow.
3. Workflow Overview: Alright, here we are,
The Hollywood Workflow. So let's have a quick overview of what it actually consists of. Part one is going to be
our core principles. We're going to cover
exposure rules, not just in relation to
360 panorama photography, but things you can use in
all your photography needs. We're also going to
cover HDR photography, what it is and why we use it. And then we're going to cover
some 360 panorama details in terms of what it is. Again, why do we use it? We're gonna go into
our preparation. So we're going to look at the
exact kit that you need. We're going to give
you an example or a quick view of the
kit that I use. And then we're
going to also look at finding your nodal point. So how to find your nodal point with your lens and your
camera combination. We are also going to look
at your shooting angles and the exact formula
you need to create a 360 panorama with
the amount of overlap. Not only that, I'm
actually going to give you the exact formulas that we use in the industry
every single day. In part three, we're
actually going to shoot. We're gonna go out and do
a hands-on walkthrough on shooting your panoramas with different lenses in
different environments. And in part four is going to be our processing. From offloading your cards and some handy tips and tricks there to
your file naming stitching panoramas both in
paid and free software, and then prepping it in
terms of color correction, moving a tripod, and
prepping it for application, which is part 5 - application, how to use it in 3D
image-based lighting or IBL, virtual reality, Google Street View, all
the really fun things. So let's dive right into
it. Core principles.
4. Preparation: Core Principles Exposure: Alright, let's look at some
core photography principles. And the only reason
I really want to cover this is
because it is quite important to shooting
high-quality 360 panoramas. If you wanted to shoot just
cheap and easy panoramas, you would have done
a different course. So we're going to
focus on quality. And for that reason,
we just need to touch on these core principles. If you're taking this course, I actually assume that you are already quite familiar with
your camera and exposure. But if there's
something to learn and I think there always is, let's have a quick look at it. So exposure in simplest terms, is of course, how much
light reaches your sensor. Exposure is controlled
by three things. The f-stop, the ISO, and the shutter speed, also referred to as
the exposure triangle. And it's really easy
to picture it in that way because
as you change one, it affects the other two. So let's have a look
at your f-stop first. As you probably know,
the lower the f-stop, the wider your lens is open, which means it allows more
light into your sensor. With that, you get
beautiful depth of field, which is lovely, right? It's when things close
to us is in focus and the rest is out-of-focus,
creating a lovely blur. So it's quite artistic. However, for 360 panorama photography,
it's not that great. We want everything to
be sharp and in focus. So we want our
f-stop to be higher. You want to be aware
that each lens has a specific point
where the sharpest. And so you can go
into Google and have a look at your
particular lens. Someone would have reviewed it. And we tell you where
the sharpest point is. As a general rule, we want our f-stop to be
never lower than F5.6. And that's really if you're in a very dark environment and
you're pushed for time. So we never want to go below F5.6. And some lenses tend to
break down around F16. So you might think just
when you're outside, you just wanted to
pop it up to F22, F16, whatever it may be. And again, I recommend
that you actually look at your sharpest point for your particular lens
and pop it in there. So as a general rule, 360 panoramas would
be around F8/F11, That's a nice little sweet spot. But again, it really does
depend on your environment, your set, your
lighting situation. Because whatever we set that up obviously affects
the other two items. Now let's have a
look at our ISO. The lower the ISO, the darker the image is, the higher the brighter,
more light into our sensor. The issue with the ISO is
that it introduces noise. So we never really want to push your camera
beyond that point. So each camera has
its own native ISO. For instance, Sony cameras, and particularly your S range. They have a very high ISO range. You can push them
into the thousands without introducing noise. Others you can't push past 200. So we want to find
that sweet spot again for your particular camera. And knowing where you really
start introducing noise. For my 5DSR, ideally, I'd like to have my ISO
around 320 as it's a native. But I'd never, ever
really push it past 640, which is not that high. Really. Particularly if again, if you're in a low light situation and you're
pushed for time, that's not very high at all. So another way we can
now rectify this, if for instance we
have an F8 and we have an ISO of 320 is
our shutter speed. Shutter speed is
actually going to be a main adjustability function
when shooting 360 panorama. So shutter speed in
the simplest terms, obviously, it's got
to do with speed. It is the speed at which the shutter of the
camera closes. And so we have to consider the
speed of things around us. If things are moving
very quickly, you want your shutter speed
to be higher, faster. Another thing is you
really need to learn to understand and
trust your histogram. Don't trust your monitor or your display because
it's never really accurate. So learning to understand your histogram and really
trust it is essential. The easiest way to remember
it, if you're new to histogram, is right, is white. And if you're looking
at your histogram on the right-hand side
is going to be all your whites, meaning
your highlights. You've got your midtones
in the middle, and then you have your
shadows on the left. When setting up initially, we're always expose for
the middle bracket, right? So when doing that,
we don't want to clip the highlights and we don't want to clip the shadows either. So you'd want a histogram with a nice little mountain
in the middle. Another cool trick
when exposing is using your depth
of field preview. If you're camera,
got this, It's this little button up here. And that's really
cool because it shows us our lowest bracket, which is just a quick way to
really check your exposure. And then I'll show you
some cool bonus tricks using a color chart to help with your exposure as
well as some of the basics. And again, you can apply this
to any and all photography. It could be portrait
photography, can be landscape, it could
be absolutely anything. Another cool thing you
can do to help you understand these basic
exposure principles, a jump online and have them look at some cameras simulators. There are plenty of
them on the Internet. So you just jump
on there and play around with your
ISO, your shutter, your f-stop to really get a nice grasp of your
basic camera settings. So it is important that we understand these core
principles because we're here to learn how to shoot
quality HDR panoramas. So let's go into
it and let's talk about HDR photography.
Why do we use it? And what is it?
5. Preparation: HDR Photography: Alright, high dynamic
range photography, or HDR, in the simplest terms, means you're bracketing
and image at different exposures and
merging it into one image. That is so that we capture
the entire tonal range. So you can shoot
brackets anywhere from three brackets to nine. You can shoot as
many as you like. As a general rule of thumb, we always exposed for our middle bracket and
that particular bracket, we don't want our highlights
to clip and we don't want our shadows to clip either. So it takes us back to our
core exposure principles. So you're going to expose when setting up your camera
for that middle bracket. And you're going to
decide how many stops apart your other brackets are. You can be anywhere
from one-stop apart, 23 in anywhere
in-between, right? For our purposes, we usually shoot three brackets
and three stops apart. It gives us the biggest
range of exposures at the least amount of time for
three-sixteenths panoramas, we tend to shoot three, particularly if you're
shooting on a camera with a high pixel count, that's all we really need. Because it's much quicker. And particularly when you're outside and you're shooting in an environment that things
are moving really quickly, like the window and the
sun and clouds or onset, honestly always have a
lot of time constraints. So we wouldn't have
the highest quality or the least amount
of time. We shoot. Three brackets,
three stops apart. So why do we use high
dynamic range photography? It is particularly
useful to capture the entire tonal
range of a scenario, and particularly important when capturing high
contrast situation. So I'll show you
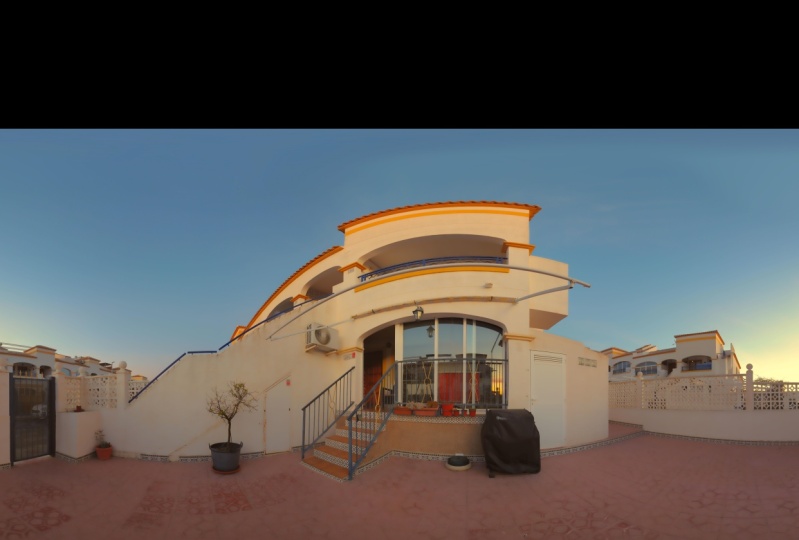
an example here. For instance, in this
particular example, we are trying to capture the beautiful exterior as well as this beautiful old
interior of this house, like I mentioned, are set up to my middle bracket and then
we'd shoot or low bracket. As you can see, the
entire interior is completely underexposed, but the exterior is exposure. We can retain all
the highlights. Then our middle bracket is a lovely combination
of the two. And then our high bracket, our exterior is
completely blown out. But recapturing our
interior on the left. If you were not to shoot
bracketed or high dynamic range, That's what your image
would look like. But if you short
bracketed and you merged it into an HDR photo, you would get this beautiful
thing which would have All the value of the Interior
as well as the exterior. This is particularly
important when shooting 3 16th photography. And again, you can shoot 360 panoramas with
a single image. You don't have to bracket it. You can still shoot it through
60 panorama and you can choose to either focus on just the Hague child photography
part of this course. We can just skip straight to
the three-sixths panoramas. But again, we're here
for high-quality, right? This is why you're here. And that's what the
HDR is important because in most cases, you want to capture absolutely everything so that they could use it in visual
effects or whatever. It might be. Some basic rules for
HDR photography, as we say, it's bracketed. Now one rule, shoot
it on a tripod. Because again, you want
to merge those 379. How many brackets you're shooting want to
merge them into one? If there's even the
slightest movement in between them is
going to have a really hard time stitching in. If you're shooting a lot of
brackets and you're, you're, you're slower brackets
given your situation is a slow shutter speed,
things are going to move. So you want to shoot on a tripod at the sequence
of bracketing as well, we usually tend to shoot our fastest bracket
first and then work the other way because you
can set your camera up to shoot or this slow brackets
first and reverse it. And the reason why we shoot the fastest bracket first
is to avoid any shape. So we want to get
that first shutter that's quicker first, Hopefully you, your tripod is settled by the time you
slowest shutter comes in. And we always want
to shoot in manual. Always, always, always. So whatever your camera
habit doesn't matter, there's always a manual mode. And the reason for
this is we don't want our exposure focus to
change during our brackets. We want it to be exactly the same so you can just
merge them all in one. We're going to expose
for the middle bracket. Like I've mentioned
probably several times. We're going to expose
for the new bracket. And then when shooting
you're always, you can use your depth of field preview button like
I talked about earlier. And you can check
your close bracket or just shoot it and
actually look at it. That's our basic rules. Shoot it on a tripod or issued manual exposed for
your middle bracket. And then don't clip
your highlights in that middle bracket and then cloaked, unclip your shadows. That's the ideal exposure or application of HDR photography. Certainly the effects
world we shoot, HDRI, which is usually a shot onset
with an eight mil lens. And that is purely to capture the lighting environment
and that gets used in image-based lighting. Really what we want here is the quickest and the
most values, right? So the whole crew concept there waiting for
us while we shoot at 24 male higher risk
panorama at this point. So we thrown 8 million and
we should seven brackets. So that's one way we
use HDR photography. Another one obviously is the one we will be
focusing on this course, and that is
high-quality panoramas. And that is used again
for image-based lighting. In conjunction with the HDRI
and then the silver bowl, we use all these tools
for image-based lighting. It's not just one of them. But then our
high-quality panoramas that we'll be focusing on today. That gets used for clean plates, that gets used for image-based lighting,
like I mentioned. It gets used to texture environments when you're aligning it tonight
or photogrammetry. So this really a
multitude of ways these panoramas get used and why they need to be
really high-quality. Hdr gets used in photography
if you just want to shoot landscape or you have a cool
scene like for instance, this old house with this
beautiful exterior, you want to use HDR photography. So now that we have a
basic understanding of HDR photography, high dynamic range photography, let's jump in to the
360-degree panorama section, understanding what
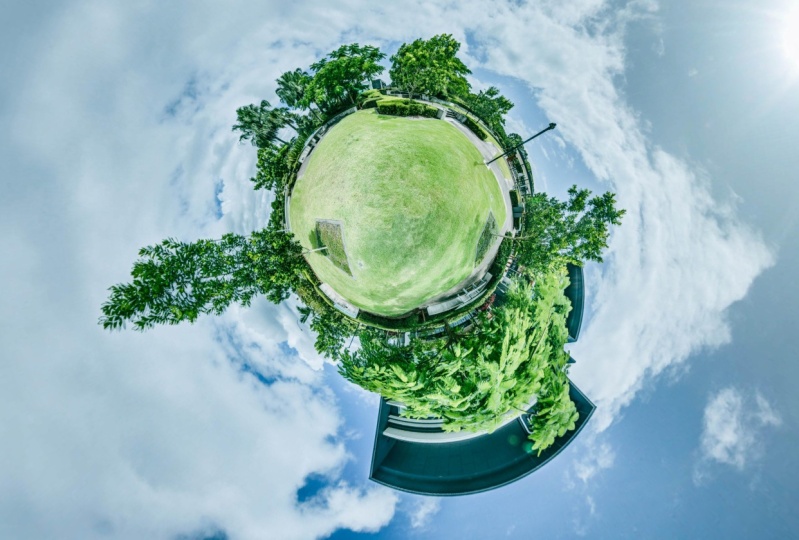
the difference is and how we apply them.
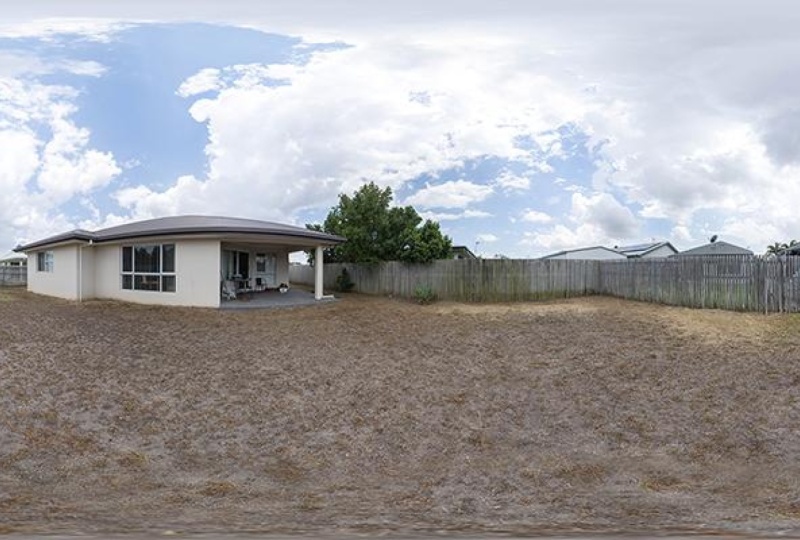
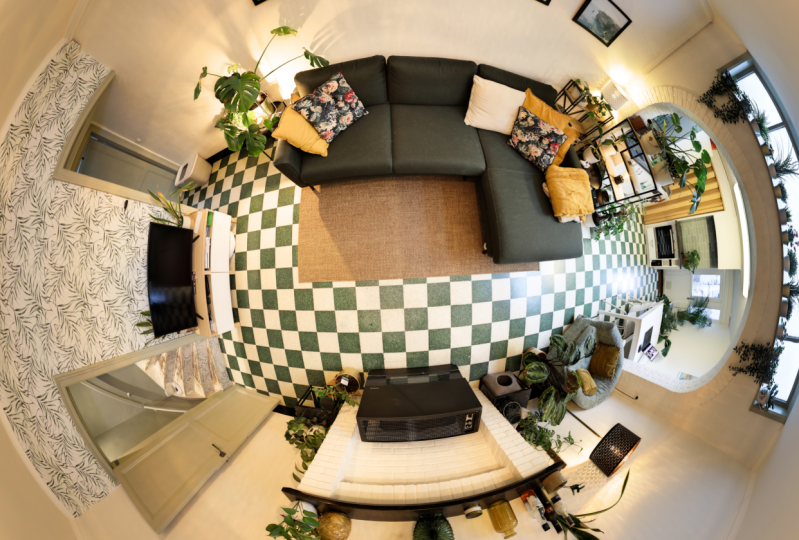
6. Preparation: Panoramic Photography: Alright, so now that we
have a basic understanding of the high dynamic
range HDR component of our course in 306 degree high dynamic
range panoramic photography. I know it's a mouthful. We're going to cover
the 360 panorama part. And like I mentioned earlier, we have HDR component and you have 360
panorama components. And you can do one
without the other. You can shoot your panoramas
without HDR and vice versa, you can shoot HDR. Is that any type of photography? Now, it's important to make
the distinction between a normal panorama or tile
and if 360 panorama. And the big difference
here is a panorama or tile only covers
a certain degree of field of view or angle. So it might only cover a 140
degrees or a 180 degrees. Were 360 panorama,
as you can imagine, covers entire 360 degrees, including the ground plane. And it's quite plain so that you can create a
virtual environment. In the simplest terms,
it's always the easiest. I think if you tell people to think of Street View because that's really what it is and
also can be used to that. It all a panorama, a tile 360 panorama. They're all a set
of images shot from the nodal point at a predefined formula and
then stitched together. So that's the biggest difference between panoramas
and 360 panoramas, again, can be shot with high dynamic range of a
single, single brackets. In this particular course, we're going to cover high dynamic range panoramic
photography because again, we're here for
Hollywood quality. So some basic rules for 3
16th panoramic photography. Always shoot it from
a tripod or she'd manual and always shoot
from the nodal point. We're going to cover how to find your nodal point
in later lecture. But for now those are
some basic things that we always remain the
same regardless of shooting a 180
degree planner or a 360 panorama bubbles fear
whatever you want to call it. So those are some basic
rules that always apply. Some applications for
the 360 HDR panorama in the film industry and in particular the effects industry. We use these for high-quality
image-based lighting. We'll show you how
that's done later on. We can also use it to texture environments
really quickly by aligning it to the LIDAR
or photogrammetry, would we use it
for clean plates? We use it to clean out
gear and people we do large environment captures
using these things you can do, fly through some entire set in an environment using there. So it's really, it's such
a staple of what we do in visual effects actually are their applications
is virtual reality, real estate, virtual tours, Google Street View,
little planet, showing off to your mates, your cool photography
skills all in all, I think it's a really cool
skill set and it has many, many applications and
I think I'll only grow in its usability
in the future. Hopefully you're
excited because what's happening is our
preparation list again.
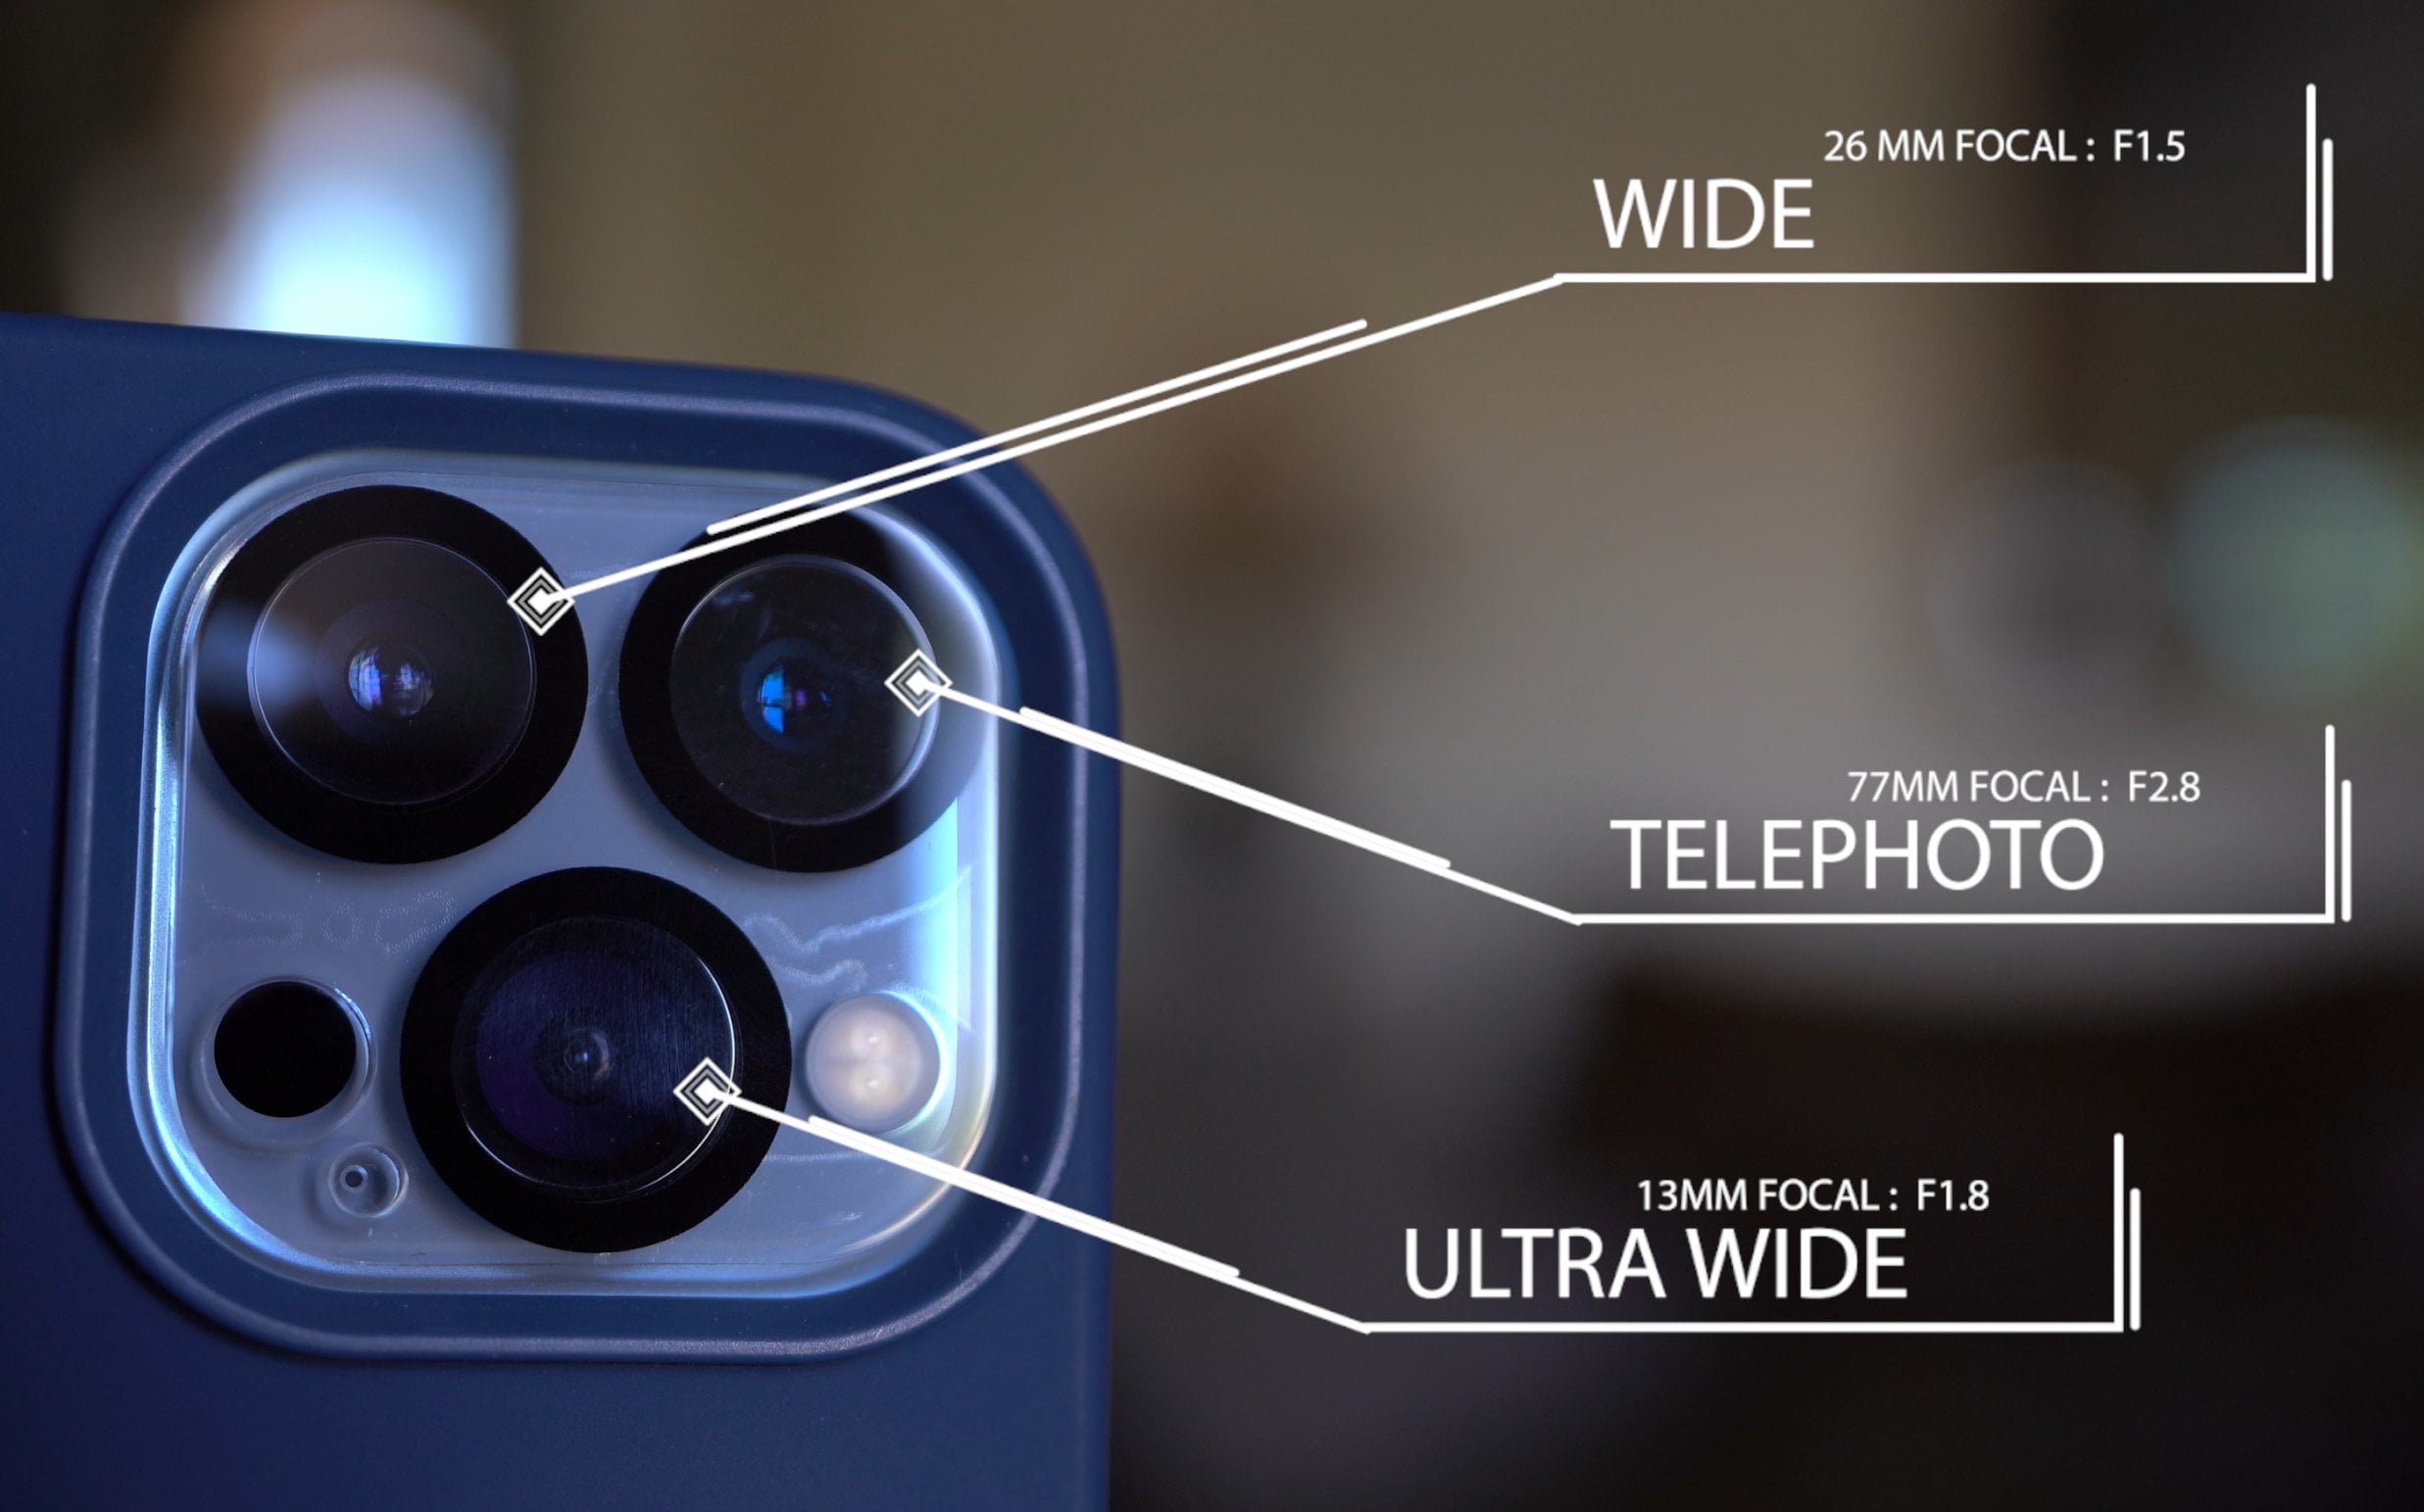
7. Preparation: Gear Requirements: Alright, so let's have a look at some basic gear or
kit that you're going to need to be able
to shoot 360 panoramas. You need a camera. Of course, it can be full frame, it can be a crop sensor, it
doesn't matter. You'll need an
interchangeable lens. It can be a Zoom, but
prions are ideal. You will need a tripod, ideally a steady one, but whatever you have will
do the trick just the same. Then you'll need
a panoramic head. There are multiple
brands out there, so it doesn't matter which
one you have or get. Just make sure that
you understand the way that specific one works. The general rules will
apply regardless. Then additionally, you will
need a shutter release cable. If you don't have this,
it's not a problem. We will use a 2 second timer
to set up your shutters or 2 second time it does
that automatically sets of your brackets if you
have three or seven or nine, which means you press
it once and you don't have to continue
pressing the button. The shutter release cable
does something similar. Then lastly, a color chart. Again, this is not an
essential piece of equipment, but we use it to color
balance, color match. Then we also use it to expose, which is a neat trick that
I'll show you later on. Alright, so let's have a
look at what's in my bag. And you'll note that
I've mentioned bag. The reason why I use
a backpack instead of a pelican case is because you're always on the move in strange
environments on a beach, on a mountain, and then lugging a big Pelican case
is very difficult. So make sure you have
a nice backpack. They can put all your gear in safely and can ideally
carry everything. And that will make your
life a lot easier, right? So let's jump in and have
looked at what's in the bag.
8. Preparation: What's In My Bag: Alright, so now that we have a good understanding of what
gear we're going to need. Let's have a look at
what's actually in my bag. And here it is. So let's
go ahead and look inside. Alright, so this is
a low pro Whistler, be P450, AW, two lovely bag. It's quite deep. It carries
all my gear for me. Starting at the top. This is a Canon 35 mil F14. This is the Canon 5D is
R. This is my workhorse. This is the sigma 24 mil F14. My remote switch. This is a Canon. Our SAT in three. Shutter release. This is my Nano ninja six. This is a Canon 72200 mil. F4, our series lens batteries. This is a Sigma 50 mil. This is a one-point
for heartlands. In a 100 ml, this is a 100 mil macro. If two-point et al series. I just have my cards. This is a semi and 14
mill T3, 0.1 Sunni lens. And then my charger. So that is what's in my kit. I usually have another body but identity and
carry it with me, it's in a different bag. I don't tend to
carry the 14 Miller depends on what I'm doing. I have just some lens cleaner. Always keep your lens is clean. Filters, extra base plates, and then just front. Alright, so just
in the front here. I have my color chart
that's in there. I just keep this here to keep my colored chalk
nice and straight. And then I just have a
pocket color chart as well. And then just some
Sharpies and then a torch if I'm working in dark environments so I
can see my rotations. And that's what I use
on a daily basis. This is my Manfrotto X1 90 Pro. And I just have a little bit of Velcro on it where I can stick my slate and my column chart. Right, so now that we know
what gear you need and we've had a sneak
peek inside my bag. Let's set up your camera. We're going to look at some
basic camera settings, and we're also going to look at some panoramic
specific settings. So let's go ahead
and do that next.
9. Preparation: Camera Settings: Alright, so now
that we've looked at the kid that's needed, Let's look at some settings. And I'm going to cover
some really basic things. And like I mentioned with
the start of the course, you might not think that
it's particularly relevant. But believe me, these things really make a difference
in the long run. Because if you set it up
properly at the start, it really makes processing so much easier and you're just
removing a lot of bugs. So let's have a quick look at
some of the basic settings. Image quality. Make sure that it's set
to RAW and JPEG large. And the reason we do that is
because we want to preview our panoramas really
quickly with our stitching very large raw
files image review. I turn that off just to save my battery and
to help the speed, I don't want to display
an image every time I shoot a rotation beep. I have that disabled. We don't want any noise and set shutter release without card. Make sure that is off. We don't want to
learn this lesson. The hard way all this does
is this shutter will fire, even though you don't
have a coordinates, are always make sure that is off regardless of what
photography you do, any other settings on this
doesn't really matter. Next, the exposure
will set up on the day using our brackets saying
without white balance, the only thing here
is to make sure our color space is set to RGB. Next menu over a picture style, make sure that it's
set to neutral. We don't want to bake in any specific color
profile or contrast. So make sure that
it's set to neutral. And then there's nothing
else on this menu here. Nothing on this menu. Lobby shoot enable these modes
you will change as well. I usually have a ping disabled. And then our grid display. I'm going to put it through
breathy plus dialogue, which gives us the
center cross hairs, which helps us align our
nodal point when we point our camera down to the
center of the nodal head. But you can choose any of these. Nothing on this menu,
the autofocus menu, I usually leave as it is. There's nothing. I never shoot anything auto. This menu, there
is nothing for us. Same here. Nothing for us to really change. This menu are holiday alert. I have it enabled. This helps us see which parts of our
image are overexposed. And it also use it to check our exposure using
a color chart. When a single white
square is clipping. When this is enabled, that a good indication of
a good exposure histogram. The histogram isn't set up. Just make sure that it's set to brightness and that'll
display correctly. Record function. So this is where we create our new folders so that we
shoot into a new folder. And we always shoot a
panorama into a new folder. So things are very easy to manage when we start offloading and processing each panorama
into its own folder. For our numbering
continuous filename, you can set this up
to whatever you want, like auto rotate. We want this off
because we don't want the camera or the
computer to import images, portrait, and landscape
at the same time. So this enables us
to stitch things properly and much quicker
and without any drama. So this is important.
Make sure that it's off, auto power off. You can choose to
whatever you want. Brightness, I always leave
manual because I don't want to deceive my eyes
when I'm exposing. Make sure you set your
date and time zone. This and shows that when
importing our photos, everything is sequential,
an incorrect order. Nothing for us to do here. Custom settings, I
tend to use this when having outdoor and
indoor scenarios, right? Our exposure level increments, make sure that's 1
third ISO settings 1 third bracketing
order cancel on. And then our bracketing
sequence always make sure that we shoot our fastest
bracket first. And so that is why
we select that one it shoots are
darkest image first, just a faster shutter
speed, then our middle, just the 0, and then
our high bracket, which is usually a
slower shutter speed to allow more light
into the camera, creating our highest bracket. Number of bracketing shots, we will be using three when shooting a HDR on
set will be seven. And you can shoot your
panoramas using any of these. In our case, we will be
using three brackets. Nothing for us here. Then our favorites menu, I always have my selecting my folders at
the top because again, you will create a new folder
for every single panorama. I have registering my custom shooting mode on my
favorites menu to create scenarios for indoor
and outdoor settings when having to
move very quickly, highlight, alert, disable, and enable those to
check my exposure. Format card always format a car before starting
a new session. Lcd brightness,
like I mentioned, is for moving indoors
to outdoors and having to adjust your display number of bracket, It's shots three. And then another one over is my bracketing sequence if I
ever wanted to change this. So that is a quick
look at our settings that will really help
us in post-production, enable us to shoot
proper HDR panoramas. Okay, so we've set up
our camera settings. Now we need to figure out
the exact formula to enable us to shoot high-quality
360 panoramas. That means the amount
of overlap you need per camera and per body. So if I'm shooting on a 24
melt and a full-frame body, it's going to be
different than it 24 mill on a crop sensor body. Likewise, my formula
for a 35-millimeter, 24 mill will be different. So let's go ahead and
calculate those formulas. And then I'll also give you the exact full-frame
formulas used every day.
10. Preparation: Shooting Angle Formula: Okay, So calculating
our shooting angle or formula is essential in
shooting 360 panoramas. If we do not do this, you won't have images overlapping and it won't be
able to stitch the images. And the reason why it's
important that we do this during the preparation
stage is because you don't have time to do this
when you're on location or onset and things are
moving very quickly. Again, the reason we
do things properly in the start will make the whole
process so much easier. So you're shooting angle simply means the amount of
overlap between your images. So each camera has a
different formula. And what I mean by that, in particularly a full frame
versus crop sensor camera, the overlap will be
different the way a full-frame camera
displays a 24 moles. As a crop sensor, 24
miles will be different. I'll show you several ways that we can actually calculate that. But as a general rule of thumb, you want at least
twenty-five percent overlap and at a minimum 10%. And what that means
in the simplest terms is when I shoot my first
image and I rotate, let's say 40 degrees clockwise. One, my second image to have about twenty-five
percent overlap or minimum tin so that our stitching software
is able to pick up those same points
and align them. With that. Our nodal point is key and we'll cover it
in the next lesson. So not only do we have
horizontal overlap, when shooting a full 360, we're trying to create a sphere, meaning I will have multiple
rows and multiple columns. I'll have to shoot a row at, let's say 0 degrees. I'll have to shoot
another at 45 degrees, whatever it may be so that
we build the entire sphere. Once we put this into our stitching software
will be quite easy to visualize the way it
all stitches together. So having a formula will
enable us to shoot more efficient and
enables us to shoot a panorama that's stitches
every single time. When calculating
our shooting angle or our amount of overlap. Here are a few key
things to remember. First one being that
a full 360 panorama, in essence measures at 360 degrees horizontally and
a 180 degrees vertically. And we'll use those numbers when calculating our overlap, 360, horizontal or vertical,
to create a full sphere, always shoot up 90 degrees
and down 90 degrees. And that's in order to capture the sky and the floor plane. When calculating the
rows that we calculate, exclude this up
and down rotation. This will make a bit more
sense once we get into it, but it's worth
noting at the start. And then the way our panoramic heads or setup
will be different. But for this case and
for these examples, it is set up as follows. My head rotates horizontally at ten degrees and vertically, it rotates at increments of 7.5, but it's setup to rotate at 15. So those are worth remembering
once we start calculating. So let's jump onto the
computer and have a look at some online calculators. First I'm being
kind of catches it. You're going to do is you are going to select your camera. You either select a APOC, which is a crop sensor camera, will select a forefront. For our purposes, we will
go full-frame sensor width and a height that should
be included automatically. But if you're in
doubt, you can always google the full-frame
sensor size. And you'll see that
it's 24 by 36 mill. You can see 245359 close enough. Your lens type. For our purposes, we will
be using prime lenses. If you're shooting
on an eighth note, we will select fisheye, but in our scenario
we will be using a normal lens focal length. You will input this manually. We will go 24 mill
for our coverage. We want a full 360
or overlap 25. You can go ahead
and change that, but let's go 25. Generate shooting
pattern, right? It looks like nothing
has happened. Just scroll on down. Okay, So the horizontal field
of view for this lens is 53 degrees and vertically
it's 73 degrees. And with twenty-five
percent overlap, that's adjusted to horizontally, Let's call that 40 degrees, that 3985 and vertically 55. For the formula, it is
suggesting that we shoot horizontally ten positions
and vertically five, so ten horizontally and
five rows, row one. In this example, we would be at 72 degrees upwards and
we've chewed for positions. And then row two would be
at 36 degrees upwards, and we should nine positions. As you can see, it can be
a little bit convoluted. And it's going to take you
a while to shoot a 24 mil. But do not fret because
I'm going to give you the fastest
formula out there. You will never look
back, so standby. But for explanation purposes, let's have a look at these
websites and calculators so you can go through and
figure it out yourself. The next one we'll be
using is PAN-OS society. So this one is quite simple
because it's just a table. So I'm going to go
and zoom in there. So let's say we're shooting full-frame camera and we're
shooting portrait mode. We want 360 panoramas. And let's say we're
shooting on a 24 mil. And so this is more
accurate and fast. You'll be shooting nine
shots at 40 degrees. So that means you're rotating
horizontally 40 degrees, which is 940 times 9360 degrees. And then landscape,
we won't really be using landscape at all. So what this does is lovely,
That's very accurate, but it only gives us a single row and we want
to create a full 360. So we're going to have
to duplicate that. We're going to have to
shoot at least two rows. And that means you have
twenty-five percent overlap between your horizontal images. And it also have
25 degrees overlap between your vertical images
between these two rows. Let's have a look
at the next one. The panel calculator from HDR labs is another
good one to use. So this one, you can either
select a lens from the drop-down or you can
type it in manually. Let's go Eight mil. And our common films size, we'll leave that as
36 by 24 because that's our full
frame sensor size. But you can also
change that too. If you want to go
and eat candy 17th, that'll be different
because it's a crop sensor. Let's go with 35 mil film. Alright, so we're going to
calculate our field of view. Once you hit that, it'll show us our vertical field of view and a horizontal
field of view. We'll use those in a moment to help us calculate our rows. But let's go ahead and
calculate our panorama. We're going to say we want
twenty-five percent overlap. We're going to calculate. And it is suggesting that
we shoot 4.3 images. So number of images for 0.3. So let's have look for images is 20 per cent from our
account online calculator. It suggests that we should, for rotations or four positions. So if you want to know
the amount of degrees you're rotating for
that for positions, it is as simple as 360 degrees
divided by four equals 90, so it'll be rotating
at 90 degrees. So the more complicated one is to find our number of rows, which is this 132 degrees. So we're going to
use that 132 degrees and we're going to
divide it by a 180. So it's 1.3, meaning that it merely covers our full 180
degrees field of view. So we need one row. And if you want to see the amount of degrees
you'll be tilting. Take the 132 vertical field
of view times one row, gives us a hundred and thirty two hundred and thirty two plus then another 132 because you'll be rotating up 90 degrees. Remember we said we
don't count those when we calculate the
initial number of rows, but you will be adding it. So plus 132 gives
us 264 degrees. So tourist 64 obviously
is more than a 180, so we're going to minus 118
and gives us 84 degrees. So that is what it's
suggesting, that we tilt. Our head, doesn't rotate
at those degrees. So our next closest
one is 90 degrees. If you want to make
sure that that is still enough overlap, it is as simple as 90
plus 9080 degrees. So we know that if I shoot my first row at 0 and
the next one at 90 up, it'll be enough overlap, right? So we're going to select
24 mill in our lens. And we're gonna go calculate. Alright, so our vertical
field of view is now changed to 73 degrees. And we're going to
calculate our panorama. That is our first step. So first thing we wanna do is calculate the number
of images we need to create our first 360 rotation and then we calculate
the rest from there. So nine images is
what it's suggesting. 360 divided by nine
equals 40 degrees. So we'll be shooting
non positions and rotating at 40
degrees horizontally. Work out the amount of rows. We are going to take the
vertical field of view, which is 73.74, so we
can round that up. So the vertical field
of view is 74 degrees. A 180 degrees vertically
divided by 74 is 2.4, meaning we need two rows
in order to create a 1A2. Obviously we're a
little bit short, but we'll fix it with the additional top and
bottom 90 degrees. So now if we want to
figure out the amount of tilt between the rows, we will take our vertical
field of view 74 degrees times two
rows equals a 148. Then we add another
position which is 74 degrees up, gives us 222. And that's the additional
top 90 degree position right about the field of view of that image is 74 degrees. Then to figure out
our tilt angle, we're going to take
the 220 minus one AT, and it gives us 42
degrees, right. So our next closest position
on her head because our head doesn't rotate
it 42 degrees is 45. And to check that 45 times
two equals 90 plus 45 again, for that top one,
it gives us a 135. So in this particular case, we do not have enough overlap, meaning we need to
add another row to get us 21845 degrees times three rows equals 135 plus 45 for that top 90 degree
position equals a 180. So that is how we get to 45
degrees tilt in-between. Alright, so 35, calculate
and calculate, right? So it is suggesting 12.7 images. So let's go with, in this case, for our 35-millimeter to find
out horizontal rotation, it's 360 divided by 12 that the calculator gave
us 30 degrees. They will take our
vertical field of view and round that up to 55
just to make it easier. So then we take 180 degrees
divided by 55 equals 3.2. So we need three
rows in order to achieve the a 180 degrees. So to find out the amount of degrees between
the rows will take off vertical field of view
of 55 times three is 165. Then we add our top positions, which is another 55
degree of field of view. And that gives us two
hundred and twenty two twenty minus 180 is 40 degrees. Obviously, our head doesn't
tilt to that degree. So our next closest one is 45
degrees times three is 135. Add your top position and
then gives you a 180 degrees. So in other words, we need 45 degrees
tilted between arrows and we need three rows. So let's have look at a 50 mile. Go calculate, calculate. Alright, so number
of images is 17.8. So we're going to round that up to 18360 degrees divided
by 18 equals 20 degrees. So we'll rotate 20 degrees
between these 800s positions. We're going to take
our vertical field of view, which is 39.6. We'll call that faulty. And we'll calculate
the amount of rows. So vertical field of view, 39 degrees a 180 divided
by 39 gives us 4.6. So around that up to five rows, we will need five rows
in order to create a full 360 panorama using a 50 mille to figure out the amount of
tilt between these rows, we'll take our vertical
field of view 39 times five equals one over five, plus another 39 for that
top position equals 234234 minus 1 eighth
is 54 degrees. So our next closest one
will be 45 degrees. 45 times five. Again, this is just if you
want a sanity check yourself, you figure out how
much overlap you're actually shooting
gives us two to five. Plus again, that top
position is to 70. So at 45 degrees, we're shooting way more
overlap than we actually need. So let's bring that down. We'll go to our next
position on our rotation, which is 30 degrees. 30 times five rows
is 150 degrees. Your top position of 30 degrees, and that gives you 180. So in other words, we
will need five rows, will be rotating 30 degrees
in between those rows. So let's put in a
100 mills will go calculate our field of view
and calculate a panorama. So the number of images is 35. So 360 degrees divided by
35 equals ten degrees. So we will rotate ten degrees in between are 35 positions. So we're gonna take
our vertical field of view of 20 degrees. You're going to divide it by 180 and it gives us nine rows. And again, you're not really
going to shoot a full 360, but we still want to figure
out the amount of degrees of tilt between your
rows and we need the amount of rows
to calculate that. So 20 degrees times
nine is a 180. Plus. Then again, your top guy, which is another 20 degrees, is two hundred two hundred
minus 18020 degrees. And again, our next closest
rotation on her head is. 15 degrees. Alright, so we've had a look
at some online calculators. Now, let's go
through and look at the Hollywood formula
I'm getting give you the exact overlap formula used in Hollywood
every single day. First one being our
eight mill fish islands. It is the quickest way to
get the lighting scenario, which gets used in
conjunction with our Chrome and silver balls to create image-based lighting. We also combine that with the high dynamic range,
three-sixths panoramas, there'll be captured
at a later stage, the H2RAs with an eight
mille is there for speed. We don't want the entire
crew waiting for us while we shoot a high dynamic
range, 24 mil Pena. So we shoot at eight, no HDRI. We'll look at a safe
formula of doing this and creating
a full 360 sphere. So we're gonna be
shooting three rows, 90 degrees horizontally,
and it will be a total of 56 images. And when you're done,
your first rotation will be at 0 degrees. We're going to rotate
four positions or four times at 90 degrees. So you'll start at 0, shoot yourself in brackets. Rotate 90 degrees to 90. She just seven brackets wrote at another
90 degrees to 180. Shoot that, wrote
it horizontally. Another 90 degrees, talk to 70. Then you're going to
rotate back to 0. You're going to tilt
your head up 90 degrees. And we're going to capture
two positions here. You're going to shoot
the first one at 0. You're going to
rotate it 90 degrees and shoot that one as well. Then you'll rotate back to 0. Rotate your head down
or tilt your head down. We'll shoot the
first one, add to 0. And then again, similar to the
one we shot up at the sky, you'll rotate 90 degrees
clockwise and shoot that guy. So let's have a look at
our Hollywood formula. This one is a lot quicker
like I mentioned, because we're pressed
for time went on set and it has
about 10% overlap. You're gonna go full-frame
sensor eight mil lens, seven brackets apart. We want to get as much
dynamic range as possible. And we usually tend to shoot two and two-thirds stops apart, but you can adjust this for
onset photography or HD ours, we usually shoot only one row and we should 120
degrees horizontally, and it's a total of 21 images. We rotate up 7.5 degrees. Remember that our
increments on our head. And then we shoot at
120 degrees horizontal. So we should add 0, one, twenty, two, forty,
and then that's it. That's how you shoot your HDRI, the quickest way possible. The 24 mil panorama. We're actually going to do a hands-on walkthrough as well. But I'll give you an example of a safe version of
shooting this panorama. You chewed 45
degrees down than 0, then 45 degrees upwards, and then you'll shoot 9090. So that's a very, very
safe method of shooting a panoramas because you
have a lot of overlap in, cannot go wrong doing that. The one I'm gonna give you is the fast and efficient
Hollywood one. That is simply 30 degrees down
at 40 degrees horizontal. So do nine positions. And then you'll do 30 degrees up at 40 degrees and 90 degrees. 0, rotated 90 and
she'd another one up. And then you're going
to repeat the process by pointing down 90 degrees at 0 and at 90. And that is as simple as that
is a total of 66 images. And it's very, very quick. We should have three
brackets, three stops apart. So that formula will probably change your
life for the good. I'm actually going to give
you the 35 mil fifty million, eight hundred million
formula as well. So 35-millimeter going to
rotate 30 degrees horizontally. And you're gonna do
Forty-five down, 045 up the 1990s, down 191950 mille is gonna
be 20 degrees horizontally. And then you're
gonna go 60 degrees down at 20 degrees horizontally. Thirty zero, thirty up, 60 up. And then you're gonna go
1990 minus 90, minus 90. And then a 100 mil formula. Obviously, much tighter
lens, less overlap. So a 100 mile,
you'd never really shoot I full 360 sphere, Ruth, just because it'll
take so long and the file size would
be giant, enormous. So we usually only shoot
gigapixel tiles with 100 mil, meaning you should ten degrees horizontally and 15
degrees vertically. So you'd perhaps should a mountain or a cliff side
and you'll shoot it at 0, rotate ten degrees, 203040. You'll rotate up 15 degrees and then you'll tell
back the other way. And so you'll be at
4030200 and you'll create however many rows you
need to shoot your interest. Okay, So that is
how you calculate your specific camera and
lens shooting angle formula. And you can either use the
online calculators we walked through or you can use the
formulas I've given you. The reason we do this in prep is because you never
have time to do this onset and we want to shoot efficiently and
with high-quality. So you have a guaranteed
stitch every time. And if you stick
to this formula, that is what you'll get. It'll also make our
processing side of things very, very simple. So make sure you write this
down where you have them on your phone and keep
them really close by. And that is going to make all
the difference in the end. The next thing we're
gonna do is find our nodal point and we're
going to cover some theory. And then we're
gonna do a hands on walkthrough on how to
find you another point. So let's go ahead and do that.
11. Preparation: Nodal Point Theory: Okay, so we've covered the
basic gear requirements and we've covered
the basic settings. So now let's get into
the nitty-gritty, which is quite essential, and that is finding
the nodal points. So I'm going to teach you how to find the nodal point
for your camera and your lens process is
absolutely the same, I guess. So the first thing we
should really cover is what is a nodal point? I'm not sure we hear
this term all the time. So let's have a quick
look at what that means. So the nodal point or the
note parallax point is simply place in the lens where all the light converges
and it crosses over. So in simple terms, it means that the foreground objects
and background objects, a line in a simple
way to check this is just to use the
thumb trick, right? So our eyes aren't nodal. As you can see the
distance from each other. They're not right in the center. So if you hold up your thumb
and you close one eye, and then the other, it will appear as if your
thumb has lived. Go ahead and try that. So that is the simplest
way to explain. Nodal point or no parent x
points are that is parallax. So for panoramic photography, we want the camera to spend on that nodal points so
that things align. Not just to stitch, but to create a high-quality
and sharp image. So if we have our cameras nodal, our foreground and
background objects will overlap at the exact point. So this is an example
of a good alignment. When set of images are shot from the nodal point, it
aligns properly. This is an example
of a bad alignment. So these images are not
shot from the nodal point, which means that when
we rotate horizontally, we are not aligning on this same set of
pixels, if you will. So you can see it's
misaligned quite severely. There's two sets of books, There's two candles
that chair split into. That's why it's
important that we should find the nodal
points so things align and we get a
nice crisp image. Alright, so before we jump into the hands-on walkthrough on
how to find your nodal point. Here are just a few basic rules. You're going to set
up your camera with your chosen lens on a
tripod and level it. And the goal is to find your
nodal point for your body, which is on the a bar. And you do that simply
by pointing down your camera and 90 degrees
at the center market. Once you've found the
nodal point for your body, that'll always be the same. Then we want to find the
nodal point position on the B bar, which is the top one. And that we do by again placing an object in the foreground and one
in the background. And then moving your
camera left and right and seeing the
amount of parallax, and then you correct it, but either moving your camera forward or back on that B bar. So those are the
basic principles for finding your nodal point. Set it up on a tripod level. It find your body nodal point by pointing it down
on the center. And then find your
lens nodal point by aligning two objects in the foreground and
the background. Alright, so let's go do it. Let's go do a
hands-on walkthrough on how to find your nodal point.
12. Preparation: Nodal Point Walkthrough: Alright, welcome back. We are going to do a
hands-on walkthrough on how to find your nodal point. We're just going to take
our tripod, set it up, remove our standard HD, which might be your pen until
Ted, just twist that off. Your panoramic head usually
comes in two pieces, especially when he's sitting
it up for the first time. You're a bar or sometimes
referred to as the x-bar, is going to come with the
rotator and we're going to just tighten that onto our
screw on the tripod. Make sure you tighten these
knobs really nice and well, so we get a tight
fit on a tripod. We don't want the actual head spinning off the tripod
once we start rotating. Just going to listen
that so I can twist. And now we're going
to add our b-bbar. Nice way to know which
way to actually place it. You always want your loosening
knob on the outside. I'm also reading the
numbers that'll face me. So the numbers will face me. So I'm just going
to pop that guy on. I am going to tighten it. When I loosen this guy. This will be it. This is what your pen
ahead will look like. And we're always going to place the camera with the
lens facing forward. So a bar down the
bottom on the rotator, V bar, also referred
to as the x and y. So we are going to find our body nodal point
using this guy here. We're going to push
it forward and back. And we're going to find
a lens nodal point using this guy here,
back and forward. Okay, So let's throw a camera on this pen ahead and start
finding our nodal points. I have a Canon 5D SR
and a sigma 24 mils. So we'll start with that guy. I'm just going to tighten
it onto this Vbar. At any position. We want to make sure that if your head has been that it's
nice and level at the back, we don't want to actually
tighten the body onto the head off balance so we wanna make sure it's
nice and flush at the back. So first things we want to do when finding an
adult point and when shooting a panel is we
want to make sure we actually bubble our tripod. So we're gonna go
ahead and do that. Alright, so we have
a nice and bubble. I have a bubble on this head
as well as on this tripod. Two parts to finding
your nodal point versus finding your
body nodal point, which is on the a bar and then your lens now point
which is on the B bar. So for the body nodal point, we're just going to point
our camera down onto our center and find the
center of our body. And then for the length 0, we're actually going to take
two items and line them up. And then align our camera
with that and rotate left and right to find
our lens saddle point. So we'll get into
that in a moment. Let's start with the body. Once you have your
body nodal point, it will always remain the same. If I'm shooting on
this camera regardless of what lens I
actually put on it, this marking down here will always remain the
same. So that's nice. Once you have that
for your body, you can always just
look this guy in. Never really have
to move it again. Make sure tripod is leveled. Tighten these guys down so
there's no wiggle room. And then we're
just going to turn our crosshairs on,
on our display. That's going to help
us align center. So I'll just go
ahead and do that. So it's the three-by-three
plus dialog. I'm going to rotate my
camera and 90 degrees down. And again, remember
there's must be leveled. And I'm going to turn
my live view one. And I'm simply going to
loosen this knob and slowly push it forward until my crosshairs line-up into
the center of the head. You can always zoom
in to help you out with that. That looks nice. Alright, so now we have to find our nodal point for our lens. We can add align two objects, one closer to the
camera foreground, and the one further away, which is in background. And we're going to move our
camera left and right to see the amount of parallax and then fix it using this guy up here. Usually you can use whatever
you have around you. Two light stands to see stance, a toothpick and a building
and the distance, you just need two straight
lines so that you can tell the amount of parallax. So I'm just going to use
what I have available to me, which is the coat hanger. And then just this
little arm that I have, I'm just going to clamp
it to a chair and use it as my foreground object. And this is my
background object. And this is where it's
a little bit more complicated to get
your nodal point. It's certainly a little bit more convoluted than
finding your body. No point. But it's actually not that
hard at all. So let's do that. So I've aligned a foreground object
and background object, and I've just learned my camera up so I can see both objects. I'm going to use my live view and we use the zoom function. And I'm going to punch right in. And I'm going to use my depth
of field preview button to have a look at my alignments. And I can see that
there's a sliver of wood on the left and on the right that I'm
going to rotate left. I'm going to zoom in again. And you'll see that
the width is moved. It's on the left and there's
nothing on the right. Which means I am not
on my nodal point. I'm going to rotate
to the right. Zoom in. Here's my
depth of field preview. You can see the woods on the
right, so that's incorrect. So now I'm going to loosen this knob on this V bar and
I'm going to pull my camera backwards until it looks
like it is in the middle. Go back to the center. Zoom in. Chicken liver on the left
sliver on the right. Left. Zoom in again. I probably come back
just a little bit more. That looks lovely. Check the center. Check the right. And that is it. So we set up our tripod, we set up our panoramic head, we level it, we find
our body nodal point by pointing it down 90 degrees and aligning it to the
center of your head. Then we flick our camera back to 0 so it's
completely parallel, again, making sure that
everything is level. Then we place two objects, one foreground, one background. Or you can use something in the foreground of
building in the background. You can use anything in
our environments as long as they're both straight
and you can align to them. And then we just wrote it
our camera to the far left and to the far right to see
the amount of parallax. And then we move our camera
backwards and forwards on the B bar until those
objects are perfectly aligned. And it is as simple as that. So you'll repeat that process for any loans and
all your lenses. And like I mentioned,
once you have your body nodal point on your
a bar, that'll be the same. Remember to write these down because you don't
want to have to do this when you're
out on location or sudden you're trying
to shoot a piano, you don't have time
to do this things. And the difference
between finding the nodal point in doing
properly is you're gonna get a guaranteed
stitch and he also going to get a much
crisper image. So make sure you write those
down and keep them on hand. So let's get into
actually shooting pianos, which we're all here for. Very exciting. Here we go.
13. Shoot: Walkthrough: Alright, now that you have your nodal points and your
markings and your formula, we are ready to
shoot your panorama. So I have the 24
mill on my head. I have placed it at the correct markings
on my piano head. So the first thing
you ever wanna do is we want to make sure
basically that our formula is accurate and to
enable me to shoot 40 degrees because I'm
shooting at 24 mil, I have to shoot fully
degrees horizontally. So you'd worked out that using the calculator or using the
formula that I've given you. I've set my rotator up to
rotate at ten degrees, meaning it will click
at ten degrees. So 1234, there'll
be fully degrees. So you'll have
rotators that have different degrees that
it will rotate that. And most of them you can adjust. This one is just up here. And I can loosen this one
here and then move it to any of our other points to
rotate that. What do I have? 36 degrees, 60
degrees, 90 degrees, ten degrees works best
for me because I can achieve my 40 degrees
horizontally, but I can also
achieve my 90 degree, which is an odd number. So something worth considering. Alright, so now that we've
set up our nodal points, we're just going to
extend our tripod all the way to want to
be as high as possible. And then once we've done that, we always live on a tripod. It is the first thing and it's such a key thing that
we do regardless if we're setting up
for the first time today or if we're
moving position, she always level your
tripod first because it's really going to help with
our alignment of our images. And again, just another example of how shooting properly saves you in the long
run and make your post, post-production process
so much easier. So I'm just going to level
that guy real quick. So most heads and tripods will have
little bubbles on them. So we just use that to level. The reason I want the tripod so high is because
we're shooting 360. I'm obviously going to
capture the floor plane, including the sky plane. And because they're closer
to my tripod and to my lens, we don't want them to be soft, we want everything to be sharp. So focusing our cameras
obviously essential, speaking of our height and having things
close to us unfocused, including things
far away from us. When shooting 360 panoramas. We want everything
nice and sharp. So we want a higher F-stop. We don't want to introduce
noise with a higher ISO. And so we're going to use
our shutter speed to adjust. Predominantly. We can use lens lab, which is an app
you can download. And within the app, we
input what lens we have, what we have, and it'll give us our infinite
focus meaning, things close to us
will be in focus. Things far away from
us will be in focus. This is a more specific way
of setting your hyper focal. But it takes a bit more time. If I want to do that, I
have to set my camera up. I'll input it into the app. And then I have to measure from my lens plain film
plane distance. So for instance, if I've
got five foot four as my hyperfocus for this lens
and setting combination, I will measure it, set my
focus autofocus to it, and then switch it back to
manual and then leave it. So that'll be hyper folk
for their skeletons. The problem is, if I
change any settings, which in most cases you do because the environment around
you changes all the time, then you have to redo that. So another way we do it, which I tend to
use all the time, is to do it on the fly. So for this 24 mil, I am going to turn
my live view one. I'm going to rotate
down 30 degrees. I'm going to switch
my autofocus on. And I'm going to navigate my autofocus to the center of the frame right
on that cross here. And I'm going to focus and I'm going to
switch back to manual. So you want to make
sure when you do this that you are not focusing
to your closest objects. You want to focus to something in the middle ground of
your image or environment. That is how we achieve a
high-profile call that shoot in Ninety-nine percent of the time should give you a
hyper focal meaning, things close to us
and things far away from us will be in-focus, right? So once you've labeled your tripod and you
set its height, we're going to expose first things we want to do
is setup our bracketing. And as we've
discussed previously, we are always going to shoot three brackets,
three stops apart. That is the nicest blend between speed and quality and giving us the highest dynamic range. Just set up your brackets on this candidate and it's
just the little Q button. Press that once you
can navigate using this toggle here, set. And now I'm going to
rotate at this front, and I'm going to write
it to the right. So that's three brackets, two stops apart,
three stops apart. We've set our focus, we
set up our bracketing, we've leveled our cameras,
now we just need to expose. Alright, so we are going to
use the histogram to expire. And some core principles
that we touched on earlier. In this particular case, I am going to set my f-stop to, if I'm going to
push my ISO to 400, it is a little bit
darker in here because it's overcast outside. And I'm going to use my
shutter speed to adjust. So we're exposing. There's a few things. Obviously
when I'm facing down, my lighting is going to change, meaning my histogram is going
to display differently. It's probably going
to be a bit darker. So a good way to check
an overall exposure is to go back to 0
on your nodal head. And they'll give
you a more balanced view of your environment. And so I'm looking
at this histogram and it's looking really lovely. I've got a nice
mountain in the middle, which means there's a lot
of midtone information. I'm not clipping my blacks
and lock clipping my whites. You can also rotate throughout your scene and
look at different parts of your scene or your
environment and kind of get a better feel of what you're seeing because
you might have a set, for instance, that's very overexposed one side and
very dark than the other. So you one-on-one to try and
find that middle ground. So speaking of exposure, once you're happy
with your histogram and you call settings, meaning we don't have a too low f-stop and we
don't have a too high ISO, and we've adjusted
with a shutter speed gets thrown to get us
the right exposure. We are going to
use a color chart. If you don't have this, it's
not the end of the world, but it is a lovely, lovely trick to expose. Obviously we use it
to color balance, color match, and color, correct? But it is a cool little trick
we use to expose as well. So when you turn your
highlight alert on, you want your middle
bracket that we expose for this white to be clipping. So we want a single
wide square to be clipping when we have
the highlight alert on. And so that is usually
a very good indication of a well balanced and
well exposed shot. We also want to place
this down on the floor, me to no more than two
meters away from us. And that is so we can see it
and it's not too far away. And we want to place it down
in the way it's going to get imported into our color
correcting software. Meaning I don't want
to place it down this way because I'm
going to have to flip my image to match this color charts at placer down in the way
it gets imported. And we'll look into
this when we do our post-processing as well. So it'll make a lot more sense then I'm going to
place this down. We just need our final touches, and that is going to be
our shutter release cable. If you have one of these, wonderful, if you don't, you can still do this. You will just place your
camera into 2 second timer. The reason we use a
shutter release is to avoid any unnecessary shake
when shooting our panoramas. We don't want to
introduce any shake so that our images aren't blurred and they stitch together properly and get a
really sharp image. And so there's always
a little bit of movement from human interaction. So this negates that, including a 2 second timer
just gives you a camera two seconds to rest
before it goes. And then that also ties into the way we set up our
bracketing sequence. We overshoot our
fastest bracket first, again to negate any
possible movement or shake from the head
or human interaction. So first things first, always shoot each
individual panorama into its own folder. So when you bring it
in post-production, it's going to be
incredibly easy to sort, rename and batch stitch. So create a new folder. Okay, so we've set our height, we have leveled our tripod. Everything is at the
correct markings. According to our nodal
point, expeditions earlier, we've said are hyperfocus,
we've exposed. Bracketing sequence is ready. So we know our formula, 30 degrees down at 40
degrees horizontal, 30 degrees, 40
degrees horizontal. And then we're going to
add 90 degrees up 090. And then we're gonna
shoot to add minus 90, which is getting a 090. Let's do a quick walk-through. I'm going to write it
down to 30 degrees, and I will release it three
times using my trigger. Always make sure to
stay behind your lens. Obviously, if you're outside or there's any bright lights, try and stay outside of the light so you
don't cost any shadow onto your images
because we don't want to paint that out
to our first shot. It's always gonna be
down because it's the easiest to identify and align. It will always have your color
chart in your first frame. You would have heard
it three times. I'm going to rotate clockwise. Always rotate in
the same direction. If you want to rotate
anticlockwise, please go ahead and new to you. But in most cases, we're going to rotate clockwise, whatever you choose to do, do it consistently
do it every time. Not only does it help you on
the day, it isn't extremely, extremely helpful
thing when we batch stitch all our PAN-OS, right? So I'm going to rotate
40 degrees horizontally, and I've set it up
to ten degrees. So it'll click four
times 10203040. And I'm going to rotate
to eighty one twenty one sixty two hundred 240 to 8320. Rotate back to 0. I won't shoot the 0 again
because we already have that. If you wanted to sanity
check yourself when you rotate up 30 degrees. Check how many images you have. New Folder, menu, folder select. And I should have
exactly 27 images. So it's nine times three. And I'm going to do
the exact same thing. I'm going to rotate 40
degrees little time. And then back to 0. Now I'm going to
rotate up 90 degrees. So I'm at 0 on my rotator and I've rotated up 90 degrees
is going to shoot three. Then I'm going to rotate
90 degrees clockwise. Rotate back to 0, and
rotate down 90 degrees. For this one, we want to make sure we slip away
from the camera, we hide behind the lens and
we don't cause any shadows. We don't want to shoot your own feet because
we're going to have to paint out this
tripod in Christ. Rotate 90 degrees and height. Rotate back to 0. And check how many images
go into your folder. And you should have exactly
66 images straight away. Once you've checked
it, immediately create a new folder and you'll
automatically shoot into it, meaning you're eliminating
some mistakes. So that is how simple
it is to shoot a full 360 HDR panorama
using the Hollywood formula. And so you're going
to repeat the process the same principles
for your other lenses. In combination with the other
formulas that you have, you're going to find your
nodal points for those lenses. You're going to use the
formulas either given to you or that
you've calculated. And you're going to remember
these core principles. Always level, hyperfocus,
expose properly, and then shoot in a congruent
formula every single time. And that will make your
life so much easier. So let's jump into the computer and they sought processing these panoramas and
see how we apply them, which is a lot of fun. Let's do it.
14. Processing: Overview: Okay, so let's have a look
at our processing and we're gonna do an overarching
overview of the steps involved. And I'm going to spell out
the difference between a paid version and
a free version. Or ultimately, if
you shut properly and you created folders
and camera as suggested, this whole process should be a lot quicker and more efficient. Let's have a look at
our paid software. So the first step is gonna be to offload your card or
ingest your data. You can either do that
in your finder directly. We can use software
like to Vinci resolve that has a checksum that literally confirms
every bit of data has transferred across
whichever way you choose to go. Most importantly
is that you make sure you check your data sizes. So if it's two gig on your card, make sure it's two gig on your hard drive or computer
wherever it may be. So we're going to
ingest our data. Then we're going to do
some file management. You might need to
rename your folders and your files just to make
it easier down the line. And you can either
do that directly in Finder or you can do
it in Adobe Bridge, which is a free software, which just makes it really
easy to view your images. It loads and quite quickly. And you can rename
everything in there. You can actually
bulk rename as well, but I'll show you both versions. Then next we're going to look at merging your HDR is
they will give you an example how to do that
with just a single image and then also how to merge
them for the panoramas. After that, we're
going to stitch our panoramas in the paid
version or paid workflow. Merging your H2RAs and stitching them happens in one software. We will be using
PET gooey for that. It also does a really
nice job of tone mapping, but we'll do that as an
additional step regardless, the paid version
you get a merge to HDR is you're going
to stitch a panorama and you're going to
do a little bit of a tone mapping all
within one software. After that, we're
going to turn that and we're going to color
correct using Lightroom. And then we are going
to remove the tripod as our final step in
preparation for application. And once you've
removed the tripod using Photoshop,
you'll export it. Panorama is ready
for application. So interesting, your data, file management, merging
your history, your eyes, stitching a panorama,
tone mapping, removing a tripod, and then
export it for application. As simple as that, Let's have a look at our
free software workflow. In essence, it's
going to contain the exact same steps
because that doesn't change the difference being there'll be a few additional steps
because we're using different software that can
do multiple things at once, like merging and stitching. So again, you're going to
offload your card and you can either use Finder or
Da Vinci Resolve. You're gonna do your farm
management using Adobe Bridge. Then you're going
to merge your HD, ours either with dark
table or luminance HDR. And then you're
going to stitch it. So the big
differentiating factor happens here in the workflow. I found that a lot of
the Free Software have a harder time aligning
panoramas when trying to merge to HDR as well. So having, for instance, I found better results
having merged and rotated my images prior to taking it into hugging to
stitch my panorama. Hugging does have the option to merge and stitch
at the same time. But like I said, I've
really gotten very results. If you're using a software
like auto stitch, it does not allow
any user input. You can merge your mixture as
he can rotate your images. So you have to do that prior in a different software
like dark table. So you get a merger HDR hours, and then stitch them. So in essence, that process gets split into
compared to PT GUI, where does it all in one? After that, we're gonna
do the same thing we are going to map, we're
going to color correct? You can use GIMP, you
can use dark table, whatever image editing
software you have or prefer. After that, we're going
to remove the tripod, which we'll do in GIMP and we'll do a walk-through
of that as well. The exact same way
you're going to export your images for application. Those are the big
differences between our paid workflow and our
free software workflow. The steps are the same. There's just a few
more in-between. Okay, So now that we
have a nice idea of what the steps are and
the differences between the paid
and free version. I'm gonna do a quick
comparison between the two. And the reason why I'm doing is because I put a lot of time in researching and trying and testing using free software
when developing this course. And there were
some painful times I'm not going to lie to you, so I thought I'll put my thoughts onto a
page, then you can. Just look at it and
make up your own mind. I'm also going to give
you some recommendations of what software is out there. So I've done the
research and I've just highlighted
them here for you as well as prices for
each of these software. So let's do a simple
pros and cons between are paid and are
free version of workflow. Pros for our paid
workflow is that using software like PT
GUI allows you to merge, stitch and tone map
all-in-one application, which is a lot more efficient, which leads me
into the next one. It is a lot faster and not only because you're reducing
the amount of steps, but the software itself
is a lot faster. You're also going to get more
consistent quality results. And then the Batch Processor is a big bonus because
when you're shooting large environments and
sometimes you have big cashier doesn't have
a 130 plus panoramas. You can sit there and
individually stitch all of them. So having a batch process or a batch stitcher is
very, very handy. Hugin, which is free, also has something but the
results I've found very con, for our paid version of
workflow is obviously the cost. So our free software biggest
pro there is that it's free. And that's the biggest
differentiating factor with that, you are compromising
on certain elements. The first one being
that there are simply just more steps
within your workflow. You have to do more
individual steps to get to your end result. So it is a bit more
time-consuming. And in contrast, it
also operates slower. The software itself is
slower than for instance, you're paid versions
and that's fine. That's a compromise. You also tend to give
more errors and it's more labor-intensive to
fix those errors. The user interface
design just makes it a little bit more
time-consuming. You also don't get
as quality stitches. I've noticed and
I've traveled many, many different versions and
showed different panoramas, different formulas, and really
get such a varied results. And that's a big one for me, is the consistent
quality output. So those are the pros
and cons, in my opinion, between the two versions, paid versus free software. Ultimately, you will be able to stitch and create
high-quality panoramas using whichever version I
just wanted to lay out the facts or at
least my findings to you so you can make
up your own mind. So let's have a look at
some software suggestions. The paid version
to merge your HDR. I use PT gooey. Like I said, this is a
workhorse within my workflow. And the industries
workflow as well. So PDQ emerges and stitches the panoramas and
that's very, very helpful. It also does a
really good job at merging the HDR as well. That will set you back
about 175 US dollars. It's a onetime payment, which isn't really that bad. Then if you have Photoshop or Lightroom already as
part of your toolkit, both of those actually
merge to HDR, and that's 999 per month. Or if you go into Adobe Cloud, different bundles that will set you back a difference That's 999 US dollars per month
for each of those. Then photo matrix
is another one. That guy is a 129 US dollars. And then on the cheaper spectrum we've got easy HDR and that guy is 49 US dollars that
are merging side. Let's have a look at
our stitching sites. So PTU, again, you'll hear
me say this multiple times, is in my opinion, one of the best stitches
out there who just does a really fantastic job
at auto the lining. It makes it easy to
correct any errors. It has. Batch processing, it merges the HDR as well
as time-lapse it. So definitely my number
one recommendation for Panorama software. Photoshop and Lightroom both actually stitched
panoramas as well. Photoshop tends to do
a better job of this. In my opinion, lightroom
creates a bit of HDR and in Photoshop actually
stitches a better panorama. But again, results vary depending on what you
shorten, how you shot. We have Pamela Weaver. That guy will set you
back a 149150 US dollars. And then we have
panorama studio. That guy is about 40
bucks, 3995 US dollars. So all of these software
actually comes with free trials. You can go ahead and try. Any of these are pretty gooey. You can use pretty much
with every single function. It'll just export
with a watermark. So if you wanted
to test it out and compare it with hugging
or anything else, you can go ahead and do
that on a trial basis. I so let's have a look at some free software options
for merging your HDR. You can use something
like a dark table, which is similar to Lightroom. There's also luminance HDR. I've had mixed results
with luminance HDR, and that's why I've gone with dark table during this
experimentation process. Another one that gets referenced quite a bit is picture naught. That is in Windows only
for stitching panoramas, you have software like hugging. That one gets referenced by
many users and it does have some tutorials and YouTube
reviews and things on it, so you can check those out. I've had mixed results
with that guy, but it might just be
my operating system, but that's my
experience thus far. You can also use auto stitch, which is a free version. It's very much for
beginners though. It doesn't give you any
control over rotating images. It doesn't merge to HDR hours, but it is a nice way to
get started as well. So that's a look at some software options
out there for you, both paid and free. And we've compared some pros and cons between the
different workflows. You can go ahead and test
this out for yourself. We're gonna do walk-throughs
for both workflow so you can get a nice feel for whichever
process you'd go with. And you can use any
combination of these. If you already have Photoshop, you might do most
of it in there. So whenever you have used that, but there are some free
alternatives knowing that there will be
some compromises. But hopefully that's
laid out some facts and some research for
you so they can help you make up your mind so
you don't have to spend as much time as I had trying to solve this problem of
doing everything in free software even
though it is possible. So let's jump in and let's do some walk-throughs
for both workflows.
15. Processing: Ingesting Data: Alright, so now
that we're ready to start processing our panoramas, we're going to start
from the beginning. We are going to have
to ingest our footage. We're going to ingest
our panoramas. So you can do it many ways, of course, as with anything, you can either do it
manually by copying and pasting or dragging and
dropping in your Finder. We can use software like Da
Vinci Resolve, for instance, which is a free software, whichever process you choose to go with to ingest your data. The most important part is
that you'd make sure you check your file sizes that if
you have it took gig card, it matches your two gig on your hard drive or computer
where it be offloaded. So whichever process
you go with, the most important part is
checking your file sizes. So let's jump in and
let's do a walk-through. We have a card. We're going to offload it so we can either just
create a new folder. So I've just gone into
my folder structure. I usually like to add the date to 24 and
just call it taste. The reason I like organizing
by debt this just because it does the order
everything sequentially, which is just kind of
a nice thing to do. Alright, so the first thing we can do is I'm just
going to create a card one just for
example purposes. So the first thing we
can do is obviously just drag and drop or copy and paste. Alright, so we can copy
and paste, drag and drop. Same thing. The reason why I don't
like this is because if your card reader gets knocked or anything happens to
stop the transfer, it'll stop the entire transcript
and have to start again. So it's not a very
safe way of doing it. The other way we
can use is we can open up Da Vinci Resolve, which is a free software
and is very, very robust. It works on all
operating systems. I'm just going to go create
an untitled new project. We'll go into the Media
tab bottom left here. Then you'll see the clone
tool on the top-left corner. So you just hit that and this
little window will appear. So you can do is
you can add a job. And you'll see it's very simple, it's just source
and destination. So I'm just going to grab my card and I'm just going
to drag it into my source. And I'm just going to
create a new folder. Oops, which haven't done. Alright, and you'll
see it'll pop up there and you're just going
to drag that guy there. Alright, so then
you just gonna hit Close and it's going to run
through there very quickly. And the nice thing about this
that if something happens, you can just resume
the transfer. It will also export a nice text file just to show every bit of information
is actually transferred. You can also add multiple jobs, which is really, really nice. Obviously don't have to do this. But debenture is always nice
clone tool to let that run. And that is done. So again, you can add
multiple jobs and you can run multiple cards at
once if you wanted to. So I'm just going to quit Vinci and we will see a
cartoon is their card, one is our copy paste. So cartoon series,
a few other things. That is just a
checksum text file. And just make sure that actually everything is transferred over. Most importantly,
whichever way you choose to transfer
your information, always check the
sizes serve on a Mac, it's Command Option I, and it will check
the file sizes of how many folders
you select. 3.41. And it also keeps
the Info tab active. If I click on this guy, you will see that my
path has changed. So you'll see it's under
this path and it's 3.41. And if I click back to my card, you will see that
it is the card. Alright, so 3.41 there
and then you can click in-between
card one, card two. See, that's all the same sizes. So whichever way you
choose to transfer a key part is to make sure
that your file sizes are actually transferred
across properly and as a simple command or
file size check. So now that we've
ingested our panoramas, we're going to look at
file management next.
16. Processing: File Management: Okay, So we've ingested
our panoramas. Now we're gonna do
some file management. If you shot things
properly and you created folders per
panorama in camera, this is going to be
a lot easier to do. But regardless,
it's still helps. Renaming your files,
renaming your folders, and doing some clean up
before we start processing. So let's go ahead and
do a walk-through on some file management. If he shot things properly, it would be pretty
straightforward. You'll have exactly one
pan out per photo case. You've created it in camera. But let's say you haven't, you might want to
just clear that up. And you might also want
to rename your folder. So you can either go to
do that in Finder and you can just enter your
information there. You can also batch rename
things within Finder. So if you select all
those new right-click and you go rename them. You can go replace text, you can go add text. So you might go, I had texts there after
the name and you can go underscore piano 11. You can see the preview of
what we'll name it here. So you can go and rename that. So go ahead and do that and
find it as a really nice job, actually renaming so you don't need particular
software to do this. You can see it's just
running through doing that doesn't do a bad job. But if you wanted to manage your files and it's a
bit more complicated, you can use Bridge, which is
a completely free software, runs on any operating system. Nice way to get to it is
you can either navigate through your navigation
here or you can just, if you ever want to
navigate very quickly, you can just right-click, right-click on the
folder you want to go. Once you hit the Option key
will go from one as partners. Copy that and click up here
and you can seal credit path, paste that in there, and
it'll take it straight to your folder. If I wanted to. Let's say for instance, I showed multiple panoramas
into a folder. This is really nice way, easy way to check my images. It also loads the raw
files really quickly. So a nice way to
display your images. You can sort by type and you can tell your rules
and you can just view your J pink so it
loads it rather quickly. And you can change the size
of the thumbnails display ad. You can change the
way it displays. So it is just a
really nice way of actually seeing your panoramas. So let's have a look at this. If you hit Spacebar, it'll
open up in a bigger preview. Alright, and if you
wanted to bulk rename, hit Command a and you can
just go batch rename. And then this just gives
you a bit more information. Your exam probably be down
here again so I could go. Oh, that's cool, cool. The other one pan I didn't
mean Palo will start it there. And we'll just get rename. And it's really quite
quick, which is nice. If I wanted to rename
my top folders. To me, it's just a slope double-click on the folder
that I can delete them. You'll see that it's actually
going to change here. So what am I do within bridge? If I delete this, it'll delete it in my folder so it's a direct correlation. So that is how you
can use branch and it's completely free software is really nice quick
way to just view or images to organize them. Yeah, it's a lovely software. Alright, so now that we have
our farm management done, we're going to look at merging
or HDR as our next step.
17. Processing: Merge HDR Photos: Alright, so our next step
is to merge our HDR images. We're gonna do a paid version of this workflow as well
as a free version. I'm also going to just,
for example, sake, show you a very simple
single position bracketed image and how
to merge that because it's the same principle
if you're merging a single image or
multiple images. So we're going to
look at both versions because for our panoramas, of course we're going to have to batch merge multiple images. So let's go ahead and
have a look at that. We'll look at merging your
HDR individually, PTU. We will do this
automatically for us, but I think it's worth
checking how to do this individually if you had to
do that as your process. So you can either
do it in my dream or you can do it in Photoshop. So I'm just going to pop
that into Lightroom. And for example, sake, I'm actually just going to use a photo that's easier to see. So I'm going to go into one of my other folders and
I'm just going to grab my rule images. You can see that's a three
bracketed HDR that I shot. I'm just going to import that. Important. I'm just going to rotate
which command left bracket. I'm going to select all
three of them so you can see are going to develop. You'll see, that's
my lowest brackets. So our exterior is lovely and exposed and interiors
completely underexposed. Our middle bracket is
a blend of the two. And then our fast bracket, our exterior is essentially overexposed and
completely clipped. And then we have the
exposure of the interior. So we want to merge
those three into HDR. So I'm going to Shift
select all three. I'm just going to
right-click and I'm just gonna go further
merge to HDR. Okay, So it's gonna
do its thing. Then. If I wanted to see ghosting, so I can just turn
the ghost overlap on. And what's nice about
this that there isn't really any ghosting. So because I shot
this on a tripod, there was a movement
in between the images. If they're worried, you'd see
a little bit of ghosting. I'm just going to hit Merge. It is merging as you
can see up here. And you'll see it pop up,
down the bottom here. I will now color
balance, color correct? Whatever you want
here so you can see the amount of information left. So we'll bring the highlights down all the way so you can see how much information is in our highlights because
we've merged it. For example, if I
didn't shoot HDR and that is what I
would be left with. You see that there's really
all that information is being lost because of merge and
I've showed a bracket, you'll see that we're retaining all that information is so much information you
can push it all the way. Alright, so I'm gonna bring my highlights down
somewhere there. I'm going to bring
my shadows up. We have it. I can bring my whites just a little bit because it creates a nice little vignette almost. And then you can bring your
blacks up if you wanted to, if you want to brighten
it in here, you could. Because we shoot with a
neutral color profile, you can just add a little
bit of vibrance and saturation, just a snitch. Then I'd like to add to remove
chromatic aberration and enable profile corrections
and automatically picks up that I showed it on
a Canon 35-millimeter. And then we would like
to auto fix that guy. Then you can go ahead and edit this whichever
way you want. You can go all sorts of
funny presets if you like. It doesn't really matter, you can go nuts. But the great thing is that
we have all this information. So that is what we'd looked
like with it merged, but you can see so
much information we've retained
absolutely everything. So that's one way you can do it. Now. I am going to just
open it up in Photoshop. But there'll be File Automate and it'll be merged HDR Pro. And so you can either browns files and if you just
drag that in there, it should just pop
it up automatically. It okay. Alright, so it
is currently merging. You can see it's
not quite done yet. I can see the
spinning wheel that's doing it in the background
is essentially alright, so it's created a nice
composite of the three. You can see we can hit Remove ghost even though there really wouldn't be any on this. And it's a 16-bit.
We can go 32-bit. 16-bit is fine. Then you can just go ahead and play around with these
settings if you wanted to. I'm not really
going to touch it. Like I said, I usually
tend to use library. And then you just hit Okay. I'll just rotate that. So yeah, laundry is a little
bit quicker and I like it the way it merges the
HRs a bit better as well. So to merge to HDR
hours in free software, we will be using dark table. So I'll grab the same image
we just used in light green, grabbed the rose, and I'm just going to drag
it into dark table. Alright, I'm going to
select all three of them. I'm going to rotate
left just so it's easier to see to merge them. It's that simple. You have all three
images selected and you just go create HDR. And you'll see here
on the left here, I'm going to rotate that and also gonna give it
a five-star rating. And I'll show you why
that's important once we do a batch merge of the HDR hours, you also see that it's
displayed a bit dark. That's not a problem. We're going to fix that. So you're going to navigate
over to the dark room tab. So this is the same
editing principles you get in Lightroom, give or take. You can navigate using
these terms up here. Let's just bump the
exposure on this guy. Let's have a look
at that. And the way you activate any of these, it's just you turn on or off. You can search for anything
by typing in here. Anything with the
word highlight. I can turn on this guy here, turn that guy on, and I
can adjust my shadows, eliminate my shadows up. I can bring my highlights
down, but not too much. You can see doesn't
do such a good job in comparison to Lightroom, for instance, compression,
you can compress it, listen more, color adjustment. You can mess around
with any of these. So that's just a quick
run through of how to merge change jars
using free software. And that is dark table. And so once you're done there, you can just go back out here, orange dark table and
experts on your left, you can just navigate to
where you found your image. We saving it. I'll say that guy in there. And you can save it out
as a tiff 816 or 32-bit. You can also save it as a JPEG. I will just substitute J peg for examples purposes and
you just go export. You'll see the
progress down here. I'm going here. And there it is. So this is the Lightroom one. This is the dark table one. So as you can see, I've
said it a little bit more editing on these edges to
make it look more distinct. But you can get the idea. You're still able to
merge to HDR hours using free software in order to prepare my images for our stitching software
that does not automatically merged HDR hours, we will use dark table to
merge the hedge jars as well as rotate them in
order to stitch using, for instance, auto
stage or even hugging. Hugging does merge
automatically, but it doesn't always
do a very good job. Let's bring a piano in. We're going to use
the exact same method we used for this image here. So let's go and bring
in it's grabbed the one we did the walk through one I'm going to
just sort by kind. So as you can see,
it's uploading. It is worth noting that
dark table will only merge to HDR for raw images. So if you want it to do a quick
test and stitch or jpegs, this is not really
going to work, so make sure that you
input your raw images. So I'm going to group
my positions together. And the reason why I do this, it's just so it's a little bit easier once I started emerging. What I'm doing is
I'm shifts selecting my three brackets per position. I'm gonna go group. The reason or how you know
it's been grouped is it forms. There's a yellow box
around the three images. So you know, that's a group. So I'm gonna go ahead and
just group all of my images. You don't have to do this. I've just found that it's
a little bit easier for me to visualize and stay organized when merging now that it's all been grouped. So I'm going to Shift select all three and then create HDR. If you select one image
and try and create HDR, and we'll try and create an
HDR from that single image. Not all three, even
though it's any group. The group is purely
for ease of use. So Shift select all three
images and go and create HDR. You will see it working. And so there it is, it's underexposed,
that's not a problem. We will fix that later. I'm going to give it five
stars just because it makes a little bit easier for me
to find and sort later on. I'm also going to
rotate it while I'm at it makes it easier
for me to spot. I'm going to select those
and I'm going to create HDR. You'll see it always kinda pop
up in front of your group. If you are unsure
which one is your HDR, if you hover over b dot
DNG, head shadow DNG. Alright, so I'm gonna
go through and create HDR is for all of this. Okay, so now that I've
merged all my images, The reason why initially
didn't rotate these brackets. It's just so when I have
my HDR, I just rotated, it makes a little bit easier
for me to identify which one are my merged HDR images. The reason why I gave it
a fast five-star rating is also that I can go
and sort by rating. And it will group all
my images together, which is exactly what we want. So 22 those now we'll have to go through and just fix
the exposure really quick. So navigate to the Data tab. And I'm just going to expose
this guy all the way and I am going to bring the
highlights down on. That just helps me a little
bit more compression. I bring my highlights down. It's too much somewhere there
and lift my shadows a bit. Here we go. If I just copy Command
C or Control C, and I just go ahead and
I select my HDR images, shift select all of them, and I just go Command
V or Control V. Paste that exposure
correction onto all of them, which is what we want. And you can go through and
edit these individually. It is worth checking
your images. You're going to select
all the images. You can go back to light table and then you are just
going to hit Export. You're going to
change your settings. You can select where
you want to save it, like just output destination. And then you can change it
to 16 bit eight bit, 32 bit. I'm just going to go Joe pick eight bird for example sake. I'm just going to
export. And it'll export 2222 selected images, which will then in turn be ready to be run through
your panorama stitcher. So that is how you do
a batch merge using free software like
dark table, right? So now that we know how
to merge to HDR images, we're going to have a look
at stitching our panoramas. And we'll look at doing
that in our paid version, which automatically batch merges are HDR as well as stitches it. And we're also going to
look at our free version, which means you'll have to
merge and rotate your hips, your images prior to import
into our stitching software. And purely for efficiency
sake and testing wise, I found this to yield better results using free
software like hugging. You can go ahead and
try this for yourself and see what results
you get as well. So let's go ahead and look
at stitching our panoramas.
18. Processing: Stitch Panorama: Alright, so we're
getting into the really, really exciting stuff. We actually get to
see your panoramas come to life and that
is stitching them. So given whichever workflow you choose is going to look
a little bit different, we're going to have to
merge the HDRI separately, or we will do it all in one
using our paid workflow. So let's go have a look. We're going to look at
both of these versions. So let's jump right into it. So we are going to start with our paid workflow
first and we're going to use PT gooey,
use the panorama. We did the walkthrough on, I'm going to open PT gooey. And I'm only going
to select the jpegs just to make it a bit quicker to stitch for examples purposes, but you will be stitching
the raw images. I'm just going to
go sort by list. And then if you sort by
kind, you can shift, select all your J pigs
are all your roars. And you'll see it's 66, we'll
just drag it into P degree. Alright, so all our images, all our brackets have
come in the landscape, which is exactly what we want. We don't want some images, portrait and some landscape. And that is why we turn the auto rotate off
on your cameras. So you're going to rotate all
of them into portrait mode. And then we're going
to enable HDR. We're going to merge bracket
at images to HDR and link positions
because we shot on a tripod, you can hit Okay? And so PT GUI is now merging all my brackets into
single HDR images. And it does a relatively
good job of that as well. You will see the panorama
editor here and currently all our images are stacked
right on top of each other. You can check your
image parameters and you'll see
everything is at 0. So it is as simple as
dragging your images in, rotating to the left, enabling your HDR, and then
you will go Align images. And so PDQ is a very
simple user interface. You just drag them
in, rotate them, enable HDR image, a line. All right, so there's
our panorama. It is done a auto alignment
and you can see our images. So if I turn that off,
we'll see 12345678910. So that is our formula. That's the way we shot it. So that is how simple
it is to align a panorama or stitch
panorama in PT GUI. You can change the
way it displays. You can do tone mapping in here. You can change your compression. You can do quite a
bit within PT Gui. So let's say for instance that your panorama didn't
come in at, had an issue. We can fix that using a GUI
and its image parameters. So if you go to
image parameters, you will see that this
is the way it's aligned. So let's take image, just this one, and that's
just a stack of three, right? So expand that. So let's take image 15
for instance and lead. So our role is our rotation, our pitch is our tilt, so it's plus 30 is close enough. And then are your, is its position in our
horizontal rotation. So let's say, for instance, this guy didn't come in, let's say it came
in at minus 200. You will see that it
created a gap there, right? So it's placed that
image incorrectly, but let's pretend that your panoramic came in and there
was an issue with it. It didn't align properly. So it's very, very easy
to correct that MPT GUI. I can see that there's
a couple of images stacked on top of each other. And so there's multiple
ways I can fix this. So I know image 15 because my
formula is meant to sit up here and it is right
above image six. So one thing I can do is
I can go to Image six. Here it is. And I can just copy that. Go back to 15 and paste it. And it's placed it up there. So that is a very
simple way in which he can fix problems
within PT gooey. Another really, really cool
thing is R Batch Processor. Way we can do that is
by creating templates. So given that I know my formula, I'm going to just clear
everything out here. I'm just gonna go, Let's go. If you shift select
everything, you just go 0. It's going to put
everything on top of each other again, right? So if I were to
create a template, the first thing I'm gonna do is I'm going to
rotate my images. I'm shifts selecting
gonna go minus 19, it's going to rotate them all. Then I'm going to start placing images as
per our formula. So this is a 24 mill and we know that our
first row is minus 13, then plus 30, and
then we'll have our top and bottom 90 degrees. So my first row, I
know is nine images, nine positions we rotated. This guy was minus 30. Again, you should select
all of them and you just input it and you'll sit
shifting our images. Our next nine will be
plus 13th, such as 30. These two I know, are 90 up. These two I know, or minus 90. Alright, so now it's
placed our rows, but what I need to do
is actually place it. Horizontally. So our first position
obviously is at 0. And then remember we
rotated 40 degrees. So it's going to be
4081206200 to 4320. And as you can see, it is now placing my images
per these parameters, which is our formula. While I'm doing
this, this is also going to create app templates. So now I'll place my
second row, so it's 040. And you'll see that
image switch into place there AT 2302, 8320. Alright, so now I'll
place my top 2. First 1 we shot at 0, and then we rotated 90 degrees. And then same with our
bottom guy is 090. Essentially manually aligned my images per these parameters. What I can do is I can
save this information as a template which we then use
to batch stitch information. So it takes everything. So whatever you decide to do in terms of your tone mapping
or any other settings, it'll save that sitting
as the template. So let's just leave
it for that for now. We can go to Create Panorama and I can
change my size as well. So obviously if I just
wanna do a quick stitch or bad batch stitch to
check multiple images, I will change this
to be a bit smaller. So let's make that 15 thousand. Because remember again,
this is going to save all this information, absolutely everything about it. If you did masking in it, whatever it is, one thing you can now do to save this, again, your image parameters
is you go to File and you go
Save as Template. Alright? So you don't really have to change
anything here. It's just going to
save it in the default PT gooey template position. You can name it
whatever you want, but I like to use it
by using my dates. 24 mole. Alright, so save that. Okay, cool. So now I've saved those. So if for instance I create a new project and
I say Don't Save. And let's say I bring all
this and again, same images. I'm not going to rotate,
I'm not going to enable HDR anything at all. You just going to go
file and apply template. And we're going to use
the one we created today, which is this guy here. As you can see, that is automatically merging
the HDR and it's automatically placing
the images per the coordinates we
placed in the template. Which is really, really nice. And it helps you stitch a lot quicker than trying
to auto align it. So once you've
actually done that, you will still hit a light
images and I'll just make a few minor adjustments where perhaps things
are just perfect, whichever never really are, but it'll just make a few
minor adjustments. Right? Then you'll just go
Create Panorama. And again here and
you can either, if you stitch your rules, you can export, you
can export a JPEG. But let's say if you
go to, if you can also change the information. So we can change it to 16 bits. I'm just going to leave this at 18 J peg again just
for quick export. And you can choose where
you want to export it. I'm just going to
create a panorama. That is default,
is to export it in the exact same folder
where it found the images so that it stitch. And so if I go back into my original folder,
there's our panorama. As a bonus, I'll show you how to batch stitched panoramas
using PT gooey. And we'll do that using our template that we
created for the 24 mil. If you had different
templates for, let's say a 3550 melt
process would be the same. So what you're gonna do is
you are going to go into P2 gooey and you're
gonna go tools, and you will go batch builder. You'll go detect panoramas. You can choose
multiple of panoramas, put folder with a fixed
number of images. And I'll choose that
because I know that I have 66 images for my 24 miles and I can also change it
to row if I wanted to, but I'll go JPEG and this, you can either browse directly
to where you wanna go. And it'll look in that folder. We can copy it as a path name. Remember right-click hold option in a low copy as pathname. And you can just
paste it in there. So what it's gonna do,
it's gonna look in this top folder here
at all the folders. And it's going to look for
66 jpegs within each of these folders and then
detect the panoramas. So as you can see, that's
running through and it's finding that panoramas
which is lovely. It's also finding that stitch
folder, which is up there. And obviously we don't
want that, so you just click on that
and you delete. So when you've done
your file management, this is very easy to do. So it is picked up for
panoramas, 66 images, each. Then you will go, you can either run it from a new indie project, but because we've created a template, we're
going to use that. It's going to create a faster
and more accurate stitch. So you will go and select the
template that we created, which is this guy here. And you will also select, will run align images. Otherwise it will just take the template and it won't
do any micro adjustments. So we will still select,
will align images. You can choose to delete the project files after
batching and you always select send a batch
list to batch Stitcher. So let's go ahead and
generate projects. Alright, so now it
is running through, it is stitching all
these panoramas. And so that is how you
batch stitch many, many panoramas if
you've done your sorting properly and
you've created a template. So we'll let that run through and we'll see what it produces. Alright, so that guy is done, our batch stitcher is complete. So we got into my folders. You will see that it's stitched all my panoramas without me having to do
very much at all. Which is lovely. Cool. So what I usually do is I
just go ahead and I grabbed these panoramas and I placed them in this stitch folder here. So that is how you stitch panoramas using the batch
Stitcher and PT Gui. So next we will look at the
free workflow to stitch panorama is using free
software and we'll look at a couple
of applications. We will look at auto stitch
first, open that guy up. There is a very, very
simple user interface and it doesn't actually give you any options to merge to HDR, to rotate them, anything at all. You can change the quality and the size and
that is about it. So you just open that guy up. Let's use a different example. So what I've done previously
is I've gone through and I've merged all my brackets
into single HDR images. So you would do that using
dark table, whatever you have. And we'll just drag
those guys in. Your let it run
and do its thing. But that is done running. And there is a panorama
using auto stitch. So it's very, very simple, very primitive, but it's a
nice way to get started. So if we want a bit more
editing capabilities, let's have a look at hugging. This is the way it opens
in these simple interface. So we're gonna do is
you're going to load your images in same way
you would any other. Let's grab this example here. And again, I've gone
ahead and rotate it and merged HDR images. So I'm just going to
grab all those open. Alright, it's going
to load that guy in. An all you'll do is hit a
line and it'll do its thing. It is a bit slow, so I will
cut and come back to you. Once that is done, Let's go hit preview. It displays a bit
funny for some reason. Alright, so it didn't do such
a great job with this guy. The bottom-right quite nicely, but not the top guy. And so we can fix that in
a similar way that we do in PT GUI interface advanced. What we can do is
we can group by position and you can see it's
the same as our PT gooey. It is a little bit
more time-consuming. So if you double-click
on this first image, we know that your is 0 and
our pitch is minus 30. So we can go through and just change these and place them manually as we did in PT gooey. So I'll go through and do that. The reason why I'm
doing this as well, a, so that I can create a
template similar to PT GUI, which will make your stitching process a lot easier as well. So let's go through and do that. And you can see that
it's actually placing our images as well down
here as I'm doing this. Next row we know is
0 and it's plus 30. In the last two, I
know is 90 up at 00. 90. This guy we know is at 0 and as a minus 199090 minus 90. Okay, so we've gone ahead and placed our images
according to our formula. And as you can see, it is much, much better
job at aligning it. If we go through and Into the formula,
the way you save a template is you
just go save as, and let's save it in
that same folder. And I'm just going to call
it 24 mil Hugin, HDR. Alright. Alright, so now that
we've placed it, it tends to work really
nicely when you actually try and find some
control points. This control point
find pre aligned helps during this process once we've imported our template
essentially. So you just go create
control points. And then we'll run through
and Craig control points. Given the current
placement of these images, which is again our formula. We'll let that run. It
does take a little bit. So when it's finding
control points, it is just finding similar points in each
overlapping image. Alright, so now that we've
created control points, we can go ahead and
hit the line again. So that's done a lining. If you wanted to change
the way projects, we're going to make sure
that it's 360 by one. But you can change it to a little planet,
whatever you wanna do. But we'll leave that
as a full three, sixty, three sixty by 118. You can go back to assistant and then just go create a panorama. And that'll be due a very
simple way of doing it. I'll probably change this
just for example sake. Or you can go into
your advanced tab and you're going to Stitcher. And you can change
your settings here, calculate tech that guy out. And then you can
change your format. You can go to if
you can go do peg, you can go stitch. I'm going, I'm going to save
it in that same folder. I'll just leave it the
same name as it is. Is now done stitching. And there it is, and
it's not too awful. We can fix some of these
mistakes just in Photoshop. If I wanted to align
another set of images, I can use that same
template we just created, which is this,
this project here. So if I just go File, Save and I can either load my images like we did
before or drag them in. So I'll just go and grab this exterior one
we used previously. Drag those guys in. As you can see, it comes
in kind of all over the place and it's gonna do
an okay job at aligning. Let's have look at
it. We'll do an auto align all to aligning. And as you can see,
it is all wacky. So if I wanted to use
that template we created, load the previous projects. So let's go into photos,
will sort prepositions. You can see it's
all over the place. If I change my
interface to expert, I can go File applied template and I will navigate to
that previous project. So make sure you save
this one if you intend to use it as a template
in future instances, save it in a place that's
easy for you to find. I'll just hit Open and you'll see it automatically changed our positions and pre aligned it according
to our template, which is again our formula. So that's also going to help
you align a lot quicker. So you can then go
ahead and create control points using
the pre alignment. Great. Okay, So I can now just
go to my Stitcher, trace that back to 360 to 80 will leave a sizes that is all they would just
jam pack for this example. But again, you can
export as tiff. Any kind of quality. You can export as PNG will just go J peg for this example. I'll go ahead and stitch that. Let that run stitching.
There you go. So you can see it does
a much better job when you pre align it. And then run these Stitcher. Hugin does have a little bit of a harder time I've noticed, which is totally fine. In that case, I
would suggest just shooting a little bit safer. So this is a 24
meropenem are shot with the safe method and you'll
see it loads all of them in. We have how many? 26 images and remember that's all merged. So this is a safer way of shooting a panorama and it
gives us something like that. And it does a better
job at auto aligning. But ultimately, if you
want to auto align, I'd say go shoot
the safe method, but otherwise you can shoot
your quick 24 mil formula and just pre aligned them using the formula and the
positions as we did here. And then just apply your
template and stitch using that. If you want to look
at HDR images, we can do that as well. So let's go into
this same one here. And I'm just going to
grab the jpegs real quick and drive those in. So hugging will automatically
detect that there is bracketed images and it will ask you to
link the positions. So that's great. We'll
go link position. And I'll go through and attend to create stacks of images. And you can see that if I
change this so my y'all to 0, my pitch is minus 30 because I know it's
my first position. And then I also need to
rotate this image, right? Because remember, I
haven't done that yet. You can go through and change all these
parameters for all images. And you can see I only edited
the one but it's changed. All three said recognized
that as a stack of images. Then you can go ahead and
create a template for this. You won't be able to
apply the same one we created before because it's a
different amount of images. So that one work
you'll have to create a new set of templates if
you want to merge the HDR. But like I mentioned, I've
found better results merging the HDR hours prior to
bring it into Hugin. But hugging does have the
option to merge to HDR hours. I've gotten mixed results
using that, right? So that is a quick
look at using what arrested and hugging and different ways in
which you can stick your panoramas using
free software. Alright, so you high dynamic
range 360 panorama is stitched and we'll
just a couple of steps away from it being
ready for application. The next step we're
gonna be doing is to tone map and color, correct.
19. Processing: Tone Mapping: Alright, so our next step is to tone map and color, correct? And we'll look at
doing it both in paid and free software. Okay, so we're going to
look at are paid workflow first in order to color
correct and tone map our panoramas, we will be using
Lightroom for this. We'll open that guy up. Okay, great, So it's loaded a
panorama I used previously. So the simplest way to do this, if you have a color chart
in your shot is to zoom in, take your white balance picker and just select
your white square. If you hover over this
middle square here, that should represent 50% gray, which means it's bouncing back
50 per cent of the light. And if you look at our top
right corner at our histogram, you will see the values that RGB values change
as I hover over it. And that's about 50 per cent
there, which is lovely. If you don't have a color
chart in your shot, you will use
something like a wall to try and find a wide balance or they'll
have to improvise. Alright, so for tone mapping, that is simply a manipulation of our highlights are
midtones and shadows. We can bring our highlights
down because we have a lovely merged HDR panorama. We can bring our shadows up. We can bring my whites
up a little bit. We can bring our general
exposure up if we wanted to bring up blacks down. And then because
we showed neutral, we can just add a
touch of saturation. I would consider a very
neutral edited HDR panorama. But you of course can add
any pro for you'd like. You can make it as
cool and as funky as you'd like with whatever
presets you might have. So I would probably
use that as it is. So that is a before
and an after. So you can be a bit more
specific when having a color chart in
your shot to using the x-ray color checker plug-in. It is a little bit
beyond this course. But know that you certainly
can get a lot more specific when you have a
color chart in your panorama, you can create specific
color profiles per lens, per lighting scenario. We weren't covered
in this course, like I said, a little
bit beyond the scope. So let's look at a
different example. Let's look at something a
little bit more extreme. Let's load this guy here. And this will definitely need some color correcting and
some color balancing. So as you can see, this is a
nighttime shot on panoramas. I'm going to zoom in there. I'm going to use my color picker and I'm going to select that. And lovely that has
created are white. So our middle gray
is a little bit underexposed or not
reflecting gray. So I'll go to the second
square root cross, and then that's a little
bit more accurate. Okay, so this guy here, I'm going to bring the
general exposure up a smudge. I'm gonna bring my
highlights down quite a bit and bring my shadows up. And I can even lift the
blacks if I wanted to a little bit and again
little bit of saturation. And so that is a before
and that is an after. So that is why it's
important too. Color correct and tone map your images that
are free software. We will be using GIMP. You can use dark table like we did previously,
but I'll use games. But just because
our next step of removing our tripod will
be done in GIMP as well, which just makes it your
workflow a little bit quicker doing both at once. So use that guy,
just drag it in. Gimp is pretty straightforward. You just kept your colors tab. And then you've got all
these options out here. So we can start with
our white balance, color, temperature, and
you can adjust this. Let's put a split view
one so you can see on the left adjusting the color. So this guy is not
far from wrong, like a little bit cooler. Here we go. Then you can do our
brightness and contrast. So we can bring the
brightness up a little bit. There. Then we will bring
our shadows and highlights. Remember that is how
we do tone mapping is manipulating our
shadows and highlights. Let's bring those
shadows up a little bit. It's a bit slow to render, so you'll see the
changes happening there. Let's bring our highlights down. The brand shows up a little
bit more, not too much. We can compress our
image a little bit. Here we go. We can do saturation. A little bit there. Alright, so that's
again a very basic way of tone mapping and color
correcting using GIMP, you can use dark table,
but like I mentioned, our next step, which is removing the tripod
will be done in Gibbs. So it's very simple
to just come in here, color correct and
tone map using game, and then move the tripod. You can also go in here and
has a tone mapping feature. We can try some of these. I found the Reinhard one kinda
yielding the best result. It does an automatic
tone mapping. I still prefer
doing it manually, but you can certainly
go ahead and do that. So this one's a bit bright. What does bring their brightness down to somewhere
where you live or hit. Okay, so that is how
you tone map and color, correct, using free software. Alright, so your
panorama should be looking fantastic at this point. We just have one
more thing to do before it's ready
for application. And that is to remove the tripod and color chart if
it's in your shot. So that's what's up next.
20. Processing: Removing Tripod: Okay, so the final
step is to remove the tripod and the
color chart in order to prepare it
for application. And as always, we're
going to look at both paid and free software. From there we will export it
and it'll be ready to go. So we've opened the stitch
panorama that we've edited in Lightroom and toe mapped and we've opened
it in Photoshop. So in order to
remove the tripod, I am going to
duplicate this layer Command J is the shortcut. I'm going to go into Image, Image Rotation a 180. The reason we do this
is once we go and filter and distort our
polar coordinates, he'd always does it
from the top for some reason,
rectangular to polar. We'll want that
selected and hit. Okay? And you'll see it's
distorted our entire panel, so we're looking straight
down onto the panel. I'm just going to zoom in there. And so there's a couple
of ways you can do this. You can hit your lasso tool and that's just the owl short key. And you can just drag
around your object. And this is definitely the
very quick and dirty method. Because I'm on a
patterned surface, it's probably not
going to do great job, but let's have a look. So I'm going to select
that and I'm going to hit Shift, Delete or Backspace. And you make sure that content aware is on and I'll hit Okay. Do an awful job. I'm not going to worry too much about it because I'll show you some other examples how
to paint it up properly. So let's do the
same with this guy. Shift Delete, Content-Aware,
not bad at all. Command D to get rid
of the running ads, or I'm going to zoom out. And you see it's
really not that bad. And you'll see once
we flip it back, you won't even notice. So they'll Filter, Distort polar coordinates
and we'll flip it. So I'll go from polar
to rectangular. You'll see it's
still upside down. So we'll just go to Image, Image Rotation 180 and the go. So that is a version
of our piano with the troponin at tripod and
sharp painted out, in, out. And it's really that simple
when using Photoshop. And we'll just go ahead and
save that out either as a tiff, no tripod. We can save it out as a JPEG, whatever you might prefer. Save that for when you save it as a JPEG and you can go ahead and
change your size. It's 2.75 megawatts. You can change your
quality to very high. You will see that
changes our file size. Go to maximum 12 megabytes. Go ahead and save that. And make sure we save
that way we want. And that is how simple it is. Okay, so here's
another example of a pan out and just use the
clone brush in Photoshop. So I've already rotated my images and maps it
to polar coordinates. Instead of using the Lasso
tool like we did previously, we're going to use
the clone tool. You're going to hit option
to select your source. You are just going to start
painting out your tripod. So that is how to
use your pen tool in Photoshop to remove the tripod. Then another example. So this is going to be quite
difficult because we have to paint out not only that tripod on a very
distinct pattern, we also have to paint up
to shadows because there's so much light in the scene. So you're gonna do
the exact same thing. You can use your clone tool. And you are going to start with my fine
brush a bit smaller. I'm a zoom right in. So I'm going to
select my sources. You do. It's more actually. And you are going to start
painting out your tripod. You're going to find
a source that looks something similar to
where you wanna go. And you are going
to just paint this out so that you can see, I'm just going to
take us quite awhile, so check back with me
once I've completed this. All right. So that is before we've painted out
the entire tripod to shadows and the
Nichols chart as well. And it was quite painful. Whenever you have places
like the it's trying to find perhaps a piece of ground that's more uniform
or easier to paint out. And they obviously, because
we had so much light, we had two shadows as well, so we had to paint that out. So it's always something
to be aware of. But that is how you paint out a tripod and color
chart in Photoshop. So I'm just gonna go
ahead and save that out to remove the tripod and colored chart
in free software, I've just opened up that
exact same panorama. In GIMP, GIMP is a free software and we're gonna do the exact same process. I'm going to duplicate
my layer and I'm going to go image transform, rotate a 180 degrees and it
will rotate it upside down. And then we're going to go filters, distorts
polar coordinates. And that'll map. So I've just export
this image as a JPEG. Just solid, goes a bit
quicker, a bit slow in. Alright, so you just
wanted to map from top. That's why we flipped it upside down and to polar
we'll hit Okay, we aren't going to zoom in. I'll go to 100%. It's less than
two, isn't as nice or I'm not aware of it being. So we're just going to
clone, brush it out. So is this clone tool up here, which exact same way as
you would do in Photoshop. So you are going to just hit Command or Control to
select your source. So wherever you click it, That's what we'll source from. The exact same
thing in Photoshop. So you just going to
collect your source. I've also, if you've noticed, selected a hard edge. I want to sample as close to my object and I'm
trying to paint out. It's not as obvious,
so I'll just keep changing my source
quite frequently. Also not to create a pattern
that's two recognizable. But again, as you saw in a previous example,
you won't really know. So now it looks quite obvious when you
look at it this way, but once you flip it back, you won't really notice as much. And you can go in and do a much better job
than I'm doing here. But again, this is
for explanation sake. Let's do color chart. Right? So we're just gonna do the
exact same thing again, we are just going to zoom out. You can see that's gone. We'll go filters. And I can just go
back up here to polar coordinates
or you can go back to distorts polar coordinates. And we'll just do the reverse. So we'll go unselect to polar. And you'll see that
it is rendering. So that guy, once that's
done, you'll hit Okay. And now we just need
to flip them and show the image transform. I did a 180 degrees
while the ego. Same thing done
in free software. So you can just
say that guy out. Congratulations, you should have a beautiful
high dynamic range, 360 panorama, ready
for the real world. And that is what we're
going to look at next. How do we apply? How do
we use these panoramas? Let's dig in.
21. Application: Okay, So this is a really
exciting part of the process, and that is how we
actually apply and use these panoramas
in the real-world. We're going to look at
some VFX specific examples like image-based lighting, how you might use it in conjunction with
photogrammetry in lidar to texture environments
and light environments. We're going to look
at how you might use it in virtual reality. How in real estate you could
use it for virtual tours. We're also going to look at some online resources where you can upload panoramas doing you might even make a little
bit of extra money from it. You can also upload it
to Google Street View, which is really quite cool. If you're a nerd like
me, you might just shoot them to show your family. I've personally done this many, many times where I've just shot 360 panorama because
I really just wanted to share where I was with my friends and
family when I got back home using an app like
spherical eyes for instance. So let's dig in and look
at some of these examples, which is really quite exciting. Alright, firstly, let's look
at some of the effects, image-based lighting in the
very simplest way possible. So I've just opened up blender, which is free software, but you can do it
in any 3D software. And I've just created a simple sphere or a
reflective silver bowl. And I've loaded my panorama. So this is a very simple way of doing image-based lighting. I have my object in my scene, and then I light it
using my photographs. So as you can see, as I move around
the environment, my object, my 3D object, is reflecting my environment. And so that is how you
would light a 3D scene. And we do this in conjunction with the chromium
silver balls, unsaid. But those are very, very simple way of doing
image-based lighting. So let's have a look at just
a couple of other examples. Because why not? Here we go. So we have a different scene and this is a very bright sunny, so you can see the
sun's up there. And our 3D object is
reflecting our environment. It is being lit by our high
dynamic range 360 panorama. Zoom up and down. I can wrote it up or down and it will reflect 360 degrees. Let's load perhaps a nighttime. Here we go again. And as you can see, it is reflecting
our environment. Really quite cool. So if I
go over here where she sees, should see a little bit read
from that tree up there, which is really quite cool. This one is a cool
one to look at. This scene has this
circular lighting right at the top and you can see
that's being reflected in my object is awesome as well as these
really distinct lights that's all being reflected. Object is being
lit by the image. And that is a very
simple explanation of image-based lighting and why it gets used in the VFX world. So I'll just open
up a bit more of a complex 3D object here. We'll just go to
different shading port. Alright, so here's a little
bit more of a complex object, if you will, or 3D object. And you can see it is still
reflecting my environment, which means it is being
lit by my environment. And this is a very rudimentary
way of viewing it, but it's a good way
of just showing the example of what
image-based lighting is. There we go. So you can see this guy is
being led by our image, which is really quite cool. In this is just a quick
render of it as well, just so you can compare. That is image-based
lighting for you. Let's have a look at
some other examples. You can also use high
dynamic range 360 panoramas to texture a 3D
object really quickly. So if you have a set or an
environment or an object that's been lidar scanner or created using photogrammetry, you can align that really
quickly to the geometry and do a quick texture of
your object as well. So image-based lighting
is actually quite important in the gaming
industry as well. They use HDR, high dynamic
range panoramas to light. They're seeing their environment
to build environments, and particularly making
it more photo-realistic. And then the same goes for virtual reality games
for that matter as well. All virtual reality as a general image-based
lighting is very, very beneficial and used in
those industries as well. For real estate, you can use software or an
application like cooler. There are plenty
of them out there, which lets you create 3D virtual tours or 360
virtual tours of real estate, but you can really
apply it to anything. So if we just go to my tours, let's have a look at one that I created earlier and
this one was just. Outside at the marina which
are used as a fly through. And you can just go ahead
and create virtual tours, fly through the environment, tours, whatever you want. So that is another really
cool way in which you can use 360 degree panoramas
and HDR panorama, which is particularly helpful when shooting real estate
because you often have a blown out window outside and then a darker
environment insights or HDR photography is
fantastic for that. There are plenty of online resources that you
can use where you can upload you 360 HDR panoramas. This one is 360 cities.
It's really quite cool. Here's a nice little
viewer as well. You can watch in VR, you can change the way a display so we can do
this in little planet. The cool thing about this
slide is that it actually links it to Google
Street View as well. So if you go into, let's go account English. So here is a panorama that I shot and that I've
uploaded to 360 cities. And as you can see,
it's being selected so as automatically linked to Google Earth or
Google Street View, which is really quite cool. There's a really cool
viewer, this guy. So let's jump in. So this one you would have seen plenty of times
during the course. This is one I shot actually
while just on holiday and I wanted to show
my family around. So I shot this guy. But it is now in 360 cities. And people can use this and you can earn a
commission from it, which is really quite cool. And like I said,
it also links it to Google Maps,
Google Street View. You can also upload your
HDR 360 panoramas to either online resources
like turbo squid for instance, or poly haven. And you can contribute,
you can add your hydrogen. Ours here, we can search
for, Let's go HDRI. So this is just a resource of
hatred your eyes 3D models, panoramas that you can
upload a turbo squid and then cell we can choose to contribute it
for free as well. So you can go into turbo squid. They have lots of affiliate websites that
they are linked with, Including Photoshop, plugins
and all sorts of fun things. So that's something
that you could do. Poly haven, for instance, is another one and
wonderful resource full of lots of lots of textures
and hedge DRIs. They are very specific with
their upload requests. If you go to contribute, Let's go down to requirements
for how your eyes. So it needs to be photo-based. It needs to be for
linear, no tone mapping, color contrast, so no
editing in that sense. So Fully Raw needs
to be unclicked, it needs to be high
dynamic range, and it needs to be a
minimum of 16 K resolution. So as you can see, this
is another example why it is important
that we should really high-quality 360
panoramas and why we tend to use different
Lin sizes as well. Because that helps us build really high resolution panoramas and want them to be
high-quality as well. So as you can see, they
want the tripod removed, all those sorts of things
that we walked through. Poly haven. There is no payment, but it's certainly a
very cool way for you to have your work out
there if you so choose. And there are plenty of other
similar resources as well. Those are just a few examples. So let's have a look
at Google Earth and Google Street View. Let's go to Google Earth and
look at Chatsworth House. Take us right there. Very cool. And then I don't think my panel will be live yet because I've actually
just uploaded it. So if you drag your
little Street View man, you'll see these
blue dots appear and that is positions
that people shop at panoramas add once mine
is actually loaded. It will also appear here. So you can, let's drop in there. Cool. So this is one
somebody else sharp. But as you can see,
that's a really cool way of using the panorama. So you can do the
exact same thing with Google Maps, of course. And you'll see once we drag
that little man again, you'll see those exact
same dots appear. Let's get a different position. Now let's go to Time Square. And that's really all these
panoramas are, right. So Google has little
truck that does it. But then people also go and upload their
three-sixths panoramas. And you can go anywhere in
the world and you cannot be, of course linked these guys. And they get used
on Google Maps, Google Earth,
Google Street View, which is really quite cool. So you can upload it to Google, you can upload it
to 3D resources. We can earn a little
bit of extra cheering. For instance, people
can go in here and by this and use it
for their learning. And then there's a few
other resources as well. So that's really
quite cool as well. So as you can see, there
are so many ways how you can use high dynamic
range 360 panoramas. And I think the list is just
going to keep expanding. And before we
finish this course, I'm gonna give you some
bonus tips and tricks. I'm going to tell
you what resources are available to you
through this course. And additionally
beyond this course. And we're also going to answer some frequently asked
questions. So stick around.
22. Maintenance: So as this course
draws to a close, I wanted to give you
some bonus tips and tricks and tell
you what resources are available to you through this course that will help
you beyond this course. I think the first bonus tip, and it's something that was
taught to me and as always, stuck with me, is to tell a
story with your photography. And I don't think it matters what type of
photography you do it. It might be portrait or
landscape, or virtual reality. Tell a story with
your photography because it's still
a creative pursuit, even though this is a more
technical process of doing, it is still storytelling. So that's something to
always keep in mind. Move in a certain way that you're not shooting a
panorama here than they are, than their move in a
way that makes sense. A second bonus tip is to be patient with
your photography. Wait for people to
move out of your shot. They, in most cases, well before taking it. If you're shooting
on a day where it's both cloudy and sunny, shoot just cloud
or shoot just sun, so everything matches
really nicely. So tell a story with your photography and
be patient as well. Pick your time,
pick your moments. Sometimes it can have to
move really quickly to capture the cloud cover
that you have at that time. But keep those things in mind. I think it'll really
elevate your game. Then probably the most
important tip I could ever give you is to
go out and shoot. There is nothing like
learning by trial and error. Take your gear,
go out and shoot, find your nodal points, find the shooting angles, two different methodologies processed differently that will truly elevate the way you should and then your
results in the end as well. And have fun with it because
that's what it's all about. This is a creative pursuit. And at the end of the day, whatever application
you use it for, there's an element
of fun and we're so incredibly blessed that
we get to do this. So go out and have
fun with that. I'm also going to let you
know what resources are available to you through this
course, this entire course, a PDF version that you can
download and reference really quickly if you ever wanted to refresh on a particular
area of the course. There's also a PDF of the
shooting and your formulas. So you can reference
that really quickly. And then a PDF of what
your recommendations are, the software we spoke about. So it's just really
easy for you to access. And then I'm also going to add some additional resources and other articles and videos to watch that might
help you as well. So speaking of that, I'm going to try
and answer some of your frequently asked
questions next.
23. Frequently Asked Questions: Okay, So here are some
questions that are often get asked when teaching
this course in person. One of them being, how do
you shoot in low light? So we apply, of course,
the same principles, but given our
lighting scenarios, you're going to have to
make some adjustments. If you're working on set, you might be pushed for time
and oftentimes you are, so you're going to
have to compromise on some things and
we'll talk about that next because that's also something I get asked
quite frequently. To shoot in low light. You're going to want
a lower F-stop so that you don't have
shutters that are too long. And we don't want
to push our ISO to hide to introduce
noise as well. So this ties in with
that compromise as well. So perhaps I'll cover
them at the same time. So the next question being, what can I compromise on? So let's use a dark night time. As an example. You
want to f-stop of no lower as 5.6 because
it'll be too shallow. You're still going to sit, you're hyper-focused as we know. And the ISO, depending
on your camera, you're going to find the
point where you start introducing noise
and not go above it. So for my camera it's 640. And then you're going to adjust with your shutter speed again, these are basic
exposure principles. Bacon Now see how crucial they are in producing quality work. And so that's why
it's important. We understand that
from the beginning. So you will never want to push
your ISO too high and you never want to go too low on your F stop because
it'll be too shallow. And so your shutter
speed will be your playing range if you go too low and your
shutter speed, you might be there a
significantly long time. So things to consider here
is rather underexpose. Overexpose particularly if you have a scene with, for instance, a nighttime scene
and its exterior, some very bright lights as well. So you still need to expose
for both of those sources and they've completely on
the opposite side of the spectrum or histogram. So if you're in doubt, rather
underexposed, overexposed, you're more likely to pull information out of the blacks or shadows then from
clipped highlights because there is nothing there. Once it's clicked
in the highlights, there's no information. So when in doubt,
rather underexposed, a little bit overexposed. And that goes the same
for any daytime or any high contrast scenarios if in doubt underexpose by a stock. It also will make your work a little bit quicker if that is your default setting is to rather underexposed,
overexposed. So what do you compromise on if you're in a scenario
it's very dark, you have no time. What do you compromise on? I would probably bring
down my f-stop first. Especially if you're
in a large environment and you far from objects, I would bring my
f-stop down first. If you're shooting
in, for instance, a very narrow hallway, you might need to
reconsider that and you would have
to bump your ISO. I would start with those guys. Your shutter speed will be your last one that
you compromise on. Again, that is completely
time-dependent. You'd still in some scenarios, would rather capture
a panorama than nothing at all because
you ran out of time. So you're gonna have to, again, I think that ties into practice. Just go out and practice
and practice under different circumstances
and that'll really help you out with that. But I feel that clarifies least some confusion as to
what you can compromise on. Another one I often
get is how to fix a panorama that doesn't stitch
automatically or properly. If you shot in a certain way, if you shot in
accordance to a formula, regardless if it's one you've calculated or one
I've given you. If you know that formula, you will know how to fix it. You can go into
software in both Hugin, MPT, gooey, even though
it's a little bit easier. And Peter GUI, you can go in like I've showed it in
creating the template. You can tell that
software where to place that specific image that
will really help you out. And that's where the formula
is really important. It's the easiest way to fix a panorama that's not stitching
properly and it happens. Stitching software often don't like the sky plane or floor plane because it's hard to align with anything else if page, especially if you have
just a bright open sky and nothing else and no trees
or nothing to align it to. So telling your
software manually, mathematically
where there's image are meant to be
really help you out. And then this is probably more a VFX specific question,
but I do get asked, where do the three-sixths
panoramas fit in the VFX texture
photography workflow. In the film industry, we use it in conjunction with
our texture photography. So we usually texture in flatlined depends on the
supervisor and the show. But we tend to texture and
flat lighting so we don't bake in any harsh shadows or contours so they can paint
it all in afterwards. And then we should add panoramas in the hero lighting and that is what they use to then like the textures and enlight
the environment as well. So it works in conjunction
with a texture photography. The texture photography
part is related, but also completely different
subject that if interested, I can always do course
on later in life. So hopefully that's answered
some of your questions. But if there's
anything specific, please get in
contact anytime and I'll try my best to
answer them for you. There's also plenty
of other resources out there that will
help you as well. I think ultimately
going out there and shooting is probably going
to be your best bet. You're probably going
to answer a lot of these questions for yourself. And you're going to remember it. Before we part ways. We're gonna do a quick
wrap up of the course.
24. Conclusion: [MUSIC] Here we are. We've reached the
end of the course. I wanted to do summary
of the entire course just as a refresher because
we really did cover a lot. We started with some basic myths and we've proved
that you don't need expensive equipment or expensive software to
shoot high-quality, high dynamic range,
360 panoramas. We've also covered
some core principles. Basic exposure
photography principles. What high dynamic
range photography is, what 360 panoramic
photography is. How we use all that knowledge to create high-quality
panoramas. We covered what gear you'd need and you can use anything
you really have. The key element is a panoramic hit and there are
multiple options out there. But that is what really
set you apart from shooting sharp, crisp images. Then we covered how
to find your formula. You're shooting angle for your body and your
lens combination. We looked at doing that both
using online calculators or the formulas I've given you that gets used in
Hollywood every day. From there, we looked
at our nodal point. What is our nodal point? Or I know parallax point? The importance in shooting panoramas that aligned
but are crisp as well. We did a walkthrough
on how to do that. As you'll remember to find
your body nodal point, you pointed down
and you align it to the center of your head. Then for our lens, we move it back and
forward and try and align the two objects
by doing that. Just a quick run through of
how to find your nodal point. Remember to always
write it down, have them handy and do all of this preparation prior
to going shooting. It's going to make
all the difference. Preparation is absolute key
to high-quality end result. From there, we did a shooting
hands-on walk through. How do we take everything
we've learned up to this point and apply it in
a real-world situation. We consider our
exposure principles. We take our formula
and we've set up our camera according
to our nodal markings. Then we shoot a panorama
and we've touched on some key things like always
leveling your tripod, how to set your hyperfocal, and the importance
of that to shoot in a formulaic manner
to make processing easier and to keep you
on track when shooting. We also covered creating
folders per panorama in camera, which makes processing
so much easier. Then of course,
we walked through the entire processing workflow from ingesting your data
to merging your HDR, to stitching, tone mapping, removing the tripod all the way through to exporting
for application. At application,
we've seen there are so many ways in which you
can use these panoramas, which is very exciting. Then like I said, I think
it will only keep growing. Then we covered just a
few additional questions that might not be
specific to this course, but I get asked quite a lot and hopefully that's given you just a little bit more extra information into the bonus tips and tricks like tell a story
with your photography, be patient and practice. Then you now know what resources are available to
you additionally as well, and quick access forms. Then ultimately
go out and shoot, take this knowledge,
take action and implement shoot go,
trial and error. Go make some mistakes, go learn, because that's
where the fun lies. That's where this knowledge
actually sinks in, is if you'd go out
and take some action. I really hope you got a tremendous amount of
value from this course. I've had such a joy
presenting this to you. I hope you're able to
take what you've learned, walk away right now and go shoot some high-quality
360 HDR panoramas. Thank you once again
and have fun. [MUSIC]
 Este Heyns, Teaching HDR 360° Panoramic Photography