Transcripts
1. Welcome to the Granny Squares Masterclass! : If you live on planet Earth,
it's impossible to have never seen granny squares. They are literally everywhere. Since the late 1800s, they have
been integrated into our decors and the invaded fashion in the 70s. They came back very recently. The choice of color and assembly
have evolved, but they still remain the same good old granny squares. And no, it's not just for grannies. Hi, it's me again, Crochetmilie, the
one who wants to influence as many people as possible to discover this
beautiful hobby that is crochet. You may be one of those that I had the
privilege of teaching in my last two crochet classes, the How to Crochet
course, and the Amigurumi Masterclass. It's a great pleasure to present you
my new course, The Granny Squares. The title is simple because it really
encompasses all the concepts you will need to either be comfortable following
any pattern that involves grannies or give to your creativity the freedom
it needs to make your own masterpiece, either if you are right or left handed. I'm going to start by showing
you different ways to crochet the classic granny and how to
read the famous crochet graphs. Then you will learn the best assembly
techniques, whether with the needle, with your hook, and even the inventive
join as you go technique, which makes you integrate all the squares
while crocheting their last row. You will also learn how to have
straight squares using blocking. I have designed each lesson and project
to make your work as enjoyable and aesthetically pleasing as possible. And as usual, small projects will
be offered to you to put into practice all the concepts learned. In addition to combining the
majority of the techniques from the course, the final project will
be as charming as it is practical. You will be able to carry your materials
to crochet grannies everywhere. Join me now and discover all the
secrets of these little squares. See you soon!
3. Material & Techniques: Let's start by discovering the
concept of granny square and how they can be used, as well as the
material you will need to make them. As we can clearly see, that is about
squares, which put together can form really all kinds of creations,
and it allows you to explore your creativity by playing with
all kinds of color combinations. Granny's can act too like pixels,
to create all kind of pictures and patterns, a bit like quilts. They can also transform in hexagon
grannies, which makes that you won't have enough of a lifetime to explore
everything we can do with this technique. To be able to follow the
lessons of the course, you will need just a hook and yarn. I'll show you in a few seconds how
to choose them well, but if you would like to do the projects that I
propose, here is the exact material that I used, which you will need. First, I will use Paris Drops
brand worsted weight cotton yarn in natural, wheat, and rust color. Full details regarding quantity used for
projects as well as where you can get them are written in the pattern that you can
download in the documents under the video. We will use a 3. 5 millimeter hook, a yarn needle,
stitch markers, scissors, and measure tape if necessary. And a blocking board, which
is completely optional. I'll show you in another video
which alternatives to choose. In general, you can make granny squares
with any yarn, but just to show you an example with super bulky one, I
did exactly the same pattern, but you see that the square is much bigger. So if you want it to go quick, that's
a good tip, to use a thicker yarn. Just to the right, I made a square made
of acrylic yarn, which is smaller and a little bit brighter, more malleable,
which will make perfect baby blankets. Then we have the square made with
cotton, a very stiff fiber, which makes that the project has a better
holding for clothes and bags. And completely right, I tried the
same square with sport weight wool. So a little bit thinner than the
worsted weight one, which gives a nice soft and fibrous texture. Also perfect for accessories and clothing. You can choose the yarn you like depending
on the project you wish to carry out. Regarding the choice of hook suitable
for each type of yarn, know that to have a tighter project, you can take
a hook a smaller size than normal. And for a more malleable project,
you can choose a larger size. I have put on the screen the hooks
that I used for each type of yarn. You have certainly already seen
small squares stacked one on the other on a block or on a mat. It serves to block the squares, so
to shape them so that they are all uniform before sewing them together. It is not mandatory, but
it gives a nicer finish. The most popular ways to block
are with a wooden board with small holes and metal rods. or a foam mattress where
we can pin our squares. I'm going to show you how we proceed
in one of the following videos. If you would like to avoid shopping and
have an all inclusive option, I offer a box containing all the necessary materials
for creating the three course projects. You can find the link under
video or in my online store. If you know how to crochet, you are
capable of making granny squares. To remind you, crochet
is very mathematical. So to arrive at a square shape,
you will have to start the first round with a multiple of 4. And with each additional round,
increases will be made in each of the corners to form the square. And surprise! Don't panic if you absolutely
don't understand these drawings. I'll explain everything and teach
you how to read a crochet chart. Yes, at the end of the course,
these little graphics will no longer intimidate you, because we are going
to practice together how to read them correctly while crocheting. The advantage of knowing how to read
a diagram is that it is a universal language, so no matter where in the
world where the diagram was drawn, you will be able to crochet it. And for crocheters who are left handed,
Watch the indication which will be at the top right of each video to have access
to the version designed just for you. Are you ready to crochet
your first granny squares? See you in the next video!
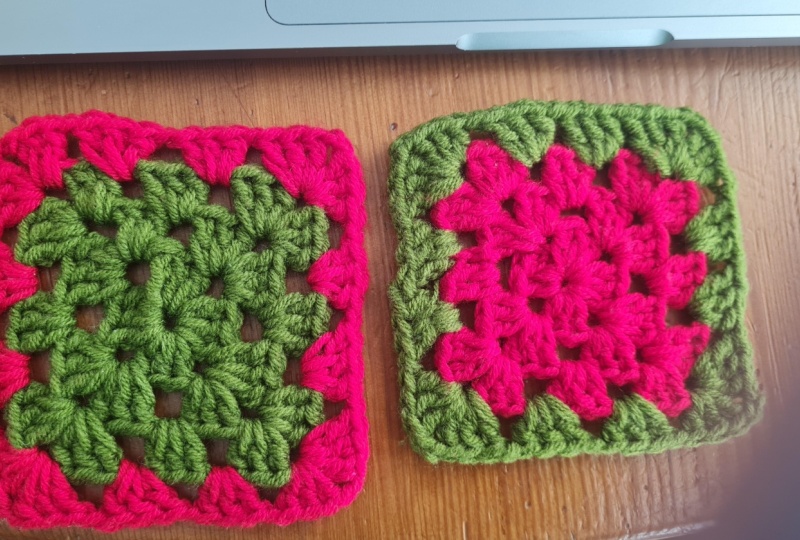
4. Granny #1: Start On The Side: We're now going to do
our first granny square. It's the basic one, the classic granny. The version that I'll show you
now will start and finish the rounds on one side of the square. The following videos will show you
two other different versions, all this to make your granny square
as aesthetically as possible. It will be up to you to choose
which version you like the most. I will also show you three ways
to integrate colors subtly. And to make granny squares
enjoyable to do, I will also show how to have the least of threads
possible to weave in at the end. With your 3. 5 mm hook and wheat color, you
are going to tie a slip knot. Insert your hook inside, tighten the
loop around the hook and you will begin by making 5 chain stitches. On the left side of the screen,
you have the symbol which corresponds to the chain stitch. It is oval in shape and empty inside. You will now make a slip stitch
in the first chain that you have done and it will form a ring. The symbol of the slip
stitch is a solid black dot. Basically, we are going to come and
crochet round 1 inside this ring. So we start round 1, you can chain 3,
which will count as a double crochet. And the symbol this time is 3 small
chains put one on top of the other. Now make your first real double
crochet inside the ring that you made. Inside the space of the 5 chain
stitches at the beginning. The double crochet symbol looks
like a T with a small bar across it. And you're going to do another
one, one another double crochet inside the same space. Since our chain 3 takes itself
for a double crochet, we will have formed our first set of 3
double crochet, our first shell. You will continue by doing
chain 2, which will constitute the first corner of the square. And you are going to make 3 double
crochet, once again in the ring. So a set of 3 double crochet, a shell. To form the second corner of the
square, you will chain 2, and you repeat 3 double crochet in the ring,
followed by 2 chains, 2 more times. We have now finished our round 1. We are going to join with a slip stitch
in the 3rd chain of the starting chain. The one who thinks it's a double
crochet, just on top of it. And there you have it, the first round
of your first granny square is now done. I'm showing you right now what
it looks like on a diagram. In red you see the 5 chains
that we did at the start. We then closed these 5
chains with a slip stitch. We started round 1 by doing chain 3, that
counted like our first double crochet. Then we made 2 double crochet in
the ring followed by 2 chains, which formed our first corner. We then continued by making 3 double
crochet in the ring followed by 2 chains, therefore a shell, followed
by the second corner, and we repeated this instruction 2 more times. And we finally completed round 1 by
making a slip stitch at the top of the third chain of the starting chain. You may have noticed that I didn't
make you use a stitch marker. It is intentional because I really
want your eyes to get used to it, to the anatomy of each stitch. It will really make it easier
for you when the time comes to assemble all your granny squares. I trust you. I'm sure that with all the
practice you will do in this course, you will get there. We will now continue with round two. To start, you will chain 4 that will
count for a double crochet plus a chain stitch you will understand
why at the end of the round. You are going to make your first
shell, your first set of 3 double crochet, in the first corner. So in the space of the 2 chain stitches. Followed by 2 chains. So we form the corner once again. And you make another shell, another
set of 3 double crochets in the same corner, in the same space of
the 2 chain stitches of round 1. You will continue by making 1 chain. And you repeat what you just
did in the corner of the square. 2 sets of 3 double crochets
separated by 2 chains. Your second corner is now done. We will continue on the side of
the square by making 1 chain. So we separate each of the
shells on the sides of the square by a single chain stitch. And you repeat the same
pattern in your third corner. 3 double crochet, chain
2, 3 double crochet. You are going to make chain 1 to separate
the 2 shells between the 2 corners. And for the last one, the
pattern will change slightly. You are going to make 3 double
crochet, chain 2, . And only 2 double crochet in the same corner. And finishing round 2 by
joining with a slip stitch in the beginning chain 4 space. You will see that 3 of these chains
will become the missing double crochet from the last corner. On the diagram, I put the slip stitch,
the small dot, so that you understand that you must do the slip stitch inside these
4 chains, and not on top of this one. We will now continue with the next round. Since the diagram starts to be a little
too big for the screen, what we're going to do is that I'll make with you
one side and one corner of round 3, with the instructions, and then I will
display the diagram so you can continue to make the square, and we validate in
the end together if everything is good. So we're going to start with chain
3, that count like our first double crochet, You'll make two double
crochet in the same space to form your shell on the side of the square. You then make chain one that will
separate the two shells from the side end corner in the chain two space. for the first corner,
you do the same as usual. Three double crochet. Chain two, three double
crochet in the same space. You will now continue your
square with the diagram. We meet at the end to see
if you did this correctly. I put you in red what we just did. You are going in counter clockwise
and you complete your square. You will end up doing the chain
1 which separates the two shells. You can put the video on pause and
we'll just meet again before making the last slip stitch to join the round. After making the last chain 1, you
are going to make a slip stitch on top of the third chain to close round 3. Your square should looks like this. Make sure your shells are always made
up of 3 double crochet, that they are separated by a chain 1 on the sides
of the square, and in the corners, let them be separated by chain 2. Prepare now for round 4 because
we are going to change color. A first way to change color subtly,
it is to join it into the last stitch of the previous round. So in this case, we made a slip stitch. You can just undo a little bit and redo
the slip stitch, but this time taking the colored yarn, rust or natural,
it's your choice, and you pass it in both loops to finish your slip stitch. And we will be ready to
continue with this color. But first, to avoid a nightmare of ends
to weave in, I will show you a method that takes a few seconds but will
hide the strands while securing them. You can cut the colored wheat
yarn, we don't need it anymore. And with the two ends of colored
threads, you can tie a double knot. You can remove your hook from
the loop, but still leave a good space so as not to lose it. And we're going to go transport
these two threads towards the last corner of the previous round. You will be able to do
it with your yarn needle. You enter the 2 threads inside
and you just pass through vertical strands of the last 3 double crochet
to hide them behind the corner. We will now be ready to start round 4. Once again, I will show you how to get
to the first corner and then I show you the diagram and you continue on your own. We will start by making 4
chains that count as 1 double crochet plus 1 chain stitch. Then you will make a set of 3
double crochets in the next space. Followed by a chain stitch. And you are going to do
your corner again, as usual. 2 sets of 3 double crochets
separated by 2 chain stitches. And here is the diagram for round 4. In red, this is what you just did. And to explain you the theory, each time
we add a round, instructions for corners of the square will always remain the same. And on the sides, we will always add a
shell, a set of 3 double crochet with a chain stitch that separates them. No matter the size of your granny
square, this rule will still apply. So I'll let you work on round 4 with
the new color, and we come together just before starting the last corner. We will learn how to hide
the threads of color change. You can pause the video. Arriving at the last corner, what
you're going to do is integrate the two threads of colors by crocheting
the double crochet around them to hide them well in your shell. And we will continue. You make a chain stitch and you end up
with two double crochet in the next space. You can always include the
color changing strands. And you finish with a slip
stitch in the chain 4 space. And that's it for your
first granny square. Well done! The color changing threads are
well hidden behind our last corner. You can cut off the overage. I will now show you how to bring in the
ending thread so that it is invisible. After cutting the yarn, you
can simply pull the loop. Do not enter the thread through the loop. Really pull it like that. And you will come and place a
stitch marker in the back loop of the last stitch you made. In this case, it's the slip stitch. So yes, it is a very small braid,
but it's really this strand here. Put the thread in the needle, and you will
enter in the stitch after the next stitch. So you skip the next stitch,
in this case, that will be the little chain one right here. So you skip it, you go
enter the next stitch. It will be the first double
crochet of the shell. So you get into both strands, from
right side to wrong side, like this. You bring back your needle, your thread
at the front of your square, and you go enter, once again, forward to backwards,
in the little strand where you put your marker, in the back loop of last stitch. And you pull. You see, it creates a kind of fake stitch. It looks very uniform. It will really help you when you will sew
squares together to not mistaken stitches. You will only be left with this thread
and the beginning one to weave in. One way to do it, given that there are not
many stitches where you can go with your thread, is to pass through the vertical
strands of the double crochet, this way. and turn around a strand. You can do this two, three times
so that the thread is very strong. And you can cut that thread. To weave in the beginning thread you
can simply pass it around the strands from round one as I'm doing right now. That's all and just for your information
that's the wrong side of the granny square and that's the right side. The double crochet are
more defined on this side. You have just learned a
bunch of techniques to make a beautiful granny square. In the next video, you will see a slightly
different version of the same granny.
6. Granny #3: The Reversible: We're going to work one last time
with this classic granny pattern. This time it will be reversible. We will turn the project every row
to crochet a row on the right side, and one row on the wrong side. This is the best method to have the
square as straight as possible, and above all, if we plan to make a very
big square like a blanket for example. We'll start the same way than
our first granny, but this time with the magic circle. You can always decide which technique
you like best to start with. And, since you have practiced with
the two previous versions of granny, I'll leave the diagram here for you. You can complete row 1. And we finish the row with a slip
stitch at the top of chain 3. And you can also pull the starting
thread to close the circle. We continue with row 2. I don't know if you noticed in the
previous diagrams, but each numbered row has an arrow pointing in the direction
where you have to read the instructions. In this one, in the second row, the arrow
points to the right, so we will follow the instructions in clockwise direction. But you will crochet in from right
to left anyway because we are going to turn the granny like that. So we are going to come to work
our row 2 from the wrong side. According to the diagram your chain 3
count for your first double crochet and you will do 2 more in the chain 2 space. Then chain 2 and 3 double
crochet always in the same space to make your first corner. And you will continue like the
other grannies, chain 1, which separates the 2 corner shells. And you continue with the
same pattern in each corner. You follow the diagram clockwise. We meet at the end of row 2. And we close the row by doing a
slip stitch at the top of chain 3. So you have your row 1 that
currently is on the wrong side. And row 2 is on the right side. We will now continue with row 3. You see that the little arrow
points to the left, so we will follow the instructions in the
counterclockwise direction. So you can make your chain 3, turn your granny, and just
continue with the diagram. What's nice about the reversible granny is
that you will always start the same way. Your first chain 3 will always act like
your first double crochet of the row, which makes it really easy to follow. I'll show you the diagram here. You can continue with row
3 and we meet at the end. We finish the row with, one more time,
a slip stitch on the top of chain 3. Your granny should look like this. So you have a row on the right side
and the wrong side alternately. You can see that it is very subtle
and aesthetic as a way of doing it. For a comparison, on the left
you have the granny we just made, and right the first version. For row 4, I will show one last
way to change the color subtly. You can cut the thread and
pull on it to release it. Turn your granny, given that we are
going to do the next row on this side, and And with your hook, you come and get
the thread to bring it to this corner. So you can go between double
crochet like this to do it. Come out right here in the corner. You will attach the new color in
the corner by making a double knot. And make sure you do it around
the weak colored thread. Just to make it more secure. You will now be ready to crochet row 4. Make sure you're on the right side. The last row should be
with wrong side facing you. So bring the new color to be ready
to make your first chain three. And because of the color change,
the fourth row in the diagram will start elsewhere, in a
corner rather than on the side. But you know very well the granny
square's anatomy, so you will be able to continue your pattern. And the important thing is to crochet
the two from the corner around the two colored strands to secure them well. And it's worth it because
it makes a very subtle color change, with no ends to weave in. I put here the diagram with the color
change, which done in a corner, but know that you can proceed with the
same technique if you would have liked to change of color in previous rows. Your first chain 3 will act as
the first double crochet from the first shell in the corner. It will be the same if you
change color every row. And just a little reminder, row 4,
you will follow the diagram clockwise. You can put the video on pause,
we meet at the end of the row. After closing row 4, I'll show you
again how to make an invisible finish. The right side of row 4 facing you,
you are going to put the marker on your last slip stitch in the back
loop of it, Which is immediately after the last chain stitch that you made. You pick up your yarn needle again,
and here, these are the chain 3, so this is the stitch where you
are now, so it doesn't count. It won't be the next stitch
either, but the next after it. So it seems a little far away,
but trust me, it will work. So you pull your needle, you put it
back in front of you, and you pass where is your marker, and you pull. Just to show you quickly the
anatomy of the stitches, so here you have the fake one stitch of
your chain 3, that we just made. Here you have your second double crochet,
and the third, from the first shell. So everything is beautiful, you
have the exact number of stitches. It gives you a nice finish. You can weave in the ends as usual. You have just finished the last
version of the classic granny, but this pattern is also customizable in
changing the number of chain stitches, which separate each shell, which will
make it either tighter or more airy. For example, you might decide to
add a chain stitch to each corner and between each shell, which would
give you this kind of square with plenty of space between the shells. And you could also decide to remove
a chain stitch between each of them, which you would give a tighter square. We will now learn together the
importance of the next step, blocking.
7. Why And How to Block Your Granny: Although it's an optional step,
blocking will ensure that the assembly of all your granny squares will
look more professional, because it's almost impossible to have a very
straight square without blocking it. It will also standardize all your
squares if ever you had slight different tension from one square to another. Well, I didn't really know what term
to use between wetting, soaking, watering, you can't do them all. The important thing is that
your granny square is moistened. to take the desired form. You can either pass it under water,
spray it, or use a steam machine. Remove excess water by squeezing
it in a towel and you are ready to place it on your blocking board. If you have a precise measurement,
you can use a measuring tape to see how many centimeters from diameter
you are going to pin your square. I will now show you the different
blocking accessories you can use. First, we have the wooden board, which
is very pretty and very practical because each hole is separated by 1 cm,
so no need to measure it with a tape. Simply count the distance between
the holes to place your small sticks. In this case, my granny square
measures 10 by 10 cm, so I'm going to put down my little sticks so
that they are separated by 10 cm. Make sure each stick
are towards each other. You are now ready to
lay your granny squares. You will insert each of the
corners on the four sticks. You have to stretch a little bit the
granny, so that it takes its shape. So you will have a slightly
bigger granny, but never smaller. And you can stack a square
on the other, perhaps leaving a small centimeter of space. between each to let the air circulate. And all you have to do
is wait for it to dry. The other option, which is easily
accessible, small styrofoam mats. They are often sold in packs of four
so you can block a bigger project. They come with pins that you
can use at every corner of the square and also on the sides. The grid is divided into inches so you
can do the conversion with your tape measure to make sure to have your 10. centimeter or any other measurement. Unlike the blocking board, you
can't stack them one over the other, but you can very well put them one
next to the other and let them dry. The last option is within
the reach of anyone. With measuring tape, pins, and a
fabric surface, you could block your little squares all over the house, but
especially warn your family members to avoid unfortunate accidents. Now let's learn how to
join our grannies together.
8. Join With Needle: The easiest way to assemble your
grannies is with a yarn needle and a thread, either of the same
color or with a contrasting one. Note that your grannies must absolutely
have the same number of stitches on each of their sides, so it doesn't
matter the kind of granny you crocheted, as long as the total number
of stitches and size are the same. Also, it's good to know that it's easier
to assemble granny squares which have two chains in each of their corners. You can reserve one for sew with
the side square and the other to sew with the square above. This is what a graph looks like that
asks you to sew two squares together. There will be a small dotted
line between the two squares. And if you assemble several
squares, it will look like this. And as I told you a few seconds earlier,
when there are two chains in every corner, it's very practical because
you will be able to pair them together. One when you are going to sew
on one side and save the other for when you will sew crosswise. Don't worry, we'll practice together
in the third project of the course. Here are the four assembly techniques
that I will show you today. There will be the whip stitch, the
invisible stitch, the reversible stitch, and the mattress stitch. The names are maybe not the same you
can see elsewhere because I saw several videos using the same stitch name
but which was a little bit different. So go ahead with the finish it gives. And usually if you buy a crochet pattern
the designer will specify how to sew. The whip stitch is the simplest. You can work with grannies with their
right side facing you and it's now where your knowledge about stitches
anatomy will be super important to know where to start and which stitch
pair together with the other granny. We will start by entering the needle
in the chain stitch that is just before the first shell on the side. You can either enter in the corner space
or in the chain like I'm doing right now. It's easier if you put the two squares
wrong sides together and you just go and insert your needle from front to back
and back to front on the other side. And you turn around your thread like this. Make sure you don't skip a stitch. To really go into the two stitches
which are opposite each other. You can pull the thread time
to time to make it very solid. And you continue like this
until the end of the square. At the end you will see I will enter
the first chain stitch right after the last shell of both grannies. So you joined two grannies
together with the whip stitch. And this is what it would look like if
I had took the thread of the same color. Now we will learn to make
the invisible stitch. So you are going to put your
two grannies good side together. And we will start sewing. It's the same principle
as the whip stitch. You will start in the chain which
is just before the first double crochet of the first shell. So it's right here. You're going to go into the back
loop only of the two grannies. Since the wrong side is facing you,
it will be the strands which are outside of the two squares, like that. And you're going to enter your
needle front to back and back to front in the next loops, like this. And the last seam will be
done in the first chain. that constitutes the corner. You can put the squares back to
right side and pull the thread. And there is your invisible seam. And this seam is very easy to undo if
you don't block your thread at the end. Now, let's see together
the reversible stitch. A very easy and nice one to do. And the appearance of the seam will be
similar on both sides of the granny. This time we will start by simply
passing our needle in both corners. You can sew the grannies flat. And what you're going to do is that
you will pass from the inside towards the outside of the junction of the
two grannies in one of the stitches. And you will enter the corresponding
stitch of the other square, again inside to outside of the two grannies junction. And you alternate like that. You can pull the thread time to
time to properly tighten your seam. And at the end, just go
into the last corners. You see that with a contrasting color,
it's not a very pretty technique. But with a thread of the same
color, it's very subtle and it makes also a nice seam on the back. It is for this reason that I
called it the reversible stitch. The mattress stitch looks a
lot like the invisible one. except that it is much
stronger, less stretchy. So I show you how to do it now. It's a little more complicated
but the finish is worth it. You will enter again in the back loop
of the chain right next to the first shell of the corresponding corner. And you will re enter the first
chain stitch and exit through the top of the loop of the next stitch. You will do the same
thing on the other side. Enter the first stitch again, and exit
through the back loop of the next stitch. And you still continue like this. You enter the stitch where you went
previously, you enter from the front towards the back, and you come out of
the back four, into the next other loop. And you go like that, zigzag,
from one granny to another. It may seem confusing at first but
with practice it goes very well. You enter the stitch which
is already taken and you exit through the next stitch. And every now and then you can pull on
the strand to tighten well until that you no longer see the sewing thread. And in the end you should finish
in the corresponding chain to the side of the granny. And check if your thread is well
pulled all the way through the seam. And that's it for the last
assembly technique with a needle. You see, it's a very solid
stitch and even the contrasting color does not even appear. We will now learn how to join
grannies with crochet stitches.
9. Join With Stitches : Another way to join our granny squares
is using our hook and basic stitches. The same principles as you have learned
about assembly with the needle will apply. We will learn in this lesson how to
join two squares with slip stitch, with single crochet, reversed
single crochet and flat slip stitch. The graphs will look like this by telling
you which stitches use between squares. And I forgot to tell you
the previous lesson you. If you do an assembly of squares which
will make a large rectangle or a large square like a blanket, for example,
I recommend going one way at a time. So you will join all your squares together
in the vertical or horizontal direction, and you do the opposite afterwards. You are going to join the two grannies
together with a slip stitch in the corresponding stitches of each square. You can start by entering
the corresponding corners and join the thread to them. You can make a little chain stitch just
to secure the thread from the beginning. And then you're going to go into
the both loops of each square and you make a slip stitch. It's that simple. And you can hold both squares so that
their wrong sides are facing each other. When you arrive in a chain
space, you can just make a slip stitch through both spaces. So it should look like this. And note that with a strand of
contrasting color, this is not the best method for joining. It doesn't look very pretty. So if you do the slip stitch
method, it's better to take a thread with the same color. At the end of the square, you
can go join in both spaces. This type of assembly gives you a
texture between the two grannies. And like I told you, it's much better
with a thread of the same color. And this is what the graphics
that require joining two squares using slip stitches look. They can be either shaped round or
oval as long as it is a small full dot. Let's try with single crochet. This time, instead of entering into both
loops of each stitch, you will enter into the front loop only of the two squares. So you enter your hook into the front
loop of the small chain stitch before the first single crochet, as well as
in the front loop of the corresponding square chain, which is right here. You are going to join your
yarn, do chain one, and we will continue in the front loops of the
corresponding stitches of the squares. You enter in the two front loops
and you make a single crochet. And you continue like this all
along the side of the square. At the end, you enter the first
chain stitch in the corner, as well as the one of the other
square to finish the assembly. And here what it should look like. It creates a little more texture
than the slip stitch, and with a contrasting color, it's very pretty. And if you take a thread of the
same color, it will look like this. The diagram will tell you to do single
crochet stitches between the two squares. And maybe it will go even further
by specify you to enter the front loop of each stitches. Reversed single crochet are always
practical to create a beautiful finish, but they are crocheted backwards. So for right handers, you will
crochet from left to right, and left handers from right to left. You will enter into the back loops of
stitches corresponding to each square. We will start by entering a chain
stitch from one corner of each square. Don't forget to take the back loop, even
if on this square it looks like it's the front loop, because it's facing you. But it's the back one
of this granny square. You can chain one, and you will crochet
in the back loop of the previous stitch. So you step back. You're going to take the two
little strands like this. And you make a single crochet like
as usual, but it will be reversed. And you continue on all the
back loops of previous stitches corresponding to the two squares. This technique is a little difficult
in terms of dexterity, but with practice you will find it pleasant. And you continue this
way on the whole side. When you reach the end, you can do
your reversed single crochet in the last chain stitch of the two squares. This should give you this result. It creates a nice bouncy texture. If you had taken a thread of the same
color, it would have looked like this. And the diagram will tell
you to make reversed single crochet between the two squares. It is an X with a small wave on top. And the chart could go further by telling
you to make them into the back loops only. The technique with flat slip
stitch will remove the texture created with previous ones. The junction between your
squares will be flat. It just takes a little
bit more of patience. I show you how to do it now. You can tie a slipknot and insert your
hook inside, then pass it through the back loop of the chain stitch from the corner, and enter from the front to back of
the chain stitch of the other square. And you are going to make your
slip stitch through both loops, as well as the loop on your hook. Then you will enter the back loop
of the next stitch of the same square, and in the back loop of
the other square's next stitch. And you make the slip
stitch through all loops. It's a little difficult to
pass, it takes practice. And you go to the next stitch of the
same square, as well as the next stitch of the other square, and you continue
like this from one square to the next. And it is very important to always
make sure to pass the hook over the thread when you go through
the stitch of the opposite square. So it should look like this. You form a small braid
between the two grannies. And just to show you the last slip
stitch we make in the little corners chain, if you have difficulty to pass
the thread through the loops, you can pull it like this to help it pass. That does a nice assembly
work with no texture. I don't have a diagram to
show for this technique. You will at least know it exists if
you want to have that kind of finish. Let's now discover the
latest assembly technique.
10. Join As You Go: A super interesting assembly technique
is to join our squares together by crocheting their last row. It's super practical if you want to
make a big blanket, clothing or bag. To do the exercise with me, you
will need 4 classic granny squares. If you purchased the crochet kit
that comes with this course, don't make a fourth square with the wheat
color, because you're going to run out of it for the last project. So you can take the rust color. You can arrange the four squares like
this, and at each step, I'll show you the graph that comes with it because
the whole diagram is a little scary. But don't worry, you will
understand everything at the end. So we'll start with
the lower right square. For left handers, it will
be the lower left square. So for you, the diagrams, again,
will have to be reversed, but the technique remains the same. You will start in a corner
with the natural color and you'll crochet one shell only. You join the yarn, you chain three and
you make two double crochet in the corner. Then chain one and you will continue
by crocheting the classic granny made up of shells of three double crochet
separated by a chain stitch on the sides and in the corners two chain stitches. So I put the graph here for you. You can follow it until you have
reached the third corner of the square. You can pause the video. In the third corner, you will do only one
shell, therefore three double crochet. Then you will chain two. And we will continue on the
square which is right next to it. You can position your square this way. And we're going to work on this one. You'll make a double
crochet in the lower corner. And you continue, you will do 2 other
double crochet in the same corner. And now we're going to join
this square to the other. So you can place it this way to
clearly see what you're going to do. You will do a slip stitch in the
chain 1 space that's right here. You can go over this way. And you continue in the next
space of your second square by making 3 double crochet, a shell. Your slip stitch will have
replaced the chain stitch. And you will join once again
with slip stitch passing over it. If you're wondering if it would be
easier to make the slip stitch passing under the square, it is a more intuitive
movement, but here is the result it gives. This will give you a little rebound to
your junction, so the finish will be a little less flat than if you do the
slip stitch on top, as I showed you. Even if the movement is a little less
intuitive, the result is more aesthetic. Whether you choose one way or the
other, just make sure you do the same thing throughout your project. And we continue to make a shell in
the next space of the second square. We join the two squares with a slip
stitch in the space of the chain stitch. And that will be the principle
throughout the assembly. So the graph will look like this. You see the same shells on the second
square, except that instead of the chain 1 between each of them, I put
the slip stitch symbol, which is facing the first square chain 1 space. So it shows that you will have to
attach the second square on the first. You continue like this
until the upper corner. You will make one shell only. Then, we will join with a
slip stitch in chain 2 space. You are going to make chain 1
only, so your first slip stitch count as the second chain. And you do your second
shell in the corner. It should look like this. So you will continue on the
upper side of your second square. We meet at the next corner. After making your first shell
from the corner, you will chain 2. And we're going to join the
third square, the one just above. You will proceed the same way you
just did with square number 2. I leave here the diagram
for you to continue. At the second corner, you make a shell. And like we did previously, you
do a slip stitch in the corner space of the second granny. Pay attention, it's
really this space here. So you make a slip stitch, chain one, and you will continue
with the second shell, in the corner of the third square. I put here the graph that you can
follow for the following steps. You will continue to crochet on the side
until the first shell of the upper corner. You will then chain 2 and assemble
the 4th square with the 3rd. And we meet at the last shell. I'll show you how to assemble the
4th square with the 3rd and the 1st. You can pause the video. You're going to do the shell in the corner
that really connects all squares together. After making your 3 double
crochets, You are going to do a slip stitch in the corner space of
the third square, so right here. And a slip stitch in the lower space
from the corner of the first granny, which is opposite, right here. Your four squares are well
joined together, and you continue with the second shell from the
corner of the fourth square. The rest of the side will be worked on
the same way as your previous assemblies. You can follow the instructions in red. We meet just before making
our second corner shell. We are now at the point of doing
other side of our fourth square. So you end up with your
second shell in the corner. And the next steps will be very simple. We're going to close the outline
of assembling our squares. So for the next two sides,
you will do as usual. And we meet right there, at the
junction between square 3 and 4. After making your shell in the
upper corner, you will not chain 2. You will only chain 1. And you will make a slip stitch
in the chain 2 space right here, between the two squares. And you will make another
chain 1, which will belong to the corner of square number 3. And you are going to finish the corner
of square number 3 with a shell. The graph will look like this. You see at the top the chain 1,
the slip stitch in chain 2 space, and another chain 1 that will form
the corner of the third square. You will now continue as usual on both
following sides of the third square. And you are going to do the same
thing between square 3 and 2. Chain 1, slip stitch in the chain 2
space, chain 1, and you continue on both following sides of square number 2. And the same principle,
chain 1, slip stitch, chain 1 between squares number 1 and 2. And finally, the last side of
square number 1, that you will be very happy to end with the missing
shell from the first corner. You will finish with chain
2 and a slip stitch on the top of the beginning chain 3. And that's all! You have just finished a join
as you go assembly technique. I show you the final diagram
here, what you just did. I hope you are no more
intimidated by this graph. It's really about following the steps. I put yellow arrows when there is
no assembly to be done, and and blue dotted lines when they are. I have also numbered all the steps
to do them in the correct order. You will sometimes see diagrams drawn
simply like this, which will tell you in which order assemble your squares. And here we have the formula if you
want to assemble several squares. So horizontally, if you want to add
squares, you would repeat squares number 2 and 3, and horizontally, if
you want to add squares, you would repeat squares number 2 and 3, And
if you would like to add some in height, you will repeat squares 6. And you would end up with
the final border as we did. I have included a PDF with
all these informations and the documents to download. I'm going to show you now that we don't
have to use only the classic granny pattern with the join as you go technique. You can use the same method
for other types of stitches. You don't need to practice. I'm just going to show them to you here
as a reference because we're going to practice it in the third project together. What I did in this case are double
crochet in each of the stitches instead of the classic granny style. So you still have corners, this time
made up of 2 double crochet, chain 2, 2 double crochet but all sides are made
with double crochet in each stitch. The principle is the same as we
just practiced together Only is that we are going to join each double
crochet with the double crochet that we will do on the second square. I will show you two
slightly different methods. The first, the simplest, after having
made your first double crochet from the second square, you will come and join with
a slip stitch in the last double crochet that you made on the number one square. So the one opposite, just here. Hold your loop on your hook so as
not to lose it, and you pass through both loops of the double crochet
and you make the slip stitch. You may have difficulty to pass the
thread well through the loops, but with practice it should be fine. You're going to continue. You're going to do your second double
crochet of the square number two shell, which you are going to join with
a slip stitch in the corresponding double crochet of square number 1. And you continue in all
subsequent double crochet. Once again, it's better to do the
slip stitch over and not under for a more beautiful result. And at the corner, after having done
your first shell, you will proceed in the same way to what we have just learned. You are going to make a slip
stitch in the chain 2 space. Chain one. And you continue to
the side of the square. With this technique, it makes still a nice
finish, but with a little texture between. This is what a diagram will look
like who has to crochet the last one row in double crochet, joining each
of them from one square to another. I put the little green arrow for
you to indicate that after having made your first double crochet,
you go make a slip stitch in the corresponding one of the other square. And then you continue with the
second double crochet and so on. The technique we learned with the
classic granny square will remain exactly the same when it comes
to join the corners together. The last variation that I will show
you and which we will use in the project number three It's very similar. We're going to join one double crochet
or any stitch to the other, but this time, for a little more aesthetic
work, there is a step that we will add, and it's up to you to choose whether
you would like to use it or not. After making your first double crochet
on the other square, you will take out the hook of the loop, you're
going to enter in the corresponding double crochet of the first square,
and you're going to take back the loop to pass it through the stitch. You will continue by doing the next
stitch, in this case the double crochet. You are going to let go of the
loop, be careful not to undo it. You enter the both loops of the
next double crochet of the other square, and you will go and look
for the loop to pass it inside. And it doesn't matter which way you
take the loop, even if it twists, know that it will make no difference. So you take the loop as it comes. And don't worry, we'll practice
a lot with project number three. The finish will look like this. It only adds texture between the two
squares and not a raised texture. And here is what it gives when
we replace the double crochet with single crochet stitches. And that's what we're going
to do with the third project. That's all for the assembly techniques. We're now ready to
start our first project.
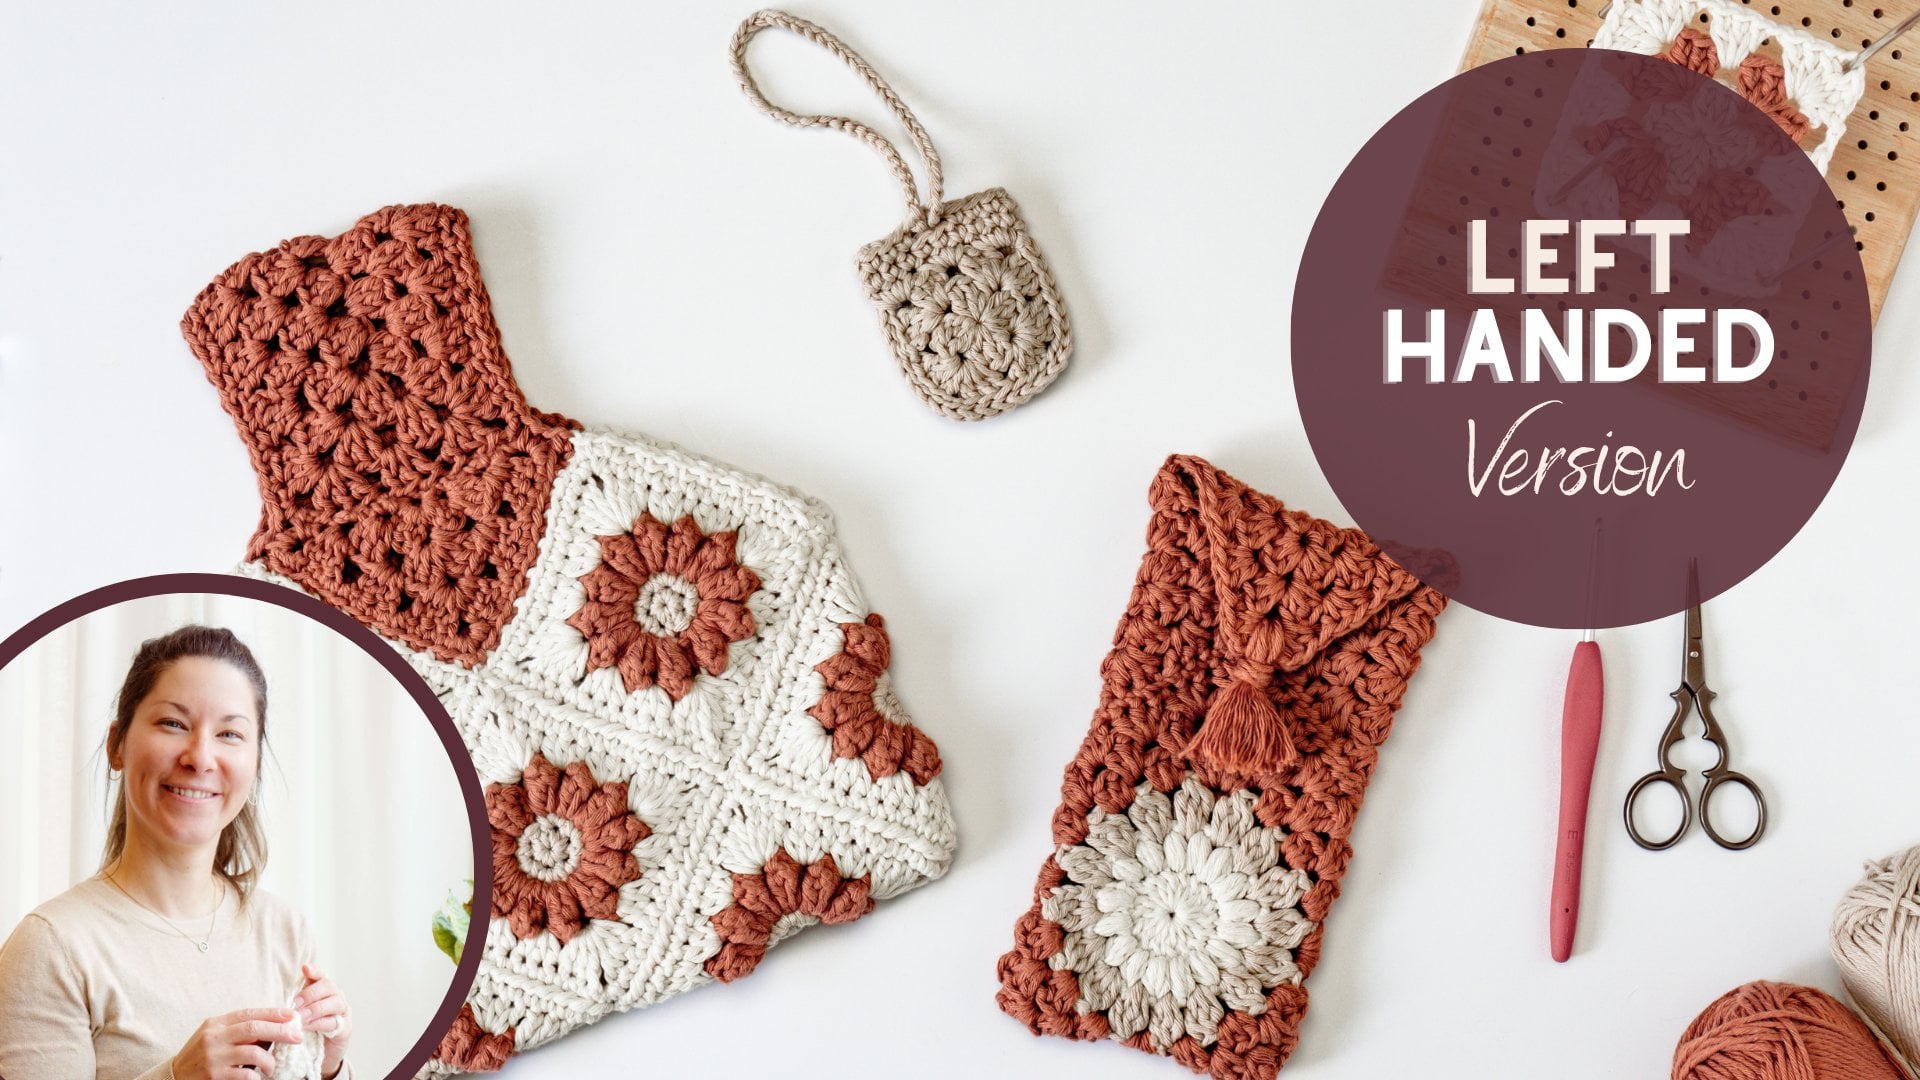
11. Mini Pouch: Material & Techniques: Welcome to the first project of the
class where you will make a mini pouch. Super practical and quick to
crochet, you can transport with style all your little accessories
like your airpods or your lipstick. Here is the material you will need. About 10 grams of worsted weight
cotton yarn in wheat color, but you can take the color of your choice. A 3. 5 millimeter hook, scissors, a yarn
needle, and a stitch marker if necessary. And here are the techniques we will
use in the creation of the mini pouch. We are going to crochet small classic
grannies, then we will put them together using the slip stitch assembly technique. And we will learn how to add a border. Grab your hook and let's get started!
13. Mini Pouch: Assembly: You now have your two
little grannies done. You will put the wrong sides
together, and we will assemble with slip stitch technique. If you would like to use stitch
markers, they can be useful to know where to start and where to end. So you will be able to put it on one
of the chain stitches in the corner, the one which is the most inferior. So right here. And you can count eight
stitches that separate them. It will be supposed to be on the lower
chain from the other side corner. We can now start. You will take your hook and
the yarn of the same color. You will enter into the back loop
only of each of the stitches. And make your slip stitch. Take only the back loops from
each of the grannies, like that. You'll continue all around
until your next marker. And you can make your last slip stitch
in the chain loop where your marker is. You can remove it to
make your work easier. And don't cut the thread because we're
going to continue with the border. You will continue by making a chain and
3 single crochet in the next chain 2 space, which is right in this corner. And you will continue in
all of the next spaces. You will make 3 single
crochet in each of them. So we just made the middle space, you will
now go in the first granny's corner space. You are going to make 3 single crochet. And continue around the corner
from the second granny, right here. And we continue in the middle
space of the second granny. And we finish in the last
corner of the second granny. You can join this round by making a slip
stitch in the first single crochet made. Round 2 will be very simple, you
start with chain 1, you will make a single crochet in the same stitch,
therefore in the single crochet where we joined, and you will continue
by making single crochet all around for a total of 18 single crochet. And at the end, you join with slip
stitch into the first single crochet. Round 3, chain 1, single crochet in the
same stitch, the one where you joined. You are going to make
3 other single crochet. You are going to chain 3. Skip 2 stitches from round
2 and continue with a single crochet in the next 8 stitches. You will now make a long
chain of 50 chain stitches. When you're done, your little pouch must
certainly have turned around your thread. So just make sure your chain is
not twisted before continuing. You will continue on the same
round into the next stitch. You will make a single crochet. You can check if your
chain is not twisted. And you continue by making single crochet
in all three following stitches. You can join with a slip stitch
in the first single crochet. And that's all. You have finished your mini pouch. I'll play the video and fast forward
to show you how I weave in ends. And your little pouch
is ready to be useful. You can tuck in the chain in the
small opening that we have done on the front to be able to attach it to
your bag and secure everything inside. Now, let's move on to the second
project, the all round case.
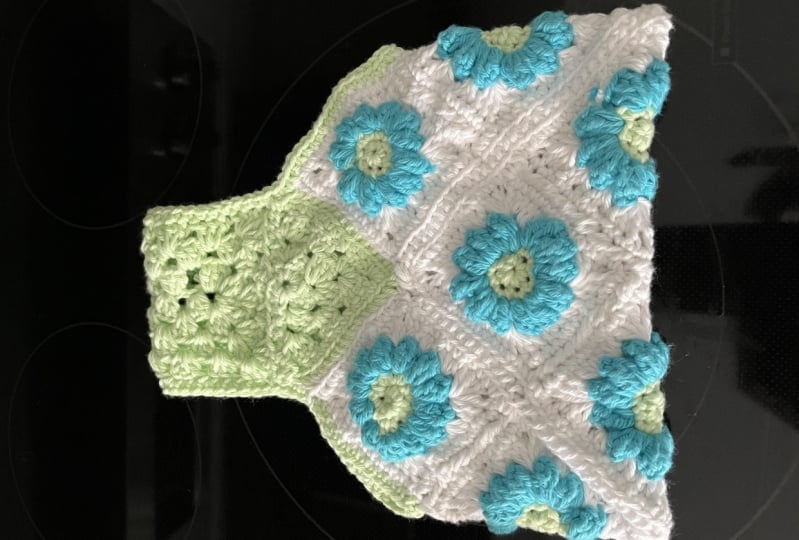
14. The Case: Material & Techniques: Now let's move on to the second
course project, the all round case. It will be useful to protect with
style all kinds of accessories, like your phone and your glasses. You will need 40 grams of cotton worsted
weight yarn in rust color, 5 grams in natural color, and a little bit of
wheat color cotton yarn, if you want to do exactly the same thing as me. But you are free to choose
the colors that inspire you. We will once again use a 3. 5 millimeter hook, scissors, a yarn
needle, stitch markers, and a 15 by 15 centimeters blocking board,
which is completely optional. You will learn different
techniques with this project. You will learn how to do the puff
stitch, the bobble stitch, you will also know how to transform a circle
into a square, and we will do the assembly with the needle technique. And also, you will learn that
we can use grannies to give your creativity all its liberty. Come join me in the following
video to get started.
15. The Case: Granny #1: We will start right away
with the first granny. You will take the natural color
yarn and start with a magic ring or the other technique if you prefer. You will chain 3 and make 16
double crochet in the ring. I will show you the graph and
we meet at the end of round 1. After making your 16 double crochet, you
can pull the thread from the beginning to close the ring tightly and make a
slip stitch in your first double crochet. Make sure you count 16 double crochet. You will continue by making chain 2, and
I will show you how to do the puff stitch. You are going to yarn over, you enter in
the same stitch where you did the last slip stitch to join, yarn over, you pull
through the stitch, yarn over, and you enter once again in the same stitch,
yarn over, you pull through the stitch, and one last time, yarn over, you still
enter the same stitch, yarn over, you pull through the stitch, Yarn over, you
pull through all the loops on your hook. And you finish with a chain stitch. So that's the puff stitch. I'm going to make another
one again to show you. Yarn over, you enter into the next
double crochet in the next stitch. Yarn over, you pull through the stitch. Try to create space over as you go out. Leave it well loose to be
able to pull through later. So you do this three times. And the last yarn over, you pull
through all the loops and you close the puff stitch with a chain. I'll show it to you one last time. Then I'll put you the
diagram and I'll let you go. And for your information, the
puff stitch can have variations. You could enter, for example,
4 times instead of 3 to make a slightly more bumpy texture. You continue the same way in
all remaining double crochets. You see the symbol here? It's like 3 half double crochets together
with a little chain stitch on top. When you have finished your 16 puff
stitches, you will make a slip stitch in the chain 2 space, while joining
the next color, which is the wheat one. You can cut the natural colored
thread, we won't need it anymore. You join the wheat color, you can
tie a double knot with the 2 threads. just to secure them well. And we will come and hide them
while crocheting our round three. You are going to do a slip stitch
into the next space between the first two puff stitches. Don't forget to include your two colored
threads that we are going to hide. And then you make three chains. We are going to do two double
crochet together, always around our two colored threads. You start your double crochet, but
after having passed the first two loops, you stop and do another one. You pass in the first two loops,
and the last step, you will yarn over and pull through your three
loops that are on the hook. So we made two double crochets together. And you can make two chains. Always crocheting around your
threads, you will enter into the next space, between the two puffs. And this time, we are going to make
three double crochets together. So it's the same principle,
only you add one. So the last double crochet, you go
through the stitch, you pull through two loops, and the last step, you will
pull through all loops on the hook. This stitch is called the bubble stitch. It can consist of more
than three double crochet. We could make four or five double
crochet together, which will create a little more texture. You will continue by doing chain
two, And another bobble stitch. 3 double crochet together
between the next 2 puff stitches. And you continue like this all around. The bobble stitch is drawn with
3 double crochet put together. Your last bobble stitch will be
done between the last and the first puff stitch right here. Followed by chain 2 and you will
make a slip stitch on top of chain 3. And you will join the last color. You can cut the wheat colored
thread and tie a double knot with the 2 colors just to secure them. And we continue with the next round. You are going to chain 3. And while crocheting around
the 2 threads that we have just tied, you are going to do 3 half
double crochet in the next space. You will do the same thing in next space. 3 half double crochet again. by crocheting around the threads to
not having to weave them in afterwards. You repeat another time 3 half
double crochet in the next space. In the next one it will be 3 double
crochet, chain 2, 3 double crochet. So it will form the corner
of your granny square. You can make 2 chain stitches after
the first shell and the second shell is made up of 3 double crochets. So this is how we transform
a circle into a square. We make shorter stitches on the
sides, therefore half double crochet. And in the corners, we are
going to make double crochet, which will give a square shape. You can now cut the two colored
threads you crocheted around. They are going to be pretty secure. And you continue on
the side of the square. I put the diagram here for
you so you can follow it. The next shell will be made up
of three half double crochet. On the diagram you see the
difference between a double crochet and half double crochet design. The half double crochet does not have
a small line which crosses its branch. So you can see that on the sides of
the square we make half double crochet and in the corners double crochet. I'll show you how to make the
last corner of the square. So you are going to make
three double crochet. Chain 2 and 2 double crochet
always in the same space. And you will make a slip stitch in
the chain 3 space from the beginning, which will form your third double
crochet missing from the corner. So it's going to look like this. We will continue with the next round. Given that we already have transformed
our circle into a square, we will We will work only with half double crochet. You will start by doing chain 2 and 2
half double crochet in the same space. You are going to make a shell of 3 half
double crochet in the next 3 spaces, therefore on the side of the square. In the corner, in the chain 2 space,
you will make 3 half double crochet, chain 2, 3 half double crochet. I'll let you continue with the
diagram, knowing that all shells will be made of half double crochet. After crocheting the last corner, you
are going to make a slip stitch at the top of the two chain stitches. You will start the sixth round by
making chain 2, and this time you are going to do your first shell of 3
half double crochet in the next space. And the principle remains
the same as round 5. except that a shell will be
added on each side of the square. And in the last space, you
will do 2 half double crochet. And you will join with a slip stitch
on top of chain 2 from the beginning. And that's all! You have finished your first granny. I'll fast forward the video to
show you how I weave in the ends. So this is the back of your
granny, and that's the good side. Now, if you want to do the blocking
step, go ahead, but I don't think it will make a big difference if you omit it. After having humidified your square, and
if you use a small board 15 by 15 cm, you can put the small sticks in the corners
of round 5 to be able to stretch it well. So the square should be
approximately 15 by 15 cm, and you just have to wait for it to dry. Let's now move on to the second
granny, who is much simpler.
16. The Case: Granny #2: The second granny is
going to be very simple. It's going to be the same as
the classic granny, except that you are going to do half double
crochet instead of double crochet. I'll start with you. So you can start with a magic ring,
or 5 chain stitches closed with a slip stitch in the first one. And you will chain 2. Then you will do 2 half
double crochet in the ring. Chain 2. 3 half double crochet in the ring, chain 2, and you repeat 2 more times. At the end, pull the beginning thread
to close the ring, and join with a slip stitch on top of chain 2. Be careful not to go in the first
half double crochet, but really the small chain stitch just before. I give you the diagram
of what you just did. We will continue with round 2. You are going to chain 2 and make
your first shell 3 half double crochet, chain 2, 3 half double
crochet in the first corner. I leave you the diagram to
continue the second round as well as the following rounds. At the end of round 2, you will
make a slip stitch in the chain 2 space to transform it into the
missing half double crochet from the last corner's second shell. You will be able to pause on each picture. If you have difficulty following a
diagram, you can always return to the lesson of the classic granny squares,
the version 1, and only do half double crochet instead of double crochet. The last round of the second granny,
you finish with a slip stitch on top of the beginning chain 2. And this is what it should look like. And I show you in fast
forward how to weave in ends. You may notice that the corners of
the granny are not very straight. It looks like there are too many stitches. You are right. Usually the shells of grannies made of
half double crochet has to contain only two half double crochet and not three. But given that we can do whatever we
want with crochet, I decided to make shells of three half double crochet. to have more leverage
while assembling my case. And there you go! We are now ready to assemble
our two granny squares.
17. The Case: Assembly: You will start by taking your
first granny, the one with the flower, and you are going to drop
it the wrong side facing you. And you're going to fold it from
this way, like a small pouch. We're going to sew these
two parts together. To help you hold it, you can
put a stitch marker that holds the three corners together. You can cut a rust colored
thread, about three feet long. And we're going to sew with the
needle, with the whip stitch technique. It's okay if you don't remember,
I'll show it to you right now. You enter the needle in two
corners together, like this. Leave a good length of thread
left behind because we're going to use it to sew the other part. And you're going to sew this way. You enter in both loops of each
of the corresponding stitches. And you will go into the following
stitches by turning around them. So always start sewing on the same side. And you pass through both small
remaining loops at the end. We will now do the same
thing on the other side. And we are going to use the other
part of the thread you left behind. If you ever miss a stitch and you are
no longer really in the corresponding one, if it is only a question of one
stitch, don't worry, it really won't show. That's the beauty of crochet. We finished sewing our
first granny square. Let's go now integrate the second one. This time, right side will facing you. This here is the back side,
where you can see the small bumps that the middle loop does. We'll place it that way, a corner that
fits in the space of the small pouch. And we're going to sew both sides,
from this granny to the other. Again. You can take a three feet long
thread, go enter into the two corners that meet together, and once again,
let about half the thread behind. And you can start sewing from
the same way as the other granny. Start by joining the corner of the side
with the corner of the second granny, and you are ready to start sewing. You will sew until the next corner. And you're going to do the same thing with
the other side with the remaining thread. And at the end, you can solidify the
three corners together with the thread. And that's all! You have made your all round case. You can now weave in ends. Take the opportunity to close the
case even higher by entering into the next stitches just after the junction
of the three corners, like that. It's going to close it a little
bit more roundly than triangularly. And then you can weave in these. Now let's make the little tassel,
which is going to be right on the flap. You will cut 9 strands that will
measure about 6 or 7 inches. You will then pass them through
the corner of the second granny between round 6 and 7. Cut another thread a little longer. And you will roll it
around to make the tassel. And block it by making a double knot
with the beginning and end thread. Cut the fringes so that
they are about an inch. You have to separate each strand
so I give you the long option, it's with your yarn needle. But if you have a comb close to
you, it will be 10 times faster. And you can finalize
with that little haircut. And that's all! You have completed your second project. I hope this case will be super
practical and bring you a few compliments along the way. Now, let's move on to the final
project, the Crochet Everywhere bag.
19. The Bag: Main Granny: We're going to start the main
granny with the wheat color. And you will start with the magic
ring or the other technique. And you will make 6 single
crochet in the ring. So you start with chain
1 and 6 single crochet. I put the diagram here for
you so you can follow it. At the end you can pull the thread from
the beginning to close your magic ring. Count if you have 6 single crochet made. And you will join with a slip
stitch in the first single crochet. Round 2, you will do a chain 1, and
you are going to include the thread from the beginning while crocheting
the following single crochet. So you are going to make a single
crochet in the same stitch, the one where you have joined in slip stitch. And you make a second one, always
by including the beginning thread to avoid to weave in at the end. And you will continue by doing 2 single
crochet in every following stitches. for a total of 12 single crochet. And all along you crochet around the
beginning thread to secure it well. I'll give you the graph for round 2. The symbol for 2 single crochet in
the same stitch will look like this. And the last set of 2 single
crochet will be right here. Just before you finish your last single
crochet, you will join the rust color. You can cut the beginning
thread that you have secured. And finish your last single
crochet by joining the new color. And make a slip stitch into the
first single crochet of round 2. You can tie a double knot with
the 2 colored threads and we will crochet around these for round 3. You are going to chain 3 and I will show
you how to make the real popcorn stitch. Sometimes we use this term when
we actually make a bobble stitch. So when you follow a pattern, just
make sure you read the instructions regarding the stitch used. So the popcorn stitch is done this way. You are going to make four double
crochet in the same stitch. And be sure to include the
threads of color change. At the end of your fourth double crochet,
you take the hook out of the loop, you will enter from forward into both loops
of the first double crochet you made, and you will pick up back your loop and you
pull it through this first double crochet. And you close it with a chain stitch. So, you just made a popcorn stitch. You see that it really makes stand
out your group of four double crochet. It's even more pronounced
than the bobble stitch. We are going to continue the pattern. You are going to do an extra chain. And you will continue by making a second
popcorn stitch in the next single crochet. So, four double crochet
in the same stitch. And you join the fourth
to the first at the end. And don't forget to crochet
around color changing threads. And don't forget also the little one extra
chain between the two popcorn stitches. You continue like this by doing
the popcorn in each single crochet of the previous round. This is what the diagram
will look like for round 3. The popcorn stitch will be
represented with the number of double crochet inside it. With a small symbol in the shape of a
smile, which show to join them at the top. And since the popcorn stitch comes with
a chain to finish it, I did not include it in the popcorn symbol, but I put
the extra chain one between each one. Just a little note, you can stop including
the changing color threads approximately at the fourth popcorn stitch. And your last one will be in this stitch
right here, right before the color change. You make the extra chain stitch
and you will join in chain 3 space, from the beginning,
while joining the natural color. Cut the rough thread and make a
double knot with the new color. We're going to crochet the next
round around these two strands. You will start by making a slip
stitch into the next space between the first two popcorn stitches. You will then chain two and make two
half double crochet in the same space, including the threads of color change. You will then make a shell of three
half double crochet into the next space. We will now make your first corner
to transform the round into a square. You are going to make a shell of 3 double
crochet followed by 2 chain stitches and 3 double crochet in the same space. It will look like this. You can now stop to include the color
changing threads, they are quite secure. You continue with a shell of 3 half
double crochet in the next 2 spaces. I put here the diagram to continue. You would have to do the second
corner made of two shells of double crochet separated by chain 2. And I'm going to do the
last corner with you. The first shell of last
corner will be right here. You make 3 double crochet,
chain 2, 3 double crochet. And you join with a slip stitch
on top of the beginning chain 2. If you would like to try the technique
to assemble all the grannies by crocheting the last round, the join as
you go technique, you can stop here. Make an invisible finish with the
ending thread, as I showed you in the previous lessons, and make nine
others, so ten small squares in total. They should measure approximately two
and three quarter inches on the sides. Otherwise, if you would like, better
make the assembly with the needle. Here is the diagram that
you will need to follow. So you will start with chain one, a
single crochet in each of next stitch from the sides of the square, and the
corners will be made of a one single crochet, chain two, one single crochet. And don't forget the
little feature at the end. I made you make a single crochet in
the space between the last double crochet and the two chain stitches,
just to make it more aesthetic. And you end up with a slip stitch
in your first single crochet. Your granny will look like this. And it should measure approximately
3 inches on the sides. And I show you just how to do
the little invisible finish. Once again, you will do 9 additional
squares, for a total of 10 grannies. No matter which granny you choose
to do, you can block them with the technique of your choice. We will now learn how to do a
triangular shaped half granny.
22. The Bag: Join As You Go Assembly: Now is the time to assemble the
main grannies to form our bag. If you chose the join as you go technique
by crocheting the last row, stay here. Otherwise, go to the following
video to learn how to assemble the grannies with the needle. Position your ten squares this way. You will now put stitch markers on the
sides of four grannies like I do here. And if you can use different
colored markers, it will be better. I show you the diagram that I will use. Do not be afraid, we will
do each step together. But you see I put small circles to
indicate where the markers must be. We will start on the corner of
square number one, which is this one. We'll start in the lower right corner. So enter your hook in the corner,
join the natural colored thread, and you are going to make a chain one. By the way, it won't count like a stitch. And you will make a single
crochet in the same space. You will make a single crochet in
each of the following stitches. We meet at the corner. In the first corner you will do one single
crochet, chain 2, one single crochet. So all the corners of every grannies
will be made up of this pattern. And you continue on the side of the
square, single crochet in all stitches. And when you reach the second
corner, you make 1 single crochet, chain 2, 1 single crochet. Here is the diagram of what we
just did, and what we will do. We started in the bottom corner,
we're going to work on 3 sides of the square, and we just meet
before starting the 4th corner. Now that you have completed 3
sides of the square, you will only make a single crochet in the
last corner, followed by chain 2. And we're going to join the second square. You can take it this way. Wrong side to wrong side. And make a single crochet
in the corresponding corner. And this is where I show you the flat slip
stitch technique to join the two squares. You're going to take the
hook out of the loop. You're going to get into the corresponding
single crochet of the one you just did. Therefore, the last one
of square number one. You take the loop again and pass it
in the stitch of square number 1. And you do this for each of the single
crochet on the side of square number 2. You can really come and get your little
loop the way you want, even if it is twisted, it really won't bother. As long as it passes through the stitch. And if you don't really like this
technique, know that you will have to make on only 16 sides of square. Otherwise, you can always choose
the ordinary slip stitch method, which will make a small texture
between the two squares, like I've shown in the lesson including all
crocheted assembly techniques. And here is the difference it will make. It's up to you which
one you like the most. But in any case, just stay with the
same technique throughout assembly. For the reminder of the video,
I will stick with the flat slip stitch option, because I find
that it makes a much nicer finish. Continue this way until next corner. I'll show you how to connect them. I put here the diagram which shows
that it is necessary to make a slip stitch with the corresponding
stitch of the opposite square. When you are ready to do the first
single crochet in the corner, you can join this one with the one
corresponding to the other square. And you have two options. Either you let go of your loop
to come and do a slip stitch in chain 2 space, that is right here. You're just going to look for
your loop to pass it inside and you make your other chain. But I noticed that even if you would
make two chains directly without joining one with the other square, honestly,
it doesn't really make a difference. And it's a little less
difficult to work with. And you finish this corner by doing
a single crochet inside, and you continue with a single crochet in
each of the following stitches. I will show you the diagram
for you to continue. You will make the next corner
as well as the external side of the same way as usual. So far we assemblied two squares. You will continue following the
same principle for assemblies square number 2 and 3. Same thing for square number 3 and 4. We'll meet up after you have
done step 11 in the picture. It should look like this. Well done, you already have four squares
assembled and check that your markers are on the lower part of squares 3 and 4. Now we're going to assemble the square
5, the one just above, with the 4. It's exactly the same. You do one single crochet in the
corner, chain 2, and you assemble the square just above the same
way you have done for others. We meet at the next corner. Once in the corner, you can do a
single crochet, join it with the corresponding single crochet of
square number 4, and this time it's going to be important to join with a
slip stitch in the opposite corner. You can do it this way. You release the loop on your hook, you
enter it in the corner and you take it back to pass it into the opposite corner
and you do the remaining chain one. You will do the rest as usual
and we find ourselves at the bottom corner of the next square. We will learn how to join
four squares together. So your sixth square is attached. Let's go now attach the corner
to the corresponding square. You are going to make
your first single crochet. You will let go of the loop to make your
slip stitch with the corresponding stitch. Then you will make a slip stitch by
releasing the loop and entering the corner of opposite square which is right here. And you won't do a chain 1, you're going
to do the same thing in the corner of the square number 3, the one right here. And there you have it,
your 4 squares are joined. Now you can finish the corner of square
number 6, as well as continue on the side while joining it to the opposite square. I'll let you continue follow the
diagram to join square number 7. We meet at its external junction. You can follow the arrows and
the numbers indicated to knowing what order to do the steps. The yellow lines means that you
will only make single crochet without worrying about joining. And the blue dotted lines will mean
that it'll be necessary to join with a slip stitch in the opposite square. So you now have 7 assembled squares. You can do the second bottom
corner of square number 7 this way. You make a single crochet, you
attach it as usual with the corresponding single crochet. You will join with a slip stitch
in the corner of square number 2. And then you will do a chain 1. And you continue on the other
side of square number 7 as usual. After crocheting the fourth side of square
seven, I will show you how to go from a square to the other on the same line. You will start by making a single
crochet in the corner of square seven. You will then chain one, slip stitch in
the center of the junction, it doesn't matter if you just go a little sideways,
and you're going to redo a chain one. and a single crochet in the
corner of square number 6. So it ends well the
assembly of two squares. I have now shown you all the
situations that can occur in assembly squares while crocheting. I'll let you go for the assembly of
the last three squares, and we meet at the step which is right here. Your bag should now look like this. The 10 squares are joined together. Now it's time to form the bag. And it is at this stage that your
stitch markers are important. You will crochet as usual the
sides of square 10 and square 8. You can remove and put back the marker
just to not let it be in the way. And you're going to join the two squares
laterally, as I showed you, by doing chain 1, slip stitch in the center of
the junction, chain 1, and single crochet in the corner of the other square. And you continue on
side of square number 8. Okay, now we are going to join
this square to this one, and this square to square number 10. So you will have to fold the bag. I'll show you how to do it right now. You will make the lateral
connection the same way. You make a single crochet, chain 1, slip
stitch in the center of the junction. You are going to take
the hook out of the loop. You will enter the space of chain
stitch that you just made, and you're going to go find the loop. So it's as if we had joined
the two corners together. And you will make a single crochet
in the corner of the next square, which you are going to join in the
same way with the corresponding single crochet of the square to attach. It happens to be the last single crochet
you have made on the other square. And you fold your project like this, to
join the same way as usual all this side. I show you what the diagram looks like. So we are in the process of
joining square 5 to square 8. At the next corner, you will make a
single crochet, which you will join with the corresponding single crochet. You are going to take the hook out of the
loop, and you will enter into the loop. Chain one space from next
corner to pick up for the loop. You will then make a slip stitch in the
middle of the junction of squares 4 and 5. And in my video, I forgot to join
at the junction of square 8 and 10. Unlike me, you can do it. It will be more logical with
the patterns mathematics. But know that it is not
such a visible error. Then, instead of making chain 1,
you'll just attach, as usual, in the chain 1 space of corresponding
square, which is right here. You can continue on the corner
of square number 4, and continue on the side to the next corner. Square number 4 to square number 10. It should now look like this. We will be able to finish the corner
of square number 4 by joining at the corner of square number 10. You do the same thing when you
join the two squares together. So a slip stitch which
joins the two corners. Then you make a chain and you finish
the corner with a single crochet. You can continue as usual on
the next two sides of squares. And we're going to do the
same thing we did previously. We are going to fold the
squares together at this level. I'll let you go. If you need once again to watch how
to do it, you can rewind the video. It's exactly the same steps. After crocheting the lower sides
of squares 4 and 3, you are going to join square 2 to square
3 and square 1 to square 4. And you will have finished
constructing the bag. I'll show you the final step. You will complete the first corner
of square number 1 by making a single crochet, which you will join to
the corresponding single crochet. Then you make a slip stitch junction
in the corner of this granny, who goes replace the chain stitch. You will then make a chain, and you
will join and slip stitch on the first single crochet of square number 1. And that's all! Congratulations, you have
enclosed the entire bag with only two threads to weave in. The assembly of the other crannies will be
the same whether you have chose the join as you go technique or needle assembly. So you can skip the next video
and go to the finishing one.
23. The Bag: Needle Assembly: This video is made for those who crocheted
the main granny square to the fifth round and who wanted to assemble with a needle. You can position your 10 squares this way. I show you the diagram here
of what you are going to do, the way you are going to sew. Don't worry, we're going
to do each step together. First. We're going to sew the grannies
together, which are located in the trajectory of the first arrow. So you can cut about a three feet long
of natural colored yarn, and I will use the mattress stitch technique,
but you can really use the technique you want to join grannies together. So to remind you a little bit what
is the mattress stitch, you are going to insert your needle into one of the
chain stitches from the bottom corner. You will take the one that is the most
superior, this one, in the back loop, and you enter into the corresponding
chain of the other granny to assemble, once again in the back loop. You can do one more round to
secure the base of your seam. We are now ready to start
with the mattress stitch. You will return to your chain from the
first square, and you will come out by the back loop of the next stitch. On the other side, you
go do the same thing. You enter the chain that you have already
been, from the front, and you exit through the back loop of the next stitch. So you do that all the way through. You always enter the stitch
where you have already been, and you exit through the next one. This will create a very tight seam. And don't worry if the cotton strands
separate, it really won't show when the sewing will be completed. So if your needle ever passes right
in the middle, don't worry, when we tighten it well, it hides everything. And you continue all
the way down the side. From time to time, pull the thread
to tighten the seam properly, because if you wait until the very end, it
might be a little more difficult. I'll let you go. We need to find out how to
assemble the two upper corners. The last stitch you will make to
assemble these two squares will be on the first chain of each of them. You can put, if you want, a stitch
marker on the second chain stitch. The marker will simply serve you
to let you know that you should not enter your needle in that stitch now. So we continue sewing in the same way. You will come out through the first
chain from the corner, and you will do the same thing with the other square. You can once again put another
marker on the remaining chain stitch of the other square's corner. We will now join the top two squares. So you can go back in the small
chain of your first square and come out through the corresponding chain
stitch, the one which is the most superior, so the one right here. I hope you are now well used
to differentiate the chain from the single crochet. It helps a lot for assembled grannies. You will now enter the same
chain of your second square to get out in the other corresponding
chain of the fourth granny. This is the one right here. You are now ready to continue on
the sides of these two new grannies. So you enter into the small chain where
you went to exit through the back loop of the next stitch and you continue as usual. And feel free to remove the stitch
markers because we are going to see well the remaining chain when we
will sew in the opposite direction. I'll let you continue assembling your
little squares and we'll meet when it's time to assemble the square at the top. You have now assembled
a row of 6 grannies. We're going to assemble a
side of the granny number 10. The seam will be done in this direction. You can directly join the thread
through the chain 2 space in the corner. And continue sewing on
the corresponding granny. You now have finished the first step. We're going to sew the second one by
following the direction of this arrow. You can cut one more time a thread
of about 3 feet long and we're going to start sewing right here. Starting once again in the
chain which is on this side. And keep it up, we're just going to meet
up in the junction of the four corners. Okay, this may seem confusing
so far, but you can clearly see the small chain that remained. We will sew in it. Same thing on the other side. It's a very limited space, but
I am sure that you will manage. Anyway, you know that with crochet,
nothing too bad can happen. As long as there is no
hole in that corner. And we're going to jump
over the cross seam. to continue to sew the
other two squares together. So the junction of the four
squares will look like this. It's quite clean, quite aesthetic. I now showed you all the situations you
can meet when assembly with the needle. I'll leave you now to finish
the assembly of the 10 squares. You can finish assembling the
green arrow from step two. You will finally do the third
seam following the direction of the arrow from step 3. When you have finished assembling your
10 squares, it will look like this. You can return the project to have
the wrong side facing you and you fold the tip towards the center, as
well as each side towards the center. The bag will look like this. We now have two seams to do. If one of your sewing threads
is long enough, you can use it. Otherwise, you can cut a new one. You're going to start in
one of the lower corners. It will be easier to properly
align the stitches together. And you're just going
to keep sew like you do. So you go in the same stitch, you
come out through the next, from one side to the other, and you continue
like this until the end of the bag. Arrived at the junction of the four
squares, usually you had already a scene made, but there is none there. So here is what you will do. You will go through the chain 2 space
from the corner of this square, the inferior one, and you do the same
thing on the other side to attach both squares together by entering in the
last chain of the lower one, and exit through the one of the superior square. And you do the same
thing on the other side. You can continue with the
assembly of these two squares. And it will look like this. Once finished, you will
just have to do this side. At the end, you will be able to
join the corners of these three squares for a more beautiful finish. All you have to do now is weave in the
threads before moving on to the next step.
28. BONUS: 2 colors Granny: I'll now show you how to make a solid
granny square that has two colors. It's going to look like the reversible
version of the classic granny square. With your first color, you're going
to start by making the magic ring. Chain 3 and 2 double crochet in the ring. You will continue by making 2 chains,
a shell made of 3 double crochet, and just before closing your last double
crochet, you will join the second color. Then make the 2 chain stitches
and the 2 remaining shells. You make the 2 chains at the end,
and you will do a slip stitch on top of the beginning chain 3,
always keeping the same color. So here is the diagram for row 1. We will start row 2. You're going to chain 3, and you're going to turn like this. You already have the right
color to continue row 2. That's the big advantage of going
with the reversible granny technique. You can make 1 double
crochet in the chain 2 space. And you will make a double crochet in
each of the next shell's double crochet. You will make 2 double crochet, chain 2, and 2 double crochet. As you learned in the
instructions for the solid granny. And you continue by making a double
crochet in the next 3 double crochet. You will make one of the
next space's 2 shells. So 2 double crochet in the same space. And just before finishing the second
one, you will join the first color. You will chain 2. And finish by making a shell in the same
space, still making 2 double crochet only. And you continue on the
side of the square as usual. 1 double crochet in each
of the following stitches. And you make the corner as usual. Also, 2 double crochet,
chain 2, 2 double crochet. And you will finish by making a
double crochet in the next 3 stitches. The last one will be on top of chain 3. So don't be surprised to have
only one strand to enter. You will now make half of the
corner, so 2 double crochet. Chain 2. And you will join on top of chain 3. So it should already look like this. You can see the nice diagonal
that our 2 colors make. And be sure to keep the ends to
be weaved always on the same side. And row 2 will look
like this on a diagram. We will follow the instructions
clockwise, like the reversible granny square technique. We're going to continue with the next row. So you're going to chain 3, turn. You're going to make a double crochet
only in the chain 2 space, which is one of the shells in the corner. And you're going to make a double crochet
in each of the following stitches. You should have 7 on the side. I'll let you continue, we'll
meet up at the next color change. After having made the first shell
made up of 2 double crochets, you'll join the other color just
before finishing the second one. And you will continue by making
chain 2 and the second corner shell. And try to keep the colored
strands on the same side. So you see here, I entered my hook
just to the left of the colored strand, just to keep it on the same line. And you continue the pattern. We meet up just at the end. This time, row 3, you will follow the
diagram in counter clockwise direction. When you reach the last corner,
remember that you must always have 7 double crochets on each side. So don't forget to get into the
top of chain 3, that is right here. before you make your shell. And you'll finish by making two chains
and a slip stitch on top of chain three. You've completed your
two color solid granny. It will be ideal if you want
to make quilted style blankets.
29. BONUS: Hexagon Granny: Our granny square can easily be
transformed into a hexagon granny. It's just a matter of
making it have six sides. So you can start with a multiple of six or
make your original granny square contains a multiple of four and six simultaneously,
like the numbers I put in red. To illustrate with an example, the
main granny we made in the final project could easily be transformed
into a hexagon because the central flower contained 12 petals. So 12 being multiples of 4 or 6. Instead of building 4 corners around our
flowers separated by 2 half double crochet shells between each corner, we will make 6
corners of double crochet shells separated by 1 double crochet shell on the sides. This will give what you see on the screen. I also put in the documents
to download the classic granny transformed into a hexagon one. That will start with 6
shells of 3 double crochet. A pattern that I found very
beautiful is the African flower and I show you how to make it here. You can choose two or three colors
as long as the petals stand out. You will start with the magic
ring or the method of your choice. Chain 3 and you will make a double
crochet in the ring. You will then make a chain and
two double crochet in the ring. And you continue like this by making
chain 1, chain 2, 2 double crochet, for a total of 12 double crochet,
or 6 shells of 2 double crochet. Counting the 3 chain stitches at
the beginning as a double crochet. At the end of your last double
crochet, you will chain 1. You can tighten the magic ring and
close with a slip stitch on top of chain 3, by joining the color
that will be used for the petals. You can cut the thread of the first color
and tie a double knot with the 2 strands, and then crochet around to secure them. And we will start the second round. You're going to make a slip
stitch into the first chain 1 space, that's right here. And you can crochet around the
colored strands to secure them. Then you're going to chain 3, a double crochet in the same space, chain 1, and 2 double crochet
always in the same space. So in each chain 1 space, you
will make 2 shells of 2 double crochet, separated by 1 chain. And you continue in
the next chain 1 space. You're going to do the same thing,
a shell of 2 double crochet, chain 1, and 2 double crochet
still in the same space. I'll show you the graph here. We meet at the end of row 2. After you have made all your
shells, you can join with a slip stitch on top of chain 3. And we are ready to make the petals
of the African flower for round 3. You're going to start by making
a slip stitch into the next chain 1 space, which is right here. You're going to chain 3. That counts as a double crochet. And 6 more double crochet
in the same space. That's going to form your petal. And you're going to make another one in
the next chain 1 space, which is here. So 7 double crochet in each
chain 1 space all around. You should have 6 petals in total. I put the diagram here for round 3. At the end, you can make a
slip stitch on top of chain 3 while joining the new color. Round 4, you're going to make a chain
that will not count as a stitch and you're going to do a single crochet in
the same space while crocheting around the colored strands to secure them. And you continue. You make a single crochet in the next 6
stitches and you can stop including the colored strands after the first petal. Then, between the 2 petals, we
will make a spiked double crochet. You will insert your hook in the
space between the 2 shells of round 2, which is right here. We're going to get it far and that's
why we call it a spiked double crochet. It's going to make a little line
that will separate the two petals. And you're going to continue by making
single crochet in the next seven stitches. So on all the petals stitches. And make another spiked double crochet
just in the middle, entering round two. And you continue like that all around. It's not the most geometric graph
that I've made, but the important thing is to see that you have to make
single crochet on each petal, And between each of them, you see the
symbol of the spiked double crochet. Which will really enter the space
between 2 shells of round 2. And at the end, you will finish
with a double crochet between the last double crochet and the
3 chain stitches of round 2. And you will finish with a slip
stitch in the first single crochet. We will now do the last round. We will finish our African flower
with a round of half double crochet. So you can start with chain 2, that
will count as a half double crochet. And you will make a half double
crochet in the next 2 stitches. We will now make the first
corner of our hexagon. So it is right in the middle of a petal. You will make a half double
crochet, chain 2, a half double crochet in the same stitch. And you continue with half double
crochet in the next 7 stitches. Then you will make the second corner
of the hexagon consisting of a half double crochet, chain 2, half
double crochet in the same stitch. And you continue like this all around. You make 7 half double crochet
followed by a corner of the hexagon. And you will finish with a
slip stitch on top of chain 2. And that's it! You have finished your
beautiful African flower. With several put together, it will
make beautiful blankets or bags. And if you want to block a hexagon,
you can use six sticks to install them in each of the corners.
 Emilie Bolduc, Crochetmilie - Modern Crochet