Transcripts
1. Introduction to the Complete Revit Guide: Revenue is such an incredibly great program, but it's so complicated to learn. And there's so many complex parts that you have to figure out. Each one it seems like unless you have a complete guide. And that's what this is. Hi, I'm Brandon and I'll be your instructor for this Complete Guide to Revit basics. Rabbit is in comprehensive software. So in this course, I go through the interface, go through learning the basics, and going to an entire project where you start to experience the building information modeling tool that are at your grass and revenue. I go through the project and I go through the elements and also workflows that help you be successful in your future. Work with rapid courses for those who might have no idea, refer to those who might have a basic understanding. This course is set up for the success of someone who could understand the different concepts and molding ideas that I had to learn when I first came to rev it quite a few years ago. But I've been in industry for 20 years and I've used forever for over a decade. And it's gotten so much greater and more potentials in it. So I think it's a great program to use. I've done projects from small houses, two towers, to even working on universities and larger projects. So I'm giving you all that when you take my course and I make sure to look at the practical, Professional, and imaginative the project. This class project will go through making a small traditional house design, but using all the tools and rabbit. And it will help you prepare for make your first project. And also to understand how to make that successful deep tune next projects. And BI, if you're ready to get started working on the complete guide to rabbit, and let's get going.
2. Class Project Trailer: To best help you develop your Revit skills in this course, I made a project or a simple house design that will go through the same concepts you've learned this course. First, you're going to be working with a bit of a sketch of the project with a plan using detailed lines and rabbit. Then you'll be going through making the walls and then going into rooms. And then you'll be working on some of the external features, adding windows and doors. And then you'll be adding roof, and then you'll be adding rooms. And then we go into adding the components that will make up each area making for furniture and different layouts. And also will go into making some generic models in Rabat. And finally, we'll be looking at how to put all the elements onto a sheet using plans and elevations so you can experience and also share your design in a quality way. We'll also be working on the perspective. So pay attention as you go through the course. If you have any questions, feel free to share those and show your project when you're done so that you can, of course, grow as you share and work on your projects. And I hope you, you will learn the key concepts that are important for getting started in revenue. So you can work on any project from this class project.
3. Chapter 1: Installing Revit: Welcome to the complete Revit guy. You've already gotten to this cause you're probably really ready to get started with learning, might read it. And the first thing you learn is for sure where to get rid of it. And I'll go over some of the principles about Revit as we're looking at their product page. Rabbit is a multidisciplinary software that gives you all sorts of great abilities. There is a high price stag per year. There are other options as well. You can also download a free trial. So if you're working on it by yourself or with a firm, I think it's a good investment and you will learn that throughout this course. Revit is a building information modeling. That's what BIM is, software that helps you have higher-quality coordinate designs. That means that several different trades, including engineers, contractors, they can all use Revit as you are putting a building together and building project together. You can go through this website and you can see several things that they offer that you can be using as you are advancing.
4. Starting Revit Introduction: Let's look at the rabbit interface. It's a lot of things that go into Revit. So we're gonna go step-by-step and we'll come back to it and we'll explain a little bit more as we go throughout this course. One of the ways this course is going to be taught is going from inside to outside features like printing out and exporting, and also thinking about the different things that go into building after your model. So this inside, outside way of thinking is really connected to what building information modeling is. Because at the end of the day at tool, so be thinking about those things as we go in the back of your mind.
5. Starting Revit Interface: So here we are looking at the rabid main interface, the place where you can put your models as well as your family. So this is where you are opening the models, all your buildings for your engineering models. And here is where you're going to be opening different components that go into Revit models. And as you see, this is actually quite simple and that's really useful. You can see the recent files at the top and then you see at the bottom some families that may have been customized or use in this project. Above that, of course, you see the ribbon. You see pretty much wherever it can get started from scratch. And when we click on this button here, we can actually go to the home screen, which shows an empty model. But you see some of the commands in the menu and this Icon Bar. And you also see the project name as well as some icons that will activate when we're working on a project. So it's very useful to see all these things. I'll go over them little by little as we get through the project in general. You will also notice things about your ID where you can get help if you need to buy some other things like apps, which I have some that are really great. We'll talk about a little bit of that. And you pretty much are going to be going through this page a lot as you go into your models. But we'll start by looking at a model and we'll be looking at one that I've motto for this class. And we just double-click that. As I talk about the interface, you have this understanding basic of what's going on.
6. Chapter 2: Revit Concepts: Before you start looking at Revit or something important you need to know. And there are five different principles that are related to the problem people have with revenue that will help you turn around. You're thinking right before you start. So you'd be headed in the right direction if you've already started all keep you so you keep going in the right direction. The first thing is, Revit is complex, but you can simplify. Revit has a lot of different power and tools that is going into the elements that make it great. But the idea is you need to know how to navigate those and set those up so the complexity becomes your ally as opposed to your enemy. Okay, another thing that people think about rabbit is that it has a lot of hidden features. Well, the plus side is you have a lot of features in general that if you learn where they are, then they can help you go so much further along. Or you can see what features are the best view and which ones you just don't even need to use or think about. Next is Revit is a constraint-based system. What that means is there's a lot of things that are connected to other things. So you can't just make anything all over the place and a model. The great thing about that is actually that you get to control your model better and you also will be less likely to have your model fall apart. So when you learn how to work with the constraints, you actually get great freedom. I've heard it said that as designers, creativity isn't just having no constraints, but as having power over your train. So learning about your constraints will help you in using Rabbet. The next rumor is that Revit only works for big projects. That's not true at all. You can use referred for a variety of different sized projects. You can put your effort and your Think Tank together so that you can understand it in a credible way. So revenues for several sized projects and whatever you bring to Revit, just bring an open mind and that will help you use it really well. The last thing is that Revit is married with BIM and a good way. So in a negative way, some people think that will be super complex because it has all this stuff. But I felt like a model, incredibly creative and addressing thing just like in any other program. So BIM is a additional thing to Revit as a 3D modeler. It's not something that takes away. And we'll go over those sorts of ways that you can keep free as you are working with threaded throughout this course.
7. Revit Menu Ribbons: This is our architecture tab. If we were working in structure, that would be of course, one of the critical parts of work with structure including the steel. And we see for MEEP they'd be concerned with the systems ribbon. So its icon ribbon that, that's related to what you're going to be doing. And sometimes architect will use structure and impossibly steel. But we're gonna focus on architecture for this section. So we have some basic things that we can build. Starts from a wall, goes to different elements in a wall. Also components which can be like a wall that different elements as you can see in their example. And you can also do elements like roof, ceiling, and floor. And finally, it talks about curtain walls, which are interesting ways of using class and material, or just a different framing system. And then at the end it goes to ramp, stairs and railing. So different circulation components. And the last three sections are the model where you can add lines, add letters, make a group, and you can also work on rooms. And this is more of the outside of rabbit sort of thing because you're going to be communicating about rooms. Whereas the left side is where you're gonna be making a model. Now, the openings is something where you are going to be working to make a model, editing and working on that. So that's actually sort of internal though what's on the right. But the grid is definitely something that's something that's helping you organize your model. So there's an on the inside part of rabbit with this. And the work plane is going to be valuable as we start to make things later on.
8. Revit Selection Tools: Selection is a major part of rabbit. So here are some things that are going to help you as you look at the interface for selection. Right down here we see that you have the ability to select the links that you're gonna be working with. So that's, that's useful. Because sometimes you want to select one object and sometimes you want to select a lot of objects. So having that selected is, is useful. Though I don't typically use it. So underlay elements, because there's a lot of different things inside of rabbit. You can choose things that are under other things. We're not gonna choose that one. You could also select pinned elements. So if you bring an object and then there's also select elements by face, which it makes it very useful to operate in that method. And then you could also do some, several different selections, including if you select multiple objects, you can click here and make sure that you only collecting and selecting the object that you're focusing on.
9. Common Shortcuts: To set you up for success and know and beyond path with what I'm doing n This tutorial for rabbit, I want you to know some key shortcuts that I'm using continuously. So it's of course very useful, as you see on the rabbit tab to know the keys that you're gonna be using most frequently. And so the ones that I use all the time, typically in the Modify command, our match properties in a. And as well Philae, which I call for labor. They call it trim to corner and also extend. These are incredible. And of course move is something that is always been used as well as a line. So the idea is if I make a wall, I press, press W. And I start by making a type of wall. And the thing is, sometimes I will want to make a new different type of wall. You know, I'm always going to be pressing in a Just really quickly. It's almost like a reflex now. So knowing how to do that, knowing that in the course is going to be critical. Also, I always use filet so that just like I did before about undo that, just match an item. Also I'll always do fillet and Philae. What I do is F, But you can of course make your own. Just click trim the corner. And it's just so useful when you're working with items also if you're making something like a floor. And the thing is if you, you know, the idea is you don't have one a year sides connecting, you know, being able to press F or what have you ever trimeric corner will make it so much more quickly available. And if we go back to modify, again, another useful one is definitely mirror. Because you have these geometry and you just want to get something going on the other side. So often I will just click on the items I want to mirror, press nm. And I'm just mirroring and it, it's, it's, it's so useful to get that done very quickly. And sometimes it also of course use rotate. So you have rotate here. Rotate will rotate around a Sonoma she press space bar. Then you can choose the senator rotate on. And I do that all the time. And also when you rotate, you actually can of course make, make a copy. So that's the beautiful thing about you can just pretty make a new one. And so those are things that you would like to know and also in terms of offsetting, offsetting. So variable here is the command here. If you're trying to do like six feet, but also just pressing o, you just make it a second habit to make sure that's all going in at the same time. And extend is also a credibly valuable because you're going to, you know, if you want these walls to be connecting, you just want to select that wall and get this one going. But I've made aware it's 0x is. So that's just gonna make sure that happens at the same time. So that's a, that's something I use all the time. And another command that I use all the time I think would be VAB view is a line. So a line is sort of like extend only its moves something to be connected with something else. So for instance, right now, none of these walls is sort of in the same plane so it doesn't exactly align. But if I make a detail line or press DL and I'm making two boxes, clicking that align or pressing a l is going to help me tremendously. I just press that button and it's already working. And of course it's obvious if you're copying things, that's just going to be of course, very useful just to be able to select an object and press CEO. It's going to be one of the most valuable tools you have in revenue. So as you're going through this class, look at the points that you can make it, the customized shortcuts and make sure to go through those two. Make your shortcuts, just make sure to always go to File and options. And as you are going to do the options, click user interface and you keyboard shortcuts. And if you are trying to make a, something for copy ECCO mine that it might be for another item as well. So be mindful of that. So your shortcut is only going to be for that one. I think you're trying to do. For instance, if there's something that's already in there for plumbing and you don't do plumbing, there's no reason for you to be worried about that. So that's something to mind as you are working in Revit so that you can have the workspace setup so you can be effective and productive. Make sure you have your key setups for your shortcuts and that you know those as you're working.
10. Annotate Ribbon: So let's start our project with making our new architecture template. And before starting, we're not just going to start with walls where we're actually going to make a diagram, which will be a great way for you to look at some of the analytical tools and annotation and dimension tools and rabbit. So we're going to currently work and what's called a working view. And we're going to duplicate the current view with the detailing. And we're going to label it. And you can label that in the Properties dialog here. We'll just call this a working level one. So we know some of the basic sizes that we want for our houses by going to the annotate ribbon. And here we have various different effects. We couldn't use region. Some of the details where we can make a detail component or region where we can make something like a, a box. And the thing is, you will see that these are general lines. We have a typical draw. And if we press start, are okay with the green arrow. We'll see there's a region that we can move around. And this is going to be the hallmark of what we're working on as we are analyzing a drawing. And so we're going to use the annotate and we're also going to be using some detail lines. There's a difference between a model line. This is a model line. And you can tell by clicking here. And in here, in the Properties you'll see it just talks about Line and detailed line is not clicked. Though you can change it very simply. You are using the same command. You can. If you one another difference, the 3D view will show your model lines. But if you make a detail line and you detail line, I tried her new annotate as we draw it right next to this model line. And they can have the same sort of features. You won't see it. So it's for working on figuring things out in your model and understanding. We're going to break down this line to see a little more of what you can do in terms of working with the model. I currently have just a few lines. We're going to actually stick with the model on for right now. We can have different styles and we'll learn how to customize those a little bit later. But you can see it can have different line weights and to hide the monoid, to turn them on. You'll be clicking this button right here. Here are the types of line you're beyond. Line will look like this. And then you have a center line which looks like this. And then you have your demolished line and vice versa. And so right now we showing line weights, so that's useful for us. Let's go a little deeper into the annotate tab. So here from the start we see different ways that we can make dimensions. So right now, we'll learn a little bit about the constraining for before we just made a wall and then we made some lines. But now, let's see what sort of things we can do with these constraints. You see I just change the dimension and this whole form changed. That's because there are constrained. And so when I click on a value, it'll just change it for me. And so that's a really cool way. You can also, if you go into or double-click on this region, every time you click on a line, it will have a relationship to other lines. So if I know that I'm wanna make a 16 by 16 space, I just click that. And all of these are automatically change because there are constrained. And so here are some other items that you can find here. Revision cloud. You'll pretty much use if you're doing a drawing edit. And you can also work on tagging different items in your model. And every tag has a particular family. And so I will go into the rest of this and then we'll talk about families for a little bit. So these are different tags for different elements all here. And then there's some keynotes and ways to make legends. Color legends, all sorts of legends that are also useful when figuring out things about your space. And then you also can put in symbols and different information. But your motto in your annotate tab and including text.
11. Manage Ribbon: And if you want to customize the type of line, you can have a really wide line. You can go to your Managed tab. And so your Managed tab is where you can start to work on your material settings, these various settings and the model you're snaps, your objects styles. You can work on different parameters. I typically don't work on these. On this, I'm working with a family, which we'll go into a little bit later. And there's some different systematic things that you can set up as well. And you can also change some various things about your model. Create your own settings for lines and different materials, and also different ways to set up your model here. And then finally, you can manage your project and start dynamo from this Managed tab.
12. Other Ribbons: And the insert ribbon would be where you load in your plan. You can import CAD. You can also import an image, PDF, et cetera, and loading a family simply we'll talk about later when we start to put ideas the pot later model can do a lot in terms of, well, if you're doing structural, You can find I've mentioned what your motto. You could also do information about your plans and you can also start creating schedules for different systems. So this is some of the MEP and also planning parts to read it. We won't be using that collaboration is for working with other people. So if you're synchronizing, you can make work sets when working with other people. So we will look at that later in the course. And view again is where you're choosing how your model looks. In terms of lines you show, you don't show. You cannot control your renders, you can control your views. And as we developed this model, we will make some of our own views. So you can look at it and you can also work on sheets which will make at the end of this exercise, look at add-ins. Now we use C where you can batch print some of your drawings. You can also use some different plugins that you put in here. Escape is a renderer that you can use in your model. We won't be using that for myself. But that's something that if you're interested in, you could be looking into I think the Revit model or is really great. And you also can use things like v re. There's all sorts of options for rendering.
13. Chapter 3: Introduction to Geometry in Revit: Rather it has a lot of cool features and cool ways of working with geometry, but it might be very hard to get started for how rabbit works with geometry. So we're gonna go through some of the key things for just making geometry. Just lines is 2D geometry and rabbit, this works with detail lines also with modal lines. So right now we are in a view that's just the typical view. And I want you to know something about the difference between a regular view and a legend view. You actually can't copy items from either sheets, sometimes legends into your model. So it's funny sort of way have things work. So like you're you can't use modal lines in a legend. And why you can copy from your legend to level when you make a sheet, will make a sheet very quickly because the basic sheet, you can't copy that into a sheet. So be mindful that when you're working with revenue, where things can be located. So as you won't make something and wonder why can I connect it there? But we'll go back and press D L for detail lines and we'll look at how to make different types of wines. So this straight line, and of course, the basic type. We can also go in here. And this is a legend sold only uses detail lines. We can make rectangle AC. We can actually offset it from our location where we started. So they actually can have it where it's offset from a location. So that's also an ICO. And we also can actually put it with a radius. So that's pretty cool as well. You can just make rounded shapes.
14. 2D Geometry in Revit - Grouped Geometry : As opposed to making solid geometry, everything can actually interact with each other, which is great. But if you want to make a closed besides this pressing Tab and select the whole item, you can always just make it a group. So when you move it, it will all move together. And actually if you make a group and you copy it, if you change that first group. And mindful this as well. You can actually add new geometry to a group, but it's not as easy as doing that outside. So you can split something. I use these Philae and split all the time. Since it's a group, it's actually a component. And you can see it's, it'll change and will change any other. You actually can mirror groups as well. You can even exclude items in a group. For instance, if you start saying for this group, which you want to have this line and here, you actually can select this element and right-click. And you can click exclude. So you actually see it in one and you don't sit another. That's an interesting thing about groups.
15. 2D Geometry in Revit - Polygons: If we go back to basic geometry, we also can make polygons. And we choose how many sides they have. Like if we wanted to 12 sides, we don't want any offset or radius. Now you see this complicated form. One thing about it is after you have created it, you can't go back and change how many sides it has. But just something that the mine, but you can always make sure that you just keep the same center point. So if you want to make it again, let's look at some other geometry we can use. We can actually circumscribed geometry or we can just have it inscribed. So the one being, or you can do one inside of a shape, other side, other one where we can do it. And there's literature about making inscribed geometry.
16. 2D Geometry in Revit - Curves & Circles: You can also just make a basic circle with options for circle, of course, are your, your offset. So that's a very simple geometry form. Now we have for our curve sections, of course, the easiest is a making a simple curve. And the idea is you can make it anywhere. However, you are not going to control when you're moving the point, you can't just stretch it and pull it. So that's one of the caveats of rabbit. And it's controlled geometry. It will maintain its diameter. Unless you move the center. You can't just move the point at stretch it. And so you can also make sinner ends arc where you start at the center and you can go to a point. Now this also behaves the same way where you can't really change its diameter unless you really just go in and out. And then you can actually change where it's centered at, so it's not super free. Also. Now this requires the tangent n ARQ requires actually starting with two points that are already at work. And it starts from the ARG point. Or it can do a straight point as well. But it doesn't, it's not based on starting with a line. You can start with a point. So when you're using fillet, flay works with lines and points. So you can see this Philae was a little bit screwed up. We go back and do that again. At the detail line. We click this point and this point. And we make sure to click it on the right side. So you can of course, click too far off, but also you're clicking and you have these lines. And then we also can make splines. But be mindful when you're making a spline, it seems very free. But your spline actually isn't as free as you might think. You actually can't. Cut slot applies as easy. So I have this extend tool right here. You also, you can't fillet splines. So be mindful of working with splines because of that. Even in terms of spines working with each other, splines, this work radically different. So be mindful when you're working with splines, they don't work like lines. And then of course, if we use ellipse, ellipses are lot more free in terms of, you can stretch them and make sure to escape when you've added your geometry. So you can just move things out as, as desired. And you can stretch them, whereas you can't do that with a curve. And also when you're making a basic line, you can actually, this will have all the functionality of this moving something up in a way. But we still will have that limitation of like with circles where you cannot really move these points closer together.
17. 2D Geometry in Revit - Pick Line Tool: Another thing to see is, of course the PICC line tool, which is very effective if you're making a region, for instance, and you want to follow the line, that is this thing. You can just pick that mine. You can even constrain it. If you want to say move that element in the future. So the idea is now it's connected. If I move that the, the, the filler will follow with it. However, this is where the trains get crazy. You can see that the constrain is not perfect. So be mindful of when you can train items that if something is flipped, it might not act the way you want it to do. So the to use a line tool is also a great added feature for you.
18. 2D Geometry in Revit - Conclusion: So those are how you work with geometry in rabbit. You of course, can be working with groups and one way with your geometry, it's good to be very simple about making groups. But these are some ways that you can work to make geometry do what you needed to do. Either. If you're trying to sketch out a form that you want to make into models. Or if you're making a profile, this will give me your freedom. And of course, you can always use model lines using the PICC line tool. And PICC line tool is something that again, you wanna make sure you're controlling when you're working with that. But making jump chain and rabbit is constrained, but that also helps it to be better with building information modeling. So mine that as you're creating your geometry to always be fall, fall of how you can do it in a Reddit way.
19. In Place Masses: Making generic models and rabbit is a great way to play with form and also sketch different ideas. There is of course, to sort of ways of making these generic models. The first one is going through and modeling and place in a second one is making masses and sites. And grading about sites is that you can actually make a building elements from your mass. So if you say you want to play some mass, rather it will be in show mass mode. And it talks about your mass family. So I think that's something that probably wants to in place mass. You can also add families or make templates. And so this way is, it's very basic where you, you start with a pretty much a profile. And which you would probably want to see is the 3D view should make in this. You can choose what you're looking at. So right now, you have this and you can choose what type of form it's going to start with. We want to make a solid form. So now we have this solid form. And what if we want to have some interesting part to it? So if you want to add an edge, it tells you sort of some of the things that we'll deal with it or we want to put a profile upon one of the faces. So it's not entirely easy. So you can click edit profile. We can just from this side maybe add a bit of a champion. And you see that that bad change one side. So now we can say maybe we will have the bottom face, will have a different sort of set of parameters. And so this, this does give you a lot of freedom in revenue because you can be playing around with this, this form. And you also of course, could, could have it where you're creating a form by itself. To make 3D forms a year the quit lines and work with them, that's fine. Let's go ahead and work with adding a bit of a bit of a fillet to our profile. Where does actually come in here. And this is not the easiest thing to work with. With Revit. So it's something that you want to spend some time to get to know. A lot of people will say I'm working on a plan, let's work on that plan. This edit the profile here. And if you've seen my geometry course, that's somebody that helped you figure this one out. Because ideas you'll be working with geometry to figure out what's going on. Okay, we're going to edit our bottom profile. We're actually going to use our top profile for a reference point or just copy this chalet and we see this is actually ten foot six. So we can actually come back down here. And it is base profile. And we'll do that same ten foot six. And it's, it's really not going to scar that. Accidentally press that. Okay, so now we have this interesting form that we've made is very simple. So it's, there's a lot of freedom with making generic Masses and rabbit. And then you could even just say where you go into your mass menu. Where if it's a certain size, you can go ahead and add floors to it. Level two and Level one. That's useful to just have a generic floor here. And this is the mass for, so you just for demonstration. And then you could go into your massing aside and you start saying, let's make a curtain system. Like if I want this to be a current system right here, I just can press press that coordinate system. And we'll just try that one more time. So we want to make a curtain wall for this curtain wall on this side as well. Five by ten system creates system. So now we see that it's not as curvy as we want on this side, that one's fine. So what we could do is come back over here. So you can go ahead and actually do want it to be constrained. But if we want to work on it to be a little more who might just actually start from scratch. So we can actually get a better curve, actually. Select on it. See we can do a little better versus a five by ten will just come in and duplicate it and make it a, maybe a five by one by one. So that helps us immediately have a lot more freedom. So take that freedom from your generic mass into your modelling and it'll regenerative figure it out. So, so now we have a curvilinear too, curvilinear walls. And our, our remaining walls, we could just say that would be something like baby brick. So we want to make a wall over here. And we'll just make a generic eight inch wall here. And we could of course also come in to massing aside, make a roof. And we'll do a generic tool bench roof. And immediately we have a building that's made from some of the generic components in Revit. So this is the first method of making some 3D items in your model. Of course, this is obviously for building, modeling and figuring out. And there's so many components like I'd have to make an entire course about making 3D geometry with rabbit masses. But you've got a little bit of a primer. It's very useful to get some basic forms out and figure out how to put them on the floor as you can generate at something like a tower really quickly or an outside form. Getting more intricate would take a little more time. It's injury can make things very quickly. And rabbit anyway, that's the question about using masses. It is something that takes time to get into how to use. Obviously some people are freer and some other software, but rabbit is cool for its ability to make a lot of information in your model. And this is something you have to practice a little bit. Width.
20. Introduction to Model in place : The second type of method for massing and Revit and 3D generation besides making the components is making generic models. So this is very useful if you're amassing and a part of a building or some cabinet tree, it's good to work on generic Masses. So let's go into our component model place. And you can of course also save this as a family and help other people working on making that for any project they're using it. Or they could just copy the generic model n. And you can see there's all sorts of types of models. And the great thing about this is this would be included in the building information model if you have like it as a stair or a type of wall, et cetera. So that's a useful thing. Typically generic models, what I do to get started. So in generic models we have different types of forms that we can be working with will make each type of those. We'll start with the extrusions. Susan is just where you just like it says, go straight up. Blend is where using two profiles, one at the bottom, one at the top. Revolve is where you can center around a form and sweep follows a path and sweet blend, you can have two different types of profiles. And then you can have these sort of information component within a component. So that's a useful way to have that in your component. Besides your form, you can actually use something that's repeatable. And then you can also take out with Avoid form. And there's some other 3D tools that are usable would just make the forms right now.
21. Model in Place - Extrusions and Voids: Well, we're going to start with a 3D form. So the fusion is going to be something that starts on a plane. You use a same 2D geometry from rabid. You can actually have a any sort of extrusion or you can have multiple parts, but they do have to be closed. That's the one thing. And it gives you a start and end point. So I said ten feet, that would be there. And so now if we go into our 3D view, you'll see that exclusion is ten feet long and it's this size. So one thing we can do to make this more interesting, of course, is we could actually start saying, if we want to have particular profile on this, that we can create that using a void. And void could also be an extrusion. So now we could to avoid form of extrusion. And the thing about it is we've been working on the ground plane, but we can actually choose the plan we work with, where you make that profile. So it's going to be a 2-dimensional. We can choose any plan that in the model that we want to pick a plane. And so now we've made up plane. And what we can do is now saying, if we want this to be the profile that's subtracted. And we do the same thing over here. And we actually want to let it make it, and then we'll align it an, align our edge over here to this. And so now we actually have two forms, but you only see one because the other one wasn't. Avoid form. And we could do that same process on this side. Or we could say, let's make a Avoid form of an extrusion. And we could say, we actually want to set it as a plane. And the model would pick a plane. Since our previous one wasn't there. We actually can just come in and make this separately. And think about it is that when you're making something, you can always actually go back. And right now I wanted to actually make that on the same form. We actually can just say right now to uncut ID. So the void will cut the fall. If you don't press anything. But you can always uncut it and added a second time. So now we want to create to void forms. And we're gonna set it on this face. And it's going to be doing something in this way. And now we'll see how that plays out. And now we want to probably have it going from here to here. And so now all we need to do is say ket. Now that automatically cut this form. Now we can say cut again and we say cut. And now we have two voids cutting into our object here.
22. Model in Place - Sweeps: What if we wanted to make some sweeps? Or this idea of if we want to have a profile and we want to have it on a path. For instance, if we came and made a curvilinear path and we want to probably set are plain, make sure it's going to be applying one. So we do level one. And we'll make our path where it's curving out a little bit. And now we want to choose our profile. And we asked you can choose a profile that we make, what we can find one in the project. For instance, if I choose the fascia, that will. When we press go Finish Edit mode, we'll see it's, it's a tiny fashion that's rotated along here. But we also got a comment to this sweep and press edit suite when it's created. And we could edit the profile. And we can select it like that. And we can just load profile. Or we could just click, click on that and say sketch. And we can just edit the profile right here. And the thing about it being curved is you don't see the face of it. So that's the one challenge for making profiles. You wanna make sure that you can see what, what is it doing. So because ideas, if you are not perpendicular to the face, you'll have an issue seeing what's actually happening. One great way to figure that out is actually you can, you can find out the plane of the lines, like we can say, orient to a plane. And we'll pick a line. And we just click that. And now we have a proper plain. So now we can see exactly the size and how that will look. So now we'll just try it out. So these be close. We're just Philae this through that flight on this side as well. And now we'll look in 3D and we'll finish this sweep. And now we see our sweep is this cool little form.
23. Model in Place - Blends: So let's try a sweet blend. And we'll just sketch another path, would just try and other curvy path. And we're gonna make our profile first profile. And we'll just edit that. And that's going to be, which can keep it simple for now. Just do that in that plane. And we want to do this select profile to edit that. And that's going to be more of this sort of form. And we'll move that point over. And so we'll have it crawling up here to make that form. So that's a cool way of having that sweep blend from two forms. But that's not all. That's sweep. Sweep is a little bit different from just that basic blend because the land is just giving a top and a bottom, which is used to grabbing like a, a column form that is going to be changing at the top are something that we're going to the top. And the top is going to be smaller than that. And we see that it's saying now going up one foot, now we say ten feet. And we also can change the vertices. So right now you see how it's gonna go up. You can choose if the virtus is not going to be the way you like, you can change that. So we can also twist it. So you see this line will connect to that line. So it's, it's very useful in how you figure that out. Okay, so now we have this and that's how you do your, your bland as the basic extruded blend. Basically one group to another.
24. Model in Place - Revolves: And now we'll work on a revolve. So revolve is where we will choose our boundary line. And right now we're just going to, you want to know which plane we are working in. That's the one, the one challenge. So we're actually going to set the plane of this plane. And we're going to make our axis line right here. And then we're going to work on our boundary line. And we'll just do an interesting form. So we're going to make sure of course that our, our boundary line is closed. So it happens to overlap the axis line down, get deceived. Okay, so yeah, so we see that it rotated around that line. And so we of course also could've come in here with our property browser and set that to 180. And we could have started somewhere else. And the great thing about it is always when it started it's constrained to a plane, but you can click on that plane constrained button. And when it's gone, you can actually move it freely around your model. For the most part. C Part of it is still constrained. That's why you call it omega construction line. But now it's, it can go wherever you like for to go. Alright? So if you want to rotate it, you can choose a plan which you're going to rotate it. That's the funny thing about that. Because right now you see the plane we're, we're, we're in. We could always just get out of that plane. We can go back to our create and we've set the plane as the level one. Now we rotate it. You can just rotate it like that.
25. Model in Place - Hosted components: And one thing we can also do, which is really cool is we can also make openings. And so I'm going to finish this model. And we're going to make some geometry in rabbits so we can work on openings. So walls are forms that can have openings. Pretty much. Different surfaces can have openings. So when you're making a generic model, you might want to think of a window that you wanna place in your, you're building. So if you click Window here and you want to make a opening for the window and you wanna make the window. What you're going to do is you're gonna sit the plane where you want the window to go. And then you're going to make opening. And we're going to select the host is gonna be this wall. And we could choose any form that we want. And you see the opening is made. And so now we could go back and say that we wanna extrusion. That's going to be our frame is you can see here, you can make a material here and you also can select a category for this. So we want to make a frame. So as this is not just the generic component, it has like some specialized functions. And saw all we could say is maybe we have this and we have this coming in, maybe three inches. And that's as much as we want to have for that going. And this is shrewd, is going to be about four inches. And we just want to make sure it's on the right side. So it's coming out four inches. Probably want to have it going through the wall. And the wall is about eight inches. So we'll go to negative ten. So b on both sides of the wall. So that's our window opening. And also for making a window, we're going to make that exclusion. We can select the lines inside of our frame. And we can just say going from 0 to probably too. And make sure in our sub category category to make that class and be mindful if you don't make it the need to probably make it the glass material could just clicked by category. And from your materials, make sure to select class and press OK. And there you have it. You've made a window, an opening. So that's another type of generic models and there's all sorts of types. So Autodesk does ask some good revenue instruction on making unique masses. But that's one of the key basic ideas of masses. Just play around with that.
26. Model in Place - Component Annotation: Finally, looking into what we can do with R. We can look into with making our model in place. Mass will again go with our generic models. Is we can work on making some information about our model that would be useful when we're coming back to it. And the great thing about it is the modal lines will be visible. So you can use those as reference points. However, your reference lines are not visible and they can be used for construction purposes. For instance, if your Since this is a window type, you might want to say, I'm going to set this view. For instance, if you want to set some lines to help us orient a frame or something, you could use this. But the model line could be useful if we're gonna make a projection line. So we also choose how the window is going to be cut. So we want to put this view AN compress finished a model. If we're going to make a, we go to our level one. And if we make an elevation that will look at this is we finished a model looking at elevation and we see our little projection lines. So.
27. Model in Place - Conclusion: Those are some ways to figure out working with generic models. Generic models can be helpful for a lot of things. But you want to spend time to figure out how you're going to model something, if it's going to exclusion or if it's going to be a blend, you'll figure it out by using some critical ideas based on those methods.
28. Chapter 4: Introduction To Views : However, it has some incredible ways to view your project and understand it in 3D as well as in elevation. That's where you're looking straight on to a model. In addition to looking at it in perspective, which Revit also offers. So I just wanna give a primer before any projects about views and rabbit. And we're going to look at some projects. Views in a project so you can get to fail. And what's really going on.
29. View Tags: This is a house project that we'll be working on in this class. And these are some elevation tags. So that elevation tags we look close, comes both to the sheet name and also a number. So that's when it goes on a sheet. To break it down. When you start a Revit project, it will have four of these, north, south, east, and west. And when you click on your tag, it will tell you the type of elevation that it is. And this is just the tag. When you click on the unique view, it will give you information about that view, including the scale. And as we look into our project browser, we will see more information. Will have a sale and different options for that view, including how will crop the extents and also things like the template and the name. And it finally, you'll see what filter is setup for the phase phasing deals with reducing with a new or existing model. So let's click into here. As you can see, when you click on that particular tag, the letter or number and the carrot shape, the triangle escape. It will go to a view. And this view will have a crop window. And you can find that crop window right here. We can show the crop region. And we also can show beyond the region where we can crop it. But you also can find that crop region. If we go back to a level one right here. Because you'll see the extents of this little point are going to be the crop region width. And then you also can move it somewhere inside. You'll actually be making a section because the view is inside. However, if you want to make a internal elevation, you have to make a new one because this is still set-up for external. So what we need to do is we actually can just click on this tag. And we can convert it right here into an interior elevation. So interior elevation works just like a elevation for exterior, except for if you click on it, it typically has a little less information. And you can see on this tag and we click on it, it has other information has where you can add a another view. And each one comes with four directions. So you can only have four views associated to this tag. And each tag has an individual tag for a view. So each tag for the elevation set comes with four unique directional tags. Now, the type of thing that you're seeing here is a interior elevation that includes multiple information. It includes the name and the number. So here's how to customize that tag. If you double-click on the the tag and go to edit type, you see from the families property that there is graphical information about this. There's information about the callout tag, and there's also what it would be called if it's a reference view. So I'll reference through is not attribute, but it's named for another reference or another view that in the model. And you don't have to make a view for each reference. You can make a reference view. And these are made sadder one in the model that you can convert by going to the View tab, View ribbon, and clicking elevation. And the elevation tag will typically orient to the closest wall. And you just press escape to get out of that. And so this doesn't have any names or sheets. So it's bare right now. So when you're making a view is when you decide to click again, whether it will be a view that's just based on something it sees or if it will be a reference view. Now if we make a reference view, we can choose that same detail for North. And we could put it here. And it gives a tag identifier of Sim for being a similar tag.
30. Customizing View Tags: So if we go back into the family of this interior elevation, we actually can change the type of call out tag that's used by clicking on it. And it will go to this page. So you cancel, you'll go back. If you click on this, it will show you what type of color tag is used. So one thing you could do for this collar tag for interior elevations is that you could change it to a another type. For instance, if you wanted to add that, you'd have to add that in the families. So be mindful that that's something you'd have to load or edit. And you could find this call out head within the Project Browser. You also can change if it's a circle, half circle. Other options are half square. Click okay. And you see your elevation tag will become a square. And if we go back to edit type, we can change this here to make this to be half circle. And now actually now we see in this elevation tag family, we also have some different information we could actually put here. So we get had where it just puts the field arrow and the view name, or we could say field arrow. And leave that by itself. Press OK. And the great thing about this is now you don't have that name was still an interior elevation. And if we go back into here, we can actually see that the square had the filled arrow. But we can also choose the circle filled arrow and press OK. Now we have interior elevation tag that doesn't include extra information. So that's a very useful way of making these views.
31. Editing Elevations: Now let's click into this interior elevation and add a new one for this wall by clicking this point here. So this is not a reference tag. We click in here. What we can see from the interior elevation that's different is it actually makes a crop right at the wall. And so if you make it on the inside, it will conform to the level and the wall. And you can set a template where you choose what type of things you see and you can make that unique for your own type of elevations. And elevation is a detail view. Which means though you can draw though you can draw detail lines. So by going to annotate and you can make a detail line here or you can press DL. You actually cannot make modal lines. In this view. Unless you pick, pick a plane, and pretty much go from the plane that you're working with. So you can, in some sense work on that model line, but pretty much you are a little bit limited here. So this is a model line. But the thing is it's in 3D space. So whereas if you actually go to the 3D and if we take off the roof for this, we'll hide this element. You will see that this model line was drawn in elevation. However, the thing about it is it will always asks you to pick up plane when drawing as elevations are not meant for drawing lines. So and we'll stop that. Alright, so your detail line also means that this detail view mean you of course, can make text. You can use dimensions. And you could also of course, click on items and families of revenue and work on them in the elevation view. So that's all accessible within elevation.
32. Placing Views on Sheets: So elevations can be made in multiple ways. You can make many as you want for a project. You can coordinate and make reference ones. And when you place them on a page, bill conform. For instance, if we made a new sheet by right-clicking on sheet. And we add, we does Dragon and elevation. We see elevations and our project browser. It will come in just like we made it. So if it's not cropped, it will not come in crop, for instance, here, this is cropped, as we said from here. If you bring that in, it's called an elevation 1B. It's interior elevations. So you see the under interior elevations. If it's cropped, it'll come in like this. But if we don't crop the view and we just click, do not crop. When we bring that in. It'll show everything in the model that was visible. So that's a mindful thing to think about for elevation and views, for orthagonal views. But we also can make 3D views in rabbit.
33. Walkthroughs: Making a walk-through in Revit is very simple. You just go to your top tab where you have 3D and you start clicking points in your model where you want to walk to start, you press escape to stop. And you will actually find this in your walkthroughs. And you double-click on a walkthrough, you'll see what the camera sees. And if you're not seeing what you need to see, unfortunately, walkthroughs and I edit it like other views, you will change your walk through. You have to click it in with the level. And you'll have to click Edit walkthrough. But from there, you had to make sure that your click No, if you click off of it, it will ask you this, stop. I'll quit editing and that's not what you wanna do if you're trying to edit it. Which you can use is this top bar which says previous or next frame. And then for each one, you can change the view right there and make sure to hit it on the right side. And you also can change where the path is by clicking on path and moving that location. And so now when we go to the walkthrough view, we're not going to quit editing. We wanna make sure to go back to a level where we edited the path and go to active camera. And now we will see from our edit walkthrough menu what you're gonna see in the model. And we can click play, and it will play through. And we'll stop this.
34. View Concepts in Revit : Those are some ways of making and looking at views and revit, will of course go through that as we were working on the project, how you can specify that and understand that in context to a project. But making views is a powerful part of rabbit because views will update to what's in the 3D model. And you don't have to change the view to see the model again, if you put that view there, it'll always capture that element. So the thing is getting familiar with the fact that the views are constrained and making sure that if something is moved, that you can understand, let it to go back in the view and just get free with it as it is a free-flowing process of keeping your model with information that's going outside from that information that's been modeled inside.
35. 3D Views: So here are some ways to make 3D views within Revit. The first type of 3D view and revenue, of course, is the standard 3D from pressing the default 3D view. So in this view, you can create things, choose particular view effects, and also choose different ways to see the model. You can see it in perspective. And you navigate with your middle mouse button or by using your scroller and the middle mouse button. And you also can navigate by clicking on the part of your model. And right-clicking here and orient to a plane, clicking that button. And you can actually choose a particular plane to look at in Revit. So this is useful when modelling, as you can imagine. So this is oriented, this Blaine. And so this is a working view. And typically it actually has a crop that typically people will use it on cropped. Just like elevation views. You actually can crop this and you also can put this on a sheet. And so that's a beautiful thing about these sort of elevations. And we, as you can see when you rotate, it doesn't affect the crop region. And so the 3D working view is something to get familiar with finding out what do you want to show, moving around in the model. And when you're finished and you want to save a view, you can click down here for locking your view, where you can choose the option of saving orientation and locking your view. And you actually can't save it as this name because Revit only allows letters. So you would just type a name in and you can see your 3D views under your 3D view area of your views. Next we'll look at a type of view that is made from a perspective. And you can use that by making a camera. And you just place it down. And we're using that same crop window to choose what we see. At perspective is a little different from your 3D view. As a lot of times you will navigate it using this navigation will. And we click on the navigation, we'll just click on that. We get options to zoom, depend the orbit, rewind, and all you have to do is click on it and move. If you use it, pretty much follows you around and you get to do whatever you want to do with the model. You can orbit. You can send a one-point and look around and go up and down. You can pan. You can also rewind to your last view. So that's very useful. And you also have that same ability from your view categories to make it shaded, to show the shadows. You can render this by going to the View tab and clicking render. Well, you've got options for saving your image. And you can do different things with lighting or rendering. And that will go into that later. And finally, from this view, you also have of course, the ability to walk around. But if you want to save your walk around, that's when we get to our next type of view, which is our walk-through.
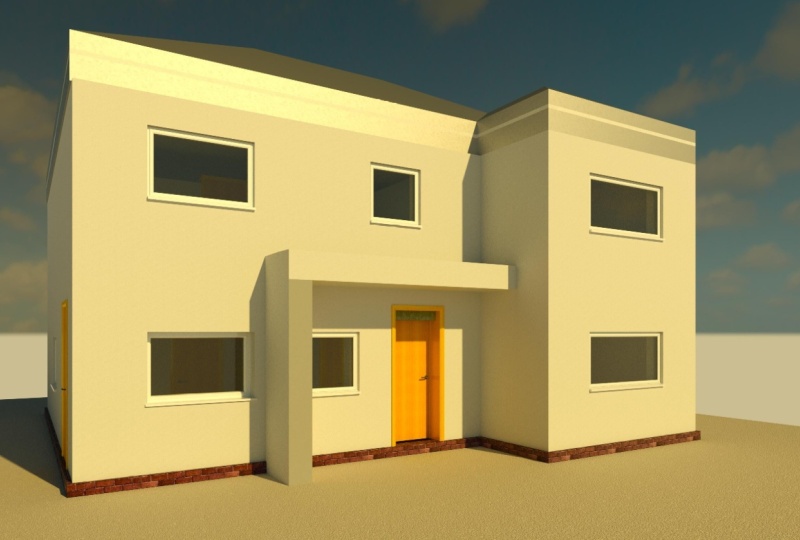
36. Exercise I: Revit Wall Project: Now let's go into a simple exercise that you will learn a little bit about the icons and some of the basic families in rabid, This will be a lot more helpful than just going over the menu and all the things. Because I know you definitely wanna start getting in creating things and seeing some professional methods. As we go from that, we're going to go to New. And rabbit gives you three options when you're starting a file. And there are templates that you can add as well. There's actually four besides architectural. So if you're using it for structures and mechanical, you can also use those templates. We're just gonna use architectural template, but the other ones work pretty much the same. And just looking at the different traits that will be involved. And you can also open and started a project where you can start a Project Template. So it's useful to get that workflow because if you're gonna do something again and again, work on a template that you can bring into several projects. And that's something that I regularly to do is make sure I'm working from a template that's really properly made. So we're going to open the template for this project and we press ok. So now you're going to see what happens from a real Revit project as you're loading and sing all the ugliness and the beauty at the same time. Let's just start by simply making a simple house. And we can choose anywhere in the Canvas, though there is a project's 0. We're just going to start it here. And in this exercise we're just going to run through the systems and you can replay it. And we're going to talk about the things that you learn. Because I know a lot of people are really fascinates and some people are slower, but great thing about the classes. You can just repeat anything that you're trying to learn. Alright, so we have, what we're gonna do is a 40-foot by 40 foot by 40 foot footprint. And what we'll do is we'll go to the 3D button like we had before. And we see immediately that we've made 3D walls. And so we click on a wall. We're gonna expand out this information about the wall. You can see various information and I will just close these so we can go section by section. The top section is about the constraints on the wall. And this talks about what is your wall start and where does it end? And if there is something that is a feature like room bounding is applicable to your wall, then we have structural elements. So the idea is if this wall is structural, You can elicit here. Then you can work on the dimensions. When you select them objects, it will tell you one object, it'll tell you the area, the volume, also the link. And click on that again, will also be able to see identity. Or you can make a comment about the object and you can make a particular type, and they'll be useful later. And then you can also work with phases. So rabbit is used for a lot of renovations because you can go inside and say, Okay, we're doing this thing then, and then this thing here. And you can actually put multiple phases inside of rabbit model, which is a really cool feature. Okay, well, since we have these walls, let's be working back and forth between level one and start to make a building. We're going to be looking at a rabbit project that I have made already. And we'll get the PDF to see the type of things that we're trying to do in this project. And I'll go through different elements as we go through in the project.
37. Chapter 5: Building Systems: Simple Building Adding Windows and Doors: Now there's jazz it up and finish this project. We can already, from looking at the, the wall, we can already make a four boundary. So I click floor and it gives you the menu. Starts with properties and clipboard and something you do geometry. And it also goes with things you measure and you can also get information about the model. For instance, if we wanted to measure the distance from the wall, one thing I do is press tab. Because tab, you can choose to use the inside or outside line to measure from. Because rabbit, Of course, has walls and you can look and see how large it is. But one of the favorite things I like about rabid, of course, is its ability to automatically connect your objects. So I made this floor, I press go and then now when I move something, the floor actually moves with the wall. And to choose the wall, we can cycle through our selections with the tab button. And so here's our floor and our wall is here. And now let's go ahead and make a few doors. We're gonna make a door. And as we started to place things, you'll notice that we already see dimensions. So we saw that when we are making a wall. But now we see it where we can get something Center. And we could also click to make a window. And you have that same sort of thing where it gives you a center. We also can go ahead and make a roof. And it says, will you make it to the lowest level and it will move it to level two. So it's automatically helping us that we're not making a roof on the ground. But even if we did make it, we could change it and we'll go through that. So this has the commands for roof. It has the same sets of commands where you can start making things. You can do different effects to them. We're going to just start by choosing the walls. We press Tab to select all and immediately is already closed. And one thing that we can do because we're obviously going to see where there's lenses is. We can choose n the properties, some functions of the roof. And so right now it says 1912. And that's the properties of the entire roof. You can see the constraints. It can be controlled to a level. So there's a level one, level two. And then we can choose what type of cut it is. And we'll see this in 3D. So we'll just leave that basic for now. And then we can choose our slope. So I'm gonna go ahead and put a 612. And we'll make sure that these all are 612. We select that one object and then the press escape so we can move forward. We're going to click modify. So sometimes you might get stuck in a command, so you press modified, stop that. So they're all 612 scrape. And we're not really somewhat enter that information. Let's just see what we're getting now. So now we're going back to 3D. And we see that our walls are taller than our roof. So no worries. We can select. And we can go back to our filter to make sure we're only selecting the walls. Press OK. We'll click up to level two. Now our walls in right there.
38. Working With Building Levels: And so these right here are levels. And you have to zoom in to see some of them. So our first level that 0 and our second level as is at ten. So you can set the levels just like you can set any other object. The levels will be your plan to levels would be the way that you're making particular details. So levers can also be, of course, you can make a tag for level. But the idea is that if you change anything that's constrained to level, it will change your model. So that's a great thing about these levels.
39. Modifying Roof and Wall Parametrically: As we can see, our roof is actually not resting exactly where we want on the walls. Of course it's resting on the inside wall. So all we need to do is click on the object and click Edit footprint. And the footprint is not really a 3D. So we're going to actually select all the objects, select all the lines, and we're gonna go to level one. We can see everything. And we'll try this again. And it chooses the outside lines. And now we're gonna go to modify. And we'll select all of these and we'll change the slope that to 612. And because I clicked with this button, you'll see that this, this is going to be constrained. And now we looked at it's, it's on the edge, is already going straight down. So because I have these constrained, which is a great thing about revenue, I just moved the wall out. You'll see that the roof is automatically changed and the floor as well. And we're going to undo just pressing Control Z or clicking right here. And you'll get back to what you're looking for. All right, so let's go into move just a little bit more. And we notice that we can't scene a level one. However, if we extend our our project brows up just a little bit, we can see site and insight. You can see the roof. You also see these four boxes. These are call your elevation tags.
40. Customizing A Roof: And we're gonna put overhang of three feet. And so because they are pretty much good linked to the wall, the overran automatically knows. And all we need to do is use our measuring. And we can see that it's three feet from our edge. And we can also put a dimension within here and we can press tab to make sure we're selecting the outside of that wall. And we can verify that that is what we're looking for. Okay. Now, let's look at our view and elevation. So the elevations are also in the level one plan. All we do is double-click on the triangle and we see our view. Now we click again and if we click another one, the same thing happens. So you've seen that we've made a 612 roof and that it's we've added these little items in. And there was this very simple, just from a few clicks.
41. Introduction to Exercise 2: Now that we've looked at some of the basics of revit, let's go into a little bit deeper with an actual exercise and also deeper into the Ribbon and what things are working for you as you are starting a project. You'll see and this viewport, a simple project for a house. You will see a plan view with some dimensions. And you'll also see some elevations and 3D view, all of which we are going to work on. And this is going to be the exercise that you're going to make and we're going to make a similar house. And you pick up the ideas for how to make it feel watching this and you can watch it again to figure this out.
42. Diagramming Spaces with Annontation Tools: I've made a program with some of the regions from working with the first parts of this plan. And now we're gonna go from this regions into walls, roof, and a floor. So you can see the process. And we'll talk about families as her son ad and some of the elements that will make your model comes alive. So we're still working in the working drawing. And the issue is called working level. You see the layout of some basic spaces that are typically in a building. These are all just text over different regional mass.
43. Adding Walls: Right, so now that we have our plan, let's go and start populating with walls. We're just gonna do the outside. And as we're starting to break into the commands, we are going to have ten foot high walls. But we could just go to the second level. And I think that constraint will be something beneficial for us. We want to locate the wall exterior. So we're just kinda do core exterior because we're doing basic Will chain these walls together. And we'll do the offsetting. And we'll just basically be joining all the walls. So let's start. And we see we do an eight inch wall and we can change that setting fuel like later. And what you're seeing right now is a bit of draw order. You can't see these underneath these masses. So what one thing I might do is select everything and make sure that we're only looking at our detail items. And as opposed to being deceived the lines, we want to turn it to transparent. So now we can see things underneath. And we'll just continue on. And I'm just gonna start with exterior walls. And we'll just kinda keep drawing will correct anything we have issues with later. And press escape to finish. And we see that this wall is not exactly where we want it. So when I click on it, we're going to move that point down. And now let's start with some interior walls. And where we started off, an exterior is eight. Actually might want to do more of a wood frame only inside, but this will probably look at the options for using a brick veneer. So I think it's a good starting point. Now we want to use a be a five-inch for inside. And how we're going to use this one is what we make sure that we were using the side of the wall that we want. We're gonna to level two. We went to go to the core face interior. And we're going to connect this wall. And automatically connected. Though, if we look at our line weights, you see these aren't exactly connected. So we probably want to change this a little bit so it's precise. Or if things are not aligned, we wanna make sure that things are aligning perfectly. And that's a great use of this command. And so that's one of the things we do in AutoCad alot of making sure that things are perfectly aligning. So you can do that in Revit, get very precise models. And we're gonna go finish to the recipes.
44. Adding Doors & Windows: Now it's time to add some more detail to our model. We have our room setup and this again is our working view. Let's look at our 3D view to see what we have. So we see that our program has become a bunch of walls. But why not start to populate these with doors and windows? So we're actually going to leave out of our working view where we worked on the program. Now we're looking at a plan. And so we can already foresee that we need doors, which you can pass DR. Well, you click here. Each family is a particular geometric type and you can choose different functions for it. So if you want a large door than you have and you click on the door command, just click into here and you can choose a different size. Or you can even customize certain families. If you see the type properties, these are the family type properties. And it has all sorts of information from the finishes, which will be important for 3D rendering, to the dimensions, how it's constructed, and other information that would be useful in schedules. So we're not going to change any of those. But one thing we want to do because we were working on this model and we're trying to keep centers. That's when we can start working with things like detail lines. And we just press DL. That's one of the ways to get detailed lines. And we just put a line through the middle of the model and just pull it out and we'll call this our center line. And so if we want to mirror or something, you can mirror all sorts of elements. We mirrored the door right there. And so as we go back to our working level, we see that this is going to be a closet. And we can actually even copy. That's from my modify command. We clicked on these and I press a CEO. Or you could press Copy to Clipboard. What we're actually doing is using this copy. So Copy to Clipboard is here. But we're just using a typical copy. We're going to go from here to here. We have to try that again. You see what's happening. It's constraining it. If we remove that constrain, it lets us copy what we were looking for. Alright, so now we have a plan and if we look at it in 3D, will see we have all our doors here. So let's keep going to add some of the things that will make this real.
45. Adding Floors : One thing we now can add says we have our doors. We probably wanna put our floor down. And to make a floor, we can choose the pick walls. And we'll just pick all the outside walls. And that's our first level of floors. And one thing about it is if you've seen it, was picking the outside walls. But for our construction type, we're going to probably use the inside walls. So what we're gonna do is we're gonna offset eight inches since firewall. And we'll delete the other information there. So now we have our floors and we're looking in the working view so we can get the footprint for our porch. And we just go back to making our next floor and put that down as well. And as we look in the 3D, we see that our floor is below the walls. And don't worry, this is because obviously if you're pouring a slab or something building, it will be below the walls. So one way to get around this is to just for a model purposes though it, in real world, you might actually make two different walls for different elements. But we're going to choose our outside walls by pressing control. And it's less the entire outside walls. And we're actually going to go down. Three feet. Saw immediately that sort of shows going to our foundation.
46. Chapter 6: Detailing Spaces - Adding Cabinetry: Alright, so now we're going to go into some of the other parts of the building. We're gonna close the working as we're pretty clear on what things we're using. And we're going to add some of the Cabinet tree. Because a cabinet tree is going to effect where other windows can be placed. So to add the cabinet tree, we press Cm. Cmb is a shortcut for place component. And we're looking for a cabinet if it's looked at in the model and it's not. So what we can do is we can edit type and we can just load the cabinet tree or case work. That's, that comes already and rabid. So there are different types of cabinets that come. We're just looking for the the countertop because that'll help us to get started. We just want to basic countertop. And if we want to change it later, we can do that. So you can see the family of a countertop. And we just, we see where it's placing we're waiting for to make sure it's directly on this point. And we'll add a sink later. But for right now we'll just leave this. We're going to click this and press control to select that whole item. And now we're just going to be placing items. Have Cabinet tree here. For our restaurant will also have Cabinet tree. And what we're gonna do is because we know that rest CME, we're going to load a new cabinet tree that has a place for a bathroom sink. So it's more of a vanity. So you see some of the different types of things that are here. So we press that one, that we have a simple vanity. And as you see what I did with this last one, it has grips that helps you move it. So that's one of the cool dynamic families that you can use to develop your model. And we're going to rotate this by 90. So I just clicked R, which you could also click on this button. And I'm actually going to start using a line a lot more. Just press a l. And a line is also on the Modify tool. And we're going to undo that. So sometimes a family things move separately. So when I press the line here, it only a line part of the model. That's sort of how the family setup. So sometimes you can use it, sometimes you can't. We're going to put this in that wall. And what we're gonna do for this restroom is probably have two of these vanities. And we're actually going to add a, going to mirror this one vanity and we actually kinda line the edge. Now work properly. This didn't move. So that's helpful. And we're going to mirror this. And we're going to add some cabinet tree on the side of this, which would be like our our cabinet. If we have it available, it might not be there or we might have to customize it. Okay. So right now we're saying that we don't really have such options. So what we're gonna do is we're going to actually create a component now. And it's just going to be a place holder. And we want that placeholder to possibly be. And we're pressing a Trolls, we can get that dimension. We're going to make that placeholder three feet. So I just move this over a little bit and we're Would we rather just make a detail line to define out the information that we want it. And we'll just kind of move this. So be careful the line, a line has some good features and sometimes it's confusing. Gonna mirror this. And we're gonna change this now. All right? And now that we have this, we're gonna make our component for our cabinet tree. So we're just gonna do basic cabinet tree. We are going to lead to 3D to see what this created. It's going to be exciting, but said that and we're doing it one thing at a time. Okay? We're going to model in place. And we're going to call it Case Work. And it's called case work one. And so now we're going to see a whole different types of functions. So I'll, I'll actually go back here sort of quickly. These are some 3D things that you can make. So we can just play around with the different types of forms. You can add words. And you have also some other options. So we're making an extrusion. And so the way that you can make extrusions is we just click the dimensions that we want. And we're actually going to start at 0 and we're gonna go up 88 feet to be the same place where we're gonna put our windows. And we're going to press enter. And we will see what this is doing. And we see that's providing a nice tall cabinet. And we're just going to keep it basic like that. For a mass, this is just a schematic model. We're just figuring stuff out.
47. Adjusting Spaces: Okay, now let's add our windows and let's look at the window family. The window family. We can choose a little information here, but a moon go into edit type. We see a lot more information. And now we'll look at a little bit more into loading your families, because we're going to use quite a lot of families to make a good house plan. So let's load. And if you look at what you see with you press Load, you'll see in the file structure that revenue has a set of libraries which are in US. It also has metric, imperial. So we're gonna go ahead and use the imperial. That means when working in feet. And we're gonna look at a different type of window. So you can see the different categories of things that you can use. Annotations, boundaries, case where columns conduits, detail items. That's when you're doing details. Drawing. Then you look at different types of doors and several different objects and including openings, plantings, especially equipment. So that's where you might get different front or items. We'll look into that later. But we're trying to get windows. So let's look at some of the windows that are available. Each of these windows has particular types of settings. And we find the one that we like the mouse. To me, I really like the fixed window, so they have different types. Each one will have a certain ability of flexibility. I want to probably go with a casement single That doesn't open. So a fixed casement. So here we are, have all those settings right here, and we click it and it tells you the different sizes you might use. So I know that I'm looking for windows for the kitchen and windows for the bedrooms. So I probably want someone knows that started three feet, that goes to eight feet and I want some windows that go from one foot, eight foot. So that already gives me a lot of information. I'm looking for windows that are probably two feet by six or 2.2 feet by seven feet. And I see that the maximum it's giving me is by five. So I might need to customize some windows. And also like sing the three by three by five. And also just, of course, very simple one that you want to use our three feet windows just in case. But we were pretty sure that we are going to be using two by 5s. And we're going to customize and make our own family for one of the larger windows that were going to be using. So it's loading the families. It's the same family with different settings. And so you see that we have the four that we chose. And we're going to add some. So we're gonna duplicate one of the families that we have here. And we're actually going to make it by seven feet. So seven feet equals 84 inches. So we're going to come and we look at the mentions and where it says, Hi, we're gonna put seven feet. And some of these values are parametrically linked. So we're going to start with these settings. We're going to start putting our 24. And again, we love the idea of things mean centered. Just to give a heads up a little bit, we are going to be making Kaba tree. And so that's going to be something that will affect us. So we're gonna make a detail line, press deal, two feet. And that's going to be one of our constraints that we're going to be watching out for. And so besides that, probably mirror this. And we'll probably add a window in between. And so now, to make this beautiful, Of course, we want to probably have some similar action like this. I press a mirror to the other side of the building. And as we have this done, now, we have our first set of windows. But they are too tall. So we're gonna click inside these windows and see how many are selected right here. Select all six row windows and we want them to be at 100 foot high.
48. Adding A Unique Front Door Component: And our front door. Probably we want to have it as a unique family. So we're gonna go into edit type. We see only one type of family in this model. So we're going to load again from this directory a nice residential front entry door cell. Think something like this would be fine, but we'll look at some of the others that are in here just to see what's available. I think we're we'd really like something simple like this. And so we like we have a two-foot dimension on our Windows. This one being three foot by eight foot would be really great. So we're just going to import this three foot by eight foot door. And styles are fine. So we look at this door, Door Family and we see the different things that are setting for this. Where we're looking at the mentions, we're looking at some of the properties. So it's a lot more than the window, but still you can see all these. And just be careful if you're changing them to make sure that it's fine. You can always undo if you've changed something and it screws up. Ok. We're fine with the 36 by 96 door. And it's loading. And there we are. It's opening into a building. So we're starting to have a little bit of a style.
49. Cabinetry Detailing : Alright, so now we're going to go into some of the other parts of the building. We're gonna close the working as we're pretty clear on what things we're using. And we're going to add some the cabinet tree. Because a cabinet tree is going to effect where other windows can be placed. So to add the cabinet tree, we press Cm. Cmb is a shortcut for place component. And we're looking for a cabinet if it's looked at in the model and it's not. So what we can do is we can edit type and we can just load the cabinet tree or case work. That's, that comes already and rabid. So there are different types of cabinets that come. We're just looking for the the countertop because that'll help us to get started. We just wanna basic countertop. And if we want to change it later, we can do that. So you can see the family of a countertop. And we just see that where it's placing, we're waiting for the to make sure it's directly on this point. And we'll add a sink later. But for right now we'll just leave this. We're going to click this and press control to select that whole item. And now we're just going to be placing items. And so there we have Cabinet tree here. For our restaurant will also have Cabinet tree. And what we're gonna do is because we know that rest CME, we're going to load a new cabinet tree that has a place for a bathroom sink. So it's more of a vanity. So you see some of the different types of things that are here. So we press that one, that we have a simple vanity. And as you see what I did with this last one, it has grips that helps you move it. So that's one of the cool dynamic families that you can use to develop your model. And we're going to rotate this by 90. So I just clicked R, but you could also click on this button. And I'm actually going to start using a line a lot more. Just press a l. And a line is also on the Modify tool. And we're going to undo that. So sometimes a family things move separately. So when I press the line here, it only in line part of the model. That's sort of how the family setup. So sometimes you can use it, sometimes you can't. We're going to put this in that wall. And what we're gonna do for this restroom is probably have two of these vanities. And we're actually going to add a going to mirror this one vanity. And we actually kinda align the edge. And that will work properly. This didn't move. So that's helpful. And we're going to mirror this. And we're going to add some cabinet tree on the side of this, which will be like our our cabinet. If we have it available, it might not be there or we might have to customize it. Okay. So right now we're saying that we don't really have such options. So what we're gonna do is we're going to actually create a component now. And it's just going to be a place holder. And we want that placeholder to possibly be. And we're pressing a Trolls, we can get that dimension. We're going to make that placeholder three feet. So I just move this over a little bit and we're wood, we'd rather just make a detailed line to define out the information that we want it. And we're just gonna move this. So be careful the line, a line has some good features and sometimes it's confusing. Going to mirror this. And we're going to change this now. All right? And now that we have this, we're gonna make our component for our calorimetry. And so we're just gonna do basic cabinet tree. We are going to lead to 3D to see what this created. It's gonna be exciting. But said I'm, we're doing it one thing at a time. We're going to model in place. And we're going to call it Case Work. And it's called case work one. And so now we're gonna see a whole different types of functions. So we're making an extrusion. And so the way that you make it chooses is we just click the dimensions that we want. And we actually are going to start at 0 and we're gonna go up 88 feet to be the same place where we're gonna put out windows. And we're going to press enter. And we will see what this is doing. We see that's providing a nice tall cabinet. And we're just going to keep it basic like that. For a mass, this is just a schematic model. We're just figuring stuff out.
50. Bathroom Detailing: And now we're going to actually add some of our windows. And we're actually going to press wn for our windows. And these windows that are gonna go over the sink, we're going to make those kind to be five feet. So we're gonna do 24 by 60. So some people like to have mirrors over there. We're going to have it where the mirror would be. We're going to add a detail line right in the middle. We will have a mirror sort of in the middle cell. A little bit of artistic license, and be mindful which side the window is on. So I believe the window is going to be the other way around. And this is a flip command, very useful. And one other thing, there's now we're looking at our bathroom. And if we look at clinics for walking and such, we want like three feet. We see that we're a little bit short. So our bathroom, we probably want to have it at a bath tub. And we we're actually would probably might even want to put the bathtub on this side of the space. So using the information we have here, we have to figure out some design moves. So we'll go back to our work than level. So let's make a region for our toilet. We probably have that as three by five. And we might want to have a similar dimension for our shower. And therefore we'd put it in the side. And so maybe these doors can shrink a little bit because they're pretty big. O there, 30 feet, 30 inches. So maybe not. So this is one of those space figuring out issues. We might have the ability just to put our toilet would take the train off in the corner. If you put that in the corner, might be able to to sneak and sneak a tub in the middle and put our cabin tree on this side. I think we could try that out. Let's try that out. And so if we're looking at the space we're looking for, we're gonna add a simple wall. And it's going to be three feet. And we're going to make sure we have the inside dimension properly with dimension tag. So we see that we're not getting our three feet on the inside. So let's go to three feet. And now, if we want to take this dimension, we know that's three feet. Maybe it's changed a little bit. Let's make sure we can move this back to three feet. And now we probably want to have and we have some, some dimensions for a bathroom. You want to have our cabinet tree on this side and a tub on. And we'll probably bringing the cabinet tree inside or maybe have one tall unit. And maybe our cabinet tree on the side. And we're going to rotate this 180. And we want to at least have this as two foot, or we want to have this at least said three-foot. So and we're going to move it, move the wall, move this element, and don't worry about the doors. Doors move. When you move walls, which is a great function. And remember, we're trying to get a particular dimension. We're just extending that point. We're trying to get at least three feet. And let's add another six inches. And so now we can just download, download 21 inches to get the middleware are our sink would be we just move that shrink down. And now we're going to change the size of our little tall cabinet. We just want to move it. And though, though it's edit in-place component, you can change the grips. You can't change a footprint unless you go on and click Edit in-place. And we're gonna mirror, pull this all down. And because that does seem a little bit cramped, We're gonna get four feet. I'm gonna come out one more foot. So people have enough space. And since we figured out a lot of this stuff, will take out those construction lines.
51. Finalizing Bathroom: And now we're going to add some of the information that would help us for our walls. So right now we're going to make a 5-foot shower and a 5-foot toilet. And we're going to press Control so we can hit the edge. And we want this to be five foot. And so since this would need to come in, we'll just go ahead and push this in. We moved it in five, this m5. And we know we need to move a lot more in, so we'll probably come in as almost as close as possible. Three inches. Three inches n. And will we get our five with that? Not yet. So you can go ahead and maybe a little smaller to well, it probably probably the minimum will pull this in. Maybe two, maybe one more inch. As opposed to make an ad again, we're just going to click it. And distributors a little bit slow. We're going to mirror that. Now. We're finishing out this bathroom. And we're going to finish it out with some nice simple doors, 30 by 30 by R. We're trying to get eight foot doors. So we're going to actually change that, but we're gonna leave right now. And we're going to line the doors and going to mirror this door. And we're going to add a, a window, sort of the same style that we have. There will press wn for window. And when they get the center line of this area is not exactly on the center line. Click it here. And we'll actually just do an online. Because we want to be a little more design-centric. We'll go ahead and move this one more foot. So they have no space for our window design. And that means we'd be moving this six inches to keep it centered. And we're going to measure that distance. We have in-between these two windows as four inches right here. So we'll do this and we copy that there. And all we need to do now is see well our bathtub fit. This might start us to probably a minimum size on a tub as well. But if we look into our 3D view now, we can see the makings of a sort of thin bathroom.
52. Adding Furniture Introduction: And now it's time
to put in some of the furniture that'll help fulfill this design to
really be communicated. Again, working in
plan, but also in 3D. That's one of the great
things about revenue.
53. Detailing Kitchen Living Spaces : If we go back to our we
go back to our plan, we see the different areas
that we're trying to fill. So let's go little area by area. Let's start with the kitchen. Everyone loves the kitchen. We're looking for our stove, looking for an island. Then we're looking for table. But first and foremost, we will note that
we're missing a door. But a lot of times
people don't want a door that goes
into their kitchen. They'd rather have an opening. So let's add that. And then we'll start adding the wonderful things that
go inside of our kitchen.
54. Adding Openings: So to add a opening to a
wall, we click on the wall. There's a modify wall command here where we get
to add an item. And so what we wanna do is we
draw on this central line. We want this opening to
be about seven feet. We're going to offset. This. Offset is one
of the commands. You click a line in the modify. You can offset a line right
here or you press OF. But now that we have
our wall opening, we're using thin lines so
we can see everything. We're going to line this
opening and we're going to add a new opening to this wall that goes
into the living room. Sometimes it doesn't hit
directly on our points. So we just go ahead and
click this and a line. Now here this opening, this great big area which
is probably too large. We're fine. And because of this size, we might even just make these
walls a little bit thicker. For the presence. We just click on that
wall, select eight inch. We're just having some
general sizes right now.
55. Adding Kitchen Appliances : Okay, so we're going
to add a stove. So we're gonna go back to our R load families are
adding a component, going to look for some of
our kitchen equipment, which you can find in your specialty equipment
folder, says domestic. See there's lots of kitchenette, which is also cool. But we want to maybe look
for maybe some mid-range. We'll be using. Some of those. Will add a refrigerator. Refrigerator, or
probably come at. One of the ends. Will go into near this
again is a family. We can choose certain
things they want. You don't want to
show the label. Some other information is there. Rotate this 90 degrees. Here. Give a little bit of space. Probably two feet and three feet to be the safest. Press one for a foot. So we're going to have to probably think about
that as we figured this, this whole area out. Because are we, as
we start to see, our refrigerator is
gonna be really big. So let's add our island now. And we can place, we
can place things later. So we probably want to Ireland, that doesn't take
up too much space. So maybe 30 inches by ten. So we'll see what
basis options we have. We'll click on this line. And we're just going
to do 30 inches. And each one of these, we just
come down three feet six. That's not too bad. Three foot six. Before we leave this extrusion, we want to go ahead and set
starts at 0 and ends at 30. And here we're going to give ourselves three
feet off the main area. So that's our Ireland. And our refrigerator. Could possibly go into
this niche that we have. This is always a fun challenge. Or maybe we could just put this refrigerator
in this corner. One of the things
that's gonna go in the middle is our stove. We can just change
it to having are. Another possibility. Let's put our stove
on the island. Will just use it to
entry reveal here. And actually I think
we're pretty good too. We're pretty good to
add our windows around. This this little
clearance is really good. We sort of have a
fat refrigerator. I'll see if we can change
it in the settings. We want to have
it right now It's about the depth is really fat. We're gonna go
ahead and say maybe wanted to see if it will change. Might be in the family.
Yeah, there it is. So we'd like to have
a flush refrigerator. And we're going to
add a little piece for a custom size that fits the same size
as the refrigerator. We'll just call that casework. We're not labeling
our groups here, but you can see that it's part of if we wanted
to label them, we could be organizing a lot of these. While we're working. We're going to
make an extrusion. We always choose the rectangle
when it's that simple. We want this to
go up eight feet, no, align with the
top of the windows. Now, you can look on 3D. We have a couple of
models spaces now. We see that our
windows are aligning. Their refrigerator is a little
bit shorter than we want. Maybe if we can change
this a little bit, get that eight-foot high. Or another alternative is we can always come in here and just
put cabinet tree on the top. Because obviously you might
not be able to choose your, your refrigerator height. So you're getting
a little bit of a less than n modelling. And actually, we will actually
use the align command. While we are able to
play around with it. We just align this. You have a better
looking kitchen already. Alright? And we're going to move our counter so it doesn't
run into our refrigerator.
56. Adding Stove Fixtures: Now let's add our sink
and add our stove. We're going to load
the family for a stove top and our mid-range. And I think we're fine with using a Arrange
that's Electric. Actually, since we were not
going to add this in here. But sometimes people
want to use a oven, a wall Levin as
opposed to a stove. For our purposes, we'll
go ahead and add a stove, but we're actually
going to change this to a high range top cooked up. And as you put items in, you can always choose
the elevation as well. So I'm going to click this. I'm going to rotate that 180 degrees is click
our starting point AT. And we're going to
make it so we can turn off and go inside here
and turn off the label. Now we're going
to load our sink. Before we load our
same. Since we know we want to put
a washer and dryer. We'll go ahead and we're
going to forego this, the dishwasher for now. But we know what we're going
to add a washer dryer combo. Just put that in our our
facility room right here. Alright, so we ever
washer dryer for later. We can actually in 3D checkout which which direction its ends so we can make sure
we're not looking too silly. Okay, it's a little
bit backwards. And you actually might
want to put this like this is you can see it. It also goes underneath the chemistry,
which is very nice. Alright, so we have our kitchen, what we need to have our sink. So while we're here, let's go ahead and go back
to our family loader. We're gonna go to our plumbing. Gives a lot of these great ones. I'm going to give some links for some custom families that you can also use your
models a little bit later. I'm going to put this in first and then
we'll look at that. Let's go to fixtures and now we're going to
look for syncs. And there's all sorts
of interesting sinks. Since we want a kitchen sink, that's probably a double.
We're just choose this one. We're gonna put it right by
the window and load that in. And it's already in
the right place. So there we are. We have a kitchen and it's
starting to look nice.
57. Detailing The Bedroom : We're going to start
with our master bedroom. And so one of the things
that people don't like is a master bathroom that is so accessible as opposed to having a
little space in-between. So one of the things we will add to this master
bedroom to make it look nicer is a bit
of a vestibule. Vestibule will come in. Look at this maybe three feet. And we're actually going
to put our door and wider. And this is where your
design decisions come in. We probably want to
offset this to come in. And what we can do on the side of the bedroom is probably make little built-in
cabinet tree there. So when people come into the bedroom as opposed to something because some
people don't like to have a straight entry. I think one nice thing
would be to make a bit of a three-foot little doorway
where people can come in. You see a lot of things
have been repeated here. That's the thing to watch out
when you're copying item. You don't need this door. And this is this part of
our modern aesthetic. Where we just, we just have a bit of a
floating wall right here. And we may just do
a small opening. And all we need to do to
make this opening work, It's align it to this door. And we give it a
little bit thickness. So now we have a bit of
a concealed bed wall. Can we actually might
even align this door. Now we have a bit of
a private space here. Now let's add our mashed bed and wanted to go to
our families again. And we're looking
at our furniture. So there's a simple set of furnitures that
you have and rabbit, rabbits furnitures or basic. When we finish adding
the furniture, I will look at some
of the places and resources we can
start to customize. But this is cool for
getting just the idea out and getting it in 3D. We just want a standard bed. And we have that various sizes, standard beds in Revit. So we want to make
this a king size bed. We just see that
attribute is right there. We want to rotate
this 90 degrees. Come off the wall,
maybe a few inches. And we'll just check for
clearances right here. That about three feet. We don't really need
to have it too much. Some people of course,
want to have a nice set of people want to have a nice set of
tables beside her bed. This room obviously is not
named in so much of that. But we'll make some
small little ICE tables. And we just want a little
little night table. We see what sort of
things are here. Maybe this little
table will work. And we put one in
here and we'll choose some sizes that will make sense. Probably want to make
a little 12 by 12. So it's a little cute. 11212. We've added that family
in and we just come here and do one by one. And we just align that here. And this maybe get a little
closer, about two inches. And probably wanted to pull
this whole thing back. So it's a little
close to the wall. So maybe you have like
a little bit of a zone here for the master
bedroom closet.
58. Adding Living Bedroom Furniture : So we have a few things to add for our kitchen and dining. We're going to load our
families for our table. And we want to have
a simple table. Actually, we're fine with a
long table that looks nice. Then we'll just put
something in the middle. And now we're just going
to add some chairs. Now load our chairs in. Also from the Rabbit collection. And interesting options. We'll come back for some chairs, for our interesting chairs
for our living as well. And center our table. When I come over here, when we see this
area in the middle, sort of big probably
want a bigger kitchen. It's come in one
foot on each side. That makes the space
little more believable. And we might even go ahead
and pull this door N. Instead of having opening here. Put that opening in this wall. You've seen some of the live
editing that you can do in Revit that's happening all in 3D as we're coming up with this. Now we're going to add some
seating for our living. We have a good set of
options for feeding. Or interesting, at
least probably. Let's make some
interesting choices. Maybe we'll do Corbusier a
for this living ensemble. Might want to add
these on the side. 90. Rotate that. And now we're going
to add in our front, the larger couch, and our fireplaces looking
pretty small right now. So probably want to
set up a little bit. We're not going to load a
fireplace for this yet. We'll just be basic right now. But we do want some end tables. We're actually going to take these that are used in the
bedroom, unconstrained it. Come over to this corner and
make this the 24 by 24 ones. We'll look at this
family to see if we have a little freedom. The caribou couch and we can
make a little bit longer. Maybe we can make it seven feet. That's the proper size. We are starting to ask some
interesting things going on. And we will add a
table in the middle. We're going to go to our tables and see what options are nice. In the coffee table
would suit here. And probably want to
have a proper size. Cvs, some good ones. This works. No, it's
still pretty small. 72, That's starting
to look serious. Comeback six inches. Maybe pull this back six
inches or eight inches. And you see what happens if we maybe this doesn't
need to be square. We will go ahead and
just make it Thirty-six. Thirty-six. There we have it. We have a kitchen,
a bedroom closet. Now we look in 3D and we see we have an entirely 3D model.
59. Adding Porch: Alright, so our porch is a
little unfinished right now. We probably want to
add some columns here. When you look at the columns, you have option for
architectural or structural. You'd probably want a column
that's maybe eight by eight. And so we can just
duplicate and make eight inch by eight
inch will come in here. And we'll just do H. H. And these are, I'm just
leaving the nominal dimension. You can change them if you're working on this is
a generic model, so keep it simple. Or you can start adding in. For instance, seven
and a quarter would be how much this
would be if we're looking at lumber or
timber dimensions. But it's fine because
I'm not going to get too complicated
with using it right now. We're going to work on
some of that later. But understanding
the value of these. So my outside Walden mentioned, so now we're gonna
get low serious. 16, my porch dimension is 16. You're going to see why
that's important when I come up with the model. Now we're going to play
with a ring as we're moving this column to
copy on our porch, were going to array
here and the Modify commands we want for objects. This how you array in
Revit linear array. Now, as we Wanted to start looking at our
model more than just the 3D. Let's go ahead and
go to level one. Let's move these elevations. So when you click on
an elevation triangle, again, that moves part of it. But we want to click the
elevation to be a little closer. So when we get our model out of here for exporting
going to the external, that will be very simple
and easy to understand. So let's click on
that arrow and now we start to see our building
and perspective. Well in elevation. So now we're going
to add our roof.
60. Adding Roof: So let's make a roof
for this structure. Started walking outside. So it makes more sense. And you'll see why
did the dimensions from the beginning,
as we work on this. Now we're going to add our roof. Having all the internal systems rarely made this pretty simple. What's the process
for making a roof? So it's a little
more complicated. It says going to love it
too, and that's fine. What I want to do
is I'm gonna make a simple gable on both. One gable going long and
one gable going tall. So I could just draw it, but I want to align
them with these walls. So I'm going to go ahead
and just select it. To my major walls. Actually were
overlapping right here. We don't want those are connected with the walls. We click on Control
to select all those. And we want a two-foot
six overhang. Want these to be 121 12th. We actually only wants
two angles on the sides, so we were not looking
for a hip roof. It's very distinctive when you see the type roof that
we're going to make. Now we're going to add a roof for this long part
of a building. And we're going to
select the edges again. This time we're going to select that and make sure that
we have the right line. We're going to
constrain it right there so that when we move it, just like with the walls,
will be constrained. So we have those items. We're going to make
sure that this, these two slopes and our roof, or 12 on 12. And this is also a roof
family and we'll look at some of the
construction shortly. We're going to make
our ends, gable ends. And they are not going
to find the slope. Let's see what we
have now in 3D. Now we have a nice sort of
form, nice simple form. We are saying that some of the things are not going through because we
don't have our overhang. So we're gonna put
our overhang in here. Since we don't see our
roof in level one, we can go to site
plan to see that. And we can have this probably want to
have this two-foot six. You probably want to
have our gable end, something closer to one foot. This Gable. We're just doing it manually
because it's not a wall. We'll come back and do this. This roof will put this
as one foot as well. We are going to add a
simple additional roof. And we're gonna make this just simply covering these walls and we'll go ahead and
constrain it to the wall. And we'll come back
in. Bridge the gap. We're going to pull this in. And we don't want this sloping. You only want a gable sloping. And we really don't
even want that sloping. We just want this one. So it's going up one direction. And we're going to actually
do a little bit longer. So it runs into this roof. You see what I was doing now? So now we see what's happening. And so to make our
little detail again, we're going to come back
on these two walls and do our I'm one-foot overhang. We'd been doing everywhere. We're doing this one
at two foot six. And as you will look
into our west elevation, all of our eves a line. So one thing we wanna do, of course, is we
look at our model, we will see that there is
a blank face above these. Now we're going to
look into the concept of joining our
walls to our roof. So we're building a model here. Everything is
interesting and new, so bear with me. We're figuring it all out. I'm bringing these roofs
to match this this wall. We're just going around
our entire model, just attaching the
relevant walls to the relevant ceilings.
61. Detailing Roof: We're gonna go to level two. We're actually going to make
a little wall right above, right above our post. And right now it might not
really have a location. So we're just going to
attach it to the roof. So we're going to press
control and select all these. We're going to attach
them all to this roof. Yeah, we're going to
take these walls on my one because some of the walls that are attached to the other parts
of the building, we don't want to attach here in touch these two, this roof. We actually, because
we're making a fireplace, we actually can go ahead and just keep this wall going up. Because we probably
want to go up. You probably want to
detach it from the roof. And we can go up maybe 20 feet. And maybe we'd go up
another 20 or another six. And may go ahead and
copy this in our plan. So this is one of the
sort of little tricks. This won't be on our roof. We're going to
actually go up 26. But we're going to come in. Now we are the full enclosure for our fireplace and we'll
want to add a opening here. And that's going to be one
of the things that helps us work on our fireplace. And we're going to use
our dimension tag. And we've just
changed the shading. We don't need that. We're
hitting one would be fine. Yeah, we're gonna see
how much we can come in. So maybe we move
that out 18 inches. Then we'll have our
fireplace, chimney. It's a basic, basic story. Alright, so we have our roof now connecting our back roof. The last thing we're working on, we're going to attach this. So it looks like we
have a house and so that's our simple house Revit. Now, we probably want to
bring this wall down. We'll just come down. We can cut our roof
and some of the items. But since we're not really
concerned with that, we'll just bring this down. We're going to come
down negative two feet. And we're actually going to put a window here and then
go to our West elevation and press W N. Probably
want a small little window. It doesn't have to
be something major. Maybe a 24 by 48 or close
like that. 24 by 36. Good work. We've come up one foot. We can add similar type. We actually going
to move this wall. Move this wall actually down
negative, negative one. And we actually, we will need to cut this roof so it doesn't run into are our door. So one of the great
things about it is it's an overhang that doesn't run into
Windows if it stopped. Right here does. And so we're gonna go into here and we're going
to work on it. One of the tools called
vertical opening. We're just going to
select that roof. We're going to come
to our site plan. We're gonna go from the middle. We're going to go out
to the edges of there. That's gonna be an opening. Now when we look
back at our model, nothings in the
way of our porch. So it's working on
getting a proper model. We do see an opening
here now and I want, so I will look into that now. Each wall is unique and you
can make profiles for them, you can make them unique. You can add different
effects to them. So what we're gonna do
is edit the profile. And unfortunately
we will have to move its attachment to the roof. But the great thing about it is we can just use the roof line. We just can choose a
line, choose a line. We just can use
our trim command. And now just save
that Android it. But now we have it
without knee seen. We can do the same
thing right here. Just come in here,
click Edit Profile. And it's going to give us
an error. But that's fine. We're prepared for it. And just connect this to
this this, this, this, this remove the top of the wall and we can
underline the elements. So now we have a proper house. Let me ask some interesting
things going on.
62. Adding A Site: For the sake of
understanding a little bit about the site, we're just going to
make a basic site that will be under our building. And that will make an
interesting way of how you're going to see
how everything relates. We're going to add a
little bit of step right before porch. And then we'll come up with some views as we're
going to go into our sheets from our site. Drawing. The way to create a site
is going to amassing. Right now. We're going
to make a semi TOPO, which is going to have
points at negative one feet. We're just going to make
for them out in space. Our building will
be pretty basic. So you see an AR
model now that we have a ground and our porch
is a little bit floating. So what we can do
is make some walls, and now we're going to
make some custom walls. These walls are going to
go from negative one. And actually we're going to
start at negative three. When I go to negative one. Negative one off of or we
can just say two feet. So it'll be right
under the porch. And it's making a note because
you can't see the walls. Will look to see
where our walls are. Walls are straight
underneath here. And our portrait
actually is 12 feet. Provinces. That's alright. So you're not going to see that. So that's fine. We just wanted to basic. So now as we can go shaded, you see that our buildings
coming together nicely.
63. Refining Geometry: Now we probably want to
bring this wall down. We'll just come down. We can we can cut our roof
and some of the items. But since we're not really
concerned with that, we'll just bring this down. We're going to come
down negative two feet. And we're actually going
to put a window here. And they go to our West
elevation and press W N. And probably want a
small little window. It doesn't have to
be something major. Maybe a 24 by 48 or
close like that. 24 by 36, good work
would come up one foot. We can add similar type. We actually going
to pull this wall, move this wall actually down
Negative, Negative one. And we're actually,
we will need to cut this roof so it doesn't run into our Artur. So one of the great
things about it is it's an overhang that doesn't run into
Windows if it stopped. Right here does. And so we're gonna go into here and we're going
to work on it. One of the tools called
vertical opening. We're just going to
select that roof. We're going to come
to our site plan. We're gonna go from the middle. We're going to go out
to the edges of there. And that's gonna be an opening. Now when we look
back at our model, nothings in the
way of our porch. So it's working on
getting a proper model. We do see an opening
here now and I'll wall. So we will look into that now. Each wall is unique and you
can make profiles for them, you can make them unique. You can add different
effects to them. So what we're gonna do
is edit the profile. And unfortunately
we will have to move its attachment to the roof. But the great thing about it is we can just use the roof line. We just can choose a
line, choose a line. And we just can use
our trim command. And now save that and joined it. Now we have it
without knee scene. We can do the same
thing right here. Just come in here,
click Edit Profile. And it's going to give us
an error. But that's fine. We're prepared for it. Yeah. And just connect this to
this this, this, this, this move the top of the wall and we can
underline elements. So now we have a proper house. Let me ask some interesting
things going on.
64. Reviewing Elevations : Okay, so now let's look at
all of our elevations to see what sort of things we're
getting in our building. Right now we see that
we have our level tags, which is our datum tags. They probably need to come in before we export this model. Probably going to bring all
these n on each of our views. So far, west view. And we're gonna do the
same for all our views. Get them cleaned up.
65. Chapter 7: Documentation - introduction to Sheets: Now that we have our model, pretty much Model in Revit, we want to now go from inside of developing their model. It's being able to communicate that to others, to drawing sets through Sheets and two perspectives. So that's what we're about to do.
66. Adding Dimensions: As you can see from this window, it's very comprehensive. And from the things that we've been working on, we have a lot of information. So let's go into a little bit about annotations right before we get to our sheets and also perspectives. So we already have a dimension. If you remember how we do dimensions, we just go to our annotate tab and we can click linear dimension or repressed d i, the same thing. And one thing that's useful is the getter overall dimensions. And you see that rabbit with the center of the wall, don't worry, we can change that. And one thing it has is it will have a string of dimensions. I press control, so I get that outside. I press control. And I can get this one and I'm left clicking each one of these. And so those are some major dimensions. And what that's called is we just exit out of the command. And what its call is witness lines. You can click in here and it will tell you about the witness lines you can take or add. You can even change the line. But here's another way to change a line, since we see this is in the middle, would just click that middle point and it goes to a new location. And so we actually don't need that one of course. So let's make an overall dimension. And one on the side of that column, one and outside of this wall. And we also want to get some dimensions on this side of the house. Will go all the way to the end of the fireplace. Or big dimension. And that will make a string of dimensions. And we'll just go through these and will probably be place that, that little porch one. And finally we have here and we just delete that one. And so now we have a set of dimensions for our plan.
67. Customizing Elevations: If we go to our elevations, we had an east elevation. What we can do when we look at our our east or north ourself and our West, right before we get started putting on the sheet, we probably want to have it in a crop you, so we won't be all over the place. So we're going to crop it right before we get in there. So to crop your views, we're going to first go down here to on crop you. And then we'll show the crop. And then we'll just get to our dimension that we'd like. So we're bringing it all down to the close close as possible to the house. And we'll bring our bottom-up. And we double-click dot psi, which close this. We didn't open it as an Edit Group to modify, like we can do here with edit profile. But you can just drag the crop bar. And so we'll do the same thing here, will show the crop region. And we'll drag that. And it automatically brought the levels with it. Yeah, we'll click off and then we'll go to our north elevation. I'll do that same thing. And we drag it n on both sides. And what we can also do is go back. And I had the crop region. After we finish, we want to show the crop region here. We're just pulling that trade n and put that trade n. So now we have everything in a controlled crop region. Double-click our middle mouse button to see everything. And we might want to bring our points closer to our little edge for our level closer to the inside. And we're going to sum all of our views.
68. Adding Perspectives: We're going to leave our views. We have the views we want except for a perspective to less Add a perspective drawing. So here's how you add perspective. We'll click on level one and will also control the view here. Probably want to just bring everything in. And we want to come here to this top bar icon where it says Default view camera or walk through. So we'll create a camera view. Probably want to see a little bit of a house. So that takes us to a new view and it's a little bit crops so we wanna make it wider. And so just come in here, they get larger. And one thing, because it seems very maybe too much perspective. We probably wanna come in here and click our navigation will. And here we can start to walk around that 3D view. And we'll probably do this. What will come out a little bit. So we see more of the house. We press Escape to exit pipe. And then we lower everything so we get a good crop. And just for visual sake, we might turn on the shadows. And another cool thing you can add is we'll save it just in case it crashes. We want to also click on our visual style. And then the visual style we have the option for ambient shadows, which are also ready useful. They give a little bit of a character to the drawing. And we can also choose if we want to have sketchy lines. So that will make things a little more like a sketch does have a little bit of jitter. So it looks like it's hand-drawn just a little bit.
69. Setting Sheet Size: Now that we have our drawing sets that we want to put, let's get a sheet size. Okay, so if we scroll down and I like to collapse also, I can choose one. We go to sheets and so we don't have one. We right-click and click New Sheet. And here are some formats that are already in rabbit. But we're going to load from here title block, that's 24 by thirty six. And twenty two, thirty four is pretty valid for what we're using now. To edit this, we can just go into the family. Suppose we want to actually make it a true 24 by 36. We can just double-click on it. And now we're editing family for the first time. And this detail family is something that we will have to save separately. But don't worry, it's just a very simple edit. So to make this 24 by 36, we're just going to make some lines and I'll make a box. And whereas this right now is 22 by 34, we can just very simply stretch this down and stretch it out another inch. And we can just do the same thing. Be sure not to leave it on this side. Sorry. So we're get, we're make sure we're in the family editor and we're doing two inches on this side. And so this is our new 24 by 36. And we're going to save it in our project. And we're going to save it as 24 by 36. And we'll just make it labeled so we know that we put it there. We call it revised, loaded into project and close. And now we just go to our unnamed. And whereas it said this 22 by 34, we can choose a 24 by 36. Just like that. We might go and edit, edit this a little bit. But for right now we're going to put things on this page.
70. Adding Content to Sheets: Alright, so the way to put items on a drawing page is simply by dragging. You see that it's on page and letting it drop onto the page. And it already gives you a number, a title, and the scale. And if you change, the scale will change automatically. And you can see this is the type of family. So we could always actually click this and changing thing that you're looking to change. We're fine with what it has for now. But again, these are some options for customizing your family of your viewport. So let's put in our elevations. We do want to show our site as well. And we probably wanna go and make sure we've cropped the site. So doing one at a time. We'll double-click into our site. And we'll check that crop region. It'll probably crop it. And to hear, the great thing about the site plan is that you'll get to see the the roof. Okay. We go back to the sheet and we'll just say this. Will label this. And we go to our properties. We'll scoot on our browser and we'll label this drawing. And we click on the space, we'll see what its name is, the sheet number here and it says sheet name. We'd just go in here and say drawing set. And we'll put SD. Okay, so we have our, our plan here, put our site plan here. And we probably want our site plan maybe one to 16. But for our sake, since we are not really showing too much, we can just make that 11 eighth inch sort of small. Maybe we'll put this right. Should we make this 1 eighth inch? Could sorta small? We'll make sure we see what we can fit on the page. When we do this. Residential, you typically go to one-quarter if possible. And when it's going to be a little bit tied to get our elevation on the page. So we have two Trad Jazz at, and you see that I've been moving this around. But the if we want to, and I double-click the middle mouse button, if I go off screen, we can move our title just like that. And we have our site plan. And then we can also add our elevations. Cell latter, ease elevation first, then R, north elevation, then our south elevation. And then we are checking to see if it's possible to make it a larger scale. And it might be. So. But we're going to, for now probably just stick at 1 eighth. So we have enough space. But that it's that easy to change the scale in Revit. And we're gonna put our drawings probably an order where we have the front elevation here. And you can see that as we move things, there's automatically a aligning. The see the aligning levels. Also the lining of different elements like the lining of the title right now is just says south, west, east and north. So we can come in here, since this is bit large and we say, maybe this could be with a little bit of shadow. And we put that up to top over here. Then what we can do is add our perspective. And our perspective was created enough 3D views. And we just put drag and drop it. We have this here. And though you see the crop region, we can simply take that off very easily. And if we want to make this perspective change the size, we actually would have to move it so we'll get something like that later. But right now since we don't want to show the crop region, we just select all of these and you just click the cooperatives and will not be visible. So now you see everything on the page. So that's how you get your Revit project onto a page.
71. Adding Room Tags: This has been a fun little project. One thing we might want to add is some titles on the rooms. I think when we add that, that will finish this set off for just getting an idea across. So we go back to level one. We come in here and one thing that we'll do is go to our architecture tab and our room tag. So now we'll look at how do you put room tags in. And when you click room tag, it will know if there is a room or not yet to create room for us. So you'll see where the rooms are automatically. I have something in the room that you want to be room for if something isn't. So since somethings aren't rooms, we can always come in and add a room separator so we can get a clear, definitive space. Now when we go to create our rooms, we have a little line that we want to move. When we go to tag our rooms. Now, after we create the rooms, actually it's automatically tagged. And we just come in each of the rooms and will change the names after putting them in. And the great thing about this is you can always move up and it will align with the closest tag.
72. Updating Sheet Items: As this is getting pretty small, we're looking at our page size again to see if we could possibly make this larger scale. I think we can. And as we get to a larger scale, and actually we might just even do 330 seconds. So, sorry, 3 16th, size up. And the great thing about 3 16th, as we go to all these, just keep them all the same size. We'd just lay at our sheet a little bit differently. And after that, everything has automatically gotten larger. And what we can do is we can, we can line up our plan. And one thing to note is that you can't click to points in your equivalent of a paper space from auto CAD, you cannot click on points like that in Revit. Like if I, I can't click on that particular point, so be mindful of that. It's a bit of a failsafe, I guess. So you won't be going back and forth like in CAD. So yet use a line to line these and moving this one as well. And then we just come back and we could use our, our mouse a little bit low. So we come back up a little bit. And I wanna make sure that we're we actually might reverse the order of this joint. And it's this easy to move things around. And we see that we actually went to the line of the house. We want to move it to the line of the house. House is click this over here. And we see that are now there. See it's larger. We see our elevation tags are a little bit far out. It's going to bring that in. You probably want to match it a little bit. So come over here and we double-click to get out of the viewport space. And now we can just come over here. And we see that's a line that we come over here and do the same thing. And we've aligned that one in our drawing now is here. What we can do is as we want to probably enlarge our our perspective. And you see when you click on it, you can see how it looks in the window. If we walk closer, we probably wanna walk back a little bit. We can get a bigger size. And we double-click on Medicare or just single click, really zoom in a little bit and pan a little bit. So we've made it larger in the viewport. And don't worry, the the views port crop is not visible. Though it, it's useful to see what's going to be shown on the page. We might do away with the site plan for now.
73. Labeling Rooms : Few titles we want to add. And we want to just say this will be our kitchen and dining. So we added already tagged and label this our Fourier. We just had to click on the text. And and we'll just say master bathroom. And we actually can go in here and also tag when making rooms for the water closet. In the shower. We don't need this any longer. Shower. And we can actually come in here also and adds a little bit of notes, not too many. We just press TX or if you go to your annotate, if you're adding text is click there. And we can just add different items. And if the text is too large, you can click see if the families and therefore smaller text and it was. But if you can, you can always edit a type. If you wanted to be 1 16th to say Duplicate, and just type in a name. And then put that over here. And there's some other information with that. That'll be all we need for right now. You can always just make that a little bit smaller. And we can add a couple more maybe for the range. And since we want that to be the automatic class for our texts, we can next time we click TX, all we need to do is select that. And that'll be automatically piped down for us. And because it's sort of middle aligned, we can actually change that alignment right here. You see some of the text properties. We can click this one and it's already what's not actually centered. So we click this Help Center and we can go ahead and just because we have a laundry here, we will add a tag, o at a room Anna tag. And we're going to have this stuff here. This right here is our pantry, and this is our laundry. And these right here, we're probably be our built-in ones. So actually I'm going to, I'm just gonna draw a line for these four rabbit way. But for right now we'll just put a line here and we'll pick detail line. And I pressed DL. And we'll just put built-in. And for this text, you can see there's some press escape to get out of that. And you click on a text, it gives you the ability to just rotate it and it automatically snaps to 90. And I just I press copy and I just click a point to another point. And we also want to labor a porch. And we probably actually want the porch to be a little bit bigger. So we clicked one quarter, that's fine. And that's actually too big. So when they come here and select on that and make it a little bit smaller. And see if v3 seconds will work. It's going to make a new family for three 30-second Arial bold. And it says 530 seconds. And we'll click Bold. Who probably wanted to match the size of our, our other texts title. So we can actually duplicate. This shouldn't be a 1 eighth inch interior bolt. Right here. We're now 33 seconds. Yeah. And so you can see also adding this. And we're going to have our front or open-end because that's typical for residential. This flip that direction. You see our lines are a little bit unbalanced here. So we want to come back SD corrected. Before we go out to print, we're mirroring this line. Press MM to mirror. And I'm going to align this with this and said, well, yeah, and move our room separator.
74. Printing Sheets: Alright, so we have our drawing set. We can do some naming here. So this is one of their templates and you can go and just like we did and edit it. We can just name this Revit project, SD drawing set. And this is a family, so you could just dial it in here. And it talks about the scale. And we don't have to worry about that one. But you can always go in and change it. Again, this is double-clicking it. And our finishing for this project, we will just printed out, we'll choose Adobe PDF. We'll go to our properties and it's printing just like for motto cat or other programs. You select a size, press OK. OK. In this dialogue, it tells you if you want to create multiple, you only have one page, but it can also create separate files. And then you'd also can choose if you want to print the current window, you can print AS visual portion. Pretty much the basic style. Obviously, if you're using a lot of drawings, it's going to be important. But if you're just doing a short drawing, a few drawings, then this is fine. We're not gonna save a set. We just can do the current window. We can preview the drawing. It says Arrest arise because of the rendering. That's close. So it's loading that up. Weeks. Yeah, what's gonna come out? Take a little long, but everything is basically in here. Okay, so we'll go ahead and press, print. And we'll choose a name. And we'll just place this in our Revit folder, classic house1. And we have a name and then we'll just press OK. And it's loading and it's printing. And we'll see a beautiful set very soon. And my dialogue actually x twice. So class, I call it a classic house1. So it's loading through PDF. And the rendering sometimes takes long, so be mindful of that. If you're putting a large set, you might want to print some of the bigger drawing separately and then just add them in. Alright, so that's been printed. Because we loaded, we can see our output. The second little bit load. Again, that's probably a very big file. And there we are. There's our, our first Revit house in classical style.
75. Sheets Conclusion: I hope you learned a lot with this example. You've seen the basic ins and outs of first getting a model in, putting it together, then going through and communicating and out through your views, through your sheets, and also going back and forth between things you have to work with your families. And the output is going to be.
76. Chapter 8: Importing to Revit - Revit App Store : While rabbit has a bunch of great built-in features, there also are lots of great features that you can actually find online that you can actually use in your Revit models. That's called the App Store. And also by other developers that make software for rabbit. You can see in this window, there are some featured apps in the Autodesk app store, and you see there's a browser yet the sign-in to download these. But there's all sorts of types of industries that use these plugins. And there's all sorts that you can just click on, find out more information about and make sure you see the version of Ravid that is usable for this. And make sure of course, to save a file, you're gonna try to use something new so you can find information. There is lots of videos are examples and comments. So the app store is really, really valuable. If you get some time to explore what rabbit can do, I would start by learning out what's in Revit before you just start with the plug-ins because there's so much already in rabbit as opposed to something like SketchUp or you're getting a lot of plugins. So many stuff is built in to rabbits. So first off, get some basics on learning rabbit. And then you'll have some time to explore things like plug-ins. And plug-ins I would recommend are auto section Bach. When you're more advanced and I have a course on this. This helps you make sections in your rabbit model. And also escape. Escape is a renderer and they have a plug-in for renderer that works in SketchUp, Revit and other programs. So these are some plugins that I would recommend. And I recommend definitely learning Revit before you start adding the plug-ins because the plug-ins will add another constraint your model. So be mindful of that.
77. Revit City & Online Libraries: If you're looking for a Revit models to help believability of your model. Also, to maybe add some information to your model. You can use the site rabid city, but you also can look for a rabid BIM models on manufacturer websites. So first we will look at rabbit city. If you want to find almost anything, you could just search and find it on rabid city, for instance, if you wanted to find out oval table, you could find a Revit model, which is called a family. Just wait till it loads. And as you can see from the website, it has forms as news articles, downloads, and galleries. You also can upload your own families. And so you see when you click on something like a table, there's all sorts of items in categories that you can build it down to the version of rabid. And so this is a great way to find things that you could put in your model. I would always test something out because you don't know if it's new and it works. The great thing about it, if you click on one of these and people like it, people will add a review to it. If something is Do you might want to spend a little time to check it out before you put it in your model.
78. Manufacturer Models: One thing you can also find in the world of rabbit models is manufacturer products. You can find both people who make rabbit models for manufacturers, and you can find them on manufacturer websites. Are cat is one of the sites that makes different rabbit models. And you can download families of things like stoves or any sort of appliances. You can also download things from Revit roof families from a manufacturer. For instance. Bm object is also a place to download. There are some paid models, but you also can look for anything on Google that you want to download and you'll see that there's probably a manufacturer. For instance, also, if you were trying to use a particular type of glass or particular type of door, there's all sorts of people who are now making rabbit model. So everyone's join in. So if you need something for Revit, just do a quick search. You don't already have it. Rabbits built-in libraries are great place to get started. You can customize things. But of course, if you are going to go really fast, you can actually find lots of models online. And I would definitely start someplace like the rabbit city or at the manufacturer side because we have it. That's an incredible way to go further in your modeling.
79. Introduction to importing: Often in rabbit, you will need to import information that will help you to finish a project in various formats. So I'll show you how to import both CAD and also PDFs in the same manner happens for anything you want to import in your model.
80. Importing CAD Files: You will be going to the Insert tab and you will be clicking on the types of file that you can. You can insert a PDF, you can insert an image. You can also import CAD. So we're going to import CAD. And all we need to do is click on file path for instance, this is a topography. And now you'll see we go to the 3D view that we've imported some geometry. And you could do this with plans. Also. You see this is actually 3D. You can do that with 3D information as well. And one thing you could do when you've imported, you actually can scale. But first thing you'll have to unpin the element. You see this is pinned. So to unpin, you just click this button here. If you want to pin it again, you can always come back and click pin. And now you can actually scale anything you bring in here, just choose a base point and scale it. And you also can explode it. You see these are all splines. And you can actually use the geometry. You can use PICC line to work on the geometry. And you of course, can draw right on top of it. So that's how you import CAD and Revit.
81. Importing PDFs: If you want to import a PDF into rabbit, what you are going to do is we're gonna make sure you are in a level one view. You see 3D sort of inhibits the importing. And you're going to load this. And we have a plan that we were using on another project. And now we need to do is we click on it. Choose a resolution. So you want to choose a high resolution because you don't want it to come in blurry. You can also choose the multiple. If there's more than one page, you can make sure that you can choose the right page. And so this is a 300 dpi. We click OK. And it takes a little time to load. As you can see, we've placed it in here. And it looks like a nice quality. And the great thing about it is you can, you can skill. And you also, if you click on the PDF, click on Enable snaps, you actually can connect. And this is based on, of course, vector drawings. So this drawing here says that this length is 51 foot 9.5. So I'm drawing detailed lines on the edges. And all I need to do is offset the top line of press o. And I'm offsetting it 51 feet, 9.5 inches. And we see we're a little bit off. So I'll need to do is click on it. And we can click Scale. And I'll need to do is click the starting point for our point in our closed point. Now if we will have to draw a line, we can click the points, but we have to measure from these. We just draw a line and it's a little bit off. But we can always just work on that. So that's how you would go about getting your information into Revit and Schelling. And, and of course, you can always come back and make sure it's on the right point if it's not. Revit is a pretty handy software package for importing information. If you import something, you can very simply start drawing walls on the, on the lines. And you can have a building in a very short amount of time. And you can even snapped to points on the PDF. So it makes it very easy to be del, developing that. And make sure to note that your PDF is actually a viewport. Pdfs are not 3D information, but if you import a cat, it will be in your 3D view.
82. Chapter 9: Introduction to Adding Detail: For your added benefit in learning, Revit, this simple class exercise will really need to have some advanced features. And there are some advanced features that we're going to set up sheets for. And then we're gonna go into as you build your set and some skills along the way. We're first going to set up our sheets for adding our interior elevations. We're also going to add our dorm window schedule, as well as a detail and building section page. So pay attention as we go through the elements though you can set it up every time figuring out the basic detail. So you'll know from the beginning what's going to be the end result. Now prepare you for success.
83. Updating Walls: As you can see, our 3D model, we've modeled a house, but one of the things missing is actual materials. One of the first things we're gonna do is set our material to a Woodstock on brick. And we're going to carefully monitor the first floor so that we can make sure that the exterior of the building is going to be the right type. Or looking at the plan and making sure that we aren't using a template. So we can change settings for this drawing. And we'll just set it to medium. And we're going to see what's clicking in the wall. All right, so now we'll set our materials clicking on a wall. And we're going to set the material to be a brick gonna go in here. And we actually do have a brake material that we could just use called Brick on CMU. But for this house, we'd rather have brick on Woodstock. So we're gonna go into the materials. We're going to select the brick on brick on metal stud. We're gonna duplicate it, make it a brick on wood stud. And so this is how you edit and get a unique wall type. You change the name, and then you go into structure and instruction. You should your options for what type while you're using. So if we're going to use brick on the outside, that level can man the same. The only thing that will change is the structure on the n side, which is going to be Woodstock. And you can simply put stud here, see what is in the relevant materials. And if it doesn't have it, we could either make it or use a generic material. And I'm saying that we have a structure item here. We're actually going to just make this duplicate material. And we'll just say structure. And we'll say this is going to be wood stud. And within the parents were not really gonna sit because since had the wall. But it was just looking to see what things you'd see from it. If you go into identity, you see some information. This would be useful if noting it later on in the project. And also just apparent it since going to appear regular white. And that's fine for what we're doing. And press okay. And we call it Woodstock and rational to do a five or two by 6.55 inch. And so we're going to have that same brick. And this assembly will be fine for us. We'll click OK. Click OK.
84. Compound Walls: One challenge of this project was a challenge that people have in mini-projects where we want to have two different types of walls. For instance, this building having a wood framing underneath the stud, will still have a CMU below it. But now we only have one type of wall. And if we look at the section, just the simple building section would show us that we have this stud framing going down to the base, but that's not what we want. So here's how we work. To get a better section, we're going to make a Stacked wall. Making a stack wall starts really simple. Make sure that you have two different type of compatible walls. The first wall we're gonna have and will draw it, will press W. To start a wall is we want to look at our brick on Woodstock and will make a few of those, just one level. And then we'll make a brick on CMU. And so the thing that we're trying to do and we'll make it so we can see this in section. We will extend this wall by aligning or extending this to all is here. And the section goes right through here. And so we see two different types of wall. And if we want to have these as one type of wall, if we move this center point, we turn off our lines with TL. We move our brick, moving constrain to go a little bit higher. And we'll probably have just move it. And we're just going to align the brick. We're having, just looking at this. So we're going to set both of these walls to align their wall finish phase exterior. So aligning this wall and this wall, currently, it's going to be needed to connect with this wall. And there we go, we just move that point. And if this wall is going to be over this wall, we have to have these things matching. And so one thing we're gonna do is we're actually going to, instead of this type of wall, we're gonna make a wall that will match this dimension. 78s from the brick for our little wall. So all we need to do to do that is go into edit type. We're gonna duplicate and we're gonna say brick, exterior foundation, brick on. Cmu foundation. So that will give us a different requirement. So we saw before where we're not really going to insulate the foundation wall. So we can take that out. And we want there to be 73 eighths from the core of the wall to that finish her right now we have three plus 35 h, which is 65 eighths. So we need to add six eighths or three quarters. And so we could simply do that by adding our air layer being 33 quarters and press OK. And this is our brick on CMU Foundation. And now we see an aligning top and bottom. And so now we can make a stack wall that will keep our above dimension and will work as a foundation for us. And so to make a stack wall, we're gonna go to our wall command. Just pick w. And we'll make sure that we are in the level one. We already have these two walls where we want them. We'll turn off the crop that we can see the wall. And we just want to align these walls as well to this. And currently they're not aligned to be perpendicular. And with those walls as our guide, we'll just press W and then the wall properties. And we'll just scroll down. Here below curtain wall, we see stacked wall. And a stack wall is already available for us. We just have to click inside of it. And this type of stack wall, and we'll look at it in section. Has a CMU that goes out beyond a brick, but we have a metal as the stuff. So we're gonna go inside and edit this and we'll duplicate it. And we'll call this one brick over over stones. Cmu. And we're going to press OK for that. And now we get to choose the type of wall. Top wall is going to be our brick on Woodstock. And we have here some dimension information. And we have our height, the offset, and the top of base. What can help us is by choosing finished face exterior. And we can also click the preview button. And now we can set our base here to be a break on CMU Foundation. And the only thing we need to now do is to take off the interior as we would would probably put insulation here for different type of assemblies. But for our purposes, we'll take off the insulation on the inside. But generally you see that our wall is doing what we want and press OK. And we have our stack wall and we just want to come back in here and make sure that our foundation dimension is three-foot four. So it'll be stacking and it'll be coursing with eight inch unit and press okay. Yes. Okay. Again, and now we see that this wall is matching this wall and all, all we have here is if we flip this wall, we go to level one, flip it. We'll see that we're getting what we're looking for here. So that's how you make a stack wall. You can go onto your motto now and for wall is set to that same finished face exterior setting. And you make sure that your wall is going down to your foundation at the coursing dimension. And then you just put match, wait for it to load. You see that it will set it to the wall and all you need to do is, of course, if it having any issue or as you want to make it exactly, you will make sure that it is going to go to the same level and it'll go down the same amount. So you can do a perfect match. And so now at the same information, it will be right next to the floor. So that's something that you'd have to pretty much work out in section. But for our purposes, we have a more informed section that will tell us what's happening in the floor. And the way we've we'd probably have it is a four inch concrete slab that runs into this CMU. That's how you make a compound wall.
85. Customizing Exterior Walls: And so now we're loading that brick type. What's the fabric exterior? As you can see now we have a little more intricate type of pattern. And so now we see and we're going to actually make a detail view. And so we can get into what's going on when to click view and make a call out. So we can start to see what's happening in this drawing. And we're gonna make it a smaller scale. And we're going to make sure it's on good resolution. Three quarters, right? So we have a wall now. We say a brick layer, air layer, some sheathing, and we also have our interior layer. So that's working pretty fine. We're gonna make sure it matches our existing cabinet tree. And what we're gonna do so we can keep our our project. We're gonna make sure that our setting is going to be the same. So this is, our core phase is going to stay the same. So that means it's going to add brick out this way. So when we click this, put brick on, this wall is changing the type. We see that the would still remain in the same place and they just added brick on the outside. That's sort of what we're trying to do. We will just go ahead and bring it back in. Will align that to the cabinet tree. So we're not trying to destroy our, our initial model. We just tried to add this new material. So we're going to continue this through the model. And every time we have an issue will just correct it. Right now we have a little bit of a challenge with our kitchen. We're going to undo that last element. Just going to align based on here. And what online this interior wall to match this. And what we could do just to expedite this as we're pretty sure that's how we're gonna do our detail. We press tab and select it all the wall for that low anterior. And now we'll just do that same exterior brick, Woodstock. And so now we can fix anything that's a challenge. For instance, right here, will probably turn it back into generic. And it's already generic. We just have this, this unusual situation here. And all we wanna do is have a wall that comes in here.
86. Customizing Interior Walls: So we can just make a new six-inch layer. And as we look for more detail, we can sort of see what's going on. And we'll actually going to turn off the line weights. Okay, so now we see what's happening here. We do a six sensual. You actually want to do a start using our, our architectural dimensions. We're gonna do a duplicate and we're gonna call this one a two-by-four. And we're going to come in here and we're gonna make this a 3.5. And we're going to add five mm on each side. You customize that wall. And these are just going to be our finished layers. So we change the type here to a finish. And so this is our generic two-by-four wall. Two-by-four with gypsum. And one thing you might want to note is this is for some of the walls will leave it for this one. But we're going to customize a wall that will go to the ceiling. Okay, so, so we have this here. We're going to add our two-by-four wall here. And a two-by-four will line up with this point. I'm gonna make sure that it's all in the right place. We're looking at our properties. We're going to make it start at level one. And it's just going to go up to level two. And we're gonna go from core face interior. So now that's aligned. We can this up this here.
87. Converting Interior Walls: But the other walls we have, we're going to have a two by four with gypsum. And we're just going to use are aligned tools to align this. This wall will fix anything that we have an issue with later. Ok, so now we have this here, because at this wall to the same and phi for this wall, this will likely, will come in here, make a shock for this. Ok, this is a double wall, generic double. And so we'll use two by eight here. And we'll come into our structure. And we'll add a gypsum and finish. And so you, you can type in just mere. You don't have to, obviously, just for your reference sometimes. And when you click on that, you can just loads. And we'll just click that and copy it and we'll insert another one. And we'll make this 17 and a quarter. And we have this as Egyptian wall. And one thing we noticed the ends aren't rapping. So if you go back into that wall type, you can make sure that it wraps at the ends. Press OK, now you see that r ands are wrapping. And so we'll just get to you. And we'll just matching everything using the MA or making sure to align things like our firewall levels. Align these walls. Now for our cabin tree that sort of moved. We're aligning to put them back on the wall. And these, these are generic Masses, so they actually moved. It probably best to just move them physically because the lining, these just changes the shape. Will do that. And we'll do the same thing with this, with this shred up against the wall. And now when we go to our level, one will see a brick on all sides. And now when we go to our elevation are 3D view and our elevation, you'll actually see the material.
88. Fixing Chimney elevation: The wall. And what we do for this right here is this. This could be entirely brick. This chimney. When I click on, Make sure it's selecting it. And just for visual purposes, we've got a Level one. And we'll see that our one of our little chips mall is still here. So in terms of resolving where our brick is, now have it where its little brick wall hits this one. And we're just dogmatic diagramming it out now. Because now we've changed walls, so now we have the brick home. It's gonna really help us for elevations.
89. Adding Door Tags: So that we can have information for building schedule for our doors and windows were going to go ahead and label all of these items. And we're also going to labour all walls. And the way you do that is by pressing Tg. And td also can be found here. And your annotate tab is tagged by category. And we simply want to tag all the doors and windows. And here are the options you have for tagging. We can choose if it's horizontal or vertical. We take out the leader. And we could just put them in these elements. So this is start tagging. You see the numbers on the tags. The doors are automatically tag when you create them. And the same thing for windows, but you can still change them. So now we've tagged all of our doors. We can always come back. And if we want this to be 2x, we could come and change this one. And there was another two. We can always change that one. So if we wanted this one to be three, you'll tells us duplicate so we could actually come and changes when later.
90. Setting Up Window Tags: Let's also tag our windows and that's, this is simple. However, a lot of times what people will do is they won't. The idea is numbering the windows is not as valuable because obviously all these are the same type. And the numbering of the tag and Windows is now going to be the same. So here's how you will tag the window. You actually are going to be using. A view may for window elevation. And this project might not have the window elevation. So we have to create it. So we just go into building elevation and we click on a tear elevation. It's like interior elevation. We're going to duplicate it and when to call this window elevation. And it's going to use a similar type of thing. But the way that we're going to tag these is going to be a little different in different views. But for this one we're going to leave it as this. We're going to come in here. And what we're gonna do is go into edit this. And we can choose to change this cod head to something that's a little different. So we're actually going to leave the call ahead. We're going to make sure that the type of callout head for this one will be similar to this one. So we're gonna make a duplicate. But you see the settings for the elevation mark. We can change that right here. And we're gonna say half circle, no detail. And that's because right now you see, look into the window, you'll see there's going to be, we just go back out. You see there's a name and a tag, but we want to take out that tag. So it's this very simple. It'll have the page number inside of here, and it'll have a tag. I'm going to edit it. And want to come in here. And we have a half circle. Half circle, and we call it empty. And is this going to be the detail number? So we'll say elevation filled arrow, circle and filled arrow and press OK is OK. And so this will only have the detail Number.
91. Making Window Elevations : The types of windows we have, our R3 frame a to frame our window at our kitchen and our basic one window and sell for each of these, we only need to get a small amount of space for the view. And then we're going to make reference for the other views. So we're going to make one of these for each one. And we'll go to making into elevation for each of those. And make one for here are three and R two. So those are all of our window types. For each one, we're just going to shorten it. And then we're going to make a schedule.
92. Fixing Window Details: And we're going to solve different challenges like this. The windows shouldn't go to the break. So we can just very simply click that window and move it over six inches. And it solves that problem. We do the same thing for this window. Number seven, so we just come back down. And when we get these on sheets, we're going to do what's called making a reference tag on the windows that are matching these. And so we can just click back on these and we're changing the crop region and the plan. So that's what we're doing right now. Do the same thing for this window. And so all of these are set up.
93. Setting Up Window Elevations: And what we can already start to do, and we click on these. Just go inside of the double-click on the black area, go inside of each of these. And what we're gonna do is we're going to create a window view category, our view template. We'll click on the View template and we'll call this, well, this is where we create our views, assigned view template. We're going to use the architectural elevation. And what we're gonna do is we're going to duplicate it and then call this interior elevation. Press OK. And then there are some things that we don't want to see in the interior elevation. And we're going to go through that and our overrides. And these are the visible things in this view. One thing we're going to take out is our elevation tag, and that's actually in our annotation categories. But anything you think that would get in the way of your drawing you can already just take out from here. And so you just press OK. And so we still have our levels. So we took out elevation will be savvy levels. So what we're gonna do is we are going to at least get the level to show where the floor is. We're gonna make make this go to the floor. And when we draw detailed line where the floor is, that will be really useful. And we turn line weights on, you'll see it. And we're gonna go back into our category. And we're going to choose to hide from my annotation category levels. Right? So now you can see it. Some of the information we press the reveal hidden items.
94. Fixing Chimney Elevation: So now we're going to add a sheet for the new sections. And we're going to leave that number. Click here again. And we're going to change the name to building sections. I'm going to make a sheet for our two elevations and schedules. So we're not really going to have a lot, but we wanna put it in here.
95. Drawing Window Elevations : So now we have our window and I want to create some regions, so I just see the window so I can come to annotate. I've used the word FF for filled region. And I'm going to make an invisible line box. And I'm going to come around the window and I'm going to make that with a medium line. And press OK, turn off, fly away. And I'm gonna make sure that this is actually filled white. And if that's not here, I just come in here. And so, okay, duplicate and will say solid white. And we'll select our foreground color to white. Press OK. And now we have a solid white and then we're going to save this project as classic House revised through adding some new information to this or archiving our old one and a sense. And we're gonna do the same thing for the remaining windows.
96. Annotating Window Elevation : So now we've added our four types of windows. And we're going to label each of our views and also put in dimensions so that they're easy to figure out. So we have elevation a, 1A, 2A, 3a. And for a and I've made finished cohere. And actually there's a little element here that we probably don't want in our drawing and we're actually going to go into the template and remove it. And rational Go to View template. And this go to our site. And you see there's some site property-based point that's feasible. And we don't want them visible, apply that. There'll be removed. And we also actually can go in and take out the other side element of v survey points. And I believe that's, that'll take care of all that. Alright, so now we have our elevations and we actually can go ahead and put these on on the sheet.
97. Adding Windows Elevations To Sheets: So let's go ahead and add our interior elevations or window elevations. You can see they have their own group. Want to make sure each one of them is in the interior elevation family and it is. And we'll double-click to get out of that queue. Each one put in, it'll align. You see the mining point. And we'll label these. And then we'll go through our model will tag. We're gonna call this one. We'll name this type. A will give it the number of w1 for this movie the same b. And you could actually do this in the model, of course, you see it's a little bit small, however, Type C, the three Click the area first of the BU, as opposed to you can just click this and you click this, removing it. So you just click that viewport and then name, this is Type D. This is W4. And we'll go back into a level one plan. You can see now that we have both a tag and a type.
98. Aligning Windows: Well, we go through and I reverse these windows on our walls flipped. This might have been flipped as well. Just do that one and then we'll be able to fix any errors.
99. Adding Window Detail: But let's go ahead inside the types and just put some basic dimensions. But dimension from the ground to the sill and grounds the header of the window. And we want to click this and edit the witness lines so we can have a string that goes from this click off. So now we have where window as if we wanted to change anything. We've come in here and change it. I'll leave that for now. And think for elevation is we will just come straight to our little crop. And only thing we want to see in our crop is going to be the window frame. We don't need to see anything else on this area and make sure that's fighting. Double-click back in here. We'll move this more precise. We'll come down here. I see this would be the end. And we can measure to make sure it's one foot off. Okay. Let's be it. So it's one foot off the finished floor. And to change our dimension will just come back around and fix that. And we just change here. Change a dimension as well. That's facing this dimension for both of these. Okay, now we have our perfect dimensions for our window. And we'll do the same method on the remaining.
100. Introduction To Window Schedules: So now we've made our windows in our elevation, and we have these elevation for each window I made types. So now we want to make a Windows schedule that will reflect both these and we'll label them with reference tags in our project. Okay, so now we have our types here. So the only thing we wanna do is label them in their plan and then put the schedule on Page that conforms.
101. Adding Reference Tags: So an easy way to do this, of course, is to just make one. And we can actually copy an elevation. It would create something and doesn't have any label. So the way we do this one is we just go to our elevation tag and we will reference another view. And w1 is already labeled here. As you can see, it's type a w1. And the idea is it has to be close to that wall so it hits it. And we can go ahead and delete this one that's going the wrong direction, pull this back and probably can come into this family and this for the same tab, just make space because it's similar, but we're fine with just having it like this. So this actually can be copied to wherever we needed to go. Back just a little bit. And we'll just use multiple and we'll just copy them all along our drawing. And even here where we're doing one for this window, reference it as well. This is the W1 and this also is W1. And now we're going to reference our W3. So we'll just come on this side. And this one's a W3 and will reference are W4 before, before that, before. And our bathtub is also a four.
102. Chapter 10: Schedules - Preparing The Window Schedule: So we referenced our windows. Now let's go clean them up just a little bit and make our schedule. To make a schedule, all you need to do is go to the schedule on the Project Browser and click New Schedule slash quantities. And as you see, there's a category and there's names for what we're making. We're going to scroll down to see Windows. And we'll just say Windows schedule, that's fine. We'll leave it as that. We don't have to worry about phase. Everything is new in this project. These are fine as they are. I'll click OK. And now we have a scheduled properties where we get to show what's gonna be in the drawing. So we're going to put the, the type here. We'll put a width, will also put a height. But you see all this information. You could put that in your model. And we're also going to put our mark, mark. And that's going to help us to identify the project element. We'll put a tick mark first. And we're just going to look at what this information will give us. Press OK. Now it's made our drawing here. And so what we can see is that there are multiple marks for the Windows. There's multiple types. The mark is a numbering system. And the type here versus the type Mark, we see the dimensions of that window here and type Mark, we see that it's describing the individual window. So, and a lot of ways this might not be as useful for us as we have made, as you can see from our interior elevations. So we this actually is a lot more useful than the information from the schedule. We'll put the schedule here. The issue is when our windows had come together, that information isn't reflected. However, that's one of the things that you can always refine on. But every single window will be in this schedule. And the thing is, these will all correspond to one of these. And so that's that's the helpful part about it. It will require a contractor determining how to see work with these. And some, some way to help you sort of orient is definitely say that this window is. And you see I've, I've actually used inches here where I've come in in the dimension properties to see inches, you will be going through here. They don't know how many to order and there'll be aligning this to that. Another way to do this, of course, is to actually edit a family to include these elements or make a custom, a custom type of schedule. But this talks about every window individually. So the multiple units are actually also being here. So that's one challenge of making what schedules. But in terms of having everything in the model, you have information for someone to get started about what they would do in making this. And it's all parametric because of rabbit. If you change a window, the one thing you will have to do is come in to your schedule or your key and change this item. But the idea is if you change anything in your plan, this table automatically updates. So that's one of the brilliant things about working with schedules and rabbit.
103. Customizing The Window Schedule: Solve our issue with our window schedule. We are going to label the types, so we at least have a differentiation. So we're gonna come in here and make this have a tight Mark I window of this size as whereas it has a mark here of two. We can always just come in here and change this. And I window fixed. Right now it's 22. And we can go back to our schedule. We see that there are only a few of the 22s type. And we can just, instead of saying 20 to turn this into a, a type or A1 and press OK. And then if we go into this type of window, just click any one of these. We click into the properties and the type properties and we just click be one. That will already go along way is now when we click our table, we have divided by a1 and b1. So we could just go into our schedule. And now filter or to think sort, which you can actually see as well, sorting and schedule properties. And we could filter by our type Mark, press OK. And so that helps us tremendously as we go back to our schedule where we see where we have A1 and B1, I would need to do is every time we have A1, just put this as A1. Can this make this text smaller? I want 16, Ariel. Just copy that. And we'll actually, we're in the papers basically double-click to get back into that model space. For this, we just label this one as our RB1. And so and we look again, we see this is our, this is going to be our, our B1. So now we have a little more organization here between our schedule and our information in our key.
104. Door Schedules and Legends: Doors are a lot easier to organize because obviously there are a little more unique yet uniform. So making a door schedule will be a lot more simple. And the way we do that is we also make a key and we also make sure that we look at the type of doors for our tags.
105. Add A Door Schedule: And so we're actually gonna start this one by making a door schedule will say new scheduler quantities. And we'll scroll down and we'll choose doors. Press. Okay. And we're going to put the similar information of our mark. Tight Mark, width are heights as well. And then we're also going to put our, our family with this. And we're actually going to put family before Heights and we'll put height lattice. So we will put this into our schedule. And now you see that it has various marks and types, but there's only a few different types. All the doors have different marks. And what we're gonna do is we're going to sort this by the mark and press OK. And so all we need to do is come and make a schedule. Would already gonna put this on Sheet. One way that we can windows a little more tidy. You can always make this wider. Update that. So we have one mole. We have three different types of doors. So we know how much we're gonna put in our key. And we can even just separate that out a little bit.
106. Adding A Door Legend: And making a dorky is going to be a little different because we're not gonna make it low interior elevation. We're actually just going to go using our ledge. And we're gonna say, this is our door legend. And the reason for doing this is that it's just the easiest method to organize. So doors can be added via our annotate and component, and we click down on our legend component. And while windows can be added this way, this is, this is the best way to really do this four doors. What is AD are types that are in the project or make sure adding our front view. And so pretty much this component, let's us very simply put this into our joining in. The idea actually is our 30 by 84 doors to same as our 36 by 84. It's going to be the same type. So we actually cannot just move this one going at two different types, type a and type B. And we'll just make this Type a. And we'll just come in here and set the text T 1 16th. Copy one, be right next to this. And we want to do that same thing where we're showing are a ground line. And we'll come back here with our 33 second Ariel. And we'll call this our finished floor. These are 332nd. And probably want to reverse that a little bit. Right? So what we wanna do is we don't need to see the frame. So we're actually going to use our region filled region. I press FFT, do that. And around each door we're going to make medium lines will go turn off line weight so we can make sure we're getting where we need. And then we're going to make it invisible line for the XOR outside of that region. And just make sure that this filled region is going to be a solid white. And we'll just do the same thing. We just copy this food region. Though it's of course not that hard to make. Will still copy it. I will just write here. Just double-click and then align it to this frame. And what we'll do is I'll do a low dimension here because it might be different. The legend from the actual door, because sometimes the generic dimensions are not there though you can click on any component, legend component, and some of them have your ability to S2 link, some of them don't. So what you'd really do is double-click here on the text and change the text to further door door schedule. And we'll click that for their effect will actually change as the sea. So we have enough space. See door schedule, see your schedule. And do the same thing for this place with the texts C door schedule. Same thing for this one. And just make sure that it does say Type a and Type B. And now we need to do for our schedule now is Pais is we asked you can bring another schedule on, but we want to bring in that door legend. And so now we've, we've added our door legend, window legend, and our schedules.
107. Adding Interior Elevations: Having a good understanding of what's going on in your building with interior elevations. Both to show you if you're having a client or you're working on your own house or show a contractor, is going to be essential because it allows you to make these elevations and anything you change, the model will change in that it makes it even better. So we're gonna make some interior elevations for the kitchen. Just looking at one wall so you can understand how to do that. And really rock and roll with that understanding, looking at the different type of components that are available and how you can put those into your project.
108. Chapter 11: Interior Spaces: We want to create an iterator elevation of this window in this, this sink wall for, for project. So we go first to view and we click elevation. But there is an option for interior elevations. And all we need to do is choose a side. And the great thing about it is we actually come back in here. If you've noticed that it it does still showed the name, we can go back in here just like we did for window elevation. And we want to change the the elevation tag and we want to just have the filled arrow for the circle without the text. We change that. And actually we have this wobble. We also want to see our range. So we're going to click this box now will have two elevations. And if we click on the shaded area, we can see what we're gonna be looking at. And so both of these are going to be showing area that we like. So now we'll just come into the elevation for open both of them. And we wanted to the same thing we did for our window elevation. So we're actually going to come in into view template. And the thing about our tour elevation Tap Type and template, we're going to duplicate it, will call this interior elevation, or we actually can update the interior elevation by itself and press okay. Okay. So we've already set this interior elevation to what we're looking for. So right now we see that we probably see too much. So we're going to shorten this view. Look into our elevation 1A. So this is obvious shown us we don't have any other cabbage tree and we also don't have any sort of surfacing to the roof. So when they come in here and the set of few template to tear elevation. And now we look at are both elevations and probably wanna come out a little bit. And we're gonna use our same detail. We're going to look at where elevation is. And we want to choose our own border. So we'll have a invisible box and we'll have a medium line around our inter area from the floor to the ceiling. And this is the medium line. Will turn that off. Make sure this is on the right level. Right types, so it's solid white. So this is going to be what people are going to see. And one way we can also correct this is you want to make sure that it's not going too far. And now for this one, we'll do that same detail. Remove it out past the walls and the ceiling. And we'll go to our reveal hidden elements is see whether top and bottom of things. Are we going to add our region medium lines from our floor to ceiling. We use a box, will make invisible lines or our boundary beyond TO make sure that type is solid white. And one way to keep it going into the right type is of course also to just view one. To set the right type is click it and change it with nothing selected. And then the next time you do it, LP set probably. That's something that gets me a lot. Okay, so we can already from our crop region, put this on our sheet. So currently we are in create boundary mode. So we will XOR that with just quick sketching. So we weren't using that. So on each day is now we have our interior elevations. We go to our interior elevations and our view who has collapsed this so we can see. And we'll see our interior elevations here. And we'll just put one next to the other. And so we have these two interior elevation and now we're going to fill it with some cabinet tree.
109. Cabinetry Families: So to fill it with Cabinet tree, we sort of want to know some of the dimensions that we're working with. So we're just going to create a working view of the floor plan. And we're just going to duplicate this view. And we're gonna call this our view. And we're just going to put a lot of dimensions so we can see what's going on with our model. So we have 14 foot eight clear here are Island is seven foot eight. And so right now in our elevation, we only have this sort of talk cabinet, which is a place holder and a tall refrigerator. Are sync. Sync actually run into the window, which is what we're avoiding. So we can see what's going on here. The sink is supposed to be up three feet. So a window sills because our backdrop, we're actually going to decrease those up a little bit. For this purpose, we'll see actually how much you need to increase 5.5 inch, so just come up six inches. And the way we're gonna do this is we're actually just gonna make it 54 inches instead of 60. And we'll add the change in elevation as well. And that's our height will just set at 54 inches. And we'll make our cell height now at three foot six. Ok, now, have that nicely, not interrupting our our, our items in our kitchen. And now we can measure what's going on with this. And this is still eight foot. And so what we can do is we can always bring this up a little bit. 13 quarters, right? Well, look at our exterior to see a little bit what's going on in this location exterior wise. So we can make sure that we're not doing too much damage. And we'll go back to our window elevation will make that same adjustment. So we have this region here, AC or dementia tech moved immediately. I would need to do is come in here, fix that. Right. Clicking and going back to our elevation. So you have a pretty short refrigerator. Think that's, you know, it's probably a tall tall kitchen. But that's five foot nine. And so if we even come into our two elevation here, we'll say this is the kitchen sink or change the name. And our properties. Kitchen sink wall will come out to double-click get up. And they will say our island. And we see that our Island actually is sort of short. We're actually gonna come in here. They show the island is going to be three feet just as much as or edit it in place. There'll be three feet just like the counter. So exclusion in at three feet and will come in 3D and will either move. So we can see this area element. We see our roof is r. This is hidden and are stoked up. Should be looks like it's maybe a good place. Will make it three-foot, three. So b, over kitchen.
110. Modeling Cabinetry in Place : Now we see what we're trying to do here is we're trying to add some category just to go along here. And that's very simple. And so we'll measure this distance in our RATIONAL_A. Make sure we're working in a working plan. So we probably trying to make sure that we're using carpentry dimensions. So three-foot three is going to be our desired dimension. Three foot three or one foot 7.5. And we'll see here one foot four. So now we're going to open our families to look at our chemistry that we haven't rabbit. I'm Architecture tab. We go to component and plays a component and we're going to load the family. And so now we're gonna go down to our case work family folder. And we're going to load base cabinets. And we just want to have one of these under the sink and we'll add a single one that will go right, and it's placing it in the middle. And we're gonna change this to be a wider one. And we're going to now load our final one, cm load of family. This is going to be for our side cabinets. And actually we did load one for the vanity, would probably want to no one for the double double sink unit. So I will just place that in here and we'll lose the other item. You can go to our kitchen sink wall. You can see that this is the one that should be there. Click here. And we just cycle through to select it. So that's our Vanity one. We want this one. Instances are DaMatta working view. We'll close our level one view. You can go ahead and move some of these things out of the way. So we can focus on our text less and focus more on our items here. So we're move this to the level. And we'll look this kitchen sink wall. So we have this under the double sink, but it's not wide enough. So we need to be we looked at our level one working to be at least three foot six. Good. Our kids think, well, we just come in here. And three foot six is going to be 42 feet. 42 enters, sorry. And so now we have the ability to make some other cabinets here. So this is 210. So the other cabinets OB, based off that dimension and allowed the family. This is going to be a base cabinet. So what we'll do is we'll use base cabinet with a single drawer. And we can just use two. These will like this before. This dimension is 210. So if we come back here and divide that, I'll be one-foot five each. So one foot five is about 17. So the thinness they have here is 15. So we can just see is that it gives a little bit of extra space. Don't wanna push things too much. So each of these added to 17. That will help us out. Instead, we'll just, we'll do is we'll just space this and just use a custom dimension, though this is something you might want to focus on when you're working to avoid these things early on. So I'm going to duplicate this. I'll make it a non-standard dimension. But this is something you can of course, workout as you figure out how to work on these. Because it's, of course the undesirable one foot five. So that's and I will just move this a little one-inch. And now I'm going to do is mirror that. So we have our set of category here. And what we can do above the refrigerator is we're actually, as well as on this side, we can add a cabinet. So we'll go back in a level one working. And we'll go to our CME are placing with opponent folder. And we see tall cabinets are here. So we have this options of tall cabinets. We go to the tall cabinet, Dumbledore. The dimension we're filling is eight. So we can say that that's what we want this to be. To fit eight is going to be 32. So we're gonna come in here and options available and it's not just add that. And this width years. And now to find eight super custom. And we can take out generic mass. And we just come to our kitchen sink wall. Now we have it a little bit lower than we want. So what we can either do is lift our windows or maybe we could just make this a lot taller. So we're trying to have this AB 12 inches taller. We'll save our project. So we're having this 12, it is taller. So we're gonna make this a right here. Press OK. I have a little bit of an extra space at the top. We can add that in, will make two marches to that, will make it eight-foot two. And so we have this one here. And what we want to add now is a little taller over the refrigerator just to match this. And we can do that. And the component menu again. And now we're working on our wall cabinet. And upper with Dumbledore. You just like this. You can actually load this in your elevation is going to make sure you have nothing in a way. This is going to be that same dimension, 32 inches. Let's click on it. You can set it to 32 here. And that's where this is going to be. And this refrigerator is a little bit, little bit taller than we want it, so you actually can adjust this so that it doesn't know the fridge. This needs to come up a little bit. Move that up so much we're over two inches, so we just come into the family here. Make the height two-foot For now we have our Tierra elevation. And of course you can just adjust things out as needed. This is 32 inch, another 32 edge. We just might want to center things up. But to finish off this interior elevation, all we need to do is probably just come in here and just start giving some dimensions. And this, pull this down. And you always can come back again. If you wanna just use inches is set it to inches. Inside your sides is up just like this. And as we look at our tour elevations page, we see that we have a full set for our kitchen wall.
111. Chapter 12: Introduction To Section Details: Making walls section that building sections and Revit is pretty simple to start. And if you know to doing, it can be an easy process to get a lot of information out of your model. You can model things. Twitter, you can also use detail items. And detail items are also libraries that come with revenue or you can customize to your own desire.
112. Concepts of Revit Building Sections : For our building, we want to first check it out. Three model has some things open. We're going to just show the entire model. And we're looking at where we can show a section that will communicate about what's happening in the building. So we want to have a section probably going across the back and then one section and going through the porch. So we're just going to make two simple sections and they want to break it down into some details. Ok, we are going to work a little bit and our level one plan won't work in our working plan for right now.
113. Adding building Sections: So the first thing we're going to do is go to our View tab and click on Section. And because we know we're trying to get a typical section, we'll just go through the brick wall and we'll make another section that will go through the porch. And we'll try to make it so it doesn't intersect anything else. And now we're going to look at these sections. So the one that went to the back is pretty basic and got the foundation, it got the roof. And notice we don't have a ceiling. So that might be an interesting point to work on. And the one through the porch, you see that one that looks at the house. And we see some of the modeling issues that we might want to clean up as well. When you make your sections, you, you do see that there's some things you model that you can clean up. As we want to be very simple, we're going to actually select areas that we want to see in this model. And we're going to cut it off. If you click on the filled part, we can view it, but we click on the line to see where we're starting and stopping. So we're just going to stop right here. And you see where we're going to do that cut. If we go back out, we can see where we're looking at. So these are two basic sections. And see right here, we're not really seeing too much information. So probably when I come back in, I'll draw Level one and move it so we're going to see something. So it's still in, inside of the wall. So maybe we can move these little tags in so we can see something through the section. Okay, so now we see it where we have information. So some information that could really benefit us and our model right now is cleaning up the roof. That would help us to prepare for, sorry to add some more detail.
114. Adding Roof & Ceiling Details: Here's how you clean up roofs situations and also add ceilings in rabid. We first want to just come to the Architecture tab for ceilings. And this one is pretty simple. We can just make an automatic stealing from an area. And we just want we do want to make sure that it's offset a proper amount. So this is offset eight-foot. And we might want to just say nine feet were clicking. And each of our regions will just automatically creating these ceilings. Now as we go to section, we'll see a ceiling. And so typically the ceiling would probably go up underneath the joist. And so we're going to just start working on that. We do see that we're now having some ceilings. We don't have a sailing on a porch, so we're going to go try Level one and we'll add a ceiling to the porch. And so now we've added that ceiling. So we do have a ceiling on the porch.
115. Chapter 13: Working with Ceiling Plans: And to see this type of settings you have, you'd go to your ceiling plans. You double-click. And you see the two different types of selling that you have. And as we probably not going to be using ACT for this residential project, we're gonna isolate this category. We're gonna make these all to be, this is simple, generic ceiling. And we're gonna make sure they're all offset ten feet or a ceiling type. We are going to use compound. So we're going to make this a compound ceiling. And we're going to come in here and make sure that it's going to be on gypsum wallboard. But we're not gonna do the structure for right now. As we're gonna do that in our section. And we're just going to put like a 1 eighth inch structure and press OK. And on duplicate this GWP Woodstock. Impressive. Okay. Now as we go to our sections, we can see this little sealing. And will it have studs above that? So now that we have our ceiling n, We now have a lot more information to work with for our sections.
116. Adding Lights to Ceiling: Nr ceiling. And other thing that we can add is as we can overlay and see some of the other items in our drawing. We can click Level one underlay. Now as we have a ceiling, we can start saying where would we place light fixtures? And you could find light fixtures in rabbit in the same area that you'd find your other components and just load your families. And we go up to the lighting and architectural. And we have quite a few different types of interior lights. So you want to add probably some cam lights and maybe a pendant. For the most part, we're just going to add down light. We says cans. And adding to your sibling plan is just very simple. You just choose a space where you want to add your light. And since it's in the ceiling plan, it'll automatically be placed. These are hosted inside of your family. So the mindful that you'd have to add the these families onto a ceiling. But some of the, some of the things like lamps actually can be floating. So we're going to place a couple more of these. Then will have some sort of floating around. And we'll actually use the center line of the room. Is the center line of the room to place these. And you can measure them just like you mirror other objects in rabbit. And you could also come in here and also add four more of a linear fixture over your kitchen island or your Table. That's something people like to use a lot. And just you can locate it. And then you could come in center it by making a construction line. Getting the center. Though it's in the ceiling. You see that it's pretty much, they're now just near the middle. Now that's centered on Ireland. And then we could do the same thing. We can even just copy it over the table. And if you want to make some scan's is just go into that family again and we load actually in that folder. And we just have some spheres that we want to place in our building. And we could just locate that anywhere. Like if you wanted to place those, for instance, dislocation. And we can of course always mirror anywhere. We have them. So we have these checking of our our lights. The scan's however, is probably more visible from the ground level then from the RCP. And so now we have a lot more lighting things going on. And you just continue that throughout the space.
117. Chapter 14: Structure and Sections - Adding Structural Footing: So now in our section, we see the house. You see some of the elements you have in it. So we don't exactly want to add too much detail. But since we are here, we can already see that maybe we could start adding some foundation wall. So if we go into 3D view and we isolate this element or category, we can see that this wall could be added with a foundation wall and we go to structure. And this will help us build our set. All these walls at a simple 36 inch retaining wall. And so now as you go to a section, section one, and now we have a retaining wall. So we start at some intelligible information here.
118. Setting Up The Building Section: And so now we have our ceiling. Ceiling probably wants to go up to the bottom of this element. So we can actually change that from this view. And we know we have brick. And we can start to put in some of these details. So one easy way of getting more information before just adding it to this section, which will add to the sheet, is to make a wall section. So we'll first put our building sections on the sheet and then we'll come in at the wall sections. Sections are located in our building section category right here. And we just had to go to our page for this section. We will add that both of them currently there at the scale of three sixteenths. But we probably would be fine that they could be a little bit larger. And what we're gonna do is we're going to as typical creative view template or work with on that we have. We'll just actually start back from scratch with architectural section from a this element. So from architectural section we're going to duplicate or we just actually can change it here. Since we're not really doing too much with that. I would say a medium detail level. We'll come back over here and make this also our architectural section. So now we see our brick going down to our foundation. And we see our slab, as well as our roof or ceiling.
119. Adjusting Building Sections: Another thing we might be interested in getting is also a section that's cross the house. So we see sections going through the Gables. Well, we don't see one going through an IV. So something like that would also be very valuable. So we're gonna come and add a section through the House. This way. We'll double-click in here. And we'll set this in the same way we said the other ones, where this would be an architectural section. And for issues that we see like this, we actually can actually add a footing to this. Since we're seen too much here. Might move it over just a little bit to level one. Level one and we can see what's happening in this site. Maybe we'll have a section that gives us a little more information as we also finish all these elements. So choosing a section is a, is a skill. So you have to make sure you're not overlapping something, you don't want it overlap. The section tag allows you also to choose which end will show as the leader. And which for me a mark. You also can cut it in half so you don't break through all your model. So that's also a very nice feature. Have a lot of information going on this section. So we're trying to simplify it just a little bit. And then we're gonna place it onto a page. And we're aligning our sections, outlining some of the tags for them.
120. Refining Building Sections: And so we'll make sure a line weights are on. And we see now that you've got a lot of information going on, we probably want to use the other side to get a little more simple elevation as well. So just move this over and over. And it's just that simple to, to move a section. And we see this, it's a lot more simple and this gets the point across. We probably want to work on our roof to fix this situation. So we can just see our walls and we'll go ahead and turn off all line weights and make sure that our ceiling or gypsum come up to this level. And we can have this area lower around the entry. And so we're going to come in and work on this from 3D to fix the roof on challenging with our roof currently, is that if we isolate it, exceed that, there's no cutout in the roof. And so don't worry, it's actually not that hard to add. We just come and we will make sure to click vertical opening. And so we've done this before in the project. So we're just doing that one more time. And we'll go to our site plan view. And from our intersection point, just going to come down at a 45-degree angle on both sides. And we're just going to pull it. And because it's actually not truly at that area will come off a little bit. When mirror this name will come into our section. We have just solved our problem. So that's awesome way to figure that out.
121. Adding Wall Sections: With our sections on the page, the next thing we can do is start to do our our, our wall section. These are at three sixteenths, same as our plans. So now we just want to choose some locations for them. And then because our ad in detail to the wall section. So we'll just add wall sections by calling out different areas within our buildings. Sections. I think to them pretty critical. And in this one, since it's the porch, would be very good to have. We'll come back here. Double-click will make a call out on that section as well. So, so now we have our section generally set up and we're gonna put them on the sheet. Are building sections are currently in our same areas, are regular sections, but since they are different, we will just go ahead and changed their name from building section to all sections. So that's a group that's already in rabbit and will click in them and will actually label it from here. So we go into and select one of our section. We can just label it right in the view. We could say this is our typical rake actually would work. And here we'll just double-click them. Final leaving it at this level right now. We'll call this our typical IV one. And we'll click our third section. Are building. Actually start placing these on here. The third one is going to be a porch IV labeled here. And now we'll just add them. We'll see we like to scale. Probably gonna do a little bit larger for a wall section, but I think this could be fine for now. And we'll just drag it in here. Make sure we're out of the modal space. Or drawings in. We can actually just put our building sections on top of each other. And then we'll just put our gable wall sections side-by-side. So now we have our information setup for our building section set. And we're actually going to work on one of these to clarify some of the information on it.
122. Configuring Wall section Sheets: And it's that simple. Now that these sections that have been created, we'll just look back at level one and we'll see that everywhere we've placed a section that the section has automatically been given the sheet number and the detail Number. And while we're at it, since we've also made a plan detail or plan call out. We actually can go ahead and we can move this a little bit out of the way. We actually can double-click on. It. Might not double-click on that region, just click on the circle. And as you can see that sometimes the sections overlap, they're shown a view, but we don't need to see that. So we're going to right-click and hide this element. Here. What we can see, this is located in your floor plan call out. And you also you can make a new type for that. But we're gonna leave it here and we're going to place this also on building section sheet. And this is this little section call out from the space and will save the project. So now having these items here on the page, we do want to add a little bit of water, so we're going to number these. And now we're going to work on our typical IV.
123. Chapter 15: Introduction to Wall Sections: So we're going to start working on our building detail and we're going to label it. And they want to get some detail items that will make it much more believable. This will be useful for you as you figure out the rest of the model to understand what's going on with your program. So now we are in our annotate tab. And before we place a detail, we're just going to label some of the things that we're going to be looking at. So we know when I'll be using for this project exposed thereafter tells and if you notice that you can't see that detail, I just add, that's because annotation crop is on. And we just in our properties browser, just click here. And it'll take that off immediately. And so we just need to add some more and we just copy it down so we can get a good dimension. Above our ratchet l we are going to be adding, we might guess model this. We're going to add a flashing. And then in our roof Moody's copy some of these tags freed up so we can make sure it's aligned left. It's one of the nice way to align the things. We're going to label our from the bottom and then we'll go to the top. And we'll call it our rafters. And then we'll label our exterior sheathing. On top of that, whatever moisture barrier. We'll have our asphalt shingle and all these items. Just assembly. You can add a detail line. It could just be a component. You could also just simply start to draw those section. It actually creates geometry that you can draw right on top of. And I'll turn my weights back on. And now we've made a little line here. We can make that a medium line. We can offset for the elements that we are looking for. Maybe if you want to show it as three quarters of an inch down for the asphalt. And then we go another down for moisture barrier and another down for the sheathing and maybe the moisture barriers, something we turn into a hit. I use the hidden line just so you can get a dotted line, but you can actually change that. And then you can always come back over here. And for your flashing, you can extend these all these elements. And you can come over here right over your sheeting and make some flashing that just does this. And just make that a medium line. And you show all this little detail, right in your model. And obviously the brick and the model doesn't go up to inside the roof. But you could simply for adding your framing for the roof. And we just do a 5.5 inch member. Right now, we have this is just that pattern, but we can make it a solid white pattern. And this right here, we get, it's currently ME with invisible lines. We could just come in here and make those two thin lines. Whereas you could also, could come in here and create a stirred, maybe just a rectangle. You just click on that rectangle. And we could give that a very thick line. So, and also make this into a solid white object. And make to these for our brick. We of course could just come in here just like with this one. And just go down to the foundation with a filled region and just bring it up to the top of the roof here and would make the outside of the outside wall of the brick a thicker line. And this R n side, a thin line outside, a wide line. Internally it's set to the diagonal across Azure. We could just say diagonal up here. And so that would show up brick and we start to build that detail. And so there's a lot you could actually add without adding some of the details components. And you could just say here, brick veneer and your wood framing.
124. Adding Floor Detail: It's floors and called concrete floors is called generic right now. We could just as easily call it concrete. Currently doesn't have that setup right now, but we could just make a field region. I press FF, and I can just use those same points. And I wanted to be a four-inch concrete slab. I can come over here and just make this into a medium lines. And currently I don't believe concretes loaded. So I'll need to do is click one of these, these families over the solid white duplicate and call it solid concrete. Press OK. And why it would be fine instead of solid fuel would come in here. And we'd say concrete and press OK. And now we've got to the point where it would be useful to start showing a differentiation. Stops and where we have our CMU unit.
125. Adding Detail Components: So now we're going to add that using a detail component from Rabbit. And the way to do that is having all this information in here. We're just going to copy down, show our CMU for foundation. Now we're gonna load the CMU units and we press DC, which can also be found here. Who detail component. And from our Modify, placed the tug upon it, Menu and ribbon. We click Load family. And these. And the US imperial or you're using metric, you should have a folder. Be careful not to go out of the folder. You should have a folder that's labeled detail items. And detail items are divided into several categories based on the master specification, a guide for different materials if you've used that before, you familiar with this. And so it has different items from different materials like structural for concrete, masonry metals, and also as the thermal protection openings. All kinds of openings and oh, and materials and families want to click on one just to see the type of thing that we're needing. So though we're using concrete and there's a lot of things for concrete. The thing we're using for this model is actually a concrete masonry unit, which is actually going to be in masonry. And you can see that right here, the concrete masonry. And you see in this category you see several different types. Bond beams, ground fluted, split face units we're just going to use and the basic CMU. And be mindful that some of these CMU's are actually thin to mu. So you might want open and low to make sure you have the right one. So this CMU to core is one we're going to start with. And we'll click OK. And as that loads, you can see that turf line weights, it's given us a thin CMU. But if you go into the properties, you can see that you can change the size. So we want this to be an eight by eight by 16. And that changes like that. And so you can see at this wall section level, it's still pretty hard to read certain elements. But if we turn off line weights, we get at least loaded in here. We'll just move this place. This will take off constraining. And we'll just place a trade below slab only it's going to run into this lab. And so what we can do is make this detail family. Go shoot over that detail family. We come down eight inches, will just see the same thing. And we'll just copying it down to a foundation. And we see that our foundation isn't exactly coursing. So we can actually just come into the wall. Just undo. So are our foundation actually appropriate? Should be down for more edges. So we actually can just like that. Click our object in the wall. And you see that we've put the wall versus the detail item, we can make sure that it is coming down are three-foot for to course. And that really helps us out a lot. And you can change that in the rest of your model.
126. Framing Detail Components: Whereas we are, make it some of our own headers. We actually can go load the family of wood framing. And we can find that in wood plastic. And all we're looking for is our wood framing and la mano nominal cut section. We load this, it gives us star common options for framing. So two by 42 by 62 by h, as well as two by 12, are the most common types used. And now you see we have similar to what we just made and we'll turn off line weights. And I could just make that to be a two by five. I'm rotating that. And so we see that our little detail item, it's a little bit off. So we actually could have model it again, but now that we have our component, it makes it a lot easier because it has a lot of the features that were already looking for. And we'll just precisely get that point. And we'll align it were perfectly aligned. And we'll just copy it all the way down to the base of that plate.
127. Adding Finishing Components: We can also add a family for our sheathing. We ESM interior sheeting right on that framing. So we'll just add that by clicking DC again. And you could find wood sheeting in the same folder, division six. And you can either use plywood section or gypsum. We're gonna use this plywood section. And the way this works differently is this actually works by making a line. So and we're actually going to be inside the wall of this. But I placed it here is to get it in the model. So be mindful of that. I just think it's the right on the table here. And so I place that there. And so now our section is starting to make a lot more, a lot more sense. Currently, since this is actually not being cut right here, we probably don't need it to be so dark. And also we get some information that must have a little neat wall. So our roof can actually rest on something. So this is far our design skill coming in handy. So any wall that probably helped us right here would probably be six inches. And we're going to use a filled region right here, will make that with thin lines. And we'll add another top plate. And the way will have it is probably add a little bit of trim here. And you're actually also confine your trend in your family here. So when you look at your wood folder, you see different options. You can simply get one of these or you could use maybe a wood framing element. Sometimes I will just make a a region to do what I'm looking for it I don't have the idea of what I'm looking for at the moment. And we'll just come in and make sure that we're not using visible lines will make it medium.
128. Completing The Wall Section: And the great thing about this is now that we have a bit of a wall section is we can very easily, if we want to make a detail in the detail of the wall section for a detail view, we can always just come and make a selection box. And we can turn off a model. You see the option here for display your model. We can actually say down display the model. And just take all the elements that we just created. A text. And we can press copy, we can double-click. And we can paste those elements to the same place. Immediately we have buildings of our building section without doing hardly anything. So and we can click elements in the model like this one. You can click overriding in few. Cuz it's gonna show the elements. And this is going to be exposed. We don't need this to be that thick. Click that again, override the elements. And we've clicked liberal of half tone. We probably want the protection line to be more like three. So we can apply that to see how that will look. And maybe we could even go down to one. And sometimes that might not work as we're looking forward unless we're looking at the cut lines. So now we have a cut line right here. So we can change the cut line for that. So since that's going to be the top for our roof element, you probably can just come in here and make this one the thick line. And make sure we can see our lines. So this is a little detail and we can go ahead and put that on our sheet.
129. Organizing Sheet Tags: And now we have a set getting started for making our buildings sections. And you just continue in the same fashion. Some things your model somethings you will be using the detail components and every building is unique, but you'd be going in that same fashion. And we click here again, we can turn on the model display. We also can make it half tone. That's, that's useful for sometimes. And you really just get a lot of power with rabid for doing these types of things. And you go back to your set, will collapse this. We'll look at our SD drawing set. And you'll see that some of our section tags are now in the elevation. All we need to do is pull them down. And we can also come back in here to show the make sure that we are showing the site.
130. Wall Section Conclusion: And there we have it. We have a much more full set started from our basic St. drawing set. We started adding different sections and elevations and schedules. And these can help you as you're figuring out your projects. Might want to turn off some of your sections in your two elevations. These are some ways to increase your quality and help you as you're getting started with your Revit modelling to know the types of things that you're gonna be working on. Rabbits going to expose you to all sorts of challenges and the type of challenges. Understanding the fundamentals of you're going to be modeling something on the inside of the model, but you're going to be making it so it could be communicated out. And just keeping this going by having sheets, knowing how things are going to be output will help you maximize rather because rabbits thinking about building information modeling the things you make in this model can be given out to contractors, other consultants given out to clients for communication purposes when you print it, if you want your drawings a say in your hand, you can do a lot of things by controlling that model. And so revit helps you set up for success in that way. So think about this. Learn how to put these types of things into your drawings. Be thinking about as you're modeling it, understand that Revit already makes it. Whereas if you had a drawing and AutoCad, you'd have to do something new. So Revit has this great power in doing these sorts of things. And if you keep practicing, you figure out how a lot of different hiccups earlier and you'll be able to figure out greater models by working in the Revit way.
131. Intro to Enscape Rendering: Enscape is a great add-on for your Revit projects. It's a helpful renderer you see here I'm just, but it will help you in visualizing your projects in addition to the current exporting after that you have, you can also export renders.
132. Enscape Plugin for Revit: And so Enscape gives you a trial that you can download. And when you install it, you will see a Enscape bar, essentially on the ribbon, and you will have different options for loading your Enscape models. Right now I've actually loaded the Enscape. We'll go into that in a moment. But you can essentially choose a view. You can choose if your render your image into the document, you'll add assets. For instance, you see all these little polygon trees that comes with Enscape. And you would just loaded up it takes maybe sometime to load. And you just take an item that you have from that library and place it on to your model. Just let it load up a little bit. As you can see, we can just play something. Sometimes they're small and sometimes you can placing their big, like you see there's this furniture, there's lighting, there are people, for instance, several different types of people and you can just search. And you can also make custom ones. But you know, the library that existed already so useful. For instance, for the people, I just click on that one person. I could just go to the area I want to place him. And he's, he's going to be our model and we'll see that in just a little bit. And so that's how you're going to be adding people. And then you can also work on the materials within Enscape. You essentially can take it in material that's in Revit. You can add a unique set of albedo. For instance, if you're gonna show bump maps, you can add that here. Also choose how it's going to deal reflectively or with transparencies. You can also upload. This is for working with Exporting Web models or also executables. So this is what you can have people give a link to your model. And also here you can actually add sound to your model. You can also set up the general settings for how your project will work with your licensing. You can have preferences for what to show. Essentially, there's a, there's a ton of thing. So cleaning your rabbit options, Let's go into Enscape to see what the final result is.
133. The Enscape Window: So here is Enscape. Now you can see some of the elements that I've just added that one person in the model. And you can see that the Enscape interface is all rendered. So you seeing light. To the right, you see I've turned on the Help menu. And it tells you like the basic commands, for instance, moving, if you're flying or walking on the ground, you can rotate things, you can orbit. Essentially, everything you need to move including who changed the time of day by pressing Shift? Holding our shift in your right mouse button. That sort of thing is one of the things you've double-clicked to go close to a model, come back out. And I've customized some of the materials from the model. So we see a variety of things just to make it a little more beautiful.
134. The Enscape Interface: Okay, So here's a Enscape interface that'll just give you a quick overview. To get you started with this. First, you can always annotate in your model. That's the same thing for BIM. These are where you can select a particular item in the model. This more advanced features. You can also look at the views at using, we're gonna close the Help tab. For instance, these are views that you've made or you can create a view within Enscape that it will go into your Revit. For your video editors where you can add movies, for instance, you can choose a frame and then choose another frame. And then you can always play that back in the model. You can choose the timeline for that. And so you also can export any of your elements in your video, or you can export to screenshot. And this is for exporting a screenshot. You can export videos within the video tab. And you can also export your panoramas here. And here's where you can export your stand alone, either for an EPS file that you can send someone to download or you can put it on the web and you can go. And to the right part of your interface. You can be clicking on a map for where you are. You can be putting the safety bars. And we'll talk about that with Visual settings essentially. Because you choose your window for you, your export. You also can change if your perspective is two-point or orthographic. You can choose which mode is best for navigation. You can also connect with your Oculus right here. And these two items are for your visual and render window settings. And we'll go into that because that's definitely where you get to talk perfecting what model elements are, are going on.
135. Enscape Visual Settings - Main Tab: So here's looking at the visual settings. First, we have our model in the view. We can be changing different things about the sky, the image, et cetera, et cetera. There are different modes where you can turn everything white. For instance, if you aren't ready with your colors, it takes a little time. You can always change your rendering quality. In the every at the bottom. If you set it to lower resolution, that will move a lot faster. So we're just waiting for that to load a little bit. But it goes a lot faster. You see certain things like the trees and the ground are going affect it. We can change the camera. I'm actually going to go back to the regular model. That's a little bit quicker. We can change the exposure mountain, the light. So dealing with the camera is very important thing. We changed the field of view. That's for your main tab.
136. Enscape Visual Settings - Image Tab: And corrections you can change different things about the lighting and the color. Also dealing with different effects here for how the edges are. If you see the sun in the model, you can have a lens flare to it exceeded the sun location. This model is a little far away. But if you go back, you see it's, it's sort of in that area. We're going to go back to the house. Now you see also we have lights within the model. So that's a cool sort of effect. There.
137. Enscape Visual Settings - Atmosphere Tab: If you go to atmosphere, that's where you're going actually affect some of those items. For instance, your artificial light brightness. These can be setup right here. You're also going to increase the ambient brightness. You can change at the night sky if it's going to be a little more bright. These sort of things may change and also wind. When shows the how, when you're moving to the model, I'm using the keypad here if the trees are moving. So I'm going to change a day with shift again. You're also going to attach fog coming at you.
138. Enscape Visual Settings - Sky Tab: And then in your sky tab, you'll be working with things like if you're showing the moon, the size of it. You can work with clouds if they're big or small. And you also can deal with things like contrails and change the location of the sky.
139. Enscape Visual Settings - Output Tab: And finally on the Output tab, that's where you're choosing what you're going to export as. And that's the size that you put here. For instance, you want to just do a simple window. You'll see my safe bar as I left those on there gone because it'll export the full frame. And you also can export different things with your image. For instance, object ID. You also can choose the name or choose a folder here. And also, as for the video, you can set those settings here for the compression quality, Francis Bacon and also settings for your panorama.
140. Enscape Visual Settings - Render Window Settings: The final thing we're going to look at for Enscape is the Render Window settings. So this is where you get to start to customize how you're walking through the model or your experience of it. So you can of course change the window title. This is definitely for when you export the executable. You can change how fast the mouse moves, your change how much you're moving, and also your height. For instance, if you want to, this is when you're unlocking mode. You can increase that height here. And I also choose some hotkeys. And with devices, this is for different 3D TV effects. And you can change if you're having sounds with the model.
141. Exporting Graphics From Enscape: And so these are the Enscape elements that you can put your model. There are a couple of different renderers. Enscape is really great for the real-time rendering that provides as you're going into your model. And it's very simple. If you want to export something, you just click export. And it'll export the image just like that. And if you're doing your movie, you can just set your duration. And I'm going from one location to the other. And I can just play back. And that same thing. I can just export it just like that. Yeah, and that could be just saved and it'll take just a little bit of time. Definitely depending on the size. This actually is very large monitor, so it's a little larger than 1920 by 1080. And the same thing goes if you're exporting panoramas or execute cuticles. It's a very simple process. This is one of the great renderers and it's using Revit to an incredible degree. So this is something that incorporate into your workflow. It's a great way to experience your model.
142. Intro To Revit Design Options: RVT 2025 has a lot
of great abilities. However, we're just going to see one different option using the topo service
for this tutorial. However, we're going to talk
about making design options, which has been part of
Revet from the beginning. So I'll go into a little
bit the workflow just for the site and working
with topo solids. So you can get that
introduction as well as what is cool about design options,
how to set one up, how to switch back
and forth with views, and also how to go ahead and
make your final selection.
143. Setup for Design Option Workflow: First, we'll go ahead and start by looking at what we have here. Which is our sheet view of
two options for a site, and this is the starting point with the course materials
where you can start with. And what we have is two
options for a site. And I just sketched
it out, a layout that comes in from the street. This is just using
our sample house. And all you need to do for
this is you need to just get some items for the site
as well as structure. And structure one structure
will be on the right side of the house from the front and one's going to
be from the left. So these can be done
simply in options. I'm going to go on how to get started with design options. You know, the idea is
you can do a sketch. You have a paper sketch.
However, it's useful to sort of draw out
what your motives are. And again, use detail
lines so that will be fine for changing, you know, you can do as many
sketch options, and then just as you start to sort of hard line
them with Revit, that's where you
need to exercise the skill with design options. So we're going to go
to the starting point for design option by
looking at option A. So we'll first start there.
144. Creating A Design Option Set: And so in looking at the options that EVD is giving
you availability for, we have to go to
the managed tab. So in the managed tab,
there is the option for pretty much design
options, how you get started. And this is, again, true for
several versions of Revet, so it's not going to be that different no matter
what version you're using. Of course, you can use
this in several versions. I just want to show you
definitely the latest workflows. So the first thing you're
going to do is create a new option set after you've
clicked on Design option, and that's right here, and
all you have to do is click, and you can always
change a name though it gives you some
standard options if you make Option one,
Option two, you know, be careful whether when you're trying to
add a new option, but you're careful that you're not creating a new option set. We are wanting to work on maybe we'll just
start with a roof. So I'll just say this
is our roof option set. Or garage option set. And we are just going to add
options to that set, right? So you just click on
that option set and click on New and you'll have
your different options. And you'll see this
little carrot that highlights this as primary
with letters primary, that's going to be the
one that's going to be displayed by default. So you can always change
which one is primary, and that's going to be the
one that's going to be sort of default when
you have the setting. And as we close this, you won't really see it till
you're dealing with model
145. Adding Model Elements to Design Options: So what I'm going to do is
I'm going to go ahead and use the default wall that we're
using in this project. I'll just hide the roof, and I'll just utilize
that wall to create a similar style wall
for the garage. And one thing I'm going
to do just to make it a little more design aesthetic and I'll bring that wall
back to match this wall. Okay? And so I've made a
standard sized garage. It probably you know, I get 20 by 20 for two cars. It's typically what
someone would do. I'm going to go ahead and go to the wall finish face exterior. So I just sort of keep
it in my footprint. And as you notice, I just drew this in
just a regular model. However, what is actually
going to be now apparent, even if I click on Option B, is you still see that wall. So what we have to do is we actually enter into
the design option. Now, we can do that from a
couple of different ways. And I'll also show
you the settings that control what's happening
within a design option. So essentially, every
view has some level of ability to show which design option
you want to work in. So that's called
visible and option. It's both available
in the properties, and it's also available in the visibility and
graphic overrides. You will see design option is in the last tab right here, right? And you get to choose, Oh, you know, which
would you show. So, for instance, if I want my side option A to only show A, I can already do a lot
of the setup for that. I can say that which
visible and option. And the idea option is empty, it's not really giving me
that choice right now. So I'm going to reset so we
just see everything again. So I'm actually going
to start off by actually just putting this
using the managed tab, putting this modeling items
into a design option. You can click on manage. In the design option tab, you have the ability to
change your view or you can add geometry in your
model into design options. So I'm going to add this into option one and option two
for the garage option set. And so what that does is that takes it out
of the main model. And you'll notice I
can't really click on it anymore unless I do
one of two things. I have to go into the option. So option one is where I
should see this location. But for option two,
this actually needs to be all the way in
my second location. And that doesn't affect
where option A is. The reason why you
actually seeing option B in it is
because the view is not
146. Setting Up Views For Design Options: So now that we have
updated our view items, what we can do is we can now choose which options
are going to be visible. So right now, we have option A, which we can simply say here. Option one, you see, and
now we see option two, and that's changing
for all the views that are showing everything. So if I go to Min Model, to get this will
work differently on different views.
I have to be honest. If the view setting
is not available, it might be because it sort of how the view is sort
of set up right now. I'm using currently
a view template, and what I can simply do
to make that an option where I can just change
it within the view. So this one right here does have a little bit of override. And so we are going to
probably unclick it. And so as we set that up, that gives us the ability to
now choose for any option. Like, this will
be design option. And just for ease, we can already go in here and
just make it one and two. And now for here, we
have that same ability. And again, using templates, just always make sure to check that feature because if
you double click that one, that might be the reason why
it's a little bit harder. So for Ease, I'm naming that design or site option
one and sit op two. Yeah. And so now you see them both in their
respective location.
147. Working Within A Design Option: And so the idea is, you know, hey, do I want to use
the same type of roof? Do I want a different
type of roof? I think I really
want to, you know, now just work on the
individual option. So what I can do is I
can just click here, and this lets me model
only in that option, and that's only for
model elements. So right now, as I
want to create a roof, I probably want to use a similar style to what's in the model. So I can click
also on the button active only if I want to, you know, use a
or access a type, and then I get to choose, of course, the level for that roof. And this level, this roof will be likely used in my same gable. So I'll go ahead and
remove that slope, and I'll bring this off to maybe align the front and
whichever I have here, I just take and use that
same two foot six this side, and then I can also just
do a 1 ft ak over here. All right. And so now, what you see is that
this is only going to be visible in
this design option. And so if you look
at the three D, we can look at sort of how
sort of this is structured. We can go ahead and say, maybe these are going
to attach to that roof. And so that's my
design option one. And so if I like the
item that I've used, you can simply
copy to clipboard. And if you want to go into
another design option, you actually have to go
ahead and click here, and we get paste
to current view. And, you see the
walls are not there, so this has to be
located appropriately, and of course, you can use
your different axis to locate. And this doesn't have to
be the same type of roof. I clicked and copied
to different type. What if I wanted to, instead of a roof like that, choose more of a roof that was more of a hip
roof at the front, right? It's a little bit different
from the sides of design. So again, it's just sort of showing you what the process is. But again, also, this has a little less
problem, you know, connecting because
obviously, the other side is going to
be matching that.
148. Creating Views for Design Options: So this is just the first part of seeing our design option. And again, so we
have a three D view. I could always save
my three D view, three D view and to the option. And so you can just
always have that setup. You can say visible
option and you can just say this is
going to be two. And then you could always
duplicate your view. Duplicate view, duplicate
with detailing. And you can say that
this is your Opt one. You can just change your
identity data title. And so these are easily pretty much in how you are
putting this on a sheet. Again, I set up a sheet where
I can see both options. But if I wanted to set
up a three D view, maybe not just my working view. Maybe if I just wanted to make a three D view from the site, I could create the
view that I want that maybe captures the
entire site, right? It could be something
like this. And as opposed to this view being so much about
what I'm looking at, like, since I want to see, you know, option on
this side or that side, that's going to be one of
the things you have to do when you're
working with views is if you're going to choose pretty much to be free
from three D views, it has a little bit of a
different setting, see? Right now, I click automatic, I just change that view setting and visibility and graphics. Now when I click my
Option one Option two, it'll just do that
automatic shift. But since I want to see how it relates to that main exterior, that's what is going to
be the basis of that. And I have to go back to the main model to
adjust my view, making sure that I'll get the you know, the
context of everything. And so now we're going to actually step into the
next phase of just sort of making a site that works with that footprint and
also adding a door.
149. Developing Site Design Options: Now that we have our
amassing option, and sort of how things
are going to relate, what we get to do now is
work on giving our view an option and adding a site that would
add a little bit of context to what we're working.
150. Creating Design Option Views and Working Views: I'm going to save
this as op two. I'm going to go ahead and
set it on this setting here. And then I'm going
to duplicate this in this as opposed to just
being a three D view. This is a three D
perspective view. And we'll just duplicate that. And we'll save this as one, and we'll come up here simply to the visible option and go
ahead and set this to be one. So now, only thing to
be added to this will also go ahead and save orientation for
both of these views. From our working view, what we're going
to do is, again, it might be easier to just
keep a working view that just, you know, separate
from any option and just keep this on all. This is just because
the working view is just going to be something we're going to
want to use again.
151. Developing Site Options: And so we're going to go back obviously to our plan view,
we want to work on the site. So the idea is the site
right now is going to be within sort of
the main model. But we can always make
some of the elements. Again, this is going to be now this little introduction
of primers for sites, topo solids in R 2024, 2025 because one of
them is going to follow this path that
goes to the far garage, one's going to follow
the other path. So these elements can all be made directly in
the design option. And so, again, if
you're in option one, we can just do that directly. And so we're going
to create a floor, which is going to be a road, and we can just call
this generic six inch. And I'll just come here and set it sort of six inch asphalt. And that could be
simply set here. Again, the material
might not be set up, so we just have to simply
come in our materials. And if it's in the model, we can always just collect that. So it's more of
asphalt for road. So I just double click
there at that in the model. And so now I'm just going
to make a footprint. And the idea is, it's also possible, again, just for me to
subdivide the topo. So that's going to be
possibly a better one. And this might be
more of if I want to make a floor for a tile, but the idea is, however
you're going to do it, you have the ability to
interact with a topo. And so we're actually
going to maybe leave the asphalt
if maybe around the paving area because
that's going to be like that floor where we're going to see
that go into the site. And so I'm in option one
again, saving that there. And then I'm going
to go ahead and actually break the topo. But again, that's going to
have to be by this topo, which is a topo solid being
within the design options. So what I have to do is go ahead and add to both of
the garage sets. So we have two different sites. So go on to option one now, and we're going to go ahead and sort of subdivide Topo and give a partial division for
where we have I mean, the idea, some of the street
can sort of be the same. But the part that's going
to be that curb cut and, you know, is it going to go to the right of the
house at Gillett, we can separate that out. And so we've
separated this area. I'm going to go ahead and make it to be simple, simplistic. And there's no real
deviation on it as well, so that's going to also be
another way it can be simple. Go up here, and again, this actually is going to
be that similar asphalt. And we also have a little
bit of a structure. But that's going to
actually come afterwards. But now that I've updated this, I get to go to my option B where there's none
of that development. I come back here and look
at Option B and what I actually even in a simple way, I can always copy how this sketch was come
over into Option two, and say the same sort of
subdivide element here, pace the current view, and
again, just adjust it. Now, this one's different
only because it has that curb got here. And so ideas, one might
simply come over here. That could be like four
or five foot radius so someone could come in
to get to their garage, and I'll do that same
thing of adding that road. Again, you could
always just create that new floor with
that same set here. And so I just came
directly to here, I have to look at the
floor plan a little bit to see some of the other
sets of information here. But now, as I go to
my three D view, I just really call this
my working view right now because I think it's really doesn't need to really
be divided into options. So the idea is now
you can see what's happening with my topo
solid, and I'm again, making sure that I'm just
looking at the option that I'm working on and making sure that my three D view is
going to be a working view that it's pretty much
separate from any option. I'm just going to make sure
that it's set to automatic. And so now I can just
simply go back and forth. Right? And that's
going to be helpful. And then again, I can
choose my elevation. I can do this at two inch
for my asphalt there. And this could be negative 6
" or negative 4 " as well. So that's a nice little
way setting that one up. And I can get those same
settings in my option two. And again, we just
put negative 4 ", and this could be 2 ". So this is just how much it
comes up from that level. Again, if it's not level, you can always adjust
that to match that. And bring that back here.
152. Loading Autodesk Library Families: And we could always for adding the element that we
need for, of course, a door, we can always go into
Load Autodesk family, and it might be here, we have a simple
garage door flush. We can go ahead and add that in. Again, we're still
an option two, so it's going to only
affect that door. So we just DR we'd have
to crazily organize it. And what we might do, obviously, just to get the plan right, we might go ahead and
come into the floor plan. And now, what we get to
do is we're actually just doing a level one view
but of the garage. So we might just
create a plan view or just sort of extend
the current plan view. Duplicate, I would might
just duplicate it just like a regular floor plan and just
make sure that I'm showing everything and make sure that
I see where my section is. And so now one of
the things because it does have a sort of
optional footprint, this might just be a working
view till we sort of have fully realized, how
are we going to show? Because right now,
if I want to say, this one is working with
option one, you know, the other ones work
with Option two, because it's on a different
side of the house. That's going to be one
of the options for that. So right here, we get to do
some of the planned work. So go ahead and
work on option two. We just make sure that
garage door comes in. And again, we wanted it
to be like a double door. So it's always nice to get
that nice little center line, so we know where everything is supposed to be. Centered on. And again, this shows a
very valuable point of why if you're getting enough
space for your facility, because a 20 by 20, when
we use that same brick, it's going to probably
take away at more space. We might need to do 22 by 22. And unfortunately, we
do have enough space. We don't be too close to
the other structure here. I'm going to come in 1 ft. So this is maybe the
option over here. We're going to have it where
we have a two elements here. And so as we look at what's
happening with Option one, we can go ahead and do
that similar effect. And that's, you know, one of the pluses and minuses
for working with options, you do have to sort of do in
tandem, because it's like, you're not you have to have
them at the same level. So if you're making options, always consider how to
be efficient with that. Okay? And so I'm
creating my garage door. Again, we're going to do
it going to the inside. And again, it's going to tell
me where then by adding it. Like, this garage door unit is actually very capable
of actually extending. If I want to instead
of saying 96, if I want to say that
this is going to be 192, I can always do that. So again, check
the family before you change a major
feature of that because, again, that would probably
affect how the structure is. But if I say 16 feet, the family, this one is
one that can adjust. And so what I would do is
also just come back to our site plan and adjust that so that that
is going to be working. So I'll edit that
footprint a little bit, and again, now you're sort
of seeing why I separated the site from the pad because that pad is going to
need to really adjust a lot. And so as I look at Option two, and come back here over here
and do that same thing. And it's need to
adjust by that one.
153. Setting Up Sheets for Options: But now what I can do from, again, looking at
my option sets, go back to the sheets
that I was working on and get looking at our vt
2024 as we broke it down. We just put all of this
option on our A 100. And so we see option one, we see our gables looking from the top down, and
we see option two. And now what we can do is we can take those three D views, and we can go ahead and put those on right below the option. And so someone could see
perspective for option one and perspective
for option two. And so, you know, the owner
can see what is going on, and is that something
worthwhile for them? And you go ahead, probably
could shade that. And so they see the option now, again, this was
one of the way of just showing a site option. But we also, of
course, for sure, can show just a simple
a different set of options for a same type. We don't have to limit it
to just being the location.
154. Updating 3D Options: So what we can also do, we could very simply. Now, again, this doesn't happen based on the particular option, but the idea is if we
said, Hey, you know, I noticed that I'm showing one option with this particular effect, and
this is another effect. And also, again, we have to
probably adjust our roof. That's one of our one thing you can see now is we
can see everything. We can go back to our
working three D view. It's just sort of to help us out to make
everything work right. Come back over here.
1 ft six. 1 ft six. Again, you can always align
things or use DEMs to help you stop that from happening without
changing automatically. But again, this one
is coming up here, 1 ft six 1 ft six.
155. Duplicating Design Options: Yep. Alright. So yeah, the concept is that we don't have to just
limit ourselves. Any option we have, we can
just always duplicate it. So let's go on to that
sort of workflow. Also in terms of if you want to add a door to one
of the options. So it's not just, of
course, the garage door. You know, we can have different
layouts options there. So we've just been
working in sort of this big view but one thing we can do if we wanted to have a variation for how this worked, we always do our door. We could do, like, a
single flush door. And if we had wanted, you know, maybe a little walkway
that comes out, if we wanted it
scented or something, we could always create that. And I made this in option one. And so now you can
say from option one, what if we were thinking
about different ways for how someone could access and enjoy the
use of this lot, right? You know how does
someone come into here? So this is going to now, let us say, that if
this was opt one, level one, opt one A, right? I could always come and now saying, Hey, you
know, option one. Now, it's not going
to be a sub option. If I said I really
like that layout, I could always just say
that I can finish editing. If you're an option,
it's going to sort of kick you out from editing
some bigger editing, but you can always just
start making sub options. Now, this is how you
connect like a dual option. Okay? So if I duplicate
that to one A and one B, that's how I can sort of drag another option set
within the option. So if I said one A has
this entrance and one B, one B might instead of having sort of this
sort of configuration, it might be more of a instead
of having this door here, it might have a door that
goes out from the back. And maybe there's, like, a
rear entrance, and, you know, maybe that gives us
a little more of idea for a bit of a porch to
come out for the main house. And so I could also
with that logic, also start to detail elements that would be on
a different floor plate. Now, it might be
useful to, of course, keep things in the
same sort of building. But again, you could
say that this is, like, where this would
really relate to. So it might be
something that needs to stay in line with this. So so this is going to end up being something
that is going to change. And this is going to be
where we also start to talk about the logic
of design options. So if something is not
in a design option, it really can't add
to a design option. So what would have to
happen in this model, if now this became at
play for that particular, add on to this space, this would now need to be within
the design option. Now, we could simply do
that by adding to the set just mind that it will
change how it connects to the other option elements. So something that's in a design
option can sort of join, but it cannot cross,
like with host. Like, you can't make a
door in the main model. Except for that it's
in the primary. So right now, it can do it
because it's in the primary. However, you'll see
that it will start to get a little wonky
as we go through. So this walkway, which might have tended
to a footprint that would have gone maybe and
connected directly to this walking path and a
walking path from here. So little breezeway. This might have been that option that's in
one A because it's just a clear little path through here that you don't
need additional entry. However, that one B entry, maybe it very well suits and
maybe it comes out this way, it will suit a door
that comes out. And the idea is that sort of might need to be a
little thinner door. Maybe it could be 32 by 84. And again, you just consider, you know, of course, your
clearance that you have here, maybe this option would affect if you would have
that kitchen layout. But it just gives you
a oto entrance in. And so then, of course,
you'd be saying, if you were doing the other
option on the other side, how does that connect? That would, of course, have
an even different approach, as I would start to say, maybe this option that now comes into play
needs to go ahead and be added to the
design options. So we're going to
add that to the set. And again, it's going to give you an idea about
how it connects. So one thing that's going to require us to do
is we have to make sure that this is well separated because you
can't host something, you know, it creates essentially
a bunch of conflicts. But now that I moved it that
it's not hosted as something that's in the main model,
it's going to be fine. So I'm going to add that to the set.
It should be fine now. So now, this would
need a walkway. And so what this can
simply be shown in is, um, now going back into
option two and saying, you know what if
this option just has a lot more space for
creating your floor? And again, it's using
a similar footprint. Right? And so but that's
just going to say, what if I'm going to put instead
of having a window here, that now becomes a door,
and maybe, you know, you have some sort
of relationship or maybe it's centered
in this wall, and maybe goes this way. I just creates a nice
little walkway there. And so
156. Prepping Sheet for Design Options: That's something that
could be now saying, you know, we could document
this as a larger plan. And the idea is, if this plan is working, I can uncrop that. Just go to main model, come here, and maybe that could be something that's
on a separate page, maybe a sheet for 101
hundred B duplicate sheet. And we'll just call that 100 B, and that's sort of the
garage plan options. And you notice that the
whole footprint didn't have to be on there, but the idea is, we could just go ahead
and duplicate this, those three times
for the one A and B. And so that's something
that we can simply do. So I could say this is now say this is the footprint
that I'm working with duplicate with detailing. This could go ahead
and now tie in option, option A, right? And then we could go ahead
and place that on the sheet. If you want to show
all three options on this page, you might
want to, of course, make this smaller by
some amount or degree. If 316 was here, maybe it needs to be one eighth. And we can always
duplicate with detailing. And this is not adding
any notes or anything. So again, this is just
being very simple, just showing you how you can
utilize your design options. So I can go ahead and
set this to op one B. And so you'll see
that we can change that name to
accompany that again, do you don't have to separate everything out per the
different options, but you see how they can easily
read next to each other. And again, that's the spirit
of making design options. Design option here, and this is going to be C or
just actually two. And so option two,
all we're changing is that we're going to make this is going to be the one
that's going to be visible. So So this is, you know, the ideas when you're ever showing your garage
plans, you know, Hey, look, you can show several
ways of seeing the options. You can show in three
D. I close this. You can go ahead and sort of sify how
many views are open. You of course had
your working views, and now you, of course, now see what your
available sheets are. So now that we have, okay,
you know, this is an option. Hey, what if we showed
our option for exterior, what's happening on the outside? What if we do our garage to
the left of our building? What if we did to the
right of our building? And then our next option, of course, is, Hey, what if we are starting
to work with plans? All we need to have is
our different setups. And again, you can
always come in here and change any notation
for the option, and, you know, you can
duplicate any labels, so that what you're showing
will be very visible. You know, this is a benefit
of this option versus
157. Accepting A Primary Option & Archiving Options: I'm going to go
ahead and save this, and this is something
that I also is important as you deal
with design options. Obviously, every design
option has to come to an end at some point. And so I'm going to go over
that particular workflow. So what happens for the end design options
is, you know, Hey, what if the client
said, Hey, look, option one B is the
best option for me. You know, I don't need to
see anything else like, just go with this. Make it work. Well, what you're going to do
is now maybe you would save your model and you just archive, you know, your previous model, you can go ahead and
just maybe sort of save it for your
workflow, right? You save it as archive
of what you did, and then you'll now
save your new model, and you'll say
this as selection. Selected garage, right? Because one thing that
this model is going to do, when you select a design option, you're going to
essentially tell Revett that there's no reason to keep anything
else in the model. So, whereas, you know, now we haven't really been
using primary as much, but the actual primary
would actually be one B if it's going to be
the one that we want to use, and it's going to give you
maybe a little bit of a ping. You know, some things aren't
going to work the same. But again, that's going to be the one that
they want to use. All you need to do is finalize, click on the particular
set and accept primary, and it will tell you
that you'll have to lete options and
particular views. And that's going to be
the way to of course, clean up your model, it's going to take
a lot less longer. So, you know, the
idea is every option on some level will
come to an end. I've also seen some
people use option sets to pretty much make layers
that won't change. So that's also another
particular use. But consider how
things are posted and, you know, sort of look
at the implications when you're accepting a primary. And it's going to pretty
much remove all the opt one and two because
I'm taking Opt one B. And so, again, you would note that that's also going to take pretty much
our side options. So one thing we might want
to do just to prepare for that sit option being removed is you might
want to go back to our views. And because we didn't
have a side opt B, go ahead and duplicate
with detailing and we'll just make
this site op one B. And the idea it's
actually going to be the site opt at
the end of the day. And what you need to do is
just maybe on this one, make sure that it's
going to set to this one so that we will not lose that
particular workflow. And so what you can do now
is as you are going to your design options and you're
going to set your primary, you're going to make sure
that as you delete views, you have one or if you're
going to duplicate things like the perspective you scan
might be very useful. So you duplicate with detailing, and you just change it to op one B. Scroll back and make
sure that it's on the B. That gives you the
excellent ability to have a carefree delete because you have your duplicate and you have the view that you
want to stay with, and you will now
have the ability to that's the one that
you want to go with. So that would be
your final plan. And again, you've PDF, you've saved your other options. You actually haven't
lost your progress. But if you look at your
design options again, you don't have any longer
things that were sort of shown there when you
sort of accept the view, but again, you know that op
one is no longer really used. It's really only op one B. So, you know, some of the
other things like, again, you still have the detail lines if you were using
multiple types. So right now, because that's the only
one that was selected, it actually did delete that one, and it actually it
looks as if it sort of sort of just
removed that one. So you do actually do see
that that one was removed, and Idas the one that was left is the one that's
going to be in your model.
158. Design Options in Revit Conclusion: That's how you use design
options efficiently. You just apply that
to any workflow. Again, just thinking
about things that are hosted and how those are worked and pretty much always sort of having that
workflow of getting started, keeping it manageable,
something needs to be added, something might not
to be in a set. So time for planning out
what's going to be an upset is always going to help you to get the best from
design options. And also, again, if you're
ever in a three D view, you always have the ability
to be going back and forth. And if you're doing inscape, a good Rule than is always
have your working view because your working view
allows you to go back and forth between different items.
159. Complete Revit Guide Conclusion: Congratulations on finishing this Complete Guide to rabid intermediate. You're ready for an incredible start to any project you make in rabbit, because you now have some of the fundamentals and you have the basics by doing an entire project. Yet I'm Brandon, I'm glad to help you with this course and I wish you the best. Let's look at the concepts that we learned in the class. We looked at the interface, we looked at the concept of building information modeling. And we also looked at how to set up and keep your project under control by making sure you're working on one view at a time and make sure we control that Project Browser. And making sure that we also are very thoughtful and working with project information. In this class, I helped you go through to go from the beginning to the end of making a simple house. And the idea is you can use this same understanding by rewatching this class or going through exercises from this one, as well as developing further from this. If you're ready for the next level and Revit, then make sure to look at my profile for the next courses I have on the advanced courses at intermediate courses to build on your skills and rabbit. So if you have any questions again, always share. I love to see you share your result of your project from this course. And going forward, I'd love to see your questions as well because I know that you're just gonna undo some incredible work in Revit and I wish you the best as you do that, and I wish you the best in your relevant modeling and design.
 Brandon A Gibbs, Architect & Innovator