Transcripts
1. Presentation of the course: Equalization is so important in music with compression is probably the most important thing during the mixing of a sung. In this course, I'm going to teach you everything you need to know about equalizing, starting from the very beginning of the science of sound. And what is an EQ, NYU's it. Then we're going to look at how equalizers work with all the different parameters. What are the two curves? What are filtre types and filter slopes? What is Q factor in proportional Q? And we're going to dive into EQ techniques like meats I dequeue to widen a mixin, dynamic that to the input signal. How to fix a mighty makes and make it clear. And more. At the end of this course, you will be completely comfortable to apply all of this in any equalizer from modern EQs to analog once and have everything you need to create professional mixes, knowing exactly what moves to make, to make your tracks it perfectly in the mix. Takes your time alone, each lesson, practice a lot and you'll be using E2 like a pro.
2. How sound works: Before we look at what is EQ, before we look at the controls and functions of an equalizer and how and where can we use it? We need to understand where is the sound and how it works. The sound is basically based on two elements, frequency and amplitude. This terms are going to be very important when we talk about E2. Any sound we can hear is a vibration away through the air. No matter if it's a car, One's voice or a guitar, the frequency of a sound is the number of vibrations per second. It is measured in Hertz. The human ear is able to hear sounds between 20 hertz and 20 thousand hertz. That means we can hear sounds that vibrates 20 times a second to sounds that vibrates 20 thousand times a second. For example, let's listen to the sound of 100 hertz. This sounds very low because it vibrates only 100 times per second. So if we listen to a sound of 10 thousand hertz or ten kilohertz is going to sound very high. That's because it vibrates 10 thousand times per second. If we visualize the two waveforms, we can clearly see the difference between the low-frequency and high-frequency. So this is where is the frequency of a sound. And as we just seen it, this is how we can measure the pitch of a sound. Amplitude is the volume of a sound. It is measured in decibels. For example, if we look at the waveform of a quiet sound, it will look like this. If we turn up the volume of the same sound, it will look like this. We can see that the amplitude is much higher than before. So we can mix these two terms, frequency and amplitude on the graph to visualize an audio source, the vertical axis represents the amplitude in decibels, and the horizontal axis represents the frequencies in hertz. That is how many equalizers will look like. Let's see this in action with this guitar sound loaded in this equalizer. We can see that this GitHub plays on the frequency range from around 150 hertz to 14 thousand hertz with an overall amplitude of minus 15 decibels and a peak at minus ten decibels. Now, let's look at two other important terms when we talk about an audio sound, fundamental frequencies and harmonics. Fundamental frequency is the main frequency of the sound. She's louder than all the other frequencies of the sound. Most of the time is the lowest frequency of the sound. And this is what defined the pitch of the sound. Let's listen to that simple square wave loaded into this equalizer. We can clearly see the fundamental frequency around 440 hertz. This frequency determines the pitch of the sound. Harmonics are all the higher frequencies of the sound which build the harmonic spectrum. These harmonics are what give the sound its tone and character. Let's look again at this sound. We can see many harmonics behind the fundamental frequency. They are what gives the square wave is particular and unrecognizable tone and character. If I play the same note on and other instruments, like a piano, the Pij is the same, so we can see the same fundamental frequency, but the harmonics spectrum is different. The piano has his own harmonic spectrum that give its particular timber and character, and that allows us to know that we hear a piano, not another instrument.
3. What is an EQ?: So far, we learned how sound works with frequency and amplitude. And we have seen that we can combine these two elements on a graph to visualize the audio source. This is where the equalizer comes in. But what is exactly an equalizer? An equalizer or EQ, a tool that allows us to adjust the independently the volume of different frequencies of an audio source. This is the fundamental function of an issue. To do so, we will use boosts and cuts. Booths are used to turn up the volume of a frequency or set of frequencies. And cuts are the opposite. They are used to turn down a frequency or set of frequencies. Let's listen to this guitar. We, the NICU, I can decide to cut the low frequencies 60 BCE down, for example. Like that, I am only affecting the low frequencies, letting the highs intact. In addition of that, maybe I also want to turn up some of the high frequencies, three dBs up. So as we can see with the NICU, we can boost or cut independently the volume of different frequencies of an audio source. During this course, we will see that there are different types of accuser with simple and advanced controls and features. And many ways to cut or boost the frequencies.
4. Why EQ?: Now that we know the fundamental function of e2, which is boast or cut different frequencies of an audio source by different amount. We could ask, what is the goal of e2? Why use EQ? The first case where we use each shoe is to correct the frequency balance. For example, you're recording an acoustic guitar with your microphone and you wanna get rid over low-frequency rumble. Another example is if we need to remove unwanted resonances in the same guitar record, we can remove the harsh sound of the strings during the chord progression. This first way to use e2 when we need to correct the frequency balance of the audio signal is called the corrective EQ ether sort of cleaning of the signal. The second use for EQ east to shape the tone of the signal. Come on. Examples are adding high frequencies to brighten up a record, or adding the low ends to thicken the sound. These examples show that each You can be useful in order to shape the tone of an audio signal. Third reason to mix the different elements together in a song. When we're mixing a song is important to avoid frequency clashes between the elements. For that, EQ is very useful in order to feed the elements together in the mix. Imagine that you have a base and a synth clashing each other because they share some similar frequencies. We can use EQ on the synth to cut the low frequencies where the base is playing. Now we have a much clearer and cleaner mix between these two elements. So these are the three main reasons to use EQ to correct the frequency balance of the signal. Doing corrective EQ to shape the tone of the signal, and to feed the different elements together in the mix.
5. The frequency ranges: When it comes to EQ, it's always about frequency spectrum manipulation. So it's very important to know the composition of this spectrum that will divide in several bands. Knowing these bears and their specifications will help us in our work, we have seen that the human ear audible frequency spectrum goes from 20 hertz to 20 kilohertz. And this spectrum can be divided in seven frequency bands, and each one will have a different impact on the signal. These bands are the sub basis from 20 to 60 hertz, bases from 60 to 250 hertz. The lower means from 250 hertz to 500 hertz. The mates from 500 to 2 thousand hertz. Higher mates from two to four kilohertz. Presence from four to six kilohertz, and brilliance from six to 20 kilohertz. These bands are likely to vary a little bit, but they represents the seven common bands are the audible spectrum. We could simplify the spectrum into three main bands. The basis with some basis and basis. The maids with lower means, MS and higher mids and the highs width, presence and brilliance. In general, we're going to use this term to name the frequency bands. But we can also see over naming, the bases are also called Lowe's or low ends. Highest can also be called the troubles. For the middle will often have simply lower and higher means on the cues like MGS where we have HMM for higher mid-frequencies and LF for low and mid frequencies. Now let's dive into each band, starting with the sub basis is the first base band. They are very low frequency, so we fill these databases more than hearing them, and that brings power and energy. To reproduce accurately these frequencies, we must have good headphones or speakers with the low frequency response. Few instruments are in this area, will have bases like bass guitar, a weight, or a synth basis, and kids can be in the sub basis. For a q, we can boost this area, but not too much. Otherwise, we can add madness to the sound, making it less clear. Moreover, too much boost here can also affect the basis and lower mids. Conversely, too much Kurt can weaken and thin the sound, which is most of the time not likable. So for the q in dysuria, we must find the right balance. Next band basis. It's a very appreciated band for mixing is very important because it has an influence on the sun bounce the basis defined how thick or thin the sound is. Four EQ or booze, between one hundred and one hundred and eighty Hertz adds punch and between one hundred and forty and two hundred and twenty five hertz, warmth and fullness. But as for the sub basis, too much boost in this band tends to make the sound muddy and boomy, so don't overdo. Then the lower meets. Here are the fundamental lines of your instruments. For instance, will find there the fundamental frequencies of many acoustic instruments. These band is also considered as the base prisons band. Boosting around three to 400 hertz gives clarity to base or to other instruments playing low like a cello. But on high frequencies instruments, too much booze can get the sound muffled on the mix. This bend is also important because the Martinus phenomenon typically occurs in the lower meets between two hundred and five hundred hertz. This phenomenon removes clarity to the mixer. We must avoid too much energy and too many instruments in this space. For acute choose well the instruments to boost or cut and don't make extreme moves. A video in this course is entirely focused on the lower means and medina. So we'll see that later. The MS defined the importance of an instrument in the mix. Here we can add a clarity and detailed things to eat. You be careful not to boost too much around 100 hertz, not to have kind of a metallic sound and stay away from ER fatigue. And noted that medium quality headphones, earphones in speakers, focus the majority of their output sound on these bands. The higher modes are the instruments sensitive frequencies. And where our ears are the most sensitive to. In this area, our ear is able to detect easily if the music lacks something. And the contrary is also true. Too much accentuation gets the music less bearable. So every change made here, even little ones, will have a big influence on the sound, which allows to put forward an instrument or another in the mix. So making EQ boosts can bring presence, clarity, and definition. This band is particularly important for vocals. So for dialogue or a singing recording, these band needs clarity. Precautions also resides in this area which is responsible for the attack of percussions and rhythmic instruments. So the higher ms are very important meant we need to focus on, we must ensure that it's the, has depth and sounds natural. The presence band is responsible for clarity and definition of a sound in the high frequencies. We need to balance correctly the mics here because if over donor, it can cause harsh and annoying sound. If we decide to cut in this area, the sound will be darker and more distant. So we must find the right balance in this band between elements like hi-hats, since orchestral instruments or vocals. Finally, brilliance. This last bendy is entirely composed of harmonics and in the ads brilliance and heir to the sound, around ten kilo hertz we are faced. The clarity in the highest is the high frequencies brilliance area that gives detail and brightness to the sound. Beyond the ten kilo hertz we get in the air band when these parties too much pushed, the sound can look unnatural because few sounds in music or in the nature stand here. So we need to be careful when boosting the brilliance band because we can accentuate the hese are any year fatigue, so better not making extreme boosts here. So here are the seven bins are the audible frequency spectrum and their main characteristics. It's essential to know VCG ranges to control your mix and improve your skills and know-how. To finish this video, I'm gonna show you some eQTLs to apply all along the frequency spectrum to help us know which frequencies to focus on and which moves to do depending on the instruments or the sound we manipulate. At 50 hertz, we can boost to give more fullness to low frequencies instruments like kickin base cut in the 50 to 100 hertz area if they are getting too thick and interfering with the clarity of the low end of the mixing. If needed, cut to attenuate the base boom at 100 hertz boost to give the low-frequency instruments are harder sound. We can also boost here to add fullness to guitars and snares. Add warms two pianos and horns. If this area is cluttered up and too boomy cut for more clarity in the lows. If needed care to attenuate the boom on guitars and add more clarity at 200 Hertz boost to add fullness and thickness two vocals, guitars and snares, if needed, cut to reduce the moneyness on vocals or mid-frequencies instruments between three to 600 hertz. You can boost at 400 hertz to add more clarity to baselines for smaller speakers. And in this area we can cut to add more punch to kick drums is will reduce bussiness and give it thicker sound at 800 hertz boost for bases punch and clarity, it's also for smaller speakers because increasing the means make the bases more audible on smaller speakers. Between eight hundred and ten hundred hertz. Reduce on guitars to make space for vocals. 1.5 kilohertz boosted to increase the string sound and clarity on bass guitars, cut to reduce nasal sounds are on vocals. At three kilo hertz. We can add attack on many instruments like percussions. So we can boost for more attack and punch on acoustic and electric guitars. Same for pianos. Boost for more string sounds on bass guitars. Boost for more presence in clarity on vocals. If needed, cut the electric guitar to make room for vocals at five kilohertz. We can also boost for more presence on vocals or more attack on bass, drums like drones and Tom's. And more attack on piano and acoustic guitars at seven kilohertz or boost to add extra life on dual vocals. Also for more attack on bass drums, more attack on precautions, more fingers sound on bass guitars. An increase to the sharpness on since guitars end piano at ten kilohertz and above, we can boost to add the air and brightness on vocals are n instruments, but don't lose everything here and no extreme moves to stay away from an aggressive and annoying mix in the highs. Sure, this chart is not exhaustive, it only gives you a global idea. It has to guide you, but don't apply these moves mechanically and automatically. For instance, boosting for vocal presence are appeared twice, once at three kilohertz and once at five kilohertz. So the frequencies can vary depending on the audio source and the results you're looking for. First of all, work with your ears. For the boost generally little moves like two to three decibels is enough. Where you can go further if you think it's necessary and take it easy. Don't overdo every instrument current have thickness, presence and brilliance. We need to work in detail and think that the accumulation of little touches will make the difference on the whole mix. And don't forget that there is no room for it. You just guidelines to help us take the good decisions.
6. The sound vocabulary: There are thousands of words that can be used to describe audio and many of them can seem ambiguous where the in technical, but there are common ones. Engineers and producers used to help talk about M60 shoes and qualities. We're going to go through these most important and common words related to EQ and frequency. Bright is when there is a lot of high-end, not necessarily less lows, just more highs, brightness tens between 320 kilohertz. This orchestral symbol is a good example of a bright signal. We can see this nice prisons of highs. And again, right doesn't mean there is no low ends or emits, just a lot of high frequencies in the signal. Smooth is quite the opposite of brights. A smooth sound as a little bit less high frequencies. And then a bright one from one to 20 kilohertz is decreasing a little bit more in the higher frequencies. It is similar to bright, but a little bit higher frequencies on the spectrum. Era is all the frequencies above 15 kilohertz. What's we call presence is in the mid-frequencies between one to four kilohertz. This range makes things feel present and clothes like I'm vocal for instance, you would now notice trace like widow, bright, you batty indeed PCs. You don't know these trees leg, we do break your body in EPCs. Feather or thick means there is a nice amount of low ends up in the 20 to 200 hertz range. Sometimes it can also mean saturated. Here is an example of a base we can classify as thick. Thin is the opposite of fat. So that means there is not very much below n in the sound. These deficiency is between 20 to 500 hertz. Hirsch is a pretty negative term because it's when there is too much higher mean frequencies, making the sound aggressive and fatigue when to listen to. Harshness tends between two to seven kilohertz, which is a sensitive and another presence range for our ears. Distortion can turn some harsh, for example, lazily or honky is when there is too much mean range a little bit lowers and harshness between 600 hertz to two kilohertz. Boxy is quite similar with Anki because a bug Csound is a signal composed of mostly mid-range frequencies with not enough lows and highs. Money is when there is too much flow means and lows and the lack of highs, melody has been things sound unclear and unpleasant. In millimeter. It occurs between two hundred and five hundred hertz and goes down, up to 60 hertz. For the lows. Boomy means there is an excess of low frequencies causing exaggerated sustain English speakers. As cooped sound as the Mozart lows and the highs, but not many meets. Warmth usually refers to a harmonic distortion with no excessive harmonics in the highs. It's equality usually attributed to analog gears or Plugins. This is what makes it makes smooth, rich and pleasing to listen to. And depth is the three-dimensional quantity of a mix in health with instruments separation and the overall sense of space. There are countless words to describe audio, but these are the most common ones we use that will help us identify areas of sound with words. So when using EQ is easier to know what part of the sound to focus on.
7. The curves and filters: Now we're going to dive into the EQ parameters. We have seen that EQ allows us to use boosts and cuts on specific frequencies. There are several ways to use these boosts and cuts using different types of curves and filters. We're going to start with the curves. First we had the bell curve, or peak is one of the most common curve on the EQ graph. It looks like a bell or a peak. It's used both for boosting and cutting the frequencies all across the frequency spectrum. So we can use it for corrective EQ and to shape the tone of the signal on the synth. For example, I can clean the frequencies responsible for madness in the Llamas around three hundred and four hundred hertz. And writing up the sound by boosting the high mids. Now we have a much cleaner and clearer sound thanks to the bell curves. Then we have the shelf curve. It's another common used curve. It boosts or cuts or all the frequencies before or after ascertain frequency. So we can have a high shelf curves. In this case, we can boost our guts all the frequencies above the frequency we set. And we have low shelf curves that allows us to boost or cut all the frequencies below. This curves are very good to make wide tonal changes. Like on this piano to which we are going to give more thickness and presence by increasing the lows and the highs with Shelf curves. Then we have the filter types. It's easy to distinguish curves and filters. When curves can be used both for boosting or cutting, the filters are only set to cut frequencies. First, there is a low pass filter. It gets out the high frequencies, leaving only the lows through the filter. So this can give this sort of underwater effect. The place where is the filter on the spectrum is called the cutoff frequency, or simply cut off. The second one is the high-pass filter. It lets all the high frequencies pass through the filter, cutting out the lows. So it makes the sound thinner. These filters are great in many cases. They are particularly excellent for corrective EQ and to feed the elements together in the mix. For corrective EQ would mean, for instance, to clean a vocal recording by cutting the rumble in the low frequencies using a high pass filter. Tapped me. Yet tapped me. Baby. Baby, where you tapped me, baby tapped me. In other cases, we could need to cut some unwanted high frequencies with a low pass filter to clean the signal and get a clearer mix. To harmonize the instruments in the mixer, as we saw in the previous video, to avoid the Amedi mixer is important to get the low frequencies are of the instruments playing with the base at the same time. In this case, using a highpass filter is essential. Then we have the bandpass filter. It let's only the middle frequencies pass through. It looks like this. We can see that it gets out the lows and the highs, only the middle frequencies pass through the filter. And the last one is the band stop filter, or a notch filter is the opposite of bandpass. It eliminates the frequencies around the frequency we set. So this is useful to precisely get rid of unwanted frequencies by eliminating narrow frequency range. To sum up, we have two types of curves to boost or cut the frequencies or other signal, bell curves and shelf curves. And four types of filters are only to cut the frequencies. Low-pass filters, high-pass, band-pass. And Ben Stop.
8. Filter slopes: We have seen the different filter types, low-pass, high-pass and band-pass filters. In this video, we'll look at the filter slope. There is another way to control the filters. The filter slope refers to how quickly frequencies are cut by the filter. Once the cutoff frequency is past, slopes are usually expressed in decibels per octave. Let's see an example. We will AB compared these filters. All the parameters are exactly the same. Just the filter slope is different. The first filter is more gradual and let's more frequencies through. We can visualize here how Gradual is the slope of this filter. The second one is steeper, so less frequencies pass through. It cuts more brutally the frequencies. So the filter slope is a key control to set how the filter sounds. Example, we can use a steep slope for cutting the rumble. The low ends. Slanting rice, or a gradual slope for light attenuates shown here in the heist. Dress takes slice. Slice. Like I said before in this video, slopes are usually expressed in decibels per octave. An octave is a series of eighth notes occupying the interval between two notes on a keyboard that I can play an a here. And I can play another higher a here. The interval between these two is an octave. Let's see that in a more technical point of view, the first AI played ease. A4 is frequency, is 440 Hertz. The higher AI played is A5 and has a fundamental frequency of 880 hertz. Each octave is double frequency of the previous octave. So the fundamental frequency of A6 is 10000760 hertz. With this frequency point of view, an octave refers to the interval between one frequency and it's double or it's half. There is one octave between one hundred, ten hundred Hertz and 2 thousand hertz. There is another octave between 1000 hertz and 500 hertz. Now we can understand how it determines the slope of a filter. Here we have a low-pass filter set at 500 hertz, and the filter slope set at 12 decibels per octave. Every octave, the filter will cut the signal by 12 decibels. We can visualize it here. As the filter is at 500 hertz. The next octave is 100 hertz. The filter cuts 12 decibels in this first octave. The next octave is 2 thousand hertz and is going to be cut another 12 decibels. If I move the filter to 11000 hertz and set the slope at 24 decibels per octave. The next octave is 2 thousand hertz. This time, the filter is carrying 24 decibels in this first octave. That's a more aggressive cut, and that's why the slope is steeper. So this was the technical part of filter slope. But fortunately, nowadays with modern each used like fat filter procure three for example. It's easy to set this parameter thanks to the visual display. But don't forget that your ears are the ultimate tools to decide how you want to attenuate the signal and how you want the filters to sound.
9. Q and resonance: Q is a parameter. You probably noticed that on many EQs, by what is it exactly? Q stands for quality factor. The q is the parameters that sets the bandwidth of the booster order cut. So for instance, with a bell-curve at changing the queue will get the bandwidth and narrower or wider. Let's frequencies are affected when it's narrower and more when it's wider. So the Q value is important because it allows us to set precisely the boosts the end cuts. The q parameters is also useful to control the bandwidth of each band of the EQ. So we can have a great control on the sound. We want to shape our correct example. Here we have a kick and a nato eight. We see that the kick knock around that 90 hertz. I'm going to make a cut in this area for the arrowheads and adjust the queue. With this bandwidth. That sounds good because that allows the kick to cut better through the mics. For the GGAC, We can make a booster in the means to give it more power and adjust the queue to see which bandwidth works the best. Let's see now an example for shelf curves. On a shelf curve, when we adjusted the queue will get a smooth or steep curve. Let's listen to this. On this guitar. The curve acts differently on higher values. We get more resonance because this is a steeper boost. With lower values, the curve is more gradual and the sound is more natural. So we've seen some examples on bell curves and shelves. Now we're going to look at the queue when we manipulate filters, it will act a little bit differently. The queue on filters like high-pass or low-pass filters sets the resonance. Resonance is a boost at the frequency we said the filter. We can clearly see the boost at the corner frequency of the filter, that is the resonance. This gives this particular and recognizable tone and energy. So we can easily guessed when resonance is applied or not. A nice way to use resonance is to apply it on a filter sweep automation to give an interesting character to a sound.
10. Proportional Q: And so my analog muddled it use there is no queue control. In reality on these issues, the q-value is based on the amount of boost or cut we set. So the Q is proportional to the boost or cut on each band. That's why we call it proportional Q. More precisely, the amount of boost or cut determines how narrow the queue is. Let's see that in action in Slate digitals FGM, when we turn up to boost to our turndown to cut, the queue will get proportionally narrower. With a small boost of two decibels, the queue is going to be wider like this. With a big boost of ten this volts, the queue is going to be a narrower like this. When we turn up the volume, we can clearly hear that we are increasingly focusing on a narrow band of frequencies. Why proportional Q is interesting to use with small boost or cuts, we generally want to shape the tone of the signal. In order to shape the toner is better to effect a wider range of frequencies. So better have a wider queue with big boost or cut. The purpose is to correct the signal focusing on specific frequencies without affecting the frequencies around. Analog muddled, each user with proportional Q allow us to do these moves quickly.
11. The types of EQ's: In this video, we're going to look at the types of issues. There are three main types of each use. Graphic accuse, parametric EQs and semi-parametric EQs. Graphic it use have the particularities to have many fixed bands all laid out in a row. Visit US can have up to 30 bands. We call them graphic. It used because once we've set the bands, we can see the EQ curve. Generally we can only cut or boost the frequencies given to us. So this is not the kind of abuse that gives advanced controls like q-factor or filter slopes for example. Unlike graphic excuse, parametric EQs give the most advanced control over the frequency curves and filters. And the Q value. Pro Q3 is a very good example of a modern full parametric EQ. With it we can have full control over where the frequency band is, which filter or curve we want. If we want that curve wide or narrow by adjusting the queue. And other features like mid-side processing that we will look at later in this course. Slate digitals infinity, E2 and isotope ozone nine EQ are also great examples of similar modern full parametric EQs. Not all of the barometric, each user as this waveform displays waves, the SSL, each channel or slight digitals, MGS are also parametric EQs because we can choose the amount of boost or cut, the frequencies to boost or cut. And the q. And semi-parametric, each user are any issues with some of the controls of full parametric EQs. For example, an issue with frequency, boost and cut knobs, but not you control like we have seen with proportional Q equalizers. So in this category of issues, there are many classic analog modal it used like slate digitals, FGM are waves, the shapes of 73 in and we can see that we are able to choose the frequency of these bell curve and the amount of boost or cut to apply. But there is no queue control. At the top we can see the amount of boost or cut for this high shelf curve, but we can't choose the frequency of this shelf. This is a perfect example of a semi-parametric EQ.
12. Why use analog EQ's?: In the two following videos, we're going to dive in to the analog model, EQs, analog accuse our machines. We can see at recording studios. Nowadays at the digital age, we can work on plugins emulating faithfully these famous EQs, VC cues are always used today by the industry pros and in every mics and mastering sessions, we're going to see why. The main reason is to shape the sound, adding vibe and color. During the mixing of a song, we have to shape and work on the color of the instruments. For this coloration work, analog accused absolutely need to be used because they bring a special character, warmth and color, and they are very good to give clarity and presence. These analog EQs extra character is brought by Harmonic Distortion. These accused allow us to achieve these tasks quickly and easily. Let's see an example with a high shelf on a synth. With just one knob. We added air and brightness easily and quickly without adding harshness. Let's add some tone by boosting the lows with another analog, EQ. The result is a fatter and warm tone. Let's listen again before and after the two EQs. These analog EQs allowed us to add more character and color to that sinth. As this is sound shaping or creative EQ by boosting some frequencies. This work has to be realized after corrective EQ and compression in the effects chain. Let's compare with these exact same settings on a parametric stock EQ from FL Studio and fat filter procure three. Much fatter and warmer than the other EQs. And even with the high shelf boost, it doesn't sound harsh and thin. It adds a pleasing color and vibe to the sound. We can also notice that there is almost no difference between EQ and procure three. So these analog modal accused have that kind of signature tone. That is very interesting. Of course, you can use the stock EQ or another one like procure three. Sometimes it could be the most handy tool for watch wanna do. But in order to emulate the thick and warm sound of the analog modal excuse, you will need to do extra work. And in any way it would be hard to achieve the same vibe and color. Using analog accused is easier to achieve quickly this kind of tone. And we will have great results in any kind of signals, drums, since vocals, etc.
13. How to use analog EQ's: We have seen what are analog model? It uses NYU's them, even if they don't look as easy as modern EQs like infinity EQ or approach you three, you need to learn how to use them because we have seen that they can provide great and unique results. So in this video, I'm gonna show you pro tips on how to use them and helps you be comfortable in any analog model EQs. First thing to do is to understand how he's organized the analog EQ in order to imagine the graph and the bands. Many analog accuser have a similar organization to the MGS. So let's deconstruct that. At the top we have the high band, followed by the high mid, then low mid, and the low band at the bottom, it's a highpass filter. For each band we have the frequency knob and the boost or cut amount knob. For the high and low mids bands, we have the Q in addition, for the highs and lows, default curve is a shelf curve, but we can turn it into a bell curve with this burden. For the Medes, the default and only curve is a bell-curve. We will have a similar structure in many analog EQs, like SSL GQ from waves for instance. Now we need to try to picture what the moves would look like in a graph, like there isn't pro Q3. You need time to practice these mental visualization, but after a while it would be natural. And as I already said, your ears are the ultimate tools. So you also need to use them to know what you're doing and choose correctly which banned unit to manipulate for correcting EQ by cutting frequencies or creativity Q by boosting frequencies is very important to train your ears. Here I have this guitar recorder. It sounds muddy in Sumeria, most of the time homogeneous comes from the mid-frequencies, somewhere in the low mids. So to correct the signal, we know that we need to focus on these band. But without visualizer, How do we know exactly which frequency needs to be cut using the boost sweep and cut technique. First step, boost the band where we identify the problem, in this case the low mid band. Then we sweep around the frequency spectrum until we hear the unwanted frequency. It should sound particularly disturbing and it would be an exaggerated version of the problem we identified. And finally, we got this technique needs an ear practice very, it's very useful to identify easily the frequency we want to cut. And it will make analog model each use easier for you to use. And this is corrective. E2 will do these before compression and creative EQ in the effects chain. So now I can shave the sound that if I want.
14. The types of analog EQ's: We have seen how analog EQs work with parametric EQs like vgs and the SSL GQ, or a semi-parametric EQs like LGN with proportional Q. In reality, there are other types of analog model, the accuser. We're going to look at these other types, how they work and when we can use them. First type a pool take e to. This type of EQ is not designed like typical EQs we have seen so far. But they are very often used and they have to be in your EQ library. Some people even say that EQ enhance any sound going through even without applying EQ. And for EQ, they are very useful to shape the tone of a sound in a very natural way that give you a tricep, clear base enhancements, a particular warmth and silky highs. Here is how they are designed. The low-frequency section is a shelf curvy Q, with four selectable frequency bands, 20306000 hertz. Each of these frequencies can be boosted or attenuated. And thanks to the button boost and attend. The high-frequency section features a bell curve EQ booster and offers seven sector will frequencies for the bell curve. 3458101216 kilohertz. And the bandwidth knob allows to set the Q factor of the EQ curve from narrow, sharp, too wide, broad. The high frequencies can also be cut at 51020 kilohertz. And this is a high shelf HU cut for the low frequencies, having only four bands can seem limiting, but they are very well-chosen and they have a wide bandwidth that impacts the signal beyond the end below the selected frequency. For instance, if I select 60 Hertz, the shelf curvy so wide that it can impact until one hundred, ten hundred hertz. If we do a max booster on a graph, it would look like this. And this bandwidth is similar for the lows and highs attenuations. What makes the Caltech EQ special is that we can boost and cuts simultaneously, particularly on the lows, the highs only share of 510 kilohertz visit simultaneous boosts and curves give amazing and unique results. And, uh, so special character to this EQ. Boosting, anchoring at the same time can seem counter intuitive. But in fact, the boost NCAR parameters don't have the exact same frequencies n curve shape. We can use the attenuation knob or to reduce the Martinez phenomenon that can occur when we boost the low bandwidth on a graph, we would get shapes looking like this. This trick is known as low end trick. I am now in my door and we're going to see this famous low-end trick on this drum slope. I loaded this pool techie cue on it. And we're going to select the 60 hertz band and boosted gradually. Now we have a thick and big sound, but maybe a little bit to Murray in the low meets. The mids are also affected because of the wide bandwidth of the shelf, like we just seen before. So here we're going to add some attenuation. The sound is clearer and we keep the solidity due to the boost. This result is possible thanks to the combination of the two nops, we cannot get the same punch if we reset the Qurta and reduce the boost. That's because the filter shape changes when we add attenuation by cutting more in the low mids. And as we must not think that it sounds better just because the sound is louder, a reflex to always have is two level match the gain at the output with the inputs. It won't be always necessary, but in this case, I'm going to decrease the gain with the output. And if your recruiters and have an output knob, you can use the volume faders in your mixer. We can use this method on every low instruments on a base like this one, for example. Then we can play with Boost enter attenuations in the high frequencies. Keep it in mind that we can change the bandwidth for the booster. And that the high shelf curve is also very broad. Some of the best plug-ins for this type of analog, the QR, UHD pool deck, EQ P100 waves that week take EQ p1 or a tube, take gp120. There are free alternatives like Ignaty amps, a PT EQ, or analog, obsession and rarer AQ. These free ones are amazing. I highly recommend them to finish with these accuser. Some Brenda also have a version focused on the means named the MAQ five, like waves and Universal Audio. Second type, the Navy EQs, initially navies vintage and legendary recording consoles with an incomparable warmth tone and brightness. Lifetime EQs allows us to enjoy these legends. Sound thick, punchy and large to color and correct the tone of our instruments. We can use them on any kind of signals. For instance, they are great to bring thickness and punch to drums and basis and give air and presence two vocals. These kind of EQ is designed like LGN with a high-pass filter, a low shelf curve for low frequencies. One or two bell curves afford the medicine and Ohio shells curve for the highs. Generally fixed. No cue on these excuses. So they work with proportional Q. If the woke up with such a add a milliwatt, could be single thought. You usually do before I left the fall, fall inside of keeping Mekone and back to back. If the woke up with such a atom, no way I would do that could be single for befall it if all evolved in Uganda of Cape, it may come back to that if the woke up with such a atom, no law could be single sociality. If the woke up with such a animal would do so, that could be single-cell gravity limits you usually do before Folly, the fall fall inside, you gotta keep it McCallum and back to back. If the woke up. Here are neve EQs from other brands. You AD neve 1073, which is the most accurate emulation of the classic neve 1073 preamp and an EQ V2 for from waves, and the T-Rex EQ A11 from IK multimedia. Third type of API, EQs API is another type of vintage console like Naver. And the API EQ plugins transcribe the bunch and transparency of low frequencies and the precision and clarity of API EQ hardware's. The API EQ exists in several version and the most used are 558 with three bands and phi 50 B with four bands. The 550 a model from waves has a structure like this. Three frequency bands that overlap on each band fi frequencies to choose and five choices of boosts and Kurt going up to 12 decibels. The choice of bello or shelf curve for the high and low frequencies. And one band pass filter from 50 hertz to 15 kilohertz. The 550 B is similar, but more versatile with his four bands, the N7 frequencies choices. Here is the classic architecture of the API, 50-50 EQ. Visit queues work with proportional Q. So soft settings stay transparent with a wide bandwidth and more extreme boost and curves give more drastic results. They are great to have a clean and punchy sound, perfect on drums and guitars, for example. Many brands have their emulation of API EQ like UAT and multimedia. Other have more advanced feature like pink for from acoustic audio and waives. Any UHD also have an accurate reproduction of the original API 560 graphic EQ. Last type, the SSL EQs. Ssl is the third type of console, and SSL EQ is the kind of parametric analog E2 we have already seen like SSL, GQ, or MGS. These EQs are famous for their parents and unique sound. So we found classic features like high-pass and low-pass filters. High and low shelf bell curve for the meter on each band frequency and gain settings. And the queue for the meats. Generally there are four bands. Visit use are very versatile because they are both used for correcting detailed problems during the mixing and for shaping and given color and character to the sound. He are the main types of analog EQs. Many things to explore here. A lot of brands have their E2 for every type we have seen. So do some research and find which ones can be the best for you. Anyway, you must try these EQs and make your own test to discover the power of them and what they can bring to your trucks and mixes. To finish this video, I would like to quickly talk about two amazing EQ's that things are not in the four categories we have seen. The first one is EQ for from MAG audio. Another legendary EQ with its sound signature is particular rarity is the error band that ad presence in the highs while keeping the sound natural, very appreciated on vocals or to make shine anything including a full mix. The subband is also very good. Can try it on drums or master bus for instance. After that we have a fixed bands. Great to make coherent EQ. From a global point of view, this EQ is incredible to shape the tone of a tracker from bottom to end with a very transparent sound and the beautiful presence in the eyes. So this is a musical EQ, not surgical. Don't use it for corrective E2E. Trade on vocals, drums, guitars, Master, and more. The second one is the Trident, a range from soft tuber, another legendary EQ, because only 13 a range councils have been made in the history. This EQ also has a characteristic sound with its four bands is fixed frequencies and the high-pass and low-pass filters. The saturation novel allows us to play with distortion, adding vibe and character, an enqueue symbol to use musical note surgical to test on anything you want.
15. Mid-Side and Left-Right processing: In some modern EQs, we're able to process mid-side EQ and left-right EQ. Mid-side processing is a popular technique that separate the stereo field of the signal in two parts. The mid and the sides. Meet is the information placed in the middle of the stereo field. Inside it is the left and right stereo information. Among the elements most of the time placed in the center of the mix, we have, for instance, kick, snare, bass and vocals. And for the elements placed on the size of, we have, for example, stereo. Since paths, pianos, guitars, or vocal reverb, mid-side EQ allows us to EQ median size independently. So that gives more control over the signal. For example, in this mix. Here I want more presence in the Lowe's to bring out the kick and base. I'm going to use the isolation band of pro Q3 to note the target area. I know that these elements are central in the mixer. So I'm going to turn on here, the mid mode of if I isolate the gain, the bandwidth, we're going to hear the exact same thing. But if I activate the site mode and isolate again. Now when nearly don't hear anything anymore. So that confirmed that these elements are in the center of the mix. Now I can do the boost and thanks to the mid mode, which showed that the size won't be affected. Omics with vocal, the mid mode can also be a very good option if you want to give more presence to the vocals. Considering the lead vocal in the center of the mix, we can boost the mid-frequencies of the mix in mid mode. And that way the stereo instruments playing in these frequencies won't be affected. Now I would like to bring more width to this mix. So I'm going to create a new button and activate the side mode. Now I use the isolation function and sweep runs. We'll listen to the high, mid, and high frequencies. We hear the main melody that I spend a little bit on the left, and other elements like high hats in the size also stands out the reverb we apply the on the instruments here to accent and widen the stereo image of the mix, I'm gonna boost inside mode around 3.8 kilohertz. Now, this makes sounds way better. And thanks to the mid-side EQ, it's been pretty easy. Try this on your production and you will be amazed of the results. Now let's look at left, right EQ. Let us write the q is a mode that allows us to control the left and right channels independently. Let's dive again in the previous mix. And this time we're going to use left and right modes and sweep around the frequency spectrum to hear what's going on on the left and right sides of the mix. On the left we hear the main melody around two kilohertz, and on the right is the secondary things like the bad, around seven hundred, eight hundred hertz. We're gonna boost these frequencies using lefts and rights mode. All of a sudden, the instruments out in the mixer on each side of the stereo field, and we have this extra clarity feeling. So try also these techniques on your mixes and you will see that we can get amazing results with.
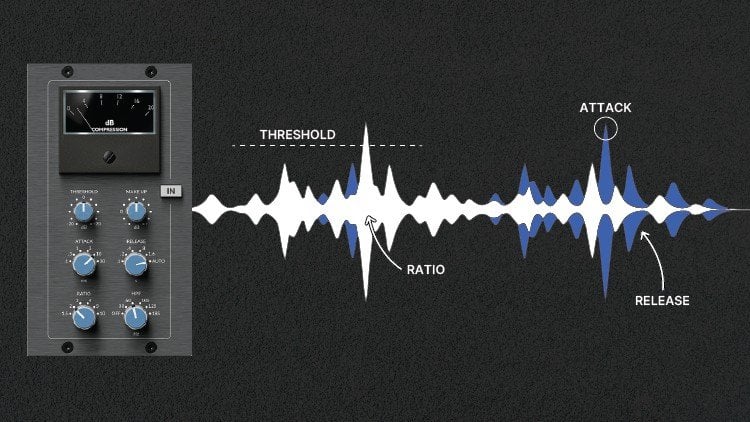
16. Dynamic EQ: During the mixing of a track, static EQ is not always the best solution. Every songs have different sections, each one with different emotions. Some parts are louder, other are smoother. A singer can emphasize Hmm, where's the N'Sync differently during the verse and the chorus? Maritime, if the drummer hits hard symbol, we'll want to attenuate the crash with a queue. But at another time, this car will morph of the symbol when it's hit more gently. Other example, we can decrease the lows on a kick drum to reduce the clash with base. The kick is thin and when the base is not playing. In such an example, we don't need EQ of the time. Automation is an option, but we will lose a lot of time. To sum up, static EQ is not always appropriate. This is where it comes dynamic EQ. Dynamic EQ features three standards, EQ parameters that we are used to manipulate frequency, gain and q, combined with dynamic standards parameters. Among them of a threshold expressed in decibels, which is the point where the EQ is going to trigger. So when a specific frequency band crosses the threshold, that triggers a NICU boost or cut. Other parameter range or dynamic range to set her father frequency can be attenuated or boosted if the value set is positive or negative. In some dynamic accused Instead of range, we can have the ratio parameter. In this case, higher ratio equals higher compression and lower ratio equals lower compression. In some cases, we can also have attack and release parameters like on compressors. Attack is the speed at which the compression starts and release it. The speed at which the compression stops. This combination between standards EQN dynamic parameters allows us to use EQ to adapt to the input signal. Here are some common examples of dynamic EQ. Control. The shrill voice of a singer during the chorus while conserving its presence during the quieter versus control, the violin crashes of symbols when the drummer plays hard, but let the symbols intact during the parts played smoother. Reduce the resonance issues of a snare. Reduce the annoying boom that occurs on some acoustic guitar chords. Used the side chain function to improve harmony between the elements of the mix, like vocals and instrumental, or kick and base. We're going to see two examples in my dough. One on one signal and the other with two signals using side chain. For the first one, let's listen to this record. There is a frequency resonance that sounds loud, pretty annoying is at 300 hertz here. If I cut, is going to be a classic static EQ, and this is not what I want because the resonance issue only occurs at some parts and at a different intensity, specially at the transition between the two bars where the frequency sounds way louder. So I'm going to make these barren dynamic. Now I said the dynamic range very low and the threshold, I just set it to minus 20 decibels. So when this little frequency range around 300 hertz crosses minus 20 decibels, VQ cut is triggered. Let's listen before and after. This is way better. And the yellow curve shows us that the compression level changes and that's exactly what we were looking for. Especially between the toolbars, we see that the EQ curve is more extreme. Notice here that the Q factor is important. It allowed us to focus on a specific frequency resonance. This kind of resonance issue is pretty common. But in other cases, we will want to cut or boosts a wider frequency range. And for that, the queue is essential. Now the second example, let's listen to the sound. The, the synth clashes each other with the kick hits. Sorry, here we can use dynamic EQ is side-chain function to make the synth free the space when the kick hits. The idea is that the EQ is triggered by the kick. I'm going to use Pro q3, where it's dynamic EQ side-chain function. I loaded this issue on the synth NIOSH chain that the kick to it. The conflict occurs in this area, in the lows. So I create a button around 110 hertz. Then I click on auto and activate external site chain. Here, the process could be different in another EQ, but the main idea is here. Now I can set the Kolyma and that can be triggered by the Kikwit range parameter. And I also said the threshold, which is when the EQ triggers. Now the mix between the two is good. No marinas, because since freely space to the kicker, the kickstand Zelda better and we have a better definition in the laws. We can proceed the same way to mix an instrumental track with vocal one. Here on the instruments Mersa, I loaded another procured three. I say that this vocal records to it to do. And I created a dynamic button on the EQ to create a pockets. Thanks to a y, the Q factor where the vocals fill-in. To finish this video, here are some great dynamic EQs. Neutron three from isotope surgery, Q2 from sound radix, track spacer from waste factory. F6, dynamic EQ from waves, and anova from TDR, which is free. Everyone has similar settings we saw on this video. So it's easy to understand how each one works.
17. Fixing muddiness: When we mix us, some clarity is crucial and a lot of time we face a common issue, a muddy mix, a Mehdi mixes when there are too many lower means giving the impression that the elements of the mix, mostly the lows, are lacking definition and clarity. And we all want to clear mix with thick and well-defined lows and cleaning precise mids and highs. What causes this phenomenon? Like I just said, the murder typically occurs in the lower means between two hundred and five hundred hertz. Many reasons for that, like recording with microphones in the room with bad acoustic treatment. Better EQ moves like too much boost on lows and lower meets on some instruments are too many instruments playing in the same frequency range. It could be in the lower middle or in the Lowe's in it makes the laws don't have a lot of space to host different instruments. So we must remove unnecessary frequencies from the elements of the mix. Other things can make madness worse. For example, compression. Compression is amazing to glue the tracks together, but it can make a Marry mix sound that even worse, by smashing the low means, the dominant frequencies become even more defined, making it harder to hear the instruments clearly. That's why there are compressors with a side chain filter. So you can select the frequencies you want. The pen naps can also get you in trouble when working with the Merry Mixer. Generally speaking, the low-frequency instruments like base and kicker are mono centered in the mix. So pulling to the left or writer, or using stereo enhancement tools on this kind of signal is a quick way to cause phase issues or masking problems, and that increases the Marines feeling. Distortion can also be problematic. Sometimes It's great for helping instruments cut through the mix by creating harmonics. But in addition to high hand harmonics that helps your track shimmer and shine, low-end harmonics are also created by distortion and these harmonics can quickly build up causing problems in the low meets. How can we know if our mix is muddy? First tried to listen to your mixing in a room with good acoustic treatments, ideally with good monitoring speakers are, or at least monitoring headphones and use a reference track for that chooses song alike similar with your tracker. With a reference strike you can quickly and easily compare your mix with your favorite songs. And then omega naught solo our instruments and analyze them. We can start with drums or, or anything we want. Try to identify if there is too much boom. Boomy is a term that refers to an excessive presence of low frequencies, which is causing a resonance and an exaggerated length on the speakers that are limited with the low frequencies amount they can reproduce accurately. So too much bass presents has a bad impact on the whole spectrum. So bad for the mix. In the drums, the kick is logically responsible for this phenomenon. Other elements can add presence in the lows, like some snares, for example. For other instruments, we're also going to identify if some are too boomy and muddy. Here it will be mostly instruments playing low or medium, like bass, piano pad, or guitar for instance. How to fix a muddy mix? First thing to do upstream is to stay away from too many instruments playing in the same frequency spectrum area, no matter if it's low or high. Frequency conflicts amplify Martinez and lack of clarity. Then we can use low-pass and high-pass filters with an acute to clean the signals. Here we want to filter every unwanted and none unnecessary frequencies on every instruments or group of instruments like birthdays or extractor doing subtractive EQ. It's going to improve the global clarity of the mix. For instance, carrying the low-frequency rumble on the lead vocal or guitar around 80 to a 100 hertz with the high-pass filter, then set the filter slope. In some cases, beware of not using too steep slopes like brickwall because it could sound unnatural, for example, on the guitar, better use a gradual slope. Then if the previous tag doesn't fix Martinez, we're going to use subtractive EQ again on each instruments or group of instruments using these times shelf or bell curves, even notch filters. Here we can make corrective EQ as well in the lows as the lower meets 200 to 500 hertz range for the lower means, the idea is also to attenuates the non-essential frequencies. But generally we will proceed smooth corrections not to remove completely the body of the instrument. Traditionally the elements dominating the bottom of the spectrum like kicking base or are the right targets for lower median attenuation. But we must analyze all the other signals to hear. If you're struggling to identify madness issues, don't forget to use the sweeper boost and cut technique for this test. We can also use dynamic EQ instead of classic static EQ. It you can solve the problem, but a problematic frequency may not be of the time the Mexican sound murray Only a few times. So to find the right balance, dynamic it, you can be a great solution like we already seen with dynamic EQ. We can set a threshold for each band. And this way the EQ only triggers when you want. So identify the programmatic frequencies on the lower, lower-middle, set the threshold and the E2 will activate only when the mix is Maddie. We're gonna look at some example on different instruments to illustrate the two steps we've just seen. First, let's listen to this production voluntarily simple, only five tracks with no effects at all. For now is very rho. First, let's dive into the guitar. The easiest way to face messiness on a guitar is using subtractive e2. So on this record will cut in the API to a 100 hertz range with a high pass filter and a gentle slope or to remove the lows rumble. Ooh, ooh, ooh, ooh. When I isolated, we can hear the rumble even if it's quiet, it's here anyway. So get it away. Now we're gonna cut gently somewhere in the two hundred, five hundred Hertz range, responsible for my DNS, gentle enough to take up the body of the guitar. Here, I'm even going to attenuate the resonance around a 130 hertz because it's a little bit too loud, especially around the last node. Then the kick. A medic IQ is a common issue on a mix, so it's important to know how to fix them with EQ. Kicks can be very different depending on the musical genre. But in general, they are murdered and ramble under 30 to 50 hertz. By filtering these frequencies, we're gonna give the kick more clarity and sometimes even a better focus on the lows. Then we can make a correction in the low MSM on a kick most of the time in the 200 to 350 hertz range. Go on with globin high hazard. Here I just going to use a high-pass filter. When we use a filter like this on an instrument, a technique is to sweep the filter around the spectrum and stopping. We can hear distinctly the impact. We don't want to denature or cubic term of the sound, just remove unnecessary frequencies. So as soon as we went to four, we go back a little bit. I'm going to do the same on vocal or following a similar process to the guitar. So choose to, Let's see, some before and after corrective EQ. It's a clearer, even if the song is still very rho. Then I added some effects on the guitar kick and vocal for the kick and the 2P1 a with low end tricky vocal d'Azur 1176 compressor V2 for Plate Reverb and limiter, and for guitar API 5-6 graphic EQ, RC 20 retro color compressors in series imager and ozone vintage limiter. And this is the result. The difference is sorrow between the mixed with effects and width and without corrective EQ, where do we have a little extra clarity, especially at the bottom of the spectrum. If the marines is still here after corrective ITU and mixing with compression and other effects, we can still correct is tracked by adding another EQ at the end of the effects chain or a render the track to save the CPU and the ads, the EQ. And we can even fix Marines on the whole mix on the master hero, just be careful not to cut too much because the lows and lower mids are still the frequencies that give thickness to the mixer. So better make subtle settings. We can use three methods on the master. Cut, the low remains like we have seen so far. Use dynamic EQ if static EQ is not suitable. And if we still feel the Martinez, we can add an EQ to boost the lows and the highs of the mixer. It can rebalance the mix and attenuates at the mid band. It's used like EQ, p1 and a are perfect for this job and give a bit of analog sound. This method is also conceivable on individual tracker or buses. Now that we know what causes Martinez in the mix, how to identify it and how to remove it. We should have no problem dialing in clear and balanced mixes.
18. Reference tracks: Reference tracks are very important for EQ or anything else during the production and mixing process. They allow to mix faster, easier and better. So we're going to look at what is reference track and why and how to use it. A reference track is simply a professionally mixed song that we compare to our mix. It could be songs, EU law for several reasons, like the mixing and composition and arrangement. The emotions you feel, the clarity in the highest or the fat presence in the low, anything like that. No matter if it's popular songs are not, the important thing is it to have to be music you like, that makes sense to you in that inspire you to create and mix these songs. We're going to AB compare them with mixes we work on to see if our tracks have good frequency balance, either are too much or not enough instruments, if there are too much highs or lack of low end, maybe the effects are two accentuated, et cetera. Having a point of comparison, avoid to mix blindly and Savers from some ear fatigue you, our ears become accustomed to what they hear. If you work on and mixed with a big presence in the Medes and the like in the low end, your ills will get used to this imbalance that will be perceived as normal. And as soon as we listened to a professionally mixed song, we hear again how the balance should be. And at this moment, we can realize that our mics have some problems like lack of base, too much air to match meets, etc. So thanks to the references, we can recalibrate our ears and we will be able to take good mixing decisions. Comparing each aspect of our mixed with a reference track like the low, mid and high bands, drums levels, vocal clarity, reverbs and more will substantially improve the quality of your sound and all of this while saving a lot of time. And if you are a beginner or intermediate, we can also underline that mixing with references mixed by the greatest is an amazing way to develop your mixing skills faster and more efficiently. How to choose your references. We can define a quick checklist to select our reference trucks to songs of the same musical genre as our project. To strikes with similar instrumentation and tone. Like said in the beginning of the video, use songs we love and that we think sound good. Use song that had commercial success and very important, use high-quality audio files. From there, we can build a reference track playlist for mixing. Listening to some of these songs before and during the mixing will re-calibrate your ears. On internet. You can also find lists of reference tracks. And if you have Spotify, you can have access to playlists created by mixing engineers. For example, I found in one of these playlists and the song loyalty from Kendrick Lamar. And the mixing engineer used it as a reference to mix the low ends. So these playlists can be a source of inspiration. How to use a reference truck. Once you selected your reference, you have to import it in your door to quickly switch between this truck and your production. Your mix will probably be quieter than your reference because your mix is not mastered yet. Our human ear tends to think that acquired to sound as weaker bases or less clarity in the highs. So in order to make a fair comparison, we have to level match the two tracks up. After that, we can make the good decisions. Locate where are the different parts of the songs versus hooks, pre-chorus, bridge, etcetera. And then we AB Compare. You can start listening to the chorus, which is generally the loudest and richest part. And we can start to ask ourselves some questions, starting from an overall view and going more and more in detail. Is my mix overall bright and clear. A lot of compression applied on the reference or the vocoder enough detailed. Are the low ends too loud or too weak? Is the stereo image wider? How are used the effects such as reverberant delay on the reference on which instruments, etcetera. For instance, if I noticed that the lead vocal has a lot of air in the reference tracker, but my lead vocal likes it does quality. I can already think about boosting with an issue around ten to 12 kilo hertz. For the AB comparison, several levels are conceivable. We can analyze each instrument or group of instruments, guitar, piano, since drums, etc., and compare their level with our mixer C, which effects are applied on which frequencies are put forward or identify their position on the stereo field. And we can also analyze each frequency band independently. For example, isolate the lows to compare kick and baser. These Bain isolation technique helps a lot to correct the tunnel balance and to correct levels and the elements placed in the mix. We can also use the mid-side n. Let's write features of some EQs to compare even more deeply. With left, right mode, we are able to check the left and right panning of mixer. And inside mode, we can listen to some effects like reverb on the lead vocal. If I noticed that the side stand out more in the href, I can use an EQ to boost the insight mode. It's not necessary to copy identically are a reference. It doesn't matter if you use a different snare or if you're kick sound different. The important point is to get closer at best to the overall tonal balance, the overall E major, the depth, and the width. And don't forget to listen to the two tracks anywhere he can to compare even better mixed and Master's song with your production. It's important to listen in as many environments as possible. Monitoring speakers or headphones, little portable speakers, telephones, earphones, car, etc. We're going to see an example with this mix. In my session, I loaded a href tracker for copyright reasons. I can't play the song, but it is very similar to my truck. To compare in detail the two I can use techniques I just talked about like analyze each instrument's, listened to each band independently, or use mid-side modes. Here I'm going to compare the overall mixes using the EQ match features of procured three to visualize in real time the reference without playing or hearing it. And thanks to the spectral analyzer, we can see which moves we can do with dq. What we see is the lack in the low ends around 40 hertz, and some frequencies are too loud, around 110120 hertz. We also notice a lack in the highest for the high hats and maybe a little bit of lack in the meats. To correct these things we can make moves individually on each instrument. Drugs like increasing the volume of the high hats, boost the very low frequencies of the airway with a NICU. Here, I'm going to make these moves directly with this EQ loaded on my master bus. Now, the mix is more balanced, end detailed, cleaner in the lows, n clearer and more area in the highest of all of these corrections, I could do them thanks to my reference truck. Without it, I might not have noticed that these problems when it comes to mixing, you have to trust your ears. But there are a lot of amazing visual tools to help us improving our mixes using reference tracks. For instance, you have tonal balance control from isotope to compare the frequency balance of your song with a reference. Or using presets based on several genres. There are also three plugins from mastering the mixer, expose, levels, and reference. All these plugins are paying, but there is a free alternative. The spectral analyzer span. Here are the settings you can make to best compare the frequency balance of two tracks. These tools can be very helpful when it comes to mixing our song, particularly for EQN, overall balance. But don't forget to trust your ears. At the end of the day, they are your ultimate tool.
19. How to EQ vocals: Let's see some basics of the frequency ranges for vocals. There is no absolute truth about it because everything can be different with different singers, different mix, different rooms. But there are some basic guidelines we can follow for vocal EQ, and that tends to work most of the time. So from 20 to a 100 hertz high-pass to get unwanted noise and rumble. Nothing is necessary on this area. Sometimes you can even go higher than a 100 hertz. Are always use your ears from one to 200 hertz carrier. If there are bad resonances. If something in the vocal is fighting with the bottom of a guitar or top of the basin. Look in that area and gently cut with an ETU from 180 to 240, cut a vocal sounds muffled. 240 to 600 hertz represents nasa allele frequencies for a lot of people cut gently with white curves if vocal sounds to nasally, like we have seen before in this course, two to 500 hertz are the frequencies responsible for Martinus, even for vocals. So generally speaking, check that area with sweep boost and cut technique to see if there is anything to correct muffled vocal, nasally sound, multivocal, bad resonances, et cetera. From 601.6 kilohertz. Nothing very important to say here. Most of the time, no cut, no boost to make 1.6 to 2.3 kilo hertz is an interesting area. If dual vocal, if lack of presence, boost in this area around 2K is generally a good starting point. The presence or real for vocal can even extend from 1K to forget. Once again, trust your ears. 2.5 to 3.5 is sometimes a tougher ER with annoying digital sound. But be careful here because those unwanted digital sounds may not be overtime. So a good solution is to use a dynamic EQ here between 3.5 and 6K, especially around 5K, trial boost here to open up the top of a vocal Bell or even shelf. Six to eight K are the Sibyl and frequencies like, as or SH. So annoying and aggressive sounds here, better user d'Azur, which is way handler than an EQ. And finally, 8K and above boost here for brightness and the air. So that's one way to see the frequency spectrum for vocals. This is general guideline. In some cases the frequencies may vary a little bit. Sweep around the spectrum and trust your to make this way. You could find things you don't like in the 600 to 1.6 k ranges. Or on the contrary, some thing you want to enhance. And most of the time gentle moves are recommended. 123d bees for instance. And don't forget to mix in context. It's good to listen to the vocal in solo for fixing it, but it's better to mix in contexts for enhancing it. Here's a vocal and a bit like you remember when we had to put in work for the dream and I was like a name as hacky lads in a booth having airpower dreams. We never would have made it if we let them kill a dream. I was in a book, anything in nature for enemy. Many things can be done on this vocal to make it sound better, like directv Jew. And it also lacks clarity and presence to better through the mixin. So first I'm going to use for corrective, fixing EQ or any other parameter p q would be good to. First start with the high-pass filter to clean the vocal from rumble and noise. Land that is Tunguska, You know, and I'm working stack and not a sphere because, you know, and but the green relative to the streets with my TDB team readiness time-like he has to he had to put a work for the dream. And I was sitting here like a name as hockey. Here around a 110 is good for this particular signal. Then let's check some unwanted resonances from two to 600 land at its Tunguska, you know, a number King stack another state because, you know, I'm but a green relative to the streets with my TDB thing. Remember when we had to put in work for the dream here around 200 sounds pretty bad. And he's going to fight with the base. So carried gently. Land that is Tunguska, you know, a number King, stack another paper cuz you know, and, but the green relative to the street. So my TDB team for their work for the dream and I was also here at 400 sounds a bit muddy and honky land that is Tanga, You know, and I'm working stack and not a sphere because, you know, and, but the green relative to the streets with my TDB team. We have also seen that the range between 2.53.5 kilohertz can sometimes be a problem. So let's check that Lana. Here I can hear these bad resonance so we can cut that gently. Land at its time to say, you know, and I'm working stack, you're not as fit because you know and but the green for this fixing step of e2. Some engineers also inspect all of the spectrum to locate the unwanted frequencies, always using the sweep boosting technique. Here I check to only a few ranges of frequencies, but it's also conceivable to check everywhere and cause when you hear something you don't like. Now that the fixing step is done for the creative part, I'm going to use an analog EQ and I chose unnecessary type. Pick the one you want. I could even stay on procure three, but I like the SSL for vocal. So let's do this. That is telling us that, you know, and I'm working stack another tip because you know about the green to the streets for my Cbb, running this thing like kissed her Kate. I feel like this vocal likes presence. Soil is loose somewhere around 2K. The technique I like to use to know where to boost is pushing the DB's up and search with the frequency knob. And once I get it, I adjusted the amount of boost. But the green to the streets for my Cdb running this timelike keys Turkey. Remember when we had to put up work but a dream land at its templates, but you know, a number King, second out-of-state because you wanted to the streets with cosine bt. It still needs to be opened up a little bit so we can try for 26K. Planet is telling us that, you know a number kings stack another state because you know about the green to the streets to run in this timelike keys, Turkey. Remember when we had to put in work for the dream and I was thinking like a name is hace labs in a booth having airpower dreams. We never would have made it if we let them kill libraries. I was in a booth, anything in nature? In modern music, vocals in any genre tends to be airy and brighter. So here I'm going to make a boost with the shelf or eight K is a good starting points. That is telling us that, you know, and I'm working stack another state because you know about the green will lead to the streets with my CBT run in this timelike keys hurricane, Remember when we had to put work but a dream and I was like a name Apache. Let's hear before and after the cues that you know. And I'm working second oddity because you know about the green to the streets for cosine bt run in this timelike keys hurricane. Remember when we had to put work but a dream and I was like a name Apache labs in a booth have an IP address. We never would have made it if we let him kilograms. I was in a booth editing in a true friend. I mean, what I say and I say, what do you know me a minute to come in like Padgett. And of course, the vocal mixing is not done entirely here because the dynamics still have to be controlled. The siblings have to be attenuated and other effects have to be added like reverb and delay, maybe a doubler, maybe Saturation and more. But he's better and clearer. And the moves we made will help these vocal could better through the mix. You know, a number Keynes stack another state because you know about the Green Street. So my Cdb running this dying like you remember when we had to put a work but a dream. And I was like a name as Hakeem lands and above haven't near Padres. We never would have made it if we let them kill libraries. I was in a booth that is begin nature free. And I mean, when I say and I say what I do in a minute or two, I'll come in like budgets. Today. Rappers like searching for food. Based on this data, you know how I do this, draw on this track and my name is Guy do
 Ugo Galamba, Music Producer and Audio Engineer