Transcripts
1. Presentation of the course: In the audio world, there are
misunderstood, mysterious, but yet being one of the
most important tools ever made, the compressors. Understanding compression
is fundamental to create high quality
and professional mixes. In this course, I'm
going to teach you everything you need to
know about compressors. We will see gradually, step by step, the concepts, controls, and techniques of compression through easy
to understand videos. We'll start with the basics, with the essential
concept of dynamic range. Then we'll navigate through
the different controls and more advanced concepts to
see how compressors work, what they do on the audio, and how to set them up properly. Finally, we'll dive into a
series of techniques used by the greatest mixing
engineers like compression in series or
parallel compression. At the end of the course,
you'll be able to run through any
compressor comfortably. To choose the right
type of compressor and set them up to get the exact
sound you're looking for. Follow along carefully. Take your time on each lesson. Practice a lot, and in no time you'll be able to use
compression like a pro.
2. Dynamics: Before we define
what is compression, we need to define the very
important term, dynamics. Dynamics is the
difference between loud parts and the soft
parts of an audio signal. For instance, take a song with the soft verse and
a loud chorus. We can say that this
song has dynamics. The difference between
the soft part, the verse, and the loud part, the
chorus is dynamics. This is what is dynamics from the perspective
of a whole song. But for compression, which is
the purpose of this course, the dynamics will focus
on is the difference between the peaks and
deeps of a signal. For instance, a bass, a synth, or a vocal. This is dynamics, also
called dynamic range, which is the difference
between the loud and the soft parts
of an audio source. From this observation,
we'll have high dynamic range signals with very loud and
very soft parts. Like a guitar recording, where the player
alternates between soft and strong
strings pluck ins. We have low dynamic range
signals where there's not much volume difference between the peaks and the dips. So before we dive into
what is compression, we need to understand and keep in mind what is dynamic range, which is a very important term.
3. Why compress?: Now that we know what is
dynamics and dynamic range, we can define what
is a compressor. A compressor is a sound
processing tool that allows us to manipulate the dynamic
range of an audio signal. Its main goal is to
control the dynamics, more particularly reduce
the dynamic range. The reasons to use a
compressor are multiple, like even out the
volume of a track. We can give more presence to
the soft parts, the dips, while ensuring that
allowed parts, the peaks, don't
stick out too much. All of this will bring
out more details. And finally, the compression allows to make
uniform the signal. Let's see in action
some examples of the benefits of
compression on a signal. We're going to start
with a vocal, let's go, I'm saying it, time
avoiding lease. Oh, please be behind on
the non compressed track. As some words are particularly loud that stick out more
and take over the rest, and there are softer parts
in the context of a mix. The signal like that will be problematic because some words will be drowned and the loud parts risk jumping out too much. We're going to listen again and switch on the same
signal with compression. Let's go. I'm saying
time, I'll wait. We can leave this
whole place behind. Yeah, let's go. I'm seeing time avoiding. We lease, oh, please be behind
on the compressed truck. The soft parts of
before are now at the same level as the
words that were too loud. Visually we can see that the dynamic range
is more controlled. The dips are raised
and the peaks lowered, so we have more detail. The truck is evened out and it will fit
better in the mix. Other example, before and after compression on drums.
Here a drum bus. Notice how the hats and
snares stand out more on the compressed truck and how the kick seems more powerful. We have the sensation of a
more homogeneous result punch. All the elements are
well glued together. Finally, an example
on a whole mix, the compression adds
fullness to the mix. The base is more present, the drums have more impact, and some details are brought out like On the high has
and the melodic part. The compression allowed us to
glue the elements together, making the mix more cohesive. This is why we use compression to control the dynamic range, to even out the volume for the loud and soft parts
to be at the same level, to help the elements
fit in the mix. To help the elements
glue together for buses and mix
buses, for example, to make things bigger, thicker, puncture like for drums, and to bring out detail and
expression like on a vocal.
4. Threshold and Ratio: We're going to see now
how compressors work. Seeing one by one, the
different parameters, We're going to start
with threshold. When we want to use a
compressor on an audio signal, the first thing we could do is setting when we
want to compress. We will do that by
setting up the threshold. Threshold is the setting, telling the compressor when to start compressing the signal. When we talk about
sound level in music, we speak in decibels. So the threshold is
set in decibels. When the input signal is
louder than the threshold, the compressor starts working. For instance, let's
look at the signal and let's say that we set the
threshold at this level. When the signal crosses
over the threshold, when it's louder in decibels, the compressor starts working. In this example, the area of the signal here in the
frame will be compressed. When the signal or part of the signal is below
the threshold, the compressor doesn't work. This part here won't
be compressed. Threshold is the first parameter to remember to simplify this, Simply remember that
threshold is the control telling the compressor
when to start working. Now that we know how to tell
the compressor when to work, thanks to the threshold, we need to tell it
how hard to work. There comes the second
parameter ratio. The ratio tells the compressor how much compression to
apply to the signal. It's set like one to 12
to 13 to one, et cetera. But what does that mean exactly? Generally speaking, a ratio is the relation
between two things. For a compressor is
the relation between the number of decibels of signal crossing
over the threshold, and the number of decibels
that the compressor outputs. So we have a signal coming in the compressor with a number of decibels above the threshold. At that time, the
compressor starts working, and once the
compression is done, the signal gets out of the compressor with a
lower number of decibels. For instance, with the ratio
of 21 every 2 decibels going over the threshold will give 1 decibel at the output. Let's look at this on a graph for better understanding here. The white bar is
the input signal, the green one is
the output signal processed by the compressor. Here what we're
going to visualize is how hard the
compressor works. Here we can see that the
input reach is -14 decibels, and let's say that we set the
threshold at -18 decibels. Now our signal is four
DBs above the threshold. If we set the ratio
on want to one, there is no compression because the input is equal
to the output. If we translate the ratio
one to one with words, we will say that
for every decibel that the signal goes
over the threshold, the compressor will
output 1 decibel. So one to one equals
no compression. If we set the ratio at 21, for every two decibles that the signal goes
over the threshold, the compressor will
output one decibal. Here we are four decibls
above the threshold. At the output, we will have two decibls less
so -16 decibals. If we set the ratio at 41, every 4 decibels going over the threshold will give
1 decibel at the output. In this example, we will have
-17 decibls at the output. Starting from this concept, the more the ratio is high, the more the dynamic
range will be low. Look at these signals,
it's the same loop, but the first one is
not compressed and the others are compressed
with double ratio. Each time we see that the
level difference between the peaks and deep decreases every time we have
a higher ratio. On the tur, one ratio. The signal still
has a little bit of dynamic range because it's
a quite conservative ratio. But the more we compress, the more the signal becomes flat with the level
that evens out. Let's listen one by one to see how the ratio affects the sound. To better realize
the difference, I'm going to play the first
uncompressed and the last. With the higher ratio, we perceive the volume variation because the level is even out. The peaks we have on the
first track are not as loud. And we have more present from
the areas initially soft, so that makes the sound more detailed, flatter, and smoother. To summarize what we have seen, the threshold tells the
compressor when to compress, and the ratio tells how
much compression to apply, Threshold equals when, and
ratio equals how much.
5. Attack and Release: Now that we know what
our threshold and ratio, we can go on with two other
important parameters. Attack, release, attack,
and release are settings we see very often in
music production because they are
in many plug ins. For instance, synthesizers
with the ADSR, sound envelope attack, decay, sustain release for the
sound envelope attack is the time it takes to
the sound to reach its maximum level after
the beginning of the note. I mean after pressing the key, release is the time it takes
to the sound to get back to the initial zero after
the end of the note. When releasing the key for compressors, we need to have a
similar approach because attack is the setting
controlling the speed at which the compressor reaches
the maximum level of compression after the signal
crosses over the threshold. If we set a fast attack
like zero millisecond, that means that the
maximum compression is applied immediately once
the threshold is crossed. On the contrary with
the slow attack, for instance 500 milliseconds, the full compression will
take more time to be applied. Once the threshold is crossed, the maximum level of
compression will be reached in 500 milliseconds. Compression will be
gradual, not immediate. Let's look again the example of the previous video with
the following ratio. We had three degrees
of gain reduction. If we set the attack
at zero milliseconds, that means that the three
degrees of reduction are reached immediately when
the threshold is crossed. And if we set 500 milliseconds, the three degrees of
reduction will be reached in 500 milliseconds. Let's illustrate this with this signal and the
threshold at this level. We have seen that the parts
crossing over the threshold here in green will be
compressed, not the rest. With a very fast attack, the compressed parts
will act like this. The signal is
compressed immediately when it crosses
over the threshold. We can see it because the
green color representing the maximum level of compression is here at the very
start of the signal. But with the slow attack, we will have
something like this. We see that the green
appears gradually. Compression took a little bit more time to reach its maximum. What we need to remember
is that setting a slower attack time means that the maximum level of compression will be reached gradually. And the faster attack
time means that the maximum level of
compression will be reached much more rapidly.
Look at these signals. The first one is not compressed, the second one is
compressed with a very fast attack immediately. At the very beginning
of the wave form, we see that the sound
is compressed because the amplitude is
reduced right away. The third one is compressed
with a slow attack. We clearly see the
gradual compression. At the beginning, the peaks
are preserved and then the amplitude
decreases comparing with the uncompressed signal. Here we are preserving the initial attack
sound of the kick, and we are compressing
the decay phase. A good way to
approach the use of attack is to think
about transients. Transients are the peaks, so they are high amplitude sound with the show duration
in the signal. A transient is very frequently
the attack of the sound. Very good examples are
drums elements like initial amplitude peaks
of a snare or a kick. On synth, we can
mention plugs which also have this high
amplitude attack Sound. A simple way to summarize attack is if we want to
preserve the transients, we will choose a slow attack. In this case, the sound
will tend to be punchure. For instance, with a
kick most of the time, it's better to preserve
the attack sound. If we want to cut
the transients, we will choose a fast attack. In this case, the sound will be smoother than with
a slow attack. Before we go on with release, let's specify that saying a fast or slow
attack is relative, because the values are
set in milliseconds. Release is the
parameter that controls the speed at which
the compressor stops compressing the signal after it has gone back
below the threshold. Once we go back
below the threshold, the compressor stops working. But with the release,
we can control how fast the compressor
completely stops compressing, how fast we go back
to level zero of compression with
the fast release. Once we are below the threshold, the compressor stops
working immediately or very quickly with
the slow release. Even if the signal has gone
back below the threshold, the compressor still
works a little bit. Compression stops gradually. Let's see again the
signal of before, with the green representing the maximum level
of compression, and the white, the level
zero of compression. With a fast attack
and fast release, we would get
something like this. Compression starts
immediately when the signal crosses
over the threshold, that's why it's green
at the very beginning. And compression
stops immediately when it goes back below. That's why it's
white right away. But if we set the slow release, we see that even when the signal goes under the threshold, compression still
works a little bit. It's releasing gradually,
that's why we go to white. Gradually, the values of release time are set in a much wider range than attack time, because it can be set in
milliseconds and seconds. Let's see an example.
Here we have compressed drums with fast and slow
release. Let's listen, with the fast release, we have a puncher and thicker result, where each element seems to
last a little bit longer. And with the slow release, the sound sags more
after the transients is because compression continues to be applied a little bit, even if the signal goes below the threshold.
Let's listen again. The release time change really affects the direction
of the sound. There is not a better
result than the other. It all depends on
the sound we're looking for and the
mix we're working on. Release is a very
important setting to get the right sound and the
right feeling we want. It's important as well as
for individual tracks, as for buses and mixed buses, it's better to set the release
while we are listening to the audio with our ears to
see how the audio reacts, and set the right settings to get the sound we
are looking for. Release is crucial to set the direction in which
the sound is going, But there is no rules here. It's a personal choice
on the results that we judge to be the best.
Trust your ears. But that's true. The release
time is motivated by the tempo of the song and the speed at which
the notes are played. So we need to focus on these two factors
to set the release. For instance, a song with a
low tempo will probably need a slower release than a song with a high tempo
and fast notes.
6. Gain reduction and makeup gain: What we will see in
many compressors, graphically or with the
meter, is gain reduction. Gain reduction is the
number of decibels that the signal loses
because of the compression. It shows us how much compression is applied to the signal. It's a visualization of the parameters we set,
threshold and ratio. Let's look back at
what we've seen before with the tone ratio. The difference
between the input and the output is 2 decibels. A compressor would show us 2
decibels of gain reduction. With the 41 ratio. We had 3 decibels
less at the output. The compressor would show us 3 decibels lost because
of compression. This indicator is very useful because it
helps us visualize how much compression
is applied and help us set correctly
threshold and ratio. With the threshold we set when the compression starts,
when is the case? Thanks to the gain reduction, we can visualize that on a
graph, we see some shapes, show us that compression
is starting on the mirror, we see the needle moving. The gain reduction is very useful to adjust the threshold. With the ratio we set how
much compression is applied. The higher is the ratio, the higher is the
gain reduction. The gain reduction
indicator is also helpful to adjust
correctly the ratio. For instance, if we see that we have too
much compression, it will be wise to set a
higher threshold and or set a lower ratio to get
a less extreme result in close relation with
the gain reduction. There is the makeup
gain that can have several names like output gain
or simply output or gain. This is an output setting
used to turn up the level of the signal to compensate the lost decibels due
to the compression. With our previous example
and the 41 ratio, we had three decibals of gain reduction between
the input and the output. The signal lost three
decibals due to the compression
making it less loud. These gain losses
absolutely have to be compensated
because it's essential to preserve the
same level between the input and the output
of the compressor. In our example where
we lost three decibls, we need to compensate by three decibals with the
makeup gain setting. Here we have three tracks. The first one is uncompressed
banana, no banana, no. The second one is compressed, but no makeup gain is
applied, banana no. The result is the signal is much quieter to compensate that an output gain is applied
to the third tracker to level match the compressed
and uncompressed signal. Banana, no, banana, no, no, no. A second important reason
to use make up gain is to make easier the before
and after comparison, and to better realize the
action of the compressor. If after the compression, the volume is quieter, the comparison is
less easy to do. But at same level, comparing the compressed and uncompressed signal is more comfortable. We will better
realize the effect the compressor has
on the signal. It's very important to see if the compressor had
the expected effect, if we took the right decisions and if we made the sound better.
7. Examples in action: To conclude these parts, in
what we have learned so far, we're going to see
in action through some simple examples
in which situations we can use compression
and how to use it thanks to the controls
we have seen together. We're going to apply
the theory with some mixing
situations we can all meet first example
with drums in this mix that sounds pretty good overall, but these drums may lack
a little bit of punch and impact for that loading and compressor on the drum
bus will help us. I'm going to let the tour
one ratio for now and start adjusting the threshold to see when the
compression starts. Thanks to the gain reduction for now. The compression
is extreme when here we are on drums and we
see that the attack is fast. Right now we are crushing the attack of
the kick and snare. Typically here I'm going to
set a slow attack to preserve the transience of the drums
because we want them punchy. Let's set that by ear and
stop when it sounds good. Same thing for the release. Now here, a fast release seems better to preserve the sustain
of the drums. For the ratio I, let's turn one. Because it's a quite
preservative ratio. I want to crush the signal, so stay away from a high
ratio, like ten to one. Now it's time to compensate the decibels we lost
with compression. With the makeup
gain, we have to get the same volume between
before and after compression. Now let's listen to before and after alone. And in context. Second example, with the guitar with no compression,
we hear that we have some soft parts a little
bit drowned in the mix, and on the contrary,
louder parts jumping out a little
bit too much. We also notice a
little lack of detail. So we need to
control the dynamic with compression. Now the dynamic is reduced, making the volume
of the soft parts closer than the peaks. Now the track sits better in the mix and is more detailed. Third example, with
a scenes base. Right now with no compression, there's no major problem that sounds pretty
good like this, but it lacks a little bit
of fullness and character. To end to end to end to end to end to end to end to end to end to end to end with compression, we
have more fullness especially around the mid
frequencies and we have more texture and details and there's also a nice color
brought by this compressor. Finally, an example with
vocals on this mix, a little get a little closer. For now it's row on the
vocals because there's no processing with reverb
delay, EQ and more. But we already noticed
that some words are too loud and others buried. So we need to
control the dynamic to keep a constant level, to make the vocal sit
better in the mix, the night begins to fall on us, get a little colder, tonight begins to fall on us, get a little colder, tonight begins to fall
on us, get a little, tonight begins to fall on us, get a little cold, get a little closer, get a little closer. After compression, the track is more intelligible, even doubt, thanks to a controlled dynamics that allows us to
hear every details of the vocal and make it see better with all the
instruments of the song. Little closer. Here are some
examples in action. Applying the basic
controls of compression. You need to take
your time to apply these concepts on your
mixes and productions. Training is essential to
get solid foundations. And then we can go
on with the rest of this course where we will
see more advanced concepts.
8. The types of compressors: In this video,
we're going to talk about the types of compressors. There are tons of
different compressors. To choose each one
classified in a type. Knowing these types,
their character, and specific aspects will
really help you to understand how these different types react to different
audio sources. And also help you to choose the right compressor depending
on the instrument style, the musical genre, or the
effect you're looking for. Maybe you have already
seen the words Opto Fet or VCA on compressors. These words refer to
the type of compressor. The most common types are optical Opto RMU or tube
compressor, Ft, and VCA. We're going to start with
the MU or tube compressor. The tube compressors are part of the original
compressors, so they are among the first
compressors ever made. We call them tube
compressors because they use multiple tubes to control the gain reduction
in the circuit. There's a series of tube controlling the volume
inside the compressor. These compressors are not
known for drastic compression, but they are known
for their very fluid and musical compression thanks to their composition. Their sound is
naturally warm, silky, and fat, with nice bottom
end and smooth top end. They also have a naturally
slow attack time. In general, we can
control the attack speed, but even set at the fastest, the attack stays
relatively slow. The most famous tube
compressor is without a doubt, the Fairchild 670
made in the '50s. And other tube models have been created after by
other manufacturer, like many for plug in. Several companies have
one on the market like the Waves Quick Child 670 and the Fair Child 670
from Universal Audio. Both of them reproducing
the original Fairchild. And we can also
size Slate Digital with the very nice FGMU like we just listened,
the compressor color the sound in a warm and
fat way. With smooth. Yes, when we see very we need to remember this character
as in the example. They are great to compress a mixed a vocals and many
kinds of instruments. The optical compressor is
one of the most popular. We call it optical
compressor because it uses a bulb and photoelectric cell to determine the
amount of compression. The signal comes into the compressor and
lights up the bulb at different intensity depending on the power of the signal. A loud signal turns the bulb brighter and a
quiet one less bright. The cell detects these
intensity variations and use these informations to determine the
amount of compression. The compression will
be stronger with a warmer signal and vice versa due to the internal
circuit and what happens in it with the
signal Latin of the bulb. Then the cell detecting the
difference of intensity. If the attack and release
times are slower, this type of compressor
is less suitable for signals with a lot of
transients like drums, but ideal for vocals, synthesizers, basses, or string
instruments for example. They are known for
their unique fat and smooth character and their
musical and transparent sound. The most iconic Optocompressor is the Teletronics L two A, with its very simple
structure like we've already seen and designed
with a fixed attack time of ten milliseconds
and a release time of 60 milliseconds for
50% of the release, and 1-15 seconds until
the signals return to 100% The L three A is also interesting because it
has a similar organization, but its total
character is different and it has different
attack and release times. So that makes it
ideal for drums, for example, to finish
the tube textile one B, which is unique for
an optical compressor because it has
controls for attack, release, and ratio uncommon
for this type of compressor. And this compressor
is particularly appreciated on vocals. If I woke up without, I don't know what I would do. Thought I could be single
forever till I met you. If I woke up without, I don't know what I would do. Thought I could be single
forever till I met you. If I woke up without, I don't know what I would do. Thought I could be single
forever till I met you. If I woke up without, I don't know what I would do. Thought I could be single
forever till I met you. If I woke up without, I don't know what I would do. Thought I could be single
forever till I met you. If I woke up without, I don't know what I would do. Thought I could be single
forever till I met you. As demonstrated in the example, the opto compression gives a smooth warm and fat character with slow attack
and release times. We need to remember
these characteristics when we see optical compressor. The third type is fat compressor for field effect transistor. The field effect transistor
is the electronic component located in the
compression circuit of this type of compressor. Don't need to know the technical details of this component, but basically the
fat compressors are designed to emulate
the sound of a bulb. But instead of using
real bulb as a detector, they use a fat component. They are known to have
very fast attack and release times with a puncture
and more aggressive sound. Making them very efficient
for signals with a lot of transient information
like drums and perfect. Every time we need to make
something cut through the mix as they have
controls for input, output, attack, and release, we can use them on a wide
range of instruments, and one of their great Sony
characteristic is that these compressors
color the sound which is often sought after
for some musical genre. And this color is also what makes this type of
compressor interesting. The iconic compressor of this category is the
Universal Audio in 11 76. And many companies
have their plug in version of this compressor, like Universal Audio
themselves, Waves, Arteria, Ic Multimedia,
or Slate Digital. We're going to see an example of what can do a Fed compressor on a signal compared to the other types we
have seen so far. Let's go. I'm saying let's go. I'm saying it t, let's go. I'm saying let's go. I'm saying let's. So what we need to
remember when we see fat compressor is
aggressive and punchy. But this won't be the
best option if you're looking for a subtle
amount of compression. The last major type
of compressor is VCA. Vca stands for a voltage
controlled amplifier, which is the amplifier located in the compression circuit. This circuit allows us in
general to control everything, threshold ratio, attack
release, and make up gain. These compressors
provide a clean, smooth and neutral compression. By that I mean the less
colored compression, the sound will have less warmth or less harmonic distortion. Compared to the other
types of compressors, the sound is more transparent. This compressor is very versatile and great on
almost any kind of signals, drums, vocals, bases, et cetera. This type is very appreciated
for its ability to link the elements of a mix
when used on the mix bus, or link the elements together
when used on the bus. This is what we call
the glue effect, the SSL G bus compressor from both waves and UID
does it wonderfully. The DBS 160 is another
famous VCA compressor, known for its unique
sonic character. The API compressors
are also great, like the API 2,500
and many more. When the other compressors
tend to color the sound, the VCA has a more transparent
sound and it's the best suited for this mix in
order to glue the mix. Now that we know better the different types of compressors, we can start to anticipate how one or the other
will sound and why choose one instead of
another depending on the situation and the
effect we are looking for.
9. Compressors with fixed controls: So far we have seen how compressors work with
their different controls, threshold ratio,
attack, release. But maybe you've
already seen that some compressors don't
have all these controls, some don't have threshold
or no attack, no release. In reality, each compressor, depending on the
type of compressor that we will see
in a future video, has a particular circuit. And some circuits work
with fixed controls. That means some controls can't
be adjusted like we want. A good example is the L
76 compressor from waves. While the threshold is absent. That doesn't mean the
threshold doesn't exist, that means it's fixed
presets to ascertain value. That's why we see
the input control on this type of compressor, because to reach and
cross over the threshold, we just need to increase
the input level. At a certain point, the signal will cross over the fixed threshold and the
compression will start. We will see the gain
reduction moving, and then we can adjust
the output gain with the output knob. So that's what we need to do when the threshold is absent, so when the threshold is fixed, use the input control to set when the signal crosses
over the threshold. Light compressors are also
very popular in the industry, and they have a very
simple structure with the peak reduction
knob and gain knob. No ratio, no attack, no release, no threshold. It's another good example of fixed controls on
these compressors. The average ratio is
set at three to one, while the average attack
time is ten millisecond, and the release time is
about 60 milliseconds for 50% of the release and
1-15 seconds for the rest. On these compressors
simply set when the compression starts with
the peak reduction control, listen to how the audio reacts and adjust the output gain with the gain knob A Zang. Go Zanzi to go Zang Danz. How do you go Zanzi? Did you go a Zanzi? Did go me Zang, go a Zanzi go A Zang.
10. Automatic controls: Let's look at another
type of control we see in some compressors,
automatic controls. Here I'm talking
about compressors with program dependent controls. Program dependence means
that the controls and the end results are determined depending
on the audio source. If we take a compressor with
program dependent controls, it won't react the same
way with the signal, with a lot of transients. Then with a flat signal, the controls like attack
ratio and release will vary in real time depending on the variations of
the input signal. The program dependent
controls can be missing on the compressor
interface, for instance, in the case of the
Teletronics L two A, the release is program dependent because depending on
the audio source, it adjusts automatically
1-15 seconds. But on some other compressors, we have the ability to put on automatic mode some
controls, in particular, each time we see auto, it's actually a program
dependent controls that analyzes the signal and adjust automatically
in real time. A common example
is auto release. Auto release is
very interesting to make a more transparent
compression on signals containing both
short duration peaks and long sustained sounds. The release adjust
automatically on faster time on transients and slower time
on the long sustained part, and that tends to make
the sound more natural. For this reason, auto release is a very good choice when
applied on full mix. Let's listen to this mix
and switch between slow, fast, and auto release. Auto release doesn't sound either like the
slow or the faster, but it's like a
combination of the two. On the peaks, like
kick and snare, the compressor seems to
adjust a faster release time, whereas in the interval
between these peaks, the release seems to be
said at a slower time. I think that makes the
sound more natural. This is why we use auto release for its ability to
make the compressor react differently
to the variations of the signal Like we have seen. It's particularly useful on the full mix in order to
get a more natural sound. To summarize, when we
see missing controls, that doesn't mean
they don't exist. That means that they
are either fixed, like on the previous
video with for instance the fixed
threshold on the eleve 76 or program dependent
like the LA two a release. If we see auto, that
means that we can switch the control on
program dependent mode. In some cases that
will allow us to get amazing results with snow worrying about setting the
controls on the compressor. It's important to understand how these fixed and
automatic controls work.
11. Sidechain compression: Maybe you have already
heard the word Y chain or y chain compression. It's a popular compression
technique often used in electronic music or
hip hop, for instance. It's what gives this
kind of effects, Like we here, each
time the kick hits the pad volume is lowered
to give space for the kick, giving that pump in effect. Here the kick is triggering
the pad compression. That is what we call
y chain compression. Y chain is a way to control
the compressor with a different signal
than the signal on which the
compression is applied. We need three elements
for chain compression. First, the main signal. For example, an 88 is the signal on which the
compression is applied. Secondly, we need a compressor
with the Y chain function. Finally, we need
the Y chain signal controlling the compressor. It's this one that will trigger the compressor and tell
it when to compress. We can take, for
example, a kick. The main signal is the one that will be affected
by the compressor. As soon as the y chain signal
crosses over the threshold, we define the compression of
the main signal will start. It's the crossing
of the threshold by the Y chain signal that triggers the compression
of the main signal. Let's see that in action, depending on the
dog you're using, the set up of a sight chain
compression may be different. Find out how to do it. It could vary if you're
on Ableton Pro Tools, Logic, FL Studio, et cetera. For this example, I'm going
to take a kick and weight, which is a common situation
to mix eight and kick in hip hop like that. Kick and base are
fighting a little bit. We lack a bit of
clarity and the kick is slightly drowned.
We are losing punch. A solution to fix
that could be trying all the combinations of kick and eight that fit
better together. But here we're going to
use Y chain compression to lower the volume of the base when the kick hits in order to get a better
mix between the two. The eight is our main signal, and the kick is they
chain signal on the base. I loaded this compressor
that has a Y chain function. An NFL studio to set up
the Y chain circuit, I previously selected the
kick track in the mixer, then right click here
at the bottom of the way track and select
chain to the track. Then in the plug in window, I go to Settings Processing tab, and next to Serial Si chain, I right click and select
my chain, signal the kick. But as I said, it will be
different in other dough. Learn how to do it
with what you use. Now we can set the
compressor like we know, threshold equals when. If I set -20 decibels, compression starts
when the kick crosses -20 decibels ratio
equals how much? Let's listen how the
compression increases and decreases when we
play with the ratio. When we increase
it, we get more of the side chain
effect because we're compressing more each
time the kick hits. Now I can adjust to the
output gain to compensate. We get a better mix
between the two with the kick that
brings out better and we have more clarity because
there is less conflict in the low frequencies when
the two elements hit. That gives more punch
for attack and release. We also need to have
the same usual approach when triggered by the kick. We're going to set
the compressor reaction time with attacker and the time to get back to level zero of compression
with the release. So we can give very different effects with the
attack and release. And we're going to look at
this on the next example. Let's get back to
what we have seen at the beginning of the video
with the kick and the pad, and see the influence
of attack and release. Let's start with
the ratio first. We get more of that pumping
effect with a higher ratio. By adjusting the release, we change the feeling
of the chain effect. It's because the
compressor is releasing at different rates every time the kick folds back
below the thresholder. It's interesting to
see how we can control the compressor with the release in order to get
the sound we want. If we rather prefer the
volume of the pad to recover rapidly or gradually and we can also play
with the attack, we can get interesting
and unique results when we play with
attack and release. This is what is Ye
chain compression? Ducking is another
word you can meet that designates Ye chain
compression as well. It's a very popular technique in electronic music
where we use the kick as a Ye chain signal to compress
other tracks in hip hop. It's commonly used, like we
have seen to mix kick and B. But we are not forced to use only a kick as a
eye chain signal. We can use this technique
with snare or anything else. Experiment by yourself and
let your creativity run free.
12. Compressors with High Pass filter: Some compressors have a feature that could be very useful. The high pass filter. It's a particular
case of Sy chain, because the high pass
filter allows us to filter out the low frequencies of the signal controlling
the compressor. Using the high pass
filter allows to exclude the low frequencies from the
compression circuit that prevents the compressor
from overreacting to the low information like
kick or base, for example. This is the spectrum
of a mixed bus. As we can see, the
loudest parts are in the lows below 250 hertz. If we decide to put
a compressor on this mixed bus, that
could be a problem. Remember that the compression
start as soon as the volume of the signal crosses
over the threshold here. To start compressing
the meds and the highs, we need to set the
threshold very low. At that point, the
low frequencies will already be
compressed a lot, and that can make the sound unnatural in constant
and heterogeneous. If we turn on the
high pass filter, the Lows will be excluded
from the compression circuit, and now we can adjust more
precisely the threshold and have more control over
the Meads and the highs, for example, on this mix. When we look at this Q to visualize the frequency
distribution, we see that the lows are
louder than the rest. Now, I apply compression on the full mix in order to
glue the mix. Let's listen. As we can see, I adjusted the usual controls,
attack release, threshold ratio, and compensated
with the makeup gain, and we get a pretty aggressive
amount of compression. Now let's listen again
focusing on the lows. And we're going to see
that when the kick hits, we notice like a pumping
effect on the track, as if the kick were
ducking a bit. The other sounds during
a short lapse of time, every time the kick hits there
is like a pumping effect. We can feel on the whole track. That could be the
result we want. But if we want a
more natural sound, we can use the high pass filter, thanks to which we
can filter out to the low frequencies from the detection circuit
of the compressor. Here, let's set, for
instance, 100 hertz. Now, the lows won't dominate
the compressor anymore. We will have more control over the quiet frequencies like
the Meads and the highs, and we will have a more natural
sound after we are just, again the controls a little bit. The high pass filter
is often used on the bus of instruments,
or on the mixed bus, or on signals containing
loud low frequencies, where we don't want
these low frequencies to pump the compressor. Every time we hear
that the compressor pumps because of
a kick or a base, we can use the compressor with a high pass button in order to filter out
these frequencies, form the detection circuit and
have a more natural sound. Don't forget that the
high pass filter is applied on the detection
circuit of the compressor, not on the output signal.
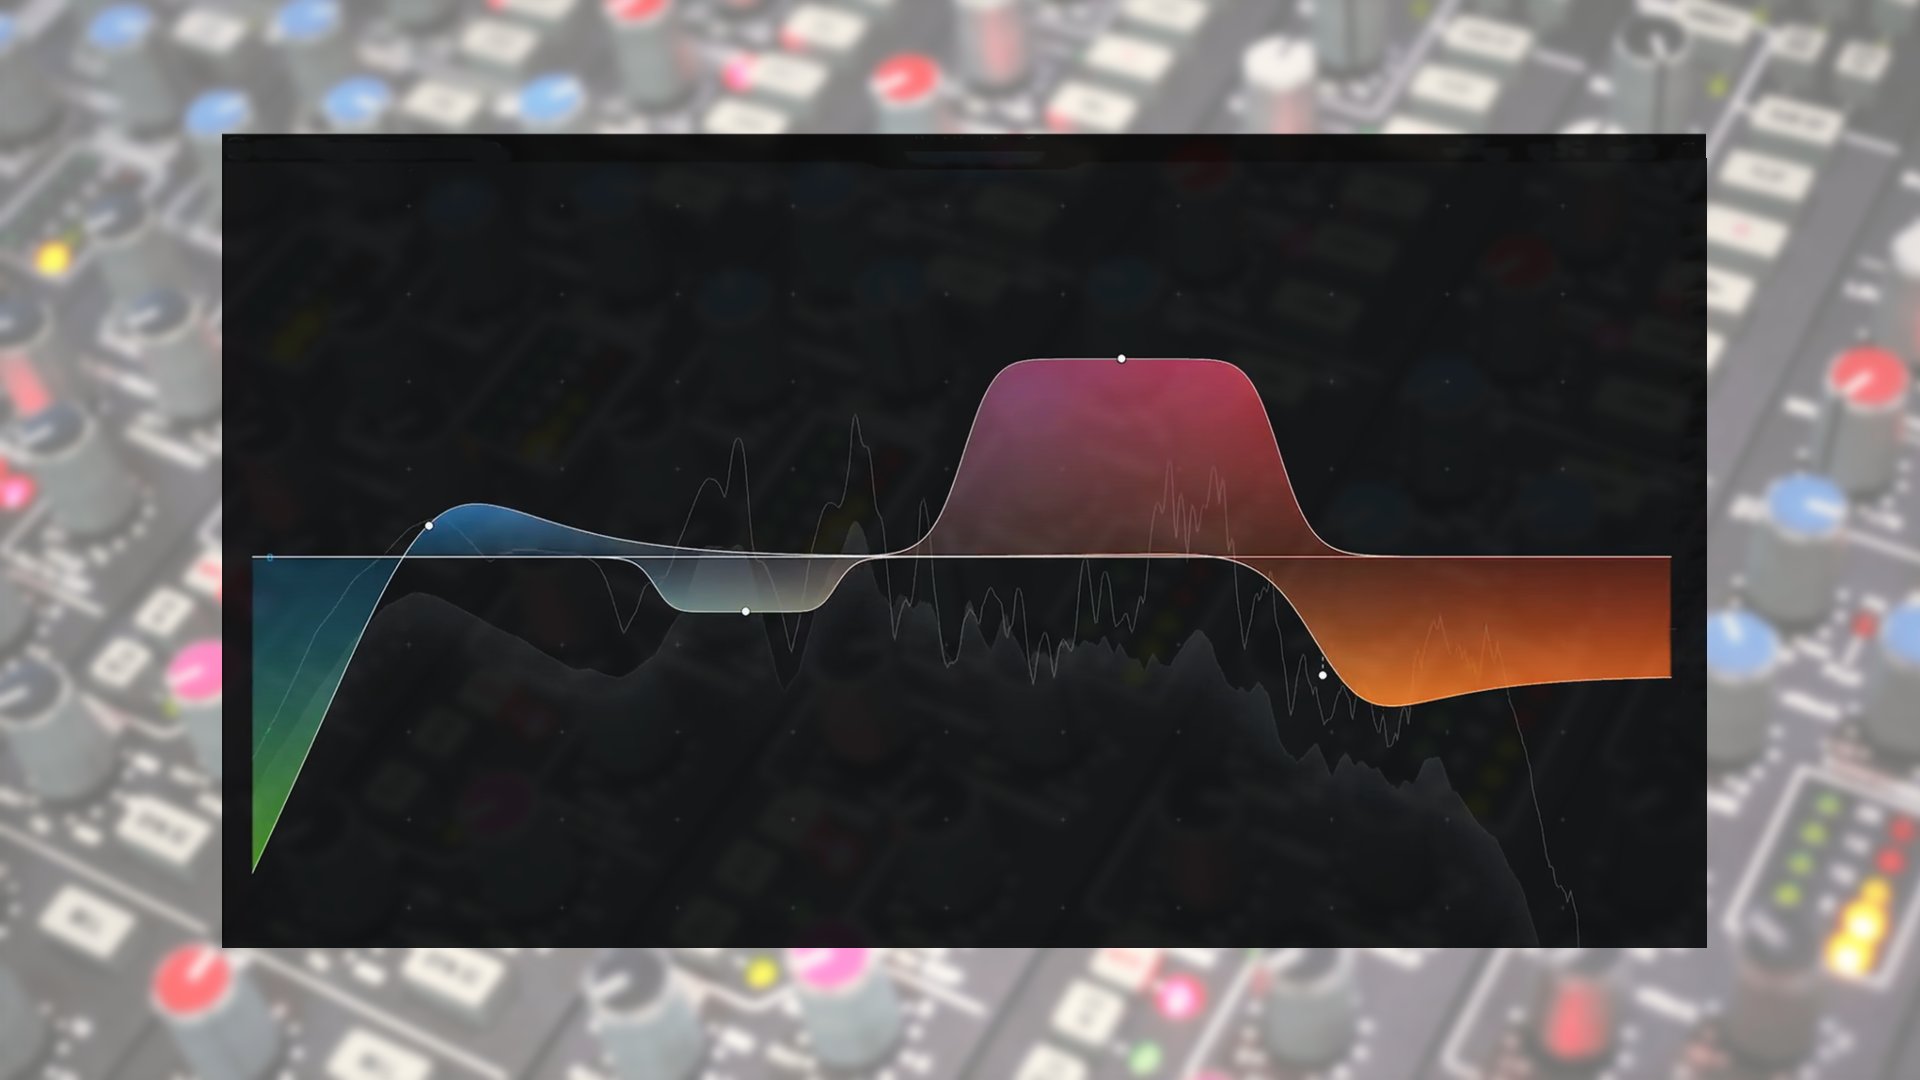
13. Multiband compression: The classic compression
like we have seen so far allows us to
compress all around the frequency
spectrum of a signal from 20 hertz to 20 kilohertz. But maybe you have already heard about multiband compression, which is very popular in
mixing and mastering. Multi bend compression is a technique where
multiple compressors are used to compress different frequency
bands individually. Multi bend compressors have several compressors working individually
on a specific band. We can have three bend
compressors like this one, to treat the low mids
and highs separately. On the low bend, I can decide to apply a big amount
of compression, a light amount on the meds, and no compression on the highs. This is the point of
multi bend compression. The ability to
compress each bend like we want to get the
sound we're looking for. And separating the
bends allows us to have more control
over the signal, to sculpt it with more detail, and to make a more
transparent compression. During the mastering
process where we work with one track
that could be very handy and beneficial to
compress the lows and the high separately and have a more
advanced control over the mix. Also very interesting on instruments playing on a
wide range of frequencies. Like some synthesizers that have thick lows
and shrill highs. At the same time, if the lows or the highs
jump out too much, we can control them individually thanks to multi
bend compression. Now let's see a multi en
compressor in action. Here we have this mix. We have this multi
bend compressor set up with three bands. The low band here,
everything below 150 hertz, the mid band, all
the frequencies 100-50 hertz and 6 kilohertz. And the high band, everything
above 6 kilohertz. Let's say we want to build the solid foundations
with thick lows. We can achieve this
goal focusing on the dynamic range of
the low frequencies, thanks to the
multibend compressor, we can do that without affecting all the other frequencies, like we would do with
a classic compressor. I have set the three compressors differently, no
extreme compression, but we're going to apply a
bigger amount on the lows, a light one on the mids, and nothing on the highs. That's why on the low
frequencies I have set a lower threshold
with a higher ratio, as I don't want to kill
the attack of the kick. We have a slow attack
time for the release. We're going to set it while
listening to the audio, but in this case I think a quite fast attack
will be better. And don't forget to
compensate with the gain for the meds, light
compression, lower ratio, and higher threshold
to tell the compressor to work less hard
and not too fast. Attack time to preserve
a bit of the snare between before and after. It's like we are giving life to this mix and listen again
focusing on the lows. We get thicker
lows because we've been able to focus on
this particular band to control the dynamic
range by making the compressor work harder
than on the other bands. With the light
compression on the meds, and nothing on the highs, the multiband compressor
allowed us to sculpt the sound with more flexibility
and more precision. Here is a good
example of how useful a multiband compressor
can be on a full mix. But as I said before, they are very useful on individual tracks as soon as we need to
compress differently, different frequencies
on a signal. We have seen here
a demonstration with three bands, but
they are a compressor. With four, even six bands, we are able to work
with even more detail.
14. Limiters and clippers: As we have already seen, the compressor's goal is to
control the dynamic range of a signal by reducing the
volume of a certain threshold. Attenuating the
louder pots to even at the level between
the peaks and the dips. Using analog
compressors will color the sound thanks to
harmonic distortion. Here we're going to
talk about a tool similar to the compressor, but that we will use
for different purposes in the mix the liter. A very simple definition of a limiter would be
to say that it's a compressor with the
very high ratio of 100 to one with 101 ratio, we'd need to raise
the input level by 100 decibels just to get a
gain boost of 1 decibel. That's why we also say that it's a brick wall compressor because
with such a high ratio, the peaks will always be
stopped to the threshold. Nothing can get louder than
the threshold of the limiter. Let's say we put a
limiter on a mix with the threshold at
minus five decibles. The maximum level
of the mix will never cross -5 decibels. Setting the threshold
allows to limit in advance the maximum level
of the peaks and push up the average
level of the signal. When we can imagine
a compressor as a tool to push down
the top of the notes, the limiter is more like it's pushing all the audio
up against the ceiling. But whatever hits the
top doesn't clip. We will see after
what is clipping, Whatever hits the
top doesn't clip, it just flattens out and
can't get any louder. The result is that the
dynamic range is reduced. We can visualize this
graph to get an idea. We can see that the
signal is not cut, just its level is modified. A distortion will be perceived. But in general,
it will be quiet. Let's see the effect of
a limiter on this base. I'm going to use this limitter
and set the maximum volume allowed with the threshold and compensate with
the output gain. The dynamic range is reduced, so the signal is
flattened and even out we are pushing up
the average level. So the base seems more powerful even if we're on an
identical decibel level. Thanks to the threshold, we know that we keep the signal in control because the peaks won't get louder than
the value we set. Now say base with
a different limit, thanks to which we
get a similar result here. Another common example with a limiter on the master, this is the pro L
two from fat filter, which is very popular
amongst the sound engineers. Here's the goal is to increase the main level and
to keep the mix under control by catching the peaks crossing zero decibel. This could be done during
the mastering process or mixing process to play the mix for
your clients with same volume as the
industry standard. To summarize, we use the limiter to set a level limit
not to crossover. For instance, zero
decibel for the mastering reduce the dynamic range to flatten and even
out to the signal, push up the average
level of the signal and to keep the signal in control by catching
the loudest peaks. Similar to the limiting, we also have the
clipping phenomenon that I mentioned before. There are two types of clipping, hard and soft clipping. What a hard clipper
does on the signal is simply cutting the picks
at the level we set, like we can see on this graph. In comparison with
the limit of graph, we clearly see the cut
like a scissors cut. Obviously this clipping will
produce a strong distortion. Let's listen to the result on a piano first and
then on a kick. Using this clipper
set to hard clipping, we hear the aggressive
distortion on the piano, but it's less obvious
on the kick heard. Clipping is an
efficient technique on percussive elements because
it can help to give them character bites and to
cut through the mix on signals with more tonality like piano guitars and more, the effect is more dramatic, which can give interesting
results but better use subtly. The soft clipping is a
soft kind of clipping. This effect also cuts sharply
the peaks at the threshold, but the result will
be a little bit less drastic because
the slope of the signal is softened and smoothed before the cut,
like we can see here. Of course, we will
also have distortion with this kind of clipping.
15. Parallel compression: Parallel compression is an alternative
compression technique with standard compression, or compression in series that we will see on the next video. We just insert one or
several compressors on a particular track. We know the result of
the audio going above the threshold is attenuated according to the
settings we set. For example, with Turan ratio, the audio is attenuated by 1 decibel every 2 decibels
above the threshold, lowering the peaks and
reducing the dynamic. This is what we also call a
downward compression effect. On the contrary,
parallel compression is more like an
upward compression. To understand that, let's define first what is
parallel compression. Parallel compression
is the blending of an untreated signal with a compressed copy
of this signal. Most of the time we
set the compressor to have a big amount of
compression on the copy. Instead of crushing the picks to make them closer to the dips, we push the dips to make
them closer to the picks. As we also blend the picks
on the compressed signal, we perceive like an
extra power like on kicks and snare on
drums for instance. The result has a
different flavor. This technique allows us to
get unique tones and make our tracks thicker without sounding like
overcompressedtracks. Setting up a
parallel compression is similar in every dog. And let's see now
an example with several drum tracks
grouped on the bus. Here I have my drum bus
and a copy of it on a second track that we
will call parallel track. To apply parallel compression, I'm going to insert a compressor
on the parallel track. We apply a high ratio and a low threshold to get a
big amount of compression. And now we're going to blend
this treated signal with the untreated one,
adjusting to taste between before and
after we get a nice, thicker sound and we are adding detail thanks to
the compressed track. Nowadays, many plug
ins have a mixed knob, which is a simple and quick way to apply a parallel compression. The mixed knob
controls the amount of treated signal compared
to the amount of untreated signal at 0% we only hear the dry
signal uncompressed. At 100% we hear
100% of wet signal, 100% of compressed signal. But if we set less than 100% we blend together the compressed
and uncompressed signal, creating a parallel compression. For instance, if we go back
to the drums of earlier, we're going to use
this compressor, which has a mixed knob here. No need to create
a parallel track. We can insert directly the compression on the
effect chain of the track. Let's set this up and then adjust the
mixed knob to taste. Parallel compression is a very good technique that
allows us to get very nice results
and have access to a nice palette of tones
by getting natural, thicker and more present sounds. It's famous on a drum bus, but we can apply
it on any source. Vocals, bases, kicks, et cetera. Let's see quickly an
example on vocal. I want to feel you move with me, Body free, you next to me. I want to feel you move with me, body free, you next to me. I want to feel you move
with me, body free. I want to feel you move with me, Yo body free, you next to me. I want to feel you move with me. Yo body free, you next to me. I want to feel you move with me, body free. You next to me. I want to feel you move with me, yo body free, You're next to me. I want to feel you move with me, yo body free, you next to me. I want to feel you move with me, body free, you next to me. We can say that with
parallel compression, we can break to the sound, the best of the two worlds, the best of the compressed
and uncompressed. But rather than thinking
it's a better technique than standard compression
or compression in series, we better have to
think about it as another weapon in
our mixing arsenal. Its use will depend on the situation and what
we are looking for. It's good to test
several techniques to see what sounds best and
what we are working on.
16. Compression in series: A popular compression
technique is using several
compressors in series. Compression in series is using multiple compressors on the same track, one
after the other. Let's see in action
what this technique can give and how
it's interesting. In this example, I have three
compressors on this track. A VCA compressor, a
tube one, and a Fet, one after the other
On the base track, Let's first listen to the
track with no compression, and then compress
with one compressor, and finally compress with three compressors chains chain. Let's analyze what
we just heard when we listen to the version
with the VCA compressor. Only we see that
the settings are adjusted to get a quite
important amount of compression, around -6 decibels
of gain reduction. We are compressing
harder to have more gain reduction
with a higher ratio that affects the sound, giving it bigger lows and more detail in the
mid frequencies. When we switch to the version with three compressors
in series, we get a smoother and
more natural sound. Because this time we set the compressor to get
a small amount of compression on each
one, around -1 decibel. We are reducing
the dynamic range, but the compression
is not as obvious. As with only one compressor is more natural and
more transparent. That is the main reason for
using compression in series. Sometimes it's
better to compress just a little bit with two or three compressors instead of compressing harder
with only one if we want to get smoother
and more natural tones. Another benefit
of compression in series that we can
hear easily in the previous example is
that we can benefit from the particular character of several compressors
on a single signal. From that we have an infinity of combination to get unique tones. For instance, on vocals, I can use first an opto
compressor to make use of its character and
musicality on this signal. In addition to that add color, thanks to a fat compressor, the night begins to fall on us, get a little cold, sir. The night begins to fall on us, get a little cold, sir. The night fall on us. Get a cold, sir. The night begins to fall on us. Get a little cold. Sera, The night
begins to fall on us. Get a little closer. The night big is, so fall on us, get a little closer. The night begins to fall on us, get a little closer. Here's how compression
in series is excellent to get more
transparent, more natural, and smoother compression
to get unique tones, thanks to the sonic
characteristics of each type of compressor
we added to the chain. But that doesn't
mean we can't have good results with
only one compressor. In many cases it will be okay, but you can experiment
compression in series with subtle settings to have
something a bit different. This technique is very
popular on vocals and bass, but can be applied on
any kind of signal.
17. Glue compression: In the production
and mixing process, there comes some
moments where we group together multiple
tracks in a bus, a drum bus, a synth bus, or vocal bus for instance. We can often want to tighten up, glue together the elements of the group in addition to ensuring that the
levels are good. We can reach this goal by compressing these elements
with the same compressor. I mean, add a
compressor on the bus. This compression is commonly called glue compression
because we are looking to glue the elements together in a project as soon as we identify the tracks we
want to group together. Here for example,
the synth trucks, we create an auxiliary
track that's going to be the bus where we
group our tracks. We also ensure
that the output of each scenes matches with
the input of the bus. Now the audio of the
scenes is sent to the bus, and we can apply a grouped
mixing by adding plug ins. Here we're going to
load a compressor and listen to the difference
between before and after. Oh, the compression glues
together the tracks, it tightens up the elements
of the group to make them more cohesive and
get a bolder sound. And by compressing
these tracks together, we ensures that none is too far behind or lost in the mix. For this kind of compression, it appears that VCA compressors
do the job very well, and generally, this
type of compressor is preferred like the
SSL bus compressor. For instance, we can
also cite the API 2,500 or the need 3036 oh
nine for the settings. Most of the time we will
prefer a slow attack, a fast release, and a
ratio between 1.5 and 41. It's not a kind of
compression where we look for a big
amount of compression. On average one or two DBs, up to four but rarely above four, these original guidelines. But of course we can experiment with other compressors
and settings. Other example here
with the kick and base compress multiple tracks through the same
compressor is especially useful for low
frequencies instruments. If we have several
instruments in the low ends, we can compress them
together to tighten up the low ends and be sure that these instruments
work well together. And grouping kick and base is a common situation during
the mixing of a song. Glue compression also works
well on other groups, like a group of vocal harmonies, a group of guitars,
or anything else. It works on any
possible combinations including a full mix. So feel free to experiment, but keep in mind
that compression is not necessary all the
time on the group. It's often useful,
but not mandatory.
18. Compressing vocals: In the mixed vocals are
extremely important. These signals are difficult
to mix correctly, with sometimes a strong dynamics and it has to be controlled
with compression. Compression is a
very important part to have a clear and
clean vocal mix. A technique that works
well with vocals is using compression in series to have more control
over the dynamic. Many great mixing engineers use two compressors
on their vocal chain. As we said in the
compression in series video, we don't have to
make each compressor work too hard on vocals. Again, reduction 2-5 decibels on each compressor
is generally enough, better have a quite
conservative ratio, 2-41 The mistake we need to avoid is to
overcompress the vocals because we immediately feel when
there's a strong amount of compression on this signal
that doesn't sound natural. Compression in series is a nice way not to
overcompress vocals. We also have to pay
attention to the transiens. We have to control them. But not crushing them like
-20 decibels for instance. Otherwise, the vocal won't sound good in the mix
and will be small. We always have to keep a
healthy amount of dynamic. In this sense, the setting
of attack time is important. It can change depending
on the musical genre, but we often set a
medium attack time, or even slow, medium, fast. In some cases, the tone of the vocal is also
primordial in a mix. An overcompressed this signal
make the tone disappear. The vocal seems thin and without character better reduce
the amount of compression. If we feel that we are losing
the tone and fullness of the vocal with what we've just seen, we
can, for instance, use first a compressor to catch the loudest peaks
without crushing them, and add a second one
to add clarity and to color the sound by
proceeding like this, the result is going to be
smoother and more natural that trying to reach the same sound
with only one compressor. So let's see that in action. Now where I go, demons go. Where I sleep, demons sleep
my hair, I can't move. She used to be
answer not anymore. Where where I got my demons go. Where I sleep, my
demand sleep my hair, I can't move on. She used to bid,
say not anymore. Where I go, my demands
go where I sleep, my demand, she used to bid, I say not anymore. I can't move far on where I go. My demons go where I got, my demons go where I got my
demons go where I sleep, my demons sleep my
hair, I can't move. She used to be answer. Not anymore where I go, my demons go where I sleep, my demon sleep my hair, I can move on. She used to bid answer, not anymore where I go, my demons go where I
sleep, my demons sleep. She used to bid
answer not anymore. I can't move far where
I got, my demons go. Where I sleep, my man sleep, my hair, I can move on. She used to pity say no anymore
where I got my demons go. Where I sleep, my Amleep, my hair, I can move. She used to pity, say no anymore where man go, where I sleep, sleep
my head, I can. She used to be not anymore. Here we are not
compressing heavily on each compressor and we
get a nice natural sound. But if I compress hard. Where I go mad. Where I sleep, my hair, I can, she used to be not anymore, that sounds bad and we lose
dynamic tone and fullness. Parallel compression is
another excellent way to control the vocal dynamic in
a natural way and to give fullness to in the mix
where I go, my demons go. Where I sleep, my
diamonds sleep, my hair, I can't move. She used to Biddy, I said, not anymore where I go, my demons go where I
sleep, my demons sleep. She used to Bidy. I said, not anymore. I can't move far where
I got my demons go. Where I sleep, sleep
my hair, I can move. She used to pity not anymore. Where I got my demons go, where I sleep, sleep
my hair, I can move. She used to pity not anymore. Multibond compression is also widely used by mixing
engineers because it helps to control the sound individually on the
low, mids and highs. We use it rather after the
first or second compressor. Because the multi
bond doesn't do the heavy lifting,
we can use it, for instance, to
control plosive like per below 100 hertz. We don't often touch
above 10 kilohertz, but we can control
some harsh frequencies in the mids and early highs between 100 hertz and 10
kilohertz where I go, my demons go where I sleep, my demons sleep my hair. I can move. She used to be answer,
not that anymore. Where I go, demons go where I sleep de sleep my
hair, I can move. She used to Betty has not
anymore. She used to. Betty has used to Betty
has used to Betty has used to Betty has used to
Betty has she used to? Betty has not anymore. Here are some popular type
of compressors for vocals. Fat compressors to give a nice coloration and if we
look for aggressive tones, opto compressors
to add warmth and a nice smooth and
transparent compression. Another popular one
which is hard to put on the category in particular
is the distressor. Very versatile, accurate, and
with beautiful colorations. There are multiple versions
of this compressor, like the FG Stress from
Slate Digital Oso form, Empirical Labs, or the Authentic emulation
from Universal Audio. These are some popular ones, but the other types can
work very good as well. If we look at the Sony
characteristics of the MU and VCA, they can also give
pleasant results. For instance, Alex Tome,
famous mixing engineer, uses the MU Pick
child 670 from waves first followed by the SSL bus compressor VCA
style in his vocal chain. Special mention also to
the R compressor and R Voc from waves because
they are widely used to. Before we finish this video, just notice that in many cases, vocals are recorded
with this chain. The microphone going
to a preamp like nave 1073 going to a
compressor like Cl1b. When the track comes
in the mixing session, the dynamic has already been controlled a little bit
during the recording. In this case, maybe only one
compressor will do the job, or maybe we will need anyway, the second compressor
and a multiban. Or only one compressor
and a multiben, or no multiban at all. There are an infinity
of scenarios. We have to train our ears
to know what we have to do, but we can use the techniques
seen on this video and all the other ones
from the course to help us sound more professional.
19. Compressing drums: Like vocals we've
just seen before, drums are also difficult
to compress in the mix because they are
essentially transients. These transients give
the specific sound of the drums and percussions. We must not kill these
transients from that. We already know that attack
time is very important for drums compression
because we know that a fast attack on the compressor
give a less transient, whereas a slow attack preserves
better the transience, We better have to choose
this second option here, release time is also
very important. We set it by ear to
match with the tempo of the song and to preserve the fullness and the
rhythm of the drums. In most cases, we will
choose a fast release time. Concerning the
compressors we can use on drums as usual,
there's no rules. But it's true that because of their punchy and
aggressive nature, fat compressors are
quite popular on a bus. Ssl bus compressors do
a very good job too. My favorite is the Neve 303609. It sounds incredible for the punch and the
depth of the drums. Let's see that in
action. Now on a bus, the compressor is
bringing the glue to this bus and
gives it a thick, bold, and punchy sound. This result is partly created by the settings of attack
and release on 11, 76 compressors, one is
slow and seven is fast. Here we set the slowest attack
and the fastest release. These are classical settings
for compressing drums. Let's listen again touching these knobs and
see what happens. When we go too far, we lose impact and punch
with a fast attack. We flatten the drums
because we crush the transients with
a too slow release, we smash and muffle
the sound because the compressor takes too
much time to recover. What we need to remember
here is that attack and release are very important
when compressing drums. In order to have a
thick and punchy sound, it's better to have a slow
attack and fast release. It's very common to compress
the drum bus following these fundamentals to
bring glue and bite. But of course, all
of this work also on individual drum elements like boosting the sound of
a kick or a snare. Parallel compression is
also very common on drums, is another great way to
muscle them and make them cut through the mix while making the compression
more transparent. An advantage of
parallel compression is that on each send, on each parallel track, we can give different tones depending on which
compressor we use. And it's great to add
that to the signal, We can experiments adding one parallel track may
be two, even three. A technique that
works also great for clap snare kick and more is to combine an Q on the insert with a
compressor on the send. For instance, with a kick
with the Q on the insert. Depending on what
we are working, we can boost the lows
and the high ads. Then parallel compress, and finally, add
that to the kick. On another mix, maybe we
would add some low mids. It all depends on what we
hear and what we feel. Let's see that with this Q, the better maker,
and the compressor. I love on a parallel chain, the DB X 160 available
with Waves and UAD. Perfect to add a little smack on the drums and an
extra punchy touch. I can also combine Q plus
compression on the send. If I want to accentuate
the low is on the kick, I can boost this area with Q and then compress and add that to the kick. In another case, maybe
I would accentuate the high meds or another
part of the signal. Again, it all depends on what
you hear and what you feel. We have to let each
song speak to us, and each song
speaks differently. There will always be different elements hitting differently at different times. It all depends on what you feel. It all depends on the vibe. Here are some techniques
to experiment to spice up your drums and give them
more impact on the mix. Again, an infinity
of possibilities here with the variety
of compressors that exist that we can use in
series on the inserts to enjoy the unique characteristics
of each compressor. Parallel compression is
also great for that to add unique tones if we use multiple sends with
different compressors, if we combine multiple effects on the parallel
chain, et cetera. Again, no rules. We can use the popular techniques
seen on this video, but we can also
experiment everything.
20. Compressing bass: We could think that basis, or other low frequencies
instruments, don't have a great
dynamic range. So they don't necessarily need compression like
vocals or drums. But in reality, these
instruments may have a big dynamic range and they actually have
to be compressed. Basis represents the
foundations of the mix. These foundations have to
stay solid and stable. If the dynamic range
is not controlled, it can unbalance the entire mix. Compression also gives
the base more weight. We can use it for
this goal as well. Let's see a quick example
of compression on a base F Y. Concerning the settings of
the compression like drums, we have to focus on
attack and release. A rule we can remember
is the following one. Every sound we hear
has a wave length. Bases have a bigger
wave length compared to high sounds which have
a shorter wavelength. With bases and the
long wave length. If we set very fast
attack and release times, it can result that the
attack and release are faster than the
wavelength itself. The result is a distortion
of the sound like that some people would qualify this
distortion as unpleasant, but it can also give
an interesting effect for attack and release. What we have to remember
is that setting the two as fast will
distort the sound. If we want to stay
away from that, ensure that at least one is not. Fast ratios can in some cases be higher than
for other instruments, 41-81 because the
dynamic may be big, especially for live
recorded bass guitars. But for base synth we
can apply a lower ratio. The classic compression
in series that we know well now is again a very
nice technique on basis, we know the benefits of
compression in series. I'm not going to get back on it, but just a literal example, a technique to try
for the control of low frequencies in
the mix is to group, kick and base on a bus. And compress that bus. It will create a packet for
the low frequencies and help them stand out while giving
them more impact and weight. Finally, we'll also have
Y chain compression. If there's a lack of clarity and masking between
kick and base, we can use Y chain compression if we need more
punch from the kick, using this one to reduce
the volume of the base. We already seen this
type of compression. So you can watch
again the Y chain compression video if needed. Don't forget simple
compression with only one compressor and
parallel compression as well. Every techniques are
good to try here. Try out these techniques
on your mixes, remembering that bases may need compression in some cases, but it's not
mandatory every time. If you're not sure,
just try and see.
21. Compressing the other instruments: We have seen how to compress
instruments like drums, basses, and vocals
concerning the others. Guitars, sings, pianos,
violins, et cetera. We'll have similar goals for all these instruments
for compression. The main reasons are
classical control, the dynamic range to make
it sit better in the mix, to make the instrument cut
better through the mix, and to give more detail and
give a particular tone. Thanks to sonny
characteristics of some analog compressors about
the control of the dynamic, A guitar is a nice example
because the player can play some notes stronger
and then play smoother. Given a big gap between
the peaks and the dips, some notes may be too loud
in the mix or too low. So here's a very standard
way to use compression, and we can apply that
for every instruments. For the second reason,
which is bringing the sonny characteristics
of a compressor, we can use any compressor
of our choice. Now that we know
the different types of compressors and
their characters, it's easier for us to
make this choice here. We're not looking for a
big amount of compression, just give a nice layer
of tone for that. One, B or two may be enough. Some compressors even color the sound just by running the
signal through the circuit. For instance, just
hitting the tubes of the tube compressor can
give a pleasing tone. We can get interesting
results without touching any knob is the case with
the Fairchild for instance. Some others also have
this capability. Learn to know well a maximum of compressors with
compression in series, we can always use
multiple compressors. If we want to add
multiple sonic signatures from multiple types
of compressors, we can add one or two, even three compressors
just for tone. If the instrument
we want to color needs first its dynamic
to be controlled, we'll load first a
compressor to do this task. And we'll combine it
in series with one or several other compressors for their sonic characteristics. On the same guitar,
I can, for instance, load in addition
of the first one, a T compressor to add its color
and aggressive character. One more example here
with a piano and a very compressor to thicken up the sound
and bring warmth to it. We see that we don't have a
big amount of gain reduction, but we're giving nice tones and a pleasant vibe to this piano. And finally here, an example of sound coloration without even touching a single knob with the VBC plug in
from Slate Digital on every other instruments. In addition of standard
use of compression, play with colors, tones, and sonic characteristics of
every different compressors. Don't forget glue compression,
we have already seen. It will be very useful if
you have a bus of synthes, guitars, or trolls,
or anything else. Multiple compression could be interesting as well in order to control the particular part
of the instrument signal. In this last example
of the video, multiple compression will
be useful on a cello when we play the cello
and the bass together, as there are two elements
playing in low registers, there's a clash in
the lows and we hear some loud resonances
From this cello, I can use multiband
compression to attenuate the bottom of the spectrum and get a better mix
between the two. Here I don't want to touch the either the highs to preserve the body and
the clarity of the cello in an infinity of
other situations. Compression can be useful
on instruments which can have unpleasant resonances
in the lows, Ms, or highs like an acoustic guitar recorded with a microphone, synth, orchestral elements,
etcetera, et cetera. In short, for the
other instruments, we can clearly use
every technique we have seen so far. Try
different techniques. If you detect some issue and
see if it improves the mix. Try to group some
elements together and compress the bust and
see if that works. Experiment just for tone as well and see if you
get pleasant results.
22. Compressing the Mixbus: The whole mix mixing, or the master mixing, is as important as mixing
individual trucks or Buses. And the compression applied on the master is an essential part. The master truck is
also named mix bus. The important thing about Mix bus is to be careful
because we can create more problems than solve if we apply two drastic settings
with compression. An important rule about mixed bus compression is to
stay smooth a little bit. We'll already do a lot. Why compress the mixed bus? The main reason is to get
a more cohesive glued mix. We need to fill the
elements glued together. Compressing the mixed bus
is using glue compression. The second reason is to control the dynamic range of the mix. By reducing the dynamic, we can even out the
different parts of the song, smoothing out the pigs
that are too loud, and enhancing the softer parts. Another reason, which is like a consequence of
the previous one, is to get a bigger and
thicker sound given by analog compressors thanks
to harmonic distortion. How to compress the mixed bus? Like I said before, the
mixed bus compressor has to work gently. We use low ratios from
1.5 to one to 2.5 to one, and we need to look for a small
amount of gain reduction, one or two DB, to ensure not
to overcompress the mix. As a starting point for
attack and release, we can start with
a slow attack to preserve the transients
and a fast release, but it's always good to adjust these controls by ear to
see what sounds best. Compressors that
works wonderfully on the mixed bus are
VCA compressors, or tube compressors, as well. As we can hear, mixed
bus compression gives more fullness to this mix. We get a bigger sound thanks to a more controlled dynamic range that evens out the levels. Many more techniques
can be used on the mixed bus like compression
in series or parallel. I'm going to use a mix
of different techniques. We have seen over the course, compression in series parallel, play with different
attack and release times. Use the high pass filter and see what it
brings to the mix. We get a very nice result
with a clear sound, bigger global image
better than before. Finally, multi band
compression is also used a lot by mixing
engineers on the mix bus. Let's see what we can get here. I split the spectrum
into three bends at 160 hertz and 2.5 kilohertz. And we're going to compress
each band setting up the parameters by ear trying
to improve the sound. We will see that here we
can go harder than before. On the settings, what
I'm looking for is to have even more
solid and stable lows, a controlled and glued mid band, and more airy his. But the highs will need less compression than
the other bends. So play around with
compression on your mixed bus to get
this bigger sound. And make sure to go
gently for that. Compression in series is
a nice way to explore. And parallel
compression as well, to make sure not to
overcompress the mixed bus.
 Ugo Galamba, Music Producer and Audio Engineer