Transcripts
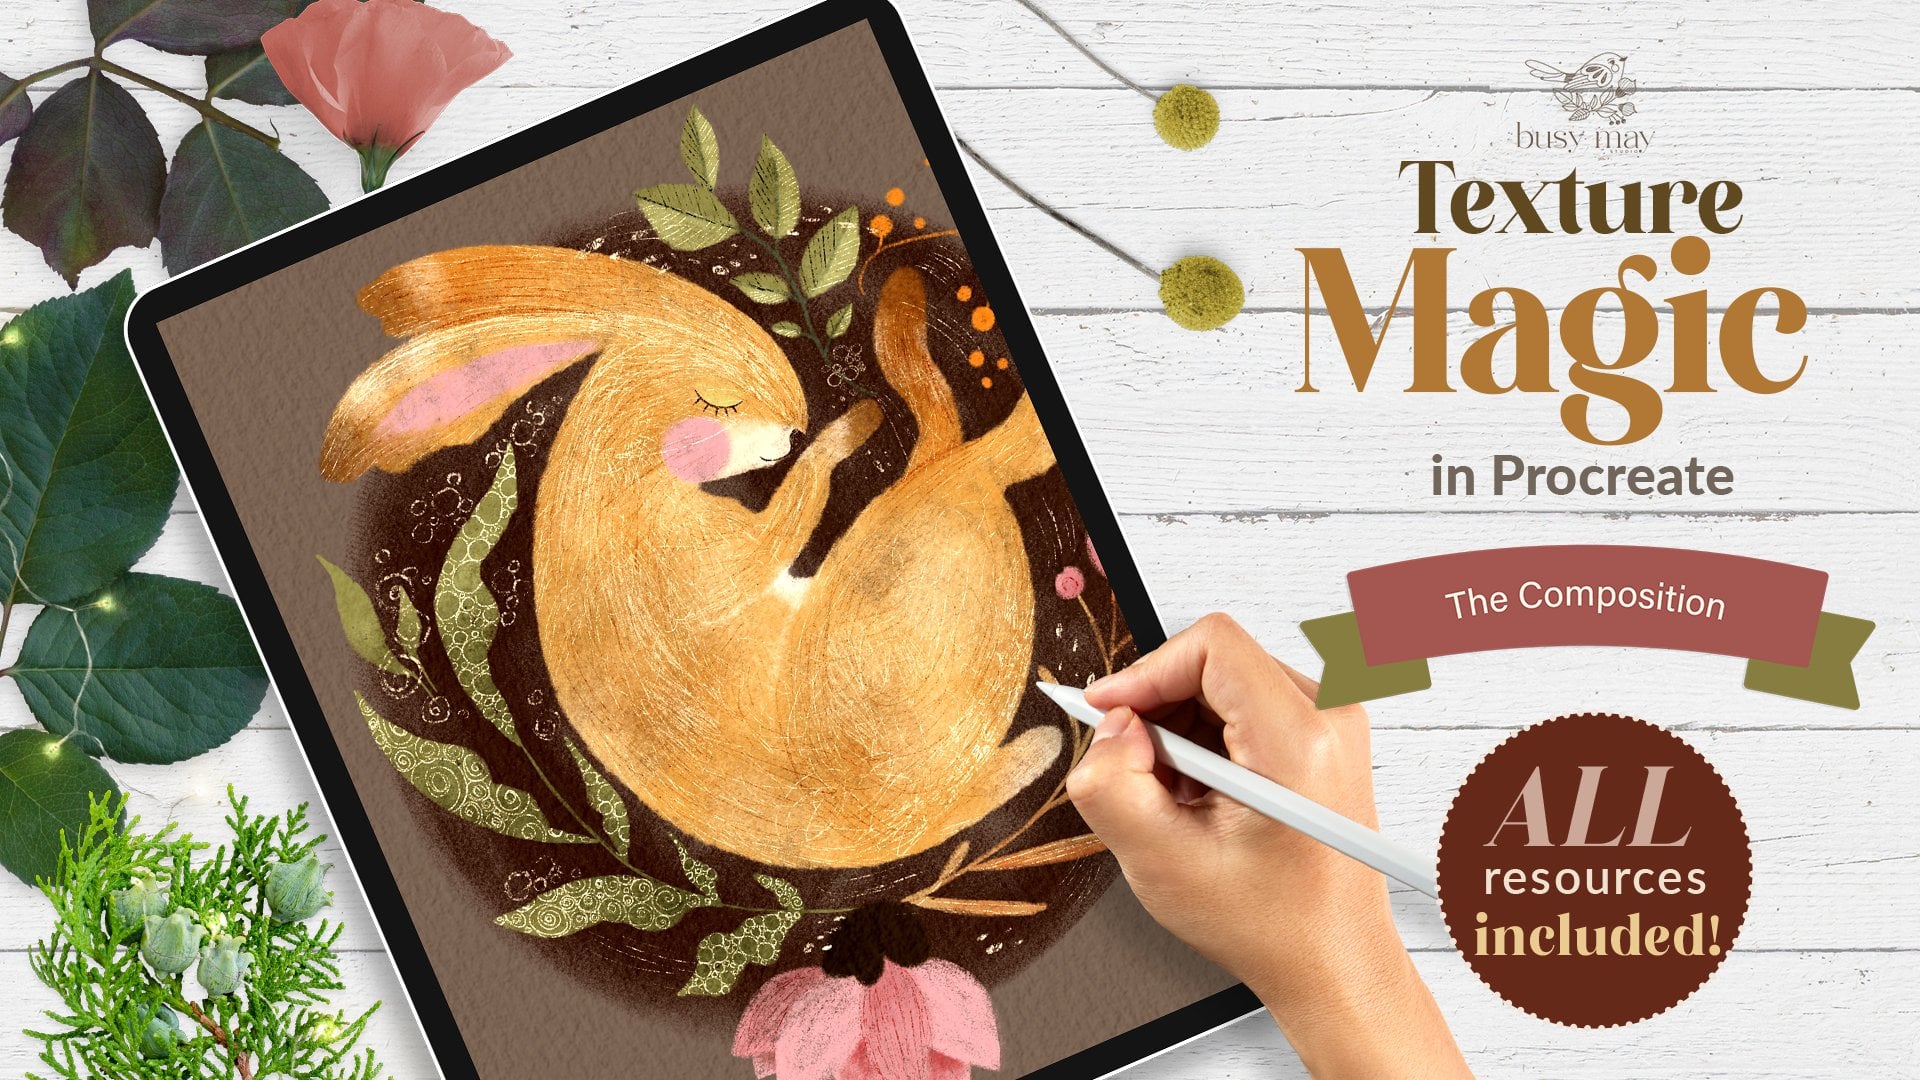
1. Class Overview and Project: Oh. Hello, and welcome to my brand new skill
share class texture magic and Procreate the landscape. My name is Rina, and I'm an illustrator
from the UK and the artist behind the
brand of Busy M Studio. Today, I'm going
to show you how I use texture brushes
and procreate, and hopefully we will inspire you to create your
own lovely artworks. This class will go through
the process of filling the shapes in color and arranging them on
the layer stack. How to apply texture to our objects using
procreate texture brushes. We'll explore different
blending modes, and I'll share with you
my tips and tricks how to bring your illustration to the finished professional level. Your class project
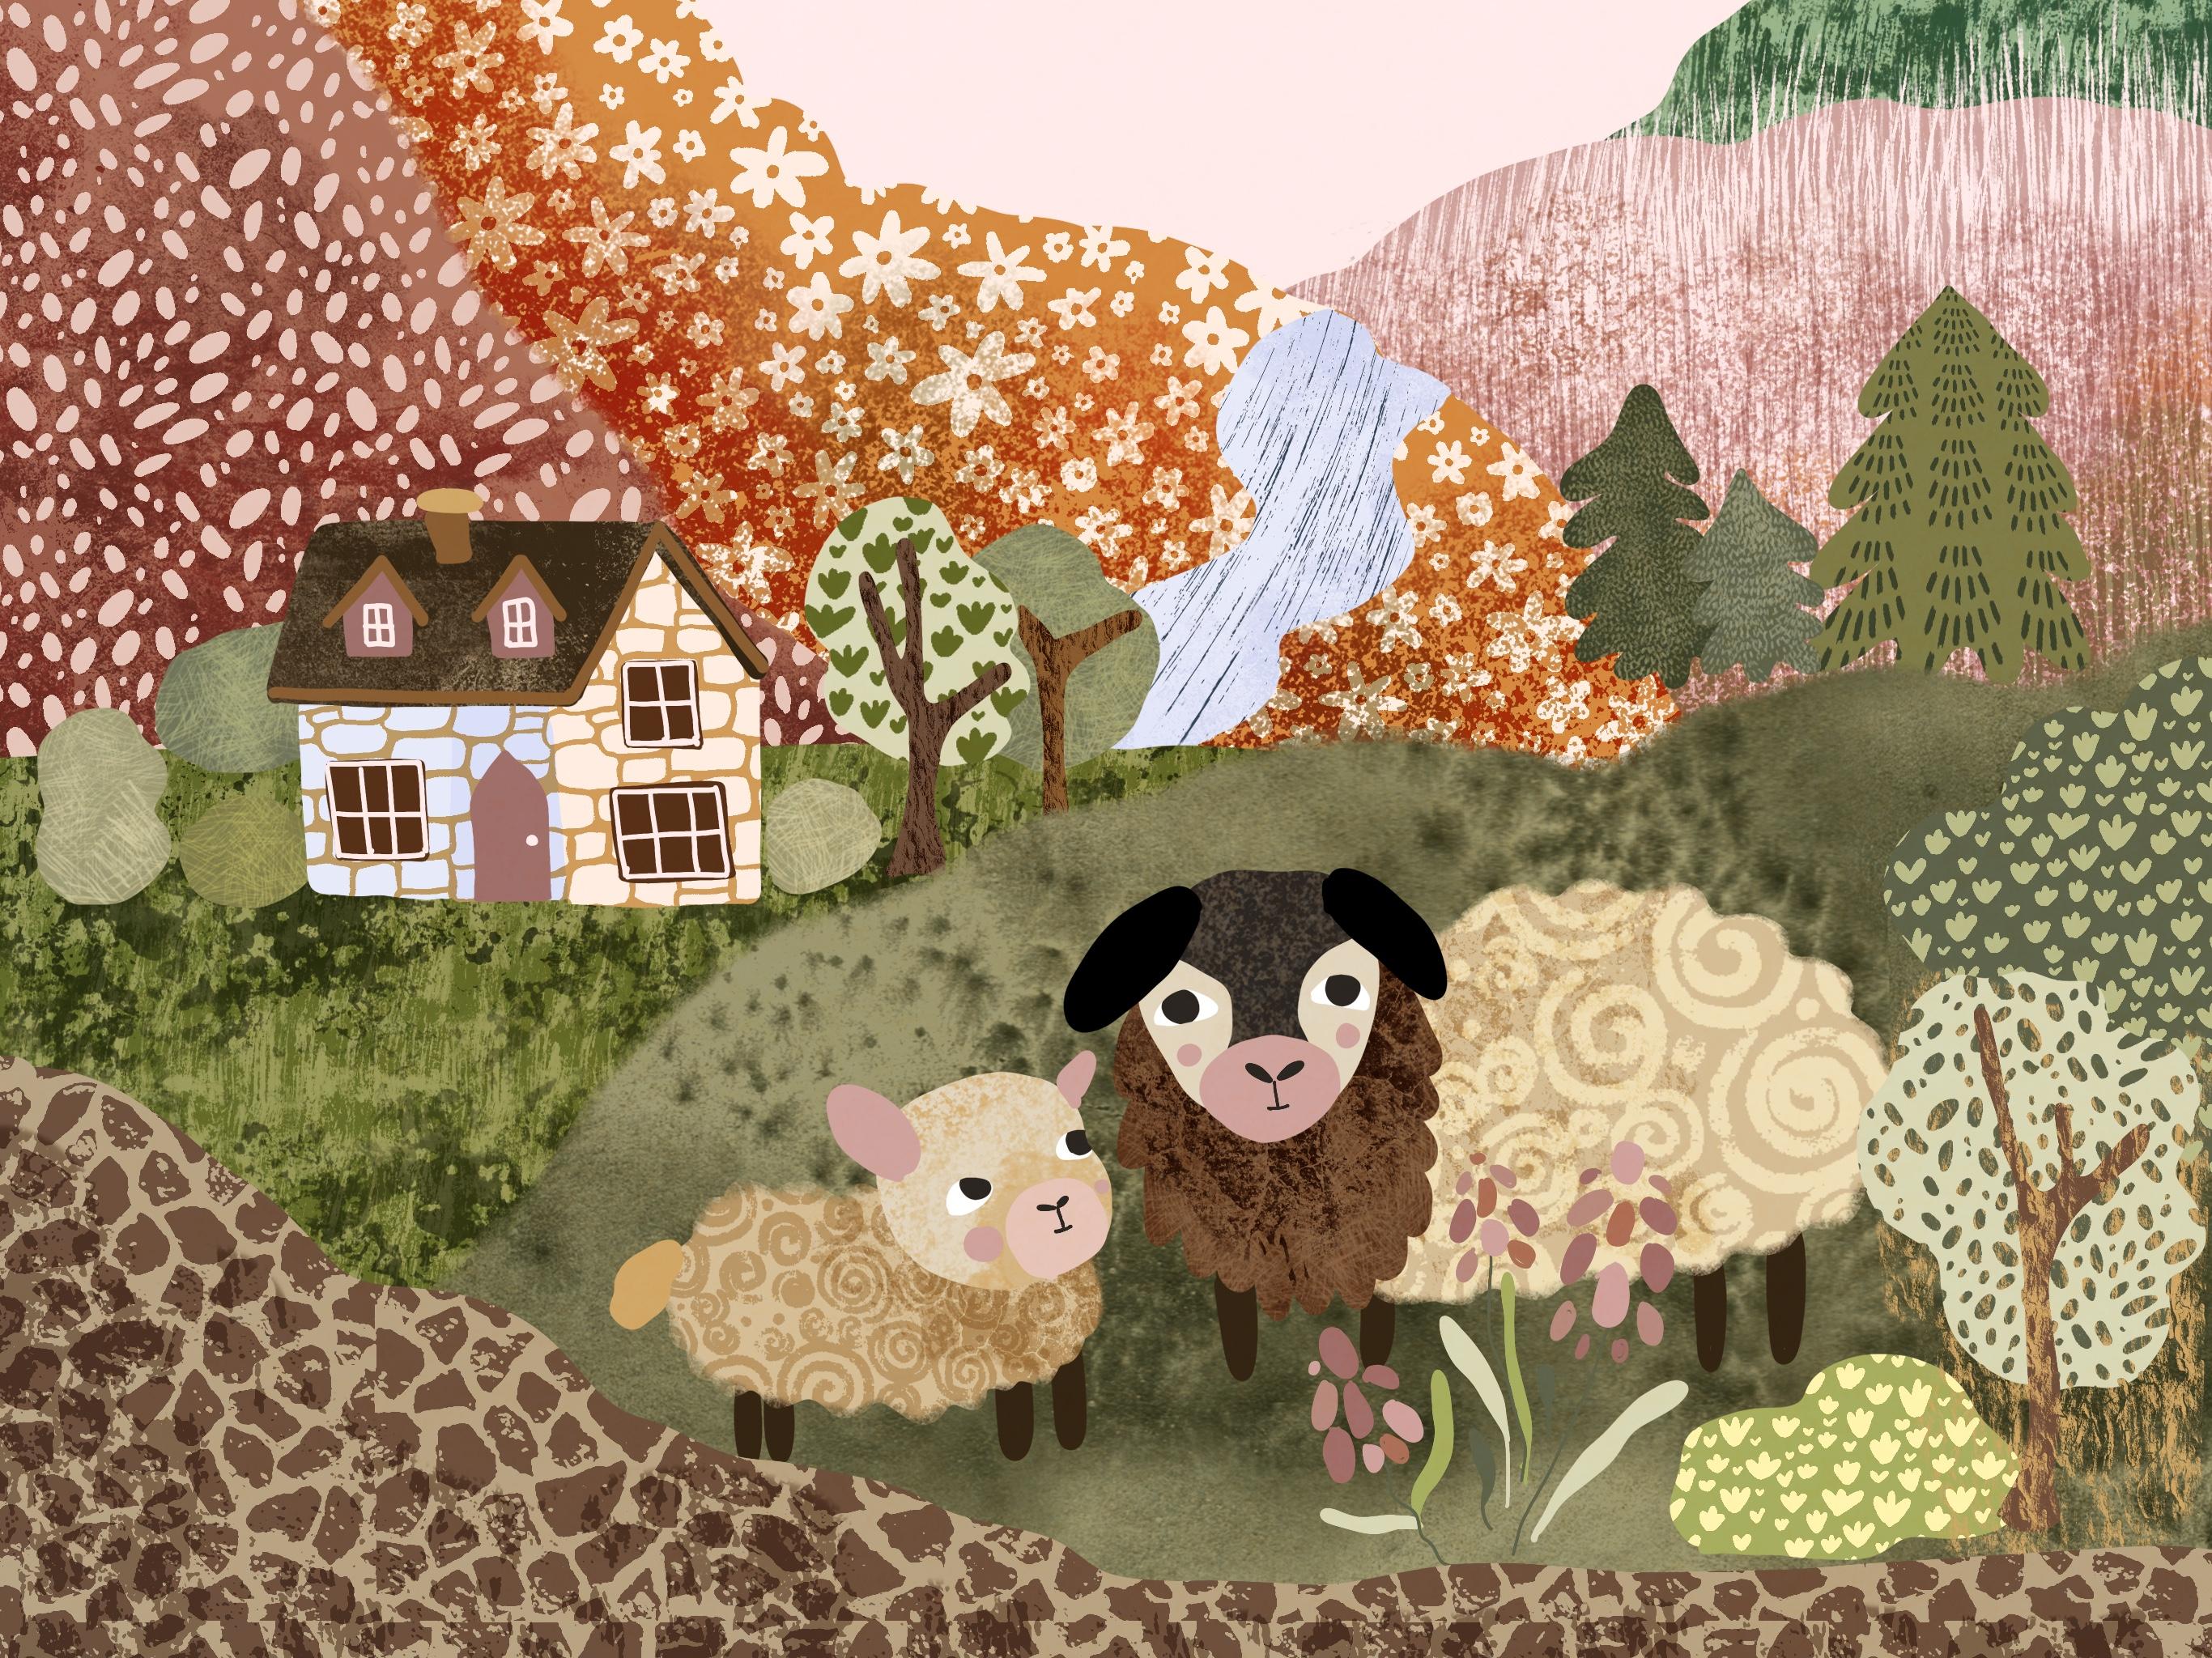
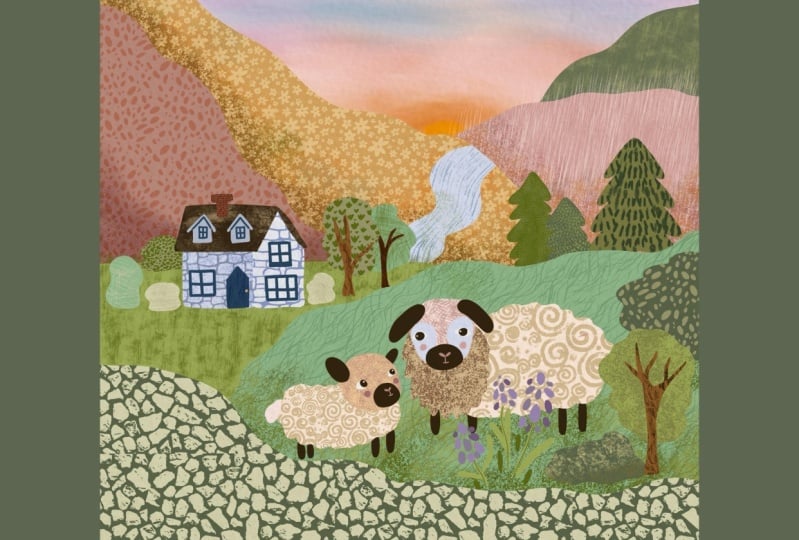
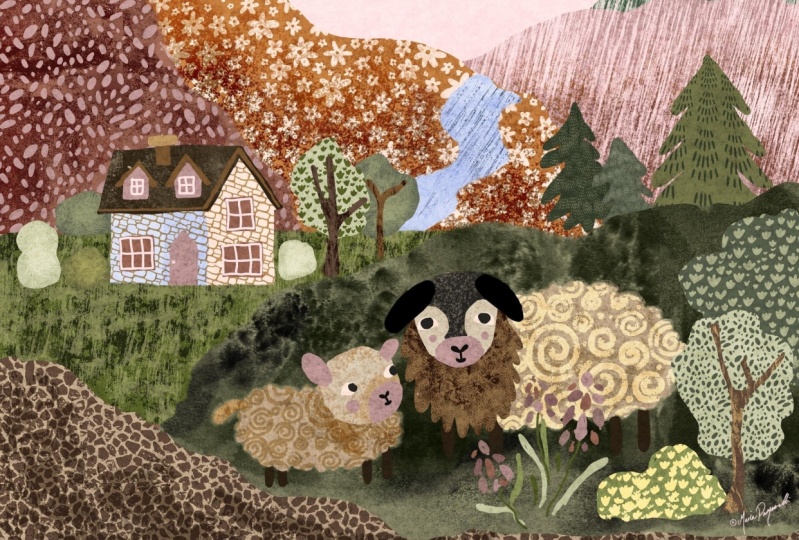
will be creating this beautiful Scottish
Highlands landscape, and hopefully, having mastered
the texture technique, you'll be inspired to create
a landscape of your own. So go ahead and grab your right pad and
I'll see you in class.
2. Inspirations: So, so I decided I'm going to tell you guys what
inspired me as an illustrator to use
the techniques of this clash type layered with texture and
color enhancements. So I'm just going to show
you a few books there. In fact, there are
much more of them. But I'll show you the most probably the main
ones that I got influenced by. So first of all, it's nature Origami and
pretty much any book. With illustrations of a lovely UK Illustrator,
Clover Robin. I absolutely adore her style. Her artworks, have
a look, this, like, clash type of constructions, she creates layered with
different types of textures. This book talks about
Origami, which, by the way, I tried and created all
every single one of them. But for this particular class, I just wanted to pay your
attention how lovely Lly and cleverly Clover
creates this shapes, layered like paper, and the
texture you see like fish. Look at this amazing fk. Something that you cut
out of paper and just combine together creating a nice composition
on the Canvas. So by all means,
guys, check Clover, Robins, books, designs, and just sign
up to her Instagram. It's amazing. Another
beautiful book. These are my children's books. Actually, I used to read them
when my girls were little. Is these books by Julia
Donaldson and Lydia Monks. This one is the singing mermaid. And here, it's exactly
like, similar concept. They're like, shapes, cut out shapes layered
with textures. Look at this beautiful
English sea sea scapes, landscapes and see the rocks are layered with rock texture. So yeah, I'm sure if
you're from the UK, and if you have children, you know this beautiful, wonderful writer
Julia Donaldson and the amazing illustrator
Lydia Monks and their books made together. And another one of this wonderful creators as
the Princess and the Wizard, here exactly the same concept. And Lok I wanted to
show you I love this. You see, like yellow socks that the princess was supposed
to separate in pairs. And you can see, like, some
socks are layered with this, like, real knitted texture. Some are layered with the
textures made out of, like, some sort of oil
or acrylic bca dots. Some of them are quite, like, shiny, glittery, some amazing. You see, I just takes my breath away even talking about it. It is like little the trees the trees leaves are layered with the
texture of real trees. So guys, just amazing. And another absolutely
beautiful edition I wanted to show you is this big massive book of poems about animals for
every day of the year, which I still read
to my children. It's selected the poems I
selected by Fiona Waters, and the illustrator is Brita Tektro another
amazing illustrator, which go and check out an
Instagram and Hubert For. Everything is just
amazing by her. And you can see, from the
first page, all the textures. Tiger tiger burning bright. It's called. So
whereever you open it. I just I find it so hard not to dwell on every single page, but just look at this
wonderful layer texture. There again, this like
cut out cut out effect. Like it's a paper collage. Look at that. And like an animal fur and the leaves
got this wonderful texture, the color enhancement
of this pigeon, see, like the snow,
I just beautiful. These books inspire me so much. And today's class,
hopefully you will see that is heavily inspired by all these wonderful
illustrators and artists. So yeah. Let's begin.
3. Tools and Materials: You. For this class, I'll
be using an iPad. You will need an
iPad or an iPad Pro. I'm using 12.9 " iPad Pro. You will need an Apple pencil. I'm using P pencil second generation
compatible with my iPad, and you will need procreate
installed on your iPad. And this class is
recommended for beginners. Absolutely nothing
difficult in it. So that's basically the basics. And the soft materials
we're going to be using. In terms of the Canvas. We won't be using any
particular texture. Paper canvas will be using default canvas size
from procreate. It's going to be screen size. O sketch. We'll be using the
coloring page, provided in the
resource section of this class like everything
else for this class, all the soft tools
I'll be using. They are provided in
the resource section. So depending where you
saved your coloring page, I've saved mine in the
photos of this iPad, so I'm going to do
in sort of photo and choose the coloring page, and it's called
texture landscape. And that's it,
that's your sketch. In terms of the brushes. In this class, I'll be using the following brushes
for procreate. First of all, I'll be using
landscape texture textures. It's the brushes I've created specifically
for this class. You'll find them in the resource
section for this class. But as always, I encourage you to try
your own if you want. Perhaps you've purchased
something before or you've even maybe
created some yourself, so go ahead and try them. But as always, you
can just follow me step by step using
my own brushes. Well, also is important guys. If you don't want
for whatever reason, if you don't want to download
and install the brushes, I provide you can resort to the brushes provided
in procreate by default, and I would like to direct
your attention particularly to the organic brushes
which you can see in your default
procreate. Industrial. See, like different industrial
textures provided here. Vintage. There are some quite nice there are some quite
nice brushes there, like Myrtle, for
example, and materials. See, like there is leather, noise brush, Blackwood,
and other things. They work great as well and that kind of art I'm
going to show you today. Other brush I'm
going to be using. It's a default procreate brush
in the calligraphy group, and it's a monoline brush. I will be using it for filling the colors and
shapes in my canvas. And another brushes I'll
be using is charcoals. They also come default
and procreate. I'll be using one of
these brushes for erasing sharp edges in my piece. You can literally
use any of these, but in this class, I'll be using to be compressed. And as for the colors, I'll be using the color
palette that you can find in the resources
section of this class is called landscape or create your own palette or use one of the default palettes
and procreate. Its the artist. It's your choice, what tools and materials
you would like to use. So, that's basically it.
4. Preparing the Canvas: So let's begin creating
our beautiful landscape. So what we need for this lesson. For this lesson, we
will need the Canvas of the screen size,
landscape orientation. We will need the coloring
page, the prepared sketch. It depends on where
you saved it. I saved mine in the photos.
What I'm going to do. I'm going to click
that range icon. I'm going to click Add, and I'm going to insert a photo. If you saved your coloring page on your Cloud
Drive, for example, you will need to
insert a file and import the file from the
location you saved it. So I'm going to insert a photo, and I'm going to
choose the sketch. This is like your coloring page. I'm just going to
fill this piece. That's okay. Here is the
sketch of our landscape. I'll be using my
own color palette that I created especially
for this class. But again, feel free
to use your own. There is no right
and wrong here, and maybe you prefer
some brighter colors, I'll be using as always like
this muddy muted colors. Let's begin.
5. Filling Shapes with Colour: Part 1: E. Let's fill our
shapes with color. So as you can see, our
landscape consists of different hills and mountains and objects like
trees and bushes, on the background, the house, and two sheep on the foreground and a
little bit of hither. We're going to start
filling the shapes according to the way sort
of they come closer to us. Think of it like paper collage. When you start placing pieces
of paper on your canvas, and one goes behind
everything else, the other goes on
top, et cetera. Don't worry. I'm going
to talk you through. For that, I'm going to create a new layer and
immediately place it between my sketch layer
and my background layer. And I'm going to change the blending mode of the
sketch layer to multiply, so I don't see any white
color and only see the lines. And I'm going to reduce
the pacity a little bit. In this way, I will still see the lines of my
coloring page of my sketch, but I don't see the
white background which will help me see
through the colors. I'm also going to change
the background color to, like, pinkish type. You don't need to do
that because, in fact, the only piece of that pink you'll see in the
end is this sky. So I'm just going to change
it in case I forget later. And I'm going to start filling
my objects with color. So as I said, for this, I'm going to go to
calligraphy set, and I'm going to
choose monoline brush. That's what I'm
going to be using. And I'm going to start filling
my objects with colors. I'm not guys dwell upon which particular colors
watch I'm going to be using for every
single object. I can only tell you
that I'll be sticking to more or less
traditional colors. A lot of green, the
trees will be green, the tree trunks will be brown. The sheep will be some
beijic color. You will see. But I'm just not
going to make it too complicated explaining which
color I'm going to use for, which, especially
if you are using your own color palette
that you prefer. I just don't want it
to be too confusing. So how I'm going to start
filling objects with colors? I'm just going to outline using my monoline brush.
And close the shape. As you can see, I'm not
bothered about this part because I can see this
hill is going to overlap. I'm just going to
drag the color from this watch and just fill it
like this, just like this. That's the first hill
I filled with color. What else is important? I'm going to create a new layer for nearly every object
of this landscape. Why? Because I'm going to apply different textures
to these objects. Some of them overlap, so I want to keep them separate. The exception to that rule will be if you have
different objects on, quite far apart on the canvas, and they're not overlapping. In this case, you can
place them on one layer. For example, these gs. So next object I'm going
to fill is this hill. And I'm going to grab this pinkish color
that reminds me of like Scottish
hair the fields, and I'm just going to drop
the color on top of it. Next layer is going to be
this hill on the background. For that, I'll be using this nice orange color
representing autumn. I'm going to actually increase the size of my monoline brush. So I'm not following the lines. It's all about freedom, guys. You don't need to
precisely fill in the lines like this unless
you want to, of course. But, as long as this
area is covered, next one will be this river. For that, I'll be using
this light blue color. See every time you see that something else
overlaps your object. Don't worry about the
bottom part of feeling, so just feel it freely, what whichever way you prefer. Also, if you feel that you
went over the lines too far, just grab the eraser with the
same monoge brush and just gently rub it out the unwanted
areas of your object. But as I say, our point here is not just to
create a perfect picture. It's just going to be a free
hand flowing illustration. My next object will
be this fir trees, and you see these
are overlapping, so I'm going to place each
tree on a separate layer. I'm just going to grab
some nice green color, maybe reduce the
monoline brush capacity, and I'm just going to over outline this tree.
The first one. New layer. I'm just going
to put various shades of green just to keep it
a bit more interesting. They are not merging together, especially they are overlapping. This one looks like it's
a little bit behind, so I'm just going to put
it on the background and the color for I'm going
to use even darker green. I like quite similar
shades of green, but yet yet different
from each other. Now we've got our trees
standing there happily. Next, I'm going to fall
this ill with color. I'm creating a new
layer for that, and I'm just going to grab
maybe this reddish color. I couldn't increase the
size of my monoline brush. I'm just going to make sure
that the series filled. Maybe remove this one, just to keep a little
bit more interested. Next part is going to be this grassy part with
the house standing. Let's create a new layer and I'm going to probably use
this brighter green color, and I'm just going to outline not bothering about
the bottom part because it's going to be
overlapped with other objects. Next layers, I'm going
to put these bushes and this tree on the same layer because they are
not overlapping, they're quite separate,
and that will give me the opportunity to apply different texture brushes
on them if I want to. But this tree is going to be separate because
it's overlapping. You'll see what I mean. I'm going to create
a new layer and similar to what I
did with this tees. I'm just going to use
different shades of green. For example, this
blob representing a bush will be that
shade of green. The same shade of green I
put on this little bush, and I'm just going to
grab a different shade of green and this
bush will make it. Maybe this tree leaves. Leafy part of the tree will
be that shade of green. And the final one. This tiny one, I think I'm
just going to make it. I'm just going to try if this
is I think that works fine. So Yeah. So as you can see, I left this tree out because
it's a separate one. It's going to be overlapped. So for that, I'm
creating a new layer, and I'm just going to
use really light light green to make this tree. You see my landscape
is basically a very, very early autumn Scotland when some fields started already
getting orange and yellow, and the trees are
still green mostly. That's that. Now I'm going to make the
layer of these tree trunks. I'm just going to put them on the same layer as well
as they don't overlap, and I'll probably use
two different shades of brown just to make it a
little bit more interesting. Outline. The shape,
fill it with color. This is going to be
this type of brown, for this tree, I'm just going
to put this type of brown. Almost orange, but I don't. The next layer I'm
going to fill is this grassy part with on
which my sheep are standing. I'm going to create a new layer and with this sage green color, I'm going to fill. Going to make it
slightly thicker. A bit more in control. See I'm going to fill
this part, green. So next layer is going
to be the house. And I'm going to use
different colors for each part just to separate
them from each other. Visually, but I'm
going to be using them on the same
layer because I'm going to cover it with
the same texture. So using this
lighter blue color. I'm just going to
fill this wall. By the way, guys, don't
mind the perspective. The the perspective is
really nonexistent. So I'm going to grab
this a little bit like more saturated blue. For this part of the house, then I'm going to fill it in. And see I keep them on the same layer
because I'm going to apply the same texture to them. And for the front part, I'm going to be using this
lightish beige pinky. Color, just to separate
it from the rest. I'm quite happy with that. Not trying to make it
perfect, so no judgment, p. And maybe I'll just
clean up the bottom of it, just a tiny bit. That was my next
layer, the house. My next layer, I'm going
to just put the roof. Over my house, for that, I'm going to use the
darkest brown color for it to pop up
up a little bit. I'm just going to
outline the roof. Film, and maybe just
a little bit in here. I'll see you in part two.
6. Filling Shapes with Colour: Part 2: B. Next layer is
my sheep's bodies. So it's like mommy
and baby sheep. Not the whole sheep, just paying your attention. It's the sheep's bodies. Actually, on the
hindside, right now, I think maybe I feel the legs first because I've
got this dark brown color, and I actually have the
intention to use it, and I'm going to put all
the legs in one layer. First of all, they are
apart from each other quite far and second and more important is that I have no intention to fill
the sheep's legs with the colors because we're going to leave some of the
elements without colors. Which is fine. That's
the sheep's legs, and the next layer I'm going to create is the sheep's bodies. For that, I'm going to be
using very light color. I think it's going to
be this bisic color. But again, you can use
whichever color appeals to you. I'm going to use this
curly wavy line. Why? Because I might
want to leave it like this or I might use
the more like texture, eraser to make the
four fluffier. It's your personal choice. On the baby ship. And the baby sheep. I'm just going to fall
the shape or the color. The next layer I'm
going to put is the m shes this front chest fur, some sheeps are
quite f. For that, I'm going to use this bright brown color, which quite like. I think it goes works
well. For this purpose. I'm going to fill
it with the color. Next layer is let's fill the
sheep's heads and faces. I'll show you how separate
layers, it's going to be. I'm going to take the
lightest color like this one. I'm f of all fill the b's face. And with the same color, I'm going to fill the
bang sheep's face. And on the new layer, I'm going to make the the
baby's ears, the Lamb's ears. Pinkish. I would like to make this part of the mom sheep's
face different color, maybe pink as well,
on the same layer, no need to create
new layers for that. I would also probably like
to make this part black. I'm going to actually even use the clipping mask for that. I'm just going to fill
this part with black, with darker charcoal,
and I'm going to use pure black for
the big sheep's ears. And I'm going to put the
little tail on the lamb. I think I'm just going
to use this like beige color on the same way and maybe the little
face as well. Like pinkish. L. Yeah, I'm quite happy with that. I always switch off the sketch layer just
to see how it's so in the coming together and
it's perfectly fine. I'm not going to try and perfect anything because
that's not the point. Moving on to the next layer, keep laying our object. The next layer is
going to be this bush, which I'm going to use
darker sage green with Is going to fill it. Next layer. In fact, I'm going to fill
this one at the same time. Despite the fact
that it's going to be a different color all green, but the objects are separate. So They are okay to stay
on different layers. Next object is the stream. So F, I'm going to use the lightest color
of the leaves part. To be honest, I can put the
leaves of the heather on the same layer with that same tree using
same green color. Reduce. I'm just going to vary
different shades of green. For this layer for these
leaves, little bit. I'm just going to grab maybe this bright
green color again. It's nice to use
variations of colors just to make it a little
bit more finished, more thought through,
if you like. And the stems are probably just reduce the size of the monoline. I'm just going to d the
stems of the header. And on the new layer, let's put the tree trunk for our tree using
this soft brown color. S. Sorry. See, I'm not following my
coloring page precisely because I just felt that this
type will be better to use. And finally, I'm going
to fill the he with different shades of this
pinkish pinkish purplish color. See, I'm just randomly filling
the pieces of heather. Just going to grab
the different shades of the lycy purple. The same purpose just
for the interest. Finally, the darkest ones. A on the same layer, they are not overlapping
and going forward, I'm not going to color. I'm not going to cover
the head of flowers with any texture because the reason is because the
details are too small, you probably can hardly
see them at all, let alone the texture of them. Maybe I'll just add
this reddish color just to make it a little bit more special. P. That's our here, the filled in, and finally, the
very last big layer. I'm going to f the
object is the stone wall because it's on the
very foreground of everything
covering everything. For that, I'm going
to create a new layer because it's going to be
covered with its own texture. And the color I'm going to use is the soft brown color again. I'm going to increase
my moe size, and I'm just going to fill it in with the color. Just like that. Let's switch this
kit sore, fancy. Yeah, I think it's
coming together nicely. And finally, what
I'm going to do. I'm just going to add
the little details. I'm not going to
dwell too much on it. I'm going to speed it up, but you will see
the colors I use. It's going to be
the sheep's eyes, noses, and the house details. And again, guys, this
is not important. You use whatever colors
the decorations you'd like because those little details are not going to be
covered in texture, and you will see it
in the next lesson. So now I'm just going to fill the objects I'm just going to add the details of M. I'm
just going to speak it out. Oh, that's it, guys. That's pretty much ready. I can switch my sketch off. And here we have an illustration that we are ready to start filling with color
enhancers and textures, which we're going to do
right in the next lesson. See you then
7. Applying Textures: Part 1: D. Now, let's begin the magic. Let's start filling our
prepared colorful objects with different textures
using the texture brushes. So as I said, textures brushes come in all shapes and sizes. They can be represented by
natural materials of nature. Sometimes they call
pattern brushes, which show different intricate
designs like flowers, leaves, birds, et cetera, or some ethnic motifs. So we're going to just agree that we all call
them texture brushes. And for filling this
landscape of ours, we're going to be using
the texture brushes that I provide with this class. They're called
landscape textures, and I'm just going
to talk you and walk you through
every single step, how to make our illustration, how to bring it
on the new layer, how to be to make it
more professional, more, beautiful, more
finished and magical. So we've got the stack of our
objects on separate layers, and we're going to start filling them with different
textures one by one. So in the same order as we've actually placed
them on this canvas. So our first layer is this
hill on the background. You can barely see it, but it also deserves
some attention. So let's just give
it its own texture. So I'm going to
create a new layer, and the technique
we're going to be using here is clipping mask, is one my favorite ones, and some of them will be
using clipping masks and others we won't just
for different effects. I'm going to talk you
through through that. So in this particular hill, I'm going to create a
clipping mask to that layer, and I'm just going to grab
from the landscape textures. I'm going to grab the brush
as called short grass. And the color I'm going to
use is this lighter color. Or use darker one if you prefer. I'm just going to maybe reduce the pacity a bit,
reduce the size, and I'm just going to
fill this hill with that. But the real magic starts to my mind is when
you start playing with different blending modes. See if I start the
blending mode, the color is literally changing from beige to light
green to brighter white. But for this one, I've chosen this blending
mode called subtract because it makes this effect of contrast of darker colors. I can always reduce pacity
if I feel it's too intense, so that's precisely
what I'm going to do. I'm just going to reduce
pacity to maybe 65%, effect it's not that harsh. And also, if I'm not particularly happy
with the way it's placed, I can always play around with
the size and positioning. And even the direction
of the movement. My grass will be, I would
like my grass to be slightly directed to one side. Yeah, I'm quite happy with that, and that's exactly the
technique I'm going to use for every object just
with different blending mode. For this pink hill, I'm going to create a new layer, and that's precisely
the case where I'm not going to use clipping
masks and here's why. The texture I'm going to use on this pink hill is long grass. The color I'm going
to use is this like this bright pinkish
almost white color. And I'm just going to
draws crass, like this, like so and see the reason why I've not
clipped it as mask because I like the effect like it
overlaps the hell edge, and I'm going to just change it to slightly strata movement. I'm just going to add a
little bit here and there. Yeah, quite like the effect. You see it's an absolutely
different contrasting texture. Let's see if it's
going to benefit from reducing the opacity, it might, but I think
it's all right like this. This beautiful orange is
going to be filled with Daisy fields. The
color I'm going to use is maybe this yellowish. Let's see how it's going
to work if I please. Pacity. You see, the
tone is too similar. I want a little
bit more contrast. I'm going to pick another color. I'm going to pick this neutral color and I'm just going to fill fill this beautiful
hill with the daisies. See, I think in this
particular case, I don't want the flowers
to overlap this hill, so I'm just going to
use a clipping mask. So the flower layer is firmly clipped to our
orange hill layer. Next one, I'm going to put
some texture on our river. Here, I definitely I'm going to be using
the clipping mask. And the texture I'm going
to be using is rain. And I'm going to show
you another effect. You can make so I'm just going
to apply this rain brush, but I'm going to use
it for my water. And as I said, you can change our river is floating from top to
bottom as all rivers to, and I want to direct this scratches like in a little bit more
following the river way. For that, I'm going
to choose distort, so I'm going to choose the
transform tool, distort, and I'm just going to bring
the edges a little bit closer together and further apart
here to give this effect. I can even use the
rap function just to play around with the
different wrapping way. And I think I'm quite
happy with that. I think it's just it shows
like the water flowing nicely. Next, let's look at
those fir trees. So I'm going to create
a clipping mask, and these trees are quite dark, but this one is
the lightest one, so I think I'm going
to be using darker. Oh, by the way, guys, going back to the
daisies and trees. If I don't mention the
change of the blending mode, you can still play around, but in my case, it means it's normal. It means that I've
not changed it. So in case of this orange
hill on the river, the blending mode is normal. However, you experiment,
play around. I strongly encourage you to do so to find out which
way you prefer. So going back to our first tree. So for this one, I think
I'll use darker color. I think the color I'm going to choose is as dark as green, and I've got these two
beautiful brushes, evergreen one and evergreen two. Let's experiment which one
is going to work best. I'm going to grab
the evergreen one. I'm just going to cover my tree in this little
gentle strokes. You can again use the
stored and bring them in a cone shape going
from bottom to top. Just like quite like that. Let's play around
with blending mode if anything is going to change. Color burn is a little bit to
tense, multiply to intens. You know what, guys, I'm just
going to leave it normal, quite like it like this. These two trees are darker, so I'm going to apply slightly
lighter colors on them. I'm going to create a new layer with a clipping mask
for this stream. I'm going to try and
use evergreen tube. And the lighter color. Maybe this this
lighter green. Yeah. I'm going to reduce the
size of this brush, and I'm just going to
gently with this texture. I think that's quite cute. And let's use even lighter
with the same brush, but even lighter green color, this like sage green. I'm just going to use the
different motion strokes. I'm just going to reduce
capacity a little bit, so the trees are quite
fuzzy and the like. I'll love that effect, in fact. Yes, that's how trees
filled with the textures. So far so good, guys, can you see that it's all
coming together as a very, very magical piece, but we're going to
make it even better. For this, we're going
to be we create a clipping mask on a separate
layer and I'll be using Leaves. So by the way, guys, the names of the brushes
shouldn't confuse you. If it's called leaves, it doesn't mean that
it's strictly for using for leaves on the
trees. It doesn't mean that. You use leaves as grass, you use flowers on the trees. You use whatever you prefer. So there is no strict
rules applied here. The color I'm going to use, maybe the pinkish color. Let's see, Yes, quite like that. And let's just fill this hill. This like leaves texture. Don't worry. They the hills look like they're blending
in together at the moment, but we will work on it. We will enhance the color. Next layer we're going to fill, is this grass layer, and I'm just going to create a new layer
with a clipping mask. And I'm just going to use the same brush as
we used for that hill, which is called short grass, and I'm going to use the
slighter green color. Use the size of it a little bit. And let's play around
with blending modes. Oh, I like that. That's like rape seed. But I think look, I quite
like this delicate Blending, I'm going to use pin light
and move on to the next one. Next one is the
trees and bushes. Not to over complicated, guys. Let's fill them all
with the same texture, which I think will be missy fur despite the fact
that it's called fur. I still would like to use it
on the trees on my trees. I think I'm going to use
this lighter beige color. I'm just going to fill them. It's going to be quite delicate. So that's why I'm just going to maybe reduce the
opacity of the layer. And actually, let's play with different blending modes and
see which one works best. I think overlay, actually,
quite like overlay. So you can still see this
little fuss going on, but not too much. Next is this tree, and this tree is going to be filled with dufted
leaves texture. And I'm going to grab this like more saturated green color. And I'm going to
fill the leafy part of the tree with that texture. I'm going to grab the uniform
function of my move two. And I'll see you in part
two of this lesson.
8. Applying Textures: Part 2: Ed. Right. I hope you
are not too tired. So next, we are moving to the
tree trunks clipping mask. I know already that I'm
going to use darker color, so I'm just immediately going to change the blending
mount to multiply. And the texture I'm going
to use is tree bark. And the color I'm going to
use is this saturated brown. See, despite that's the tip
I would like to show you. First, this brush is too
big for the tiny trees. What I'm going to
do, I'm going to fill larger area without
clipping it to the trees. Now I'm going to clip it, and I'm going to grab
this layer with texture, and I'm just going to
reduce the size of it. And you can see now it give this nice smaller texture
of the tree bark. That's the exact
effect. I'm after. Next, I'm going to fill this grass where
my sheep are standing. For that, I'm going to
create a new layer. I'm going to clip it. The texture I'm going to use is salted wash. Watercolor texture. I think it gives the
grass as you see the little tufts, obviously, the blending mode needs
change because at the moment, it's almost the same color
as the background grass. And I'm just going to use linear burn blending mode and look immediately
how it pops up. It brings the color up. Next, the house walls, creating a new layer, clipping mask, and I'm
going to use bricks. I think again, I'm going
to clip it because I want to play around with
the size of the bricks. The color I'm going to use
is this yellowish ocher. And I'm just going to
create the texture first. Why am making it so big guys? I can reduce the size
of it of course. I'm going to clip You
can leave it like that, which is quite
interesting as well. But I'm going to grab
the transform tool and maybe reduce the
size of the brakes. I think for the purpose
of my illustration, this probably size works better. I'm going to try and play
around with blending modes. I think multiply is the one I'm going to
be using quite nice. Next, we've got the roof, and with the roof, I'll come back in the
very end of this lesson. Now, the sheep's bodies. I'm going to create a new layer, not going to create
a clipping mask. First, I'm going to
start with a big sheep. Swirls is the brush I'm going to be using
for the textures, and the color I thought I'd keep the
same as for the bricks. I'm just going to fill. And the reason I've not created the creeping mask because
I'm going to create it right now and play around
with the size. I think I'm going to make
the size of the f of the bigger sheep bigger and the smaller sheep
of the lamb smaller. So I'm going to change the blending mode to color
bones a little bit too yellow. I'm just going to
maybe play around. You see what different
of as to green? Yeah, but you can see how
powerful this blending mode. You know what,
guys, I quite like the screen mode, maybe
slightly reduced. Pacity. And now I'm
going to create another layer for
the small sheep, not creating the clipping mask yet for the same reason
because at the moment, I'm not sure about the
scale of the swirls. But I'm going to grab
a different color just to make it slightly
more different, this sort of like beige
more muted color, which is exactly the same color as the little sheep's body, but because of a
different blending mode, I'm just going to change
it to color burn, and I'm going to create
a clipping mask. You know what, guys, I'm quite happy with
the scale of it. See, I can play with the
orientation or maybe this. The bigger sheep's
f is larger in size and the little sheeps
for slightly smaller in size. Let me see color burn
is quite yellow. I think guys, I'm going
to do multiple multiply, and just going to
reduce capacity a bit. I hope you're not too tired
filling your texture. I hope you are having fun, and let's move on
to the next one. Next one is the fur on our bigger sheets front
part of the body, and I'm going to create clipping mask and
I'm going to use missy fur with the
same basic color I used for the little sheep. I'm just going to fill. With the texture, and I'm just going to play
around the blending mode. I can see that it's too
intense because that's why I just reduce pacity
right away of this layer. I think I'm going to use screen blending mode
with reduced capacity. Next, leaving the sheep's
faces at the moment, Now, let's fill these two
bushes with textures. So you can see that this
bush is quite dark. It almost merges into the
grass on the background. So I think we're going to use lighter texture to cover it. So I think let's use
the tufted leaves. I'm just going to grab the
s like lightish color. And I'm just going to fill both bushes with this
pattern with this texture. And as always, I'm just
going to have a look what blending mode works best. I like lighter color. Oh, I like overlay. Look how it makes it
like delicate green and yellowish on this bush. Yeah, I'm going to
leave it like this. Next is this stree. We've got the heather
leaves as well here, but I'm not going to fill
them with the color, but I'm going to fill this one. This one, I think
I'm going to fill with the actual leaves
with a darker color. Maybe reduce the scale
of them just a tiny bit. Yeah. I know it looks
a little bit messy, but I think that's kind of
the style we are going for. It reminds me of like paper collage or different
types of fabrics, you know, like,
different colors and textures and patterns like
cut and put together. I love this style, and
I hope you love it too. And if you take my class, likelihood that you're a big
fan of this style as well, so I hope you're
enjoying it rather than feeling tired
and overwhelmed. And now I'm going to fill this trunk with the
bark of the tree. Stream bark. I'm going to create a new layer and I'm going to grab this lighter
color this time. I'm going to fill larger
area than the trunk. Why? I can scale it down. Now I'm going to clip it. Quite like the way it looks, but I think I'm just
going to scale it down at just to give it a
little bit more texture. I'm going to play around
with the pent mode. And the think I'm going
to use lighter color. The very last object
we're going to fill is this wall
on the foreground. We're going to create
the clipping mask and The texture we're going to use is quite
straightforward is called stone wall. And the color I'm going to
use is grayish page grayish, and I'm just going to fill. It looks like the actual wall. Let's see what blending mold
is going to work best here. Like that. O maybe still I want to use a
lighter blending mode. I think I'm going to use light lighten and I'm just going to reduce the
capacity a little bit. As you can see, guys, we filled almost
nearly all the objects on this on our illustration. But I would like to
point out a few things. The eyes and the facial
features of the sheep, I'm not going to
use any textures or the house windows
and little details. Not going to fill them
with any texture either. Neither am I going to fill
the sheep's legs feet with a texture because
it's just going to be too much and they're too small
to see any texture anyway. But what I'm going to do, I'm still going to add a little bit of a delicate
texture here and there. For example, the roof, I'm going to create a clipping mask, and I'm going to take
delicate scratch. Brush texture brush,
and I'm going to just apply a little bit with
this grayish color. Just a tiny bit on the roof, just so it's not too flat. See, it's not very texturized, but just the hind,
and that's it. And on the sheep's
actual faces, so see. On this black part, darker part of the bigger sheep, I'm going to use
the smooth noise. And the color I'm going to use. You know, I'm going to
use the same gray color. I'm going to reduce the pacity. Maybe even the size, just a bit to make it just
a little bit fuzzier. Maybe reduce pacity
a little bit. And I'm going to
create another layer and I'm going to use maybe this yellowish ocher just to create some fuzz on the lambs face. And the dark and blading bond. And that's it, the
ears, the eyes, the noses, the feet, the tail. They are all just
stay the same flat, just for a nice variety. And that's it, O textures
are all in place. And the next part, I'm going
to show you how to enhance your illustration
and to bring it to a new lever of finished
and elaborated.
9. Enhancing the Illustration: D. All right. In this part, we're going to make our
illustration completely finished. You know, like, I've been
contemplating about, different art styles,
illustration styles. And to be honest, looking
through multiple dozens, thousands of
illustrations online and pinterest in
children's books. I can tell you that you
can safely leave it just as it is because this
style has the right to exist. But in case you just want
to soften it a little bit, just to make it a
little bit more profound to add a little
bit more depth to it. This chapter, this part, this lesson is for you. Optional. You decide whether you prefer to leave it like this or to enhance it a little bit. And in case you don't
want to enhance it. This is how I suggest
that you do it. First of all, first level of
enhancement is the color. If you feel like the colors
are a little bit flat, let's add a bit of
variety here and there. And we're not going to enhance the color of every single object because just because there are too many and there is
no need in my opinion. Like for example, that far
away hill, it's already quite. Interesting, it has this
variety of colors and textures. But let's add a
little bit maybe on this hill because it might
look a little bit flat. For that, I'm going to create a clipping mask as a new layer. I'm going to grab the smooth
noise delicate brush, and I'm going to
use the same color. As the hill itself. Only I'm going to change the
blending mode to multiply. Let's see what's
going to happen. I'm going to start adding a
little bit of darker texture. Let's experiment. It can be actually on
top of this layer, and I actually quite
like it on top of it. Let's just maybe remove
this part a little bit. You can use this brush with
this like tapping motions. I feel like I want to add some even a little bit of
orange color just a tiny bit, and maybe just a
little plunk of green. Yeah. Maybe a bit. Here. See, it's
not changed much. But there is just a
little bit more texture going on there, more color. Next one, I would like to
work on this one and I can feel like I would like this
part a little bit darker. Again, do I add it on top of the texture or do I add it in
the bottom of the texture? Let's try on top of the texture. With the same brush,
smooth noise. I'm just going to add this orange brown with
reduced capacity. At the moment, I'm not
liking the way it looks, but I'm sure that after changing the blending mode
from normal to look, I really like linear burn. That gives it even
more autumn character. Yeah, I think I'm going to
leave it on linear burn, but I'm going to also grab a different color maybe greenish and add a little bit
here and there with the tap tap tap motions. Try to experiment with
different colors. You see orange in linear
burn turns into lovely red. And I think that's lovely. I think it gives a variety
of colors for our hills. And, I think I'm just
going to leave it. I don't want to overdo it. The river, I think I
might just add a bit of with multiply blending
mode using delicate scratch. I might just use a little bit of darker
color here and there. Must not noticeable. Yeah, I think I'm
quite happy with that. Another object I would like
to enhance is this hill. It looks a little bit flat. So what I'm going
to do this time, I'm definitely going
to create a new layer underneath the texture
and I'm going to Change it to multiple
mode right away because I'm going to use the same
color as the field itself. The brush I'm going to
use is delicate scratch. And I'm just going to
delicately scratch my hail. See only in the edges. L et's try and change the
blending mold or color burn. Look at that. It's
really burning. Line quite like line burn, maybe a little bit
reduced capacity. And I'm going to grab brownish this brownish
color just to add a little bit more variety
with the same gentle scratch. Brush, I'm just adding a bit of darker areas here and there. Could maybe add a little bit of also darker color on the
multiply mode on the new layer. I think this time I'll be
using the emphasizer to this grass because you see like this bushes are just
a tiny bit merging. So on top of the
lighter texture, I'm just going to
use the emphasizer. And just walk around this grass. Yeah, I think it's bringing
it up quite nicely. At least you can see the
bushes now on top of it. It's really up to you guys
what you decide to do. Now I'm going to add a little
bit on my sheep's bodies. I think I'm going to use
crackled rock texture just to try and the color I'm going
to use is this grayish color. I'm just going to
add maybe a bit of te and color on
my sheep's bodies. Maybe a bit of a darker color on this part, multiply mode. I'm going to grab
this deep brown with the same crackled rock texture. I'm just going to
add a little bit of texture here on top. Yeah. I think maybe the face of the lamb is a
little bit too flat, so I'm going to create
a clipping mask. I'm just going to grab
the smooth noise. This may be yellowish
or csh color, reduce the size of
it and just add a little bit of texture
here and there. Yeah. I like that. I feel like maybe
it needs just a tiny bit around the face. With the salted wash, I'm just going to I've added a little bit of color
around my sheep's face, and the blending mode, I changed to darken. And not to overdo it, guys, I'm not going to add
any more apart from, I think I'm going to
add a little bit to this wall just to make the balance bring
the balance together. As you see we've got darker
edges of the whole picture. So I'm going to
create a new layer. I'm going to create a
clipping mask and because I know already that it's
going to be a darker color. I'm going to change
it to multiply with potential changes
to linear burn. And I'm going to use
generic texturiz. The color I'm going to use is the same color I
used for the wall. And reduce pacity. And that's the color
enhancement done. Another thing you
can use to bring your illustration on the slightly different
level of style, As I said, you know,
I love the effect of this cut paper of fabric and the cand layers of
collage put together. But if you wish so, you can soften some of the
edges of sharper edges. For that, I'm going to use, so I'm going to go
to charcoals set. These are defaulted
brushes of procreate. I'm going to use to be
compressed brush for my erasor. And I'm going to try and see how it's going to
look if I erase some edges. For example, if we start
like picking sharper edges, this edge is quite
sharp of this grass. I'm just going to try and gently rub the sharpness
of it off just to make this part just
a tiny bit softer. I think maybe the edge of this. Hill as well, it stands
out as too sharp for me. I'm going to do the same on the layer where we
filled with color using the razor tool with two
becpressed charcoal brush. I'm just going to gently
with quite small size, rub the edge of and probably
what I'm going to do. I'm going to is sharp
edge of the sheep's body. Just to make them
slightly more fluffy, slightly fluffier because
sheep are fluffy. Yeah. And the very last thing
that you could do is to put their overall texture on
top of your illustration. So how I suggest you
could possibly do that. So you can create a new
layer and pick a brush. Texture brush, like for example, six B compressed and charcoals, just as an example. What I'm going to
do, I'm going to increase the pacity to 100%, and I'm going to increase
the size to 100%. You can pinch your
illustration to make it small. I'm going to use the dark
gray color almost black. What I'm going to
do, I'm just going to color it in like so. Of course, as you
probably have guessed, I'm going to change the
blending mode Oh, gosh. S. No texture on with
texture on top. But that's with darker color. You can always use like brownish color to
give it more CPL. This brush in my opinion, it's a little bit too harsh. So I'm going to try and
use to be compressed. And just give picture
this texture. And let's play around with blending modes and see
how it's going to look. Se it gives this, like that. You can always play around
with the opacity of the layer. But you see it gives
your illustration completely different
overlay overall look. You see with that I hope you can see the
change of the tone. And that said, guys,
go ahead, create. Please share your
project with me. I love seeing your artwork based on my tutorials and
lessons. See you next time. By
10. Final Thoughts: Thank you so much
for taking my class. I hope I've managed
to inspire you for creation beautiful artworks. Please make sure to
upload them here on skill share or feel free to upload them anywhere
on social media. And if you tag me, it would be just amazing, and I would be
eternally grateful. What's very important that
I would like to mention? The techniques I've shown you in this class are
very, very simple. Feel free to work on
your artwork longer. I didn't want to show you every single thing I work on when I create
my illustrations. I would like to give you
the base that you can build upon and to inspire
you for your own creations, for your own little technique, how to perfect your artwork, how to make it more finished, how to make it more
magical. Thank you so much. See you later. Hey.
 Irina Young, Busy May Studio