Transcripts
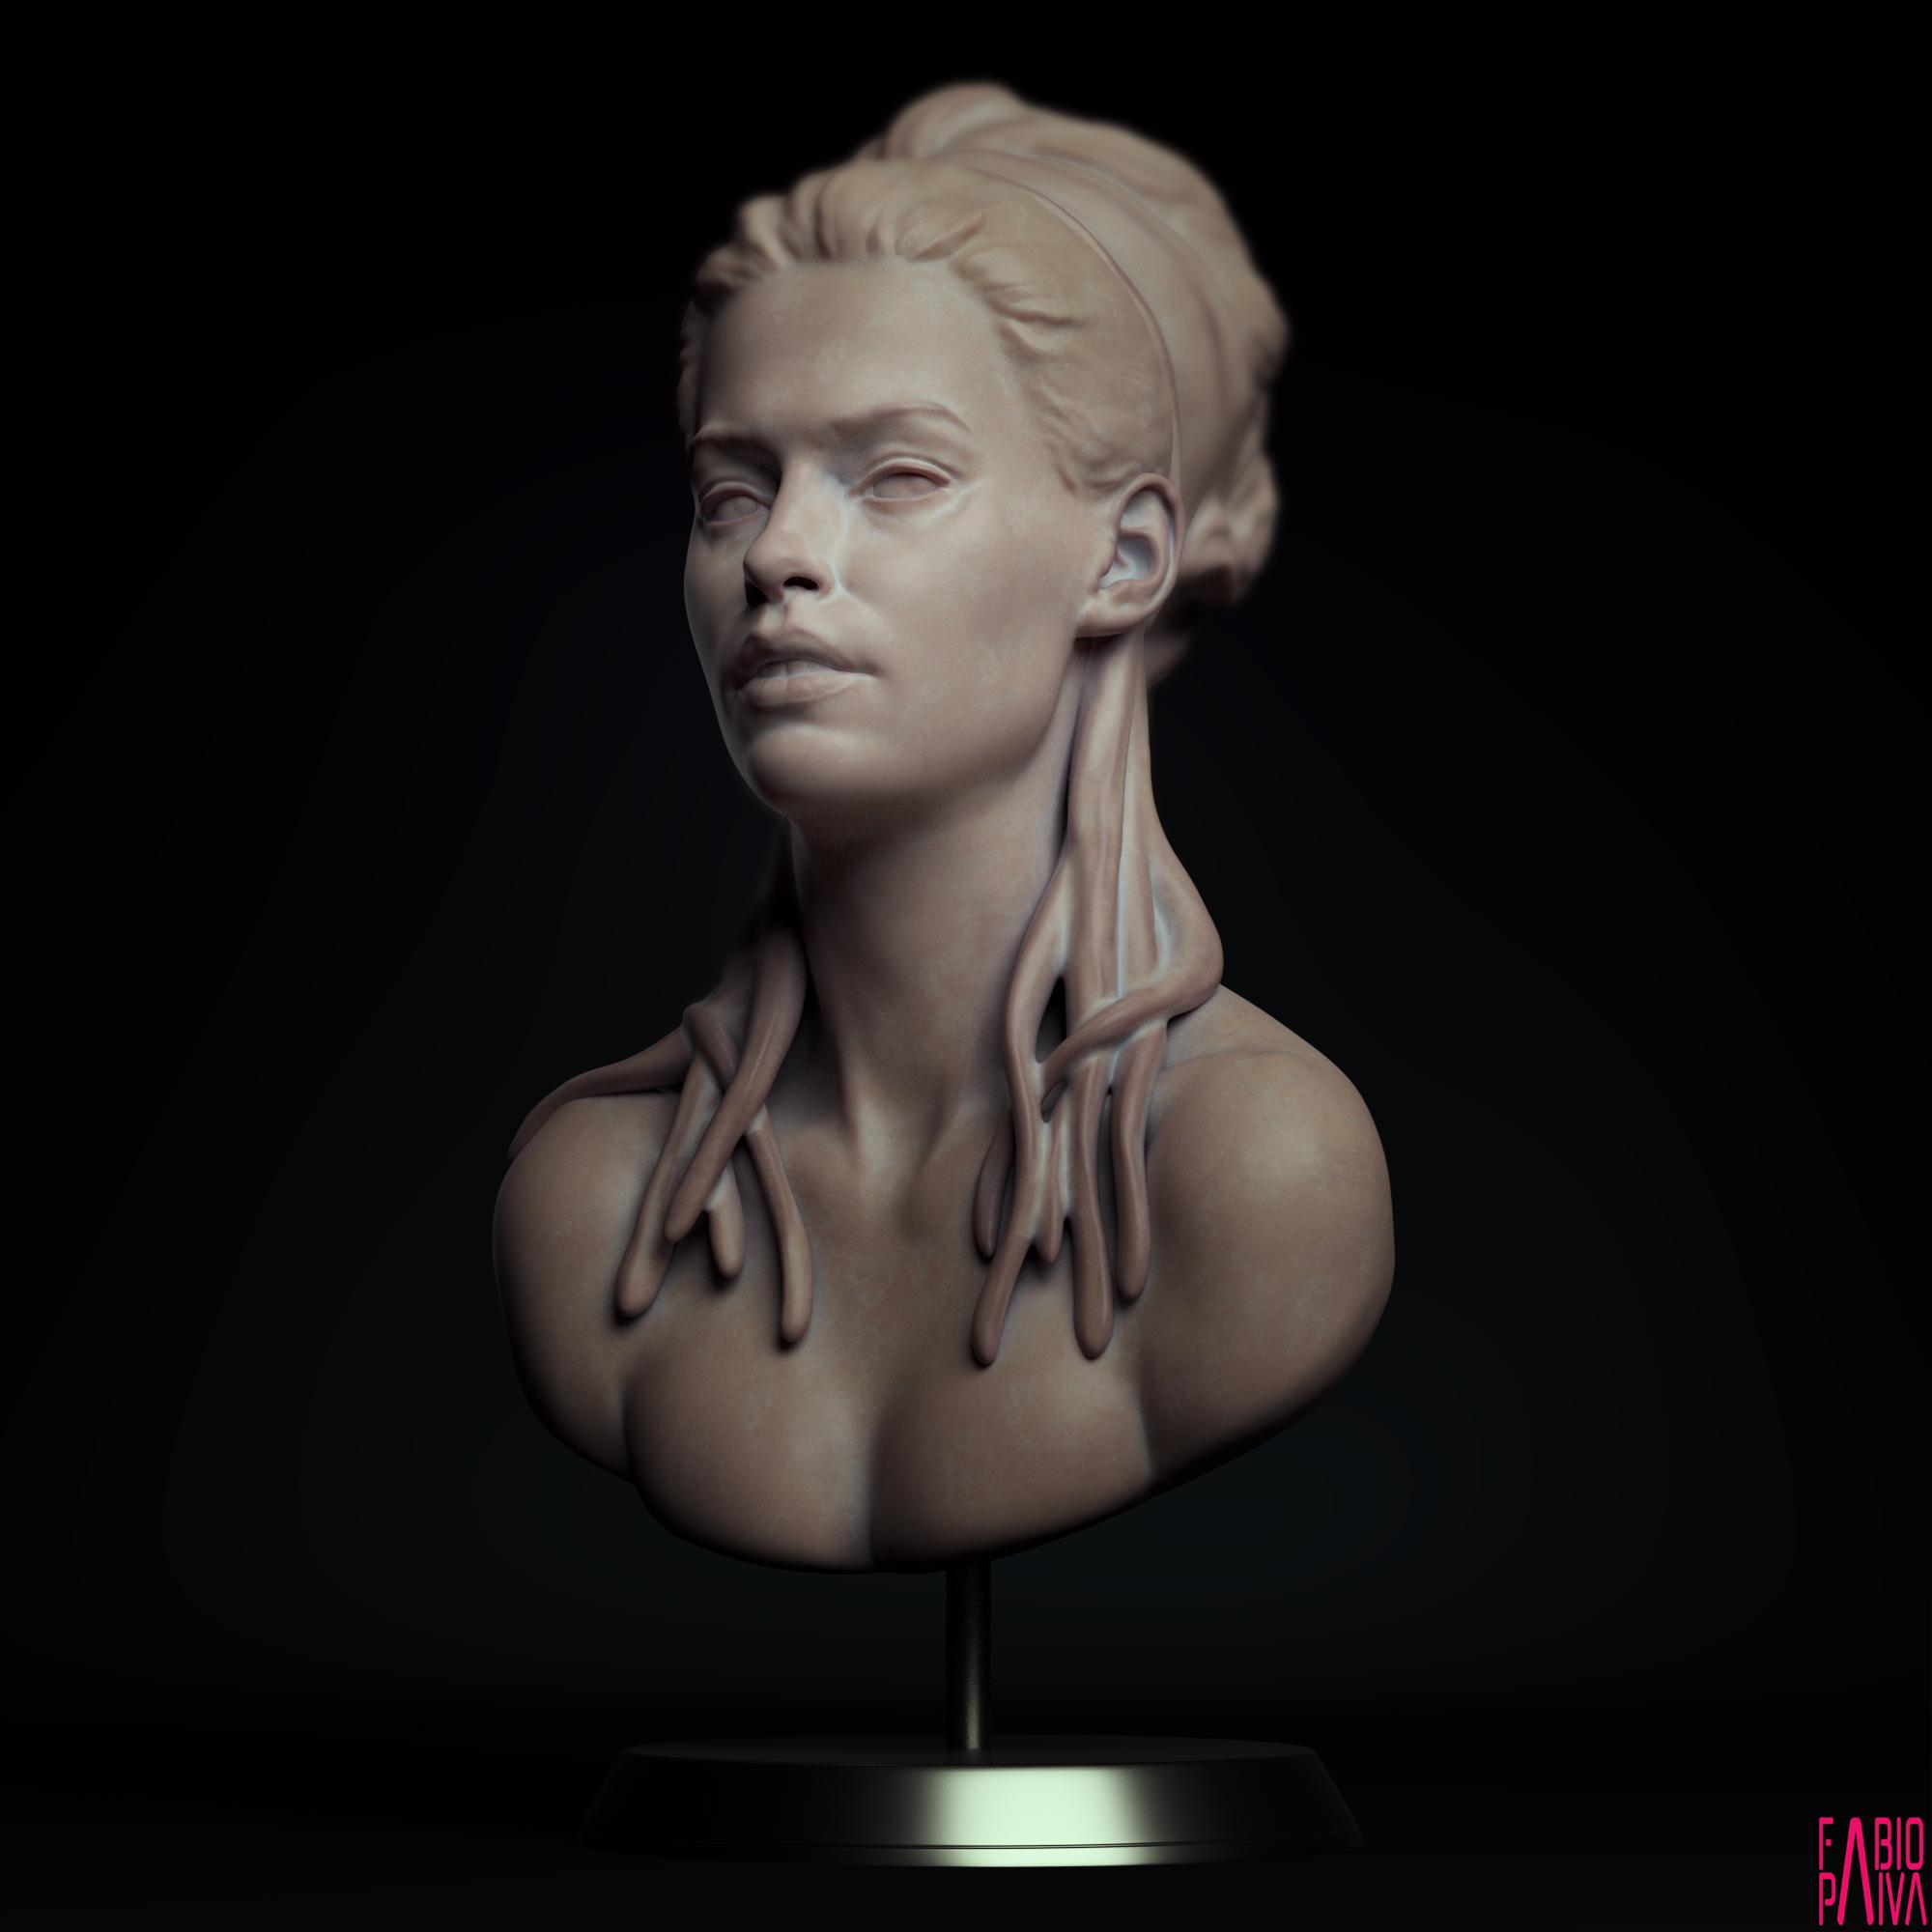
1. Female Bust - Introduction: I'm fine view and I work as a Senior District sculptor at and workshop in New Zealand. In this class, I'll be using ZBrush to sculpted female bust. What of course you can use
any other sculpting program. Don't worry. Building upon previous classes, we can now take
with his sculpting subject that it's usually
a bit more complex. I will show you in real-time
how I do it and I'll do my best to share everything
that's going on in my head. It can follow step-by-step. Regardless if you're
just having fun or you want to raise your
professional sculpting skills. This class is for you. By the end of this course, I am sure you have the knowledge to finalize a beautiful meal. Just have fun.
2. Part 1 - Blocking out: Welcome to e-mail bust
sculpting course. You're gonna beautiful
previously seen concepts. We have seen some
theory and assemble applied theory on
the humans coal, but also the male bust, which is the most
complete volts so far. If you're going in order, there's a good place to be. A good place to be.
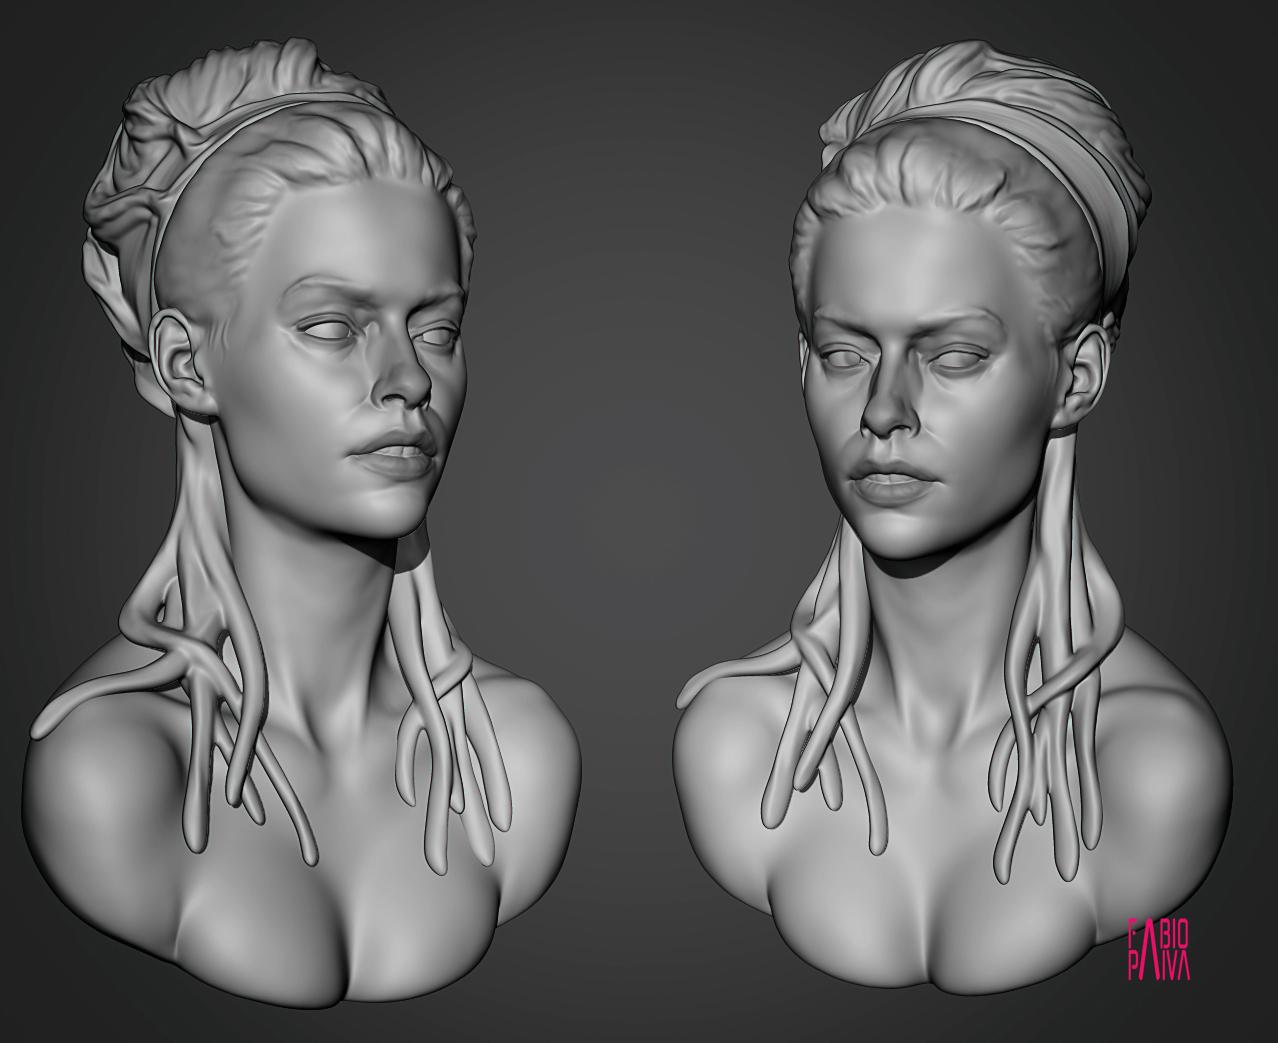
Now, as always, I'm starting in a different way, the way I block
out my base mesh. In this case, I decided to use three meshes roughly in
the shape of the human. Head and neck and upper body. Even though we're just I
sculpting the head portion. Mostly. That's the name of
the course here. I think it's interesting too. Since we're doing it anyway, to include a bit more. This piece is not two. Not for production. For any type of production. Really. It's always,
there is always a change to practice,
composition and design. I went to sculpt more
than just the head. And that's why I'm doing
the providing as well. The transition from the head to the neck and the
shoulder and chest. They all help to give a sense of the figure you're building. The good chance
to do a bit more. You could even add. Hence, even without
sculpting the whole arm, you just cut off at the
wrist and the hand appear. And it's part of
the composition. It could be part of this study. I will not be doing this way, but it's a good idea
if you want to do it. Just think of composition. Now that I'm not gonna viewed in a other pieces other
than her body. Well, including
the hair as well. But you see what I mean? And I will mention more about
the hair when we get to it. The idea with this
first part here is two. If possible, not even
to use references. You can do it as a test to
see how far you can go. Just with your
embodied knowledge. It's always good to
test it as well. And I'm sure you'll see development over time.
That's a good thing. And why I say
without references, at least for now, you may have picked your
references already. Like I have there
on the side here. At this stage, I usually
prefer not to use it just to test, as I said, but also to see if actually I am using more
of the intuition that I have. Instead of being affected
by all the references, you may come something special. I started this piece with the idea of having
that portion of the upper body and her shoulders a bit
tilted forward like that. You can see in flight right now. Since I had this idea, already, really need a reference to develop that much because
it's gonna be really rough. At this stage. As we've seen. In the other classes. There's no really one
way to start out. The way you block
out on the shapes. What has to happen and
will happen regardless, is that you slowly have
more information available, which in turn will help you make decisions
on what to do next. Just keep in mind that we're always trying to,
the same story. Always trained to
represent things here. At this stage, maybe
difficult to really represent anything other than circular, circular shape for the head. Cylinder for the
neck and all that. When we are still
representing something. As I've said before,
you could use just square shapes and planes. I tend to like to use curves more than
the plainer shapes. But when in doubt, planar
would be preferable. Just because it's
more intentional. It's actually like, you mean
it align starts and ends. There's no doubt to
what's going on. When in doubt on how
to develop the shapes. Try to develop them. With planes. That's a good way to go if
you're having a hard time with curves and move
sources like this. I'm spending a bit more time
on the shoulder area and neck just because it really
matters on the overall field. Few of the piece with the same idea of
not using references. I know I'm doing a female burst. I'm trying to imply
some forms and shapes that helped me
see that it's a female. But in the end of this class, or I should say the
end of this video. Right now, this is how you
can do. That's fine as well. I would push, push a bit more. But if this is all you
can do with a references, then he started using references
from this point forward. But don't define
things too much. Both in the resolution of
the mesh that you're using, but also the design
of the features. You'll see by the
end of the video how simple her features are and
they are open to be changed. And this is something
we were doing. We would do some studies
of different phases and pick one of those
and develop a bit more. We will develop
expressions as well. Maybe I'll be doing this to a
WIC to defend face designs. I'll pick 12
expressions. From there. We'll just pick my final model. It's a little bit of repetition. Both the concepts, things
that I can say here. It's useful that you're seeing the same
concepts being applied to different sculpting
styles or sculpting objects. So far we have not done any
female form which special, on its own, has really
unique features and other things
to be mindful of. We usually can get away with less definition, less details. They implied overall form is usually what's expected
from a female figure. But again, it's open to you to decide how much
you want to push. Notice again how how much time I'm spending on the
other other areas other than the face. I'm working on. The neck and shoulders and
everything else. And already use like
at least for me, already feels like her. That could be a female bust. Lot more to define
whether that's the idea. Really like how with low resolution meshes we can
imply so much in ZBrush. That's why sometimes
you see me going really far from the camera. Just because not only I went to see just the bigger forums, but also the size of
my brush is gonna be really small in
comparison to the object. Notice how it's really low. Low resolution DynaMesh
that I'm using. I've said many times
on the other courses. I'm always looking for how
to represent each part. How I'm looking for curves. Nice flow of an, a nice flow of those curves, which is easy to see on
the silhouette might also, it can be seen everywhere.
Internally as well. Student or using any references
for up to this point. But of course I'm
all this knowledge and farms that I'm building. They're based on anatomy
because it's human. I've said that many times. It's not about the precision. Just know roughly the
muscles that I'm building. I don't know other names, but I know they're
bigger shapes. What muscles are in
each part of the body? If you liked this knowledge, instead of really copying
and learning all its names and spending time
doing this exercise, useful exercise for
this model here. Right now, you stop for awhile. Parts where you don't
really know what to do. And then you look up in a Anatomy resources
that you have. Images. You can even say
for yourself out loud, I have to sculpt a, B, and C, these muscles. And then after you
have this knowledge and these understanding, it really goes back
to the sculpting. And then it's all
about the forms again. Because the muscles themselves, they have simple shapes. Teardrop shapes are sometimes almost a rectangle but with
smooth border borders. But really things
get complicated when you're building more
forms around them. Anatomists always just
a tool for us here. Even if you're, if you find some line and it looks
good in your design, you cannot really explain
the line through anatomy. It's fine. It's going to work. Can you really give, give
a name to every wrinkle? Human face can have? Not really. We are almost at the end here. You can see how this
boss could also work as a male as well. Briefly imply some other forms. But it's okay from
this point on. Really want to have a face or it can design some
hairstyles to use. Future is up to you to go a bit more or less than this hair. I think it's an important part. That's what we are
going to do next. You can watch the
final seconds here, and I see you the next video.
3. Part 2 - Hair Styles: In this video, I'm only going to sketch a couple of
hairstyles for them. The reason is hair blaze a big portion on how we
perceive the character. Everything else. If we were building, we're
building objects. It will be a good point in time to have something
that represents them. In this case, the only thing as a separate entity or object,
it's going to be the hair. So it may make sense for us
to do some hair studies. I'm just gonna do
enough. I can read it. And it doesn't get in the
way of the actual phase, which is the point here. You'll see that by the end, have I think three or
four switching them between the faces in the future when we have
the other studies. And it's always good practice to just try things out
on whatever your duty. Because the only thing
that I knew I wanted to have here was a female face, certain ethnicity or style. When I was hoping for the
design itself of the face, I don't even know what type
of nose or what type of eyes or say shape or
anything like that. As I've shown before. The references that
are used or not for a specific details. I use them as reference. More inspiration, reference, see something and then it pushes me
to a direction. And then I may not even copy or follow the shapes
that I'm seeing. Which is so interesting
to see how just by having that group of photos and
you're going through them, you will just push you
to a different direction depending on the day or wherever you're
feeling in a moment, it may push you to a
different direction. You'll never know it's
really unknown territory. Here. There's nothing
much to say really. Because all we're
doing is sketching. Some hairstyles are not using any special techniques
on different brushes. You can do whatever feels
more comfortable to you. I would say just try
to make it as simple as possible in unspent days, knowing this is
supposed to be just enough to give the face
some type of framing. It should don't do too much, then it becomes a problem as well because it
doesn't read well. But if you can split the
hair into too many groups, as you can see right now, I'm splitting three
or four groups. And then it would be
enough, let enough. Usually the other ones there gonna be a bit
more complicated. But in the end, they will not
serve for any other purpose other than just driving
the rest of the design. If I were to finish them, to print or anything else,
really better representation, I would have to spend a
lot more time sculpting in defining using more measures. Actually actual geometries
to the find them. Instead of sculpting into one. I do like the effect of
sculpting the hair with the actual face object
or face geometry. In this case, I will just leave
them as separate objects. Will serve their
purpose the way it is. Maybe if the hairstyle or
trigger doing is short hair, then it makes more sense to model the same mesh just because the transition
will be a lot more natural. But here I can get away with separate mesh because the
transition is hidden. For most, for the most part. As you can see a little bit. Sped up, the video. Just leave you watching. And this case, if you
have any questions, you can send me a message. But I do believe
that this part here, the concept behind the, the, the actual sculpting
part is pretty easy for anyone with a little bit of
experience in ZBrush. But if I have to say
some kind of concept behind is just make it
as simple as possible. Don't try to sculpt every
hair strand or every line. If anything, try to
go the other way. Being a simple as possible
with less information, just enough that from
the distance you can kind of see what her type it is. Hairstyle. Because really we're practicing the shapes
of the face here. As I starting point. We are concerned about the hair. To bring the hair too
at the same level of definition, that's the face. But feel free to define a
bit more if you want to. You can watch the
video and to the end. And I See you soon.
4. Part 3 - Exploring Facial Qualities: Now we have hairstyles and we're initial
blockade of the face. Make a copy of the bus. And my intention
here is to do to create two different
face designs. And I'll be going
through my references, but also being aware of the body and being relaxed
as relaxed as possible. If you're noticing
that you're moving your hands to faster,
you're rushing things. I'm here to remind you to relax a little bit
and try to go slow. Always in the back of your head. Try to have that mental note
of finding representation. Representations of every
piece of information, interface or every
feature of the face. Maybe help you to
think that you're not really sculpting upper lip, lower lip or nose. Just creating a shape that's representing whatever
you want to call it. Shapes can be beautiful. Shapes can be, can
flow into one another. That's the idea here. What, what's going
to be missing in our practice up to this point? Z artistic part of
the model itself. Because there's not
really saying anything. Expression. When we
do it, it's going to, I'm going to end up doing a really simple one, relaxed one. But we have to start
somewhere instead, instead of going right
to the extreme poses, extreme facial
features and lots of information and also implying
symbology behind all this. It's good to be at least
a little bit in control of how you are dealing with
the forms of the human body. I hope you understand
our progress here. This is not the integral, just doing versus like this where it's part
of the process. You can't even control
just the forms. I don't think you can
really apply much. Meaning behind your
piece if you're using human anatomy as a tool to express whenever
you want to express. We know what we're doing here is kind of boring
and meaningless. It doesn't go anywhere. But we are practicing the skills which is part of the of
opening up more doors to you. As always, you see how I
jumped from part to part. And that's because every time you draw a line or
change the form, the whole thing has a different appearance,
a different feeling. I never try to hide my
measure isolated my meshes the least direction. Only if I'm having trouble
getting to a place, Let's see, inside the nose or
something or the eyes if computer is
slow or something. But I usually have the
whole piece on screen. I tried to zoom out as
much as I can as well. Because it's always about
the whole whole piece, even the end of the neck is affecting some way how you're perceiving
the face up here. Keep that in mind. Try to work on everything
at the same time. Of course, it's not literally possible to work at
everything at the same time, but you get a sense of it. Whenever you feel
like you have to jump to another
place, just do it. It's probably because
you actually have to. It may seem that I'm doing too
much sometimes. Right now. I'm using sculptures to add a bit more resolution
around the ellipse. Just because sometimes it gets in the way the
lack of resolution. I really wanted to see the
the line between the lips. And if you don't have
enough information there, it will be hard to see
where also I didn't want to subdivided the whole mesh or use a higher number
for the DynaMesh. By keeping your mesh. Lower resolutions, easy to move. Big chunk of mass like I did. It's not that low poly that I can't even use them standards
as I'm using right now. Daimon standard gives it
a nice line which see how it's an S-shape coming from the cheekbone to the chin. The mesh is dense enough to actually say I can
see that line over there. Again, I love how even with a lower
resolution mesh like this, we can, we can see
a phase already. And you can play with
different designers. And if an ideas and proportions. You see how I usually have
a pretty smooth mesh. That's maybe
preference would say, kind of bothers me when I, when I see a really
noisy surface. It's just hard to read, at least for me. It
doesn't bother you. You can actually sculpt a lot faster because you don't
spend time smoothing. And sometimes when
you smooth things, you have to sculpt again
around the around the area. What you can do
you can use here, other than what I'm
saying as a reminder, you can see how I might find
some parts of the face. I'll go back to it sooner. Just gonna notice here that
we finished the first one. And I'm going to make another copy and starts
the second phase. As you watch. I do. The second phase. I'll go
back to what I was saying. What do you can use here? Other than what I'm saying
and reminder and all that, the concepts behind try
to pay attention to what parts of the face I
usually pick to imply forms. As you know, The human
body, including the face. It's highly complex and chaotic as anything
else in nature. If you zoom in enough, it may be difficult for you to know what even to simplify. If we go back to
the other videos. I always am here, always talked about
simplification and stylization and representing things where if you are lacking even the initial idea of how
much I'm going to simplify. The lips for instance,
I have no idea. I don't know what to go
by watching me do it. You can have an idea of
what parts I'm simplifying. Just pay attention to
the parts that I'm simplifying and not really
the design that I'm making. Let's say the left, right there. There's an S-shape
on both sides. They go to the centers
of 2D shapes, let's say. Now you know that I'm implying
the lips with an S-shape, so two curves on both sides. So try to come up with
their own S-shaped. Maybe you can try to define
the lips with three curves. You see another example how I picked that volume
in the forehead. It has a certain size, certain relationship to
the rest of the model. By saying that you have to
design your own volume, will your own this form, your own design of that
part of the forehead. So you'll be using my model in this video here
as a map for you. If you're having a hard time to decide where to simplify
in the first place. Then you use my my
video as a guide. You'll be always designing
your own shapes. Or else you'll just end up
with a model like mine, then you're missing a point of exploration and practicing
in the right way. If you just want to copy. There are places for copying and I copied a lot and I
still do sometimes. But keep in mind that it's different from your
own exploration. If you're just copying. Maybe, maybe you see a
really cool looking face, someone's sculpted or
cool-looking face and real face. Just want to copy
it. You can do it, but then try to have a
conversation with ourselves. And copying this
and the other part that looks cool because connects to the other
shape like this. And I'm simplifying a little bit even though I'm
trying to copy. Really, you're always giving your own flavor to
wherever you are. You're making. Going back to the model here. I'm not even concerned
about the ears right now because I didn't feel
like it's gonna, it would change the
character that much. They both have this face
on the other phase, they have similar features. I don't know why I'm
doing this type of phase. Instead of a more
Asian looking face or African phase or wherever
other type of phase. Each momentum we have
our own inclinations. If you spend too much time questioning why you're
doing. These are dead. You're just wasting
precious time, pressures, practicing,
practice time. There will be other
times when I will do other types of phases. So this is what I'm
aiming for right now. We're roughly halfway
through here. And I believe I go back
to the first phase. I sculpt a little bit more. But before we go back to
this, to the other phase, you see how I keep just testing
out different hairstyles, the ones I made before. It's amazing how. Remember when I said just
by looking at photos, it may drive you to
a different place. Point to try
different direction. Same with the hair here, just by changing hair. Hairstyle, it may not
even right to say, give you a new idea because I don't even know
what the idea that I'm having is more like
I think they are better analogy is really pushing you towards
something else. We don't need to
explain everything why we're doing
wherever we are doing. But that doesn't mean we
cannot label it in some way. I just like to label that just pushing me to a
different direction. If you remember. I didn't start the second phase
from the sketch. I actually started from our Blackout to force me
get to the forms again. Whenever forums I'm doing here, I am subdividing the
lip ellipse again. The same problem and
really wanted to define the line between
the lips a bit better. Even though the process
kind of repetitive. You feel like you're almost
losing your arms and hands in the same
way. We screen. You get used to seeing
certain shapes. The experience of
finding shapes. This is always knew.
That's really interesting. But that's sameness of everything else sometimes
gets in the way, at least gets in the
way of my sculpting, get affected by the sameness. If we can call this way. It may sound a bit simplified
or even a bit damp. But even changing the material. Changing the ZBrush Interface. Ui colors just gives a
different experience. You change the background color. You may help you
be free to sculpt. Pay attention to
what really matters. I don't know. You may you may try that and then let me know how you feel. If you have a hard time defining the nose as much
as I am right now. Really? You don't have
to do it right now. I just find that this
part of the nose, the nostrils, the actual holder, helps define the
rest of the face. But I would never I would
never do it in the beginning. It's amazing as well from
my point of view here. How the eyes, they're usually
the ones that I defined. I don't really need that
much information on the ice to get a
sense of the face. Even though there seems to be an expectation with the ice. When people talk about our target scope to
your drawing layer. Everything else. My experience here is actually the opposite. The eyes not being
the least important, but I don't need much more
than what we have here. Love to hear from you
and how you feel. You really need to define the ice more than
what we have here. Now. I think I'm almost
done with the second phase. Will be soon going to
the first one again. When I do, I will come back. So keep watching and
I'll be back soon. Developing the first
sketch a bit more. I, maybe I had some new
inspirations from the second one. It's almost like the
first one was a warm-up. And then I was able to push, push the second bit more. And then I felt that this one
was not developed as much. I just decided to go back to the first one and try
to define a bit more. Also felt that it was lacking some more complex features
that they either 1.5. See how much I can
push this one. At this point, I actually like
the other one a lot more. But I will end up picking
this one to develop further. This is the model of our course. You see how there
are features that I really like since it's not well-developed
compared to the other one, I almost let this one go. I felt this one deserved a bit more work,
a bit more care. Working on the nose there. Again. If you really have a hard time knowing how the
underside of the nose looks, please don't don't try to
avoid using references. As I said, the only
part I didn't use references here was for the first part, the
blocking stage. Really see how far I can go and where my intuitions
lie and all that. From that point on, I always have
references on the side. I decided not to show
the references here. I don't push you
to any direction. And really just
free photos from, from Google, from Pinterest. I do use some paid content
from New Masters Academy. Just because they
sometimes they have better resolution photos
from different angles. We can pretty much
find photos for free. Since you're only studying. It's fine to use them. I already said how to
use the references. Are you having copying? You're just realizing what
shapes you have to define. We'll go over that a bit more. But right now this
is what I have. I'm just making snapshots are the two models with
different hairstyles. And now we're ready
for the next part.
5. Part 4 - Facial Expression: We're gonna do a second
round of studies. But instead of using both faces, we picked this one. My intention here is to just create studies
of expressions. I will not be using all of them. Of course, but not only it's an excuse to study
facial expression, but also see wherever
meters well with this face. And how I feel at the moment is really an
exploration of the model itself. And however you are feeling, you'll become more
and more aware of things you want
to do in a moment. You will or not to
question that much. Whatever feels right
you end up doing. And then this is
going to give you a focus and patients
to just keep working. Because really this
is and endeavored. It takes a lot of time, a lot of just missing other opportunities in life if you went to put it away, It's kind of a negative, but there's so much to do. Where does your attention go? I picked two expressions. One of them is going to be a bit more relaxed, open mouth. What you're seeing right
now. And the other one, I'll try and smile. But you have infinite
combinations of face, facial expressions. You can do anything really. So it's a bit overwhelming. Try to come up with a simple
idea in the beginning. Knowing that this is a study, it doesn't have to cover everything in
management, manageable. I just picked two
expressions and I'm going to do my best here
to define them. There are things
that I like when I'm doing expression studies
like these ones, is that you don't need
that much information. Took imply what you're
trying to imply. One way to see this
is that you can see how the teeth are
just some lines. And I'm using the same
geometry to imply the teeth, but also the face itself, how humans move their phrases. At least on a steel frame
like we have right now, you have some more
room to explore. It will be a lot more difficult. If we were trying to
animate this face. It always the biggest problem. At least realistic animation. Well here we are sculptor,
so different subject. I'm still using low
resolution mesh. And that helps because
the same way that I'm not even defining
everything that much, I don't have to define the
expression itself too much. I don't need lots
of wrinkles and lots of even lots of lines really to define using sculptures. Again, the way that I'm splitting this
course, the whole course. It makes sense for me to keep in mind not to post too much, even though it will be a smooth transition from creating this
expression right now and just going into the end
where I really want to stop for even fewer like this so I can create the other expression. Or else I'll be missing the opportunity of
exploring this. The way I approach
human expression. There are many ways you
can solve this problem. You may try to copy again, which I never not never, but most of the time, I don't really I don't think it's
a messy idea to just copy. Let me give you a couple of ways that you can
solve this problem. One way would be
through drawing. Drawings a lot faster
than sculpting. When it comes to expression
or almost anything. The first stages of development. Imagine that through drawing, you can define both eyes with just two lines and the mouth. Maybe with a curve or one line. And then maybe you need two
more lines for the eyebrows. Don't really need anything
for the nose. There you go. You are exploring representation of the human expression with just a couple of
lines, few lines. If you find it by yourself. By simplifying with just lines. We're not trying to apply
that in the brush as well. That's one way. The more you do it,
you'll see how some of that learning
through drawing can be translated here in the
brush as well. That's one way. Another way is something in-between what we are
doing here in the drawing. You would have a bit
more simplified surface. You would try to draw on
the surface the same lines. It wouldn't work
that much because we have the shading information and light information
here in ZBrush, some shadow and reflections. So it's a bit harder to do it here where
you could as well. You see how much
you can use from that information
directly into ZBrush. So that's another
way to see how you represent each and
every expression. Of course, if you're going
to be more realistic output, you will need to sculpt the whole lip and the inside
of the nose and all that. So in that part, in that regard, hard to simplify with one
line, like in drawing. I hope you get a point of at least having this first
stage of simplifying, simplifying things as
much as we can simplify. Drawing. Another way
to do it will be sculpt him a bit more
information on a 3D plane. Curve the 3D plane. And you play with
the eyes and mouth. And it just keeps
the nose as it is. You can use any shape
for the nose really. Other than that, if you
do keep in mind that even an expression and emotional
expression of the model, you're still dealing with
the same forms and shapes. The same thing. It doesn't
have to be more complicated. Where is it? Kind of gets more complicated
because we're not used to seeing human expressions in
a still frame like this. Not as much as the movement
of the actual phase and token and looking at people. The same way that you may have a symbol of how an eye looks. You can ask a person that never drew before
to draw an eye. It's gonna be just two curves. Symmetrical curves with
a circle in the middle. That's a symbol of
what an eye it looks. And we do have symbols of
what every expression looks. You have to be mindful and pay more attention
to what's coming out of, you know, something is
not going to look right. If you have to compare it
to a photo, you do it. For this second expression. I'm trying a smile and not
adding any new geometry. Some features of mile, which is going to happen
to mostly everyone, that both the upper
lip and lower lip, they're going to be flattened, especially the lower lip. You've probably have
almost very little to no transition between
the actual lab to the rest of the chin. Most religious color transition not really form transition. Also the way I'm simplifying
and representing the cheekbones and the wrinkles
involved in that smile. That's my way of representing. You will find plenty of References on different
ways that people smile. Then the exercise that we've
been doing to construct a face without expression,
it's going to be the same. You actually have more
space to play and explore. Because now you have new
shapes that you wouldn't, you would not have otherwise. With face on a face
with an expression. Right now if you look at the phase right now,
it looks weird. There are many reasons
why it looks weird. It could be the shadow that
the upper lip is making, the lack of definition
on the teeth. The distance between
the teeth and the lips. Lower labor is not really
working with the upper lip. Curve curvature. The lines around the
lips are not working to see how just by
moving the upper loop, I had to move everything else. In a way I am thinking about expression and
smile and all that. But deeply unjust playing
with shapes again, you'll look at the references. You'll see some forms and shapes and everything's
complicated. You may have to
look at an enemy, charts and names of the muscles involved
in that expression to know how much you can
play with bringing the end, you'll be doing the same thing. You have some variables. And they could be the
muscles themselves. And you have to create
good shapes out of them. Like I said, the other video. If you don't know what parts you can stylize or
play with or use. Then you can use my video
here as a guide for you. If you pay attention
to the parts where I'm pushing and pulling and
changing and playing with. And then you realize, okay, so now I can play that
same area of the face. And I'll come up with
my own combination of forms to represent
the same thing. And I'm sure you come
up with something else. That's the whole idea here. That's why I don't even bother mentioning muscle names because that's not
the point here. I don't think I would be
of any help telling you muscle name that you can spend ten seconds finding out
what that name yourself. But when you see how I'm
achieving the result, I think that's a
lot more useful. And I hope you'll
find that as well. If you don't fill it
out, please let me know. Maybe I have to try a
different approach here. My teachings. That does help. Then I'm
really happy for you. We're almost done here. There's maybe 56
more minutes and I'll come back and end to
make a couple more comments. I'll let you keep watching. I'll see you soon. We're almost done here. And as you can see, it's a lot. Let's move there and
read some bit better. Again, I prefer having
a smooth surface. It just helps me read and see all the
information bit better. I also painted with
a darker tone to separate the
features a bit more. You don't have to, but I
find it then. It also helps. I hope you enjoyed some of these sites and I've shared here and the expression studies, and we're ready to pick one of them and
further developed it. I'll see you in the next video.
6. Part 5 - Final Details: This final step, if you
want to call it the weight. Even though what I'm,
what I think I'm giving you here are
ways of thinking and some kind of
workflow for you to perceive starting point when you're sculpting
study and take you to a really reasonable
finishing stage. Of course, you
could take it even further depending on your goal. If it's 3D printing or
rendering your whatever. The first two minutes
of this video is just me cleaning up the mesh little bit
and transferring the details to a 0 measure mesh. There's nothing much to say really if you've done
that at least once. But my workflow is usually just decimate a copy of the mesh. So 0 measure goes a bit faster. If I have to test
different resolutions. I usually try to
pick a resolution that once I subdivided, going to take me two
or 3 million polygons maybe for, in the end. Because I know how
much my PC can handle. Now that I have the Z
remeasure can sub-divide a few times, reproject the details. You could argue that why
go through all these? This is just I study. You could just use
DynaMesh to the end and render a dynamic. That's true. But it's just, I
like how specially for female model like this, it's so much easier to
get a clean surface by smoothing with DynaMesh already on the triangles that you
get may get in the way. Sometimes I just like how the mesh responds
to my sculpting. And today's smoothing
operations. It's part personal preference
and part kind of laziness of having to his move a bit too much if you're
using DynaMesh. But again, it's up
to you. Even if you render out you don't have to use 0 measure to make a better presentation
of this study here. I'm also placed in the eye, so I have a bit more
resolution and the eyelids. Not really, not really needed
because the design itself, that's what we are learning, that precision that
we are getting with the both the 0 measure mesh and the additional objects
for the ice is just to the technical parts
of working with 3D. It may help in some way. But you're not really
learning any designer exploring really anything
regarding the human form, which you find that something
else helps you in the way. Open up the space
for you to explore. Even more than by all means. Please do it. I know I've said in the past here
and then in another video, this is not the goal. The end goal.
Sculpting a face that represents nothing really,
doesn't mean anything. Just pass for you to have more control
and then be able to explore feelings and emotions and storylines and
wherever else. You need some sort of
technical abilities to at least be able to let go or the technical parts once you master some of it and then
they intuition will take over. I find it fun as
well doing this. But I'm aware that's
not a integral. Now that we cleaned
up a little bit, hey, that's where
the fun begins. Some parts, they
didn't work well. And I have to clean up or even change the design attributes like you're seeing right now. Finds that I'll let shape on top of the eyes
are just too large. I have no Really information
regarding the upper eyelid. A division up there. And I saw that photo. I found that to be
really beautiful. I'm trying to find a way
to apply that somehow. I didn't describe this way
in this course so far, but the contrast between the
lines you are drawing or sculpting do matter all the way. From the beginning
up to this point. See how I'm being
picky here on how, how much better said how
sharp those lines are. If I make it too
sharp or too thin, the contrast going to be just too much compared to the rest of my model right now. Specific to my model. Maybe you are going for a
sharper lines everywhere. It may fit well. It's not the case with my model. I'm being mindful here on
how sharp and how thin the lines are regardless
of what they represent. I usually like a chunker, chunkier lines and
chunkier forms. Just because you can play
with the shape a bit more. And once you make a
sharp line, that's it. It's hard to represent a bigger
shape with a sharp line, little volume, nostril
that I just did. The front. You could I
could make a mistake and make it sharp and then
it wouldn't match too well. Same with the lines
for the ellipse. You'll see how I try a few
times to get it right. I'm going for a chunker design if you want to put it that way. Same with that mesh, not mesh. Excuse me. Part of AI, part of the eye called caruncle. Make it too small. It may not go well with
the rest of the face. For the same reason.
Contrast between lines. This is like a basic design rule or sense that you,
you will develop. Things look better
if they follow a certain certain rule
all over the place. That rule can be anything. As long as you repeat
more than once, then, then it becomes a rule. Just pay attention to the
quality of the surface, quality of the lines, negative and positive lines. They all will affect how
you feel about the model. They don't really mean anything. There's no meaning behind, is just the overall
appeal of your model. It may look like you're not in control of things
you're sculpting. Make sure you even
stop for awhile and just search
for parts of that are under this concept
that reader shared. Try to find some kind of
pattern in the ways you're dealing with your
lines and surfaces. Give them the same
level of treatment. It doesn't have
to do, especially with the amount of details. You can have a highly
detailed area. And I usually detail around
the eyes and lips a bit more. But still if they are
following this idea, pattern of treatment, the
amount of detail. You can go. Either way with a lot of detail. Not too much detail
will work both ways. Of course I would
never, for this model. Sculpt or the wrinkles on
the lips for instance, I will try to stylize
them a bit more. Even though I'm going
for a realistic look. I'm not going for photorealistic
render with pores, details and all that. I've said somewhere else that
work takes a lot more time. And sometimes I feel like I'm missing an opportunity of exploring what we're
exploring here. You can create many busts like this one during a week and
you will learn a lot more. Maybe when you finally. Creator own realistic rendering of a fully detailed model. You may realize and stylize some shapes that
you wouldn't be for. I think for that reason alone, it's worth doing more of
this in the beginning. You can see now they're around the nose and
in-between the eyes. I created some shapes. There's not really any muscle or bone shapes that you can
find in the human skull. That probably goes to the
part of where we are learning here of you finding your own designs of
for the human face. I didn't see that shape in any photo that I have
here as references. I don't have it in my face. I never saw anyone would maybe I saw a photo and then some kind of shading
or light and shadow. Just by the way, I ended up here with this model. I ended up creating that shape there between the
eyes, around the nose. And I kinda like it flows from the from the
eyes to the mouth, kind of drives the eye, our eye around the face. And you can imply
that a lot more. Just pay attention to not stylized too much
unless that's your goal. If you watched the other videos, I usually usually
tennis to at least try. It doesn't mean I always
get it. These days. I try to make it real. It'll look like a real face. Not a cartoony face
or stylized games, but stylized features. My argument is that it
makes beautiful things. I'm sure a model like
this, if we keep pushing, you could give it a treatment of a highly detailed model with
pores and everything else. And would look okay. Because the only life
forms are realistic, simplified in a way that
reads as realistic. How much you'll remove, how much you add, how much we stylized, you stylize, then that's
something no one can teach you. It's hard for me to even describe everything
that I'm thinking here, even though that's
what I've been trying, that will come naturally. I believe if you
follow my guidelines and thinking here that
I'm trying to share, it will come to any
of you realized that this is what he's
been doing the whole time? That's the beauty of it. There's five more minutes to go. I'll let you watch for a
moment. I'll come back soon. Now we are almost
done with this face. You can read from
are the lines that I'm adding here and
some of them, how, some of them, you cannot
really find references. That's how I see the
uniqueness of your tendencies. You may come up with
different shapes. And these two are going
to look realistic. That's the whole goal of
what I wanted to show you. The everything has to
come to this point here and has to look cohesive
and in my case, realistic but also a
little bit stylized. That's how I find it. Faces to be more beautiful
in art form. At least. That's how I like to sculpt them and explore the human body. I hope that you will see
the same things when we develop female body and
male body in other courses. The same idea, a
lot more complex, and that's why they
come later on. But here, hard for me to really define things that went through my mind for every
line in every volume. I hope that through the understanding of
your own tendencies, your own inclinations, and how you found your
references and how you felt. You will be able to explore your own shapes and
find your own forms of the human body and come
up with a beautiful bust yourself that you enjoyed. Please share with me your
studies I really love to see. And I hope you liked it.
And they see you next time.
7. Part 6 - Bonus: Model Presentation: Video where I just
went to clean up that I did on this model
because I wanted to prepare a better
presentation. What we had before with
the transition here of the hair and some
other details wasn't working too well when
rendering was to clear that problem
of transition. Mostly hair. And then also
took some time to work on chest and shoulder area just a little bit more compared
to what we had before. And also the back of the hair. Just adding some lines
here to imply continuity. To Andrea created this image. It will serve as a presentation, but also has a
banner to the model. These are just
ZBrush screen grabs. Just wanted to show
that in order to render that model that we had some more preparation and
clean up would be needed. I didn't touch it
a face at all was just the transition of the
hair and the back of the hair. And that curve here
wasn't working too well. So you consider this
a good study and good enough representation of what are we working for
such a long time. I hope to wipe it. Next time.
 Fabio Paiva, We are just imagination of ourselves